User Dashboard
- Your OPSCOM Dashboard: Your Parking Central!
- Viewing your History
- Add, Edit, and Activate Your Vehicles
- Viewing Your Waitlist Position
- Using Forms on the User Portal
- Uploading Files
- Purchasing a Locker
Your OPSCOM Dashboard: Your Parking Central!
The User Portal Dashboard is the primary landing page for end-users accessing the system. Its primary purpose is to provide users with a personalized, centralized overview of their parking profile and quick access to essential features. This article is intended for OPSCOM administrators to help them understand and support the end-user experience.
Setup and Configuration
The dashboard requires no specific administrative setup, as it is the default landing page for all registered users upon logging in. However, the specific sections and cards displayed on the dashboard are dynamically generated based on your organization's active modules and the individual user's account history.
Using this Feature
Administrators can guide users through the following steps to navigate their personalized dashboard and access their parking information.
Navigating the Dashboard
-
Log in to the User Portal.
-
View the Home dashboard, which displays automatically upon successful login.
-
Click a specific Permit card to view detailed information or to print a physical copy of the permit.
Key Information Displayed
The information displayed on the dashboard is personalized to the user's account and provides a snapshot of their current status using distinct interface cards:
-
Unpaid Violations: Displays any outstanding parking citations tied to the user's account that require payment or appeal.
-
Active Permits: Shows currently valid parking permits associated with the user.
-
Vehicles: Lists the license plates and vehicle details currently registered to the user's profile.
-
Active Lockers: Displays any active locker rentals the user has purchased.
Best Practices and Considerations
-
Provide efficient support: Administrators should familiarize themselves with the user dashboard layout to efficiently assist parkers. When a user calls for support regarding an active permit or unpaid citation, knowing exactly what they see on their screen streamlines the troubleshooting process.
Keep in mind that users will only see cards for features that are actively utilized by your organization or applicable to their account. For example, the Active Lockers card will not appear if your organization does not use the locker management module or if the user has no active rentals.
Viewing your History
The User Portal History feature allows end-users to view a summary of their past parking activity, including permit purchases, locker rentals, and payment transactions. Its primary purpose is to provide users with self-service access to their account records, reducing basic administrative support inquiries. This article is intended for OPSCOM administrators to help them understand and support the end-user experience.
Setup and Configuration
This feature is a core component of the user portal and requires no specialized administrative setup to enable.
Admin Side: Administrators have access to complete, detailed user histories on the backend system to assist with inquiries that go beyond the user's summarized portal view.
User Side: Users access their history summary directly from their profile menu on the user portal dashboard.
Using this Feature
Administrators can use the following instructions to guide users through accessing their account history.
Accessing the History Page
-
Log in to the User Portal.
-
Click the user profile name in the top left corner of the screen.
-
Click History from the drop-down menu.
-
Review the summary of the account's activity on the User History page.
Key Information Displayed
The User History page displays a personalized summary of the user's past portal interactions. Depending on the modules your organization utilizes, this may include:
-
Permits: A historical record of parking permits purchased or registered to the account.
-
Payments: A log of past financial transactions and receipt summaries.
-
Lockers: A history of locker rentals associated with the user.
The history displayed on the user portal is a high-level summary. If a user requires a highly detailed or comprehensive historical audit of their account, they are instructed to contact their parking provider directly.
Best Practices and Considerations
-
Be prepared for detailed inquiries: Administrators should be prepared to pull comprehensive user history reports from the admin backend when requested. Because the user portal only provides a summarized view of past activity, users auditing their own long-term finances or appealing historical citations may require staff assistance to retrieve complete records.
Add, Edit, and Activate Your Vehicles
The Add Edit and Activate Vehicles feature allows end-users to register new license plates, update existing vehicle details, and manage the active status of the vehicles tied to their account. Its primary purpose is to ensure users maintain accurate vehicle records for permit validation and enforcement purposes. This article is intended for OPSCOM administrators to help them understand and support the user-facing vehicle management workflow.
Setup and Configuration
This feature is a core component of the user portal and requires no specialized setup to enable.
Admin Side: Administrators can determine whether users have the permission to fully delete vehicles from their profiles, or if they are restricted to simply marking them as inactive. This is configured within your system's global settings.
User Side: Users access the vehicle management tools directly from their portal dashboard upon logging in.
Using this Feature
Administrators can use the following instructions to guide users through adding, modifying, or deactivating a vehicle on their account.
Adding a New Vehicle
-
Log in to the user profile and click Vehicles.
-
Click the Add New Vehicle button.
-
Read the displayed disclaimer and click I Agree to continue.
-
Enter the vehicle details into the provided fields, including the Plate, State/Province, Plate Type, and Vehicle Year.
-
Click the Save Changes button to add the vehicle to the profile.
Editing an Existing Vehicle
-
Locate the specific vehicle on the Vehicles page and click the Edit button.
-
Make the necessary changes to the vehicle details.
-
Click the Save button to apply the updates.
Activating or Deactivating a Vehicle
-
Locate the specific vehicle on the Vehicles page.
-
Toggle the Active button to change the vehicle's status to either active or inactive.
Not all parking providers support allowing users to delete or remove a vehicle after it has been added to their profile. Instruct users to mark their vehicle as inactive before adding a new one. If an inactive vehicle must be permanently removed, the user must contact the parking provider so an administrator can safely process the deletion from the backend system.
Best Practices and Considerations
-
Establish a clear vehicle deletion policy: Organizations should develop a business rule regarding when and how vehicles can be permanently deleted. Restricting users from deleting vehicles helps preserve historical citation data and prevents users from attempting to evade active violations tied to a specific license plate.
-
Encourage proactive vehicle management: Remind users to update their vehicle information immediately if they get a new license plate or purchase a new car. Accurate vehicle records are critical for organizations utilizing License Plate Recognition (LPR) or performing manual field enforcement based on plate data.
Viewing Your Waitlist Position
The Waitlist Position Viewing feature allows end-users to check their current rank or projected rank on a parking waitlist directly from the user portal. Its primary purpose is to provide transparency to users regarding parking availability and to reduce the volume of status inquiries directed to the parking office. This article is intended for OPSCOM administrators to help them understand and support the user-facing waitlist experience.
Setup and Configuration
This feature requires explicit configuration on the backend before users can see their numerical rank.
Admin Side: Administrators must enable waitlist rank visibility within the global system settings. If this functionality is restricted by your parking organization, users will only be able to see that they are on a waitlist, but their specific numerical position will remain hidden.
User Side: Users access their waitlist details directly from the permit store on their portal dashboard.
Using this Feature
Administrators can use the following instructions to guide users on how to check their rank before or after joining a waitlist queue.
Accessing Waitlist Information
-
Log in to the User Portal and click Permits.
-
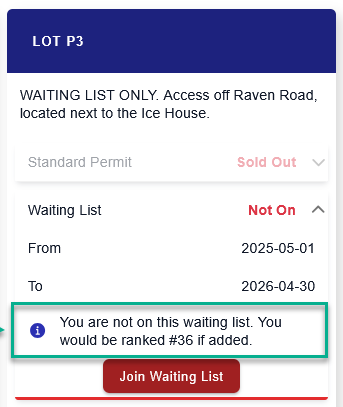
Locate the specific parking lot card that displays a waitlist option.
-
Expand the waitlist drop-down menu on the lot card to view the detailed position information.
-
Click the Join Waiting List button to add the account to the queue.
Waitlist positions are dynamically calculated based on the lot's configured capacity, the number of currently active permits, and the order in which users clicked the Join Waiting List button.
Visual Cues and Status Indicators
The expanded waitlist menu provides dynamic status indicators based on the user's current relationship with that lot:
-
Projected Position: Before a user joins a full lot, the system displays an informational message (e.g., "You are not on this waiting list. You would be ranked #36 if added.") indicating their potential rank. This helps users make informed decisions about whether to join a long queue.
-
Live Position: Once a user adds themselves to the waitlist, the indicator automatically updates to show their current, live position. This number will adjust dynamically as other users are awarded permits or leave the queue.
Available Actions and Buttons
-
Join Waiting List: Click this button located within the expanded lot card menu to officially enter the queue for the selected parking lot.
Best Practices and Considerations
-
Determine visibility policies: Organizations should ensure that waitlist visibility aligns with their operational policies. If your waitlist processing is highly manual or subject to priority overrides (e.g., prioritizing staff over students), displaying the exact rank may cause user frustration if they see their position bypassed by priority users.
-
Monitor waitlist volume: Administrators should routinely monitor waitlist numbers to gauge parking demand. If a specific lot consistently maintains a massive waitlist, management may need to re-evaluate lot allocations or pricing structures.
Using Forms on the User Portal
The Forms module allows end-users to submit special requests and applications, such as move-in assistance or event parking needs, directly through the User Portal. Its primary purpose is to centralize communication and streamline the review and approval process for custom parking arrangements. This article is intended for OPSCOM administrators to help them understand and support the user-facing forms workflow.
Setup and Configuration
This feature requires the Forms module to be active and properly configured within your environment.
Admin Side: Administrators must create, configure, and enable custom forms on the backend for them to be visible to users on the portal. Ensure that notification routing is configured so the appropriate staff members receive alerts when a new form is submitted.
User Side: Users access all available and enabled forms directly from their portal dashboard upon logging in.
Using this Feature
Administrators can use the following instructions to guide users through accessing, completing, and submitting a form.
Submitting a Form
-
Log in to the User Portal and click Forms to view the list of all available forms.
-
Click the Open Form button next to the relevant request type to get started.
-
Enter all required information into the provided fields.
-
Click the Submit button to send the completed form to the parking provider.
-
Review the page for a green confirmation message to verify the submission was successful.
Once a user successfully submits a form, an automated confirmation email is immediately sent to the system administrator. After the administrator reviews and approves the form on the backend, the user will receive a separate follow-up email containing their approval update.
Available Actions and Buttons
-
Open Form: Click this button next to a specific item in the forms list to open the data entry fields.
-
Submit: Click this button at the bottom of the form to finalize the request and send the data to the administrative team for review.
Best Practices and Considerations
-
Monitor incoming requests: Administrators should actively monitor their email inboxes for new form submission notifications. Promptly reviewing and approving these requests ensures a smooth operation and prevents delays for time-sensitive needs like event parking or move-in access.
-
Provide clear alternatives: If a user cannot find a form for their specific request, ensure they know how to contact the parking provider directly. Not every unique situation will have a dedicated form, so maintaining a clear alternative communication channel is essential for good customer service.
Uploading Files
The User Portal File Uploads feature allows end-users to securely attach and submit necessary documents—such as vehicle registrations, medical notes, or identity proofs—directly to their account. Its primary purpose is to centralize document collection, streamlining the verification process and reducing the need for users to email sensitive attachments to administrative staff. This article is intended for OPSCOM administrators to help them understand and support the user-facing file upload workflow.
Setup and Configuration
This feature is a standard component of the user portal account management system.
Admin Side: Administrators must ensure that users are aware of when they need to provide supporting documentation for permits or appeals. Depending on your organization's workflow, administrators may need to routinely monitor user profiles for newly uploaded files.
User Side: Users access the document upload utility directly from their personal profile menu on the user portal dashboard.
Using this Feature
Administrators can use the following instructions to guide users through selecting and uploading a document to their account.
Uploading a Document
-
Log in to the User Portal and click the user profile name in the top corner of the screen.
-
Click Upload Documents from the drop-down menu to navigate to the Account Uploads screen.
-
Click the Select Files to Upload button to open your device's file browser.
-
Select the specific file you wish to upload from your local device.
-
Click the Upload File button to save the changes and initiate the upload.
-
Verify that the file now appears in the list under the Uploaded Documents section on the screen.
The system strictly restricts file uploads to the following supported formats: .pdf, .png, .jpg, and .jpeg. If a user attempts to upload an unsupported file type, such as an Excel spreadsheet or a video file, the system will reject the upload and display an error message.
Available Actions and Buttons
-
Select Files to Upload: Click this button to trigger your device's native file explorer and browse for a document.
-
Upload File: Click this button to finalize the selection and push the file to the system server for storage.
Best Practices and Considerations
-
Communicate accepted file formats: Ensure users are clearly informed about the accepted file types (.pdf, .png, .jpg, .jpeg) before they attempt an upload. This proactive communication prevents user frustration and reduces unnecessary support inquiries regarding failed file uploads.
-
Establish a verification protocol: Administrators should establish a clear internal routine for reviewing and verifying the documents that users upload. Because users can upload files autonomously, having a schedule to verify pending documentation ensures that waitlist approvals and permit validations are not delayed.
Purchasing a Locker
The Purchasing a Locker feature allows end-users to select and rent lockers directly through the user portal. Its primary purpose is to provide a self-service option for locker management, reducing administrative overhead and streamlining the reservation and revenue collection process. This article is intended for OPSCOM administrators to help them understand and support the user-facing locker purchase workflow.
Setup and Configuration
This feature requires the locker management module to be active and properly configured within your environment.
Admin Side: Administrators must create locker locations, generate individual locker numbers, and establish pricing on the backend before they become visible on the portal. Additionally, if your organization requires users to agree to terms and conditions, ensure the locker disclaimer text is populated and enabled in your system settings.
User Side: Users access the locker reservation tools directly from their portal dashboard upon logging in.
Using this Feature
Administrators can use the following instructions to guide users through selecting a location, reserving a locker, and completing the checkout process.
Reserving a Locker
-
Log in to the User Portal and click Lockers.
-
Read the displayed Locker Disclaimer and click I Agree to proceed.
-
Select the desired locker location from the available list.
-
Click the Get Locker button to view the available inventory for that specific area.
-
Click the specific locker number you wish to reserve.
-
Click the Reserve Locker button to add the selection to the cart.
-
Click the Next button on the cart screen and proceed to the payment page to finalize the transaction.
If your organization has not configured or enabled a locker disclaimer in the system settings, the user will automatically bypass the agreement screen and be taken directly to the location selection step.
Available Actions and Buttons
-
I Agree: Click this button to accept the organization's rules and liability policies regarding locker rentals.
-
Get Locker: Click this button after selecting a location to query the system for currently unoccupied lockers.
-
Reserve Locker: Click this button to lock in the selected locker number and proceed to the checkout screen.
Best Practices and Considerations
-
Keep disclaimers clear and current: Ensure your locker disclaimers are thoroughly detailed and up to date. If your organization has specific rules regarding end-of-term locker clean-outs, abandoned property, or prohibited items, these policies must be clearly stated in the disclaimer before the user is permitted to complete the purchase.
-
Monitor location demand: Administrators should routinely monitor locker inventory levels across different facilities. If a specific location, such as a main athletic center, frequently runs out of available lockers, management may need to evaluate physical locker allocations or adjust pricing structures to meet user demand.