OPSCOM User Portal
Your OPSCOM journey starts here! The User Portal is where you manage your profile, payments, and vehicles. Buy parking, handle infractions, and view your history—all with just a few clicks. Let's get started!
- Setting up your Account
- Registering as a User
- Multi-Factor Authentication - User Portal
- Manage your Account
- Recovering a Password
- Payments
- Manage your Payment Methods & Subscriptions
- How to Make a Payment in Your User Profile (Or as a guest)
- Quick & Easy Guest Payments
- Your OPSCOM Dashboard: Your Parking Central!
- Viewing your History
- User Side: Managing Email Preferences
- Add, Edit, and Activate Your Vehicles
- Purchase a Parking Permit
- Printing Your Parking Permits Made Easy!
- Viewing Your Waitlist Position
- Appealing Your Parking Violation
- Using Forms on the User Portal
- Uploading Files
- Purchasing a Locker
- Managing Company Users (for Company Managers)
- Getting Started with Text2ParkMe!
- Self-Release Boot System: User Portal
Setting up your Account
Registering as a User
The User Registration Process outlines how new parkers create an account to access the user portal, purchase permits, and manage their vehicles. Its primary purpose is to capture essential user data while offering organizations flexible onboarding through either immediate access or email validation workflows. This article is intended for OPS-COM administrators to help them understand and support the end-user registration experience.
Setup and Configuration
Administrators can dictate how users access the system upon initial sign-up by configuring one of two primary registration workflows:
-
Auto Login: Users are automatically logged in immediately after signing up, without requiring them to verify their account or email address first.
-
Email Verification Required: Users are barred from logging in until they have successfully received an email, clicked the validation link, and created their password.
Admin Side: Ensure your portal settings are configured to your organization's preferred registration method (Auto Login vs. Email Verification).
User Side: Users will initiate the setup process directly from the main portal login page.
Using this Feature
Administrators can use the following workflow to guide new users through the portal registration process or troubleshoot onboarding issues.
Step-by-Step Instructions
-
Choose the preferred language and click Continue.
-
Click the Create Account button located on the login page.
-
Complete the initial profile registration questions.
-
Click the Create Account button to submit the details.
-
Review the on-screen prompt, which varies based on the system configuration:
-
If Auto Login is enabled, the user is automatically logged in, directed to their user profile page, and shown a green message prompting them to check their email for an activation link.
-
If Email Verification is required, the user is not logged in and is shown a message indicating that an email has been sent for validation.
-
-
Check the associated email inbox and locate the activation email from OPS-COM.
-
Click the Create Password link within the email.
-
Enter a new password into the provided fields and click Confirm to save the credentials to the system.
-
Log in to the account using the newly created password (if redirected to the login page).
-
Fill out any missing or mandatory details on the user profile page.
-
Click the Save Changes button to lock in the profile information and gain full access to the portal.
If Auto Login is enabled, clicking the Create Password link in the email simply allows the user to establish a permanent password for future sessions, as they are already temporarily logged in. If Email Verification is required, clicking this link is a mandatory step to gain any access to the system.
Best Practices and Considerations
-
Mandate profile completion: Users must finish completing their profile before they can explore other features of the portal. Administrators should communicate this requirement clearly, as users cannot purchase permits or appeal violations until their mandatory profile fields are saved.
-
Determine the best workflow for your operations: Organizations should establish a clear business rule regarding portal security. Use Auto Login to reduce onboarding friction for new users, or use Email Verification Required to prevent spam accounts and ensure all registered email addresses are accurate and deliverable.
-
Provide support contacts: Ensure your parking office contact information is easily accessible on the portal login page in case users fail to receive their activation emails or encounter errors during the password creation step.
Multi-Factor Authentication - User Portal
The User Portal Multi-Factor Authentication (MFA) feature adds an essential layer of security to user accounts by requiring a One-Time Password (OTP) during the login process. Its primary purpose is to protect sensitive user data and ensure that only authorized individuals can access the parking portal. This article is intended for OPS-COM administrators to help them understand the user MFA workflow and support their clients.
Setup and Configuration
This feature requires the organization to have MFA support enabled on their system. Once available, the configuration is primarily handled on the User Side, where individual users opt-in and manage their own security settings.
Admin Side: Ensure that your system's email templates are properly configured, as the OTP emails will utilize the standard system email formatting designated for your account.
Using this Feature
Administrators can use the following instructions to guide users through enabling MFA on their accounts and logging in with One-Time Passwords.
Enabling Multi Factor Authentication
-
Log in to the User Portal and click your name in the top corner of the screen.
-
Click Security from the drop-down menu.
-
Scroll to the Multi-Factor Authentication section and click the Change Multifactor Authentication Settings button.
-
Choose Enable One-Time Passwords from the available settings.
-
Click the Send One-Time Password To Email button.
-
Navigate to your registered email inbox and copy the generated OTP.
-
Return to the portal and enter the OTP alongside your current account password in the provided fields.
-
Click the Submit button to confirm your changes and activate MFA.
One-Time Passwords are only valid for 15 minutes. If the user's password expires before they enter it, they must generate a new one. Generating a new OTP automatically invalidates any previously unused passwords.
Logging In with MFA Enabled
Once MFA is successfully enabled, the standard login workflow will change to include the OTP validation step.
-
Enter your username and password on the main portal login page.
-
Check your registered email address for the automatically generated OTP.
-
Enter the OTP into the prompt on the screen.
-
Click the Submit button to complete the login process and access the site.
When MFA is active, the system restricts access to the portal. Users will be forcibly redirected to the OTP entry screen if they attempt to navigate to any other internal pages (such as their profile or vehicle management) before submitting a valid One-Time Password.
Understanding OTP Session Settings
When guiding users through their MFA settings, administrators should be aware of how the system handles active OTP sessions:
-
Session Storage: Once a user enters an OTP, the validation is stored in their browser's local session data. If they clear their browser's local storage or cache, they will be forced to enter a new OTP upon their next login.
-
Different Devices: OTP session data does not persist across different browsers or hardware. If a user logs in from a new computer, a secondary mobile device, or a different web browser, they will be prompted to enter a new OTP.
Best Practices and Considerations
-
Educate users on OTP expiration: Always remind users that One-Time Passwords strictly expire after 15 minutes. If a user complains about invalid codes, ensure they are not attempting to use an expired OTP or one that was invalidated when they clicked the send button multiple times.
-
Assist with device switching: Inform users that they will need access to their email whenever they switch devices. Because OTPs are tied to local session storage, attempting to log in on a new phone or public computer will always trigger a new OTP request.
Manage your Account
The User Profile Management feature allows end-users to update their personal details, addresses, and account passwords directly from the user portal. Its primary purpose is to empower users to maintain accurate account information autonomously, reducing the administrative burden on parking staff. This article is intended for OPS-COM administrators to help them understand the user experience and assist with profile troubleshooting.
Setup and Configuration
This feature is a core component of the user portal and requires no specialized setup to enable.
Admin Side: Administrators determine which profile fields are mandatory for users to complete before they can successfully save their profile and access other portal features.
User Side: Users access these management features directly from their portal dashboard upon logging in.
Using this Feature
Administrators can use the following instructions to guide users through updating their profile details, address, or password.
Editing Profile Details
-
Log in to the User Portal and click the user's name in the top left corner of the page.
-
Click Your Profile from the drop-down menu.
-
Modify any editable fields on the Profile Page. Fields that are greyed out cannot be changed by the user.
-
Click the Save Changes button to apply the updates.
Users must complete all required fields determined by your organization before the system will allow them to save their changes and navigate to other areas of the portal.
Updating the Address
-
Click Address located below the main profile information.
-
Click Edit to open the address input fields.
-
Enter the updated address information into the necessary fields.
-
Click the Save Changes button to save the new address.
Changing the Password
-
Click Security located below the address section.
-
Click Change Password to begin.
-
Enter the current password in the Current Password field.
-
Enter a new password and re-enter it in the Confirm Password field.
-
Click the Change Password button to save the new security credentials.
Additional Profile Actions
Users may also have access to the following features from their profile menu, depending on your organization's configuration:
-
Payment Methods: Allows users to store credit cards for seamless future purchases. Detailed instructions can be found on the Manage your Payment Methods & Subscriptions page.
-
User History: Click History to view past transactions, citations, and permit records. Detailed instructions can be found on the Viewing your History page.
-
Forms and Documents: Access custom forms and file uploads, if supported by the parking provider. Detailed instructions can be found on the Using Forms on the User Portal and Uploading Files pages.
Best Practices and Considerations
-
Communicate mandatory fields: Organizations should ensure that all mandatory fields are clearly communicated to users. Users cannot save their profile or proceed to purchase permits if required fields are left blank, which can cause confusion during peak registration periods.
-
Lock specific data fields: If your organization requires strict control over certain user data (such as student ID numbers or primary email addresses), ensure these fields are configured as read-only. This ensures they appear greyed out on the user side, preventing unauthorized modifications that could disrupt integrations with single sign-on (SSO) or external student information systems.
Recovering a Password
The Password Recovery Process allows end-users to securely reset their account access credentials if they have forgotten their password. Its primary purpose is to enable self-service password management, reducing administrative support requests and ensuring users can quickly regain access to the portal. This article is intended for OPS-COM administrators to help them understand and support the recovery workflow.
Setup and Configuration
This feature is a standard component of the user portal and requires no specialized administrative setup to function for local accounts.
If a user's login source is configured using Single Sign-On (SSO), they cannot use the standard OPS-COM password recovery tool. They must reset their password directly through your organization's designated SSO provider. Only users with a local system login can utilize this password recovery option.
Using this Feature
Administrators can use the following instructions to guide users through the standard password recovery workflow.
Requesting a Reset Link
Resetting the Password
-
Locate and open the recovery email sent by the system.
-
Click the secure link within the email body to navigate to the Update Password screen.
-
Enter a new password into the provided fields.
-
Click the Reset Password button to save the new security credentials.
-
Click the confirmation link provided on the screen to return to the Login Page.
-
Log in to the portal using the newly created password.
Best Practices and Considerations
-
Check spam and junk folders: Always advise users to check their spam or junk email folders if they report not receiving the password reset email. Institutional or personal spam filters will occasionally miscategorize system-generated recovery emails.
-
Verify the registered email address: If a user attempts a password reset but the email never arrives, verify that they are entering the exact email address associated with their active user profile. The system will not send a reset link to an unregistered or mistyped email address.
Payments
Manage your Payment Methods & Subscriptions
The Manage Payment Methods and Subscriptions feature allows end-users to securely store their credit card information on the User Portal for recurring payments and permit rollovers. Its primary purpose is to enable self-service financial management, streamlining subscription renewals and reducing manual administrative tasks. This article is intended for OPS-COM administrators to help them understand and support the user payment method workflow.
Setup and Configuration
This feature requires the organization to have an integrated payment gateway (e.g., Moneris, Bambora, EdgeExpress) that supports tokenization and secure profile storage.
Admin Side: Ensure that your system's payment settings are configured to allow users to save their credit cards. Additionally, administrators must manually configure alternative subscription payment methods, such as Payroll Deduction or EFT, on behalf of the user, as these cannot be set up independently via the portal.
User Side: Users access these management features directly from their profile on the user portal dashboard.
OPS-COM does not store user credit card information locally on its servers. All sensitive financial data is hosted, tokenized, and stored exclusively by the organization's integrated payment provider to ensure strict PCI compliance.
Using this Feature
Administrators can use the following instructions to guide users through adding a new payment method, setting up a permit rollover, or removing an old credit card.
Adding a Payment Method
-
Log in to the user account on the user portal and click the profile name.
-
Click Manage Credit Cards.
-
Click the Add Payment Method button.
-
Choose the desired payment subscription type from the available options.
-
Follow the on-screen instructions to enter the credit card details.
-
Click the Add Payment Method button to submit the information.
When successfully added, the stored credit card will appear in the Stored Subscription Payment Methods area, accompanied by a green confirmation message indicating the card was successfully stored.
Available Actions and Buttons
-
Trash Can Icon: Click this icon located next to a saved credit card to permanently remove it from the stored payment methods.
-
Permit Rollover: Toggle this setting on to authorize the system to automatically use the stored credit card to pay for recurring monthly permits.
Best Practices and Considerations
-
Communicate feature limitations: Clearly inform users how their stored cards can be used based on your organization's configurations. Depending on your portal settings, stored cards may be authorized to pay for one-off items like temporary parking, or they may be strictly restricted to subscription-term parking payments only.
-
Establish internal procedures for offline payments: Administrators must actively manage offline subscription methods like Payroll Deduction or EFT. Since users cannot initiate these setups themselves on the portal, organizations should establish a clear communication protocol for users to request these alternative billing options.
How to Make a Payment in Your User Profile (Or as a guest)
The User Portal Payments feature allows end-users to securely pay for permits, violations, and other services directly from their account. Its primary purpose is to provide a self-service checkout experience, streamlining revenue collection and offering flexible payment methods like online credit cards or in-person promises to pay. This article is intended for OPS-COM administrators to help them understand and support the user-facing payment workflow.
Setup and Configuration
This feature is a core component of the user portal's financial tracking and checkout system.
Admin Side: Administrators must ensure that payment gateways (e.g., credit card processors) are properly integrated and active within the global system settings. Additionally, administrators control whether alternative offline payment methods, such as Cash or Cheque (Promise to Pay), are enabled and visible for users to select during checkout.
User Side: Users access the payment module directly from their dashboard and must have pending items in their cart, outstanding violations, or active subscriptions to initiate a transaction.
Using this Feature
Administrators can use the following instructions to guide users through initiating a checkout and completing a transaction using their preferred payment method.
Initiating a Payment
-
Log in to the User Profile and navigate to the Payments tab.
-
Enable the checkboxes next to the specific items you intend to pay for. To select or deselect all items at once, hold the Shift key and click a checkbox.
-
Click the Continue to Checkout button to proceed to the payment method screen.
If a user has a violation that is currently under appeal or review, they should not select the checkbox for it. Users should only pay for a violation after the appeal review process is completely finalized.
Paying with a Credit Card
This method allows users to complete their payment online immediately.
-
Select the Credit Card option on the payment method screen.
-
Follow the secure redirect to the payment provider's website.
-
Enter all required payment details into the provided fields, including the credit card number, expiration date, CVV code, and billing address.
-
Click the Process Transaction or Pay Now button to finalize the payment on the provider's portal.
-
Review the generated receipt page upon automatically returning to the system, confirming the transaction is complete.
If a user experiences issues with credit card payments failing to load on the web version, it is frequently caused by the Safari browser's pop-up blocker preventing the payment window from opening. Advise the user to adjust their Safari settings to turn off "Block Pop-ups" and try again.
Paying with Cash or Cheque (Promise to Pay)
This method allows users to indicate their intent to pay in person at the parking services office.
-
Select the Cash or Cheque option on the payment method screen.
-
Click the Submit Payment button.
-
Review the selected items, which will now automatically update to a status of Paid but not Processed.
-
Visit the parking provider's physical office to supply the cash or cheque to administrative staff to finalize the process.
Best Practices and Considerations
-
Communicate available payment options clearly: Ensure users understand which payment methods are accepted by your organization. If your parking operation does not support in-person cash or cheque payments, ensure the Promise to Pay option is disabled in the system settings so users are exclusively routed to the credit card gateway.
-
Establish a reconciliation process: Administrators must actively monitor and reconcile Promise to Pay transactions. Because these items are marked as "Paid but not Processed" until the user physically visits the office, staff must promptly update the transaction status in the system upon receiving the physical funds to maintain accurate financial records and prevent revenue loss.
Quick & Easy Guest Payments
The Guest Payment process allows individuals to pay parking violations without creating or logging into a user account. Its primary purpose is to provide a streamlined quick-pay option that reduces friction for temporary visitors and minimizes unnecessary account creation overhead. This article is intended for OPS-COM administrators to help them understand and support the guest payment workflow.
Setup and Configuration
This feature is a core component of the violations and payment modules.
Admin Side: Administrators must ensure that guest payment functionality and supported hosted payment gateways (e.g., credit card processing) are enabled within the global system settings.
User Side: Users do not need a portal account. They only need their physical or digital citation, which contains the ticket number and the required security PIN.
Using this Feature
Administrators can use the following instructions to guide visitors through paying a citation without registering for an account.
Submitting a Guest Payment
The security PIN required for the ticket lookup is simply the last two characters of the citation number. For example, if the ticket number is TT-10133-3K, the user must enter the entire string TT-10133-3K, where 3K acts as the PIN.
Available Actions and Buttons
-
Pay your Ticket: Click this link on the main login screen to bypass the user registration process and access the guest portal.
-
Guest Payment: Click this button after locating the citation to proceed directly to checkout without logging in.
Best Practices and Considerations
-
Clarify the Security PIN format: Administrators should remind users that the security PIN is inherently built into their ticket number. Clarifying that the last two characters act as the PIN can quickly resolve login issues for guests trying to access the quick-pay system.
-
Emphasize the need for a valid email: Always advise guests to enter a valid email address during the checkout process. Because guest users do not have a portal profile with a saved history, this email address is their only method for receiving a digital receipt and payment confirmation for their records.
Your OPSCOM Dashboard: Your Parking Central!
The User Portal Dashboard is the primary landing page for end-users accessing the system. Its primary purpose is to provide users with a personalized, centralized overview of their parking profile and quick access to essential features. This article is intended for OPS-COM administrators to help them understand and support the end-user experience.
Setup and Configuration
The dashboard requires no specific administrative setup, as it is the default landing page for all registered users upon logging in. However, the specific sections and cards displayed on the dashboard are dynamically generated based on your organization's active modules and the individual user's account history.
Using this Feature
Administrators can guide users through the following steps to navigate their personalized dashboard and access their parking information.
Navigating the Dashboard
-
Log in to the User Portal.
-
View the Home dashboard, which displays automatically upon successful login.
-
Click a specific Permit card to view detailed information or to print a physical copy of the permit.
Key Information Displayed
The information displayed on the dashboard is personalized to the user's account and provides a snapshot of their current status using distinct interface cards:
-
Unpaid Violations: Displays any outstanding parking citations tied to the user's account that require payment or appeal.
-
Active Permits: Shows currently valid parking permits associated with the user.
-
Vehicles: Lists the license plates and vehicle details currently registered to the user's profile.
-
Active Lockers: Displays any active locker rentals the user has purchased.
Best Practices and Considerations
-
Provide efficient support: Administrators should familiarize themselves with the user dashboard layout to efficiently assist parkers. When a user calls for support regarding an active permit or unpaid citation, knowing exactly what they see on their screen streamlines the troubleshooting process.
Keep in mind that users will only see cards for features that are actively utilized by your organization or applicable to their account. For example, the Active Lockers card will not appear if your organization does not use the locker management module or if the user has no active rentals.
Viewing your History
The User Portal History feature allows end-users to view a summary of their past parking activity, including permit purchases, locker rentals, and payment transactions. Its primary purpose is to provide users with self-service access to their account records, reducing basic administrative support inquiries. This article is intended for OPS-COM administrators to help them understand and support the end-user experience.
Setup and Configuration
This feature is a core component of the user portal and requires no specialized administrative setup to enable.
Admin Side: Administrators have access to complete, detailed user histories on the backend system to assist with inquiries that go beyond the user's summarized portal view.
User Side: Users access their history summary directly from their profile menu on the user portal dashboard.
Using this Feature
Administrators can use the following instructions to guide users through accessing their account history.
Accessing the History Page
-
Log in to the User Portal.
-
Click the user profile name in the top left corner of the screen.
-
Click History from the drop-down menu.
-
Review the summary of the account's activity on the User History page.
Key Information Displayed
The User History page displays a personalized summary of the user's past portal interactions. Depending on the modules your organization utilizes, this may include:
-
Permits: A historical record of parking permits purchased or registered to the account.
-
Payments: A log of past financial transactions and receipt summaries.
-
Lockers: A history of locker rentals associated with the user.
The history displayed on the user portal is a high-level summary. If a user requires a highly detailed or comprehensive historical audit of their account, they are instructed to contact their parking provider directly.
Best Practices and Considerations
-
Be prepared for detailed inquiries: Administrators should be prepared to pull comprehensive user history reports from the admin backend when requested. Because the user portal only provides a summarized view of past activity, users auditing their own long-term finances or appealing historical citations may require staff assistance to retrieve complete records.
User Side: Managing Email Preferences
The Managing User Email Preferences feature allows end-users to opt out of non-essential email communications directly from their portal. Its primary purpose is to improve the user experience, ensure compliance with data privacy regulations, and reduce manual unsubscribe requests for your staff. This article is intended for OPS-COM administrators to help them understand the user-facing email management workflow.
Setup and Configuration
This feature relies on the global unsubscribe functionality being active in your environment.
Admin Side: Ensure the unsubscribe functionality is enabled within your system communications settings. If this feature is disabled globally on the backend, the user-facing management options will not be accessible.
User Side: Users can access and manage their specific email preferences independently from their portal account settings or via direct links in received emails.
Using this Feature
Administrators can use the following information to guide users on how to update their communication settings.
Accessing the Preferences Page
Users can access the management page using one of two methods:
Disabling the unsubscribe functionality at the system level overrides all user preferences. Always ensure this aligns with your local data privacy regulations (such as CAN-SPAM, CASL, or GDPR) before restricting a user's ability to opt out of non-essential communications.
Key Information Displayed
-
Essential Categories: A section at the bottom of the page displays a list of essential email categories that users cannot unsubscribe from (e.g., system alerts, financial receipts, password resets).
Available Actions and Buttons
-
Category Checkboxes: Enable the specific category checkboxes to subscribe, or disable the checkboxes to unsubscribe from those non-essential communications.
-
? Icon: Click the ? popover icon next to any checkbox to display a detailed description of that specific email category.
-
Select All / Deselect All: Click these bulk options to select or deselect all available email category checkboxes at once.
-
Save Changes: Click the Save Changes button to apply the updated preferences. A confirmation message will display once successfully saved.
Best Practices and Considerations
-
Communicate exempt categories: Remind users that system-related emails are strictly exempt from the unsubscribe functionality. Critical communications such as payment receipts, password resets, and new account creation confirmations cannot be disabled by the user to ensure basic account security and operational integrity.
-
Understand global overrides: If your organization disables the unsubscribe functionality globally after users have already unsubscribed, their individual subscription settings will be ignored. They will default back to receiving all non-essential emails again, regardless of their past opt-out choices.
Add, Edit, and Activate Your Vehicles
The Add Edit and Activate Vehicles feature allows end-users to register new license plates, update existing vehicle details, and manage the active status of the vehicles tied to their account. Its primary purpose is to ensure users maintain accurate vehicle records for permit validation and enforcement purposes. This article is intended for OPS-COM administrators to help them understand and support the user-facing vehicle management workflow.
Setup and Configuration
This feature is a core component of the user portal and requires no specialized setup to enable.
Admin Side: Administrators can determine whether users have the permission to fully delete vehicles from their profiles, or if they are restricted to simply marking them as inactive. This is configured within your system's global settings.
User Side: Users access the vehicle management tools directly from their portal dashboard upon logging in.
Using this Feature
Administrators can use the following instructions to guide users through adding, modifying, or deactivating a vehicle on their account.
Adding a New Vehicle
-
Log in to the user profile and click Vehicles.
-
Click the Add New Vehicle button.
-
Read the displayed disclaimer and click I Agree to continue.
-
Enter the vehicle details into the provided fields, including the Plate, State/Province, Plate Type, and Vehicle Year.
-
Click the Save Changes button to add the vehicle to the profile.
Editing an Existing Vehicle
-
Locate the specific vehicle on the Vehicles page and click the Edit button.
-
Make the necessary changes to the vehicle details.
-
Click the Save button to apply the updates.
Activating or Deactivating a Vehicle
-
Locate the specific vehicle on the Vehicles page.
-
Toggle the Active button to change the vehicle's status to either active or inactive.
Not all parking providers support allowing users to delete or remove a vehicle after it has been added to their profile. Instruct users to mark their vehicle as inactive before adding a new one. If an inactive vehicle must be permanently removed, the user must contact the parking provider so an administrator can safely process the deletion from the backend system.
Best Practices and Considerations
-
Establish a clear vehicle deletion policy: Organizations should develop a business rule regarding when and how vehicles can be permanently deleted. Restricting users from deleting vehicles helps preserve historical citation data and prevents users from attempting to evade active violations tied to a specific license plate.
-
Encourage proactive vehicle management: Remind users to update their vehicle information immediately if they get a new license plate or purchase a new car. Accurate vehicle records are critical for organizations utilizing License Plate Recognition (LPR) or performing manual field enforcement based on plate data.
Purchase a Parking Permit
The Purchase a Parking Permit process allows end-users to buy standard recurring permits, purchase temporary short-term parking, or join a waitlist for full lots directly through the user portal. Its primary purpose is to enable self-service parking management for users, reducing administrative overhead and streamlining revenue collection. This article is intended for OPS-COM administrators to help them understand and support the user-facing permit purchasing workflow.
Setup and Configuration
This feature is a core component of the user portal.
Admin Side: Administrators must ensure that parking lots, permit types, and waitlist limits are properly configured on the backend. If your organization requires a permit disclaimer, ensure the disclaimer text is updated and enabled in your system settings.
User Side: Users must have an active portal account and at least one registered vehicle on their profile before the system will allow them to complete a permit purchase.
Using this Feature
Administrators can use the following instructions to guide users through accessing the permit store and selecting their desired parking option.
Accessing the Permits Screen
-
Log in to the User Portal and click Permits.
-
Read the Permit Disclaimer presented on the screen.
-
Click I Agree to accept the terms and proceed to the main permit selection screen.
If a user has not yet registered a vehicle to their account, clicking the Permits menu item will automatically redirect them to the Vehicles screen to complete that mandatory step first.
Purchasing a Standard Permit
-
Locate the desired parking option and click Standard Permit to view the permit details.
-
Click the Reserve Permit button to add the item to the cart.
-
Proceed to the Payments screen to complete the checkout process and finalize the purchase.
Purchasing a Temporary Permit
-
Locate the desired temporary parking option and click Get Temp Permit.
-
Select the start and end dates or choose the number of hours for the permit from the provided fields.
-
Select the specific vehicle that will be using the permit.
-
Click Check Availability to verify that the lot has capacity for the selected timeframe.
-
Click Reserve Permit and proceed to the payment screen to finalize the transaction.
Joining a Waitlist
-
Locate the desired lot on the Permits screen and expand the Waitlist option on the lot card.
-
Click Join Waitlist to add the account to the queue for that specific parking area.
Available Actions and Buttons
-
Standard Permit: Click this button to begin the purchase process for a standard permit, which typically covers recurring periods like one month or a full semester.
-
Get Temp Permit: Click this button to initiate the purchase of short-term, temporary parking.
-
Check Availability: Click this button during a temporary permit purchase to query the system for available space before confirming the reservation.
Best Practices and Considerations
-
Communicate temporary permit limits: Administrators should ensure users understand that temporary permits are strictly valid for up to 30 days. If a user requires parking for longer than 30 days, they must purchase a standard permit.
-
Waitlist visibility: If your organization allows users to see their waitlist rank, ensure they know where to find this information. Users can track their place in line by following the instructions on the Viewing Your Waitlist Position page.
Printing Your Parking Permits Made Easy!
The User Portal Permit Printing feature allows end-users to generate and download PDF copies of their active, historical, and temporary parking permits directly from their dashboard. Its primary purpose is to provide self-service permit management, reducing the need for administrative staff to manually print and distribute physical tags. This article is intended for OPS-COM administrators to help them understand and support the user-facing permit printing workflow.
Setup and Configuration
This feature is a standard component of the user portal.
Admin Side: Administrators must ensure that printable permit templates are correctly configured and assigned to the relevant lot types within the system settings. If a template is missing or corrupted, the user will be unable to generate the PDF.
User Side: Users access the printing capabilities directly from their portal dashboard or their historical payment records.
Using this Feature
Administrators can use the following instructions to guide users through printing their various types of parking permits.
Printing Active Permits
-
Log in to the User Portal and click Home.
-
Click the specific permit number under the Permits section to open the Permit Information window.
-
Click the Print button.
-
Open the downloaded PDF file to print the hard copy of the permit.
Printing Historical Permits
-
Log in to the User Portal and click the user profile name in the top corner of the screen.
-
Click History from the drop-down menu.
-
Click the specific confirmation code for the payment associated with the permit.
-
Click the permit details on the receipt page to open the Permit Information window.
-
Click the Print button to download the permit PDF.
Printing Temporary Permits
The process for printing temporary, short-term permits is identical to printing active permits from the dashboard.
Temporary permits can only be printed one time to prevent abuse and unauthorized duplication. If a user has already printed their temporary permit, the Print button will be disabled, and the system will instead display the exact date and time the permit was last printed.
Best Practices and Considerations
-
Communicate print limits for temporary parking: Ensure users are aware that temporary permits can only be printed once. If a user loses their printed temporary permit or experiences a printer error during their single attempt, they will need to contact the parking office so an administrator can manually regenerate the file from the backend.
-
Test permit templates regularly: Administrators should routinely verify that PDF permit templates are correctly formatted. Whenever adjustments are made to standard permit layouts, test the changes using a test user account to ensure the resulting PDF downloads cleanly without broken formatting.
Viewing Your Waitlist Position
The Waitlist Position Viewing feature allows end-users to check their current rank or projected rank on a parking waitlist directly from the user portal. Its primary purpose is to provide transparency to users regarding parking availability and to reduce the volume of status inquiries directed to the parking office. This article is intended for OPS-COM administrators to help them understand and support the user-facing waitlist experience.
Setup and Configuration
This feature requires explicit configuration on the backend before users can see their numerical rank.
Admin Side: Administrators must enable waitlist rank visibility within the global system settings. If this functionality is restricted by your parking organization, users will only be able to see that they are on a waitlist, but their specific numerical position will remain hidden.
User Side: Users access their waitlist details directly from the permit store on their portal dashboard.
Using this Feature
Administrators can use the following instructions to guide users on how to check their rank before or after joining a waitlist queue.
Accessing Waitlist Information
-
Log in to the User Portal and click Permits.
-
Locate the specific parking lot card that displays a waitlist option.
-
Expand the waitlist drop-down menu on the lot card to view the detailed position information.
-
Click the Join Waiting List button to add the account to the queue.
Waitlist positions are dynamically calculated based on the lot's configured capacity, the number of currently active permits, and the order in which users clicked the Join Waiting List button.
Visual Cues and Status Indicators
The expanded waitlist menu provides dynamic status indicators based on the user's current relationship with that lot:
-
Projected Position: Before a user joins a full lot, the system displays an informational message (e.g., "You are not on this waiting list. You would be ranked #36 if added.") indicating their potential rank. This helps users make informed decisions about whether to join a long queue.
-
Live Position: Once a user adds themselves to the waitlist, the indicator automatically updates to show their current, live position. This number will adjust dynamically as other users are awarded permits or leave the queue.
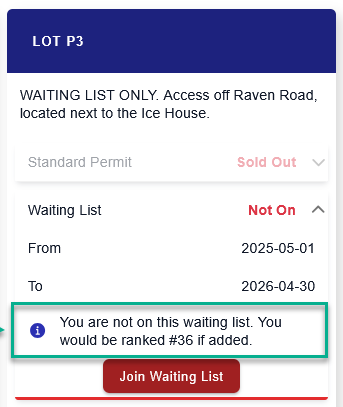
Available Actions and Buttons
-
Join Waiting List: Click this button located within the expanded lot card menu to officially enter the queue for the selected parking lot.
Best Practices and Considerations
-
Determine visibility policies: Organizations should ensure that waitlist visibility aligns with their operational policies. If your waitlist processing is highly manual or subject to priority overrides (e.g., prioritizing staff over students), displaying the exact rank may cause user frustration if they see their position bypassed by priority users.
-
Monitor waitlist volume: Administrators should routinely monitor waitlist numbers to gauge parking demand. If a specific lot consistently maintains a massive waitlist, management may need to re-evaluate lot allocations or pricing structures.
Appealing Your Parking Violation
The Parking Violation Appeals process allows users to contest parking tickets directly through the User Portal. Its primary purpose is to provide a streamlined, self-service channel for users to submit appeal reasons and supporting evidence, reducing manual data entry for administrative staff. This article is intended for OPS-COM administrators to help them understand and support the user-facing appeals workflow.
Setup and Configuration
This feature is a core component of the violations module.
Admin Side: Administrators must configure the allowable appeal timeframe (e.g., 14 days from issuance) within the global system settings. Additionally, administrators determine whether users are permitted to upload evidence files (such as photos or PDFs) during the appeal process.
User Side: Users must have an active portal account. If a user wishes to appeal a ticket for a vehicle not currently registered to their profile, they must temporarily associate that vehicle with their account during the process.
Using this Feature
Administrators can use the following instructions to guide users through appealing a ticket for their own vehicle, or appealing a ticket on behalf of a third party.
Appealing a Linked Vehicle Ticket
-
Log in to the User Portal and click Appeals.
-
Search for a specific violation using the Search my Tickets field, or locate the ticket in the displayed list.
-
Click Details on the desired ticket, then click the More Info button to open the ticket information window.
-
Click the Request Appeal button.
-
Enter the justification in the Reason for Appeal text box.
-
Click Select Files to Upload to attach supporting evidence from your device, if this feature is enabled by the parking office.
-
Click the Submit Appeal button to finalize the request.
Users can upload multiple files as evidence. Supported file types include JPG, PNG, and PDF, with a maximum file size of 12MB per document. Users can review their uploaded files as thumbnails and remove any incorrect files prior to submission.
Appealing an Unlinked Vehicle Ticket
-
Click Lookup All Tickets on the portal navigation.
-
Enter the citation number in the Search Plate or Ticket field to locate the violation.
-
Click the Request Appeal button to initiate the process.
-
Click the Associate button when prompted by the system message. This links the vehicle to the user's profile to manage the appeal.
-
Click the Request Appeal button again and complete the standard appeal steps described above to submit the justification and evidence.
Available Actions and Buttons
-
More Info: Click this button to open detailed information about a specific violation.
-
Show Appeal Information: Click this button on an already submitted appeal to view the user's submitted reasoning and the administrator's final response once a decision has been made.
-
Associate: Click this button to link a third-party vehicle to the active user profile for the purpose of managing an appeal.
Best Practices and Considerations
-
Communicate appeal deadlines clearly: Ensure users understand that appeals must be submitted within the allowable timeframe. Once a ticket passes the deadline or becomes overdue, the system will automatically hide the appeal options and prevent the user from submitting a request.
-
Understand vehicle association implications: Administrators should be aware that when a user appeals a ticket for someone else's vehicle, that vehicle becomes associated with the user's profile. This means future violations or permit actions for that specific license plate may appear under this user's account until the vehicle is manually disassociated or marked as inactive.
Using Forms on the User Portal
The Forms module allows end-users to submit special requests and applications, such as move-in assistance or event parking needs, directly through the User Portal. Its primary purpose is to centralize communication and streamline the review and approval process for custom parking arrangements. This article is intended for OPS-COM administrators to help them understand and support the user-facing forms workflow.
Setup and Configuration
This feature requires the Forms module to be active and properly configured within your environment.
Admin Side: Administrators must create, configure, and enable custom forms on the backend for them to be visible to users on the portal. Ensure that notification routing is configured so the appropriate staff members receive alerts when a new form is submitted.
User Side: Users access all available and enabled forms directly from their portal dashboard upon logging in.
Using this Feature
Administrators can use the following instructions to guide users through accessing, completing, and submitting a form.
Submitting a Form
-
Log in to the User Portal and click Forms to view the list of all available forms.
-
Click the Open Form button next to the relevant request type to get started.
-
Enter all required information into the provided fields.
-
Click the Submit button to send the completed form to the parking provider.
-
Review the page for a green confirmation message to verify the submission was successful.
Once a user successfully submits a form, an automated confirmation email is immediately sent to the system administrator. After the administrator reviews and approves the form on the backend, the user will receive a separate follow-up email containing their approval update.
Available Actions and Buttons
-
Open Form: Click this button next to a specific item in the forms list to open the data entry fields.
-
Submit: Click this button at the bottom of the form to finalize the request and send the data to the administrative team for review.
Best Practices and Considerations
-
Monitor incoming requests: Administrators should actively monitor their email inboxes for new form submission notifications. Promptly reviewing and approving these requests ensures a smooth operation and prevents delays for time-sensitive needs like event parking or move-in access.
-
Provide clear alternatives: If a user cannot find a form for their specific request, ensure they know how to contact the parking provider directly. Not every unique situation will have a dedicated form, so maintaining a clear alternative communication channel is essential for good customer service.
Uploading Files
The User Portal File Uploads feature allows end-users to securely attach and submit necessary documents—such as vehicle registrations, medical notes, or identity proofs—directly to their account. Its primary purpose is to centralize document collection, streamlining the verification process and reducing the need for users to email sensitive attachments to administrative staff. This article is intended for OPS-COM administrators to help them understand and support the user-facing file upload workflow.
Setup and Configuration
This feature is a standard component of the user portal account management system.
Admin Side: Administrators must ensure that users are aware of when they need to provide supporting documentation for permits or appeals. Depending on your organization's workflow, administrators may need to routinely monitor user profiles for newly uploaded files.
User Side: Users access the document upload utility directly from their personal profile menu on the user portal dashboard.
Using this Feature
Administrators can use the following instructions to guide users through selecting and uploading a document to their account.
Uploading a Document
-
Log in to the User Portal and click the user profile name in the top corner of the screen.
-
Click Upload Documents from the drop-down menu to navigate to the Account Uploads screen.
-
Click the Select Files to Upload button to open your device's file browser.
-
Select the specific file you wish to upload from your local device.
-
Click the Upload File button to save the changes and initiate the upload.
-
Verify that the file now appears in the list under the Uploaded Documents section on the screen.
The system strictly restricts file uploads to the following supported formats: .pdf, .png, .jpg, and .jpeg. If a user attempts to upload an unsupported file type, such as an Excel spreadsheet or a video file, the system will reject the upload and display an error message.
Available Actions and Buttons
-
Select Files to Upload: Click this button to trigger your device's native file explorer and browse for a document.
-
Upload File: Click this button to finalize the selection and push the file to the system server for storage.
Best Practices and Considerations
-
Communicate accepted file formats: Ensure users are clearly informed about the accepted file types (.pdf, .png, .jpg, .jpeg) before they attempt an upload. This proactive communication prevents user frustration and reduces unnecessary support inquiries regarding failed file uploads.
-
Establish a verification protocol: Administrators should establish a clear internal routine for reviewing and verifying the documents that users upload. Because users can upload files autonomously, having a schedule to verify pending documentation ensures that waitlist approvals and permit validations are not delayed.
Purchasing a Locker
The Purchasing a Locker feature allows end-users to select and rent lockers directly through the user portal. Its primary purpose is to provide a self-service option for locker management, reducing administrative overhead and streamlining the reservation and revenue collection process. This article is intended for OPS-COM administrators to help them understand and support the user-facing locker purchase workflow.
Setup and Configuration
This feature requires the locker management module to be active and properly configured within your environment.
Admin Side: Administrators must create locker locations, generate individual locker numbers, and establish pricing on the backend before they become visible on the portal. Additionally, if your organization requires users to agree to terms and conditions, ensure the locker disclaimer text is populated and enabled in your system settings.
User Side: Users access the locker reservation tools directly from their portal dashboard upon logging in.
Using this Feature
Administrators can use the following instructions to guide users through selecting a location, reserving a locker, and completing the checkout process.
Reserving a Locker
-
Log in to the User Portal and click Lockers.
-
Read the displayed Locker Disclaimer and click I Agree to proceed.
-
Select the desired locker location from the available list.
-
Click the Get Locker button to view the available inventory for that specific area.
-
Click the specific locker number you wish to reserve.
-
Click the Reserve Locker button to add the selection to the cart.
-
Click the Next button on the cart screen and proceed to the payment page to finalize the transaction.
If your organization has not configured or enabled a locker disclaimer in the system settings, the user will automatically bypass the agreement screen and be taken directly to the location selection step.
Available Actions and Buttons
-
I Agree: Click this button to accept the organization's rules and liability policies regarding locker rentals.
-
Get Locker: Click this button after selecting a location to query the system for currently unoccupied lockers.
-
Reserve Locker: Click this button to lock in the selected locker number and proceed to the checkout screen.
Best Practices and Considerations
-
Keep disclaimers clear and current: Ensure your locker disclaimers are thoroughly detailed and up to date. If your organization has specific rules regarding end-of-term locker clean-outs, abandoned property, or prohibited items, these policies must be clearly stated in the disclaimer before the user is permitted to complete the purchase.
-
Monitor location demand: Administrators should routinely monitor locker inventory levels across different facilities. If a specific location, such as a main athletic center, frequently runs out of available lockers, management may need to evaluate physical locker allocations or adjust pricing structures to meet user demand.
Managing Company Users (for Company Managers)
The Company Manager feature allows designated users to directly access and manage the portal accounts of their associated staff members. Its primary purpose is to empower corporate administrators to update employee parking profiles, purchase permits, and pay violations on behalf of their team, centralizing organizational parking management. This article is intended for OPS-COM administrators to help them support corporate clients and troubleshoot impersonation workflows.
Setup and Configuration
This feature requires explicit permissions and user associations to be configured before a manager can access their team's profiles.
Admin Side: Administrators must grant the correct role permissions to the designated manager account within the system backend. Additionally, administrators must link the applicable staff members (sub-users) to the manager's corporate account so they populate in the management list.
User Side: Designated managers access these impersonation tools directly from their user portal navigation bar upon logging in.
Using this Feature
Administrators can use the following instructions to guide a Company Manager through accessing and managing a staff member's account.
Accessing a Staff Account
-
Log in to the User Portal using the Company Manager credentials.
-
Click Company Manager in the navigation bar to open the list of all associated users.
-
Click the login icon located next to the specific staff member's name.
-
Review the pop-up message on the screen, which confirms the name of the staff member whose account is currently being accessed.
-
Navigate through the staff member's profile and perform the necessary actions on their behalf.
Once logged in as a staff member, the Company Manager has the ability to perform all the actions that the staff member themselves can do within their profile. This includes updating profile information, buying parking permits, paying parking violations, and adding or managing registered vehicles.
Available Actions and Buttons
-
Company Manager: Click this navigation menu item to view the list of associated corporate users.
-
Login Icon: Click this icon to initiate the impersonation session and access the selected user's portal dashboard.
Best Practices and Considerations
-
Maintain accurate corporate rosters: Organizations must routinely ensure that corporate user associations are kept up to date. If an employee leaves the company, administrators should promptly unlink their account from the Company Manager to prevent unauthorized access or accidental permit renewals on the former employee's behalf.
-
Audit corporate actions: Remind Company Managers that any actions taken while impersonating a user are recorded in the system. Payments made for permits or violations will apply directly to the staff member's account, so managers should carefully verify they have selected the correct employee from the list before completing financial transactions.
Getting Started with Text2ParkMe!
Text2ParkMe is an SMS-based parking payment system that allows users to initiate, pay for, and extend temporary parking sessions directly from their mobile devices via text message. Its primary purpose is to provide a fast, app-free alternative for transient parkers to secure parking on the go. This article is intended for OPS-COM administrators to help them understand and support the end-user setup and SMS workflow.
Setup and Configuration
Before users can initiate a parking session via text, they must configure their profile and register a vehicle.
Admin Side: Administrators must ensure that the Text2ParkMe module is enabled and a dedicated phone number is provisioned for the organization.
User Side: Users must log in to their portal account and complete a one-time setup process to link their mobile device to their payment profile.
-
Log in to the User Portal and click Your Profile.
-
Enter a valid mobile phone number in the Personal Information section.
-
Scroll to the Users Settings section and locate the Parking Expiry Reminder field.
-
Select the preferred SMS reminder timeframe (e.g., 5, 10, or 15 minutes) or select No reminder.
-
Register a credit card and ensure the Text2ParkMe subscription is active. Detailed instructions can be found on the Manage your Payment Methods & Subscriptions page.
-
Register the vehicle license plate in the Register the Vehicle(s) section if one is not already present on the account.
Not all parking providers support Text2ParkMe. Ensure your organization has the module active and properly configured before communicating this functionality to your end-users.
Using this Feature
Administrators can use the following instructions to guide users through navigating the SMS text prompts to purchase or extend parking.
Initiating a Parking Session
-
Text ParkMe to the designated Text2ParkMe phone number provided by your organization using the registered mobile phone.
-
Text P to start parking or Q to quit the session.
-
Text the number corresponding to the desired parking lot from the provided list.
-
Text the number of minutes required for the parking session.
-
Text C to continue if the time is correct, or L to go back to the lot selection step.
-
Text the number corresponding to the registered license plate, or type the plate number directly if it is unregistered.
-
Text C to confirm the purchase or L to go back to the previous options.
-
Check your device for a confirmation text and email detailing the parking expiry time.
Extending a Parking Session
-
Text E to the designated Text2ParkMe phone number.
-
Follow the automated SMS prompts to add additional time to the active session.
Managing SMS Communications
Users can text the following system commands at any time to manage their messaging preferences:
-
Opt-out: Text STOP, STOPALL, UNSUBSCRIBE, CANCEL, END, or QUIT to immediately halt all automated messages from the system.
-
Opt-in: Text START, YES, or UNSTOP to resume receiving messages.
-
Support: Text HELP or INFO for information on controlling messages and interacting with the system.
The SMS system is conversational. Every time a user texts the access number, the system will reply with clear instructions for the next required step.
Best Practices and Considerations
-
Promote reminder settings: Administrators should encourage users to enable SMS reminders during their initial setup. Receiving a text 5 minutes before parking expires significantly reduces accidental violations and improves the overall user experience.
-
Ensure profile accuracy: Remind users that their caller ID must exactly match the mobile number entered in their profile. If a user attempts to text the system from a different phone, the system will not be able to locate their payment profile or registered vehicles.
Self-Release Boot System: User Portal
The Self Release Boot System allows vehicle owners to pay for a parking violation associated with a vehicle boot and instantly receive a release code to remove the device themselves. Its primary purpose is to offer a fast, self-service resolution for parking violations, getting vehicles back in service quickly while reducing the manual dispatch burden on parking enforcement staff. This article is intended for OPS-COM administrators to help them understand and support the end-user self-release workflow.
Setup and Configuration
This feature requires the booting and violations modules to be active and properly configured within your environment.
Admin Side: Administrators must configure the booting device policies, determining whether a user is required to pay only for the single violation the boot is attached to, or if they must pay all outstanding account violations before the system generates a release code. Additionally, administrators must ensure that the automated release emails contain accurate removal instructions and clearly defined boot drop-off locations.
User Side: Users must have a valid email address to receive their unique release code. If choosing to pay through an existing account rather than as a guest, the user must have the booted vehicle's license plate actively registered to their profile.
Using this Feature
Administrators can use the following instructions to guide users through paying for their violation and removing the booting device.
Paying via QR Code or Guest Payment
-
Scan the QR code sticker located on the booting device to access the quick pay portal.
-
Navigate to the online payment portal and use the guest payment option if the boot lacks a QR code. Detailed instructions can be found on the Quick & Easy Guest Payments page.
-
Enter the specific violation code found on the windshield ticket.
-
Complete the required payment for the violation.
Paying via an Existing Account
-
Log in to the User Portal.
-
Add the vehicle's license plate to the user profile if it is not already registered.
-
Navigate to the cart to view outstanding items.
-
Locate the violation marked with the Boot Applied status.
-
Complete the required payment.
Removing and Returning the Boot
-
Check the provided email inbox for two separate automated emails: a payment receipt and a release code email.
-
Follow the detailed instructions in the release code email to safely unlock and remove the boot from the vehicle.
-
Return the boot to the specified drop-off location outlined in the instructions.
It is crucial that users return the boot promptly according to the provided instructions. Failure to return the boot within the allotted time frame may trigger automated secondary fines or prevent the user from appealing future violations until the equipment is recovered.
Visual Cues and Status Indicators
-
Grey Lock Icon: Violations in the user's cart that currently have a physical boot applied will display a grey lock icon alongside the text Boot Applied. This indicates to the user that payment is mandatory to release the vehicle.
Best Practices and Considerations
-
Communicate email requirements: Ensure users understand that a valid email address is strictly required during checkout. The unique boot release code and return instructions are dispatched exclusively via email upon successful payment.
-
Establish deposit policies: If your organization charges a refundable boot deposit, ensure the refund conditions are clearly communicated. Deposits are typically refunded to the original payment method only after the device has been returned within the specified timeframe and is confirmed to be in good condition.
-
Enforce return deadlines: Organizations should establish strict business rules for unreturned boots. Remind users to keep their instruction email until the device has been successfully dropped off, as failure to return the boot promptly may result in additional system fines or the complete forfeiture of their deposit.