User Management
- Registering a New User
- User Search
- User Profile Overview
- Archiving or Disabling a User
- Using Tax Exemption
- Retrieving Uploaded Files
- Registering a Locker for a User
- User - Vehicles Tab
- Edit Primary Driver
- Unlink a Vehicle from User Profile
- User - Parking Tab
- User - Payments Tab
- User - History Tab
- Review Emails Sent to Users
- User - Incident History
- User Company Editor
- Bulk User Type Change
- Merge User
- Bulk Email Users
- Generate Mail Merge
Registering a New User
User Registration allows OPSCOM administrators to manually create new user accounts, granting access to the User Portal. This process enables individuals to utilize features such as purchasing parking permits, renting lockers, and managing violations, ensuring a comprehensive record for each system user.
Setup & Configuration
There are a number of permissions you can enable that will allow you to have the full compliment of User Management controls. Everyone, does not need this level of access. It makes sense to restrict this to the Primary Admins. The permissions come standard to the Primary Admin role when OPSCOM is first installed.
Admins who are setting up Users as part of their daily role, will need the View Users and the Edit Users permission found on the User Management tab.
- Hover over System Configuration, then Admin Management, and click Manage Roles.
- Click Permissions on the role you want to grant this to.
- On the User Management tab, enable the Edit Users checkbox.
- Enable the View Users checkbox.
- Click Save Permissions.
Using this Feature
The user registration process involves two main stages: initial basic information entry and then full profile completion.
- Hover over User Management, and click User Registration.
Basic User Information
Completing and Activating the User Profile
User Search
User Search provides administrators with a powerful tool to quickly locate and access specific user accounts within the system. This feature enables efficient viewing and editing of user information, supporting various administrative tasks such as profile updates, violation management, and permit assignment.
Using this Feature
The User Search screen allows you to input various criteria to find specific users and refine your search results.
- Hover over User Management, and click User Search.
Entering Search Criteria
- Click the Toggle More Options button to see all available fields on the User Search screen.
- Refine your search results by selecting one of the following radio button options:
- Any Users: Displays both enabled and disabled user accounts.
- Enabled Only: Displays only active user accounts.
- Disabled Only: Displays only disabled user accounts.
- Enter your parameters and click the Search button.
- The search results will appear in a table below the criteria box.
There is a limit to how many records will return. If you see the message "The search has returned more records than allowed and has been truncated. Please refine your search." You will need to narrow down your criteria.
Available Actions from Search Results
From the search results table, you can typically perform various actions by clicking on the user's name or associated icons, such as:
- Click on any column header to resort the results alphabetically.
- Click the Username button to access the User Profile Landing Page.
- Click the Envelope icon to start an email to that user.
- Click the Clock icon to shortcut to the user history.
- Although no export button is available, it is possible to copy the search results directly into Excel or Google Sheets.
Best Practices & Considerations
- Combine Criteria: For more precise results, especially in systems with many users, combine multiple search criteria (e.g., first name and last name, or username and User Type).
- Utilize "Toggle More Options": Don't hesitate to use the expanded search options when you need to find users based on less common data points.
- Disabled Accounts: Remember to select "Any Users" or "Disabled Only" if you are looking for accounts that may have been deactivated.
- Data Integrity: Accurate and up-to-date user information in the system will yield more reliable search results.
- Quick Access: Use the User Search as your primary tool for quickly navigating to a user's comprehensive profile for any administrative task.
User Profile Overview
The User Profile Landing Page in OPSCOM serves as an administrator's central dashboard for a user's comprehensive information and current activity. This page offers a quick reference view, enabling efficient access and management of user details, associated vehicles, violations, permits, and other crucial historical data.
Using this Feature
Editing a User's Basic Profile
- Click the Edit button on the Basic Profile Information section.
- The full user profile editing form will display, allowing you to update various account details.
- The Edit User Profile form is structured into three main categories: Personal Information, Student Information, and Staff/Faculty Information. Each category contains various fields that can be individually set to Hidden, Visible, or Required (as defined in your System Settings for User Profiles).
Logging in as a User
This feature allows administrators to view the system from an end-user's perspective.
-
Click the Login as user button.
-
A new browser window will open, automatically logging you into the OPSCOM end-user portal as the selected user, with all their associated functionalities.
You may encounter an error if the Auto Login setting is not configured correctly in System Settings. If this occurs, please contact OPSCOM Support for assistance.
Viewing a User's Waitlist Position
If the user is on any waitlists, you will see the lots and their ranks listed in this section.
Adding or Editing Vehicles
- In the Vehicles section, click Edit.
- You will be directed to the Vehicle Information screen, where you can:
- Add new vehicles to the user's profile.
- Edit or remove existing associated vehicles.
- Apply a DNTT (Do Not Ticket Tag) to a specific vehicle.
Viewing Additional Information
The User Profile Landing Page provides immediate access to a wealth of additional user-specific data:
- The dashboard sections offer direct access to information regarding Alarms, Deposits, Violations, User Notes, and Permit details.
- Any active alerts or warnings associated with the user's profile will be prominently displayed at the top of the page.
- Active Deposits on the user account will be displayed if any exist.
- Private user notes will be displayed and you can also add additional notes here.
- For Violations:
- View detailed violation information by clicking the ticket number within the Violations section.
- If available, view photos related to a violation by clicking the camera icon next to the ticket number.
- For Permits:
- Access detailed permit information by clicking the permit number in the Active Permits section.
Best Practices & Considerations
- Centralized Management: Utilize the User Profile Landing Page as your primary hub for managing all aspects of a user's interaction with the OPSCOM system.
- Efficient Troubleshooting: When a user reports an issue, navigating to their profile landing page allows for a quick overview of their status, active permits, and recent violations, which can greatly aid in troubleshooting.
- Testing User Experience: The "Login as user" feature is invaluable for testing new configurations, verifying user access, or replicating user-reported issues directly from their perspective.
- Comprehensive History: Leverage the integrated views of alarms, violations, and permit details to understand a user's complete history within the system, informing decisions related to appeals, permit renewals, or enforcement actions.
Archiving or Disabling a User
Archiving or Disabling a User Account in OPSCOM allows administrators to deactivate user access while preserving their historical data. This process is crucial for managing user access permissions, maintaining data integrity for past transactions and activities, and ensuring compliance when a user's role changes or they leave the organization.
Using this Feature
The process of archiving or disabling a user account begins by accessing their individual profile through the User Profile Landing Page.
You can choose to either temporarily disable a user's login access or perform a more formal archive, often linking to an Archive User Type.
Disabling a User Account (Preventing Login)
This method revokes a user's ability to log into their OPSCOM account while keeping their profile and data fully intact for administrative reference.
Archiving a User Account (Categorized Disablement)
Archiving provides a structured way to disable a user account by assigning it to a specific "Archive Type," which can be useful for reporting or internal tracking.
Best Practices & Considerations
Using Tax Exemption
OPSCOM supports Tax Exemption Codes for users, allowing the system to automatically waive applicable taxes during their purchases of items like permits, violations, and lockers. This feature ensures accurate billing for tax-exempt individuals or organizations and simplifies compliance with specific tax regulations.
Using this Feature
- Locate the user you wish to edit/update by searching.
- Click on the Username from the search results, and their User Profile Landing Page will display.
- Confirm that the name of the user displayed at the top right-hand corner of the page matches the user whose account you intend to modify.
- Click the Edit button on the Basic Profile Information bar, or click the Profile dropdown menu and select Edit Profile Information.
Adding or Updating a Tax Exemption Code
- On the Edit User Profile screen, locate the Tax Exemption Code field.
- Enter or update the alphanumeric tax exemption code in this field.
- Click Submit Profile Information.
- On the subsequent confirmation screen, click Information Correct to save the changes to the user's profile.
Verifying the Tax Exemption Code
The Tax Exemption Code is displayed in the Profile Overview window on the user's profile landing page for easy reference, allowing administrators to quickly verify its presence.
Tax-Free Transactions
When a user with a valid tax exemption code on their profile proceeds to purchase items (such as a permit), applicable taxes will not appear as a line item on the payment or confirmation page. The system automatically waives these taxes.
Generating the Tax Exemption Report
Administrators can generate a report to view all users with active tax exemption codes.
- Generate the Tax Exemption Report from the Payments menu.
- This report includes three key fields: First Name, Last Name, and Tax Exemption Code.
- You can print or export the report records for further use, such as auditing or external reporting.
Best Practices & Considerations
- Accuracy is Crucial: Ensure that tax exemption codes are accurately entered and validated against official documentation to maintain compliance and prevent incorrect billing.
- Internal Verification: Establish clear internal procedures for verifying a user's eligibility for tax exemption before entering a code on their profile.
- Compliance: Understand your organization's tax compliance requirements and how this feature integrates with your overall financial processes.
- Reporting and Auditing: Regularly run and review the Tax Exemption Report for auditing purposes, ensuring that all tax-exempt transactions are correctly accounted for and supported.
- User Communication: Clearly communicate tax exemption policies to eligible users.
Retrieving Uploaded Files
This article provides instructions for OPSCOM administrators on how to manage files uploaded by users. It covers the process of locating, viewing, and deleting user-submitted files from within the administrative portal.
Using this Feature
File management is a standard feature which requires the appropriate administrator permissions:
- View User Uploads: Lets the administrator view the files that have been uploaded by a user.
- Delete User Uploads: Lets the administrator delete the files uploaded by users.
Additionally, it is important to understand the roles for uploading and managing files:
-
Admin Side: Administrators can only view and delete files from the admin portal. They cannot upload files on behalf of a user from this interface.
-
User Side: Only users can upload files to their own profiles.
All file management tasks for a specific user begin from their profile page in the admin portal.
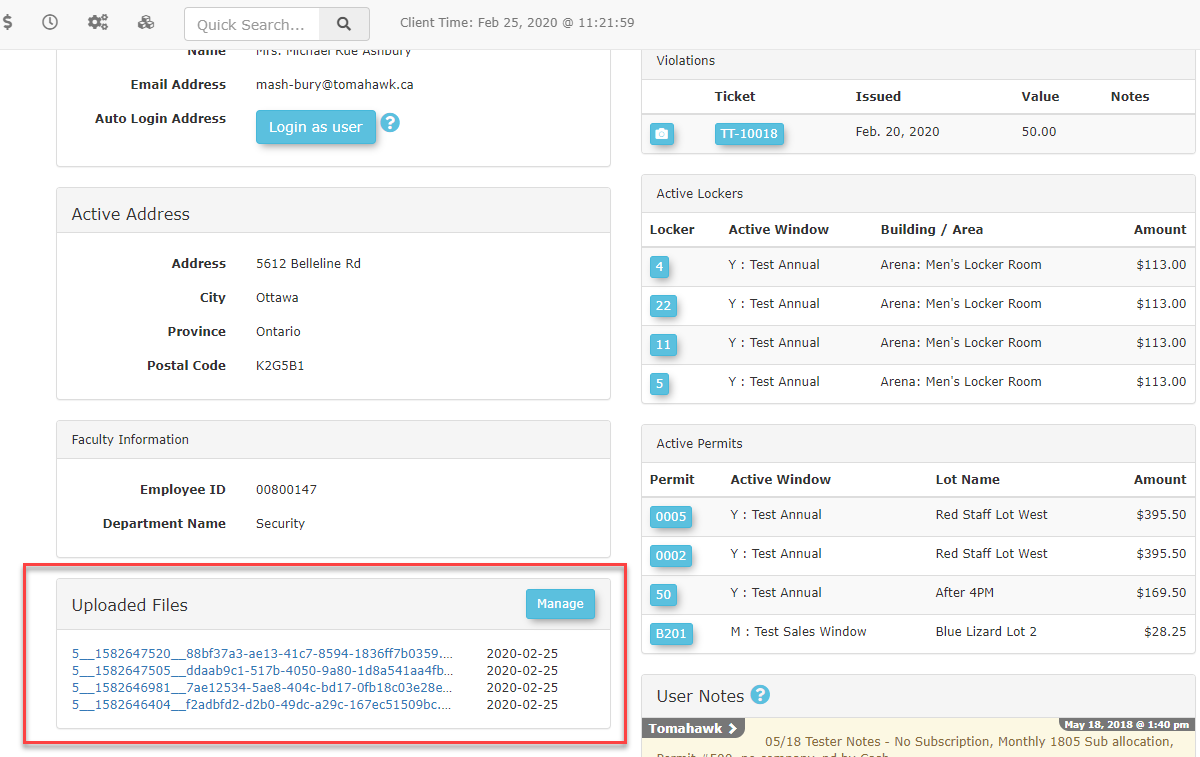
Viewing Uploaded Files
-
This section displays a preview of the five most recently uploaded files.
-
To view a specific file, click on the hyperlinked file name.
-
To view all uploaded files for the user, click the Manage button. This will take you to the user's main Uploaded Files page.
Deleting an Uploaded File
-
From the user's profile, click the View All button in the Uploaded Files section to access the full list of files.
-
On the Uploaded Files page, locate the file you wish to remove.
-
Click the Delete button associated with that file.
Best Practices & Considerations
- Uploading Files for a User: Administrators cannot directly upload files to a user's profile. To upload a file on behalf of a user, you must use the Login as User feature and follow the user-side workflow. Instructions can be found in the Uploading Files from the User-side article.
- Viewing/Deleting User Files: To view or delete user-uploaded files, ensure you have the appropriate permissions to perform these actions.
File Deletion is Permanent: Once a file is deleted, it cannot be recovered. Always verify you are deleting the correct file before confirming the action.
Registering a Locker for a User
The Lockers tab on the User Landing Page allows administrators to rent lockers to users. Users can also self-manage their locker purchases by logging into the User Portal.
Before a locker can be registered for a user, the locker inventory must be configured in OPSCOM. This includes setting up Buildings, locker room locations (e.g., Men's Locker Room), individual locker numbers, and any associated fees.
Locker Registration Process
-
Go to User Management, then Search Users for the user you wish to register a locker for. Click their Username to navigate to their Profile.
-
In the user's profile, click the Lockers button to open the locker registration interface for that user.
-
On the Locker Registration page, select the appropriate building from the list under the Available Buildings heading.
-
Choose a Location: The screen will refresh to the Locker Registration - Locker Selection page. Click the drop-down menu to choose the specific locker location (e.g., Men's Locker Room).
-
Reserve a Locker: A list of available lockers will be displayed. Select the desired locker number from the list.
-
Click the Reserve This Locker button to proceed.
-
Confirm the Reservation: The Confirm Locker Reservation screen will appear, summarizing the details. Carefully verify the information and click the Confirm Information button.
-
Process Payment: You will be directed to the Payments Due screen. To finalize the registration, click the Proceed to Payment button and complete the transaction as required.
Best Practices & Considerations
-
Payment Finalizes Reservation: In most configurations, a locker reservation is not considered final until payment has been successfully processed. If you navigate away from the Payments Due screen without completing the transaction, the locker may be released back into the available inventory.
Verify the Username: Before selecting a locker, always double-check that the correct user's name is displayed in the top-right corner of the Locker Registration screen. This ensures you are assigning the locker to the correct profile.
User - Vehicles Tab
The Vehicles tab on the Edit User Profile screen allows administrators to add, edit and remove vehicles associated to user. This is also where administrators would add/remove DNTT (Do Not Ticket or Tow) information to a vehicle.
Managing User Vehicles
This article provides instructions for OPSCOM administrators on how to manage vehicles associated with a user's profile. It covers the complete lifecycle of vehicle management, including adding, editing, activating or deactivating, and removing vehicles, as well as managing Do Not Ticket or Tow (DNTT) statuses.
Using this Feature
All vehicle management tasks are performed from within a specific user's profile.
Navigating to the Vehicle Information Page
-
Go to User Management and click User Search.
-
Use the search fields (e.g., name, username, email, or account number) to find the desired user.
-
From the search results, click the user's Username to open their Profile Page.
-
Click the Vehicles tab to access the Vehicle Information page, which lists all vehicles associated with that user.
Adding a New Vehicle
-
On the Vehicle Information page, click the Add New Vehicle button.
-
On the Add New Vehicle Information screen, fill in all required vehicle details.
-
Click the Add New Vehicle button at the bottom of the form to save.
Editing a Vehicle
-
In the vehicle list, click the hyperlinked license Plate of the vehicle you wish to edit.
-
In the Vehicle Information window that appears, modify the necessary details.
-
Click the Update Vehicle button to save your changes.
Activating or Deactivating a Vehicle
-
In the vehicle list, locate the Status column for the desired vehicle.
-
The current status will be shown as a link (either Active or Inactive). Click this link to toggle the vehicle's status.
Removing a Vehicle from a User Profile
-
In the vehicle list on the user's profile, click the X icon in the row of the vehicle you want to remove.
-
Confirm the action in the subsequent prompt to finalize the removal.
See the article Unlink a Vehicle from User Profile for the requirements to remove a vehicle from a user's profile.
Managing Do Not Ticket or Tow (DNTT) Status
-
In the vehicle list, click the Record DNTT Link.
-
This interface allows you to add, edit, or remove a Do Not Ticket or Tow (DNTT) notation. This status can prevent violation issuance under specific, pre-defined conditions (e.g., in a certain lot or during a specific time).
Best Practices & Considerations
- If you add a new vehicle but the details do not save correctly, it is likely because that license plate already exists in the system (associated with another user or archived). The vehicle must be properly associated with the current user before all details can be edited.
- Removing a vehicle only disassociates it from the current user's profile; it does not delete the vehicle record from the system. If the vehicle is associated with only one user, it will be archived. If it is associated with multiple users, it will remain active on the other user profiles.
Clear Balances Before Removal: Before removing a vehicle that is only associated with one user, ensure any outstanding balances or violations tied to that vehicle are cleared.
Edit Primary Driver
This article explains the process for OPSCOM administrators to set or change the Primary Driver for a vehicle. The Primary Driver designation is used to identify the main user responsible for a vehicle, ensuring they receive all official communications like violation notices. This guide is essential when a vehicle is associated with multiple user profiles.
Using this Feature
The option to change the Primary Driver is only available when a single vehicle is associated with two or more user profiles. If a vehicle is only linked to one user, that user is automatically designated as the Primary Driver, and the selection field will not be visible.
The Primary Driver designation is managed from the vehicle editing screen within any associated user's profile.
How to Change the Primary Driver
Best Practices & Considerations
- The Role of the Primary Driver: A nightly system process automatically attempts to assign a Primary Driver to any new vehicle. Furthermore, if a violation appeal is submitted for a vehicle that lacks a designated Primary Driver, the system will automatically assign the role to the user who submitted the appeal. This ensures there is always a designated contact for communications.
- Correcting Legacy Records: If you encounter an older vehicle record with multiple users designated as Primary Driver, simply follow the steps above to select the correct one. When you save the change, the system will automatically remove the incorrect legacy designations from the other associated users.
Unlink a Vehicle from User Profile
This article provides instructions for OPSCOM users on how to remove the association between a vehicle and a user profile. This process is necessary when a user no longer owns a vehicle, or to correct a vehicle that was mistakenly linked to the wrong user account.
Rules to Remember
-
In order for a user to remove a vehicle from their profile, these must all be true:
-
The setting to allow users to remove a vehicle must be enabled
-
The vehicle must not have any directly associated active standard or temp permits
-
The vehicle must not be associated to any incidents
-
The vehicle must not have any alerts on it
-
The vehicle must not have any valid violations
-
If the vehicle has a violation that was marked as a warning, the setting to allow this type of removal must be enabled first
-
- There is no minimum amount of time a vehicle is required to be dormant before it can be removed.
- These restrictions do not apply to admins removing vehicles from a user profile.
Important: The Allow users to delete vehicles setting must be enabled under System Configuration > System Settings > Vehicles in order for users to delete vehicles from their profile.
Using This Feature
Note: If you have been involved in incidents or the vehicle has outstanding fines and fees associated with it, you will not be able to remove it.
Best Practices & Considerations
- Understanding Vehicle Removal: Removing a vehicle only disassociates it from the current user's profile; it does not delete the vehicle record from the system itself. If the vehicle is associated with only one user, its record will be archived. If it is associated with multiple users, it will simply be removed from the current profile while remaining active on the other associated user profiles.
- Clear Outstanding Balances First: Before removing a vehicle that is only associated with a single user, it is critical to ensure all outstanding violations or fees tied to that vehicle have been resolved.
User - Parking Tab
This article provides instructions for OPSCOM administrators on how to purchase both standard and temporary parking permits on behalf of a user. All actions are performed from the Parking tab within the user's profile, which serves as the central hub for managing a user's parking permissions.
Setup & Configuration
Before permits can be sold, all parking lots, permit types (e.g., yearly, monthly, temporary), and associated costs must be configured in the system. For more details on this process, please refer to the Pricing & Lot Admin page.
The process begins by navigating to the specific user's profile.
Navigating to the Parking Tab
-
Go to User Management tab and click User Search.
-
Use the search fields (e.g., name, username, email, or account number) to find the desired user.
-
From the search results, click the user's Username to open their Profile Page.
-
Click the Parking tab to navigate to the Manage Lots screen for that user.
Purchasing a Standard Permit
-
On the Manage Lots screen, locate the desired parking lot.
-
Click the Standard Permit button associated with that lot.
-
On the Confirm Parking Permit Registration screen, review the details, including location, permit type, and cost. You may have the option to edit the permit number and permit cost here.
-
Click the Purchase this Permit button and proceed with the payment process to finalize the registration.
Purchasing a Temporary Permit
-
On the Manage Lots screen, click the Temporary Parking Permit button.
-
On the Temp. Parking Permit Registration screen, configure the permit details:
-
Click the Select a lot drop-down menu and choose the appropriate lot.
-
Enter the start and end dates for the permit.
-
Choose the temporary permit type (e.g., all day or hourly).
-
Select the vehicle the permit will be assigned to.
-
Confirm the Permit Number.
-
Enable the DNTT (Do Not Ticket or Tow) checkbox if this temporary permit should prevent violation issuance.
-
-
Click the Confirm this Permit button.
-
On the Confirm Parking Permit Registration screen, review all the details one final time.
-
Click the Purchase this Permit button and proceed with the payment process.
Best Practices & Considerations
User - Payments Tab
The Payments tab allows administrators to process user payments for one or all payment types due (lockers, parking permits, temporary permits, access card, violations). This page also shows any financial adjustments that have been made to a user account.
Purpose and Overview
This article outlines the process for OPSCOM administrators to make a payment on behalf of a user. This functionality is essential for handling phone-in payments, in-person transactions, or assisting users who are unable to complete the payment process themselves. These instructions are intended for administrative staff with payment processing permissions.
Using this Feature
No special configuration is required to use this feature, provided that your organization's payment gateway and item pricing have already been configured. For more details on these initial setups, please refer to the Payment Gateway Configuration and Pricing & Lot Admin articles.
Follow these steps to process a payment for a user account.
Warning: The Remove action is permanent and cannot be undone. Use this with caution, as the item will be completely removed from the user's account, not just the current transaction.
-
After selecting all items, click the Proceed to Payment button.
-
On the Payments Due screen, review the transaction summary. Select the payment method from the Payment Type drop-down menu and click Submit Payment Information.
-
A final confirmation screen will appear. Verify that all payment details are correct and click Confirm Payment Information.
-
You will be directed to the Transaction Details screen. Before finalizing the payment, you have two primary options:
-
Adjust: Click to modify the payment total. This is useful for applying a discount or adding a surcharge.
-
Cancel Transaction: Click to completely cancel the payment process. The items will remain on the user's account as outstanding.
-
-
To complete the transaction, click the Process Manually button. For credit card transactions with an integrated payment gateway, this process may occur automatically.
-
Once the payment is accepted, a transaction confirmation number will be displayed. From this screen, you can perform post-payment actions such as making an adjustment or issuing a refund.
Best Practices & Considerations
-
Double-Check Before Confirming: Always verify the selected items and payment amount with the user before clicking Confirm Payment Information, as reversing a transaction is a more involved process.
-
Understand Manual vs. Automatic Processing: Be aware of how your system is configured. If a payment gateway is active, credit card transactions are typically processed in real-time. Manual processing is used for cash, cheque, or other offline payment methods.
-
Use the Cancel Button to Abort: If there is any uncertainty or error discovered before final processing, use the Cancel Transaction button to safely exit the workflow without financial impact.
User - History Tab
This article explains how OPSCOM administrators can access and manage a user's complete transaction and activity history. The History tab provides a detailed log of all financial transactions, permit activity, and system-recorded events associated with a user's account, allowing for audits, adjustments, and user support. This guide is intended for all administrators who manage user accounts.
Setup & Configuration
This is a core feature within the User Profile Page and does not require any special setup or configuration.
Using this Feature
The History tab is the central location for viewing and interacting with a user's historical data.
Accessing the User History Tab
The Recent History view displays the most recent 100 records for the selected user. This list includes records for items such as Locker, Parking, Enforcement Adjustment, Address, and Mail Records.
Available Actions & Buttons
The History tab provides several options for managing user data and transactions.
-
Adjust: Click the Adjust link next to a processed transaction to modify it. After making changes, click the Add Adjustment button to save.
-
Item Number: Click the link in the Item Number column (which may be a permit number, violation ticket number, or appeals record number) to view or edit the details of that specific item. Remember to click Update/Save Changes after making any edits on the item's detail page.
-
send email: Click the send email button located next to the 'Current Renter' label to compose and send an email directly to the user associated with that record.
-
Make Payment or Processed: Click this button next to a transaction to view its detailed payment processing information.
Best Practices & Considerations
-
Document all adjustments: When using the Adjust feature, always provide a clear and detailed reason for the modification. This is crucial for maintaining a transparent and accurate audit trail.
-
Review item details before acting: Before emailing a user or making an adjustment related to a specific item, click the Item Number to review its full details. This ensures you have all the necessary context to take appropriate action.
Review Emails Sent to Users
This article outlines the process for viewing the history of automated and mass communications sent to users through OPSCOM. This feature allows administrators to verify that important messages, such as violation notices and receipts, have been successfully dispatched. This guide is intended for OPSCOM administrators.
Using this Feature
This feature is enabled by default and does not require any specific configuration. It automatically logs communications generated by system tasks and user actions. Sent Mail History provides a comprehensive log of all system-generated email communications sent to a specific user.
To access a user's email history:
Key Information Displayed
On the Sent Mail page, you will see a list of all communications sent to the user, including:
- View Email Content: To view the body of a specific message, click the link in the Subject column. A pop-up window will appear, displaying the exact content of the email that was sent to the user.
-
The Subject of the email.
-
The Date the email was sent.
The following types of internal and automatic messages are logged in the Sent Mail history:
- New & Overdue Violation Notices: Emails sent via the Send New Violation Notices and Overdue Violation Notices system tasks are logged here. The link displays the notice letter as it was generated and sent.
- Receipts: When a user completes a payment, an email receipt is dispatched. The history log displays the actual email content, which may have a different layout than the standard receipt view within OPSCOM.
- Invoices: Emails containing invoices that were generated and sent to a user are logged and viewable from this page.
Best Practices & Considerations
-
When a user reports not receiving an email, always check the Sent Mail history first to confirm that the system successfully dispatched the message.
-
Use this tool to verify communications before resending notices or contacting users, which helps prevent duplicate messages and potential confusion.
-
Note that this history only tracks emails sent directly through OPSCOM's automated systems. It does not log manual correspondence sent from personal email clients (e.g., Outlook, Gmail).
User - Incident History
The User Incident History page provides a comprehensive list of all disturbance incidents associated with a specific user. This feature allows administrators to quickly review a person's incident history on the premises to understand patterns or retrieve details about past events. This guide is intended for OPSCOM administrators. Incidents can be distributed to various departments, internal or external parties, or even police.
If you are interested in the Incident Distribution feature, please refer to this article.
Using this Feature
This page displays data that is logged through the Dispatch and Incident Reporting modules. For incidents to appear here, they must be correctly created and associated with the user during the incident logging process. No special configuration is required for the User Incident History page itself. To access a user's incident history, first navigate to the profile of the user you wish to review, then select the Incident History page to view the list of incidents
Key Information Displayed
Go to any user's profile, and Select the Incident History page to view the list of incidents.
The page lists all disturbance incidents the selected user has been involved in. Each entry in the list typically includes:
-
Incident ID Number
-
Date and Time of the incident
-
A brief description or type of incident
Available Actions & Buttons
-
Details: Each incident in the list has a Details button. Clicking this navigates you to the full report for that specific incident, providing all logged information.
-
Add Note Button: Click the Add Note button to add a general note to the user's main profile. This is useful for summarizing patterns or adding follow-up information related to their overall history. (These are only visible on the administration side)
-
Edit/View Images Button: Click the Edit/View Images button to manage the profile pictures associated with this user.
Warning: The accuracy of this page depends entirely on correct data entry. Ensure that all new incidents are accurately logged and associated with the correct users to maintain a complete and reliable history. Try to get suspects to identify with a government issues ID if possible.
Best Practices & Considerations
-
Review the User Incident History before interacting with a user regarding a new complaint or disturbance. This provides the full context of past events and informs your approach.
-
Use the Add Note feature on this page to summarize recurring issues or document actions taken based on a user's pattern of behavior (e.g., Spoke with user on 2025-07-18 about repeated noise complaints.). Notes specific to a single event should be added within that incident's Details page.
-
The information on this page is critical for identifying repeat issues and making informed decisions about property access or other administrative actions.
User Company Editor
This article describes how to create, edit, and manage company profiles within OPSCOM. The User Companies feature allows administrators to group individual users under a single corporate account, which helps to streamline permit management, billing, and reporting for business clients. This guide is intended for OPSCOM administrators.
Using This Feature
The primary setup step is creating the company profile. Once created, you can associate users with the company and assign specific roles.
To Create a New Company:
-
Go to User Management and click User Companies.
-
On the Company Search page, click the Create New Company button to open the Company Create window.
-
Fill in the company's information in the provided fields:
-
Account Number: A unique internal identifier for the company.
-
Company Name: The official name of the business.
-
Address: The physical address of the company.
-
Contact Name: The primary administrative contact for the company.
-
Invoice Emails: The email address where system-generated invoices should be sent.
-
-
Once all data is entered, click the Add New Company button. A confirmation message will appear indicating the company has been added.
After a company is created, you can search for it, manage its associated users, and archive it when it is no longer active.
Searching for a Company and Viewing Users
From the Company Search page, you can look up a company by its name or account number. The search results will display the company details and a count of its associated users.
-
Viewing Associated Users: In the search results list, the number in the Users column is a clickable link. Clicking this number will redirect you to the User Search page, displaying a filtered list of all users assigned to that company. The list will also indicate which users are designated as the Manager or Billing contact.
Adding Users to a Company and Assigning Roles
Archiving a Company
-
From the Company Search page, find the company you wish to archive and click the Edit button.
-
On the Company Edit screen, click the Archive button in the top-right corner.
Best Practices & Considerations
- Keep in mind: A company cannot be archived if it has any users associated with it. You must first navigate to each user's profile and remove them from the company before the system will allow you to archive it.
- There can only be one Company Billing Account contact per company. If you attempt to assign this role to a second user, the system will prevent the change and display a message indicating who the current billing contact is.
-
Tip: It is recommended to establish the complete company profile first before you begin associating users with it. This ensures all foundational details, like the invoice email and account number, are correctly in place from the start.
-
The Company Manager role is a powerful tool for business-to-business clients, as it allows a primary contact to self-manage their employees' profiles. Be sure to clearly communicate this capability to your corporate contacts.
Bulk User Type Change
This article describes the Bulk User Type Change tool, which allows administrators to move all users from one user type to another in a single operation. This feature is essential for efficiently managing large-scale user role updates, such as transitioning students to an alumni status at the end of a school year. This guide is intended for OPSCOM administrators
Using this Feature
This tool is a standard administrative feature and does not require any specific configuration. However, you must ensure that both the original user type (the one you are changing from) and the destination user type (the one you are changing to) are already created in the system. The tool provides a simple interface for selecting a user type and migrating all of its members to a different type.
For more information on creating and managing roles, please refer to the User Types Administration wiki article.
To Perform a Bulk User Type Change:
Warning: This action is permanent and cannot be undone. It will immediately move all users from the original type to the new one. Always double-check your selections before clicking the final Confirm Changes button.
Best Practices & Considerations
-
Changing a user's type directly impacts their permissions and access, including their eligibility for specific permits, lots, and waitlists. Before performing a bulk change, ensure the destination user type has all the correct permissions and rules configured.
-
Use this tool for major seasonal or annual transitions, such as updating student statuses at the end of a semester or moving all members of a deprecated group to a new, active one.
-
For user types with a very large number of users (thousands), the process may take a few moments to complete. Do not navigate away from the page after clicking Confirm Changes; wait for the process to finish and the page to reload.
Merge User
This article describes how to use the Merge Users tool to combine two separate user profiles into a single, primary account. This function is essential for maintaining a clean database by resolving duplicate profiles that may arise from user error, name changes, or other data discrepancies. This guide is intended for OPSCOM administrators.
Setup & Configuration
Before a user profile can be selected in the Merge Users tool, you must ensure it meets the following criteria within its profile settings:
-
The user account must be Enabled.
-
The user must have a User Type assigned.
If you cannot find a user when searching in the merge tool, first navigate to that user's profile to verify these two settings are correctly configured.
Using this Feature
The merge process involves selecting a source profile (FROM User) to merge into a destination profile (TO User). The FROM User will be archived, and its data will be transferred to the TO User.
The Merge Process
Data is only transferred from the 'FROM User' if a corresponding record does not already exist on the 'TO User'. The merge tool does not overwrite or duplicate existing records on the destination profile.
What Happens to the Data?
-
The FROM User (left column) profile is permanently archived and is no longer accessible.
-
The TO User (right column) profile remains active and inherits the data listed below.
-
A record of the merge is logged in the Completed History section on the profile of the TO User.
The following data is transferred from the FROM User to the TO User:
-
Vehicles
-
Violations
-
Permits
-
Lockers
-
Items Awaiting Payment
Warning: The merge process is irreversible and results in the permanent archival of the FROM User profile. Always double-check that you have selected the correct source and destination accounts before finalizing the merge.
Best Practices & Considerations
-
Designate the profile with the most accurate core information as the TO User (the account on the right). While transactional data is transferred, the primary profile details (name, contact information) of the TO User are what the final, merged profile will retain.
-
Use this tool to resolve common data integrity issues, such as when a user accidentally creates a second profile, changes their legal name and creates a new account, or when an admin-created profile needs to be consolidated with a user-created one.
Bulk Email Users
This article describes how to use the Email Users tool to send mass email communications. This feature allows administrators to compose and send messages to targeted groups of users based on criteria like user type, permit status, or assigned parking lot. This guide is intended for OPSCOM administrators responsible for user communications.
Using this Feature
This tool is a standard feature and does not require any specific setup. The effectiveness of the recipient filtering depends on having accurate and up-to-date user data, including correct User Types, Lot Assignments, and other user profile details. The process is divided into two phases: first defining your recipient list using filters, and then composing and sending the email.
Defining the Recipient List
Tip: To select multiple options within a single filter box (e.g., to email users in three different lots), hold the Ctrl key (or Cmd on Mac) and click each desired option. To deselect an option, hold the same key and click it again.
Composing and Sending the Email
After preparing the email, a new section will appear on the page.
-
First, verify your recipients. Click the View Recipient List button to review the list of users who will receive the email. You can also click Export Recipient List to download a CSV file for external review.
-
Compose your message by filling in the Subject and Message fields.
-
To include a file, click the Choose File button and select the desired attachment.
-
When your message is ready, click the Send Email button.
-
A confirmation prompt will appear. Click Yes to proceed.
-
A confirmation message will then display, stating that the email has been queued for delivery.
Warning: Sending a mass email is an irreversible action. Always proofread your subject line and message content carefully for accuracy and clarity before clicking Send Email.
Best Practices & Considerations
-
Always use the View Recipient List button to check your final list of recipients before sending. This is a critical step to ensure your communication reaches the correct audience.
-
Be aware that emails are queued for delivery and may not be sent instantaneously, especially for very large recipient lists. The system sends them in batches to ensure reliable delivery.
-
Use this tool for important operational announcements, such as lot closures, policy changes, or permit renewal deadlines. Avoid overusing it for non-essential matters to prevent 'email fatigue' among your users.
-
You can view emails sent successfully to a user by navigating to their profile and going to History > History > Sent Mail, or by accessing the Complete History Log. This will display the emails sent to that specific user.
Generate Mail Merge
This article explains how to use the Generate Mail Merge tool to export user mailing addresses for Microsoft Word's Mail Merge feature. This guide is intended for OPSCOM administrators managing user communications.
Using this Feature
This tool is designed to be used in conjunction with Microsoft Word's Mail Merge functionality. No additional configuration is required beyond having access to the appropriate Microsoft software.
Warning: In databases with a large volume of records, this tool may not function as expected. If you encounter issues, please contact OPSCOM Support for assistance.
Generating the CSV File for Export
Composing and Initiating the Mail Merge
After downloading the file, open Microsoft Word.
Note: Depending on your version of Microsoft Word, the instructions below may differ.
Please refer to the official Microsoft Mail Merge documentation for more details.
Best Practices & Considerations
-
The tool exports all user records from your database. Filtering options are not currently available.
- Always review the exported CSV for accuracy before proceeding.