Vehicle Management
- Search by Plate
- Merge Vehicles
- DNTT - Do Not Ticket or Tow
- Active Vehicle Report
- Tracking Electrical Vehicles
Search by Plate
This article describes the Search by Plate feature, a powerful tool for locating vehicles within the system. It allows administrators to quickly identify a vehicle's owner, review its permit and violation history, and perform related actions, all from a single interface. This guide is intended for OPSCOM administrators and enforcement personnel.
Using this Feature
This feature is a standard part of the vehicle management module and does not require any special configuration. Its results are drawn from existing user, vehicle, permit, and violation data in the system.
Performing a Vehicle Search
Interpreting Search Results and Available Actions
The search results will appear in a list below the search form. Each row provides information and quick-access icons for a specific vehicle.
-
History Icon: Click to view the vehicle's complete history, including LPR scans and past permit associations.
-
User Profile Icon: Click to navigate directly to the owner's user profile page.
-
Vehicle Details Icon: Click to view detailed information about the vehicle itself, such as make, model, and year.
-
Username: The linked username of the vehicle's registered owner. Clicking it also navigates to the user's profile.
-
Email Icon: Click to open a new email composition window addressed to the vehicle owner.
-
Violations Count: A number indicating how many violations are associated with this vehicle. Click the number to view the list of violations.
-
Incidents Count: A number indicating how many incidents are associated with this vehicle. Click the number to view the list of incidents.
-
Add Violation Icon: Click to immediately open the violation issuance screen for this vehicle.
-
Pay Station Status: Displays information about temporary permits purchased from a pay station for this license plate.
Warning: Be cautious when using the Add Violation button. Ensure you have identified the correct vehicle and user from the results list before issuing a new ticket to prevent errors.
A single license plate may appear in multiple rows if it is registered to different users (e.g., a family) or has a separate pay station history not linked to a registered user. Review all results carefully to ensure you are acting on the correct record.
Best Practices & Considerations
-
Use Fuzzy Search for partial plates. If you are unsure of the full plate number or its exact sequence, enabling this option will perform a broader search and significantly improve your chances of finding the vehicle.
-
Use the Date Range filter primarily when investigating recent LPR sightings or temporary pay station activity. For a complete history of a vehicle's permits and violations, leave the date range fields blank.
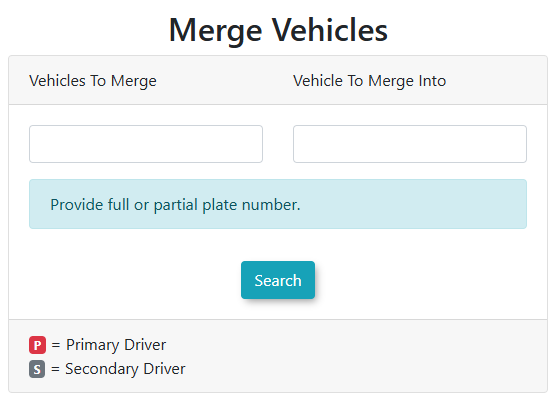
Merge Vehicles
The Merge Vehicles feature in OPSCOM allows administrators to combine two existing vehicle records into a single, unified record. This tool is invaluable for correcting duplicate entries, associating vehicles with their correct user profiles, and consolidating all historical data (including violations) to the primary vehicle record, ensuring data accuracy and comprehensive vehicle history.
Using this Feature
The Merge Vehicles interface facilitates the process of consolidating vehicle records.
This will associate the vehicle to the User and bring along all the violation history to the User.
- Hover over User Management, then Vehicles, and click Merge Vehicles. This will open the Merge Vehicles interface.
- Enter the vehicle plate or VIN of one or both vehicles you intend to merge.
- Click Search.
- From the results on the left side, select the secondary vehicle(s). These are the records whose information and history (e.g., violations) you want to consolidate into another vehicle.
- From the results on the right side, select the primary vehicle. This is the single vehicle record that will remain after the merge, inheriting all information and history from the secondary vehicle(s).
- Click Merge.
- Confirm the merge action in the prompt.
- Wait for the confirmation screen to appear, indicating successful completion.
Best Practices & Considerations
- Irreversible Action: Merging vehicles is a permanent action. Once two vehicles are merged, the secondary vehicle record(s) are effectively absorbed into the primary, and the action cannot be undone. Always verify your selections before proceeding.
- Data Consolidation: When vehicles are merged, all associated history, including outstanding violations, is transferred to the primary vehicle. This is particularly useful when a vehicle with a history of violations is later added to a user's account, ensuring all its history is linked to that user.
- Identify Primary Vehicle: Clearly determine which vehicle record should be the "primary" one that remains in the system. This is usually the record with the most accurate, complete, or longest-standing information.
- Review Before Merge: Before initiating a merge, carefully review the details of both the secondary and primary vehicles to ensure they are indeed duplicates or that the merge is intended. Look at details like make, model, color, and ownership history.
- Impact on User Profiles: If the vehicle being merged has outstanding violations and is then associated with a user, this process will correctly link all the violation history to that user's profile.
- Search by Plate or VIN: The flexibility to search by either plate or VIN helps in accurately identifying the correct vehicles for merging.
DNTT - Do Not Ticket or Tow
This article describes the Do Not Ticket or Tow (DNTT) feature, which allows administrators to apply a temporary condition on a vehicle to prevent ticketing or towing. This is used to grant parking exceptions for specific time frames, such as for VIPs, special events, or temporary service vehicles. This guide is intended for OPSCOM administrators.
Using this Feature
The DNTT feature is enabled by default. However, to access the Vehicle DNTT Report, an administrator's user role must have the Manage Vehicle permission enabled. No other special configuration is required. The DNTT workflow includes applying the flag from a user's profile, managing it, and reviewing its usage through reports and handheld devices.
Applying a DNTT Flag to a Vehicle
Editing or Deleting an Active DNTT
-
Return to the Vehicles tab on the user's profile.
-
Click the Edit DNTT button for the vehicle with the active flag.
-
From here, you can either click Modify to update the details or Delete to remove the DNTT exception entirely.
Viewing DNTT Status on Handheld Units
Enforcement officers can easily see active DNTT flags in the field.
-
On an OPSCOM for Android unit, tap Search Vehicles.
-
Enter the license plate to perform a search.
-
In the vehicle results list, any vehicle with an active DNTT will be clearly indicated. Tap the vehicle record to view the details, including the expiry time and the administrator's note.
Using the Vehicle DNTT Report
This report provides a searchable history of all DNTT flags issued.
Keep in mind: The Note field is required and is the most critical piece of information for enforcement officers. Always write a clear, concise note explaining why the DNTT was issued (e.g., "Guest of Dean for event in building A until 4 PM").
Best Practices & Considerations
-
Set the DNTT time frame to be as specific as possible. Avoid creating open-ended or excessively long exceptions. This practice maintains the integrity of your parking enforcement program.
-
Use the optional Location field to add clarity if a parking exception is only valid in a specific lot or area. This helps prevent confusion for both the vehicle owner and the enforcement officer.
-
Regularly use the Vehicle DNTT Report to audit active and past exceptions. This helps ensure the feature is being used correctly and provides a clear history of all granted exceptions.
Active Vehicle Report
This article describes the Active Vehicles Report, a tool designed to identify users who have more active vehicles registered on their profile than they have valid permits. Its primary purpose is to help administrators detect potential permit abuse, outdated vehicle lists, or other data discrepancies that could affect parking enforcement and lot management. This guide is intended for OPSCOM administrators.
Using This Feature
This report is a standard administrative feature and does not require any specific configuration. It automatically analyzes existing user, vehicle, and provides a focused list of users whose vehicle counts may require review.
Accessing and Understanding the Report
Go to User Management, then Vehicles, and click Active Vehicles Report
The report runs automatically when the page loads. It is specifically designed to display a list of all users who have at least 1 more active vehicles than they do valid permits. This is to identify potential permit misuse.
Key Information Displayed
For each user meeting the criteria, the report will typically display:
-
Username: The name of the user.
-
Email: The user's listed email address.
-
Active Vehicles: A count of active vehicles currently listed on their profile.
-
Valid Permits: A count of valid permits they currently hold.
-
Allowed Extra Vehicles: The amount of extra vehicles specifically allowed by that user, which is determined by user type settings (default is 1, meaning 1 additional is allowed).
-
- The amount of un-authorized extra vehicles is: # of active permits, plus the amount of allowed extra vehicles. Take this total, and subtract it from the amount of Active Vehicles, and this is the number each user is exceeding their limit by.
- The amount of un-authorized extra vehicles is: # of active permits, plus the amount of allowed extra vehicles. Take this total, and subtract it from the amount of Active Vehicles, and this is the number each user is exceeding their limit by.
-
Warning. This report is an investigative tool, not a definitive list of violators. A discrepancy can occur for legitimate reasons, such as a user forgetting to remove an old vehicle after selling it or adding a temporary rental car.
Best Practices & Considerations
-
Develop a standard procedure for addressing users on this report. A best practice is to contact the user and ask them to review and update the vehicle list on their profile. Instruct them to remove any vehicles they no longer own or use for parking on the premises.
-
Review this report periodically, such as at the beginning of each semester or before a major permit sales cycle, to ensure user data is clean and accurate ahead of peak periods.
Tracking Electrical Vehicles
This article describes how to identify and manage Electric Vehicle (EV) flags within OPSCOM. This feature allows both administrators and users to designate vehicles as electric, which is essential for managing access to charging stations, reporting on sustainability metrics, and applying EV-specific parking policies. This guide is intended for OPSCOM administrators.
Using this Feature
The EV flag feature is enabled by default and does not require any special configuration. The functionality is available on all vehicle information pages for both administrators and end-users. Both administrators and users can manage the EV designation for a vehicle. The system provides clear visual indicators and reporting tools to track these vehicles.
Administrator Side
How to Flag a Vehicle as an EV:
Identifying and Reporting on EVs:
-
In a User Profile: On the Vehicles tab, EVs are identified by a blue thunderbolt icon next to the license plate. Hovering over this icon displays a tooltip confirming it is an electric vehicle.
-
Using the Vehicle Report: To get a list of all EVs in the system:
-
Navigate to User Management -> Vehicles -> Search by Plate.
-
Enable the Electric Vehicle checkbox.
-
Click Search. The results will include an EV column to easily identify all flagged vehicles.
-
User Side
How Users Flag Their Vehicle as an EV:
Users are also able to designate their own vehicles as electric through their online profile.
-
The user logs into their OPSCOM portal and navigates to the page listing their vehicles.
-
They click the Edit button for the desired vehicle.
-
In the vehicle details window, they enable the Electric Vehicle checkbox and save the changes.
Identifying EVs on the User Portal:
Like the admin view, users can identify their EVs by the blue thunderbolt icon displayed next to the vehicle's license plate in their vehicle list.
Best Practices & Considerations
- Tip Use the EV flag to manage access to dedicated charging station areas. You can create specific lots or permit types that are only available to users with a flagged EV on their profile.
-
The Search by Plate report is a valuable tool for sustainability reporting. Regularly run the report with the Electric Vehicle filter enabled to track the number of EVs in your parking system and measure the adoption of green transportation.
-
Encourage users to accurately update their vehicle information, including the EV flag, during permit registration or renewal. This ensures your data is accurate without requiring manual administrative updates for every vehicle.
-
If your organization has EV-specific parking policies (e.g., 'EVs Only' parking stalls), the EV flag provides the data needed to enforce these rules effectively through vehicle lookups.