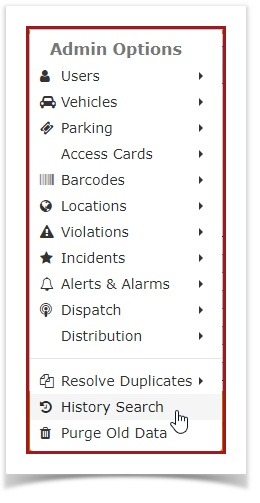
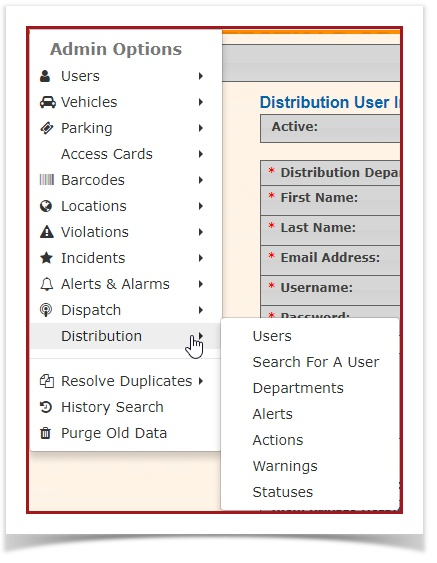
Admin Options
- Managing Recurring and Onetime System Tasks
- Deposit Options
- History Search
- Resolve Duplicate Report
- Warnings - Distribution
- Status - Distribution
- Actions - Distribution
- Alerts - Distribution
- Departments
- Search for a User
- Users - Distribution Admin Options
- Distribution Setup
- Sources - Dispatch
- Dispatch Categories
- Dispatch Setup
- Warning Email Trigger List
- Email Alert List
- Alarms Setup
- Relations
- Missing Property Types
- Flags
- Extended User Profile Options
- Ethnic Types
- Categories
- Cameras
- Incidents Setup
- Sending Alerts to Handhelds
- Ticket Offence Items
- Sort Violations for Quick Access
- Ticket Categories
- Violations Setup
- Locations - Sub Locations
- Locations
- Location Setup
- Barcodes - Edit Barcodes
- Barcodes - Edit Gates
- Barcodes - Edit Bulk
- Barcodes - Add Bulk
- Barcodes - Add Singles
- Barcode Setup
- Access Cards - Edit Bulk
- Access Cards - Add Bulk
- Access Cards - Add Singles
- Access Card Status
- Access Card Setup
- Permit States
- Common Lots
- Lot Zones
- Parking Setup
- Vehicle Types
- Vehicle Makes
- Vehicle Colours
- Vehicle Plate Types
- Vehicles Setup
- Setting Up Single Sign-On with OperationsCommander
- Using SAML SSO with OPS-COM
- Login Sources (SSO)
- User Company Editor
- User Departments
- Limiting Active Vehicles
- User Types
- User Setup
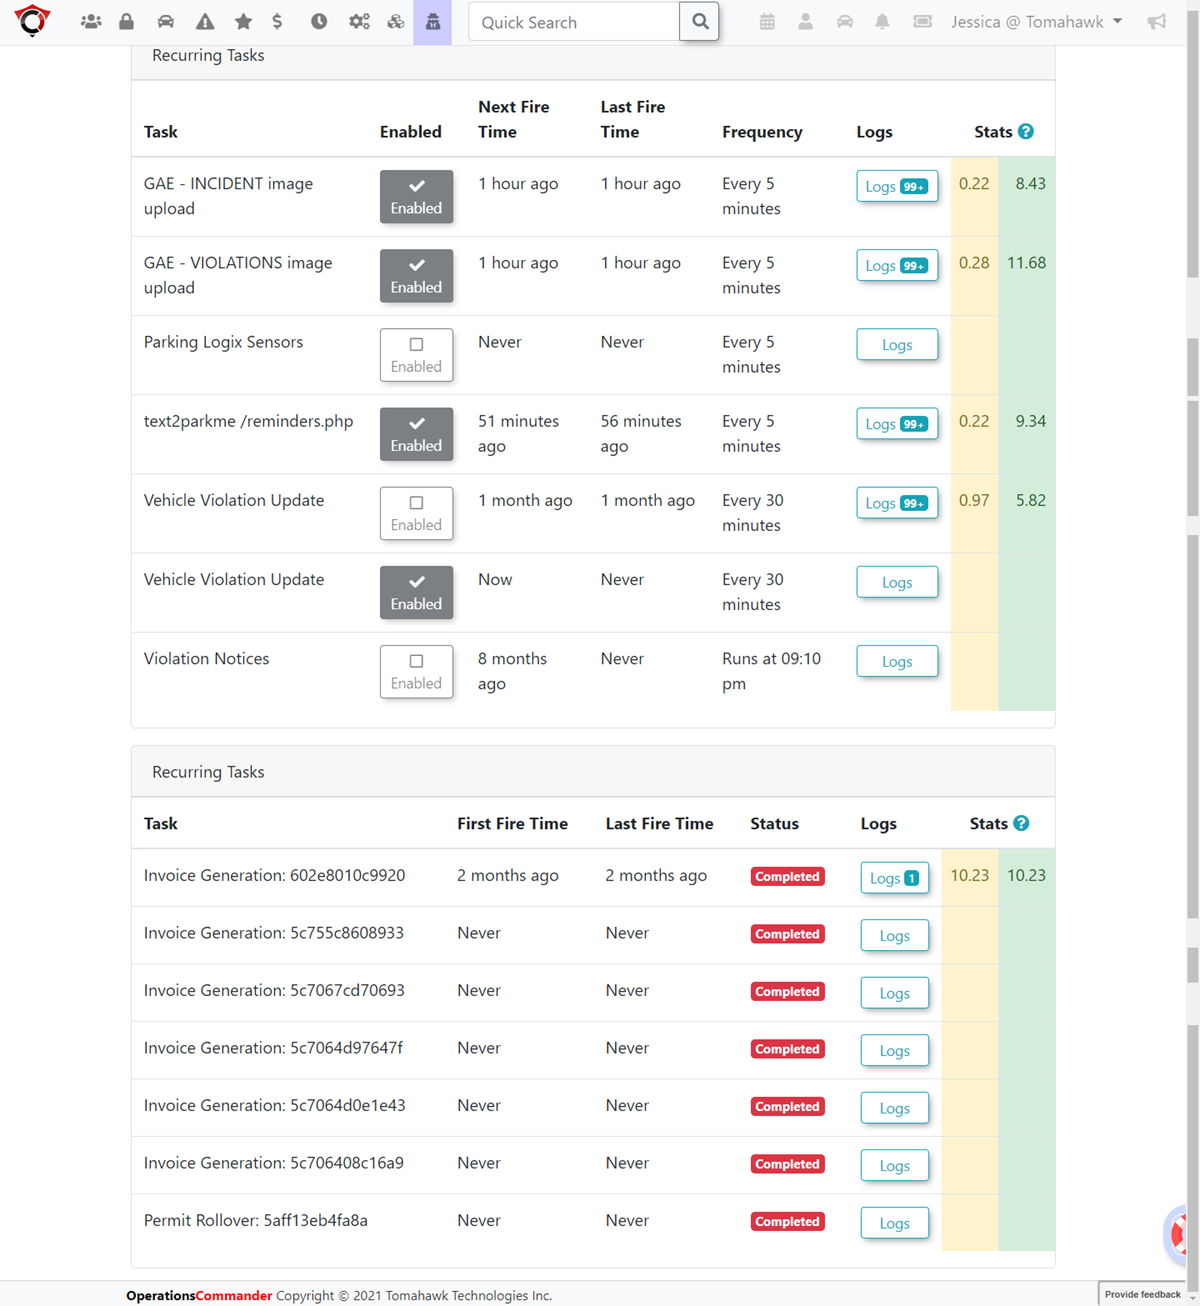
Managing Recurring and Onetime System Tasks
Accessing System Tasks
- Click Tools (the Toolbox) then click View System Task Logs.
- On the Scheduled Tasks page, there are two sections, Recurring tasks and Onetime tasks. From this screen we can see stats on when the task has run and how long it took to run. We can also enable or disable tasks from running.
- Click the Enabled checkbox to toggle the system task
- To view task logs, click on the Logs button to pop up a window that will will show details about the task.
Please be aware, there are other settings that may be important to set correctly before enabling any system task.
Deposit Options
Navigating to Deposits
To get to the Manage Deposits page:
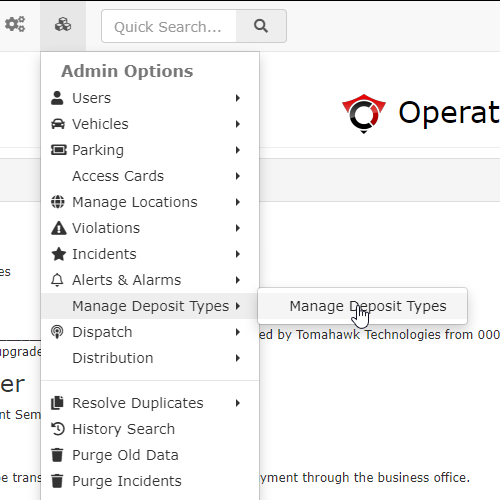
- Select the Admin Options icon
- Select the Manage Deposit Types option
- Select Manage Deposit Type from the drop-down menu
(Currently, this menu item cannot be accessed from any pages that are still in Beta.)
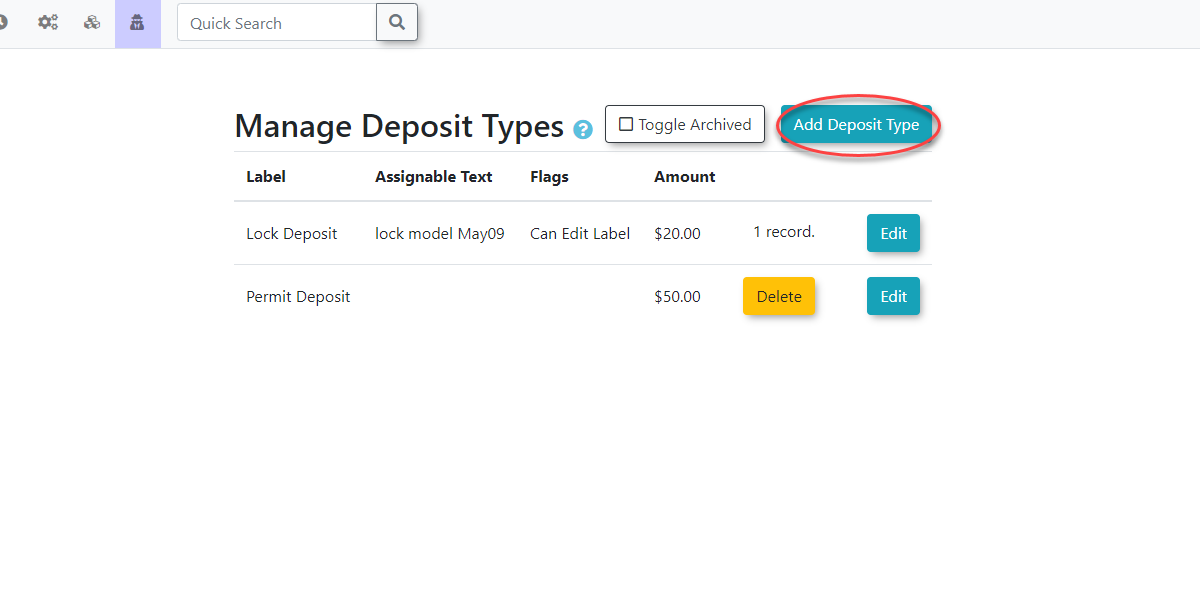
This will take you to the Manage Deposits page.

Creating New Deposits
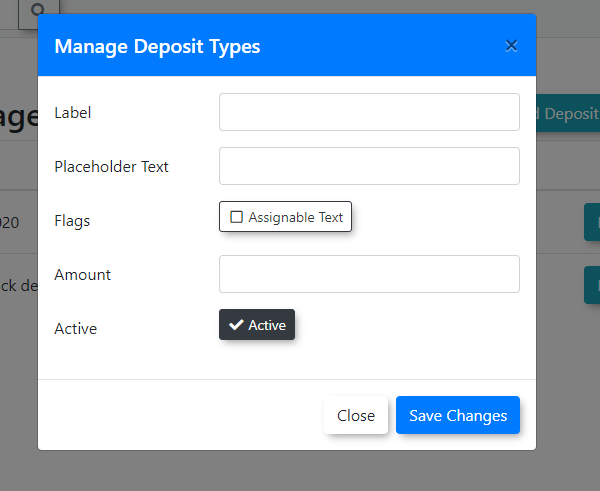
On the Manage Deposits screen, new deposit types can be added by clicking Add Deposit Type.
Fill out the information as needed and click Save Changes.
Below are descriptions of the different fields, but are not all required:
- Label - The name that will be used to identify the deposit type.
- Placeholder Text - This field is optional. The prompt or sample information that will appear in the deposit information text.
- Flags - Toggles the ability to edit the Assignable Text field in the resulting active deposit record. This will appear in the user's profile. (See below)
- Deposit Amount - The amount the deposit will cost.
Editing Existing Deposits
Click Edit to make changes to existing deposits.
Make any changes needed, then press Save Changes when finished.
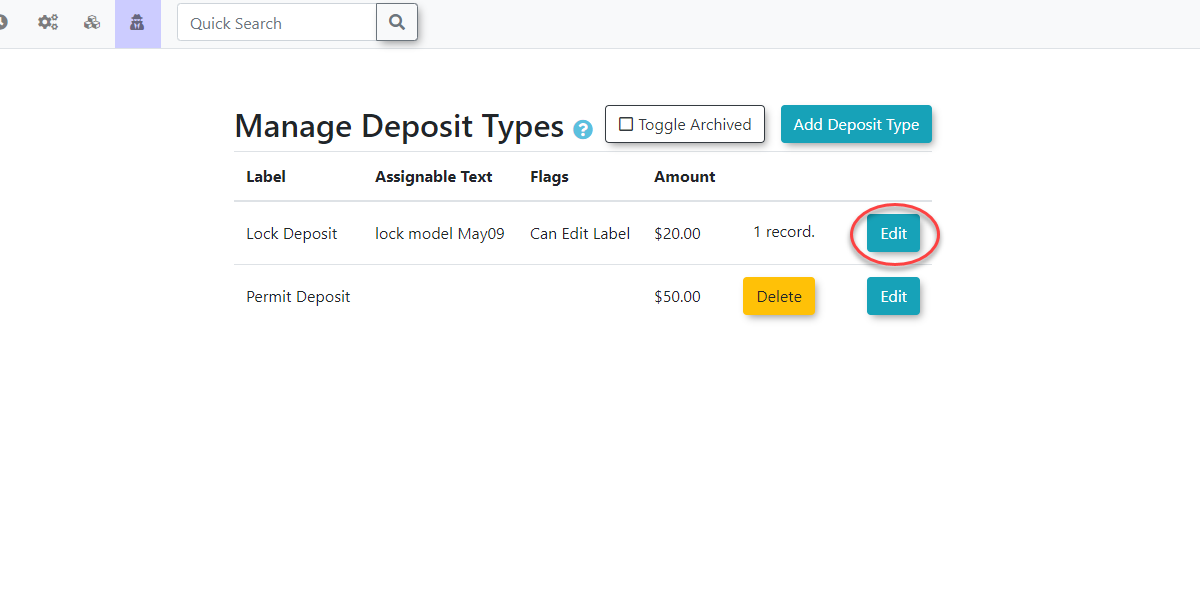
See the information under Creating New Deposits in this article for more information on what the individual fields are used for.
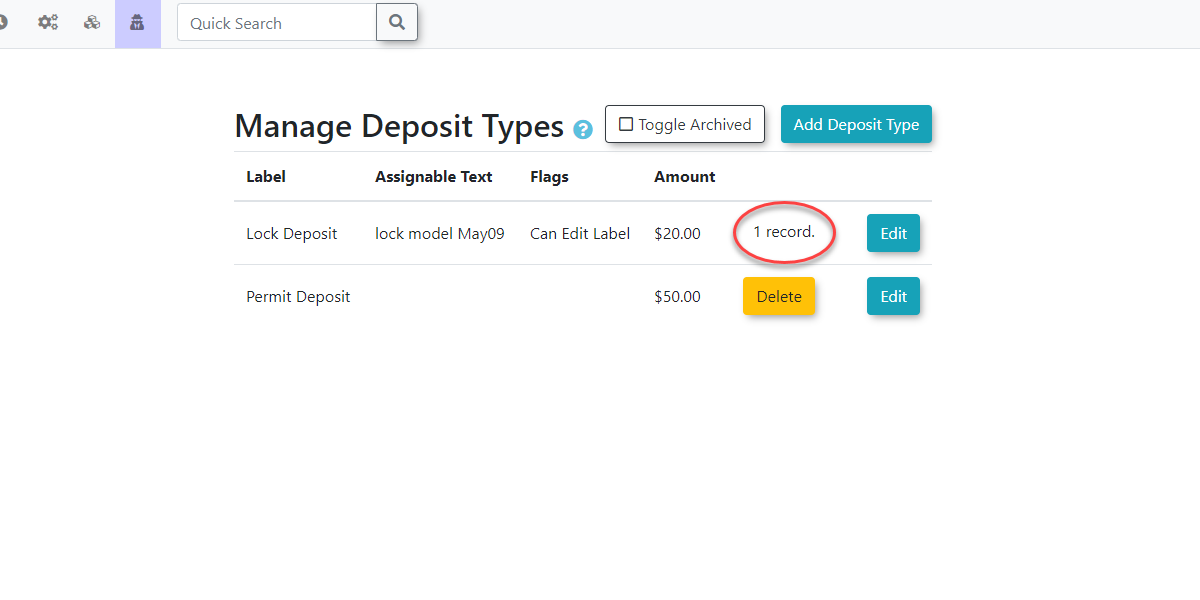
Finding Deposit Usage
A list of all deposits that have been setup and those currently in use can be viewed from the Manage Deposits page.
A deposit can only be deleted if it is not currently being used anywhere in the system.
Once a deposit has been assigned or used in the system, the option to delete it will no longer be available and will instead be replaced by a count of its usage.
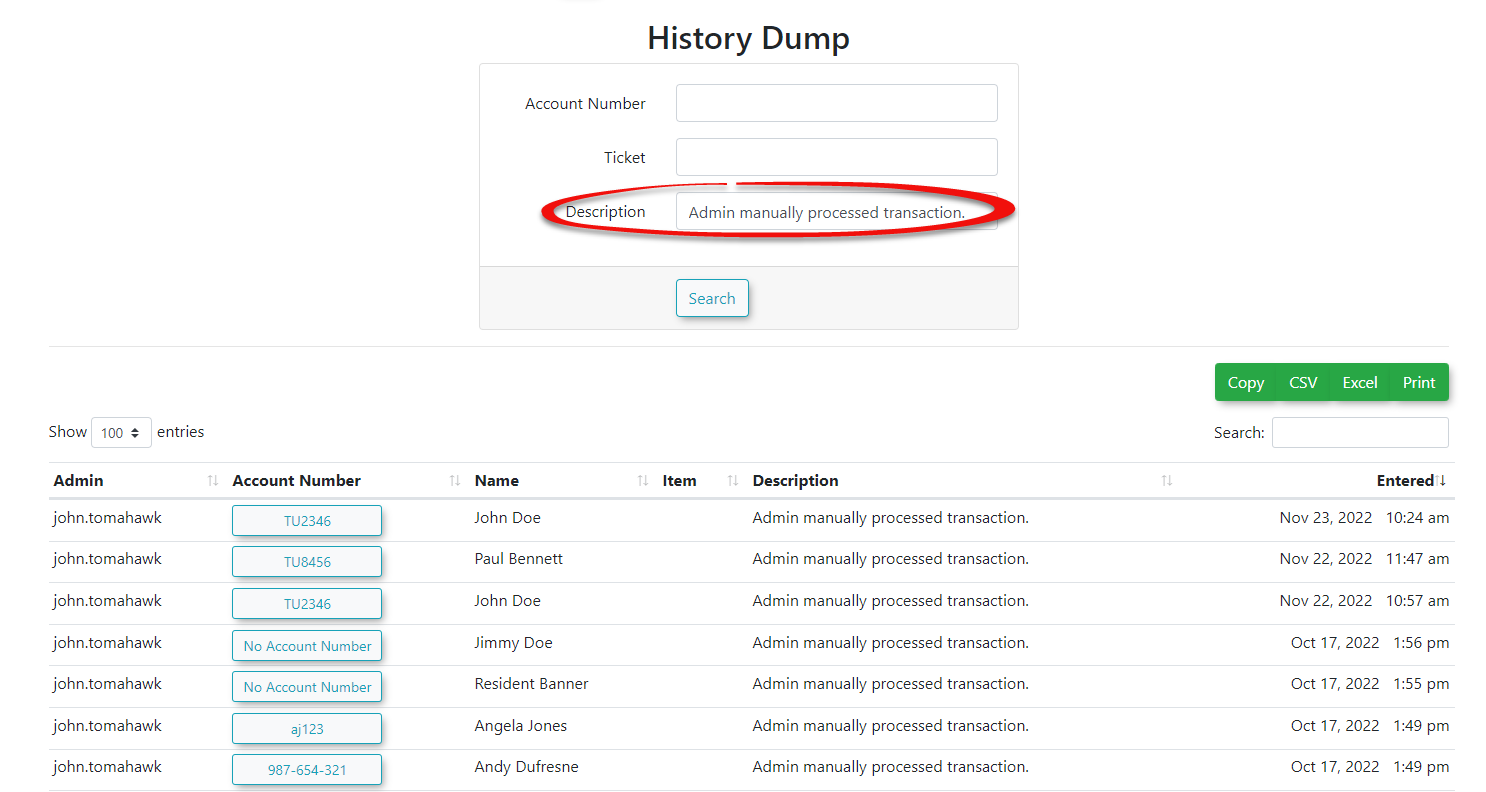
History Search
Performing a History Search
Click Admin Options and History Search.
The History Dump page will be displayed. You can search by typing in any Student/Employee Number,

Violation Ticket...

History Description or a combination of the three. In this example, we are searching by the Violation Ticket. Click "Submit" to search.
The page will refresh - here you will see some, or all of the ParkAdmin history based on your search criteria entered above.
Resolve Duplicate Report
- To address this issue, go into Tools , hover over Resolve Duplicates, then click By Vehicle.
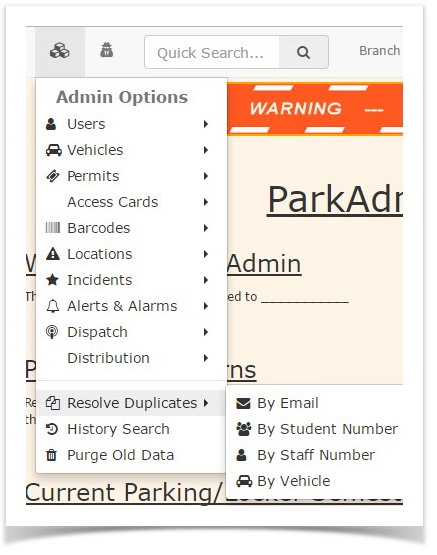
2. You will be presented with two choices: 'Strict Duplicate' or 'Include Different Plate Types'.
- 'Strict Duplicate' will generate a list of vehicles where all three unique identifiers are identical (Plate, State/Province, Plate Type)
- 'Include Different Plate Types' will generate a list of vehicles where Plate and State might be identical but the Plate Type differs. This list will allow you to see what vehicles may be duplicated in error.
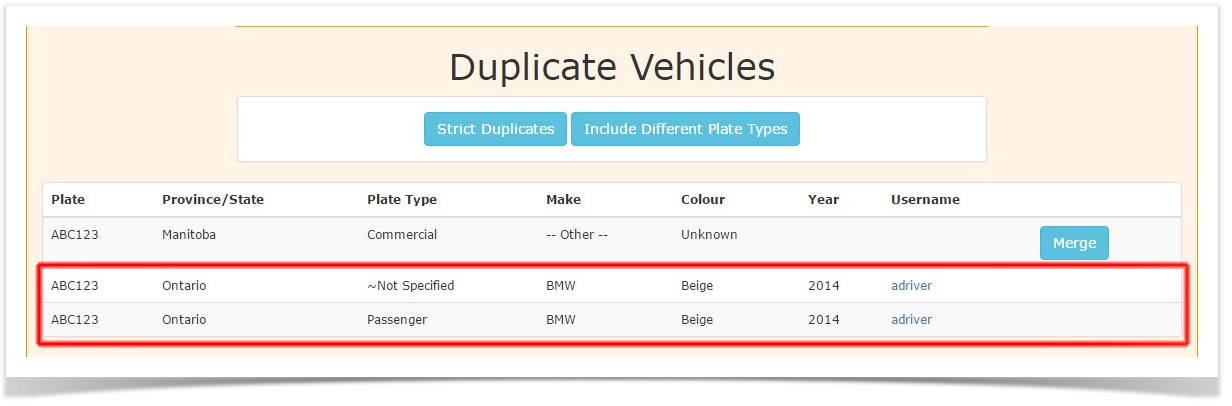
The easiest way to recognize the duplicates in question is to compare the vehicle description.
If, for example a vehicle, is a beige BMW sports car with the plate ABC123, province is Ontario, and the Plate Type is unspecified but there is another vehicle that is a beige BMW sports car with the plate ABC123, province is Ontario and the Plate Type is Passenger it is likely a duplicate and the two vehicles could be merged.
See Below:
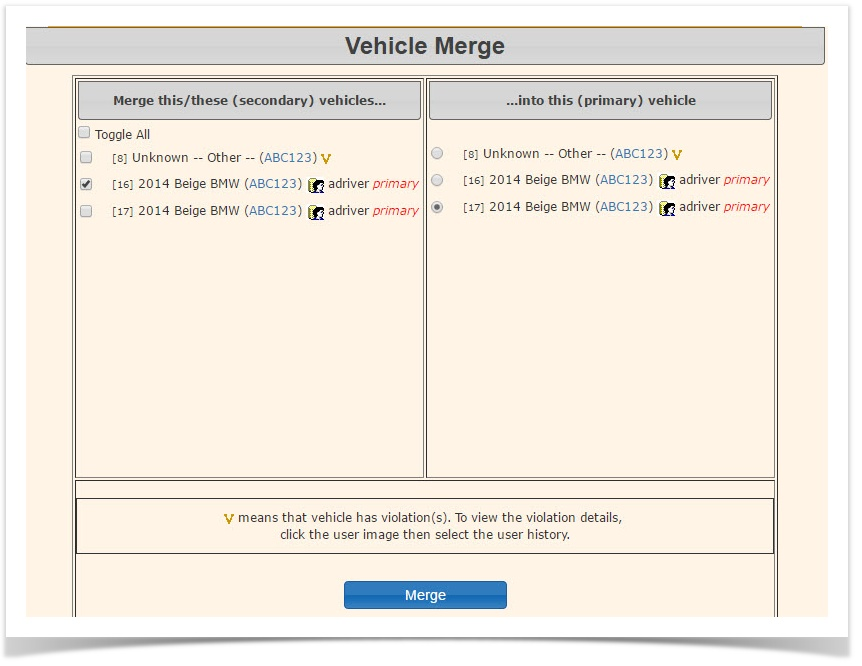
3. By clicking on the provided Merge button you will be taken to the merge function window where you can merge the two vehicles together.
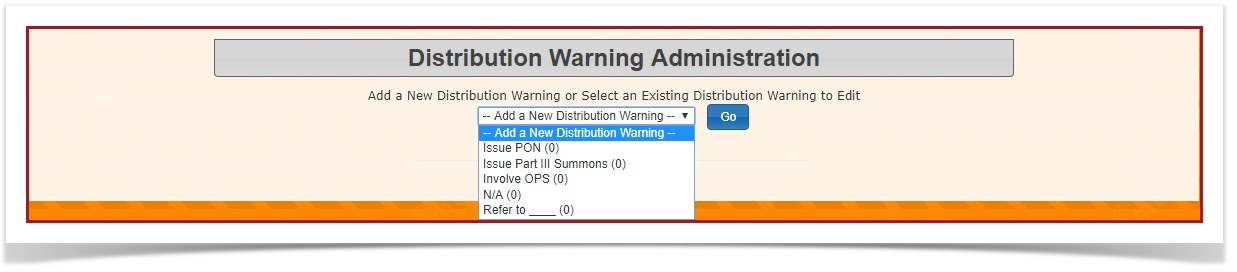
Warnings - Distribution
- Click Admin Options, Distribution and "Warnings".

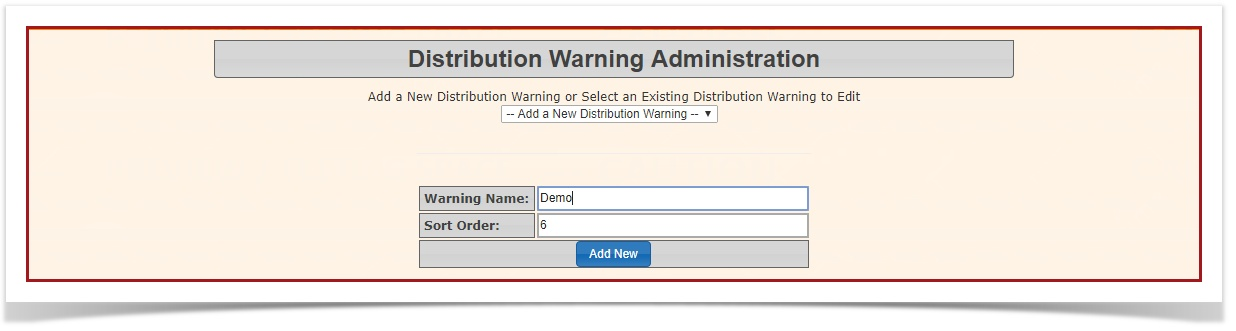
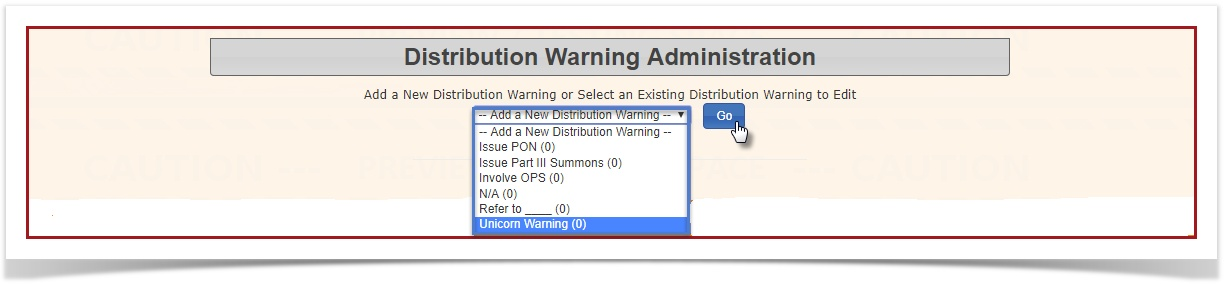
2. The Distribution Warning Administration page displays. To add a new warning, click "Add a New Distribution Warning" and click "Go".
3. Once the page has refreshed, fill out the required information fields and click "Add New".
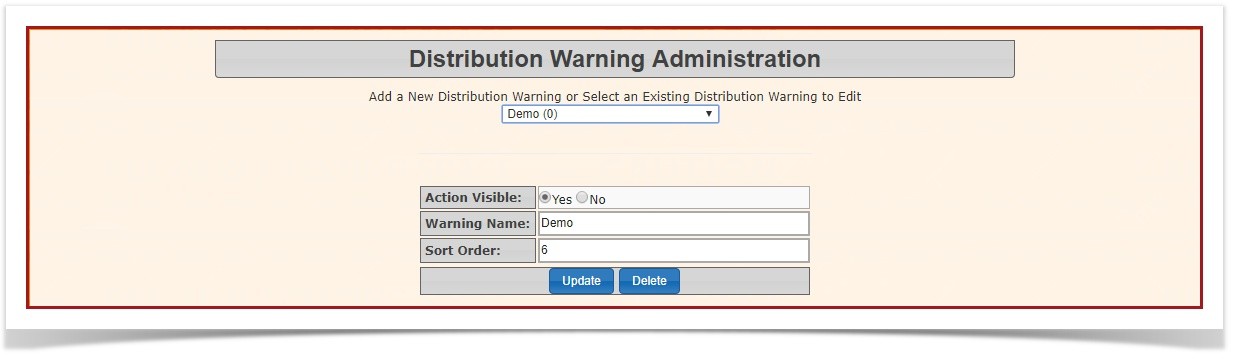
4. To edit an existing Distribution Warning, click the dropdown menu and choose the warning you want to edit. Click "Go". Once the page has refreshed, edit the items that you want to change on this warning and click "Update".
5. To delete/archive your selected warning, click "Delete".
Status - Distribution
- Click Admin Options, Distribution and "Status".

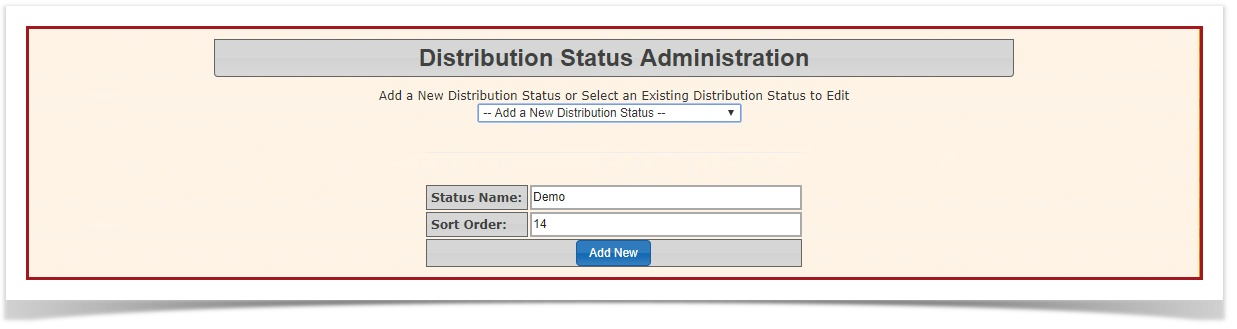
2. The Distribution Status Administration page displays. To add a new Status, click on the drop-down menu . Select "Add new Distribution Status" from the listed options and click "Go".
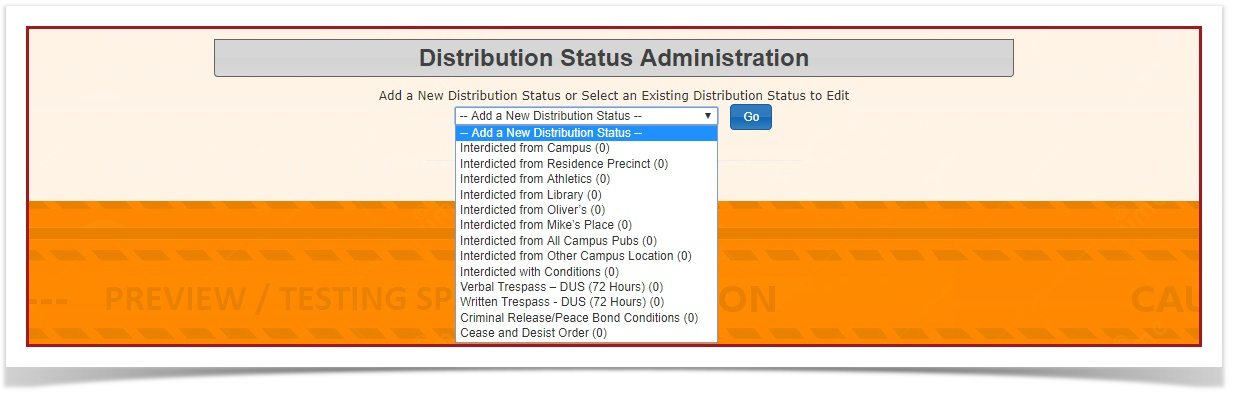
3. The page will refresh and you can fill out the form to add a new status. Click "Add New" to save the information.
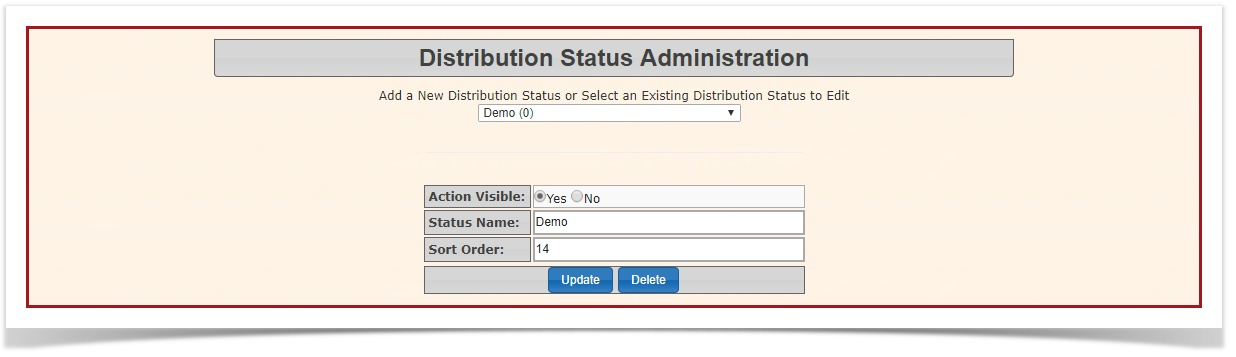
- To edit a status, choose a status from the dropdown menu. When the page refreshes, fill in the required information fields and click"Update".
- To delete a status, choose a status from the dropdown menu. When the page refreshes, click "Delete".
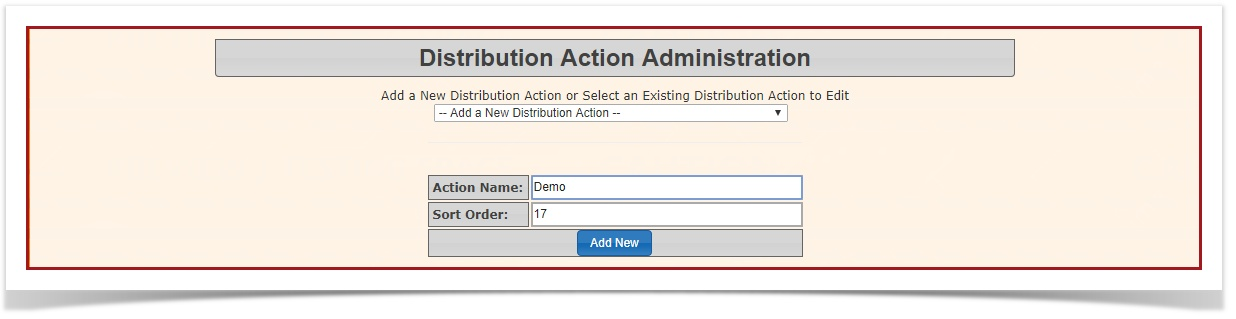
Actions - Distribution
- Click Admin Options, Distribution then Actions.

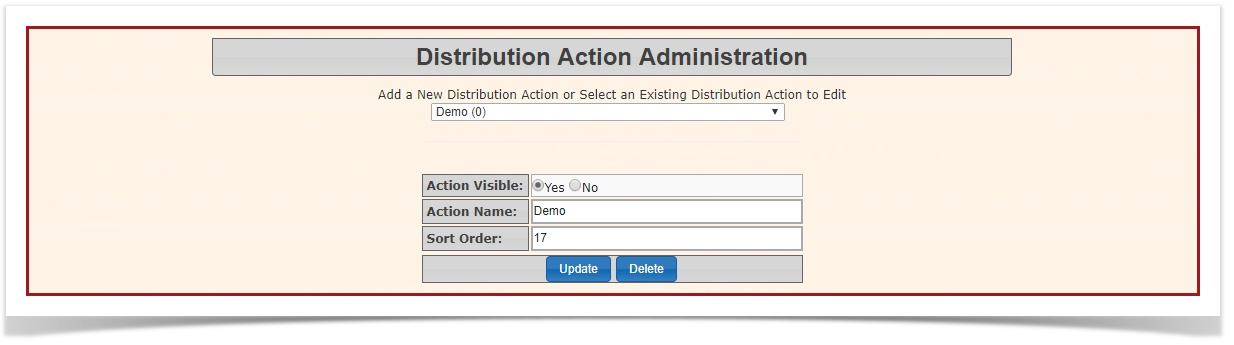
2. The Distribution Action Administration page will display. To see your current "Actions", click on the dropdown menu. To add a new action click on "Add a New Distribution Action", and click "Go".
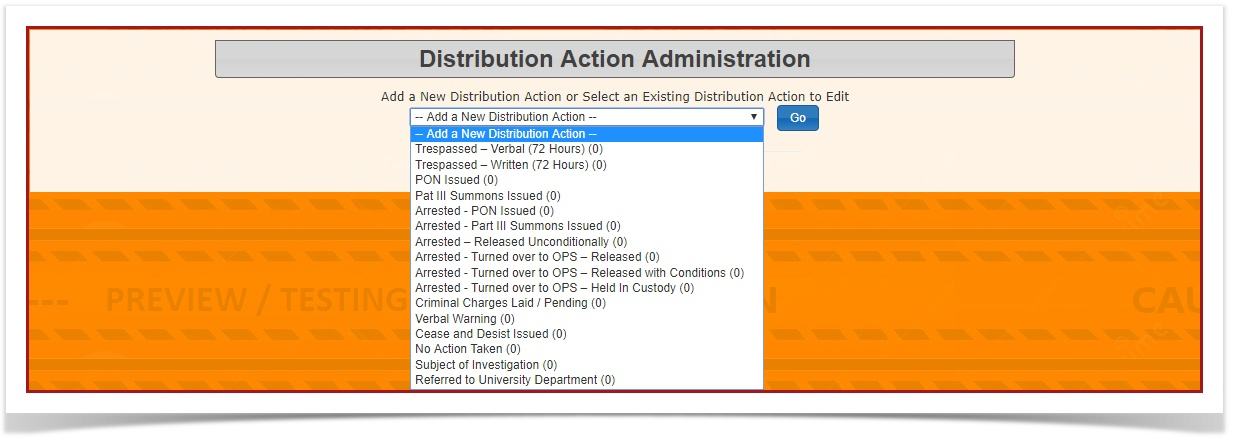
3. Fill out the fields below and click "Add New". If you want to delete this Action, repeat step 2 and click "Delete".
4. To edit this action, repeat step 2. When the screen refreshes you can edit the Action name by clicking on the name and changing it. To change the sort order click on the box beside "Sort Order". If you want to keep the action visible, enable either "Yes" or "No" beside "Action Visible".
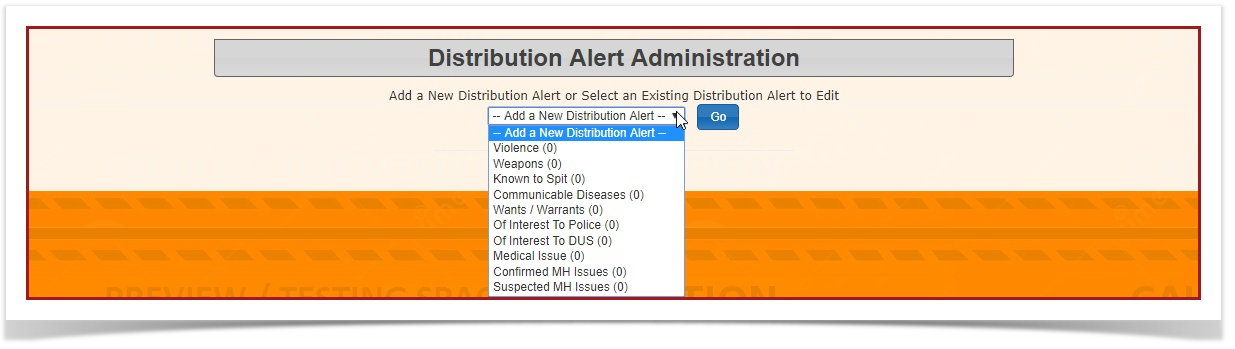
Alerts - Distribution
-
Click Admin Options, Distribution then Alerts.
2. The Distribution Alert Administration page displays. To see a list of existing Distribution Alerts, click on the drop-down menu. If you would like to add a new Distribution Alert, click on the drop-down menu, and select "Add a New Distribution Alert".
3. The Distribution Alert Administration page will refresh, with detail-options for your new Distribution Alert. Fill out the required information fields, and click "Add New".
4. To edit your distribution alert, click on the dropdown menu, select the alert that you want to edit and click "Go".
- If you want to have the Alert visible, enable "Yes". If you do not want the Alert visible, enable"No". To edit the Alert Name, click on the current alert name to edit it.
- If you want to change the Alert Colour (HEX) click on the text box beside "Alert Colour (HEX)".
- To change the sort order, click the box beside "Sort Order".
- If you would like to delete/archive an alert, click on the dropdown menu, select the item you want to delete and click "Delete".
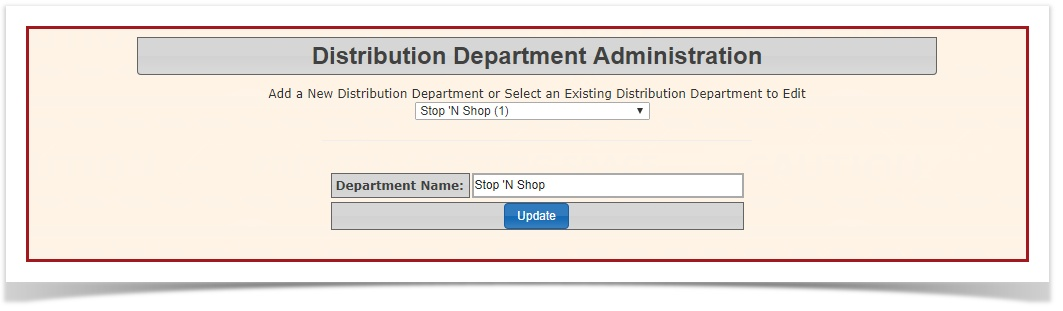
Departments
- Under Admin Options, hover over Distribution, then click Departments.

2. You will be redirected to the Distribution Department Administration page.
3. To add a new Department:
Click on the drop-down menu, and select "Add a New Distribution Department", then click "Go".
Type in the name you'd like for the department, then click "Add New".
4. To edit a Department:
Select the department you wish to edit from the drop-down menu, and click Go.
Make the desired changes to the department name in the textbox, and click Update to save.
Search for a User
- To get to this page, click on Admin Options, hover over Distribution, then click Search by a User.

2. You will be redirected to the Distribution User Search page. To search for a user, fill out the form provided, then click "Search".

Users - Distribution Admin Options
- Under Admin Options, hover over Distribution, then click Users.

2. You will be redirected to the Distribution User Admin page.
Complete the required fields, (marked with a red *). Select the checkbox to allow the user to log in and manage Distribution Reports.
Select YES if this user can view Private Details, or select NO to not allow this function.
Once you are finished, click Add New to save.

Distribution Setup
- Users - Distribution Admin Options
- Search for a User
- Departments
- Alerts - Distribution
- Actions - Distribution
- Status - Distribution
- Warnings - Distribution
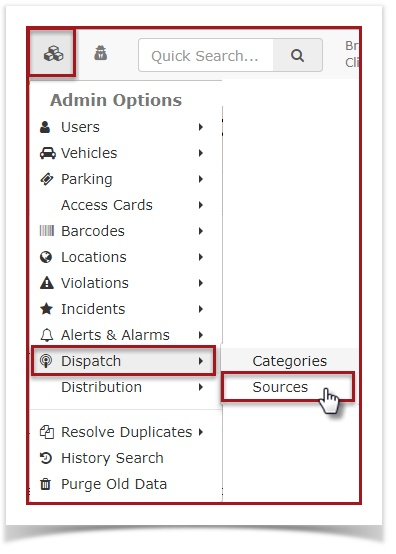
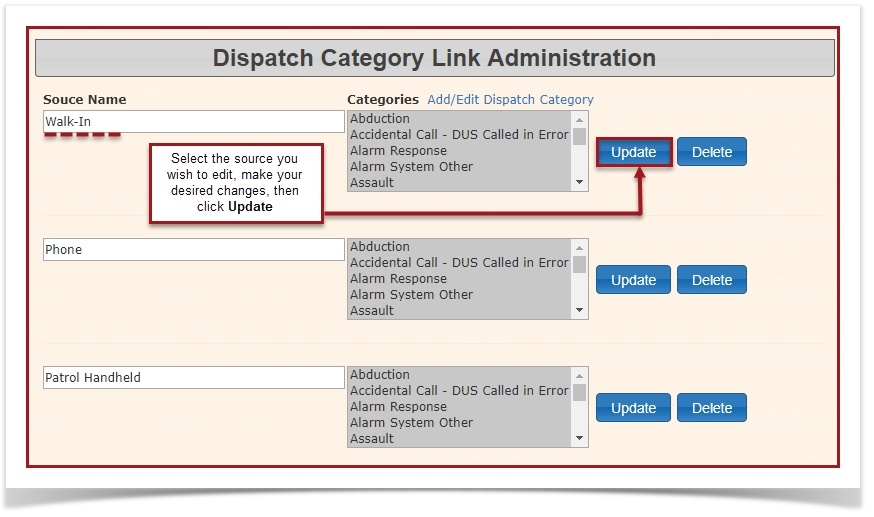
Sources - Dispatch
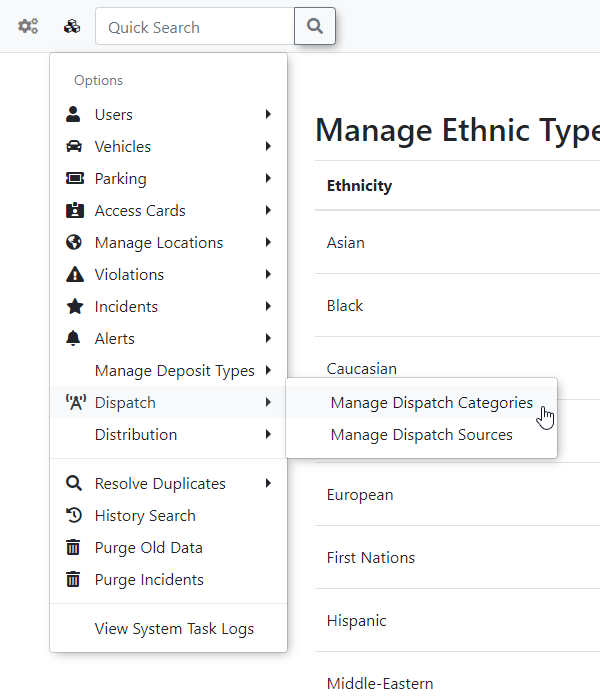
- Click Admin Options, Dispatch and Sources.

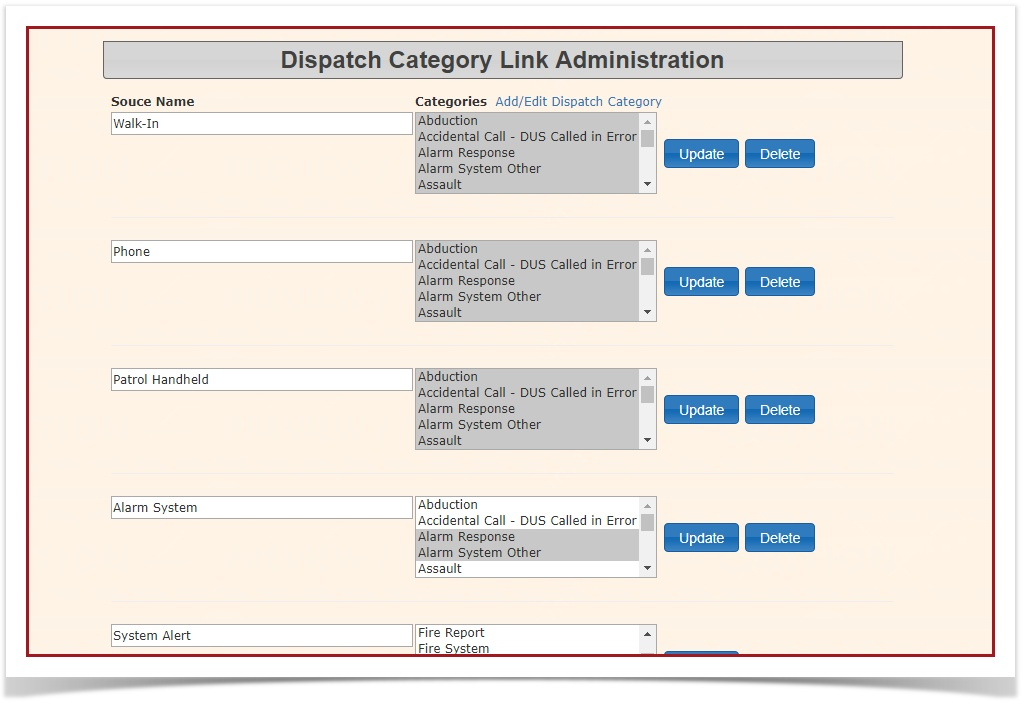
- The Dispatch Category Link Administration page will display. From here, you can add, edit, and/or delete Source Names, and Categories as needed.

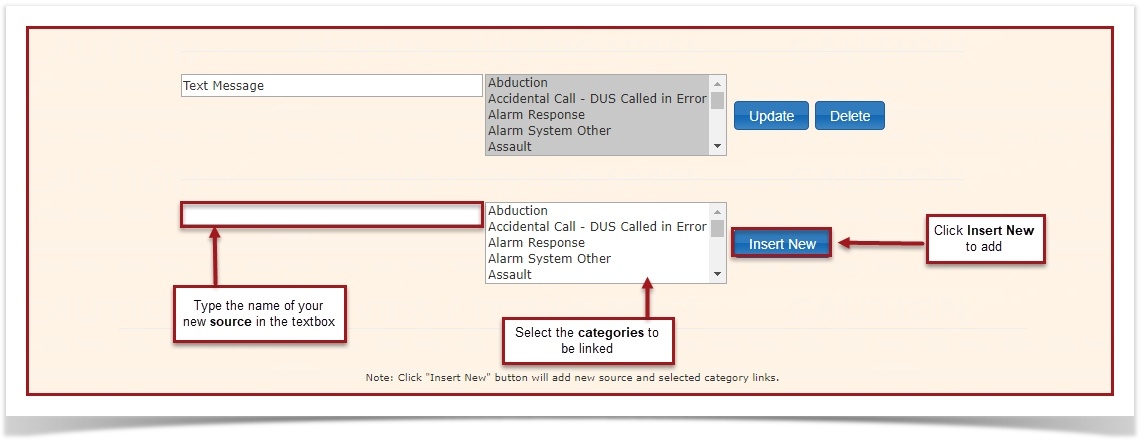
- To add a new source:
- Scroll to the bottom of the Dispatch Category Link Administration page. Select the blank text box and type in the name of your new source.
- Select the categories that should be linked to this source from the connected drop-down menu.
- Note: If you want to select all categories when you create this new source, you may left-click on the first category in the list (which will show up highlighted in blue once selected) and scroll down to select all.
- Click on Insert Newto add your new source, and the selected category links.
4. To edit a source:
- Choose the source you wish to edit from the list of sources (found on the Dispatch Category Link Administration page).
- Make the desired changes to the textbox (source name) and categories selected, then click Update to save.
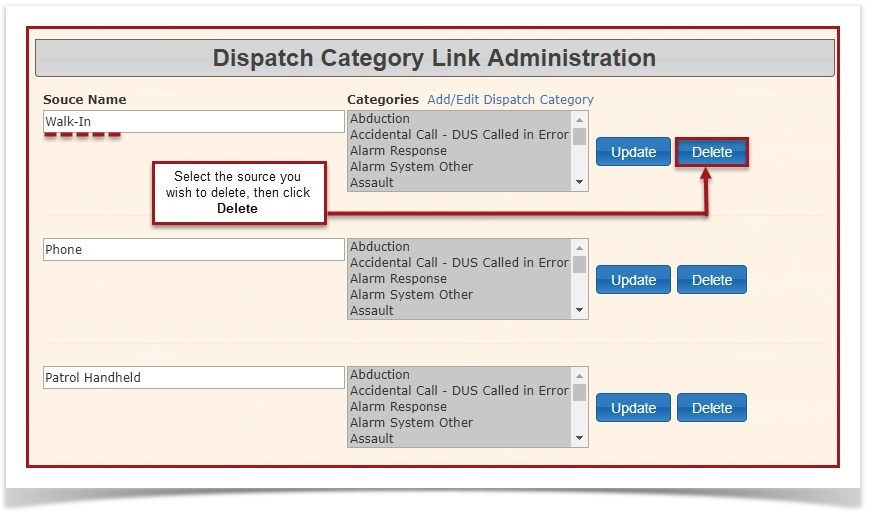
5. To delete a source:
- Find the source you wish to delete in the list of sources, then click the Delete button, found on the right-hand side of the page.
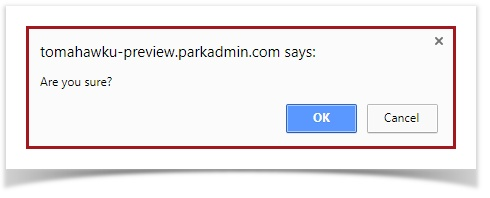
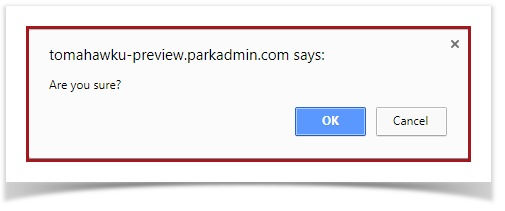
- A confirmation pop-up will appear. Click OK to confirm the delete, or click Cancel to return to previous page.
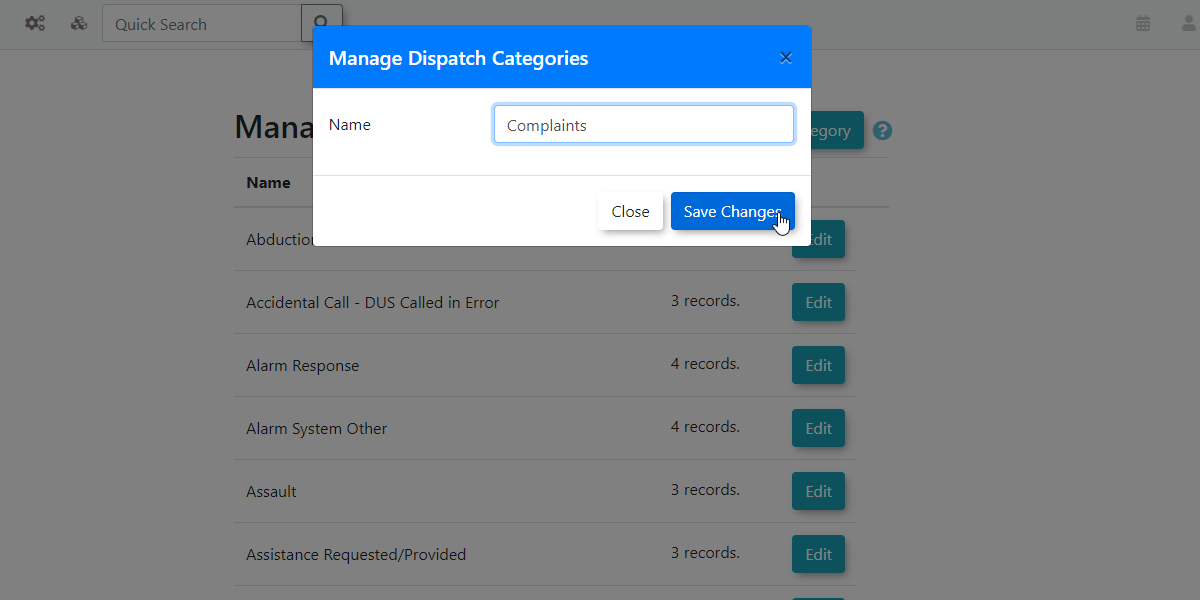
Dispatch Categories
Navigating to Dispatch Categories
To get to this page, click on Admin Options, hover over Dispatch, then click Categories.
You will be redirected to the Dispatch Categories Administration page. It will display a list of all categories currently in your system. From this page, you may add/edit/remove a Category.
Managing Dispatch Categories
Adding Categories
To add a new dispatch category click on Add Dispatch Category. A new modal window will appear allowing you to type your category name. Click Save Changes when you are finished.
Edit Categories
To edit dispatch categories click the Edit button next to the category name. This will bring up a modal window similar to the one seen when adding categories. Click Save Changes when you are finished editing the category.
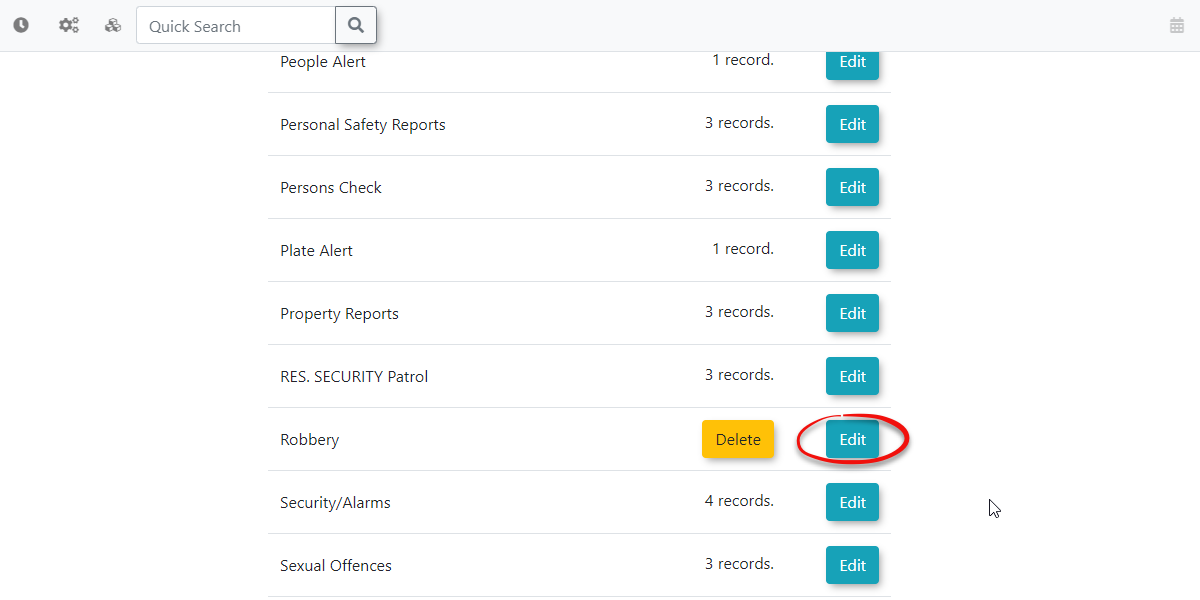
Editing dispatch categories that are being used will update them across the entire system.
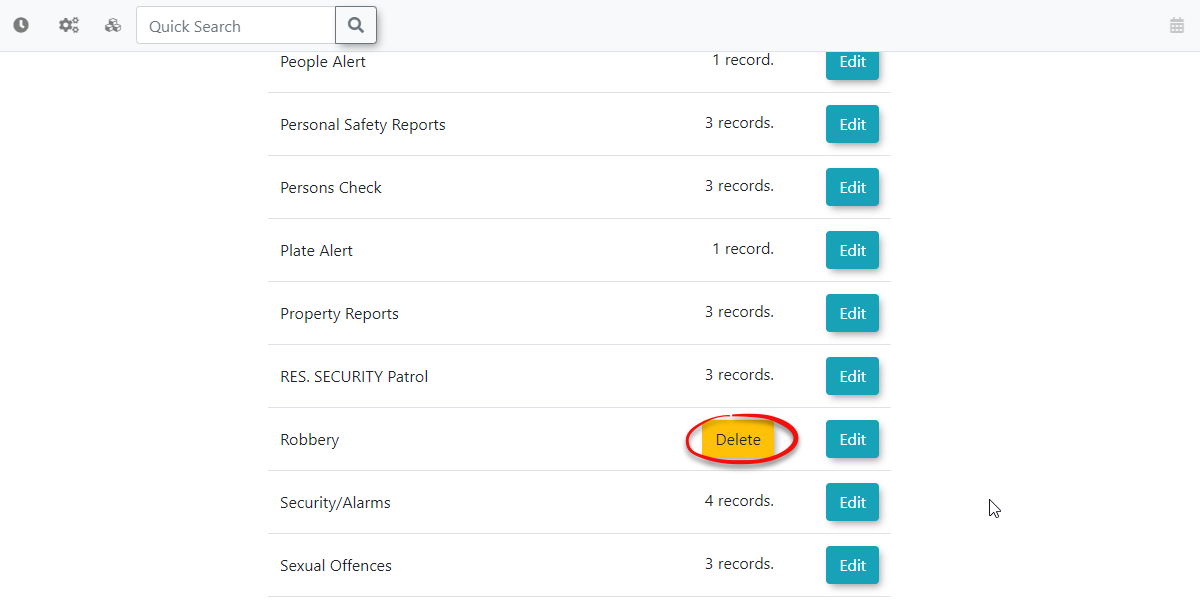
Delete Categories
To delete a dispatch category simply click the Delete button next to the category name. Keep in mind you will not be able to delete categories that are being used.
Dispatch Setup
Warning Email Trigger List
Getting to Warning Email Trigger List
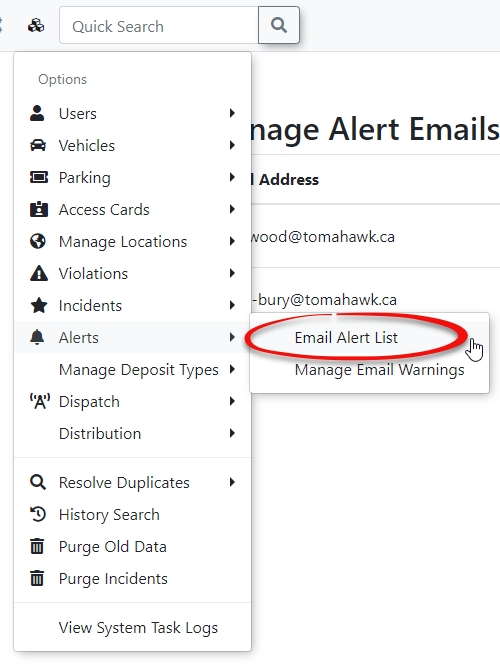
Under the Admin Options, hover over Alerts & Alarms, then click Warning Email Trigger List.
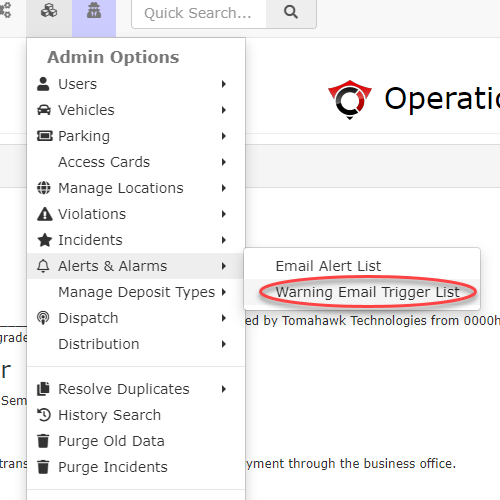
You will be redirected to the Warning Email Trigger List page. From here, you can add, edit, or delete your Warning Email.
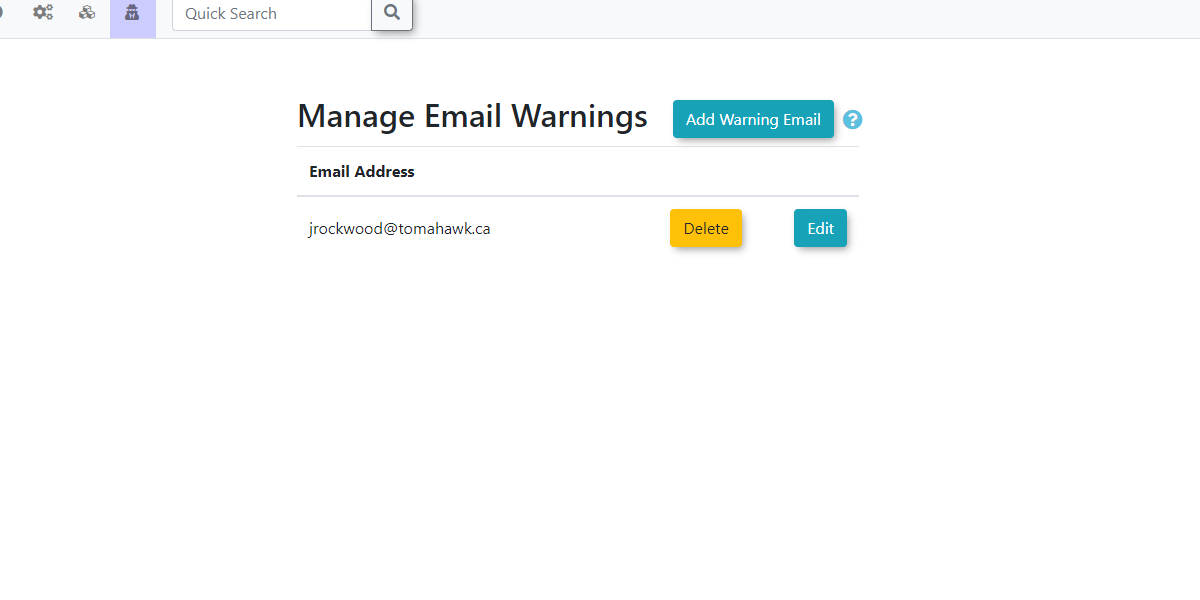
Adding and Adjusting Email
To add an email: Select Add Warning Email, then enter the email address in the text box and click Save Changes.

To edit an email: Select Edit then make the desired changes, then click Save Changes.
To delete an email: Click on the Delete button to the right side of the email you want to delete. A pop-up confirmation window will appear. Click Delete to delete, or click Cancel to return to previous page.

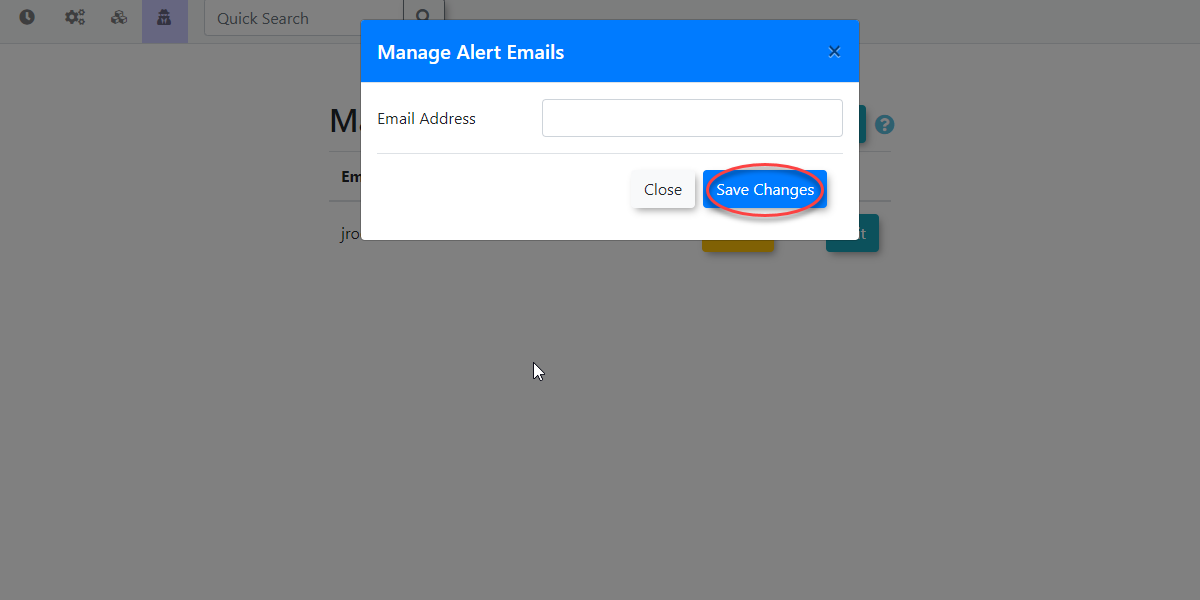
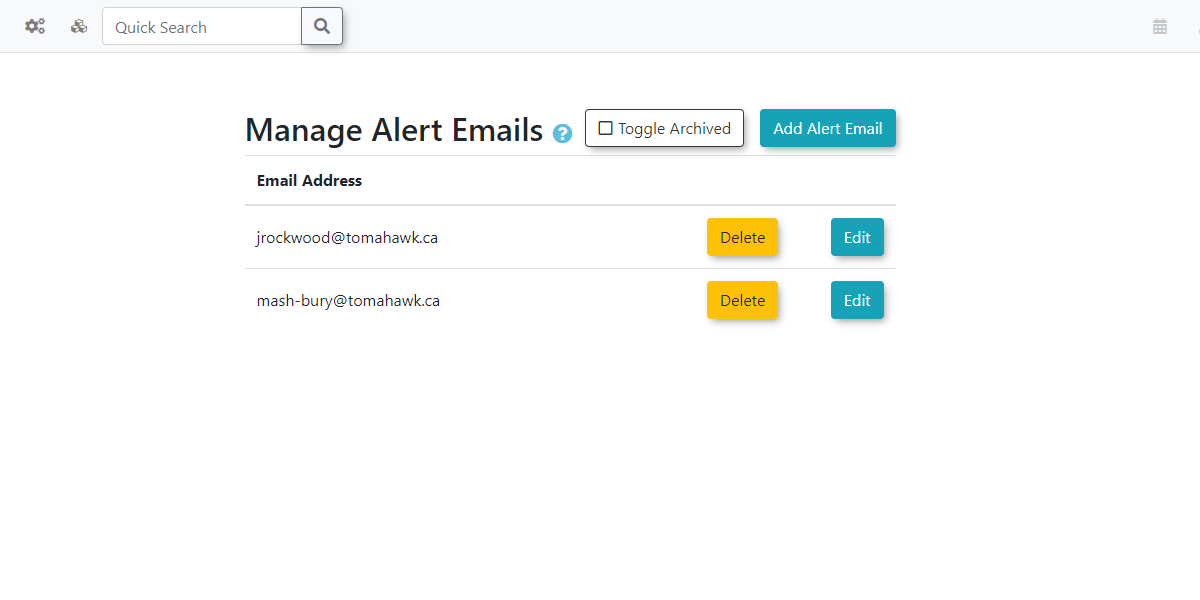
Email Alert List
Getting to Alerts & Alarms
To get to the alerts and alarms go to Admin Options, Alerts & Alarms followed by Email Alert List.
The Alert Email Trigger List page will display.
Adding and Adjusting Emails
Adding Emails
To add an email to receive alerts via E-Mail, click the Add Alert Email button at the top. A new modal window will appear allowing you to add a new email address as well as the option to make the alert inactive.|
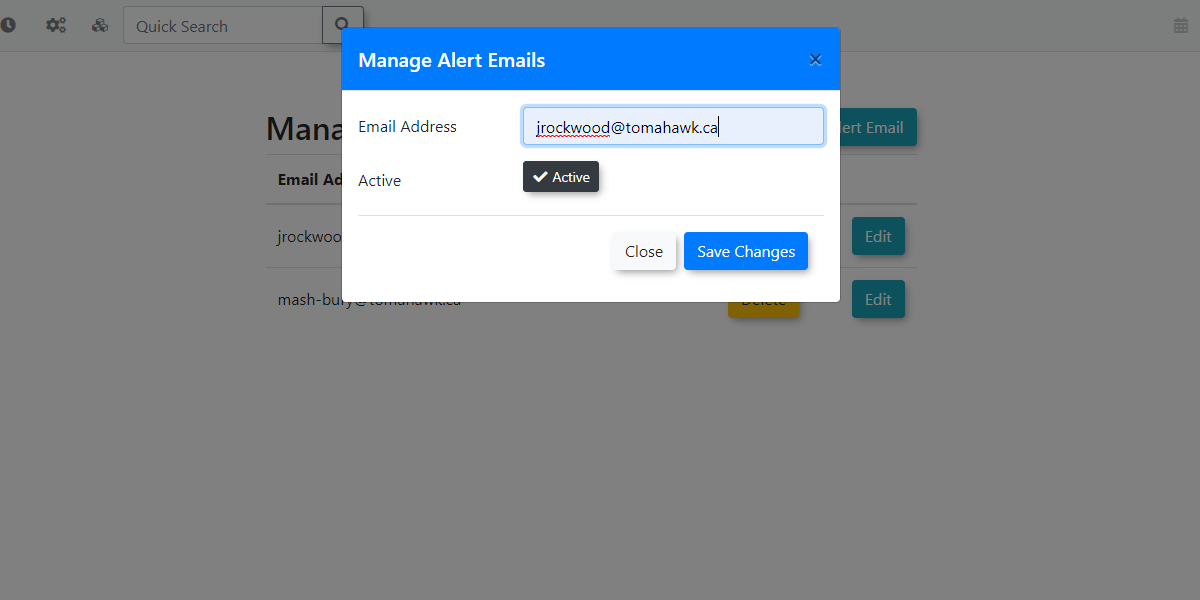
Editing Emails
To update an email that currently exists under the alert email list, click on the Edit button on the same row as the email you wish to change. This will bring up a modal window similar to the one you see when adding an email. This window allows you to update the email address as well as toggle the email as either active or inactive. If the button is darkened this indicated the email is active. If the button is white then it indicates the user is inactive.
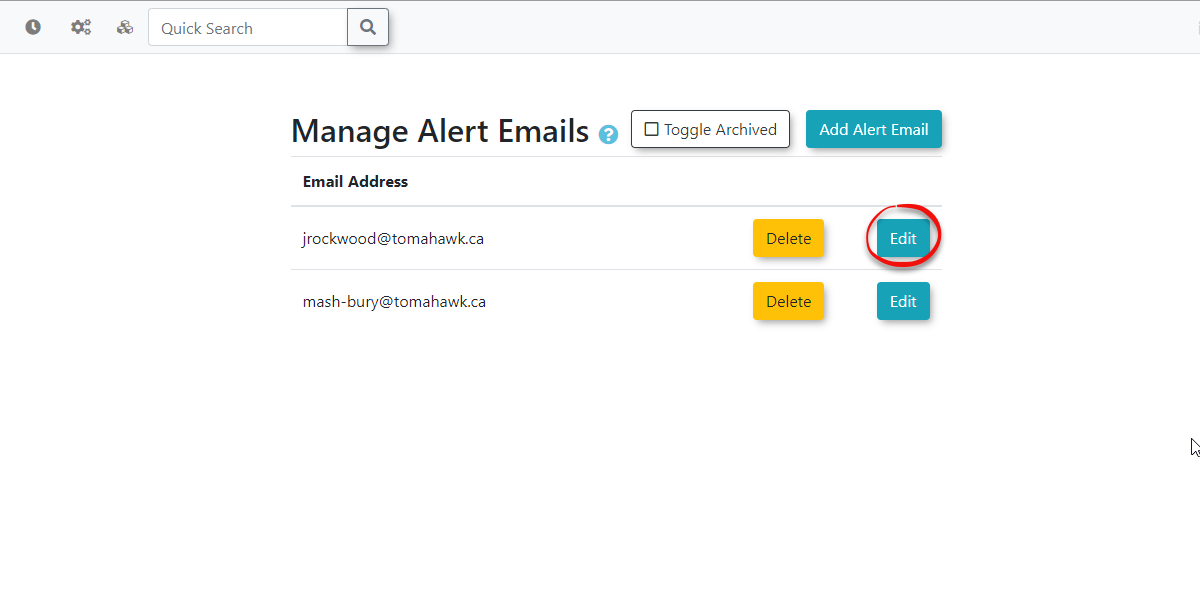
Deleting Emails
To delete an email from the list, click the Delete button on the same row as the email you wish to delete. This will bring up a modal window asking if you are sure you want to delete the email alert. Simply click the Delete button from the modal window to remove the email.
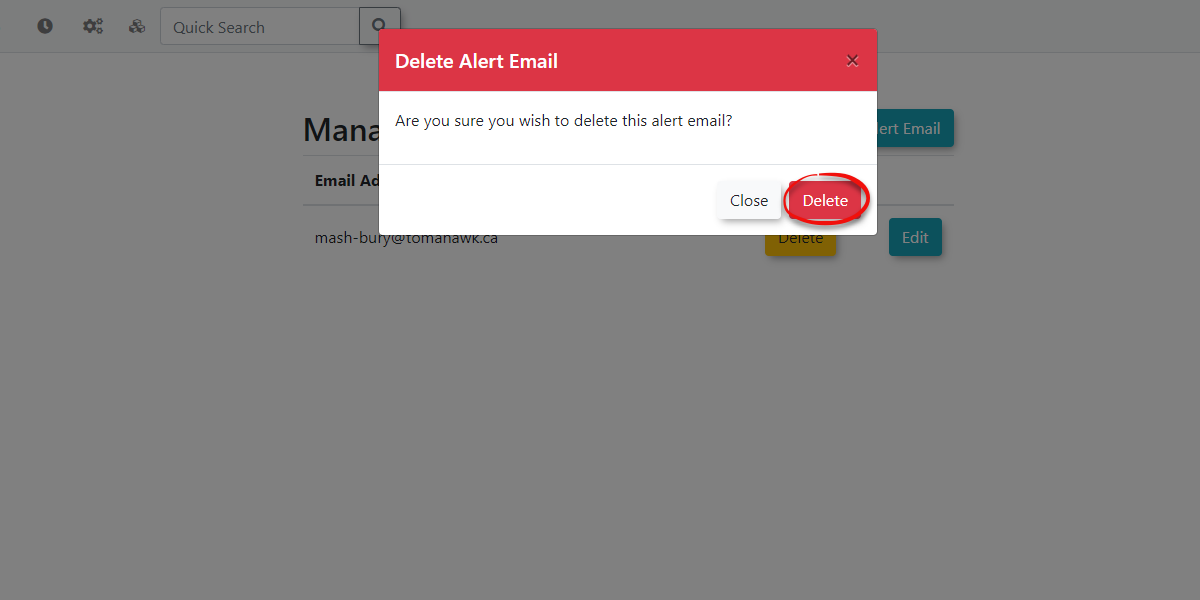
Keep in mind that deleting an email is not the same as archiving/deactivating an email. Once the email has been deleted it is removed from both the archived and active lists.
Archiving Alert Emails
You can also choose to archive a particular email if you would like to make it temporarily unavailable to receive email alerts. By default you will not see the archived users as this requires you to click the Toggle Archived button.
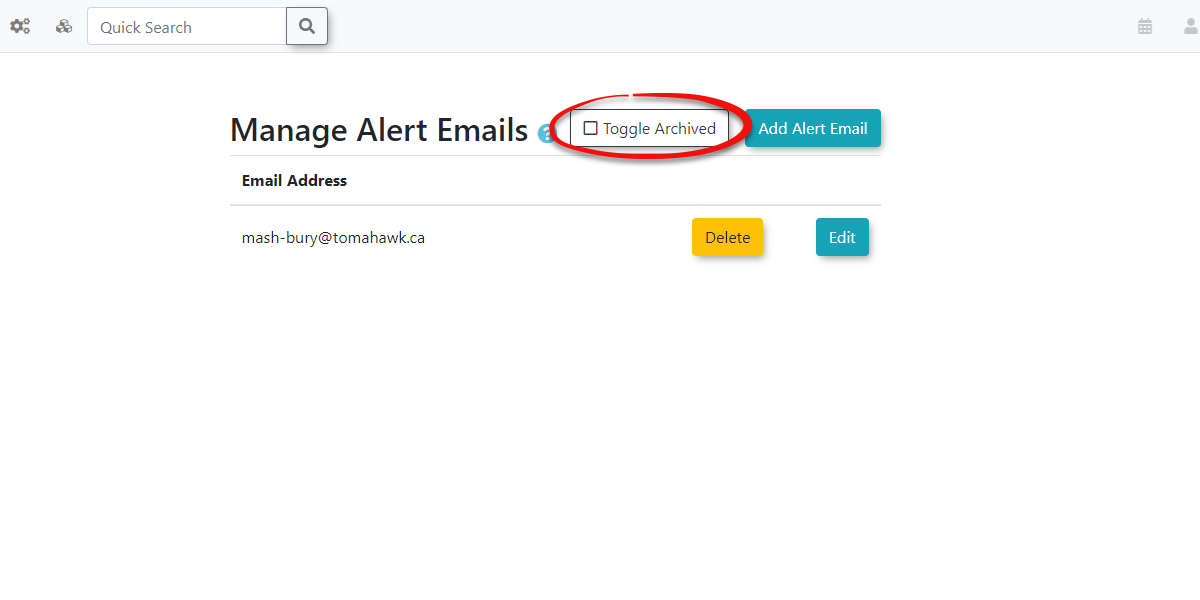
This will display the highlighted users in red and allow you to edit or delete the email if you wish. To activate emails again make sure that you toggle the Active field on.
Alarms Setup
Setting up Alarms in OPS-COM
please refer to the following article Guide to System Settings to see how we can set up Generic, People, and Plate Alarms. We can get to the alarm settings by going to System Settings → Alarms

Additional OPS-COM Triggers
Warning Email Trigger List
See the child page
Email Alert List
See the child page
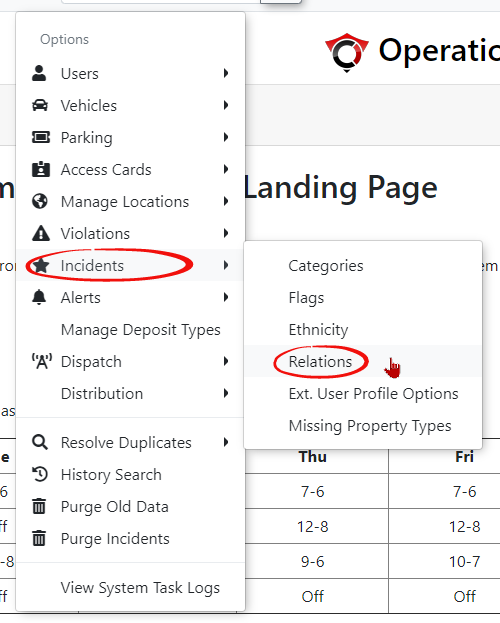
Relations
Adding a Relation to the List
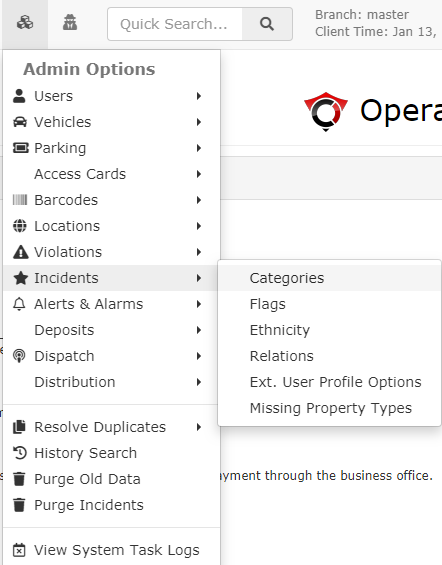
Click Admin Options, Incidents then Relations.
You will be redirected to the Relation Administration page.
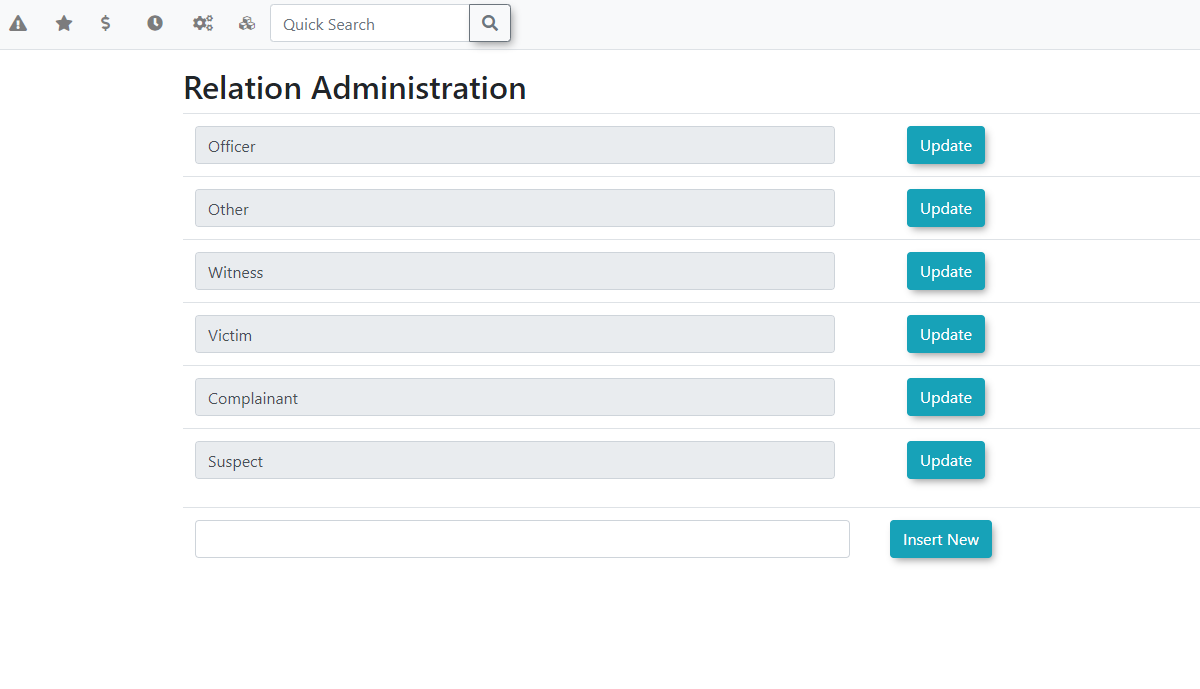
You can add or edit your Relation Options.
- To edit: Select the relation you wish to edit, change the textbox as desired, and click update.
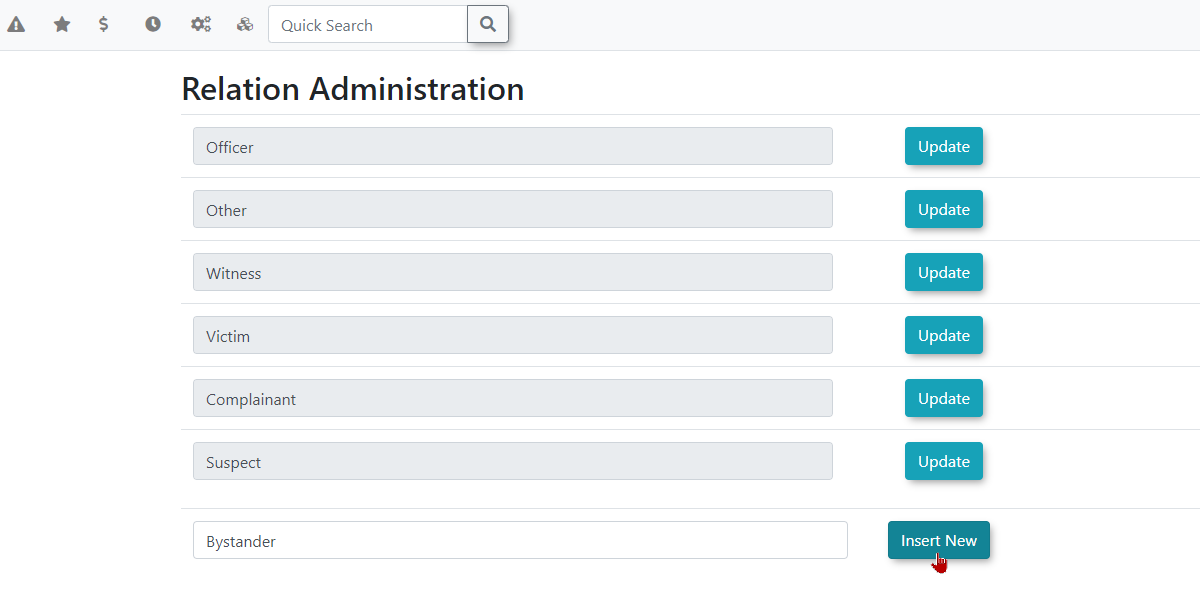
- To add: Select the empty textbox at the bottom, type in what you want as the relation, and click Insert New.
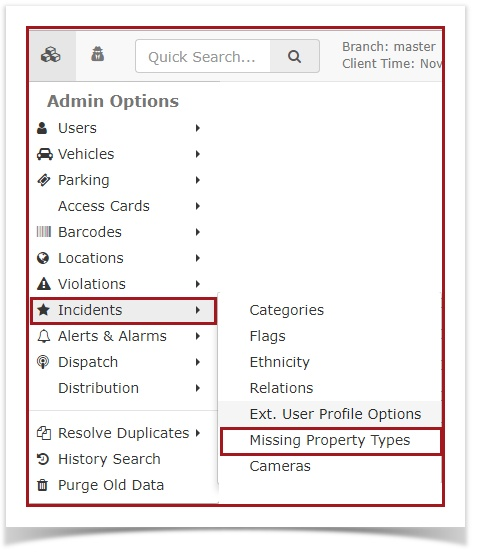
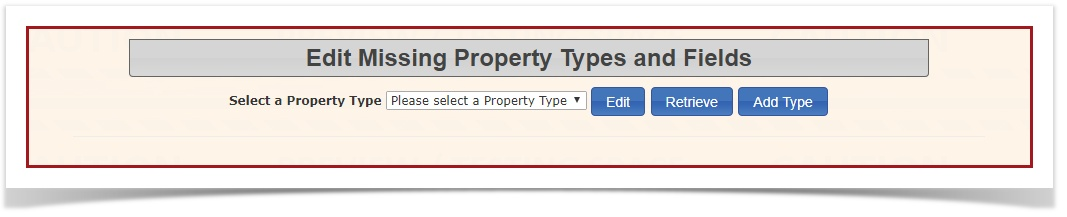
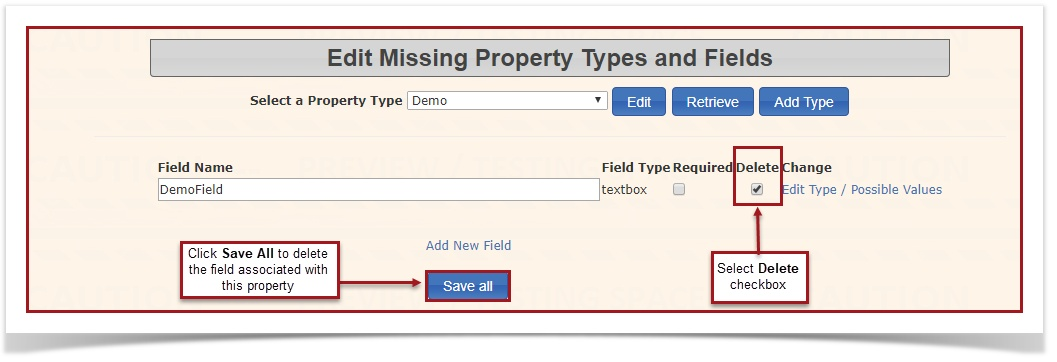
Missing Property Types
- Click Admin Options, Incidents and Missing Property Types.

- The Edit Missing Property Types and Fields page will display. You can edit, retrieve and/or add a new Property Type.

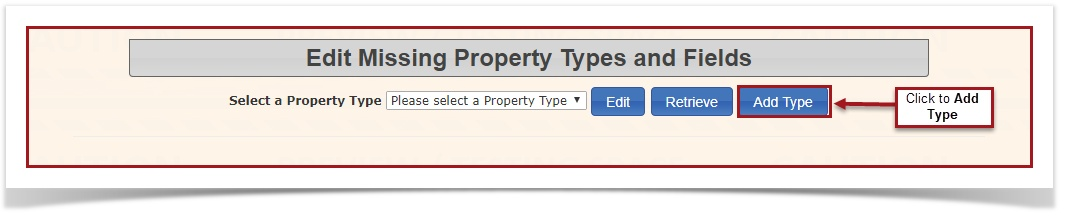
- To add a new missing property type:
- Click the Add Type button, and the page will refresh.
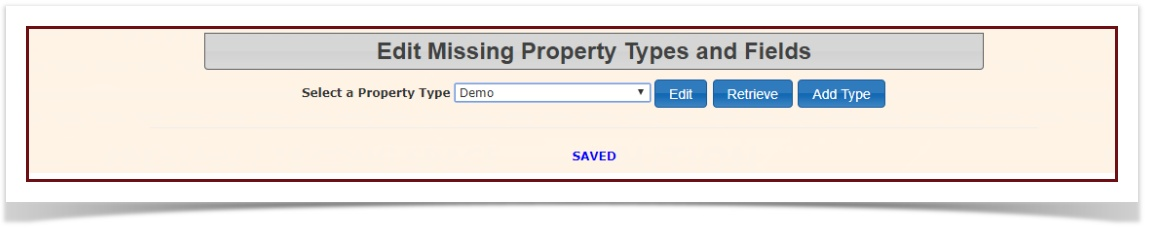
- Type the type of missing property in the textbox provided.
- When finished, click Save Type. It will now say SAVED across the bottom.

4. To edit a missing property type:
- Select the missing property type you wish to edit from the drop-down menu, then click "Retrieve"
- The page will refresh to show the property type, and fields associated with it. To add a field to this property, click on "Add New Field".
- Type in the Field Name in the textbox, select the Field Type from the dropdown menu (i.e checkbox, textbox etc.) and select whether or not it is a required field by clicking on the Required box.
- Once you have finished, click Save Field to save.


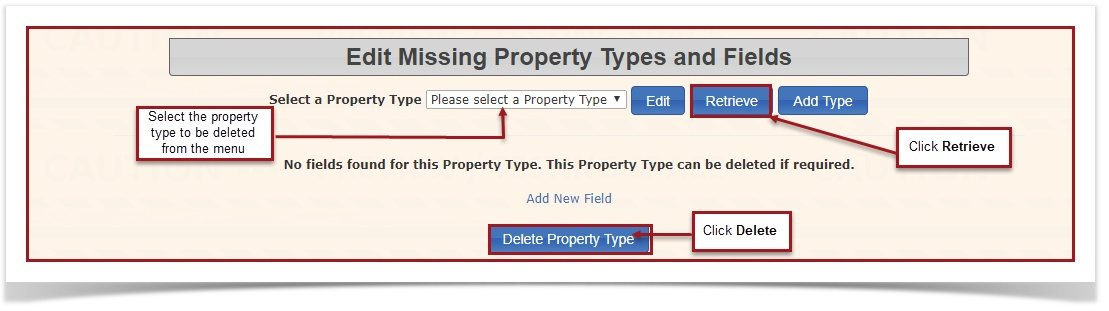
5. To delete a missing property type:
- Select the property type you wish to delete from the drop down menu, and click Retrieve.
- If there are no fields found associated with that property, you can immediately click Delete.
- If there are fields found associated with that property, select the Delete checkbox attached to that field, then click Save All.
- The field attached to that property will be deleted. You may then follow the above instructions to Delete the property type.
Flags
Adding or Editing an Incident Flag
From the Admin Options menu, hover over Incidents, then click on Flags.

You will be redirected to the Edit Flags page.
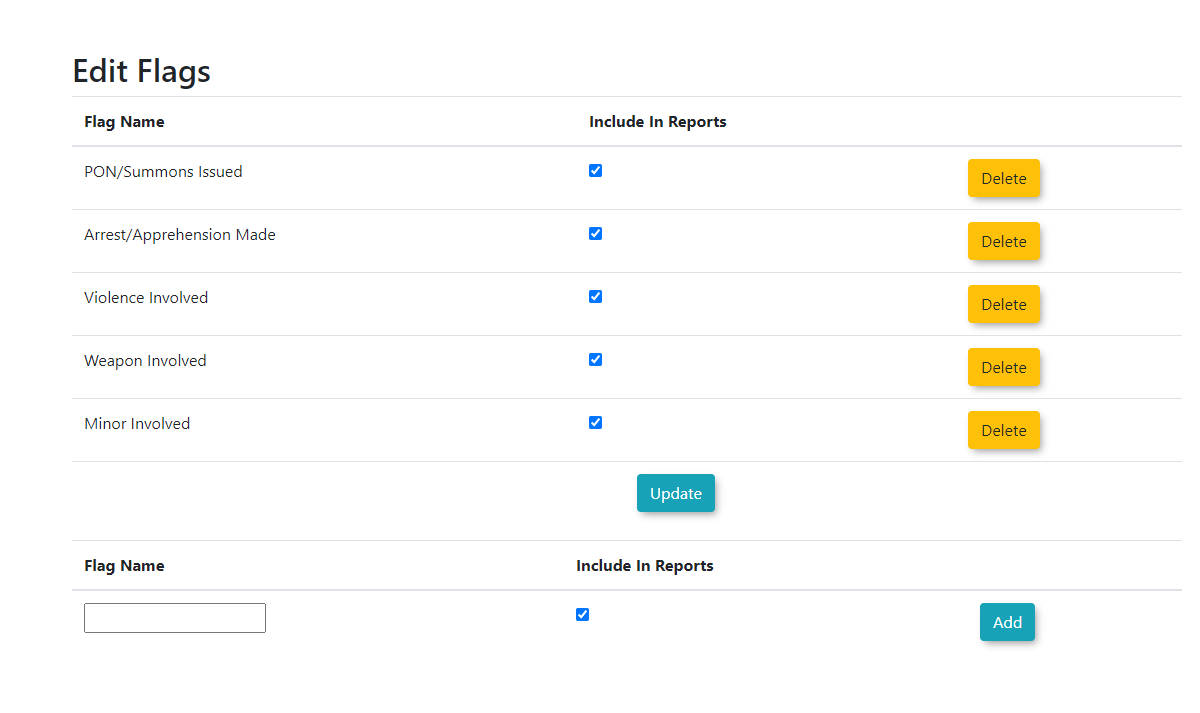
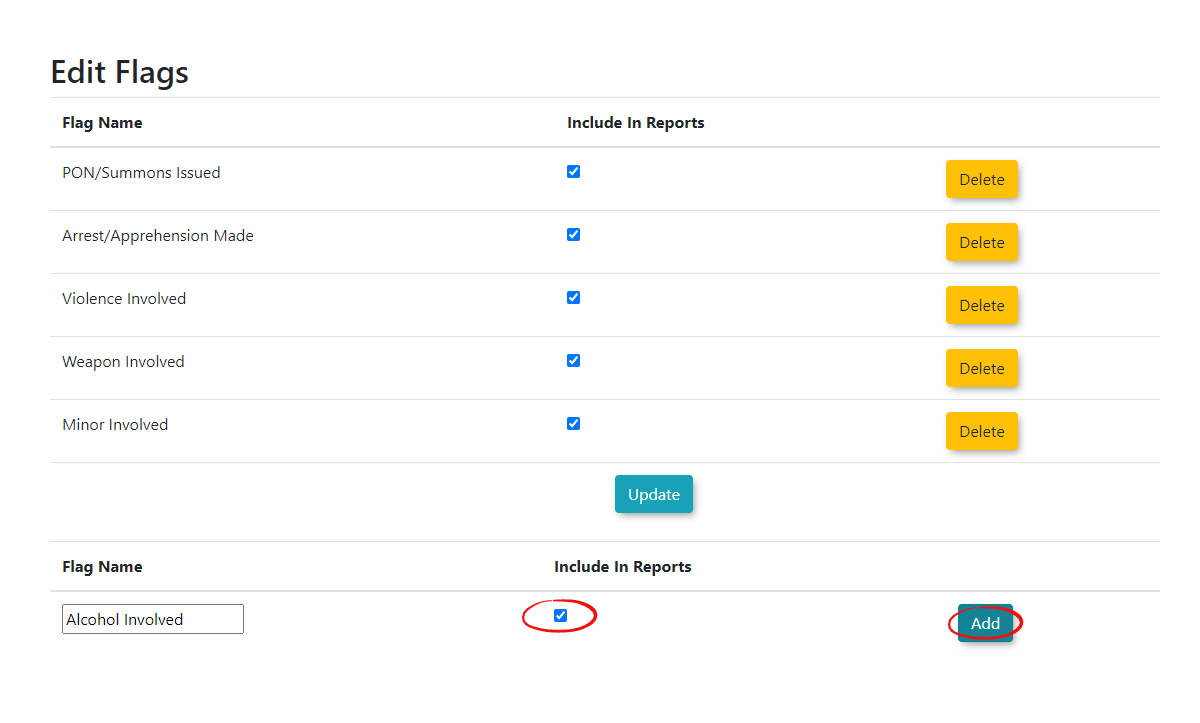
To add a flag: Click on the empty text box, and fill in the name you want for this flag. You can then choose to toggle whether this item appears on reports. The Include In Reports checkmark is on by default.
Click "Add" to complete the item entry.
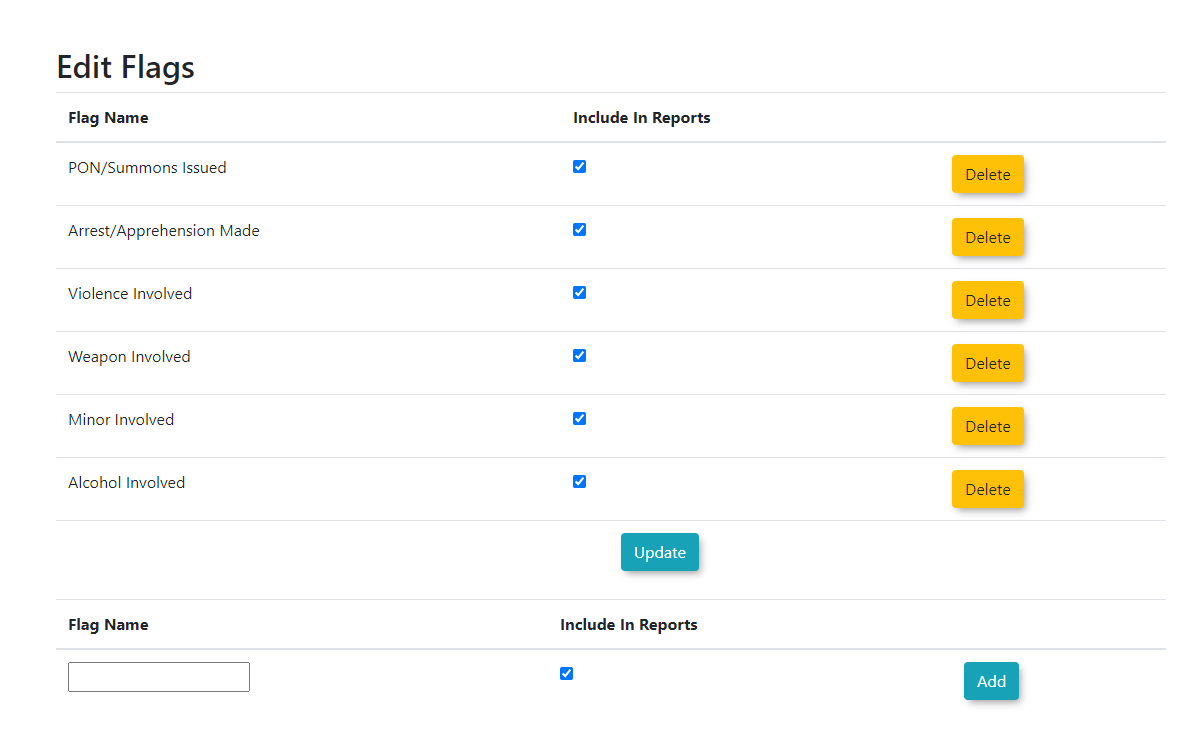
The new Flag entry will now appear in the list and is ready to use in incident reporting.
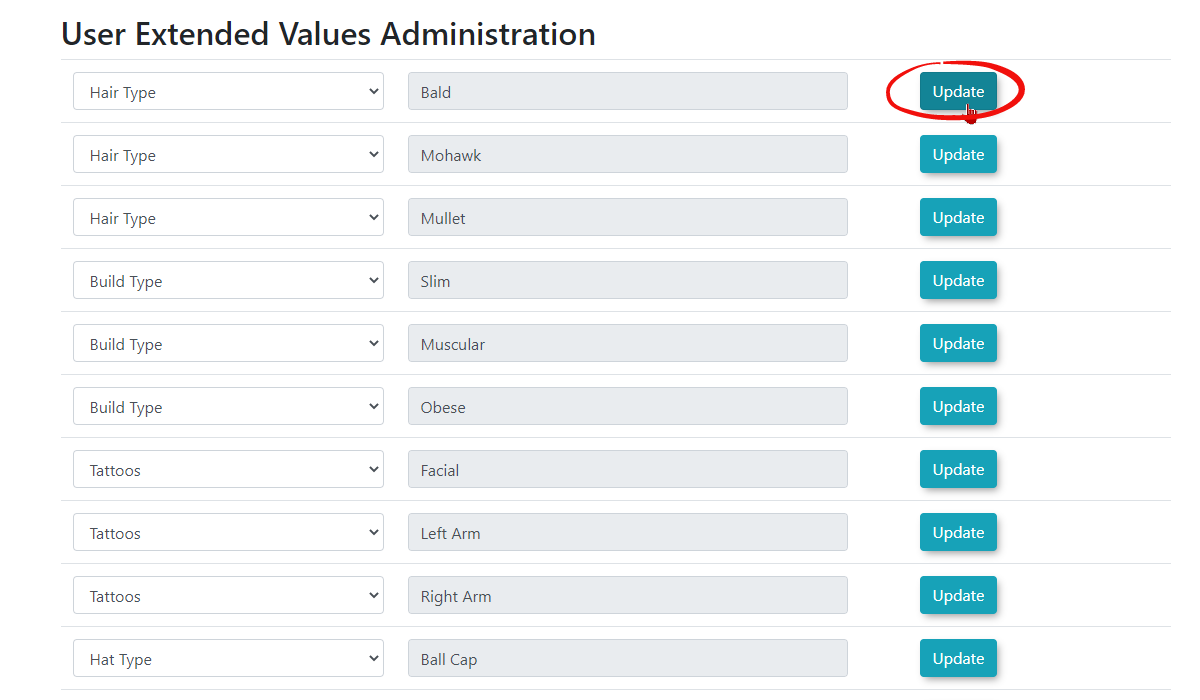
Extended User Profile Options
Under the Admin Options, hover over Incidents, then click on Ext. Profile Options.
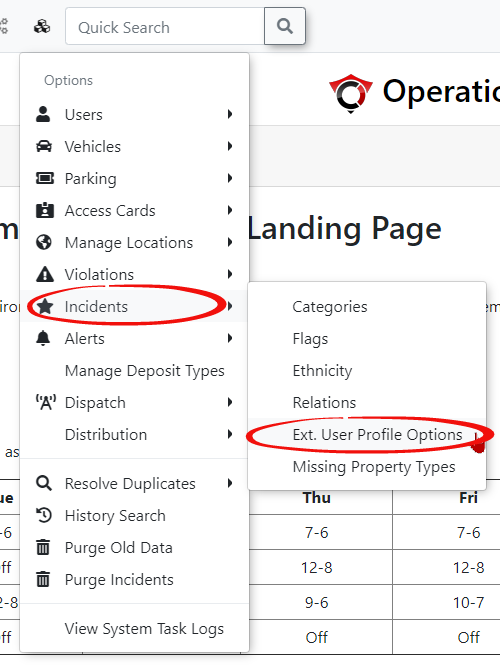
You will be redirected to the User Extended Values Administration page.
Notice the various types you can choose form to narrow your description.
This is where you can add and update Extended Values.
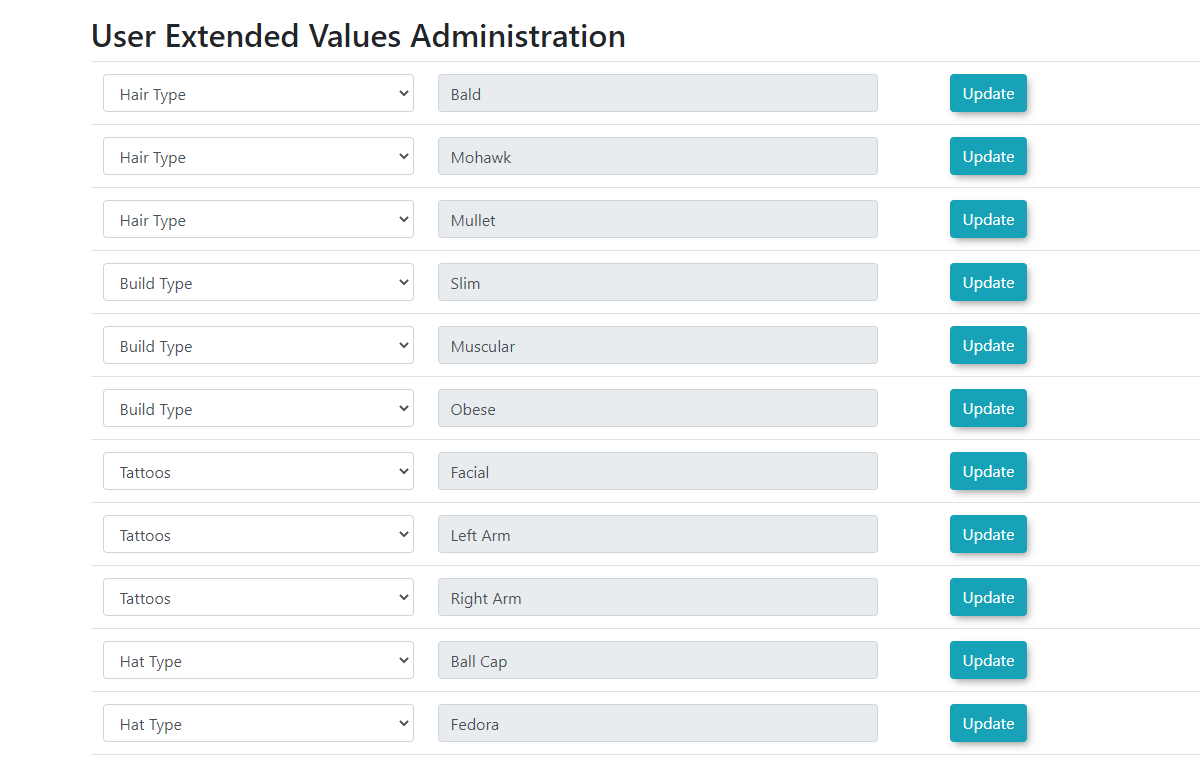
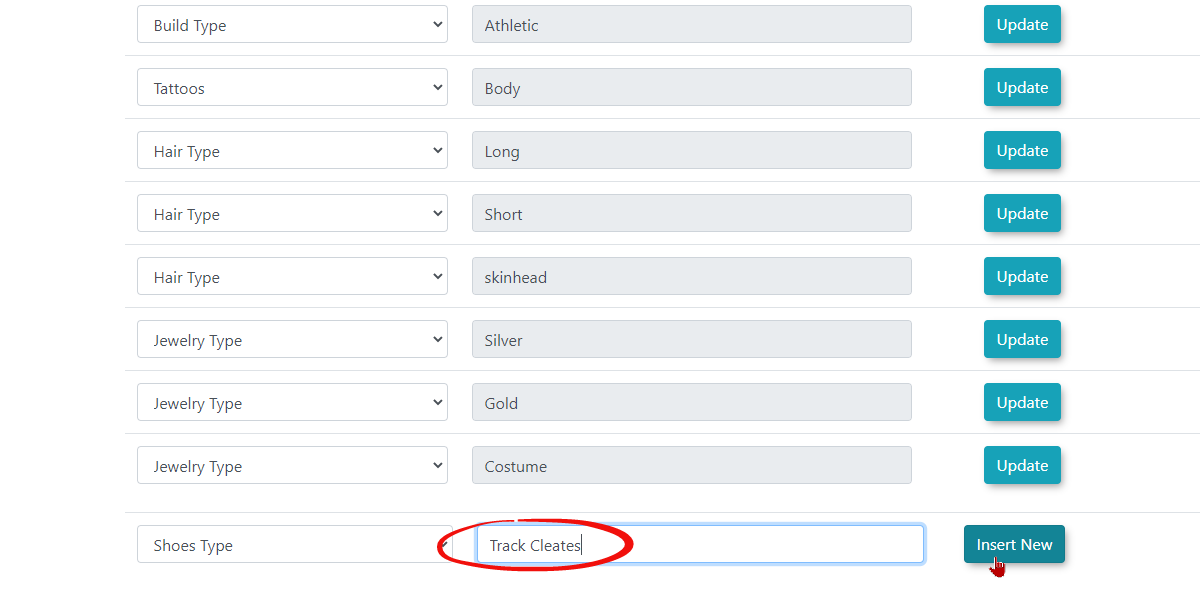
To add an extended value:
Scroll to the bottom of the values list to the blank textbox line.
Select value type from the drop-down menu. Type the value description in the textbox provided.
Click Insert New to add and save user value.
Note: A Value Type is a category you select to distinguish what your value description will be about. Example: If your value type is Hair Type, then your value description would be what the users' hair is like.
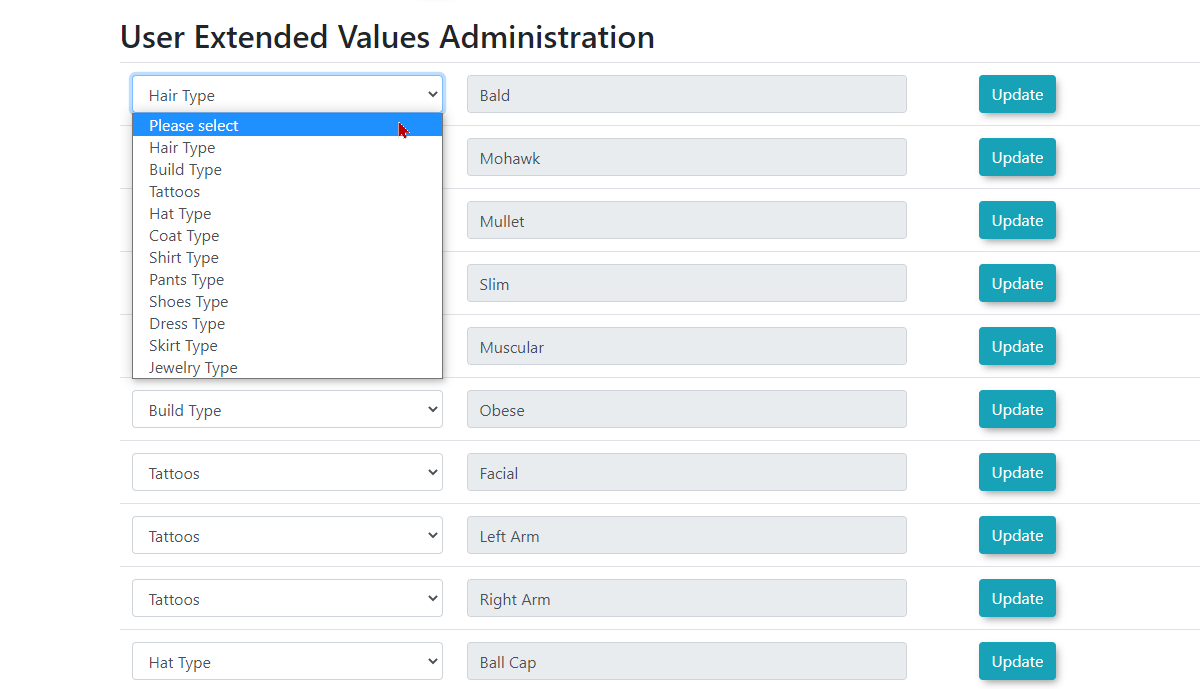
Value Description can include a range of physical features/identifiers of a user. Some examples could include; the location of a tattoo on a users' body, the colour of clothing they're wearing, or the style of hair they have.
Value descriptions allow officers to save unique identifiers of a user involved in an incident.
Editing an Extended Value
Click on Update to edit the value.
Adjust the category, and name by selecting the textbox and making the desired changes. In this case we are changing Bald to Balding.
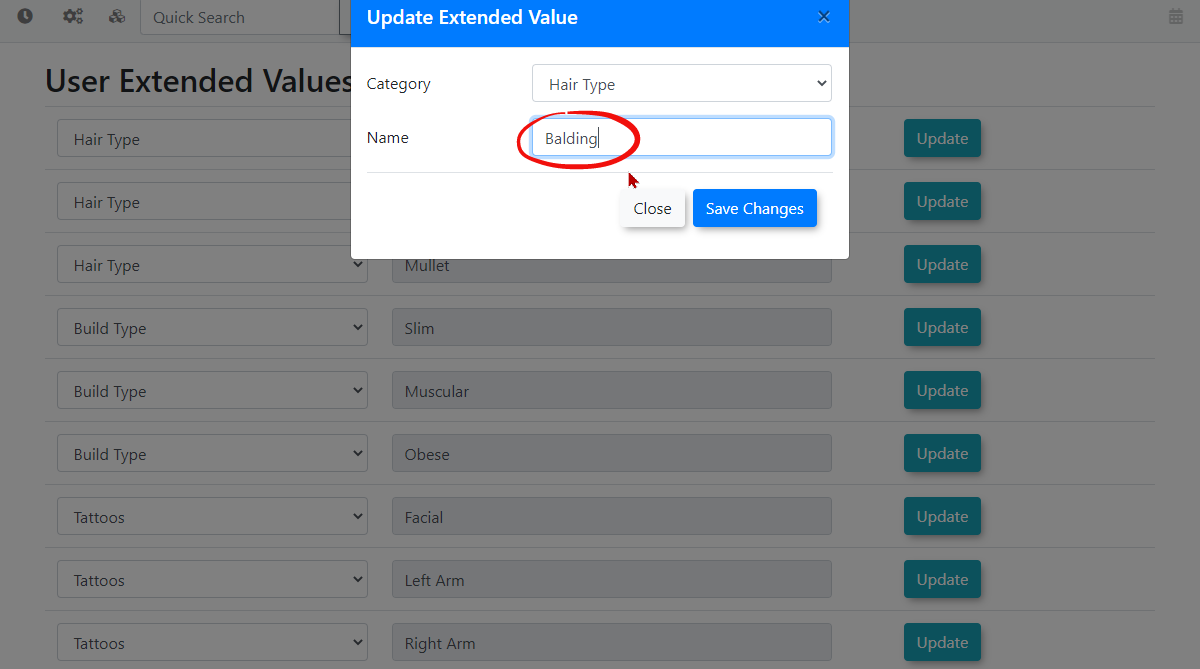
When you are finished updating, click Save Changes to save and continue.
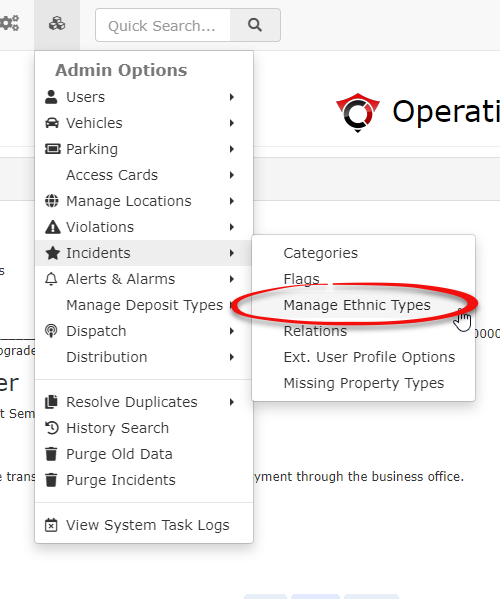
Ethnic Types
Navigation to Ethnicity Administration
To get to Ethnicity Administration click Admin Options, Incidents, followed by Ethnicity.
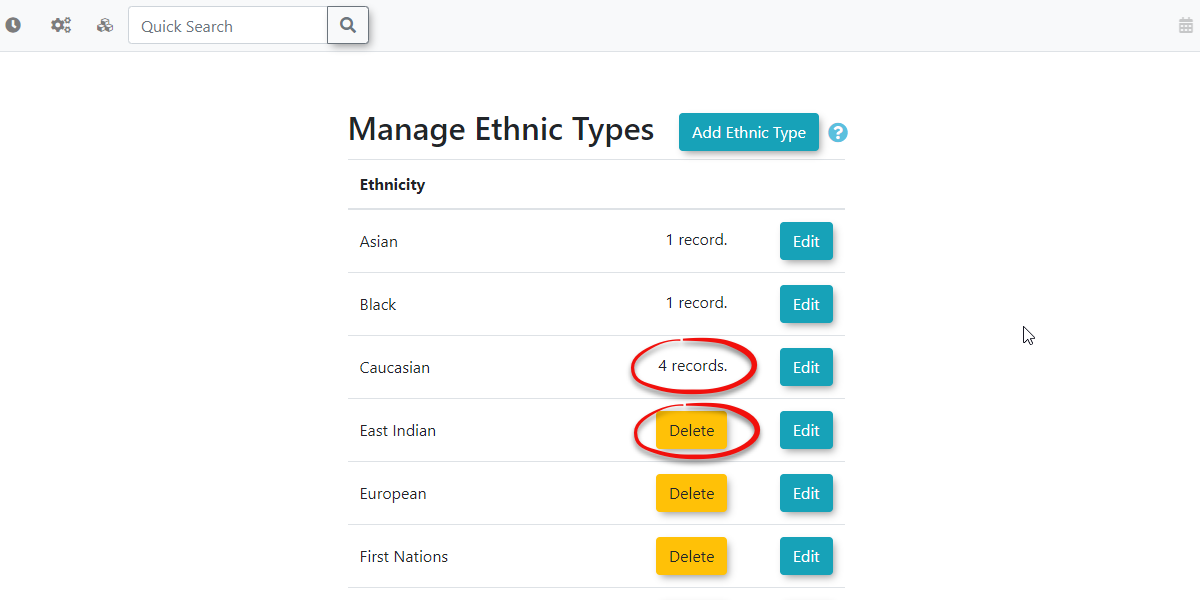
The Ethnicity Administration page will be displayed. This page will list all Ethnicity labels currently used in OPS-COM.
Managing Ethnic Types
Adding Types
To add a new ethnicity, click Add Ethnic Type. A modal window will display allowing you to add your type. When you are finished adding your type click Save Changes.
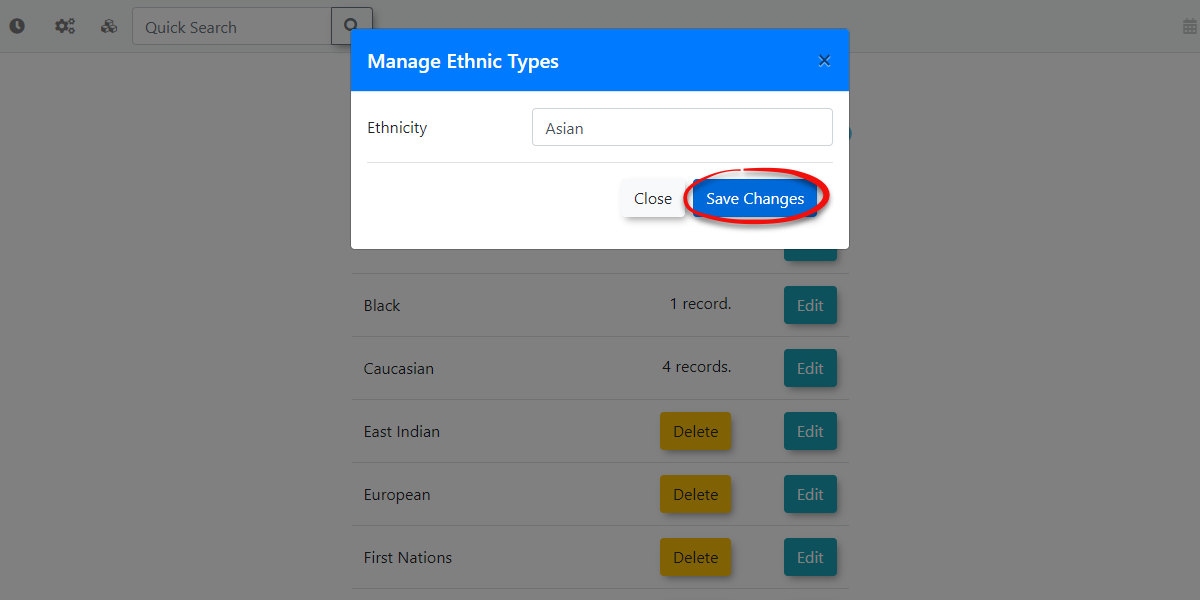
Editing Types
To edit/update an Ethnicity, click the Edit button next to the ethnicity you want to update. This will display a similar modal window as seen when adding an ethnic type and allow you to make your changes. When you are finished updating your type click Save Changes.
When you make changes to records that are already used in the system then you will be changing this for all records in the system using that ethnic type.
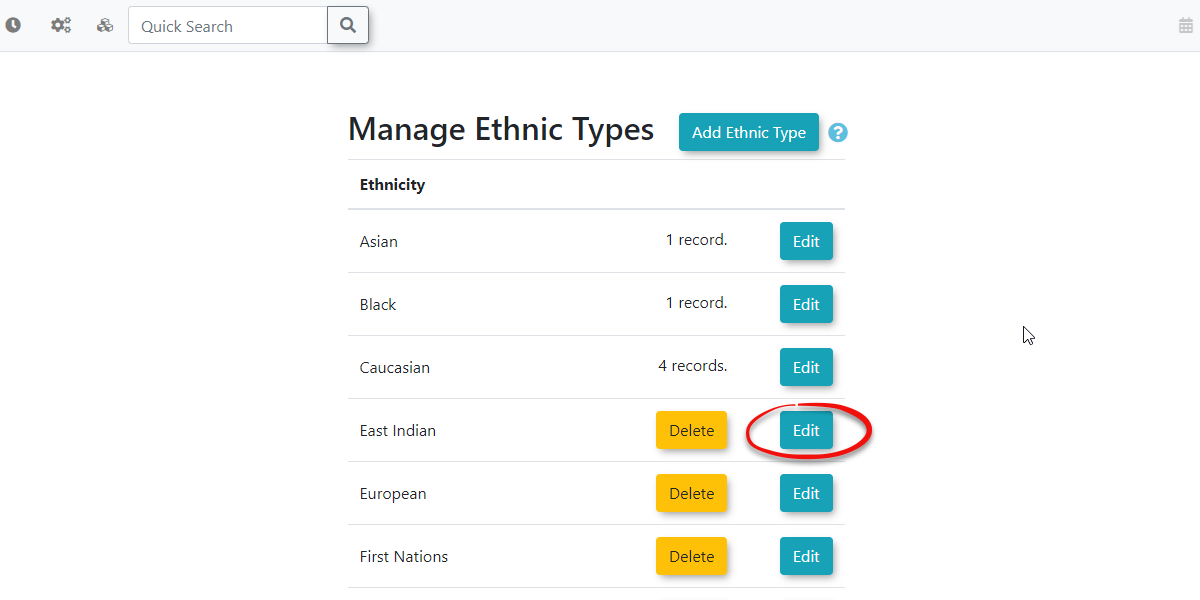
Delete Types
To delete an ethnic type, click the Delete button next to the type you wish to remove. Keep in mind that if ethnic types are in use then they cannot be deleted.
Categories
How to Get to Categorize to Create or Edit
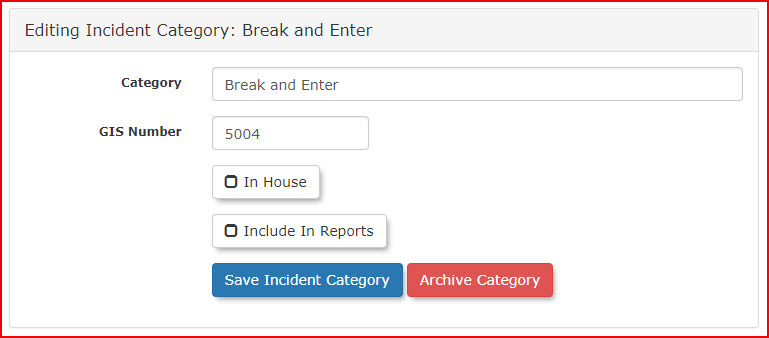
The Edit Categories and Sub Categories main page will display. To edit a Category, select the desired category from the listed items and click the pencil icon to edit.
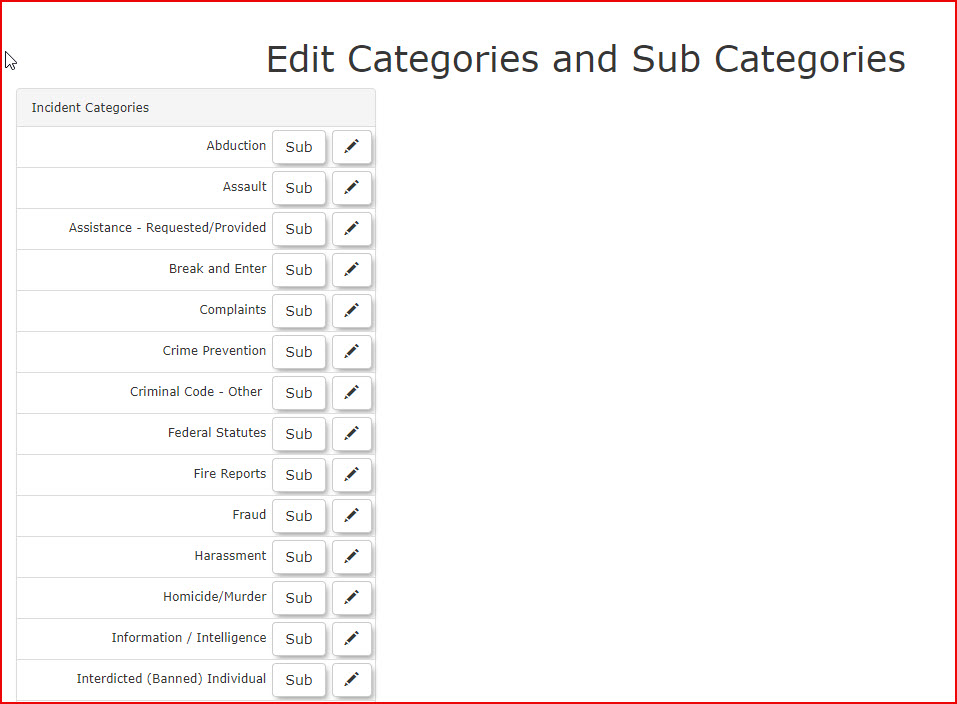
The page will refresh and you will be able to edit your Incident Category. Change the category name and/or details as desired and click "Save Incident Category".
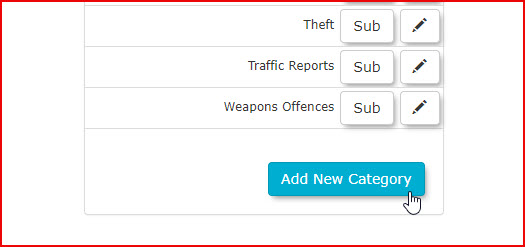
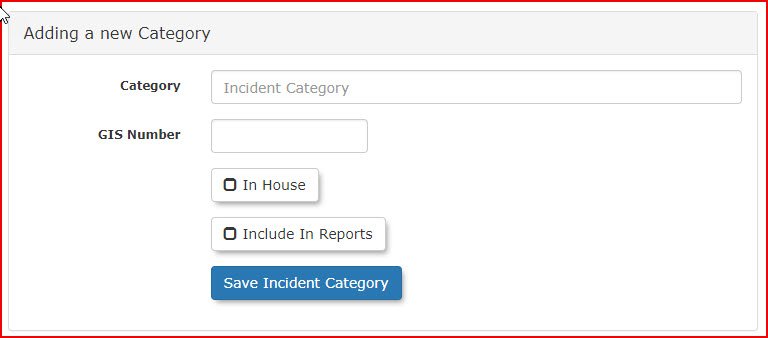
To add a new Incident Category, return to the Edit Categories and Sub Categories main page, and click "Add New Category" located at the bottom of the page.
The page will refresh. Fill out the details for your new Category Name, select whether it's "In-House", enter the GIS number, and select if you'd like this category included in Reports. Click "Save Incident Category".
To check a category for Sub-Categories, return to the Edit Categories and Sub Categories main page. Select one of the categories by clicking on Sub.
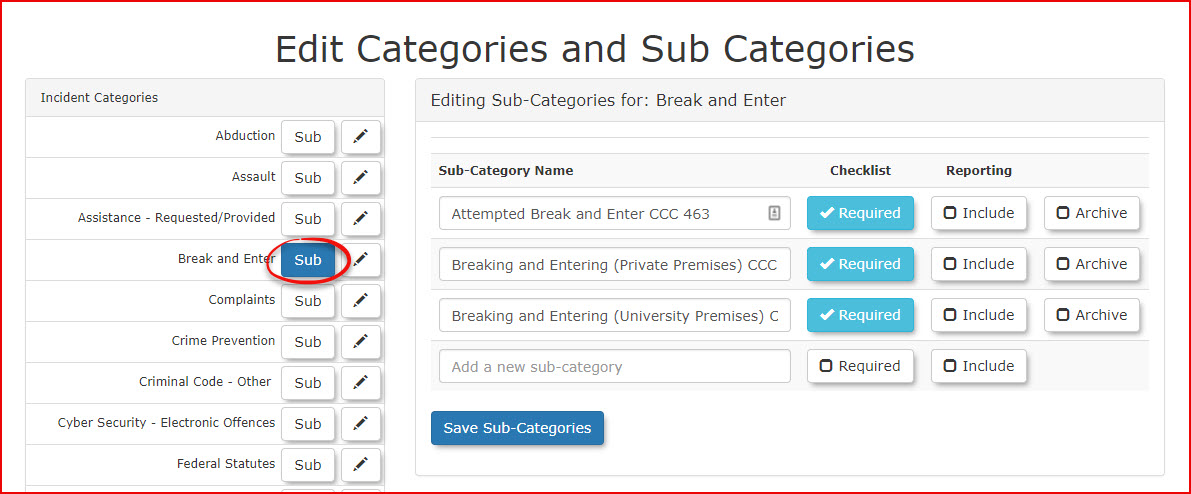
The page will refresh, and you will have the option to add a sub-category.
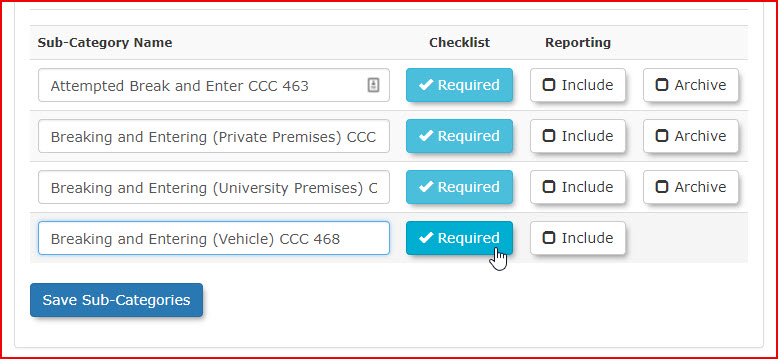
To add a new sub-category, enter the name you want for your sub-category. Enable the functions you wish to have in this subcategory.
- If a Checklist is required, click "Required".
- If it's to be Included in Reports, click "Include".
- Once you have finished, click "Save SubCategory".
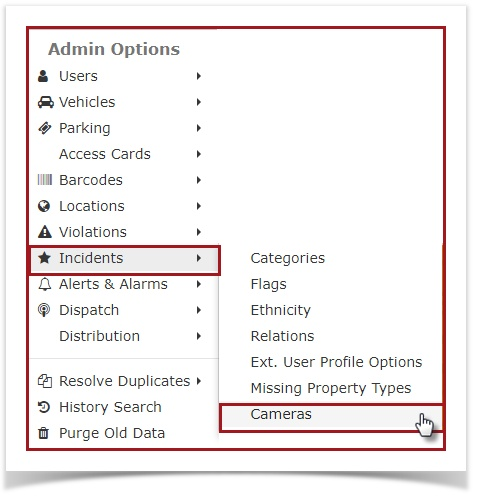
Cameras
- Under the Admin Options, hover over Incidents, then click on Cameras.

2. You will be redirected to the Camera Administration page.
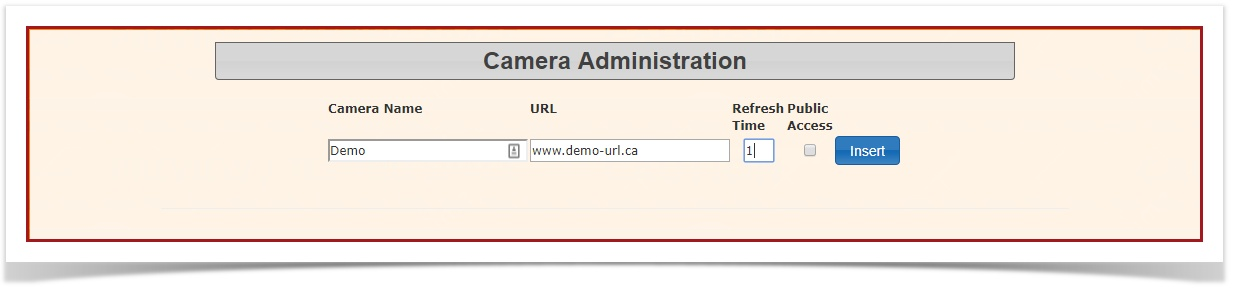
To add a new camera: Type in the Camera Name and, URL in the provided textboxes, and choose a refresh time.
If you would like the public to have access to this camera, click on the box that says "Public Access" to enable Public Access. Unselect the box if you wish to disable public access.
Once all required information has been filled out, click Insert to save.
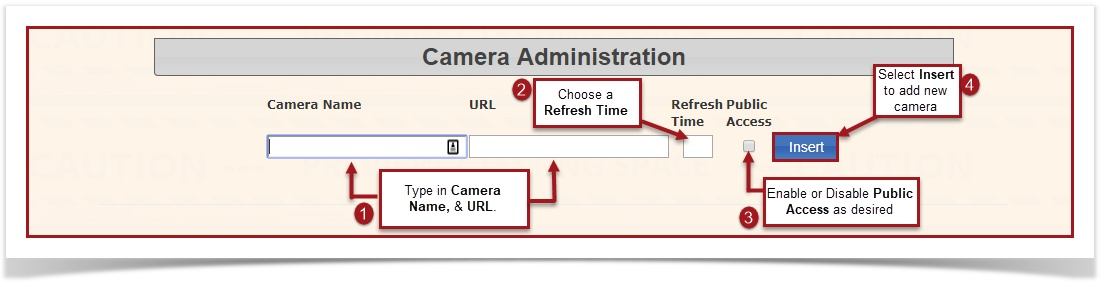
To edit a camera: Make your desired changes in the textboxes, then click Update to save.

To delete a camera: Select the camera you wish to delete, then click the Delete button to the right of that camera.
A confirmation pop-up will appear. Click OK to continue and delete, or click Cancel to return to your previous screen.
Incidents Setup
- Cameras
- Categories
- Ethnic Types
- Extended User Profile Options
- Flags
- Missing Property Types
- Relations
Sending Alerts to Handhelds
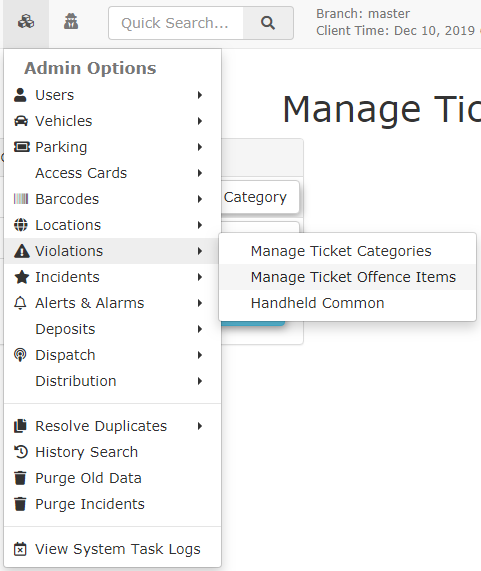
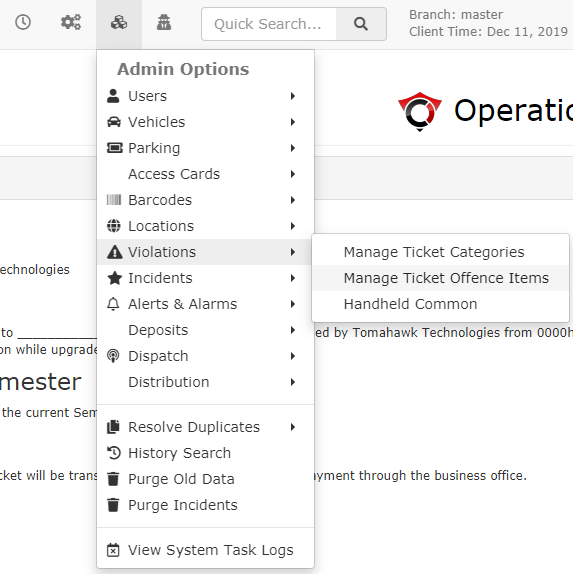
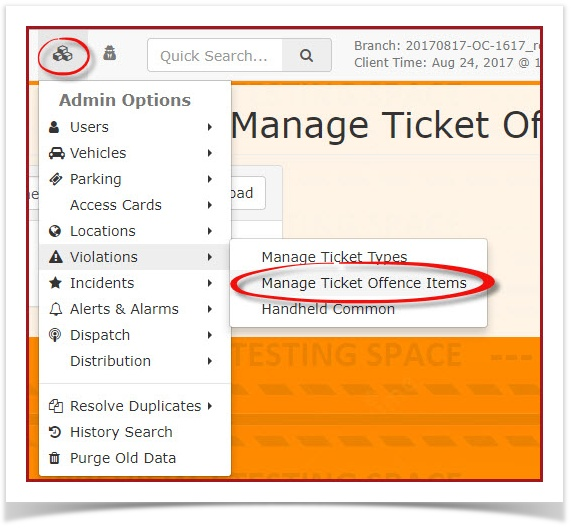
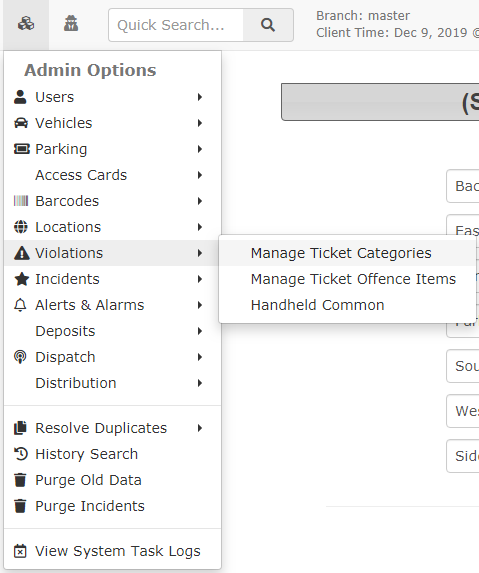
In the Admin Options menu, hover over Violations, then click Handheld Common.
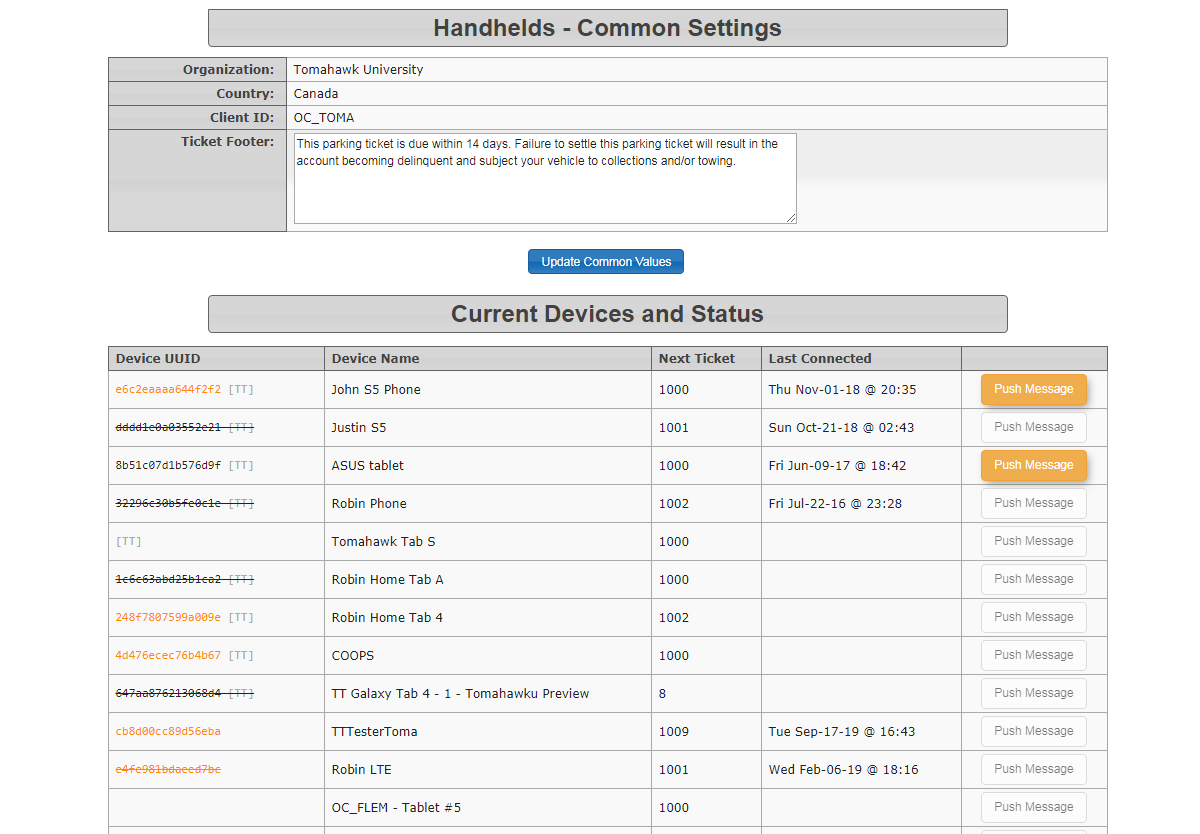
The Handhelds - Common Settings page displays. Click the 'Push Message' button beside the handheld that the alert is being sent to.
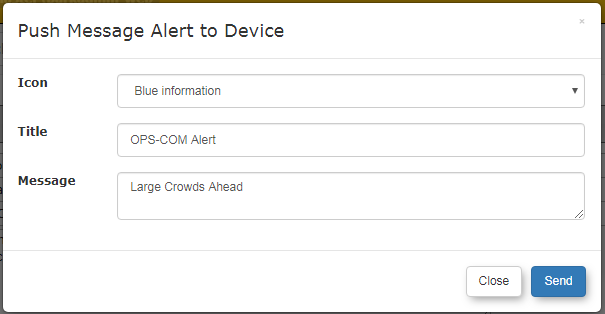
The 'Push Message Alert to Device' screen displays. Enter the text for the alert being sent out in the Message section.
You can change the Icon that will be sent to the handheld to show the type of alert by opening the Icon drop down menu.
Click 'Send' to push the alert to the chosen handheld.
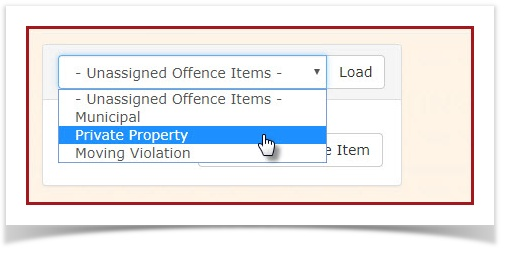
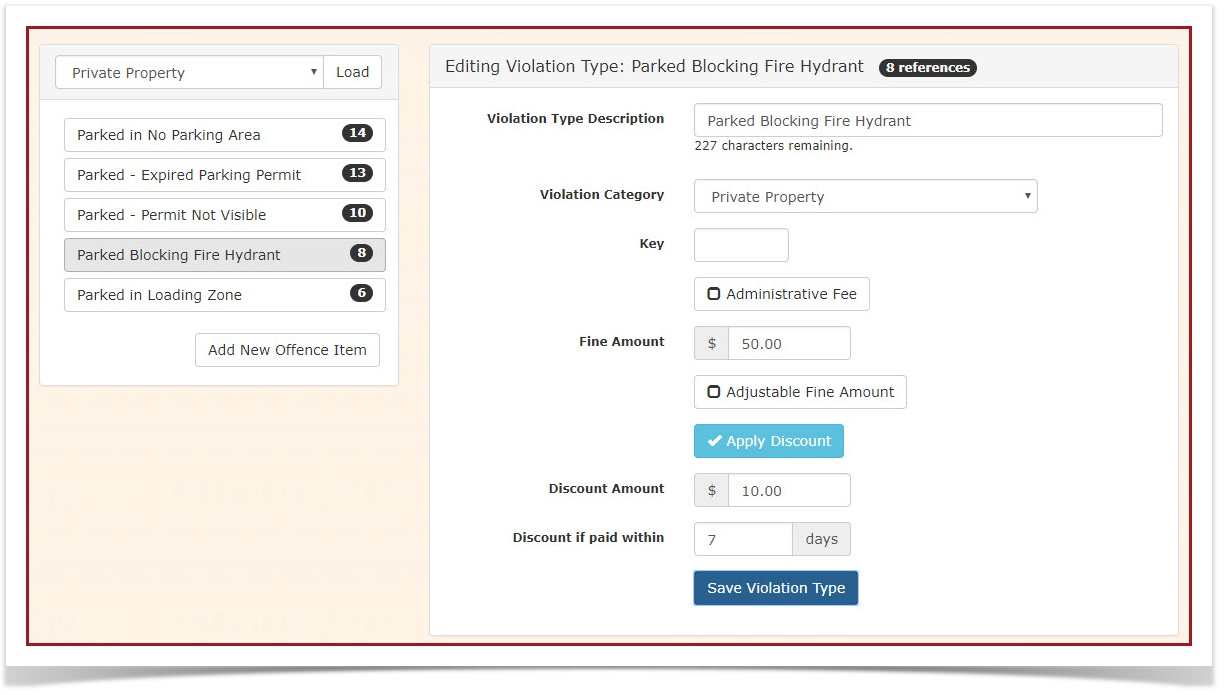
Ticket Offence Items
Managing Ticket Offence Items
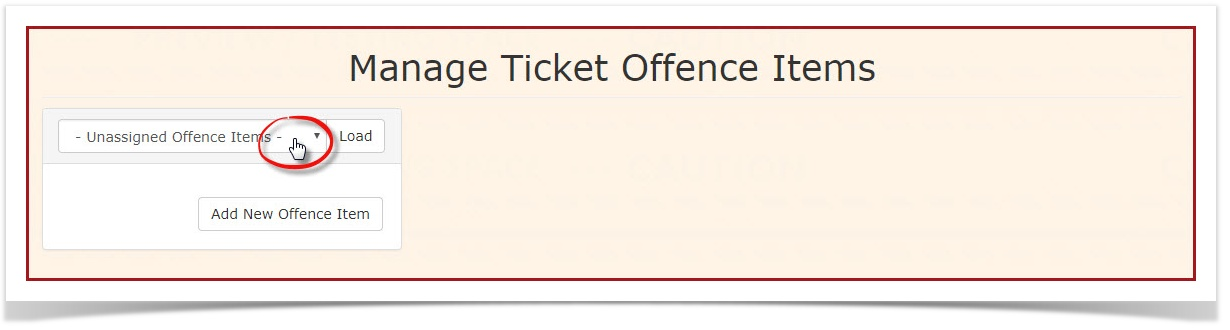
Hover over the Admin Options icon and click Violations then Manage Ticket Offence Items.
The Manage Ticket Offence Items screen lists the available Ticket Types and their associated offences.
The default view will be Unassigned Offence Items.
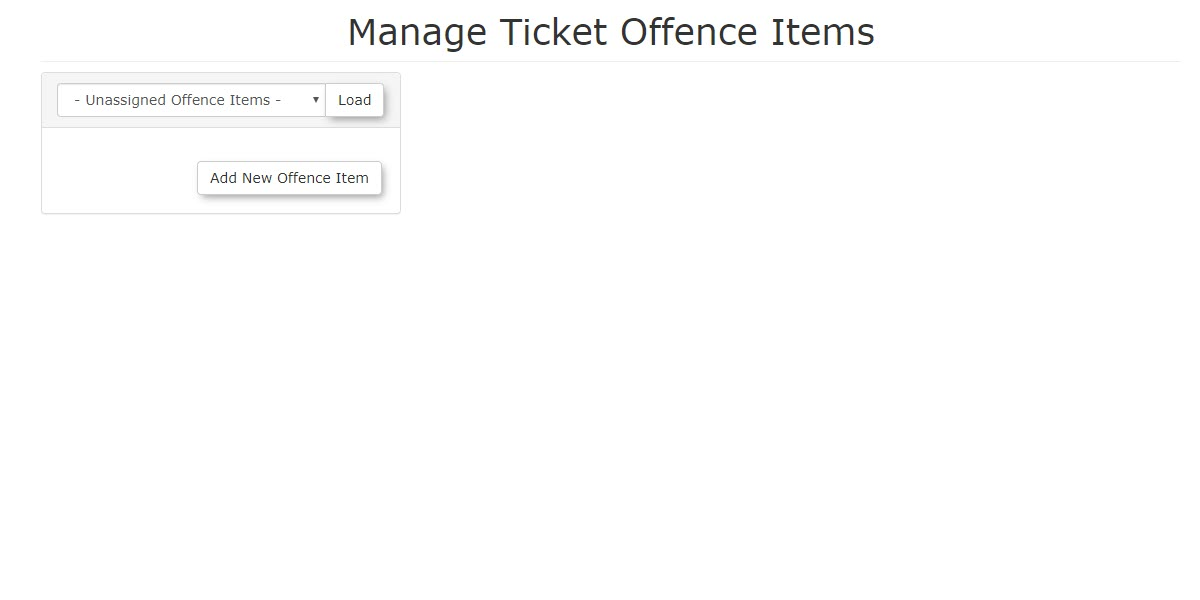
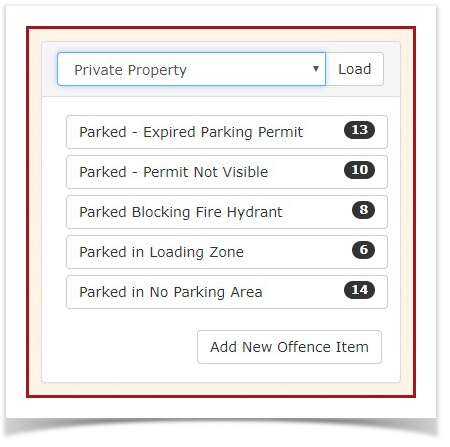
Add New Offence Item
In this example we will add a violation type to Private Property. Click on Add New Offence Item
The screen will refresh with eh blank violation entry form.
Note: The Parked in Loading Zone text is for placement only and simple stands as an example.
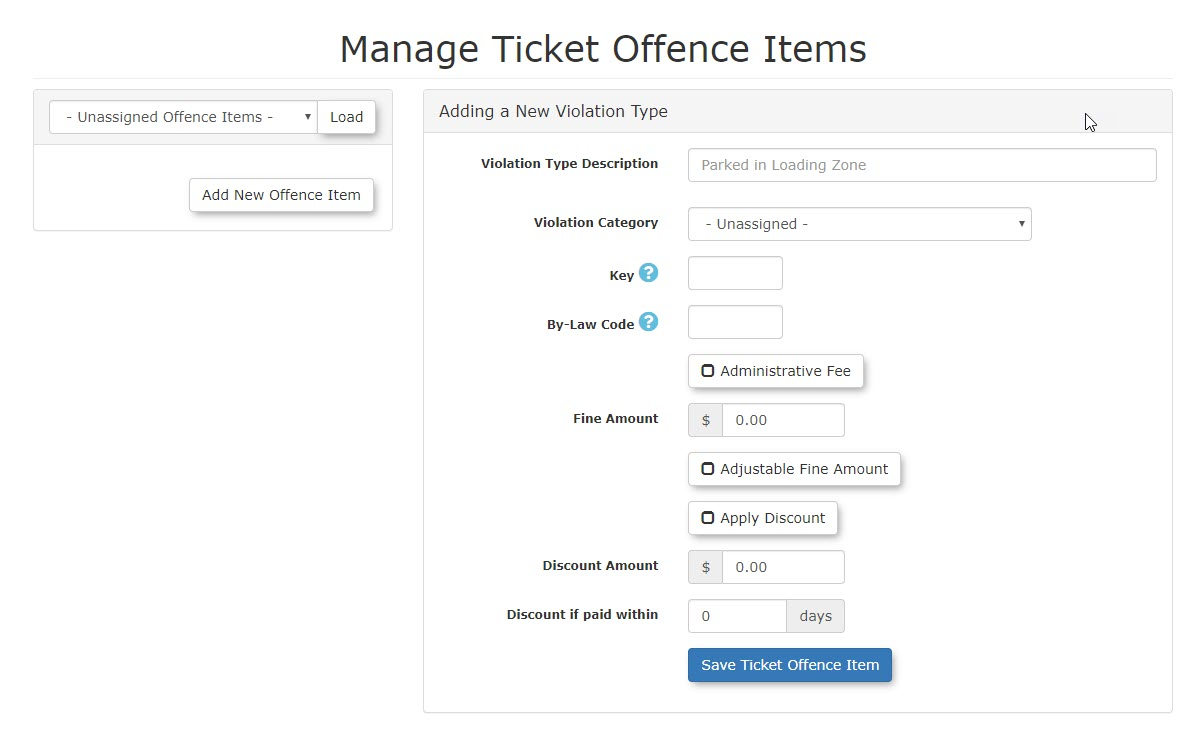
Edit this text to reflect the name of the violation you wish to configure.
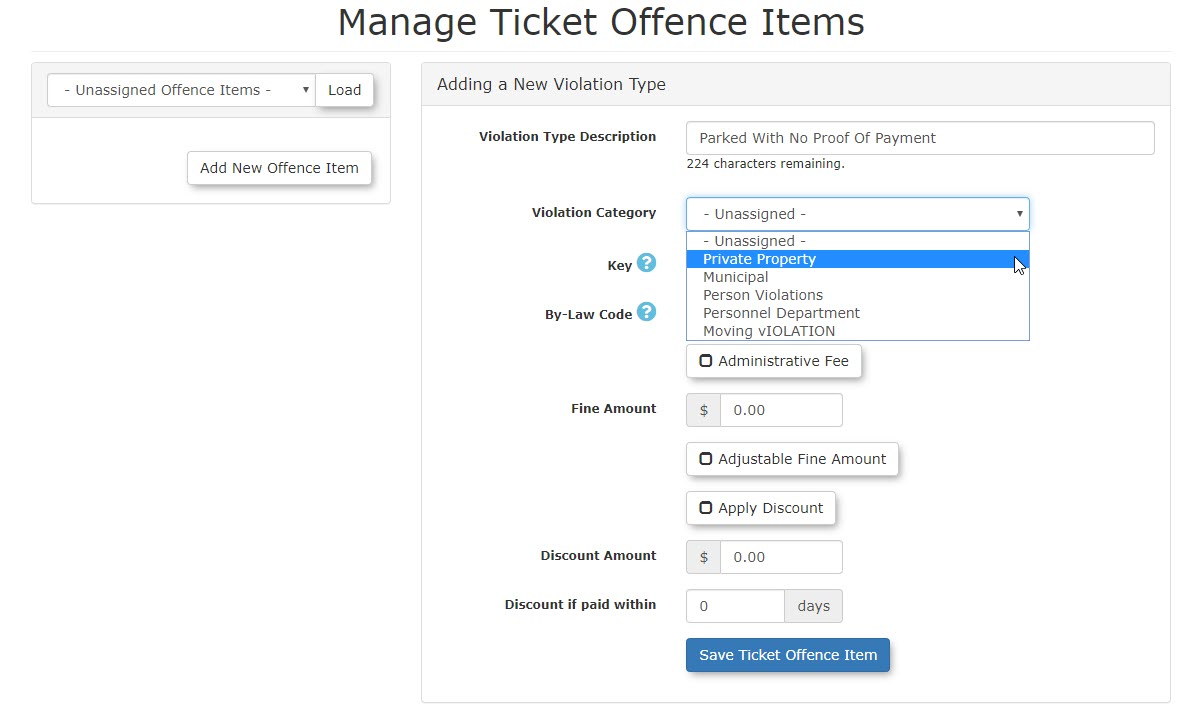
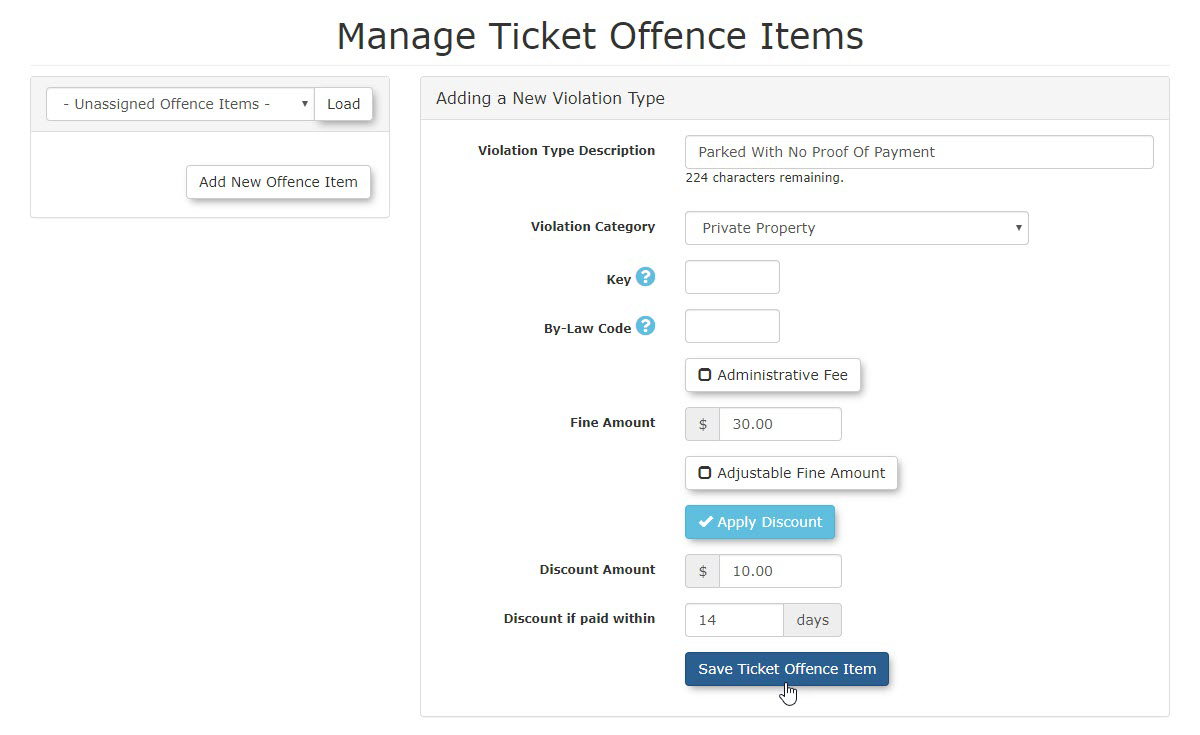
In our example here we are setting up Parked With No Proof Of Payment and selecting Private Property as the category.
Applying Discounts to Violations In the Future
It is possible that you could issue a violation in the system with an offence item that had the Apply Discount button toggled off by accident or in the past. If you would like to apply a discount to these violations, you need to toggle the Apply Discount button as well as update the violation in question. Please follow this short video that demonstrates how we can do this.
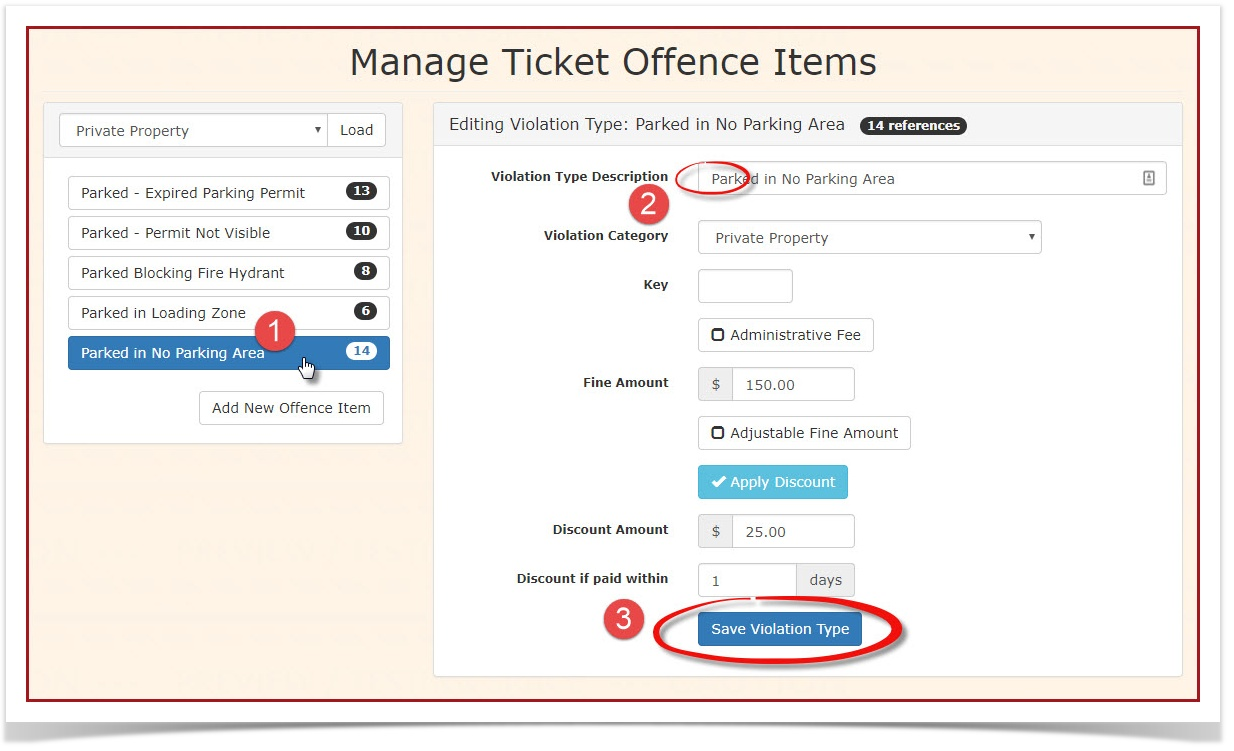
Setting the Fine Amount
We can now set up the basic monetary perimeters of this violation. (See image below)
In this example the fine amount is set at $30.00
The Apply Discount state is selected in order to allow the discount to apply.
The discount amount is set to $10.00 and the number of days where the discount applies is set to 14.
Which means:
The fine is $30.00 but a discount of $10.00 will be applied if the fine is paid within 14 days making the collected fine $20.00.
After 14 days the discount does not apply and the collected fine will be the full $30.00.
Click on Save Ticket Offence Item to save this configuration.
You will be returned to the list view with your new offence listed below the Ticket Type.
Optional Configurations
Key
The Key field is typically used by clients who want to indicate tracking codes for violations.
By-Law Code
The By-Law Code field is used by municipalities to send violations to court for collections. It is a text field that accepts 20 alpha-numeric characters.
Ticket Offence Items can be deleted if there are no violations written for that particular violation. Once the violation has been used the violation can be archived but not deleted.
They are archived in order to preserve the integrity of any data associated with this Offence Item.
Adjust Fine Amount
By selecting the "Adjust Fine Amount" box in the ticket configuration screen this will allow the patrol officer to change the fine amount i the field on the handheld unit. By default this feature is turned off and the fine amount will appear on the handheld unit as a grey text figure amount and it can not be edited.
Once turned on however the fine amount will be in black text and officers will have the ability to edit the amount. Scenarios where this may be useful is for example, are repeat offenders or multiple offences. The officers can, at their discretion, increase the ticket amount and add a note explaining the augmentation of the fine due to repeat violations. Conversely, the fine may be reduced in some cases. When giving multiple violations for example should you not want to charge the full amount of two or three combined violations, the officer can adjust the fine amount lower in accordance with your business rules.
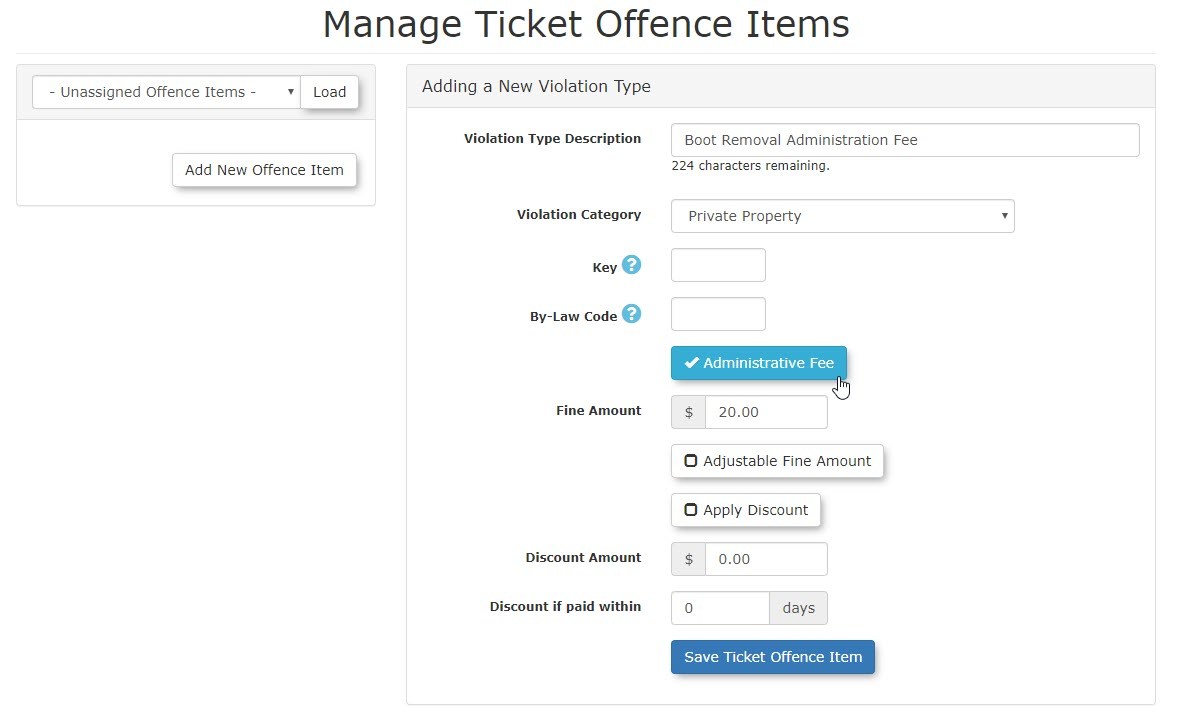
Administration Fees
You can create admin fees to be used in the system by selecting the Administrative Fee checkbox. This is useful for Conviction Fees or Booting Fees.
It is also important to note that items designated as Administration fees do not show on the Handheld units. They will only be visible on the admin interface.
In our example below we are setting up an $20.00 administration fee charged for removing a boot from a vehicle.
Click on the Administration Fee box to toggle it on. This will make it so the offence item is no longer synced with the handheld stopping patrol officers from having the option to select this offence item in the future.
Set the Fine Amount to $20.00
Click on Save Ticket Offence Item to save the item
Helpful information
Ordering the list of Violation Types
If you would like to sort the list of violations in a specific order the system will sort the list alphanumerically. Therefore if you number the Violations Type Description they will appear in the order you number them both on the admin interface as well as the handheld unit.
Spaces also work; a space is considered higher than an 'A'.. So you can prefix the offences with spaces to assist with the sort order.
For example:
<space><space>Zebra offence
<space>Test offence
A test offence
Sort Violations for Quick Access
The Challenge
When selecting an Offence, is there a way to change the order so that I can more quickly access it as opposed to scrolling down a long list?"
The Approach
It is possible to add some order to the list by adding spaces to the beginning of the violation name. In the example below we will reorder the list using this method.
Changing Alphabetic Order
The basic concept that we are taking advantage of the fact a <space> character comes before everything in the ASCII character table. So prefix a space (or multiple) will list first.
- <space><space>zebra
- <space>telephone
- apple
- bottle
An Example
As a practical example of this we will look at a sample list of violations where we'd like to change the sort order. To do so follow these steps.
Click Admin Options, Violations, Manage Ticket Offence Items.
On the 'Manage Ticket Offence Items' screen, click the Offence Types drop down picker.
In our example we will select Private Property as the ticket type.
This will open another screen with the list of Violations under the Private Property ticket type.
Another Example
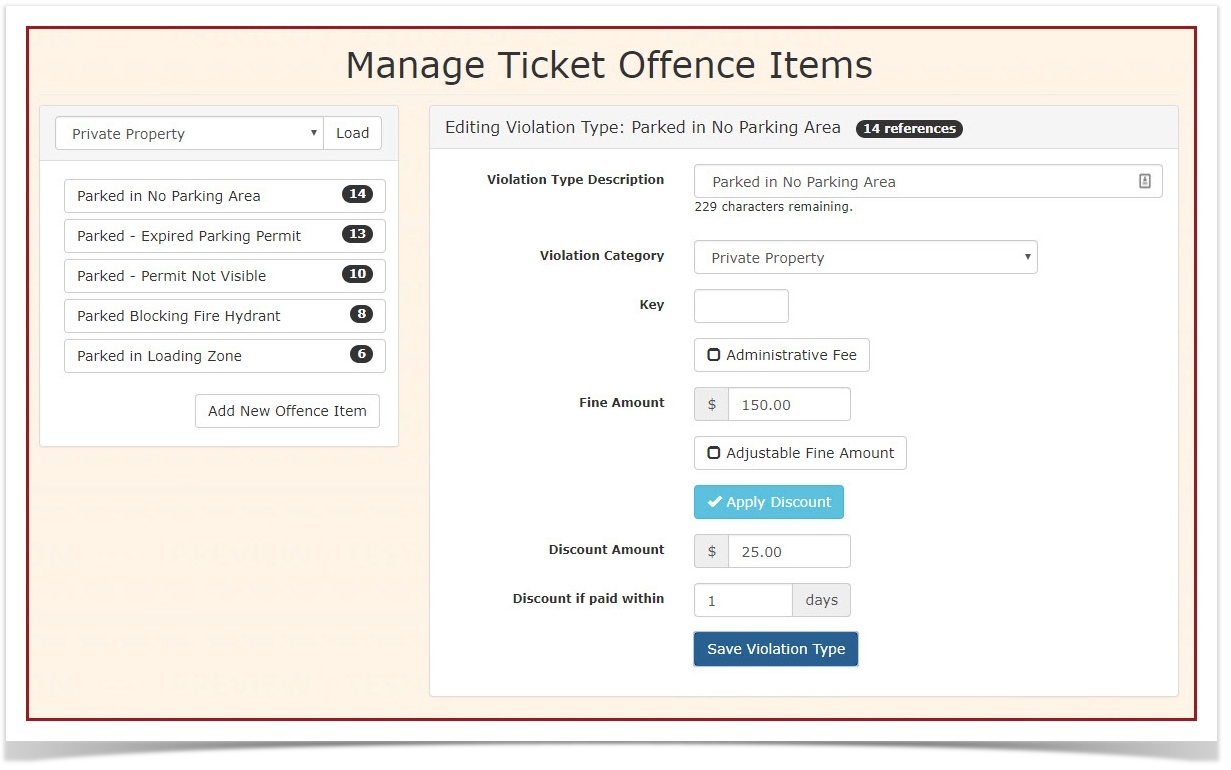
In this example we will change the sort order so that Parked in No Parking Area lists first, Parked Blocking Fire Hydrant list second and the rest of the violations list in alphabetical order after that.
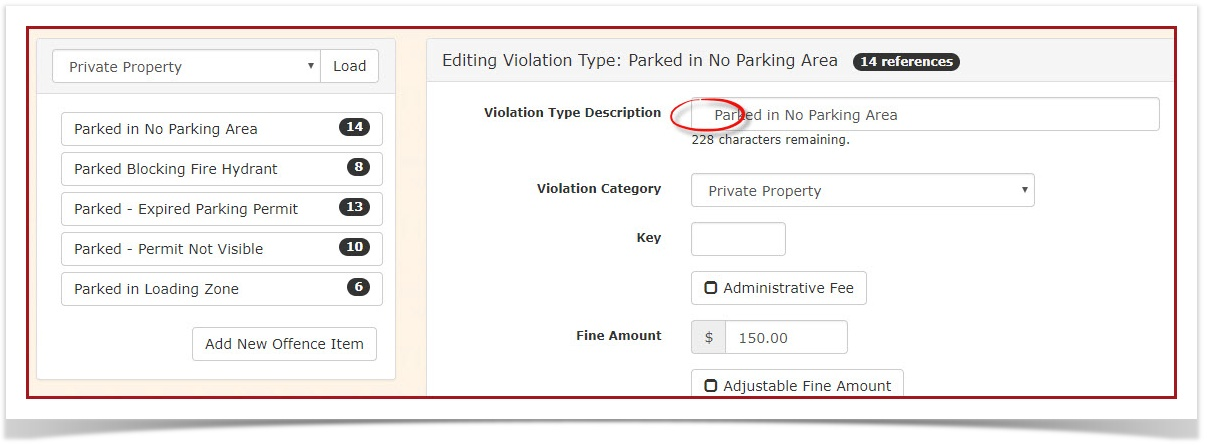
- Click on 'Parked in No Parking Area' to select it. The screen will refresh with the Entry information for the violation.
- Add a single space to the beginning of the Violation Type Description
- Click on Save Violation Type
Note the resulting list now shows Parked in No Parking Area as first.
If we do the same process with Parked Blocking Fire Hydrant the listing will change once again putting the violation to the top of the list.
The space worked to bring the item up in the list but the list still sorts in alphabetical order placing Parked Blocking Fire Hydrant first.
However we want this violation to be second in the listing.
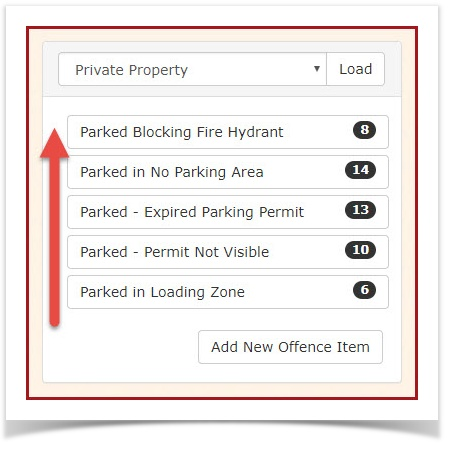
To move 'Parked in No Parking Area' back on top add a second space to the beginning of the Violation Type Description and save the violation type.
Ticket Categories
How to Edit Ticket Types
Hover over the Admin Options icon and click 'Violations' then 'Manage Ticket Categories'
The 'Manage Ticket Types' screen will display. You will see a list of ticket types that currently exist. From this menu you can add or edit Ticket Types.
Note: Ticket Types can be hidden from handheld devices. This setting can be changed by Ticket Type. See Administration Fee below.
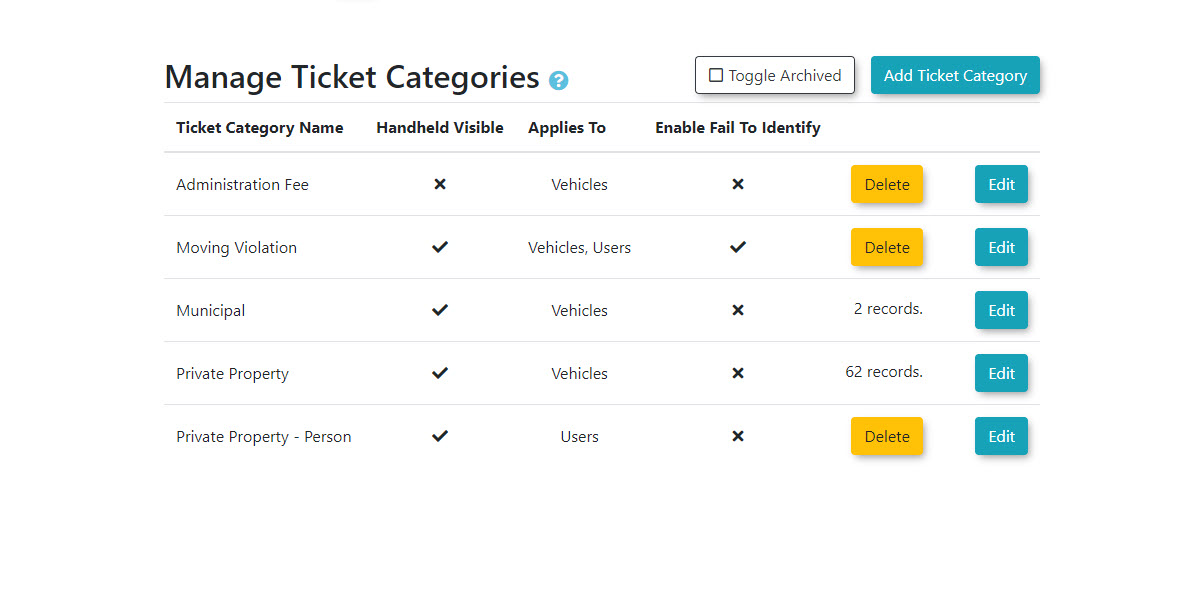
Click 'Edit Type' next to Municipal. This opens the options for that ticket type. Enable 'Visible on Handhelds' to toggle whether or not this ticket type will be available on the handheld units. Other options will be available to you if you have purchased the Violations Plus Module.
Violations Plus users can chose the following:
- Enable Failed to Identify - This is used when giving violations to users who fail to produce their ID. You can chose to log the violation against their vehicle instead.
- Violation Applies To - Vehicles - This the standard way to issue tickets for parking infractions.
- Violation Applies To - Users - This is used to issue infractions to Users, such as Smoking or Trespassing where a vehicle may not be involved.
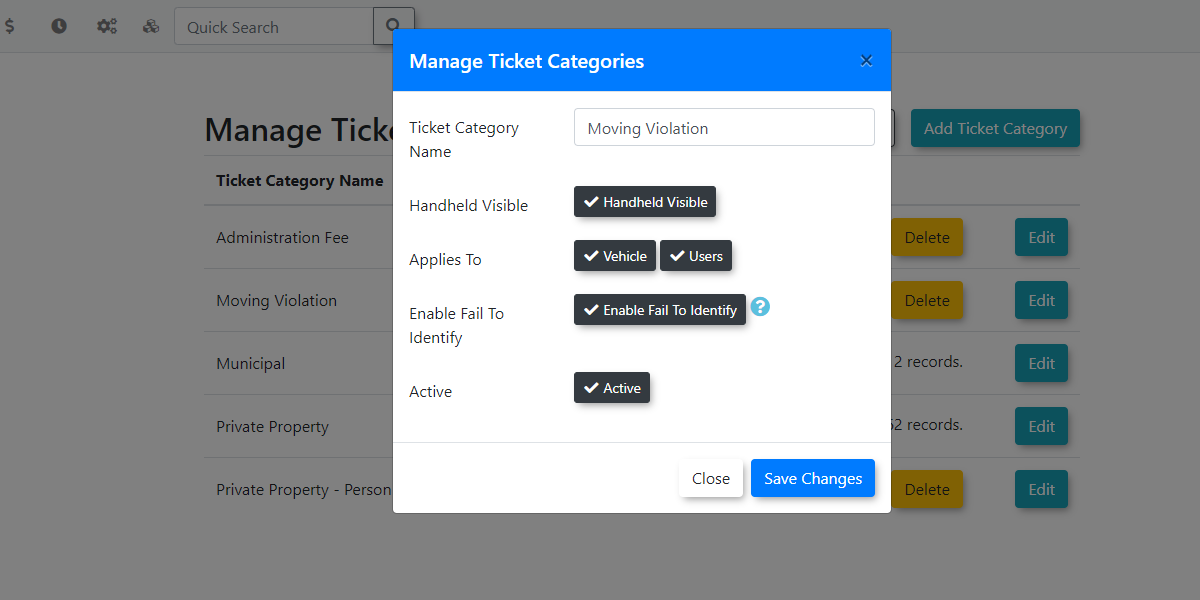
Remember to click 'Save Ticket Type' after making changes.
Ticket Types can be deleted, however they are not actually removed from the system. They are archived to preserve the integrity of any data associated with this Ticket Type.
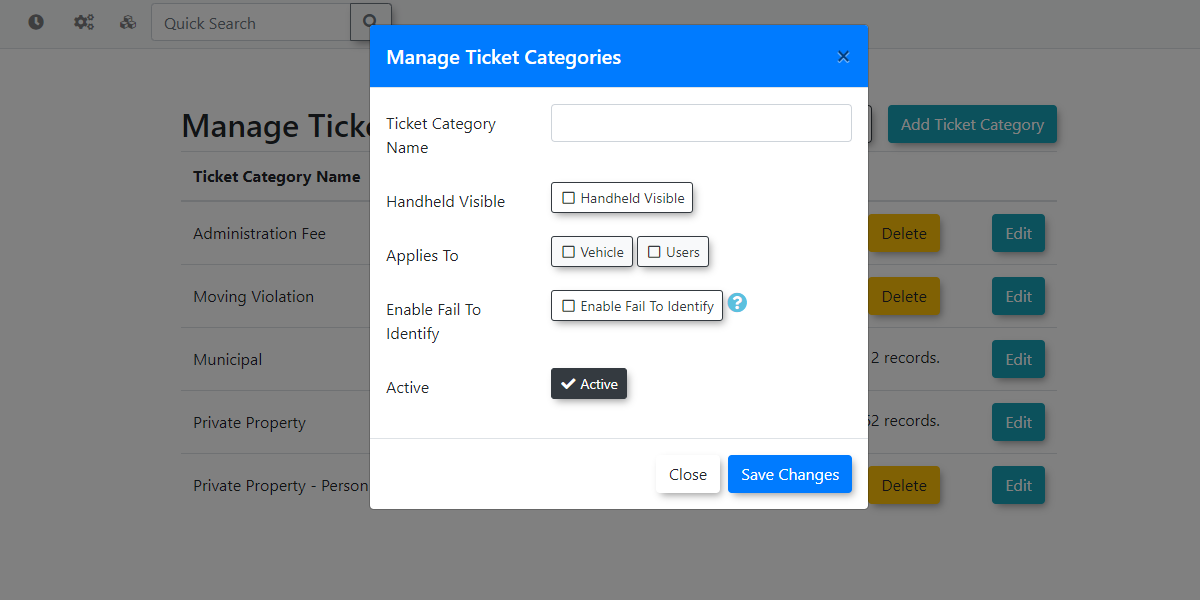
Add New Ticket Type
To add a new ticket type click 'Add New Ticket Type'. A blank form will appear.
In this example we will add Bicycle as a New Ticket Type.
- Ticket Type Name = Bicycle
- Allow it to be Visible on Handhelds
If you have Violations Plus you can enable the following options: - Select both Vehicle and Users for Violation Applies To
- You also have an option to enable "Fail to Identify"
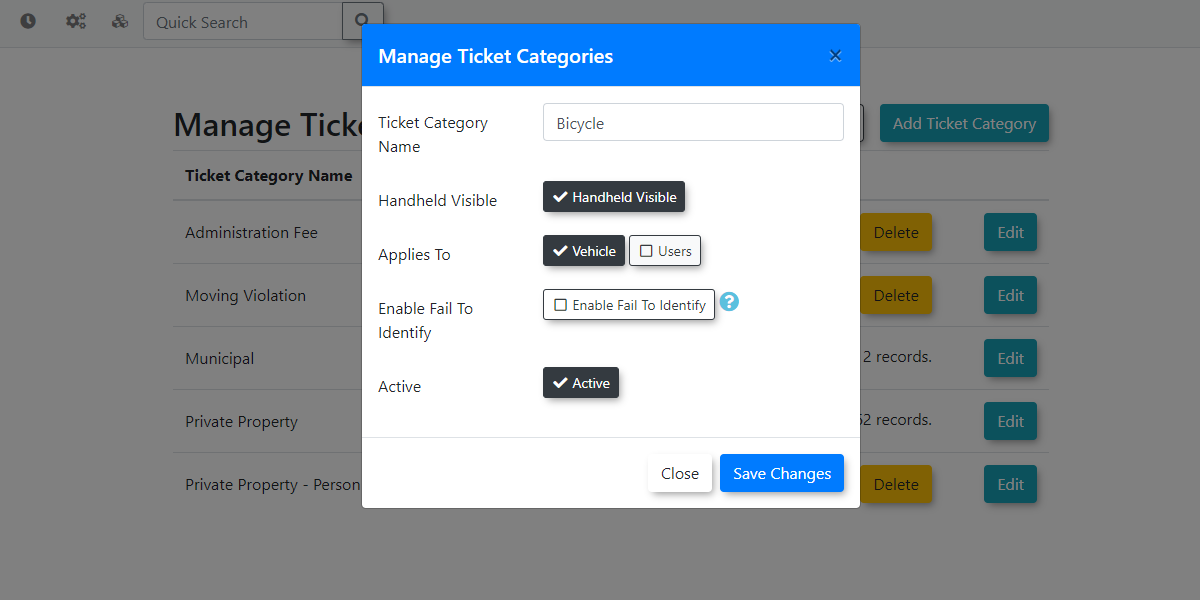
Click 'Save Ticket Type'. The list will now include Bicycle as a Ticket Type.
Personal Violations
Ops-Com offers the ability to write up a violation against an individual person. These types of offences could include violations for smoking, alcohol related offences, personal conduct, etc.
When configuring this type of category simply select "Applies to" Users only,
Violations Setup
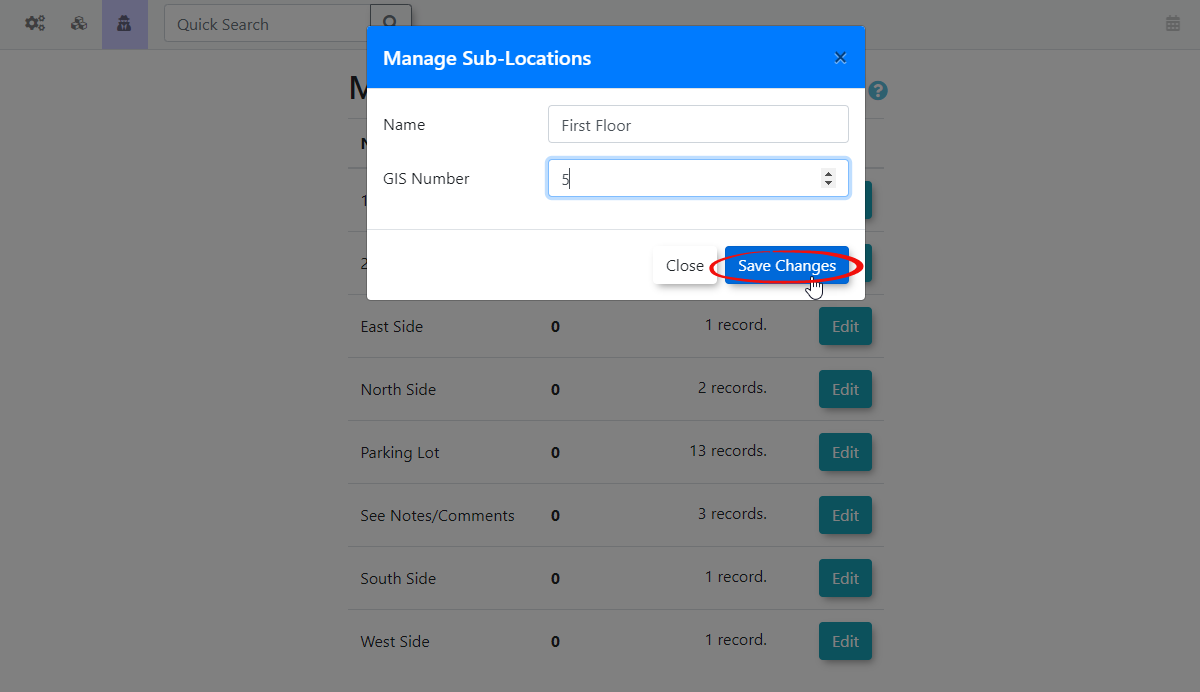
Locations - Sub Locations
Click Admin Options, Locations and Sub-locations.
You will be redirected to the Manage Sub-Locations page.
- To add a new sub-location: Click on Add Sub-Location.

To edit an existing sub-location: Click on Edit
There are two fileds to configure. The name of the location and the GIS Number (geographic information system)
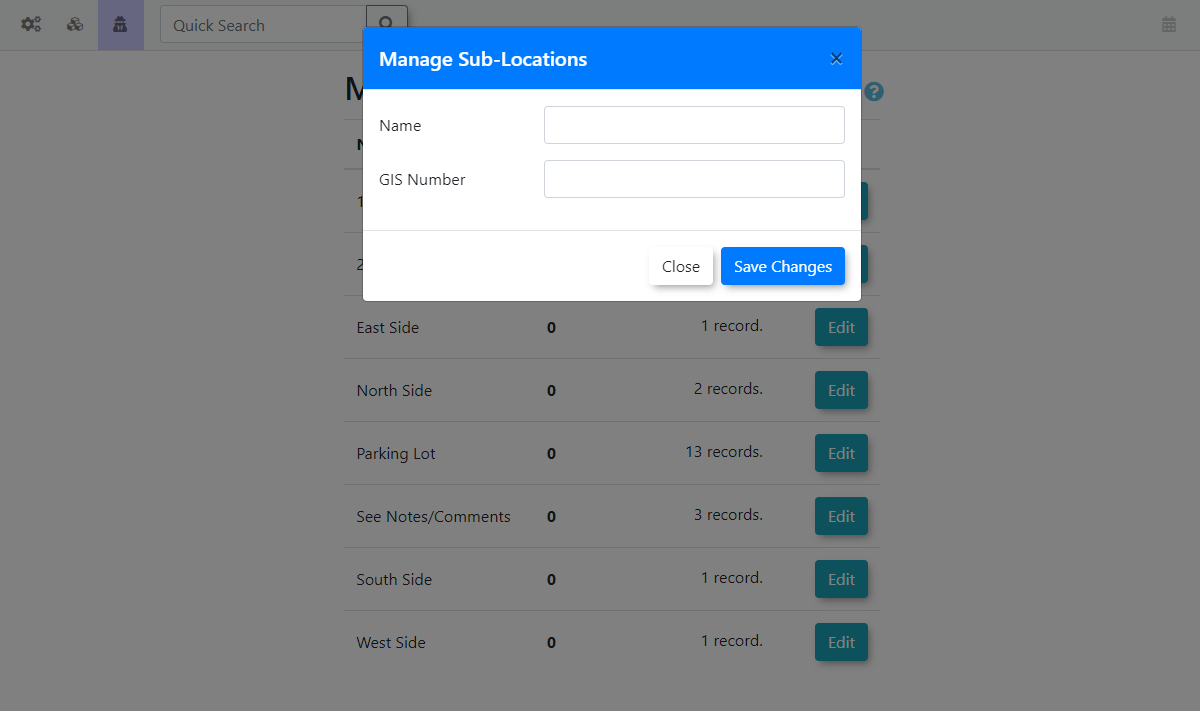
Click Save Changes to complete the process.
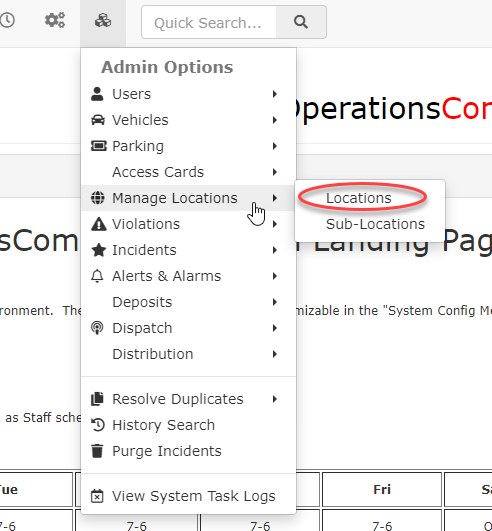
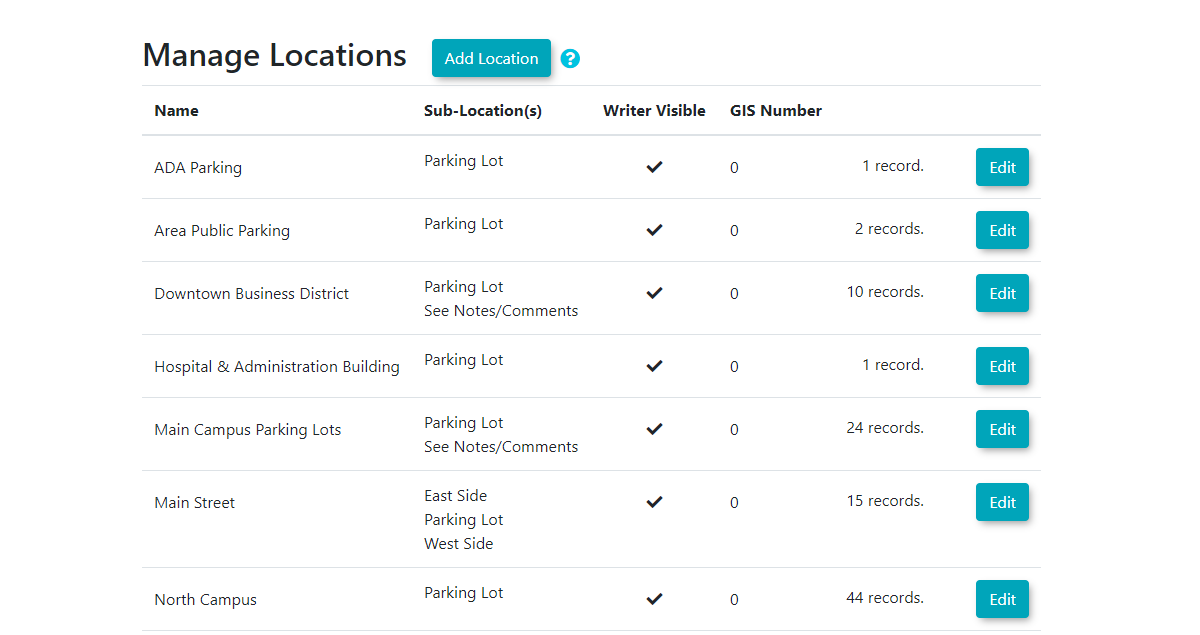
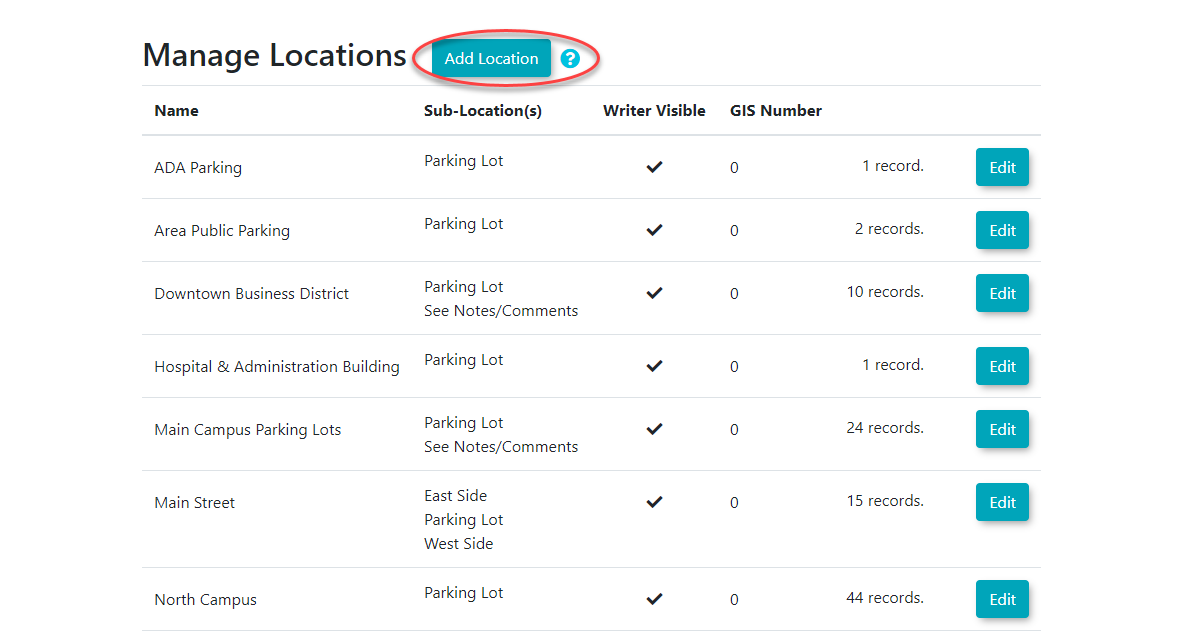
Locations
Click Admin Options, Manage Locations and Locations.
The Manage Locations page displays.
|
Adding a Location
Click the Add Location button to begin.
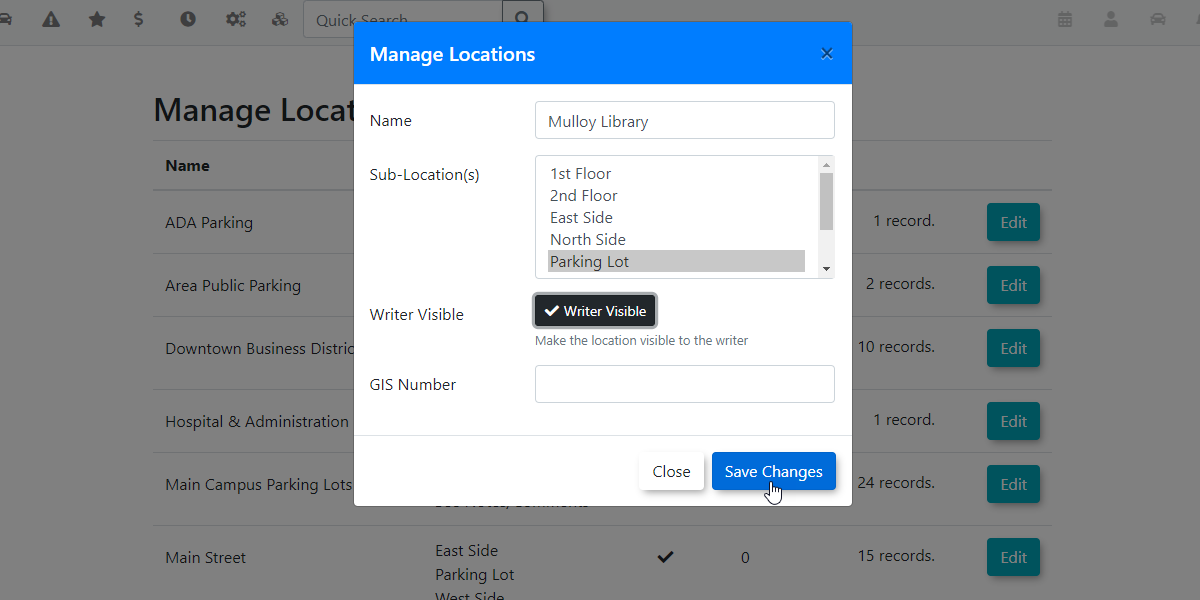
- Enter the name of your new location. In our example the name is Mulloy Library.
- Select the Sub-Location(s) you would like associated with this location. Sub-Locations are used in incident reporting and do not apply to vehicle violations.
- To have the location be Writer Visible, click on the "Writer Visible" checkbox beside the location.
- The GIS Number is optional and is used by clients who use a geographic location code.
- Click on Save Changes to continue.
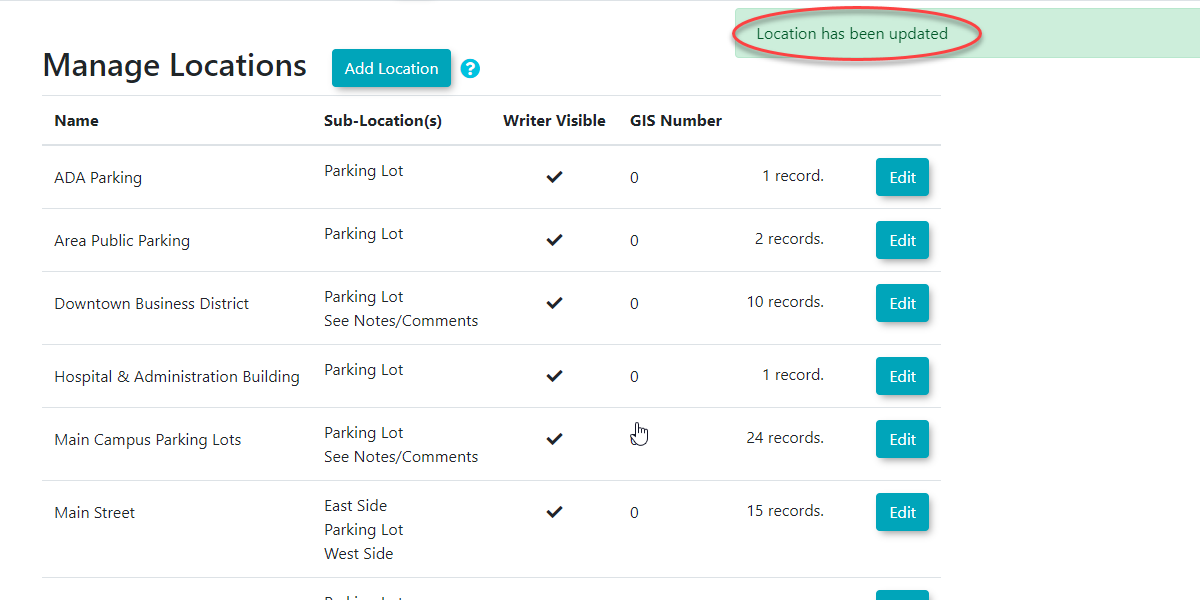
The Manage Locations page will refresh and display a confirmation message indicating the Location has been updated.
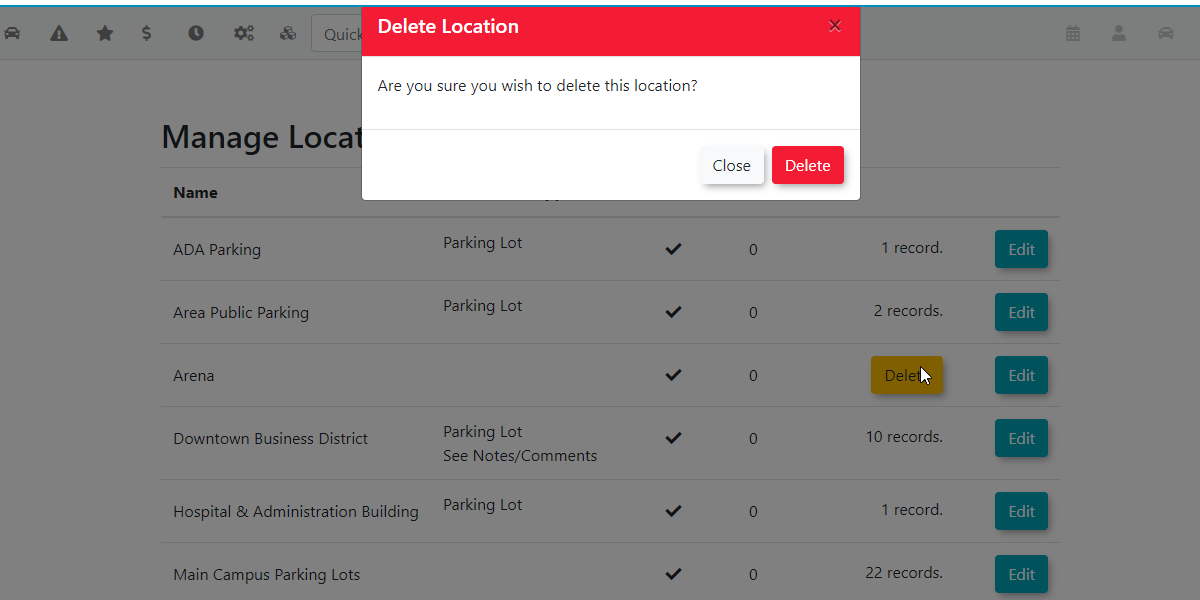
Deleting a Location
A location can be deleted from the system provided it is not associated to any records. If a location is eligible for deletion you will see a delete button for that specific Location.
In our example you see the delete button on the Arena location. Click on the Delete button to begin the process.
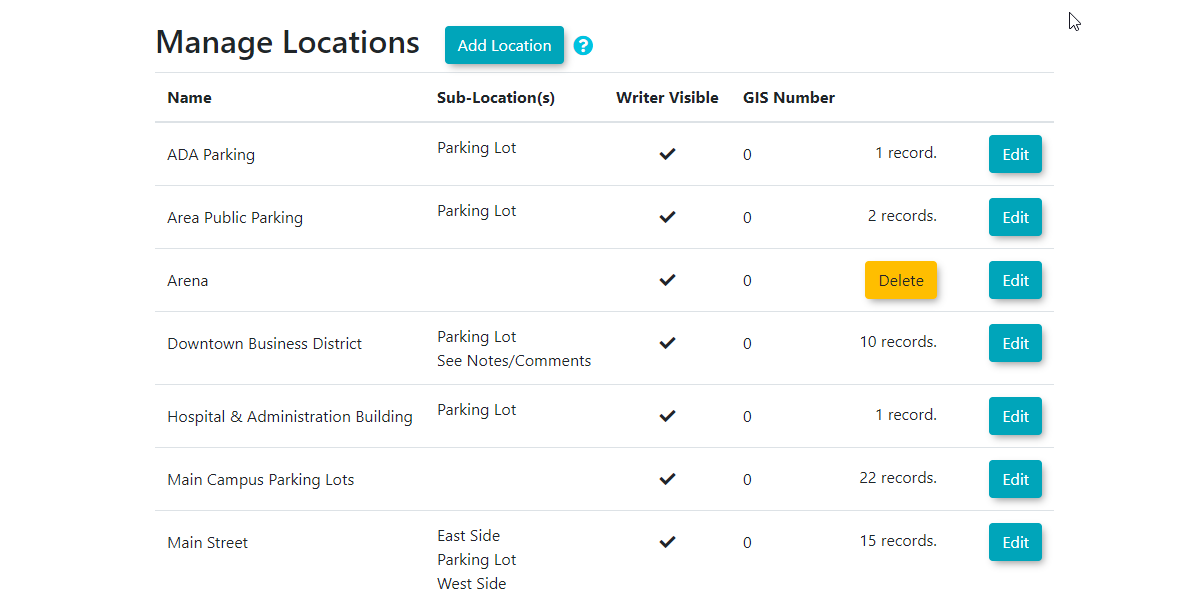
A confirmation popup will appear. Click the Delete button to continue. This action will remove the location from the system.
Location Setup
Barcodes - Edit Barcodes
- Select Admin Options, hover over Barcodes and click on Edit Barcodes
2. You will be redirected to the Barcodes Administration page.
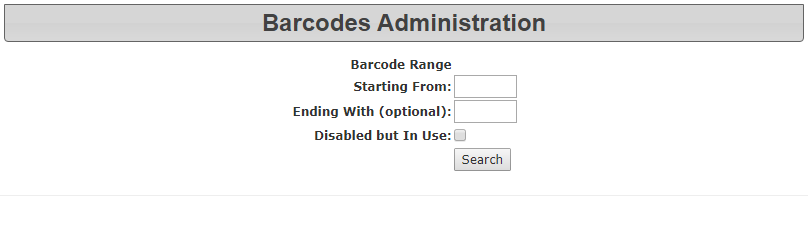
To edit a barcode, fill in the required information fields, then select Search. This will bring up any barcodes related to the information you supplied.
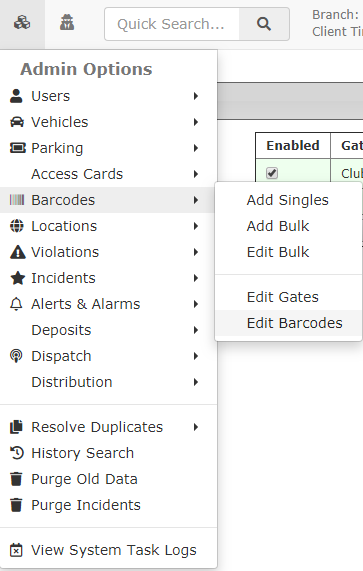
Barcodes - Edit Gates
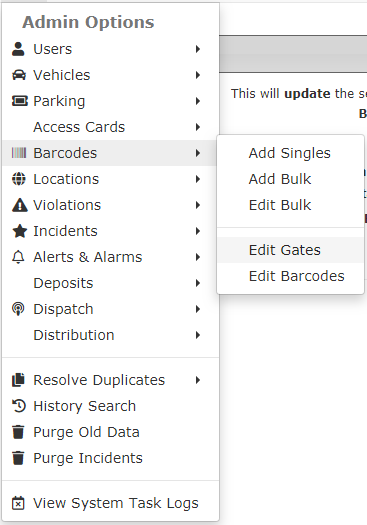
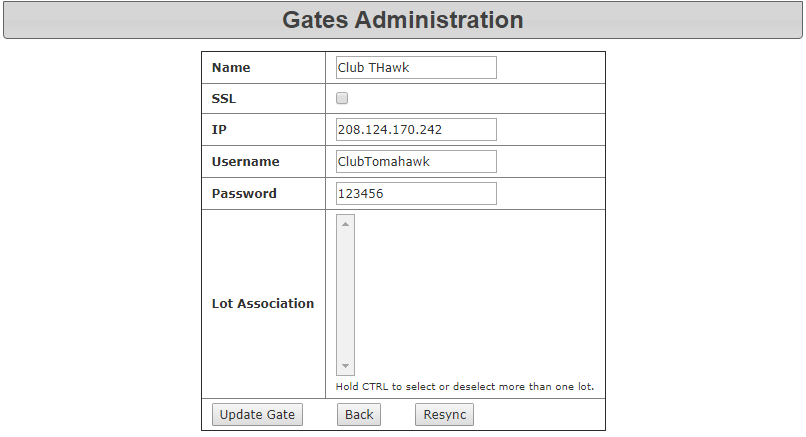
- Click Admin Options, Barcodes, and Edit Gates.

- You will be redirected to the Gates Administration page. To register a New Gate, click "New" under "IP Address".
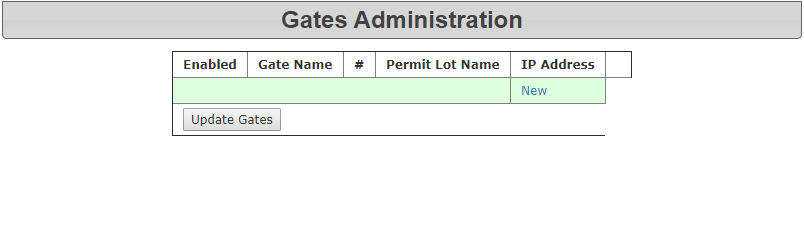
3. The Gates Administration page will refresh, to display information fields. Fill out the required information, and click "Update Gate".
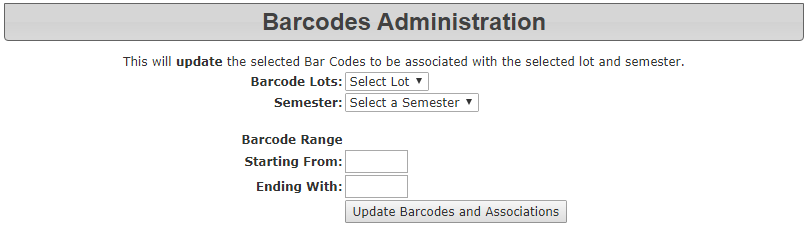
Barcodes - Edit Bulk
- Click Admin options, Barcodes and Edit Bulk.
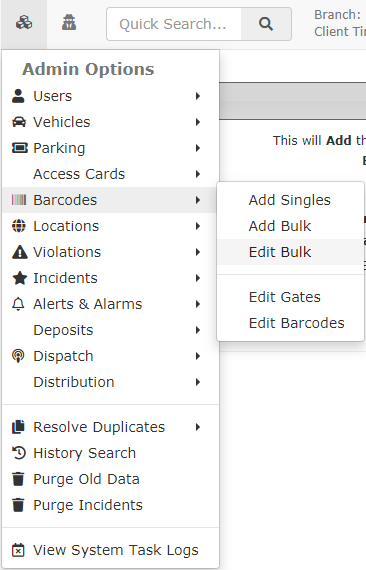
2. The Barcodes Administration page displays. To change/edit information associated with bulk barcodes, fill out the required information fields then click "Update Barcodes and Associations"
Barcodes - Add Bulk
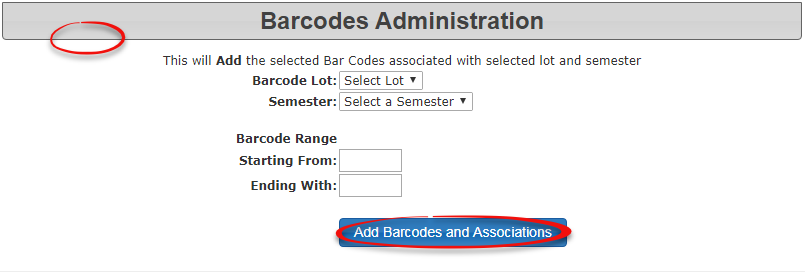
- Click Admin Options, Barcodes and click Add Bulk.
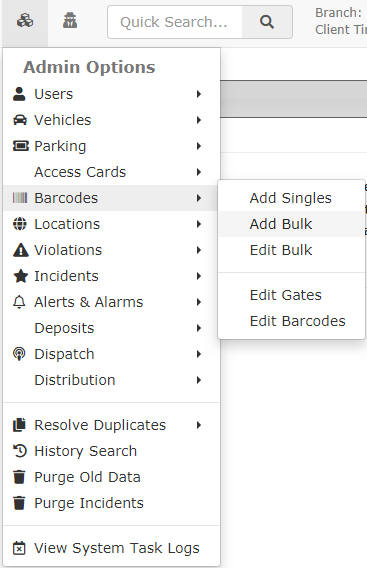
2. The Barcodes Administration page will display. To create a bulk set of Barcodes, fill out the required information fields and click "Add Barcodes and Associations".
Barcodes - Add Singles
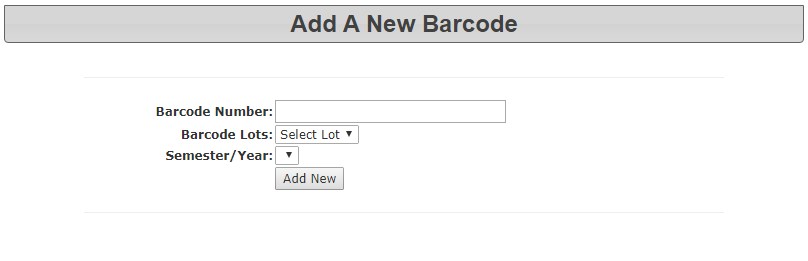
- Click Admin Options, Barcodes and Add Singles
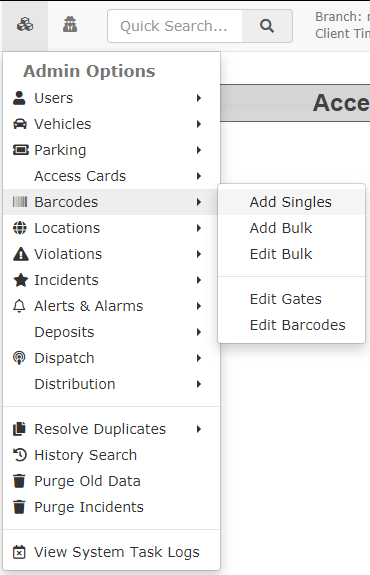
2. The Add A New Barcode page will display. To add a new barcode, fill out the required information fields and click "Add New"
Barcode Setup
- Barcodes - Add Singles
- Barcodes - Add Bulk
- Barcodes - Edit Bulk
- Barcodes - Edit Gates
- Barcodes - Edit Barcodes
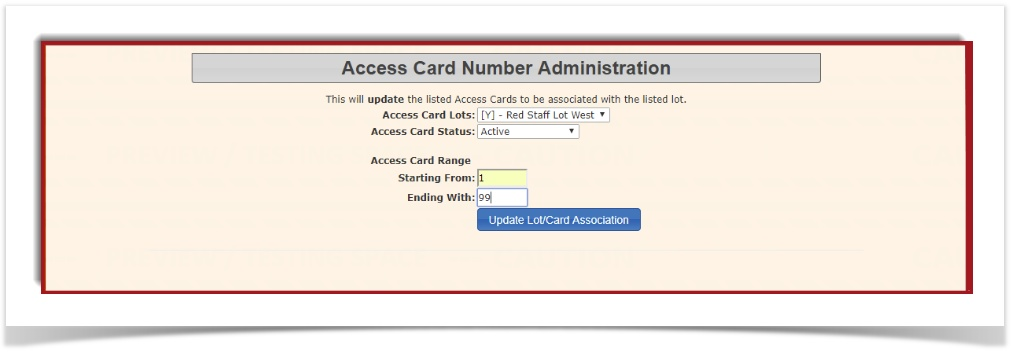
Access Cards - Edit Bulk
- Click Admin Options, Access Cards, and Edit Bulk.

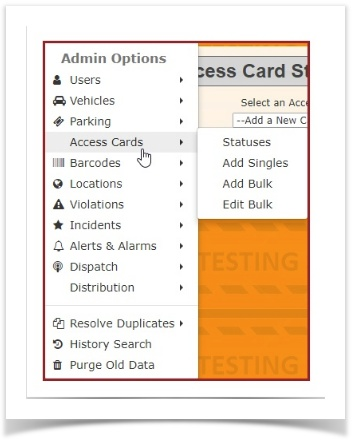
2. You will be redirected to the Access Card Number Administration page. Fill out the required changes/information in the boxes and click 'Update Lot/Card Association".
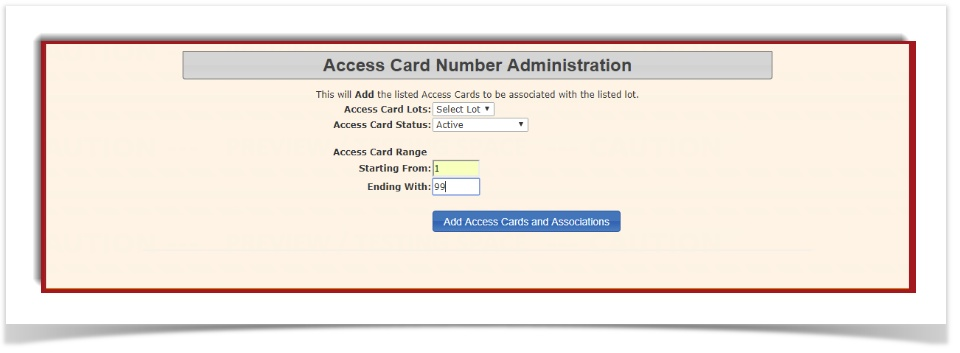
Access Cards - Add Bulk
- Click Admin Options, Access Cards, and Add Bulk.

2. The Access Card Number Administration page displays. To add Bulk Access Cards, fill out the required boxes, and click "Add Access Cards and Associations". Please note, the range must be contiguous. You cannot have gaps in the range or you must add them as separated ranges.
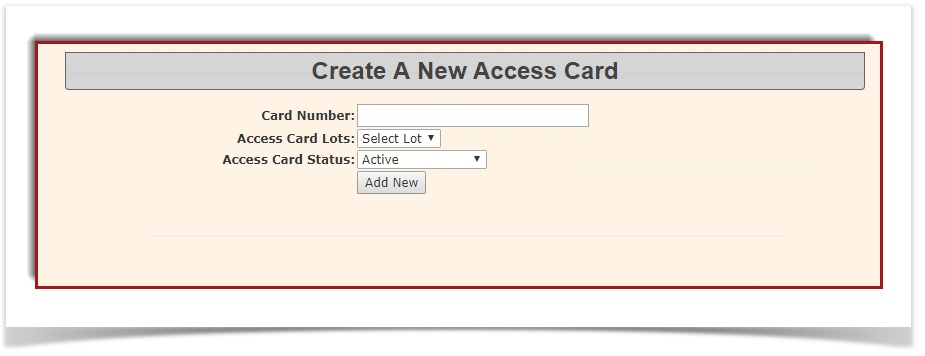
Access Cards - Add Singles
-
Click Admin Options, Access Cards, and "Add Singles".
- The "Create A New Access Card" page is displayed. To add a new entry - Enter the card number, choose the Access Card Lot and choose the Status of the Access Card. Click "Add New".


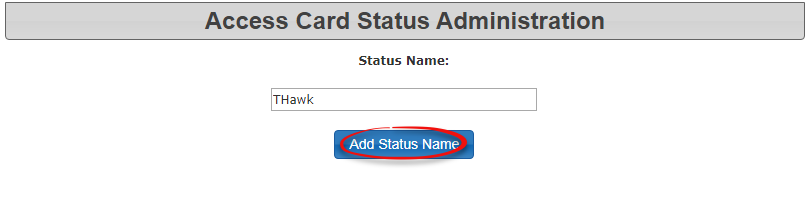
Access Card Status
-
Click Admin Options, Access Cards, and click Statuses.
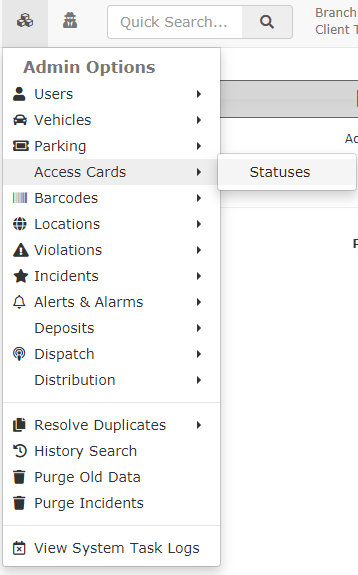
2. The 'Access Card Status Administration' page displays. You can view a list of Access Card Statuses or Add a New status. To see a list of all Access Cards, click on the drop-down list.
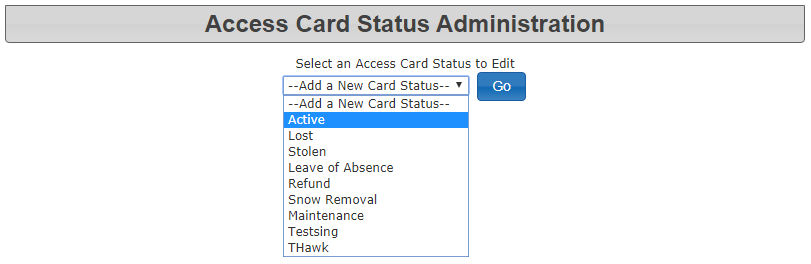
3. To Add a new Access Card Status, click on "Add New Card Status" and click "Go". Enter the Card Status name and click "Add Status Name". If you want to change the name of an existing status, choose one of the Status options from the drop-down menu and click "Go". Make your changes and click "Update Status Name".
Access Card Setup
Permit States
Managing Permit States
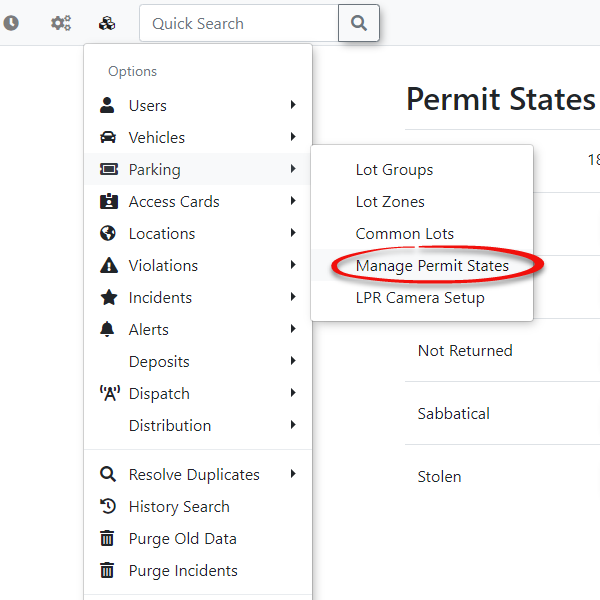
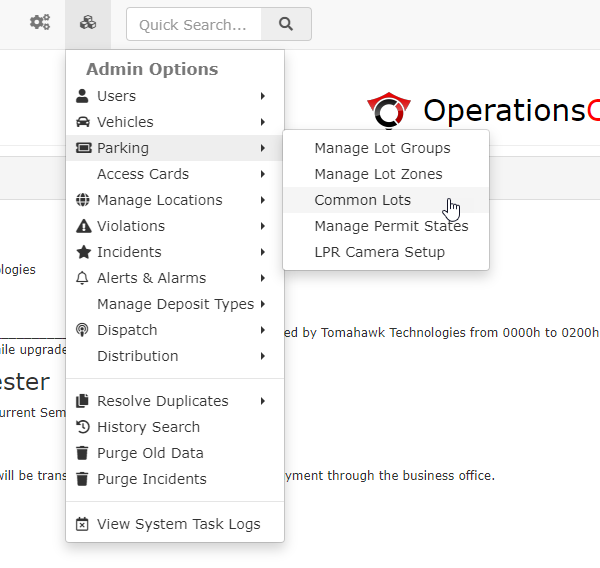
Click Admin Options, Parking followed by Manage Permit States.
The Manage Permit States page displays with all of the available choices.
Adding Permit States
To add a new permit state click Add Permit State and complete the required field followed by Save Changes.

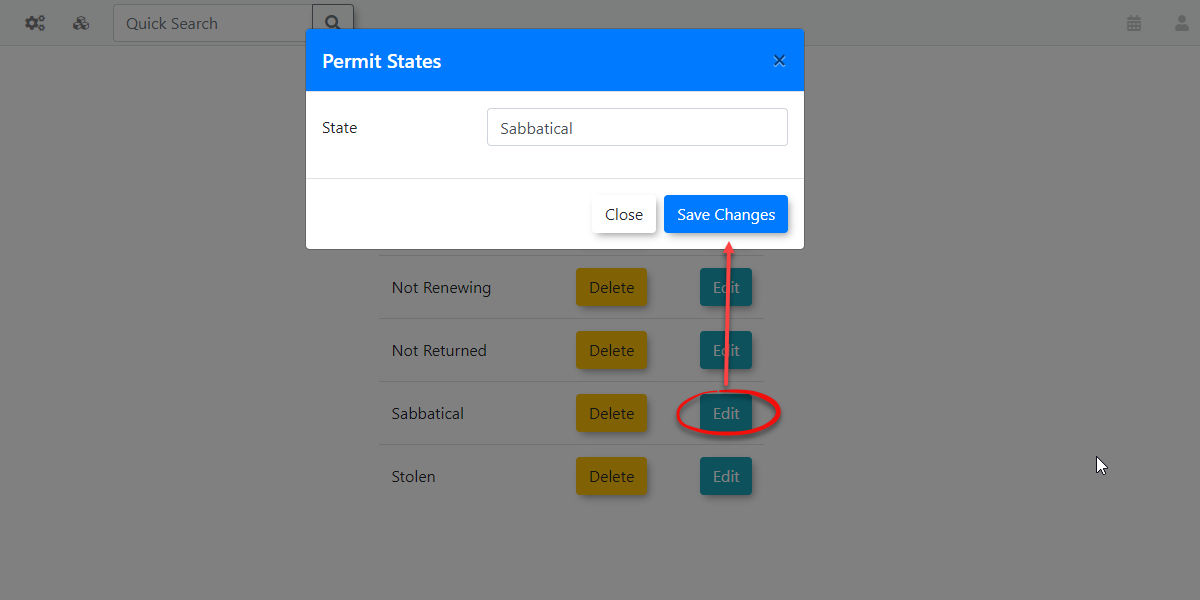
Editing Permit States
To edit permit states click the Edit button next to the permit state you wish to make updates to. This will open a new modal window allowing you to change the existing name of that item.
Deleting Permit States
To delete permit states simply click the Delete button next to the permit state you wish to remove from the list. A modal window will appear asking you if you are sure you wish to delete this permit state.
Important
In order to delete a permit state it must not be used in the system. Admins will first need to make sure that no permits are using this permit state before it can be removed. This is to prevent permits from having blank information by deleting these permit states while they're in use.
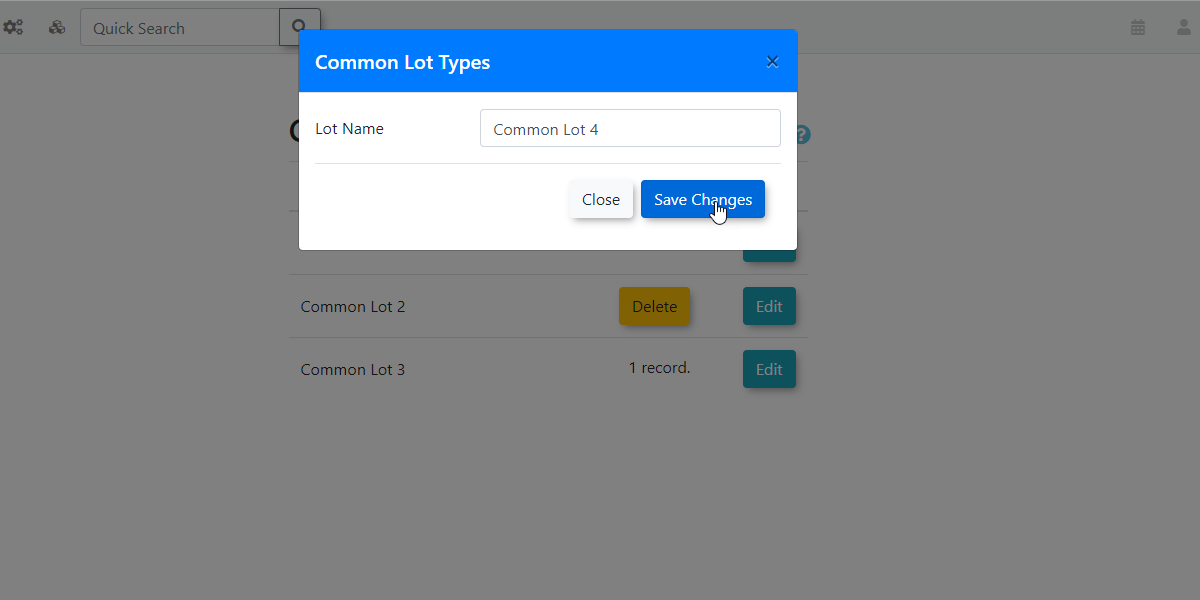
Common Lots
Navigating to Common Lots
To get to the common lots page click Admin Options then Parking followed by Common Lots.
The Common Lot Type Administration page displays.
Managing Common Lot Types
Adding Common Lot Types
To add a common lot type click the Add Common Lot Type button at the top of the page. A new modal window will appear allowing you to create your lot type. When you are finished making your changes click Save Changes.
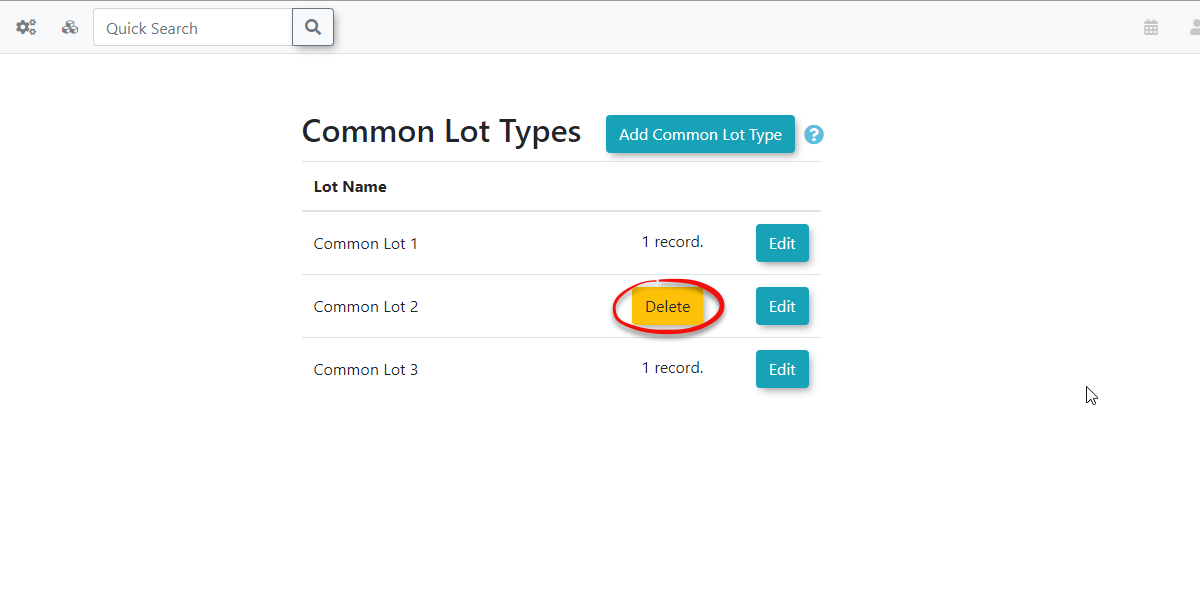
Editing Common Lot Types
To edit common lot types click the Edit button next to the type you want to update. A modal window will appear allowing you to make your changes. Click Save Changes when you are finished editing your common lot type.

Making changes to lot types that are being used will reflect the entire system.
Deleting Common Lot Types
To delete a common lot type click the Delete button next to the type you wish to remove. Keep in mind you are not able to delete items that are currently being used in the system.
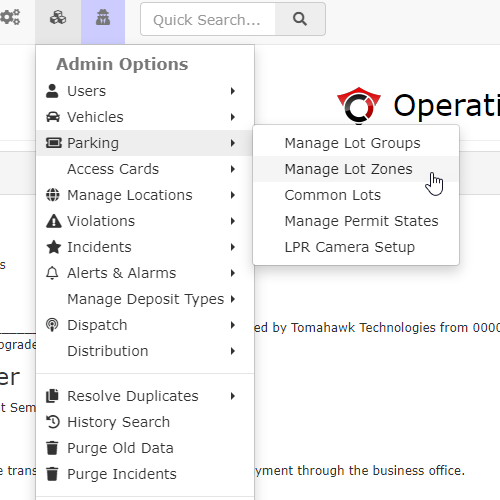
Lot Zones
Managing your Lot Zones
Click Admin Options, Parking and Manage Lot Zones.
The Manage Lot Zones page will display and you can choose to Add or Edit a Lot Zone.
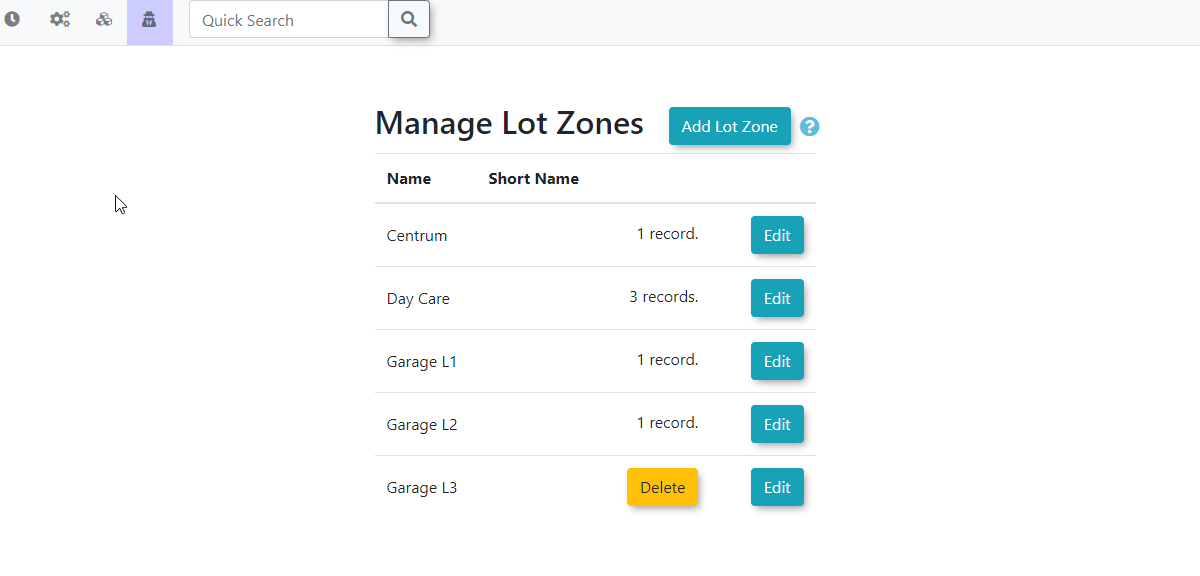
To Add a new Lot Zone, click the Add Lot Zone button. Enter the name of your new Parking Zone. When finished, click Save Changes.
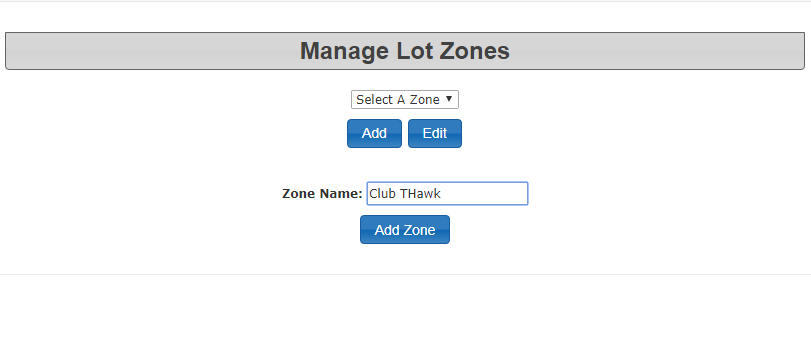
To Edit a Lot Zone, click Edit next to the Lot Zone that you want to edit. Enter the changes that are being made, then click Save Changes.

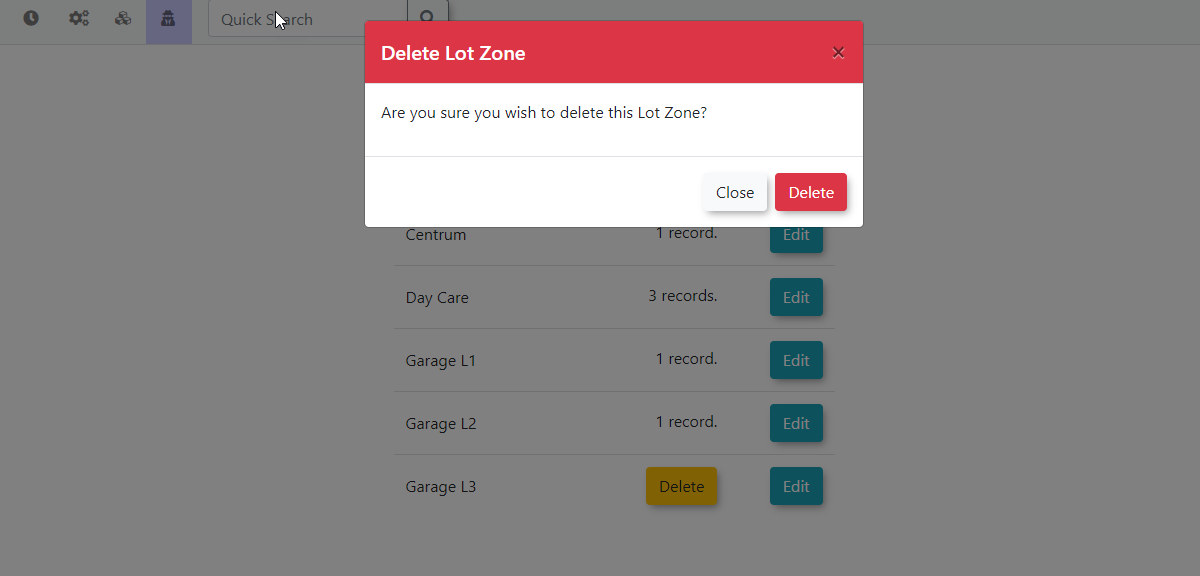
Only Zones with no records can be deleted, to delete a Zone, click Delete. Then on the confirmation window, select Delete.
Parking Setup
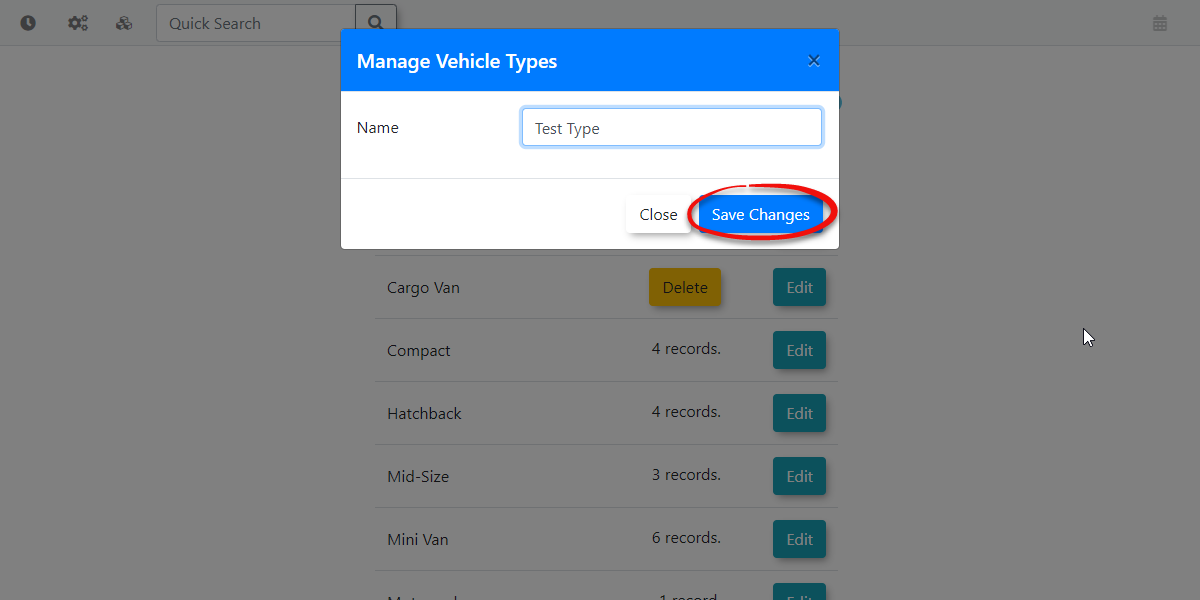
Vehicle Types
Managing Vehicle Types
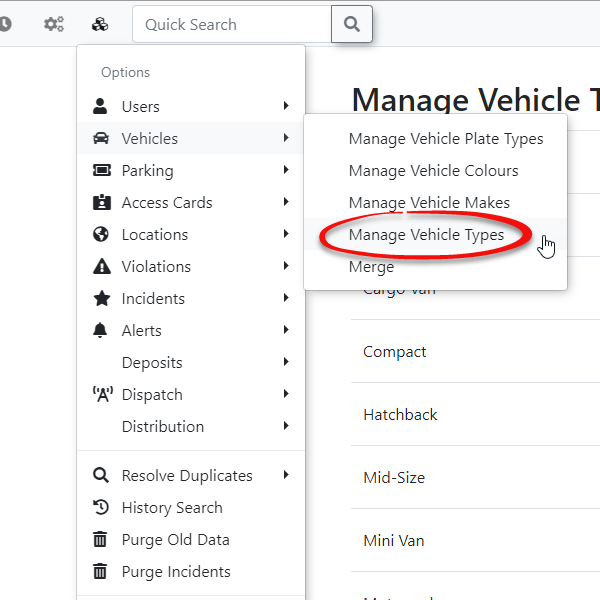
Click Admin Options, Vehicles followed by Manage Vehicle Types.
The Manage Vehicle Types page displays with all of the available choices.
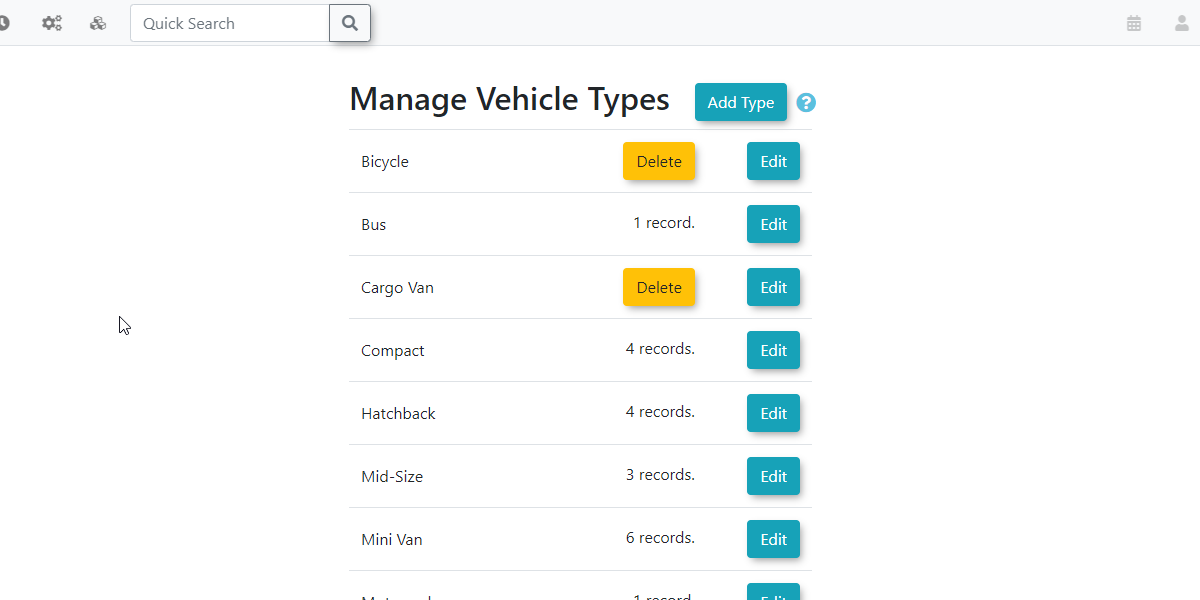
Adding Vehicle Types
To add a new vehicle type click Add Type and complete the required field followed by Save Changes.
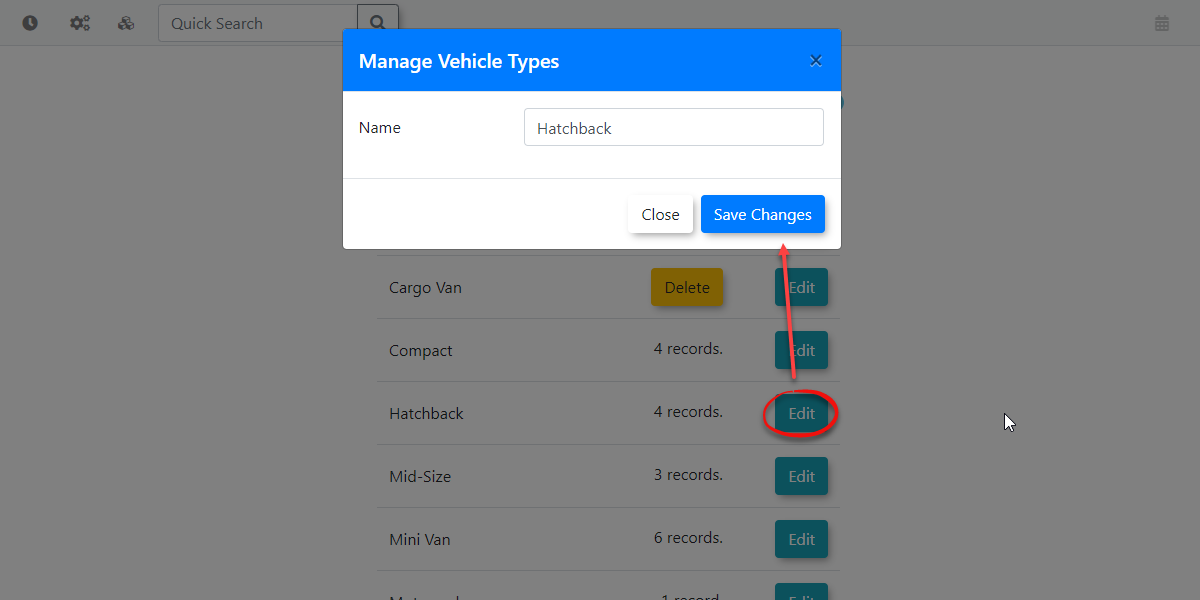
Editing Types
To edit vehicle types click the Edit button next to the type you wish to make updates to. This will open a new modal window allowing you to change the existing name for that vehicle type.
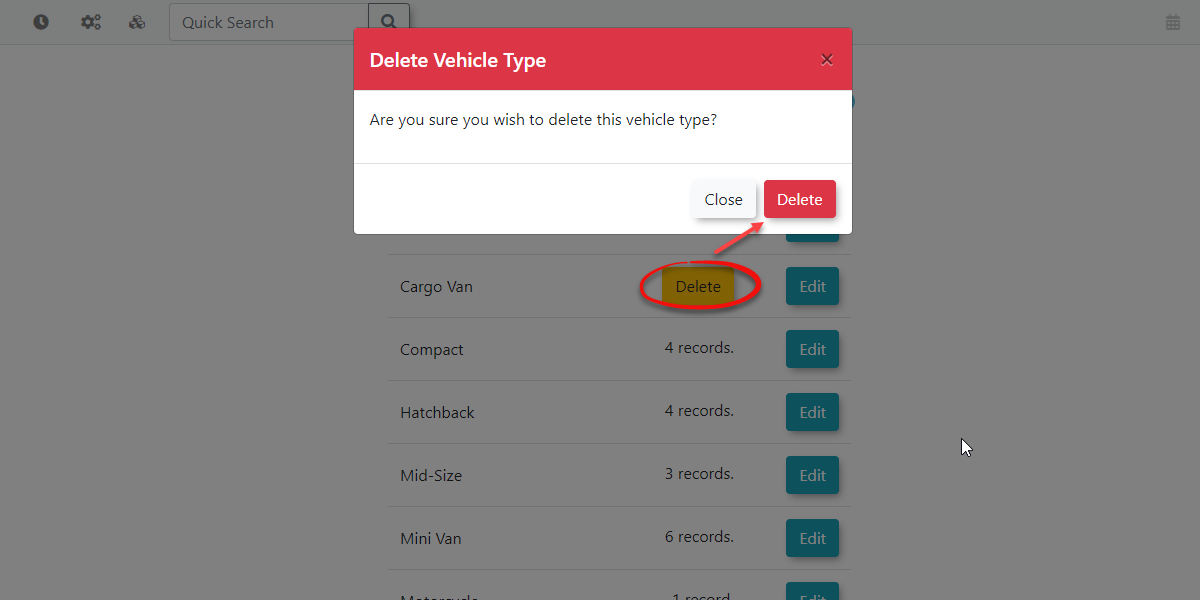
Deleting Vehicle Types
To delete vehicle types simply click the Delete button next to the type you wish to remove from the list. A modal window will appear asking you if you are sure you wish to delete this item.
Important
In order to delete vehicle types it must not be used in the system. Admins will first need to make sure that no users are using this type before it can be removed. This is to prevent vehicles from having blank information by deleting these types while they're in use.
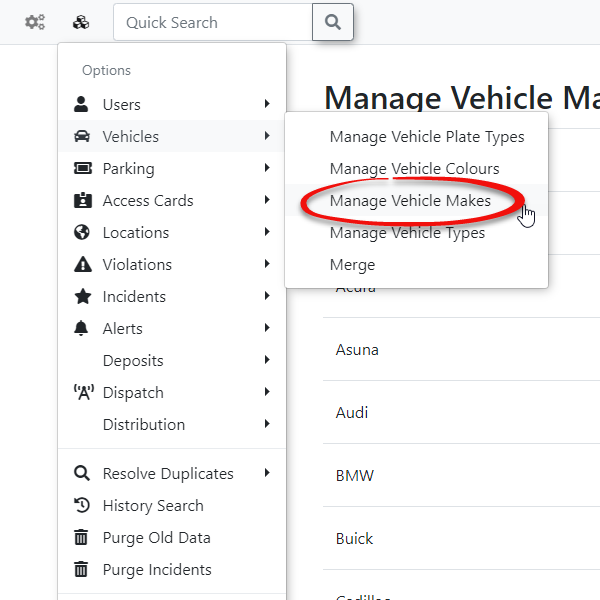
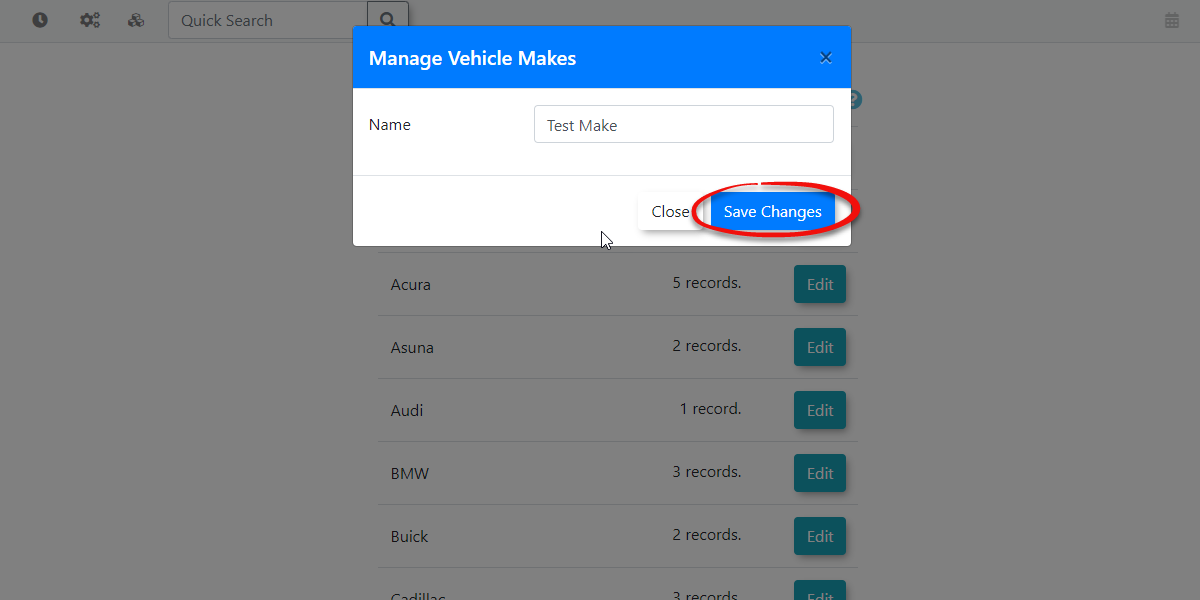
Vehicle Makes
Managing Vehicle Makes
Click Admin Options, Vehicles followed by Manage Vehicle Makes.
The Manage Vehicle Makes page displays with all of the available choices.
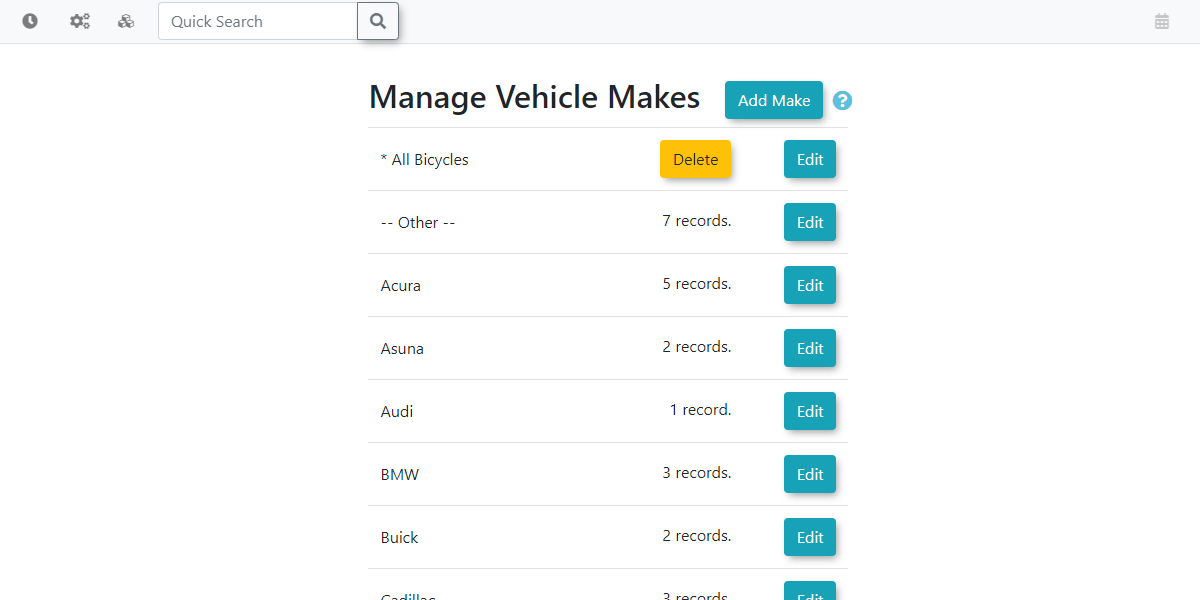
Adding Vehicle Makes
To add a new make click Add Make and complete the two required fields followed by Save Changes.
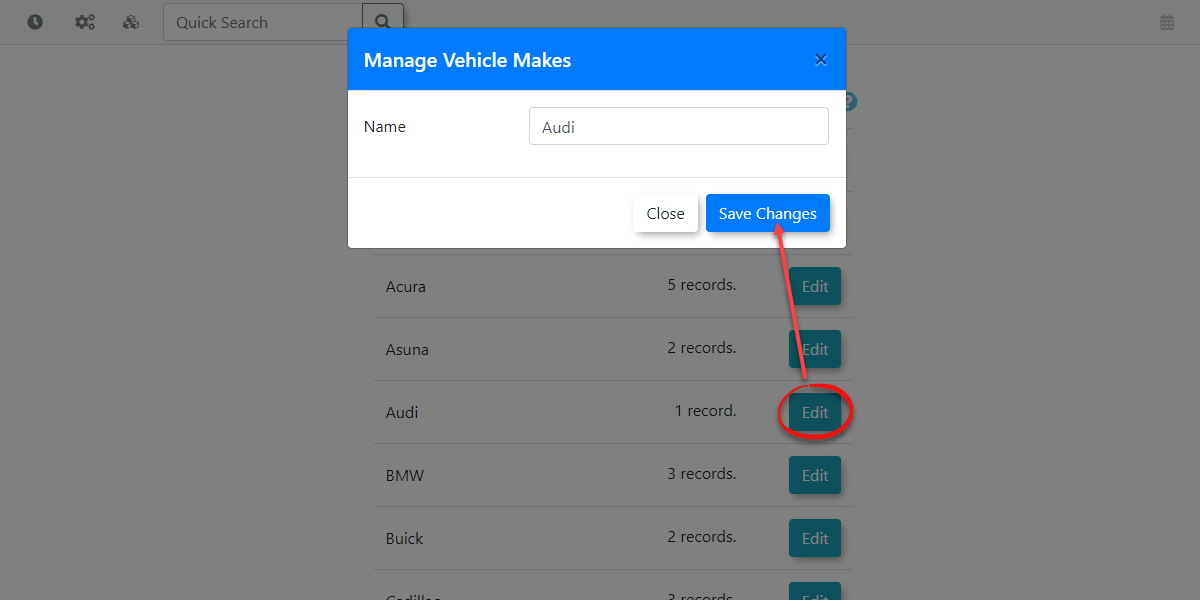
Editing Vehicle Makes
To edit vehicle makes click the Edit button next to the make you wish to make updates to. This will open a new modal window allowing you to change the existing name of that item.
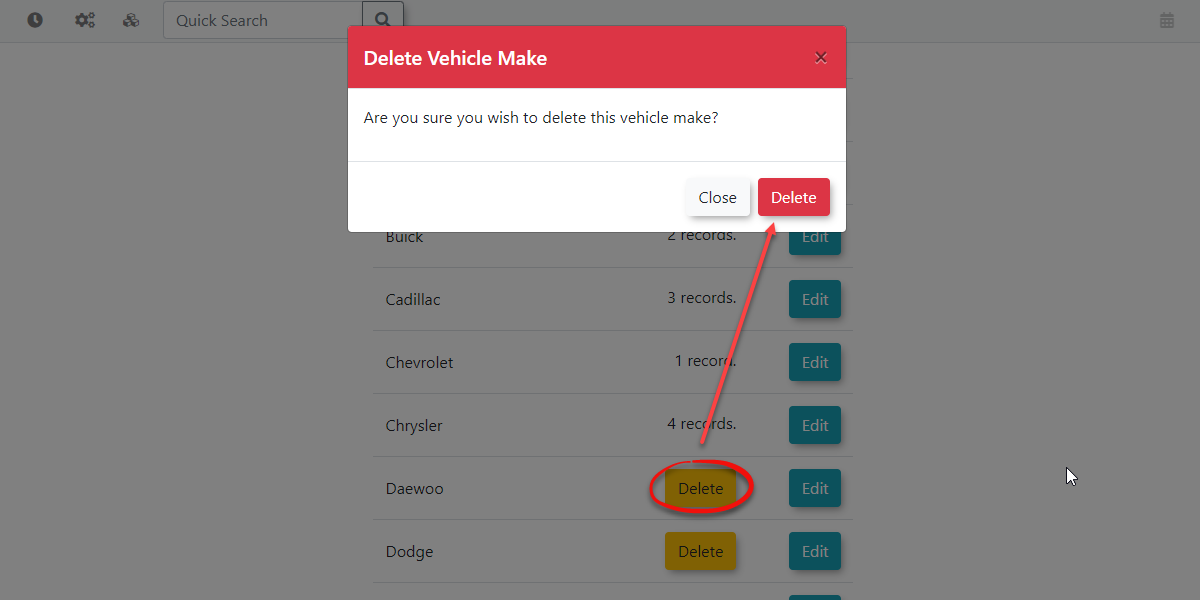
Deleting Vehicle Makes
To delete makes simply click the Delete button next to the make you wish to remove from the list. A modal window will appear asking you if you are sure you wish to delete this vehicle make.
Important
In order to delete a vehicle make it must not be used in the system. Admins will first need to make sure that no users are using this make before it can be removed. This is to prevent vehicles from having blank information by deleting these makes while they're in use.
Vehicle Colours
Managing the Vehicle Colour Picklist
Hover over Admin Options and click Vehicles followed by Vehicle Colors.
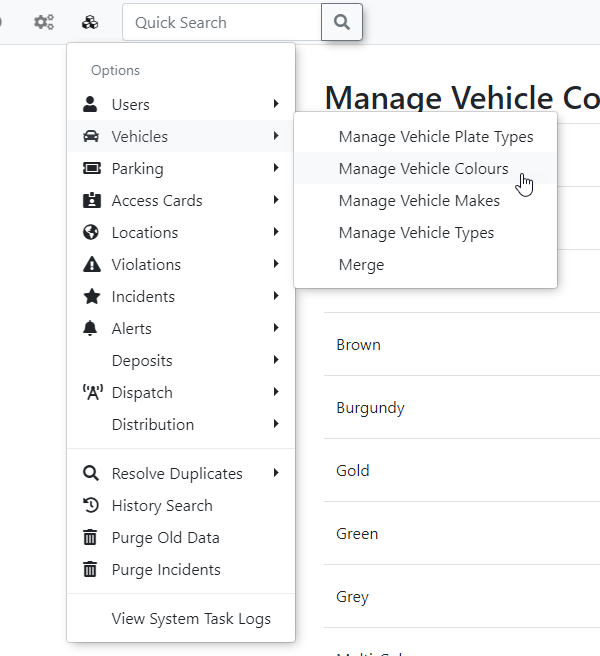
The Manage Vehicle Colours page will display.
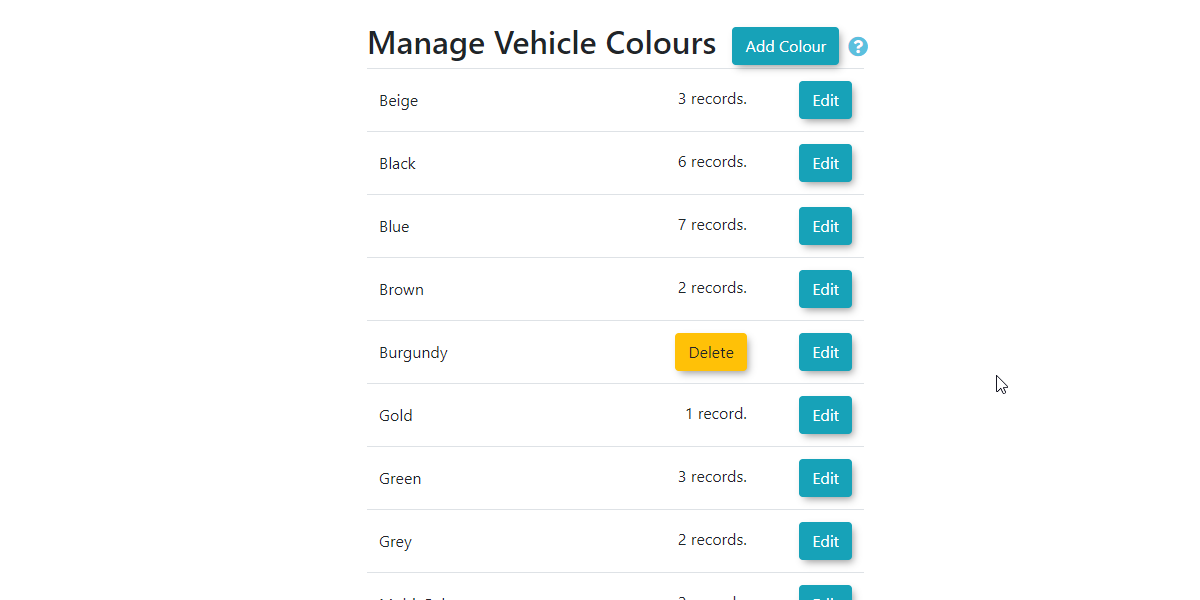
Adding Vehicle Colours
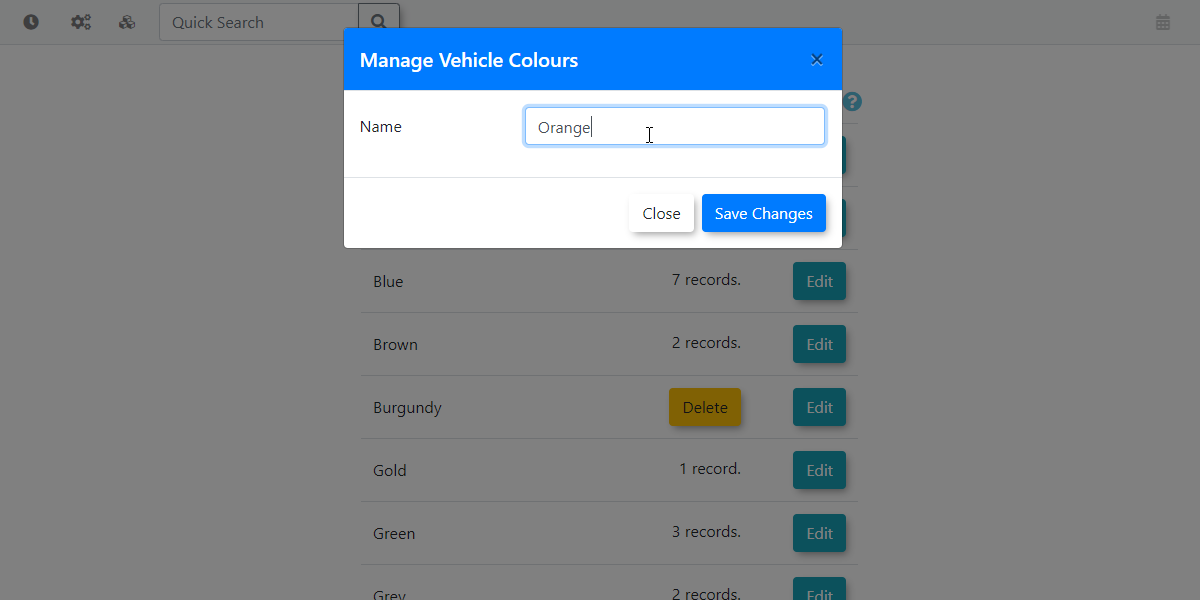
To add a new colour, click the Add Colour button. The Manage Vehicle Colours modal will be displayed. Enter the colour name and click Save Changes when you are finished.
Editing Vehicle Colours
To edit a colour name, click the Edit button and follow the prompts.
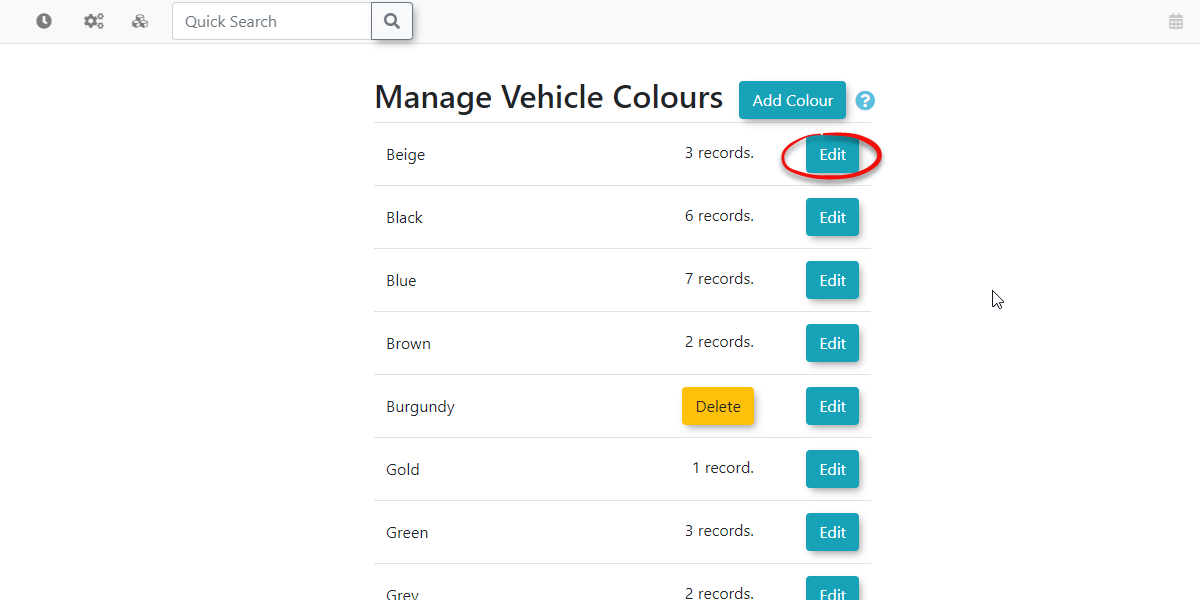
Click Save Changes to make the changes, if there are any errors while editing the vehicle colour name they will be displayed before allowing you to save.
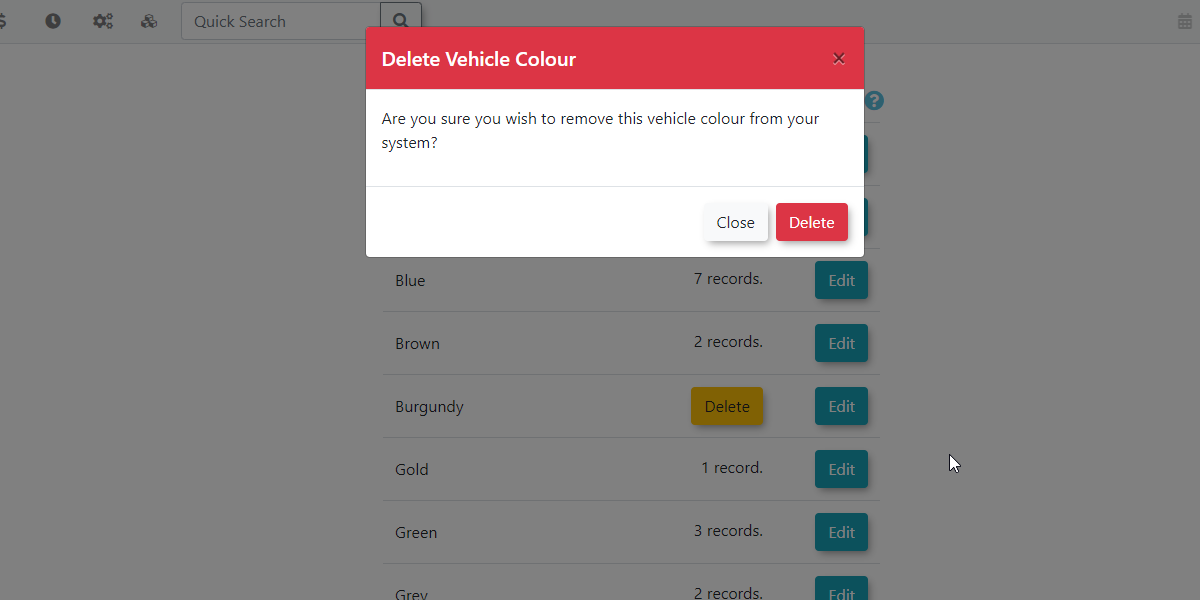
Deleting Vehicle Colours
To delete a colour name, click the Delete button and follow the prompts.
Important
If the vehicle colour is currently being used in the system it cannot be deleted by admins. You first need to go into each vehicle record associated to this colour and change their colour type.
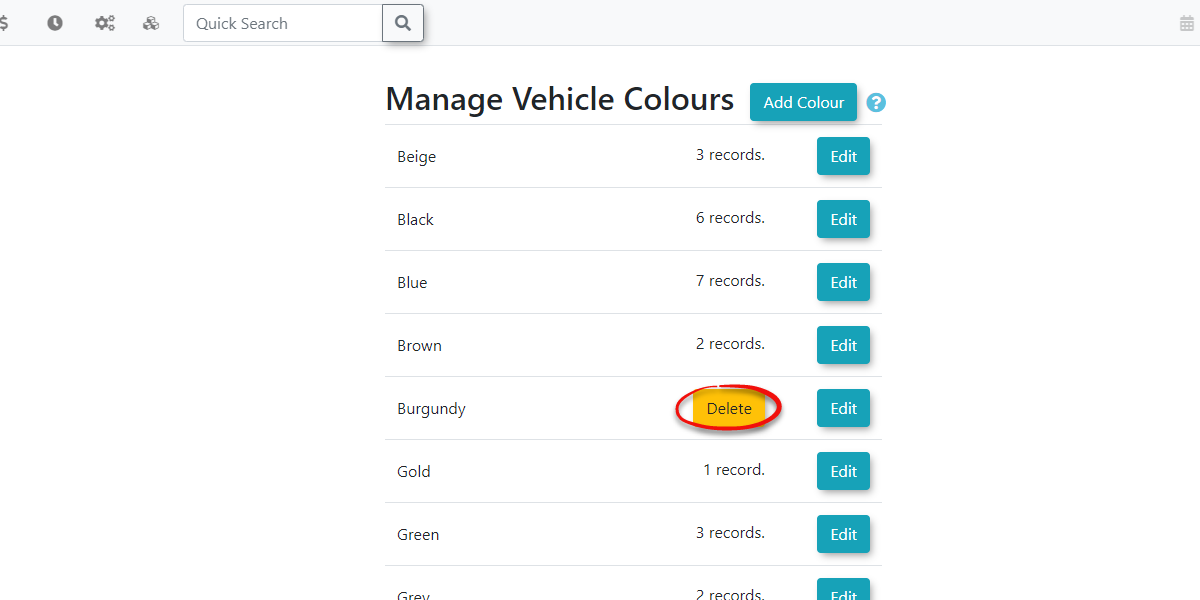
The Delete Vehicle Colour modal window will appear asking you if you are sure you would like to delete this colour from the list.
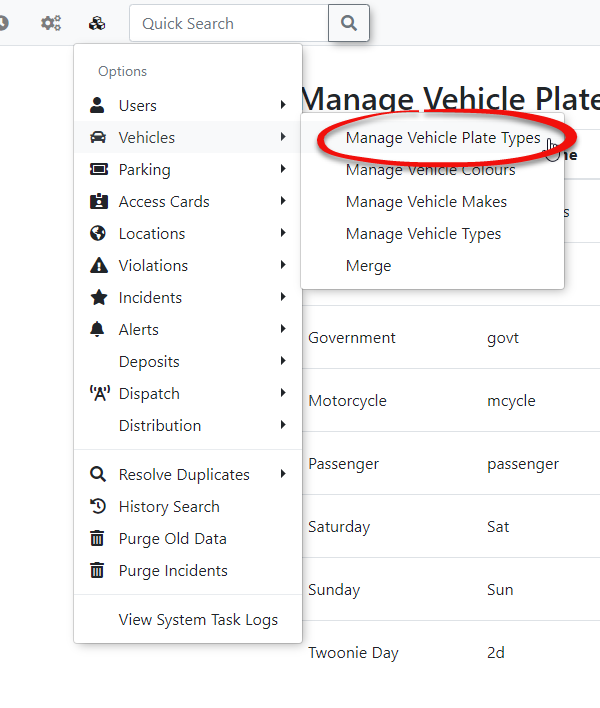
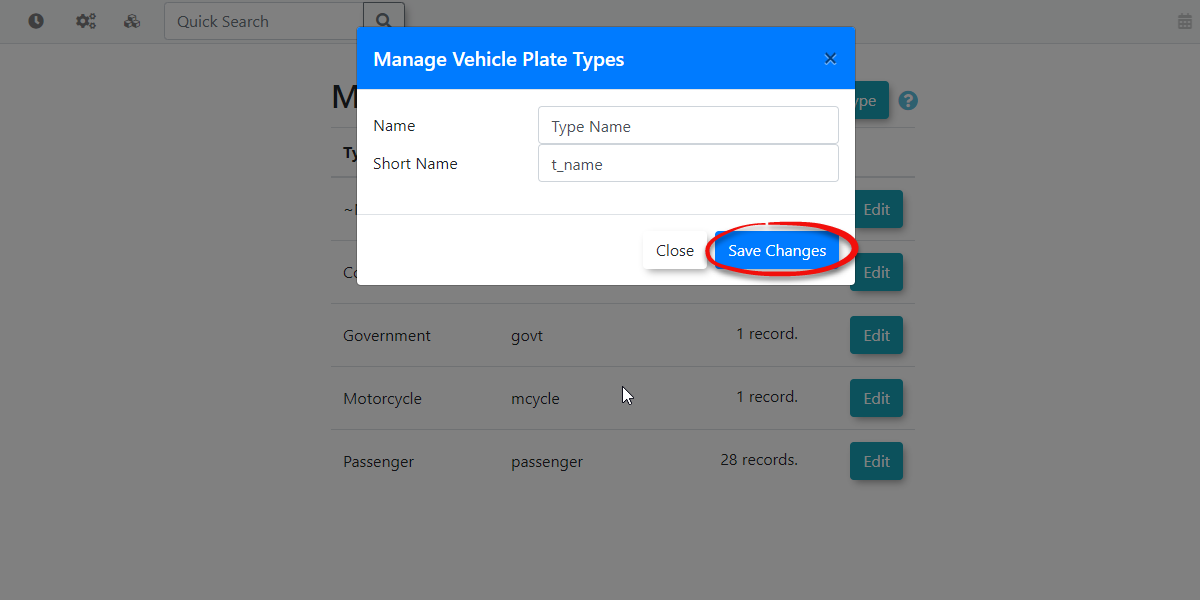
Vehicle Plate Types
Managing Vehicle Plate Types
Click Admin Options, Vehicles followed by Vehicle Plate Types.
The Manage Vehicle Plate Types page displays with all of the available choices.
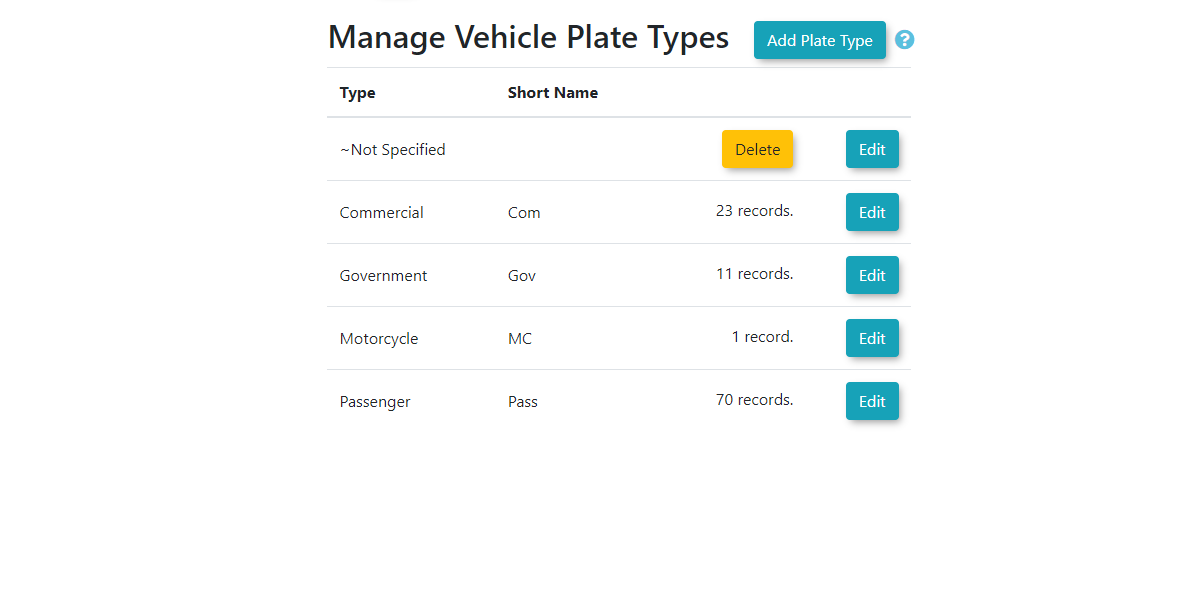
Adding Plate Types
To add a new plate type click Add Plate Type and complete the two required fields followed by Save Changes. The Short Name is used with handheld devices.
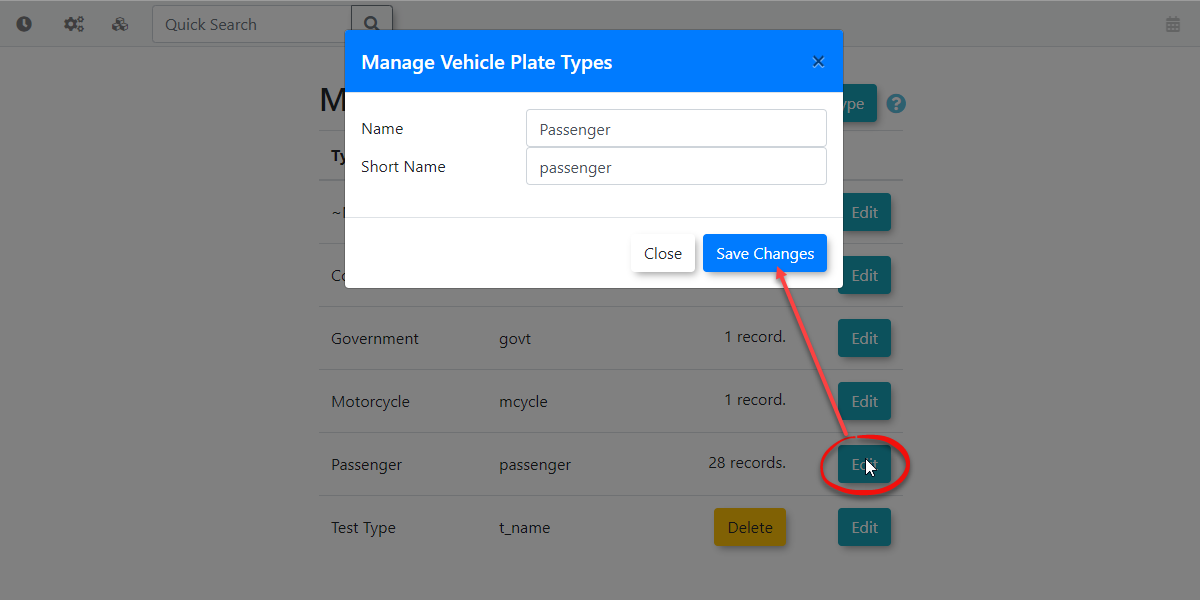
Editing Plate Types
To edit plate types click the Edit button next to the plate type you wish to make updates to. This will open a new modal window allowing you to change the existing name and short name for that plate type.
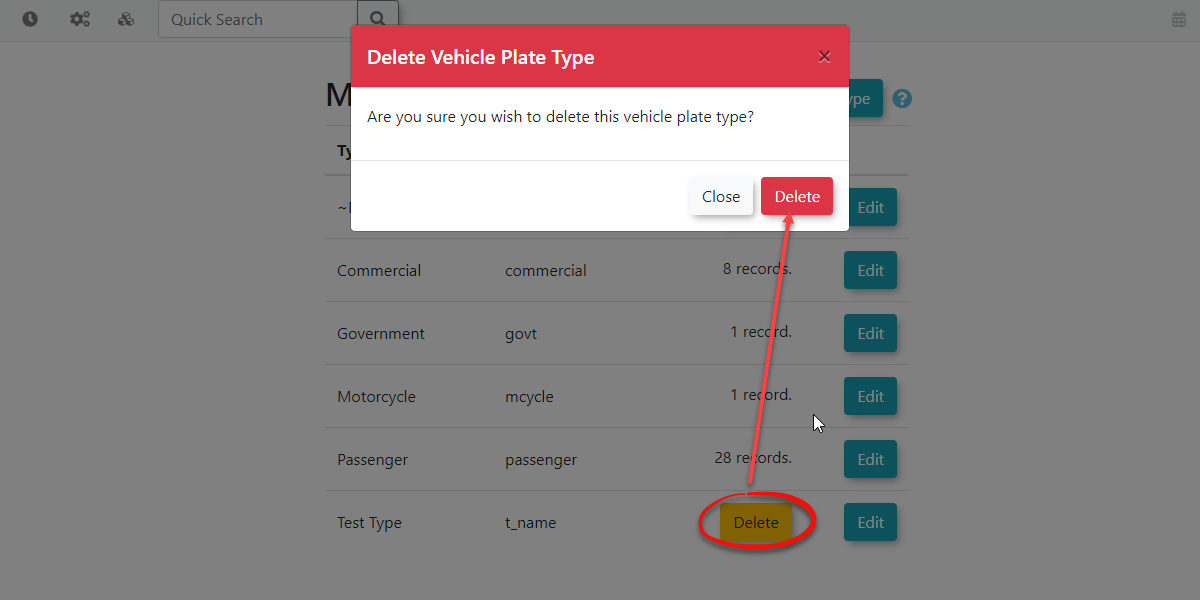
Deleting Plate Types
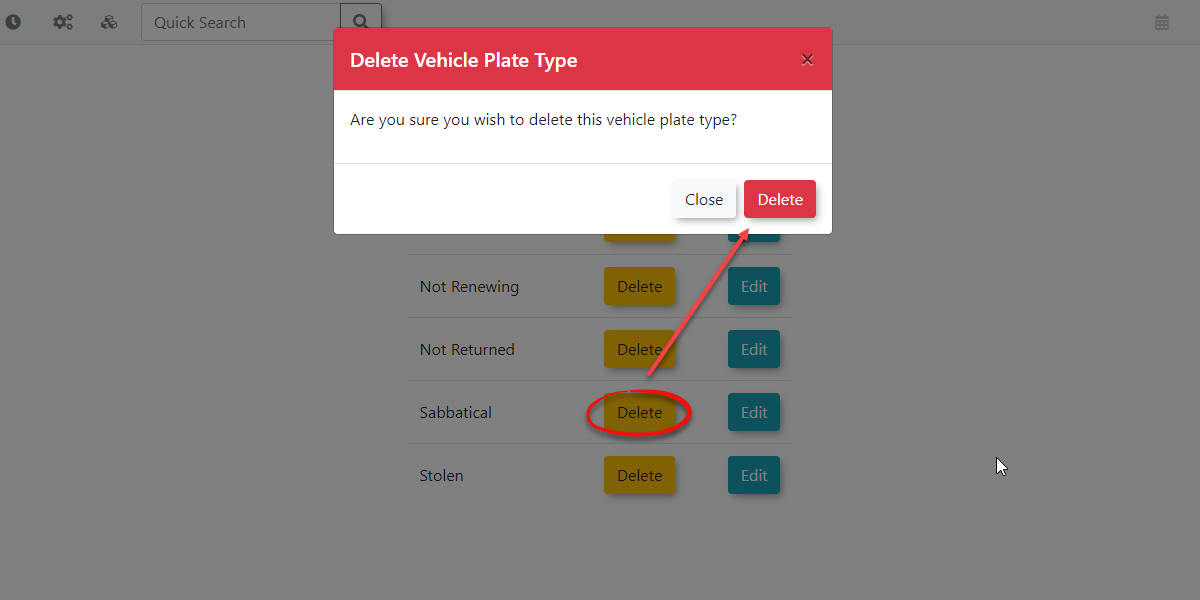
To delete plate types simply click the Delete button next to the plate type you wish to remove from the list. A modal window will appear asking you if you are sure you wish to delete this vehicle plate type.
Important
In order to delete a vehicle plate type it must not be used in the system. Admins will first need to make sure that no users are using this plate type before it can be removed. This is to prevent vehicles from having blank information by deleting these plate types while they're in use.
Vehicles Setup
Related Video
Setting Up Single Sign-On with OperationsCommander
What is Single Sign-On (SSO)?
Single Sign-On, or SSO, makes it easier to use different websites and apps without needing separate usernames and passwords for each one. With SSO, you log in once and get access to everything you need. Many companies use SSO to let employees access all their work tools with a single login. By adding OperationsCommander to your SSO system, your users can access our services without creating another account.
How does SSO work?
Here’s how SSO works in a simple way:
-
User Requests Access: You try to log in to a website or app, like your email or a school portal.
-
Redirect to SSO Service: Instead of asking for your username and password, the website sends you to an SSO service—a system that handles logins for multiple sites.
-
Enter Credentials: On the SSO service page, you enter your username and password. This is the only time you’ll need to do this to access multiple services.
-
Authentication: The SSO service checks your login information to make sure it’s correct. If everything checks out, it confirms who you are.
-
Return to the Original Site: Once verified, the SSO service sends a special token (like a digital pass) back to the website you wanted to access.
-
Access Granted: The website accepts the token and lets you in, so you can start using it without needing to log in again.
Why Use SSO?
-
Convenience: You only have to remember one set of login details.
-
Time-Saving: You can access multiple services quickly.
-
Improved Security: With fewer passwords to remember, you’re less likely to use weak passwords or write them down.
What do you need to consider before setting up SSO in OPS-COM?
SSO is a paid feature and you must have the setup fee and recurring fees negotiated before you can go further. Contact your Sales Representative or email support@ops-com.com to get this started.
- Will you have different Login Sources? Will you have Students/Staff use SSO but Public Users will not?
- Will login sources be different by usertype?
- How do you want to get your users into OPS-COM in the first place?
- Do you want Users created on the fly?
- Do you want to keep the information synced up with your Authority or will it be a one-time import?
- What user profile data/fields will you want to have synchronized between your SSO system and OPS-COM.
- Can you take advantage of the UserPush APIs?
Our Client Success team will be happy to go over the options with you to get you setup for success and working smoothly.
Using SAML SSO with OPS-COM
What is Single Sign-On (SSO)
Single Sign-On, or SSO, is a way to make it easier for your users to access OperationsCommander using your existing managed accounts. Your users will not have to remember a separate username and password and will instead login directly to your corporate service provider.
Configuring SAML Setup
Important - You must first follow the instructions to setup login sources found here.
Service Provider Fields
The Unique Identifier is part of the XML communication between OPSCOM and your SAML system. It is supplied by your SAML system and it is what OPS-COM uses to match against our UniqueID field.
The Entity ID for Service Provider defines the SAML integration path of the URL in the metadata. If there is more than one SAML integration in the system, each ID needs to be unique. The value supplied ends up in the path like this: "https://client.ops-com.com/auth/saml2/ ENTITY_ID_FIELD /acs"
The x509 certificate can be generated and added to the service provider. You, the Identity Provider provide this.
Identity Provider Fields
These fields come from the system you are working with, such as SAML, when communicating with OPS-COM. For example, SAML should display its metadata under Federation → Show Metadata on the SAML installation page.
Once the settings have been completed and saved, you will have access to the MetaData, Synchronization, and Translations tabs.
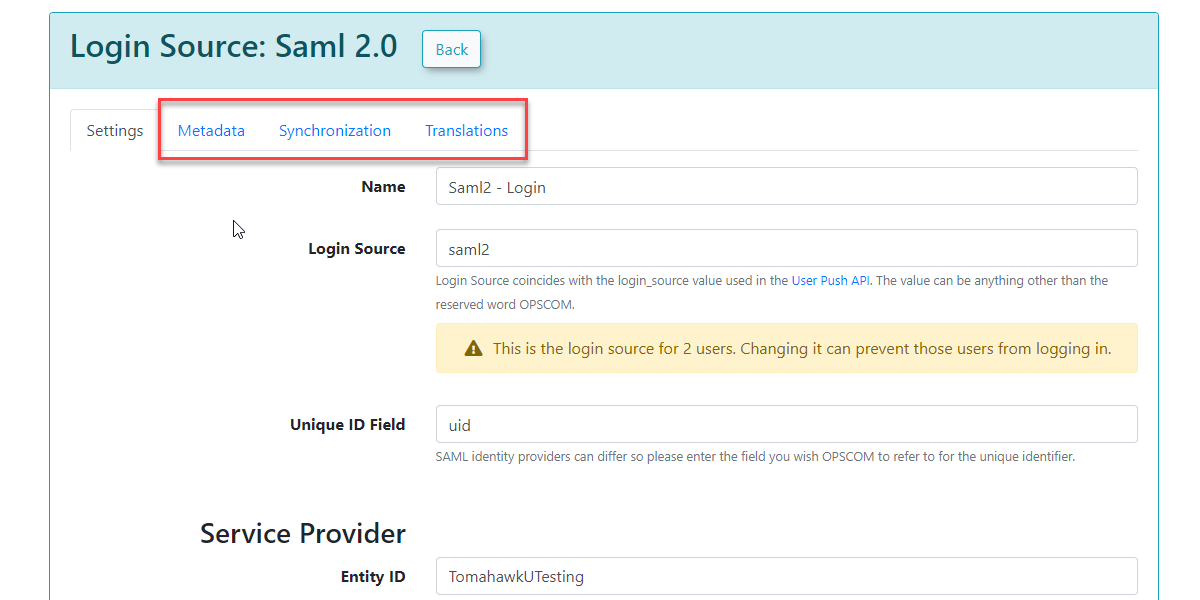
Metadata
The Metadata tab provides the XML that would be provided to the Service Provider.
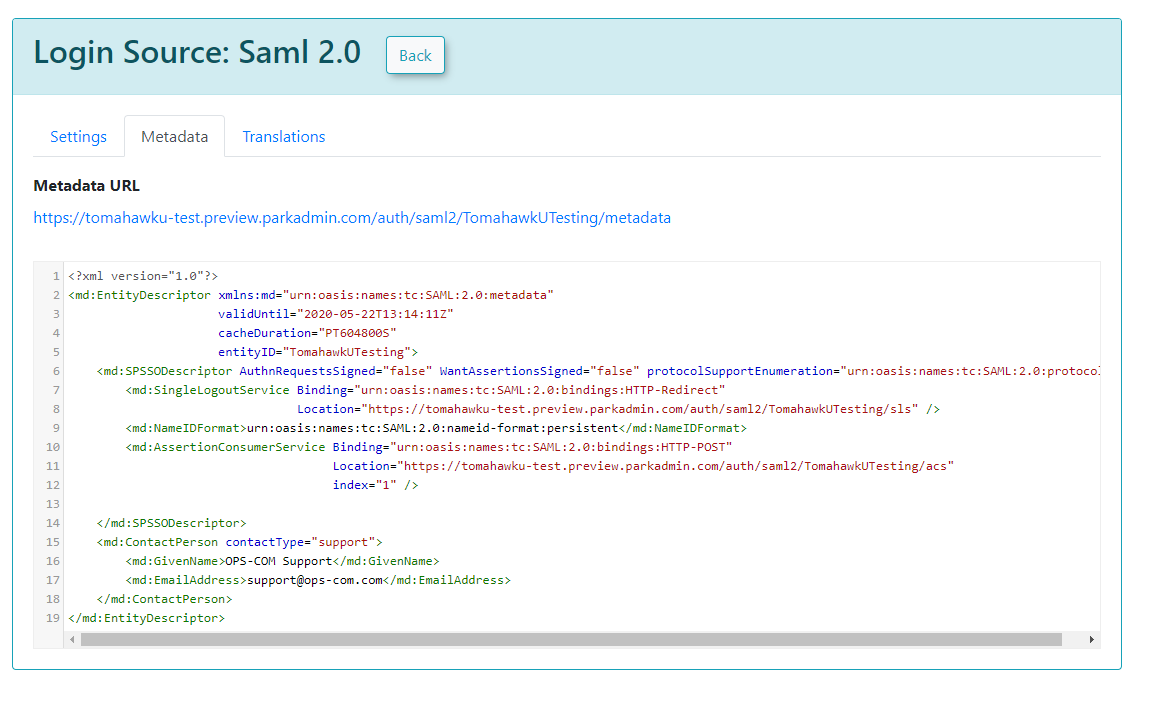
Sample XML File
The following is an example of a response from an external system to OPS-COM. In this case, it is a SimpleSAMLPhp service set up as the identity provider. At the bottom, are several attributes within an saml:AttributeStatement tag. These are required for our system to match to a user within our system. The one field that matters in this attribute section is the value being used as the permanently-unique identifier for a user. In this case it is "uid". Since "uid" is being sent back, then the setup for Identity Provider Fields should have "uid" as the Unique ID Field. If the unique ID is something else, such as SAMaccountName, then that should be used for the UniqueID.
<?xml version="1.0"?> <samlp:Response xmlns:samlp="urn:oasis:names:tc:SAML:2.0:protocol" xmlns:saml="urn:oasis:names:tc:SAML:2.0:assertion" ID="_aa1963115aa6490e728c7376f4c8849813bbb..."> ... <saml:Assertion xmlns:xsi="http://www.w3.org/2001/XMLSchema-instance" xmlns:xs="http://www.w3.org/2001/XMLSchema" ID="_9efd79bf6425983ee9176f3d33a99d1a9176180..."> ... <saml:Subject> <saml:NameID SPNameQualifier="MinionOpsComStaff" Format="urn:oasis:names:tc:SAML:2.0:nameid-format:transient">_7a426e0be71f14c1f349db00d7d543b6f7dcb52baa</saml:NameID> <saml:SubjectConfirmation Method="urn:oasis:names:tc:SAML:2.0:cm:bearer"> <saml:SubjectConfirmationData NotOnOrAfter="2021-08-24T16:00:41Z" Recipient="https://minion-3.dev.parkadmin.com/auth/saml2/MinionOpsComStaff/acs" InResponseTo="ONELOGIN_bb8a09203c888cf59af4c621a71cfa8f7559c016"/> </saml:SubjectConfirmation> </saml:Subject> <saml:Conditions NotBefore="2021-08-24T15:55:11Z" NotOnOrAfter="2021-08-24T16:00:41Z"> <saml:AudienceRestriction> <saml:Audience>MinionOpsComStaff</saml:Audience> </saml:AudienceRestriction> </saml:Conditions> <saml:AuthnStatement AuthnInstant="2021-08-24T15:34:46Z" SessionNotOnOrAfter="2021-08-24T23:34:46Z" SessionIndex="_a7a68666092117d24aab8adecf1b0830622855b85..."> <saml:AuthnContext> <saml:AuthnContextClassRef>urn:oasis:names:tc:SAML:2.0:ac:classes:PasswordProtectedTransport</saml:AuthnContextClassRef> </saml:AuthnContext> </saml:AuthnStatement> <saml:AttributeStatement> <saml:Attribute Name="uid" NameFormat="urn:oasis:names:tc:SAML:2.0:attrname-format:basic"> <saml:AttributeValue xsi:type="xs:string">6ddf4027-3397-4e45-8628-0189f60fe91e</saml:AttributeValue> </saml:Attribute> <saml:Attribute Name="full name" NameFormat="urn:oasis:names:tc:SAML:2.0:attrname-format:basic"> <saml:AttributeValue xsi:type="xs:string">Sarah Knowles</saml:AttributeValue> </saml:Attribute> <saml:Attribute Name="email" NameFormat="urn:oasis:names:tc:SAML:2.0:attrname-format:basic"> <saml:AttributeValue xsi:type="xs:string">sknowles@tomahawk.ca</saml:AttributeValue> </saml:Attribute> </saml:AttributeStatement> </saml:Assertion> </samlp:Response> |
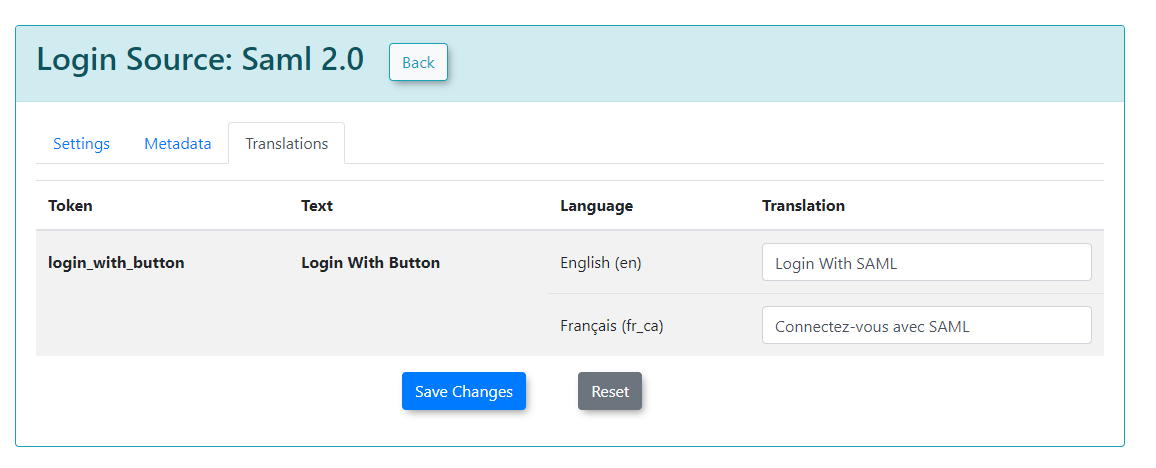
Translations
Translations can be used to change the text displayed on your login button from the user side. We can create as many different translations as we have available on our system.
For this example, we have English and French.
Synchronization
The synchronization tab allows you to create users in OPS-COM when they login from SAML if they do not already exist by mapping your user attributes to our system. This also lets you update existing users information in the system.
In this example, any field that is mapped and has a value from your SSO side should get updated to the value from SAML.
To begin, ensure that you enable Auto Create/Update User. Keep in mind that these are sample values from our test system, and that your SAML system may differ.
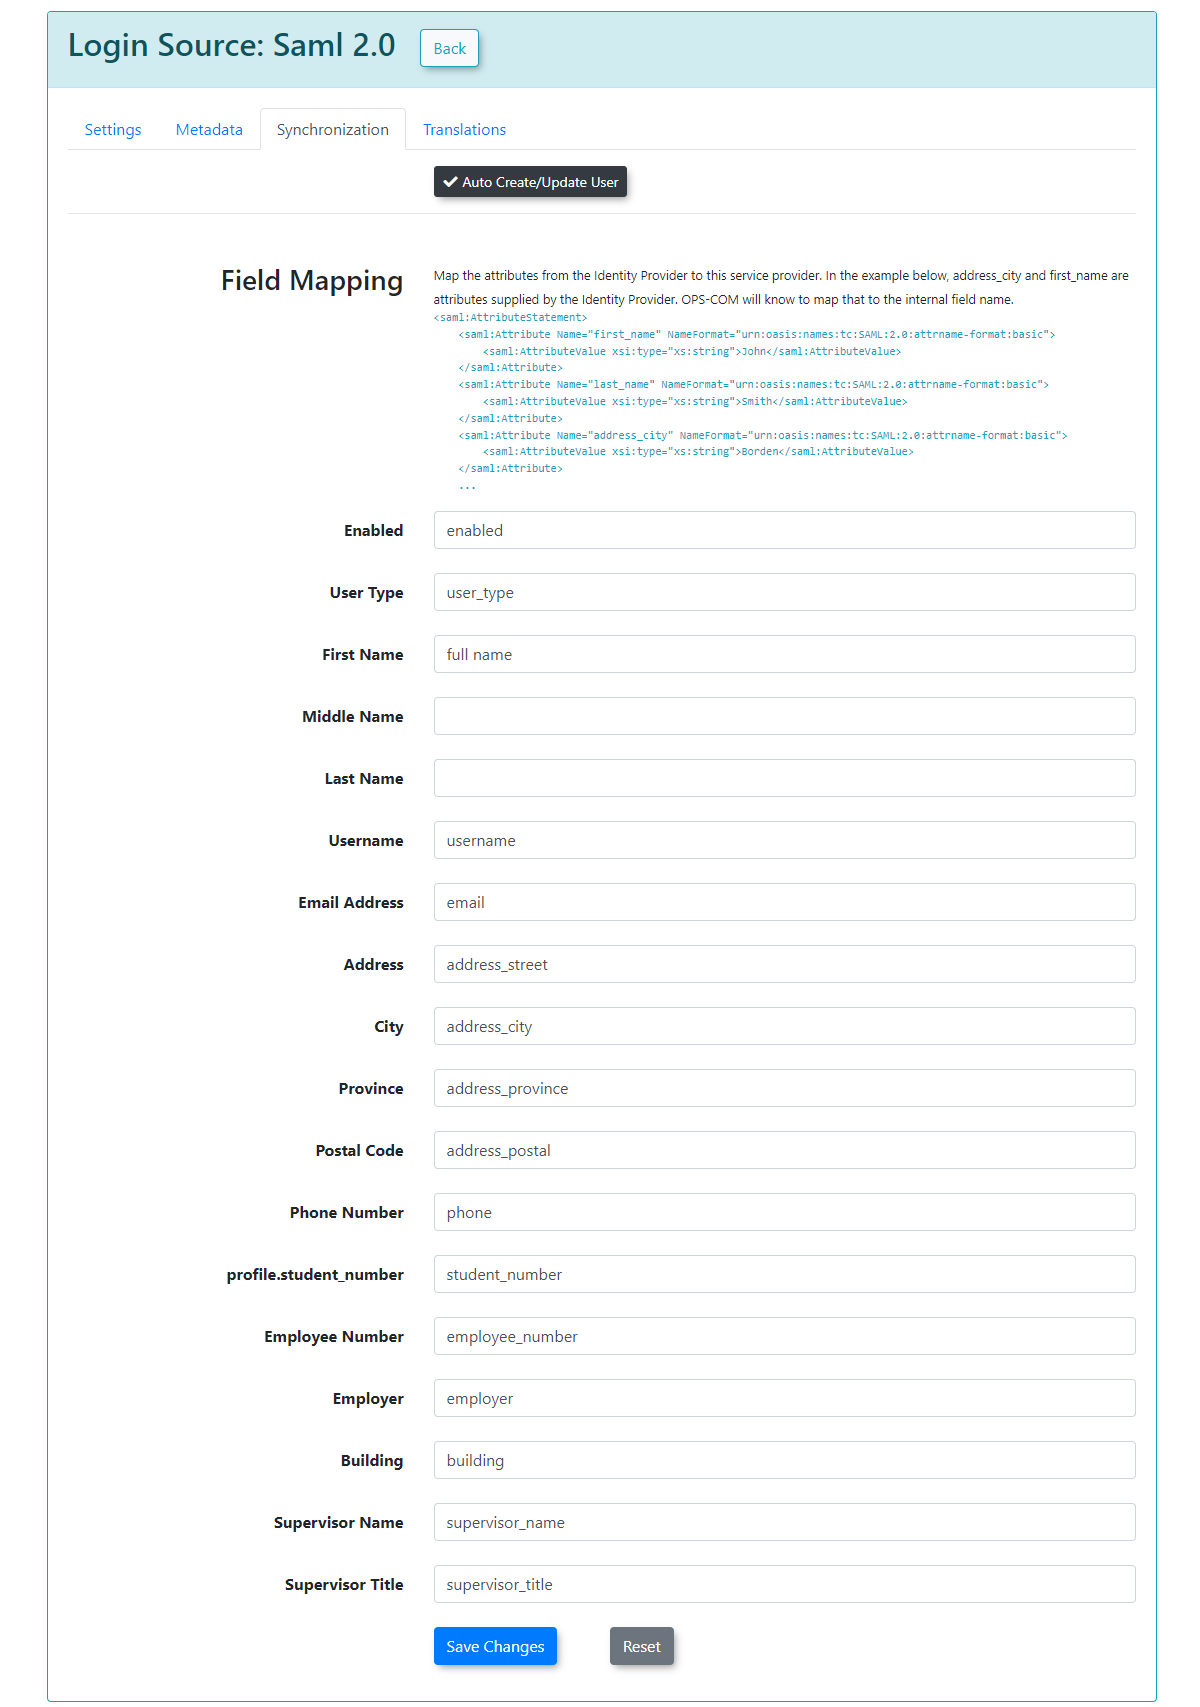
After you have supplied the information in each field, you can click Save Changes and your users will begin to be created/updated.
If any of the supplied fields are incorrect, then the information will be blank when the user logs in, or it will be unchanged if the user already existed.
Login Sources (SSO)
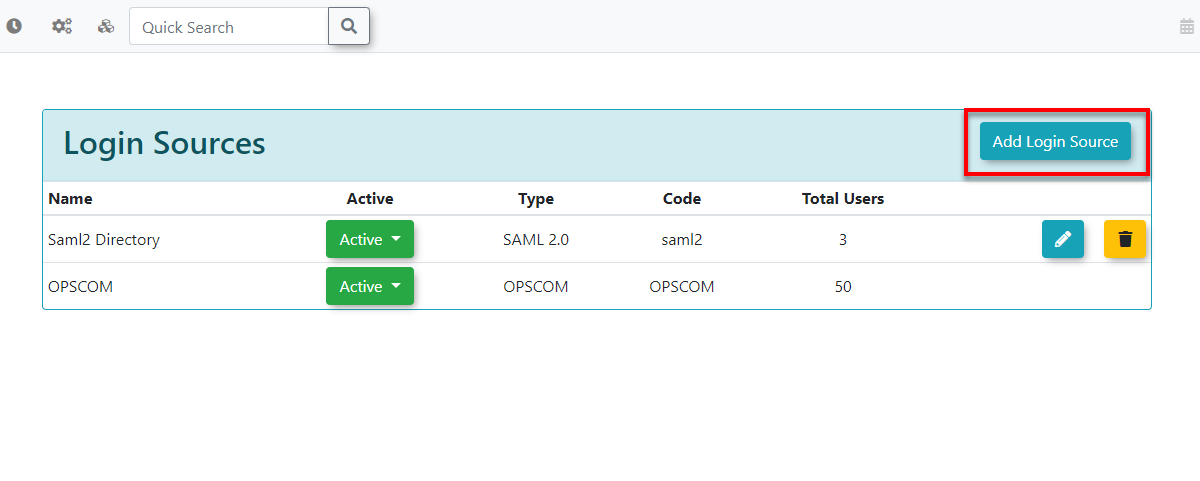
Understanding Login Sources
A "login source" is just the way a user signs into the system. For example, a user can log in directly through OPS-COM with their username and password—this would be the "OPSCOM" login source. Other login sources, like SAML or LDAP, allow users to log in through an external system instead.
This setup gives you control over how users access OPS-COM and allows you to offer multiple login options for convenience and flexibility.
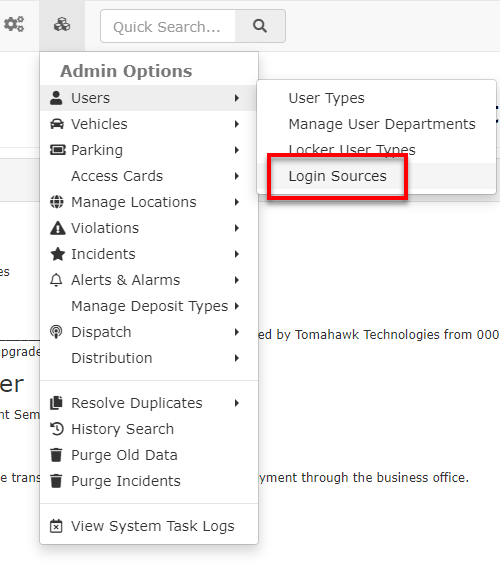
You can add or change login sources by going to the Admin Options under the Users section.
Default Login Source
OPS-COM is the default login source. This means that users will log in with an OPS-COM username and password on the standard login screen.
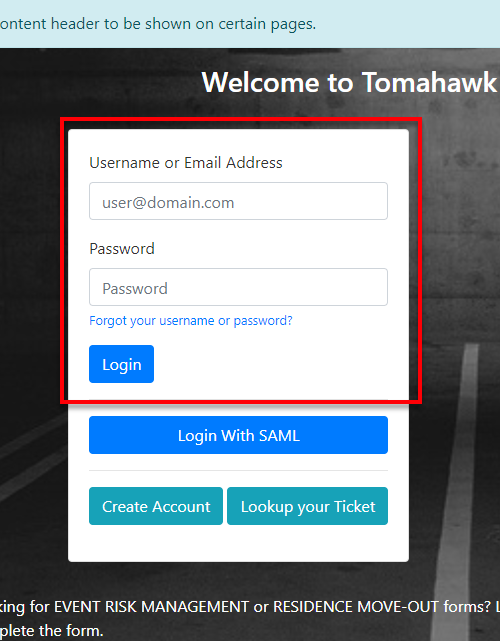
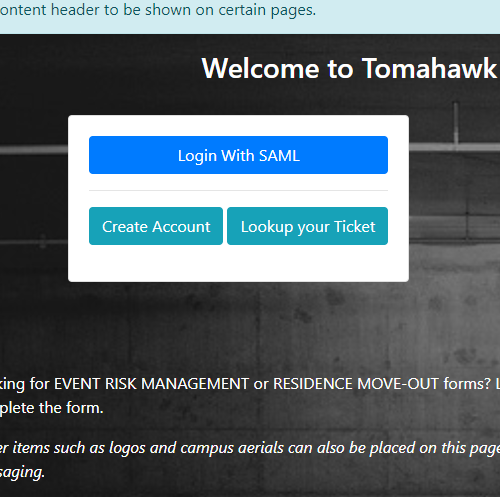
If you disable this default login source, then only other login sources, like SAML, will work.
Adding Login Sources
To add a new login source, click the “Add Login Source” button on the top right of the page.
Important - OPS-COM can support a system where some users require SSO and some do not, there can be multiple login sources. The source name is up to the Identity Provider, except for OPSCOM.
- Red fields are required to click save.
- Yellow fields are required to work but still allow empty or invalid values to be saved. Yellow fields can also indicate that a change has been made.
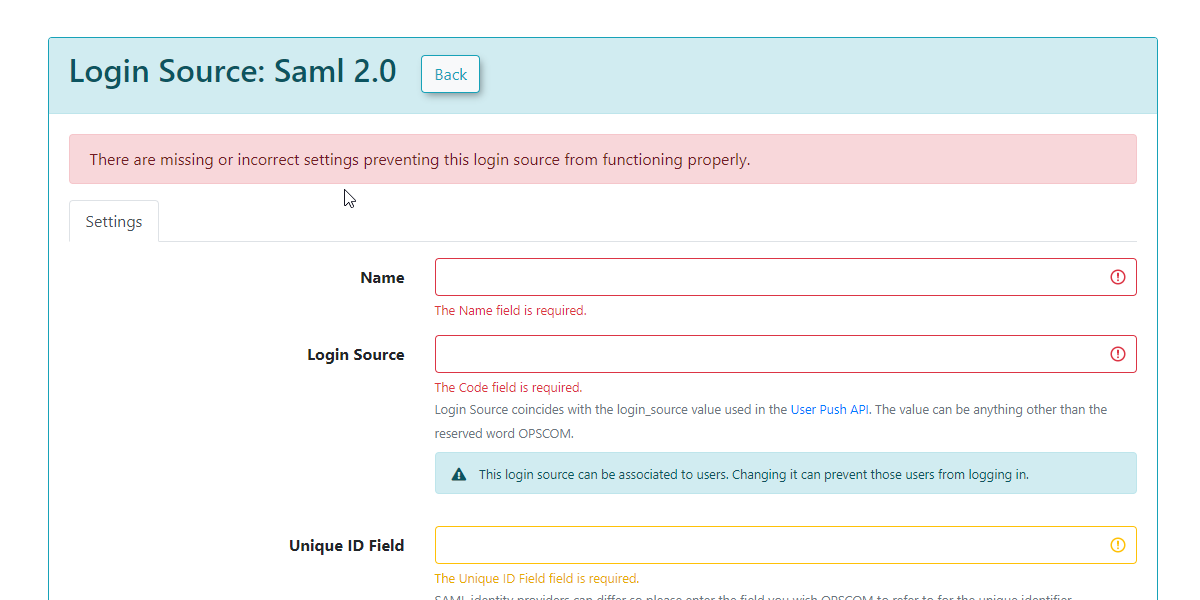
Important - The Login Source - Code field is what the user profile will match against when adding users to the new login source. However, only one login source code can be activated at a time.
Managing Login Sources
Once you add login sources, you can manage them by editing or deleting them using the buttons next to each source.
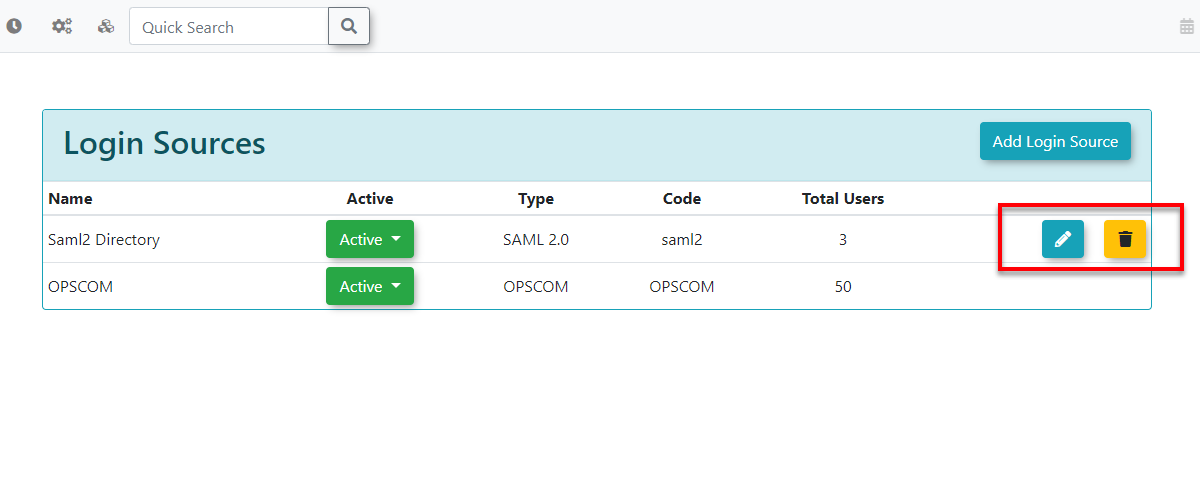
Archiving a Login Source: Archiving a login source removes it from the login options users can see, and users connected to this login source will no longer be able to log in this way.
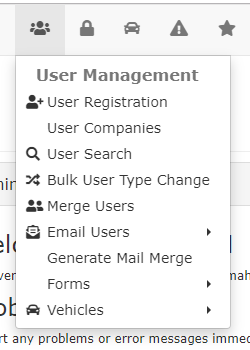
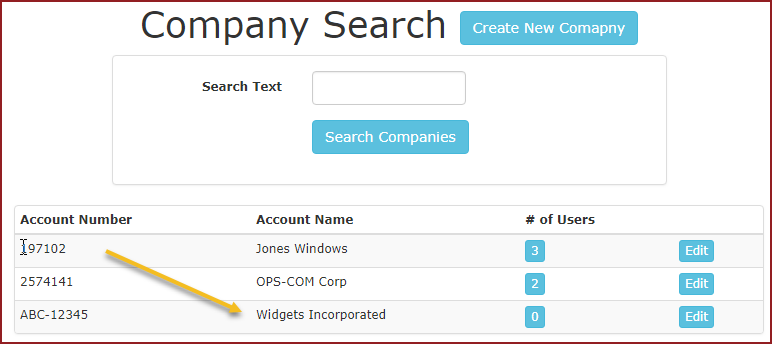
User Company Editor
Accessing the User Company Editor
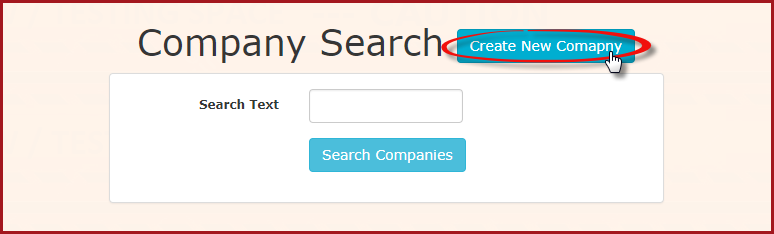
Under User Management, click User Companies.
The Company Search window will display. To add a company click Create New Company.
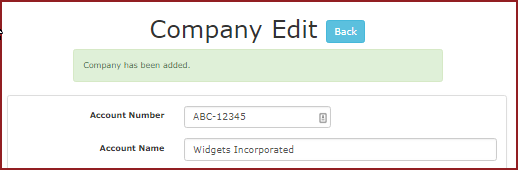
The Company Edit window will display. In our example we are using the following entries:
-
-
Account Number: ABC-12345
-
Company Name: Widgets Incorporated
-
Address: 100 Main Street, Ottawa, Ontario, K2K 2E6
-
Contact Name: John Doe
-
Address: 1110 Main Street, Carleton Place, Ontario, K2K 1R4
-
Invoice Emails: This is the email address they would like the invoices mailed to.
-
Once the data is entered, click Add New Company

After you have added the company you will see a green message confirming the company has been added.
Using Company Search
When we return to the Company Search page, it should be displayed as a search result.
Notice how we now have our company in place but no users at this point.
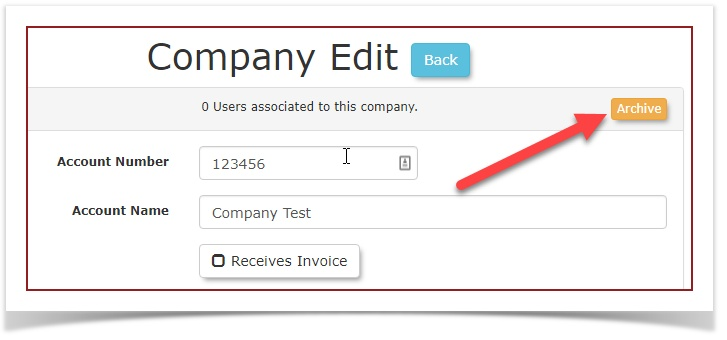
Archiving a Company
Note
Only Companies with zero associated users can be archived.
To archive a company, search for it and click the Edit button to open the Company Edit screen.
Click the Archive button in the top right hand corner.
Adding Users to a Company
In our example we are adding John Doe as the company contact and the Billing Account Contact. In John's profile enter Widgets Incorporated in the company field to link John to that company.
Enable the Company Manager checkbox to select John as a Company Manager.
This will allow him to access the profiles of other people in his company.
Enable the Company Billing Account checkbox. This will allow him to setup a payment method to pay for all permits for users he manages.
Click 'Submit for Processing' and then click the 'Information Correct' button.
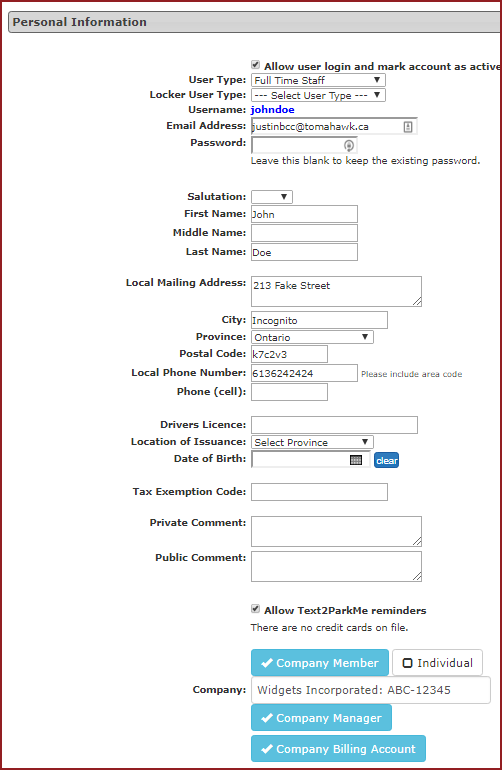
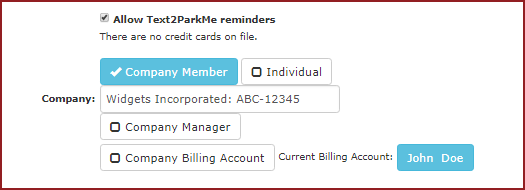
You can continue to add users to the company in the same manner as described above, however if you try to add another Company Billing Account contact, you will see a message that indicates that John Doe is already the current Billing Account contact.
Go back to Search for a Company. If you click on the number 2 , the system will take you to the user search screen displaying the 2 users associated with the company.
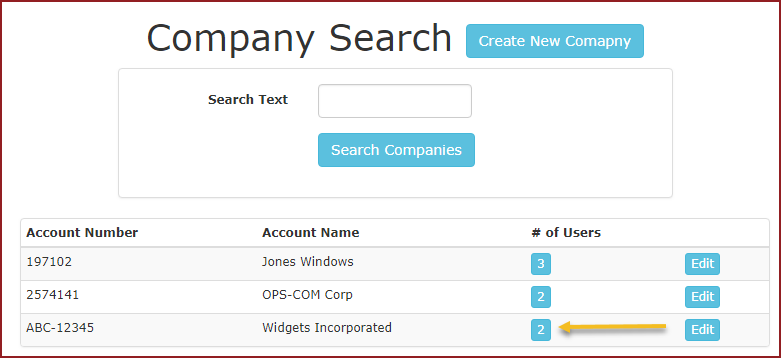
You will see the users displayed for that Company and the Manager and Billing contact will be indicated.

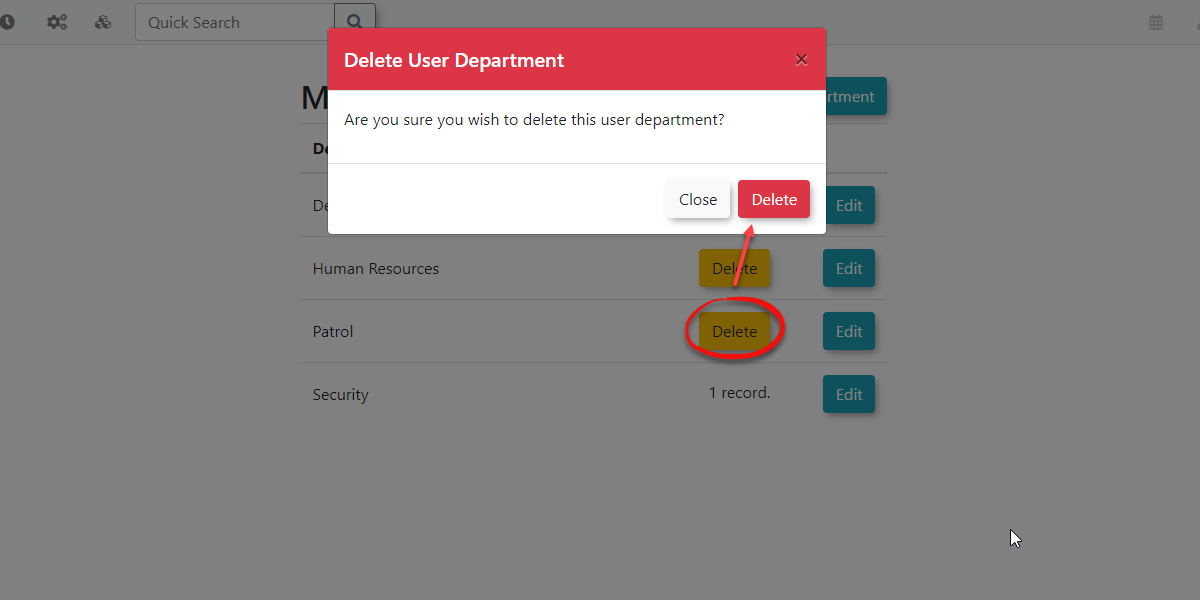
User Departments
Managing User Departments
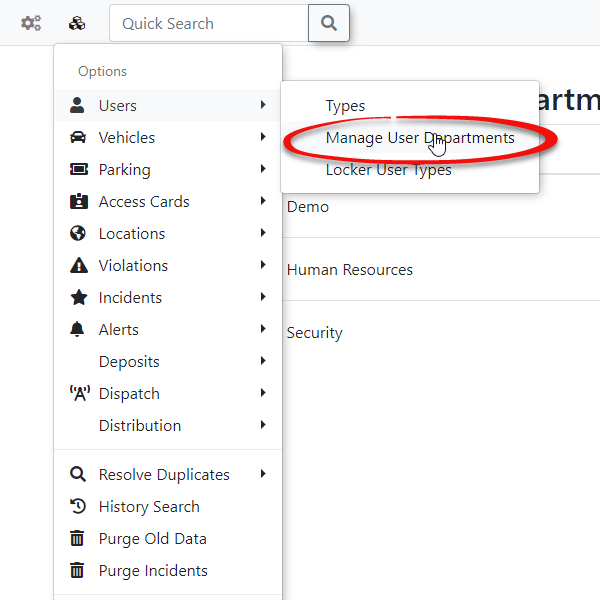
Click Admin Options, Users followed by Manage User Departments.
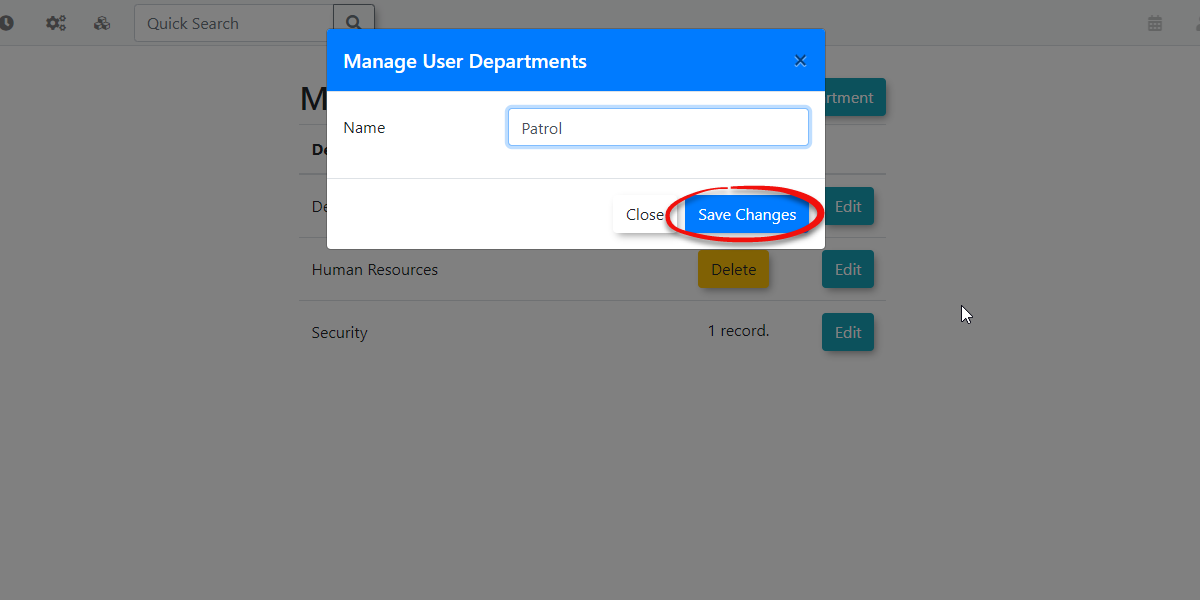
The Manage User Departments page displays with all of the available choices.

Adding User Departments
To add a new user department click Add User Department and complete the required field followed by Save Changes.
Editing User Departments
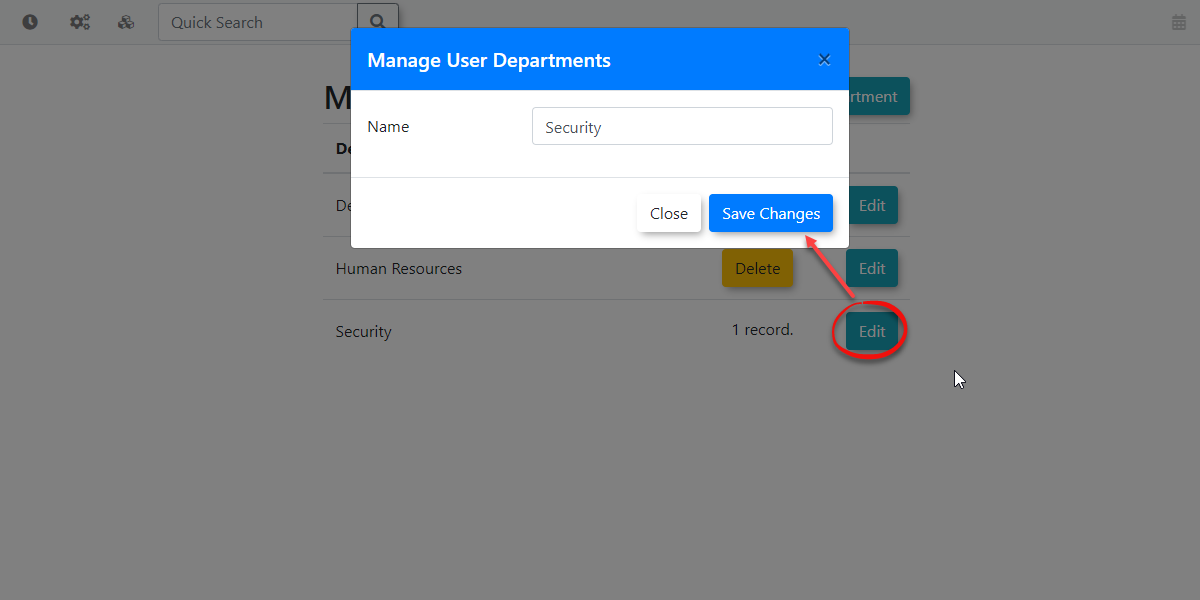
To edit user departments click the Edit button next to the department you wish to make updates to. This will open a new modal window allowing you to change the existing name of that item.
Deleting User Departments
To delete departments simply click the Delete button next to the make you wish to remove from the list. A modal window will appear asking you if you are sure you wish to delete this user department.
Important
In order to delete a user department it must not be used in the system. Admins will first need to make sure that no users are using this department before it can be removed. This is to prevent profiles from having blank information by deleting these departments while they're in use.
Related Video
Please view the following video.
Limiting Active Vehicles
On the Administration Interface
Active vehicle restriction is controlled through user types.
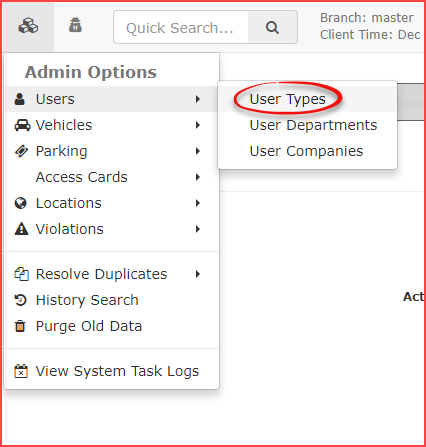
To edit the number of additional vehicles allowed to be active, hover over Admin Options -> Users and click User Types.
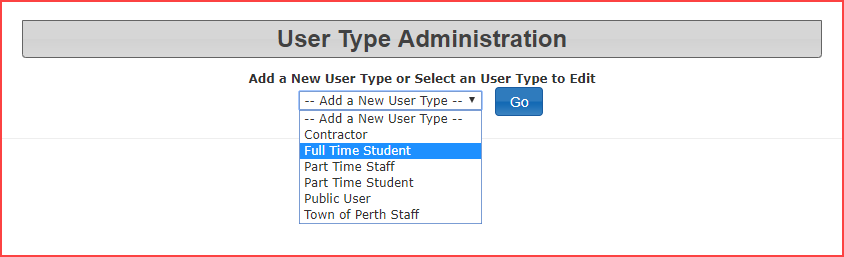
Select the user type to edit from the drop down list.
In this case, we are choosing to edit Full Time Student.
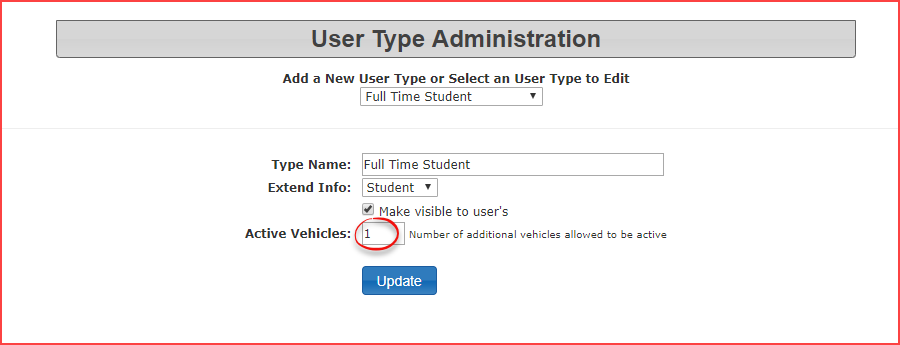
The screen will refresh with the configuration parameters for Full Time Student.
Edit the Active Vehicles number to reflect how many additional active vehicles may be on a profile.
Once a single vehicle has been added to a profile, the user must always have at least one active vehicle, so this number represents how many additional active vehicles can exist. This setting would mean the user may have a maximum of 2 active vehicles.
What Users See on the User Portal
Now that the limit has been set, let's have a look at how it affects the user's ability to add vehicles.
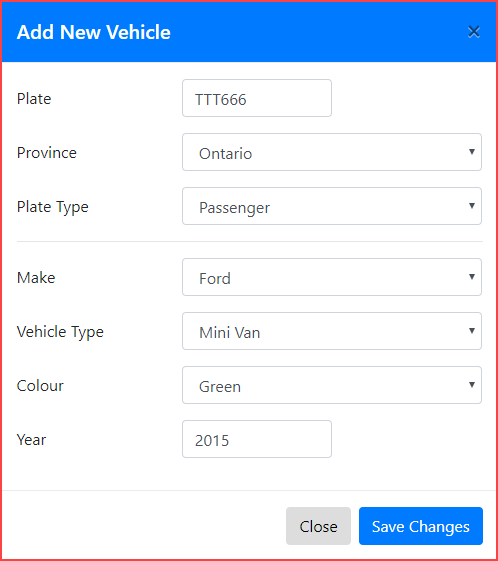
To add a vehicle to a profile, click on the Vehicle tab to access the vehicle information section of the user profile.
In this tab, you will see what vehicles, if any, are already associated with the user.
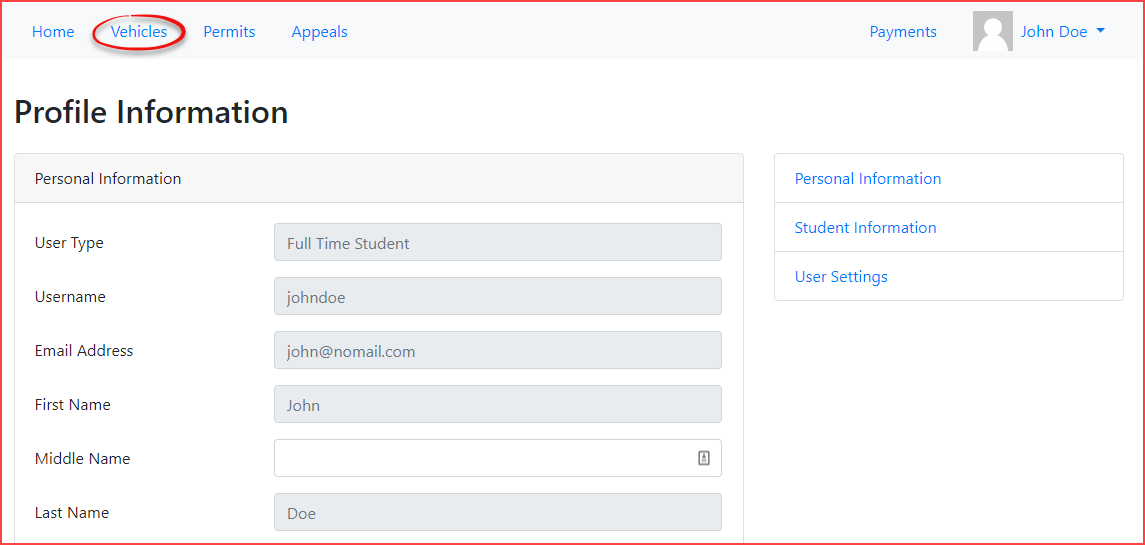
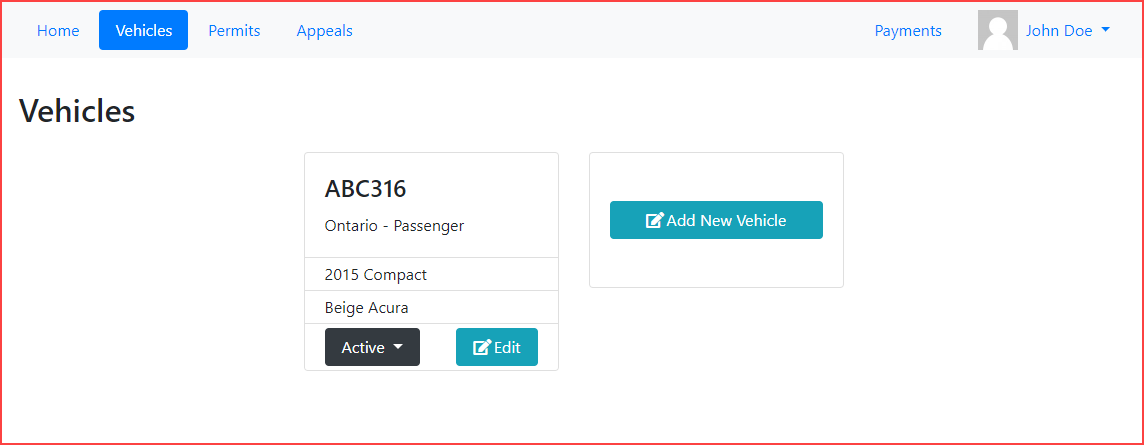
In this case we have a beige Acura with plate number ABC316.
Click on Add New Vehicle to add another vehicle.
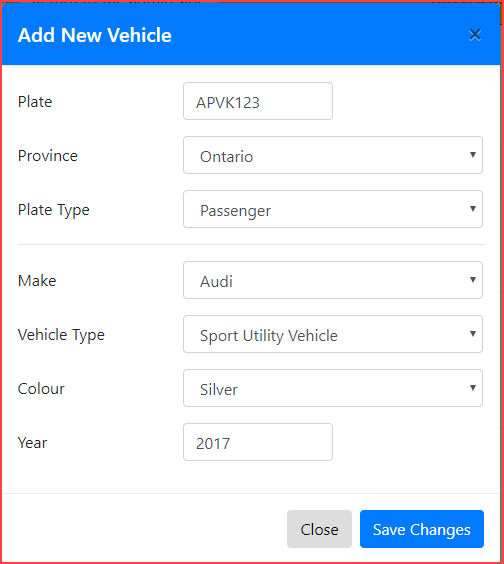
Fill out the vehicle information, then click Save Changes to register the new vehicle.
The user will see a pop up message indicating the vehicle was successfully added.

The vehicle will be added to the user's profile and appear on the Vehicles tab.
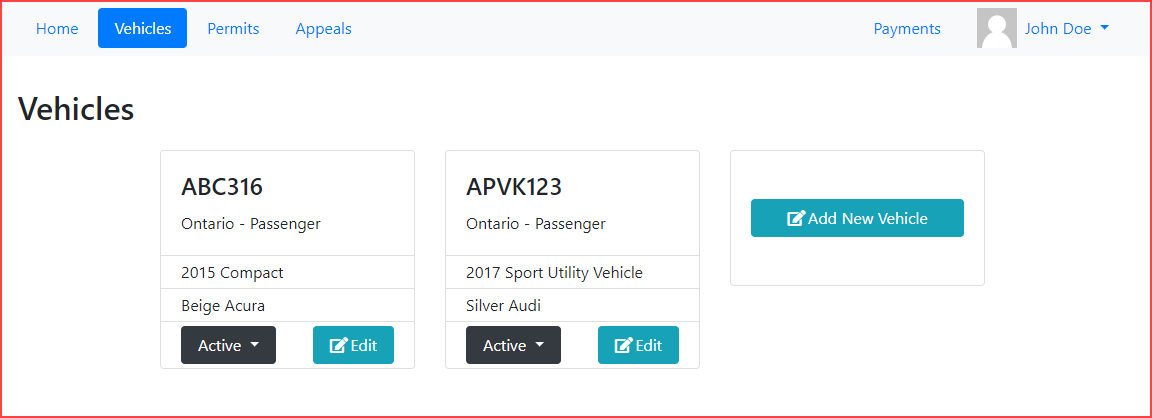
Now we will try to add a third vehicle.
Recall that we have set the user type to only allow a maximum of 2 active vehicles.
Enter the vehicle information and click save changes to register this vehicle.
Again, you will receive the pop up message indicating the vehicle was successfully added.

The vehicle will be added to the Vehicles page however, notice this time the vehicle has been added in an Inactive state.
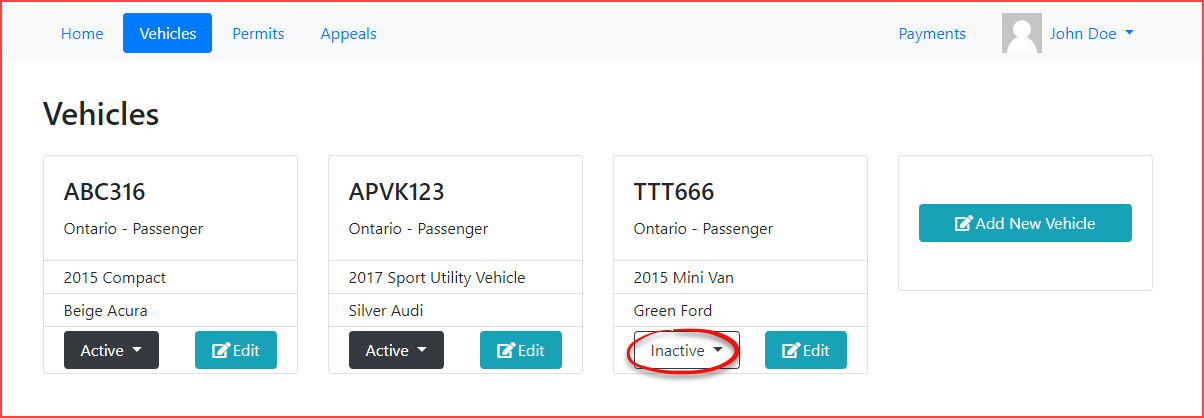
At this point, if the user attempts to make this third vehicle active by toggling the vehicle state, it will fail.
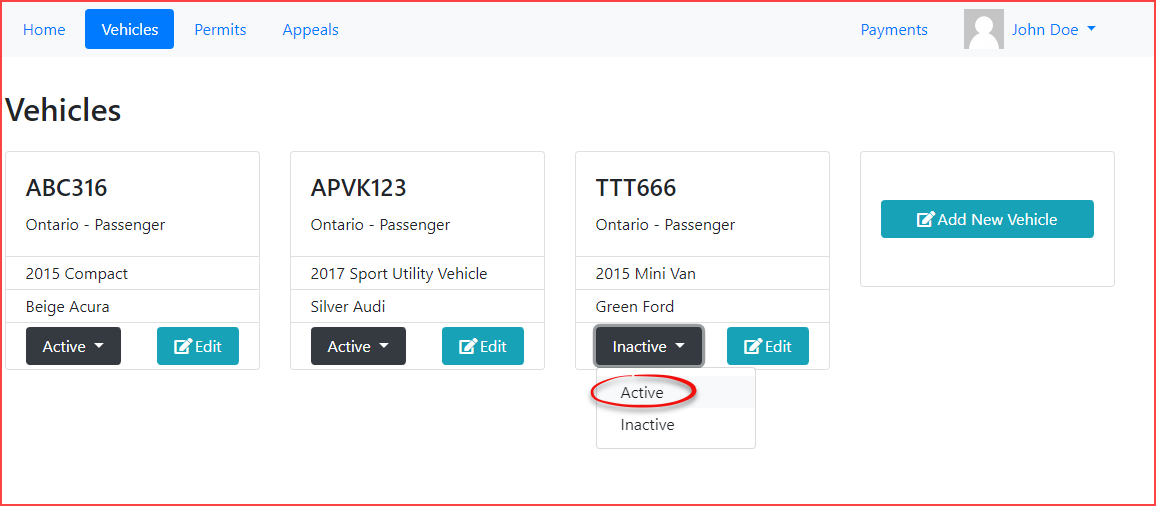
They will receive a pop up message indicating that the vehicle can not be made active due to the limit you have set for this user type.

Conversely, if a user tried to make all vehicles on their profile inactive, this would cause a pop up to appear indicating that the user must have at least one active vehicle.

Important Note
- If the vehicle being added is already in the system but not currently associated with the user, the user will be prompted by asking if they wish to add this existing vehicle to the profile. In this case the same rules described here will still apply.
- It is also important to note that if you reduce the number of allowed active vehicles, users who currently have more active vehicles than the newly reduced setting will not be affected and are essentially grandfathered in. The new rule will only come into effect when the user attempts to add vehicles in the future.
User Types
User Types Configuration
To setup a user type, go to the Admin Options menu and hover over Users to select Types.

Create a New User Type
The User Type Administration tool opens. The list of existing User Types will appear.
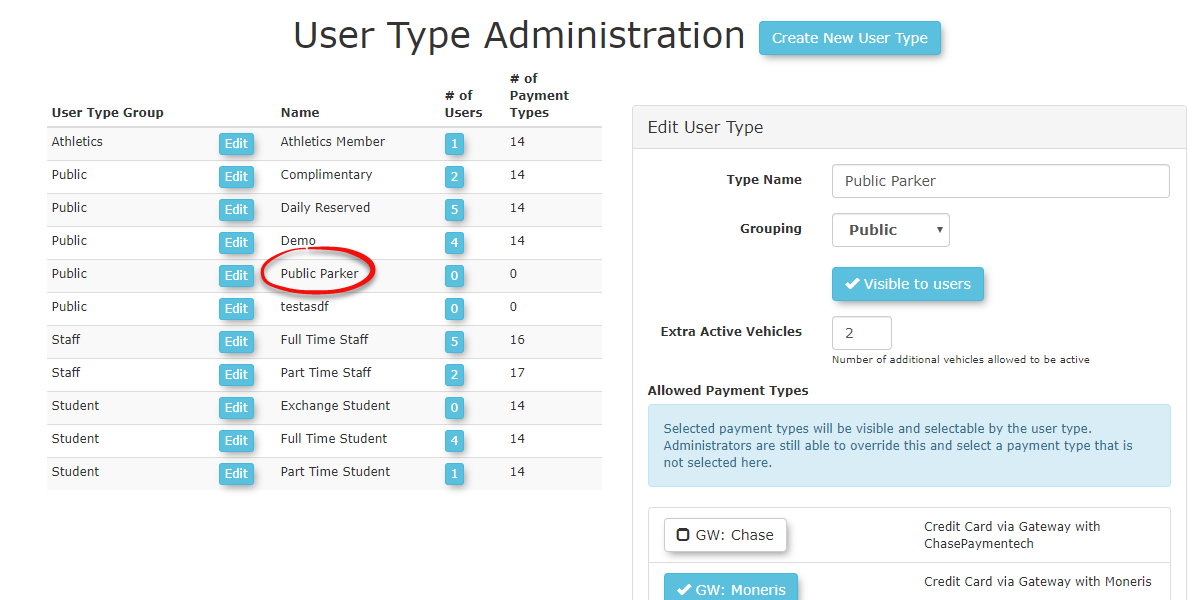
To add a user type, click on the Create New User Type In this example, we are creating a user type of Public Parker.

Enter the Type Name and set the Grouping to Public, we also have the ability to toggle if the user type is select able upon registration to your users by clicking Visible to Users as well as the number of Extra Active Vehicles that user can have. By default users can have a single vehicle at a time unless this field is specified.
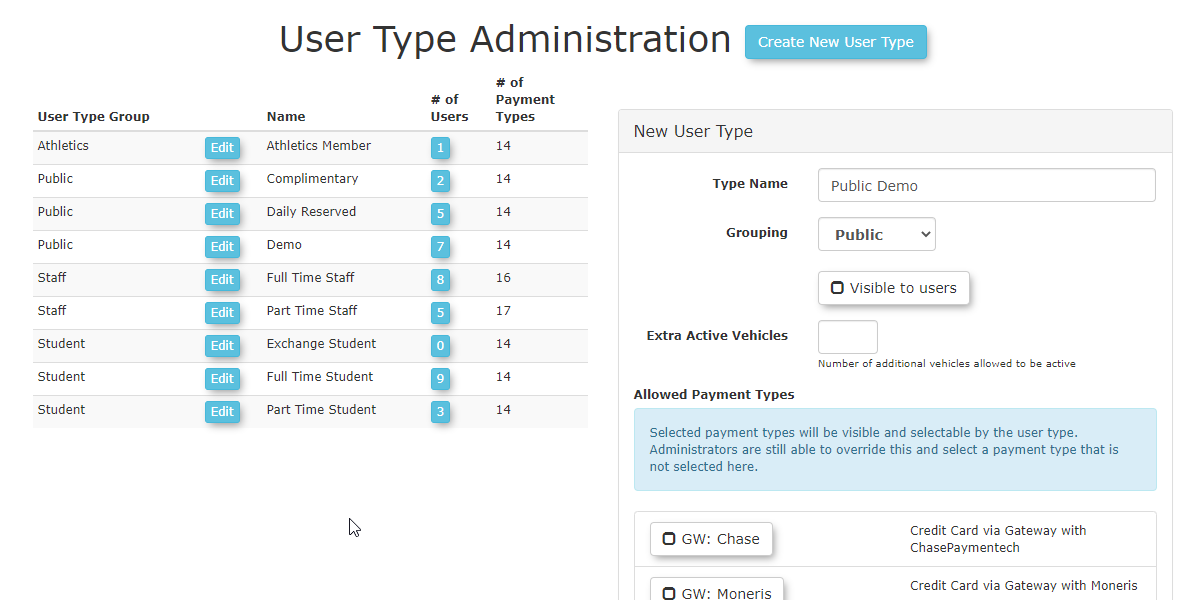
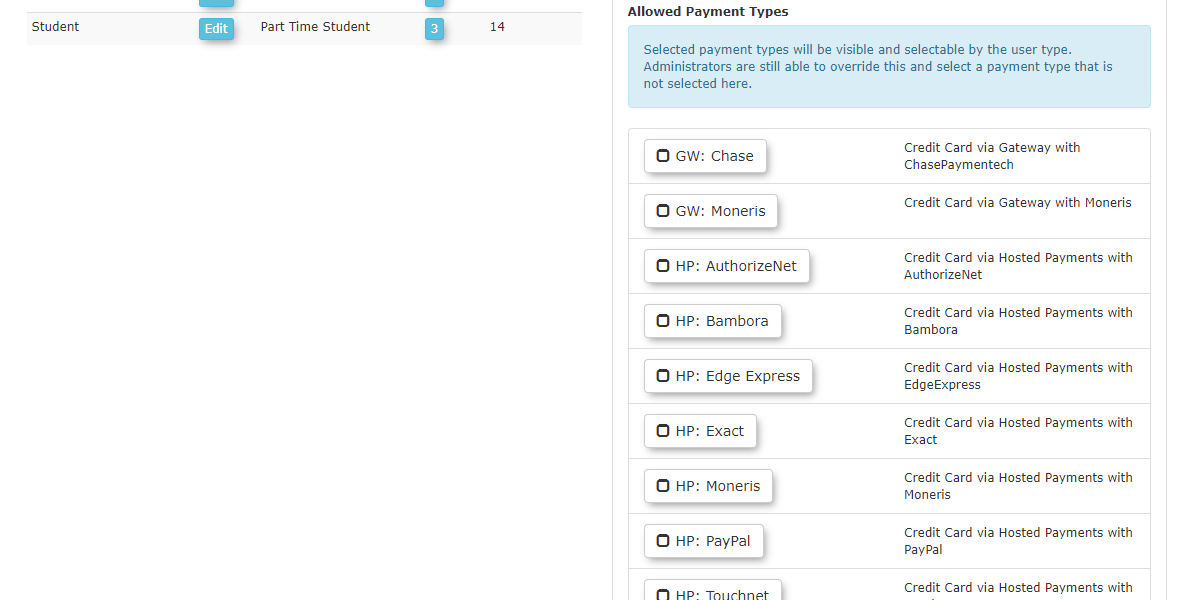
Next you may scroll to choose allowed payment types for this User Type.
A Note On Extend Info:
Extend Info is the internal system master user types. There are four categories.
These master user types are important as they govern access to other items in the system. Payment types for example, can be restricted as far as being visible in the system to internal users, end users both as staff or student. You may want Payroll deduction only visible to Staff users, as an example.
The look and feel of the profile form itself is also affected by master user type. Student users would see items in the profile registration form that staff users would not see and vice versa.
The user type you create as a subset to these must fit one of these categories.
Staff
Student
Public
Athletics
Now when you look at the list of user type, notice Public Parker is now one of the user types.
Apply User Type to User
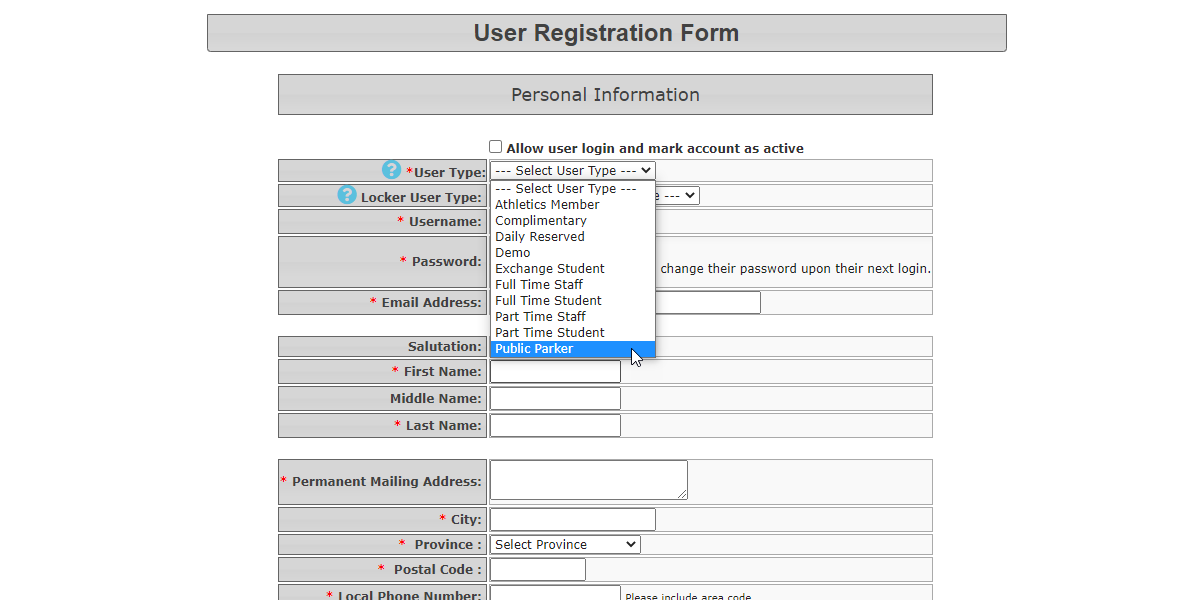
Applying a User Type to a user can be done when the user account is created. It can also be changed at any time in the future.
In the user profile, click in the field labeled Select User Type to display the pick list where you can choose Public Parker.
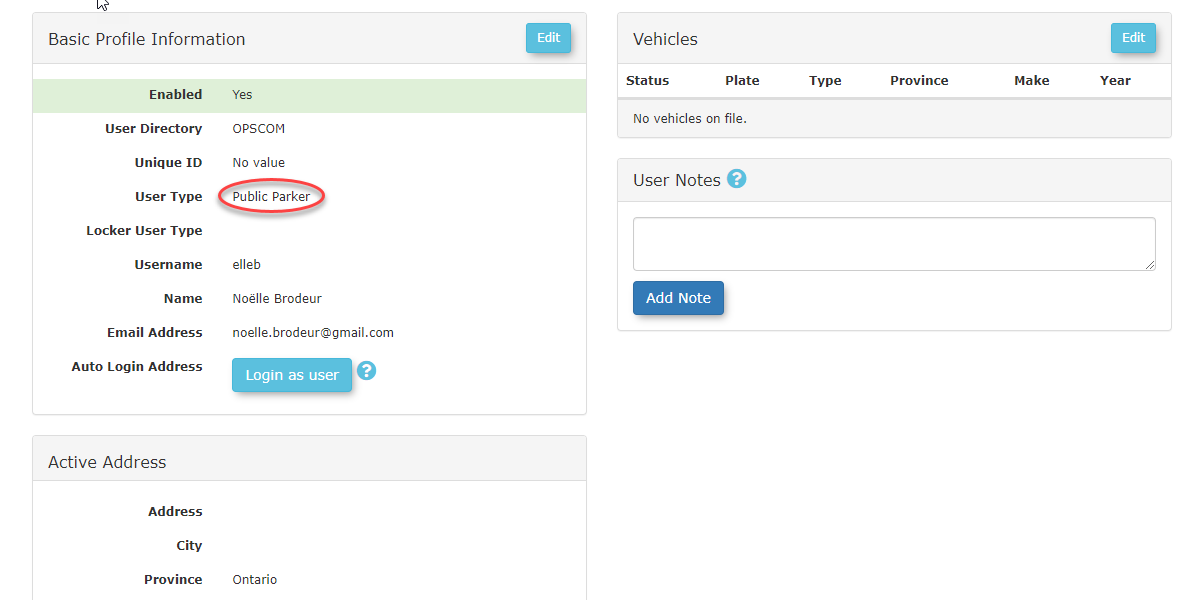
The user profile will now look like the following:
User Types in Searches
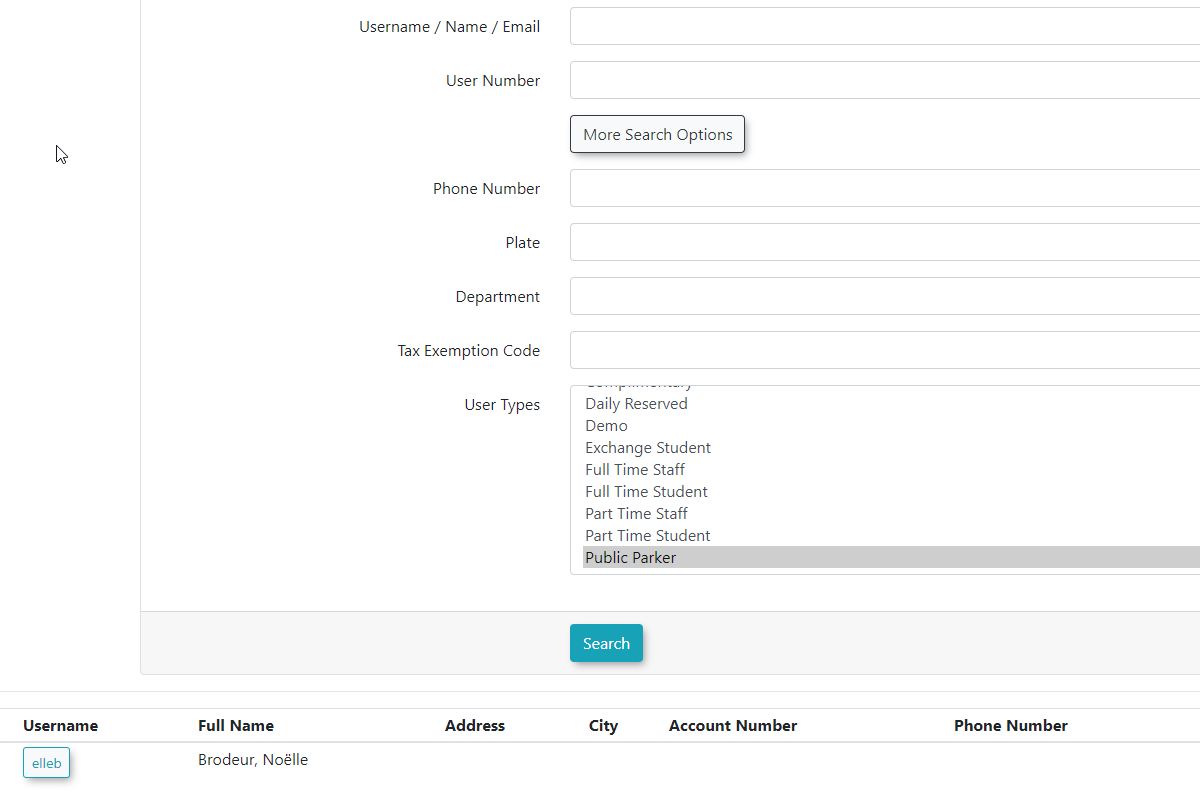
User Type can be used in search criteria as well. In the user search tool select Public Parker with no other search parameters set,
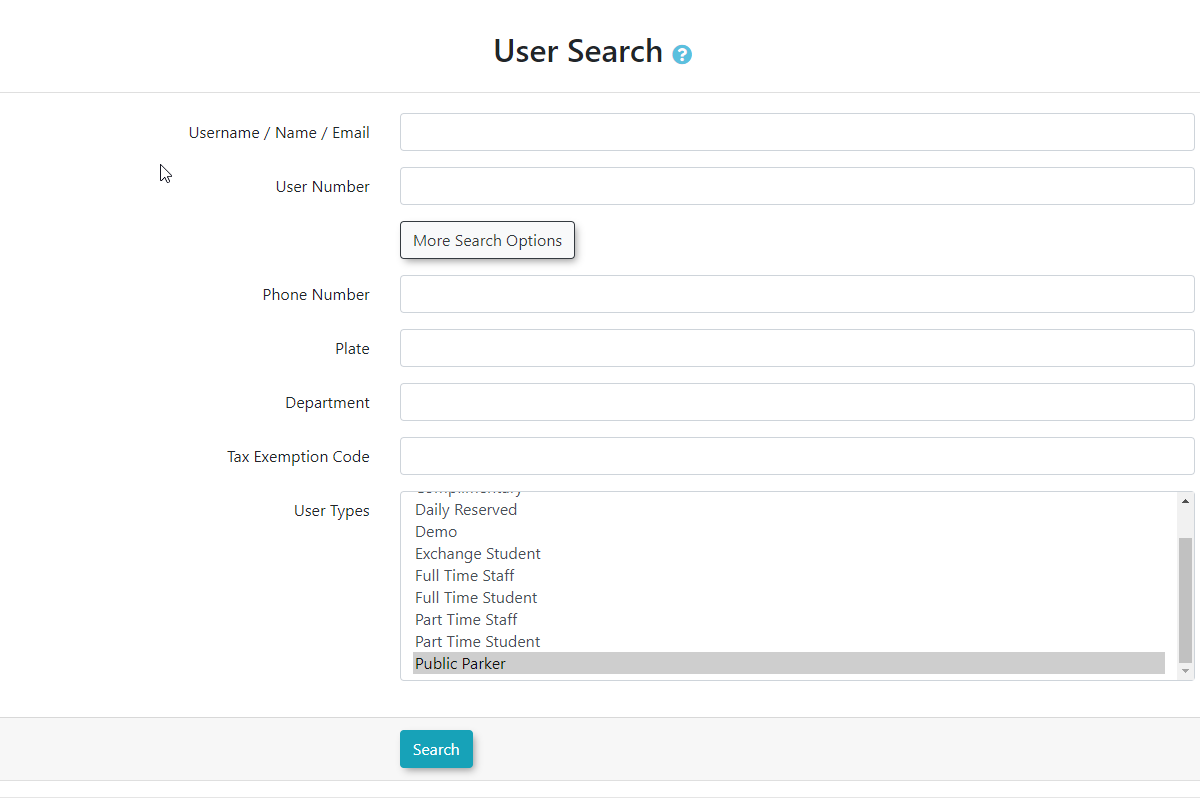
You will now see the elleb user in the returned search results simply based on the user type.
Configure Access to Lots with User Types
In Lot Administration, the user type can be applied to provide or restrict access by user type.
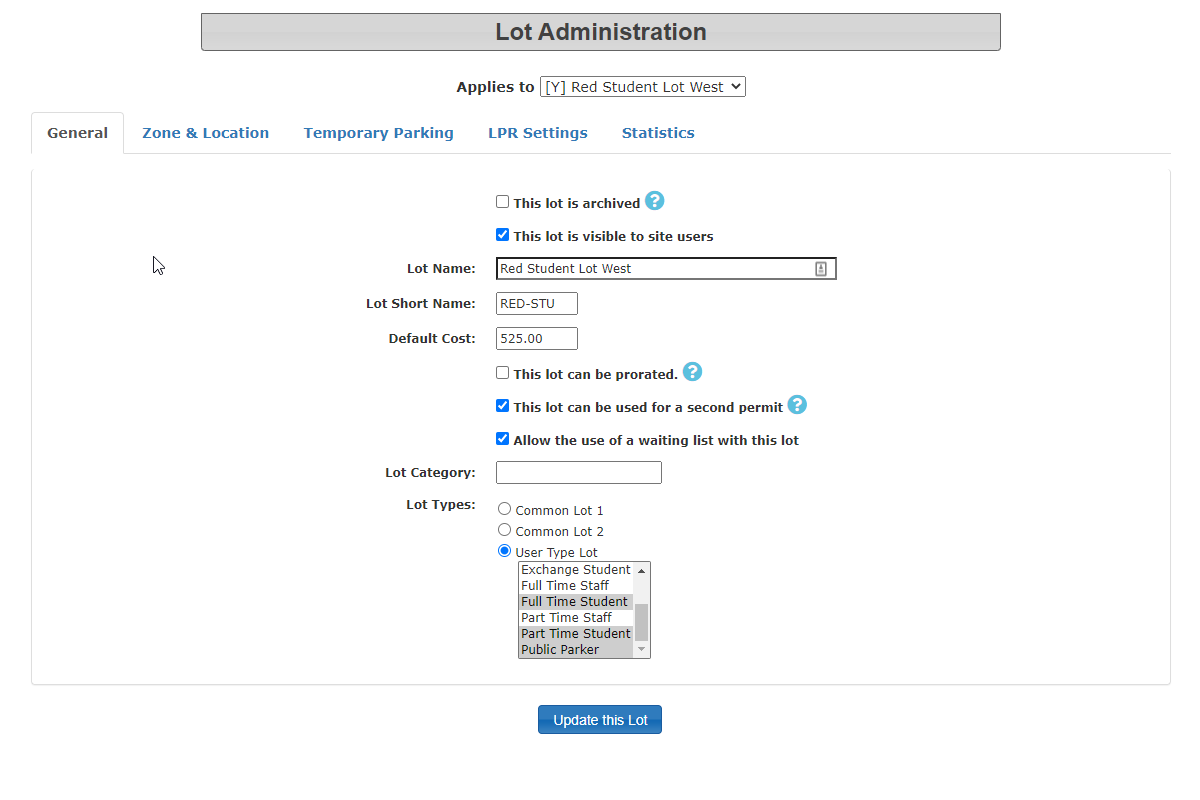
In the General Tab, you can select what users have access to the lot in question by selecting the user types you wish to allow access to in the Lot Types section.
Under User Type Lot, select the user types you wish to have park in this lot. In our example, we are choosing Full Time Student, Part Time Student and our recently created Public Parker.
The scenario for this lot is that we will allow students as well as Public Parkers to purchase permits in this lot but not Staff/Faculty users.
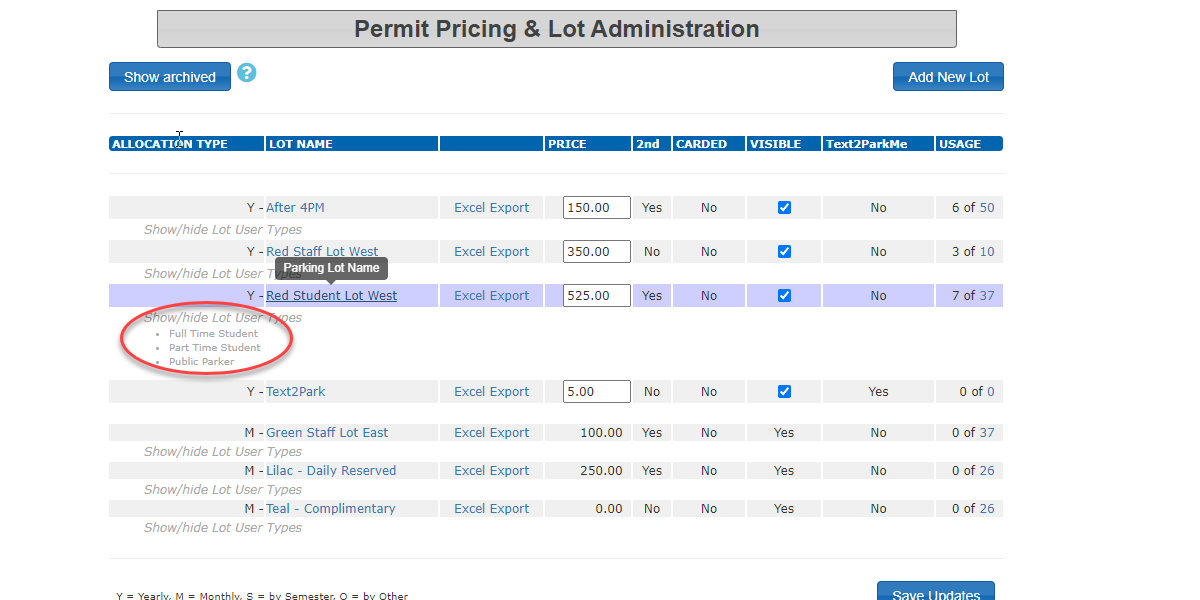
When looking at the list of lots in Lot Administration, you can see what user types a lot is configured for by clicking on Show/Hide Lot User Types.
In the example below Red Staff Lot is restricted to Full Time and Part Time Staff whereas Red Student Lot is accessible to both Full and Part Time Students as well as Public Parkers.
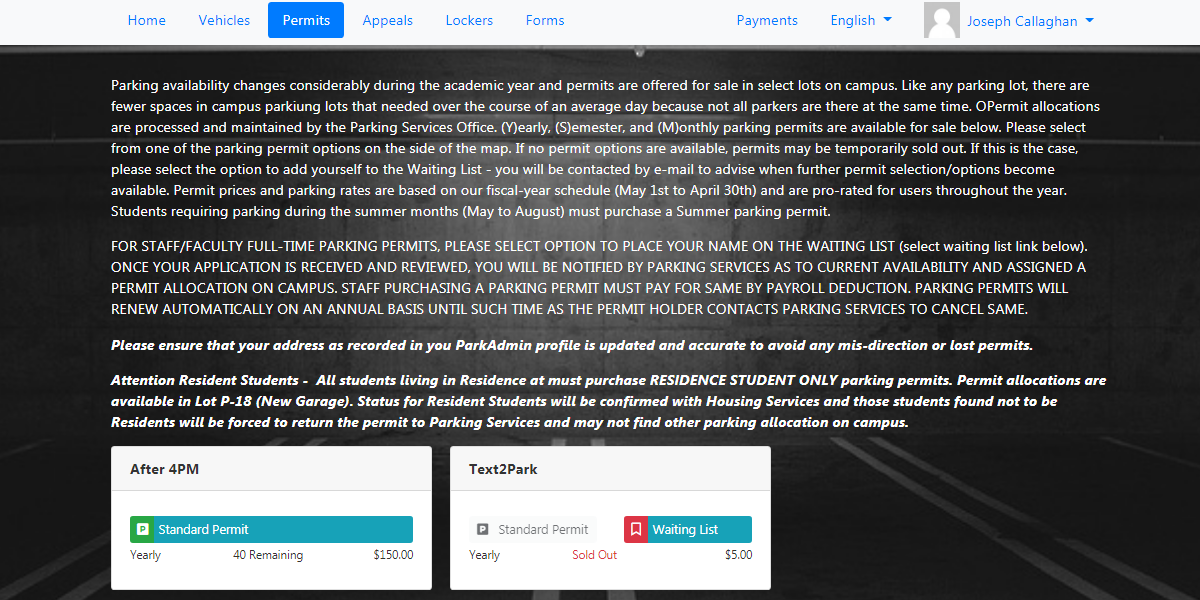
By adding user type to lots the user side will appear as follows. In this example we are logged on as Joseph Callaghan.
When you go into the process of purchasing a permit, the system will only display lots that are configured for that user type.
In this example we see our Standard Permit Lot and Text2Park only.