Data Maintenance
- Using the Database Importer
- Archiving or Disabling a User
- Archiving and Restoring Permits
- Purging Incidents from OPS-COM
- Merge Vehicles
- Merge User
- What Does Purge Old Data Do?
Using the Database Importer
Introduction
The database importer allows the admin to import their existing information into the OPS-COM system. Given a CSV file, the importer will transfer the data into the selected destination table.
The database importer only allows data to be imported into a select number of tables.
The currently allowed tables are as follows:
-
UserProfile
-
OffenceLocations
-
Vehicle
-
Permits
-
Violations
Support for additional tables will continue to be added in the future.
Initial Setup
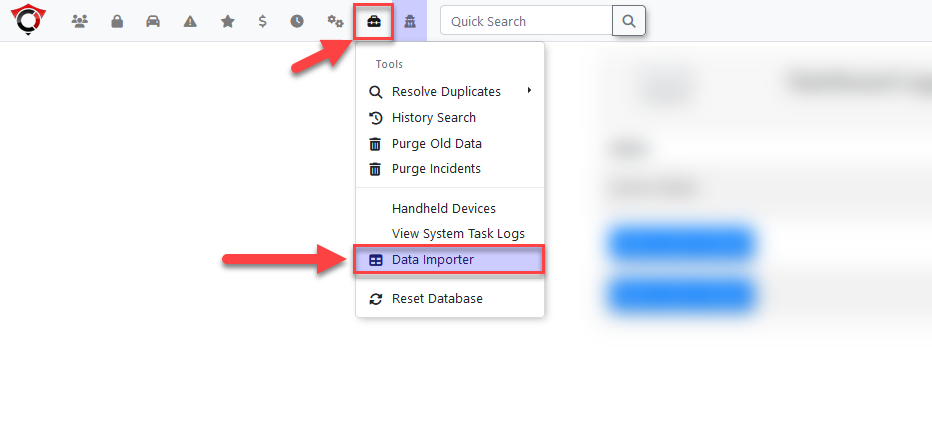
The database importer can be found listed under the tools tab.
If the database importer page is not visible, the user may not have the proper permissions. Before a user can import data, they must have the necessary permissions enabled on their account.
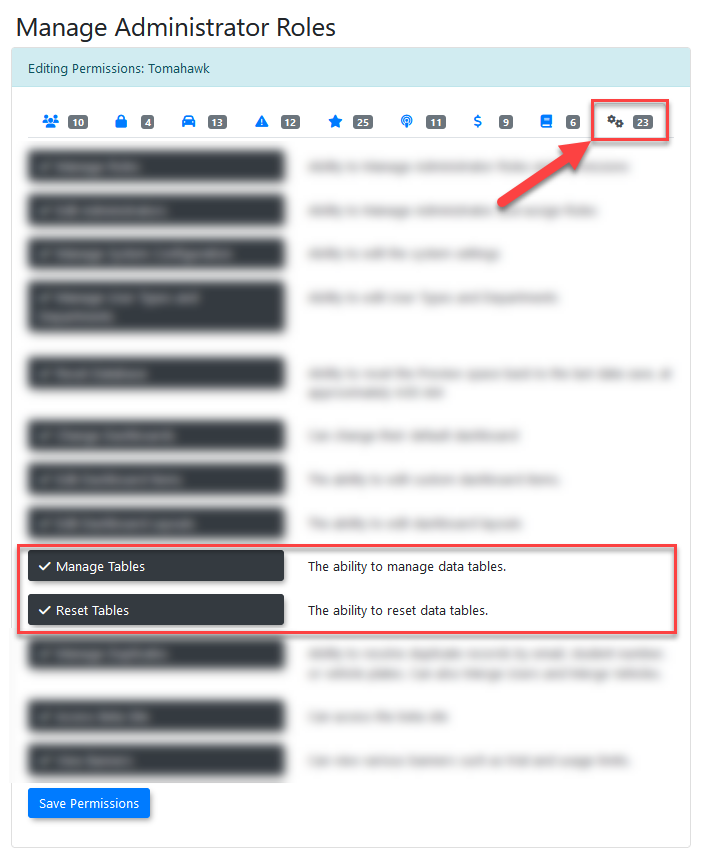
There are two permissions associated to table imports.
-
Manage tables - allows the user to view the manage tables page, and use the uploads functionality, but NOT the ability to reset tables
-
Reset tables - allows the user to reset the tables (empty them). Won't allow them to see the manage tables page.
The permissions can be found under the systems tab of the permissions management page. Enable them to allow a user access to the page.
For more information on permissions, refer to this article: https://wiki.ops-com.com/x/B4DjAQ
Importing Data into a Table
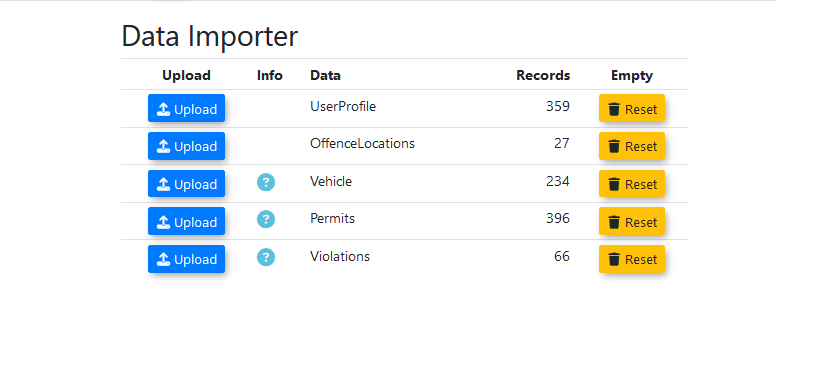
To start a new import, click on the upload button next to the destination table the information will be imported into.
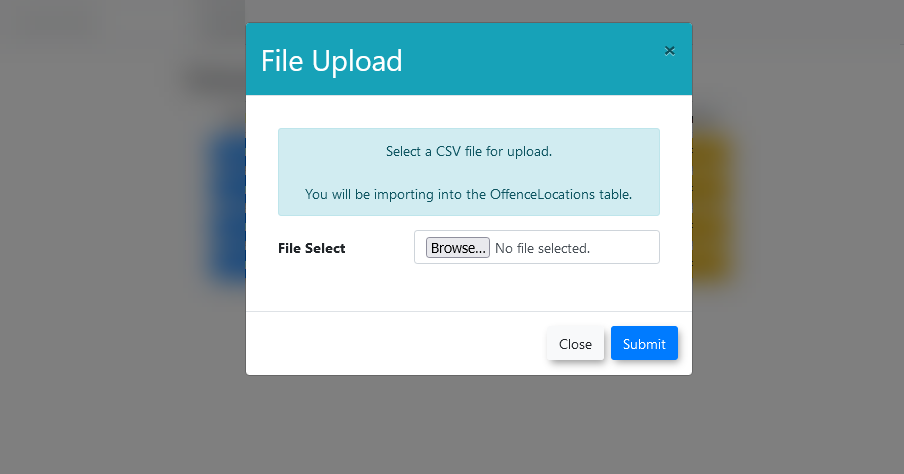
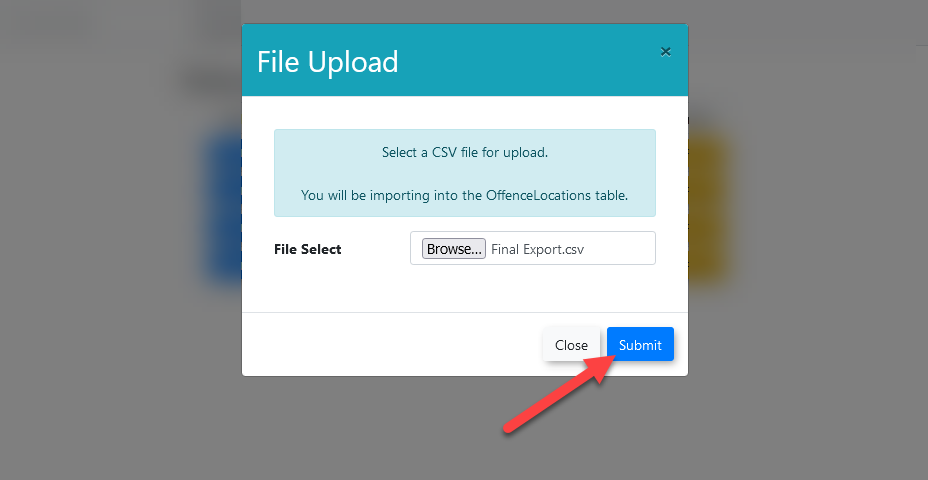
This will open a modal window prompting the user to select the CSV file they will be importing into the destination table. The imported CSV file can be comma-differentiated or semi-colon-differentiated.
Once a file has been selected, press the submit button to begin the process.
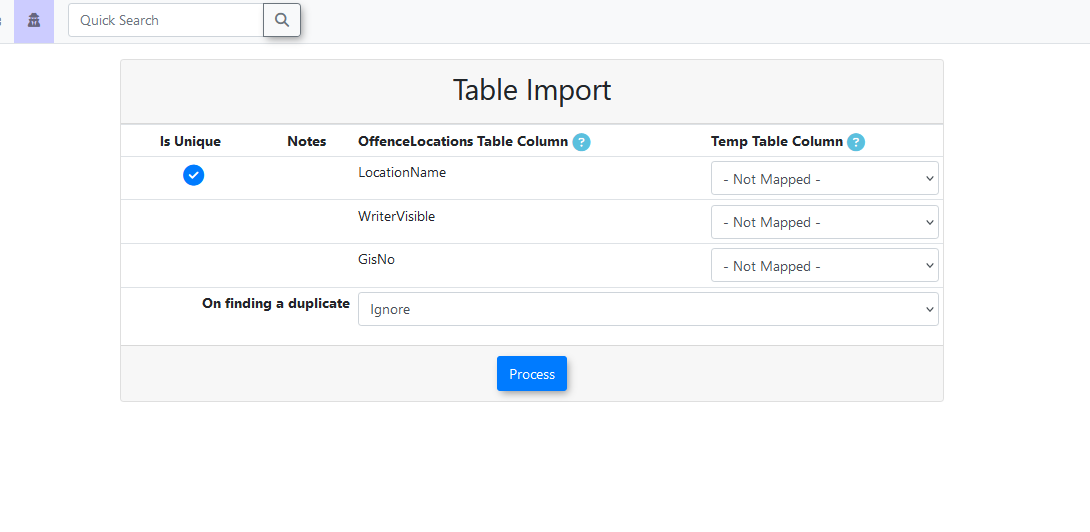
Once the CSV file has been uploaded, the table import screen will appear.
Column Matching
On this page, the columns in the imported file are matched to the columns existing in the destination table.
This is to let the program know where the data from the CSV file belongs in the destination table.
If the CSV file contained recognized column names, they will be automatically selected.
For more information on what each column is used for, or whether a column is required or optional, refer to this guide here: https://opscom.wiki/books/for-administrators-staff/page/importer-field-descriptions
One the columns have been properly matched and the process button has been pressed, the user will be redirected back to the main page while the import is completed in the background.
If an email address is setup on the importing user's account, they will be informed on the progress of the import by emails sent to their email address.
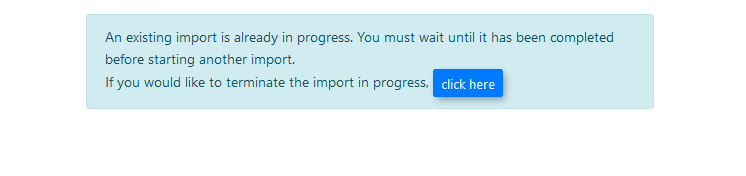
Another import cannot be started until the current one is either completed or has been terminated. Terminating the progressing import will delete the temp tables created during the import, and isn’t recommended unless the import has become stuck.
Post-Import Processing
After the initial import of the data into the base table, some tables run additional processing on the information.
These processes run separately from the import process, and are not affected by the duplicate settings chosen for the import.
After this process has been completed, the user will be sent a second email containing the final details of the import, including how many records were imported, updated, and any post-processing details.
Permits
-
If the user association column is matched, the created permit will have a booking automatically created for the associated user through the creation of a PermitJoin record.
-
If the option was selected, the newly-created permits that were booked to users will be automatically marked as paid. Otherwise, they will be located in the users' carts and the users must pay for them.
UserProfile
-
When users are imported, if they aren't provided a LoginSource, it will be automatically set to OPSCOM.
-
Users that are created are set to enabled automatically.
Vehicle
-
If the user association column is matched, the created vehicle will be automatically associated to the user through the creation of a VehicleJoin record.
-
If the alert column is matched, an alert will be created and automatically attached to the associated vehicle through the creation of an AlertComments records. The vehicle will also be flagged.
Violations
-
Any violations created that don’t have an Issued date and Due date will have one created for them at the time of the import.
OffenseLocations
-
This table has no post-processing.
Additional Settings
Additional details on import settings.
Order of Operations
Imports that contain related information have a general order they should be done in, as some of the tables contain information from another table.
The imports are able to be done out of order, but the records cannot be associated correctly to each other when done out of order.
In general, the imports the table requires should be imported before it is.
|
Table Import |
Requires |
Notes |
|---|---|---|
|
UserProfile |
|
Should be the first thing imported. |
|
Vehicles |
|
Having the user record created before the vehicle is what allows the user to be associated to the vehicle by a vehicleJoin record created during the post-import processing. |
|
OffenceLocations |
|
Doesn’t require any data beforehand, but should be included when creating a violation. |
|
Permits |
|
Having a vehicle record created before the permit is what allows the permit to be associated to the vehicle by a permitJoin created during the post-import processing. If there is also an associated user record, the permit is able to be marked as paid by joining the user and permit through a payment record. |
|
Violations |
|
A violation requires the existence of a vehicle record beforehand to have the violation be created at all. Offence locations should be imported before violations in order for the violation to have its location properly marked. |
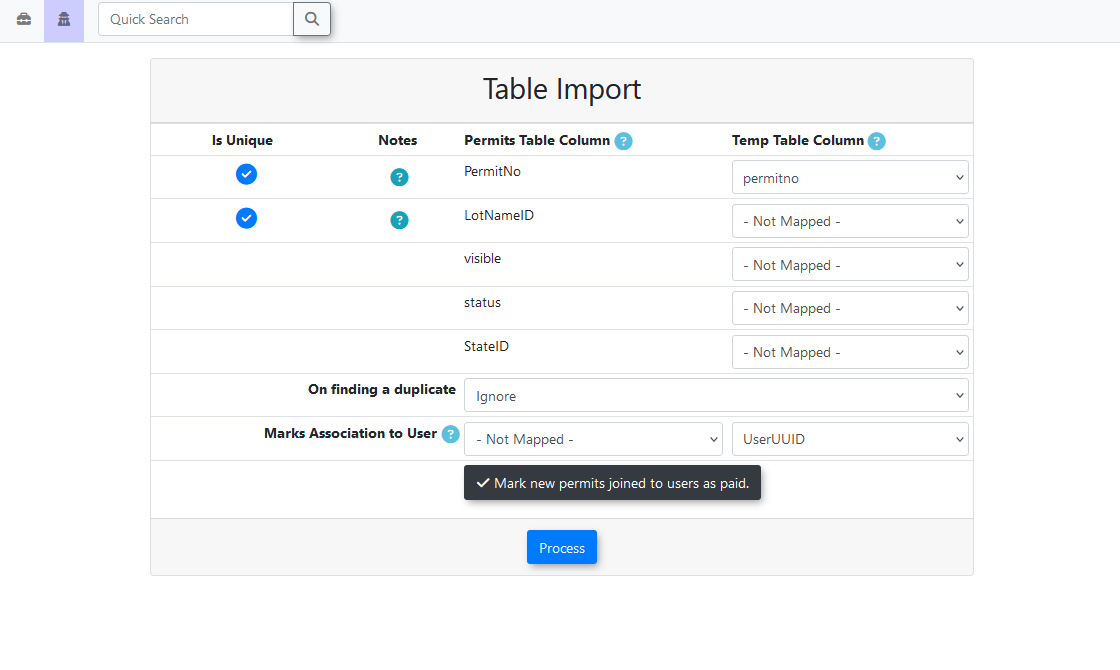
User-Association Settings
Some tables have additional processing that is run after the import is completed to associate the newly-created records to existing users.
For this, the record identifying the uniqueness of the user must be selected.
It can either be UserUUID or Email, so make sure the same value is selected for both sections.
The tables that currently have this as an option are:
-
Vehicles
-
Permits
Mark Permits as Paid
Permit importing has an additional option for if you would like to have the booked permits that are created automatically marked as paid.
Otherwise, when they are created, they will be located in the associated users' carts.
Vehicle Alerts
Vehicle importing has an additional option for setting up an alert on a vehicle automatically when they are created.
Include a column containing vehicle alert comments within the imported CSV file and select the column in the alert section of the vehicle import page.
Alerts will be automatically associated to the proper vehicle after import.
The list of vehicles being marked with alerts may also be called a hotlist.
Unique Identifiers & Duplicate Settings
This is the column that is used to tell if the information in the record is unique. If the information in this column is duplicated in the file or already exists in the system, it will be ignored or overwritten based on the selected setting.
-
Ignoring a duplicate will have the system do nothing with the record.
-
Overwrite existing will take the information in the new record and replace the existing record with it.
The number of columns that mark a record as unique varies from table to table.
-
UserProfile uses one identifier, which can either be UserUUID or Email. For this table, it is one or the other, with UserUUID taking precedence over Email if both columns are supplied.
-
OffenceLocations uses one identifier, which is LocationName.
-
Vehicle uses one identifier, which is Plate.
-
Permits uses two primary identifiers, PermitNo and LotNameID. Both are required to make a unique record, meaning identical PermitNo can be in use if they have different LotNameIDs.
-
Violations uses one identifier, which is Ticket.
Foreign Lookup Columns
Some information in one table comes from another table and is stored as an ID in the destination table.
The data in these columns should be entered as normal, then the system will automatically look to see if there is a match in the corresponding table and input the correct ID value into the destination table.
For instance, one of the foreign keys for the Vehicle table is Colour, stored in the VehicleColour table. If any of the values in the column imported for Colour exist in the VehicleColour table, it will match them by name and store the proper ID in the Vehicle table.
If it doesn't find a matching value in the lookup table, it will enter a Null as the value instead.
A list of the import tables are listed below.
UserProfile Table
|
Inserting Into |
Sourced From Table |
|---|---|
|
prov |
Provinces |
|
UserTypeID |
UserTypes |
Vehicle Table
|
Inserting Into |
Sourced From Table |
|---|---|
|
ProvID |
Provinces |
|
ColourID |
VehicleColours |
|
MakeID |
VehicleMake |
|
TypeID |
VehicleType |
|
PlateTypeID |
VehiclePlateType |
Permits Table
|
Inserting Into |
Sourced From Table |
|---|---|
|
LotNameID |
LotName |
|
StateID |
PermitState |
Violations Table
|
Inserting Into |
Sourced From Table |
|---|---|
|
VehicleID |
Vehicle |
|
TicketType |
TicketCategory |
|
LocationID |
OffenceLocations |
Status Emails
Over the course of the import process, a total of two emails will be sent to the user who initiated the import:
-
The first email is sent after the data from the CSV has been inserted into the temp table, and records the number of rows that were successful, and the rows that failed to be imported because they were malformed.
-
The second email is sent after the data has been inserted into the base table. It contains the number of records that were updated in the base table, the number of records inserted into the base table, and any relevant information from the post-import processing that happened.
Table Reset
In addition to table imports, the page also allows for the purging of a table.
This will open a new modal window, prompting the user to confirm they wish to delete the contents of the table. This action is permanent, and once the data is deleted, it cannot be recovered.
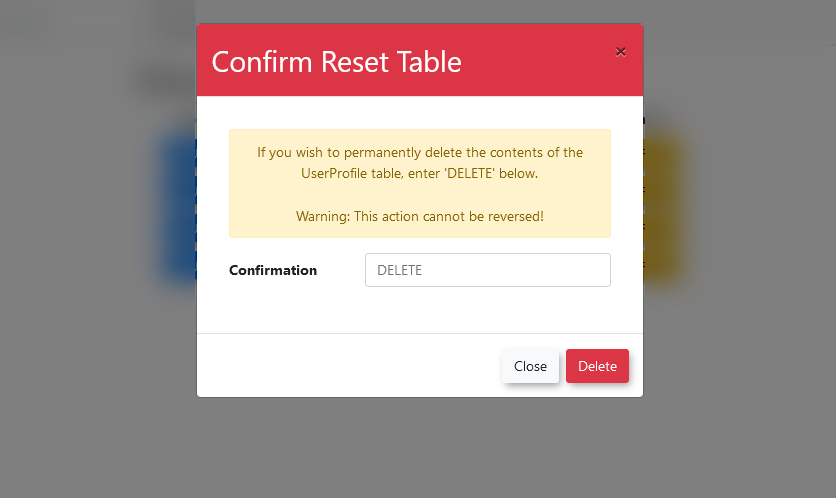
If it is certain the data should be deleted, enter DELETE into the confirmation text field and press the delete button.
The selected table will then be purged of all records.
Some tables are closely connected to the records of a related table, and removing the data they contain will also purge the contents of the related table.
-
Purging the Vehicle table will also purge the VehicleJoin table.
-
Purging the Permits table will also purge the PermitJoin table.
Note that only the table contents are deleted, and the table itself remains intact.
Troubleshooting
Converting Fields to Text - Avoid Truncating Leading Zeros
In some cases, the conversion from Excel to .CSV, will create some issues by truncating the leading zeros on your Student or Staff numbers for example. If this happens, you can use the following format to tell Excel to convert your cells to Text so that this information survives the .CSV conversion.
An example of how you do this is below.
- Open a new sheet on the spreadsheet you wish to convert to text.
- In cell A1, type ="'"& then click on cell A1 on the original spreadsheet. Note, this is equals sign, double quote, apostrophe, double quote,
- Now drag this formula down through the same amount of rows and columns you have on the first sheet. This will replicate the data on the new page but the apostrophe will be in front of all values..
- Now save the file as a .CSV and only the new page will save.
- No more truncated leading zeros.
Related Pages
Archiving or Disabling a User
Archive Process
Locate the User you wish to edit/update by searching for a user. Click on the Username and the Profile Dashboard will display for that user.
On the top right-hand corner you will see the name of the user that changes will be applied to.
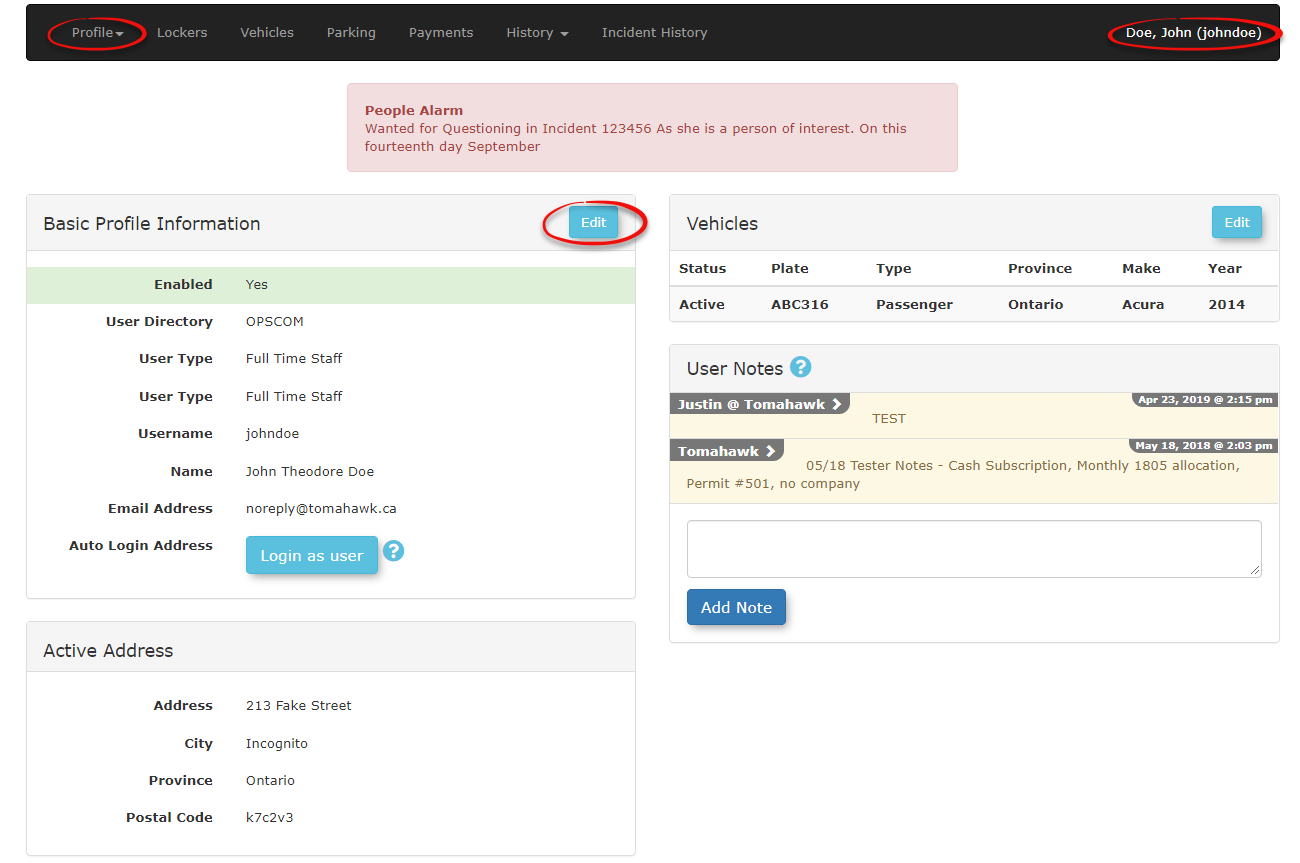
Click the Edit button on the Basic Profile Information bar or click the Profile dropdown and click Edit Profile Information.
The Edit User Profile screen is displayed.
Disable User Account
Disable the Allow user to login and mark account as active checkbox.
Click the Submit Registration Information for Processing button at the bottom of the page.
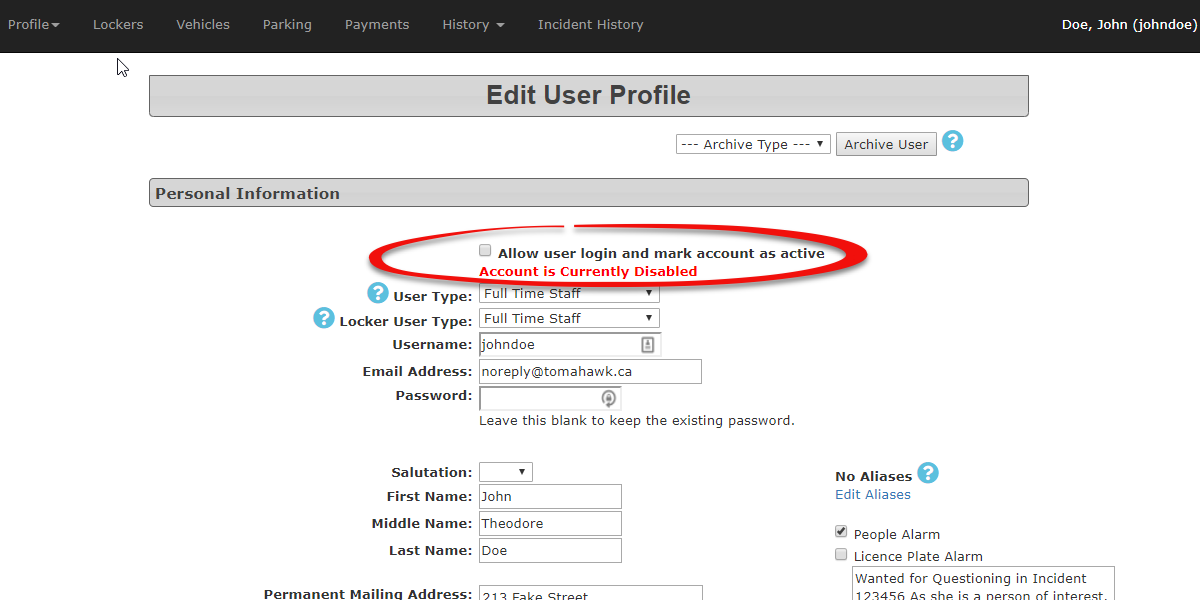
Click the Information Correct button to submit the change.
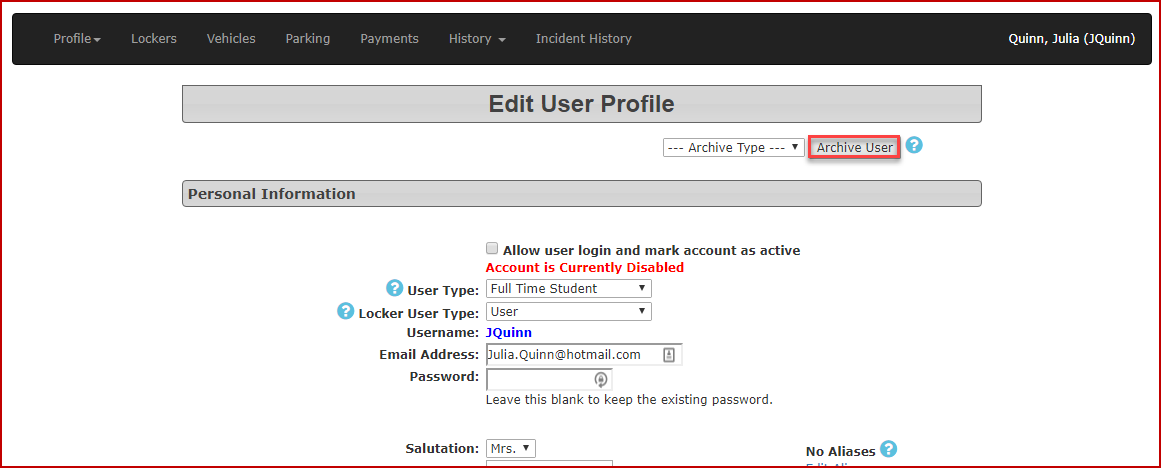
Archive User Account
Follow the steps above to locate and disable a user. Now choose an Archive User Type from the Archive Type dropdown list.
Click the Archive User button and click OK on the confirmation pop-up.
Archiving and Restoring Permits
Lot Allocation allows you to remove and restore permits in any given lot. Permits are removed through archiving. Archived permits are not permanently deleted and can be restored from their archived state.
Quick Steps:
- Hover over Parking Management then Lot Administration and click Allocate.
- Locate the lot you wish to archive/restore permits for.
- Click Archive Permits and Choose either Selected Permits to archive a portion of the permits or All Permits to archive them all.
- Select the permits you wish to archive.
- Click Remove and confirm with Remove again.
- To restore permits click Add Permits To Lot.
- Choose individual permits or a range (TL2-01 to TL2-05).
- Click Add Permits then confirm by clicking Add Permits again.
- Wait for the completion popup.
Step-by-Step Instructions:
Purging Incidents from OPS-COM
- You must add the "Delete Incidents" permission to the Admins you want to give this ability to.
- There are two ways to purge selected Incidents: either by searching for a particular incident and clicking the "Delete Incident" button or by using the "Purge Incidents" tool.
Using the Delete Incident Button
- Search for the incident you wish to purge. You can see the "Delete Incident" button is available with the incident if it is older than 7 years.

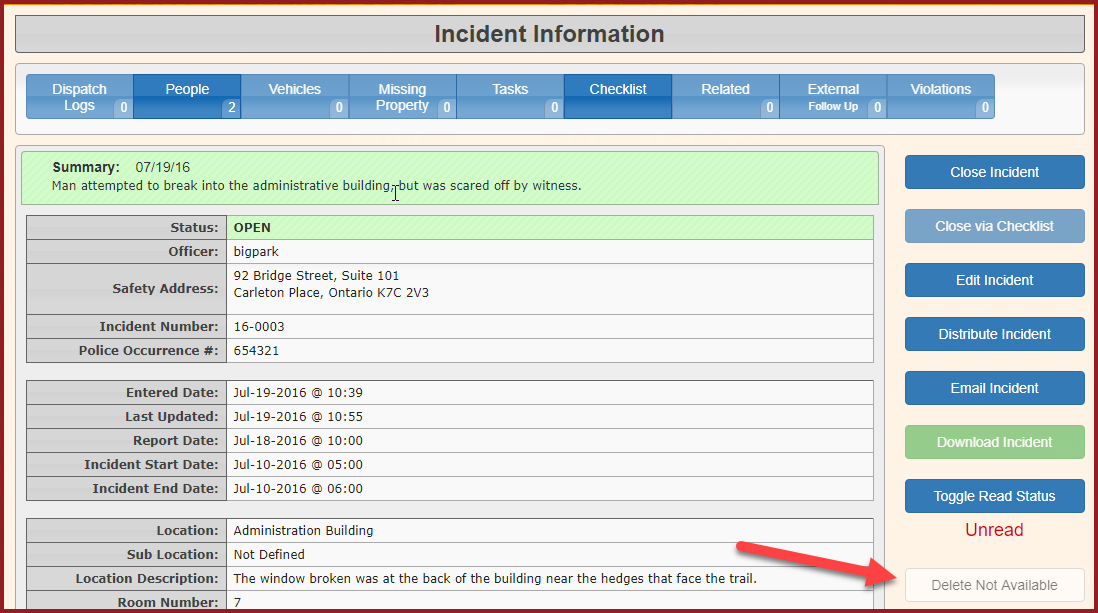
- You can see that the "Delete Not Available" button is greyed out when the incident is less than 7 years old.

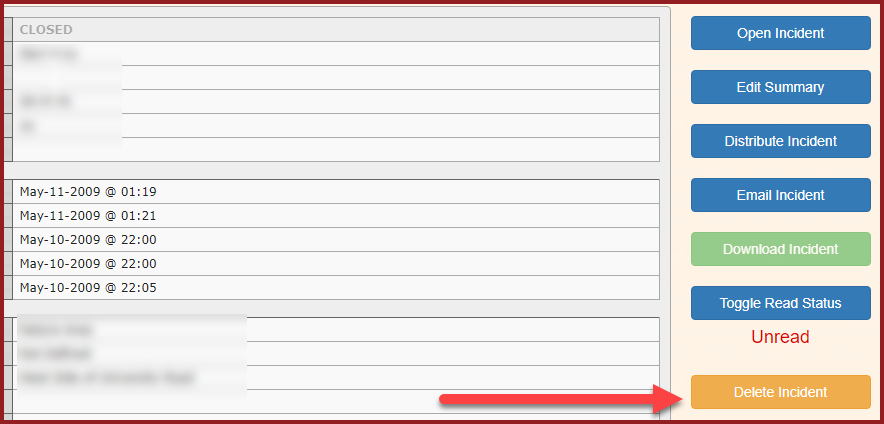
Follow the prompts to delete the incident.
Using the Purge Incidents Tool
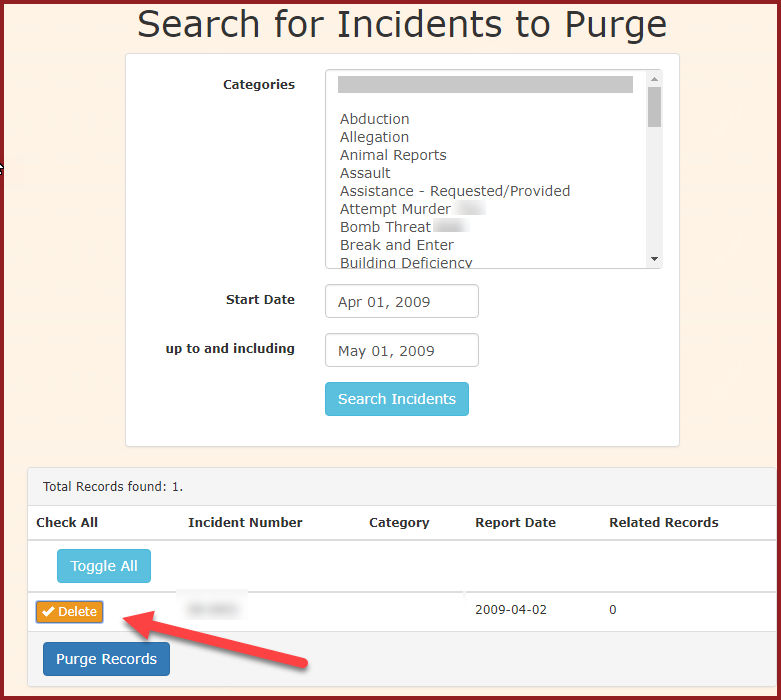
- Click Admin Options, Purge Incidents.
- The 'Search for Incidents to Purge' screen displays. Enter your criteria. Note, only the oldest 300 records will be displayed.
Note that the Number of Instances is greater than or equal to the search field. Therefore supplying 1 here could still display incident instances greater than 1. - Enable the "Delete" checkbox next to the incident you wish to purge.

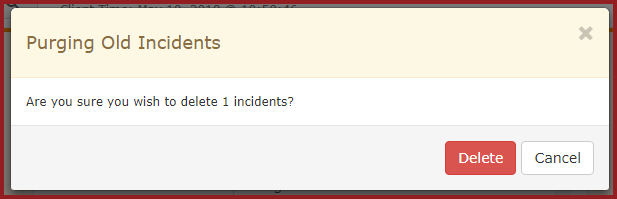
- Click the 'Purge Records' button. A confirmation prompt will display. Click the 'Delete' button.

- The incident will be purged. Note, this is not reversible. Use Caution when deleting records.
Merge Vehicles
The Merge Vehicles option is used to combine two vehicles into one vehicle. It can also be used when a vehicle has outstanding violations and a User has added the vehicle (with violations) to their account.
This will associate the vehicle to the User and bring along all the violation history to the User.
Quick Steps:
- Hover over User Management then Vehicles. Click Merge Vehicles.
- Enter the vehicle plate or VIN and click Search.
- In the search results, select the secondary vehicle (left) and primary vehicle (right).
- Click Merge and confirm the merge.
- Wait for the confirmation screen to appear.
Step-by-Step Instructions:
- Hover over the User Management icon and select Vehicles.
- Click Merge Vehicles.
- Enter the partial or full vehicle plate number or VIN of the two vehicles you want to merge.
- Click the Search button.
- Select the secondary vehicle(s) on the left (the one you want to merge into another).
- Select the primary vehicle on the right (the one you want to merge into).
- Click the Merge button.
- Confirm that you want to merge the vehicles.
Merge User
The Merge Users option is used to combine two profiles for the same person into one user profile.
User merge will delete the user record you are merging from, so be careful how you use this tool.
Why would you use this function? You may use this function if: A person created profile in error; person gets married and changes their name; and/or the User Profile does not match the Admin created profile.
Quick Steps:
- Hover over User Management and click Merge Users.
- Search for users by entering identification info.
- Select users on the left to merge into the right.
- Click Merge to start the process.
- Confirm the merge on the next screen by clicking Merge again.
- Review the confirmation at the bottom of the page after the merge completes.
Step-by-Step Instructions:
- Prerequisites: Ensure the user account is enabled. Check that the user has a user type selected. If the user doesn't show up in the merge report, visit the user's profile to confirm these settings.
-
Access the Merge Users Tool: Hover over the User Management icon. Click on Merge Users.
-
Search for Users: Enter a valid identification detail (e.g., full or partial User name, Last name, Email address, Student number or Employee number) in both search fields to locate the users.
-
Select Users to Merge: On the left side, select the users you want to merge into the user on the right side.
-
Initiate the Merge: Click the Merge button to begin the merge process.
-
Confirm the Merge: A confirmation page will pop up showing the username to merge into. Click Merge again to finalize.
-
Final Confirmation: The screen will refresh to the main page.
-
What Happens After a Merge?: To User (Right Column): The user profile on the right will remain active with updated information. To User (Left Column): The user profile on the left will be archived.
-
Transferred Data: Data from the FROM User (left column) that doesn't exist in the TO User (right column) will be transferred to the TO User.
-
Merged data includes: Vehicles, Violations, Permits, Lockers, and Items Awaiting Payment.
Important Notes:
Ensure the TO User profile contains the most accurate or up-to-date information before merging.
After the merge, you can find the merge record by viewing the Completed History on the profile of the TO User.
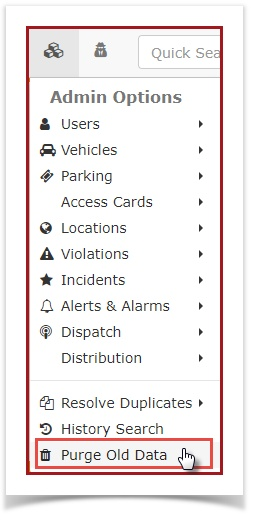
What Does Purge Old Data Do?
Under the Admin Options menu, click on "Purge Old Data".
When you click on 'Purge Old Data', a progress bar will appear indicating the number of records to be purged as it finds them.

A list is formulated of any user activity, and any associated record updates that have occurred in the last seven years.
To complete the process, click on Purge these records.

A record can remain dormant for 6 years and a small update will restart the 7-year clock.
The activity list is used to determine what to exclude from a purge. The script then purges any data that is not on the activity list.
What gets purged?
The following will get purged if there has been no activity in the last 7 years:
- User profiles
- Vehicles
- Violations
- Permits
- Appeals
- Temp Permits
- Payments
- Lockers
- Access Cards
- Gate Events
- Refunds
- Waitlist Records
- User History
The following will NOT get purged regardless of the last updated date:
- Incident Users
- Contact History