🔒Locker Management
- Non Returning Users Report
- Locker Sales Windows
- Locker User Types
- Locker Troubleshooting
- Midnight List - Lockers
- Allocate Lockers
- Awaiting Payment (Lockers)
- Locker Switch
- Locker Search
Non Returning Users Report
At the end of a semester, students are required to re-rent a locker. This report helps find students who continue to use their locker without paying for it. This report will show students that rented lockers in the previous semester but did not rent a locker in the current semester. That list can be used to vet whether or not they are still using their locker or no longer attending the school.
Quick Steps:
- Hover over Lockers Management and click Non-Returning Users Report.
- Select Old Sales Window from the Yearly dropdown under Old Semesters.
- Select Current Sales Window from the Yearly dropdown under Current Semesters.
- Click Search to view the report.
- Click Export to download the data.
Step-by-Step Instructions:
Locker Sales Windows
Quick Steps:
- Hover over Locker Management and click Sales Window.
- Click Add Sale Window to create a new window.
- Fill in the details and click Save Changes.
- To edit, click the Edit button (contact OPS-COM if the button is faded).
- Click on the Active button located to the left of the Edit button to activate/deactivate the sales window. Activate sales windows to allow users to purchase lockers.
- Click Archive to move past windows to the archive section.
- Restore archived windows with the Restore button (no editing possible if lockers are associated).
Step-by-Step Instructions:
1. Access the Locker Sales Windows: Hover over the Locker Management icon and then select Sales Window.
2. The Manage Locker Sales Window Page: You will be taken to the Manage Locker Sales Window page, where you can see and manage all locker sales windows.
3. Add New Sales Windows: Click the Add Sale Window button located at the top-right of the page. A new modal window will appear. Fill in the required information and click Save Changes when you're finished. Your new sales window will initially be set as "Inactive." You can activate it later.
4. Edit Existing Sales Windows: To edit a sales window, click the Edit button next to the sales window you want to modify. If the Edit button is faded, it means the sales window is linked to sales, and you cannot edit it yourself. In that case, contact OPS-COM for assistance.
5. Activate Sales Windows:
-
Activating a sales window determines if users can purchase lockers for a particular area.
-
Once a window is activated and lockers are sold, marking it as inactive will cause all users to lose their lockers in that window.
-
You can activate a sales window again to restore the lockers for users.
-
You can have up to 4 active sales windows at a time, categorized as Yearly (Y), Monthly (M), Semester (S), and Other (O).
6. Archive Past Sales Windows: To archive a sales window, click the Archive button next to the window you wish to archive. The archived window will move to the Past Locker Sales Window section.
7. Restore Archived Sales Windows: If you need to restore an archived sales window, click the Restore button next to the sales window under the Past Locker Sales Window section.
Note: If there are lockers associated with the archived sales window, you won't be able to edit it.
Locker User Types
Locker User Types
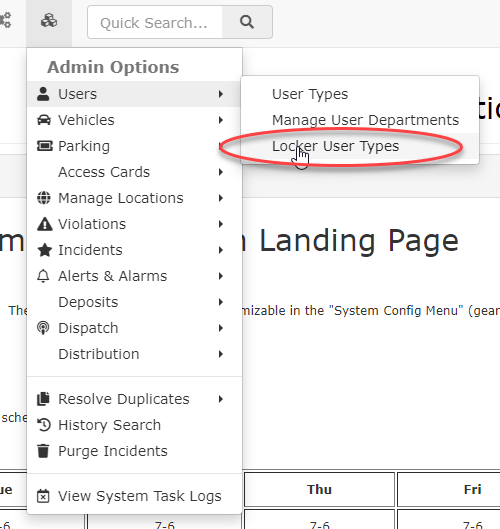
You must create the Locker User types you wish to use in OPS-COM. To do so Hover over Admin Options and click Users, then select Locker User Types.
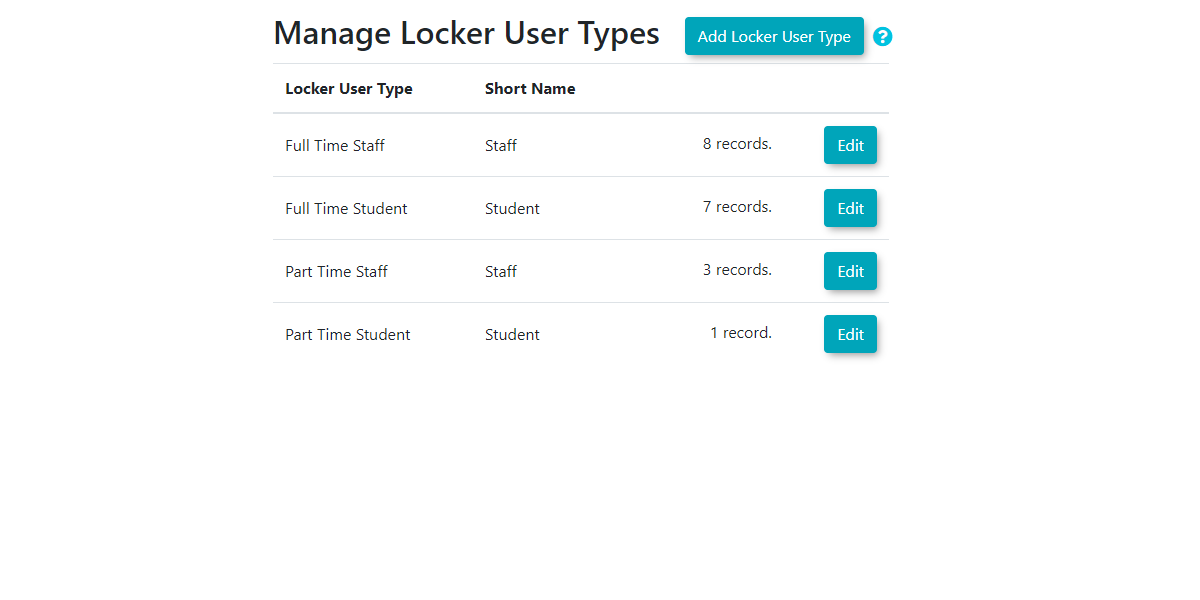
The Manage Locker User Types screen appears listing any existing Locker User Types.
The list will include the name of the locker user type, the configured short name, and the number of user records which indicates how many of each user type are in the system.
To add a Locker User Type click on the Add Locker User Type button.
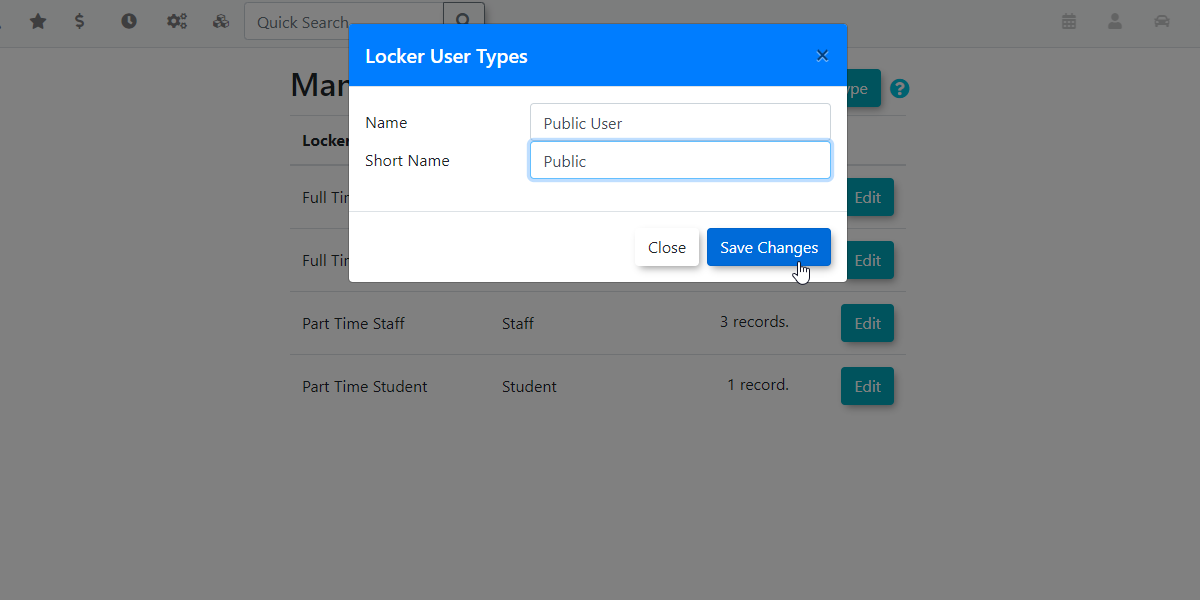
A Locker User Types screen will open where you enter the Name of the User Type along with the preferred Short Name.
In our example we are creating a Public User with the short name Public.
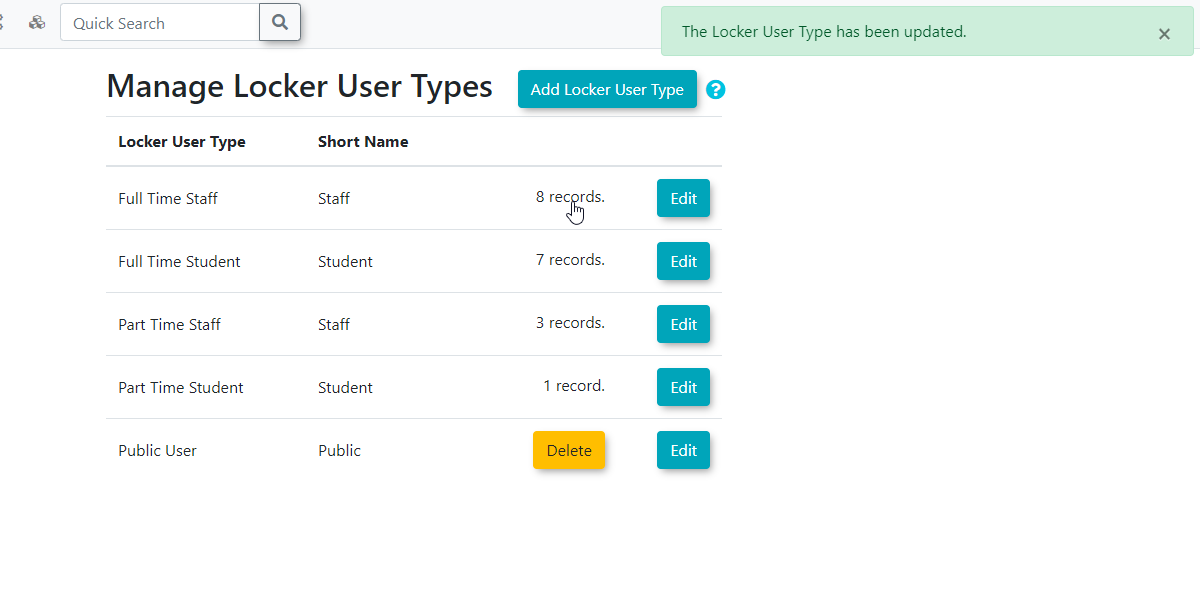
The Manage Locker User Types screen will refresh. Note that the new user type has been added to the list.
NOTE: You can see the new user type that was added has an associated delete button. Locker user types can only be deleted if that have not yet been used.
Once a user has been assigned the Public User type as an example, that user type will no longer display the delete button.
You can assign Locker User Types to any profile by editing the user profile and changing the Locker User Type.
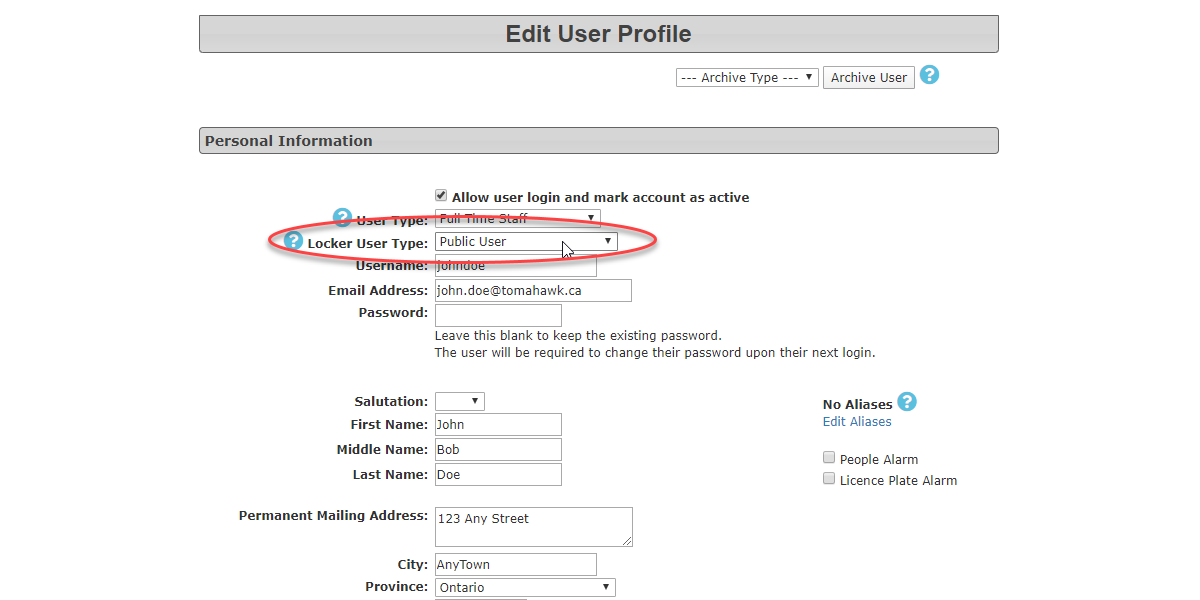
Please Note, Locker User Types is not editable or viewable on the User Side. These must be assigned by the Admin only.
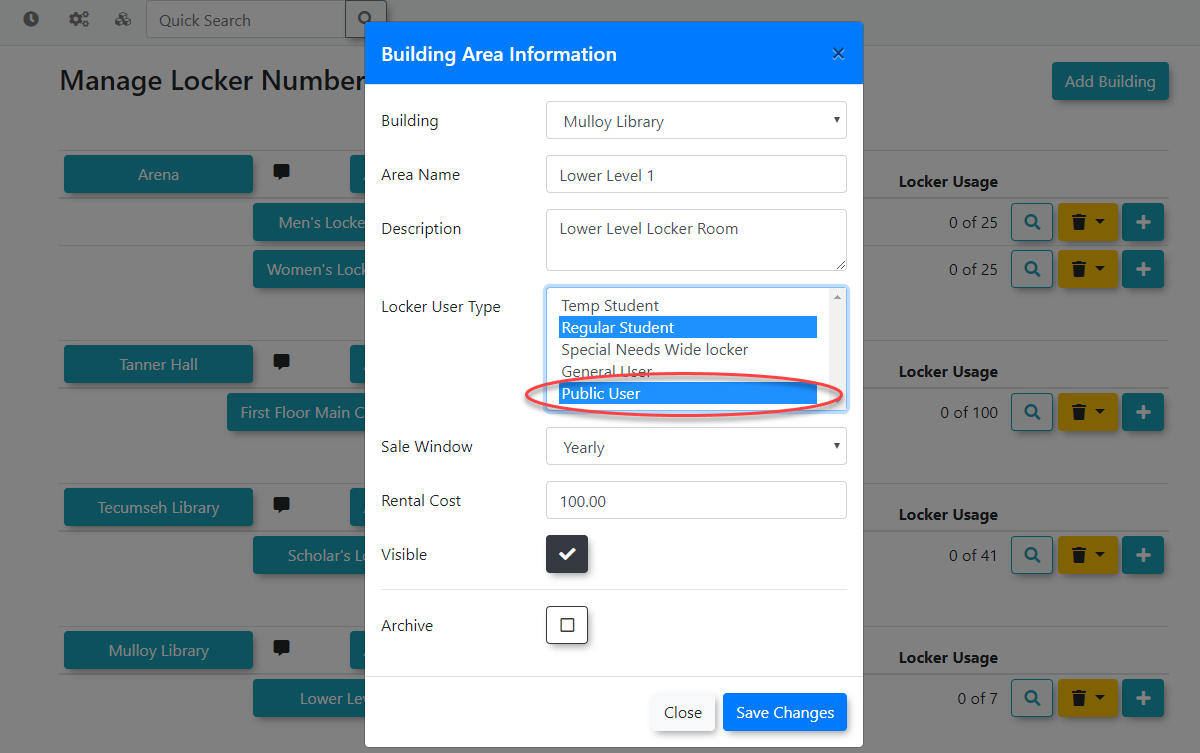
You must assigned your Locker user types by editing the Locker Building Area and choosing the Locker User Type as shown. You may select one or multiple user types.
For more on Building Areas please see this wiki article.
Locker Troubleshooting
Basic test for checking if the locker availability is set correctly when using Locker UserTypes.
Midnight List - Lockers
The Midnight List is a list of lockers due to be cleared out of the system at midnight. Follow the instructions in this wiki article to Clear Locker Items Awaiting Payment
Allocate Lockers
This guide walks you through the process of allocating lockers, adding buildings, areas, and lockers, as well as managing their visibility and archiving.
Quick Steps:
- Hover over Lockers Management and select Allocate.
- Add a building by clicking Add Building and saving changes.
- After adding a building, click Add Area, fill out the form, and save.
- Click + to add lockers to the area. Use Specific Locker or Locker Range options, then click Add Lockers.
- Confirm locker addition and return to the Manage Locker Numbers screen.
- To view lockers, click the Magnifying Glass Icon.
- To remove lockers, use the Trash Bin Icon to archive or toggle visibility.
- Restore archived lockers by clicking +, selecting the lockers, and confirming restoration.
Step-by-Step Instructions:
1. Allocate Lockers: Hover over the Lockers Management icon and select Allocate. The Manage Locker Numbers page will display. You’ll need to add buildings first to configure lockers.
2. Add a Building: Click on Add Building. The Building Information screen will appear. Here, enter the Building Name and Location information. Click Save Changes to continue.
3. Add Building Areas:
- Once the building is added, click on Add Area to create a building area.
- Complete the form by entering:
- Area Name
- Description
- Select the Locker User Types that can rent lockers in this area.
- Choose a Sales Window type (Yearly, Monthly, Semester, or Other).
- Click Save Changes to continue.
4. Add Lockers to a Building Area:
-
Click the + symbol to open the "Add Lockers To Area" screen.
-
You can add lockers using two methods:
- Specific Lockers: Enter individual locker numbers (e.g., LL001, LL002) or a list of locker numbers separated by a line return.
- Locker Range: Add lockers by specifying a numerical range (Start and End) with an optional Prefix or Postfix.
Example: Create lockers LL001, LL002, and LL006 through the Specific Locker method and a Locker Range LL007–LL010 at the same time.
-
Optionally, deselect the Visible button if you wish to hide the lockers for now.
-
Click Add Lockers to confirm.
6. View Locker List: You’ll return to the Manage Locker Numbers screen. Click on the Magnifying Glass Icon to view all lockers added in the new area.
7. Managing Lockers (Visibility & Archiving):
- To remove lockers, you can either toggle their visibility or archive them.
- To archive lockers, click on the Trash Bin Icon. You’ll have two choices:
- Archive All Lockers: Archive all lockers in the area.
- Archive Selected Lockers: Choose lockers to archive (e.g., LL001 and LL002) and click Archive.
8. Confirm Locker Archiving:
- A confirmation message will appear, confirming the lockers have been archived.
9. Restore Archived Lockers:
- To restore archived lockers, click the + symbol and add the lockers again. Select Restored for the locker status.
- A confirmation screen will appear, showing the restored lockers.
Awaiting Payment (Lockers)
This article shows admins how to manage and communicate with users who have pending payments for their lockers.
Quick Steps:
- Hover over Locker Management and click Awaiting Payment.
- Choose the locker area and sort type then click on Search.
- Review the list of users.
- Use the Envelope Icon to email individual users.
- Click the Username button to view the user’s profile.
- Use the Email Listed button to send a single email to all users.
- Click the Locker Number button to view or update locker details, then click Update Locker.
- Click the Building Area button (if applicable) to view/edit building area details, and click Update this Area to save any changes.
Step-by-Step Instructions:
- Accessing Awaiting Payment page: Hover over the Locker Management icon and click Awaiting Payment.
-
The Lockers Awaiting Payment page will appear. Apply the desired filters (e.g., All Areas, Sort by building area, user). A list of users who are awaiting payment for their lockers will appear.
-
Key Features and Functions on the Page:
-
Envelope Icon: Click this to send an email to the user listed.
-
Username button: Click to view or edit the user’s profile.
-
Email Listed Users button: This button allows you to send a single email to all users displayed in the search results.
-
Locker Number button: Clicking on this will open a pop-up window with the locker’s current details. Here, you can update the locker’s condition, check if it can be reused, and add comments. Don't forget to click Update to save any changes.
-
Building Area button: If applicable, this opens the Building Area Information pop-up. You can view or edit details about the building area. If you make changes, click Update this Area to save. You can also delete the building area from this window.
Locker Switch
The Locker Switch option allows administrators to change the locker that is associated with a particular user.
Quick Steps:
- Hover over Locker Management and click Locker Switch.
- Select Old Locker Area and Old Locker Number, and confirm the correct user.
- Choose the New Locker Area and New Locker Number, then click Switch Old to New or Swap Old with New.
- On the confirmation page, add comments if needed and click Switch User Lockers.
- The Locker Information Updated page will appear.
Step-by-Step Instructions:
2. Select Locker Details:
- In the Old Locker Area, choose the correct location for the old locker.
- Select the Old Locker Number and verify that it is associated with the correct person.
- Now, select the New Locker Area and New Locker Number.
- Click Switch Old to New to change the locker assignment, or click Swap Old with New to exchange lockers between two registered users.
3. Confirm the Change:
- You will be directed to the Locker Switch Confirmation page.
- If necessary, type comments in the Reason for Action section.
- Click Switch User Locker to finalize the change.
4. Completion: The Locker Information Updated page will be displayed, confirming the locker update.
Locker Search
The Locker Search option allows administrators to search locker(s) to be able to view/edit details.
Quick Steps:
- Hover over Locker Management and click Search.
- On the Locker Search page enter search criteria and click Retrieve.
- View search results below the form.
- Click Generate Mailing List to create an Excel report of all users that have rented lockers in the search results list.
- Click the gold H button for locker history.
- Use the User Visible column to manage locker visibility (Mark All Available/Not Available).
- Click the Locker # link to update locker details and renter information.
Step-by-Step Instructions:
-
Access Locker Search: Hover over the Locker Management and click on Search.
-
Enter Search Criteria: The Locker Search page will appear. Enter the relevant search criteria to filter lockers. Once you've entered your criteria, click the Retrieve button to generate a report.
-
View and Utilize Search Results: The search results will display below the search form.
-
Generate Mailing List: To create an Excel report, with locker numbers and user mailing details, for all users that have rented lockers in the search results list click the Generate Mailing List button.
-
Locker History: To view a detailed history of a specific locker, click the gold H link. This will show all transactions related to that locker, including past renters.
-
User Visibility: The User Visible column shows whether or not the locker is visible to users.
- To make all lockers in the list visible, click the Mark All Available button.
- To hide all lockers, click the Mark All Not Available button.
- After making changes, click Update Records to save.
-
Locker Information:
- Click the Locker # link to open the Current Locker Information pop-up.
- Here, you can update the locker’s condition, add comments, and view renter details.
- Click Update to save any changes.