Notice Letters
Articles related to setting up Notice Letters.
Notice Letter Templates
Introduction
This page allows the admin to manage, create, and edit the content and appearance for notice letters used within the system.
Notice letters, also known as a Notice of Impending Conviction (NIC) letter, are part of the MTO process, and are sent out to let a user know of an impending conviction for any outstanding violations on their account, to be collected through the Ontario court system.
Templates
The appearance and layout of notice letters is setup within the notice letter templates page.
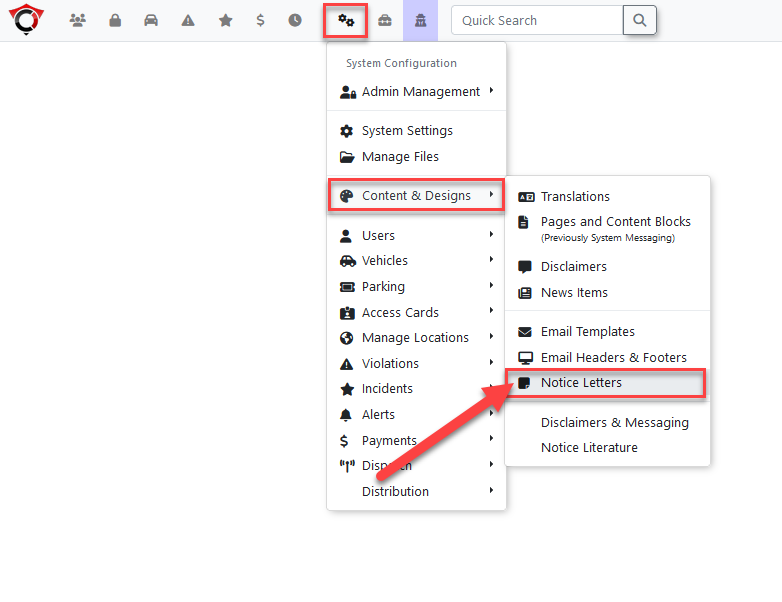
The templates page for notice letters can be found under the system configuration menu, within the content & designs submenu.
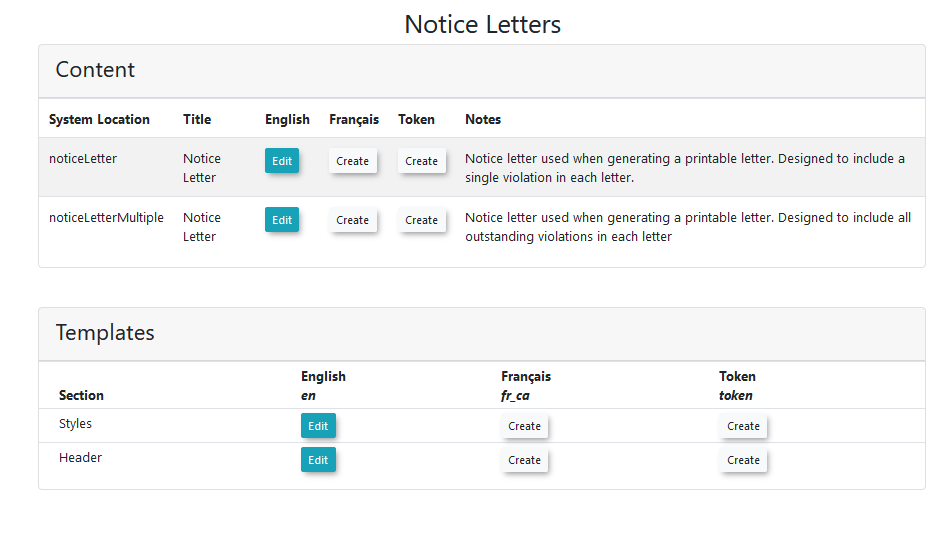
On the templates page, an overview of all notice letter content within the system is shown. Different content and templates must be created for each language that is installed on the site.
The notice letter templates page consists of two sections:
Content
noticeLetter - the template used when printing a notice letter containing a single violation.
-
noticeLetterMultiple - the template used when printing a notice letter that contains multiple violations.
Templates
styles - element styling to be applied to the notice letters. This is done using Cascading Style Sheets (CSS), a type of coding used to affect how parts of the notice letter looks, such as assigning a specific colour and size to a paragraph of text.
-
Header - the content that appears in the header of the notice letter.
Content Editor
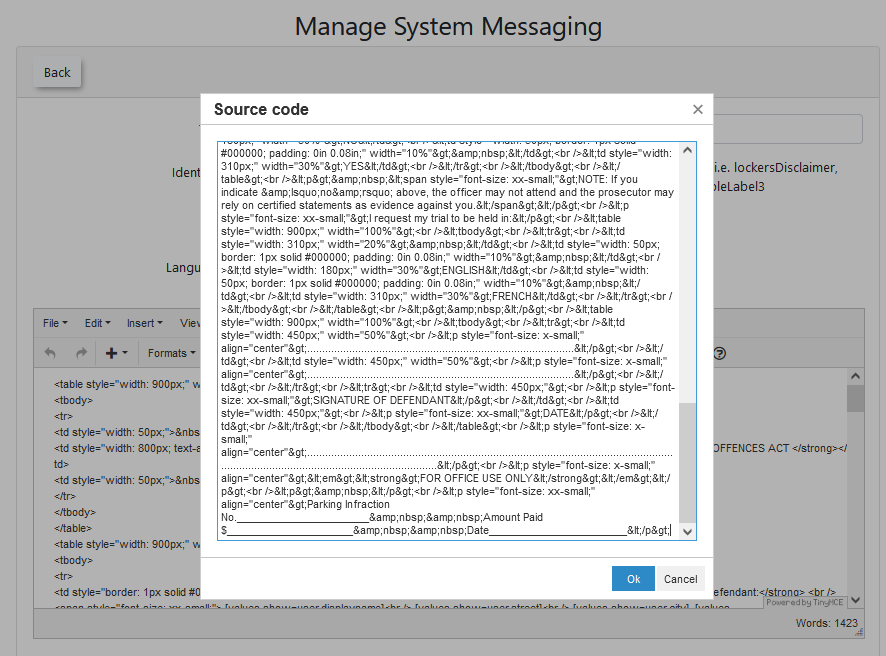
This page is where the content of the notice letters can be edited.
The content section is a type of WYSIWYG (What You See Is What You Get) editor.
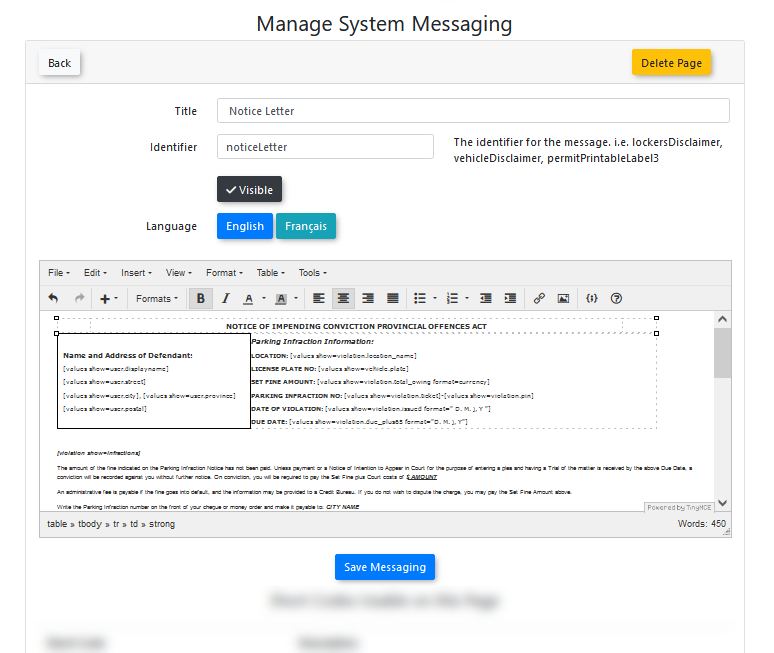
When editing the notice letter content, some basic knowledge of HTML (Hyper Text Markup Language) is beneficial.
The WYSIWYG (What You See Is What You Get) editor isn't meant for templates, and when editing directly through the interface, problems can occur where the final printed page doesn’t lineup with the template correctly.
Minor changes can be made with the editor, but it is recommended for most changes to be made through editing the HTML directly.
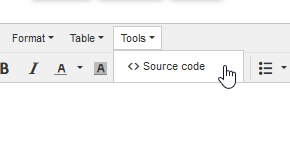
You can edit the HTML in the editor by selecting Tools → Source Code.
Alternatively, the layout of the template can be designed in an external HTML editor, and the source code copy and pasted into the HTML source code box.
Short Codes
Notice Letters use a functionality called short codes, which are pieces of text used as placeholders for user information when setting up a template.
When a notice letter is generated, the short code will be automatically replaced with the relevant user information in the print out.
Short codes usable on each type of notice letter template are listed at the bottom of the edit content page, below the content box.
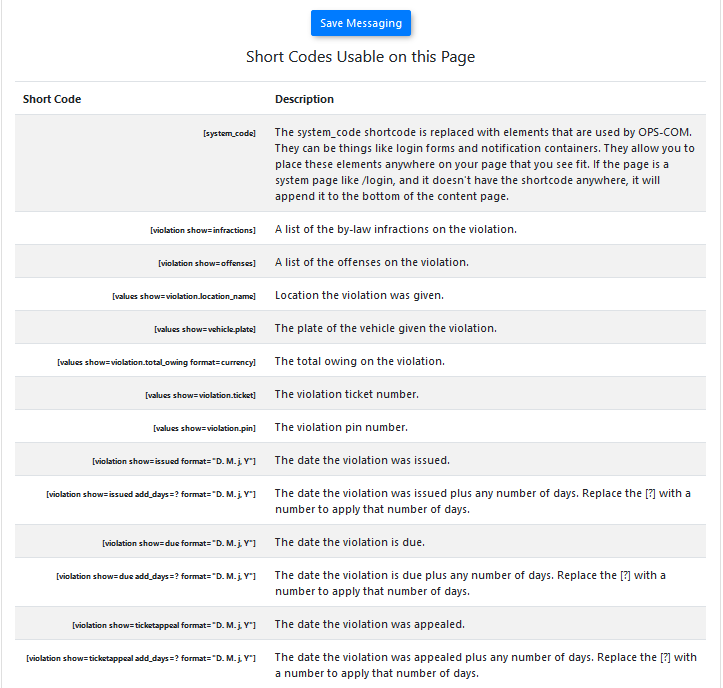
A short code placed in the template will automatically be replaced with the details of the user when the notice letter is being generated.
For example, if the following short code was placed within the body of the notice letter template:
-
Vehicle: [values show=vehicle.plate]
It would be automatically replaced with the vehicle plate when the notice letter is generated, resulting in something like:
-
Vehicle: ABC123
Using Short Codes
A short code can be inserted into the content by copy and pasting the short code from the list into the content where the information is wanted to be output in the final notice letter printout.
A short code can be copied to the clipboard by using these steps:
-
Highlight the short code within the list
-
Right click the highlighted text
-
Click copy
-
The short code will now be contained within the clipboard
The short code can then be pasted into the content using these steps:
-
Left click in the desired area within the content where the information is wanted to appear
-
Press the Ctrl and V buttons on the keyboard at the same time
-
The short code will now be pasted to the location selected within the content
Using right click will open a content-specific menu within the content menu, and so can’t be used to paste into the window.
Notice Letter Report
Introduction
The letter report page shows a list of users within the system who are eligible to be sent a notice letter, also known as a Notice of Impending Conviction (NIC) letter.
Notice letters are part of the MTO process, and are sent out to let a user know of an impending conviction for any outstanding violations on their account, to be collected through the Ontario court system.
Notice letters printed from this page are intended to be printed and physically sent to the user who incurred the violation.
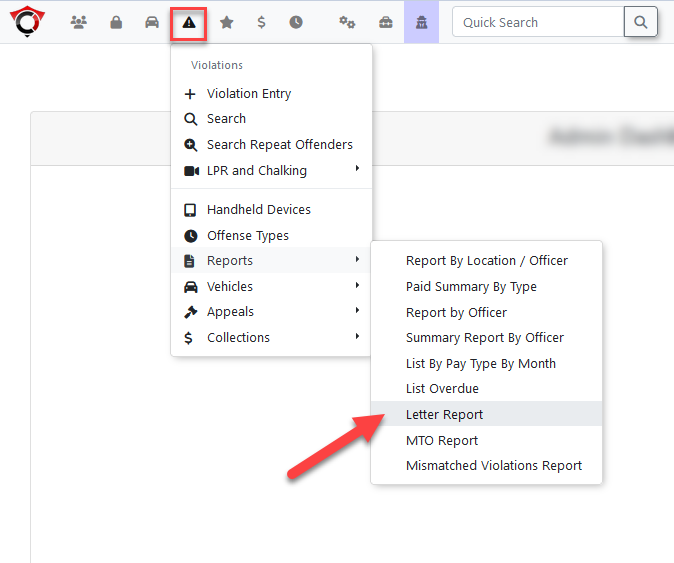
Page Location
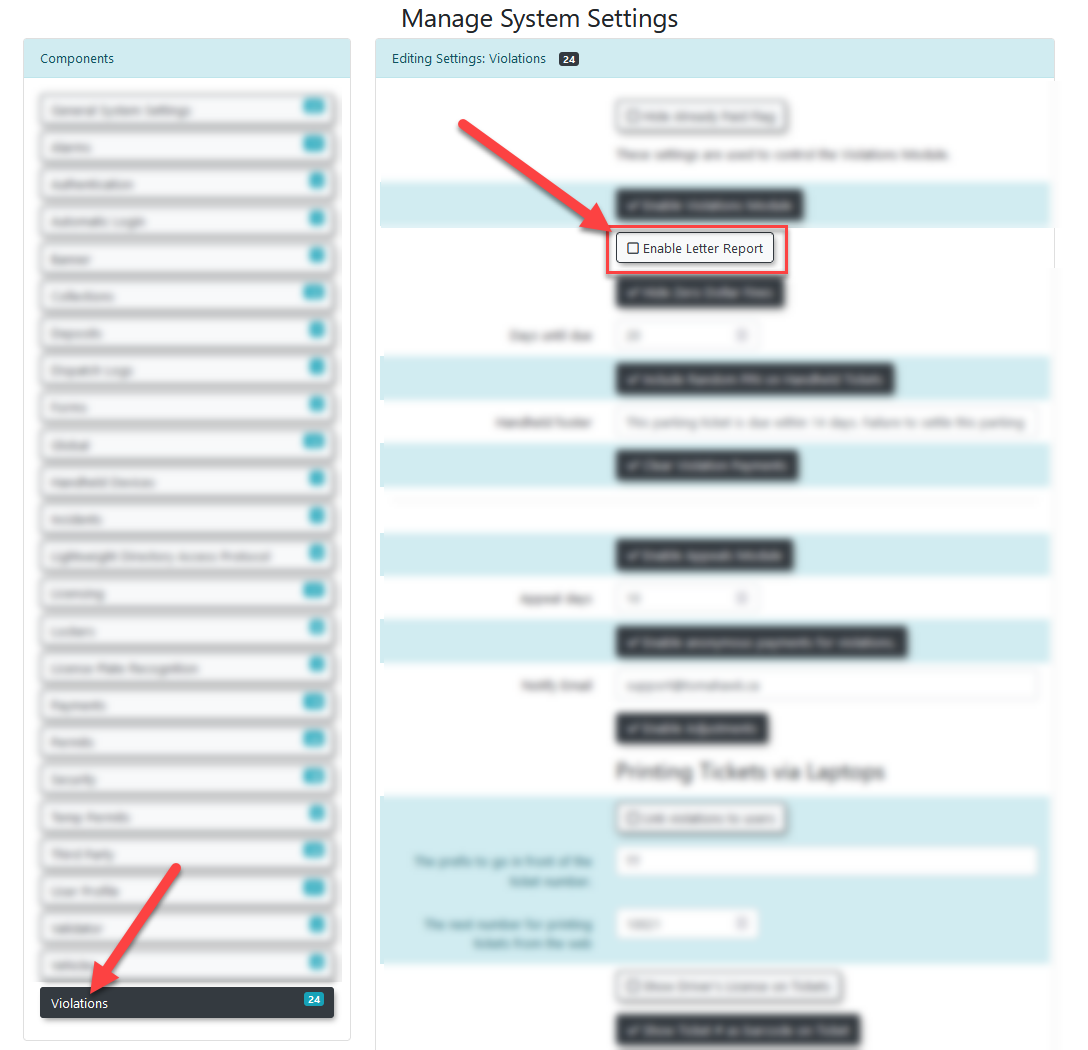
The letter report page can be found under the violations menu, within the reports sub menu.
If the letter report tab is not present in the menu, it will need to be enabled within the system settings. The enable letter report option is located under the violations tab.
Letter Reports Page
The letter report page consists of two sections, listing the notice reports that can be printed, and those that cannot be printed.
Printable Violation Notice Report
This section contains a list of all violations within the system that are able to have a notice letter printed.
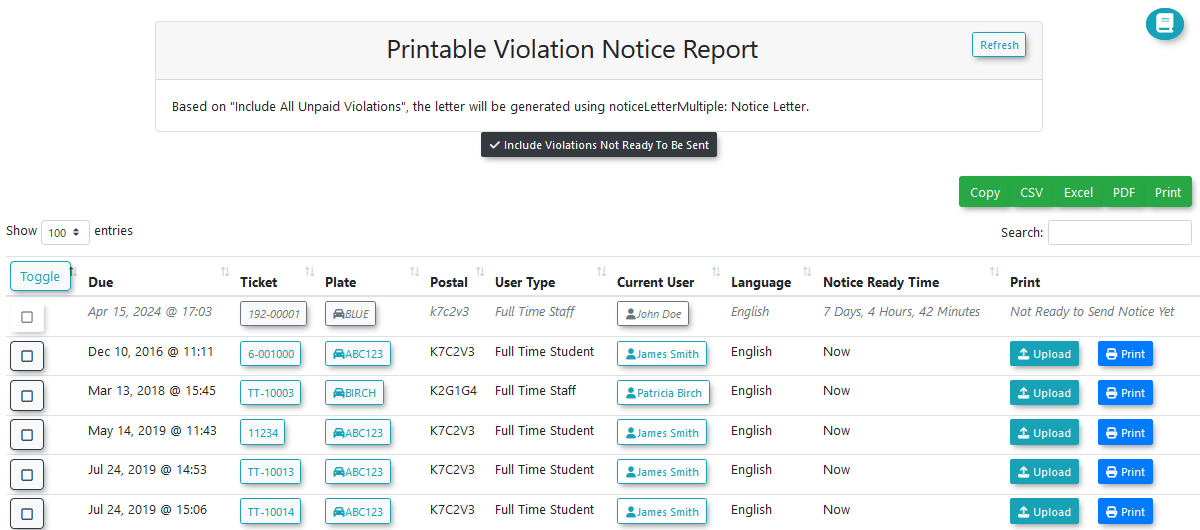
Selected Template
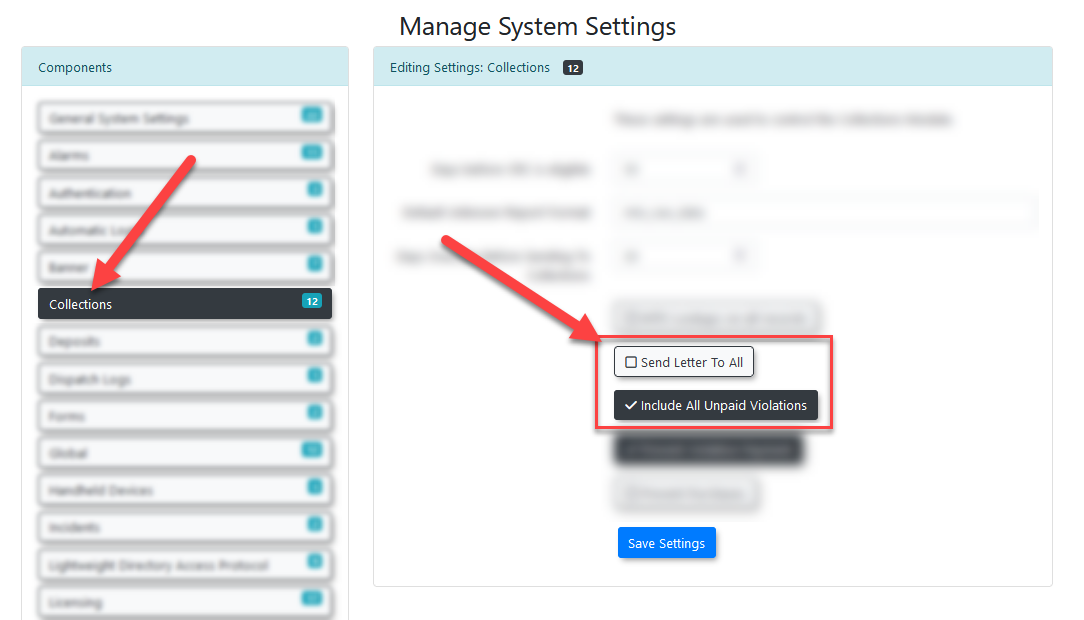
A notice at the top of the section notes which template will be used for the print-out, based on the value of the system setting “Include all unpaid violations”.
Having this setting enabled will make all violations for a user be printed on a single notice letter. Otherwise, a single notice letter will be created for each violation.
Not Ready to be Sent
Enabling this setting will cause violations that are not ready to have their notice letter sent to appear within the list. These violations will have greyed-out text.
The notice-ready column will display the amount of time left before a notice letter is able to be sent for the violation.
By default, notice letters are able to be sent 7 days after the payment for a violation is past due.
Printing the Notice Letter
There are two locations from which a notice letter can be printed; a single notice letter can be printed using the print button to the right, or multiple notice letters can be selected and printed at once.
The notice letters will be generated as a PDF file and downloaded by the web browser.
Uploading a Notice Letter
It is possible to upload a notice letter in place of generating one.
This is used when a letter or document has already been sent to the user in place of a system-generated notice letter, enabling it to be associated to the violation as if it were system-generated.
Un-Printable Violation Notice Report
This section lists violations that are unable to have notice letters printed.
A notice letter is considered to be unprintable when the associated vehicle is missing user details. This can happen when a user has not filled out all their details, or when a user is not present within the system.
In the latter case, the unknown vehicle data must be exported and sent to the MTO for information lookup using the Vehicle Lookup Export.
The MTO will return the data lookup in the form of a file, which must then be imported back into the system using the Vehicle Lookup import. After the data has been imported, the user details will be automatically entered into the system and the notice letters can be printed right away.
The user data imported in this way is considered temporary and is notated as being from the MTO. For security reasons, MTO import data will be cleared from the system after all violations associated to a vehicle have been cleared. The violations on a vehicle are considered to be cleared after being paid by the driver, or by being sent to collections.
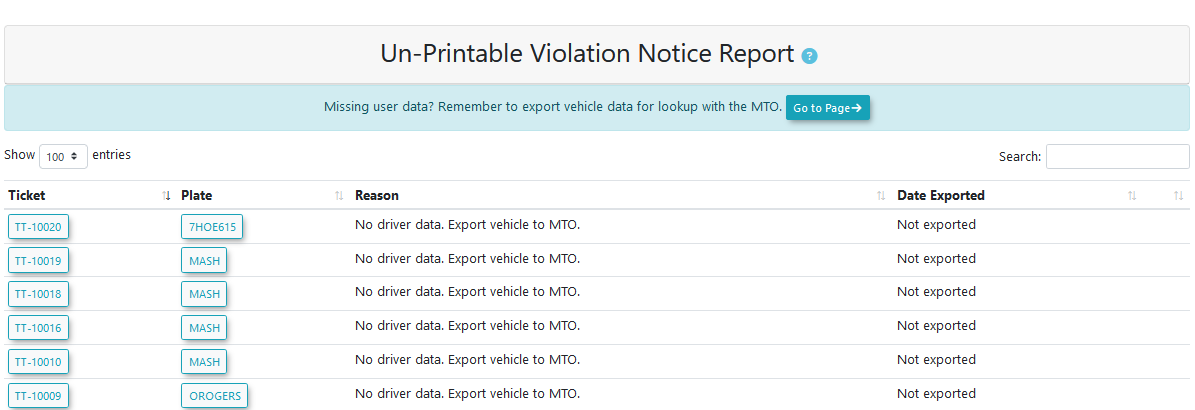
Various details are listed for the affected violations, including the reason the notice letter is unable to be printed, and if the vehicle has had its data exported yet.
A reminder will be listed for the vehicle if it has had its data exported to the MTO, but hasn’t had its return data imported back into the system yet.
Viewing Issued Notice Letters
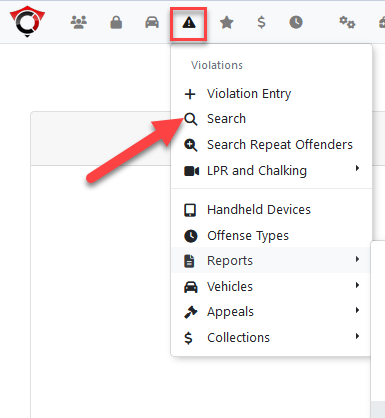
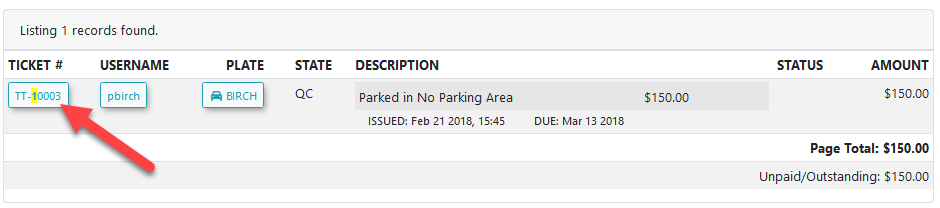
Notice letters that have been issued previously can be viewed from the violation search page.
The violation search page can be found under the violations menu.
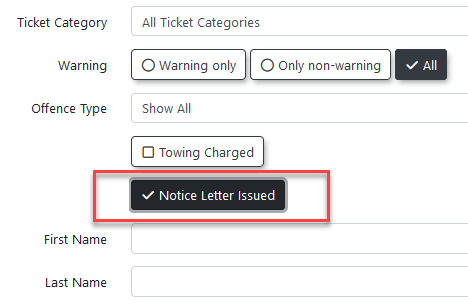
From the violations search page, additional search options can be found by clicking the toggle additional options button located in the top right.
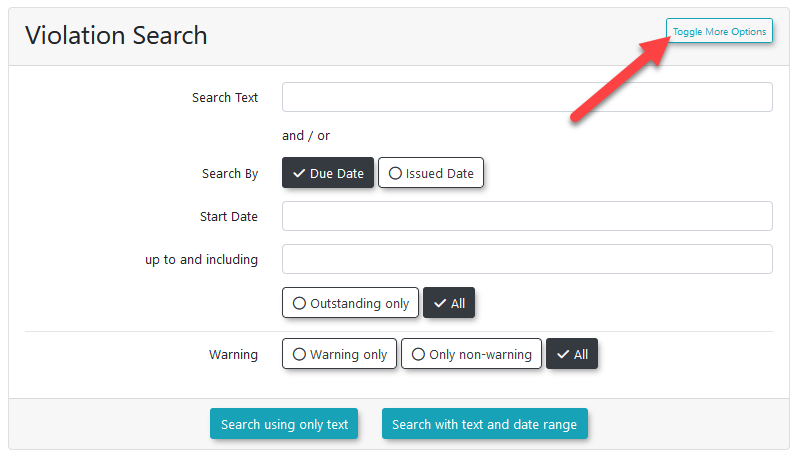
This will expand the search box with additional search options.
The relevant search option here is Notice Letter Issued.
By checking this option, only violations that have had notice letters issued for them will be returned.
Notice letters can be viewed from within the violation info window, found by clicking on the ticket number of a violation in the results screen.
The notice letters for the violation are listed near the bottom of the window.
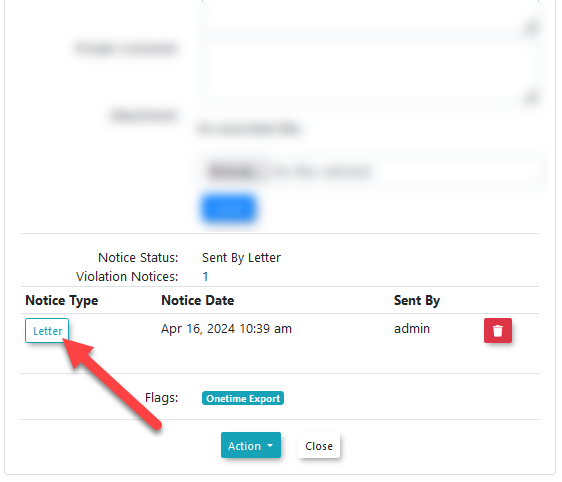
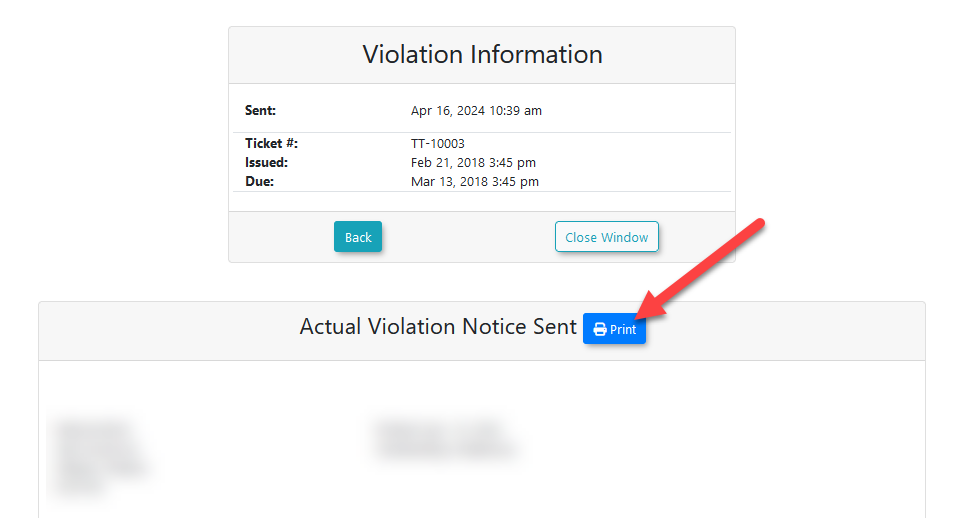
This will open the notice letter view window, from which the notice letter content can be viewed, or re-downloaded by pressing the print button.
Regenerating A Notice Letter
In the cases such as when the template of the notice letter is changed, there may be a need to regenerate an existing notice letter.
The existing notice letter for the violation can be archived by clicking on the trash icon next to it. This will flag the notice letter as archived, allowing the violation to reappear on the letter report page so it can be printed again.
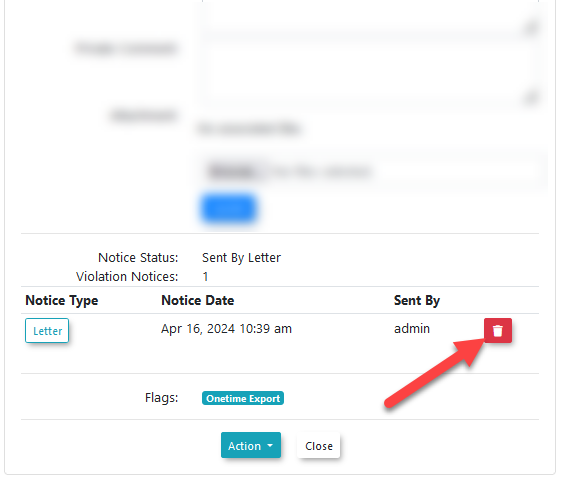
Archiving a notice letter will not delete it from the system, and it will continue to appear on the violation info page, with a notice indicating it has been archived.
Templates
The appearance and layouts of notice letters is setup within the notice letter templates page.
The templates page for notice letters can be found under the system configuration menu, within the content & designs submenu.

System Settings
There are several settings associated to notice letters.
There is one setting located under the violations tab.
-
Enable Letter Report
-
If this setting is enabled, the letter report page will be made available for use.
-
There are two settings located under the collections tab.
-
Send Letter To All
-
If this setting is enabled, notice letters will appear in the list for users who have already had the notice letter sent to them by email.
-
-
Include All Unpaid Violations
-
If this setting is enabled, all unpaid violations for the user will be included on a single notice letter. When disabled, each notice letter will be limited to a single violation.
-