🧰Tools / Miscellaneous
- System Dashboard
- Quick Search Tool Functionality
- Edit the Landing Page Messages
- Disable Browser Auto-fill and Auto-Complete
System Dashboard
The system dashboard has been reworked to provide greater flexibility. Items on the dashboard are now displayed as widgets, allowing admins to create custom dashboard layouts by arranging these widgets freely.
Reminder You need to be an Admin with the correct permissions to create or edit dashboard layouts.
Quick Steps:
-
Access Dashboard: Click the OPS-COM logo.
-
View/Change Layouts: Use the dropdown menu (top-right).
-
Manage Layouts:
-
Go to System Configuration > Dashboard Layouts.
-
Create or edit layouts by dragging widgets.
-
-
Create Widgets:
-
Go to Custom Dashboard Items.
-
Add title, content, and save.
-
-
Assign Permissions: Ensure roles have the correct dashboard permissions.
Step by Step Instructions:
Accessing the Dashboard
1. The dashboard is the first thing you see when accessing the Admin site.
2. Click the OPS-COM logo in the top left to return to the dashboard from anywhere.
Dashboard Layouts
Active Layout
Admins with permission will see a dropdown menu below the user menu (top-right).
· Use the Dashboard menu item to preview and activate different dashboard layouts.
· The active layout is the one you see on your homepage. Changing it only affects your account.
Managing Layouts
Admins with permission can manage layouts via System Configuration > Dashboard.
· Dashboard Layouts: Manage or create layouts.
· Custom Dashboard Items: Create and manage widgets.
In Dashboard Layouts, you can:
· New Layout: Create a new dashboard.
· Dashboard Items: Go to the widget creation page.
· Make System Default: Set a default layout for all users without a custom dashboard.
· Edit: Modify an existing layout.
Creating Dashboard Layouts
1. Click New Layout or Edit an existing layout to open the layout editor.
2. Drag and drop widgets from the Widget Storage onto the dashboard.
3. Resize and arrange widgets as needed.
4. Widgets left in storage will not appear on the dashboard. New widgets (system-created or custom) will appear in the Widget Storage sidebar.
Types of Widgets
· Blue: System widgets for key admin information.
· Yellow: Stats widgets for site stats and graphs.
· Green: Custom widgets created by admins.
Creating Custom Dashboard Items
1. Go to System Configuration > Dashboard > Custom Dashboard Items.
2. Click New Item or Edit to open the item editor.
· Title: Widget header on the dashboard.
· Identifier: ID for identifying the widget.
· Language: Create versions for different site languages.
· Content: Add text, images, or other elements.
3. Save the item. It will now appear in the widget storage sidebar.
4. Drag it onto a dashboard layout and save.
Permissions
To manage dashboards, you need the following permissions found in System Configuration > Admin Management > Manage Roles.
Choose the specific Role, click on Permissions for that role, and then System Configuration in the Edit Permissions section to the right to select the settings.
· Change Dashboards: View and change active dashboards.
· Edit Dashboard Layouts: Create and manage layouts.
· Edit Dashboard Items: Create and manage widgets.
Quick Search Tool Functionality
The Quick Search tool allows you to quickly find information in OPS-COM by searching specific fields. To perform a search, you must enter at least 3 characters.

Quick Steps:
- Enter a minimum of 3 characters in the Quick Search field in the main menu.
- Review the search results.
Types of searchable items are:
· License plate
· VIN number
· Username
· Last name
· Email address
· Student number
· Employee number
· Ticket number
· License plate of the vehicle involved
· Incident number
· Payment Confirmation code
Edit the Landing Page Messages
When you sign in to OPS-COM initially, you are presented with a landing page. This message is referred to as the Admin Dashboard. This landing page can be modified or edited to allow organizations to display important information to System Administrators and staff.
You need to be logged into an Admin account to access this page.
Quick Steps:
- Go to System Config > System Messaging.
- Open the Messages tab and locate the Admin Dashboard.
- Click Edit to make changes in the Message Editor.
- Save your changes using the Save Messaging button.
- Confirm that the changes have been saved successfully.
------------------------------------------------------------------------------------------------------------------------------------------------------
Step by Step Instructions:
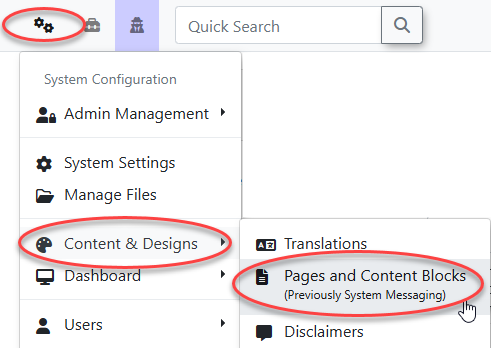
- To access the System Messaging Tool, hover over System Config in the main menu bar, select Content & Designs and then Pages and Content Blocks (previously System Messaging)

- In the Manage System Messaging window, click the Messages tab.
- Choose Admin Dashboard from the Messages list and click the Edit button.
- For visual edits, change directly in the content window to use the WYSIWYG editor. To edit in HTML, select Source Code from the Tools menu.
- After making your edits, click the Save Messaging button. A pop-up confirmation will notify you that your changes have been saved.
Customizing the Admin Dashboard ensures relevant and up-to-date information is available for administrators and staff.
Editing permissions are determined by your role. Certain sections may require assistance from the OPS-COM Support Team.
Disable Browser Auto-fill and Auto-Complete
When using OPS-COM to complete a User Profile, the browser's auto-complete feature can cause problems by automatically filling in fields with incorrect or unwanted information. This can lead to errors if unnoticed data is saved by mistake. To avoid this issue, you should turn off the auto-complete feature in your browser.
Some browser plug-ins, such as password managers, may also act as auto-complete utilities and cause similar issues. If disabling auto-complete doesn’t resolve the problem, review your installed plug-ins and disable them as needed.
Quick Steps:
- Identify your browser below.
- Follow the instructions to disable auto-fill for that browser.
- If issues persist, check and disable browser plug-ins like password managers.
- Save your changes and test the system to confirm the issue is resolved.
Internet Explorer
Edge
- Open Edge and click the More icon (three dots) at the top right.
- Go to Settings and scroll to Advanced Settings.
- Find Save Form Entries and toggle it off.
Chrome
- Open Chrome.
- Click More > Settings at the top right.
- Scroll to the bottom and click Show advanced settings.
- Under Passwords and forms, uncheck Enable Autofill to fill out web forms in a single click.
Firefox
- Open Firefox.
- In the address bar, type about:config and press Enter.
- Click I'll be careful, I promise.
- Search for dom.forms.requestAutocomplete and double-click to set its value to False.
Safari
- Open Safari and go to Preferences.
- Click AutoFill.
- Deselect all types of information you don’t want Safari to auto-fill.
- To edit or delete saved information, click Edit next to the relevant category.