🚓Violations/Citations and Appeals - ViolationAdmin
- Violations From Static Cameras / Mailout Violations
- Spoiling a Violation
- Cancelling a Violation
- Hiding Zero Dollar Violations
- Violations by Pay Type by Month Report
- List Overdue Report
- Summary Report by Officer
- Violations by Officer Report
- Paid Violations Summary by Type Report
- Violations by Location/Officer Report
- Search Repeat Offenders Report
- Restricting Payment of Violations in Court Requested Conviction (CRC) Status
- Printing the Certificate of Parking Infraction
- MTO Annual Report
- Collections - Flag as Sent to Collections
- Municipal Violations and Collections
- Handhelds Devices Settings
- Appeals Report
- Edit a Violation
- Paying a Violation
- Search for a Violation
- Configure Violations to a Person
- Manual Violation Entry
- Security PIN on Violations - How is it used
- Ticket Warnings Explained
- Notice Letter Templates
- Notice Letter Report
- Auto Email Notifications for Warnings
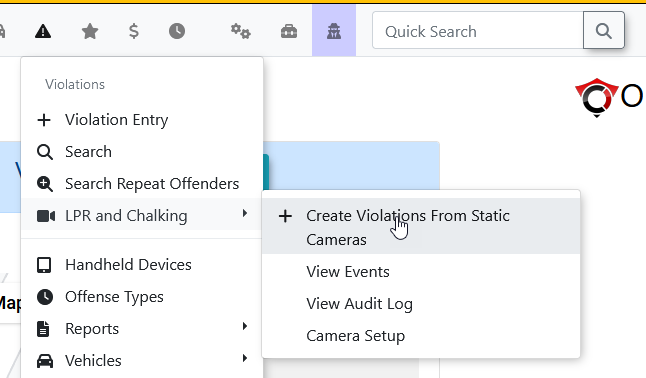
Violations From Static Cameras / Mailout Violations
Violations/Infractions can be created from a report that looks at chalk records. Before this can work, ensure that OPS-COM has set your static cameras up with the necessary settings to report on the lot group and gps location of the camera. Some cameras report on more vehicle information than others. This can be helpful in the report later.
The next setup would be to map your Lot Groups to the appropriate Offence Location:
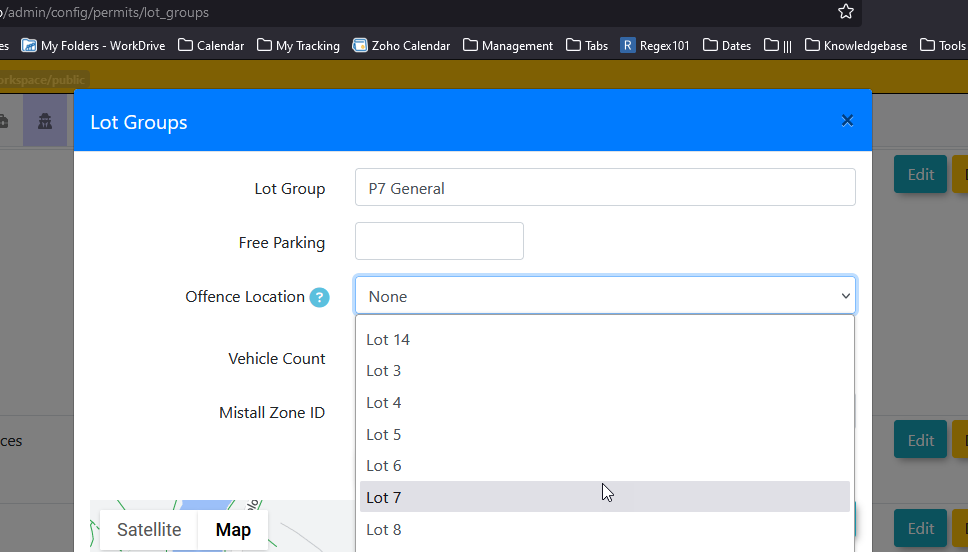
With this set up, logs will be available as they come in:
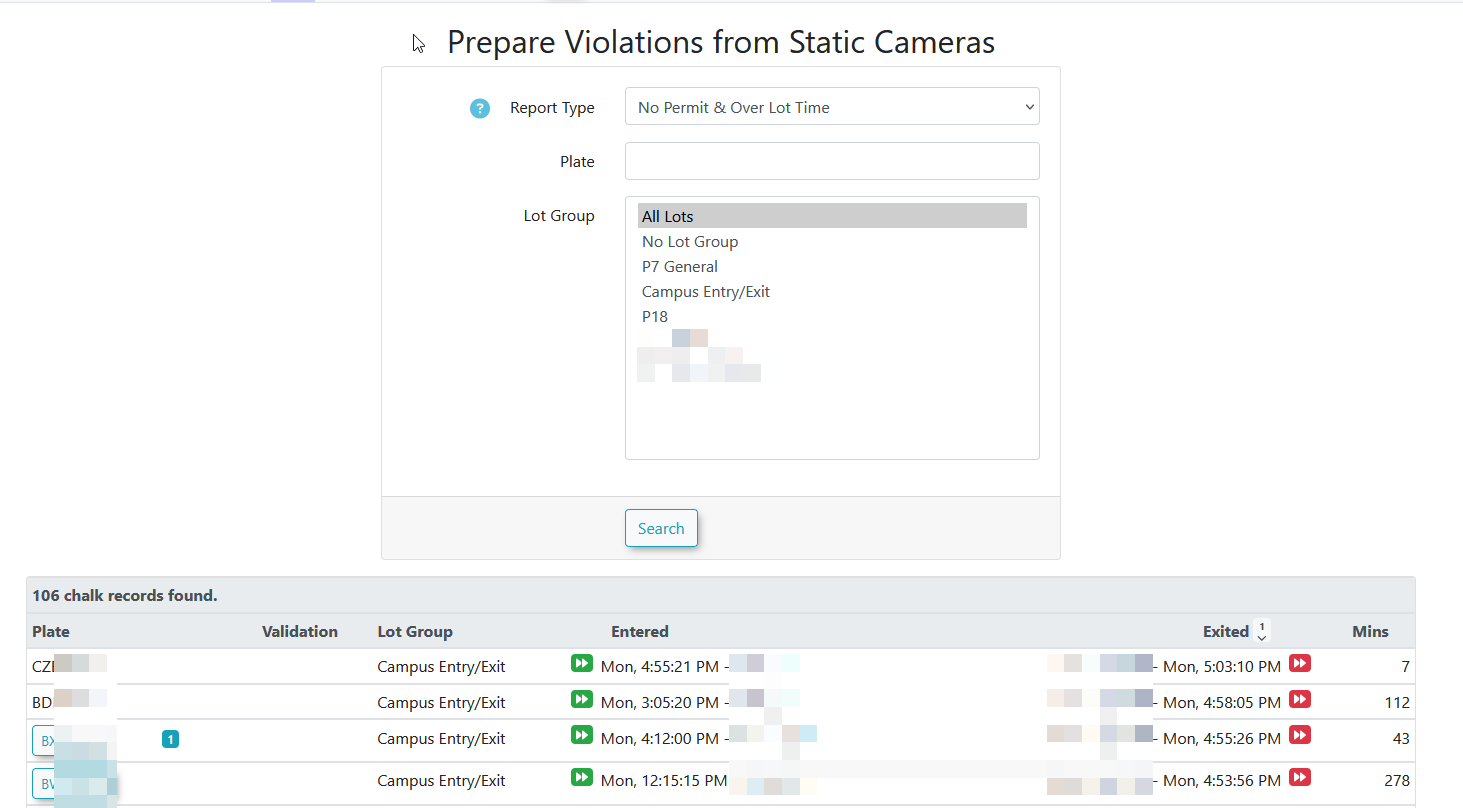
Report type will contain all available filters that we support at the time.
- No Permit & Over Lot Time - This option will only list vehicles where they have no permits and the duration exceeds the lot group's free parking time.
The following is an explanation of each field.
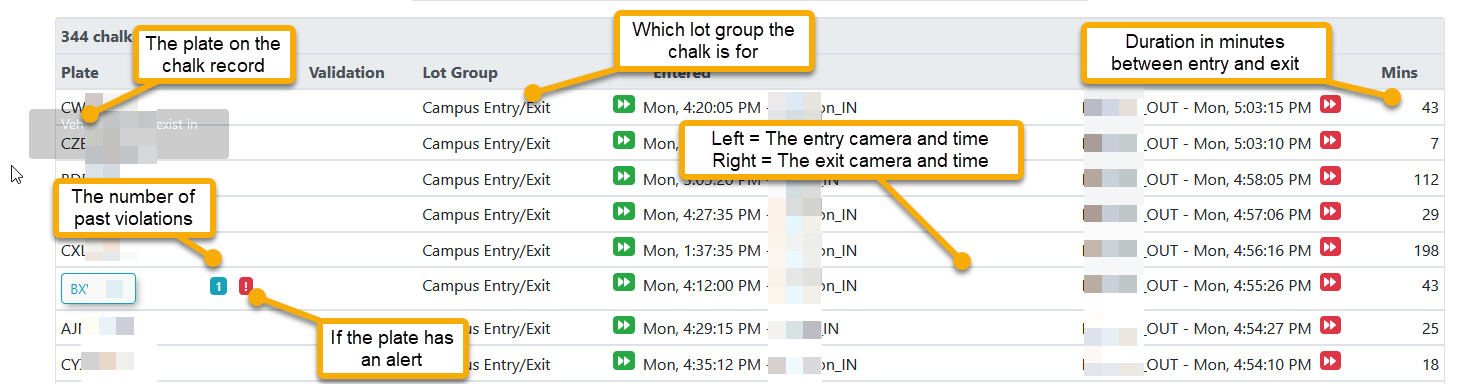
Vehicles can appear in one of three formats. No existing vehicle record, a single vehicle record, or multiple vehicle records. They will change the violation creation screen as follows:
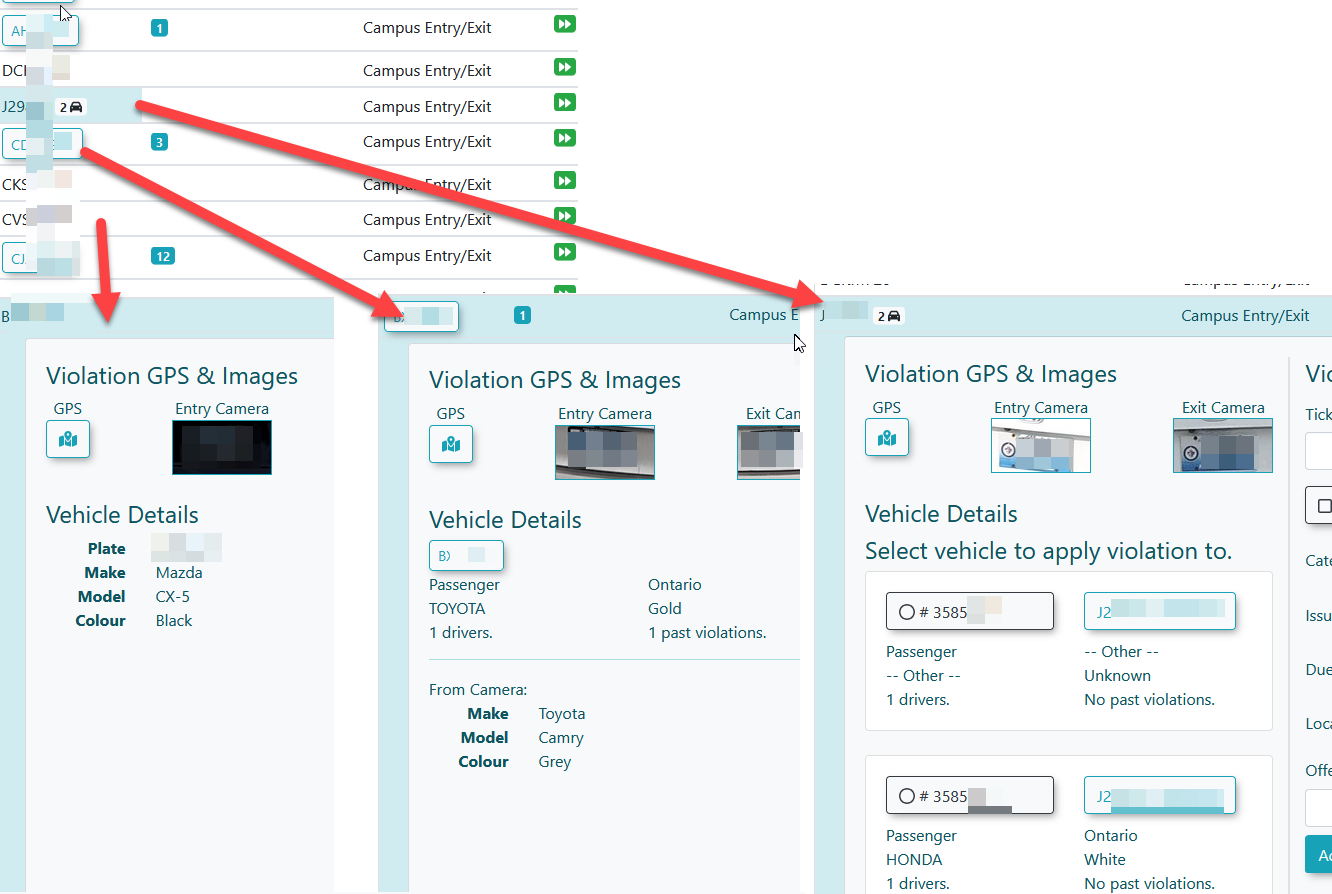
Clicking a row will display the violation entry form.
The entry and exit cameras will show the chalk image associated to this entry:
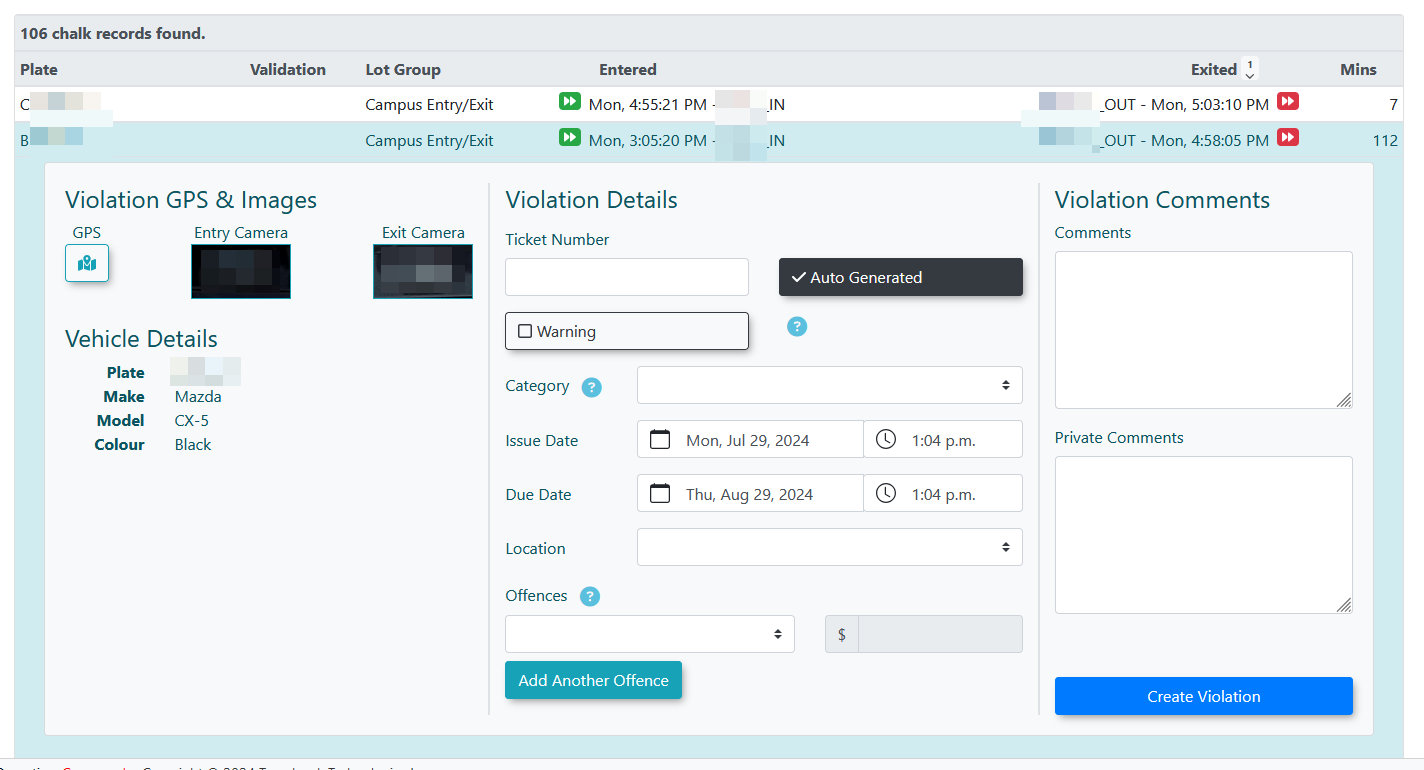
Once the details are entered, the chalk record will disappear from the list and the violation can be found by searching for it:
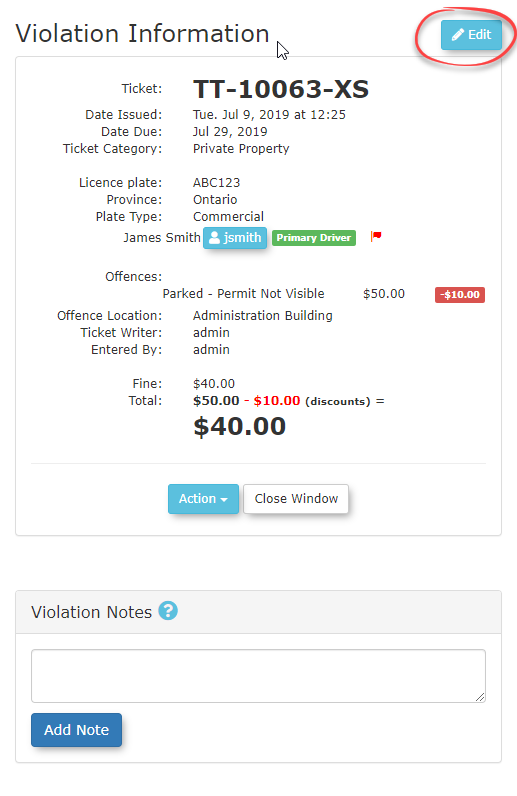
Spoiling a Violation
How to Spoil/Void a Violation
- To spoil a violation, start by searching for the violation through the Quick Search or Violation Search tool.
- Click on the Ticket # on the Violation Information page
- Select Edit at the top right of the violation and change the Spoiled status from Valid - not spoiled to Spoiled.
- Submit the changed violation details and your ticket will now be marked as Spoiled the next time you go to search for it.
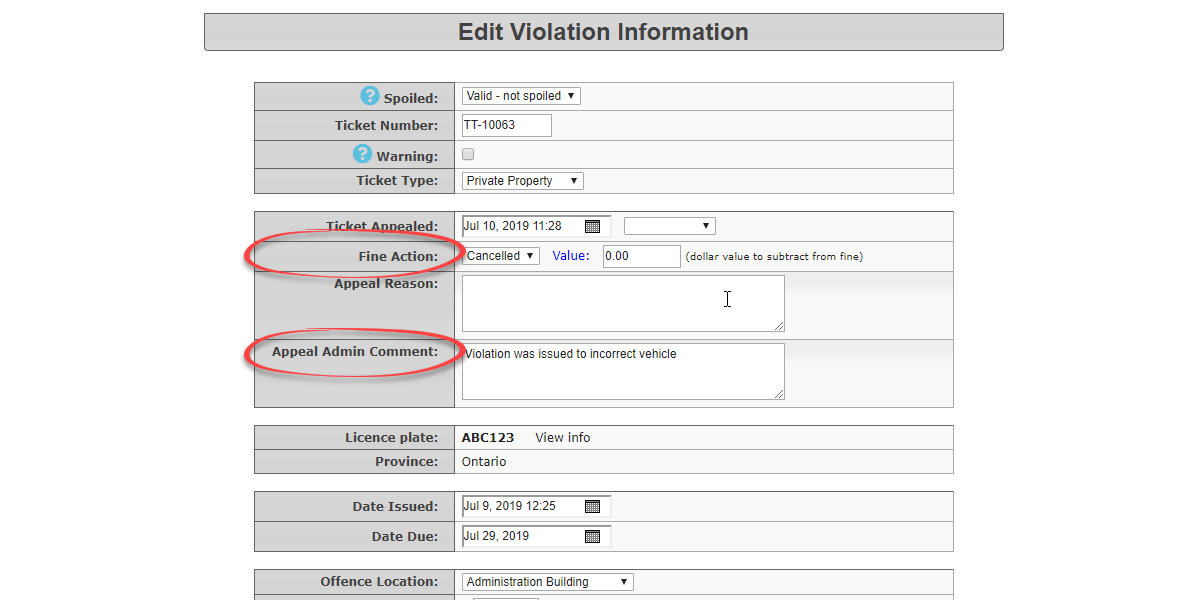
Cancelling a Violation
How to cancel a violation
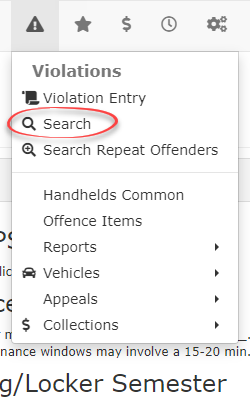
Hover over Violations, select Search
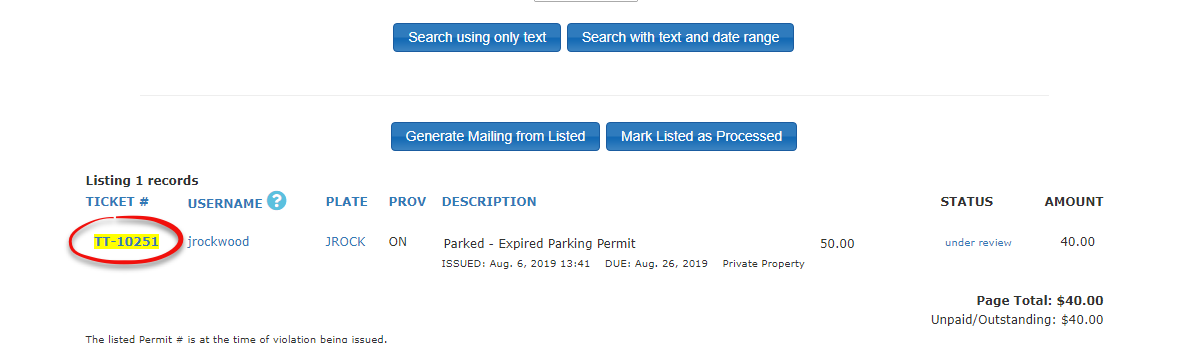
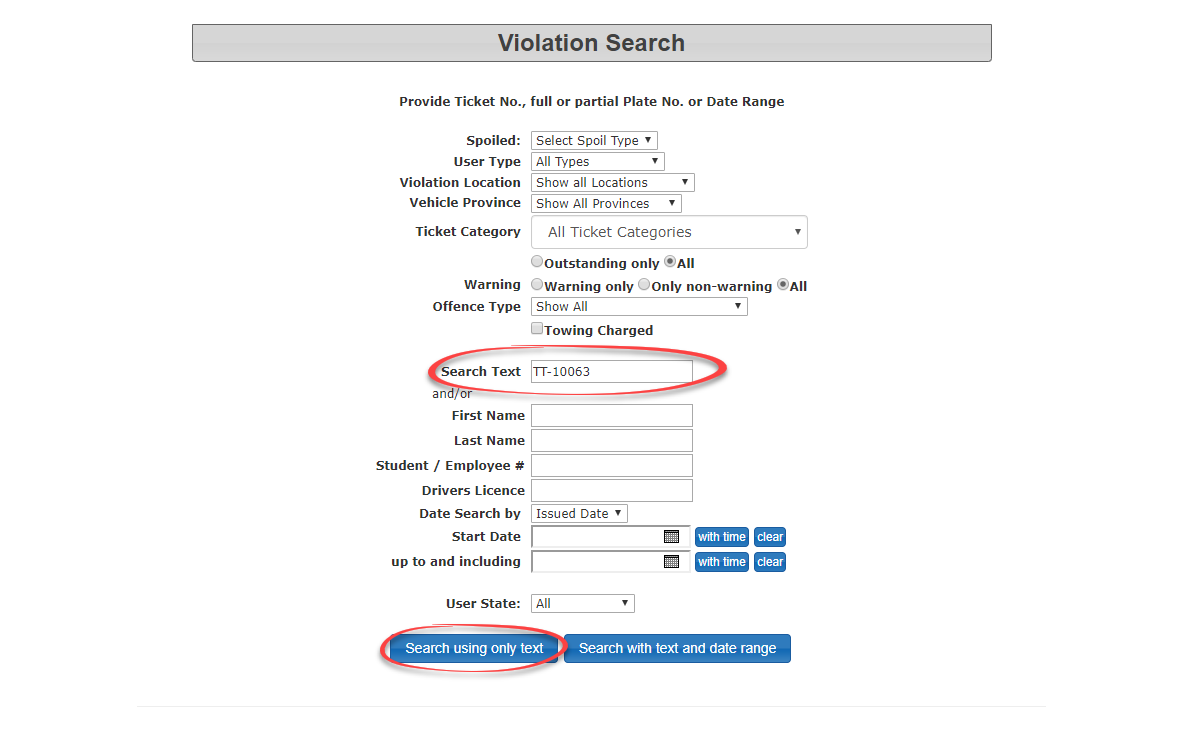
Enter the violation being cancelled into the Search Text field, then select Search using only text. In this case the violation being cancelled is TT-10063.
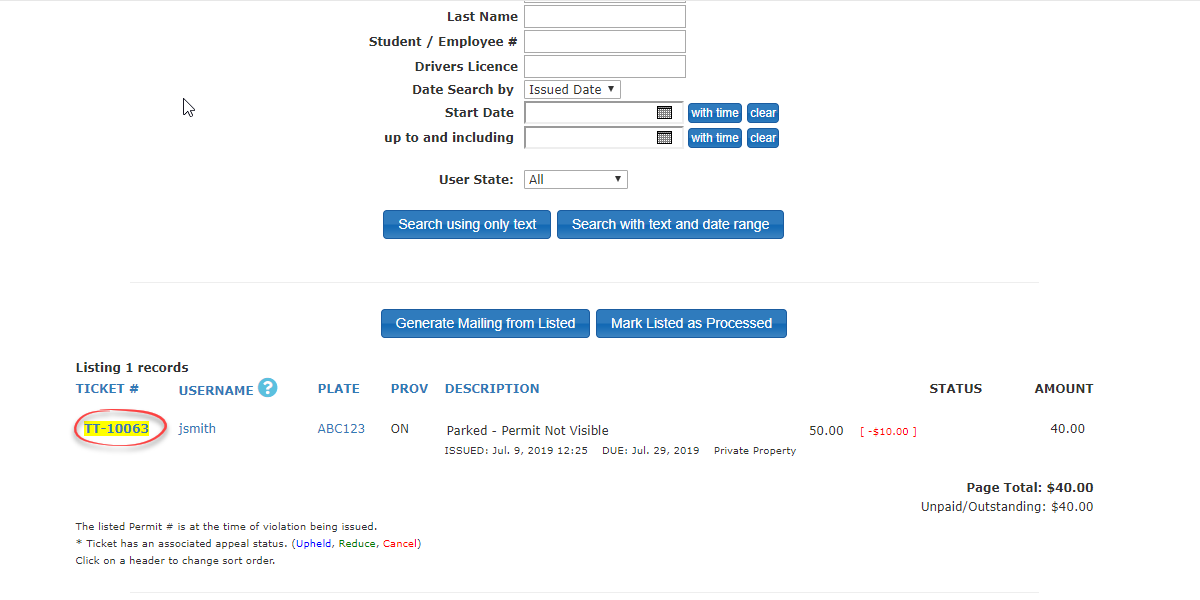
Click on the Ticket Number of the violation being cancelled
Click on the Edit button
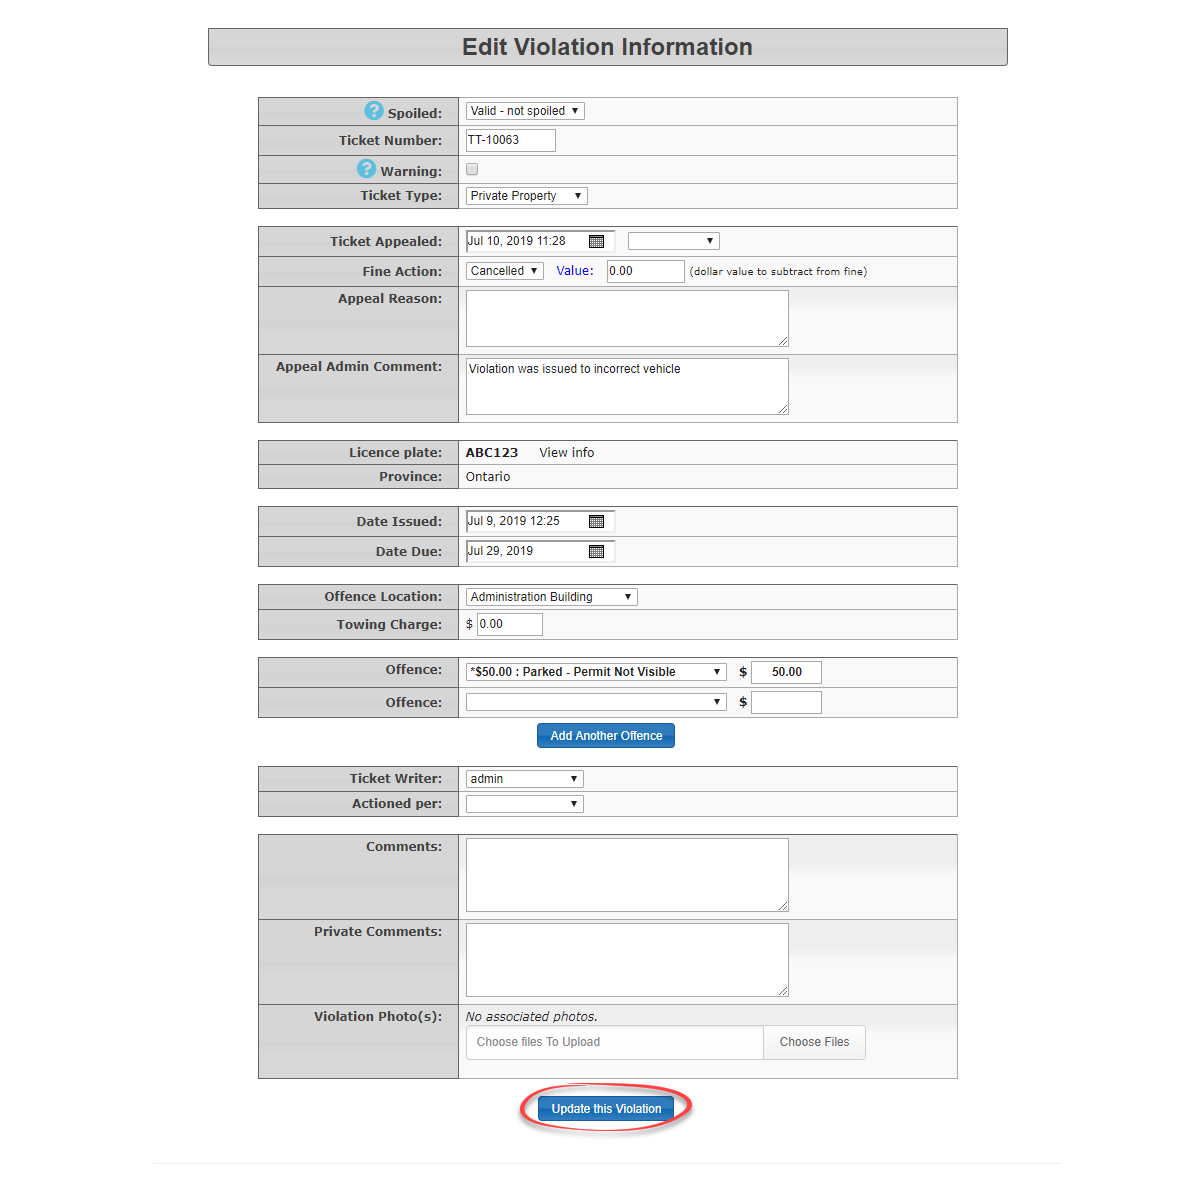
Select Cancelled in Fine Action field and enter the reason for the cancellation into the Appeal Admin Comment field
Click on Update this Violation
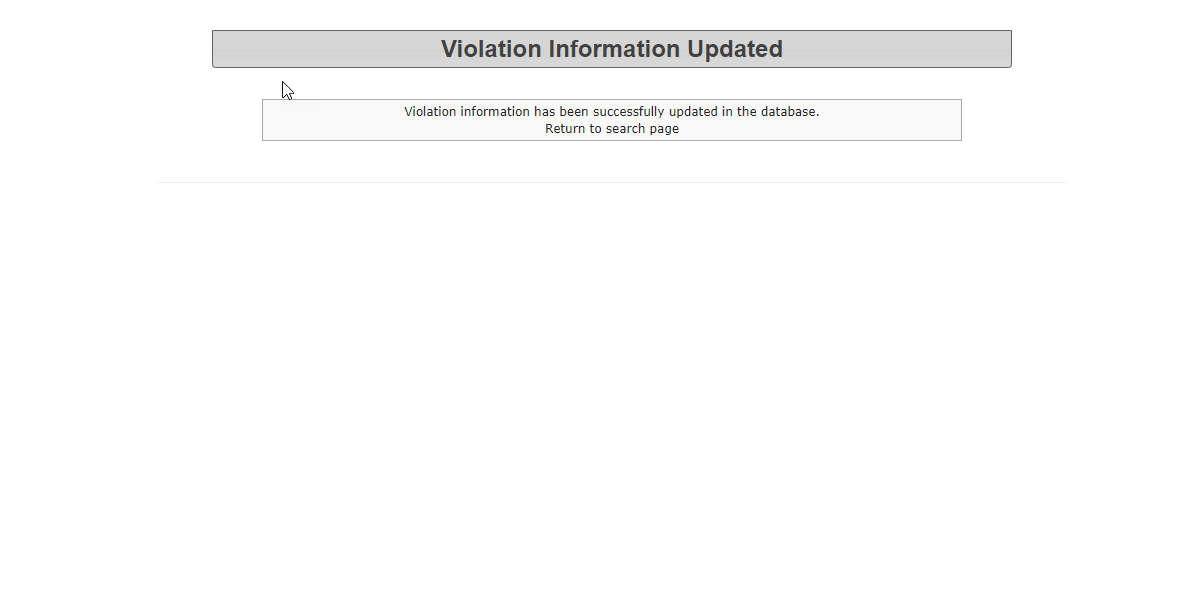
The Violation Information Updated page displays, showing the violation has been updated
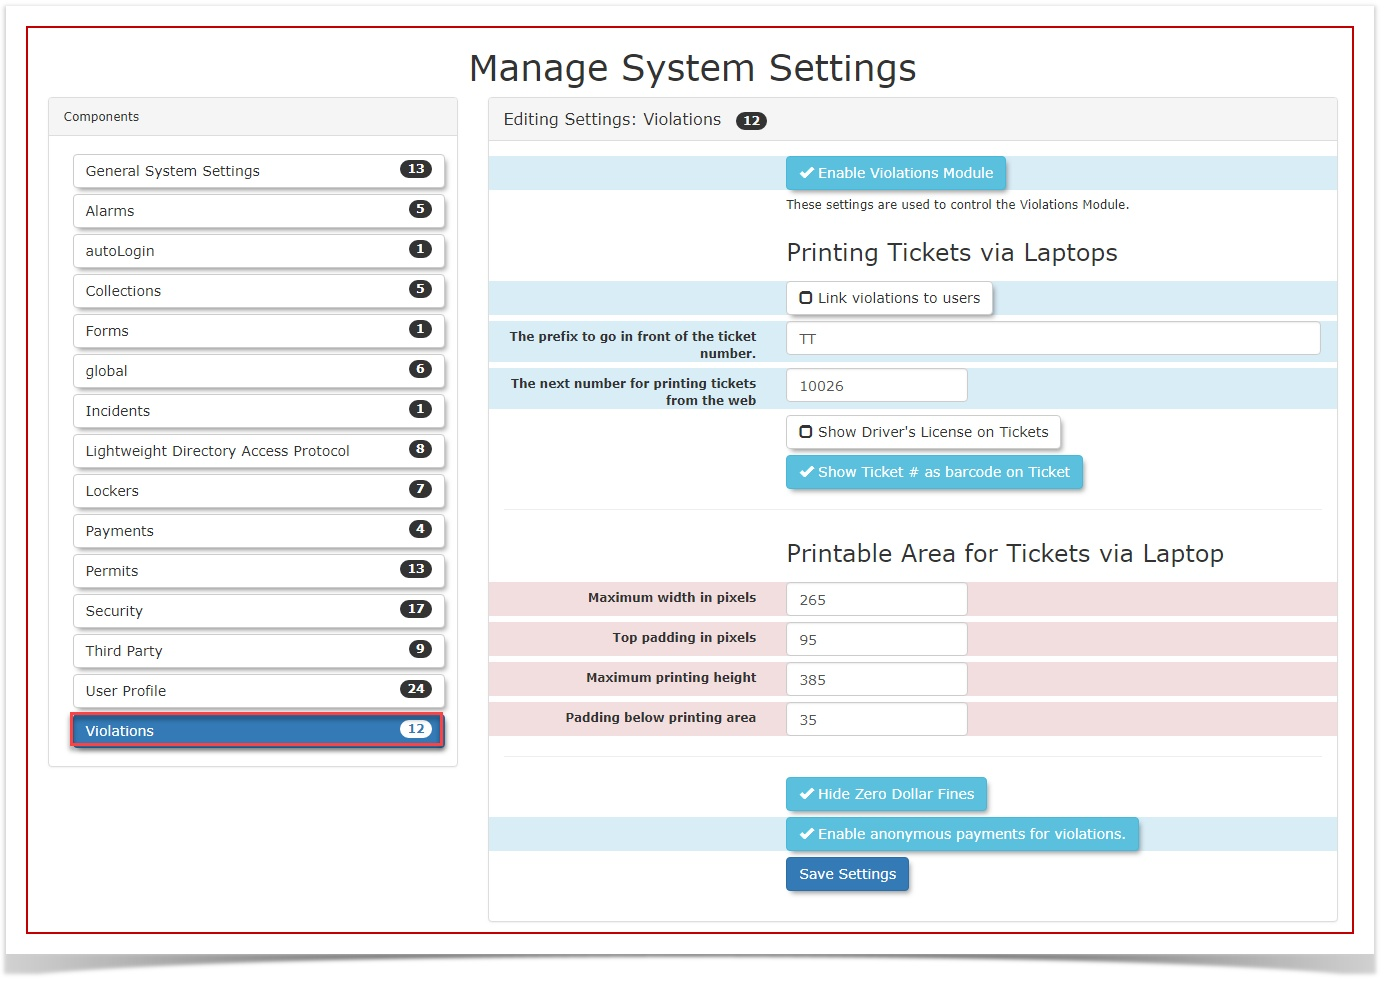
Hiding Zero Dollar Violations
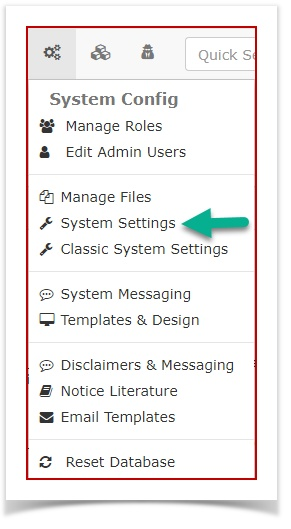
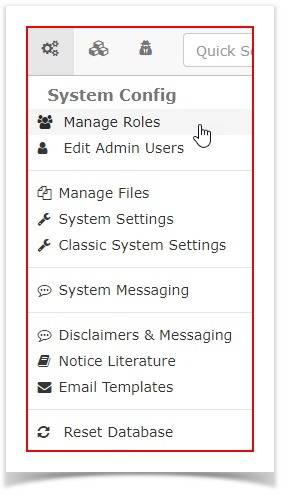
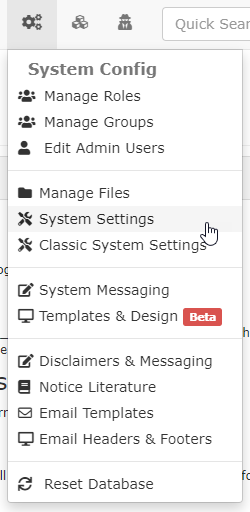
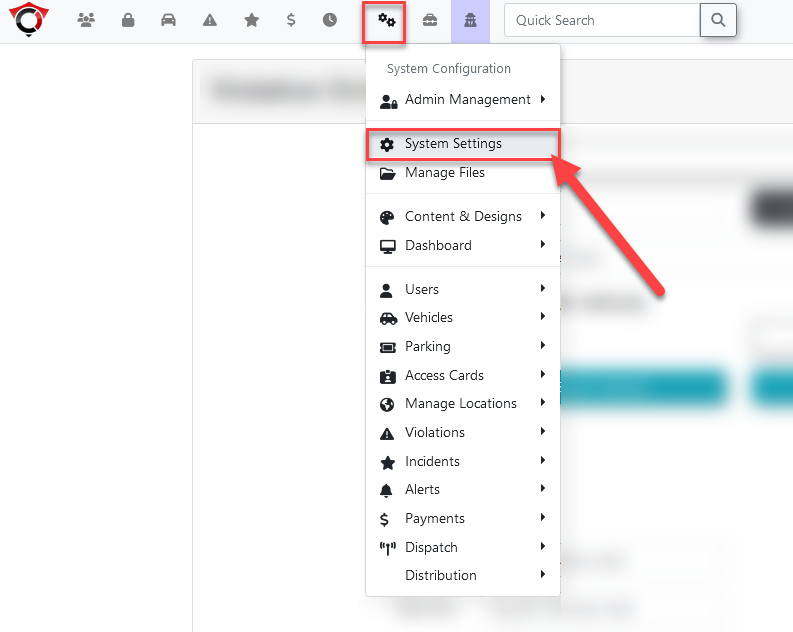
- Hover over 'System Config' and click 'System Settings'

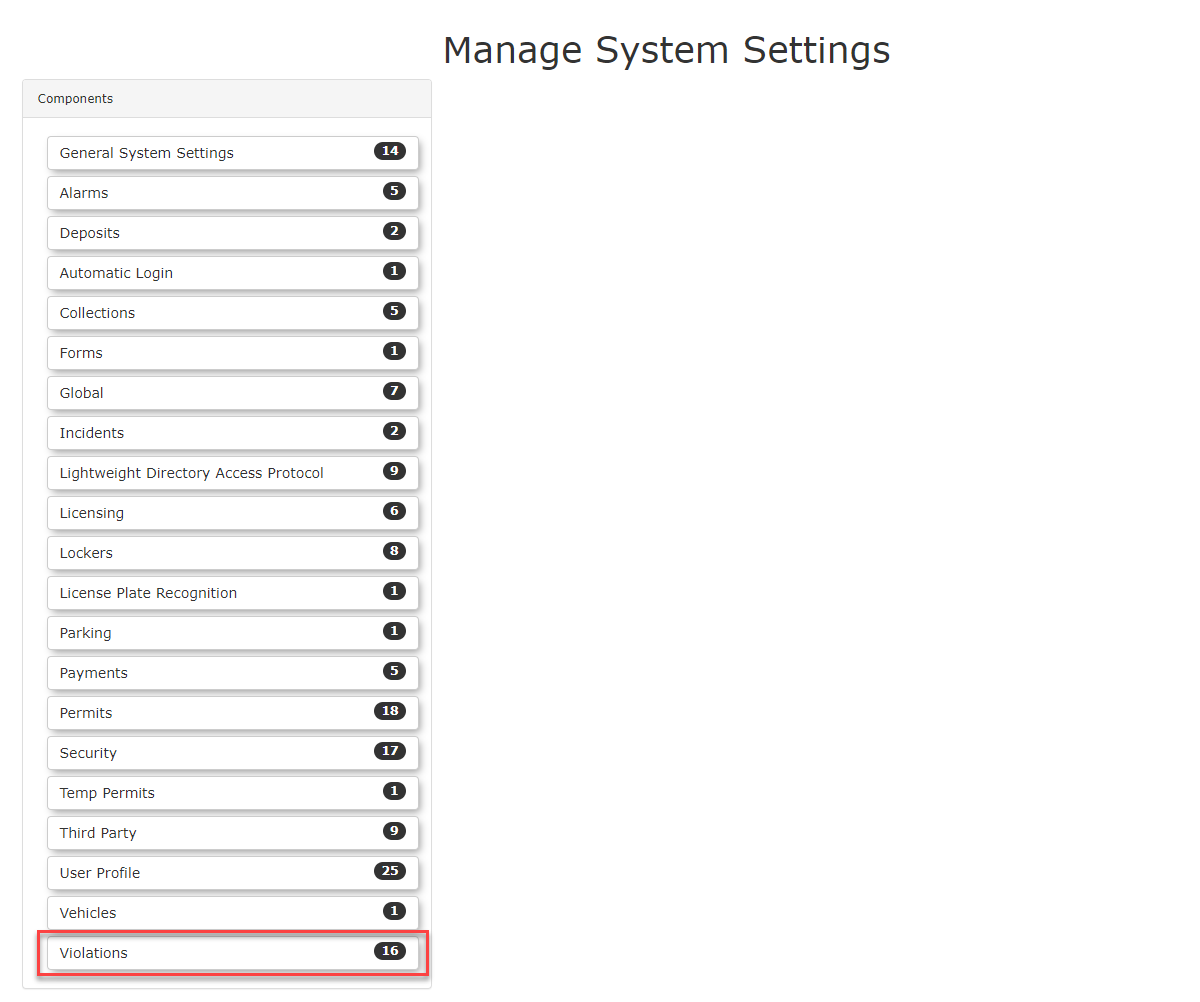
- Click 'Violations' to open the Violations settings

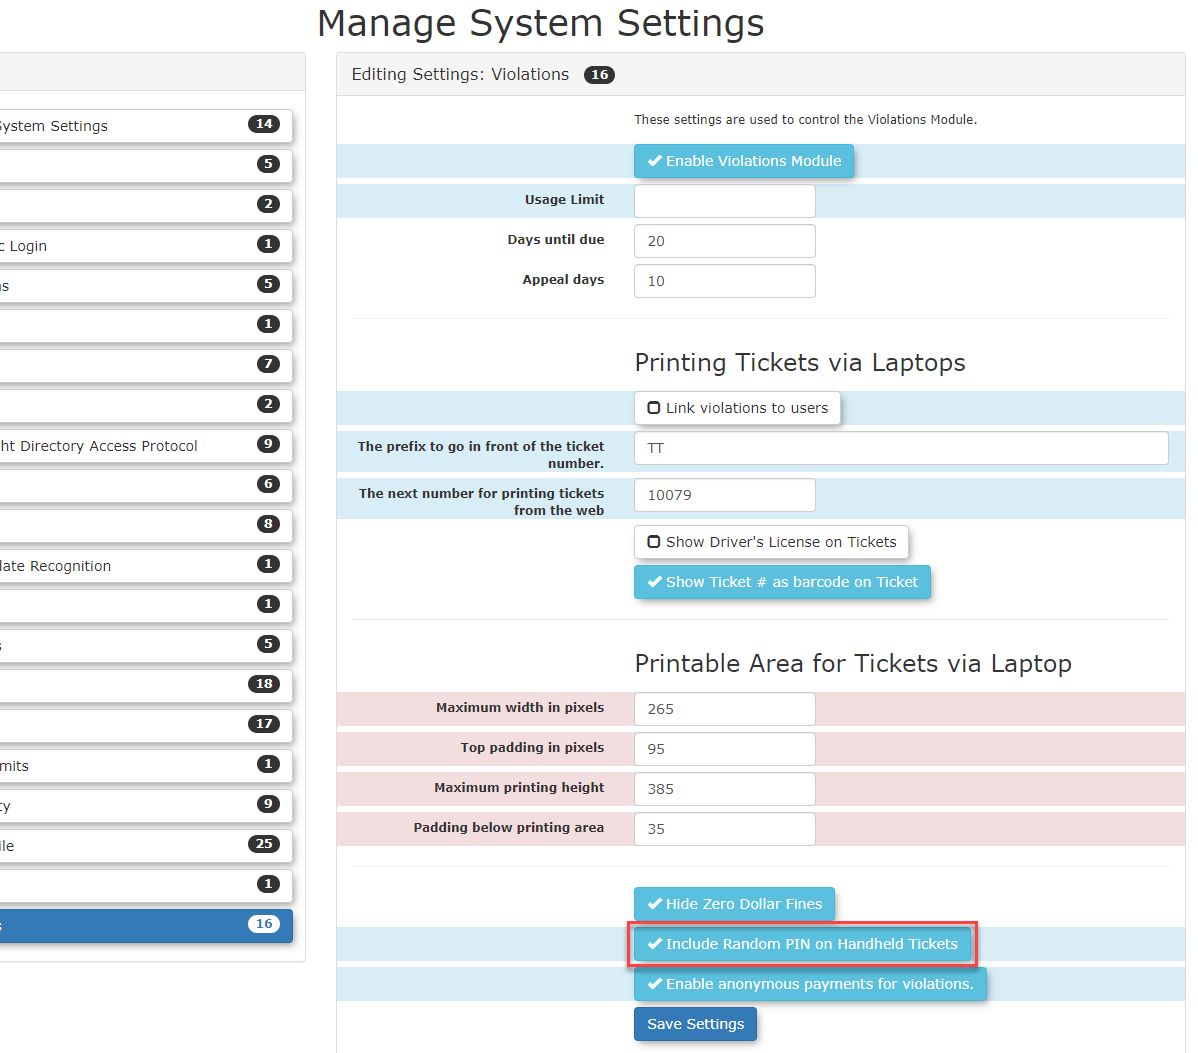
- Enable the 'Hide Zero Dollar Fines' checkbox to hide zero dollar violations.

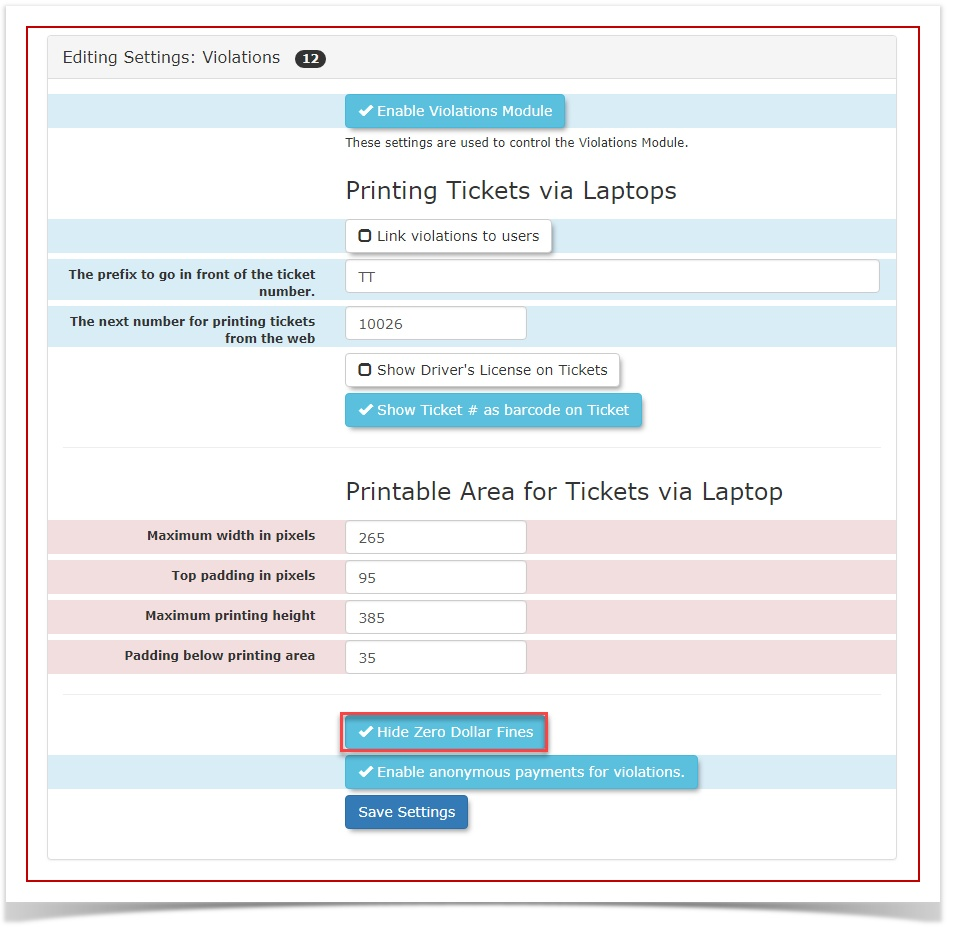
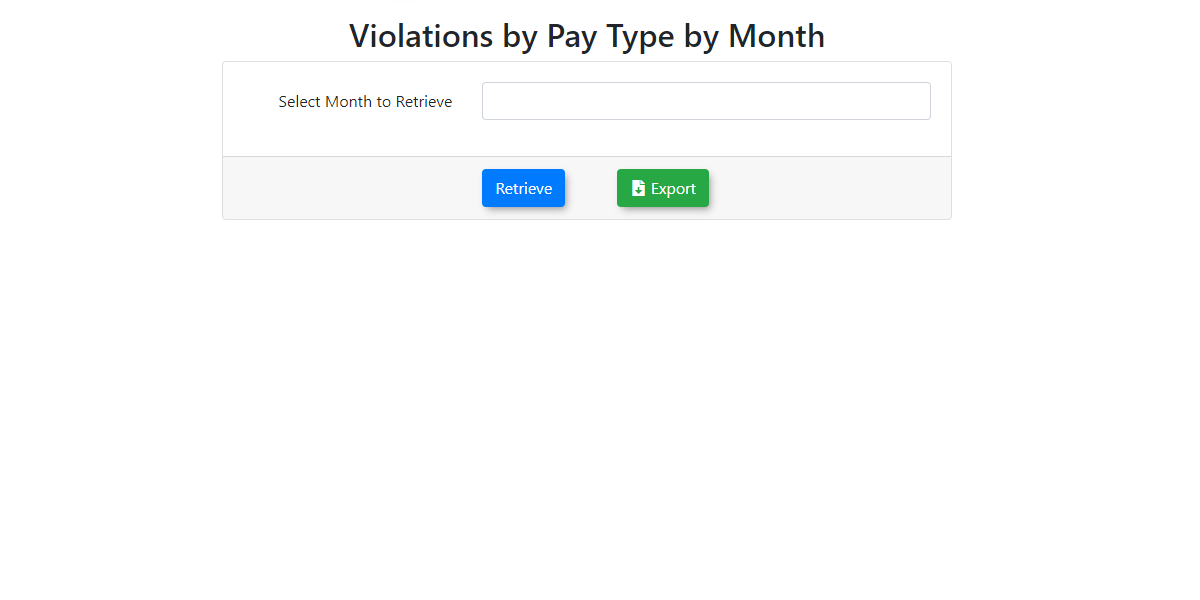
Violations by Pay Type by Month Report
Running the Report
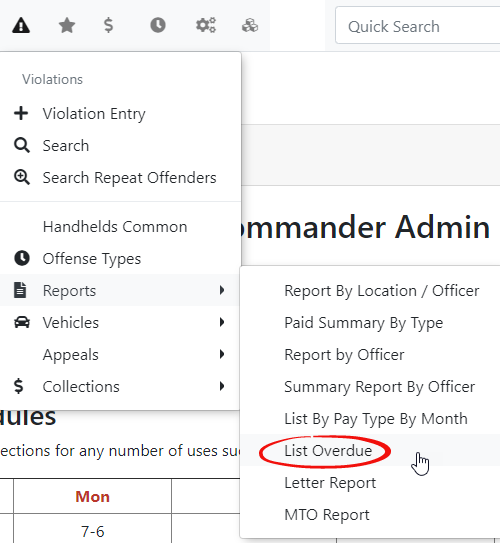
To begin go to the Violations menu and hover over Reports. Select List By Type By Month Report.
The Violations by Pay Type by Month screen opens.
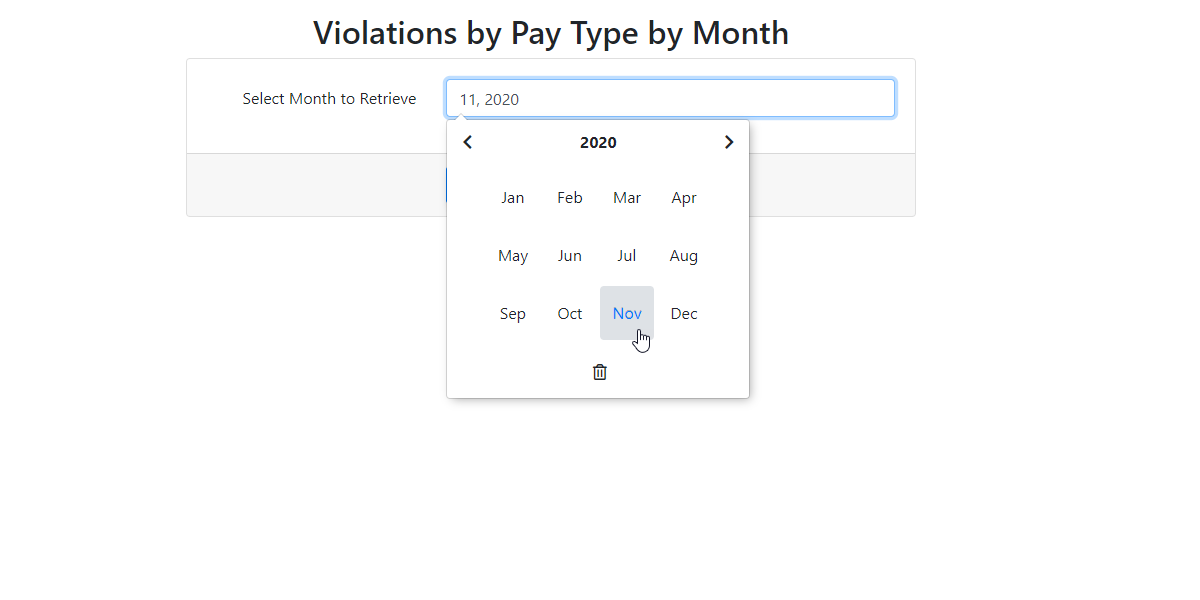
Select the month you wish to report on. In our example we will look at November of 2020. Click on Retrieve to continue.
The resulting report will display onscreen.
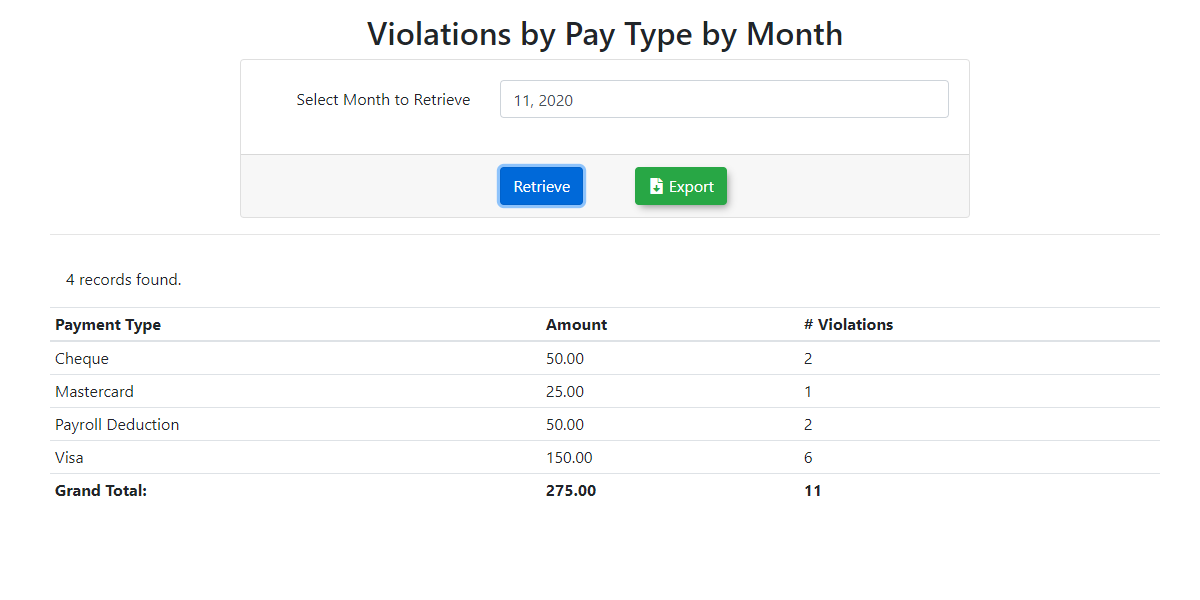
The report may also be exported as an excel file.

List Overdue Report
Accessing the Report
From the Violations menu hover over Reports and click the List Overdue menu item to access the Overdue Violation Payments report.
The Overdue Violation Payments screen is displayed.
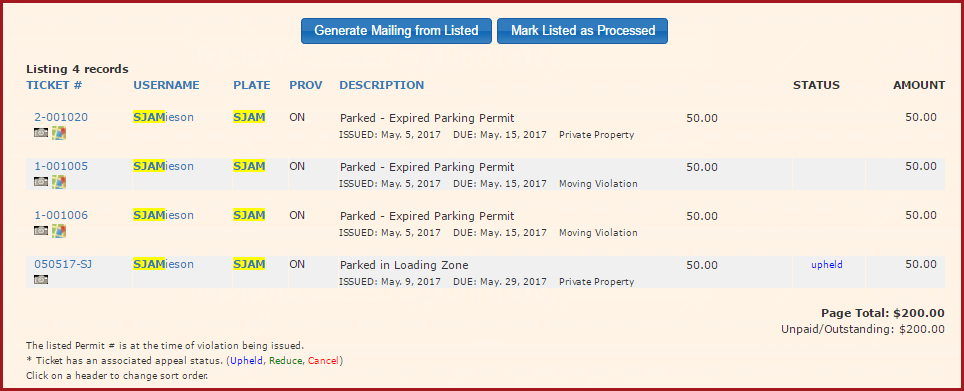
Enter your search criteria and click List Overdue Records. In this case we are looking at violations between May1st 2020 and February 8th 2021
The report will appear at the bottom of the screen with the violation number, details, amount, and offender details.
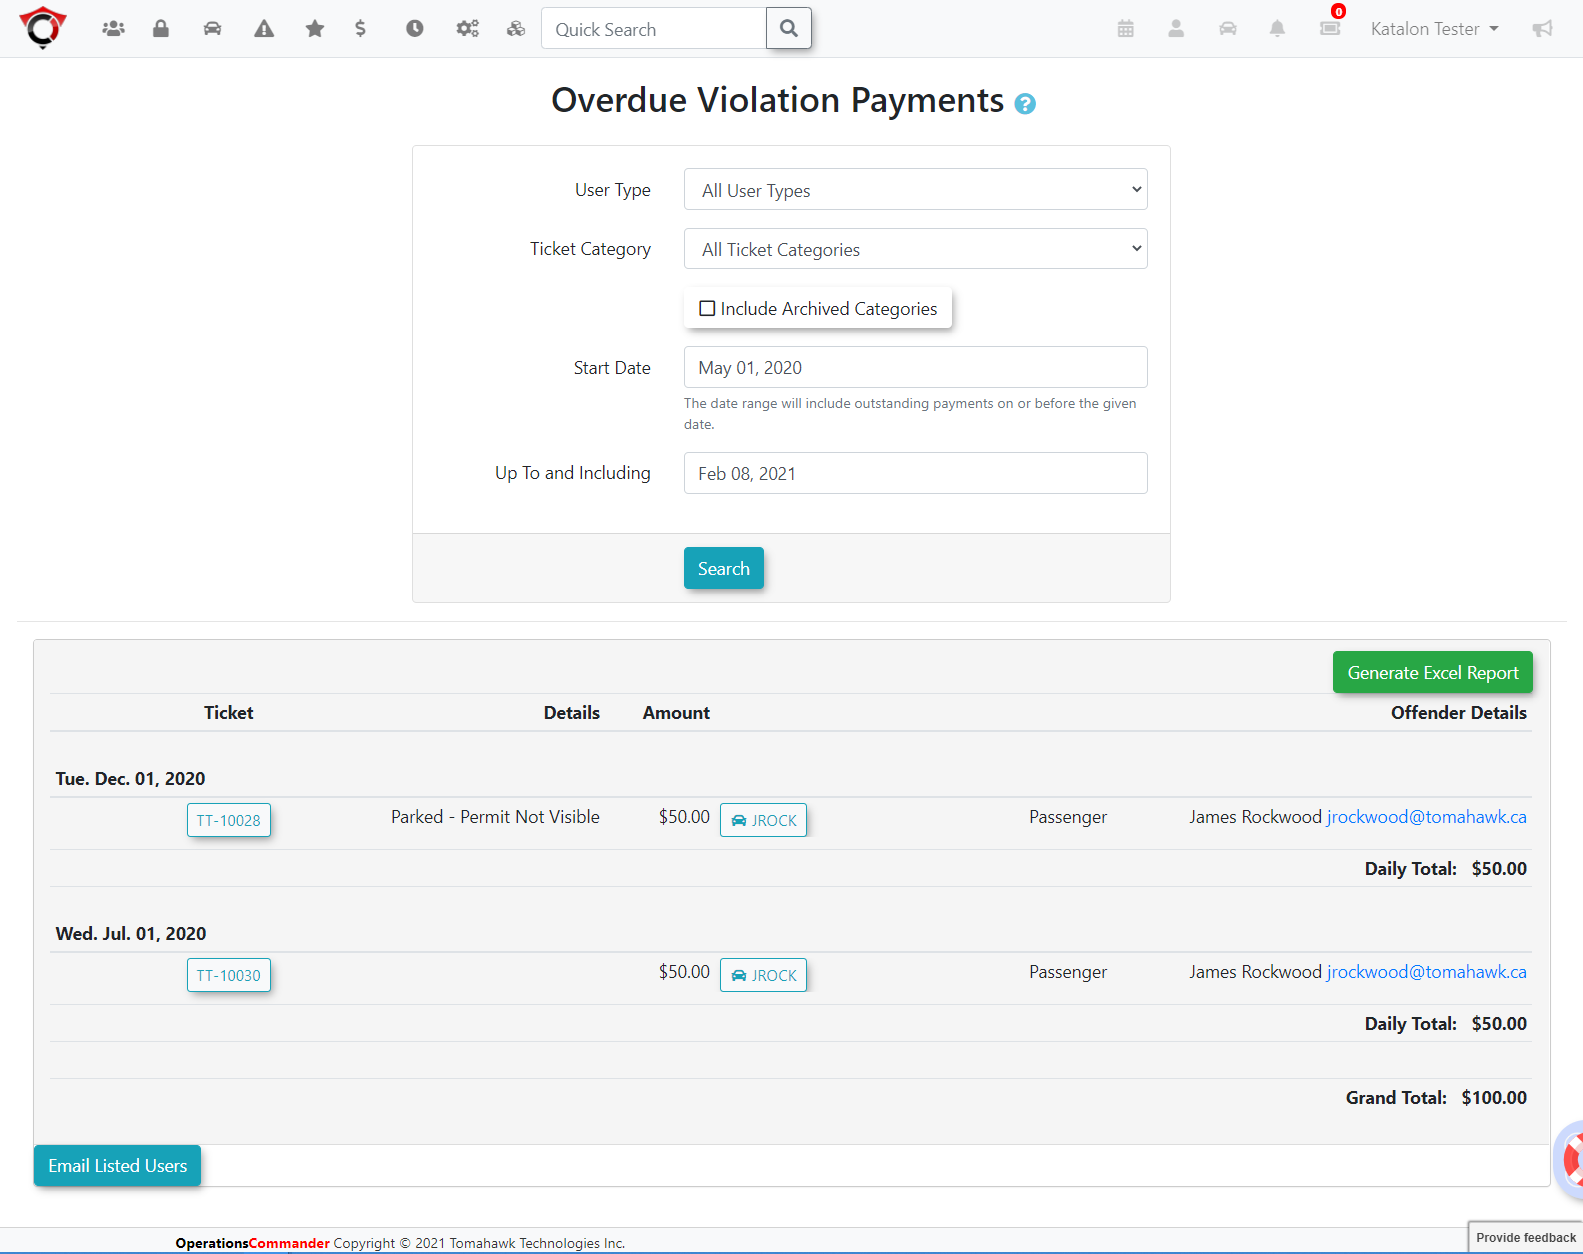
Emailing Users
You can click on the user email address to email users directly related to their overdue violations.
You can also select Email Listed Users at the bottom of the report to send an email to all users on the report.
Generating an Excel Report
Click Generate Excel Report to create an excel document for your records or further manipulation.
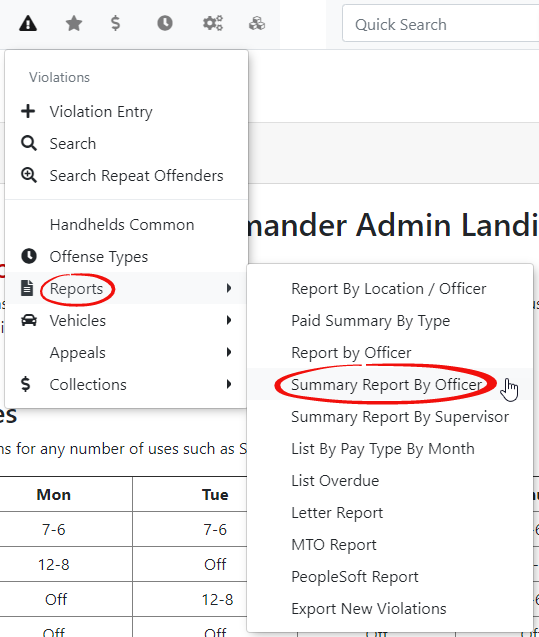
Summary Report by Officer
1. Hover over the Violations icon and hover over Reports. Click on Summary Report by Officers in the drop down menu.
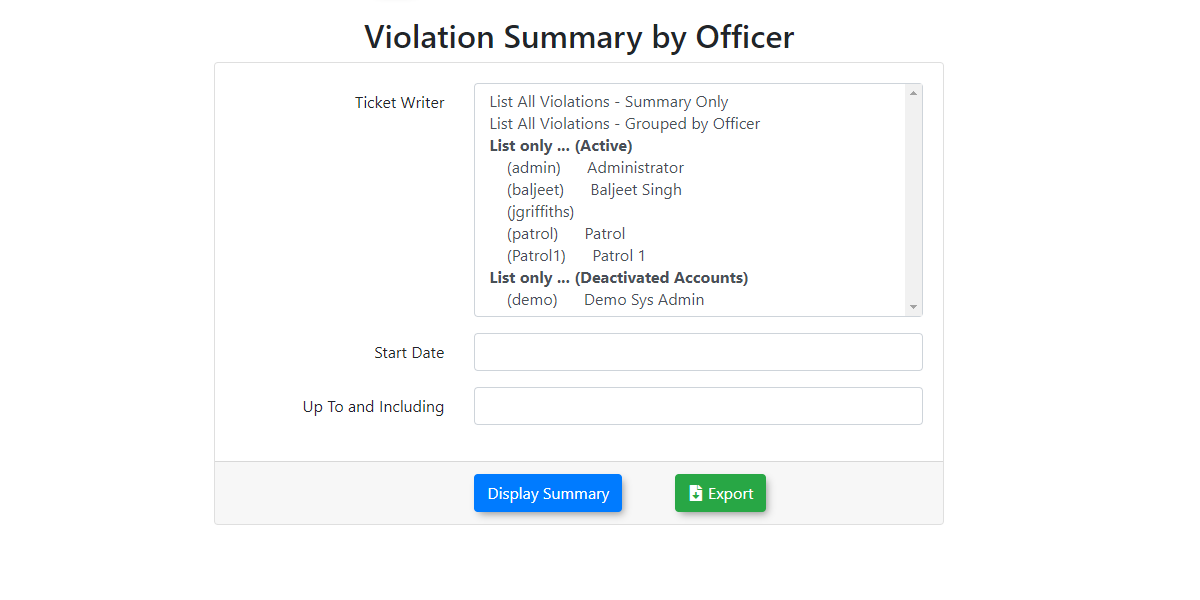
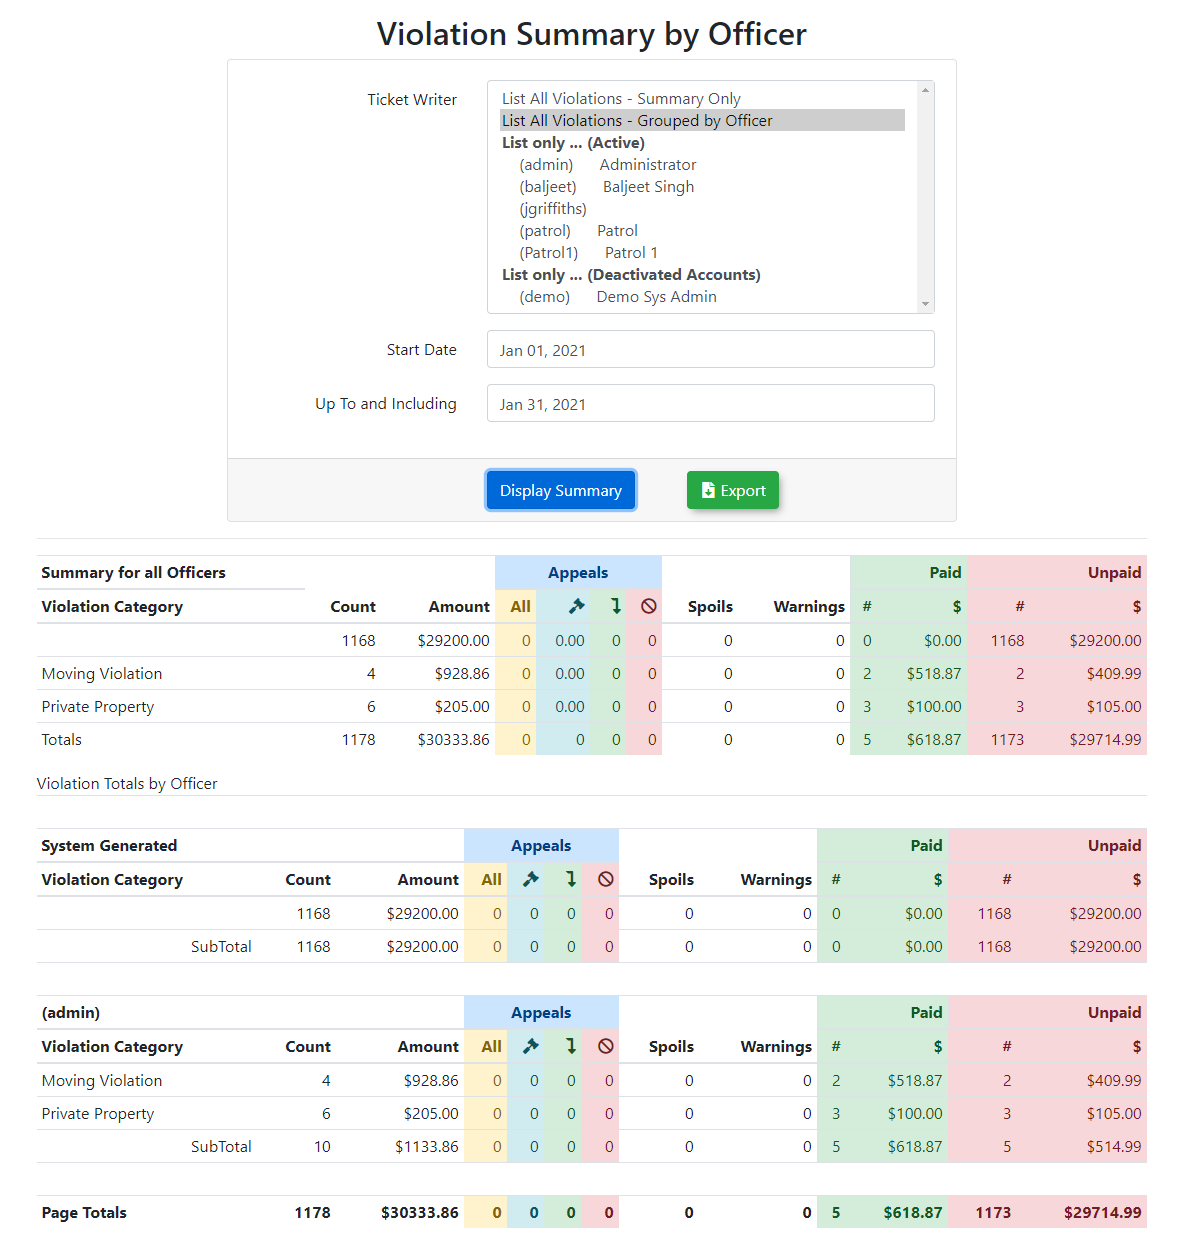
2. The Violation Summary by Officer screen is displayed. Select your Ticket Writer and date parameters for the search.
You can search individual officers or select either one of the full list options: Summary Only or Group led By Officer
Click Display Summary and the report will appear at the bottom of the screen.
The report can also be exported to Excel. To do so click on the Export button.
The report will display based on your search criteria.
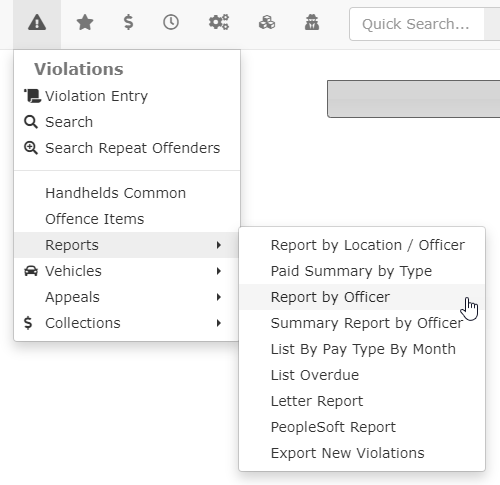
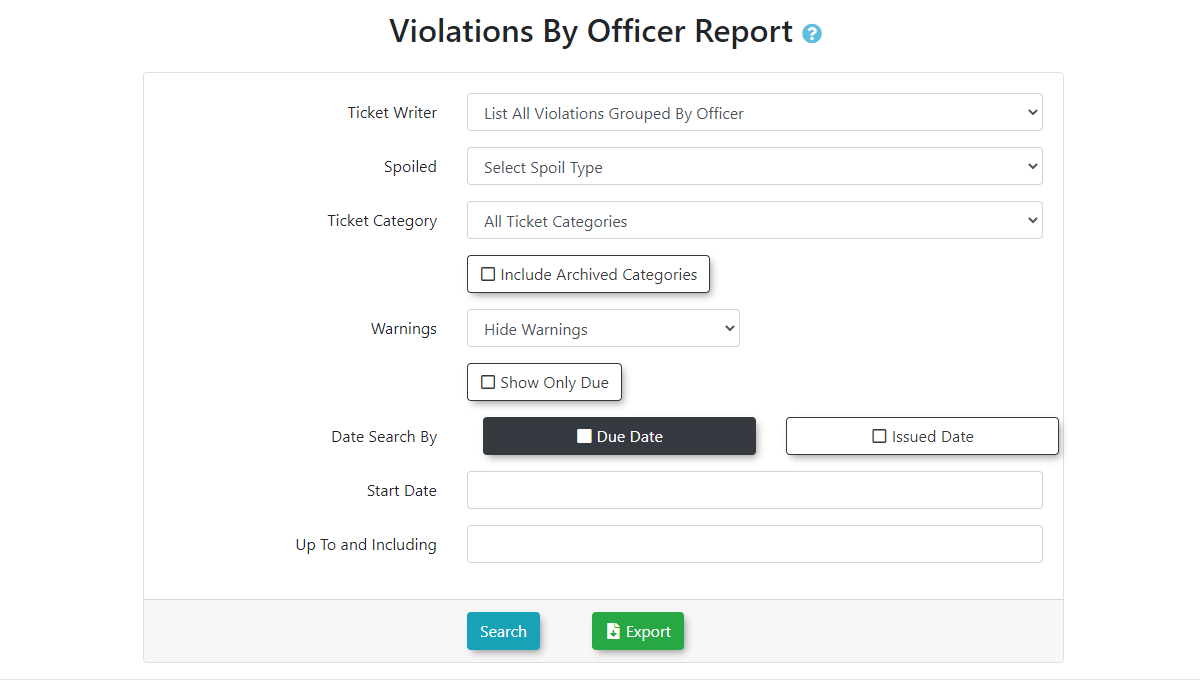
Violations by Officer Report
Using the Report
Hover over Violations and click Reports, Report by Officers.
The Violations by Officer screen is displayed. Select your parameters for the search.
Search Criteria include:
Ticket Writer: You can select a specific officer or List all violations grouped by officer
Spoiled: Select a spoiled state
Ticket Category: Select a specific ticket category such as Private Property
Include Archived Categories: Toggle the item on to apply the search filter
Warnings: Select to hide, include, or show warnings only
Show Only Due: Toggle the item on to apply the search filter
Date Search By: Select either the Due Date or the Issued Date
Start Date and Up To and Including: Set the date range you wish to report on
You can then click Search to view the report onscreen or click Export to download the report as an excel document.
The report will appear at the bottom of the screen.
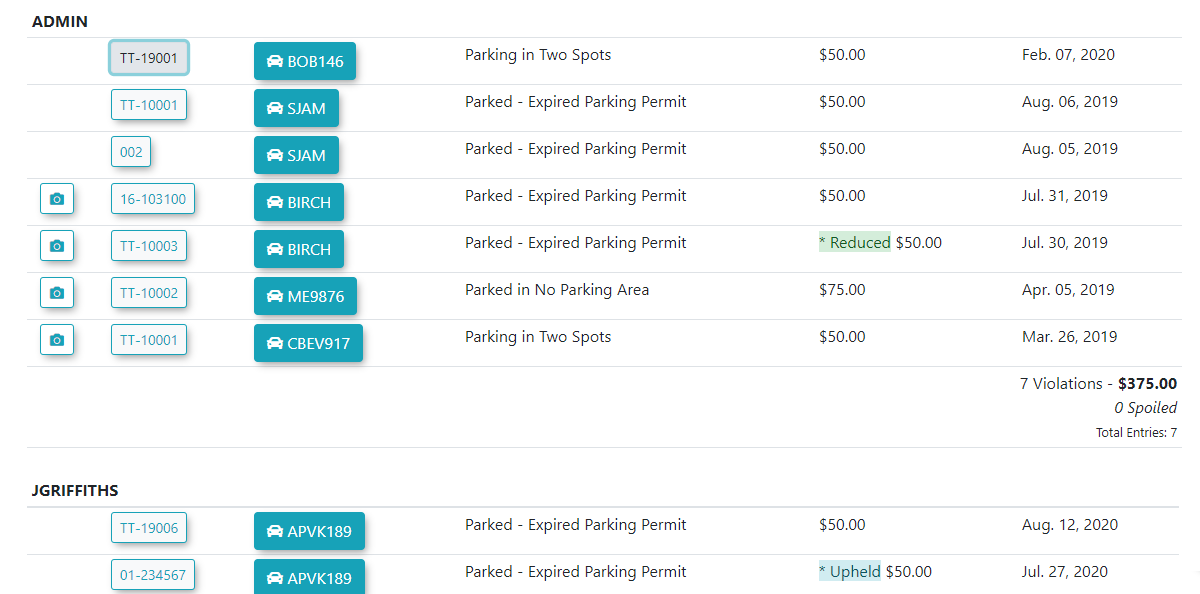
If you wish to view more information about each violation, click on the violation number. If you wish to view the pictures associated with a violation click on the Camera icon.
Exporting the Report
You can export the information to a .csv file and manipulate the data in Excel. Click Export to download the file.

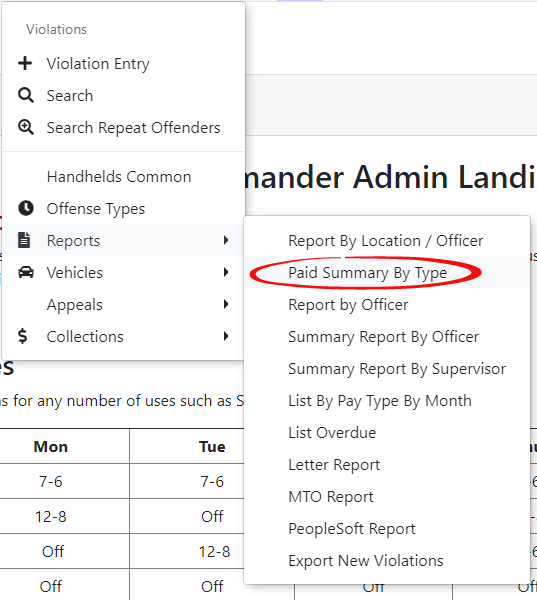
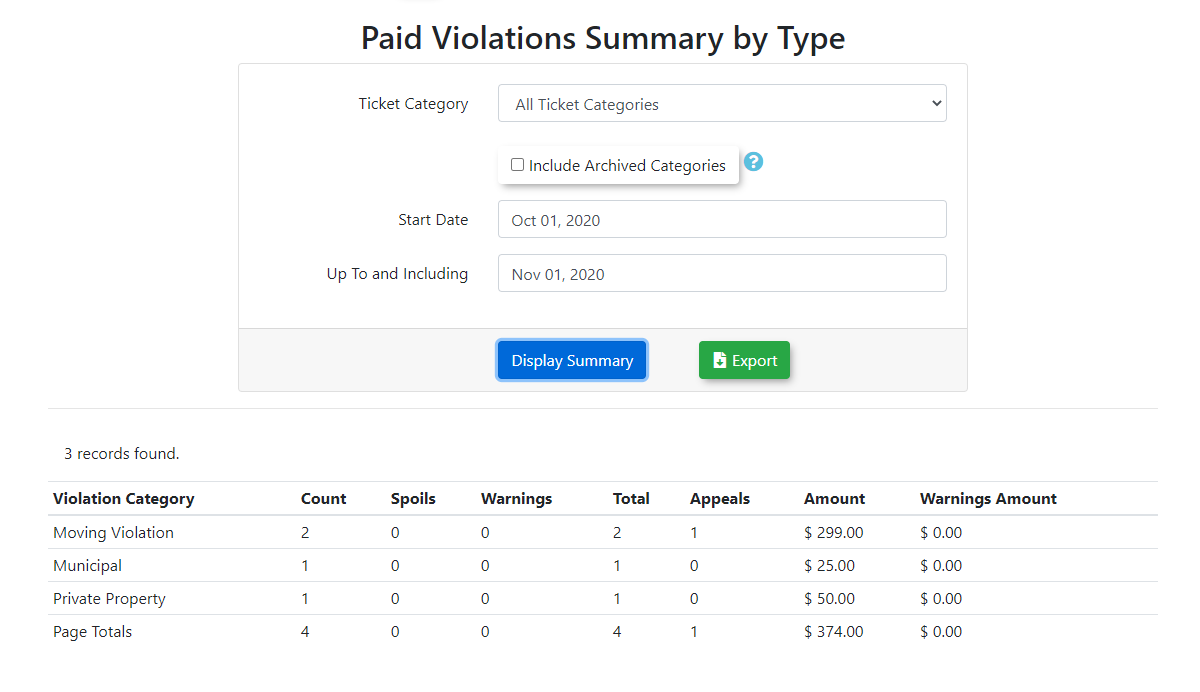
Paid Violations Summary by Type Report
Accessing the Report
Hover over the Violations icon and click Paid Summary by Type.
The Paid Violations Summary by Type screen is displayed. Select your date parameters for the search.
Click Display Summary and the report will appear at the bottom of the screen.
Violations by Location/Officer Report
Using the Report
Hover over the Violations icon and click Report by Location/Officers.
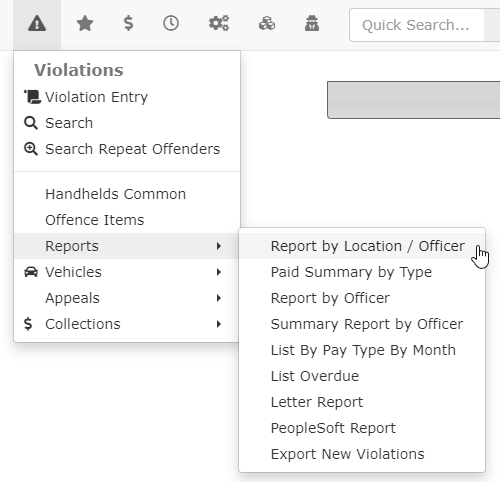
The Violation Summary by Location/Officer screen is displayed. Select your date parameters for the search.
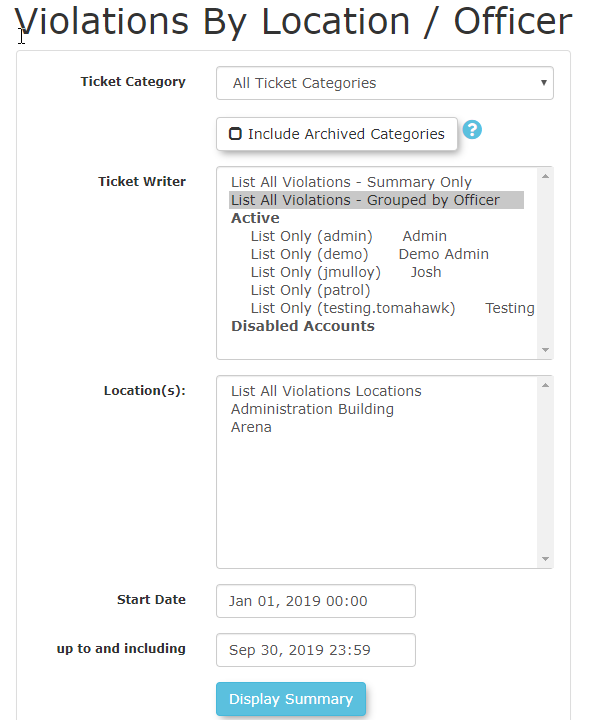
Click Display Summary and the report will appear at the bottom of the screen.
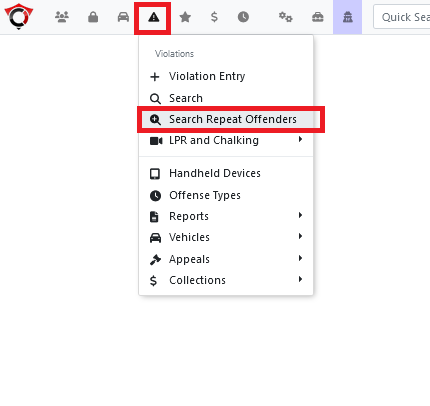
Search Repeat Offenders Report
Introduction
The search repeat offenders page allows site admins to find vehicles and users on the site that have received multiple parking violations on their account.
Navigation
- Violations -> Search Repeat Offenders
Page Usage
The page will appear as displayed.
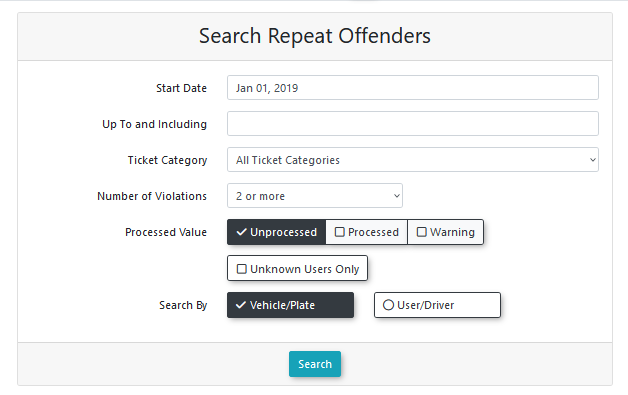
Several options are available to narrow the search.
-
Start Date and End Date: specifies the range in which the violations were received.
-
Ticket Category: the category of the violation received.
-
Number of Violations: the min number of violations the user or vehicle has received.
-
Processed Value: categorizes violations based on their processing status.
-
- Unprocessed: violations that have not been processed yet.
- Processed: violations that have been paid for and processed.
- Warning Only: violations that were marked as a warning instead issuing a fine.
-
-
Unknown Users Only: only shows violations assigned to vehicles without a known user tied to them.
-
Search By:
- Vehicle/Plate: outputs the count of violations tied to license plates. Will not include violations attached directly to a user.
- User/Driver: outputs the count of violations tied to users. Includes violations attached directly to the user and any violations attached to their vehicles. Will not include violations attached to a vehicle with no assigned driver.
- Vehicle/Plate: outputs the count of violations tied to license plates. Will not include violations attached directly to a user.
Output
The grouping of the output will vary depending on whether it is selected to be output by vehicle or by user.
By Vehicle/Plate
Grouping on the vehicle will show the number of violations on each plate, and any associated drivers of the vehicle.
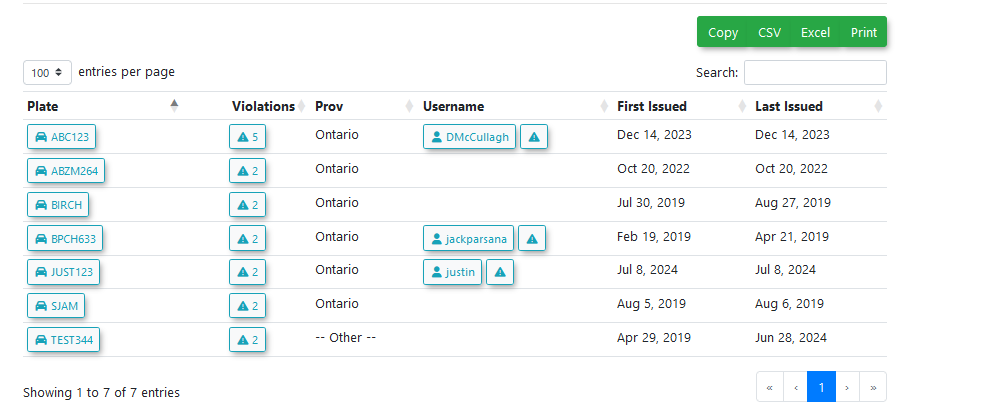
Individual violations can be viewed by clicking on the violation count.
The warning icon next to the username will show a list of the violations associated to that user.
By User/Driver
Grouping on the user will show the number of violations given to the user, including any violations given to vehicles the user is the driver of.
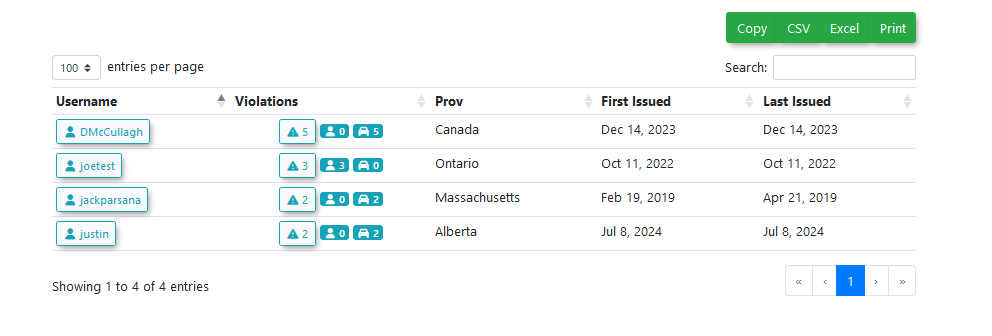 Individual violations can be viewed by clicking on the violation count.
The icon next to the total violation count shows the breakdown of the total, showing the number of violations assigned to the user and the number of violations assigned to that user's vehicles.
Exporting Results
After searching, the results can be exported in a chosen format by clicking one of the green buttons at the top right of the search results.

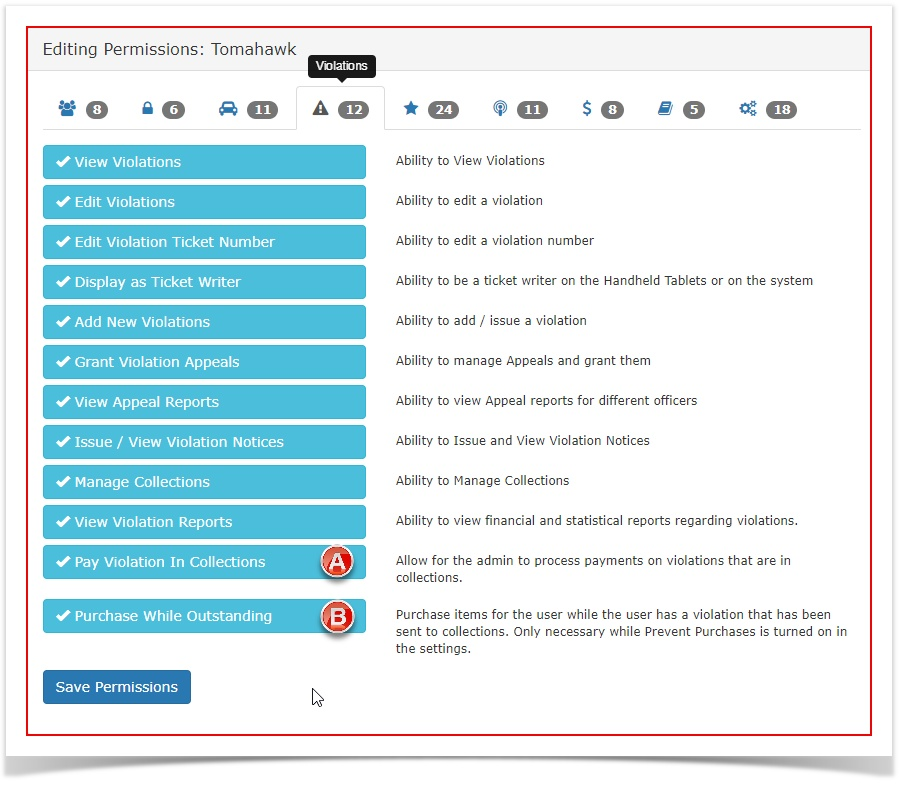
Restricting Payment of Violations in Court Requested Conviction (CRC) Status
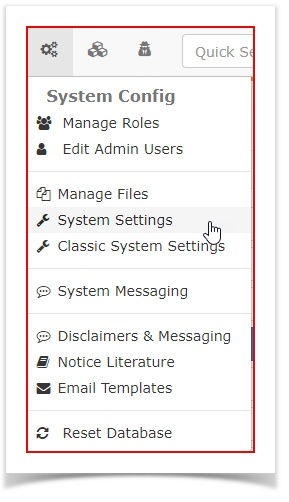
- Click System Config, System Settings to ensure the settings that pertain to Collections are set to disallow payments while violations are under the CRC status.

- Ensure that the following settings are enabled and save the settings:
- Prevent Violation Payment
- Prevent Purchases

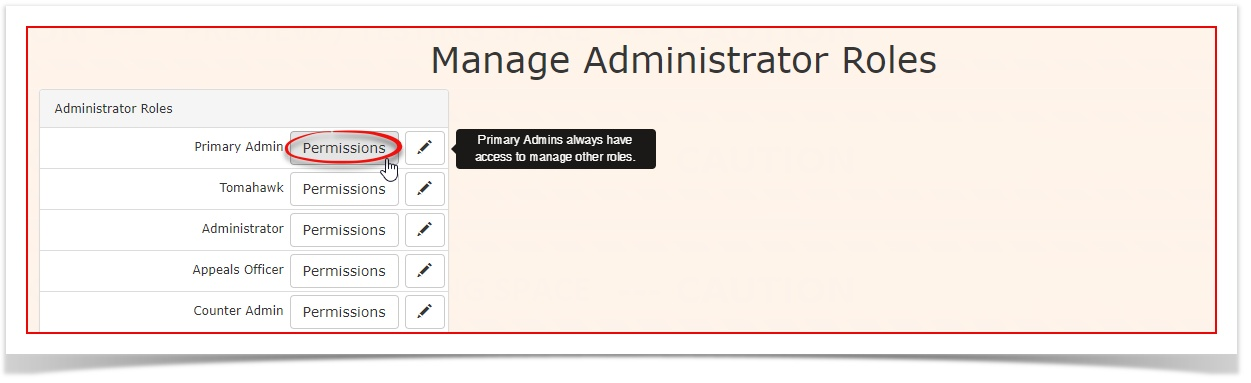
- There are two permissions that deal with the treatment of payments for CRC items. To setup these permissions, click System Config, Manage Roles.

- Select the role you wish to add these abilities to. In this example we will add them to Primary Admin. Click on Permissions to access the settings.

- Under the violations Tab ensure that these two settings are enabled:
(A) Pay Violations In Collections. (Allows the Admin to process payments on violations that are in collections.)
(B) Purchase While Outstanding (Allows the Admin to purchase items for the user while the user has a violation that has been sent to collections. This is only necessary while Prevent Purchases is turned on in the settings.

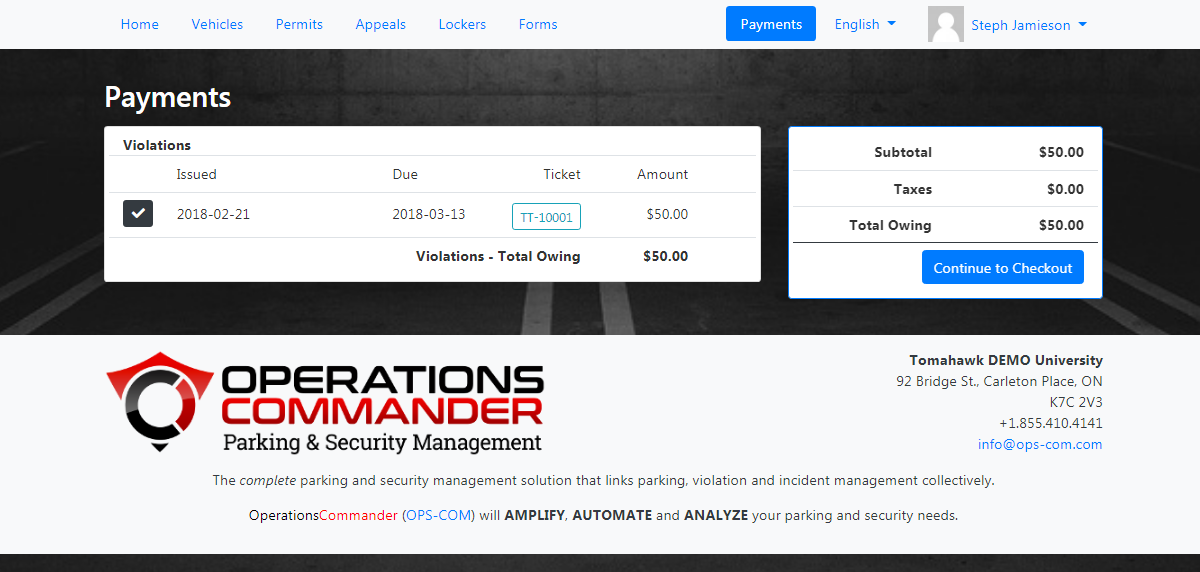
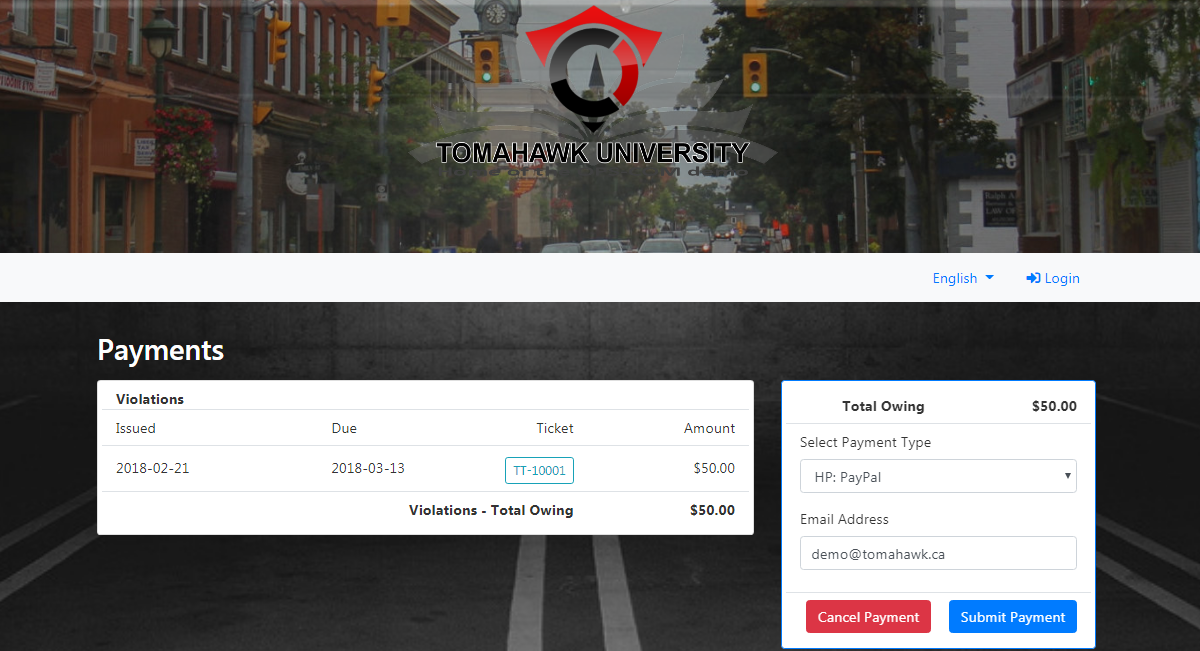
- The following two screens show how this functionality appears to the End User and the Admin:
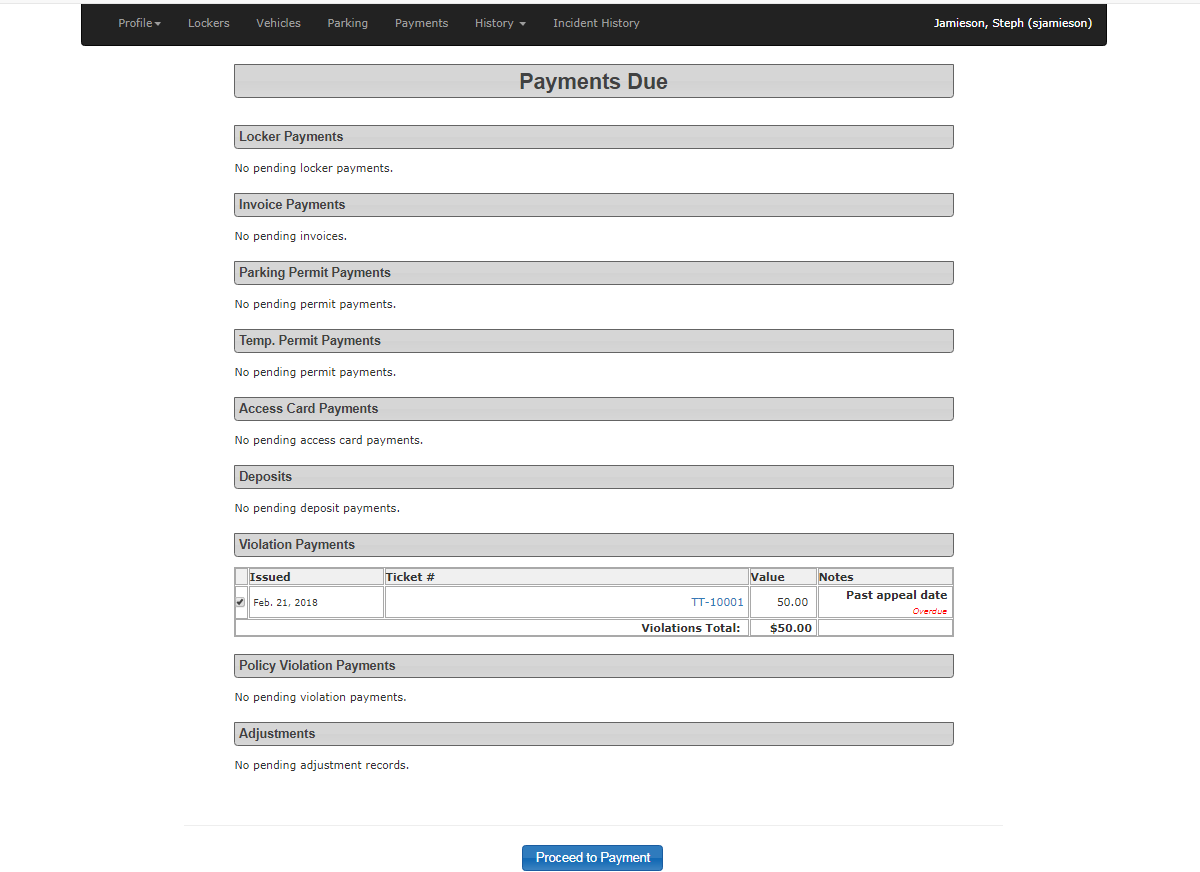
This is what the User will see if they have violations with the 'Sent to CRC' status. Note the notices indicating the violation has been Sent to Collections.

Here is what the Admin sees if they have the permission to pay these violations while in collection status. Note the notices indicating the violation has been Sent to Collections.
Here's the Admin view with the permission to pay these violations while in collection status enabled. Note the fact that the violation is still shown as Sent to Collections yet is still payable by the Admin.

In addition, if the User tried to pay the violation through OPS-COM Quick Pay/Guest Payments they would see the same message disallowing the payment of the violation.

Printing the Certificate of Parking Infraction
Create Form 11 Template
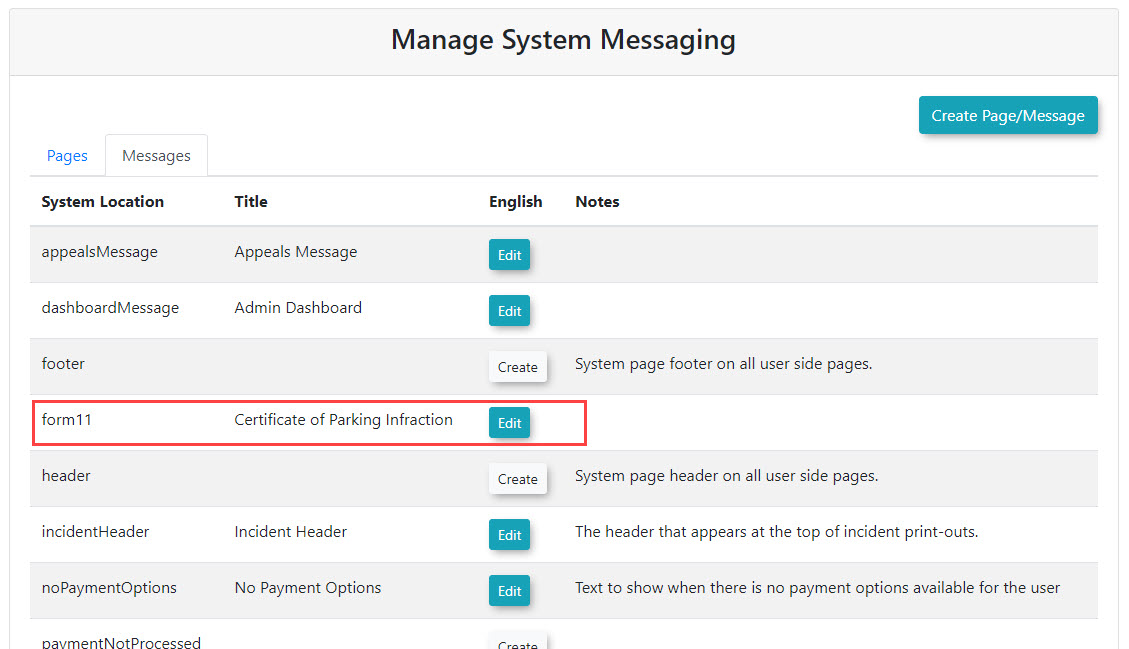
If it already exists, the Form 11 template will be found under the Content & Designs menu, in Pages and Content Blocks:
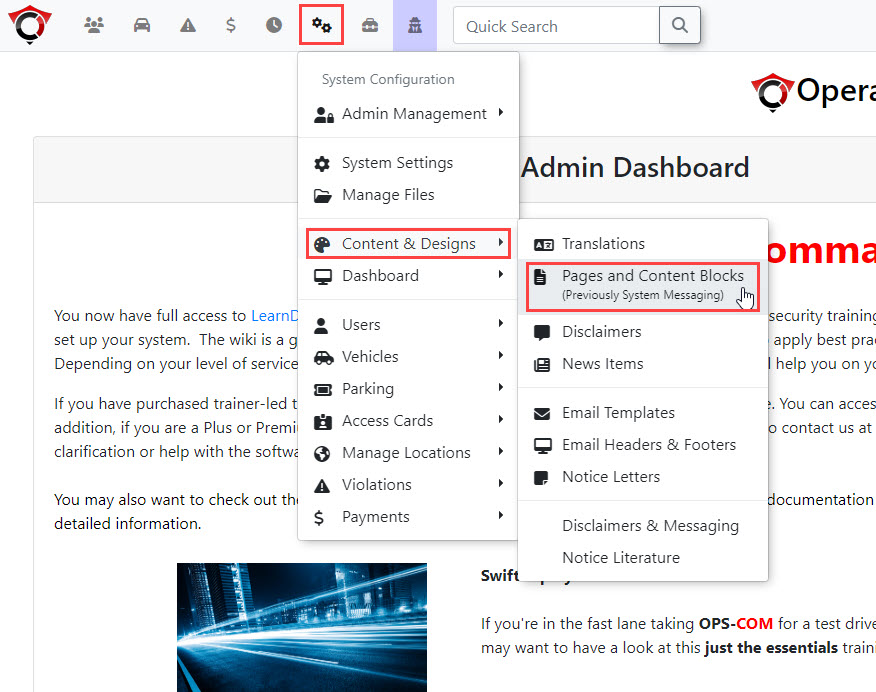
It will be found under the Messages tab. The System Location value is "form11":
If the template doesn't already exist, it can be created by clicking "Create Page/Message". Set Page Type to "Message", and for Identifier enter "form11". (Be sure to click "Save Messaging" once done.)
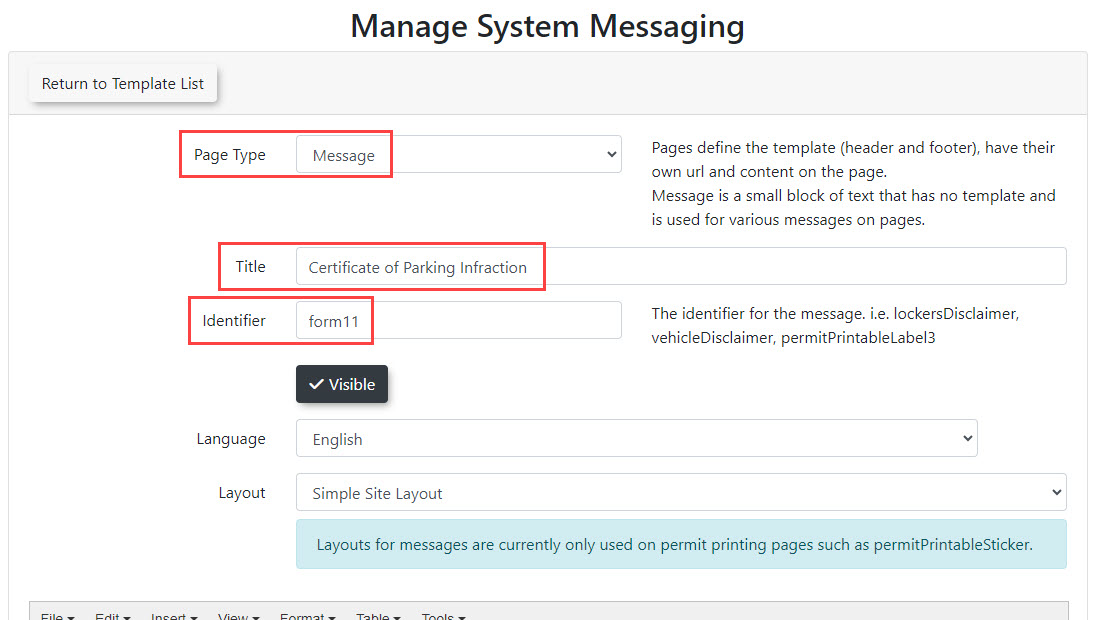
Edit Form 11
The content of the form can be edited in Pages and Content Blocks. Locate "form11" under the Messages tab and click "Edit". On this page is a text editor where the content of the form can be set. (Be sure to click "Save Messaging" once done.)
Although it's possible for admins to set Form 11 content themselves, it's strongly recommended to request the form content from OPS-COM support. This is because the content of Form 11 is very specific, and requires the use of shortcodes to auto-fill information such as date, plate number, fine amount, etc.
Print Form 11
To download and print Form 11 for a violation, first find the violation on the Violation Search page and click on the violation number:

Under the Action menu, click "Generate (title of form)":
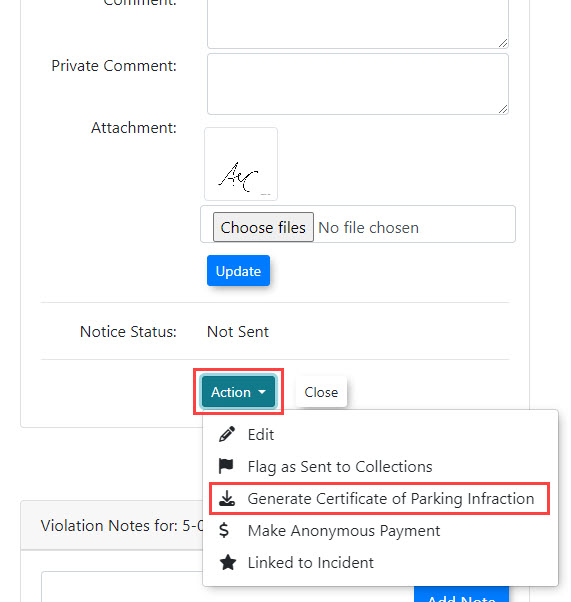
The form will be downloaded as a PDF, which can then be printed.
Adding a Digital Signature
There is an option to add a digital signature when writing a violation on an enforcement handheld. When that option is enabled, the patrol is required to sign the violation on the handheld screen. When uploaded to the server, the timestamped signature is sent with the other images. When using this option, the signature will also appear on Form 11 when printed. The option to use signatures on tickets can be enabled in System Settings under Violations:
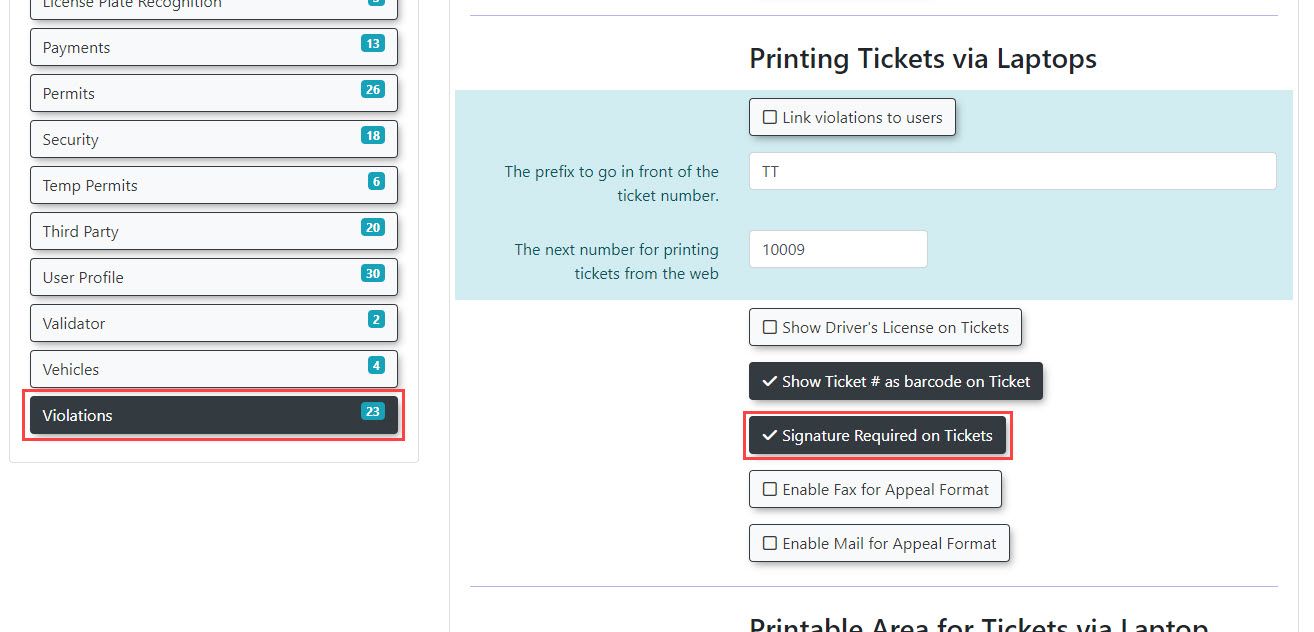
When this setting is enabled, a signature tab will appear when writing a violation on a handheld:
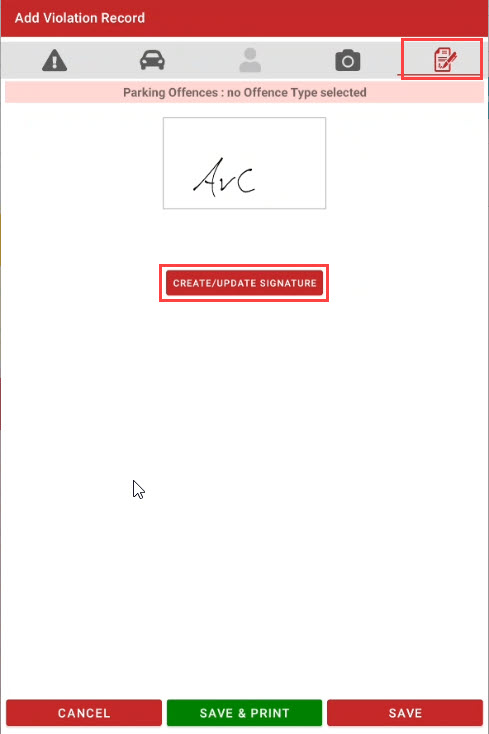
The signature will show up on Form 11:

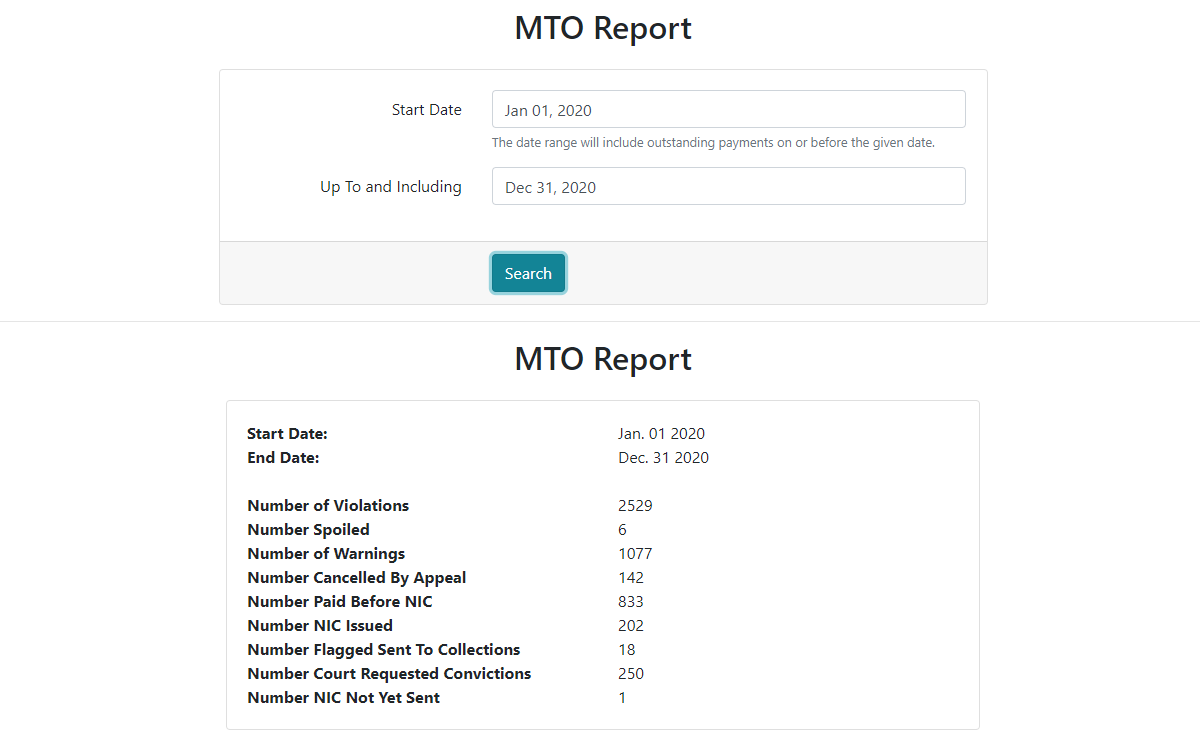
MTO Annual Report
Running the Report
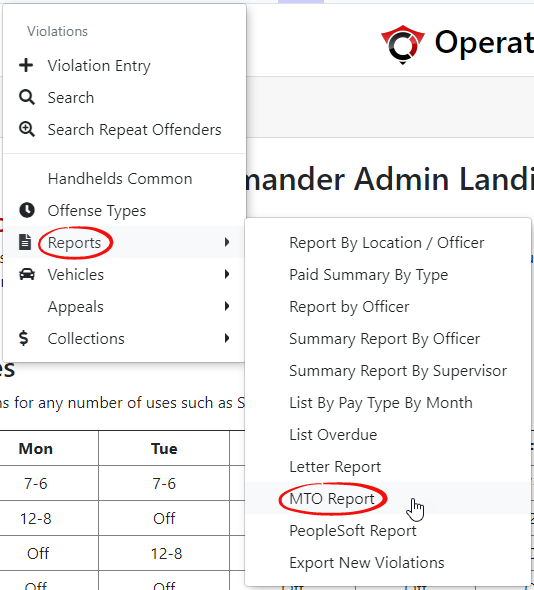
To begin go to the Violations menu and hover over Reports.
Select MTO Report from the drop down menu.
Enter the date range you wish to report on. In this case we are looking at the full 2020 year end report (January 1st 2020 - December 31st 2020).
Click Search to continue.
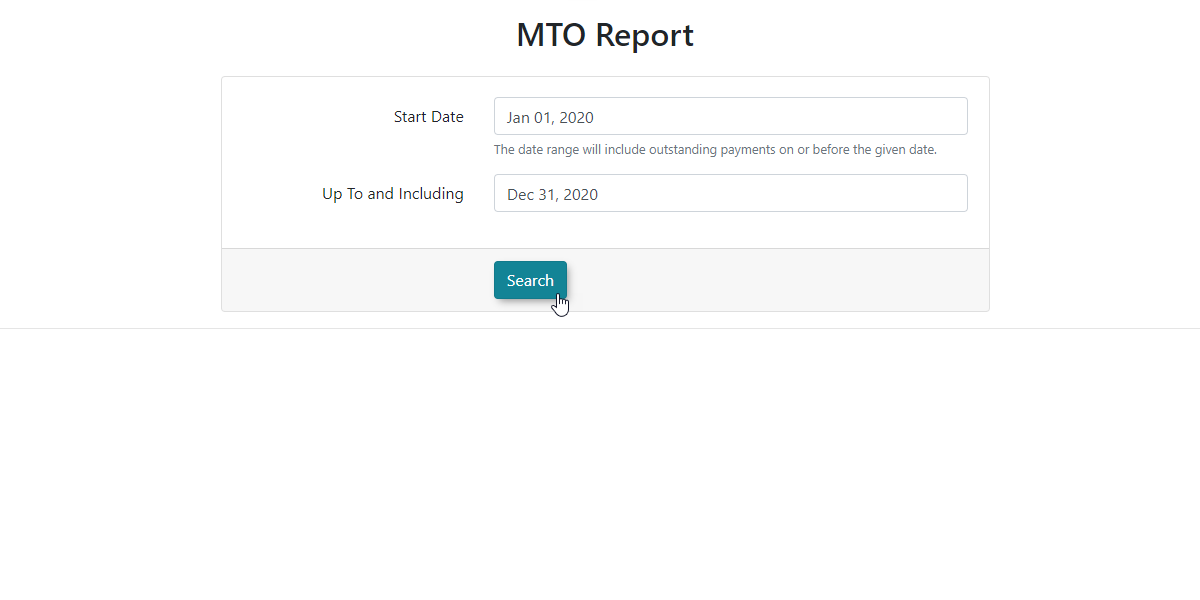
The screen will refresh with a list of items required in the Annual MTO Report.
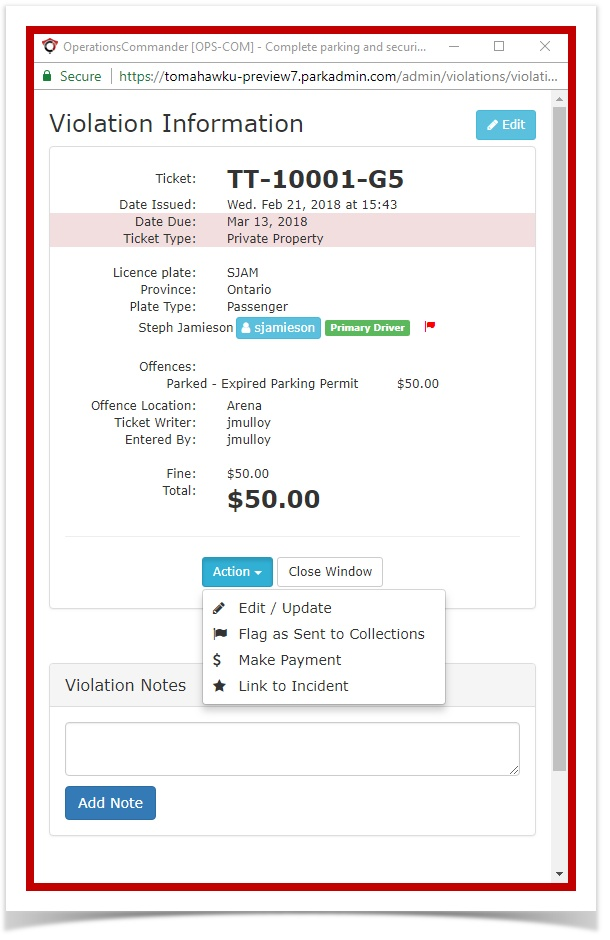
Collections - Flag as Sent to Collections
- To set the flag, open the violation search page.

- Enter the violation that is being flagged. In this case it is TT-10001. Select the ticket # to open the Violation Information page.

- Select the Action box and enable 'Flag as Sent to Collections'. Click Ok.

Municipal Violations and Collections
Introduction
Municipal clients located within Ontario have specific processes for violation offences to be sent through. The two relevant processes are the POA (Provincial Offenses Act) and the AMPS (Administrative Monetary Penalty System). Municipalities will prescribe to one process or the other.
OPS-COM supports most aspects of the POA process and is considered as a Permitted Recipient under ARIS rules. The POA process is used when a violation is given to a vehicle that has no user information present within the system.
This process involves sending out vehicle data to the transportation authority (MTO) to receive additional user information, so any outstanding violations on the vehicle can be sent to court for collections.
This article will explain the process involved in the life-cycle of a violation for one municipality in Ontario, including interactions with the Ministry of Transportation (MTO) and the Ontario court system.
It is important to note these violations would be issued to a vehicle by license plate number. Unless the driver is a registered user in the OPS-COM system, the actual owner of the vehicle would not be known.
A client must be setup beforehand to use the MTO Lookup and the Court Requested Conviction status and workflow. This could require custom development fees to handle the client’s setup. Currently, this process is only available for use within the Ontario court system.
In addition to the OPS-COM setup, the client must work with the MTO to become an Authorized Requester of the MTO information. The process can be started by contacting ARIS@ontario.ca and requesting a RAW data account.
Please contact your sales representative for more information.
An Example
Consider a municipal client that has the following violation life-cycle:
-
A violation is issued with 7 days to pay during which the fine amount may be discounted.
-
On the 8th day, the fine is no longer discounted.
-
Weekly, all tickets that have reached their 15th day of non-payment are sent to the MTO to do a lookup of relevant driver info.
-
The MTO will send a return file containing the driver information for the vehicle involved in the violation, including address and driver's license number, to be stored temporarily in the database.
-
Notice letters can be issued to drivers who have not paid their violations. This is done using the letter report.
-
-
If the violation is still outstanding on day 65 it will be sent to court and an additional court fee can be applied to the violation.
-
A file can be generated that is compatible with the Ontario court system if upload is available. In addition, a summary file can be generated to include all cases submitted to court in a particular timeframe.
-
-
When the ticket has been paid, the court will send a report back to the parking manager to let them know what the outcome was. Admins can then use the information in the report process the payment on the violation within the OPS-COM system.
Important Note about MTO Information
ARIS rules dictate the use of MTO information, requiring the information from the MTO is only temporarily stored within the OPS-COM system.
Once a violation has been cancelled, paid, or sent to collections, all information from the MTO related to the violation will be purged from the system.
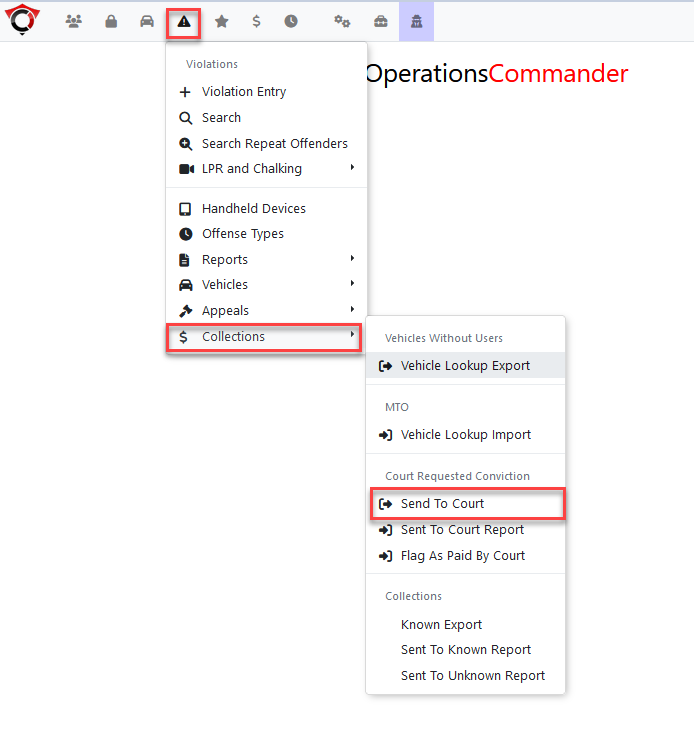
Starting the Process
The interaction with the MTO begins after a violation is past due.
The admin will run a weekly report to determine if there are outstanding violations in the system that have gone unpaid for 7 days after they were marked as due. This is done using the Vehicle Lookup Export page.
This page can be found by following this menu tree:
-
Violations → Collections → Vehicle Lookup Export
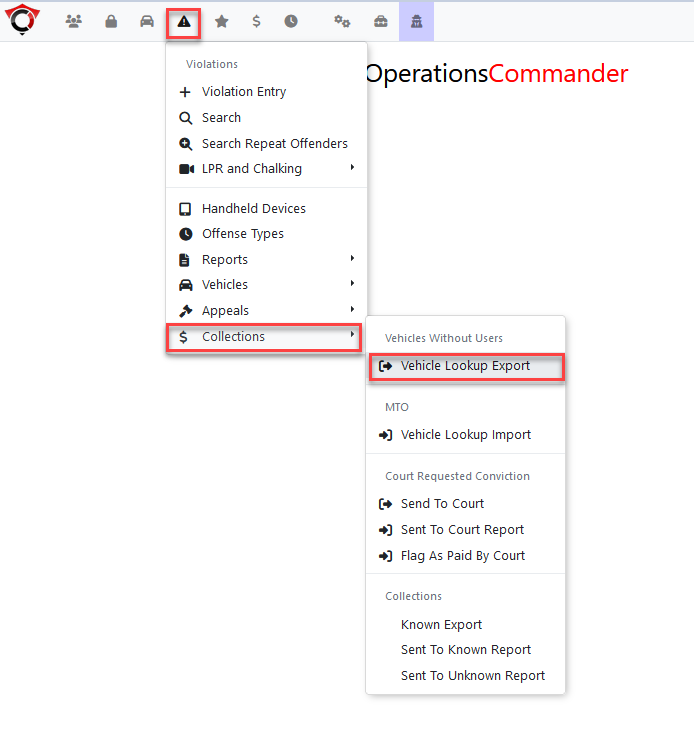
Vehicle Lookup Export Tool
Several search options are present on the page:
-
Minimum number of violations
-
Vehicle province or state
-
To search by issue date or by due date
-
Date range of the lookup

Clicking on export will generate a file to be sent to the MTO containing the vehicle information that is additional information is being requested for.
Notice there are various formats for this export:
-
Aris Raw Data Account: Used with an ARIS client using raw format lookups.
-
Aris Abstract Account: Used with an ARIS client using abstract format lookups.
-
Send to Collections: Used to send a report to a typical collections agency outside of the MTO process.
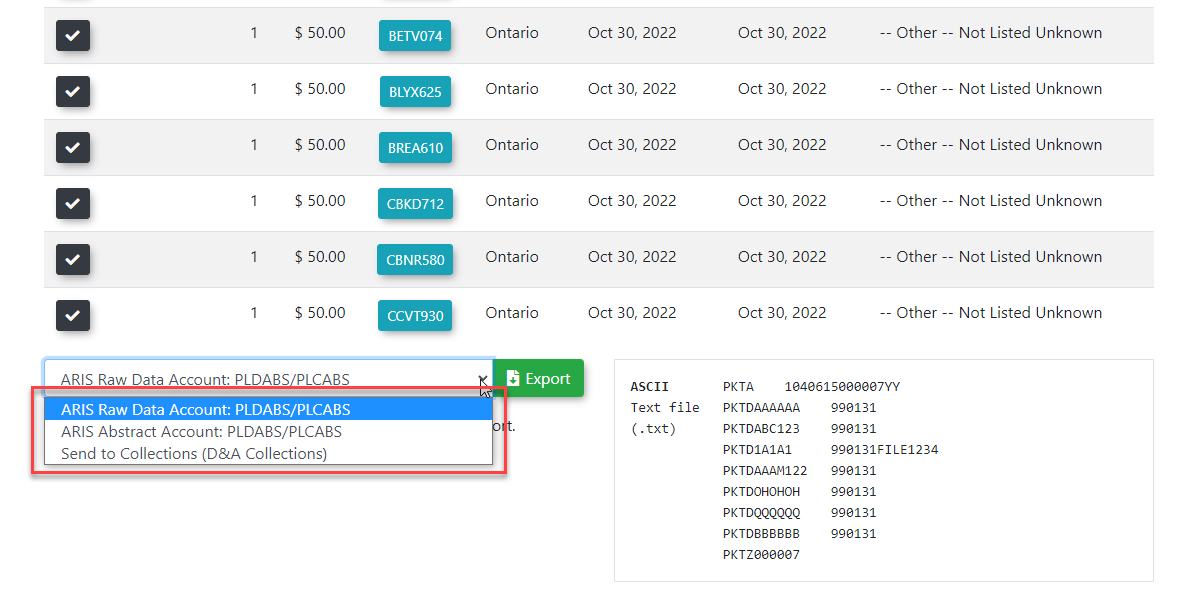
A text file will be generated with the filename as SendToMTO-XX-XX-XX.txt, with the Xs acting as placeholders for the timestamp at the time of file creation.

MTO Export File
Here is a sample of what the exported text file will look like.
The file is formatted in a custom format required for the MTO to lookup driver information.
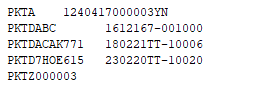
MTO Response File
The file that is returned from MTO Lookup will include driver information such as the registered vehicle owner's name and home address.
This information is temporarily stored in the OPS-COM system. As governed by ARIS rules, the information will be purged from the system after it is no longer needed.
The document return from the MTO will look like the following:

Simulated Response File
There is an option to generate a mock version of an MTO response file using the file previously exported.
This can be done using the Third Party Simulator page, located under the menu tree:
-
Tomahawk Options → Third Party Simulators

Importing the MTO Response File
To import the information received back from the MTO into the OPS-COM system, navigate to the vehicle lookup import found under the menu tree:
-
Violations → Collections → Vehicle Lookup Import
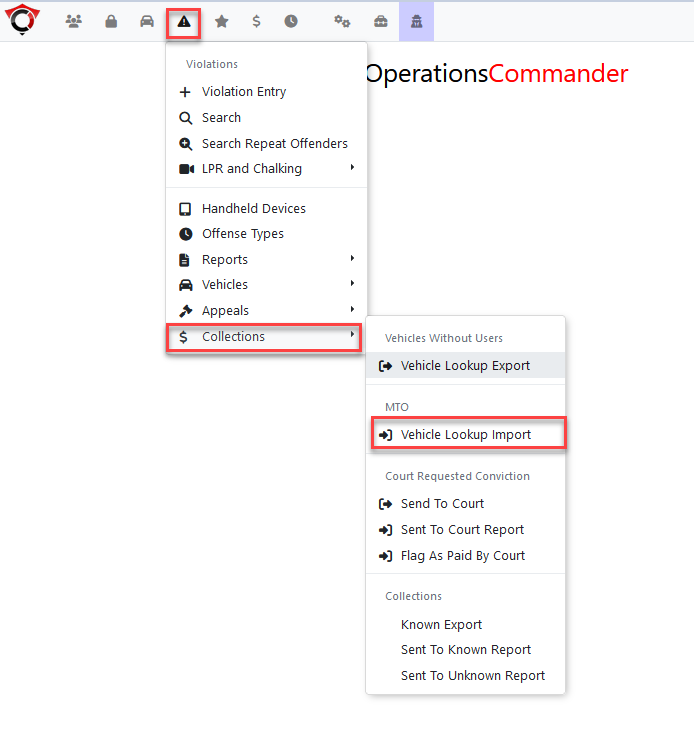
The Vehicle Lookup Import file selector tool opens.
Choose the file that came back from MTO and navigate to the file you wish to select for import.
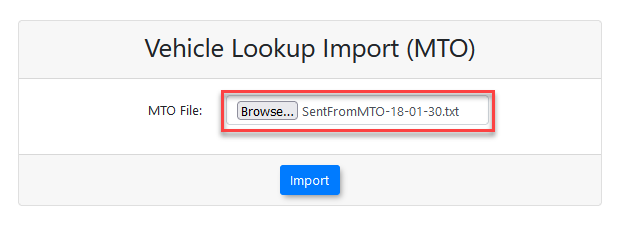
Click the Import button.
A confirmation message will appear in the top right of the page.

Generating Notice Letters
Once the information has been imported, the data will be used to populate any missing notice letter information.
Violations that have had MTO information associated to them can be viewed from the Letter Report page.
After the notice letters have been printed, they must be sent to the drivers of the vehicles by mail.
Sending to Collections
If the ticket still remains unpaid after the notice letter has been sent, it is eligible to be sent to the Ontario court system for collections.
The page can be found under the menu tree:
-
Violations → Collections → Send to Court
The number of days since the violation was issued can be specified, and violations that have not been issued a notice letter can also be included.
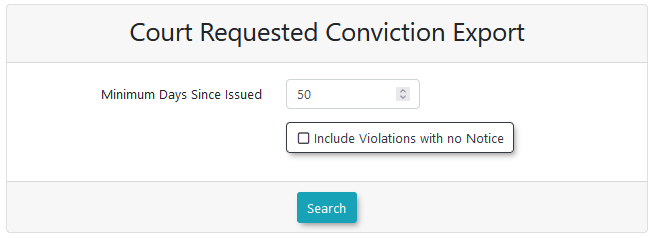
An admin fee can be added to the violation on export.
Some municipalities have a fee and some do not.
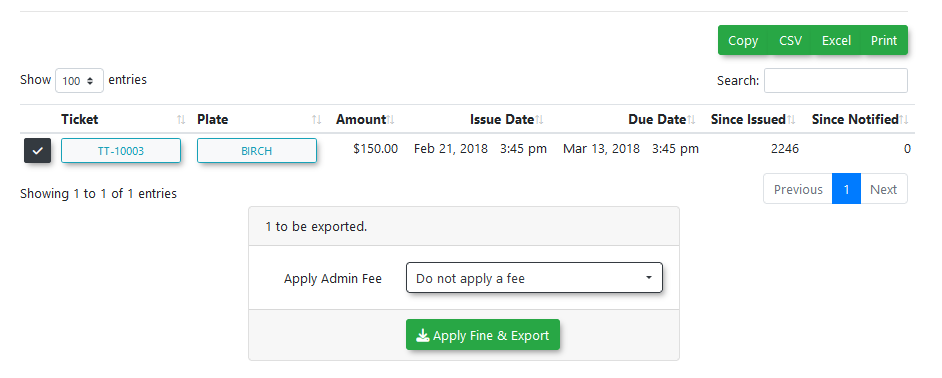
The page will then generate a file to be sent to the Ontario court system, named in the format of SendToCRC-XX-XX-XX.txt, with the Xs acting as placeholders for the timestamp at the time of file creation.
The report generated by the system is in a format specified by the Ontario court system for processing, and must be customized for each municipality.
It will look something like this:

Client MTO Codes
For each client sending information to the MTO, there are 4 codes required by the Ontario court system that must be set up on the client’s site.
NOTE - The client must request a RAW Data account from the MTO to use this process. This system will not work otherwise.
Here's a reference for all the provincial forms: https://ontariocourtforms.on.ca/en/provincial-offences-act-forms/
The provincial forms are:
-
Case Court: starts at character 3 - a 4 digit number (Parry Sound is 3060, Perth's is 1860). This is repeated starting at character 57 and again at character 186.
-
Case Jurisdiction: starts at character 7 - a 3 digit number (Parry Sound is 658, Perth's is 073). This is repeated starting at character 61 and again at character 190.
-
The Agency Code: 3 alphanumeric characters followed by 3 numbers (Parry Sound is BYL390, Perth's is BYL658).
-
Disbursement Code: 1 alphanumeric character followed by 3 numbers (Parry Sound is M525, Perth's is M658).
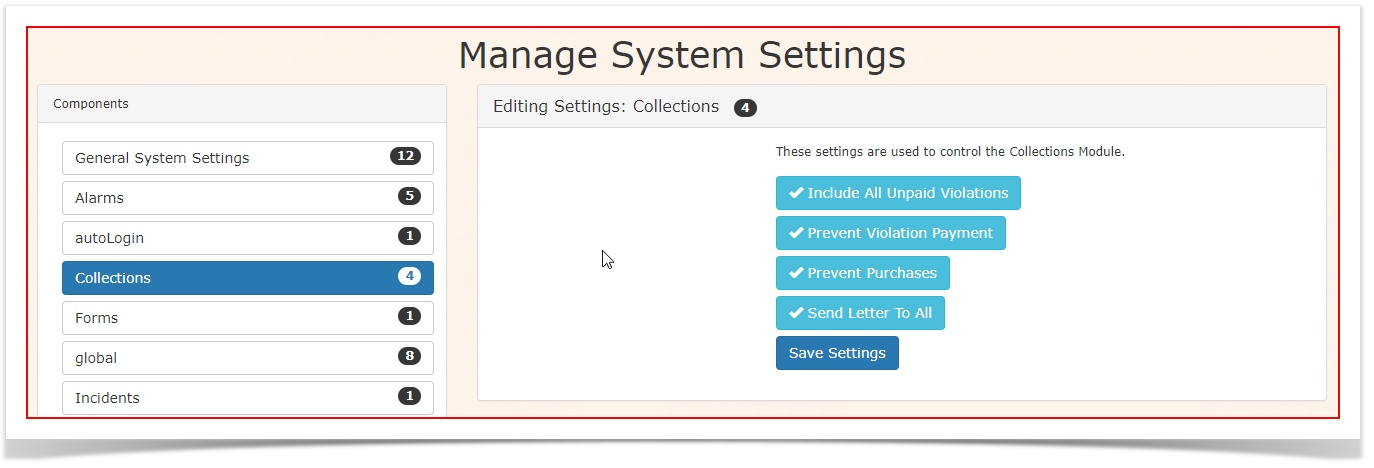
To set these codes up within the site, go to System Settings and select the Collections Component.
Enter the values in the designated fields, and then click on save settings.

For municipalities using the extra-detailed version of the notice letter where one notice is sent out for each violation rather than in bulk, the "Include All Unpaid Violations" setting must be disabled.

Generating the Ontario Court Report
A file can be generated and exported to Excel, containing a summary of all violations being sent to court in a particular time frame.
The page can be found under the menu tree:
-
Violations → Collections → Sent to Court Report
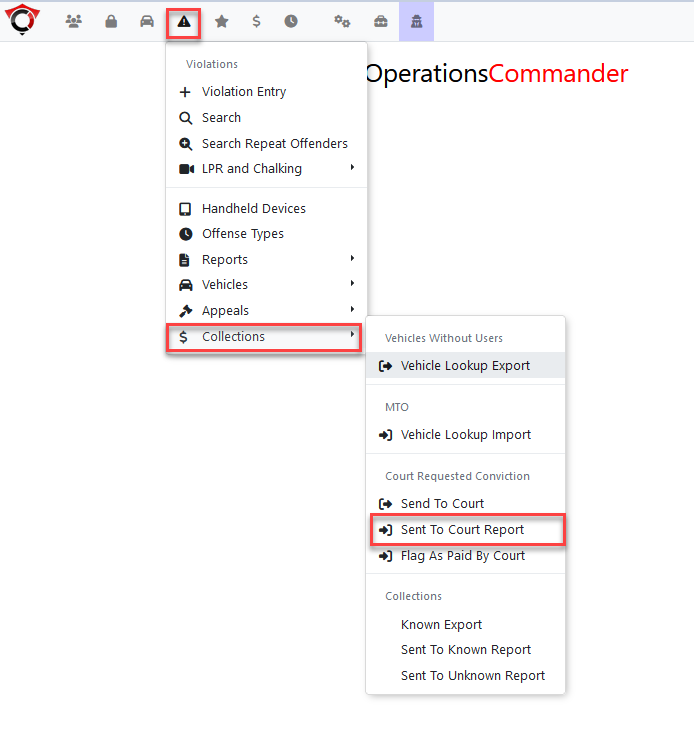
This will open the Court Requested Conviction - Already Sent Report.
Clicking on export will download an Excel file to the browser.
A copy can be printed to bring to court on the day of the hearings.
It is exported in the format recommended by the courts:

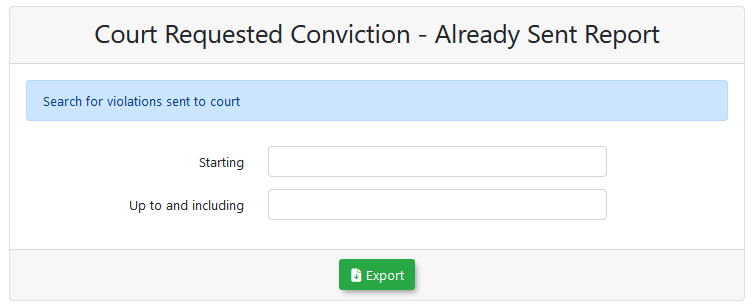
Court Requested Conviction Fee
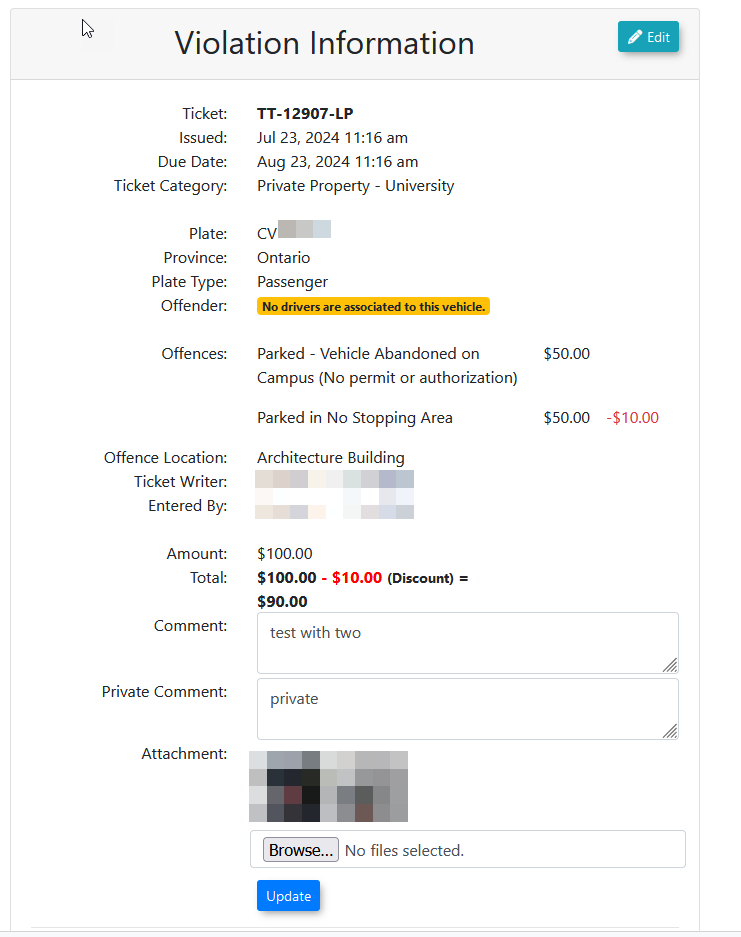
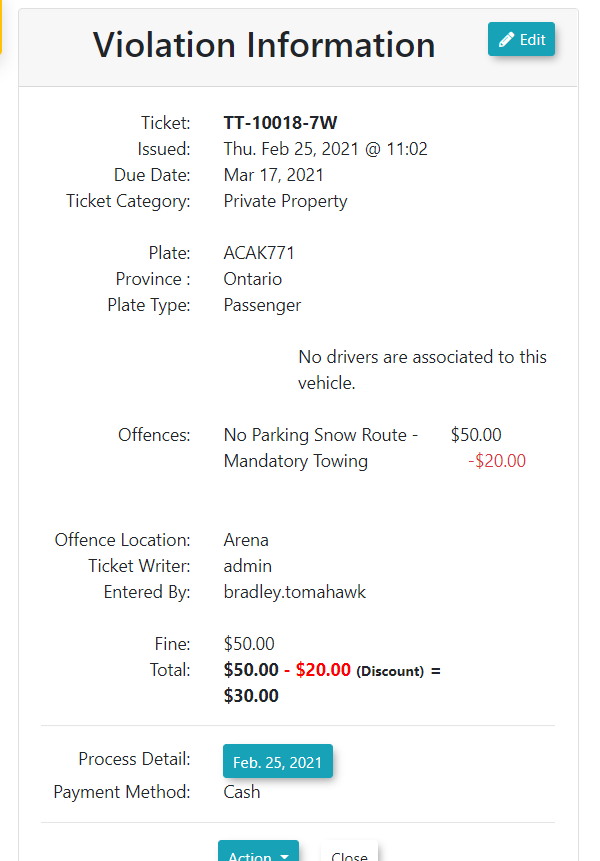
If a conviction fee was added on to the violations sent to court, it can be viewed when looking at the violation’s info page.
A record for the Court Requested Conviction (CRC) fee will have been added.
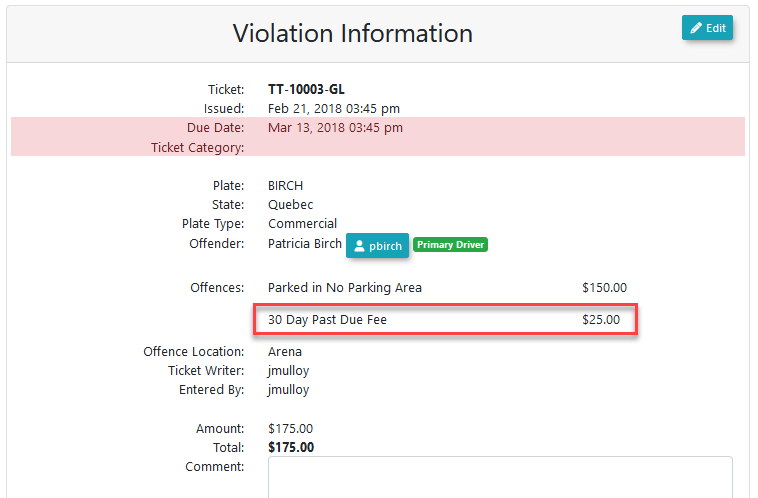
Flagging Paid Records
When a report is received back from the court indicating a violation was paid, it must be flagged in the system as being paid.
The report to flag as paid is located under the collections menu, within the menu tree:
-
Violations → Collections → Flag as Paid by Court

Enter a date range and press the search button.
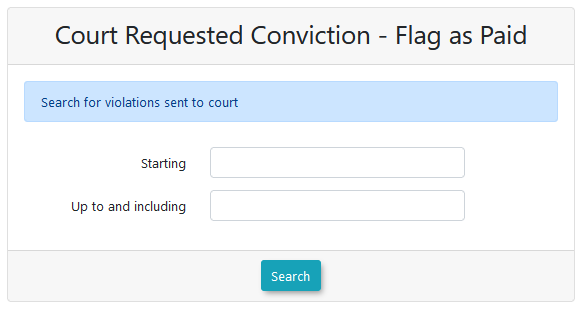
A list of the violations that have been sent to court will be returned by the page.
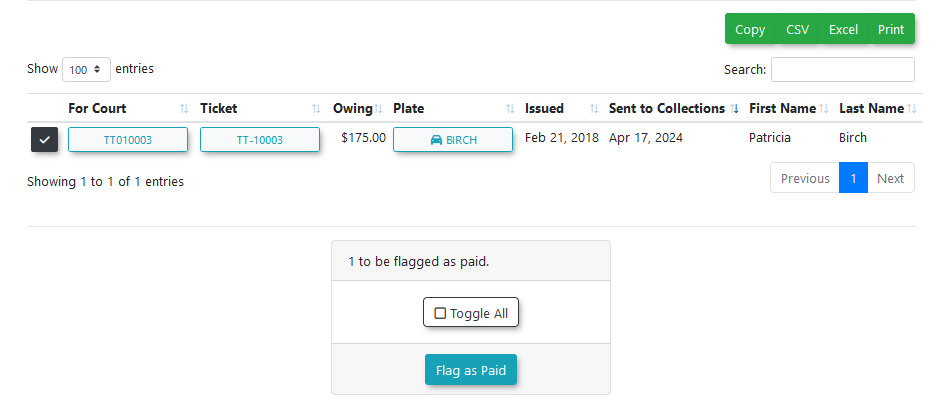
Click Flag as paid to process all selected violations to be marked as paid.
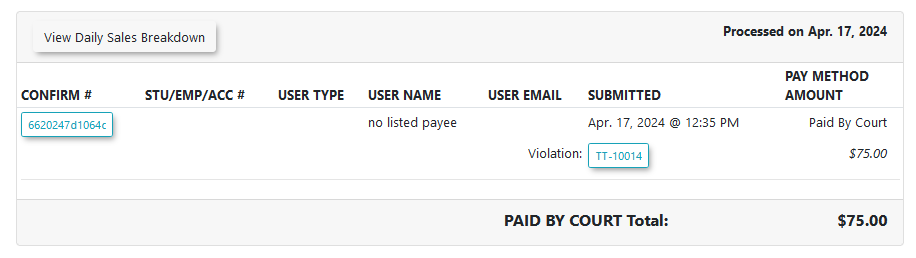
Violations flagged as paid will also appear on the Daily Processed Report with a payment type of paid by court.
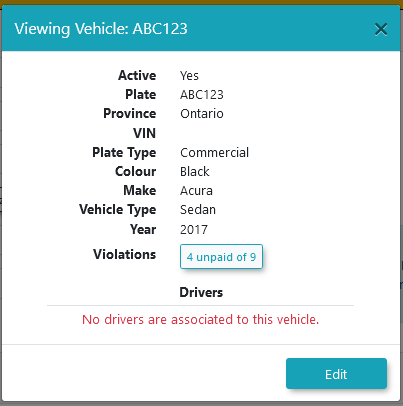
Additionally, when looking at the vehicle information for this violation, the MTO information will have been purged from the system.
Note the vehicle shows there are no associated drivers.
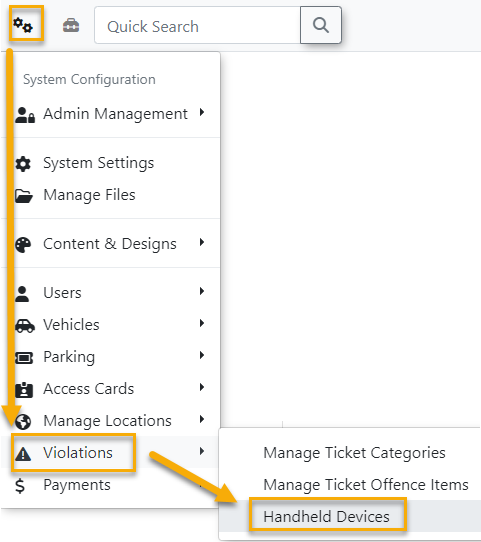
Handhelds Devices Settings
Navigate to Handhelds Devices
Select System Configuration → Violations → Handhelds Devices.
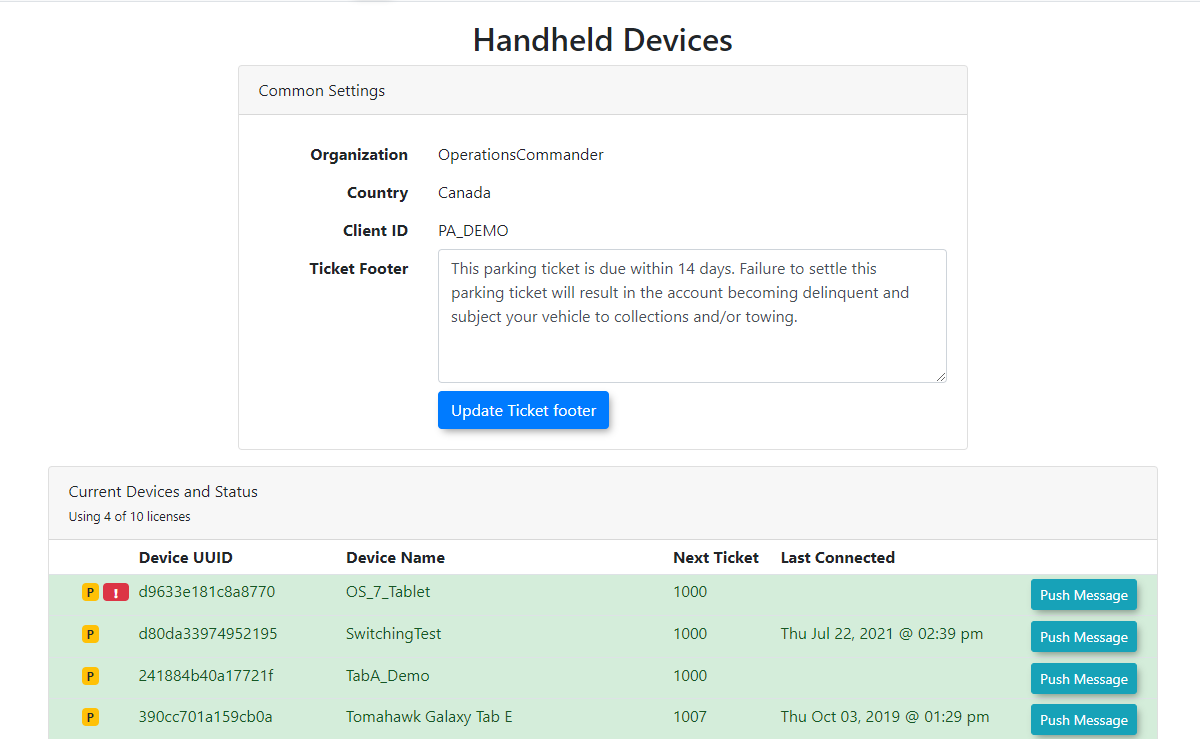
The Handhelds - Common Settings screen appears where you can edit the number of days before a ticket is due, customize the ticket footer, view device information, and manage handhelds.
Adding A New Device
When adding a new handheld device start by installing the OPS-COM for Android software. After first login you will get a notice that the device is not registered and the message will give you a UUID number to be used. It's a 16 digit alphanumeric code that appears under your login screen. Use that UUID to configure your Handheld Common registration process.
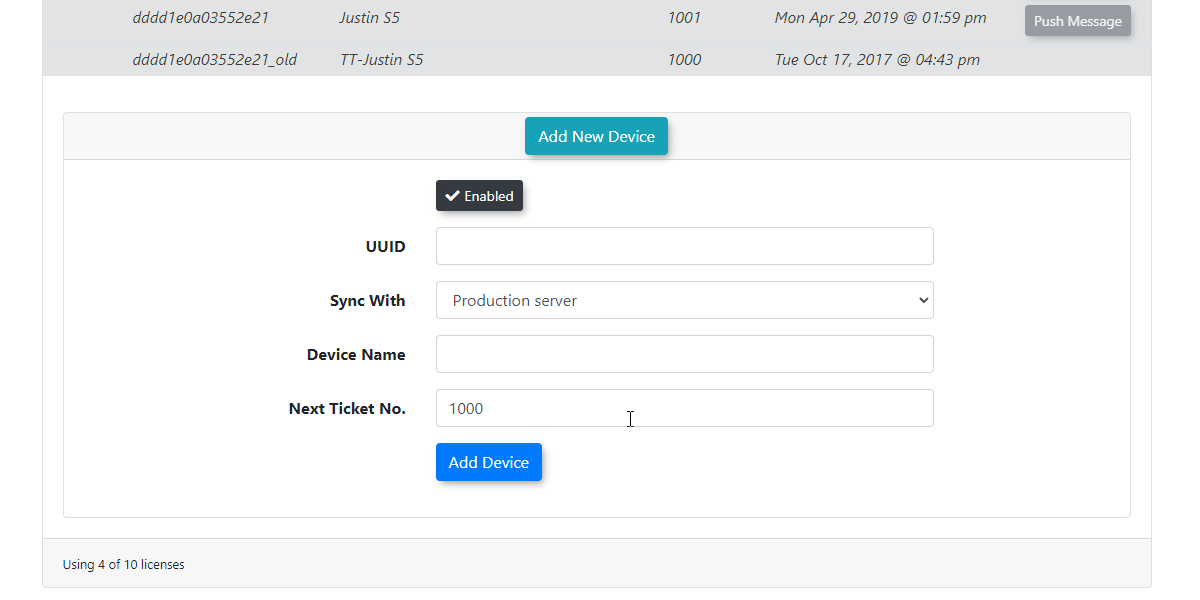
Once in Handheld Common click on Add New Device.
A screen will open up where you must add:
- The UUID (Where is the UUID? First Time Installation - Android)
- Set a Server to Sync with (always start with the Production Server)
- A name you'd like to use to identify this device by.
Also important is to ensure Enabled is selected at the top of the entry form.
Once you have this information in place click on Add Device
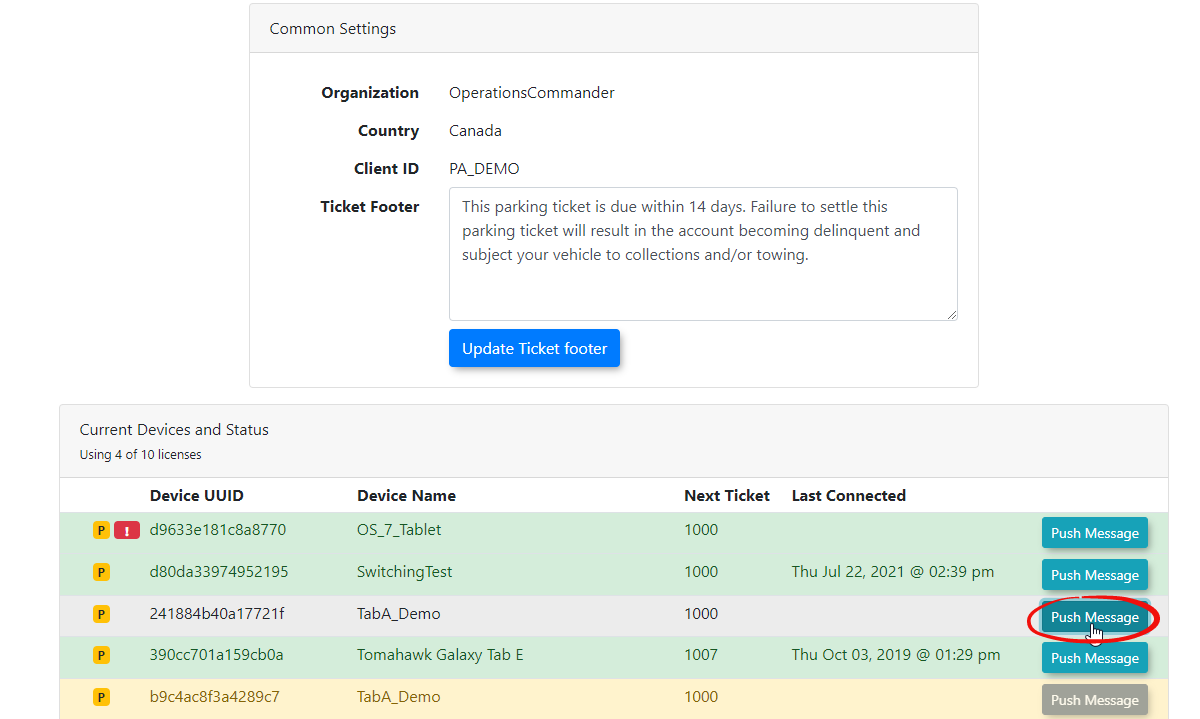
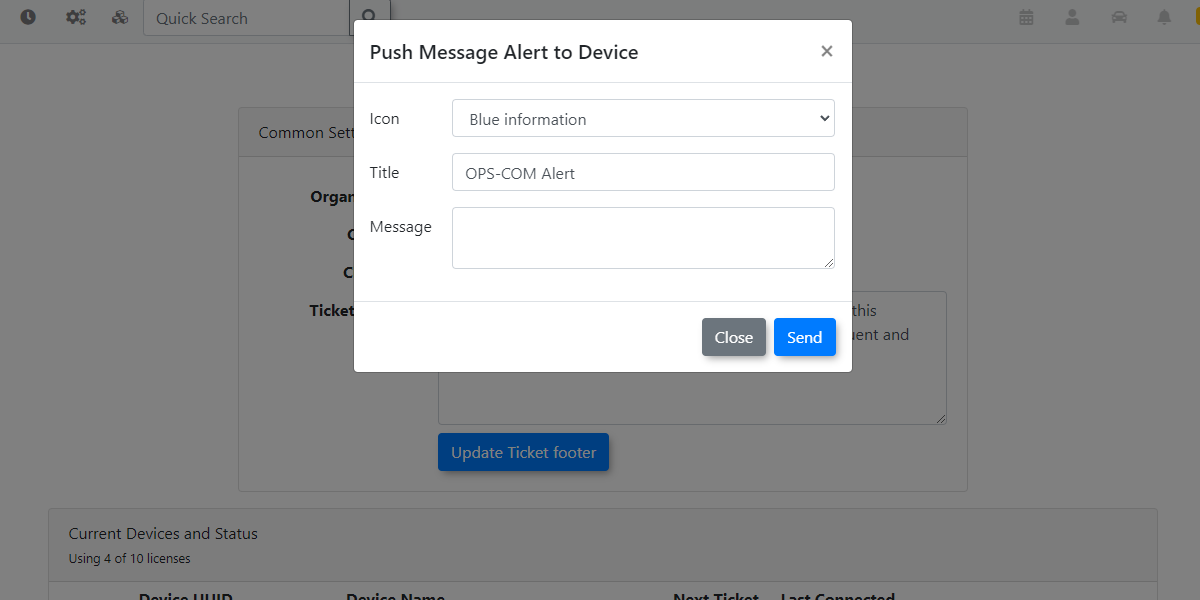
Pushing Messages
You can also push messages out to handheld units. Click the 'Push Message' button and follow the prompts.
Updating Device Data
Click the device you wish to update to get a drop-down list of the settings you can change.
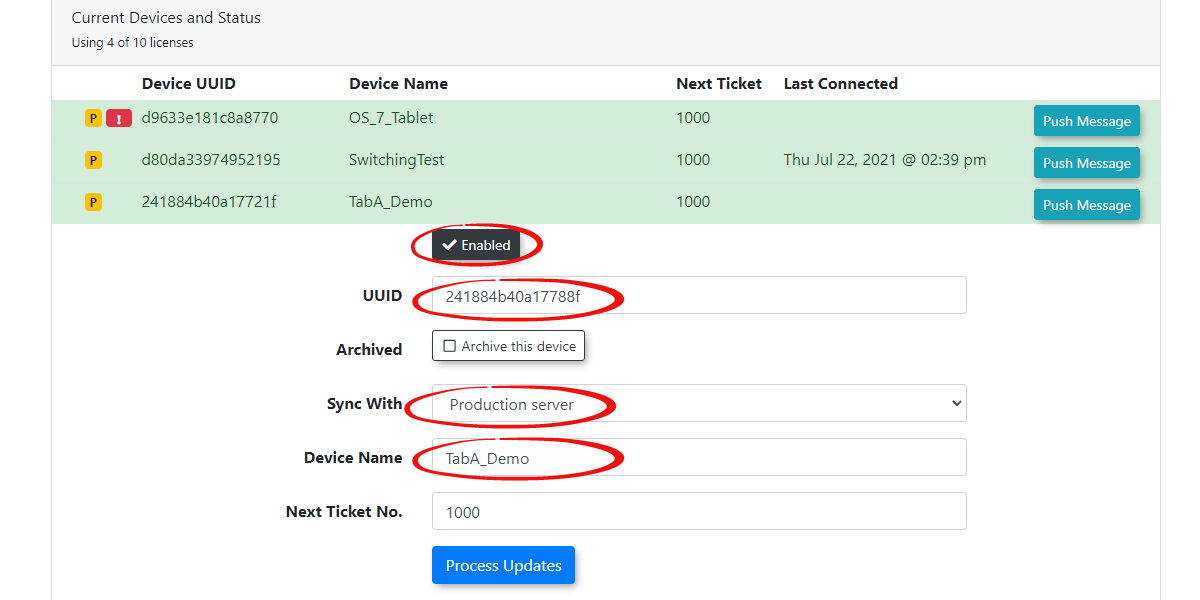
Make sure you select Process Updates when you are finished.
Important Note - Additional Information
By virtue of how the Handheld Common tool functions. It's always part of the process to start setting up a unit on the production side regardless of whether it is to be used in Production or as a test unit on Preview.
For initial handheld connection, the system always connects to production first, then looks at the PA Common/handheld assignment table where the units are registered to then know if they are registered on Production or Preview. That's the logic path so it is important to always write the tables from production side first.
Additionally, this is why we can refresh preview sites without loosing the Handheld units that are configured to specific preview sites.
Adding a Handheld Unit to Preview for Testing
To add a handheld unit to preview you must first add it to handheld common on the production admin portal. You would fill everything in as normal but select the preview server as the entry in Sync With.
This will set the proper route for the handheld unit in the database. You will then need to go to the preview server and enter the same information into the preview site.
Then perform a reinstall of the software. This will allow the handheld to pick up the new path to preview that you have set.
Once the entry is in both Production and Preview you can switch back and forth fairly easily. You repoint the sync with setting to the preferred path on both Production and Preview.
You have to do a reinstall each time you change the path in order for the handheld unit itself to be updated with the selected path.
Appeals Report
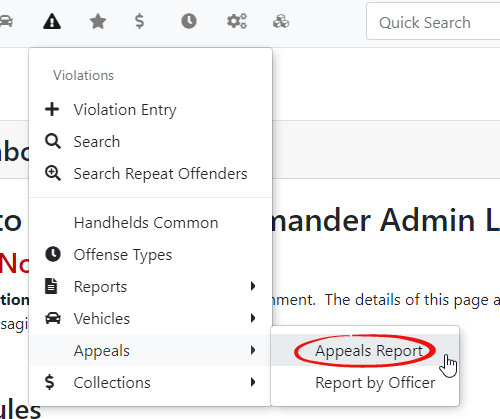
To review appeals as an admin hover over the Violations icon and click Appeals and then select Appeals Report.
The Appeals Report page is displayed with information related to the violation and appeal date.
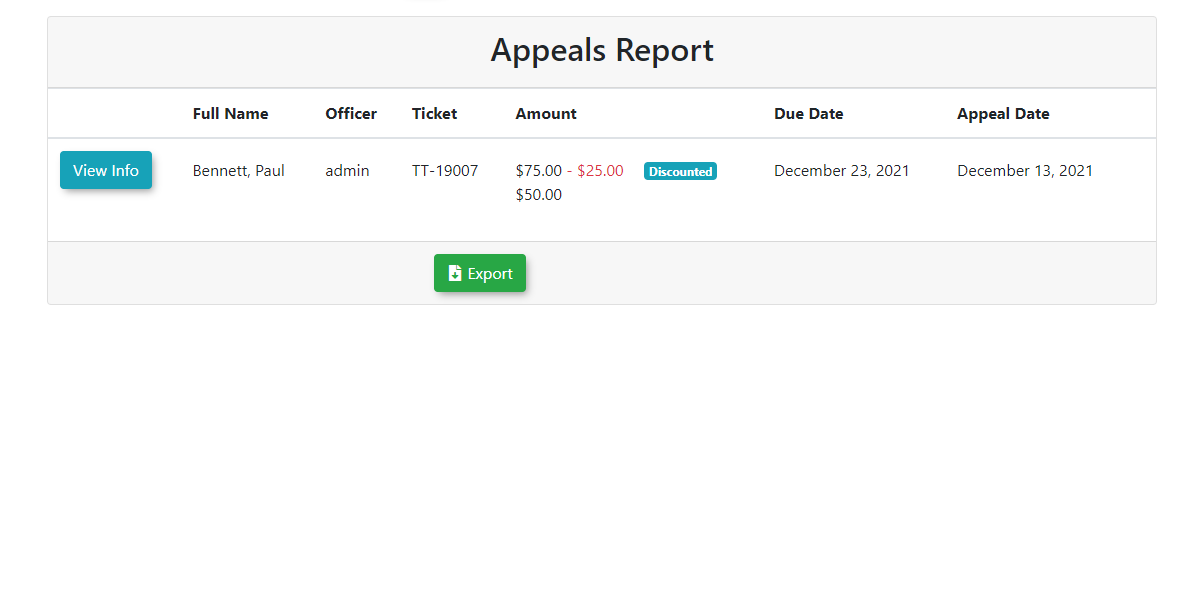
Click View Info beside a person's name to get details on that appeal. The User Appeal History screen displays.
Additional Options
If you click the person's username, you will be taken to the Edit User Profile page. If you click the ticket number, you will be able to view the Violation Information page.
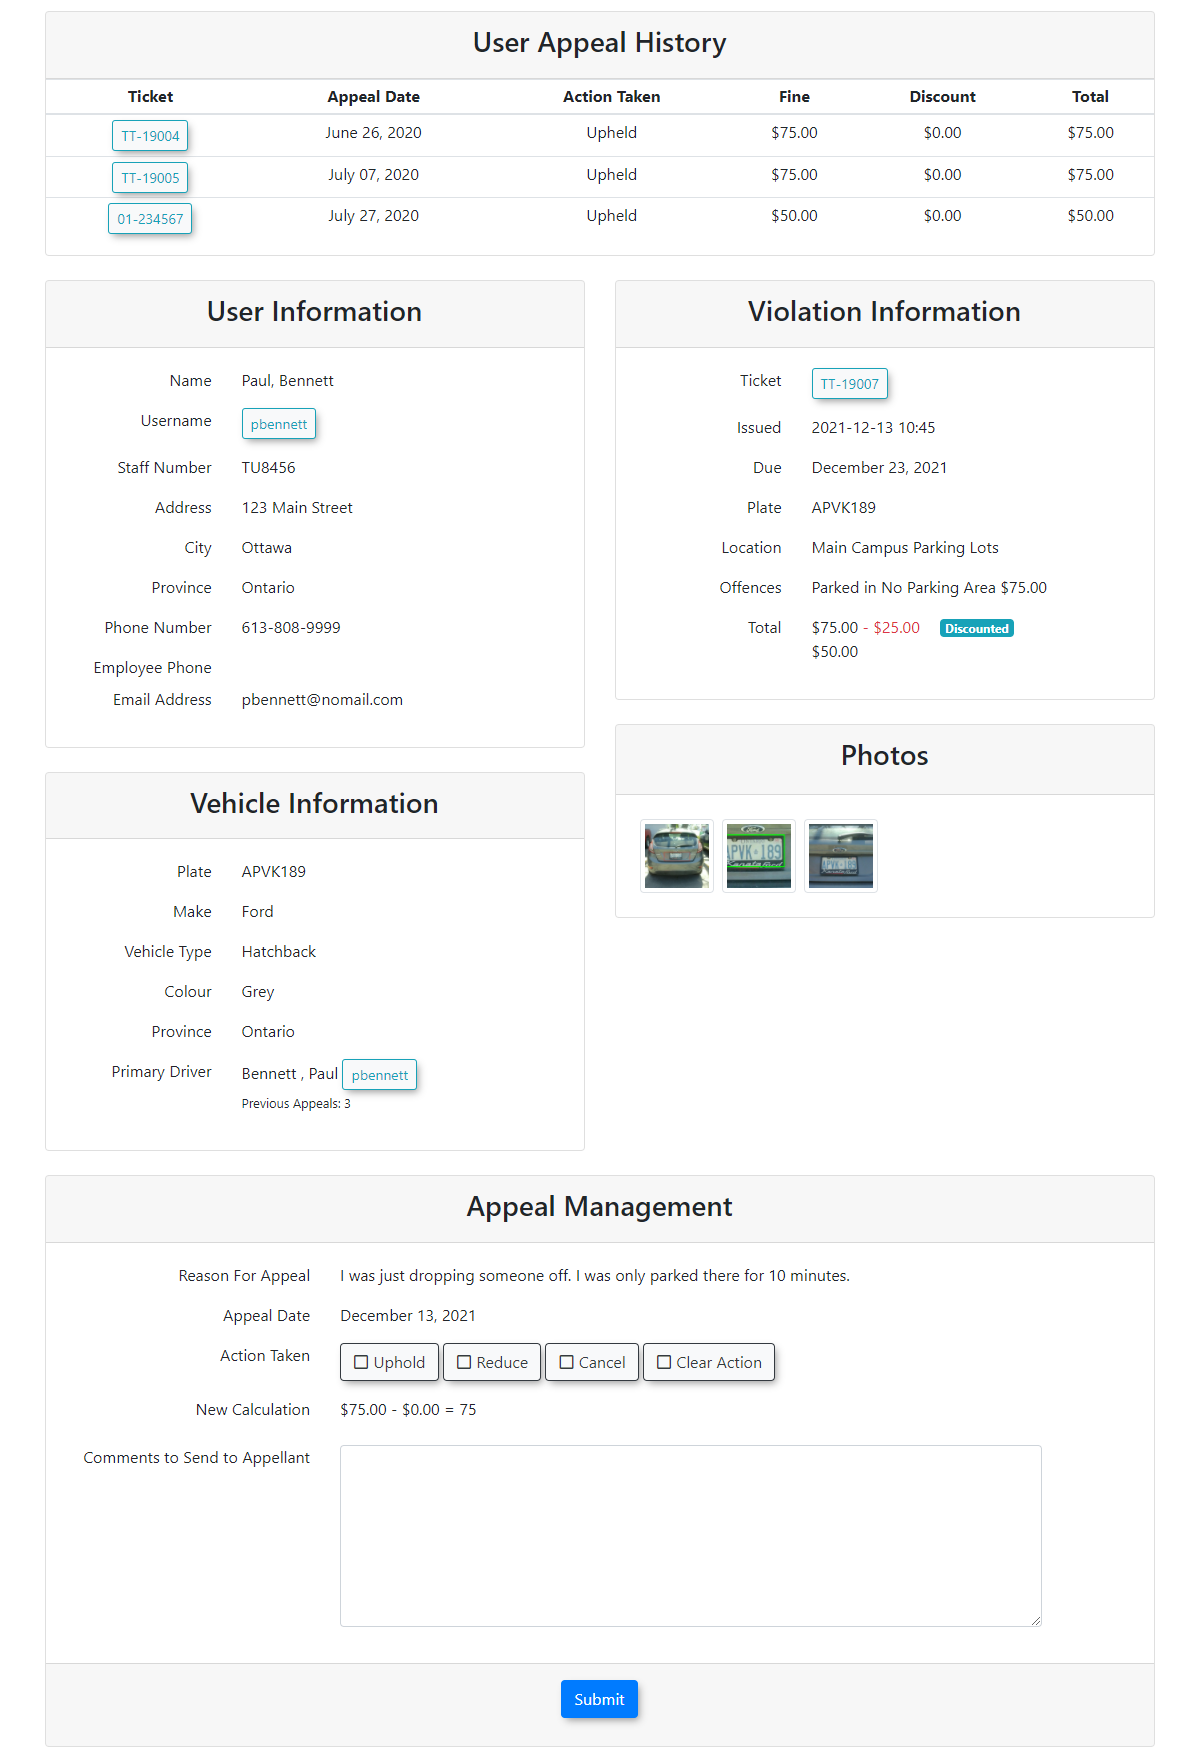
All information on the appeal is displayed. The user history is displayed as well as user and vehicle information.
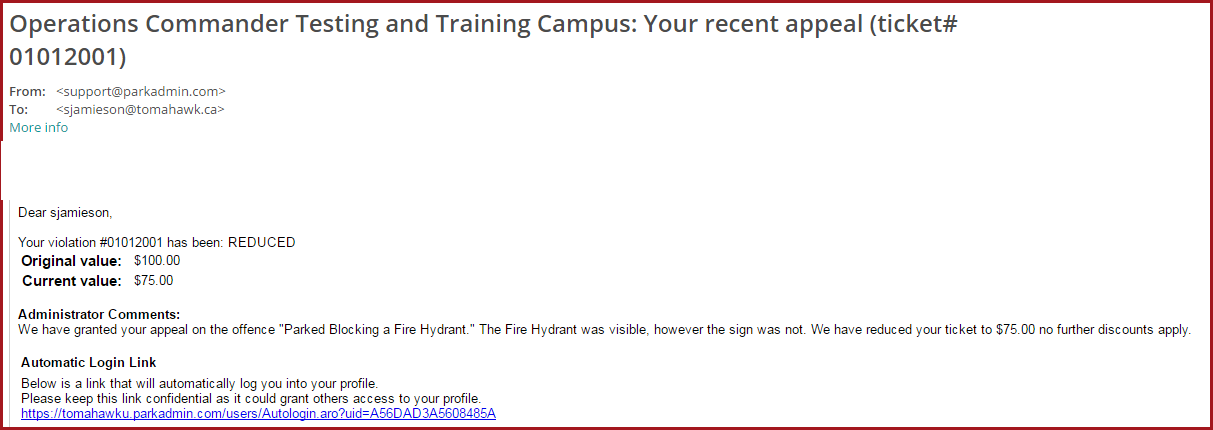
Click the Action Taken picker and choose to Uphold, Reduce or Cancel this violation. In this example, Reduce Violation has been selected and a new fine amount is entered. In the box for Comments to Send to Appellant, enter your comments regarding your appeal decision.
Click the Submit button when finished to process the appeal and to email the user.
This is an example of the email that will go to the user, your email might look different from ours depending on your set up.
Alternatively, you can follow steps taken from the 'Edit a Violation as an Administrator' page excerpted below:
Highlighted in yellow is the Appeals section. The different fields in the 'Appeals Area' are explained below:
Ticket Appealed - This is the date in the first picker and how the appeal was filed in the second picker.
Fine Action - Choose from Upheld, Reduced or Cancelled
Offense Value - The amount can be manually edited if Reduced on appeal but will automatically be reduced to 0.00 if Cancelled. You can also edit the Offence Value directly.
Appeal Reason - The reason for launching the appeal can be recorded here. This field can be viewed by the user.
Appeal Admin Comment - This is for private appeal notes. These notes are not viewable by the user.

Change the Actioned per: field by selecting the Admin account making the changes from the picker.
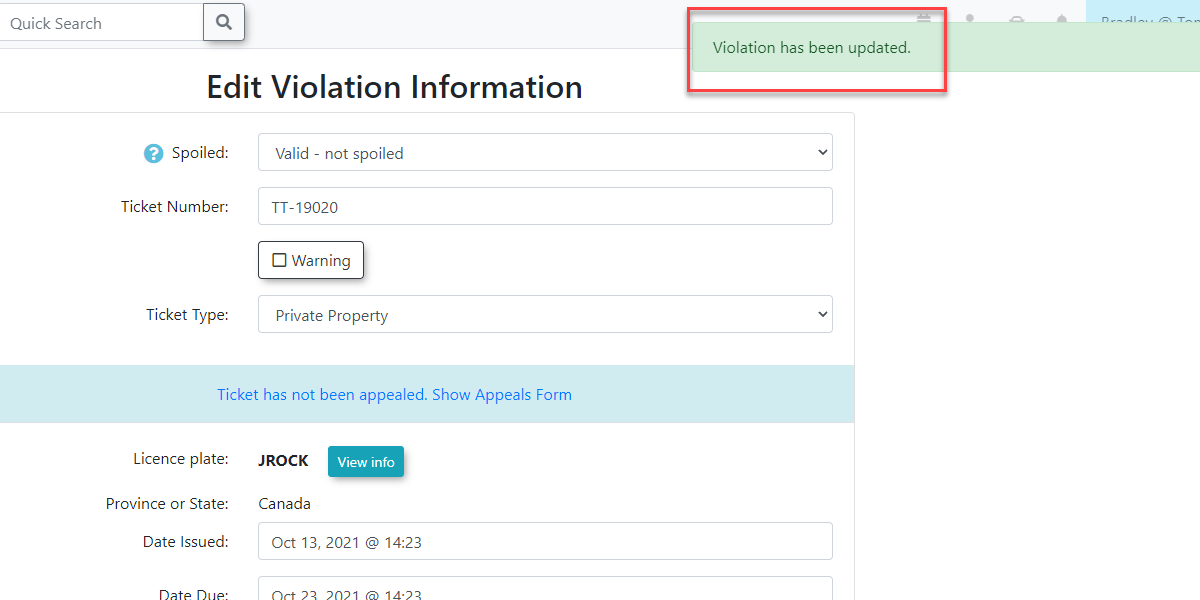
Click Update this Violation and a message will appear letting you know that the violation has been updated.

Edit a Violation
Searching for the Violation
Follow the steps to search for a violation - Search for a Violation as an Administrator
At the bottom of the Violation Search screen, the returned records will be displayed.
Getting to the Violation Information
Click the TICKET# to open the Violation Information window.
A new window will appear with the Violation Information. You can edit the violation from the Edit button at the top right, or by using the Action dropdown menu.
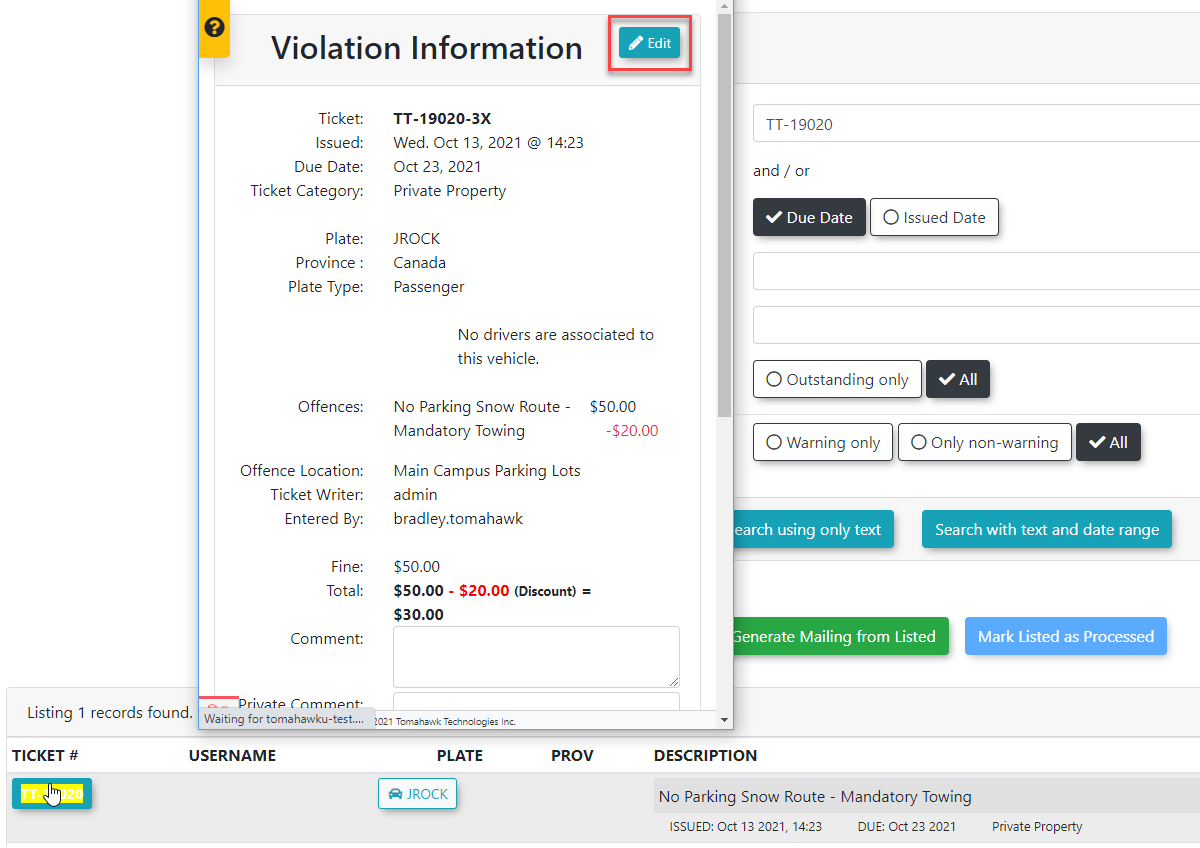
You will be taken to the Edit Violation Information window.
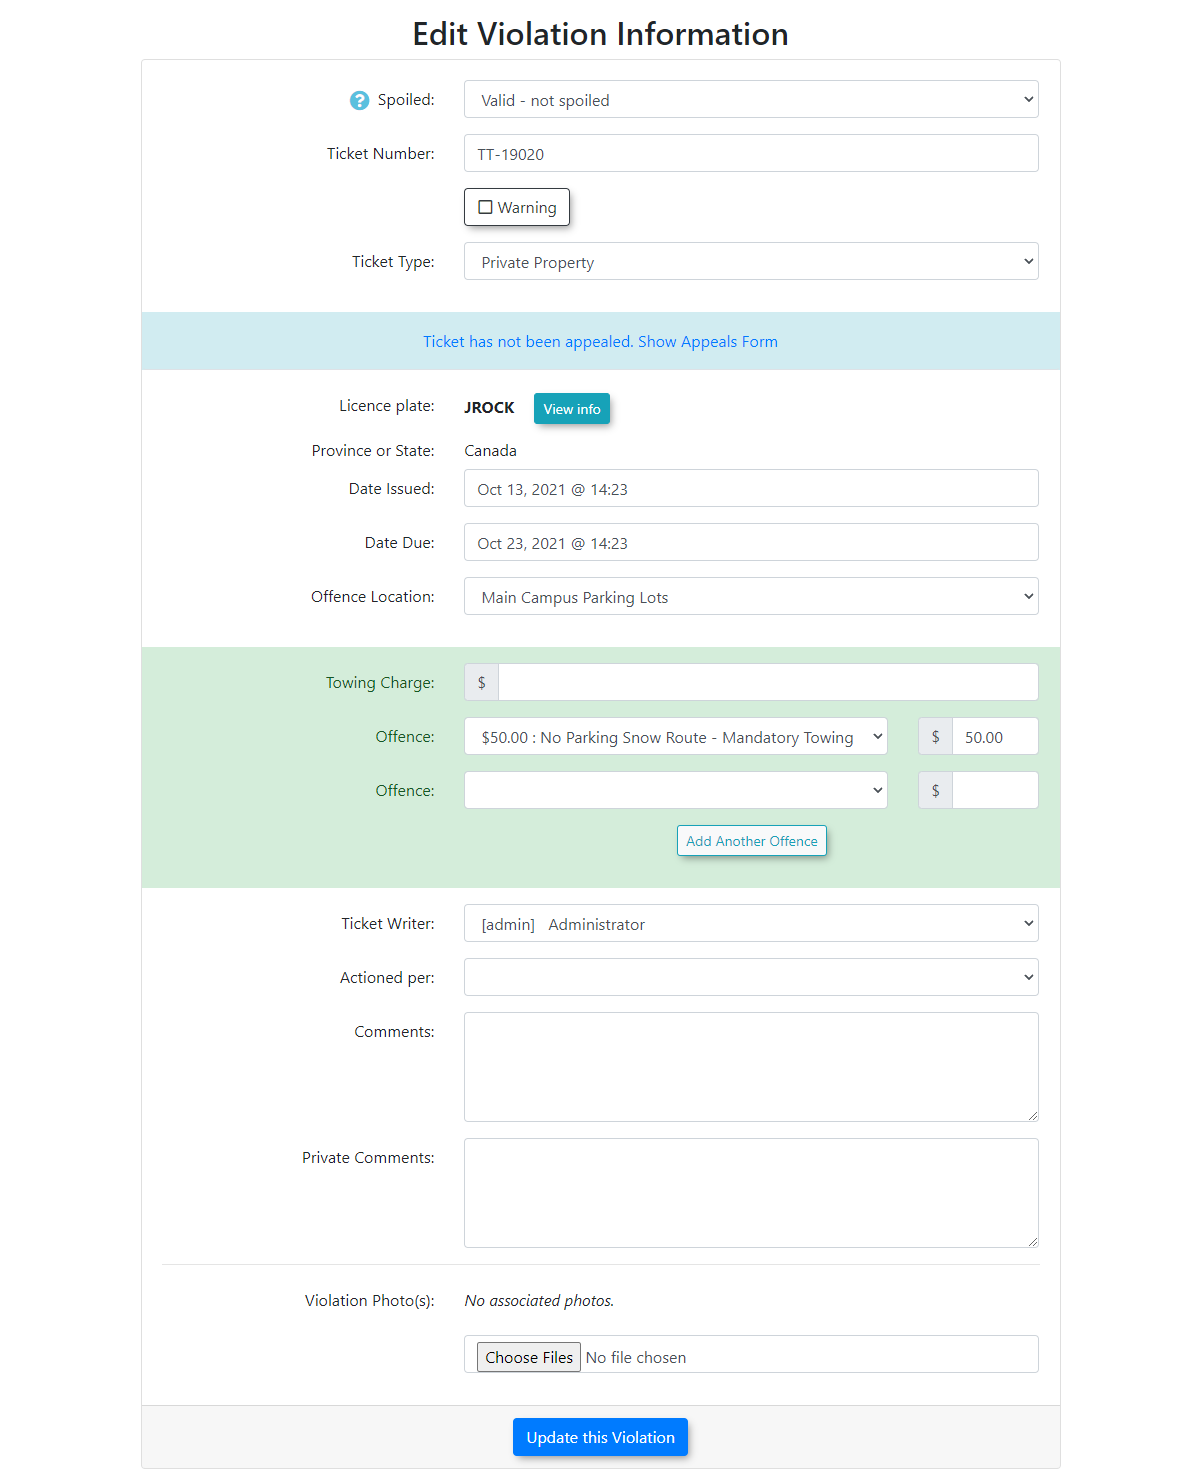
Editing the Violation and Important Information
IMPORTANT
APPEALS GRANTED, REDUCED OR CANCELLED TICKETS CANNOT BE EDITED AGAIN AND ARE NO LONGER ELIGIBLE FOR DISCOUNTS.
Violation Notes can be used for further comments. If the ticket has been appealed and the user goes to a higher power to have the ticket overturned, then you can edit the ticket and change it to a warning this will keep the information and change it to a zero value and complete the processing. This will also keep the history so that the Admin will still know that they had a ticket in the past. A comment can be added to the warning to further explain
Administrators can make changes to basic information and deal with appeals for this Violation however once a user pays for the violation the comments are locked and admins must use the Violation Notes for further comments. Simply click the Ticket has not been appealed. Show appeals form text to get the appeal information.
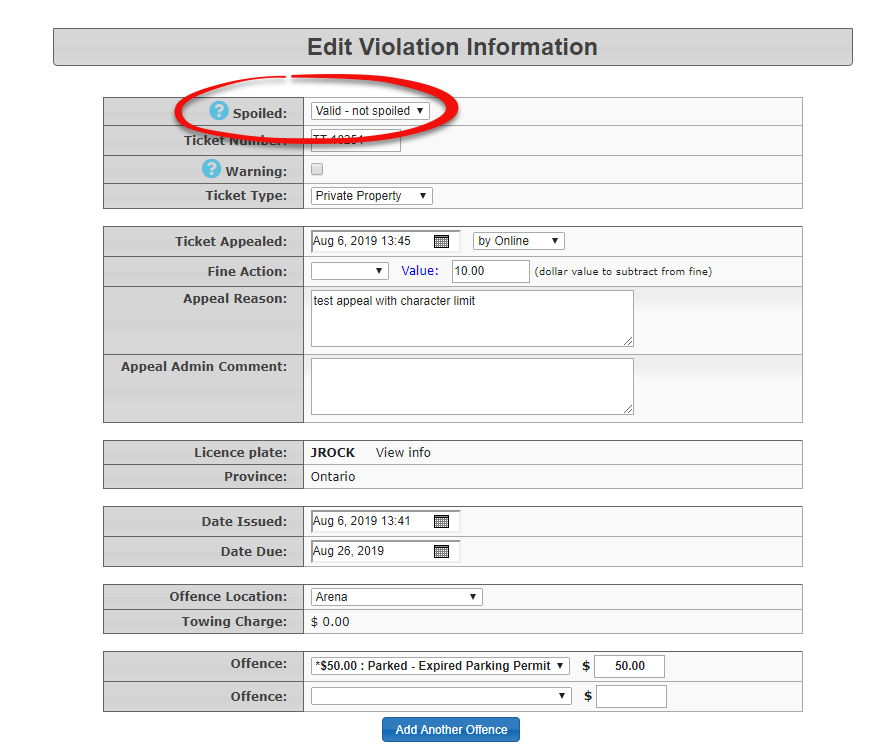
Highlighted in yellow is the Appeals section. The different fields in the 'Appeals Area' are explained below:
Ticket Appealed - This is the date in the first picker and how the appeal was filed in the second picker.
Fine Action - Choose from Upheld, Reduced or Cancelled
Offense Value - The amount can be manually edited if Reduced on appeal but will automatically be reduced to 0.00 if Cancelled. You can also edit the Offence Value directly.
Appeal Reason - The reason for launching the appeal can be recorded here. This field can be viewed by the user.
Appeal Admin Comment - This is for private appeal notes. These notes are not viewable by the user.
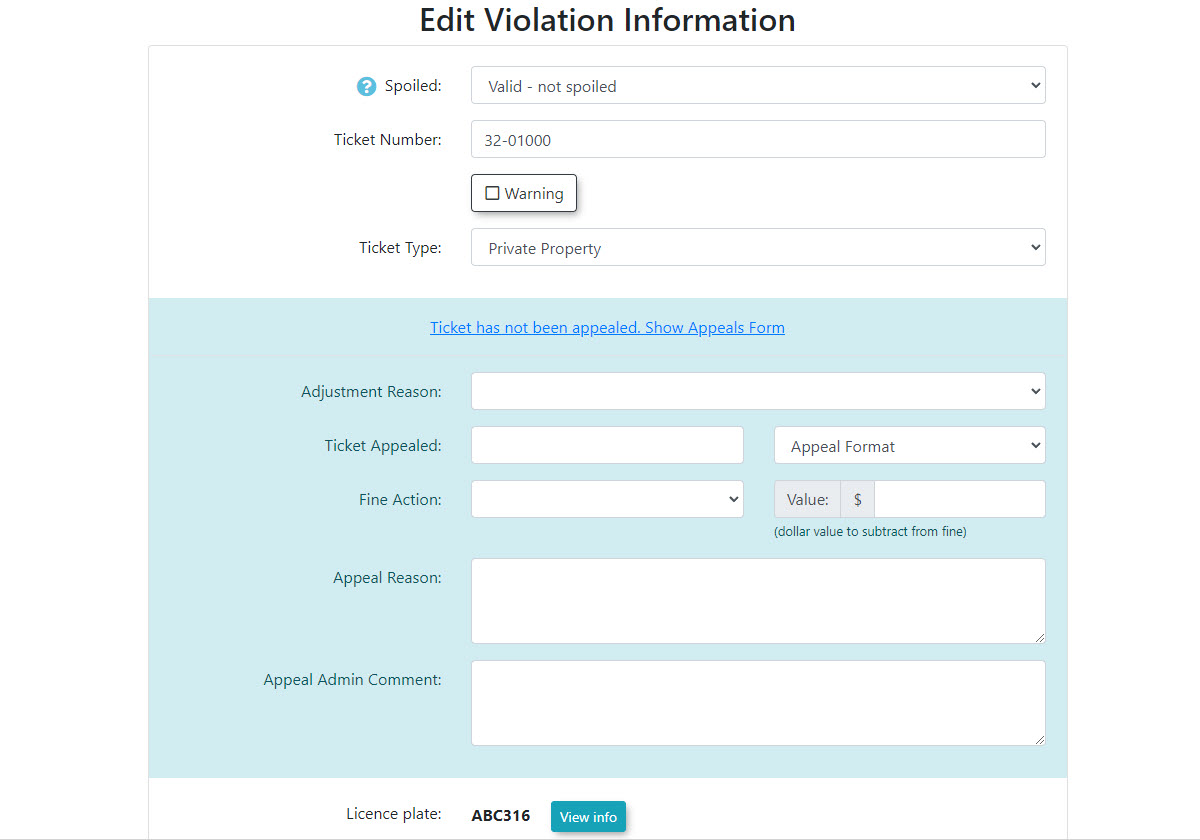
Change the Actioned per: field by selecting the Admin account making the changes from the picker.
Click Update this Violation and a message will appear letting you know that the violation has been updated.
Paying a Violation
- Click Violations then Search.
2.The Violation Search screen displays. Enter the violation number in the Search Text field.
In this case we are looking for Ticket Numeber 10-01004
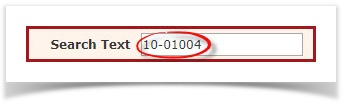
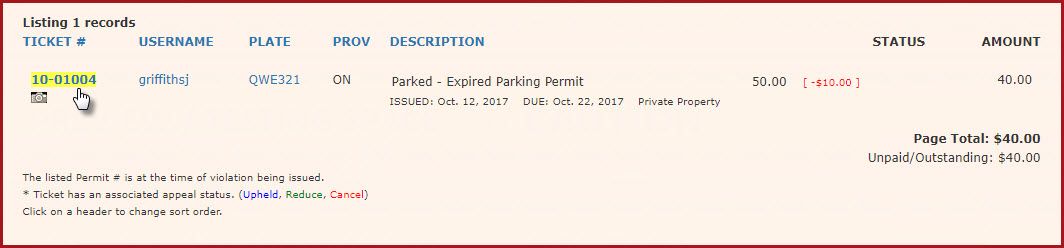
3. In the search results. click on the ticket number to see the Violation Information.
4. From the Violation information window click 'Make Payment'.
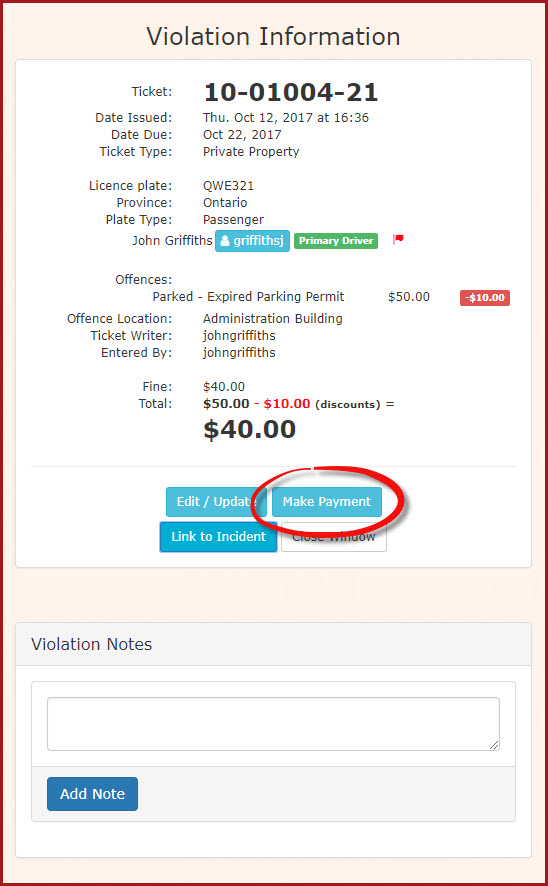
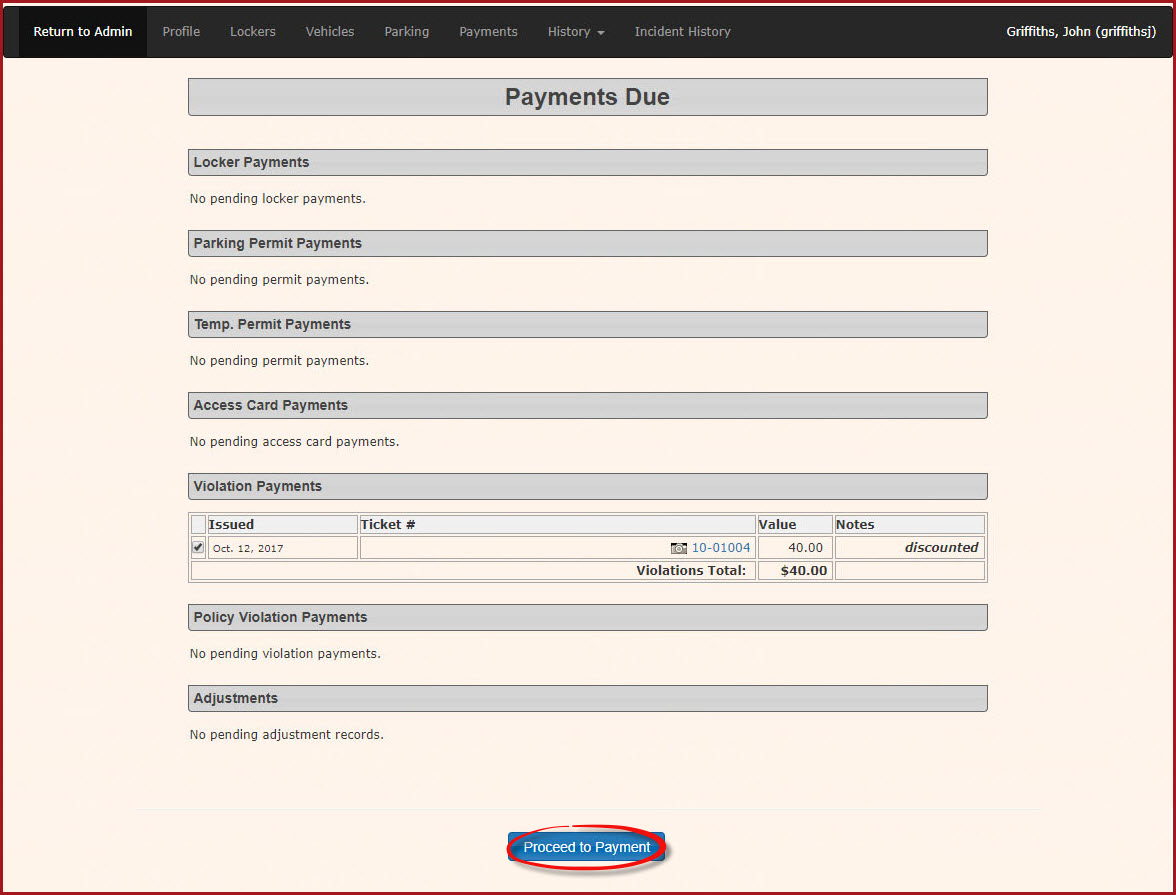
5. The Payment Due screen for the user's profile will display. Note: If there are more than one item to be paid the Admin can select by checkbox the items the user wishes to pay.
6. Click 'Proceed to Payment.'
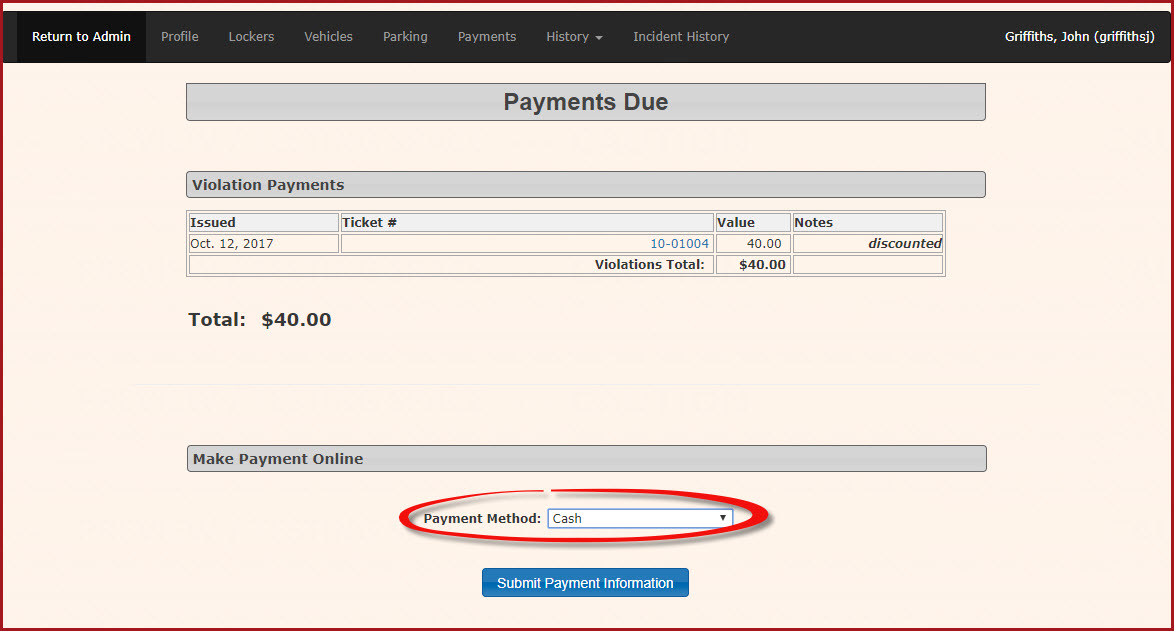
7. The screen will refresh with the specific purchase information you requested. Select the payment type you wish to process the item with. In our case we are processing a cash transaction.
8. Click Submit Payment Information.
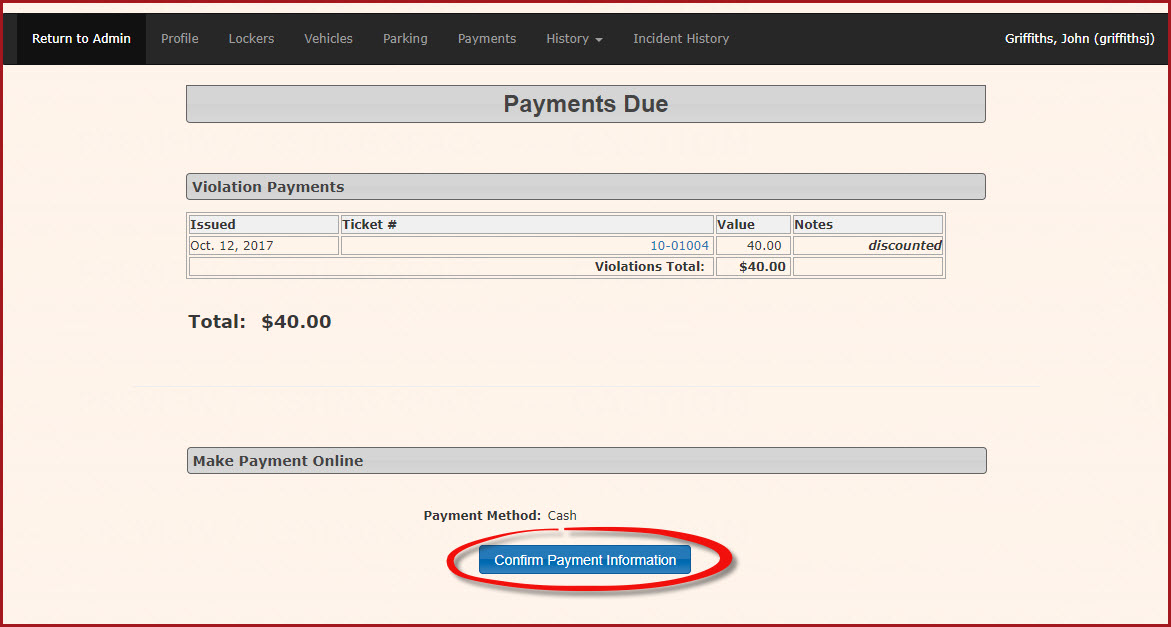
9. The screen will refresh with a confirmation screen. Click 'Confirm Payment Information' to continue.
10. The Transaction Details window opens. This will list the item/s being paid for. Click 'Process Manually' to complete the transaction. You may also choose 'Cancel Transaction' to back out of this action.
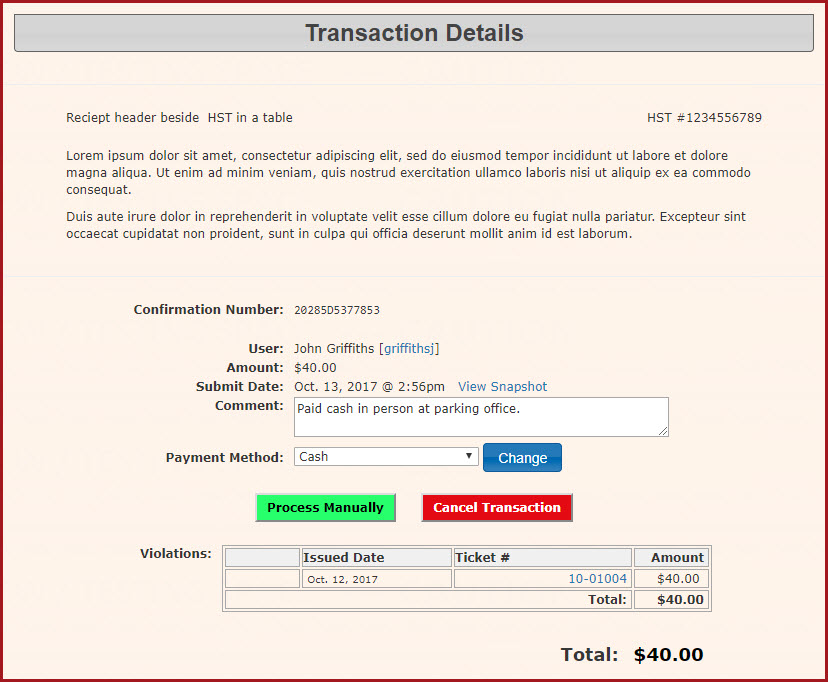
11. The system will process the payment and return to the Transaction Details page. There are several pieces of information that can be seen here.
- The confirmation number of the transaction
- The violation information (User's Name, Amount of the fine, The date Submitted, Comments and Payment Type)
- The Date Processed and the name of the Admin user who processed the payment
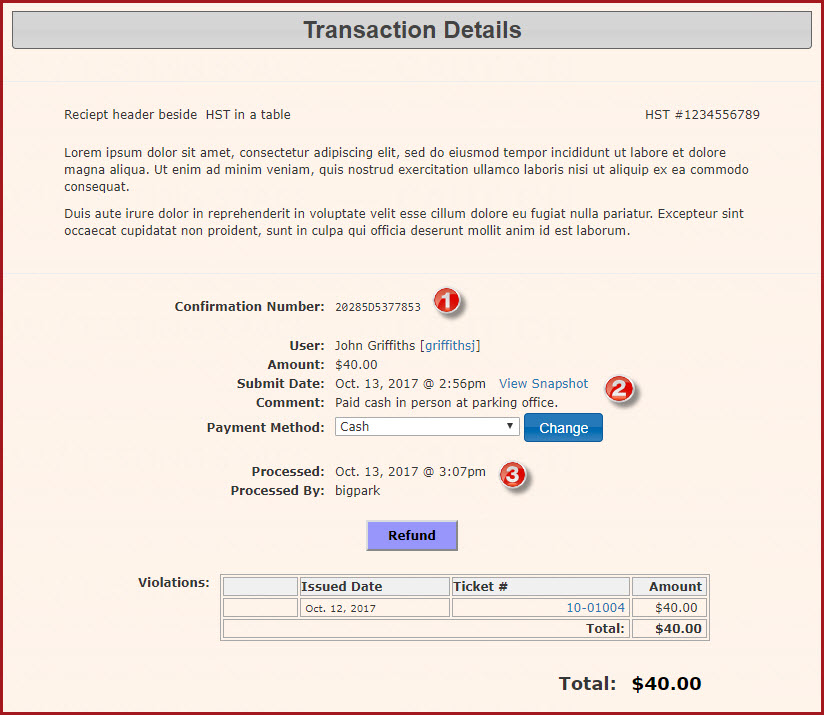
Once the payment has been made you can see in the user's history that the violation has been paid and marked processed.

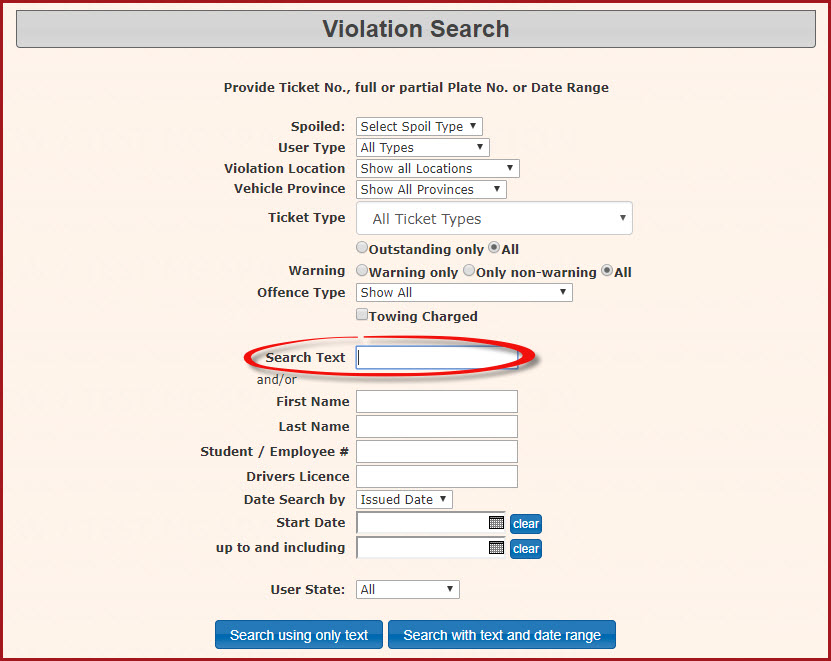
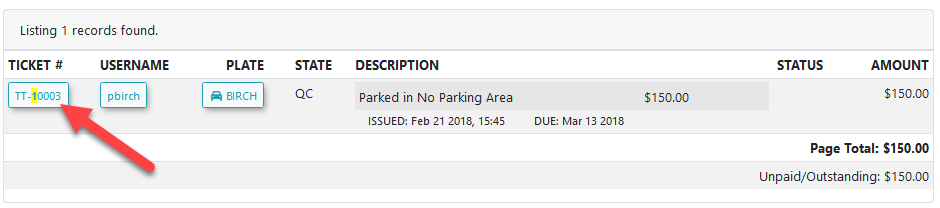
Search for a Violation
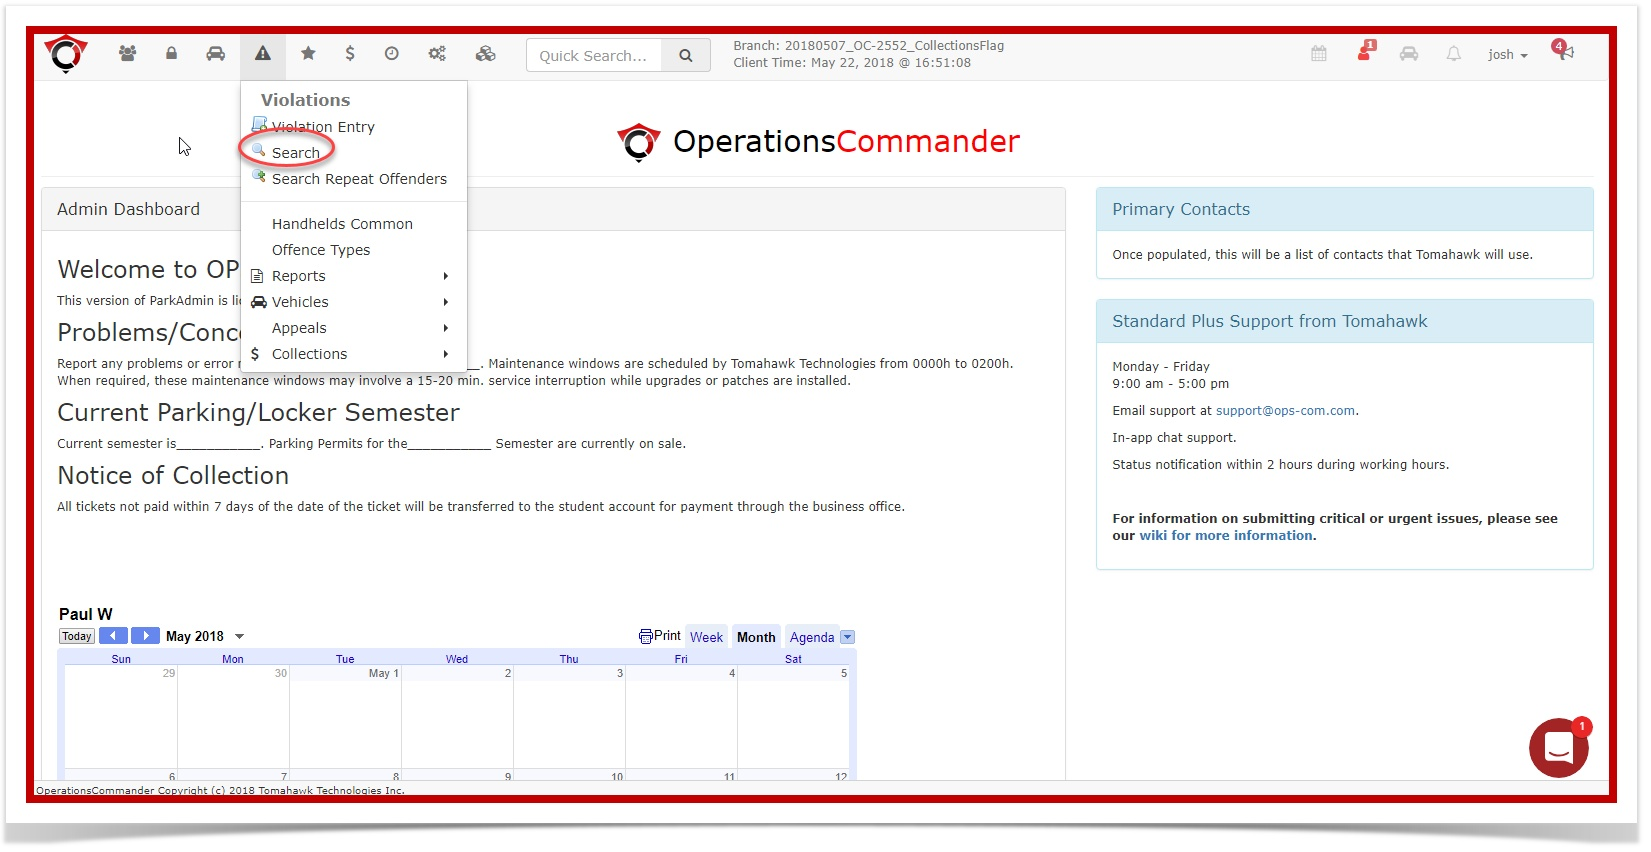
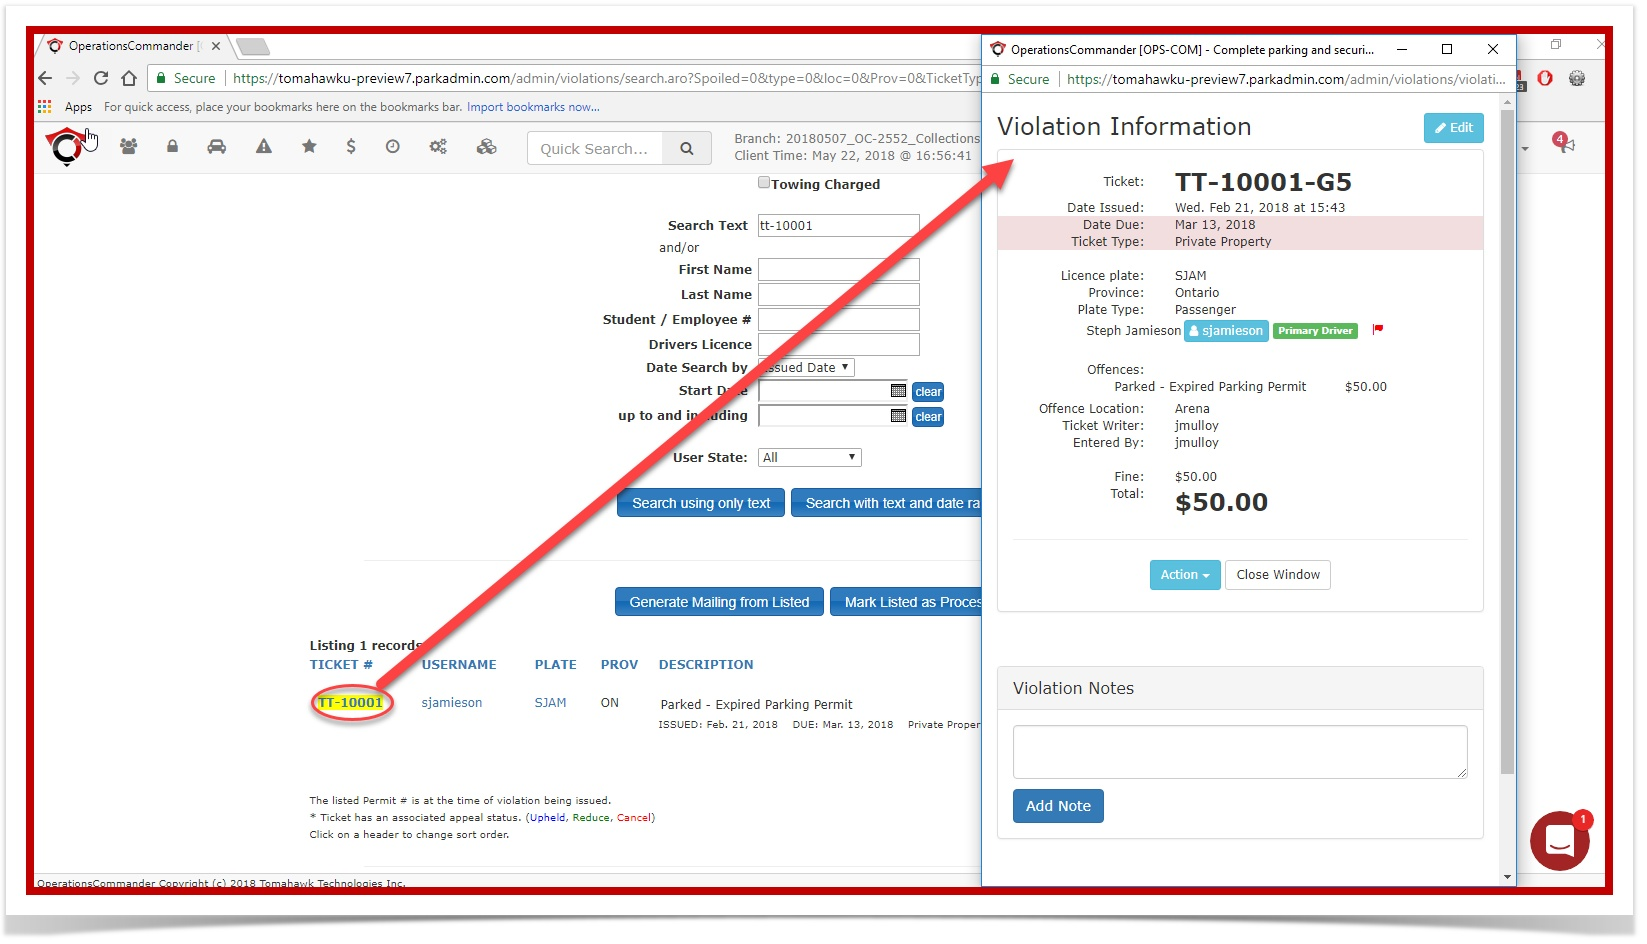
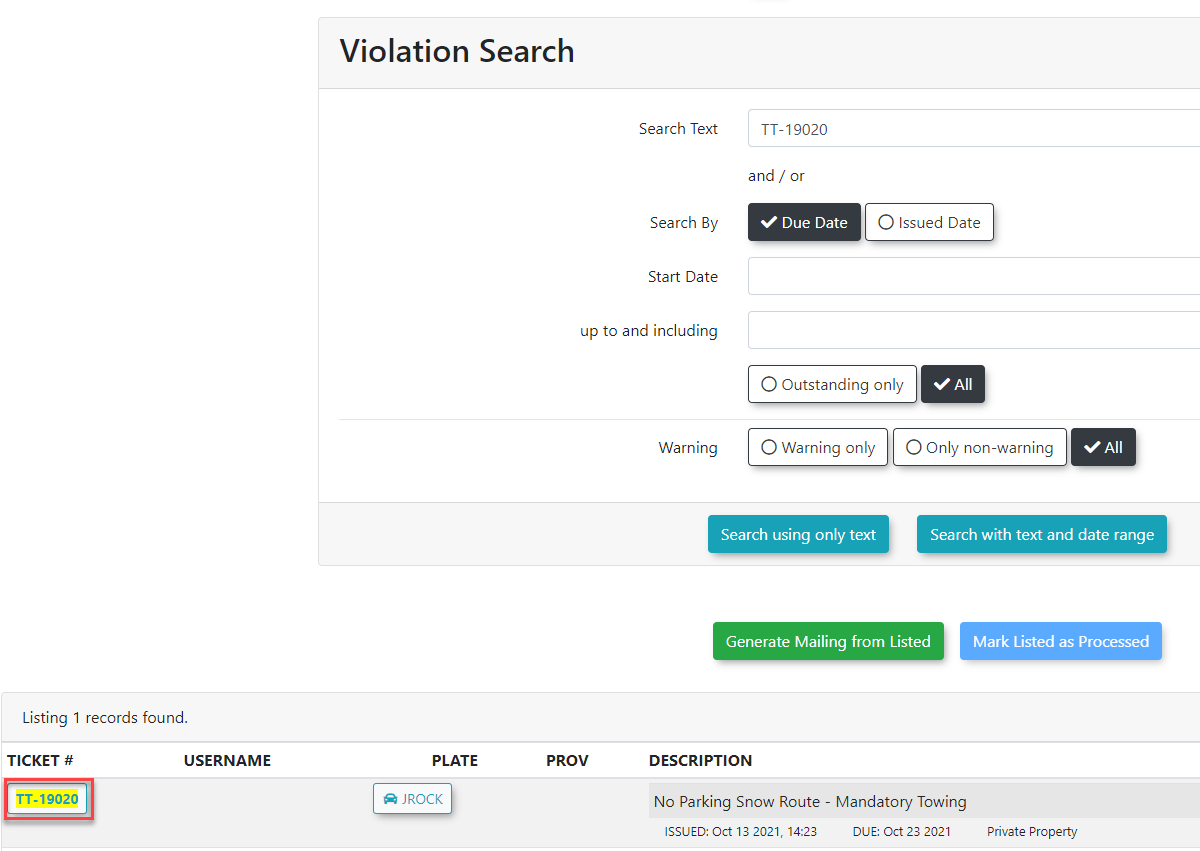
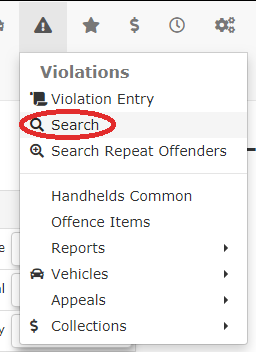
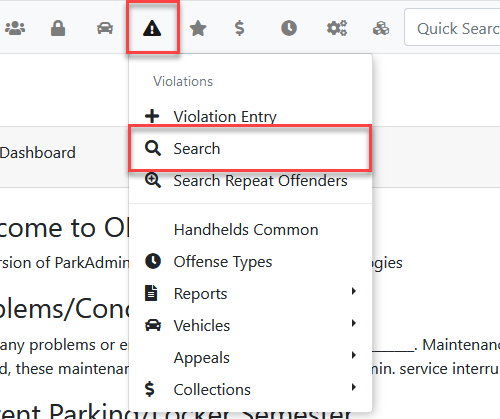
To search for violations hover over the Violations icon and click Search.
The Violation Search screen is displayed. Type the plate number or violation you want to search for and click the Search using only text button. Ticket numbers are composed of two parts, the first part (shown in black below) is the ticket number, and the second part (shown in blue) is the pin number. Admins can search using only the first part, but for security reasons, users must enter both parts of the ticket number to lookup their ticket. 3-001005-11.
You can also Search with text and date range if you want to narrow down the search parameters to a specific date range. As you can see below, there are a number of search parameters you can choose from to further enhance your search results.

At the bottom of the 'Violation Search' screen, the returned records will be displayed.
4. Click the Ticket Number to open the 'Violation Information' window. Click 'Edit/Update' to display the 'Edit Violation Information' screen to make changes if required. From this window, you can also link the Violation to an incident if you have the Incident Module available. Alternatively, you can make a payment or add Notes to the Violation.
Searching By Time Frame
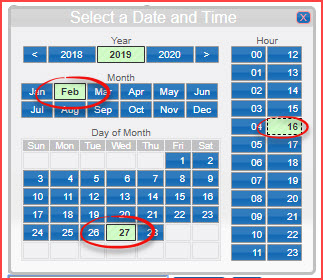
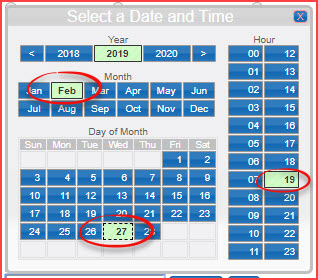
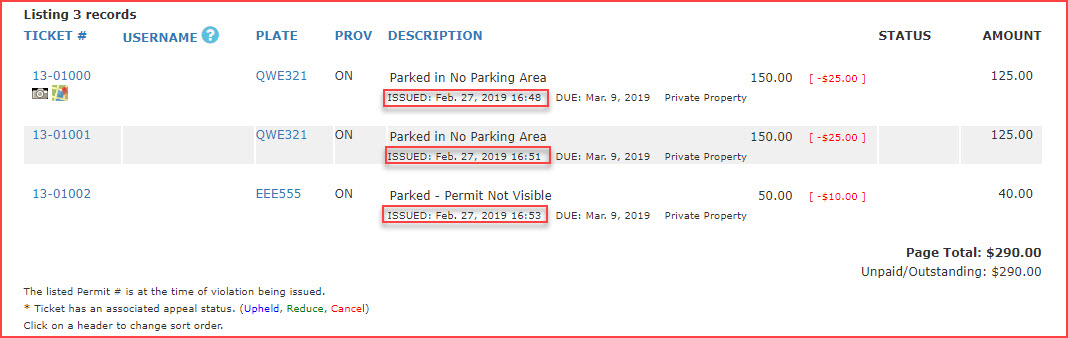
- It is also possible to search for violations using a time frame filter. In our example here we are searching for any violation written between the hours of 4:00pm and 8:00pm on February 27th.
To access the time setting click on "with time" beside the date field.

This will bring up a an interface where you can chose both date and time:
In this example for the start time we are selecting Feb. 27th at 4:00pm (1600 hours).

- Set the up to and including date and time in a similar fashion. Note that the time blocks are in one hour segments so to choose 8:00pm you would need to select hour 19 which would include 7:00 to 7:59 and appear in the date and time field as 19:59 (see above)
-
By using this filtering method the search will return only violations that were issued between 4:00PM and 7:59pm on February 27th,


Configure Violations to a Person
Setting up Violation Entries
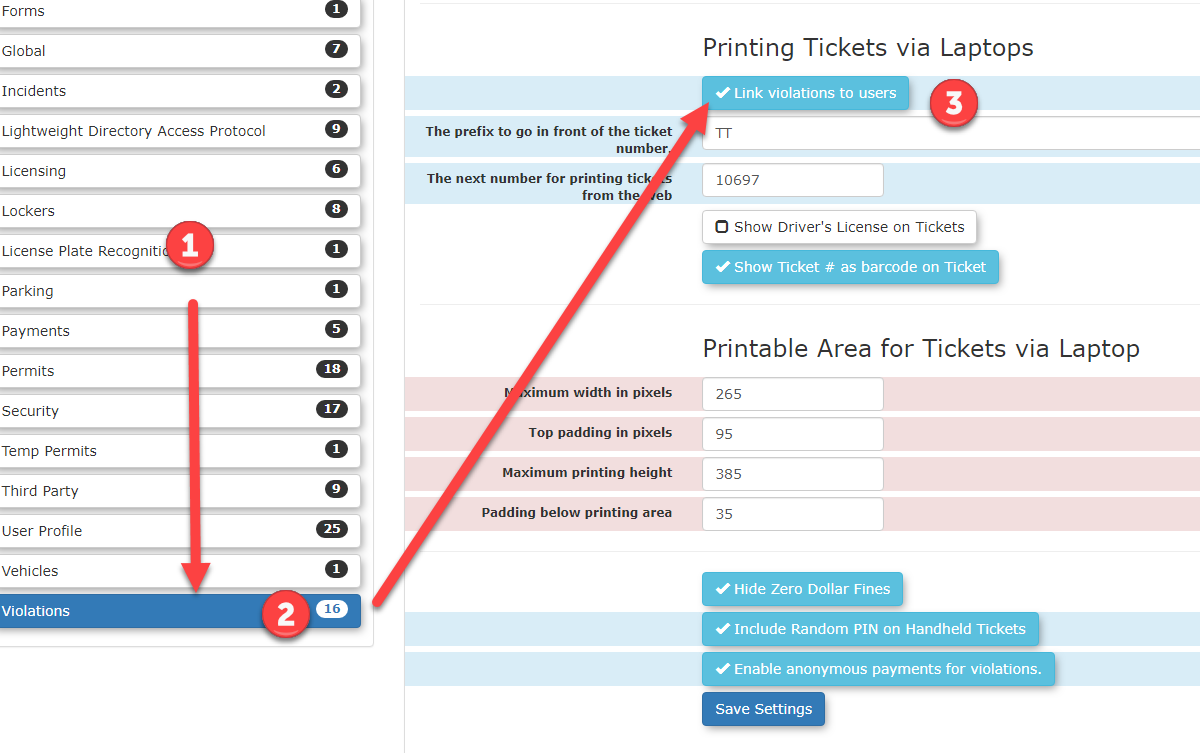
Before you can issue violations you must enable Link violations to users in System Settings, Violations before issuing violations by person or vehicle.
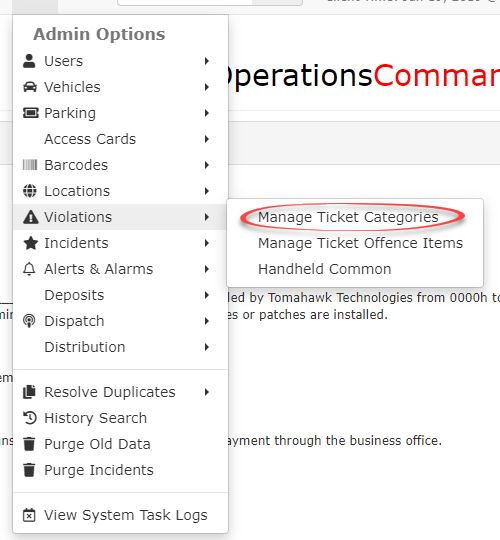
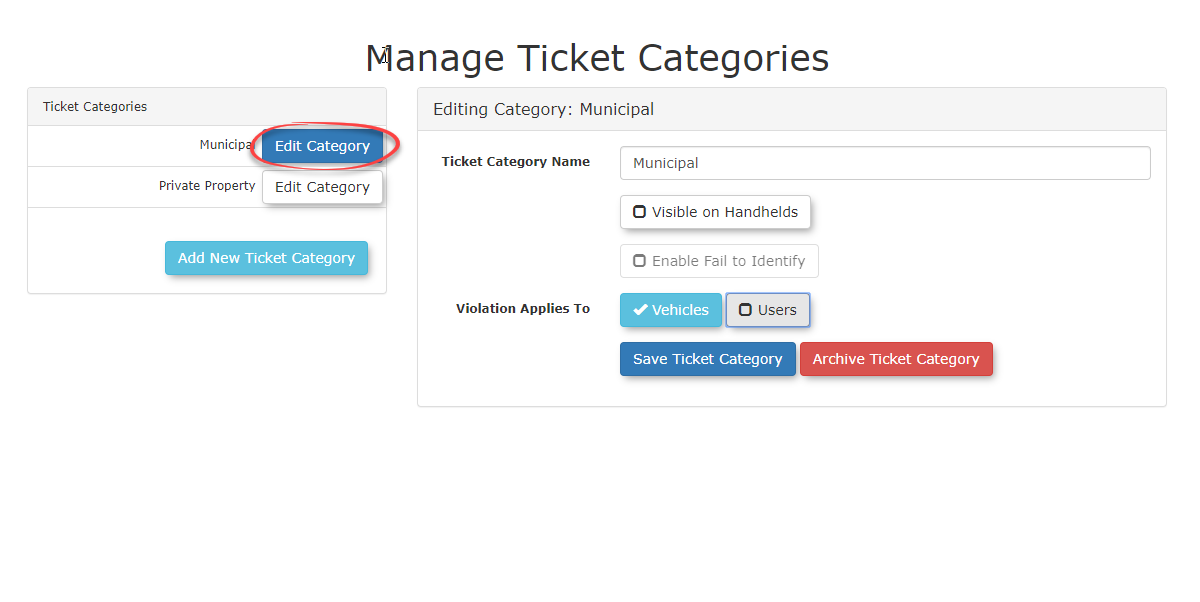
Managing Ticket Categories
Hover over Admin Options, select Violations, then Manage Ticket Categories
Select the Ticket Category that is being updated to allow users to receive violations, in this example Municipal is being selected
Select Users in the Violation Applies To section
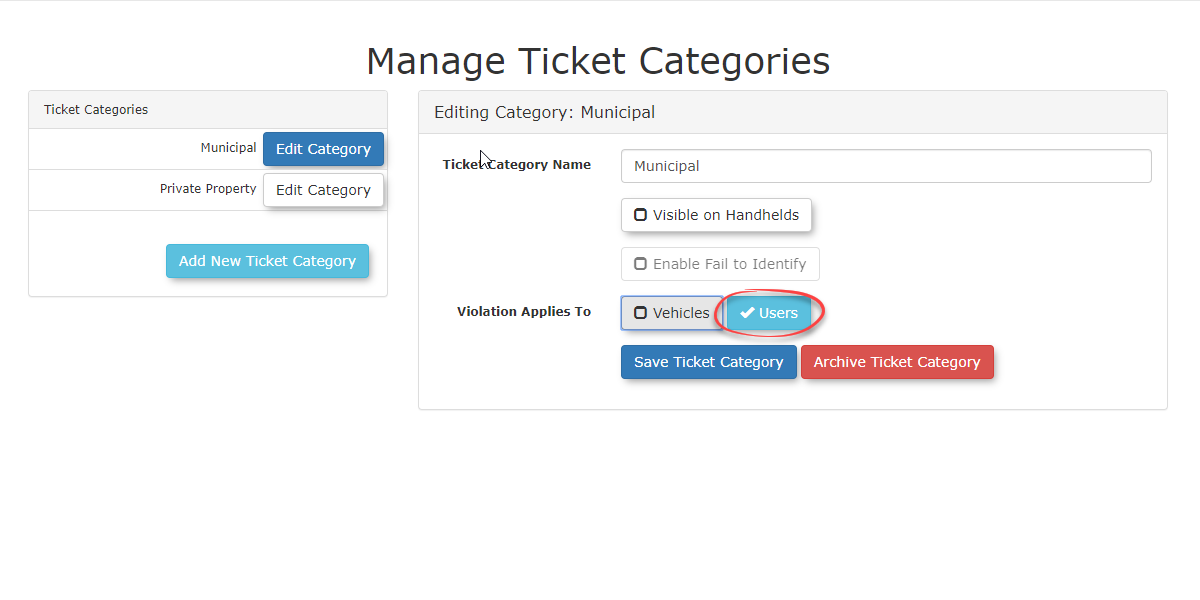
Now when entering a violation of this offence type it will be possible to apply the violation to a person.
Manual Violation Entry
Entering a Violation
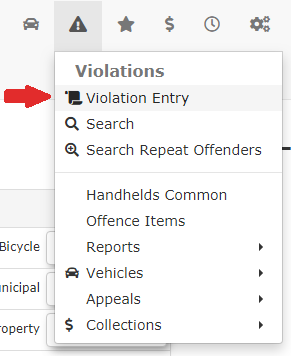
Hover over the Violations icon and click Violation Entry.
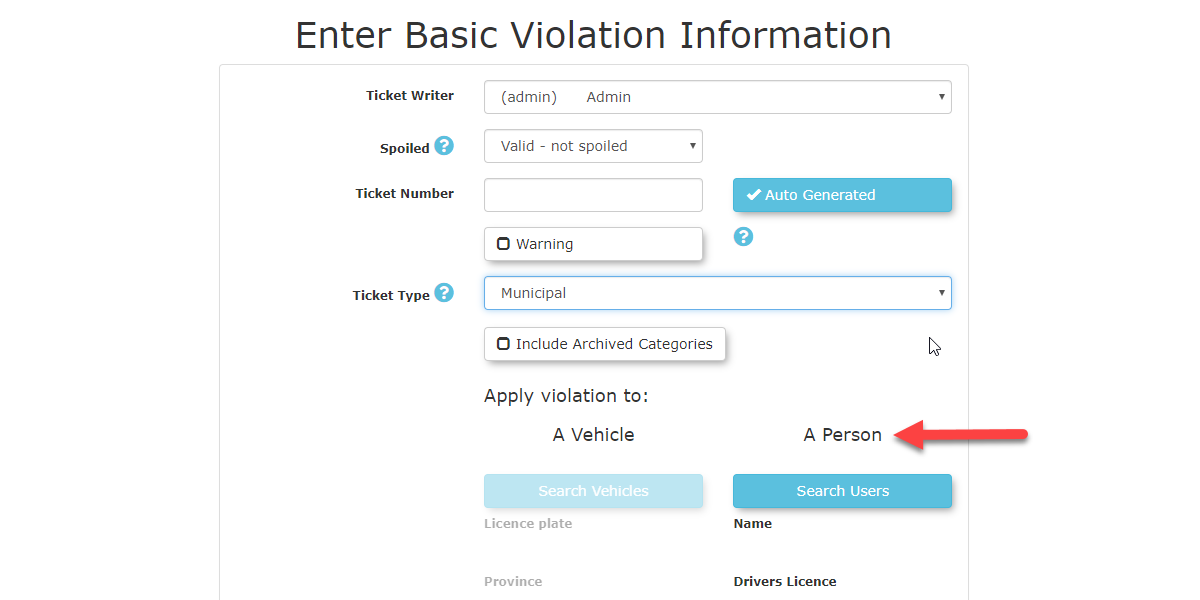
The Enter Basic Violation Information screen is displayed. The numbered fields are explained below:
#1 - Spoiled - This is used to cancel a manual ticket. This allows incrementally numbered paper violations to be accounted for.
#2 - Auto Generated - Ticket numbers can now be Auto Generated if this checkbox is enabled.
#3 - Warning - All violations can now be issued as a warning by enabling the 'Warning' checkbox. You will no longer pick 'Warning' as a Ticket Type.
#4 and #5 - Vehicle or Person - If you have the features enabled you can issue a violation to a Vehicle or a Person.
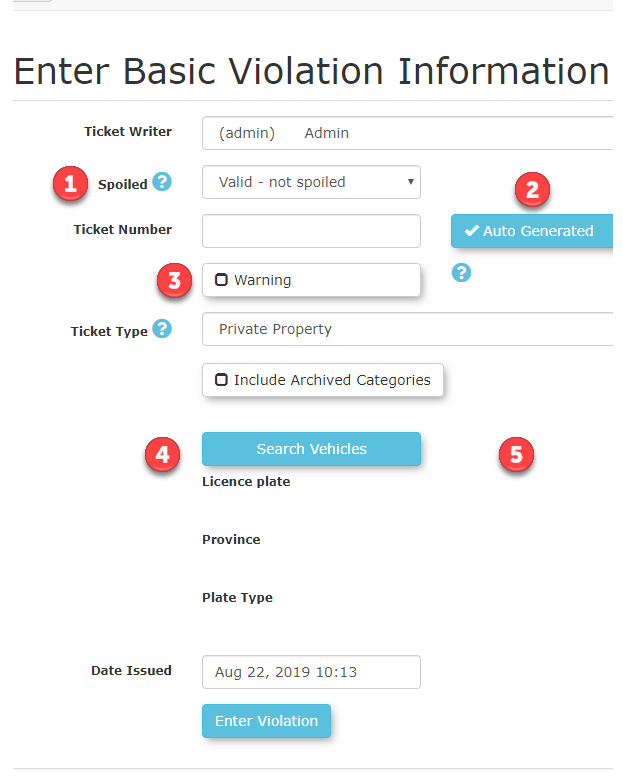
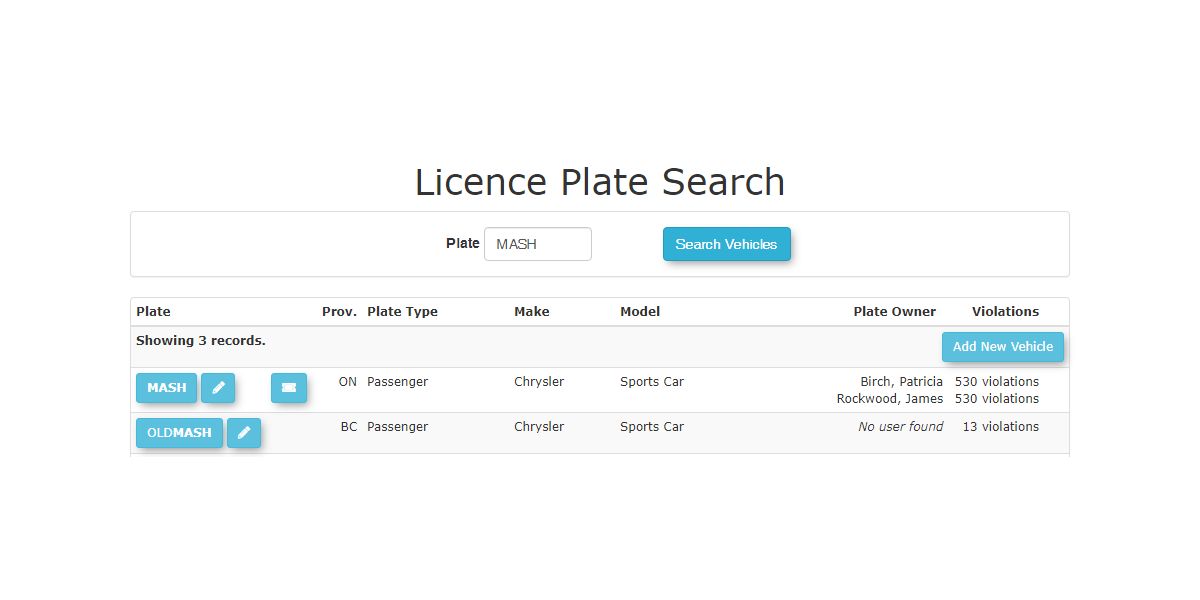
Enter all known information in the fields provided. Click the Search Vehicles button to find vehicle information by the license plate or VIN number. You can choose a vehicle or add a new one from the Search area. There are a number of actions you can take from this screen.
- If you click the Plate number, you will select the vehicle.
- If you click the Pencil
 you can edit the vehicle details
 - If you click the Permit you
 can look at the Permit details for the vehicle.
 - If you click the Red Flag, you can view Alarms related to this individual. Note, this will only be available if you have the Alarms features enabled.
- If you click the Red Alerts button, you can see the Incident Alerts associated with this individual. Note, this will only be available if you have the Incidents features turned on.
After you have selected the correct fields click the Enter Violation button to proceed.
Entering and Confirming Violation Information
The Enter Violation Information screen is displayed. Allowing the Administrator to enter more details about the Violation.
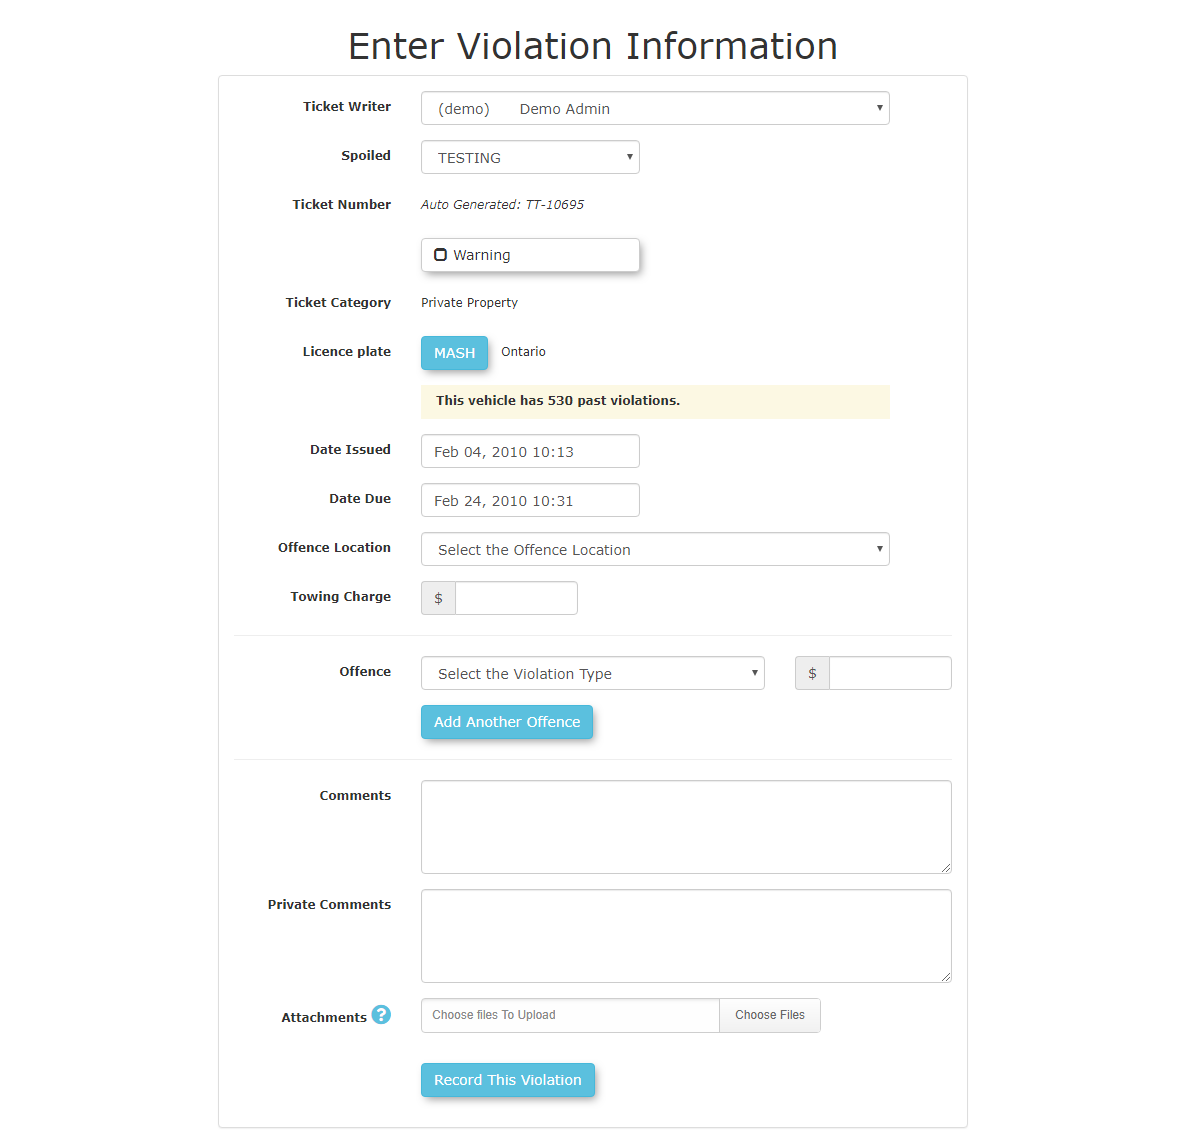
Click the Record this Violation button. The Confirm Violation Information screen is displayed. Verify the details are correct and click the Information Correct button to save the violation.

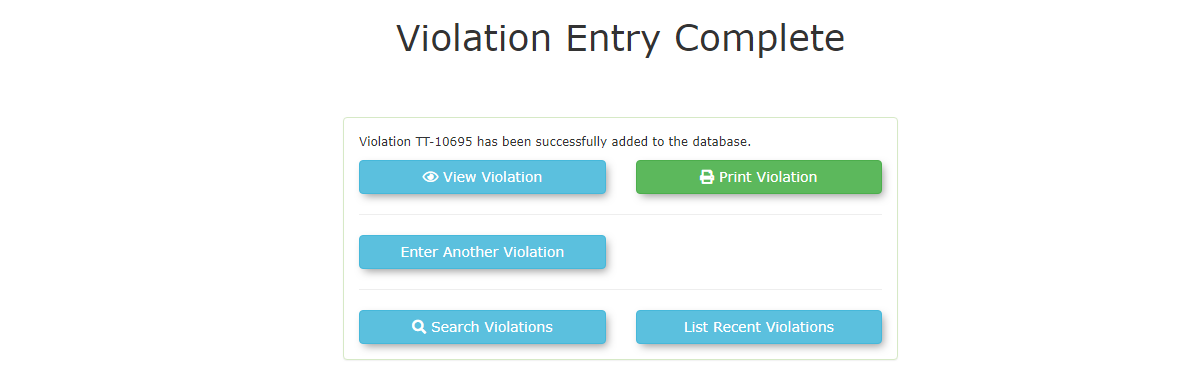
Violation Entry Completed
Once you have submitted the violation the Violation Entry Complete screen will appear where you can choose to print, view, search violations.
Manually Entering Hard Copy or Anonymous Ticket
Searching a vehicle that does not exist in the system will allow you to write an anonymous ticket to that plate or to transcribe hard copied tickets with no users. The user can then navigate to the login screen and pay for the ticket using OPS-COM Quick Pay/Guest Payments without logging in.

Security PIN on Violations - How is it used
The Ticket PIN
The additional dash and 2 digits at the end of the violations are known as a "Ticket Security PIN".
It may look like it's part of the ticket number, but it's not. It's only used as a password for the ticket when appealing it.
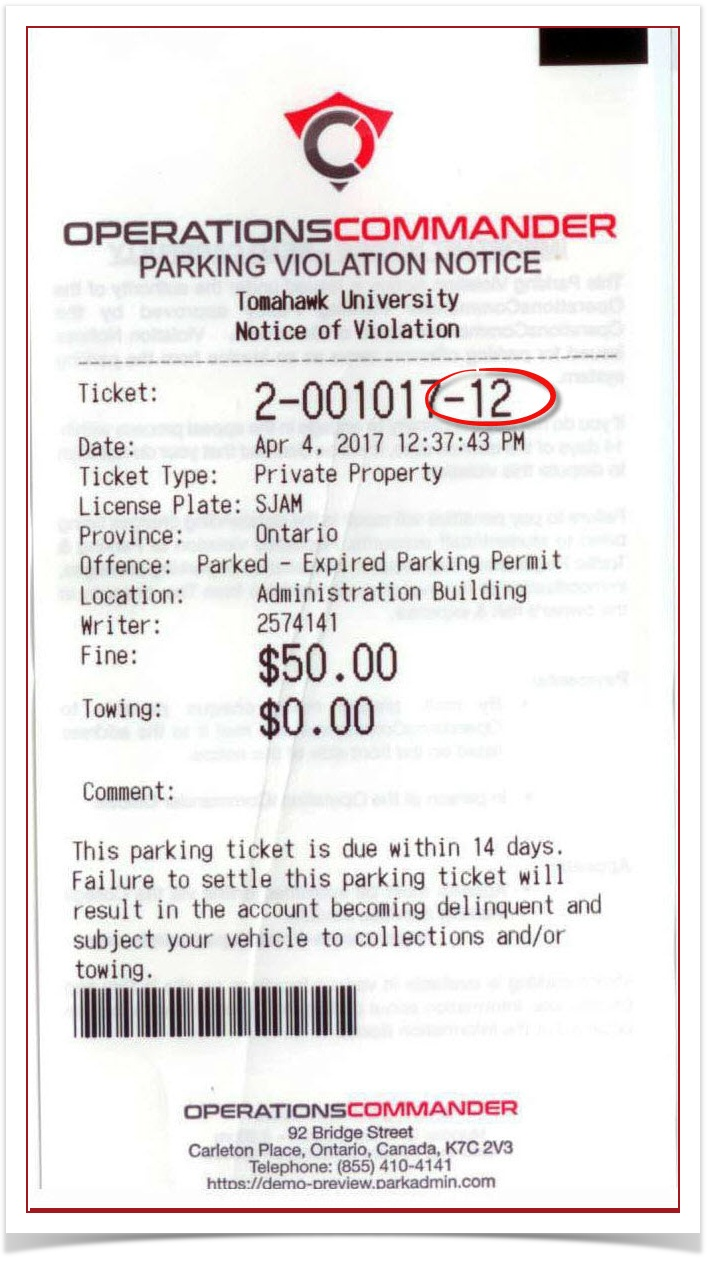
As an example when creating a violation, it appeared as TT-10016-8T The actual internal ticket number is TT-10016-8T, same format as it has always been. If you search violation TT-10016 in violation search it will appear as TT-10016.
Additionally, if someone did type in the ticket number and PIN (TT-10016-8T) it would return the same ticket.
This means the reports in the FTP file, for example, will only reference TT-10016 as the ticket number, not the additional -8T.
Additionally, the code that generates the FTP files isn't going to change/add the pin.
FTP reports will remain unchanged by the addition of the violation PIN. No PIN will be shown in the mailed out the violation.
The PIN is only used when appealing tickets if the user isn't logged in. As an example, you can see the "Lookup your Ticket" box on the login screen here.
The PIN is used in that box to give some protection from public users just looking up sequential ticket numbers.
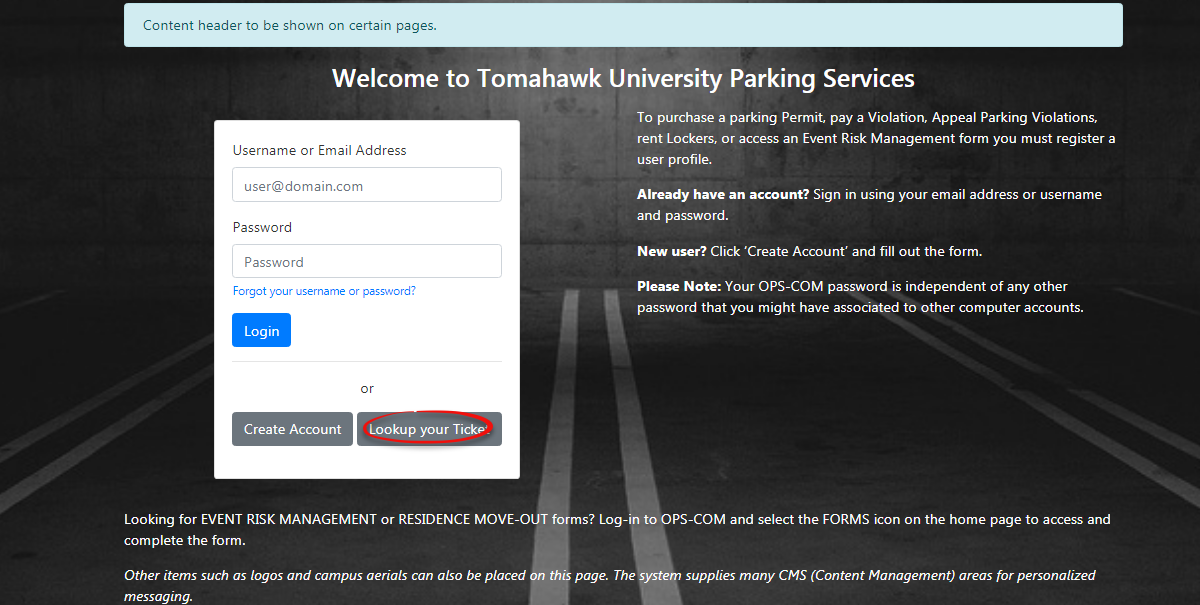
Click on the box that says "Lookup your Ticket". You should now see the following screen. Enter in the ticket number and PIN.
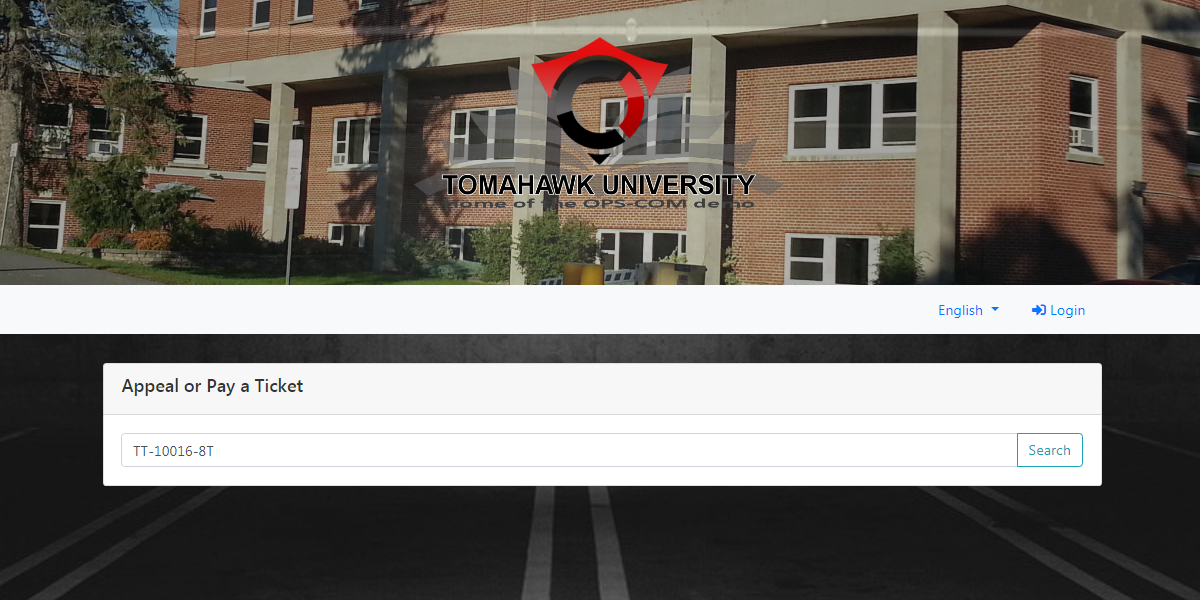
Once you click check you will be presented with a screen that allows you to appeal or pay the ticket.
Notice when the record of the ticket is found it does not include the PIN.

Removing the Pin
- If you wish to remove the PIN from the printed ticket, this can be done from the System Settings located under the System Config tab.

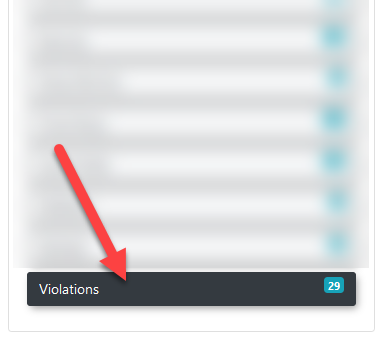
- Look for Violations in the list of components on the left:

- Click on Violations to view and edit the settings. By default the setting for including a random PIN number to the ticket number when printed is enabled.
To remove the PIN, ensure that the Include Random PIN on Handheld Tickets box is toggled off.

Ticket Warnings Explained
Below is, a sample of a warning ticket, a sample of an actual violation ticket and a sample of the back of a ticket/warning provided by the OPS-COM software.
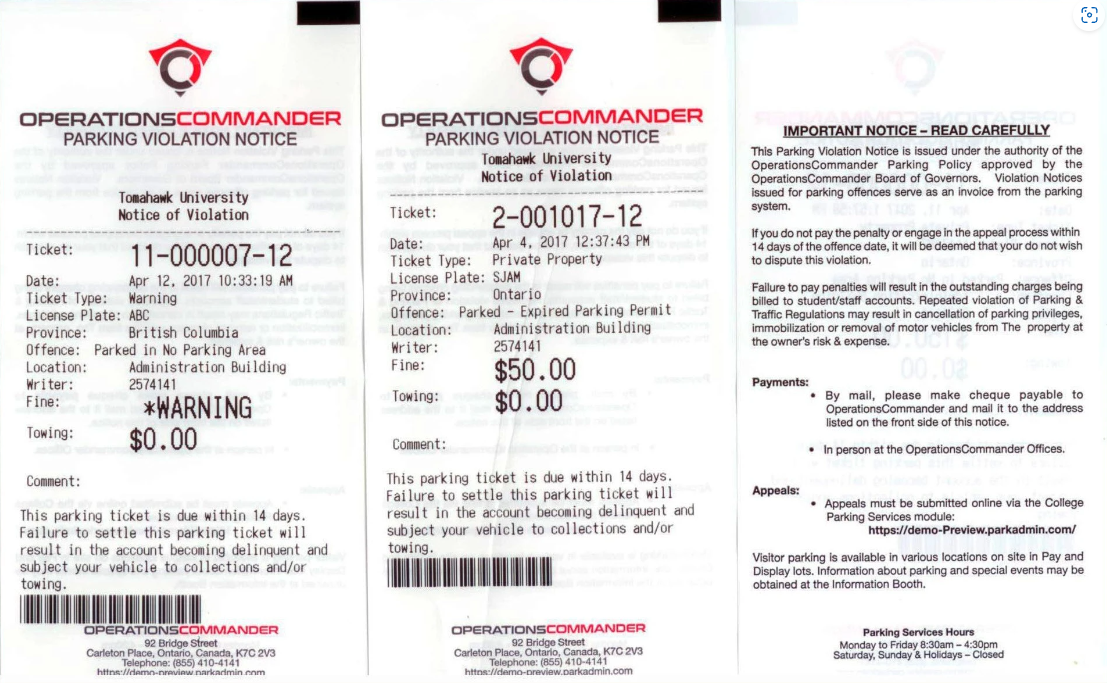
Explanation of the Front of the Ticket/Warning
Ticket Number - This is a system assigned number that identifies each individual violation/warning.
Date - This is the date that the violation/warning was issued on.
Ticket Type - This identifies the type of violation that occurred (broad range category).
License Plate - This is the license plate number for the vehicle that incurred the violation.
Province - This is the province that the license plate is issued in.
Offense Type - This identifies the specific violation that occurred.
Location - This identifies the location where the violation occurred.
Writer - This is a system assigned number that identifies the enforcement officer that issued the violation. Each enforcement officer has their own unique number and can be verified by administrators. The writer is identified by a unique identifier to provide security to the enforcement officer. If you require more information about the ticket writer you can search the violation on the admin side and get an actual name for the person who wrote the ticket.
Fine - This is the amount owed for the particular violation. Note, on the warning ticket the amount is followed by "*Warning". This indicates that the amount on the ticket is not owing, but this is the amount that would be due if a ticket for the same violation was issued.
Towing - This is the amount due if the vehicle that incurred the violation had to be towed.
Comments - This section includes any additional notes that the enforcement officer wants to include.
Explanation of the Back of the Ticket/Warning
The back of the ticket provides details about the organization that issued the ticket and the policies and procedures regarding the ticket. The back clearly identifies how the violator can pay or appeal the ticket with a section for the violator to identify themselves and sign off on the ticket. The back also identifies where to find additional information on the organization and the office hours.
Warnings and Spoiled Tickets
Warning is a warning that the user has broken the rules. The warning is tracked as a zero dollar violation that is processed immediately upon syncing to the server. The idea here is that a user will still get a ticket, but won't have to pay for it. A slap on the wrist as they say..
Spoiled refers to the old concept of spoiling a ticket. Back in the day (of paper!) a patrol might be writing up a ticket and the user shows up and moves their car. The ticket is then said to be spoiled, or another example might be a patrol entering the wrong plate/vehicle details. This is also a void type ticket and in this case like it never happened.
Notice Letter Templates
Introduction
This page allows the admin to manage, create, and edit the content and appearance for notice letters used within the system.
Notice letters, also known as a Notice of Impending Conviction (NIC) letter, are part of the MTO process, and are sent out to let a user know of an impending conviction for any outstanding violations on their account, to be collected through the Ontario court system.
Templates
The appearance and layout of notice letters is setup within the notice letter templates page.
The templates page for notice letters can be found under the system configuration menu, within the content & designs submenu.
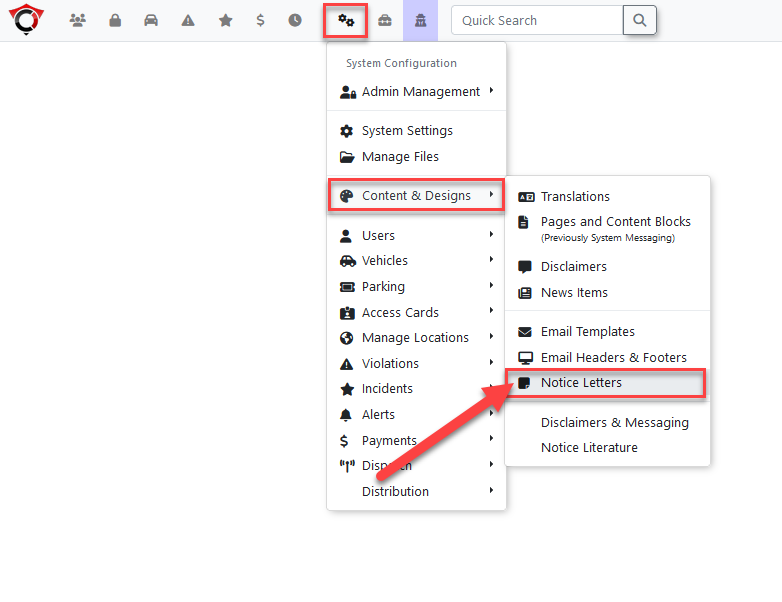
On the templates page, an overview of all notice letter content within the system is shown. Different content and templates must be created for each language that is installed on the site.
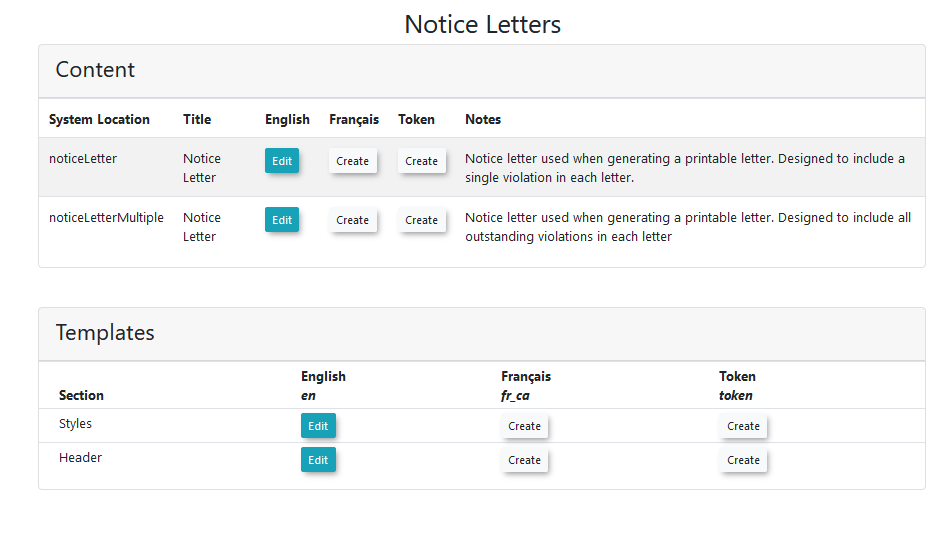
The notice letter templates page consists of two sections:
Content
noticeLetter - the template used when printing a notice letter containing a single violation.
-
noticeLetterMultiple - the template used when printing a notice letter that contains multiple violations.
Templates
styles - element styling to be applied to the notice letters. This is done using Cascading Style Sheets (CSS), a type of coding used to affect how parts of the notice letter looks, such as assigning a specific colour and size to a paragraph of text.
-
Header - the content that appears in the header of the notice letter.
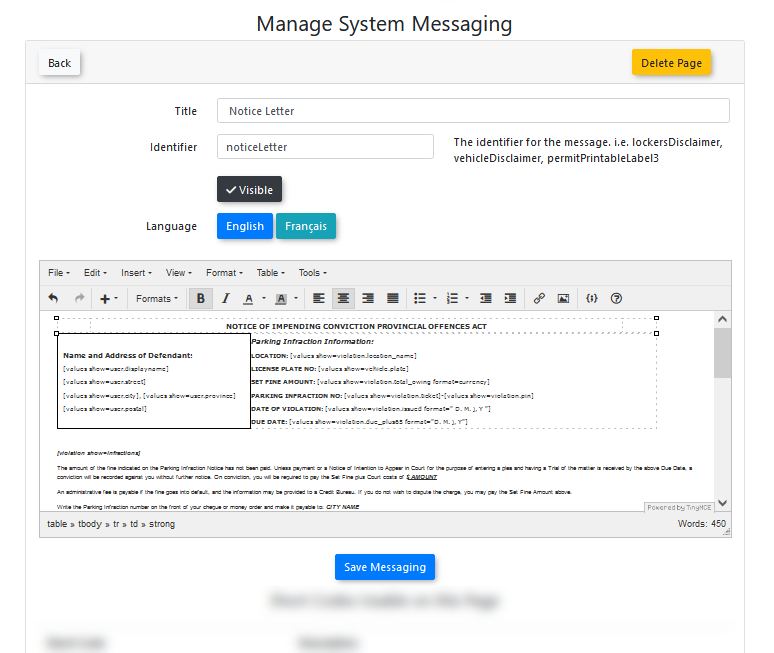
Content Editor
This page is where the content of the notice letters can be edited.
The content section is a type of WYSIWYG (What You See Is What You Get) editor.
When editing the notice letter content, some basic knowledge of HTML (Hyper Text Markup Language) is beneficial.
The WYSIWYG (What You See Is What You Get) editor isn't meant for templates, and when editing directly through the interface, problems can occur where the final printed page doesn’t lineup with the template correctly.
Minor changes can be made with the editor, but it is recommended for most changes to be made through editing the HTML directly.
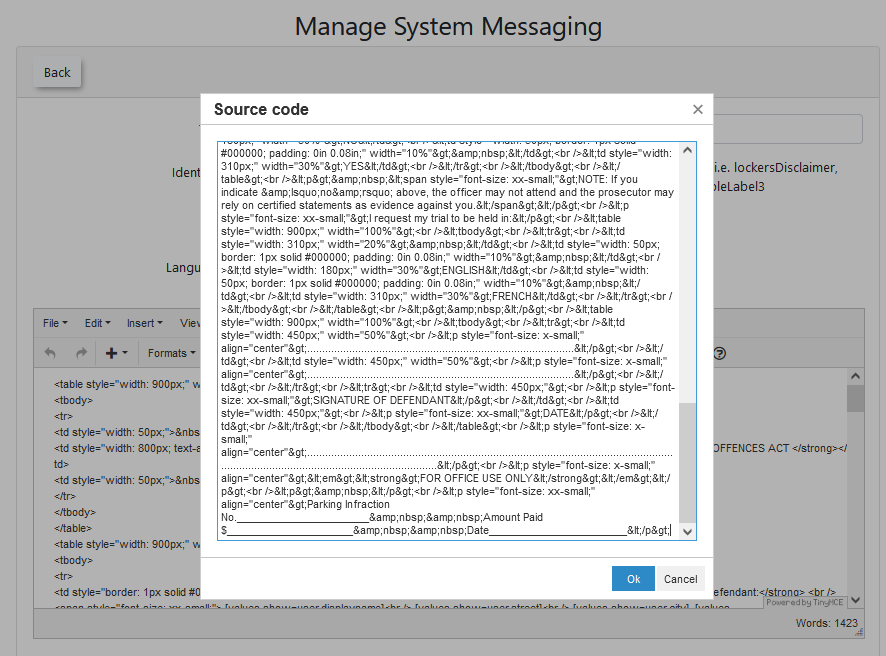
You can edit the HTML in the editor by selecting Tools → Source Code.
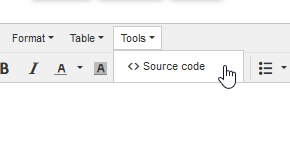
Alternatively, the layout of the template can be designed in an external HTML editor, and the source code copy and pasted into the HTML source code box.
Short Codes
Notice Letters use a functionality called short codes, which are pieces of text used as placeholders for user information when setting up a template.
When a notice letter is generated, the short code will be automatically replaced with the relevant user information in the print out.
Short codes usable on each type of notice letter template are listed at the bottom of the edit content page, below the content box.
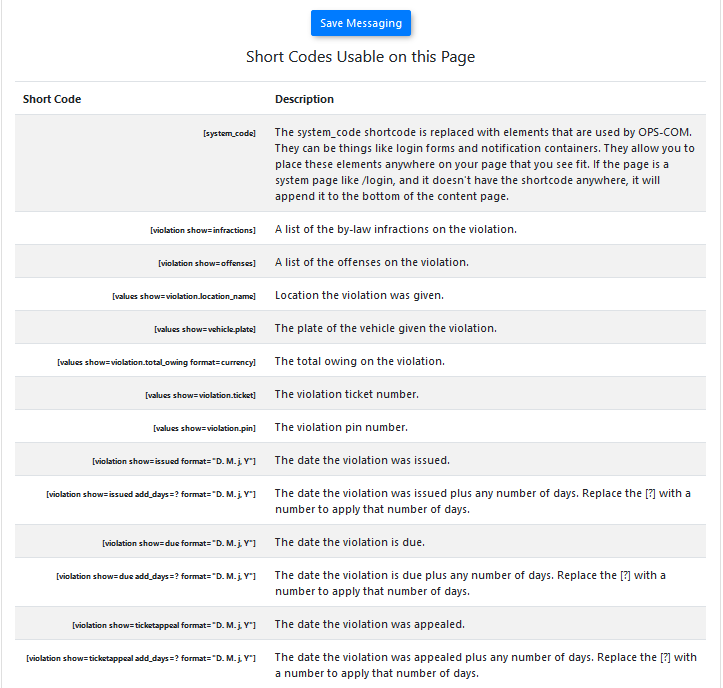
A short code placed in the template will automatically be replaced with the details of the user when the notice letter is being generated.
For example, if the following short code was placed within the body of the notice letter template:
-
Vehicle: [values show=vehicle.plate]
It would be automatically replaced with the vehicle plate when the notice letter is generated, resulting in something like:
-
Vehicle: ABC123
Using Short Codes
A short code can be inserted into the content by copy and pasting the short code from the list into the content where the information is wanted to be output in the final notice letter printout.
A short code can be copied to the clipboard by using these steps:
-
Highlight the short code within the list
-
Right click the highlighted text
-
Click copy
-
The short code will now be contained within the clipboard
The short code can then be pasted into the content using these steps:
-
Left click in the desired area within the content where the information is wanted to appear
-
Press the Ctrl and V buttons on the keyboard at the same time
-
The short code will now be pasted to the location selected within the content
Using right click will open a content-specific menu within the content menu, and so can’t be used to paste into the window.
Notice Letter Report
Introduction
The letter report page shows a list of users within the system who are eligible to be sent a notice letter, also known as a Notice of Impending Conviction (NIC) letter.
Notice letters are part of the MTO process, and are sent out to let a user know of an impending conviction for any outstanding violations on their account, to be collected through the Ontario court system.
Notice letters printed from this page are intended to be printed and physically sent to the user who incurred the violation.
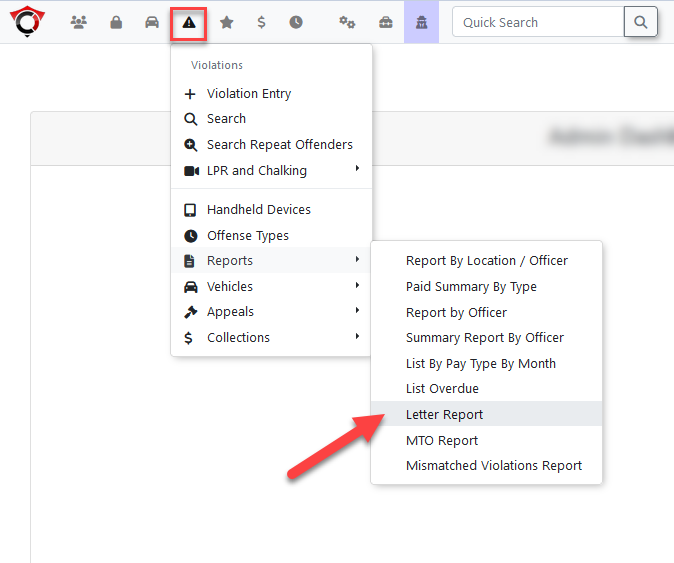
Page Location
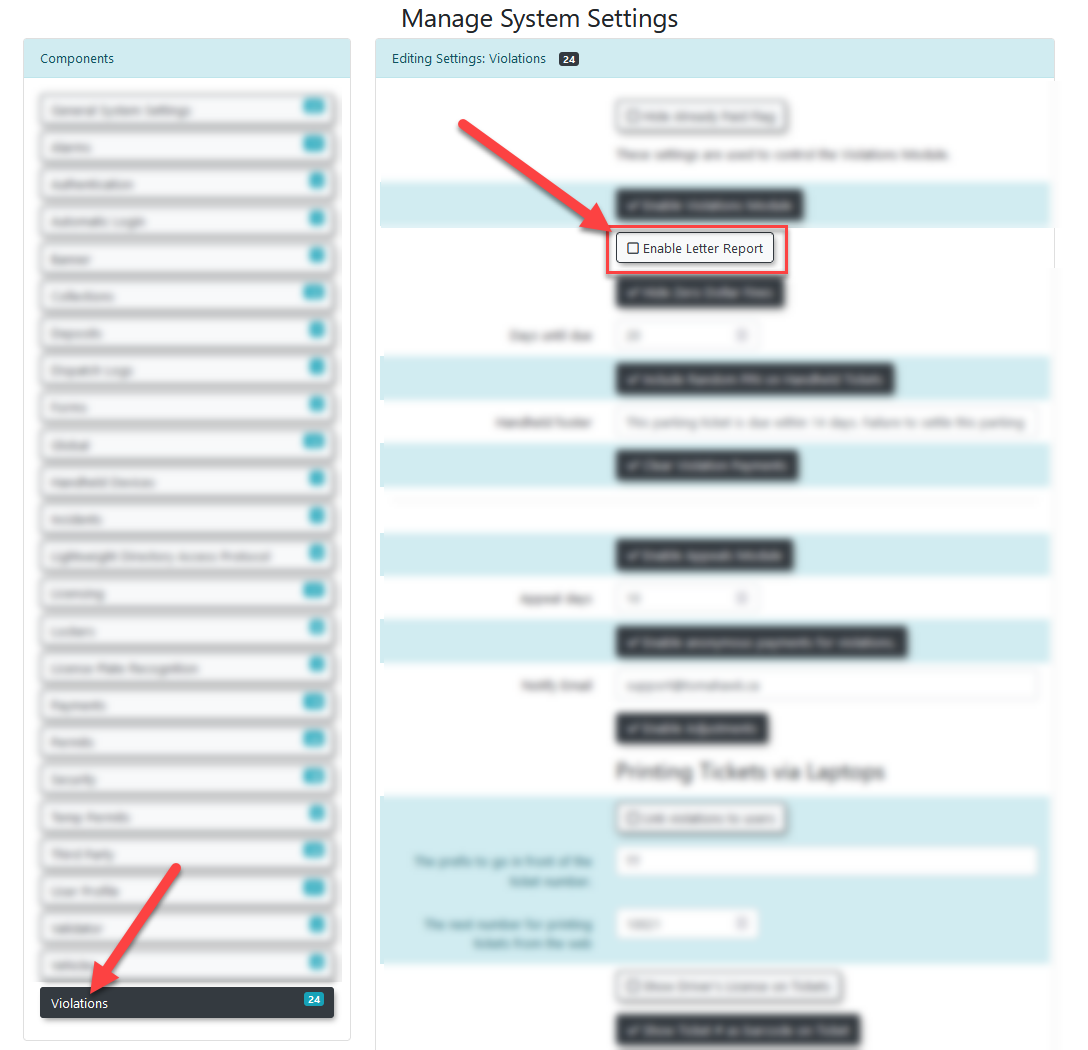
The letter report page can be found under the violations menu, within the reports sub menu.
If the letter report tab is not present in the menu, it will need to be enabled within the system settings. The enable letter report option is located under the violations tab.
Letter Reports Page
The letter report page consists of two sections, listing the notice reports that can be printed, and those that cannot be printed.
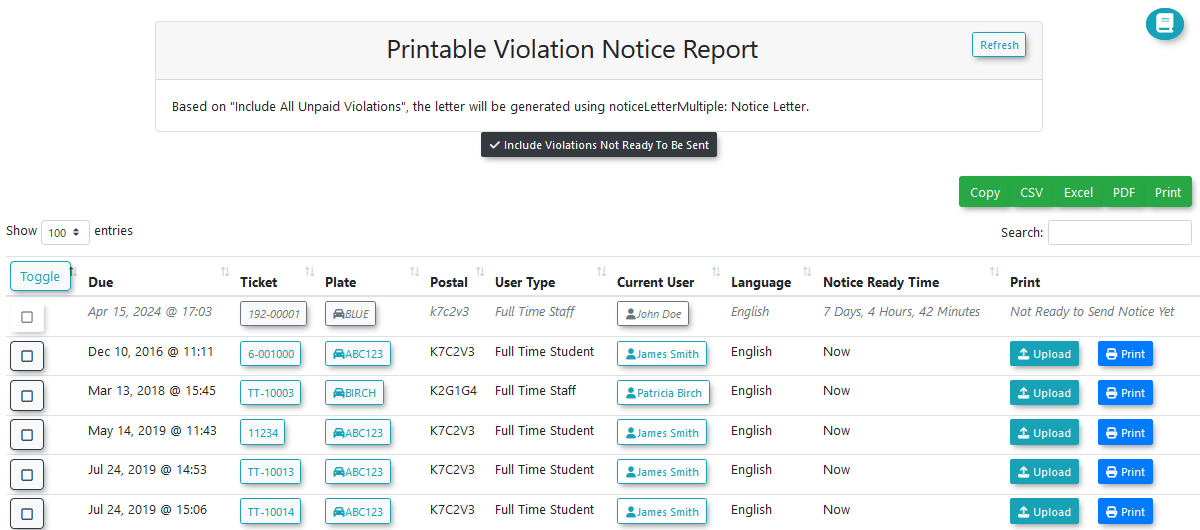
Printable Violation Notice Report
This section contains a list of all violations within the system that are able to have a notice letter printed.
Selected Template
A notice at the top of the section notes which template will be used for the print-out, based on the value of the system setting “Include all unpaid violations”.
Having this setting enabled will make all violations for a user be printed on a single notice letter. Otherwise, a single notice letter will be created for each violation.
Not Ready to be Sent
Enabling this setting will cause violations that are not ready to have their notice letter sent to appear within the list. These violations will have greyed-out text.
The notice-ready column will display the amount of time left before a notice letter is able to be sent for the violation.
By default, notice letters are able to be sent 7 days after the payment for a violation is past due.
Printing the Notice Letter
There are two locations from which a notice letter can be printed; a single notice letter can be printed using the print button to the right, or multiple notice letters can be selected and printed at once.
The notice letters will be generated as a PDF file and downloaded by the web browser.
Uploading a Notice Letter
It is possible to upload a notice letter in place of generating one.
This is used when a letter or document has already been sent to the user in place of a system-generated notice letter, enabling it to be associated to the violation as if it were system-generated.
Un-Printable Violation Notice Report
This section lists violations that are unable to have notice letters printed.
A notice letter is considered to be unprintable when the associated vehicle is missing user details. This can happen when a user has not filled out all their details, or when a user is not present within the system.
In the latter case, the unknown vehicle data must be exported and sent to the MTO for information lookup using the Vehicle Lookup Export.
The MTO will return the data lookup in the form of a file, which must then be imported back into the system using the Vehicle Lookup import. After the data has been imported, the user details will be automatically entered into the system and the notice letters can be printed right away.
The user data imported in this way is considered temporary and is notated as being from the MTO. For security reasons, MTO import data will be cleared from the system after all violations associated to a vehicle have been cleared. The violations on a vehicle are considered to be cleared after being paid by the driver, or by being sent to collections.
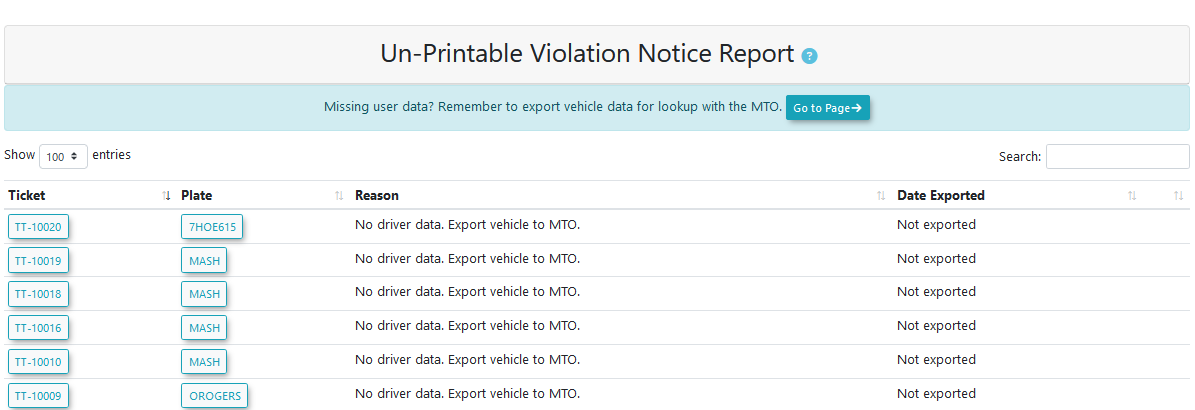
Various details are listed for the affected violations, including the reason the notice letter is unable to be printed, and if the vehicle has had its data exported yet.
A reminder will be listed for the vehicle if it has had its data exported to the MTO, but hasn’t had its return data imported back into the system yet.
Viewing Issued Notice Letters
Notice letters that have been issued previously can be viewed from the violation search page.
The violation search page can be found under the violations menu.
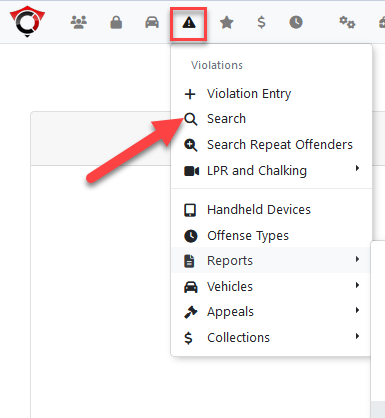
From the violations search page, additional search options can be found by clicking the toggle additional options button located in the top right.
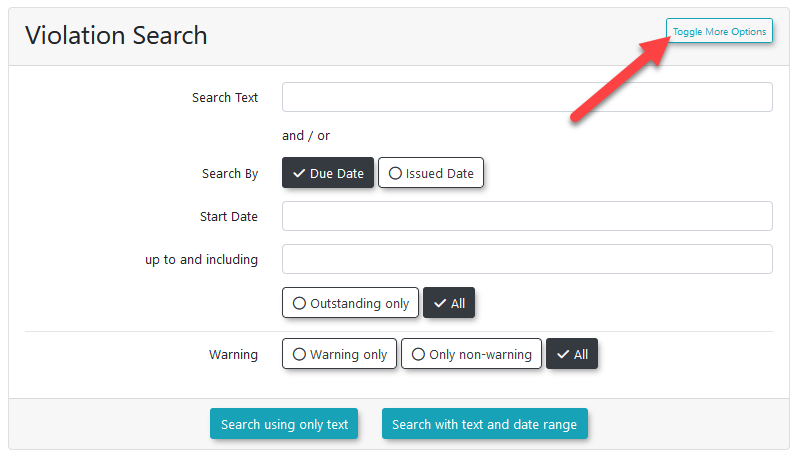
This will expand the search box with additional search options.
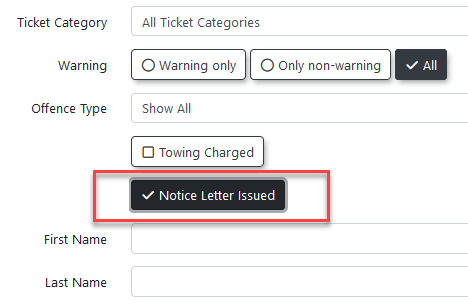
The relevant search option here is Notice Letter Issued.
By checking this option, only violations that have had notice letters issued for them will be returned.
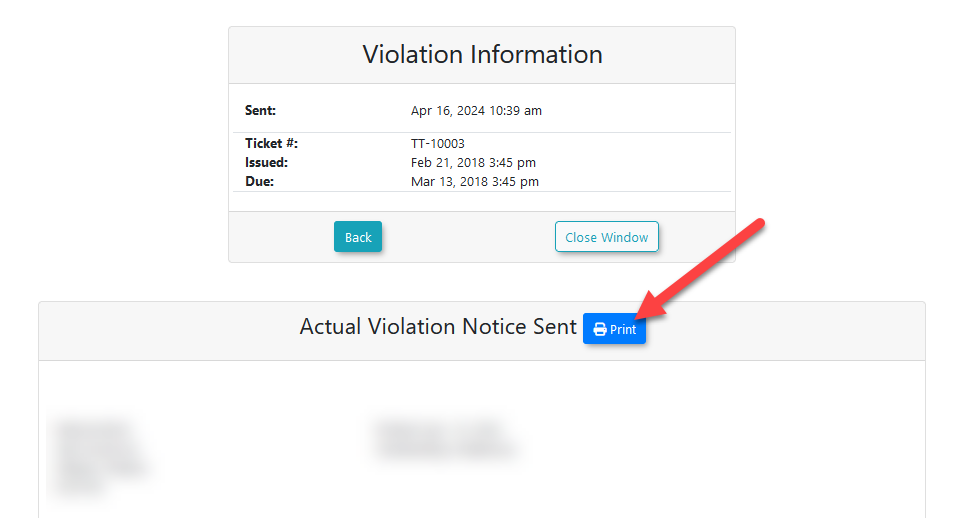
Notice letters can be viewed from within the violation info window, found by clicking on the ticket number of a violation in the results screen.
The notice letters for the violation are listed near the bottom of the window.
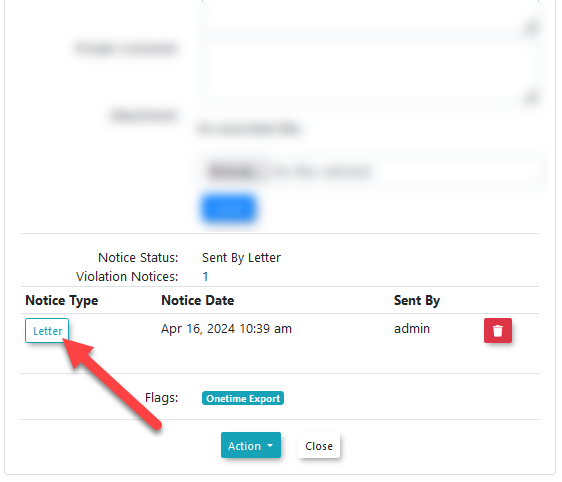
This will open the notice letter view window, from which the notice letter content can be viewed, or re-downloaded by pressing the print button.
Regenerating A Notice Letter
In the cases such as when the template of the notice letter is changed, there may be a need to regenerate an existing notice letter.
The existing notice letter for the violation can be archived by clicking on the trash icon next to it. This will flag the notice letter as archived, allowing the violation to reappear on the letter report page so it can be printed again.
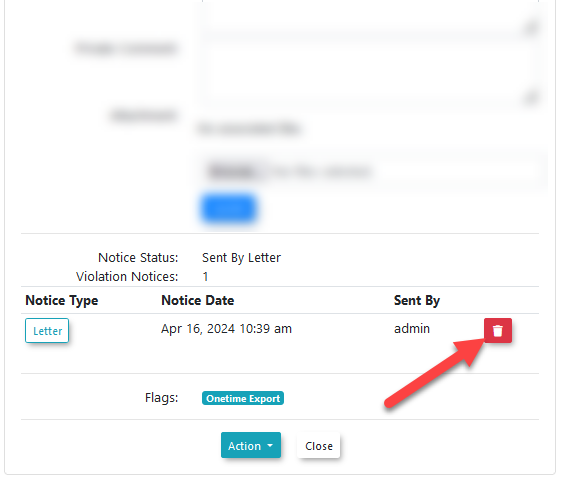
Archiving a notice letter will not delete it from the system, and it will continue to appear on the violation info page, with a notice indicating it has been archived.
Templates
The appearance and layouts of notice letters is setup within the notice letter templates page.
The templates page for notice letters can be found under the system configuration menu, within the content & designs submenu.

System Settings
There are several settings associated to notice letters.
There is one setting located under the violations tab.
-
Enable Letter Report
-
If this setting is enabled, the letter report page will be made available for use.
-
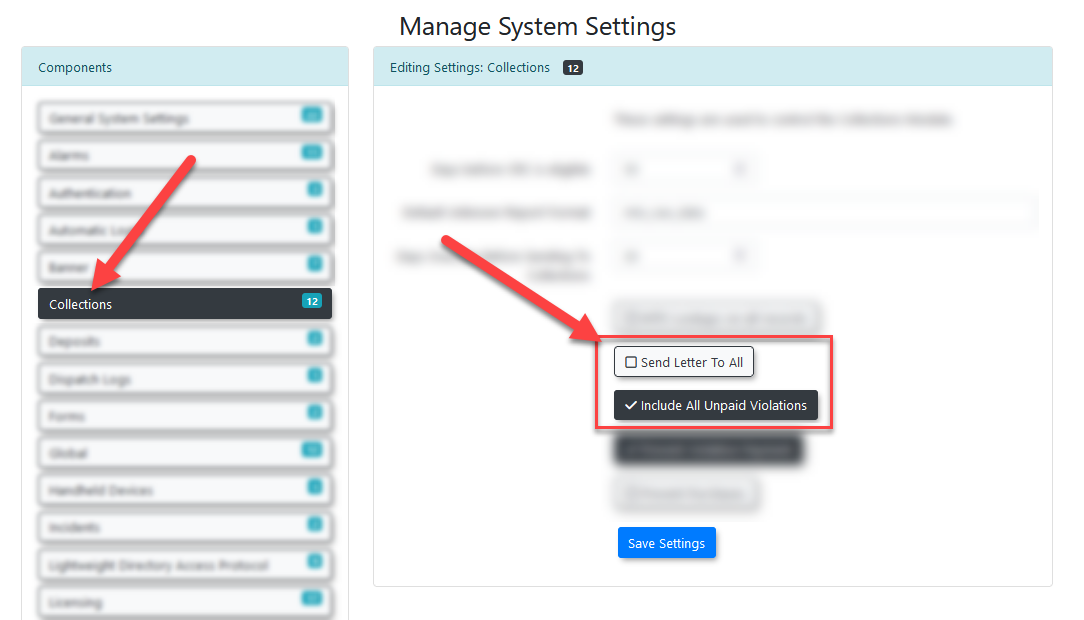
There are two settings located under the collections tab.
-
Send Letter To All
-
If this setting is enabled, notice letters will appear in the list for users who have already had the notice letter sent to them by email.
-
-
Include All Unpaid Violations
-
If this setting is enabled, all unpaid violations for the user will be included on a single notice letter. When disabled, each notice letter will be limited to a single violation.
-
Auto Email Notifications for Warnings
Introduction
There is now the option to have a warning letter sent to those who have received a violation marked as a warning. Violations marked as a warning have had their fine amount waived.
Setup
There is a new setting used to enable the sending of warning notices.
It can be found on the System Settings page.
The setting can be found under the Violations sub-menu.
The setting is named Send Notices For Warnings.
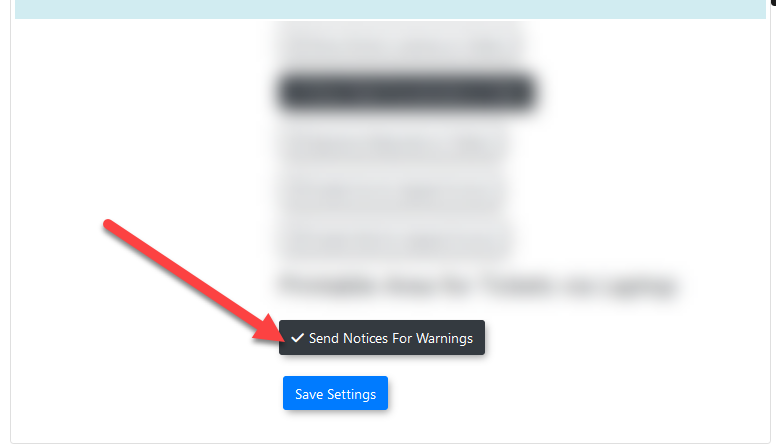
Once enabled, warning notices will be sent when the system task is run.
Template
The layout of the warning letter can be edited on the Email Templates page, found under the menu tree:
- System Configuration -> Content & Designs -> Email Templates
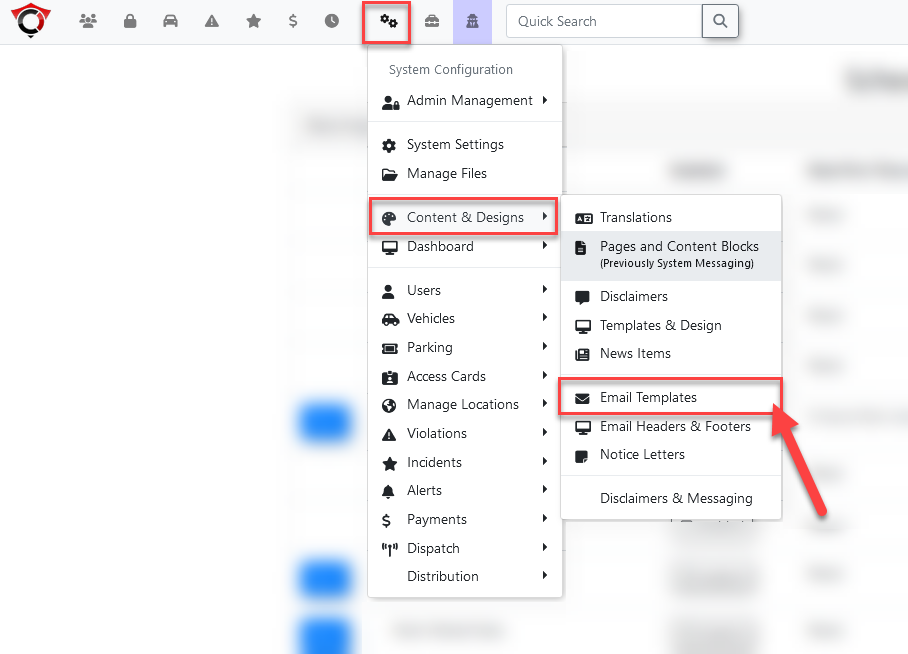
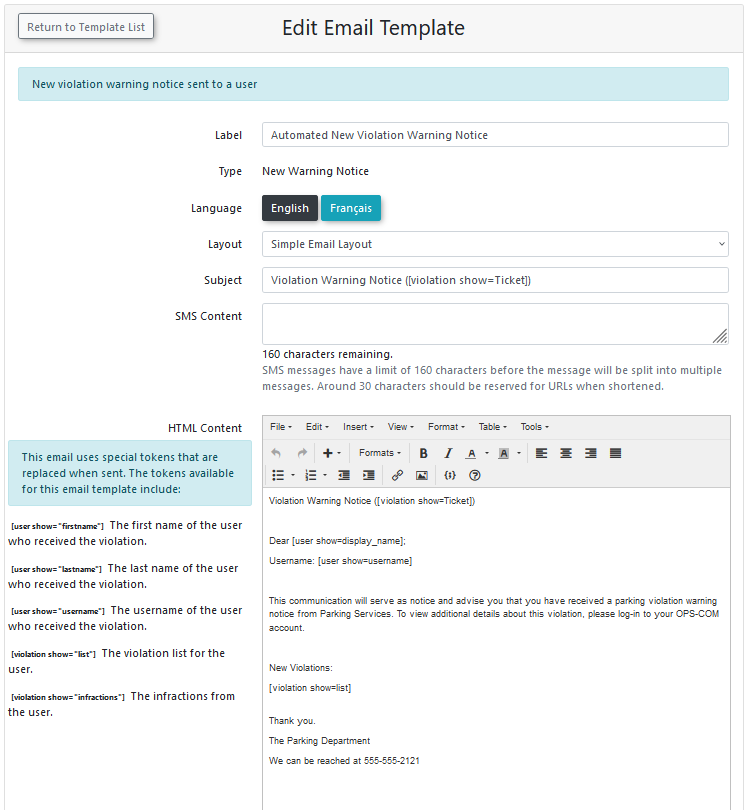
The template is called New Warning Notice.

Here the content of the notice is setup for the email to be sent out to users with warning violations.
System Task
To have the warning notices be sent out, the system task must be run.
Tasks can be accessed from the View System Task Logs page, located under the Tools menu.
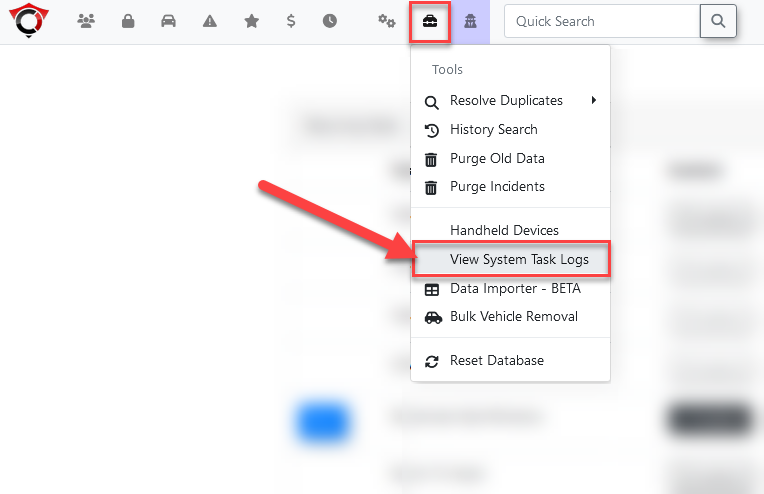
The system task used to send violation notices is called New Violation Notices.
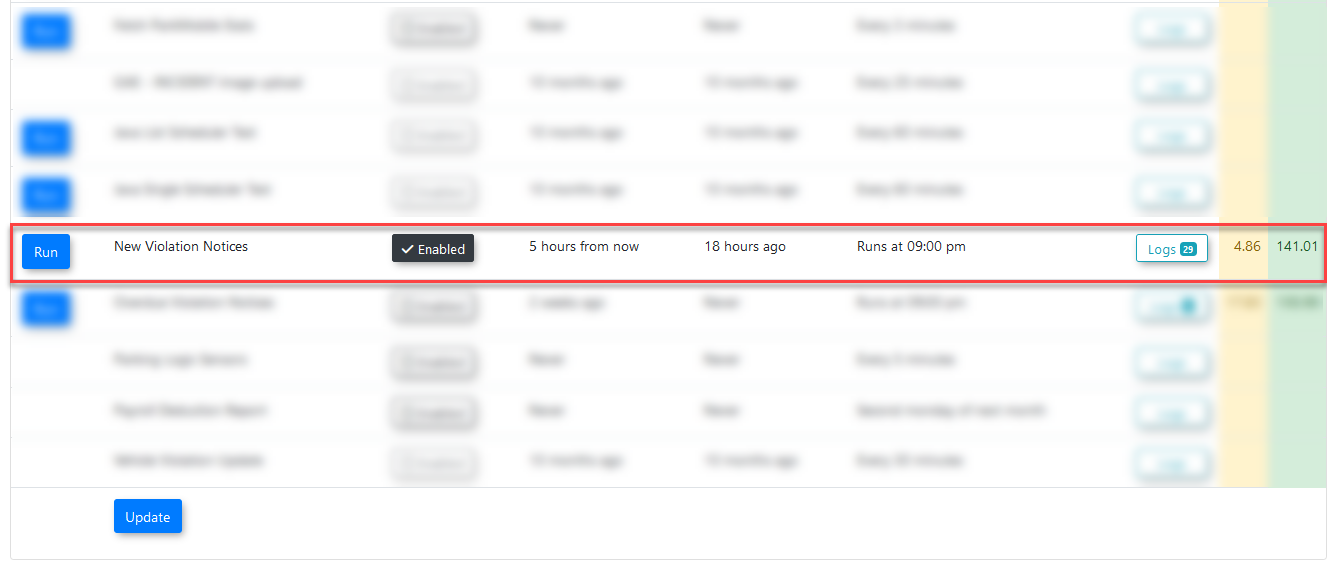
Like other system tasks, New Violation Notices is set to run at a scheduled time while it is enabled.
It can also be run immediately by pressing the run button.
While the setting Send Notices for Warnings is enabled, this task will include warning violations in its output. When disabled, the task will only send notices out for violations issued with a fine.