Admin Management Tools
Accessed from the System Configuration menu, this is where you create/edit roles and permission as well as Admin User Accounts.
- Manage Roles and Permissions
- Manage Administrator Groups
- Manage Admin User Accounts
- IP Filtering for Admin Users
Manage Roles and Permissions
Roles and Permissions in OPSCOM provide granular control over what administrative users can access and do within the system. This feature allows administrators to define specific responsibilities, enhance security, and ensure that each user has appropriate access levels, streamlining operations and maintaining data integrity.
Using this Feature
- Click System Configuration, then Admin Management, and click Manage Roles.
Creating and Managing Roles
Roles are central to the permissions system, acting as templates for sets of permissions.
- The Manage Administrator Roles page will display. The System Administrator (Primary) role is pre-defined and allows you to create new roles and assign them to other admin users.
- To create a new role, click the Add New Role button at the bottom of the page.
- Enter a descriptive Role Name and a Description for that role.
- The description will appear as a rollover tooltip when you mouse over the Edit Role button for that role.
- Click Save Role to save your new role.

Editing Existing Roles
You can modify the name and description of any role (except the System Administrator role).
- On the Manage Administrator Roles screen, click the Edit Role button next to the role you wish to update.
- Make your desired changes to the Role Name and/or Description.
- Click Save Role to save your edits.
Assigning Permissions to a Role
Once a role is created, you'll define what actions users assigned to that role can perform by setting its permissions. Refer to this article for more detailed Permissions information.
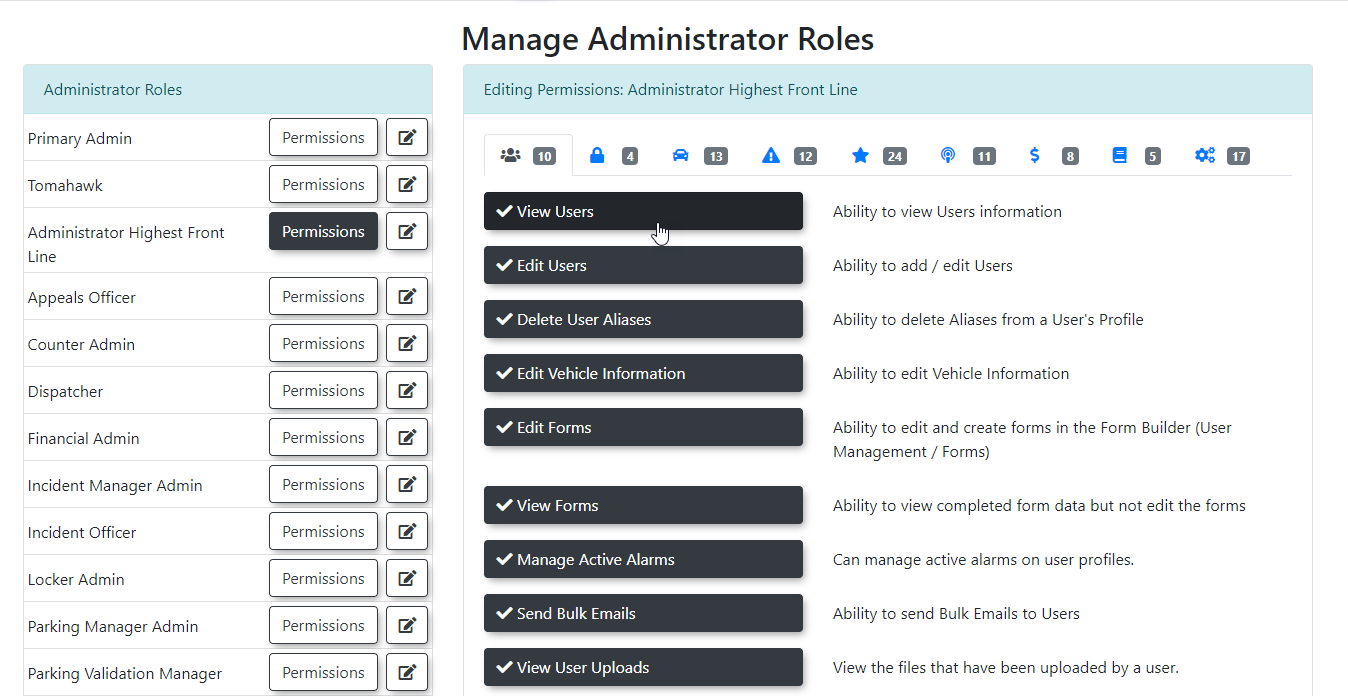
- On the Manage Administrator Roles screen, click the Permissions button next to the role you want to configure. The Editing Permissions screen will display.
- The top bar displays various icons, mirroring the OPSCOM menu structure. The number next to each icon indicates how many permissions within that category have been selected for the current role.
- Click an icon (e.g., a "Permit" icon, a "Violations" icon) to display the specific permissions available within that category.
- To grant a permission, enable the checkbox next to that permission's name.
- Once you have navigated through each icon and selected all the necessary permissions for the role, click Save Permissions. The role, with its defined permissions, is now created and ready for assignment.
Assigning Roles to Admin Users
After roles are defined, you can assign them to your administrative users.
- Click System Configuration, then Admin Management, and click Edit Admin Users. The Manage Active Administrators page will display.
- Select an existing user you wish to modify, or choose to create a new user.
- On the left side of the screen, add or confirm the User Information (e.g., name, email).
- On the right side, select the role(s) you wish to apply to that user from the available options.
- You can also add a Comment for any relevant notes about the user's role or status.
- Click Update User when you have finished making your changes.
Best Practices & Considerations
- Principle of Least Privilege: Always adhere to the principle of least privilege. Grant users only the permissions absolutely necessary for them to perform their job functions. This minimizes security risks and potential for accidental errors.
- Role-Based Access Control: Utilize roles to manage permissions efficiently. Instead of assigning individual permissions to each user, create roles (e.g., "Enforcement Officer," "Permit Manager," "Finance Admin") and assign users to those roles. This simplifies onboarding, offboarding, and auditing.
- Clear Role Descriptions: Use the role description field to clearly state the purpose of the role and the types of permissions it encompasses. This helps administrators understand what each role is intended for.
- Regular Review: Periodically review your defined roles and user assignments to ensure they remain appropriate as job responsibilities change or staff join/leave your organization.
- Test New Roles: Before deploying a new role to active users, test it with a test administrator account to confirm that the assigned permissions function as expected and do not inadvertently grant too much or too little access.
Manage Administrator Groups
Administrator Groups in OPSCOM allow you to organize administrative users into logical teams or departments. This feature simplifies management by enabling you to apply specific settings, distribute communications, or assign tasks to a collective of administrators rather than managing each user individually, enhancing organizational efficiency and control.
Using this Feature
You'll be directed to the Manage Administrator Groups page, which lists all existing groups. Initially, this page may be empty if no groups have been created yet.
Creating a New Administrator Group
Once saved, your newly created group will appear in the list on the left-hand side of the page.
Working with Groups
After creating groups, you can perform various management actions. While the provided content focuses on creation, typical group management also involves:
Best Practices & Considerations
Manage Admin User Accounts
Creating and managing administrator accounts in OPSCOM is essential for granting system access to staff, defining their responsibilities through roles, and maintaining secure and accurate user records. This article guides OPSCOM administrators through the process of creating new admin accounts, editing existing ones, resetting passwords, and disabling accounts as needed.
Using this Feature
- Hover over System Configuration, click Admin Management, then Edit Admin Users. The Manage Active Administrators screen displays, providing options for both new user creation and existing user modification.
Creating a New Admin Account
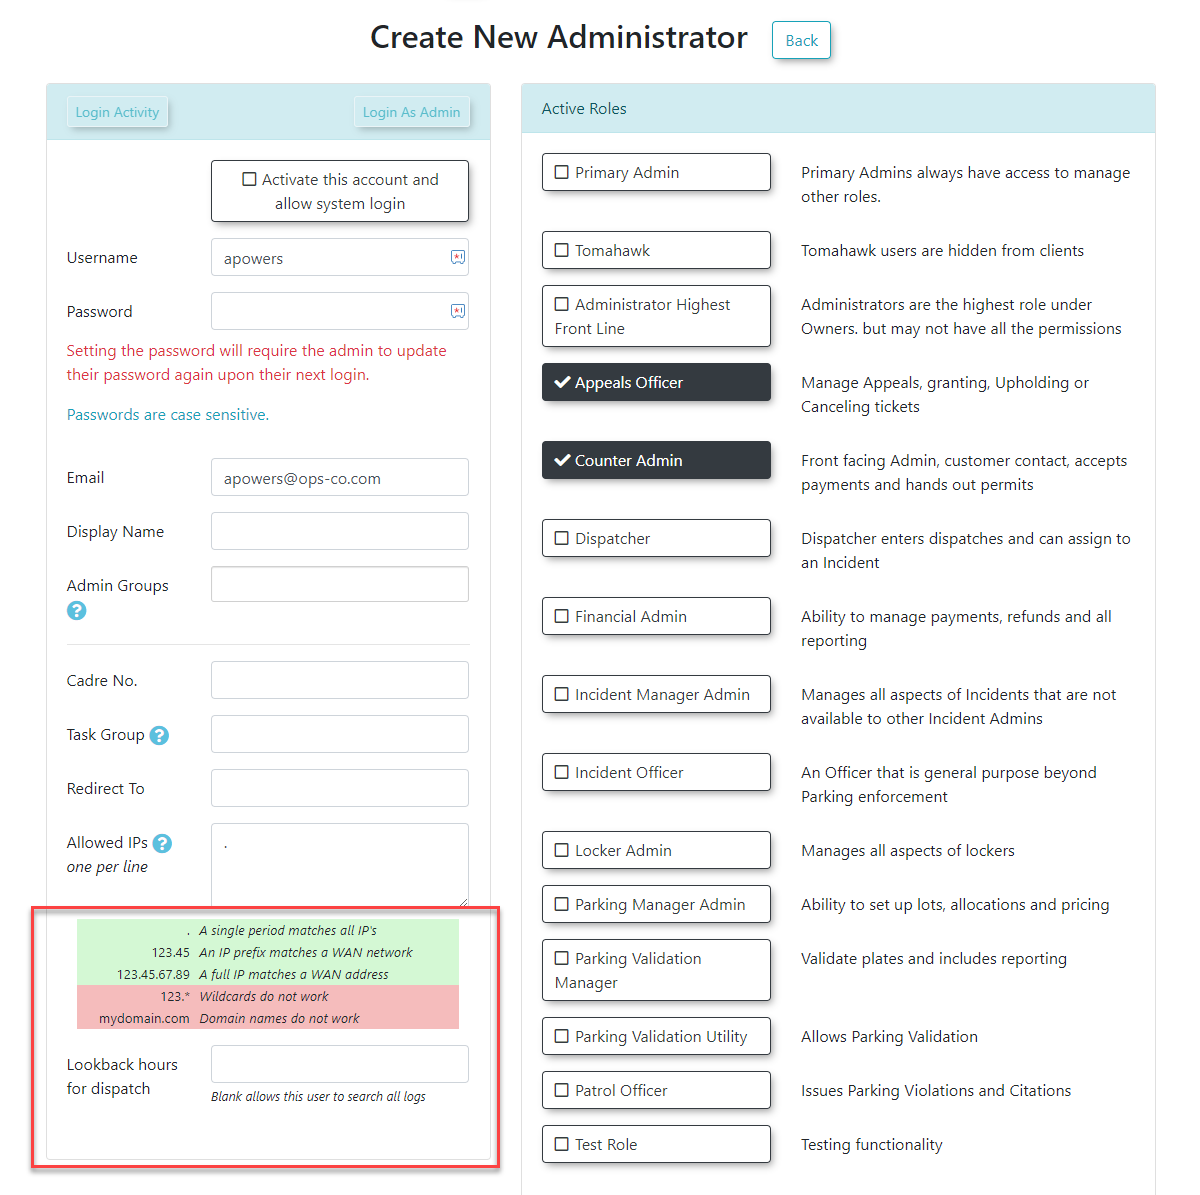
- On the Manage Active Administrators screen, select + Create New Admin.
- The screen will display the Create New Administrator form divided into two sections:
- On the left, you will enter the user information for the new administrator (e.g., username, first name, last name, email, and initial password).
- On the right, in the Active Roles form, you will select the admin role(s) this person will be granted. For more information about Roles and Permissions refer to this wiki article.
- Once all information is entered and roles are selected, click Insert New User to add the admin account to the system.
Editing an Existing Admin Account
- On the Manage Active Administrators page, select the user you wish to modify.
- You can now change any of the available options for that selected user, including their personal information, roles, and account status.
- Click Update User when you are finished making your changes.
Viewing Login Activity
- For any selected user, you can click the Login Activity button to view a log of when the administrator last logged into the OPSCOM system or a handheld device.
Resetting an Admin's Password
- Locate the specific administrator's account.
- In the Password field, enter a temporary password. The password is hidden (displayed as asterisks "**********"), but you can simply type over the existing symbols.
- Inform the admin of this temporary password.
- When the admin logs in using the temporary password, they will be prompted to update their password to a more secure, personal one.
Disabling an Admin Account
Admin users cannot be permanently deleted from the system because their accounts are often linked to historical data (e.g., ticket issuance, system changes). If an admin user changes roles or leaves the organization, the best practice is to disable their account.
Important Reporting Note - It is very important to leave the admin user's permissions in place even when disabling their account, as these permissions will still affect historical reporting (e.g., showing which permissions were active at the time certain actions were performed). Once the account is disabled, any existing permissions obviously cannot be actioned by that user, but they remain associated for reporting purposes.
- Hover over the System Configuration menu, click Admin Management, then Edit Admin Users.
- Select the user's account you wish to disable (e.g., "jim_daniels").
- The user's profile will display. Locate the checkbox titled Activate this account and allow system login.
- Uncheck this box to disable the account.
- Click Update User to apply the change.
After disabling, the account will now appear on the Manage Disabled Administrators page, accessed by clicking on View Disabled on the Manage Active Administrators page.
This action can be reversed at any time by editing the user account and re-checking the Activate this account and allow system login checkbox.
Best Practices & Considerations
- Secure Initial Passwords: When creating new accounts or resetting passwords, use strong, temporary passwords and instruct users to change them immediately upon first login.
- Role-Based Access: Always assign appropriate roles to admin users. Avoid giving Primary Administrator access unless absolutely necessary. Granular roles ensure users only have access to the functions they need.
- Prompt Disabling: Disable accounts promptly when an employee's role changes or they leave the organization. This is a critical security measure.
- Audit Login Activity: Regularly review the Login Activity for admin accounts to monitor for unusual patterns or unauthorized access attempts.
- Clear Documentation: Maintain internal records of your admin accounts, their assigned roles, and any specific notes, especially for disabled accounts.
Related Video
IP Filtering for Admin Users
IP Filtering in OPSCOM provides administrators with a robust security layer by restricting user access based on their device's IP (Internet Protocol) address. This feature enhances system security by ensuring that only authorized users from specified networks or devices can log into OPSCOM, allowing for tailored access control according to individual roles and organizational security policies.
Setup & Configuration
IP filtering configurations are managed within each administrator's user profile in OPSCOM.
What is an IP Address?
An IP address is a unique numerical label assigned to each device connected to an IP network. It typically consists of four groups of numbers (octets), separated by dots (e.g., 192.168.1.1).
- The first two octets generally identify the network your device is on.
- The last two octets further narrow the address down to a specific machine within that network.
- To find your current public IP address, you can visit a website like
whatismyip.netor simply search "What is My IP" in Google.
To Configure IP Filtering in OPSCOM:
- Hover over the System Configuration, then Admin Management, and click Edit Admin Users.
- On the Manage Active Administrators page, select the specific user you wish to edit.
- Locate the Allowed IPs field within the user's profile configuration. This is where you will enter the IP filtering rules.
Using this Feature
The Allowed IPs field in an admin user's profile controls their access to the OPSCOM system. The level of access can be precisely tailored:
Configuration Options for Allowed IP Addresses
Allow Access from Any Network (Least Restrictive)
This is typically used for high-level managers or directors who require access from diverse locations (e.g., while traveling, from a home office, or an internet cafe).
Note: In some cases, networks might be locked down or behind a firewall. Additional configuration on the part of your IT department may be required to allow external access.
- Configuration: Enter a single dot (
.) in the Allowed IP Addresses field. - Result: The user will be able to log in from literally any network location, whether internal or external to your organization's specific network.
Restrict Access to a Specific Network
This is ideal for regular office workers who primarily require access only from their designated office network.
- Configuration: Enter the first two octets of the network's IP address (e.g.,
10.32). - Result: The user can log in from any computer connected to that specific network, but will be restricted from accessing OPSCOM from any other network.
Restrict Access to a Specific Computer (Most Restrictive)
This is suitable for part-time employees or student workers who are designated to use only one particular machine for OPSCOM access.
-
- Configuration: Enter the full IP address of the specific computer (e.g.,
10.32.1.144). - Result: The user can only log in to OPSCOM from that single, specified computer.
- Configuration: Enter the full IP address of the specific computer (e.g.,
Allow Access from Multiple Specific Computers
This is useful in office settings where an employee may use a few designated workstations.
-
- Configuration: Enter the full IP address of each allowed computer, placing each address on a separate line within the Allowed IPs field (e.g.,
10.32.1.144followed by10.32.1.154on the next line). - Result: The user can log in from any of the explicitly listed computers.
- Configuration: Enter the full IP address of each allowed computer, placing each address on a separate line within the Allowed IPs field (e.g.,
Allow Access from Multiple Specific Networks
This is applicable for employees working out of multiple campus locations or different buildings within a municipal organization, each on a distinct local area network.
-
- Configuration: Enter the first two octets of each allowed network, placing each network segment on a separate line within the Allowed IPs field (e.g.,
10.32on one line and10.40on another). - Result: The user can log in from any computer on the specified networks.
- Configuration: Enter the first two octets of each allowed network, placing each network segment on a separate line within the Allowed IPs field (e.g.,
Basic IP Filtering Rules Recap
-
Good Configurations:
.- A single period to match all IP addresses (least restrictive).10.32- A partial IP address to match all computers on a specific network.10.32.1.144- A full IP address to match a specific computer (most restrictive).
-
Invalid Configurations:
10.*- Wildcards (*) like this will not work.OPSCOM.com- Domain names will not work; only numerical IP addresses are supported for filtering.
Best Practices & Considerations
- Security vs. Flexibility: Balance the need for security with the practical access requirements of your administrators. More restrictive settings (full IP) offer higher security but less flexibility.
- Dynamic IPs: Be aware that many internet service providers assign dynamic IP addresses that can change over time. If your administrators access OPSCOM from external locations with dynamic IPs, using a full IP filter will frequently require updates, making the "single dot" setting often more practical for such scenarios.
- Internal Network Changes: If your organization's internal network IP scheme changes, remember to update the Allowed IPs field for all affected administrators.
- IPv6 Consideration: When using IP filtering, it is generally recommended to enter your IPv6 IP address if your network primarily uses IPv6, as IPv4 addresses are becoming less common for external facing services.
- IT Department Collaboration: For complex network setups, especially involving firewalls or VPNs, collaborate with your IT department to ensure proper network configuration aligns with your OPSCOM IP filtering rules.