Admin Tools & Data Maintenance
Items on the tools menu control rarely accessed but important setup and configuration tools for OPSCOM. Data Maintenance options are also here.
- Data Maintenance Articles
- Using the Database Importer (Beta)
- Importer Field Descriptions
- Create or Refresh a Preview Space
- Resolve Duplicate Options
- History Search
- Purge Old - Explained
- Purging Incidents
- Handheld Devices and Commons
- Managing Recurring and Onetime System Tasks
Data Maintenance Articles
Data maintenance is crucial for ensuring the accuracy, reliability, and optimal performance of any system.
Regular data maintenance helps to:
- Improve Data Accuracy: By identifying and correcting errors, inconsistencies, and redundancies, data maintenance ensures that the information you rely on is trustworthy and precise.
- Enhance System Performance: Clean and well-organized data leads to faster processing, quicker searches, and more efficient operations within the system, preventing slowdowns and crashes.
- Facilitate Informed Decision-Making: Accurate and up-to-date data provides a clear and reliable foundation for analysis, reporting, and strategic planning, leading to better business decisions.
- Ensure Compliance and Security: Maintaining data integrity helps meet regulatory compliance requirements and reduces the risk of security vulnerabilities associated with outdated or corrupted information.
- Reduce Operational Costs: By minimizing errors and improving efficiency, data maintenance helps avoid costly reworks, resource waste, and potential financial losses due to inaccurate information.
The following articles all pertain to Data Maintenance Activities:
-
Preparing to Import your User Data
-
Purge Old Data - Explained
-
Purging Incidents
-
Resolve Duplicate Options
-
Merging Vehicles
-
Merging Users
-
Archive or Disabling a User
-
Archiving and Restoring Permits
Using the Database Importer (Beta)
The Database Importer in OPSCOM provides administrators with a powerful tool to import existing data into the system using CSV files. This functionality is essential for initial data migration, mass updates, or integrating data from external systems, ensuring that your OPSCOM database is populated and maintained efficiently. This tool is currently in BETA.
Setup & Configuration
- Click Tools, then Database Importer to access the tool.
Permissions Requirements
If the Database Importer page is not visible, the user's account does not have the necessary permissions enabled. To allow a user to import or manage data, the following permissions must be configured:
- Manage tables: This permission allows the user to view the Manage Tables page and utilize the upload functionality for importing data. It does NOT grant the ability to reset tables.
- Reset tables: This permission grants the ability to empty (reset) tables. It does NOT allow the user to see the Manage Tables page unless Manage tables is also enabled.
These permissions can be found under the Systems tab of the permissions management page. Enable them to grant a user access to the Database Importer functionality. For more information on configuring permissions, please refer to the User Roles and Permissions wiki article.
Using this Feature
The Database Importer allows data to be imported into a select number of tables within OPSCOM.
Currently Supported Tables for Import
- UserProfile
- OffenceLocations
- Vehicle
- Permits
- Violations
Importing Data into a Table
Note - There is a limit of 10000 records to be imported in one batch. This includes the header row.
To begin a new import:
- Click the Upload button next to the desired destination table that you wish to import information into.
- A modal window will open, prompting you to select the CSV file. Your imported CSV file can be comma-differentiated or semi-colon-differentiated.
- Once a file has been selected, click Submit to begin the upload process.
- After the CSV file has been successfully uploaded, the Table Import screen will appear.
Converting Fields to Text to Avoid Truncating Leading Zeros - When converting data from Excel to CSV, issues can arise, such as the truncation of leading zeros in numbers (e.g., student IDs, staff numbers). To prevent this, you can force Excel to treat cells as text before converting to CSV as below:
- Open a new sheet in your Excel workbook.
- In cell A1 of the new sheet, type the formula:
="'"&then click on cell A1 of your original spreadsheet. (This formula is: equals sign, double quote, apostrophe, double quote, ampersand, then the cell reference.) - Drag this formula down and across through the same number of rows and columns as your original data. This will replicate your data on the new page, but an apostrophe (
') will be placed in front of all values, forcing Excel to treat them as text. - Save the new sheet as a
.CSVfile. Ensure you only save the new page. This method effectively preserves leading zeros during the CSV conversion.
Column Matching
On the Table Import screen, you will match the columns from your imported CSV file to the corresponding columns in the destination table within OPSCOM.
- This step informs the program where each piece of data from your CSV file belongs in the destination table.
- If your CSV file contained recognized column names, the system will automatically pre-select the appropriate matches.
- For detailed information on each column's purpose, whether it is required or optional, and specific formatting, please refer to the Importer Field Descriptions guide.
Once the columns have been properly matched and you click the Process button, you will be redirected back to the main page while the import is completed in the background.
Post-Import Processing and Settings
After the initial import of data into the base table, some tables run additional processing on the information to establish relationships and apply default settings. These processes run separately from the initial import and are not affected by the duplicate settings chosen for the import.
Status Emails
Over the course of the import process, a total of two emails will be sent to the user who initiated the import:
- The first email is sent after the data from the CSV has been inserted into the temporary table. It records the number of rows that were successfully imported and the rows that failed due to being malformed.
- The second email is sent after the data has been inserted into the base table and post-processing is complete. It contains the number of records that were updated, the number of records inserted, and any relevant information from the post-import processing that occurred.
Table-Specific Post-Processing Details
- Permits:
- If the user association column is matched, the created permit will automatically have a booking created for the associated user via a
PermitJoinrecord. - If the option was selected during import, newly-created permits booked to users will be automatically marked as paid. Otherwise, they will be located in the users' carts, requiring users to complete payment.
- If the user association column is matched, the created permit will automatically have a booking created for the associated user via a
- UserProfile:
- When users are imported, if a
LoginSourceis not provided, it will be automatically set to OPSCOM. - Newly created users are automatically set to enabled.
- When users are imported, if a
- Vehicle:
- If the user association column is matched, the created vehicle will be automatically associated with the user via a
VehicleJoinrecord. - If the alert column is matched, an alert will be created and automatically attached to the associated vehicle via an
AlertCommentsrecord. The vehicle will also be flagged. The list of vehicles being marked with alerts may also be called a hotlist.
- If the user association column is matched, the created vehicle will be automatically associated with the user via a
- Violations:
- Any violations created that do not have an
Issued DateandDue Datewill have one automatically generated for them at the time of import.
- Any violations created that do not have an
- OffenceLocations:
- This table has no specific post-processing.
Order of Operations for Related Imports
Imports that contain related information should generally be done in a specific order, as some tables contain information that references another table. While imports can be done out of order, records may not be associated correctly if their dependencies aren't met. In general, the tables a record requires should be imported before that record's table.
User-Association Settings
Some tables include additional post-processing to associate newly-created records with existing users. For this to work, the unique identifier for the user (UserUUID or Email) must be selected consistently for both the user's primary record and any associated records (Vehicles, Permits). Ensure the same value is selected for both sections during the import setup.
The tables that currently have this user-association option are:
- Vehicles
- Permits
Unique Identifiers & Duplicate Settings
The Unique Identifiers are the columns used to determine if a record's information is unique. If the information in these columns is duplicated in the file or already exists in the system, it will be handled based on your selected Duplicate Settings:
- Ignoring a duplicate: The system will do nothing with the duplicate record.
- Overwrite existing: The information in the new record will replace the existing record with the same unique identifier.
The number of columns that mark a record as unique varies by table:
- UserProfile: Uses one identifier, which can be either UserUUID or Email. If both are supplied, UserUUID takes precedence.
- OffenceLocations: Uses one identifier, which is LocationName.
- Vehicle: Uses one identifier, which is Plate.
- Permits: Uses two primary identifiers: PermitNo and LotNameID. Both are required to make a unique record, meaning identical
PermitNovalues can exist if they have differentLotNameIDvalues. - Violations: Uses one identifier, which is Ticket.
Foreign Lookup Columns
Some data in one table originates from another table and is stored as an ID in the destination table (known as a foreign key).
- Data in these columns should be entered as normal text in your CSV. The system will automatically look for a match in the corresponding lookup table.
- If a matching value is found (e.g., a "Colour" name in the
VehicleColourtable), the system will input the correct ID value into the destination table. - If no matching value is found in the lookup table, the system will enter a
Nullvalue instead.
Below is a list of common foreign lookup columns and their source tables:
Table Reset
In addition to importing data, the Database Importer page also allows for the purging of an entire table's contents.
- Click the Reset button next to the table you wish to empty.
-
A new modal window will open, prompting you to confirm that you wish to delete the contents of the table.
-
Irreversible Action: This action is permanent. Once the data is deleted, it cannot be recovered. Ensure you are absolutely certain before proceeding.
-
-
If you are certain the data should be deleted, type DELETE (in all caps) into the confirmation text field and press the Delete button.
-
The selected table will then be purged of all records.
Related Table Purges
Some tables are closely connected to the records of a related table. Removing the data they contain will also purge the contents of the related table:
- Purging the Vehicle table will also purge the VehicleJoin table.
- Purging the Permits table will also purge the PermitJoin table.
Note: Only the table contents are deleted; the table structure itself remains intact.
Best Practices & Considerations
-
Data Preparation is Key: Ensure your CSV file is meticulously prepared. Accurate data, correct formatting, and adherence to specified column names (if known) will significantly reduce import errors.
-
Backup Before Import: While not explicitly a system feature, it's a best practice to ensure you have recent system backups before performing large-scale imports or table resets.
-
Understand Dependencies: Always review the "Order of Operations" before importing, especially when dealing with related tables like UserProfile, Vehicles, and Permits. Importing out of order can lead to unassociated records.
-
Handle Duplicates Strategically: Choose your "Duplicate Settings" (Ignore or Overwrite) carefully based on whether you intend to add new unique records or update existing ones.
-
Monitor Status Emails: Pay close attention to the status emails sent during the import process. They provide crucial feedback on success rates and potential issues.
Importer Field Descriptions
This article provides a comprehensive guide to the fields used within the OPSCOM Database Importer. For each supported table, you'll find a list of column names, their internal system names, their requirement level (Unique ID, Recommended, Optional), data type, and a detailed description, ensuring you can prepare your CSV files accurately for successful data imports.
Understanding Field Requirements
When preparing your CSV files for import, it's essential to understand the different levels of field requirements:
- Unique ID Fields: These fields are required and are crucial for identifying a record as a unique entity in the system before it's assigned an internal ID. They represent the bare minimum information needed to import a distinct record.
- Recommended Fields: While not technically mandatory for a record to be created, these fields contain information that makes the record a genuinely useful entity within the system. Examples include a user's first and last names or the fine value on a violation. A record can exist without them, but its utility will be limited.
- Optional Fields: These fields are not required, and a record without them can still function as a useful entity. They contain supplemental information that can be filled in later or isn't essential for the basic functionality of the record, such as a vehicle's manufacturing year.
Importer Columns
Below is a detailed breakdown of the columns available for each supported import table, including their internal names, requirement levels, types, and descriptions.
UserProfile Table
|
Column Name |
Internal Name |
Requirement |
Type |
Description |
|---|---|---|---|---|
|
User Unique ID (UUID) |
UserUUID |
Unique ID
|
Standard |
The primary identifier. If UUID is not supplied, email will be used as the key identifier instead.
This value identifies the user as a unique record and it or the email is required to import a record. |
|
Email Address |
|
Unique ID
|
Standard |
The secondary identifier. If UUID is not supplied, email will be used as the key identifier instead.
This value identifies the user as a unique record and it or the UUID is required to import a record. |
|
Username |
username |
Recommended |
Standard |
The username of the user. |
|
First Name |
firstName |
Recommended |
Standard |
The first name of the user. |
|
Middle Name |
middleName |
Optional |
Standard |
The middle name of the user. |
|
Last Name |
lastName |
Recommended |
Standard |
The last name of the user. |
|
Password |
password |
Optional |
Standard |
The password of the user. |
|
User Type |
UserTypeID |
Recommended |
Foreign Key
|
The user type of the user. Attaches to the UserTypes table.
The values supplied by the user in the uploaded file are expected to be values from the TypeName column of the UserTypes table, as these are the values that will be matched against.
The values in the uploaded file must be an exact match to the values in the TypeName column, matching the capitalization, spelling, and spacing exactly, or else it won’t be counted as a match.
The UserTypeID from the UserTypes table matching the name will inserted into the record in the base table. The value will be left blank in the imported record if no matches are found. |
|
Street Address |
street |
Optional |
Standard |
The street address of the user. |
|
City |
city |
Optional |
Standard |
The city of the user. |
|
Province/ State |
prov |
Optional |
Foreign Key
|
The province or state of the user. Attaches to the Provinces table.
The values supplied by the user in the uploaded file are expected to be values from the ProvName column of the Provinces table, as these are the values that will be matched against. These are the long names of the province and not the abbreviation; as in, Ontario and not ON.
The values in the uploaded file must be an exact match to the values in the ProvName column, matching the capitalization, spelling, and spacing exactly, or else it won’t be counted as a match.
The ProvID from the Provinces table matching the name will inserted into the record in the base table. The value will be left blank in the imported record if no matches are found. |
|
Postal Code |
postal |
Optional |
Standard |
The postal or ZIP code of the user. |
|
Cellphone Number |
phonecell |
Optional |
Standard |
The cellphone number of the user. |
|
Employee Number |
employNo |
Optional |
Standard |
The employee number of the user. |
|
Student Number |
studentNo |
Optional |
Standard |
The student number of the user. |
|
Secondary Phone Number |
sPhone |
Optional |
Standard |
The secondary phone number of the user. |
|
Date of Birth |
DOB |
Optional |
Standard |
The date of birth of the user. |
|
Preferred Name |
preferredname |
Optional |
Standard |
The preferred name of the user. |
|
Public Comment |
publicComment |
Optional |
Standard |
The public comment for the user. Visible to the user. |
|
Private Comment |
privateComment |
Optional |
Standard |
The private comment for the user. Not visible to the user. |
|
Login Source |
loginSource |
Optional |
Standard |
The method by which the user logs into the system. If a login source is not supplied for a user, it will be set to OPSCOM by default. |
OffenseLocations Table
For additional information on this table, refer to this wiki article.
|
Column Name |
Internal Name |
Requirement |
Type |
Description |
|---|---|---|---|---|
|
Location Name |
LocationName |
Unique ID
|
Standard |
The name of the location being imported. This value identifies the location as a unique record and is required to import a record. |
|
Writer Visible |
WriterVisible |
Optional |
Standard |
Whether the writer of a violation of a ticket made in the location is visible to the user. |
|
GIS Number |
GisNo |
Optional |
Standard |
The GIS number is a geographic location code and is only used by certain clients. Associated with GIS maps (https://www.gismaps.org/). |
Vehicle Table
|
Column Name |
Internal Name |
Requirement |
Type |
Description |
|---|---|---|---|---|
|
Licence Plate |
Plate |
Unique ID
|
Standard |
The license plate number of the vehicle. This value identifies the vehicle as a unique record and is required to import a record. |
|
Vehicle Year |
Year |
Optional |
Standard |
The year of the vehicle. |
|
Active Vehicle |
active |
Optional |
Standard |
Indicates whether the vehicle is active or not. If not supplied, vehicles will be set to active by default. |
|
Plate Type Name |
PlateTypeID |
Optional |
Foreign Key
|
The plate type of the vehicle. Attaches to the VehiclePlateType table.
The values supplied by the user in the uploaded file are expected to be values from the TypeName column of the VehiclePlateType table, as these are the values that will be matched against.
The values in the uploaded file must be an exact match to the values in the TypeName column, matching the capitalization, spelling, and spacing exactly, or else it won’t be counted as a match.
The TypeID from the VehiclePlateType table matching the name will inserted into the record in the base table. The value will be left blank in the imported record if no matches are found. |
|
Province/ State |
ProvID |
Optional |
Foreign Key
|
The province or state of the user. Attaches to the Provinces table.
The values supplied by the user in the uploaded file are expected to be values from the ProvName column of the Provinces table, as these are the values that will be matched against. These are the long names of the province and not the abbreviation; as in, Ontario and not ON.
The values in the uploaded file must be an exact match to the values in the ProvName column, matching the capitalization, spelling, and spacing exactly, or else it won’t be counted as a match.
The ProvID from the Provinces table matching the name will inserted into the record in the base table. The value will be left blank in the imported record if no matches are found. |
|
Vehicle Make Name |
MakeID |
Optional |
Foreign Key
|
The make of the vehicle. Attaches to the VehicleMake table.
The values supplied by the user in the uploaded file are expected to be values from the MakeName column of the VehicleMake table, as these are the values that will be matched against.
The values in the uploaded file must be an exact match to the values in the MakeName column, matching the capitalization, spelling, and spacing exactly, or else it won’t be counted as a match.
The MakeID from the VehicleMake table matching the name will inserted into the record in the base table. The value will be left blank in the imported record if no matches are found. |
|
Vehicle Type Name |
TypeID |
Optional |
Foreign Key
|
The type of the vehicle. Attaches to the VehicleType table.
The values supplied by the user in the uploaded file are expected to be values from the TypeName column of the VehicleType table, as these are the values that will be matched against.
The values in the uploaded file must be an exact match to the values in the TypeName column, matching the capitalization, spelling, and spacing exactly, or else it won’t be counted as a match.
The TypeID from the VehicleType table matching the name will inserted into the record in the base table.
The value will be left blank in the imported record if no matches are found. |
|
Vehicle Colour Name |
ColourID |
Optional |
Foreign Key
|
The colour of the vehicle. Attaches to the VehicleColours table.
The values supplied by the user in the uploaded file are expected to be values from the ColourName column of the VehicleColours table, as these are the values that will be matched against.
The values in the uploaded file must be an exact match to the values in the ColourName column, matching the capitalization, spelling, and spacing exactly, or else it won’t be counted as a match.
The ColourID from the VehicleColours table matching the name will inserted into the record in the base table. The value will be left blank in the imported record if no matches are found. |
|
VIN Number |
vin |
Optional |
Standard |
The Vehicle Identification Number (VIN) of the vehicle. |
Permits Table
|
Column Name |
Internal Name |
Requirement |
Type |
Description |
|---|---|---|---|---|
|
Permit Number |
PermitNo |
Unique ID
|
Standard |
This field is the first primary identifier. Both it and LotNameID must be provided to create a new permit This value identifies the permit as a unique record and is required to import a record. |
|
Lot Name (Long) |
LotNameID |
Unique ID
|
Foreign Key
|
The long name of the lot associated with the permit. Attaches to the LotNames table.
This field is the second primary identifier. Both it and PermitNo must be provided to create a new permit. This value identifies the permit as a unique record and is required to import a record.
The values supplied by the user in the uploaded file are expected to be values from the LotName column of the LotNames table, as these are the values that will be matched against. These are the long form version of the lot name, and not the lot short name.
The values in the uploaded file must be an exact match to the values in the LotName column, matching the capitalization, spelling, and spacing exactly, or else it won’t be counted as a match.
The LotNameID from the LotNames table matching the name will inserted into the record in the base table. The value will be left blank in the imported record if no matches are found. |
|
Visible |
visible |
Optional |
Standard |
Indicates whether the permit is visible or not. |
|
Permit Status |
status |
Optional |
Standard |
The status of the permit. |
|
Permit State |
StateID |
Optional |
Foreign Key
|
The state of the permit. |
Violations Table
|
Column Name |
Internal Name |
Requirement |
Type |
Description |
|---|---|---|---|---|
|
Ticket Number |
Ticket |
Unique ID
|
Standard |
The unique identifier for the violation.
This value identifies the violation as a unique record and is required to import a record. |
|
Licence Plate |
VehicleID |
Recommended |
Foreign Key
|
The license plate number of the associated vehicle. Attaches to the Vehicle table.
The values supplied by the user in the uploaded file are expected to be values from the Plate column of the Vehicle table, as these are the values that will be matched against.
The values in the uploaded file must be an exact match to the values in the Plate column, matching the capitalization, spelling, and spacing exactly, or else it won’t be counted as a match.
The VehicleID from the Vehicle table matching the name will inserted into the record in the base table. The value will be left blank in the imported record if no matches are found. |
|
Ticket Type Name |
TicketType |
Recommended |
Foreign Key
|
The type of the ticket. Attaches to the TicketCategory table.
The values supplied by the user in the uploaded file are expected to be values from the TicketTypeName column of the TicketCategory table, as these are the values that will be matched against.
The values in the uploaded file must be an exact match to the values in the TicketTypeName column, matching the capitalization, spelling, and spacing exactly, or else it won’t be counted as a match.
The TicketTypeID from the TicketCategory table matching the name will inserted into the record in the base table. The value will be left blank in the imported record if no matches are found. |
|
Fine Amount |
Fine |
Recommended |
Standard |
The amount of fine associated with the ticket. |
|
Towing Amount |
Towing |
Optional |
Standard |
The amount of towing charges associated with the ticket. |
|
Tax Amount |
taxAmount |
Optional |
Standard |
The amount of tax associated with the ticket. |
|
Issued Date |
Issued |
Recommended |
Standard |
The date the ticket was issued. |
|
Due Date |
Due |
Recommended |
Standard |
The due date for payment of the ticket. |
|
Ticket Writer |
Writer |
Optional |
Standard |
The admin who wrote the ticket. |
|
Violation Location Name |
LocationID |
Recommended |
Foreign Key
|
The name of the location where the violation occurred. Attaches to the OffenceLocations table.
The values supplied by the user in the uploaded file are expected to be values from the LocationName column of the OffenceLocations table, as these are the values that will be matched against.
The values in the uploaded file must be an exact match to the values in the LocationName column, matching the capitalization, spelling, and spacing exactly, or else it won’t be counted as a match.
The LocationID from the OffenceLocations table matching the name will inserted into the record in the base table. The value will be left blank in the imported record if no matches are found. |
Best Practices & Considerations
- Exact Matches for Foreign Keys: For all
Foreign Keytype columns, the values in your CSV file must be an exact match (including capitalization, spelling, and spacing) to the correspondingNamecolumn in the referenced OPSCOM table (e.g.,TypeName,ProvName,MakeName,LocationName). Any mismatch will result in a blank orNullvalue in the imported record. - Prioritize Unique ID and Recommended Fields: While optional fields offer additional detail, ensure all Unique ID fields are present and accurate, and Recommended fields are populated for maximum utility of the imported records.
- Pre-Populate Reference Tables: Before importing data that relies on foreign keys (e.g., Vehicles relying on Plate Types or Makes), ensure the corresponding reference tables (VehiclePlateType, VehicleMake, etc.) are already populated in OPSCOM with all the necessary values. This prevents
Nullvalues in your imported data. - Data Consistency: Maintain consistent formatting for dates, phone numbers, and other standard fields within your CSV to avoid import errors.
- Test with Small Batches: For large imports, consider testing with a small batch of records first to verify that your column matching and data formatting are correct before importing the entire dataset.
Create or Refresh a Preview Space
Preview Spaces in OPSCOM provide clients and support staff with a secure, isolated testing environment that mirrors your live production system's data. These spaces are invaluable for testing new features, staging changes, or conducting training without impacting your operational system, ensuring a safe sandbox for development and learning.
Setup & Configuration
Preview spaces are typically created on demand. Your production/live OPSCOM system is used to either create a new preview space or refresh an existing one with current or historical data.
Creating or Refreshing a Preview Space
- Click Tools, then Database to Preview.
From this page, you have two options for refreshing your preview database:
- For Up-to-Date Information:
- Select Backup Production Database.
- Wait for the backup process to complete.
- Click the Refresh Preview Database button.
- For an Older Backup:
- Select the specific date of the backup you wish to restore the preview database to.
- Click the Refresh Preview Database button.
It may take a few minutes to refresh the database. Generally, a database is refreshed in 1-2 minutes, but it can take up to 15 minutes depending on the size of your database. A message will be displayed along the top of the screen notifying you when the database refresh is complete.
Once the preview database has been refreshed, your preview system will automatically be created or updated. You can access the preview system by adding ".preview" before "OPSCOM.com" in your browser's address bar. For example, if your production space is https://tomahawku.OPSCOM.com, your preview space will be https://tomahawku.preview.OPSCOM.com.
Using this Feature
Accessing Your Preview Space
As an OPSCOM client, you can access your preview space directly by simply adding the ".preview." suffix to your subdomain name. For instance, if your production site is located at https://yourorganization.OPSCOM.com, your preview space can be found at https://yourorganization.preview.OPSCOM.com.
Preview Space Banner
To clearly distinguish a preview space from a live production system, all preview spaces are denoted with an amber warning banner displayed prominently at the top of the page.
Locking and Unlocking Database Reset Option
You can now lock and unlock preview and development OPSCOM databases to prevent them from being reset or refreshed accidentally.
- On your preview site, click Tools, then Reset Database.
- Toggle the lock/unlock setting as needed.
- You will be prompted to provide a reason for locking or unlocking the database.
- A history of the previous 10 lock/unlock actions will be displayed below for your reference.
This feature allows you to ensure that if you are actively working on a preview/development system and do NOT wish for your changes to be reset or lost, you can place a lock. This lock notifies others attempting to refresh the database that a reset is not desired.
Best Practices & Considerations
- Testing and Training Benefits: Preview spaces are extremely useful for testing and training purposes. They allow you to work with a copy of your live database, providing real data for exercises without any risk of affecting your production system. The database can be manually reset at any time, allowing you to "erase" training data and start testing scenarios from scratch.
- Daily Data Backups: Production/live data is backed up daily at 2 AM EST and is available to push to the testing environment at any time. This means if you perform a refresh of your preview site, it will pull data captured the night before. This operation is specifically for providing relevant data for testing and preview during training or similar efforts and is separate from normal system backup procedures.
- Automatic Deletion of Inactive Spaces: Preview sites are automatically deleted after 7 days of no login activity.
- If you require a preview site for an extended period, please contact OPSCOM support staff, and an expiry date can be set.
- Email Notifications are Suppressed: No Emails Sent from Preview/Testing - All email notifications that would normally be sent from the server are captured and suppressed in preview/testing environments. Therefore, any email notifications generated within your preview space will not reach clients or external recipients. This is a deliberate security measure to prevent accidental communication from a non-production environment.
Resolve Duplicate Options
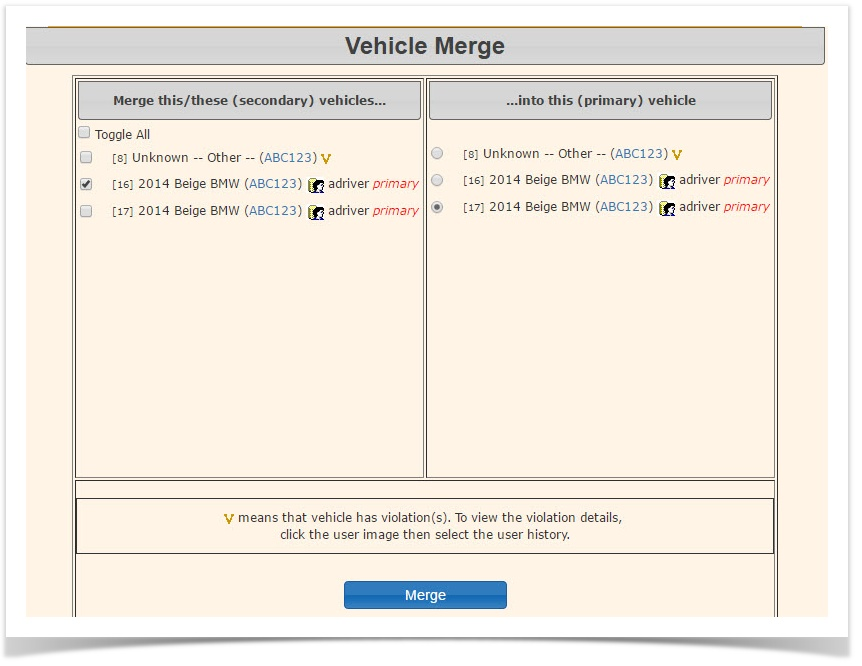
The Resolve Duplicates feature in OPSCOM allows administrators to identify and merge duplicates by email, student number, staff number and vehicle (plate) in the system. This is crucial for maintaining data accuracy, preventing operational errors, and ensuring that enforcement and permit management processes are based on clean, unique vehicle data. This article focuses on resolving duplicates by vehicle, however, the concept is the same for other data types.
- Click on Tools, hover over Resolve Duplicates, then click By Vehicle.
Using this Feature
On the Resolve Duplicates By Vehicle page, you will be presented with options to define the criteria for identifying potential duplicate vehicle records.
Duplicate Identification Options
There are two choices to generate a list of potential duplicates:
Strict Duplicate
Purpose: This option generates a list of vehicles where all three primary unique identifiers are identical. This is for finding exact, unambiguous duplicates. Unique identifiers are:
- Plate
- State/Province
- Plate Type
Include Different Plate Types
Purpose: This option generates a list of vehicles where the Plate and State/Province are identical, but the Plate Type may differ. This is particularly useful for identifying potential input errors where a vehicle might have been entered twice with the correct plate and province, but an incorrect or unspecified plate type was initially used.
Example: If a vehicle is a beige BMW sports car with plate ABC123, province Ontario, and an unspecified Plate Type, but there's another record for a beige BMW sports car with plate ABC123, province Ontario, and Plate Type Passenger, it is highly probable that these are the same vehicle entered as a duplicate. Comparing the vehicle description (make, model, color) can help confirm such cases.
Resolving Duplicates
Once a list of potential duplicates is generated based on your chosen criteria:
- Review the list carefully, paying close attention to vehicle descriptions and other details to confirm actual duplicates.
- For each pair of duplicate records you wish to merge, click the Merge button provided next to the entries.
- Clicking Merge will take you to the merge function window, where you can select which information to retain from the duplicate records and then finalize the merge.
Best Practices & Considerations
- Core Vehicle Identification: In OPSCOM, vehicles are uniquely identified by three key pieces of information: License Plate, Province / State, and Plate Type. All three details are essential for a vehicle to be considered unique within the system (e.g., "ABC123" could be a passenger plate and also a commercial plate in the same province, requiring the plate type for distinction).
- Careful Review: Always thoroughly review potential duplicates before merging. Merging incorrect records can lead to data loss or inaccuracies.
- Common Reasons for Duplicates: Be aware of common scenarios that lead to duplicates:
- Mismatched vehicle information (e.g., slight variations in plate number or state entry).
- Incorrectly entered plate numbers or manual data entry errors.
- Orphaned vehicles that are not properly linked to a user profile.
- Orphaned violations that should be associated with a specific vehicle but are linked to a duplicate record.
- Proactive Data Entry (Prevention): The more information included when adding a vehicle to the system, the better. Providing additional details helps the system recognize potential duplicates and reduces errors. In addition to the three key identifiers, it is highly recommended to include:
- Vehicle Colour
- Vehicle Make
- Vehicle Model
- Vehicle Year These details help to clearly identify specific vehicles and ensure they are properly recorded.
- Data Retention: When merging, OPSCOM typically allows you to select which data fields from the duplicate records you wish to preserve. Ensure you retain the most accurate and complete information.
- Regular Maintenance: Periodically run the Resolve Duplicates report to maintain a clean and accurate vehicle database, especially after periods of high user registration or manual data entry. Duplicate vehicles can cause significant confusion, especially when multiple drivers are associated with the same vehicle, impacting permit management and enforcement accuracy.
- User Training: If duplicate entries are a recurring issue, consider reviewing user training or data entry procedures to minimize future occurrences.
History Search
The History Search feature in OPSCOM allows administrators to quickly locate and review historical system activities and events. This tool is invaluable for auditing, troubleshooting, and investigating specific actions related to users, vehicles, or violations, providing a comprehensive log of system interactions.
Using this Feature
1. Click Tools, then History Search. The History Dump page will be displayed.
You can search using a single identifier or a combination of them to narrow down your results.
Available Search Criteria
- Student/Employee Number: Enter the identification number associated with a student or employee.
- Violation Ticket: Enter the specific number of a violation ticket.
- History Description: Enter keywords or phrases from the description of the historical event. This field allows for broad searches based on the recorded action.
Steps to Perform a History Search
- On the History Dump page, enter your desired search criteria into one or more of the available fields (e.g., enter a specific Violation Ticket number, as shown in the example) and click Submit.
- All OPSCOM history records that match your entered search criteria will be displayed.
Best Practices & Considerations
- Combine Criteria for Precision: To achieve more accurate and manageable results, especially in systems with extensive history logs, combine search criteria (e.g., a Student/Employee Number along with a specific History Description keyword).
- Broad vs. Specific Searches: Start with specific criteria if you know exactly what you're looking for. If you're unsure, use broader terms in the History Description field and then refine your search if needed.
- Auditing and Troubleshooting: This tool is excellent for auditing user actions, tracking changes, and troubleshooting issues by reviewing the sequence of events.
- Regular Use: Familiarize yourself with this feature for daily operations, as it can quickly answer questions about past system interactions without needing to navigate through multiple individual records.
Purge Old - Explained
The Purge Old Data feature in OPSCOM allows administrators to remove inactive historical records from the system. This process is essential for maintaining database efficiency, improving system performance, and ensuring that your data remains relevant and manageable by automatically archiving or deleting old, unused information. The only records that will be purged are ones that have not had any activity associated with them for more than 7 years.
Using this Feature
1. Click Tools, then Purge Old Data.
When you click Purge Old Data, the system initiates a process to identify records that meet the purging criteria.
- Upon activation, a progress bar will appear, indicating the number of records being identified for potential purging. The system compiles a list of any user activity and associated record updates that have occurred within the last seven years.
- The compiled "activity list" determines which data to exclude from the purge. The script then proceeds to purge any data that is not on this active list.
- To complete the process and execute the purge, click Purge these records.
An important business rule is that any small update or activity on a record will "restart" its 7-year clock, meaning the record will then be excluded from purging for another seven years from that last activity date.
What Gets Purged?
The following record types will be purged if they have had no activity in the last 7 years:
- User profiles
- Vehicles
- Violations
- Permits
- Appeals
- Temp Permits
- Payments
- Lockers
- Access Cards
- Gate Events
- Refunds
- Waitlist Records
- User History
What Does NOT Get Purged?
The following record types will NOT be purged, regardless of their last updated date, ensuring the retention of critical historical and incident-related information:
- Incident Users
- Contact History
Best Practices & Considerations
- Understand the 7-Year Rule: Remember that any interaction or update restarts the 7-year inactivity clock for a record. This ensures that records with recent activity, even minor, are preserved.
- Performance Benefits: Regularly purging old data can significantly improve system performance by reducing database size and speeding up searches and reports.
- Data Retention Policies: Ensure this purge process aligns with your organization's data retention policies and legal compliance requirements.
- Historical Context: Be aware that while purged records are removed, essential incident and contact history data remains for long-term reference.
- Schedule Appropriately: Consider running this purge during off-peak hours to minimize any potential impact on system users, although the process is designed to be efficient.
Purging Incidents
The ability to purge incidents from OPSCOM allows administrators to permanently remove outdated incident records from the system. This process is critical for maintaining data relevance, complying with data retention policies, and optimizing database performance. This article outlines the two methods for incident purging: individual deletion via incident search and bulk deletion using the Purge Incidents tool.
Setup & Configuration
To enable incident purging capabilities for an administrator, specific permissions must be granted.
- You must add the Delete Incidents permission to the specific administrator roles or individual administrators who require the ability to purge incident records. Consult your system administrator or the User Roles and Permissions wiki article for details on modifying permissions.
Using this Feature
There are two primary methods for purging incidents in OPSCOM: individually through the Incident Search, or in bulk using the Purge Incidents tool.
Method 1: Using the Delete Incident Button (Individual Purge)
This method allows for the deletion of a specific incident after searching for it.
- Search for the incident you wish to purge using the standard Incident Search functionality.
- Once the incident details are displayed, observe the Delete Incident button.
- The Delete Incident button will be available (active) only if the incident record is older than 7 years.
- If the incident is less than 7 years old, the button will appear as "Delete Not Available" and will be greyed out, preventing deletion.
- If the button is active, click the Delete Incident button.
- Follow any subsequent prompts or confirmation messages to finalize the deletion of the incident.
Method 2: Using the Purge Incidents Tool (Bulk Purge)
This tool allows for searching and purging multiple incidents simultaneously based on specified criteria.
- Click Tools, then Purge Incidents.
- The Search for Incidents to Purge screen will be displayed.
- Enter your search criteria into the available fields (e.g., date ranges, incident types, specific IDs).
-
The results displayed will be limited to the oldest 300 records that match your criteria.
Note: When entering a value for "Number of Instances," the search field functions as "greater than or equal to." Therefore, supplying "1" might still display incidents with more than one instance.
-
- Review the displayed list of incidents.
- Enable the Delete checkbox next to each incident you wish to purge.
- Click the Purge Records button.
- A confirmation prompt will display. Click the Delete button within this prompt to confirm the action.
Best Practices & Considerations
- Irreversible Action:
- Warning: Purging incidents is a permanent and irreversible action. Once an incident is purged, its data cannot be recovered. Exercise extreme caution and verify your selections before proceeding.
- 7-Year Retention Rule: Be aware of the system's built-in 7-year data retention policy for incidents. Incidents cannot be purged using the individual button method if they are newer than 7 years. The bulk purge tool will also primarily display older records.
- Permissions Management: Carefully manage the Delete Incidents permission, granting it only to trusted administrators who understand the irreversible nature of the action.
- Audit Trail: While the incident record itself is purged, ensure your organization has an appropriate audit trail or backup strategy if long-term historical access to all incident data is required for compliance or other purposes.
- Pre-Purge Review: Before using the Purge Incidents Tool, it is highly recommended to perform a thorough review of the search results and selected incidents to ensure no critical data is inadvertently removed.
Handheld Devices and Commons
The Handhelds Devices section in OPSCOM allows administrators to manage and configure handheld devices used for enforcement and data collection. This includes registering new devices, pushing messages, and updating device settings, ensuring seamless operation for field personnel and accurate data synchronization.
Refer to this wiki article for more information.
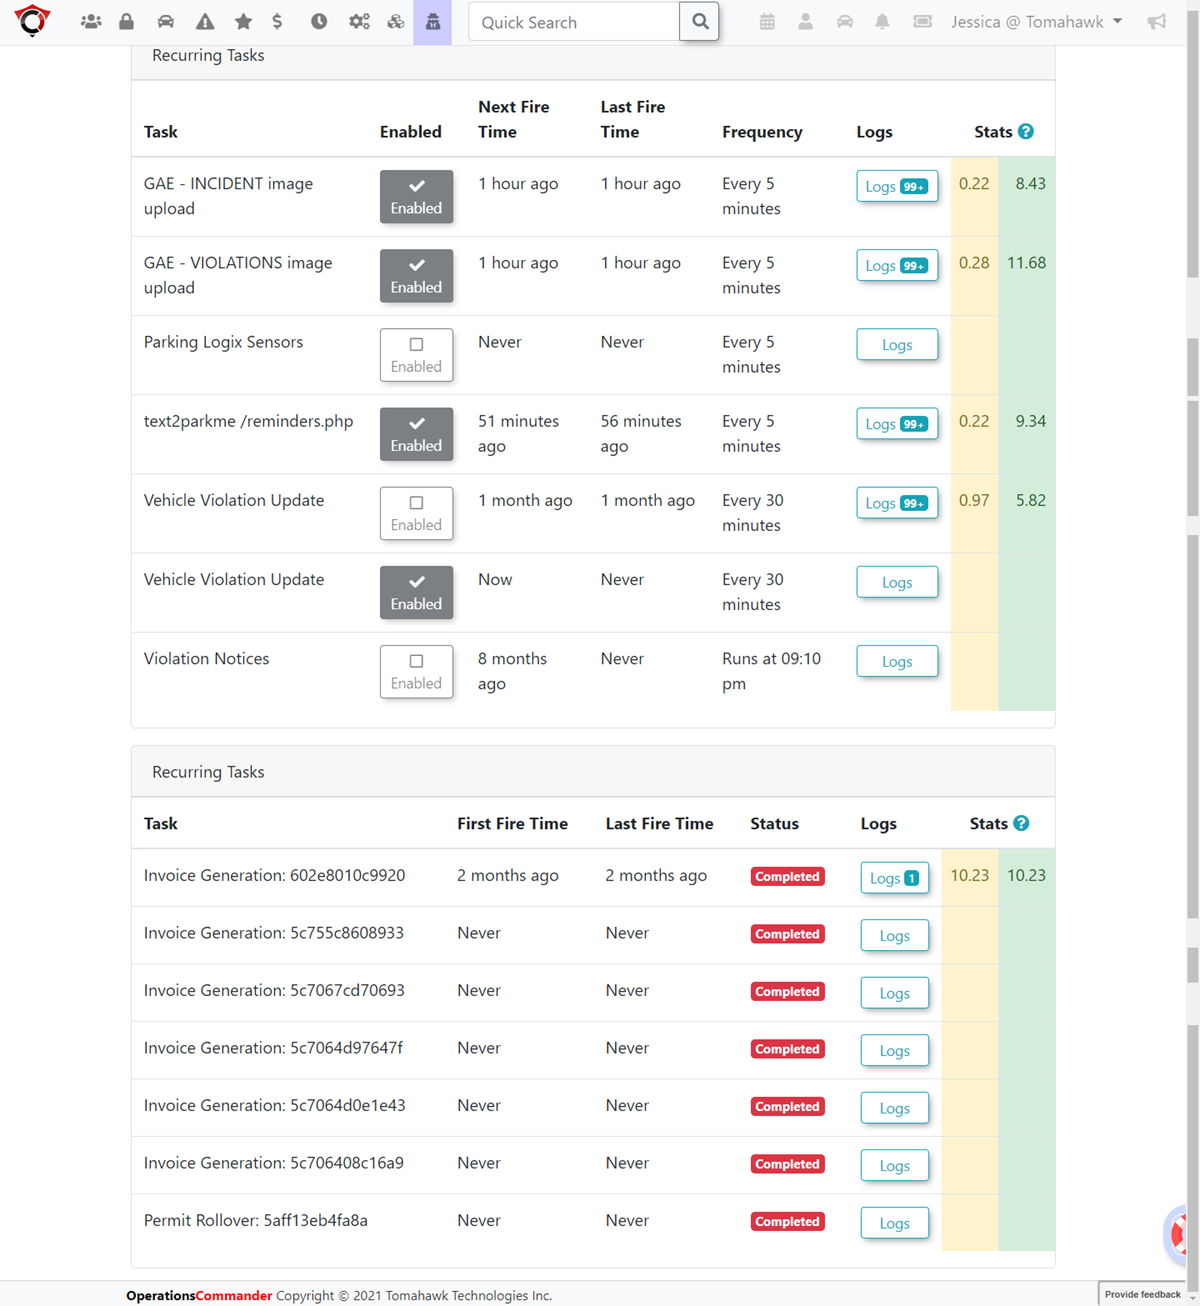
Managing Recurring and Onetime System Tasks
OPSCOM utilizes both recurring and onetime system tasks to automate various back-end processes, such as data synchronization, report generation, or system clean-up. This article guides OPSCOM administrators on how to access, monitor, enable, and disable these critical system tasks, ensuring efficient operation and maintenance of the OPSCOM environment.
Accessing System Tasks
- Click Tools (the Toolbox), then click View System Task Logs.
- On the Scheduled Tasks page, there are two sections, Recurring tasks and Onetime tasks. From this screen we can see stats on when the task has run and how long it took to run. We can also enable or disable tasks from running.
The Scheduled Tasks page is divided into two main sections: Recurring tasks and Onetime tasks. For each task listed, administrators can view its status, statistics, and manage its execution.
Key Information Displayed
- Task Name: The name of the system task.
- Last Run: The timestamp of the last time the task was executed.
- Next Run: The scheduled timestamp for the next execution of the task.
- Average Duration: The average time it takes for the task to complete its execution.
- Enabled Status: Indicates whether the task is currently active and configured to run.
Available Actions & Buttons
- Enabled Checkbox:
- Click the Enabled checkbox next to any task to toggle its status.
- Enable (check the box) a task to allow it to run according to its schedule.
- Disable (uncheck the box) a task to prevent it from running.
- Logs Button:
- Click the Logs button for any task to view a pop-up window.
- This window provides detailed information and historical logs about the task's past executions, including success/failure status and specific output.
Please be aware, there are other settings that may be important to set correctly before enabling any system task.
Best Practices & Considerations
- Monitor Task Logs Regularly: Periodically review the Logs for critical system tasks to ensure they are running successfully and completing without errors. This helps in proactive identification and resolution of potential issues.
- Understand Task Impact: Familiarize yourself with the purpose and function of each system task before enabling or disabling it, as they can affect data integrity, system performance, or automated processes.
- Scheduled Maintenance: Coordinate the scheduling of onetime tasks with periods of low system activity to minimize any potential impact on user experience.