Payments Configuration
- Manage Deposit Types
- Managing Payment Types
- Managing Convenience Fees
- Taxes
- The Invoice Template
- Setup payments with Flex Dollars
Manage Deposit Types
Deposit Types allow administrators to define and manage various categories of deposits (e.g., for permits, equipment, or specific services). This feature is essential for accurately tracking refundable amounts, providing clear financial oversight, and ensuring proper accounting for deposited funds within the system.
Using this Feature
The Manage Deposits page provides a straightforward interface to add, edit, and view the usage of various deposit types.
- Hover over System Configuration, then Payments, and click Manage Deposit Types.
Adding a Deposit Type
- Click Add Deposit Type.
- Fill out the information as needed:
- Label: This is the name that will be used to identify the deposit type (e.g., "Permit Deposit," "Key Fob Deposit").
- Placeholder Text: This field is optional. It provides a prompt or sample information that will appear in the deposit information text field when creating a deposit record.
- Flags: This toggle controls the ability to edit the Assignable Text field in the resulting active deposit record. This text will appear in the user's profile associated with the deposit.
- Amount: The amount that the deposit will cost.
- Active checkbox: This determines if the deposit is currently available to be assigned.
- Click Save Changes.
Editing a Deposit Type
- Locate the deposit type and click the Edit button next to it.
- Make any necessary changes to the fields.
- Click Save Changes.
Deleting a Deposit Type
1. If no records are associated with this deposit you can click the Delete button.
Best Practices & Considerations
- Clear Labeling: Use descriptive labels for your deposit types (e.g., "Annual Permit Deposit," "Visitor Pass Deposit") to ensure clarity for both administrators and users.
- Placeholder Text Utility: Utilize the Placeholder Text to provide clear instructions or examples for administrators when entering deposit information.
- Understanding "Flags": The "Flags" setting for
Assignable Textcan be useful for adding specific, customizable notes to individual deposit records on user profiles, allowing for unique details per transaction. - Financial Reconciliation: Accurately tracking deposit types is crucial for financial reconciliation and managing refundable amounts.
Managing Payment Types
Managing Payment Types allows administrators to control which payment methods are available throughout the system. This comprehensive control enables you to define new payment options, assign them to specific user types (e.g., Staff, Students, Public), and configure their usage for subscriptions or guest payments, thereby streamlining transactions and ensuring alignment with your organization's financial policies.
Using this Feature
The Payment Types screen gives you a comprehensive interface to create, edit, and view details about different payment methods available in OPS-COM.
- Go to System Configuration, then Payments, and click $ Setup Payment Types.
Adding Payment Types
Use Case - For this example, we will setup a Payment type that will use the provider Always Successful. This will allow payments to immediately be flagged as fully processed with no intervention of any admin. This is often used for things like Payroll deduction. For example, you want your users to be able to purchase a permit through Payroll deduction that will immediately be valid upon checkout. The actual payments will take place through payroll and have nothing to do with OPS-COM.
- Click the Add Type button.
- The list of Providers is hard coded and controlled by Tomahawk. You will not be able to change this picklist. The tooltip below the provider will tell you what each provider means.
- Pick Always Successful for this example.
- Click Next Step.
- Provide a Type Name.
- Choose the User Types this will be available to.
- On the Settings tab, Enable the checkboxes as you required.
- In the section Allowed Payment Types, you will see any payment types that are currently active first, then a list of inactive payment types after.
- Click Update Payment Type.
Hosted Payment Providers
The following links will detail the process of setting up a Hosted Payment provider, of which currently support. Click the link matching the payment provider you are adding below and follow the steps outlined on those articles.
- OpenEdge:
- We need the following credentials to work with OpenEdge;
- Auth Key: a multi-digit string key
- Terminal ID: a 8 digit numeric key
- X-Web ID: a 12 digit numeric key
- Moneris Checkout:
- We need the following credentials to work with Moneris Checkout;
- store_id: store#
- api_token: xxxxxxx
- checkout_id: xxxxxxxxStore#
- Bambora Checkout:
- We need the following credentials to work with Bambora Checkout (JSBambora):
- Payment Authorization Header: An alphanumeric passcode
- Profile Authorization Header: An alphanumeric passcode
- Payment Authorization Header: An alphanumeric passcode
- We need the following credentials to work with Bambora Checkout (JSBambora):
Once you retrieve the required values from your hosted payment provider of choice, save the credentials securely and contact OPS-COM Support for further instructions.
The information you obtain in the above documentation are credentials that secure the information exchanged between OPS-COM and the provider. Please save these in a secure manner, it is important they are stored properly to ensure operational security.
Extended Payment Information
For each payment type, you can view extended information on the Payment Types screen.
- A general description of the payment type.
- An indication of what the user will be prompted for when selecting that payment type. For example, in a hosted payment scenario like EdgeExpress, the user might be prompted to enter an email address before being redirected to the payment provider to enter credit card information.
- The number of users associated to this payment type.
There are also three columns on the far right that use an X or checkmark to indicate specific uses of the payment type:
- Column 1: Indicates if this payment type can be used for guest payments.
- Column 2: Indicates if this payment type can be used for permit and invoice renewal payments.
- Column 3: Indicates if this payment type can be used for Text2ParkMe subscriptions.
Configuring Payment Types for Subscriptions and Guest Payments
You can fine-tune how specific payment types are used for subscriptions and guest payments.
- Find the payment type you wish to configure and click the Pencil icon.
- Click the Settings tab.
- Select the items you wish to allow the payment type to be used for (e.g., enable Text2ParkMe, subscriptions to permit renewals, as well as guest payments).
- Prompt Information can be changed as well. You can enable only an email address or full address information. Full address info is required when the provider is doing Address Verification using AVS, 3DS or other similar service. This controls what shows up on the QR Code reservations screen after the Payment Type is selected.
- Click Update Payment Type.
Processing as an Admin
When processing payments as an administrator, the payment types presented will be split into two categories:
- What the user would be allowed to use for their specific User Type.
- What an administrator can choose (which may include additional options not visible to the user).
Best Practices & Considerations
- Granular Control: Leverage User Types to restrict payment methods, ensuring users only see relevant options. For example, you might only allow "Payroll Deduction" for Staff users.
- Clear User Experience: By limiting available payment types based on context or user, you simplify the checkout process and reduce confusion for users.
- Refund Alignment: Ensure that appropriate refund types are linked to their corresponding payment types to facilitate smooth and accurate refund processing.
- Subscription Compatibility: When enabling payment types for subscriptions (recurring billing), verify that the chosen payment gateway provider fully supports recurring transactions.
- Regular Review: Periodically review your payment type configurations and their associated settings to ensure they remain aligned with your organization's financial policies and evolving needs.
Managing Convenience Fees
Convenience Fees in OPS-COM allow administrators to add an additional flat-rate charge directly to user payments, managed entirely within the OPS-COM system. This feature provides flexibility to offset processing costs, incentivize certain payment methods, or cover administrative burdens, distinct from any transaction fees imposed by external payment providers.
Difference Between Transaction Fees and Convenience Fees
It's crucial to understand the distinction between these two types of fees:
- Transaction Fees: These are charges applied by your payment provider (e.g., credit card processor) for processing a payment. They are independent of OPS-COM's internal settings. Depending on your setup, OPS-COM and end-users may not be directly aware of these fees as they are managed solely by the payment provider.
- Convenience Fees: These are additional charges that are managed and applied directly through OPS-COM. For example, your OPS-COM system can add a $5 convenience fee onto a payment. This fee amount is visible within OPS-COM and is added to the grand total before being sent to the payment provider.
It is possible for a system to utilize both Convenience Fees (managed by OPS-COM) and Transaction Fees (managed by the payment provider), but recognizing their distinct origins and management is important.
Using this Feature
The Fees Page allows you to set up various convenience fees.
You can only use Convenience fees if you have Bambora/Worldline as your payment provider.
Fee Limitations
Before configuring, understand these limitations:
Fee Examples and Setup
Admin Collected Fee for Collecting Cash and Cheques (Deterrent Fee)
Admin Collected Fee for Permits
Admin Charges a Convenience Fee to Cover an OPS-COM Collected Transaction Fee
Admin Includes the Transaction Fee in the Price of the Item (No Fee Setup in OPS-COM)
Setting Up the Fees
You can access the Fees page to accommodate any of the scenarios above.
- Hover over System Configuration, then Payments, and click Fees.
- Click Add Fee and follow the diagram below.
- Click the Update button to save.

Best Practices & Considerations
Taxes
The Taxes configuration page in OPS-COM allows administrators to define and manage the tax percentages applied to payments made within the system. This feature is crucial for ensuring accurate tax calculation during checkout, maintaining compliance with local tax regulations, and providing transparency to users regarding applicable taxes.
Setup & Configuration
You must be a Primary Admin with the permission to Manage System Configuration to be able to edit the system settings.
If you do not see the settings mentioned in this article, please contact support@ops-com.com to have them enabled for you. You will need, in writing, the permission of your Primary Admin.
Using this Feature
The Taxes page allows you to configure multiple settings for each tax type, ensuring accurate calculation and display.
1. Hover over System Configuration, then Payments, and click Taxes.
Editing a Tax Type
When editing an existing tax type, the following settings are available:
- Enable: Check this box to enable the tax type, making it active and applied to transactions. Uncheck to disable it.
- Percentage: Enter the numerical percentage of tax to be calculated (e.g.,
13for 13%). - Tax Label & Translation: This field defines how this tax will be displayed to users during the cart and checkout process (e.g., "HST," "Sales Tax," "VAT"). Multiple languages are supported for translation to ensure clarity for diverse users.
- Apply to the following items: Check the specific system modules or item types to which you want this tax to be applied (e.g., Permits, Violations, Lockers, Access Cards).
Best Practices & Considerations
- Compliance: Ensure your tax configurations (percentages, labels, and applicability) are always compliant with current local, provincial/state, and national tax regulations.
- Clarity for Users: Use clear and understandable Tax Labels that resonate with your users (e.g., "HST" for Canadian users where applicable).
- Module Applicability: Carefully select the "Apply to the following items" checkboxes to ensure taxes are only applied to the correct modules and items, preventing incorrect charges.
- Testing: After making any changes to tax settings, perform test transactions in a Preview Space to verify that taxes are calculated and displayed correctly in the cart and on receipts.
- Communication with Finance: Coordinate closely with your organization's finance or accounting department to ensure OPS-COM's tax configuration aligns with their reconciliation processes.
The Invoice Template
Editing the template
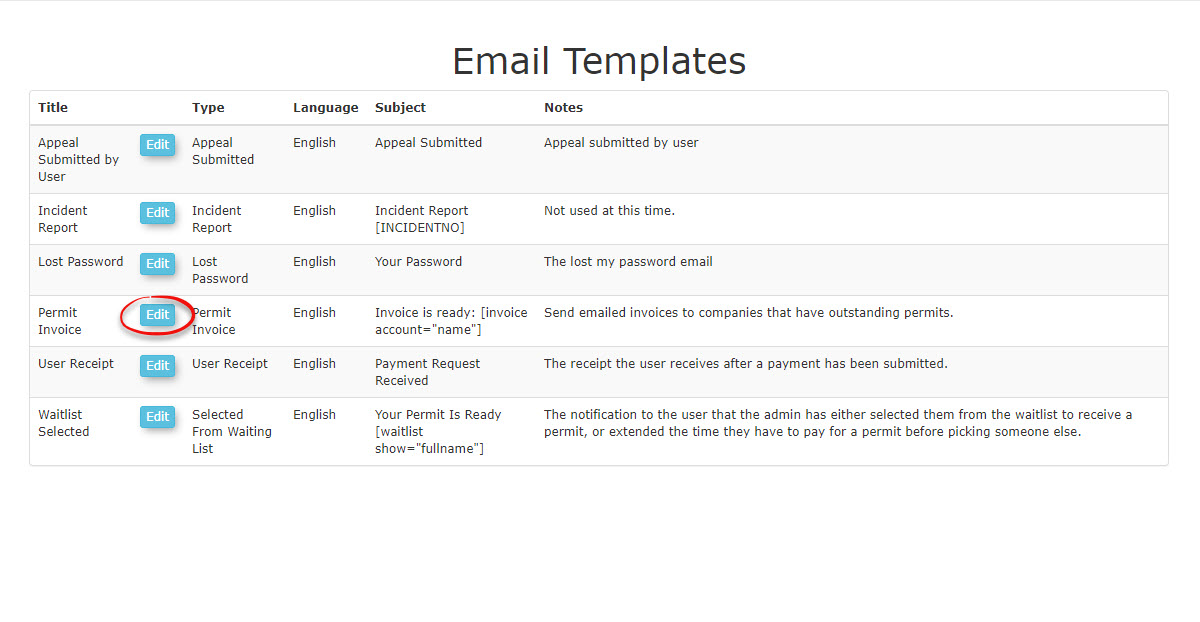
To access the template, go to the System Config menu and click on Email Templates.
The screen will refresh with a list of possible templates to edit. In our case, we want to click on the Edit button for Permit Invoice to access the template.
The screen will refresh with the complete Template form as seen below.
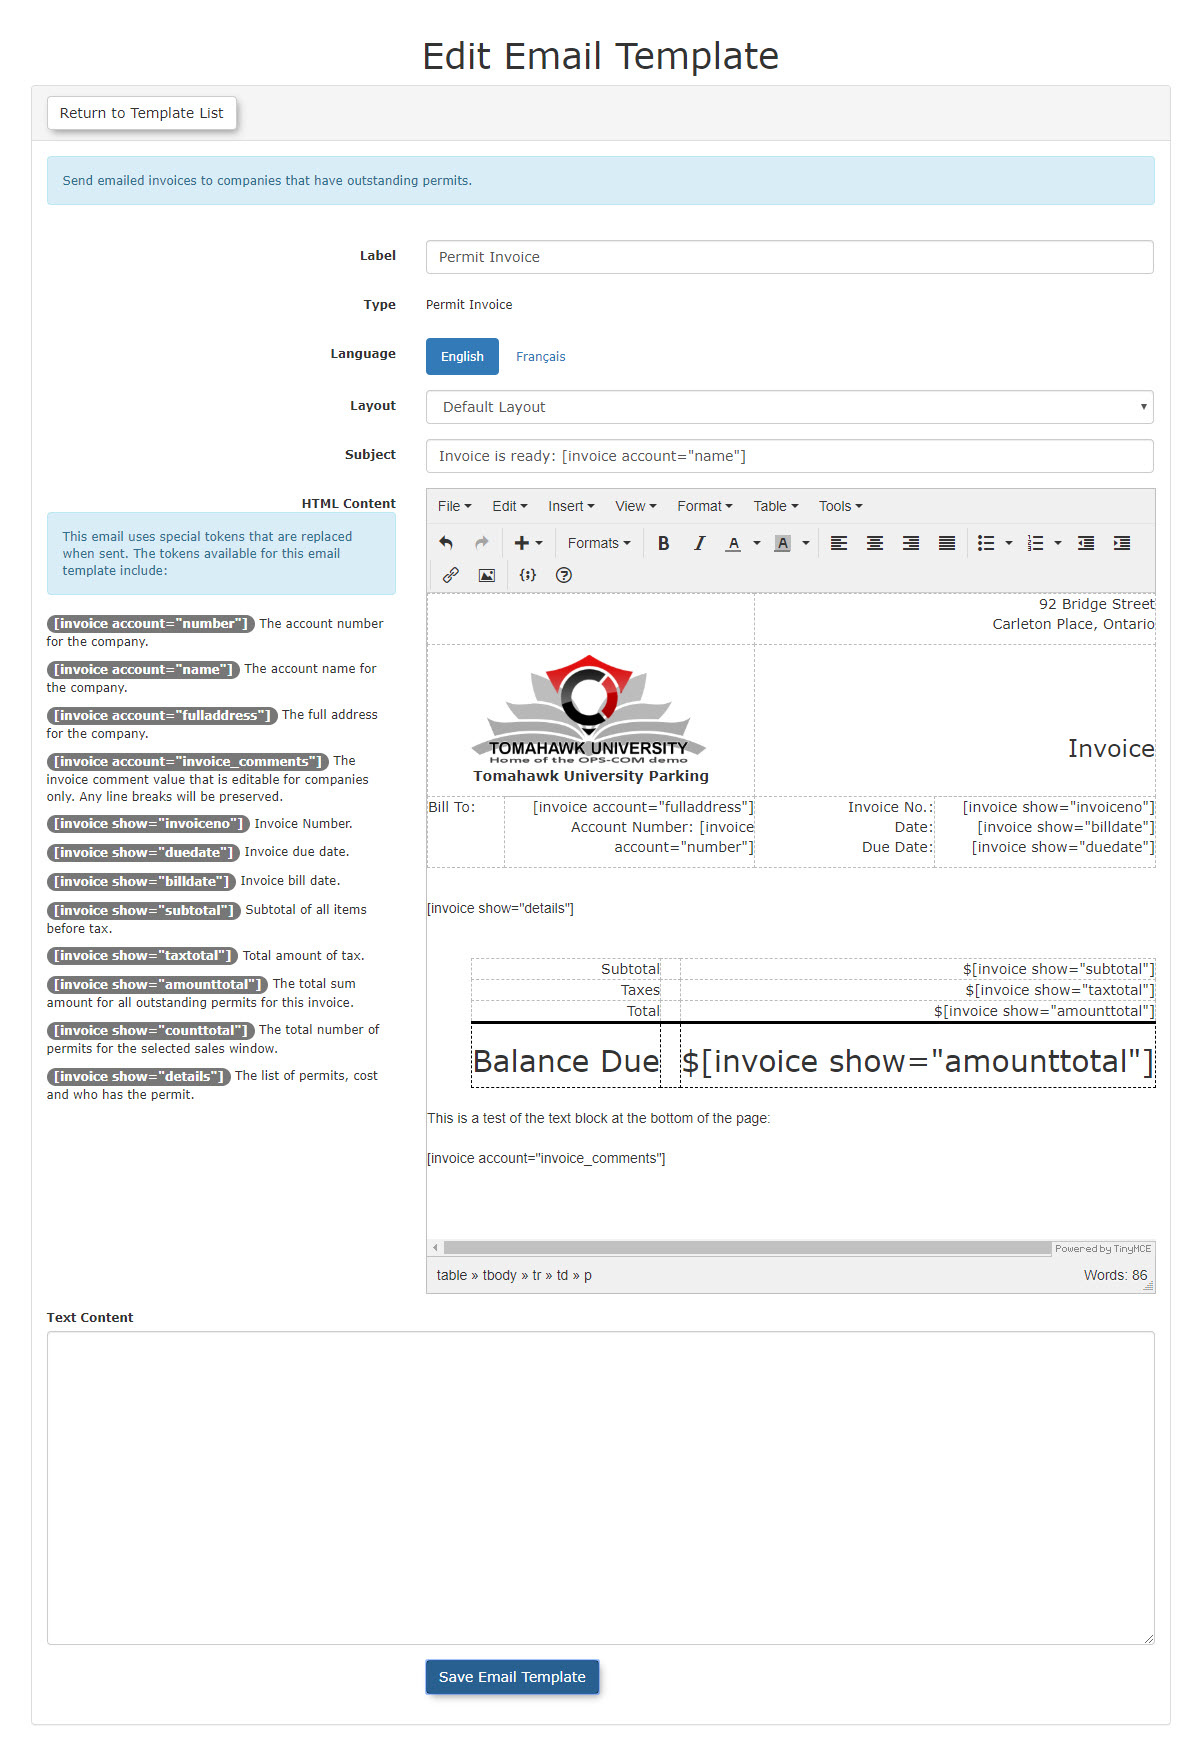
The form contains 4 areas:
At the top, Meta Data for this specific template.
On the left, a list of possible Short Codes that can be used on this template form.
On the right, the actual Template.
At the bottom, a Text Content field (This field can be configured for a plain text version of the
Meta Data
Label - Enter a name for this Template.
Type - This field auto fills.
Language - Choose the language of the template.
Layout - Choose default layout.
Subject - This text will appear as the Email Subject. Note that the use of short code is permitted in this field. In this case, we are calling up the account name for the company being invoiced.
Short Code List
The template allows the use of special tokens, or short codes, to pull information from the database to appear on the invoice when sent.
These include:
[invoice account="number"] The account number for the company.
[invoice account="name"] The account name for the company.
[invoice account="fulladdress"] The full address for the company.
[invoice account="invoice_comments"] The invoice comment value that is editable for companies only. Any line breaks will be preserved.
[invoice show="invoiceno"] Invoice Number.
[invoice show="duedate"] Invoice due date.
[invoice show="billdate"] Invoice bill date.
[invoice show="subtotal"] Subtotal of all items before tax.
[invoice show="taxtotal"] Total amount of tax.
[invoice show="amounttotal"] The total sum amount for all outstanding permits for this invoice.
[invoice show="counttotal"] The total number of permits for the selected sales window.
[invoice show="details"] The list of permits, cost and who has the permit.
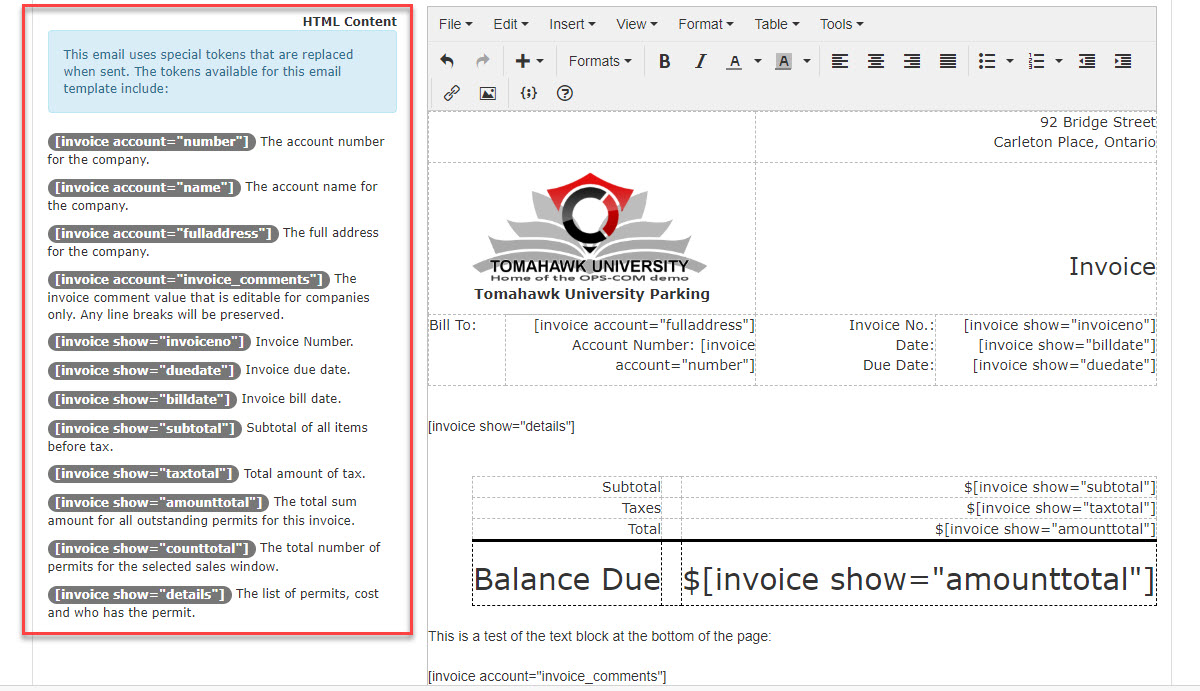
These tokens can be placed anywhere on the template and will pull data from the system, similar to a mail merge functionality.
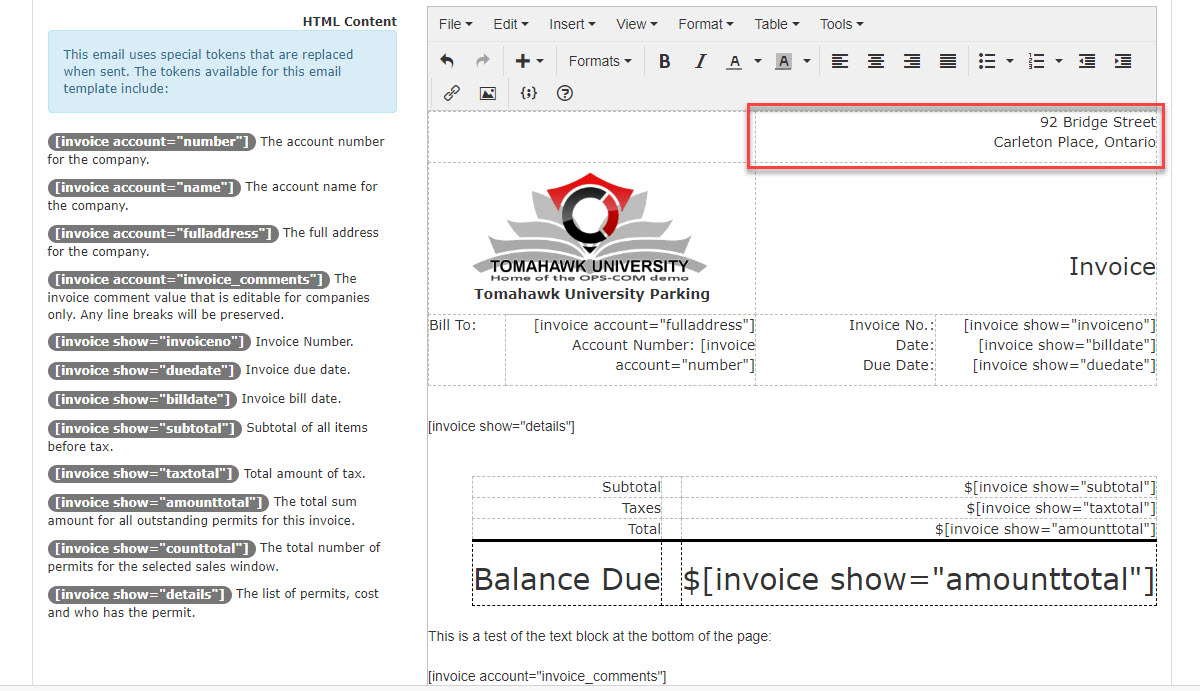
For example, in the Bill To: area, the system will retrieve the Full Address of the Company as well as the Company Account Number using these two short code tokens:
[invoice account="fulladdress"] The full address for the company.
[invoice account="number"] The account number for the company.

The Template
There are a number of areas on the template that can be edited by the admin. To add branding to the template there are two areas that will be of concern.
The Company Logo Field:
This is where you would place your company logo. Using a .JPEG or .PNG file format is recommended.

Your Company Address:
Enter your company address here.
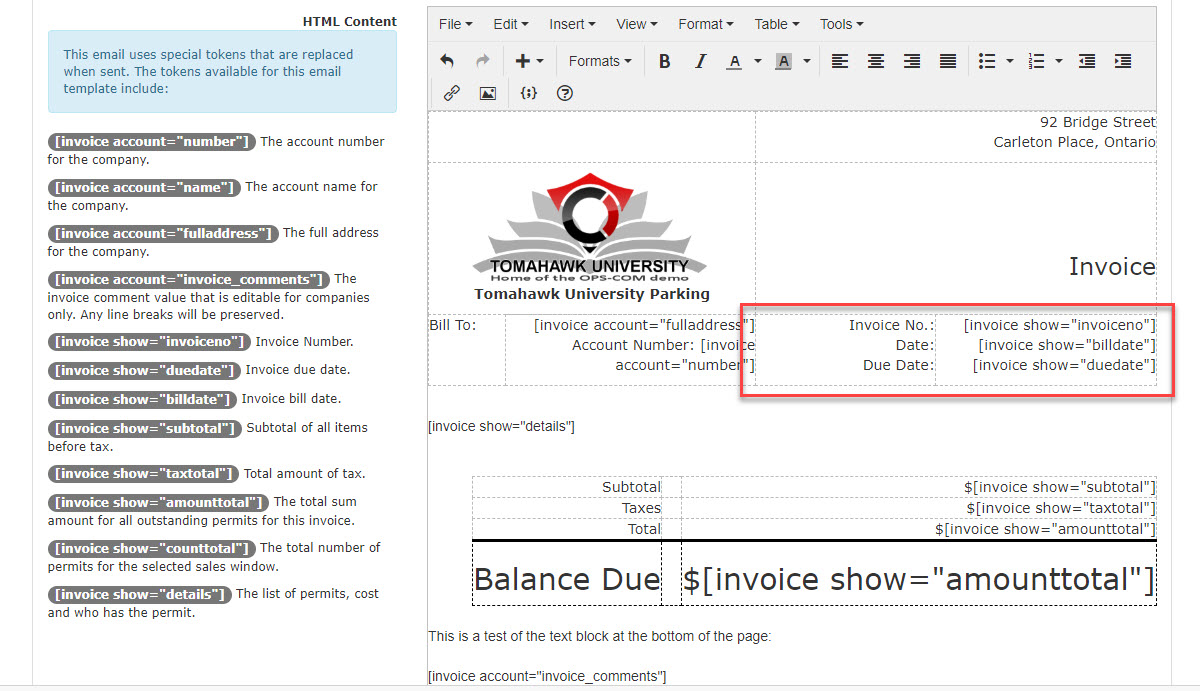
Invoice Identification:
In this section use short code to pull in the Invoice Number, Billing Date, and Due Date.
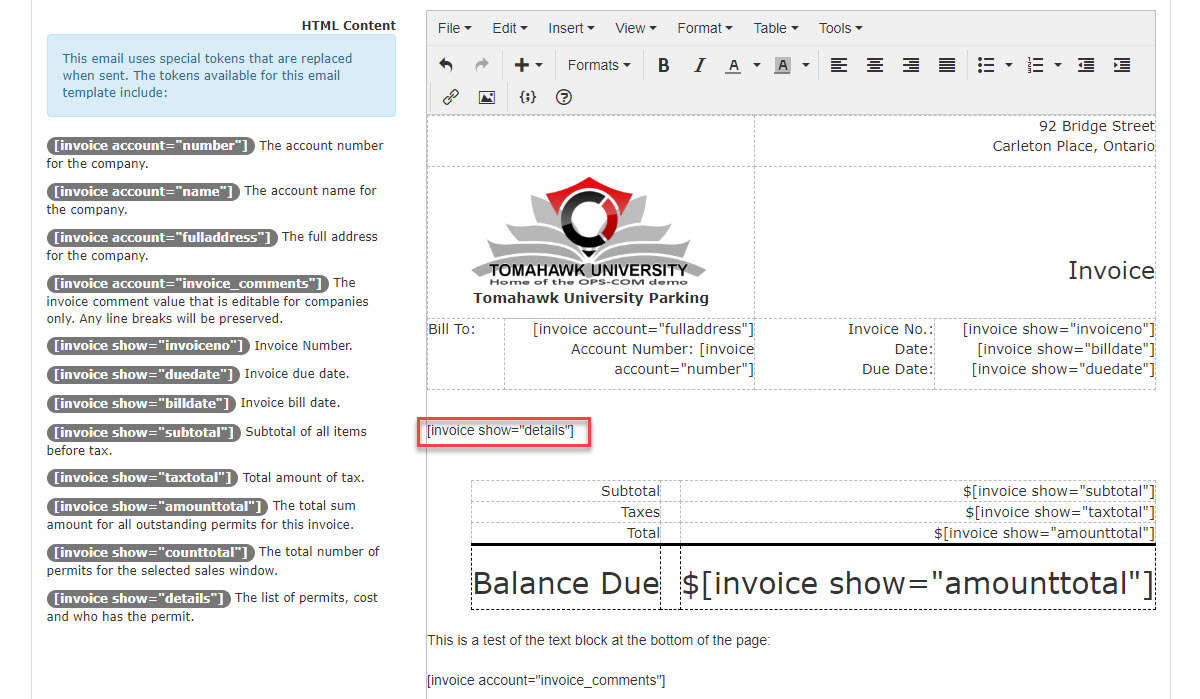
Invoice Details:
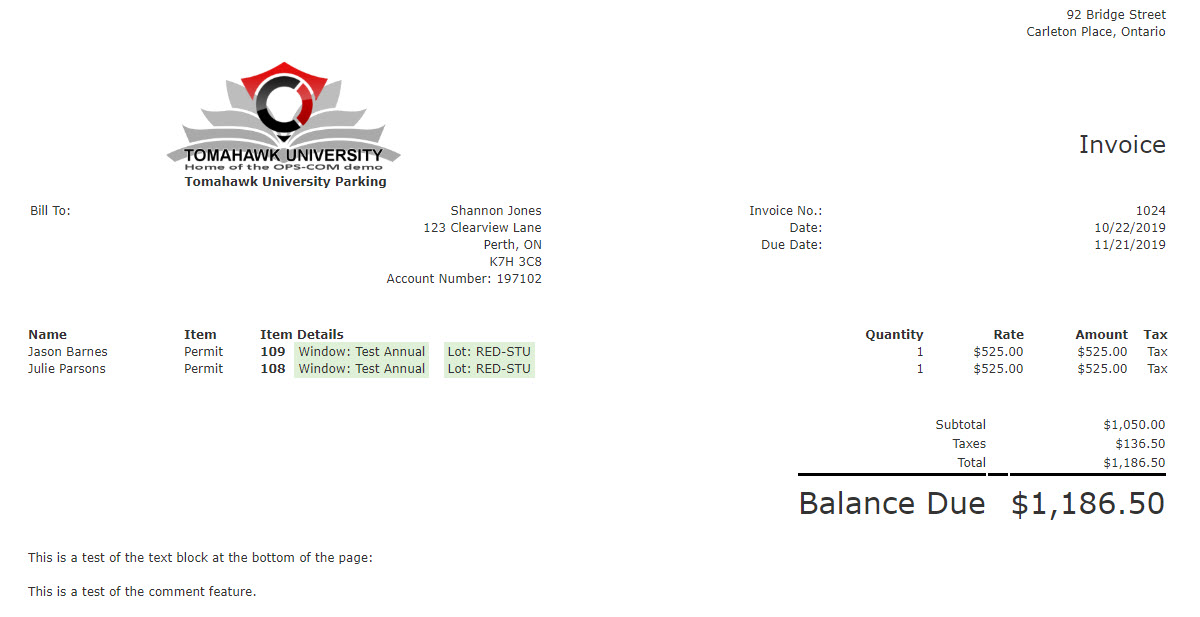
The short code [invoice show="details"] pulls in the list of permits that will appear on the Invoice. (See a sample of the Invoice below)
These include:
Parker's Name
Item type being Paid for (Permit, Access card, etc.)
Item number (Permit Number)
Sales Window
Lot Name
Quantity
Cost
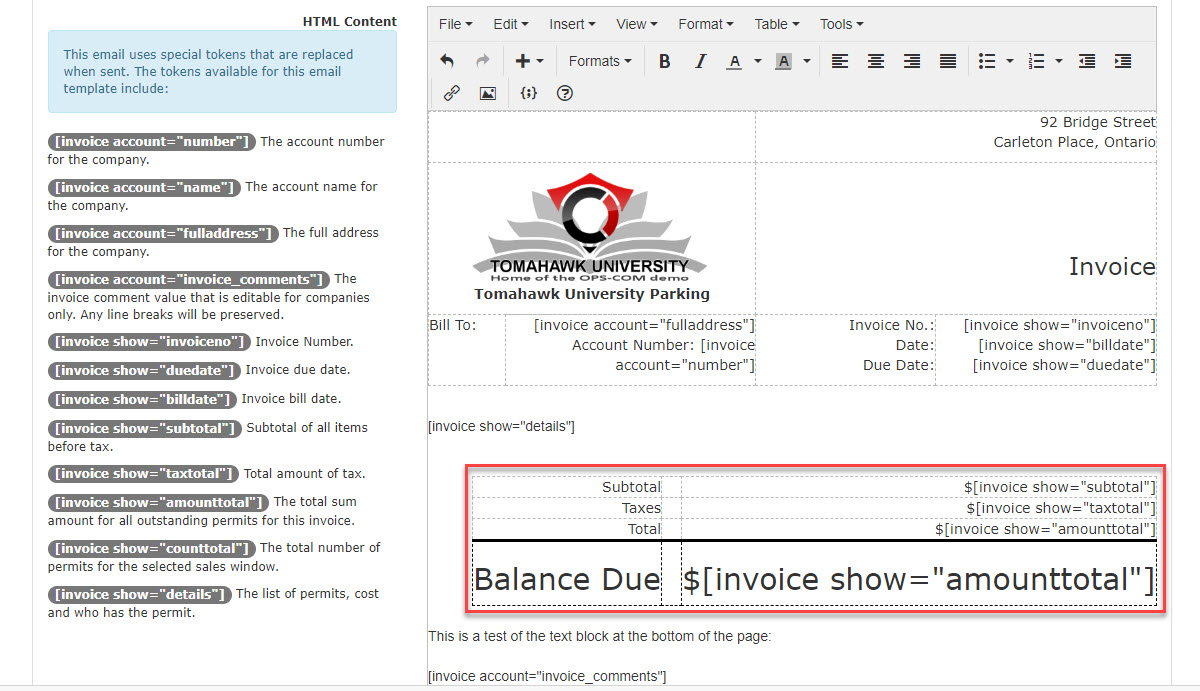
Payment Information (Billing Cost):
In this section use short code to pull in the billing information such as Subtotal, Calculated Taxes, and Total Billing Amount.
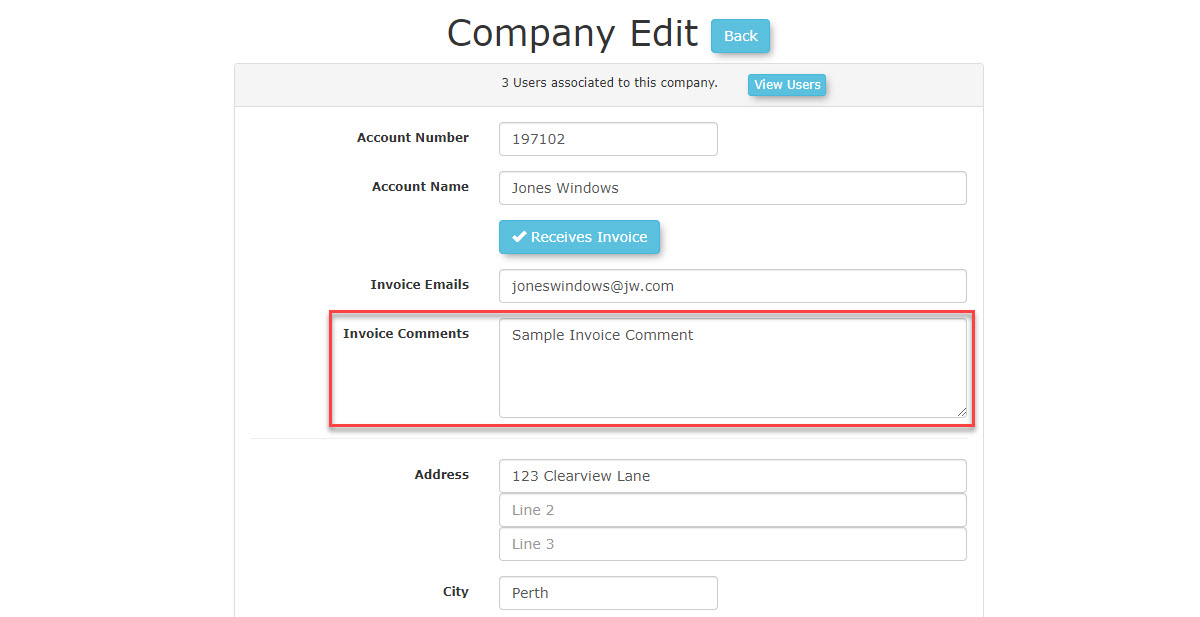
You may also wish to add comments to the invoice. Comments can be added in the company configuration.
The Email with PDF attached:
Here is a sample of what the resulting email would look like. There is also a .PDF version of this invoice attached to the email.
Setup payments with Flex Dollars
This article describes the Flex Dollar and Payroll Deduction feature, a specialized payment method for handling partial payments with credits. This feature allows your users to apply a pre-defined amount of flex dollars towards a permit purchase, with the system automatically notifying administrators of the remaining balance to be processed via payroll.
OPS-COM Support Configuration
The Flex Dollar Payment feature is a custom development, tailored specifically for one client, Trent University. It is not intended to be useful to, or available to all clients. Its availability is controlled by specific configurations set up by an OPS-COM Support team member.
This feature requires configuration by an administration of your system, and must also be enabled by an OPS-COM support team member before it can be used. The setup involves defining the selectable flex dollar amounts, setting the notification email, and assigning the payment type to the appropriate users.
This feature is enabled by a system-level setting that is typically configured by OPS-COM support upon request. Once enabled, you may proceed with the steps below.
Configuration and Functionality
-
To enable flex dollars, hover over System Configuration, and click System Settings.
-
Click Permits.
-
Enable the checkbox beside Enable Flex Dollars.
Configure Email Notifications
An email address must be configured to receive a notification internally and each time this payment method is used (and the details of the transaction for accounting).
-
Hover over System Configuration, Payments and click Manage Flex Dollars
-
In the Flex Dollars Alert Email text box, enter an email address you will be monitoring.
This email address must be monitored for any changes to be made to student flex dollar balances.
Define Flex Dollar Amount
Create the specific flex dollar values that users can select during checkout.
-
Hover over System Configuration, Payments, and click Manage Flex Dollars.
-
Click the Add New button.
-
Enter a Label. This is the text the user will see in the drop-down menu (e.g., "Apply $100 of Flex Credit").
-
Enter the corresponding numeric Value (e.g.,
100.00). -
Click Save.
-
Repeat this process for all the pre-determined flex dollar amounts your organization offers.
Assign Payment Method to User Types
Finally, this payment method must be enabled for the specific user types who are permitted to use it.
-
Hover over System Configuration, Users, and and click User Types.
-
Select the user type you wish to grant access to (e.g., Staff).
-
In the user type settings, assign the Flex Dollars/Payroll Deduction payment option.
-
For detailed instructions, please refer to the User Types Administration wiki article.
Using this Feature
Once configured, the feature provides a streamlined workflow for users and a clear notification process for administrators.
User Purchase Workflow
-
An eligible user adds a standard term permit to their shopping cart.
-
On the checkout page, they select Flex Dollars/Payroll Deduction as the payment method.
-
A new drop-down menu appears, populated with the flex dollar Labels you configured.
-
The user selects an amount and completes the transaction. Their permit is considered valid and is issued immediately.
Administrator Workflow (Post-Purchase)
-
Upon successful purchase, an email is automatically sent to the address configured in "Flex Dollar Alert Email" field.
-
This notification contains the key information needed for manual processing:
-
User's Name and Contact Information
-
Permit Details
-
Flex Dollar Amount Applied
-
Remaining Balance Due
-
-
Your administrative team (e.g., Payroll or Parking department) uses this information to confirm users flex dollar balances the remaining balance via your organization's internal payroll system.
-
For auditing purposes, a note detailing the flex dollar amount is also automatically added to the users transaction payment record.
The payroll deduction component is not an automated process and neither is the updating of Flex Dollar balance. The system's function is to calculate and report the remaining payroll deduction balance to administrators.
Best Practices & Considerations
-
This payment option will only appear to eligible users when their cart contains only standard permits. It will not be available if other items, such as violation payments or locker rentals, are also in the cart.
-
Use clear and descriptive labels for the flex dollar amounts (e.g., "Use $75 Payroll Credit"). This transparency is key to reducing user confusion and support requests during the checkout process.
-
Ensure the staff who manage payroll are aware of this workflow and understand how to act on the email notifications. Clear internal communication is critical to the success of this feature.
-
External Verification & Reconciliation: It is critical to understand that OPS-COM does not verify real-time flex dollar balances with any external system. Administrators are solely responsible for independently verifying the spent flex dollar amounts with their HR/payroll department and managing any discrepancies or adjustments outside of the OPS-COM system.
Note: this type of payment is treated as a full, successful payment. The system does not have split-payment logic or backend validation of flex balances beyond recording the user's chosen amount.