User Configuration
User Types
User Types in OPSCOM categorize your system users (e.g., Student, Staff, Public) and control various aspects of their interaction with the system, including access to specific lots, available payment options, and the fields visible on their profile. Configuring user types allows administrators to tailor the OPSCOM experience to different user groups, ensuring appropriate permissions and functionalities.
Setup & Configuration
User Type configurations are managed through the User Type Administration tool.
This will open the User Type Administration page, displaying a list of your existing User Types.
Creating a New User Type
New user types must be assigned to one of these categories. These are hardcoded and cannot be changed.
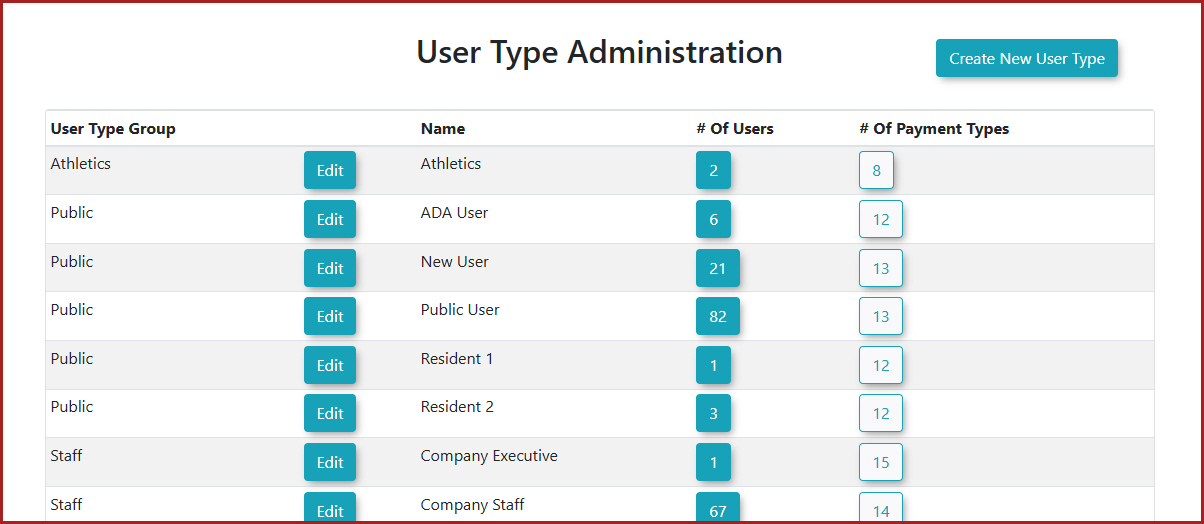
Once saved, your new user type (e.g., Public Parker) will appear in the list.
You can also create user types to allow you to categorize your archived users. Refer to this wiki article to learn about managing archived users by user type.
Using this Feature
Applying a User Type to a User
A User Type can be assigned to a user when their account is created or changed at any time later.
Searching by User Type
User Types can be used as criteria in various search tools within OPSCOM. You can use the User Search tool or you can click the # of Users button beside the lot to automatically perform a search for this user type.
Searching for Payment Types Assigned by User Type
You can click the # of Payment Types button to immediately see a list of all payment types associated to each user type.
Configuring Access to Lots with User Types
User Types play a critical role in controlling access to parking lots.
User-Side Lot Visibility
When a user logs into the system (e.g., as "Joseph Callaghan" who is a student), and attempts to purchase a permit:
Deleting or Archiving a User Type
Best Practices & Considerations
Limiting Active Vehicles
OPSCOM allows administrators to control the number of active vehicles a user can have associated with their profile. This feature, configured through User Types, helps manage parking inventory, prevent abuse, and ensures that users maintain a reasonable number of active vehicles in the system. This article explains how to set these limits and how they impact the user experience.
Setup & Configuration
Limiting active vehicles is controlled through the settings of individual User Types. For detailed information on working with user types, refer to this wiki article.
- Hover over System Configuration, then Users, and click Types. You'll be redirected to the User Type Administration page.
Editing Active Vehicle Limits for a User Type
- Locate the user type you wish to edit from the list (e.g., Full Time Student) and click Edit.
- Locate the Extra Active Vehicles field. This number represents how many additional active vehicles a user of this type may have on their profile, beyond the first required active vehicle.
- For example, if you set this number to
1, the user may have a maximum of2active vehicles (their one required active vehicle + one additional).
- For example, if you set this number to
- Enter the desired number to reflect the maximum additional active vehicles allowed.
- Click Update User Type to apply your new limit.
Using this Feature
Once the active vehicle limit is set for a user type, it directly affects how users interact with their vehicle information on the user portal.
What Users See on the User Portal
- A user logs into their portal and clicks the Vehicle tab to access their vehicle information section.
- This tab displays any vehicles currently associated with their profile (e.g., a "beige Acura" with plate "ABC316").
- The user attempts to add a new vehicle by clicking Add New Vehicle, fills out the information, and clicks Save Changes. A pop-up message will confirm the vehicle was successfully added, and it will appear on their Vehicles tab.
Exceeding the Active Vehicle Limit
If a user tries to add a vehicle that would exceed the configured limit (e.g., attempting to add a third vehicle when the limit is set to a maximum of 2 active vehicles):
- The user enters the vehicle information and clicks Save Changes.
- They will still receive a pop-up message indicating the vehicle was successfully added.
- However, the newly added vehicle will appear on the Vehicles page in an Inactive state.
- If the user attempts to make this third vehicle active by toggling its state, they will receive a pop-up message indicating that the vehicle cannot be made active due to the limit set for their user type.
Minimum Active Vehicle Requirement
Conversely, if a user attempts to make all vehicles on their profile inactive, a pop-up will appear indicating that the user must always have at least one active vehicle associated with their profile.
Best Practices & Considerations
- Understanding the "Additional" Limit: Remember that the
Active Vehiclesnumber you set represents additional vehicles beyond the one required active vehicle. A setting of0means a user can have a maximum of one active vehicle. A setting of1means a user can have a maximum of two active vehicles, and so on. - Existing Vehicles are Grandfathered:
- Important Note: If you reduce the number of allowed active vehicles for a user type, users who currently have more active vehicles than the newly reduced setting will not be immediately affected. They are "grandfathered in" with their current active vehicles.
- The new, stricter rule will only come into effect when the user attempts to add new vehicles or reactivate previously inactive vehicles in the future.
- Existing Vehicles Already in System: If the vehicle being added is already present in the system but not currently associated with the user's profile, the user will be prompted to add this existing vehicle. The same active vehicle rules described here will still apply to this process.
- Clarity for Users: While the system provides pop-up messages, it can be helpful to inform users about active vehicle limits in your FAQs or permit purchasing guidelines to manage expectations.
Manage User Departments
User Departments allow administrators to categorize users based on their departmental affiliation within an organization. This feature enhances user management by enabling better organization, reporting, and potentially targeted communications or access controls, ensuring that user data is structured and easily manageable.
Using this Feature
- Hover over System Administration, then Users, and click Manage User Departments. The Manage User Departments page will display. This page provides a simple interface to add, edit, and delete user departments.
Adding User Departments
- Click Add User Department and enter the desired Department Name.
- Click Save Changes.
Editing User Departments
- Locate the user department you wish to modify in the list.
- Click the Edit button next to the department.
- Update the existing name of that department.
- Click Save Changes.
Deleting User Departments
In order to delete a user department, it must not currently be in use by any user in the system. Administrators must first ensure that no users are assigned to this department before it can be removed.
-
Locate the department you wish to remove from the list.
-
Click the Delete button next to the department and click Confirm.
Best Practices & Considerations
- Reflect Organizational Structure: Create user departments that accurately reflect the departments or divisions within your organization. This helps with reporting and user organization.
- Consistency in Naming: Use clear, consistent, and recognizable names for your departments to avoid confusion.
- Data Integrity: Always ensure that no users are assigned to a department before attempting to delete it. Reassigning users to another department (or to "None" if applicable) is a necessary step to maintain data integrity.
- User Profile Integration: Remember that these departments are selected when creating or editing a user's profile, providing a key piece of information for user categorization.
- Reporting: Categorizing users by department can be highly valuable for generating targeted reports or analyzing trends across different parts of your organization.
Related Video
Locker User Types
Locker User Types allow administrators to categorize users specifically for the purpose of locker management. This enables flexible control over who can access and utilize certain locker areas or types, enhancing organizational efficiency and tailored access to locker resources.
Setup & Configuration
Locker User Types must be created within OPSCOM before they can be assigned. This is done via the Manage Locker User Types screen.
- Hover over System Configuration, then Users, and click Locker User Types.
The Manage Locker User Types screen appears, listing any existing Locker User Types. This list typically includes the Name of the locker user type, and the Number of user records associated to that type.
If you do not see the settings mentioned above, please contact support@OPSCOM.com to have them enabled for you. You will need the permission of your Primary Admin.
Adding a New Locker User Type
- Click on the Add Locker User Type button.
- Enter the full Name of the user type (e.g., Public User).
- Click Save Changes (or similar button).
The Manage Locker User Types screen will refresh, and your new user type will be added to the list.
Using this Feature
Assigning Locker User Types to User Profiles
- Hover over User Management and click User Search.
- Search for the user you want to edit.
- Edit their profile and choose the Locker User Type from the picklist.
- Click Submit Profile Information, review the submission, and click the Information Correct button.
Locker User Types are not editable or viewable on the User Side portal. They must be assigned by administrators only.
Assigning Locker User Types to Locker Areas
Once Locker User Types are created and assigned to users, they must also be associated with Locker Building Areas to control user access to specific lockers.
Refer to this wiki article for information about assigning Locker Types to Building areas.
Best Practices & Considerations
- Logical Categorization: Create Locker User Types that align with your organization's locker access policies (e.g., "Student Dorm," "Staff Locker," "Gym Member," "Public Day Use").
- Deletion Policy: A Locker User Type can only be deleted if no users are currently assigned to it. Once a user has been assigned to a Locker User Type, that user type will no longer display the delete button. You must reassign all users from a Locker User Type before it can be deleted.
- Clear Naming: Use clear and concise names for both the full Name and Short Name to avoid confusion.
- Coordinate with Locker Areas: Remember that simply assigning a Locker User Type to a user profile is not enough. You must also link the Locker User Type to the relevant Locker Building Areas to define actual access permissions.
- Admin-Only Assignment: Since Locker User Types are not visible or editable by users, ensure your administrative staff are properly trained on how to assign and manage them.
Login Sources (SSO)
Login Sources define the various methods by which users can sign into the system. This feature provides administrators with flexible control over user authentication, allowing for standard OPSCOM logins or integration with external identity providers like SAML or LDAP, enhancing convenience and security for diverse user populations.
Setup & Configuration
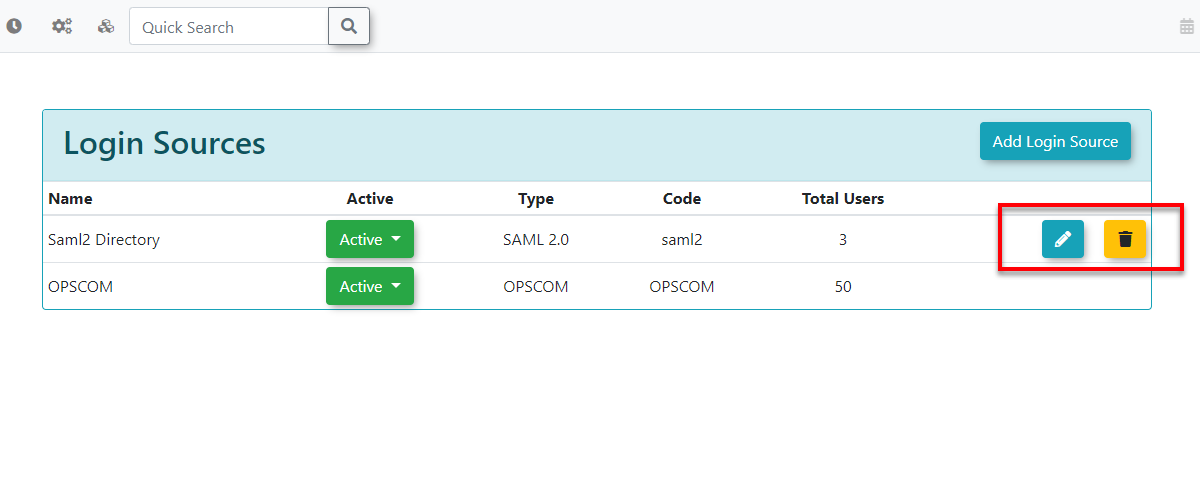
Login sources are managed under the System Configuration menu, within the Users section.
- Hover over System Configuration, Users, and click Login Sources.
Default Login Source
- OPSCOM is the default login source. This means that, by default, users will log in directly to OPSCOM using a username and password created within the system itself on the standard login screen.
- If you disable the OPSCOM default login source, then only other configured login sources, such as SAML or LDAP, will be active for user logins.
Adding Login Sources
OPSCOM supports multiple login sources, allowing some users to utilize SSO while others log in directly.
-
On the Login Sources page, click the Add Login Source button.
-
Fill out the required information:
- Red fields are required to be filled before you can click Save.
- Yellow fields are technically required for the login source to function correctly, but they will still allow empty or invalid values to be saved initially. Yellow fields can also indicate that a change has been made to the field.
The Login Source - Code field is crucial as it's what the user profile will match against when associating users with this new login source. However, only one login source code can be activated at a time for a particular type (e.g., you can have multiple SAML configurations, but only one primary 'SAML' code active for user matching at a time if the system differentiates by 'type' of code rather than unique code string across all). The source name (code) itself is typically determined by your Identity Provider, with the exception of 'OPSCOM' for direct logins.
-
Name can be anything that is identifiable to you.
- Login Source is what you will see on the user profile to indicate if this user will login with a special source. Often is is called SSO or SAML
- Domain Name for OPSCOM to use should be set to the OPSCOM domain without any references to admin etc. For example, if the domain name you login looks like CLIENTID.admin.OPSCOM.com/admin, this should be changed to CLIENTID.OPSCOM.com only.
- Do not fill out the rest of the fields until you are ready to follow the instruction for setting up your SSO information.
-
Click Save Changes to add the new login source.
Using this Feature
Once login sources are added, you can manage their status and properties.
Managing Login Sources
From the Login Sources page, you can manage your configured login sources using the buttons next to each entry:
- Click Edit to modify an existing login source's details. This will bring up the same form used for adding, allowing you to update its configuration.
- Click Delete to permanently remove a login source from the list. A confirmation pop-up will usually appear before deletion.
Active/Inactive/Hidden Login Sources
You can make Login Sources Active, Inactive or Hidden. If a source is made Inactive, users who were previously connected will no longer be able to login and must be changed to a different login source.
Best Practices & Considerations
- Strategic Planning for Multiple Sources: Carefully plan your login source strategy. Determine which user groups will use which login method (e.g., students via SAML, staff via LDAP, public users via OPSCOM direct login).
- User Provisioning: Consider how users will be created and linked to their login sources. Will they be auto-created on first login, or pre-imported? This linkage uses the Login Source - Code field.
- Disabling Default OPSCOM: If you intend for all users to access via an external SSO, ensure you disable the OPSCOM default login source. Test thoroughly before making this change in a live environment.
- Testing New Sources: Always thoroughly test any new login source after configuration to ensure users can successfully authenticate and access the system.
- Communication with Users: Clearly communicate to your users how they are expected to log in, especially if you introduce new SSO options or change existing methods. Provide clear instructions and links.
- Inactive vs. Deleting: Use the Inactive function for temporary deactivation or if you foresee needing to reactivate a login source in the future. Use Delete only when a login source is permanently no longer needed and has no associated active users.