Violations Configuration
- Ticket Categories
- Ticket Offence Items
- Sort Violations for Quick Access
- Handhelds Devices Settings (Handheld Commons)
Ticket Categories
Ticket Categories in OPSCOM allow administrators to define and manage different types of violations (e.g., Municipal, Parking, Bicycle). This feature is essential for accurate incident reporting, enforcing specific rules, and tailoring violation processes, including whether tickets apply to vehicles or users, and their visibility on handheld devices.
Using this Feature
The Manage Ticket Categories screen allows for comprehensive configuration of how different violations are classified and processed.
1. Hover over System Configuration, then Violations, and click Manage Ticket Categories.
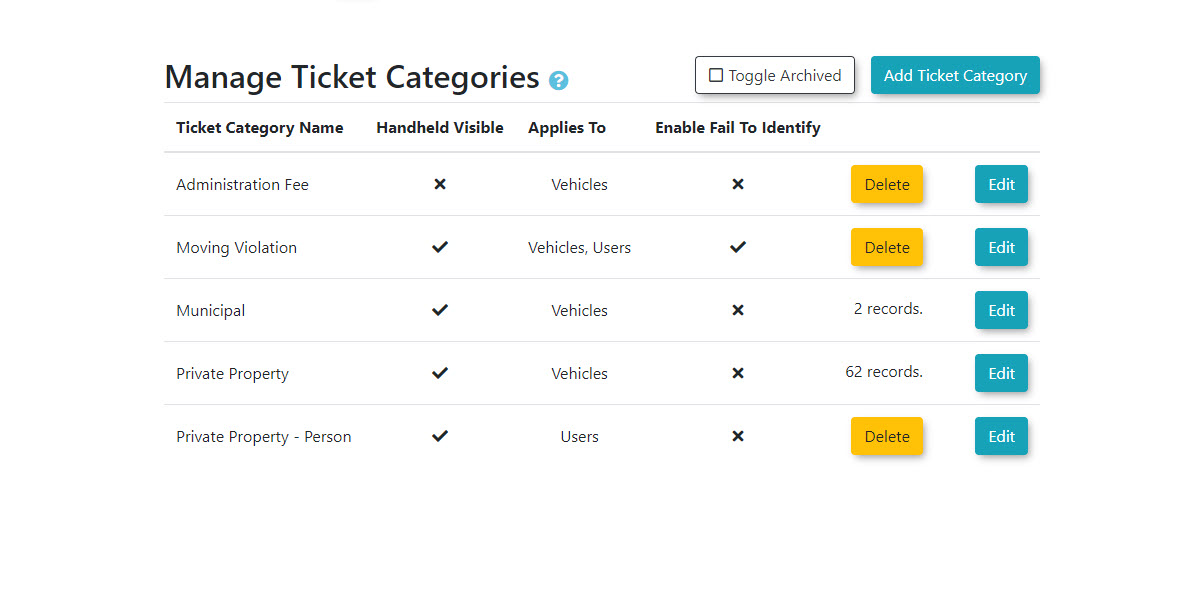
Adding Ticket Categories
Editing Ticket Categories
Archiving Ticket Categories
Ticket Types can be deleted, however, they are not actually removed from the system's database. Instead, they are archived to preserve the integrity of any historical data associated with that Ticket Type (e.g., past violations that used this type).
Best Practices & Considerations
Ticket Offence Items
Ticket Offence Items define the specific violations (e.g., "Parked with No Proof of Payment," "Expired Meter") that can be issued within OPSCOM. This feature allows administrators to configure fine amounts, discounts, and specific behaviors for each offence, ensuring accurate and consistent enforcement across both web and handheld platforms.
Using this Feature
- Hover over System Configuration, then Violations, and click Manage Ticket Offence Items.
- The Manage Ticket Offence Items page opens. This page provides comprehensive tools to add, edit, and configure individual offence items.
Adding a New Offence Item
- In the top left box, select the Ticket Category (e.g., "Private Property") you wish to add an offence item to, or choose Unassigned Offence Items.
- Click Add New Offence Item.
- Fill out the following fields:
- Enter the Violation Type Description (e.g., "Parked With No Proof Of Payment").
- Select the Ticket Category it belongs to (e.g., "Private Property").
- Enter a Key. This optional field indicates specific tracking codes for violations (e.g., internal audit codes).
- Enter a By-Law code This optional field is used by municipalities to link violations to specific by-laws when sending them to court for collections. It is a text field that accepts up to 20 alphanumeric characters.
- Enable the Administrative Fee if required. (More about this below)
- Fine Amount, Adjustable Fine Amount, and Discount Settings are covered below.
- Click Save New Offence Item when complete.
Setting the Fine Amount and Discount
- Fine Amount: Set the base fine amount (e.g., "$30.00").
- Apply Discount: Enable this checkbox if you wish to offer a discount for early payment.
- Discount Amount: Enter the amount of the discount (e.g., "$10.00").
- Discount Days: Set the number of days within which the discount applies (e.g., "14" days).
- Example: If the fine is $30.00, and a discount of $10.00 is applied if paid within 14 days, the collected fine will be $20.00. After 14 days, the discount does not apply, and the full $30.00 is due.
- Click Save Ticket Offence Item to save this configuration. You will be returned to the list view with your new offence listed under its Ticket Category.
Is This Fine Amount Adjustable?
This can be useful for scenarios such as repeat offenders or multiple offences. Officers can, at their discretion, increase the ticket amount (e.g., for repeat violations) or reduce it (e.g., when issuing multiple violations for less than the combined full amount), in accordance with your organization's business rules.
Enable the Adjust Fine Amount checkbox in the ticket configuration screen:
- Default - (Off): By default, this feature is turned off. The fine amount will appear on handheld units as a grey, non-editable figure.
- Enabled - (On): When turned on, the fine amount will appear in black text on handheld units, allowing patrol officers to edit the amount.
Administration Fees
Admin Fees are useful for charges like Conviction Fees or Booting Fees. Offence items designated as Administration Fees do not show on handheld units. They are only visible on the admin interface, ensuring field officers don't issue them directly.
You can designate an offence item as an Administration Fee by selecting the Administrative Fee checkbox.
- Configuration Example: To set up a $20.00 administration fee for removing a boot from a vehicle:
- Toggle the Administration Fee checkbox On. This will also prevent the offence item from being synced with handhelds.
- Set the Fine Amount to "$20.00".
- Click Save Ticket Offence Item.
Editing, Deleting, and Archiving Offence Items
- Editing: Click the Pencil icon next to the Offence Item and make your changes. Click the Update Ticket Offence Item button to confirm.
- Deletion: Ticket Offence Items can only be deleted if there are no violations already written for that particular offence item.
- Archiving: Once a violation has been issued using a specific Offence Item, that item can no longer be deleted. Instead, it will be archived to preserve the integrity of any data associated with it, ensuring historical reports remain accurate.
Best Practices & Considerations
- Clear and Specific Offence Names: Use descriptive names for offence items to avoid ambiguity (e.g., "No Parking - Fire Lane" vs. "Parking Violation").
- Fine and Discount Strategy: Carefully define your fine amounts and discount structures to encourage timely payment and align with your enforcement policies.
- Handheld Visibility Management: Strategically decide which offence items are visible on handhelds. Keep the list concise for field officers, moving less common or admin-only fees to the "Administration Fees" category.
- By-Law Code Accuracy: For municipalities, ensure the By-Law Code is accurately entered and consistent with legal requirements for court collections.
- Ordering Violation Types: The system sorts the list of violation types alphanumerically. To achieve a specific custom sort order on both admin interfaces and handheld units, you can prefix the Offence Item Name with numbers or spaces. (A space is considered higher than an 'A'.)
- Example:
Zebra Offence,Test Offence,A Test Offence
- Example:
- Leverage "Adjust Fine Amount" with clear business rules for officers, and properly categorize "Violation Applies To" (Vehicle vs. User) to fit various enforcement scenarios.
Related Videos
Sort Violations for Quick Access
OPSCOM allows administrators to customize the display order of Ticket Offence Items (violations) for quicker access, especially useful for frequently used offences. By strategically adding spaces to the beginning of offence names, you can control their sorting order on both the admin interface and handheld devices, improving efficiency for enforcement officers and data entry personnel.
When managing a long list of violation offence items, it can be time-consuming to scroll and find specific offences. The challenge is to reorder this list for quick access, ensuring the most commonly used offences appear at the top.
The system sorts lists alphanumerically. We can take advantage of the fact that a space character () comes before all alphanumeric characters in the ASCII character table. By prefixing a violation name with one or more spaces, you can force it to appear higher in the sorted list.
Example of Sorting with Spaces:
Zebra Offence(two spaces, sorts first)Test Offence(one space, sorts second)Apple Offence(no space, sorts third)Bottle Offence(no space, sorts fourth)
Let's walk through a practical example of reordering a list of violations.
- Hover over System Configuration, then Violations, and click Manage Ticket Offence Items.
- In this example, we will select Private Property as the ticket category. This will display a list of violations categorized under "Private Property."
Reordering Violations - An Example
We want to reorder the list so that "Parked in No Parking Area" lists first, "Parked Blocking Fire Hydrant" lists second, and the rest of the violations list in alphabetical order after that.
-
Modify "Parked in No Parking Area":
- Click on Parked in No Parking Area to select it. The screen will refresh with the entry information for the violation.
- Add a single space to the very beginning of the Violation Type Description field.
- Click Save Violation Type.
- Result: The list will now show " Parked in No Parking Area" (with the space) as the first item.
-
Modify "Parked Blocking Fire Hydrant":
- Next, select Parked Blocking Fire Hydrant.
- Add a single space to the beginning of its Violation Type Description.
- Save the violation type.
- Result: The listing will change again. However, since both now have one space, " Parked Blocking Fire Hydrant" will appear before " Parked in No Parking Area" due to alphabetical sorting of the rest of the name.
-
Adjusting Order with Multiple Spaces:
- To ensure "Parked in No Parking Area" appears first and "Parked Blocking Fire Hydrant" second, we need to use a different number of spaces.
- Select Parked in No Parking Area again.
- Add a second space to the beginning of its Violation Type Description (so it has two spaces:
Parked in No Parking Area). - Save the violation type.
- Result: The list on the left now shows " Parked in No Parking Area" in the first position, followed by " Parked Blocking Fire Hydrant" in the second position, and then the rest of the violations in alphabetical order.
Best Practices & Considerations
- Consistency is Key: If you start using spaces to sort, apply the method consistently across all relevant lists (e.g., if you sort one category of offences, consider sorting others for a uniform experience).
- Minimal Spaces: Use the fewest number of spaces necessary to achieve your desired order. For example, if you only need one item at the very top, one space is sufficient. If you need two items, one gets two spaces, the other gets one.
- Handheld Impact: Remember that this sorting method affects the display order on both the admin interface and handheld units, directly impacting the efficiency of your enforcement officers in the field.
- Documentation: If multiple administrators manage ticket offence items, document your sorting strategy internally to maintain consistency and prevent accidental reordering.
- No Wildcards: This method relies on actual space characters, not wildcards (
*) or other special characters that might not function as expected in sort orders.
Handhelds Devices Settings (Handheld Commons)
The Handhelds Devices section in OPSCOM allows administrators to manage and configure handheld devices used for enforcement and data collection. This includes registering new devices, pushing messages, and updating device settings, ensuring seamless operation for field personnel and accurate data synchronization.
Setup and Configuration
In order to user the handheld as a ticket writer, you will need to have the following permission set:
- Display as Ticket Writer: Ability to be a ticket writer on the Handheld Tablets or on the system.
This setting comes with the role Patrol Officer by default. To check if this role is set up in your system:
- Go to System Configuration, Admin Management, and click Manage Roles.
- Select the role for Patrol Officer and click on the tab for violations.
- You should see the box labeled Display as Ticket Writer checked.
For more information on managing roles, click here!
Before accessing a handheld device for the first time, new admin users are required to log in through the online admin portal and complete their initial password reset.
Using this Feature
- Click Tools, then Handhelds Devices. Alternatively, you can access this on the Violations menu as well.
- The Handhelds - Common Settings screen appears, where you can manage various aspects of your handheld fleet. From here, you can edit settings such as ticket due dates, customize ticket footers, view device information, and add or manage individual handheld units.
Adding a New Device
When adding a new handheld device, the process involves both the device itself and the OPSCOM system configuration.
- Install Software: Start by installing the OPSCOM for Android software on the handheld device.
- Obtain UUID: After the first login attempt on the device, you'll receive a notice indicating the device isn't registered. This message will display a UUID (Universally Unique Identifier) number. This is a 16-digit alphanumeric code typically found under your login screen on the device.
- Register Device in OPSCOM:
- Once on the Handhelds - Common Settings page in the admin portal, click Add New Device.
- A new screen will open. You must add the following information:
- UUID: Enter the UUID obtained from the handheld device.
You will need to include all characters in the UUID, including dashes between the groups of characters. Some UUIDs do not have dashes.
-
-
- Server to Sync with: Always start by selecting the Production Server. This is a critical step for initial device registration, regardless of whether the device will eventually be used for testing on a Preview server (explained further in "Production Server First (Crucial)" under Best Practices & Considerations).
- Name: Enter a descriptive name to easily identify this device (e.g., "Patrol Unit 1," "Enforcement Officer John's Device").
- Ensure the Enabled checkbox at the top of the entry form is selected.
- Click Add Device once all information is in place.
-
Pushing Messages
You can send messages directly to your configured handheld units:
- On the Handhelds - Common Settings screen, click the Push Message button.
- Follow the prompts to compose and send your message to the selected devices.
Updating Device Data
To modify settings for an existing handheld device:
- On the Handhelds - Common Settings screen, click on the device name you wish to update. This will open a drop-down list of editable settings.
- Make your desired changes to the device's configuration.
- Once finished, ensure you click Process Updates to save and apply your changes to the device.
Best Practices & Considerations
- Production Server First (Crucial):
- Important Note: Due to the underlying logic of the Handheld Common tool, you must always register a new handheld unit on the Production admin portal first, even if its ultimate purpose is for testing on a Preview site.
- The system initially connects to the production server, then references the
PA Common/handheld assignmenttable (which is written from production) to determine if a unit is registered for Production or Preview. This ensures the correct routing is established in the database. - This initial production-side registration is also why you can refresh preview sites without losing the handheld units configured for them.
- Adding a Handheld Unit to Preview for Testing:
- Start by refreshing your preview site to ensure it’s using the latest data. For details, see Create or Refresh a Preview Space.
- First, add the handheld unit to Handhelds - Common Settings on the production admin portal as described in "Adding a New Device," but select your Preview Server in the Server to Sync with field. This sets the proper database route.
- Next, navigate to the preview admin portal and enter the exact same device information into its Handhelds - Common Settings section.
- Finally, perform a reinstallation of the OPSCOM for Android software on the handheld device itself. This reinstallation allows the handheld to pick up the newly set path to the preview server.
- Switching Between Production and Preview:
- Once a handheld entry exists in both Production (configured for Preview sync) and Preview, you can generally switch between environments by re-pointing the Sync With setting on both the Production and Preview admin portals to your preferred path.
- However, remember that you must perform a reinstallation of the software on the handheld unit each time you change the synchronization path in the system for the handheld device itself to update with the selected path.
- UUID Accuracy: Ensure the UUID is entered precisely, as any error will prevent the device from connecting.
- Descriptive Naming: Use clear, identifiable names for your handheld devices to simplify management and troubleshooting.