Integrating with OPS-COM
- Integrating with OPS-COM
- Parking Logix - Parking Sensor Integration
- Mistall - Setup & Functionality
- Hotspot - Permits Integration
- ParkMobile - Permits API Integration
Integrating with OPS-COM
Considerations for Scoping an Integration
Regardless of the integration we are scoping we need the following questions answered.
- What are the endpoints; where will we connect and send data?
- What system or URL are we querying?
- Test system logins and a test endpoint address to which we can send queries to.
- we will need the same for production systems
- Are there additional (special) API endpoints and/or API tokens to access the system?
- What API/SDK is recommended?
- at the core the OPS-COM platform is built on PHP; we also work with Java and many other languages
- Supporting documentation for the API/SDKs that we are integrating with
- technical contact(s); either on location and/or for the vendor.
- How will the data (or user) flow through the system? ie. business logic/flow
For Network Administrators
Our development servers are behind:
- 208.124.170.242
- 178.128.233.75
Our production servers are behind:
- 209.217.117.82
- 159.203.14.67
Information Flow through OPS-COM
This example shows the flow of information through the integrated system of record and OPS-COM.
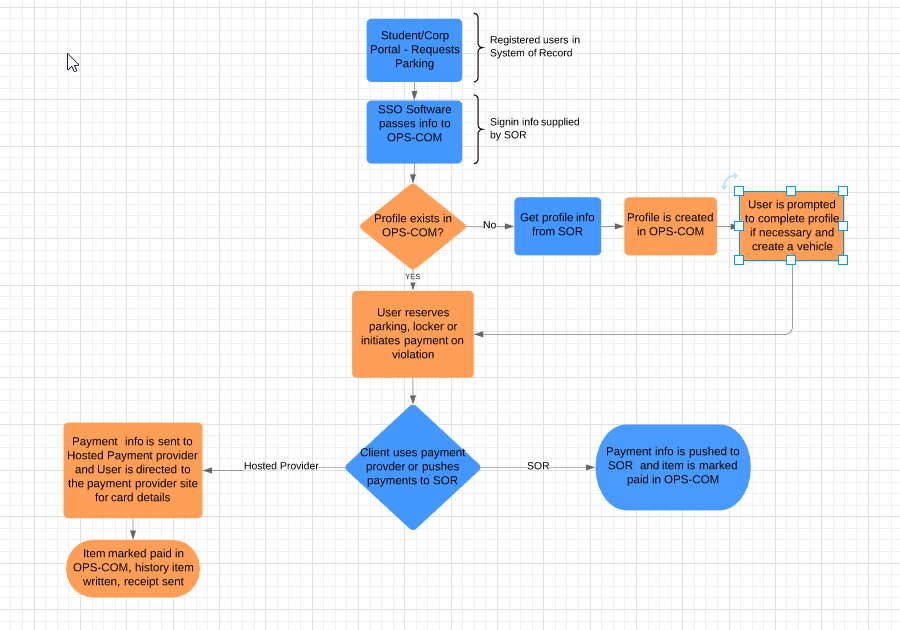
Sample: SSO Integration
This example shows the flow of a user through the system, and at what points the client wanted us to apply business logic.
Notice that in their implementation they also described the flag that would be used to designate special users in the system.

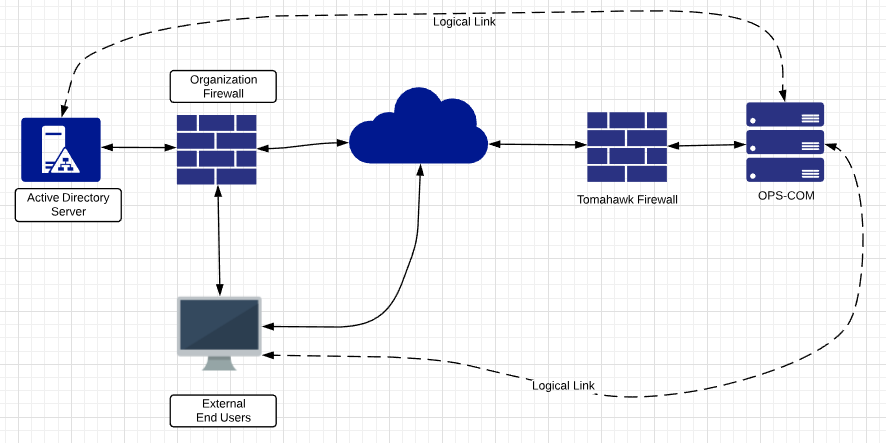
Sample: LDAP/Active Directory Integration
This represents a standard flow of information to support LDAP/AD user validation.
Current APIs Available
OperationsCommander (OPS-COM) has made APIs (Application Programming Interface) available that allow for third-parties with proper authentication to interact and manipulate data in OPS-COM as needed to accomplish specific functions, for example adding valid permits from pay and display machines.
Other Integrations Available
OPS-COM has integrations with third-parties. Your Sales Rep can discuss how you can make use of these integrations.
- T2 Luke II Meters
- CALE Meters
- MacKay Meters
- Tattile Cameras
- Vaxtor Cameras
- gTechna Cameras
- HotSpot Temporary Permits
Parking Logix - Parking Sensor Integration
Enable Parking Logix Integration
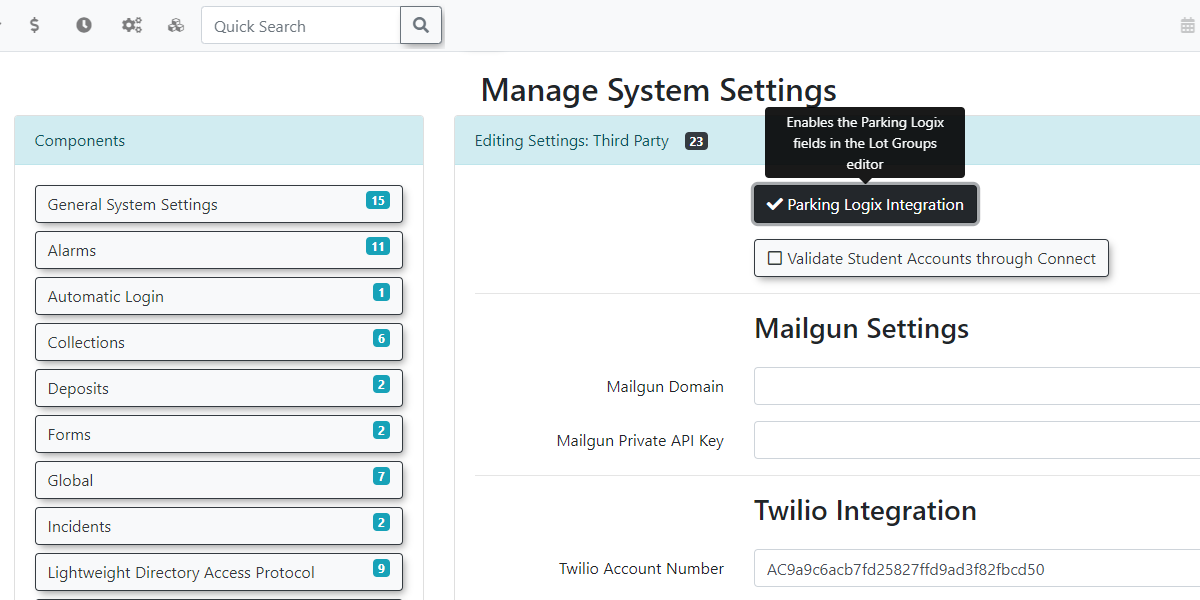
Before you can use the Parking Logix integration on your system you will need to navigate to your Third Party settings under System Settings.
From there you should see the option to enable Parking Logix Integration.
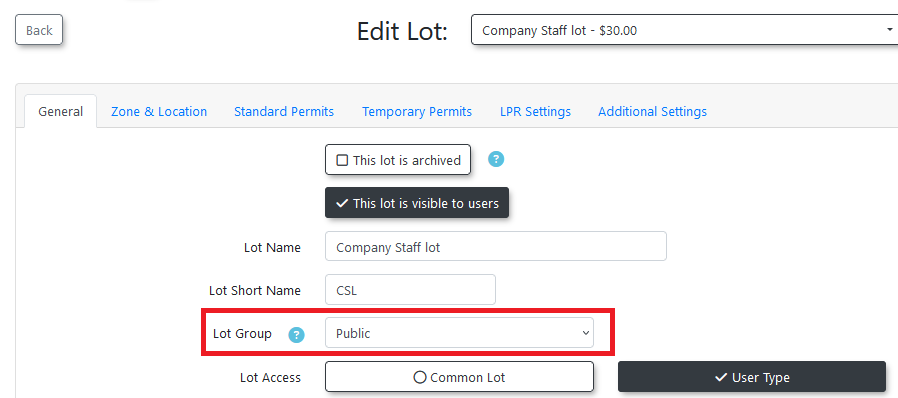
Adding the Lot Group
Next, add a new lot group to your system making sure you include the API code. It is possible but unlikely that there will be multiple API keys if lot access is split over several keys.
Create a specific group for each lot you will be collecting data from.
It's important to note that you will also need to enter the Parking Logix specific name for the lot and it must match exactly.
For example, in the image below, the Parking Logix name is Mountaineer Garage.

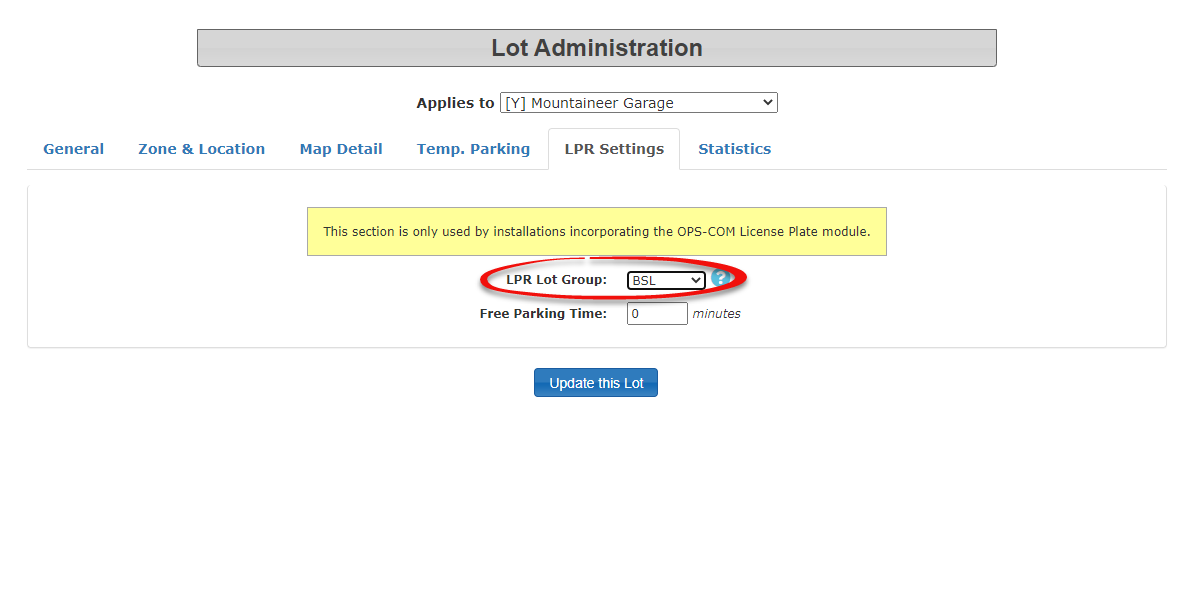
Once the Lot Group has been configured you would need to assign it to the lot on the LPR Settings Tab of the Lot Administration tool.
Enable the System Task
A system task must be enabled for the Parking Logix sensors to communicate with our system.
This must be enabled by OPS-COM integration staff and you can contact us through support to set this up. Please email support@ops-com.com for assistance.
Once the system task has been run you should see updated on the lot counts under Manage Parking Lot Groups
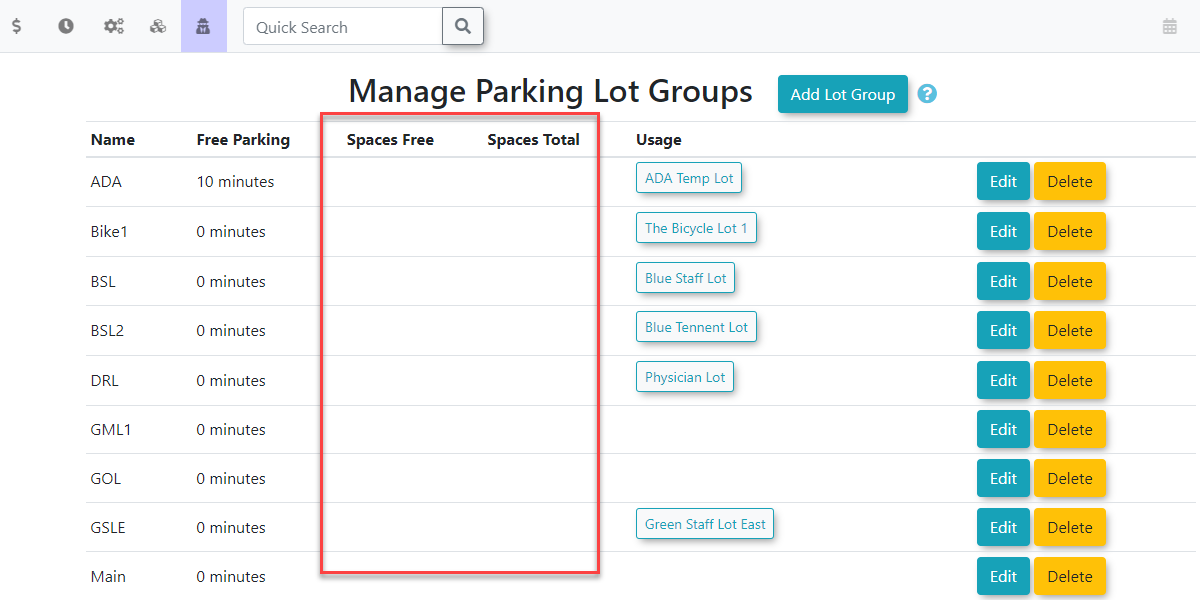
Displaying the Map on the User Side
Finally, enter the short code on the user side to any of your pages using System Messaging.
For more information on how system messaging works please see: https://wiki.ops-com.com/x/M4QCAw followed by Editing Pages.
The short code is [parking_logix] and you can pass addition parameters such as: only, show, filter, or name. This will restrict the list to show only specific lots.
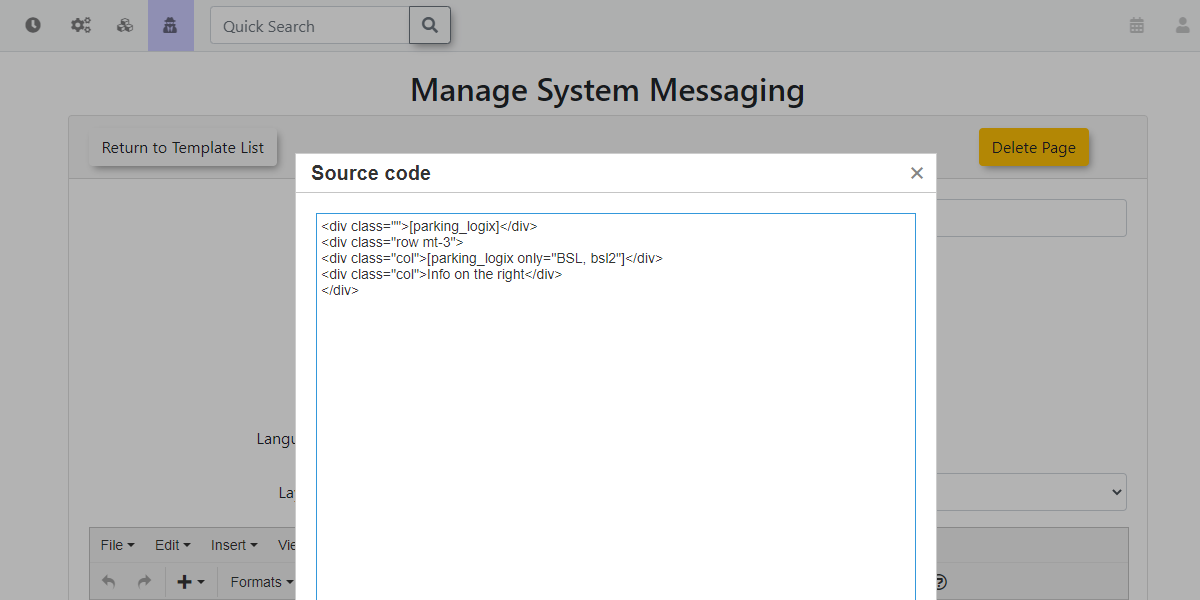
By design, it will only show lots that have a group assigned to it that have an API key stored in it.

Mistall - Setup & Functionality
Overview
Mistall is a service that is used to count cars in a physical lot, using cameras to track vehicles as they enter and exit the lot.
Within the OPS-COM system, each Mistall lot is associated to a Lot Group.
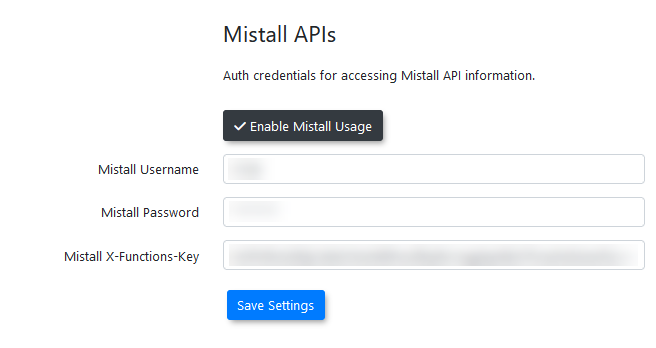
Mistall Credentials
Mistall credentials need to be entered in system settings under third-party settings to be able to use the API.
Credentials are provided to the the client by Mistall itself.
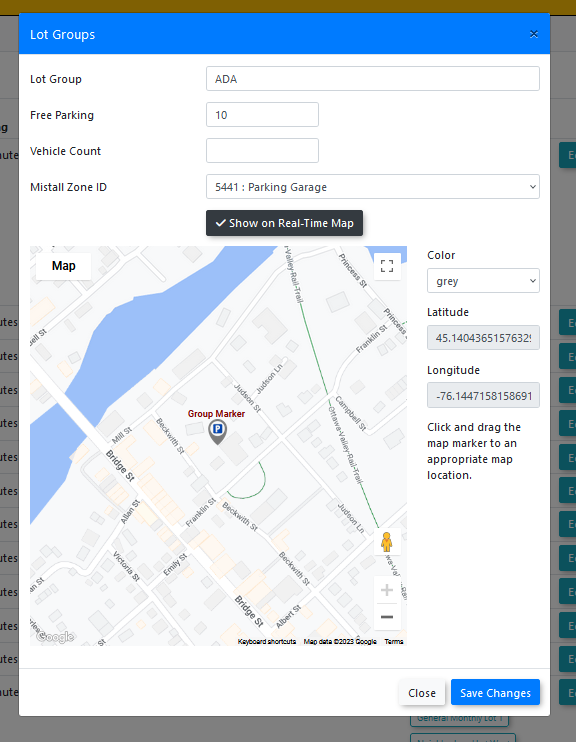
Lot Groups
The Lot Groups page was updated to accommodate the use of Mistall.
In addition, Lot Groups have replaced the use of Lots on the Real-Time map on both the admin and user sides.
To have data populate the Mistall Lot ID dropdown, the Update Mistall System Job Task must be run at least once to import the data into the system.
Columns have been added for setup with the Real-Time Map and Mistall data. These are the following fields.
-
Map color - map icon color
-
Latitude and longitude - location on the map, selected by putting a point on the map
-
Show on Real-Time map - Select if the group will appear on the real-time map
-
Mistall Lot ID - which Mistall lot the Lot Group correlates to (Supplied by Mistall)

Lot Edit
This group must be associated to the lots you wish to configure for Mistall use. In the lot editor on the General tab, you will find the Lot Group Field. select the associated Lot Group from the drop down.
Note: This field to set the lot group has been moved from the LPR section to this General section. This is to allow clients who are not using the LPR system to still use the real-time map features.
Dashboard Widget
The imported Mistall data can be displayed on the dashboard in a widget.
The widget is named mistall-lot-stats.
If the system setting for Enable Mistall Usage is not enabled, this widget will not appear in the edit dashboard page.
The widget shows the raw Mistall data. The names of the lot groups associated to the data will be shown beside the bar chart.
Note: If the Mistall data is not yet associated to a lot group, it will show the Mistall lot name instead. This is the name given to the lot by Mistall.

Real-Time Maps
The admin and user-side real-time maps have been updated to use lot groups in additional to the individual lots as pins on the map.
The functionality of the maps is not dependent on the use of Mistall in a system.
If your system doesn’t have the Mistall integration enabled, the lot groups will use the data of the associated lots in place of Mistall data for the real-time maps.
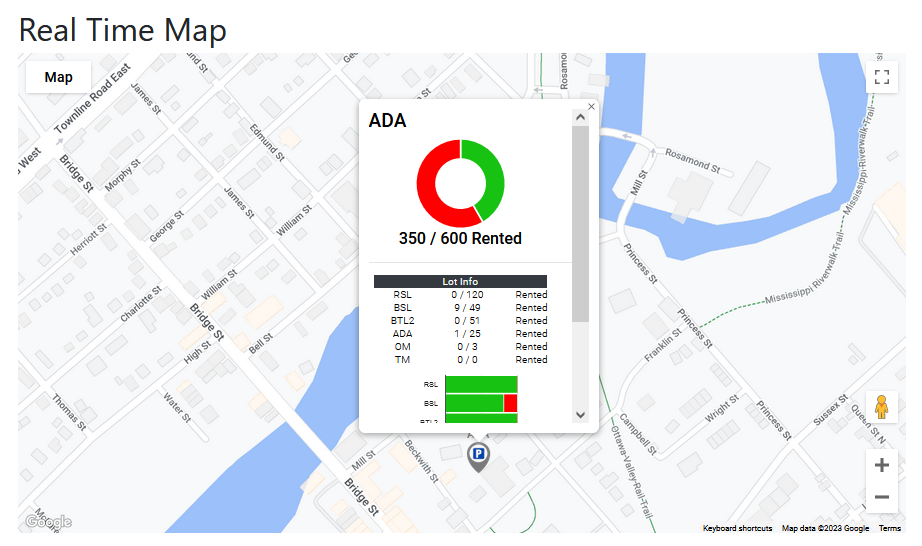
Admin-Side Map
The admin map has been updated to use lot groups.
When a lot group is clicked on, it will show the new popup.
Note: If the lot group has no Mistall data associated to it, it will use the collated counts of the lot info below instead.
If Mistall data is being used for the lot, it is likely it will not match the counts shown in the lot info window below. It is intentional that the information will not match.
The intention is that the client will be able to see the difference between what is physically present in the physical lot (lot group Mistall stats) and what the permits purchased within the system look like in comparison.
For example, if the lot is physically empty but is maxed out on purchased permits, the number of available permits can be increased for that lot.
User-Side Map
The user-side map has also been updated to use lot groups.
As before, the user map is made to appear by placing the shortcode on a client-created page.
There are two shortcodes available to use for the real-time map.
[real-time-map] - Displays the actual map.
[real-time-legend] - Displays a legend explaining the color coding used in the map.
The user-side map will now appear like this:
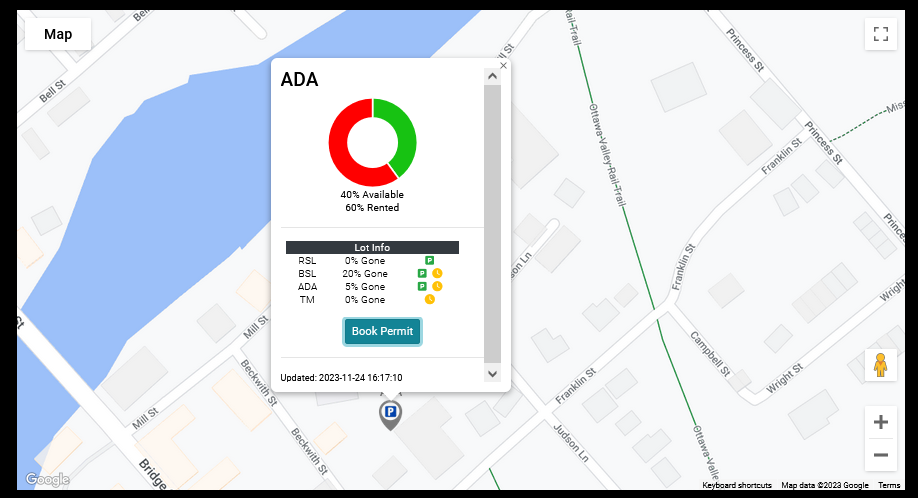
The donut graph at the top shows the Mistall data if it is present. If the lot group does not have an associated Mistall lot, it will show the collated counts of the lot info below.
The lot info shown below the donut graph is from the permit counts in the system.
Unlike the admin-side map, the information here is presented as a percentage instead of the actual numbers. This is to allow for some leeway for any inaccuracy.
The icons to the right display if the lot allows standard or temporary permits.
-
Green is standard.
-
Yellow is temp.
The map should be accessible for Guest Users who are not logged in. If the user is logged in, they will be able to see standard permits and temp permits, but if they are not logged in, they will only be able to see temp permits.
The book permit button now takes the user to a new page used for selecting a permit from within the selected lot group.
User-Side Lot Group Page
The lot group page shows much the same data as the regular permit page, just with the data specific to the selected lot group.
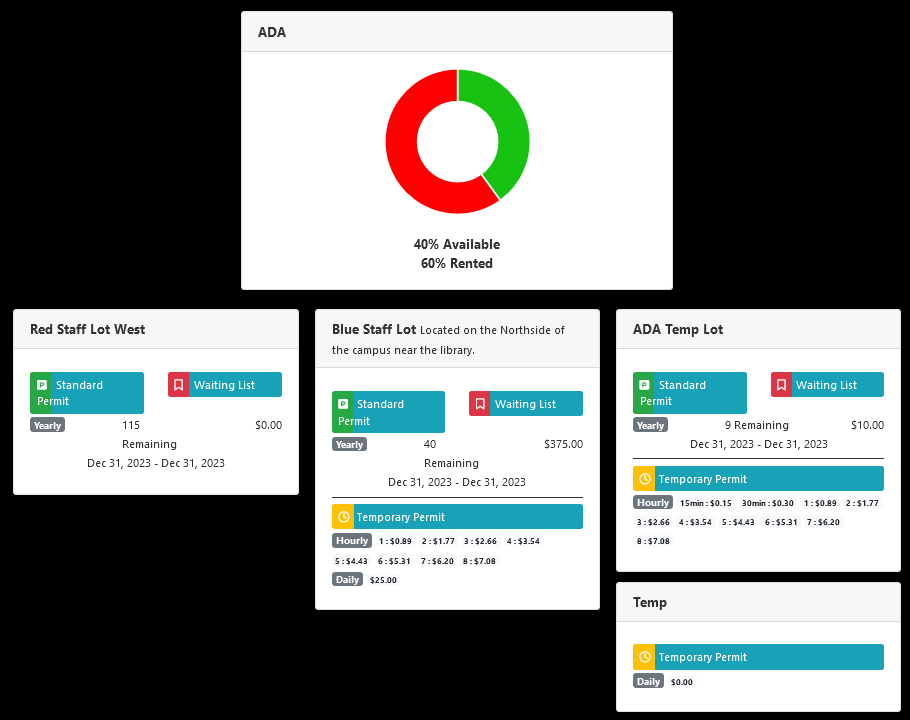
At the top of the page, the same donut graph from the pop-up window on the map is shown, displaying a percentage of availability. It is calculated from the Mistall data or the lots below if there is no Mistall data for the lot group.
The lots are shown below. If the user is a guest (not logged in), they will only be able to see temporary permits on the page.
The standard permit booking button will take the user to the regular standard permit booking page, but the temporary permit booking button will take the user to the quick checkout.
This is the checkout used for QR codes and the old version of the map. It allows the user to purchase the permit and checkout immediately without adding it to their cart.
Hotspot - Permits Integration
To configure a lot to work with the HotSpot app, you must configure a zone for any lot where you want this service to be available. Once a zone is associated with a lot or multiple lots, any user purchasing a permit through HotSpot would be valid in all lots associated with the that zone which is configured in Lot Administration. This article will illustrate how to create the zone and apply it to a lot.
Setting up a HotSpot zone
To begin you must set up the zone under Admin Options. Hover over the Parking menu item and select Lot Zones from the drop down list.

In the Manage Lot Zones screen click on Add to access the add zone form

Enter the name of the lot zone you wish to add. In our example the lot zone is 1001

Once you have the zone name entered, click on Add Zone to save your selection. It will now show up in the drop down list of zones.

Applying a Zone to a Lot
To apply this zone to a lot, you first need to go into Lot Administration to add the zone to your selected lots.
To access the lots, go to the Parking Management menu and hover over Lot Administration. Select Pricing and Admin from the resulting drop down menu.

In our example we will add this zone to the lot called Green Staff Lot East. Click on the lot name to access the configuration tool.

Once in Lot Administration for the specific lot, click on the Zones & Location tab to access the zone configuration section.

In the Zones & Location tab click on Add Zone by Days to select the 1001 zone we created.

Select 1001 from the resulting drop down list.

For our example we can leave the defaults as is which includes:
The day range - leave it with all days of the week selected. (Highlighted in green)
The Start and End Time. (00:00 to 23:59 - in other words all day)
To save your settings click on the floppy disk (save) icon.

Click on Update this Lot to save your changes.
ParkMobile - Permits API Integration
Introduction
ParkMobile is a service that offers on-demand parking payments, similar to HotSpot.
A system task is run at regular intervals to retrieve permits from the ParkMobile API, which are then stored in the local site as temporary permits.
Authorization Credentials
ParkMobile has a set of credentials that must be entered before data can be retrieved from their API.
These can be entered on the system settings page, which can be found under the menu tree:
-
System Configuration → System Setting

ParkMobile System Settings
Before the system task can be run and allowed access to the ParkMobile API, the proper API credentials must be entered in the relevant system settings, found under third-party settings.


Required Credentials
There are three values that must be provided for the system to be allowed access to the ParkMobile endpoint.
These values should be provided to the client by ParkMobile itself.
-
API Username
-
API Password
-
X-API-Key
Lot Zone Setup
Permits will only be imported into the OPS-COM system if the ParkMobile lot zone has a corresponding lot zone with the same name in the OPS-COM system.
If the local lot zone does not already exist for the ParkMobile lot zone, one will need to be created.
The lot zone management page can be found under the menu tree:
-
System Configuration → Parking → Manage Lot Zones

Lot Zone Management
To create a new lot zone, click on the Add Lot Zone button to open the add new modal.

This will open the modal used to add new lot zones.
Add the ParkMobile lot zone name as the Name of the lot zone, and then click save changes.
This will add the new lot zone to the system, which can now be used to match to ParkMobile permits coming into the system.

System Task
The ParkMobile system task is used to fetch permits from the ParkMobile endpoint and add them to the OPS-COM system as temporary permits.
System tasks can be be found under the menu tree:
-
Tools → View System Task Logs

System Tasks Page
The system task is named Fetch ParkMobile Stats.

The task must be enabled before it will run.
By default, it is set to run every 3 minutes.
The task can also be run manually by pressing the RUN button next to the task name.
Imported Permits
ParkMobile permits are imported as paystation (Cale) records, and will appear anywhere these records are used.
They can be viewed using the Pay Station Status page, which can be found under the menu tree:
-
Parking Management → Temporary Permits → Pay Station Status

Pay Station Status

