Customization and Integration
- Single Sign-On (SSO) and OperationsCommander - What do you need to Consider?
- Custom Development Expectations
- Supported Browsers, Handhelds, and Printers
- Integrations and Partners
- Integrating with OPSCOM
- Parking Logix - Parking Sensor Integration
- Mistall - Setup & Functionality
- Temporary Documentation for the Mistall Pilot
- Hotspot - Permits Integration
- ParkMobile - Permits API Integration
- Sending Email with OPSCOM
- Managed User Import (SFTP)
- Server IP Addresses
- Boot Management and Self-Release System
- PeopleSoft Integration for Payments and Holds
Single Sign-On (SSO) and OperationsCommander - What do you need to Consider?
Single Sign-On (SSO) offers a streamlined and secure way for your organization's users to access OPSCOM. Instead of managing separate usernames and passwords for OPSCOM, users can log in once using their existing company or institutional credentials, gaining seamless access to various services, including OPSCOM. This simplifies the login experience and enhances overall security.
What is Single Sign-On (SSO)?
At its core, SSO is about simplifying access. Imagine having one key that opens multiple doors. With SSO, that key is your single set of login credentials (username and password) that grants you access to various online applications and websites. Many organizations use SSO to provide their employees or members easy and consistent access to all their digital tools. When OPSCOM is integrated into your SSO system, your users can access our services without needing to create or remember another distinct account.
How SSO Works in a Simple Way
SSO acts like a central gatekeeper for your online services:
- You Request Access: When you try to log in to an online tool or website (like your work email or a school portal), the system recognizes it's an SSO-enabled service.
- Redirection to SSO: Instead of asking for your username and password directly, the website sends you to a dedicated SSO service – a trusted system specifically designed to handle logins for all your integrated applications.
- Your Single Login: On this SSO service page, you'll enter your username and password. This is the only time you'll need to enter these details to access multiple integrated services.
- Verification: The SSO service checks your login information. Once it confirms your identity, it creates a secure, temporary "digital pass" or token.
- Return to OPSCOM: This "digital pass" is securely sent back to OPSCOM (or the original application you wanted to access).
- Access Granted: OPSCOM recognizes and trusts this "digital pass," allowing you to immediately access your account and start using the system without any further login prompts.
Why Organizations Use SSO
- Convenience: Users only need to remember one set of login details for multiple applications.
- Time-Saving: Quick and effortless access to various services eliminates the need to repeatedly log in, improving productivity.
- Enhanced Security: With fewer passwords to manage, users are less likely to create weak passwords, reuse them across sites, or write them down, which generally leads to stronger overall security.
Key Considerations Before Setting Up SSO with OPSCOM
Implementing SSO requires planning and coordination to ensure it aligns with your organization's specific needs and security protocols.
-
Investment Required: SSO is a premium feature within OPSCOM. There is a setup fee and recurring fees associated with its functionality. To begin the process and discuss pricing, please contact your Sales Representative or email support@ops-com.com.
-
User Types and Access:
- Will certain groups of users (e.g., students, staff) use SSO, while others (e.g., the general public) continue to use a direct OPSCOM login?
- Do you need different login methods for different user types?
-
User Data Management:
- How do you prefer to get your user accounts into OPSCOM initially?
- Do you want new user accounts to be created automatically "on the fly" when a user logs in via SSO for the very first time?
- Do you need user information in OPSCOM to automatically stay synchronized with your main organizational system (Identity Provider) over time, or is a one-time import sufficient?
- Which specific user details (like name, email, student ID) from your existing system do you want to be shared and synchronized with OPSCOM?
Our Client Success team is ready to guide you through these important considerations and help tailor the SSO setup for your organization's success and seamless operation.
Custom Development Expectations
Planning & Scope
For clients wishing to pay for custom development, it is critical that a well thought out scope is developed with your Account Executive (AE). If you are designing the scope with the AE we consider you the project lead for your organization. It is important to provide us with workflow documentation, explanations of the problem you are trying to solve with your custom development and your ideal end result. There are 2 areas you need to consider:
- Goals
- Requirements
Goals - What are You trying to do?
What is the end goal or specific outcome you want. For example, you may wish to simplify the user experience or issue violations more efficiently. Provide us with as much detail as possible.
Requirements
Clearly, define all the processes you want in a step by step description. The following is a brief example:
- Adding a user’s middle initial to their profile
- Is this a mandatory field in the profile?
- Will all Users be prompted to update their profiles? Will it be on next login?
- What if they don’t have a middle initial?
- Once instituted will the initial be required on reports? If so which ones?
- Will it be required to be populated on violations?
- Consider all aspects that the change will affect and address them.
Our development team needs to understand the objectives to design you the best solution. It is not necessary to dictate the solution just to define the end result. Try to assume that you are explaining this to a person that doesn't understand any of the processes and are reading about this for the first time. Your scope documents will be supplied to Development through the Project Manager. You may get questions back that need to be answered before we can proceed. You may also get redirection in the plan so that the solution flows better than originally scoped.
Shared Development
If the custom development requested is deemed to be of enough benefit to other clients, the OPSCOM team may propose a reduced development rate or a shared development plan. In some cases, your account executive will be aware of other clients that may be interested in crowd-sourcing this development.
Testing
Your completed project will be deployed to your preview (testing) environment after internal testing is complete. We expect you to review the project to ensure you are happy with the way it is functioning and give us the OK to deploy it to Production. We expect that you will do the testing within 2 weeks of the deployment to Preview. If your testing takes longer than that, additional charges can be incurred and you may lose your spot in the schedule.
Out of Scope Items
Despite best efforts, sometimes something gets overlooked when scoping the project. These items will be considered Out of Scope and may cost additional time and money. Your Account Executive will work with you to develop new scope around these items and a new quote will be issued for the additional work.
Supported Browsers, Handhelds, and Printers
Supported Browsers
OperationsCommander recognizes that our users may use various Internet Browsers when working with our system. We aim for all visitors to have the best possible experience while using OPSCOM, however, we do recognize that it is impossible to develop applications that work identically, efficiently and effectively on all web browsers. We make best efforts to support support the latest versions of Internet Explorer, Firefox, Chrome, and Safari browsers.
Mobile Devices and Tablets
This site supports browsing from most Mobile or Tablet devices. Content is sized and displayed based on the screen resolution and other display attributes of your device.
OPSCOM Ionic for iOS & Android - OPSCOM Enforce
A refreshed and smoother admin enforcement app currently in beta testing with select clients, compatible with both iOS and Android. Not yet feature complete.
More details can be found here.
OPSCOM Legacy (Android Only) - OPSCOM Parking Enforcement
The ViolationAdmin component provides in-field remote data access from mobile devices and smartphones. Using an Android handheld and a Bluetooth printer creating tickets for parking infractions is quick and easy. Site patrols sync enforcement and parking data to the system through cellular or Wi-Fi networks. With this remote technology, the system can apply validation rules moments after a user makes a permit purchase on the cloud-based user portal or connected remote devices.
More details can be found here.
Minimum Handheld Requirements
Not all Tablets or Mobile devices are supported for use with OPSCOM, as processing power and camera functions may vary. They must have at least the requirements listed below. Before committing to a device for use with OPSCOM, you are encouraged to perform your own testing to ensure you are happy with the perform on your preferred device.
OPSCOM no longer supports versions of the Android operating system lower than 7. Clients with devices that do not support at least version 7 will continue to function, however, you will not be able to download this or future versions of OPSCOM. This means you cannot take advantage of new functionality in future releases.
- OS Version - Minimum:
- Android, Version 11.0 (Red Velvet; 2020)
- iOS, Version 13.0 or later
- Minimum Processing Power - Quadcore: 4X 1.2 GHz
- Rear Camera: 8 MP Camera
- Autofocus - Yes
- LTE/4G and/or Wi-Fi Connectivity 1
1 LTE/4G or better is required if connecting with cellular providers and Wi-Fi is not available (required for data sync).
Recommended Tablet Specifications
- Samsung Galaxy Tab Active Pro Tablets with LTE & data plan, 8 or 10"
- Samsung Galaxy Tab A 8 or 10” Tablet with LTE & data plan
- iPad Wi-Fi + Cellular model
- iPad mini Wi-Fi + Cellular model
The Galaxy Tab Active Pro typically comes with its own heavy-duty rugged case. iOS tablets usually don’t, though, so keep that in mind—you may want to pick one up yourself!
Recommended Cellphones
- Samsung Flagship Cellphones, S20 through S24 (OPSCOM Testing Devices)
- Samsung XCover 4 & data plan
- Any mid-range or better Android phone 2
2 While such devices are generally expected to work, they have not been tested and may display layout irregularities. As such, full functionality cannot be guaranteed.
Supported Bluetooth Printers
Below is a list of supported Bluetooth printer models. Other models and makes may require custom development to support them. The printer must use 3" printer rolls in order to be compatible with our layout design.
| Printer Model |
|---|
|
|
|
|
|
|
|
Other Considerations
- Bluetooth vs. Wi-Fi: This depends on your use case. Generally, most clients can opt for the Bluetooth-only version since a Bluetooth-enabled device is used in tandem while patrolling.
- Linered vs. Linerless: This functionality determines the printer's ability to support labels with a backing and not just paper. A linered printer supports both, while a linerless printer only supports paper. Most clients only require the linerless version; however, it depends on your use case.

Integrations and Partners
Integrating with OPSCOM
Considerations for Scoping an Integration
Regardless of the integration we are scoping we need the following questions answered.
- What are the endpoints; where will we connect and send data?
- What system or URL are we querying?
- Test system logins and a test endpoint address to which we can send queries to.
- we will need the same for production systems
- Are there additional (special) API endpoints and/or API tokens to access the system?
- What API/SDK is recommended?
- at the core the OPSCOM platform is built on PHP; we also work with Java and many other languages
- Supporting documentation for the API/SDKs that we are integrating with
- technical contact(s); either on location and/or for the vendor.
- How will the data (or user) flow through the system? ie. business logic/flow
For Network Administrators
Our development servers are behind:
- 208.124.170.242
- 178.128.233.75
Our production servers are behind:
- 209.217.117.82
- 159.203.14.67
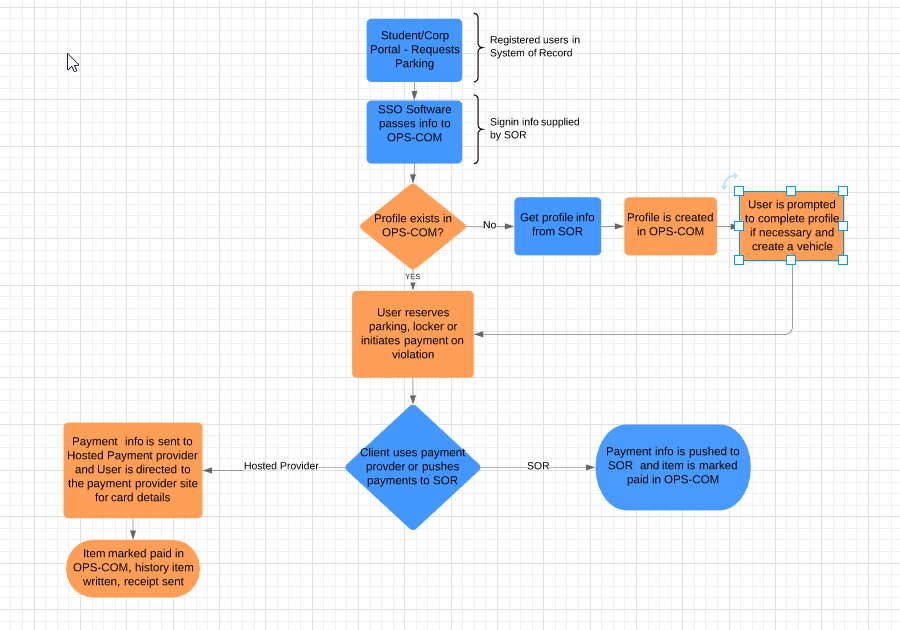
Information Flow through OPSCOM
This example shows the flow of information through the integrated system of record and OPSCOM.
Sample: SSO Integration
This example shows the flow of a user through the system, and at what points the client wanted us to apply business logic.
Notice that in their implementation they also described the flag that would be used to designate special users in the system.

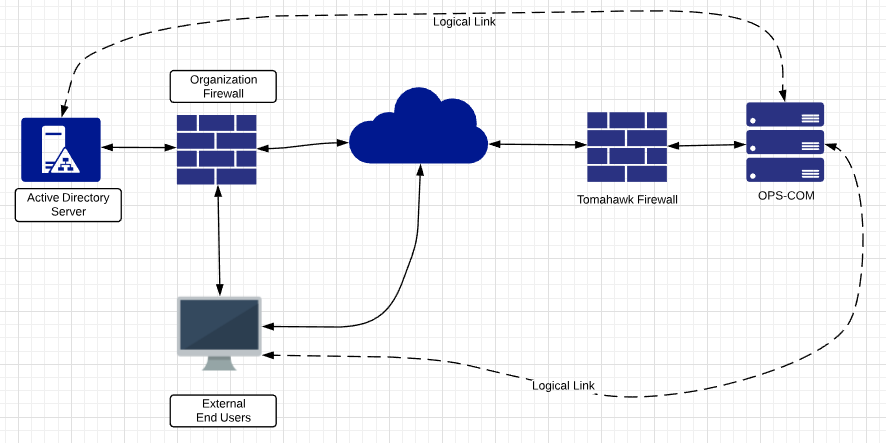
Sample: LDAP/Active Directory Integration
This represents a standard flow of information to support LDAP/AD user validation.
Current APIs Available
OperationsCommander (OPSCOM) has made APIs (Application Programming Interface) available that allow for third-parties with proper authentication to interact and manipulate data in OPSCOM as needed to accomplish specific functions, for example adding valid permits from pay and display machines.
Other Integrations Available
OPSCOM has integrations with third-parties. Your Sales Rep can discuss how you can make use of these integrations.
- T2 Luke II Meters
- CALE Meters
- MacKay Meters
- Tattile Cameras
- Vaxtor Cameras
- gTechna Cameras
- HotSpot Temporary Permits
Parking Logix - Parking Sensor Integration
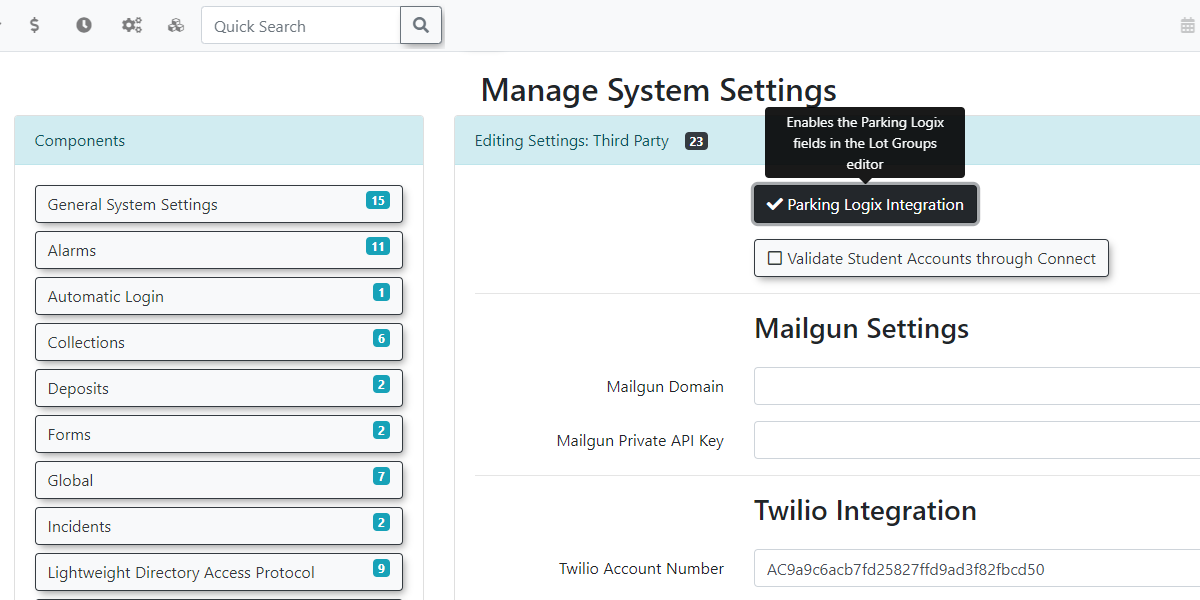
Enable Parking Logix Integration
Before you can use the Parking Logix integration on your system you will need to navigate to your Third Party settings under System Settings.
From there you should see the option to enable Parking Logix Integration.
Adding the Lot Group
Next, add a new lot group to your system making sure you include the API code. It is possible but unlikely that there will be multiple API keys if lot access is split over several keys.
Create a specific group for each lot you will be collecting data from.
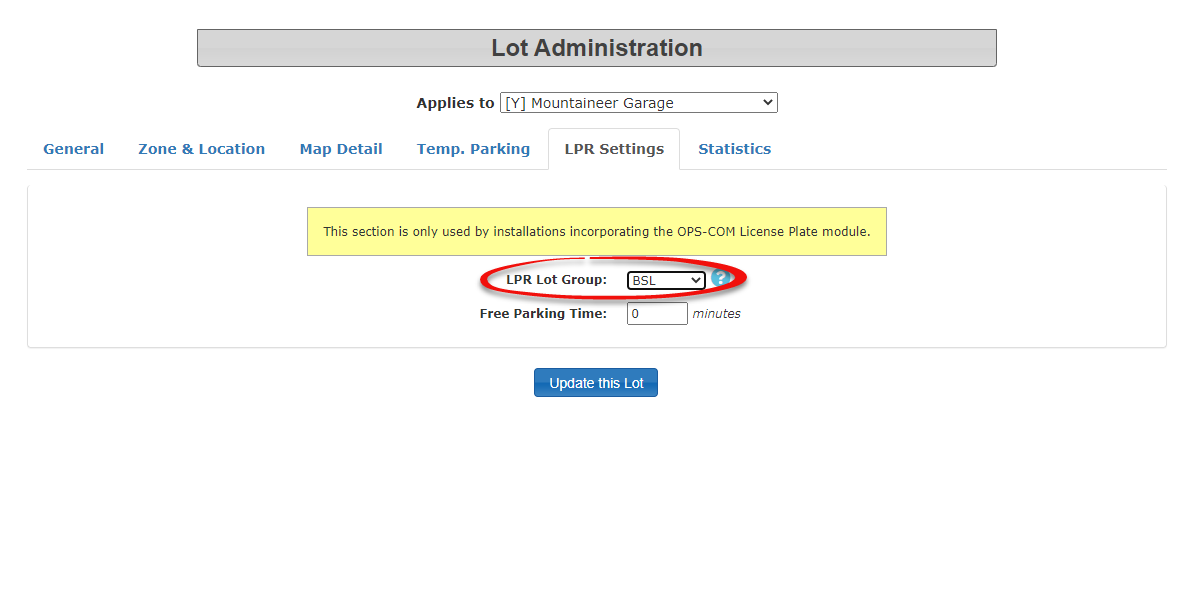
It's important to note that you will also need to enter the Parking Logix specific name for the lot and it must match exactly.
For example, in the image below, the Parking Logix name is Mountaineer Garage.

Once the Lot Group has been configured you would need to assign it to the lot on the LPR Settings Tab of the Lot Administration tool.
Enable the System Task
A system task must be enabled for the Parking Logix sensors to communicate with our system.
This must be enabled by OPSCOM integration staff and you can contact us through support to set this up. Please email support@ops-com.comcom for assistance.
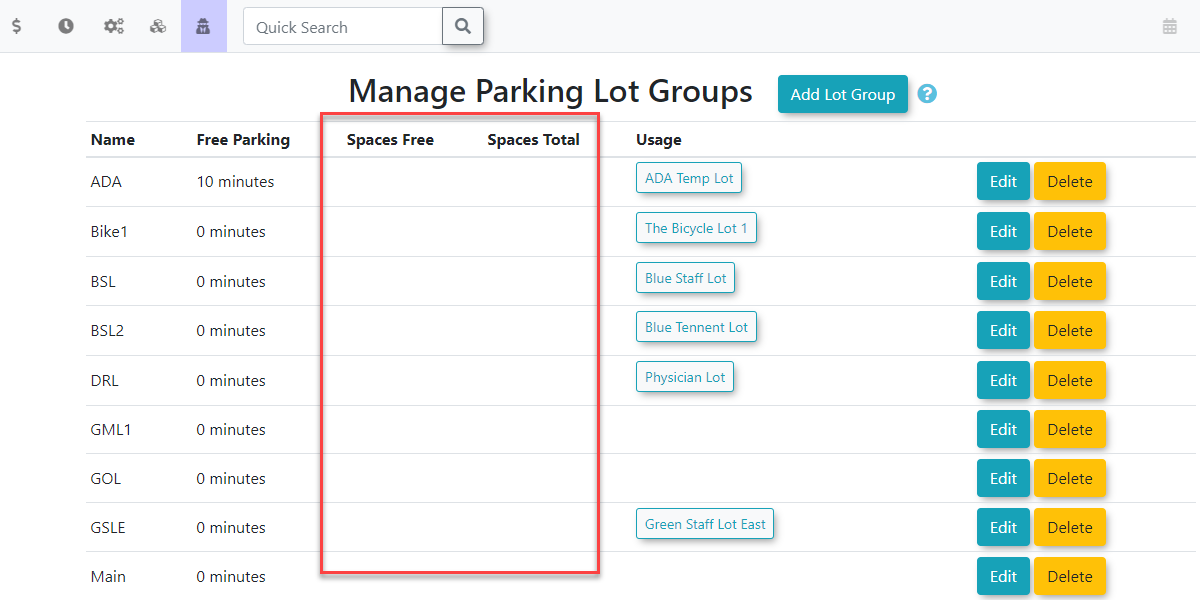
Once the system task has been run you should see updated on the lot counts under Manage Parking Lot Groups
Displaying the Map on the User Side
Finally, enter the short code on the user side to any of your pages using System Messaging.
For more information on how system messaging works please see: https://wiki.OPSCOM.com/x/M4QCAw followed by Editing Pages.
The short code is [parking_logix] and you can pass addition parameters such as: only, show, filter, or name. This will restrict the list to show only specific lots.
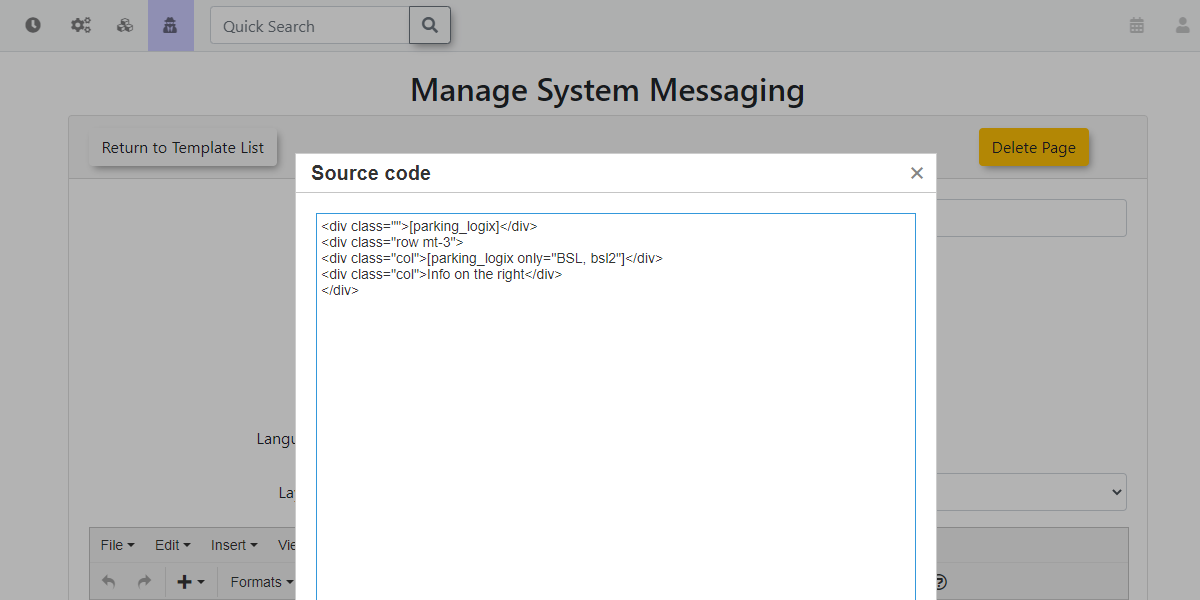
By design, it will only show lots that have a group assigned to it that have an API key stored in it.

Mistall - Setup & Functionality
Overview
Mistall is a service that is used to count cars in a physical lot, using cameras to track vehicles as they enter and exit the lot.
Within the OPSCOM system, each Mistall lot is associated to a Lot Group.
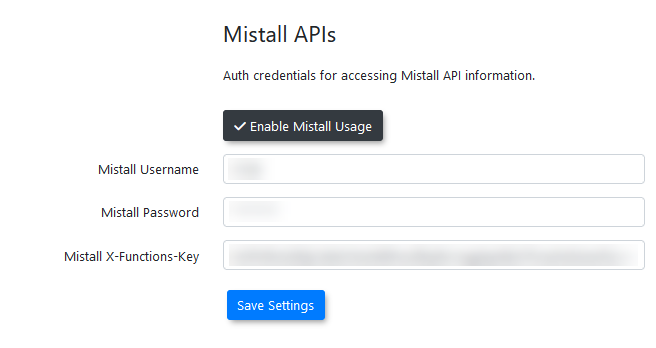
Mistall Credentials
Mistall credentials need to be entered in system settings under third-party settings to be able to use the API.
Credentials are provided to the the client by Mistall itself.
Lot Groups
The Lot Groups page was updated to accommodate the use of Mistall.
In addition, Lot Groups have replaced the use of Lots on the Real-Time map on both the admin and user sides.
To have data populate the Mistall Lot ID dropdown, the Update Mistall System Job Task must be run at least once to import the data into the system.
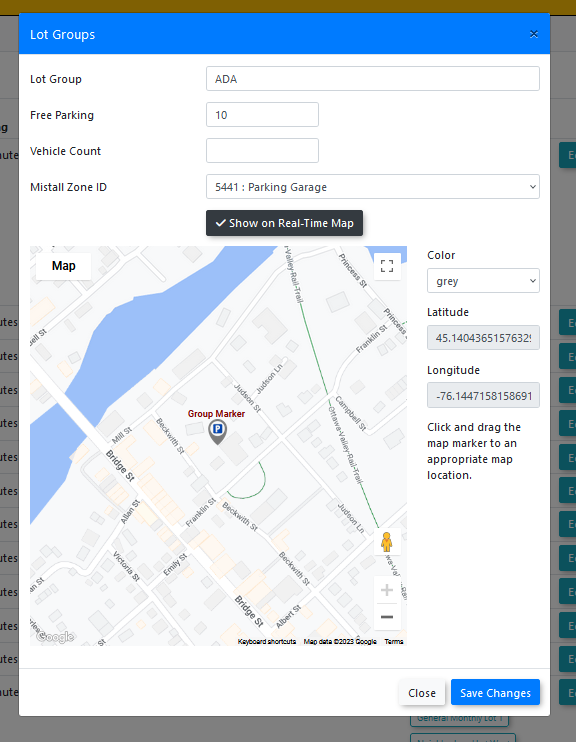
Columns have been added for setup with the Real-Time Map and Mistall data. These are the following fields.
-
Map color - map icon color
-
Latitude and longitude - location on the map, selected by putting a point on the map
-
Show on Real-Time map - Select if the group will appear on the real-time map
-
Mistall Lot ID - which Mistall lot the Lot Group correlates to (Supplied by Mistall)

Lot Edit
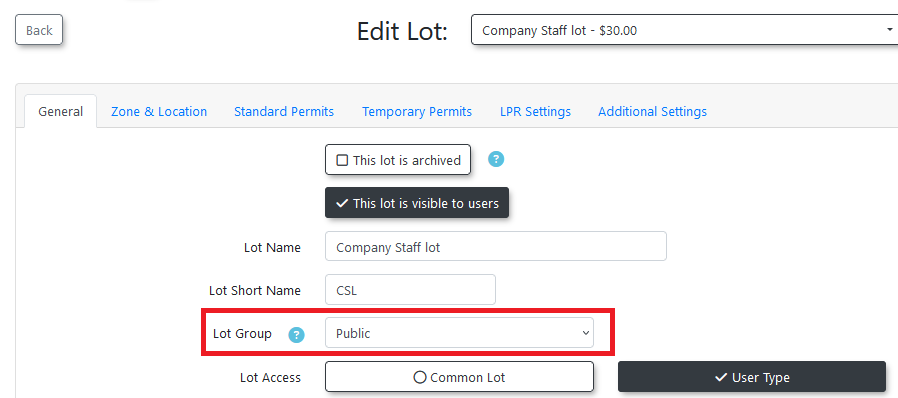
This group must be associated to the lots you wish to configure for Mistall use. In the lot editor on the General tab, you will find the Lot Group Field. select the associated Lot Group from the drop down.
Note: This field to set the lot group has been moved from the LPR section to this General section. This is to allow clients who are not using the LPR system to still use the real-time map features.
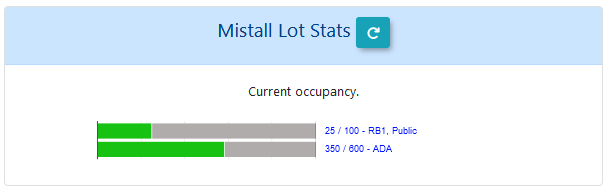
Dashboard Widget
The imported Mistall data can be displayed on the dashboard in a widget.
The widget is named mistall-lot-stats.
If the system setting for Enable Mistall Usage is not enabled, this widget will not appear in the edit dashboard page.
The widget shows the raw Mistall data. The names of the lot groups associated to the data will be shown beside the bar chart.
Note: If the Mistall data is not yet associated to a lot group, it will show the Mistall lot name instead. This is the name given to the lot by Mistall.
Real-Time Maps
The admin and user-side real-time maps have been updated to use lot groups in additional to the individual lots as pins on the map.
The functionality of the maps is not dependent on the use of Mistall in a system.
If your system doesn’t have the Mistall integration enabled, the lot groups will use the data of the associated lots in place of Mistall data for the real-time maps.
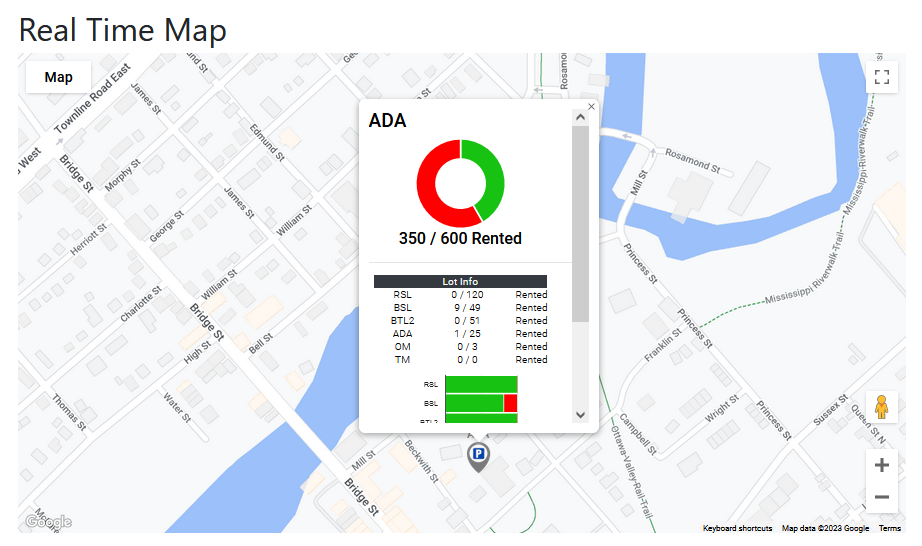
Admin-Side Map
The admin map has been updated to use lot groups.
When a lot group is clicked on, it will show the new popup.
Note: If the lot group has no Mistall data associated to it, it will use the collated counts of the lot info below instead.
If Mistall data is being used for the lot, it is likely it will not match the counts shown in the lot info window below. It is intentional that the information will not match.
The intention is that the client will be able to see the difference between what is physically present in the physical lot (lot group Mistall stats) and what the permits purchased within the system look like in comparison.
For example, if the lot is physically empty but is maxed out on purchased permits, the number of available permits can be increased for that lot.
User-Side Map
The user-side map has also been updated to use lot groups.
As before, the user map is made to appear by placing the shortcode on a client-created page.
There are two shortcodes available to use for the real-time map.
[real-time-map] - Displays the actual map.
[real-time-legend] - Displays a legend explaining the color coding used in the map.
The user-side map will now appear like this:
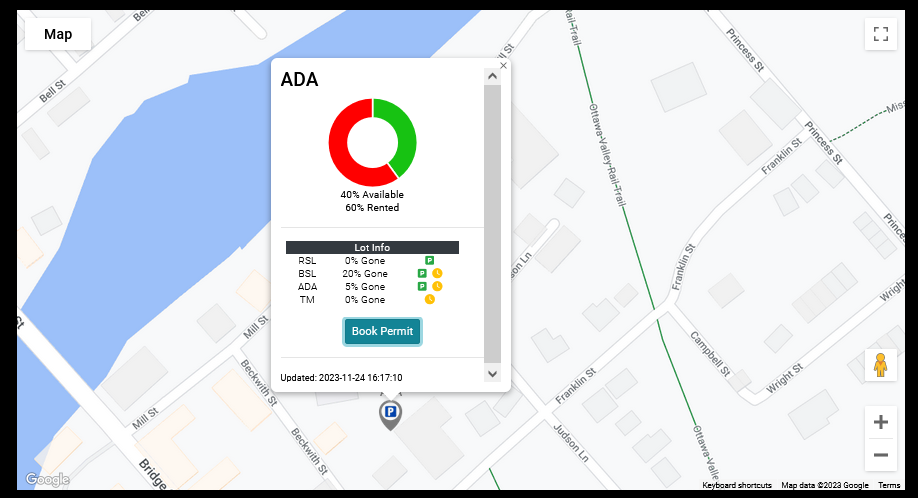
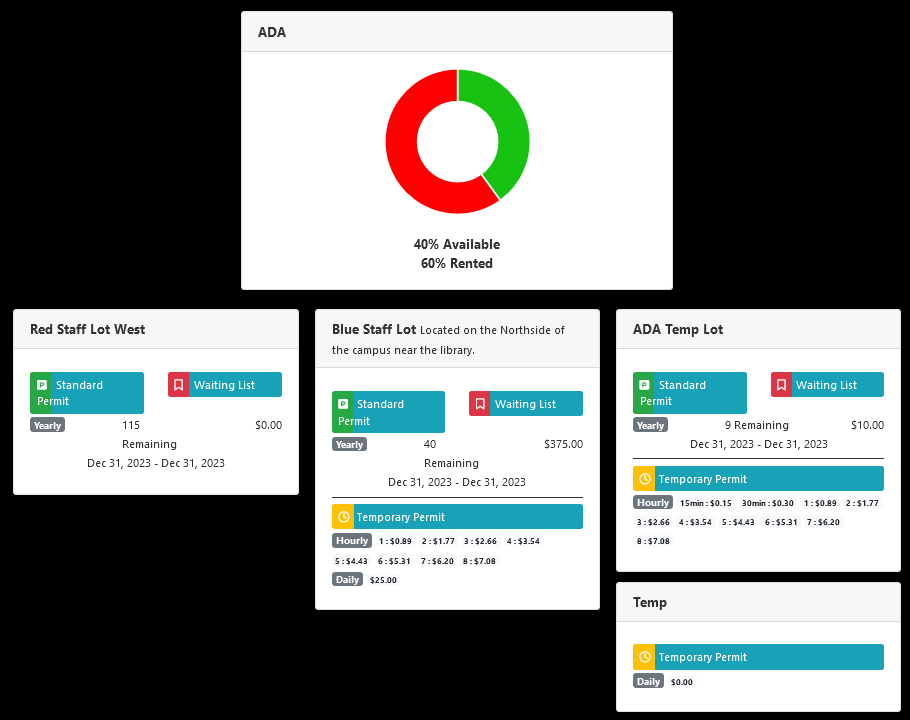
The donut graph at the top shows the Mistall data if it is present. If the lot group does not have an associated Mistall lot, it will show the collated counts of the lot info below.
The lot info shown below the donut graph is from the permit counts in the system.
Unlike the admin-side map, the information here is presented as a percentage instead of the actual numbers. This is to allow for some leeway for any inaccuracy.
The icons to the right display if the lot allows standard or temporary permits.
-
Green is standard.
-
Yellow is temp.
The map should be accessible for Guest Users who are not logged in. If the user is logged in, they will be able to see standard permits and temp permits, but if they are not logged in, they will only be able to see temp permits.
The book permit button now takes the user to a new page used for selecting a permit from within the selected lot group.
User-Side Lot Group Page
The lot group page shows much the same data as the regular permit page, just with the data specific to the selected lot group.
At the top of the page, the same donut graph from the pop-up window on the map is shown, displaying a percentage of availability. It is calculated from the Mistall data or the lots below if there is no Mistall data for the lot group.
The lots are shown below. If the user is a guest (not logged in), they will only be able to see temporary permits on the page.
The standard permit booking button will take the user to the regular standard permit booking page, but the temporary permit booking button will take the user to the quick checkout.
This is the checkout used for QR codes and the old version of the map. It allows the user to purchase the permit and checkout immediately without adding it to their cart.
Temporary Documentation for the Mistall Pilot
Overview
Mistall is a service that is used to count cars in a physical lot, using cameras to track vehicles as they enter and exit the lot. Within the OPSCOM system, each Mistall lot is associated to a Lot Group.
Mistall Credentials
See Support/Development for credentials.
Mistall System Job Task
-
Mistall data is fetched and stored in the system using a system job task.
-
The data is fetched from Mistall’s API service using the associated credentials entered in the system settings.
-
By default, it is set to run every 10 minutes.
Lot Groups
The Lot Groups page was updated to accommodate the use of Mistall.
In addition, Lot Groups have replaced the use of Lots on the Real-Time map on both the admin and user sides.
To have data populate the Mistall Lot ID dropdown, the Update Mistall System Job Task must be run at least once to import the data into the system.
Columns have been added for setup with the Real-Time Map and Mistall data.
-
Map color - map icon color
-
Latitude and longitude - location on the map, selected by putting a point on the map
-
Show on map - if the group will appear on the real-time map
-
Mistall Lot ID - which Mistall lot the Lot Group correlates to


Lot Edit
On the lot edit page, the selection to set the lot group of the lot has been moved from the LPR section to the general section.
This is to allow clients who are not using the LPR system to still use the real-time map features.

Lot edit page.
Dashboard Widget
The imported Mistall data can be displayed on the dashboard in a widget.
The widget is named mistall-lot-stats.
If the system setting for Enable Mistall Usage is not enabled, this widget will not appear in the edit dashboard page.
The widget shows the raw Mistall data. The names of the lot groups associated to the data will be shown beside the bar chart.
If the Mistall data is not yet associated to a lot group, it will show the Mistall lot name instead. This is the name given to the lot by Mistall.

Mistall dashboard widget.
Real-Time Maps
The admin and user-side real-time maps have been updated to use lot groups instead of individual lots as pins on the map.
The functionality of the maps is not dependant on the use of Mistall in a system.
If the client does not have Mistall integrated with their site, the lot groups will use the data of the associated lots in place of Mistall data for the real-time maps.
Admin-Side Map
The admin map has been updated to use lot groups.
When a lot group is clicked on, it will show the new popup.
If the lot group has no Mistall data associated to it, it will use the collated counts of the lot info below instead.
If Mistall data is being used for the lot, it is likely it will not match the counts shown in the lot info window below. It is intentional that the information will not match.
The intention is that the client will be able to see the difference between what is physically present in the physical lot (lot group Mistall stats) and what the permits purchased within the system look like in comparison.
For example, if the lot is physically empty but is maxed out on purchased permits, the number of available permits can be increased for that lot.

Admin-Side map.
User-Side Map
The user-side map has also been updated to use lot groups.
As before, the user map is made to appear by placing the shortcode on a client-created page.
The shortcode for the map is: [real-time-map]
The user-side map will now appear like this:

User-side real time map.
The donut at the top shows the Mistall data if it is present. If the lot group does not have an associated Mistall lot, it will show the collated counts of the lot info below.
The lot info shown below the donut graph is from the permit counts in the system.
Unlike the admin-side map, the information here is presented as a percentage instead of the actual numbers. This is to allow for some leeway for any inaccuracy.
The icons to the right display if the lot allows standard or temporary permits.
-
Green is standard.
-
Yellow is temp.
The map should be accessible for users who are not logged in. If the user is logged in, they will be able to see standard permits and temp permits, but if they are not logged in, they will only be able to see temp permits.
The book permit button now takes the user to a new page used for selecting a permit from within the selected lot group.
User-Side Lot Group Page
The lot group page shows much the same data as the regular permit page, just with the data specific to the selected lot group.

Lot group page.
At the top of the page, the same donut menu from the pop-up window on the map is shown, displaying a percentage of availability. It is calculated from the Mistall data or the lots below if there is no Mistall data for the lot group.
The lots are shown below. If the user is a guest (not logged in), they will only be able to see temporary permits on the page.
The standard permit booking button will take the user to the regular standard permit booking page, but the temporary permit booking button will take the user to the quick checkout.
This is the checkout used for QR codes and the old version of the map. It allows the user to purchase the permit and checkout immediately without adding it to their cart.
Hotspot - Permits Integration
To configure a lot to work with the HotSpot app, you must configure a zone for any lot where you want this service to be available. Once a zone is associated with a lot or multiple lots, any user purchasing a permit through HotSpot would be valid in all lots associated with the that zone which is configured in Lot Administration. This article will illustrate how to create the zone and apply it to a lot.
Setting up a HotSpot zone
To begin you must set up the zone under Admin Options. Hover over the Parking menu item and select Lot Zones from the drop down list.

In the Manage Lot Zones screen click on Add to access the add zone form

Enter the name of the lot zone you wish to add. In our example the lot zone is 1001

Once you have the zone name entered, click on Add Zone to save your selection. It will now show up in the drop down list of zones.

Applying a Zone to a Lot
To apply this zone to a lot, you first need to go into Lot Administration to add the zone to your selected lots.
To access the lots, go to the Parking Management menu and hover over Lot Administration. Select Pricing and Admin from the resulting drop down menu.

In our example we will add this zone to the lot called Green Staff Lot East. Click on the lot name to access the configuration tool.

Once in Lot Administration for the specific lot, click on the Zones & Location tab to access the zone configuration section.

In the Zones & Location tab click on Add Zone by Days to select the 1001 zone we created.

Select 1001 from the resulting drop down list.

For our example we can leave the defaults as is which includes:
The day range - leave it with all days of the week selected. (Highlighted in green)
The Start and End Time. (00:00 to 23:59 - in other words all day)
To save your settings click on the floppy disk (save) icon.

Click on Update this Lot to save your changes.
ParkMobile - Permits API Integration
Introduction
ParkMobile is a service that offers on-demand parking payments, similar to HotSpot.
A system task is run at regular intervals to retrieve permits from the ParkMobile API, which are then stored in the local site as temporary permits.
Authorization Credentials
ParkMobile has a set of credentials that must be entered before data can be retrieved from their API.
These can be entered on the system settings page, which can be found under the menu tree:
-
System Configuration → System Setting

ParkMobile System Settings
Before the system task can be run and allowed access to the ParkMobile API, the proper API credentials must be entered in the relevant system settings, found under third-party settings.


Required Credentials
There are three values that must be provided for the system to be allowed access to the ParkMobile endpoint.
These values should be provided to the client by ParkMobile itself.
-
API Username
-
API Password
-
X-API-Key
Lot Zone Setup
Permits will only be imported into the OPSCOM system if the ParkMobile lot zone has a corresponding lot zone with the same name in the OPSCOM system.
If the local lot zone does not already exist for the ParkMobile lot zone, one will need to be created.
The lot zone management page can be found under the menu tree:
-
System Configuration → Parking → Manage Lot Zones

Lot Zone Management
To create a new lot zone, click on the Add Lot Zone button to open the add new modal.

This will open the modal used to add new lot zones.
Add the ParkMobile lot zone name as the Name of the lot zone, and then click save changes.
This will add the new lot zone to the system, which can now be used to match to ParkMobile permits coming into the system.

System Task
The ParkMobile system task is used to fetch permits from the ParkMobile endpoint and add them to the OPSCOM system as temporary permits.
System tasks can be be found under the menu tree:
-
Tools → View System Task Logs

System Tasks Page
The system task is named Fetch ParkMobile Stats.

The task must be enabled before it will run.
By default, it is set to run every 3 minutes.
The task can also be run manually by pressing the RUN button next to the task name.
Imported Permits
ParkMobile permits are imported as paystation (Cale) records, and will appear anywhere these records are used.
They can be viewed using the Pay Station Status page, which can be found under the menu tree:
-
Parking Management → Temporary Permits → Pay Station Status

Pay Station Status


Sending Email with OPSCOM
Sending email from OPSCOM is a key element of communicating with your clients. This communication may be outgoing messages related to purchases, notifications and even as part of the appeals process. These are important messages and you want them to get to your clients quickly, securely and without ending up in spam. This guide offers information on setting up your domain with our preferred mail partner, Mailgun, to ensure your messages are delivered effectively.
We selected Mailgun as our preferred email partner due to the ease of use of their APIs and their long standing success in the email space. That together with their tools to track and report on sent emails made them an ideal candidate for email management.
Why is this so important?
When you send emails from a properly configured domain, internet service providers (ISPs) can confirm that you are a legitimate sender. This process, which relies on DNS records like SPF and DKIM, ensures your emails are not marked as spam. Using your own domain also projects a professional image and builds trust with your clients, as the emails will appear to come from a trusted source (e.g., parking@yourdomain.com).
Without this setup, emails sent from a non-yourdomain.com system may be marked as spam or carry an "on behalf of" header, which can make your brand appear less credible.
Why Do I See On Behalf Of in My Email
Visit https://help.mailgun.com/hc/en-us/articles/360012491394-Why-Do-I-See-On-Behalf-Of-in-My-Email- for more information
Setup Options for Your Organization
OPSCOM offers a few different ways to configure your email sending with Mailgun. The recommended method is to allow our team to manage this for you, which ensures the best support and easiest setup.
Recommended: Configuring Your SubDomain on the OPSCOM Mailgun Account
This method is the preferred option as it allows our support team to monitor email deliverability, track issues, and provide direct technical support for your email-sending needs. It simplifies the process for you while giving us the necessary access to ensure everything is working correctly.
You will need your IT team to support you through this process.
Part 1: Your Role (Client)
- Inform the OPSCOM team of the domain you want to use for email sending (e.g. yourdomain.com).
- Our team will add your domain to our Mailgun account. We will then provide you with the specific DNS records you must add to your domain's settings.
These records will include:
| Type |
Hostname |
Value |
Notes |
| TXT | opscom.<your_domain> | v=spf1 include:mailgun.org ~all | add an SPF for Mailgun |
| TXT | smtp._domainkey.opscom.<your_domain> | generated DKIM key | DKIM key used with Mailgun |
Above are the sending configuration items. They represent the absolute minimum to send email.
NOTE: Other DNS configuration items can also be updated to help with bounced email and tracking. We will supply these details during configuration.
Part 2: Your Role (Client)
- Log in to your domain registrar: Log in to the service where you manage your domain's DNS settings (e.g., GoDaddy, Namecheap, Cloudflare, etc.).
- Add the records from OPSCOM: Find the section for managing DNS records (it might be called "DNS Management" or "Zone File Editor"). You must create a new record for each of the entries we provided.
- Record Type: Select the record type (e.g., TXT, MX, CNAME).
- Hostname/Name: Paste the "Hostname" or "Name" value we provided.
- Value/Data: Paste the "Value" or "Data" value we provided.
- Inform OPSCOM: Once you have added all the records, please notify our support team. We will verify the DNS records from our end. When they are correct, Mailgun will show a "verified" status.
Note: Mailgun also recommends adding other records for email tracking, but these are not required for this specific setup with OPSCOM.
Option 2: Using Your Own Mailgun Account
This method is for clients who wish to have full control over their own Mailgun account. This can be beneficial if you have other systems that use Mailgun and you want to consolidate them.
- Create a Mailgun Account: Go to the Mailgun website and create a new account.
- Add and Verify Your Domain: Follow Mailgun's instructions to add your domain and verify it by updating your DNS records.
- Find the API Key: Once your domain is verified, find your Private API Key in the API Security section of your Mailgun dashboard.
- Send to Support: Send your Private API Key to support@ops-com.com.
- Enable Support Access (Recommended): To allow our team to provide technical support, we highly recommend inviting support@ops-com.com as a Developer-level user to your Mailgun account.
- On the Admin portal, hover over System Configuration and click System Settings.
- Click the Third Party tab.
- Add your Mailgun domain and Private API key in the settings.
Option 3: Simple SPF Security (Basic Setup)
Add the following to your SPF record (in DNS) to allow OPSCOM servers to send email on your domains behalf.
include:_spf.mailgun.org
Please note that this is only first line generalized security. For more details click here: https://www.dmarcanalyzer.com/spf/
Managed User Import (SFTP)
For clients that cannot take advantage of our User Import APIs, our SFTP Managed User Import allows you to import users into our system through an encrypted SFTP client. Any users that have failed to be imported will be put into a .csv file and sent to you by email. This file will include important user information as well as the reason for failure.
Note - This is a paid process you must contact OPSCOM to see if this is included in your service.
Required System Settings
Before you can use the Managed User Import you will need to have it set up on your system.
- Hover over System Configuration and click System Settings.
- On the General System Settings tab, locate the Reply-to Admin Email Address in the System Emails section. This is the system default email address that appears as the sender of system-level and task-automation email messages.
- Click Save Settings.
- Next, click the Third Party tab, and locate the CSV User Import section.
- Enter an email address in the Failed Import Email box. This is the email that will be notified in the case of a failed import. Any failed file will include information about the user as well as why the user failed to be imported. This will allow you to correct any failures and attempt the import again.
- OPSCOM will supply you with credentials to connect your SFTP client to the folder where the import file will be stored on the server. If you connect with a standard client, you will see an empty directory where you can drag and drop your import files.
Importing Users
SFTP Manual Process
OPSCOM will enable a system task to run at 5 minute intervals. There may be a pause of up to 5 minutes for the import process to complete.
1. To begin drop a comma separated (CSV) file from your computer to the server.
Please note that the your CSV file must follow the required format to be processed correctly. Refer to this wiki article to find the exact syntax for the column headers you want to use. You will find this in the Request Object Attributes section. The column headers must match the exact value in the PossibleNames column or it will fail.

2. Once completed the file will be automatically moved to the .bak folder. This folder is created as part of the import process if the folder does not exist.
3. An email will be generated containing users that failed the import, and it will be sent to the email in System Settings. The email will describe the reasons that users failed the import.
Server IP Addresses
Depending on various client project requirements you or your I.T. department may require server IP addresses.
For example, there may be IP restrictions or traffic routing requirements where an IP address is required.
The IPs listed here are egress traffic.
Development, Testing and Preview
For development and preview sites, traffic will originate from one of these IP addresses.
208.124.170.242
178.128.233.75
134.122.33.16
137.184.172.18
137.184.172.19
Production, Staging and Beta
For production and staging sites, traffic will originate from one of these IP addresses.
209.217.117.82
209.217.117.84
209.217.117.88
159.203.14.67
167.99.176.52
167.99.176.218
SPF Records for Email
Tomahawk mail servers and Mailgun mail service are used for email delivery.
Tomahawk mail services are being phased out and replaced with Mailgun services
The following is a sample TXT record from DNS.
"v=spf1 include:spf.tomahawk.ca include:mailgun.org ~all"
Boot Management and Self-Release System
This article provides a comprehensive overview of the Boot Management and Self-Release System. This feature allows enforcement officers to apply a physical boot to a vehicle and enables the vehicle owner to pay their violation(s) and receive a release code via email to remove the boot themselves.
The self-release boot system is designed to increase operational efficiency, reduce administrative and labor costs, and provide a more convenient resolution process for end-users.
Setup and Configuration
To use the boot management system, an administrator must first enable and configure several settings within the admin portal.
System-Wide Settings
-
Go to System Configuration, then System Settings.
-
Locate the Third Party section.
-
Enable the Universal Boot Enabled checkbox to turn the entire feature on.
-
Configure the Require Overdue Paid checkbox. You can choose to require a user to pay only the violation associated with the boot (Disabled) or pay all overdue violations on their account (Enabled) before the release code is sent. This setting is deployed Off by default.
Boot Inventory Setup
You must create an inventory of your physical boots before they can be assigned to violations.
-
Go to System Configuration, then Violations, and click on Setup Boot Devices.
-
Click + in the top right to Add Booting Device.
-
Enter a descriptive Name (e.g., "Red Boot 01") and the corresponding Boot Release Code.
-
Click Save. The system will automatically generate a printable QR code for the physical boot, allowing booted users to scan it and directly pay their associated ticket.
- Repeat for all boots in your inventory. You can edit the name and release code value here at any time.
Editing the Release Code value will only change the code that is stored in OPSCOM and sent to user for boot release. It must be obtained from the booting device's instructions first and updated as necessary.
Violation Type Configuration
You must specify which violation types are eligible for booting.
-
Go to Violations and click on Offense Types.
-
Select the ticket category where you want to add the booting offense type.
-
Click Add New Offense Item.
-
In the Violation Type Description field, enter a descriptive name (e.g., "Boot Applied").
-
Enable the Apply Boot checkbox.
The Apply Boot checkbox should only be enabled for the specific violation you created for booting (e.g., "Boot Applied"). Do not enable it on standard, regular offense items.
When a boot is returned, the fine amount of all offence items on the current violation, with the Apply Boot flag, will be included in the deposit refund.
The Apply Discount setting will be greyed out when Apply Boot is enabled to prevent calculation errors, as the boot refund does not consider discounts in its calculation.
- Click Save. When this offence type is selected during violation entry, the option to assign a boot will now appear.
Email Template Customization
The email containing the release code and instructions is customizable.
Using this Feature
This section details the daily operational use of the boot management system, from issuing a booted violation to managing the boot's return.
Issuing a Booted Violation
When issuing a violation for a boot-eligible offense, both on the handheld device and in the admin portal, the officer will see a new option.
-
During the violation entry process, select the ticket type Boot Applied
-
A dropdown menu called, Apply Boot, will appear.
-
From the dropdown menu, select the boot being applied to the vehicle. The list will show available boots only.
-
Complete and save the violation as usual. The system now logs that the selected boot is Issued and links it to this violation.
You MUST make sure you do not assign an occupied boot to another vehicle. Issued boots are currently occupied, while Released means that the code was sent to the user and payment received for the violation, but the boot hasn't necessarily been returned.
The User Payment and Release Process
Once a vehicle is booted, the user must pay the required violation(s) to receive the release code.
-
The user can pay via the online portal, either by logging into their account or using the Guest Payment option.
-
When a violation with an associated boot is in the payment cart, a Boot Applied tag will be displayed within it.
-
Upon successful payment, the system automatically sends the Boot Release Email to the user's provided email address. This email contains the release code and return instructions you configured in the template.
For more information on how the user side process works please see Self-Release Boot System: User Portal.
A valid email address is mandatory to complete the payment. Logged-in users must have an email on file, and guest users will be required to enter one before checkout. (They do not need an account)
Booting Activity Report
This report is your central hub for tracking the status of all your boots. To access it, go to Violations, and and click Booting Activity Report.
Key Information Displayed
-
Search Text: The name of the boot, plate number of a booted vehicle, or ticket number.
-
Filter Date By: Date Created, Date Released, or Date Returned.
-
Start Date: The beginning date for the report's search range.
-
Up To and Including: The end date for the report's search range (includes data from this day).
-
Status: The current status of the boot (Available, Issued, Released, or Returned).
Active Boot Assignments Overview
The Active Boot Assignments dashboard provides a real-time overview of your physical booting inventory, allowing administrators to monitor device statuses, track active violations, and manage configurations from a single interface.
Dashboard Key Features
- Real-Time Status Tracking: Monitor the current state of each device at a glance using color-coded status badges:
- Issued: The boot is currently deployed on a vehicle.
- Released: The boot has been paid for or authorized for removal, pending return to inventory.
- Returned: The boot has been removed and brought back, ready for deposit/refund processing.
- Available: The boot is in inventory and ready to be assigned.
- Issued: The boot is currently deployed on a vehicle.
- Violation & Ticket Linking: View active ticket details directly tied to an issued boot, including the Issued date, Ticket (hyperlinked for quick access), and the applicable Boot Fee.
- Quick Actions & Navigation:
-
Booting Activity Report: Click this button at the top right to generate historical data and search reports.
-
Setup Boot Devices: Quickly jump to the inventory setup page to add or edit booting devices.
-
Action Gear Icon: Click the gear icon on the right of any row to update device states, or process refunds.
-
Best Practices and Considerations
-
Develop a Business Rule for Non-Returns: It's crucial to establish a clear policy for handling boots that are not returned. This may involve applying additional fines or fees to the user's account after a specified period.
-
Consider using the Boot as a Deposit functionality for high-risk situations. By adding a separate, refundable fee item to the violation, you create a financial incentive for the user to return the equipment promptly.
-
Keep Inventory Accurate: Regularly audit your physical boots against the Boot Management Report to ensure all information, especially release codes and statuses, are correct.
-
Clear Email Instructions: Ensure your Boot Release Email template provides simple, clear, and comprehensive instructions. Including photos or diagrams of the boot removal process and a map to the drop-off location can greatly improve the user experience and increase return rates.
PeopleSoft Integration for Payments and Holds
This article outlines the OPSCOM integration process with PeopleSoft, designed for administrators at organizations using PeopleSoft for student and staff account management. The integration uses a scheduled SFTP data transfer to place or release account holds in PeopleSoft based on outstanding violation balances recorded in OPSCOM. This ensures that parking enforcement actions are reflected in the central institutional system.
Setup & Configuration
If you want to use people soft integration, you must contact OPSCOM Support and have them enable a setting for you on your system before you start. Once completed, continue with the steps below.
Peoplesoft Reports are sent by email on a regularly scheduled basis, so for this feature to work you will need to decide on an email address that will be used and monitored for PeopleSoft Holds reporting, then the System Task will need to be enabled to run automatically.
- Go to System Configuration, and click System Settings.
- Click on the tab labeled Third Party
- Scroll to the bottom, and under PeopleSoft Holds, enter an email address in the box for PeopleSoft Holds Notification Email
- Then navigate to the Tools menu, and click on View System Task Logs. Find PeopleSoft Holds Report and click on the checkbox to Enabled. Your report will run immediately and then schedule for the next frequency.
The PeopleSoft report is delivered by email, so this is required for functionality.
The integration is an automated process that requires initial setup and coordination between your organization and the OPSCOM support team. The primary components are data mapping, and scheduling.
-
Initial Consultation & Data Mapping The first step is to define the data fields for the export. The standard process pushes key details required by PeopleSoft to create and manage holds. Common fields include:
-
Student/Staff ID
-
Total Amount Owed
-
User Type (Student, Staff, etc.)
-
Violation Type
-
Violation Date
-
-
File Structure and Scheduling The integration relies on two distinct files, which are generated and delivered on a mutually agreed-upon schedule (e.g., nightly).
-
Holds Added File: This file contains a list of all users with a new or updated outstanding balance. The amount provided is the final total owed and is intended to overwrite any existing hold value in PeopleSoft.
-
Holds Released File: This file contains a list of all users whose outstanding balance has been cleared ($0.00). This file signals PeopleSoft to release the account hold.
-
- Testing and Verification Before going live, the OPSCOM team can provide a test account and sample data files. This allows your IT team to schedule testing, verify record uploads, and ensure the data mapping is correct within your PeopleSoft environment.
Using this Feature
Once configured, the PeopleSoft integration is a fully automated background process that requires no daily intervention from an administrator.
How it Works
-
On the configured schedule, OPSCOM generates the Holds Added and Holds Released files based on real-time user account data.
-
These files are automatically filed, and emailed to the designated email address configured earlier, in settings. The filename can be customized, but the field structure and file type (e.g., tab-separated
.txt) must remain consistent. -
Your internal PeopleSoft system must be configured to automatically retrieve and process these files from the emails, to update the account holds accordingly.
- You can configure the body of the PeopleSoft reporting email under;
- Go to System Configuration, then Content and Designs, and click on Email Templates
- Select the template labeled PeopleSoft Holds Report
Best Practices & Considerations
-
Keep the System of Record Clear. The financial debt should remain exclusively within OPSCOM. The integration's purpose is only to share an indicator of the debt with PeopleSoft to manage holds. This strategy eliminates the risk of fees being paid in two different systems and simplifies reconciliation.
-
Establish a Consistent Schedule. While the report schedule can be customized (e.g., daily, weekly), a daily overnight process is recommended to ensure holds are applied and released in a timely manner.
-
Coordinate with your IT Team. Successful implementation requires collaboration with your organization's PeopleSoft administrators to ensure files are processed correctly on your end.
-
Understand Hold Triggers. The integration is typically configured for violation-related debts only. Any unpaid violation, regardless of the amount, will result in a user being included in the Holds Added file.