FinanceAdmin - Companies and Invoices
Company Setup and Invoices
Create the Acme company
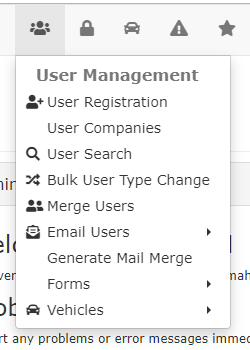
An Admin for ABC Parking must create a company entry for ACME in OPS-COM. Hover over User Management and click User Companies.
The Company Search page displays. Click the 'Create New Company' button
The Company Edit page displays. For this example the Admin will enter the following information about the ACME company.
- Account Number:19380688
- Company Name: ACME Incorporated
- Receives Invoices: Checked
- Address (Company): 2946 Jerome Avenue
- Invoice Emails:James.Rockwood@ACMEINC.com
- Contact Name: James Rockwood
- Address (Contact): 4777 Ersel Street
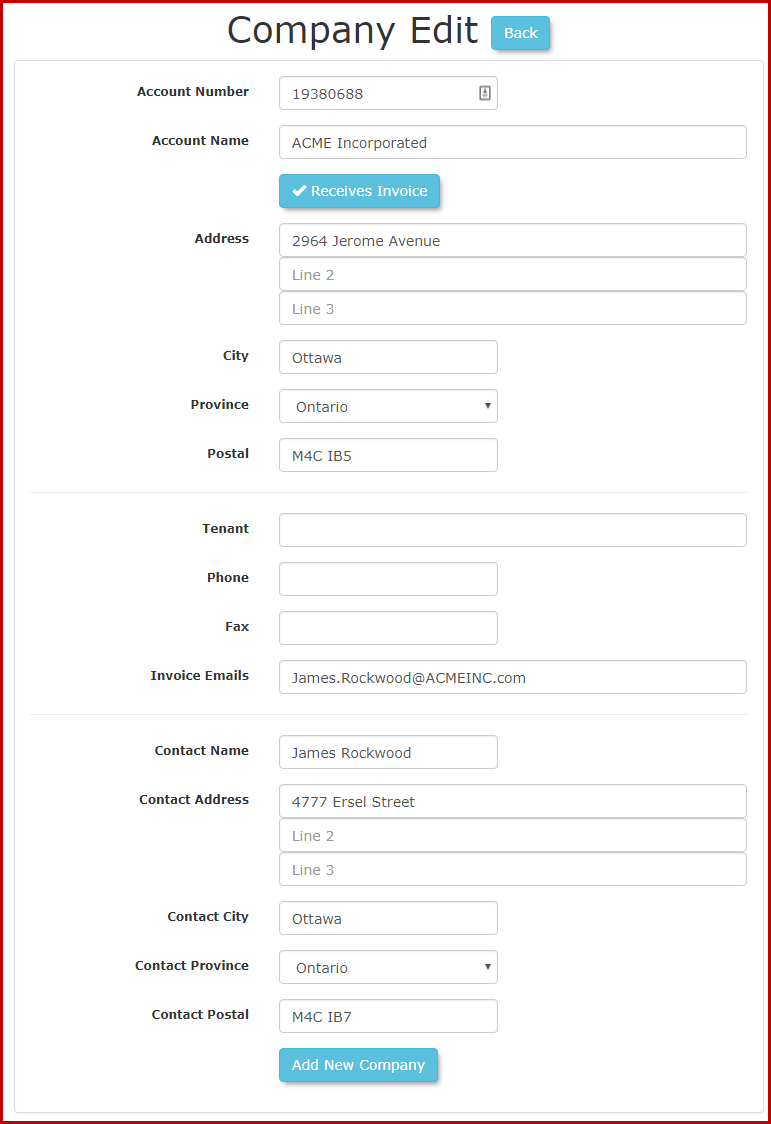
Click the 'Add New Company' button to save the information. A green confirmation message displays that the company has been added.

Assign Users to the Acme company
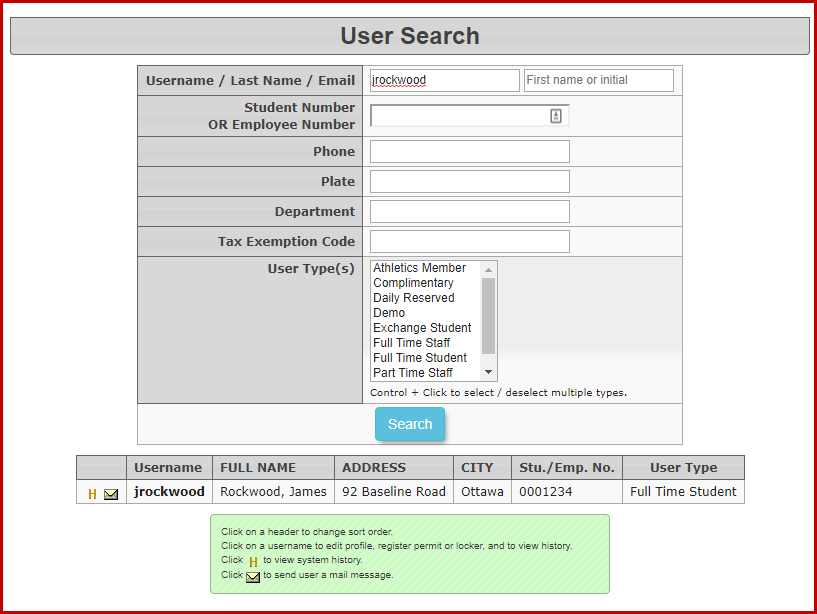
Search for the user profiles of the users you wish to add to the Acme company. Click User Management, User Search.
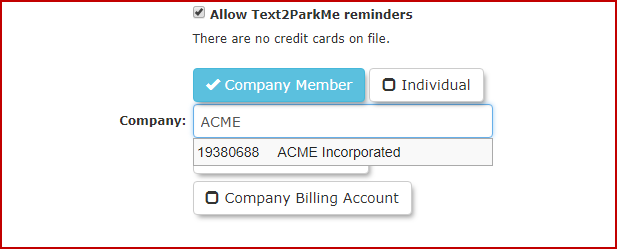
Edit the User profile and indicate if the user is an individual or as a company member. In this case they are a Company Member for Acme Company.
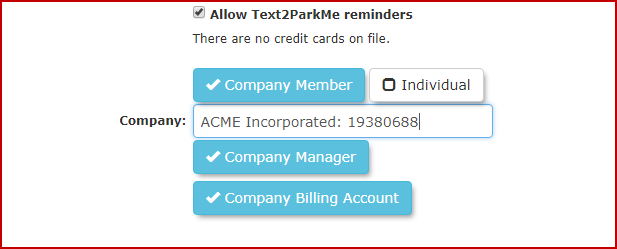
To designate a Company Manager, enable the Company Manager and Company Billing Account checkboxes. James Rockwood is the company manager for this example. He is the person who will pay for invoices for all users assigned to ACME.
Click the Submit Registration Information for Processing... button to save this.
In this example we added user Colby to the company as well. They are regular users. These user accounts that are created for the Company will not be used by the end user and are only for the Company Manager to use.
Manage the Company Account
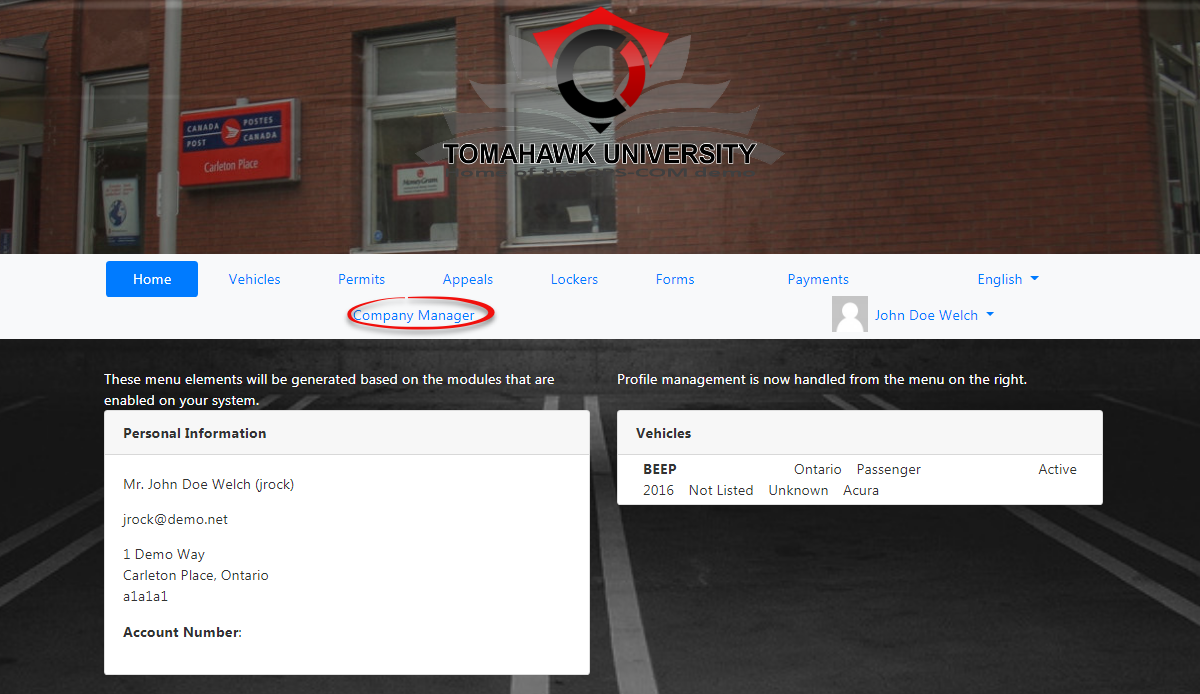
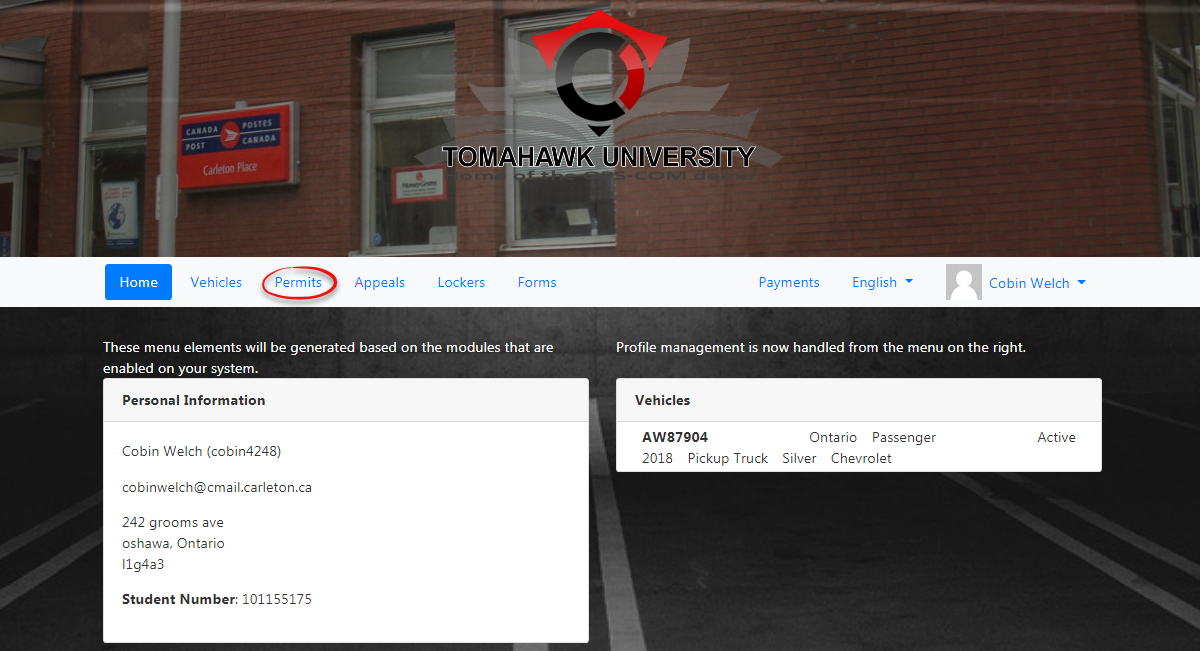
The company manager (John Doe Welch) logs into the OPS-COM user portal. Now he can manage permits for his user Colby. Click on the Company Users icon.
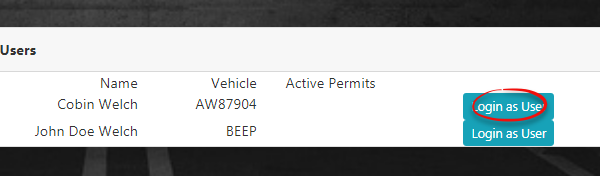
James wishes to purchase a permit for Colbin. He must login as the user to do so. Click the Login as User button to the right of Colbin's name.
A blue message appears telling John Doe Welch that he is logged in as another user.
Click the Parking icon to buy a permit for Colbin.
In this example we selected a Standard Parking permit in Red Student Lot West. If the company is planning to pay for the permit through the user side (not using invoices) then John Doe Welch (the company manager) would select the "proceed to payment" button. In this example ACME company is using invoices to purchase permits. John Doe Welch would logout of the User Portal at this point.
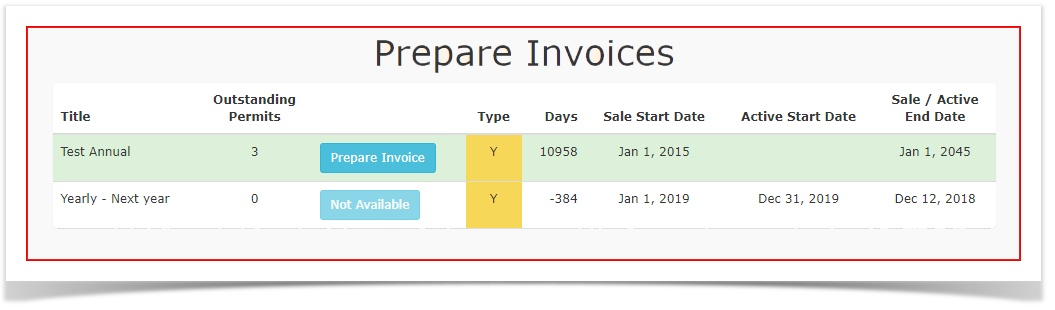
Prepare Invoices
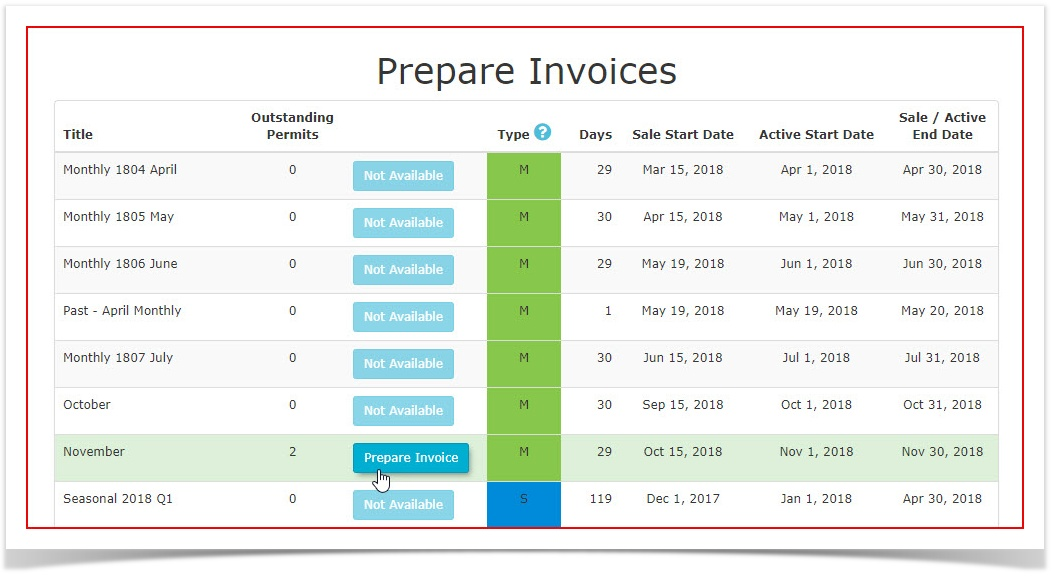
The admin user at ABC Parking must create the invoice for the company. This is done by hovering over the Allocations menu and clicking Prepare Invoices.
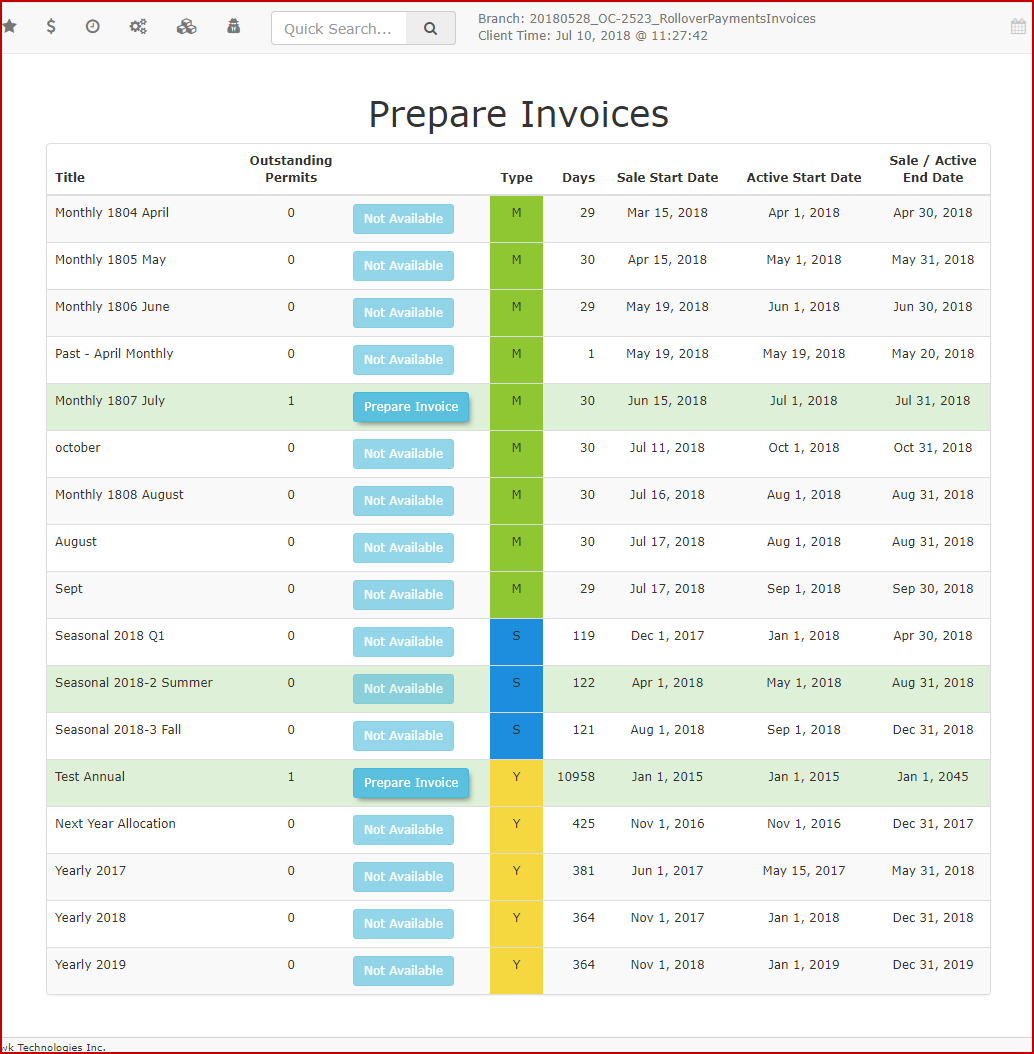
Click the Prepare Invoices button beside the active sales window. The number of invoices that can be prepared for that time frame show as a number to the left of the button.

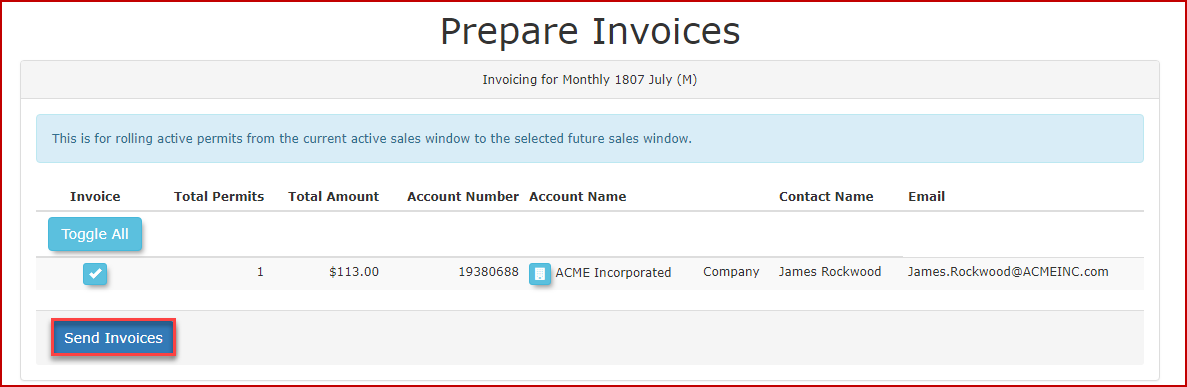
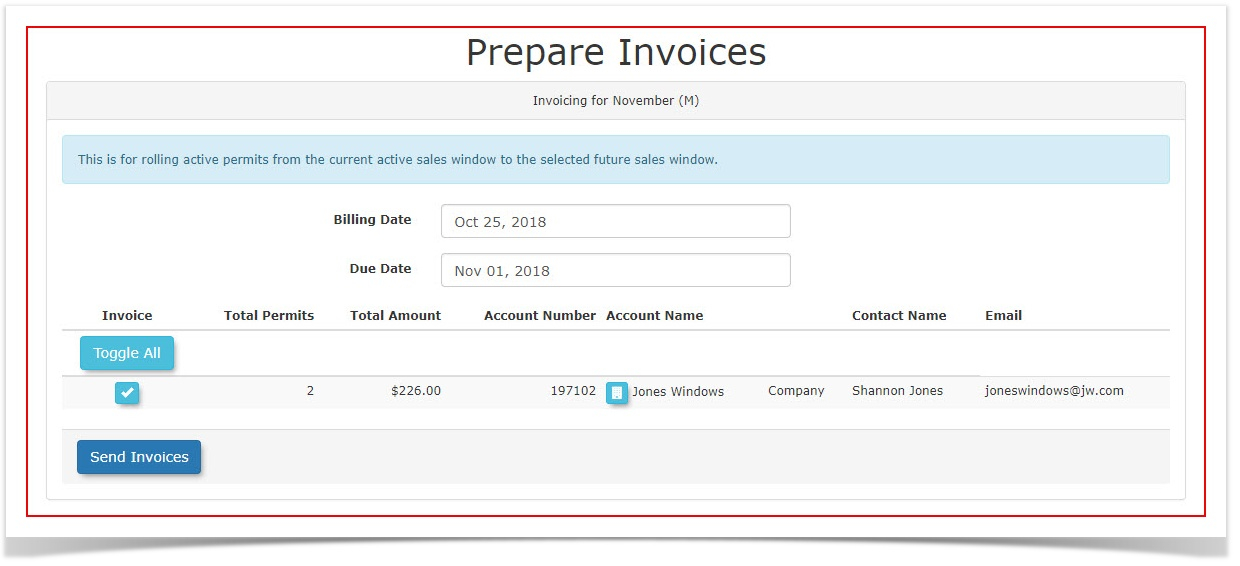
The invoice for the ACME company will be displayed, including one permit (the one created for the user Joseph Callaghan). Click the Send Invoices button to send the invoice to the ACME company.
NOTE: An invoice email template must be already in place prior to being able to prepare invoices. The email template can be modified by the Admin by going to System Config/ Email Templates.
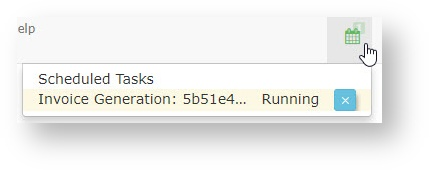
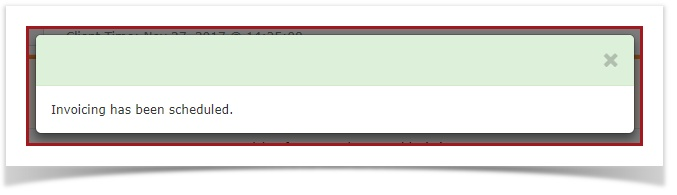
A green confirmation message is displayed indicating the invoice is scheduled.

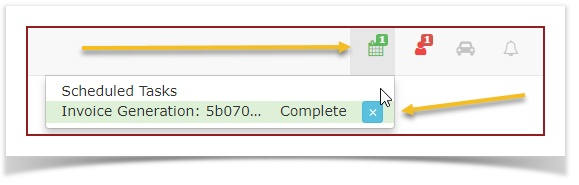
There will be an icon on the top right of the menu bar that will indicate the progress of the invoices being created. Once completed it will then be sent to the Company Billing Account designate.
In the event of an error, the Admin may opt to cancel the invoice, correct the error and then reissue the invoice.
Paying an Invoice as a Company Manager
Once the company manager at ACME receives the invoice, they must log in to the OPS-COM user portal and click the Payments icon. Joseph Callaghan's permit now available for payment.
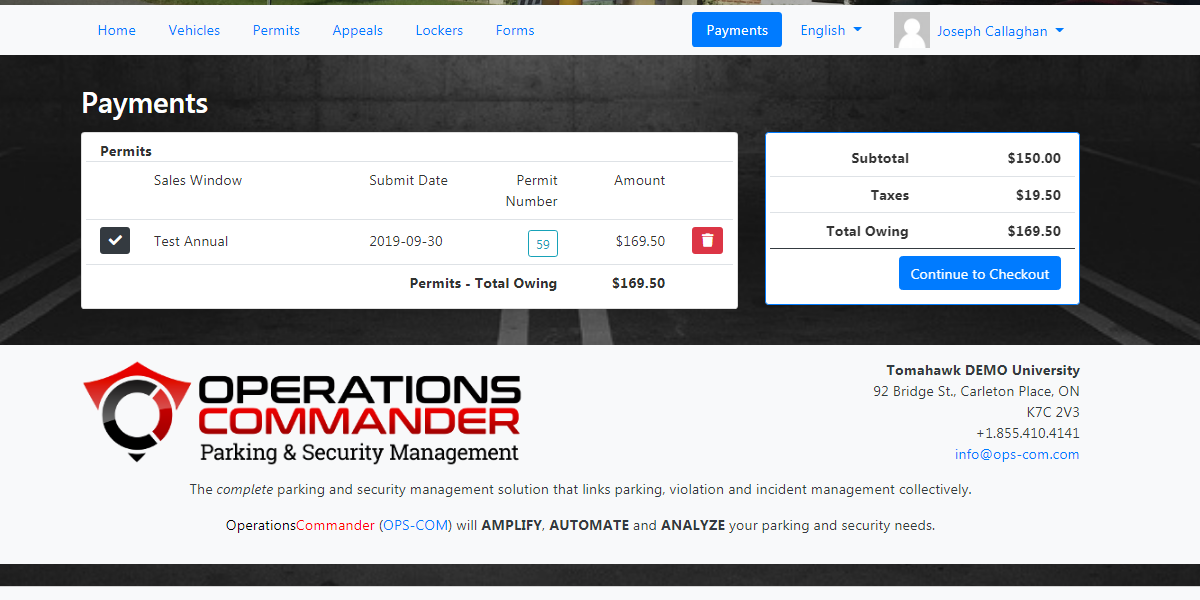
The Company Manager can Continue to Checkout and submit the payment in the method they prefer. This completes the cycle.
Sending Invoices in Advance of Payment
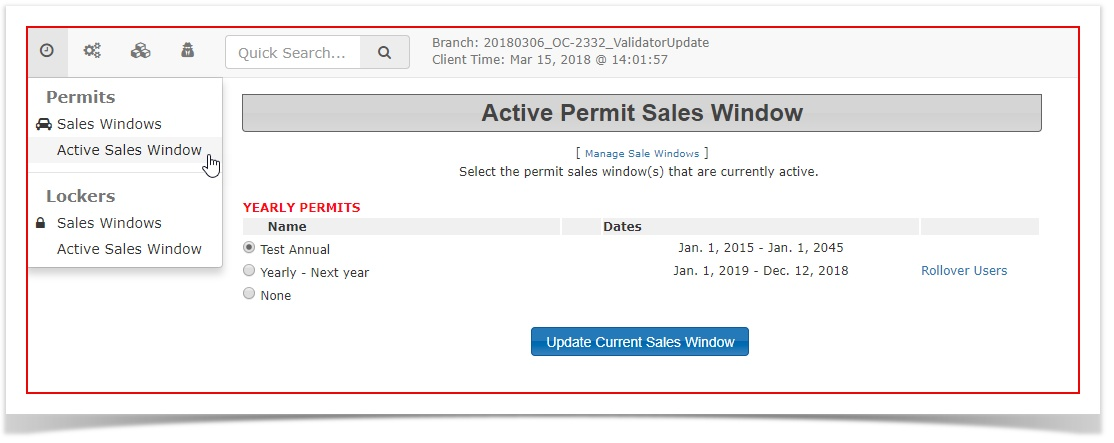
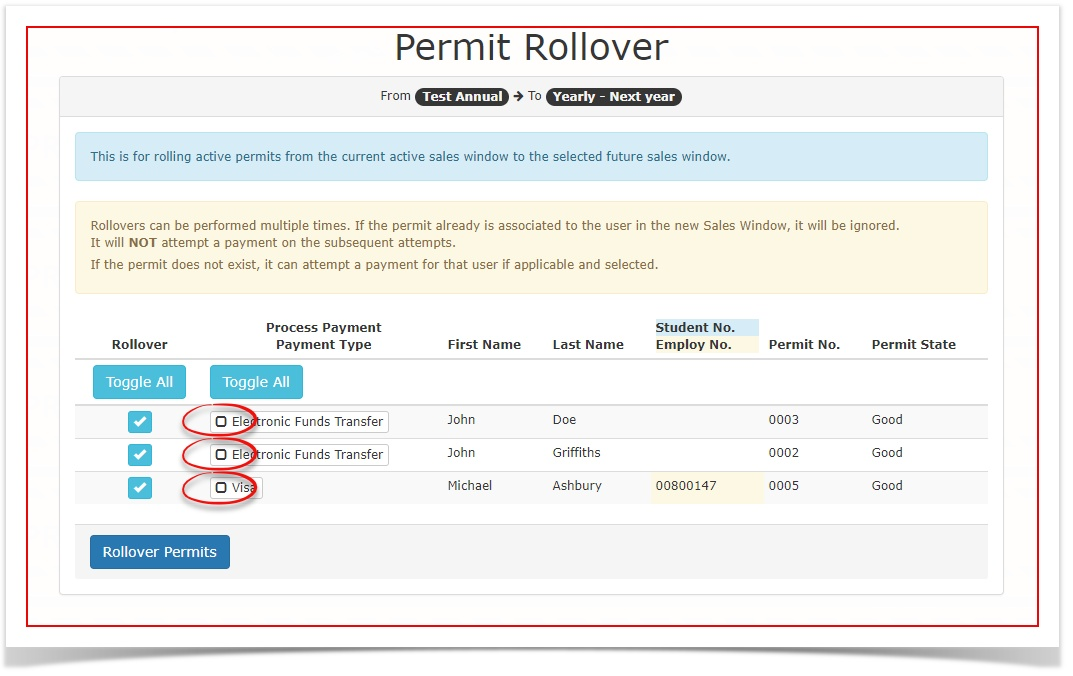
- To begin, start a regular rollover process, by going into the Permits menu and selecting Active Sales Window. Click on Rollover Users to enter the rollover wizard.

- By deselecting the preferred payment method here you can perform a rollover that will not process automated payments.

- By clicking Rollover Permits, the system will enter these permits in a state of awaiting payment and allow for an invoice to be created.
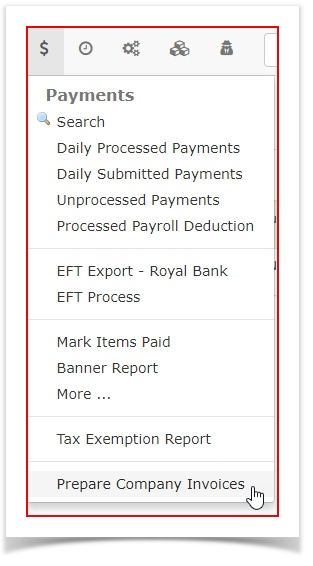
To access the invoicing tool, go into the Payments Menu and select Prepare Company Invoices.

- The Prepare Invoice window will open showing the users who have been set up for invoicing through the rollover process.

- By clicking on Prepare Invoice, the system will generate an email with the invoice as the body of message.
Re-Sending an Invoice
When do we use this?
It is also possible to change the email and re-send or just resend an invoice if the client requests a second copy sent.
If for example the client mistakenly deleted the email, the admin has the ability to search up the original invoice and send it again.
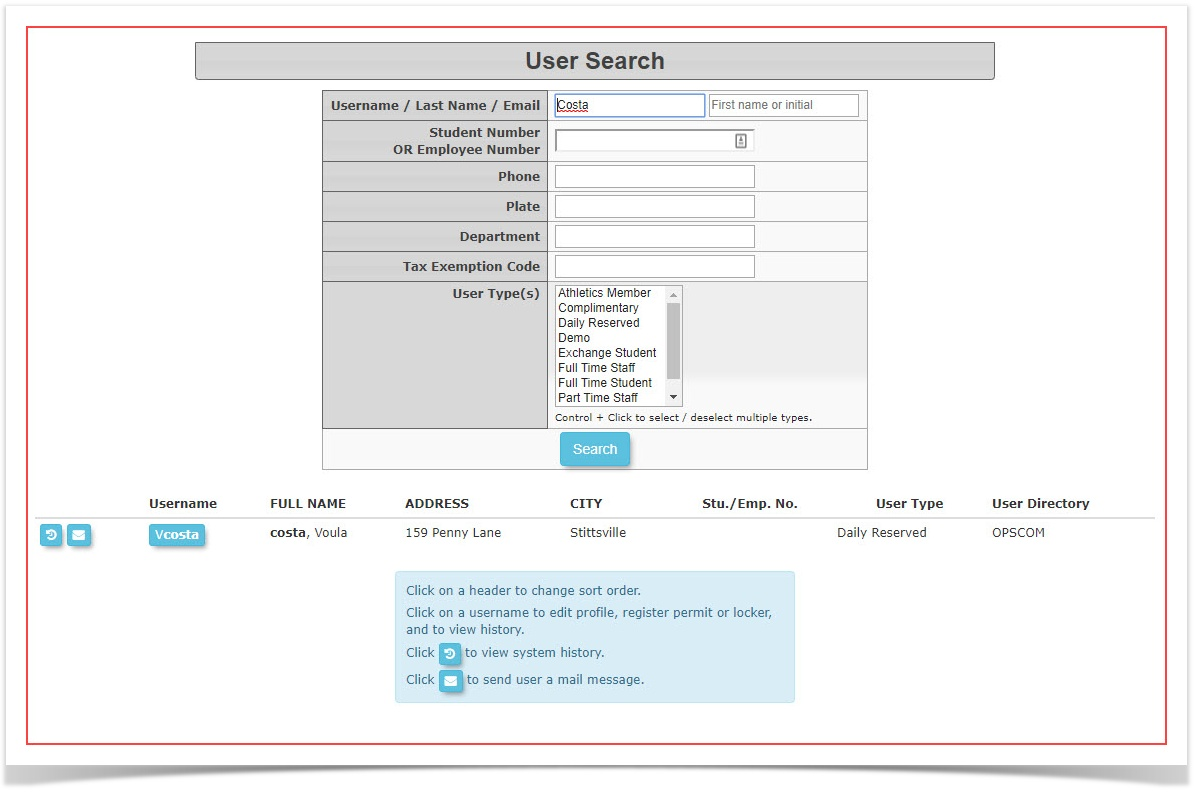
In our sample here we are looking for an invoice for Voula Costa.
- To do so there are two different methods. You can find the invoice in the user's profile under History or you can search for the invoice through the Search Invoice utility.
- Firstly let's search the user in question: In this case using the last name Costa.

- Click on the username to access the user's profile.

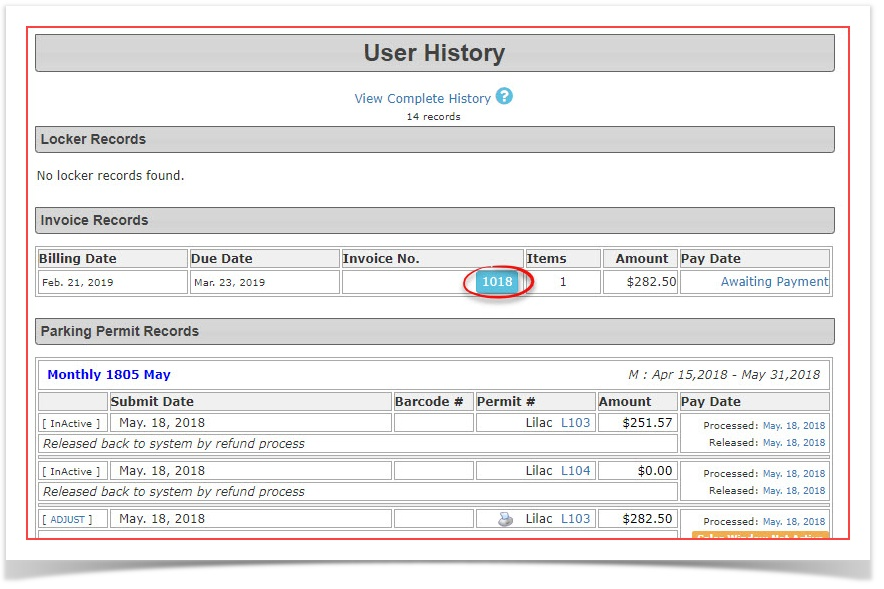
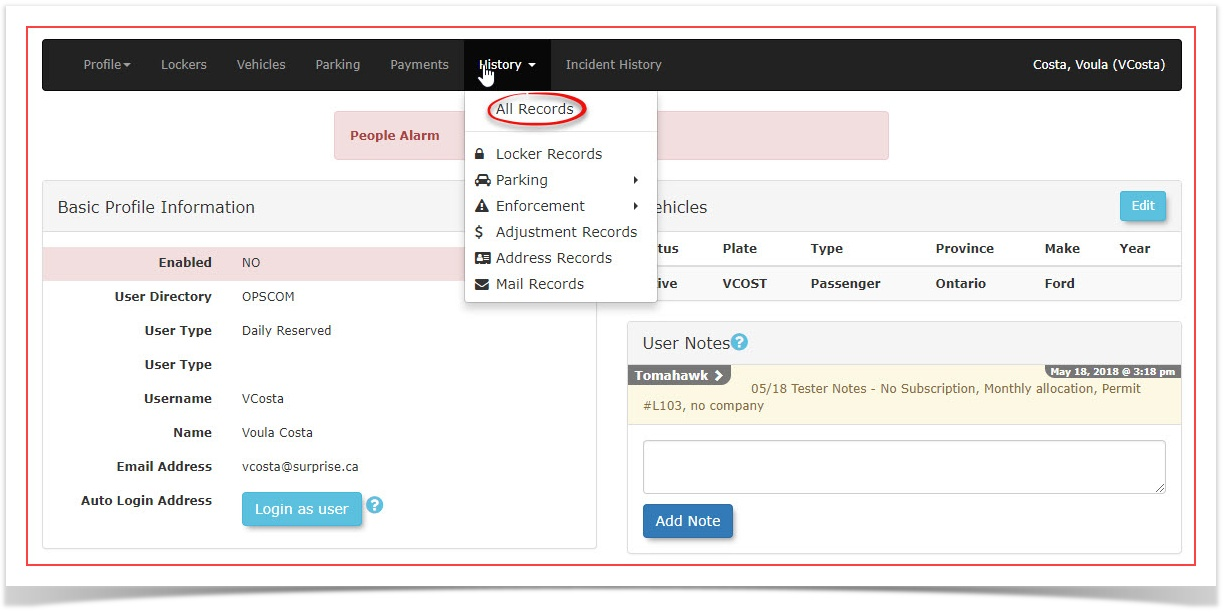
- Once in the user's profile hover over History and click on All Records to access the list of this user's transactions.

- Locate and click on the invoice number that you wish to resend.

- Once in the invoice preview you will notice the Re-Send Email button. Click on this button to re-send the invoice.

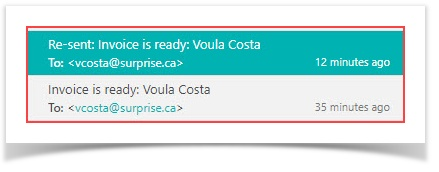
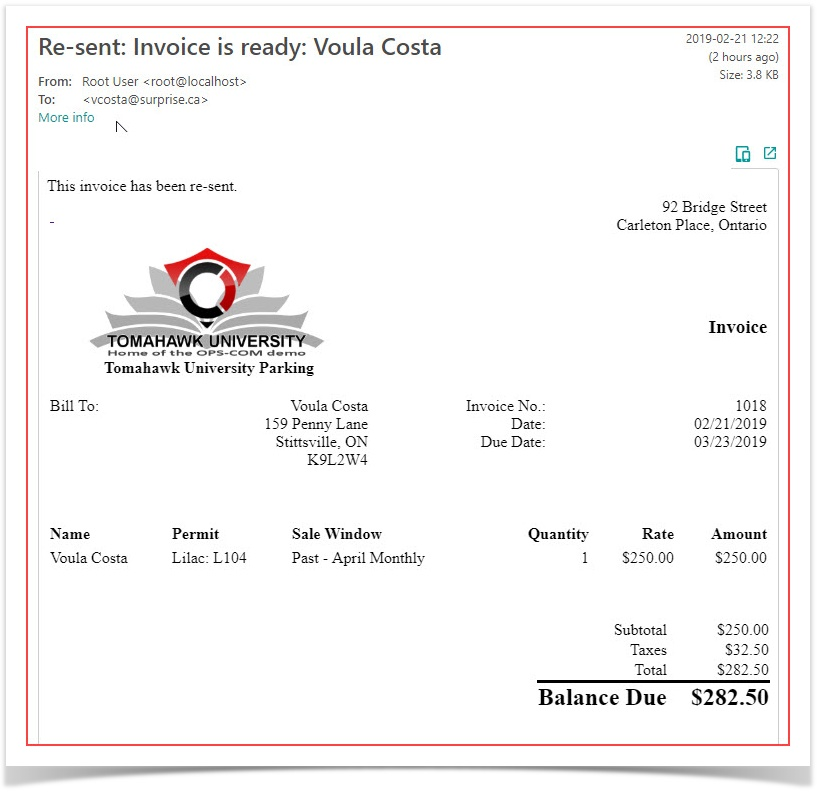
- The invoice will be re-sent. In the sample below there is an original invoice send as well as a re-send. Notice the email title for the re-send has a prefix added indicating this is a Re-sent invoice.

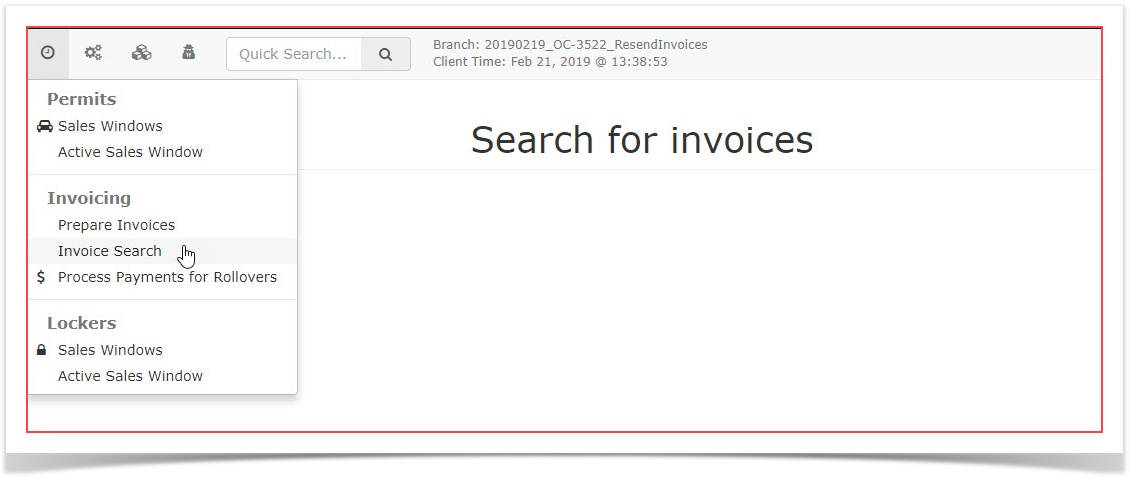
- As mentioned above you can also find the invoice you wish to resend using the Invoice Search tool. To do so access the tool under the Permits menu.
Hover over Permits and click on Invoice Search in the drop down menu.

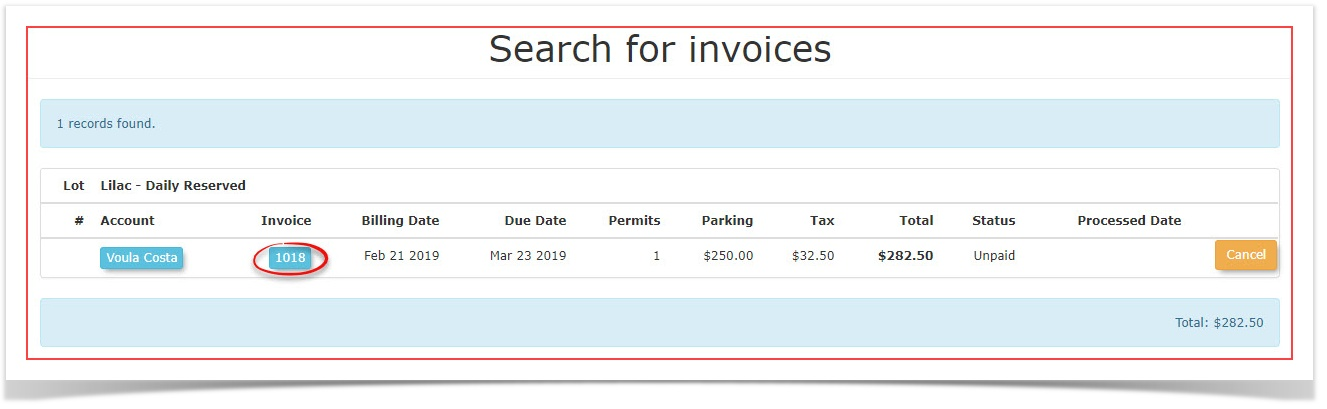
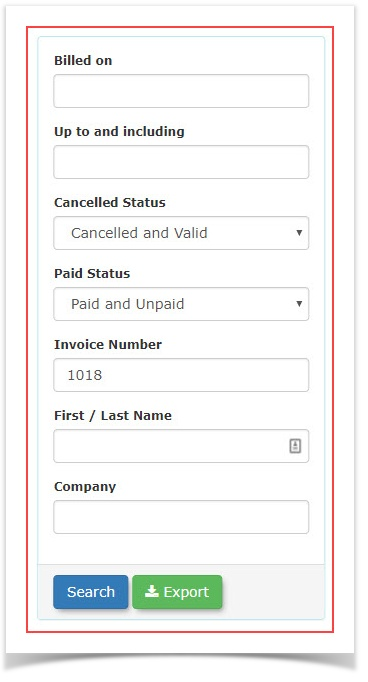
- In the search criteria window enter the Invoice Number in question and click search. In this case Invoice Number 1018.

- From the resulting search result click on the Invoice Number to access the Invoice Preview Window.

- The process after this point is identical to step 6 and 7 above.
- The Re-Sent Invoice will look identical the original invoice format:

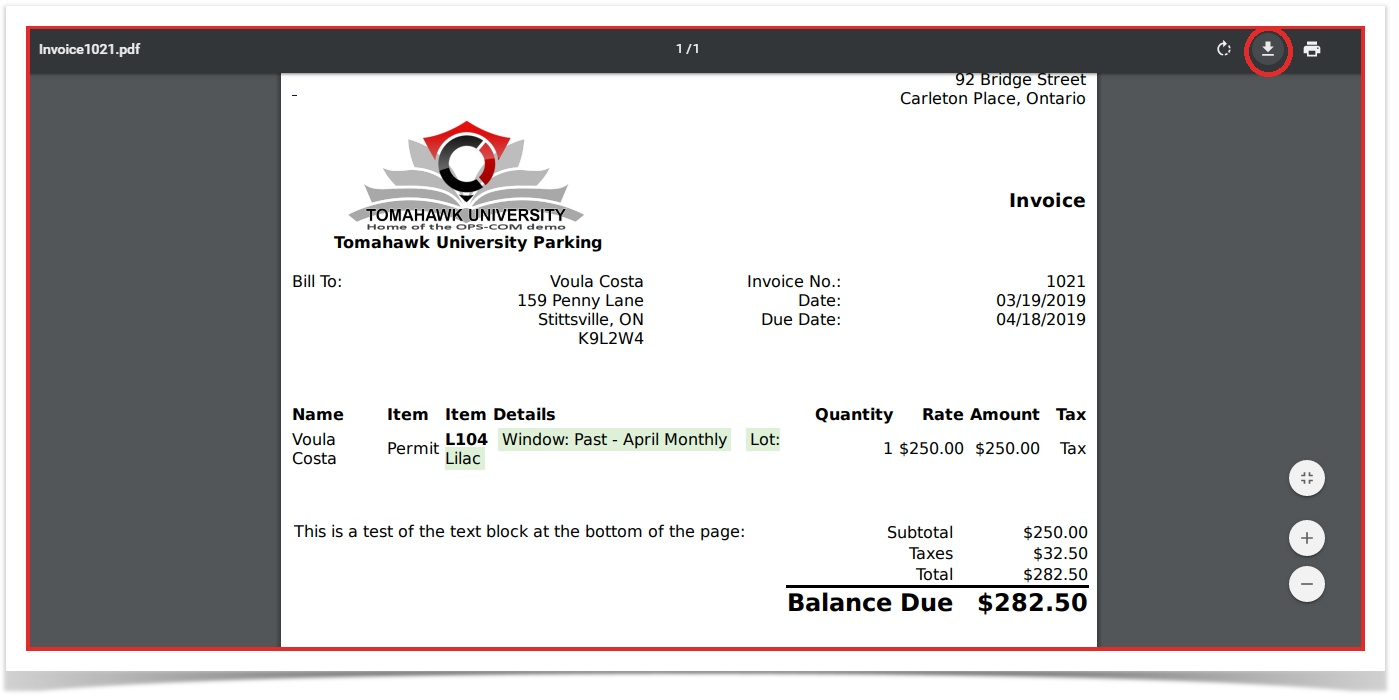
- It is important to note that in order to print this PDF document you should follow these next steps
- You must first navigate to the aforementioned email where you will find an attachments link circled below

- After opening the attached PDF file you will be brought to the file opened in the web browser.

- If you print form here you will receive a cut off version of this PDF. In order to prevent this you should download the file by pressing this button:

- Save it to your preferred location and open it with the PDF reader of your choosing

- From here you just print the invoice like you would a normal document ensuring that the print scale is set to 100%


Permit Invoicing
Preparing to Invoice
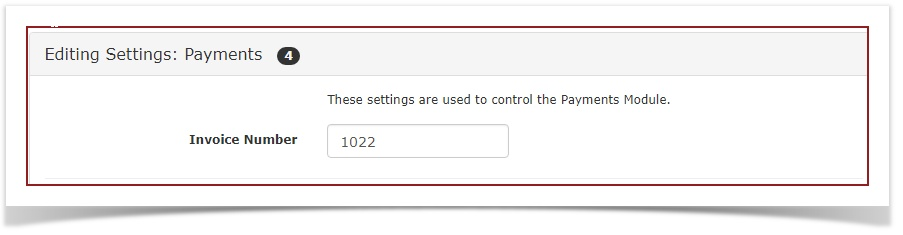
Click System Config > System Settings > Payments.
To choose the starting Invoice number enter it in the Invoice number field.
-
You must also setup your Invoicing template. You can do that by editing the Permit Invoice template.
-
Decide if you wish to allow unpaid permits to rollover to the next period.
Setup Invoice Contacts
There are different flags you must set so that your Companies and Individuals that require invoices will receive them. Instructions are below.
-
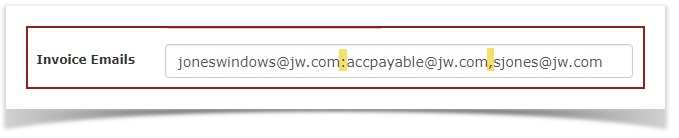
On the Company Edit screen, you must set the 'Invoice Emails' field to contain the email addresses you want. They can be separated by colons ( : ) or by commas as shown. This will ensure that the invoices go to the correct company contact.

-
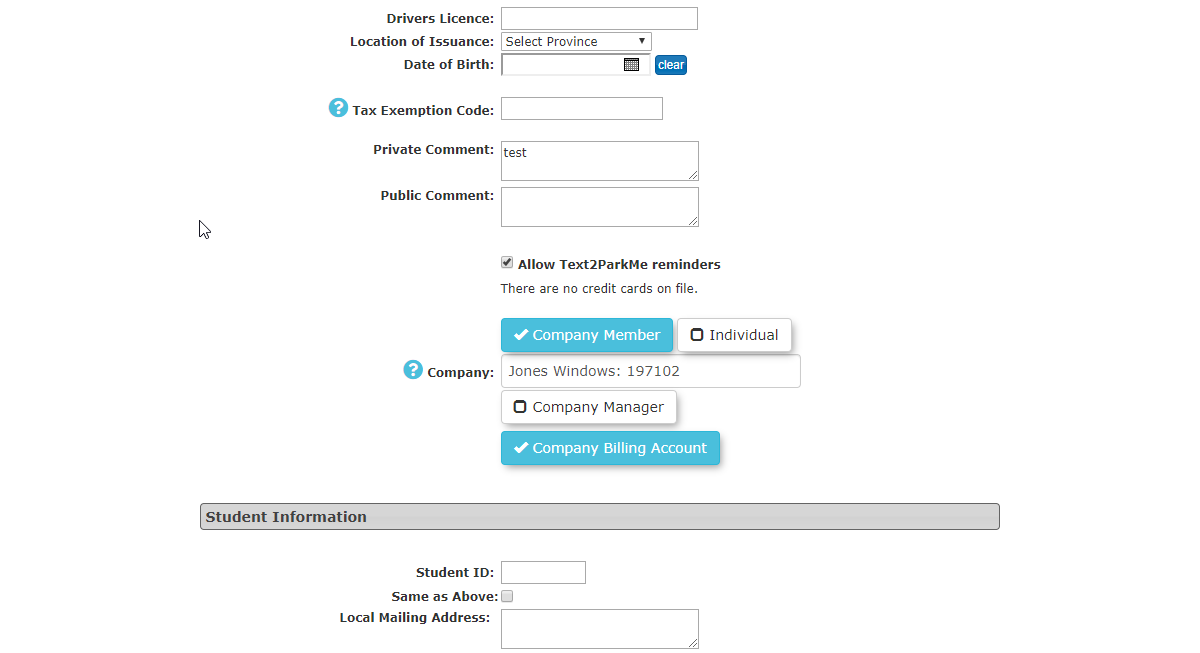
Once you have configured a user to be part of a company they will then see additional items to configure in the user's profile.
For Company Members, an admin must designate a member to act as Company Billing Manager. This will be the company member that receives invoices.Note: This person does not have to be a Company Manager although they often designated with both roles.
There can be more than one Company Manager but there should only be one Company Billing Manager.
Also be aware that a Billing Manager must be designated in order for invoicing to be activated. -

-
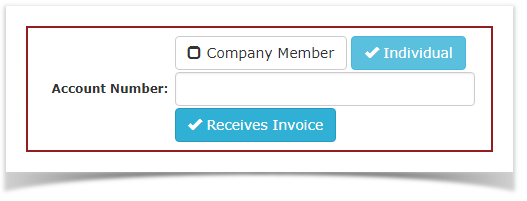
For Individual users that are not part of a company but you wish to invoice, you must edit their user profile and enable the 'Individual' checkbox and the 'Receives Invoice' checkbox.

Creating Permit Invoices
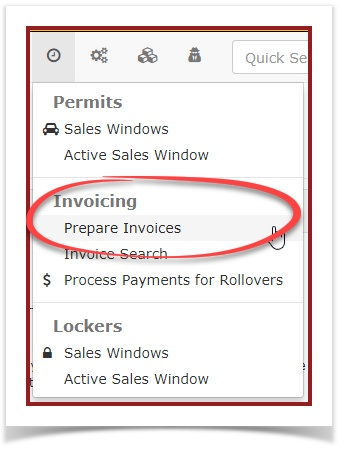
Click Allocations > Prepare Company Invoices.
The 'Prepare Invoices' screen displays. A list of invoices that are ready to send will be displayed.
Click Prepare Invoice.
Note - Currently, only permits for user types that are not Student or Staff will be shown as available for invoicing.
Setting Invoice Billing and Due Dates
-
A list of invoicing for the selected allocation will display. The Admin can toggle off invoices that they do not want to send, but typically you would send all selected.
All Invoices are toggled on by default.
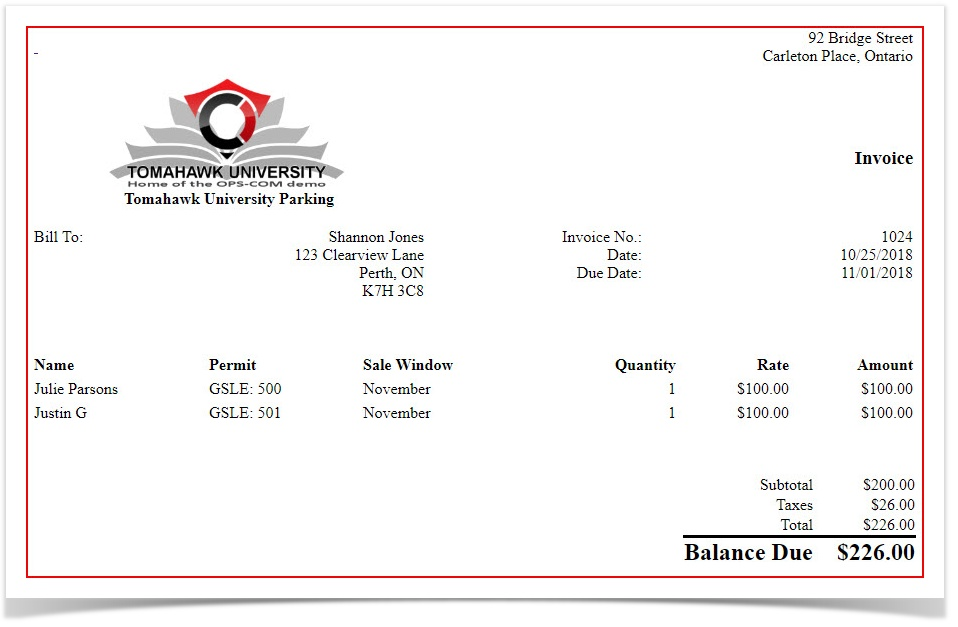
Set the Billing Date and Due Date. In this case billing was done on October 25th and the payment is due November 1st.
-
Click Send Invoices to schedule the invoices for sending. The following message will pop up.

-
After a few seconds the Invoicing task will be displayed on the Task Manager Icon as below. You can see the status of the task. In this case it is complete. You can click the blue "X" to clear it or leave it be.

-
Emails will be sent to the companies selected. By default, the email will be formatted as follows:
The invoice will list the names users as well as the permit numbers being purchased.
Note the Date and Due Date: The Date indicated is the billing date and the Due Date indicates when the invoice is expected to be paid.

Searching for an Invoice
-
Click Allocations > Invoice Search.

-
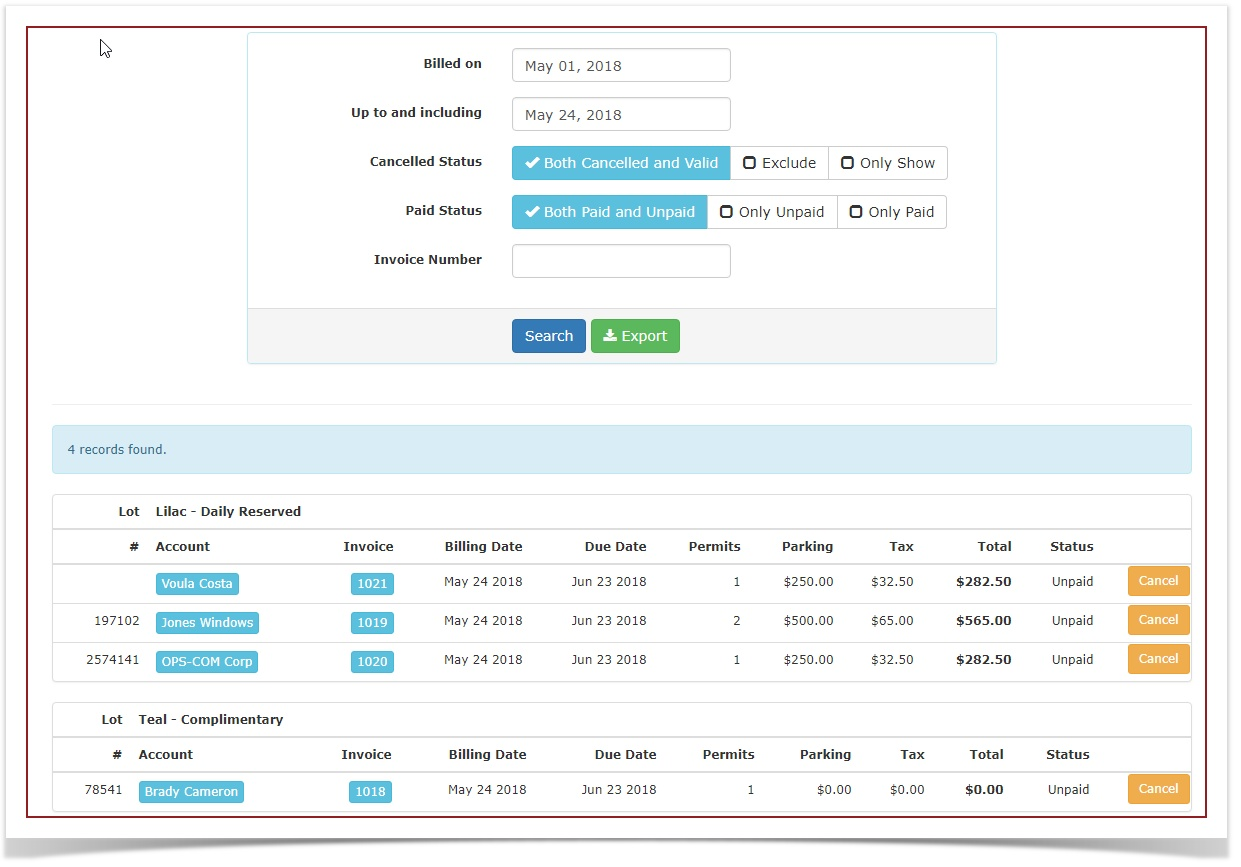
The 'Search for Invoices' screen displays. You can search for a specific invoice or for an invoice issued during a range of dates. You can also eliminate canceled or paid invoices from the search parameters.
In this case we are searching for a date range.

-
Click on an invoice number to see a copy of the invoice that will be sent to the client.
Note: If you wish to print this you can right click and print it out of your browser. You can also print to a PDF if required.

-
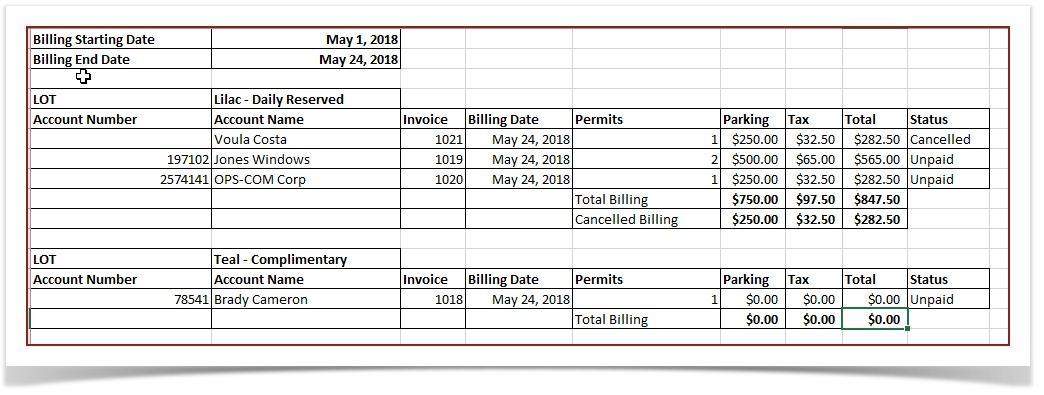
You can also export this report to Excel. This will show you the revenue for a selected date range by Lot.


Re-Sending an Invoice
When do we use this?
It is also possible to re-send an invoice if the client requests a second copy sent.
If for example the client mistakenly deleted the email, the admin has the ability to search up the original invoice and send it again.
In our sample here we are looking for an invoice for Voula Costa.
-
To do so there are two different methods. You can find the invoice in the user's profile under History or you can search for the invoice through the Search Invoice utility.
-
Firstly let's search the user in question: In this case using the last name Costa.
-
Click on the username to access the user's profile.
-
Once in the user's profile hover over History and click on All Records to access the list of this user's transactions.
-
Locate and click on the invoice number that you wish to resend.
-
Once in the invoice preview you will notice the Re-Send Email button. Click on this button to re-send the invoice.
-
The invoice will be re-sent. In the sample below there is an original invoice send as well as a re-send. Notice the email title for the re-send has a prefix added indicating this is a Re-sent invoice.
-
As mentioned above you can also find the invoice you wish to resend using the Invoice Search tool. To do so access the tool under the Permits menu.
Hover over Permits and click on Invoice Search in the drop down menu.
-
In the search criteria window enter the Invoice Number in question and click search. In this case Invoice Number 1018.
-
From the resulting search result click on the Invoice Number to access the Invoice Preview Window.
-
The process after this point is identical to step 6 and 7 above.
-
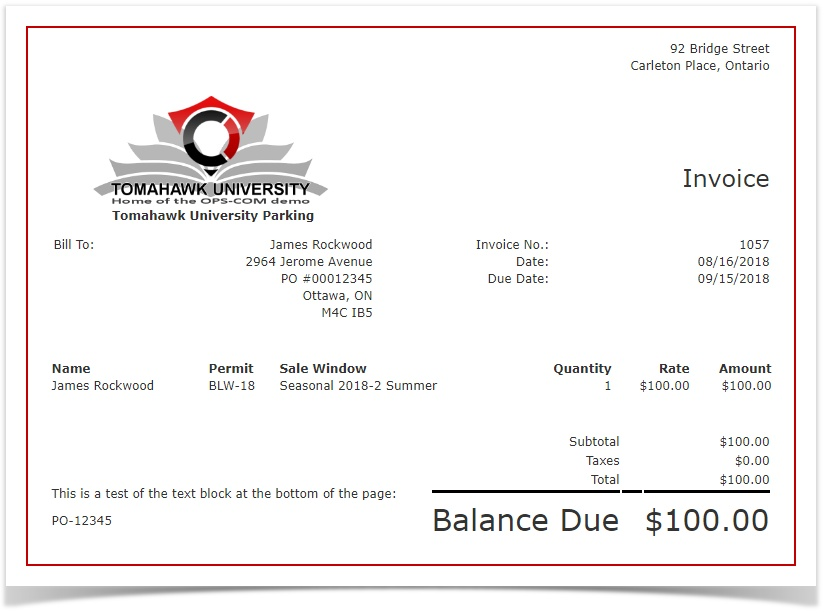
The Re-Sent Invoice will look identical the original invoice format:


Printing From Emailed PDF
-
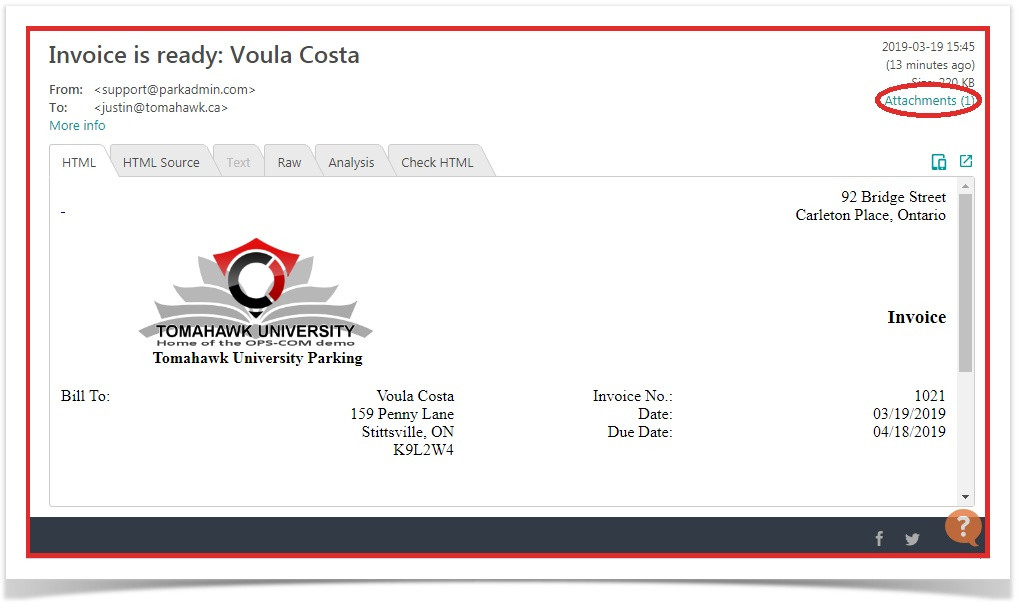
It is important to note that in order to print this PDF document you should follow these next steps
-
You must first navigate to the email of the invoice in the client email where you will find an attachments link circled below
-
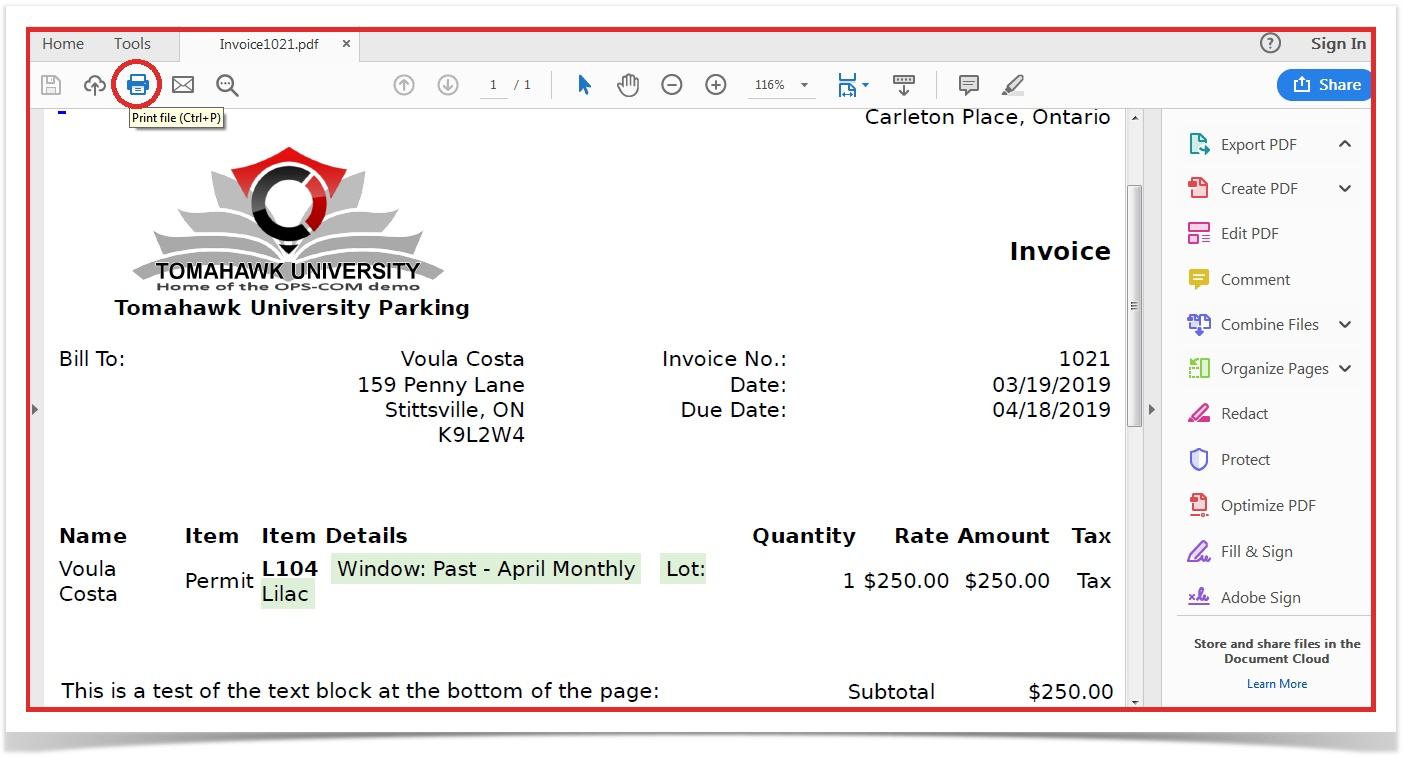
After opening the attached PDF file you will be brought to the file opened in the web browser.
-
If you print form here you will receive a cut off version of this PDF. In order to prevent this you should download the file by pressing this button:
-
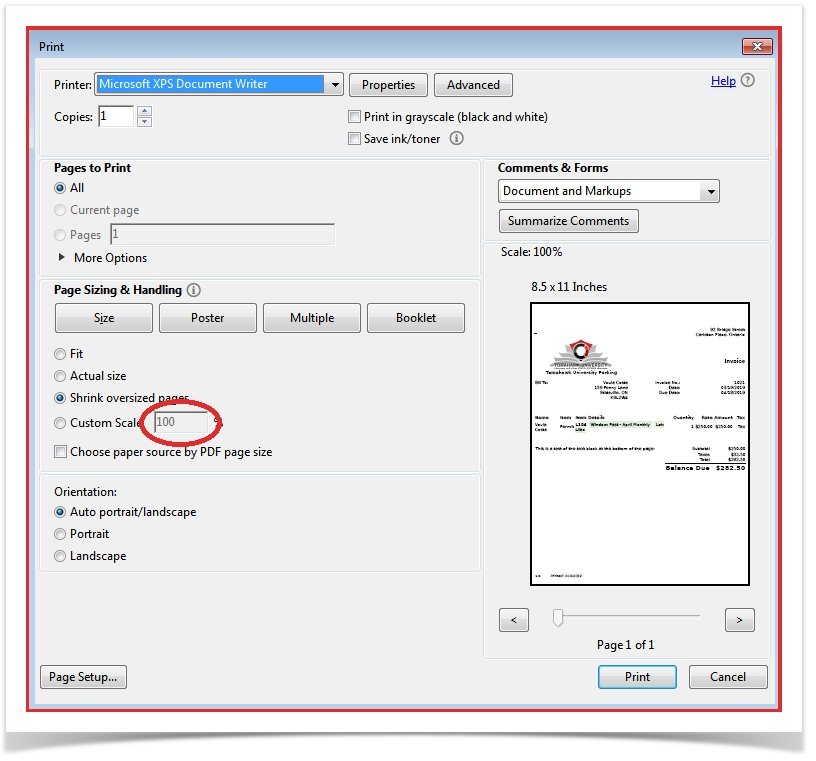
Save it to your preferred location and open it with the PDF reader of your choosing
-
From here you just print the invoice like you would a normal document ensuring that the print scale is set to 100%


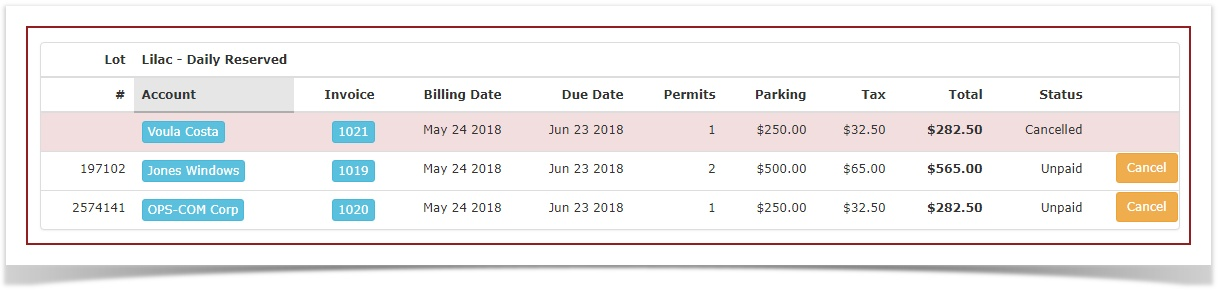
Cancelling an Invoice
Note
If you have issued an invoice then the company would like users removed or changes made, you MUST cancel the invoice from the Invoice Search page. If you don't it will show up twice as revenue for that month and both invoices will be due for payment. You cannot remove invoices directly from users payment tabs.
-
If you wish to cancel and invoice click the cancel button. The following prompt will display.

-
Click 'Cancel Invoice' and the invoice will now show up as Cancelled on the report.

-
Make your changes as required to the permits and users then go back to Prepare Invoices. That company should be there to reissue as long as the changes you made are not further back than a year.