System Configuration
- Roles and Permissions
- Permissions in OPS-COM
- Admin User Accounts
- IP Filtering for access to OPS-COM
- Editing a Username
- Defining User Profile Items
- Email Headers and Footers
- Guide to System Settings
- Configuration Checklist
- Password and Security Features
- Manage Files
- Administrator Groups
- The Invoice Template
- System Messaging Checklist
- Email Server Communication Errors
- Default Header and Footer for Mobile Readiness and SwiftDeploy
- Email Templates
- Pages and Content Blocks
- Templates and Design
- Translations
- Taxes
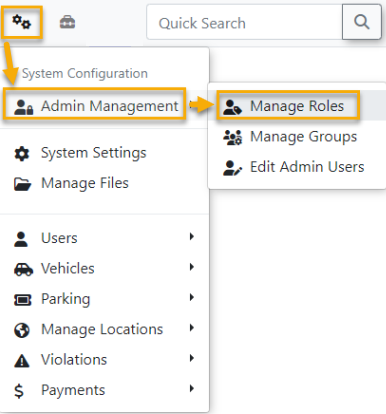
Roles and Permissions
Roles and Permissions
Click the Manage Roles button to begin.
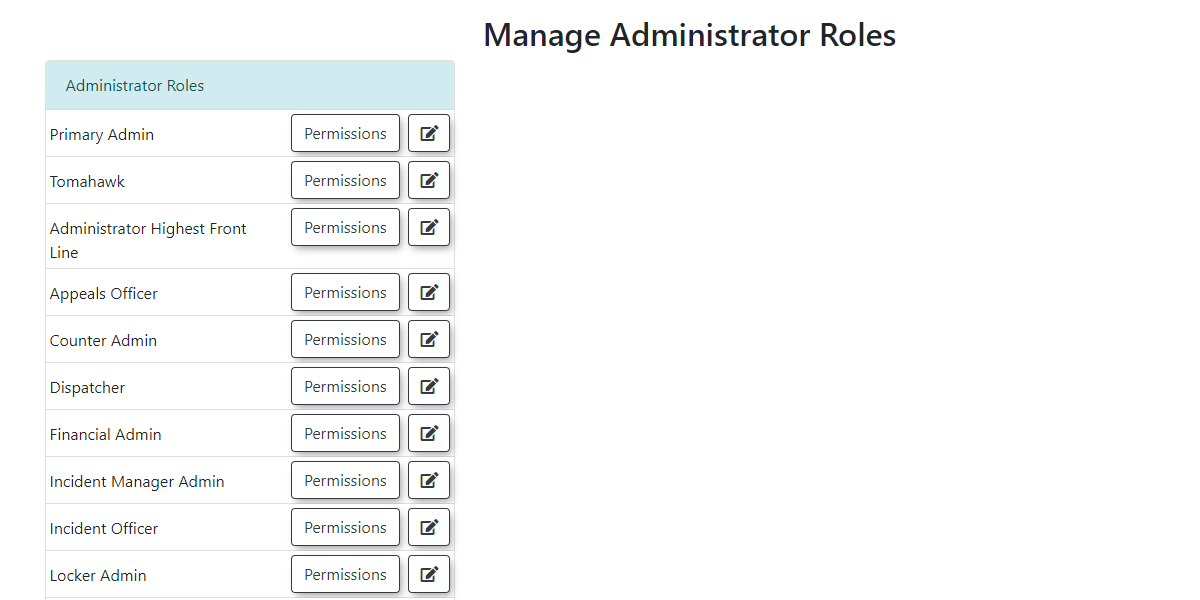
The Manage Administrator Roles screen displays.
The Primary Administrator role will be available to select. This role will allow you to create new Roles and assign them to other Admin Users.
Click the Add New Role button. Enter the Role name and the description for that role.
The description will become the rollover tool tip that displays when you mouse over the Edit Role button of an existing role. Click Save Role to save.
You can edit any role by clicking the Edit Role button. You can edit the Role Name and Description for any Role except Primary Admin.
Click the Permissions button to edit the permissions for any role. The Editing Permissions screen will display.
The number next to the icons across the top bar indicate how many permissions in that category have been selected.
The icons mirror the OPS-COM menu. Click an icon to display the permissions in that category.

To select a permission, enable the check box next to that permission. Once you have gone through each icon and selected all the permissions that are required for the role, click Save Permissions. That role is now created.
You can assign this role to one or more users. Click the System Config menu and select Edit Admin Users. The Manage Administrator Users screen displays.
From this screen you can create a new user or edit an existing one by selecting the appropriate option from the dropdown list. Click Retrieve to display the user options below.

Add or confirm the User information on the left and select the roles to apply to that user on the right. You can add a comment for any relevant notes about the user. Click Update User when you are finished.
Permissions in OPS-COM
User Management Permissions |
|
|---|---|
| Permission Names | Description |
| View Users | Allows the admin user to view, but not change, the users in the system. User Search functionality is enabled. |
|
Edit Users |
Allows the admin user to edit users in the system including new User Registration. This should be used with the 'View Users' permission.
|
|
Delete User Aliases |
This permission allows users to Update User Aliases. It cannot be used without 'View Users' and 'Edit Users' turned on. |
|
Edit Vehicle Information |
Allows Admin to update vehicles and view the vehicle's history. Admins can also do a Plate Search from the User Management menu. In addition, Admins can see the DNTT reports. |
| Edit Forms | Allows Admins to create, update and view forms. |
| View Forms | Allows Admins to view all forms and see the user-submitted entries of forms. Users cannot create or edit forms without the 'Edit Forms' permission. |
| Clear Alarms on User Profile | Allows Admins the ability to update and clear alarms on the user's profile. This must be used with 'View Users' and 'Edit Users' permissions enabled. |
| Send Bulk Email | Allows Admins to send email messages to various groups of Users. |
Locker Permissions |
|
|---|---|
| Permission Names | Description |
| Building Areas | Allows the Admin user to view buildings and building areas and add buildings and building areas. You must use this with the 'View Lockers' permission. |
|
View Lockers |
Allows the Admin to view lockers and look at locker history. As well the Admin can see lockers awaiting payment. |
|
Edit Locker Information |
Allows users to edit the locker information. |
|
Allocate Lockers |
Ability to allocate locker numbers to a building area. |
| Edit Locker Allocations | Allows creation and editing of locker sales windows, allows Admin users to view active locker sales window |
|
Allocation Locker - Single |
Admins are able to add new buildings and building areas, able to create and update certain lockers. You must have 'View Lockers' enabled to use this permission effectively. |
Parking Permissions |
|
|---|---|
| Permission Names | Description |
| Pricing & Lot Administration |
Allows Admins to create and edit lots. This permission will not work by itself. The Admin must also have the following permissions:
|
| View Permits | This allows the Admin to view Permit records, do Permit Switches and to view waiting lists. |
| Edit Permits | This allows the Admin to edit Permit details. This permission allows access to most functions that relate to permits. |
| Allocate Permits | Grants the ability to allocate permits to different lots. This permission will also grant all privileges of the 'View Permits' permission. |
| Edit Permit Allocations | Allows access to edit the Permit Allocation Sales Window and the Active Permit Sales Window. |
| View Access Cards | Allows the Admin to view Access cards. This will not work without the 'View Permits' permission enabled as well. |
| Edit Access Cards | Allows the Admin to edit Access cards. This will not work without the 'View Permits' permission enabled as well. |
| Add Access Cards | Allows the Admin to add Access cards. This will not work without the 'View Permits' permission enabled as well. |
| Prorate Permit Purchases | Allows the Admin to prorate permit purchases for the end user. This cannot be used without 'User Management' permissions and 'Edit Permits' enabled. |
| Create Temp Permit Entries | Allows Admins to use the Parking Validation utility. Please note, |
Violations Permissions |
|
|---|---|
| Permission Names | Description |
|
View Violations |
Allows the Admin to see information about violations including, basic user details and details of any payments. |
| Edit Violations |
Allows the Admin to search for violations. This permission requires 'View Violations' to see the details. |
| Edit Violation ticket number |
Grants the ability to edit a violation number if you also have the 'View Violations' permission. |
| Display as Ticket Writer | Grants the ability to be a ticket writer on the Handheld or the Web if the Admin also has the 'Add New Violations'. |
| Add New Violations |
Allows the Admin to issue a violation. The Admin must have the 'Edit Vehicle Information' permission found in the User Management section. |
| Grant Violation Appeals |
Gives the ability to manage Appeals and grant them. The Admin must have the 'View Appeal Reports' permission as well. |
| View Appeal Reports |
Allows the Admin to view Appeal reports for different officers. Admins must also have the 'View Violations' and 'Edit Violations' permissions. |
| Issue / View Violation Notices |
Allows the Admin the ability to issue and View Violation Notices. |
| Manage Collections |
Grants the ability to manage the collections process for violations. |
| View Violation Reports |
Allows the Admin to view financial and statistical reports regarding violations. Admins must have the 'View Violations' permission as well. |
Incident Permissions |
|
|---|---|
| Permission Names | Description |
|
Add/Edit Contact History User Notes |
Grants the Admin the ability to add / edit notes in contact history. You must have User Management permissions to use this since it is accessed through the user profile. |
| Delete User Contact History Notes |
Grants the Admin the ability to delete User notes in contact history. You must have User Management permissions to use this since it is accessed through the user profile. You must also have the 'Add/Edit Contact History User Notes' permission. |
| View All Incidents |
This is a master permission that grants the ability to view all Incidents. This permission is normally used for high-level Admins as it grants access to all information. |
| Add Incidents |
Allows the Admin to add incidents and have an incident reported on their behalf. |
| Delete Incident |
USE WITH CAUTION - This permission should only be added to a Primary Admin. If this is enabled the Admin can remove the incident and all related records and files where they are not used in other reports. There is a button on the incident to "Delete Incident". |
| Open Incidents |
Allows the Admin to open incidents that are closed. This requires the 'View all Incidents' permission. This permission is normally used for high-level Admins. |
| Edit Incidents |
Grants the ability to edit Incidents. This requires the 'View all Incidents' permission. This permission is normally used for high-level Admins. |
| View Incidents - Self |
Allows the Admin to view Incidents if they are listed as the reporter. |
| Edit Task Notes on Incidents |
Grants the ability to edit comments on Incident tasks. Requires the 'View all Incidents' permission. |
| Edit Incident summaries | Allows the Admin to edit Incident Summaries. Requires the 'View all Incidents' permission. |
| Incident Administrator | Grants the ability to view and edit incidents. This permission is normally used for high-level Admins. |
| View/Edit Confidential Information | Allows the Admin to View/Edit Confidential Information on reported incidents. Requires the 'View all Incidents' permission. |
| Be assigned Tasks Directly | Allows the Admin to be assigned as an investigator for an Incident. |
| Edit Incident Tasks | Grants the ability to edit Incident Tasks. Requires the 'View all Incidents' permission. |
| Close Incidents / Checklists |
Grants the ability to close Incidents and Checklists. Requires the following permissions:
|
| Assign Incident to Case Manager | Allows the Admin to Ability to assign a Case Manager to an Incident. Requires the 'View all Incidents' permission. |
| Assign Incident To An Investigator | Allows the Admin to assign an Investigator to an Incident. Requires the 'View all Incidents' permission. This permission is normally used for high-level Admins. |
| Assign Incident To A Different Investigator | Allows the Admin to assign a different Investigator to an Incident. Requires the 'View all Incidents' permission. This permission is normally used for high-level Admins. |
| Is Incident Case Manager | Allows the Admin to be listed as a Case Manager that can be assigned to an Incident. |
| Is Incident Shift Manager | Allows the Admin to be listed as an Incident Shift Manager. This will require some other high-level permissions as required for the job. |
| View Incidents Distribution Reports | Grants the ability to view the Incident Distribution Reports. |
| View Incident Reports | Grants the ability to view all Incident Reports in OPS-COM. |
| View Incident In-House Report | Grants the ability to view the Unpaid In-House Incident report. |
| Export Incident Reports | Grants the ability to export the Recent Incidents Report and the Sub-location Report to Excel. |
Dispatch Permissions |
|
|---|---|
| Permission Names | Description |
| View License Plate Alarms | Allows Admins to view License Plate alarms. |
| Receive License Plate Alarms via email | Allows Admins to receive Plate Alarms via email if they also have subscribed to the Alarms list. |
| View People Alarms | Allows Admins to view People alarms. |
| Receive People Alarms via email | Allows Admins to receive People Alarms via email if they also have subscribed to the Alarms list. |
| Add New Dispatch Logs | Grants the ability to add dispatch logs. |
| Edit Dispatch Logs | Grants the ability to edit the Admin's own dispatch logs. |
| Edit All Dispatch Logs | Grants the ability to edit the dispatch logs of other Admins. |
| Open Dispatch Logs | Allows Admins to Open dispatch logs. |
| View Dispatch Logs | Allows Admins to View dispatch logs and close log records. |
| Add/Drop Dispatch Logs | Grants the ability to remove the association of a Dispatch Log with an incident. |
| View Cameras | Allows the Admins to view Cameras, if this is configured with OPS-COM. |
Payment Permissions |
|
|---|---|
| Permission Names | Description |
|
Manage User Credit Cards |
Grants the ability to add, remove and update credit cards from Users. |
| View Payments | Grants the ability to view payments. Limited access to user information is also granted. |
| Edit Payments | Allows the Admin to process payments. Admin must have the 'View Payments' permission. |
| Change Payment Type | Allows the Admin to change the Payment Type of a payment. |
| Drop Payments | Allows the Admin to drop payments. |
| Mark Bulk Payments | Grants the ability to mark Bulk payments for bulk processing. |
| Refund Payments | Grants the ability to refund payments, but not process. |
| Process Refunds/Adjustments |
Allows the Admin to process refunds and adjustments. |
System Content Permissions |
|
|---|---|
| Permission Names | Description |
|
View and Select Files |
Grants the ability to view and select files for use in editors. Admins must have the 'Manage System Messages' permission as well. |
| Manage Files | Allows the Admin to add and remove files for use with content editors. Admins must have the 'Manage System Messages' permission as well. |
| Manage System Messages | Grants the ability to edit the email templates, home page messages, system messages, Temp Permit Text and Notice Literature. |
| View History Search | Allows the Admin to view history searches if they also have the corresponding User Management permissions. |
| Purge Old Data | Allows the Admin to purge Data older than 7 years. |
System Configuration Permissions |
|
|---|---|
| Permission Names | Description |
|
Manage Roles |
Grants the ability to manage roles and permissions. This is typically the job of a Primary Admin only. |
| Edit Administrators | Allows the Admin to edit other Admin user accounts and assign roles based on their job description. This requires 'Manage Roles' to function. This is typically the job of a Primary Admin only. |
| Manage System Configuration | Grants the ability to edit the System Settings. This is typically the job of a Primary Admin only. |
| Manage User Types and Departments | Allows the Admin to manage User Types and Departments. |
| Manage Vehicle Configuration | Allows the Admin to setup the different Vehicles descriptions that are used in OPS-COM. |
| Manage Permit Types and States | Allows Admins to manage the Zones, Groups, Common Lots and Permit States. This must be used the 'Edit Permits' permission. |
| Manage Access Cards | Grants the ability to setup Access card options. |
| Manage Barcodes | Allows the Admin to setup Barcode options. |
| Manage Locations | Grants the ability to setup Locations options for use in OPS-COM. |
| Manage Handhelds | Allows the Admin to manage settings stored in the Handheld Commons area |
| Manage Violation Offence Types | Allows the Admin to manage ticket types and ticket offence items. |
| Manage Alert Lists | Allows the Admin to setup alert and alarm email lists. |
| Manage Distribution Configuration | Allows the Admin access the Distribution setup options. |
| Manage Dispatch Configuration | Grants the ability to the Dispatch setup options. |
| Manage Incident Configuration | Allows the Admin to configure the IncidentAdmin options. |
| Manage Cameras | Grants the ability to Admin to access the Camera options. |
| Reset Database | Allows the Admin to the reset their preview database for testing. |
| Manage Duplicates | Grants the ability to resolve duplicates in the system. |
Admin User Accounts
Creating an Admin Account
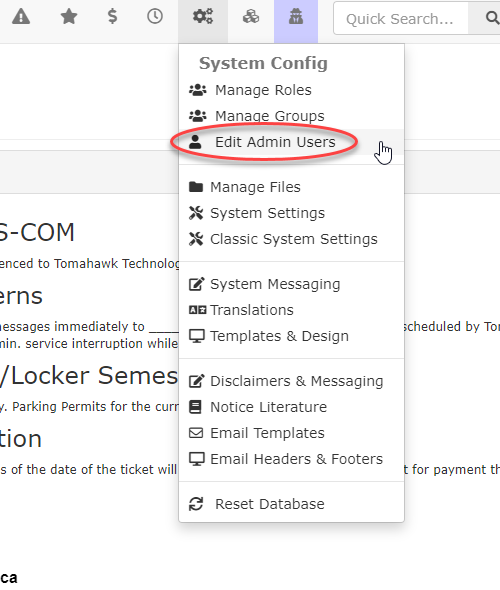
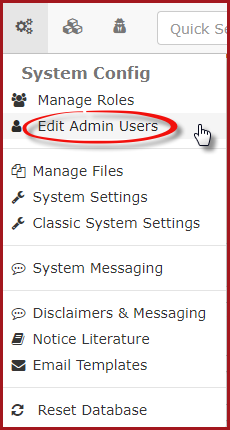
Hover over System Config and click Edit Admin Users.
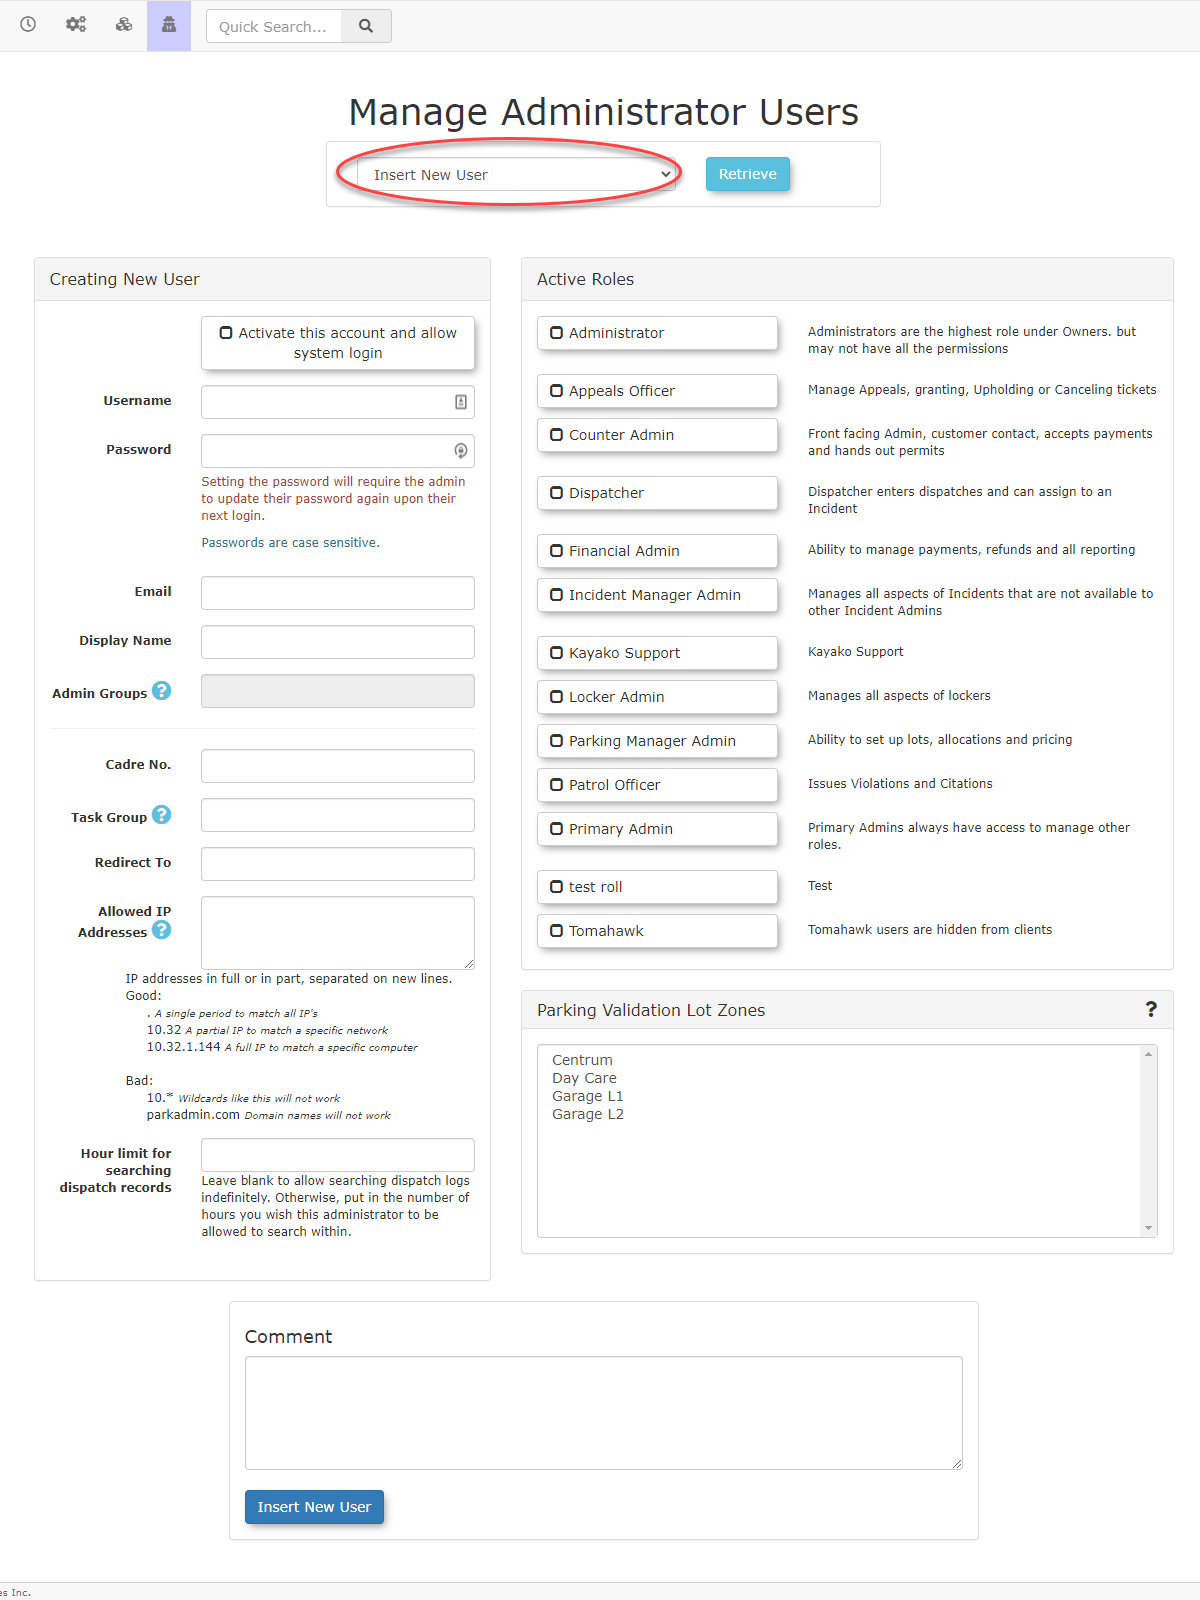
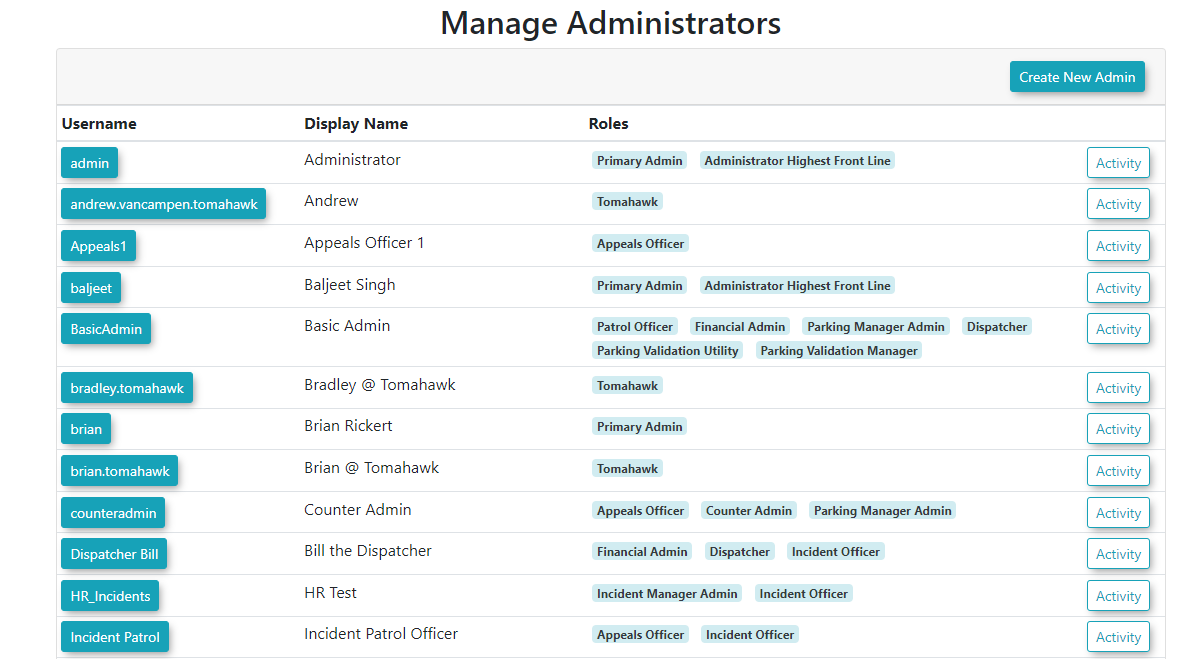
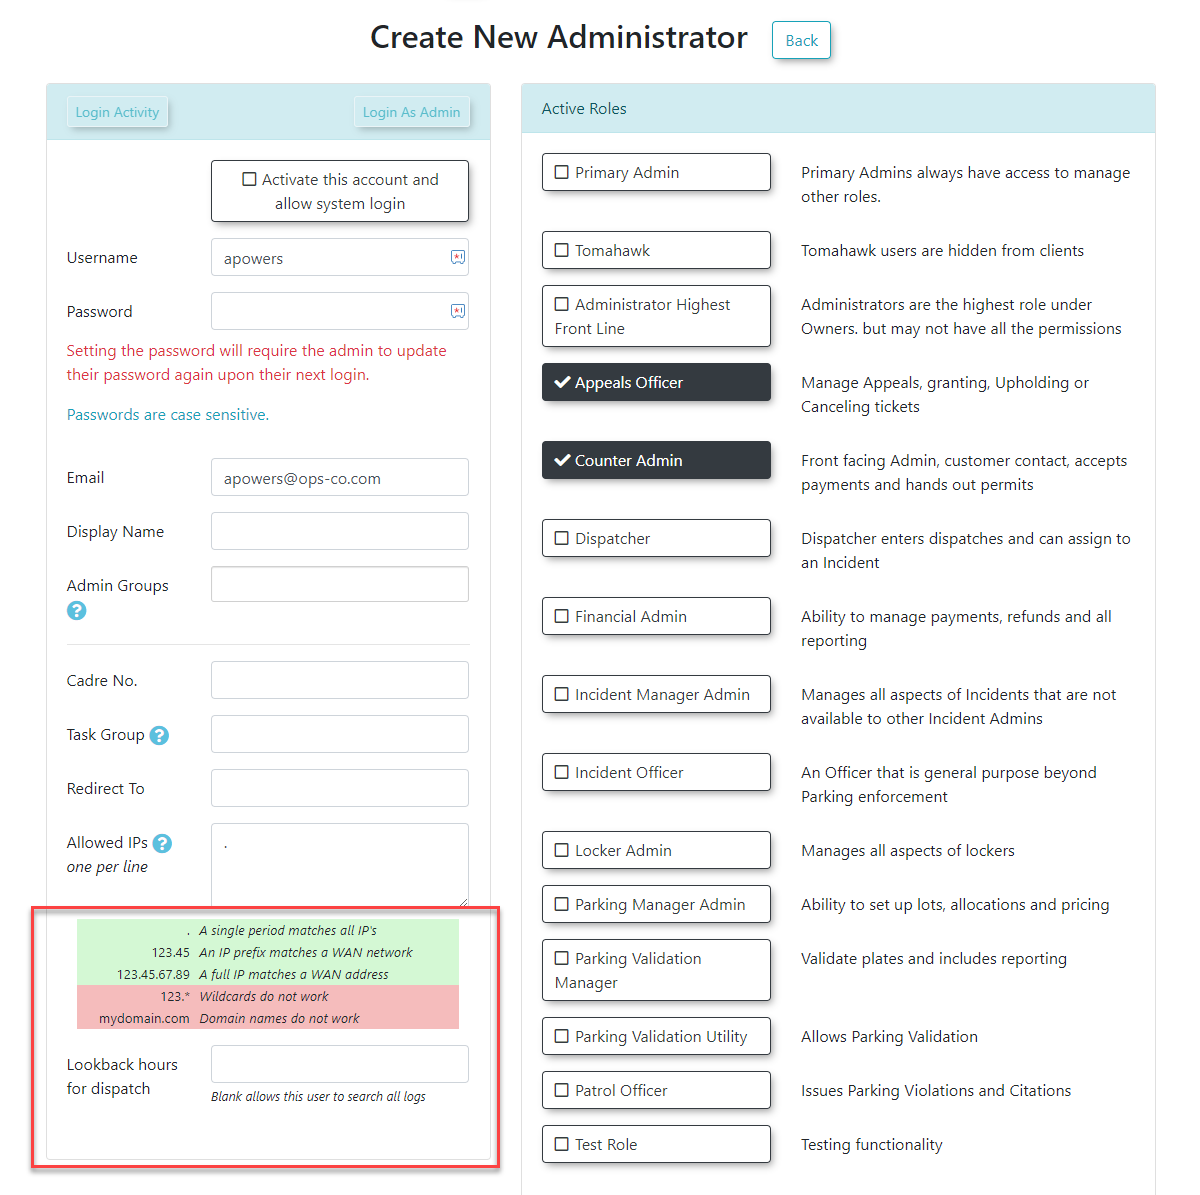
The Manage Administrator Users screen displays. Select Insert New User from the drop-down menu, then click Retrieve.
On the left, you will enter the user information, and on the right, you will select the admin role(s) this person will be responsible for.
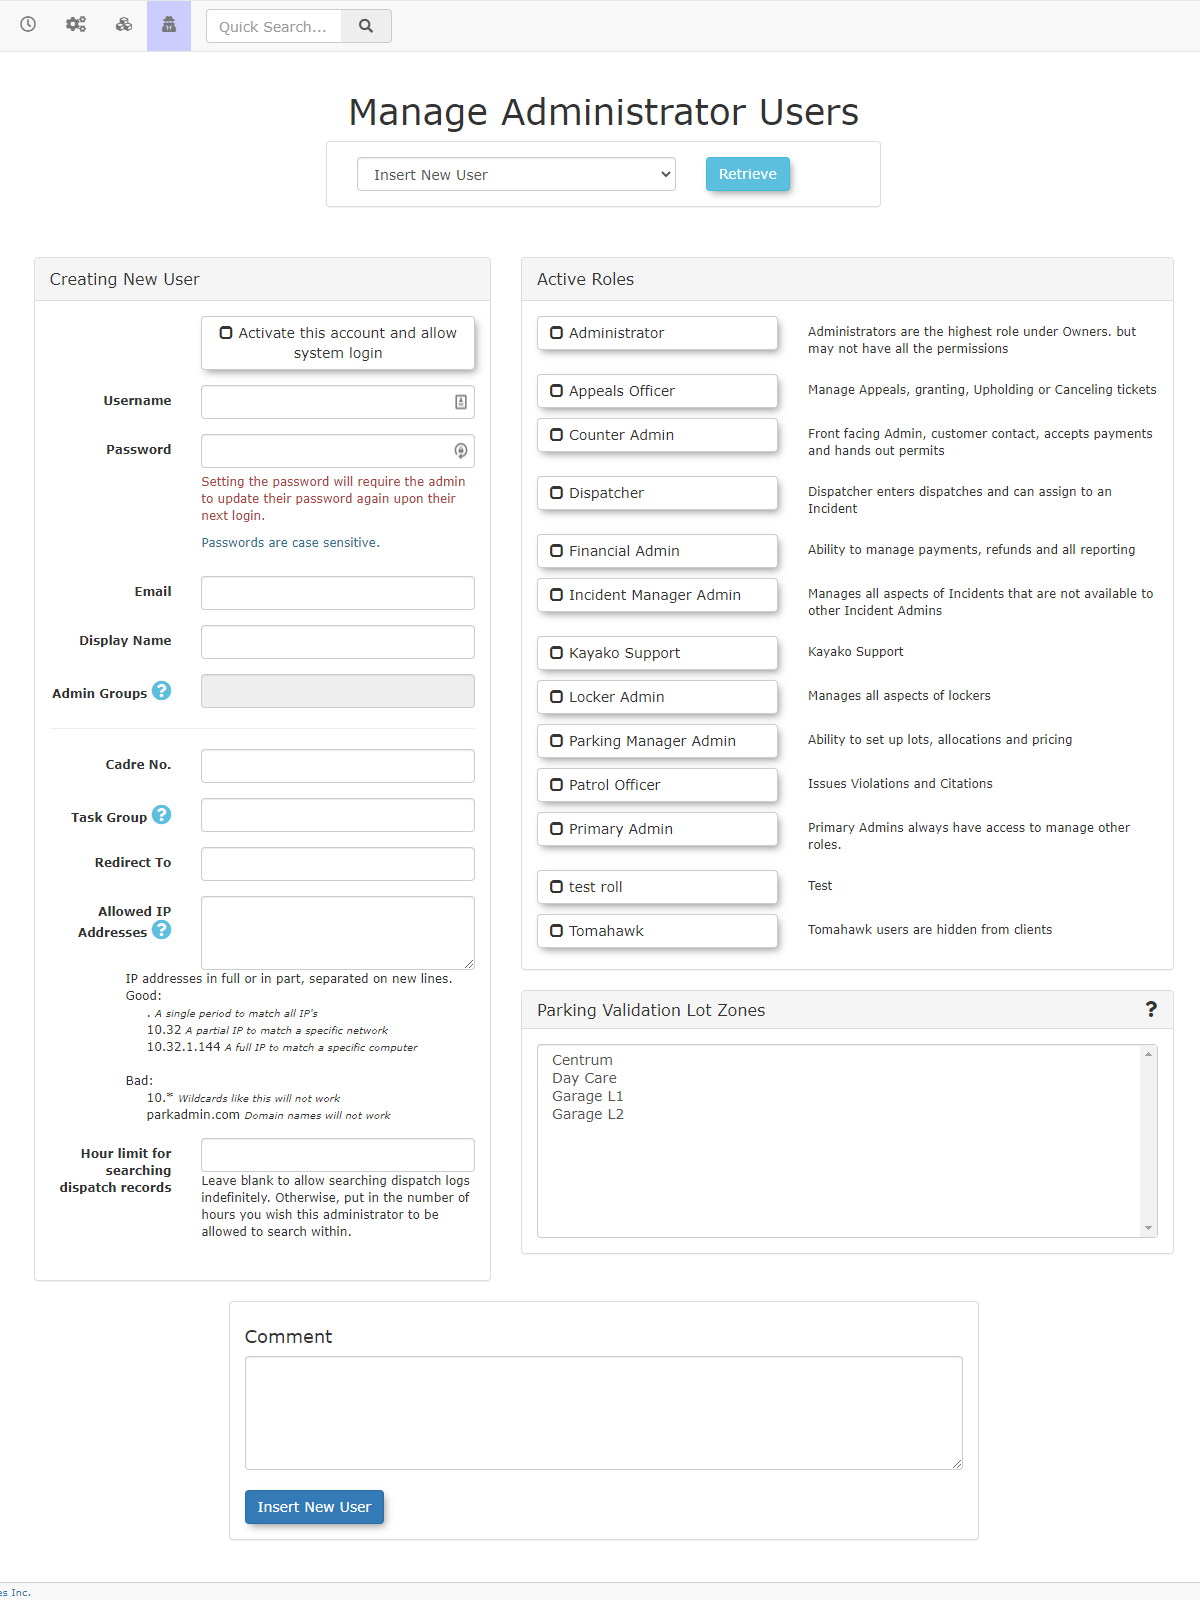
Enter the admin's information into the Creating New User form
In the Active Roles form select the role(s) the Admin User will be granted.
We suggest you view the video demo to fully understand how the Roles and Permissions in OPS-COM function.
Click Insert New User when complete to add the admin user to the system.
Editing an Existing Admin Account
To manage Administrator Users, select the System Config menu, then click on Edit Admin Users.

The Manage Administrator Users page will display. To change a user, select the user from the drop-down menu and click Retrieve. You can now change the options for that selected user.
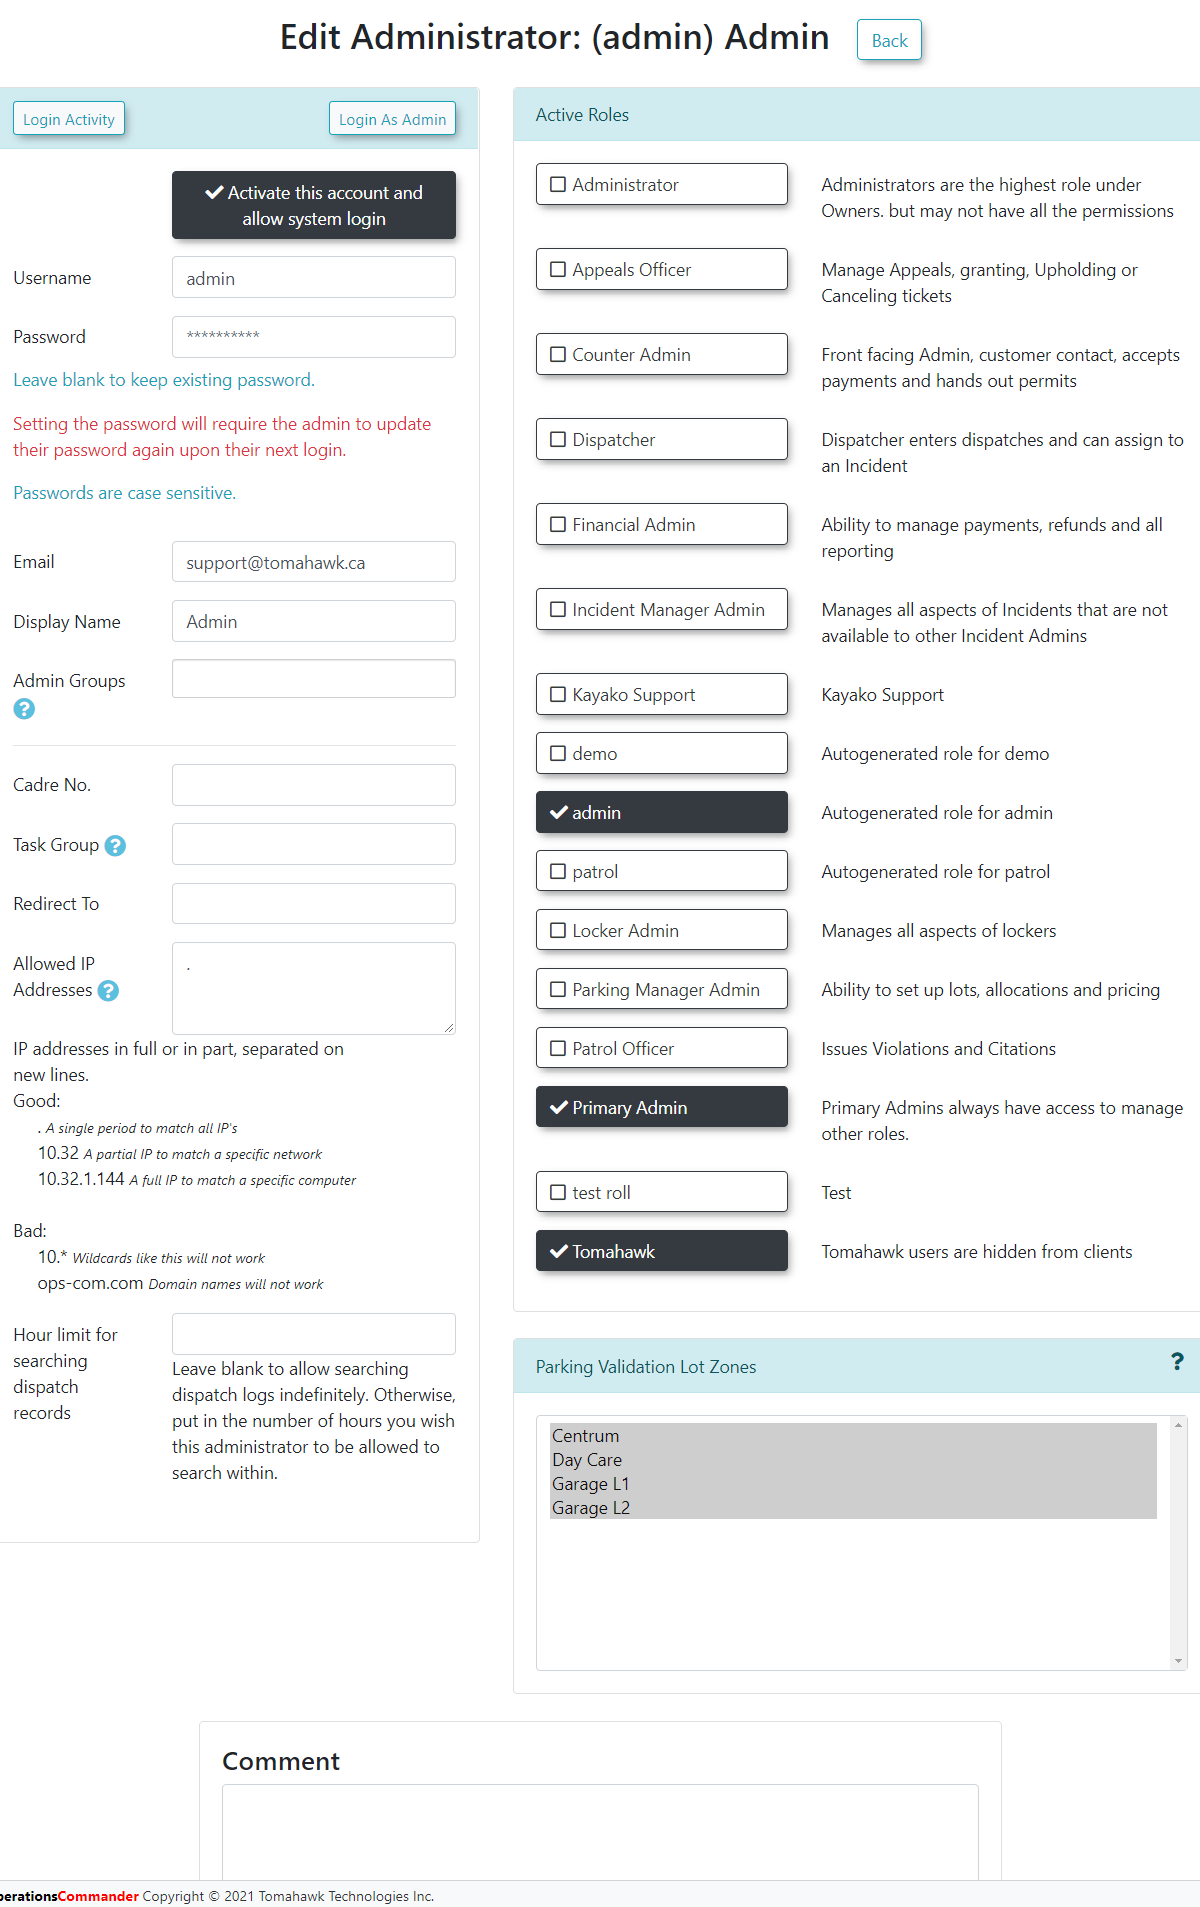
You can also click on the Login Activity button to see when the admin logged into the OPS-COM system or a handheld device.
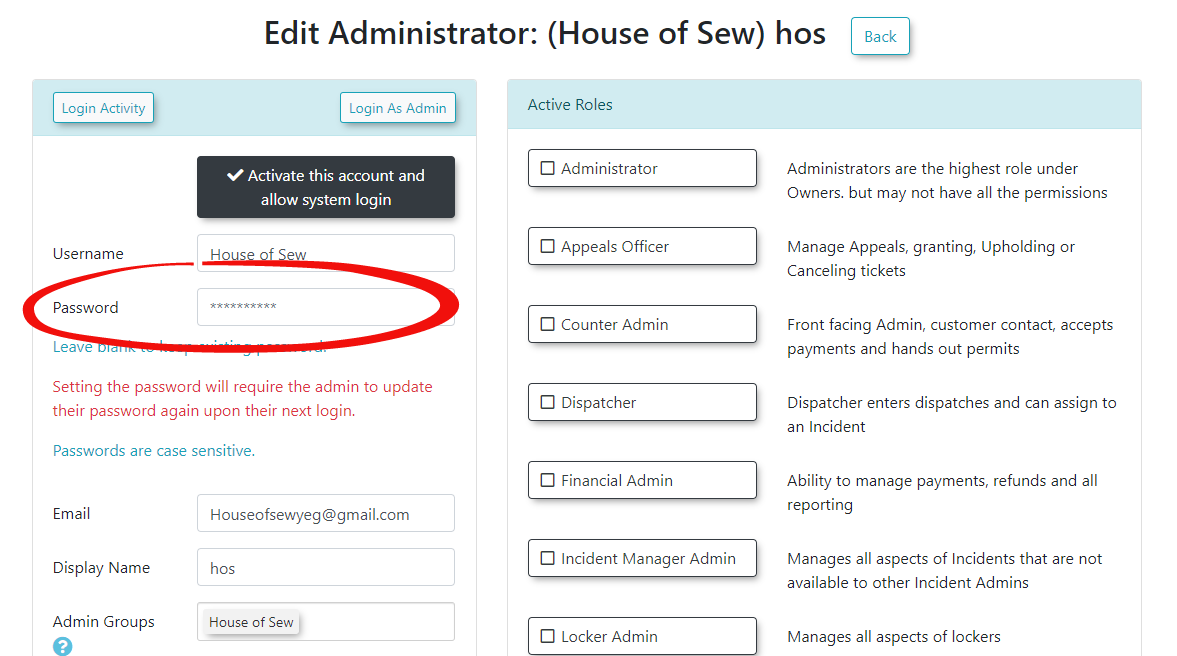
Resetting an Admin's Password
To reset an admin's password go to the specific user's account and enter a temporary password into the Password field. The password is hidden but you can simply type over the existing symbols "**********".
Inform the admin of the temporary password. When they login with the temporary password they will be prompted to update their password and they will have the opportunity to make it more secure.
Disabling an Admin Account
When do we use this?
Admin users cannot be deleted as they have data attached to their accounts. If an admin user changes roles or leaves the organization the best practice is to disable their account.
NOTE: It is very important to leave the admin users permissions in place as the permissions will affect reporting. Obviously, once the account is disabled any permissions existing cannot be actioned and will only be used for reporting purposes.
Click on the System Config menu and choose Edit Admin Users.
Click on the field labeled Insert New User to see a drop-down list of active users.
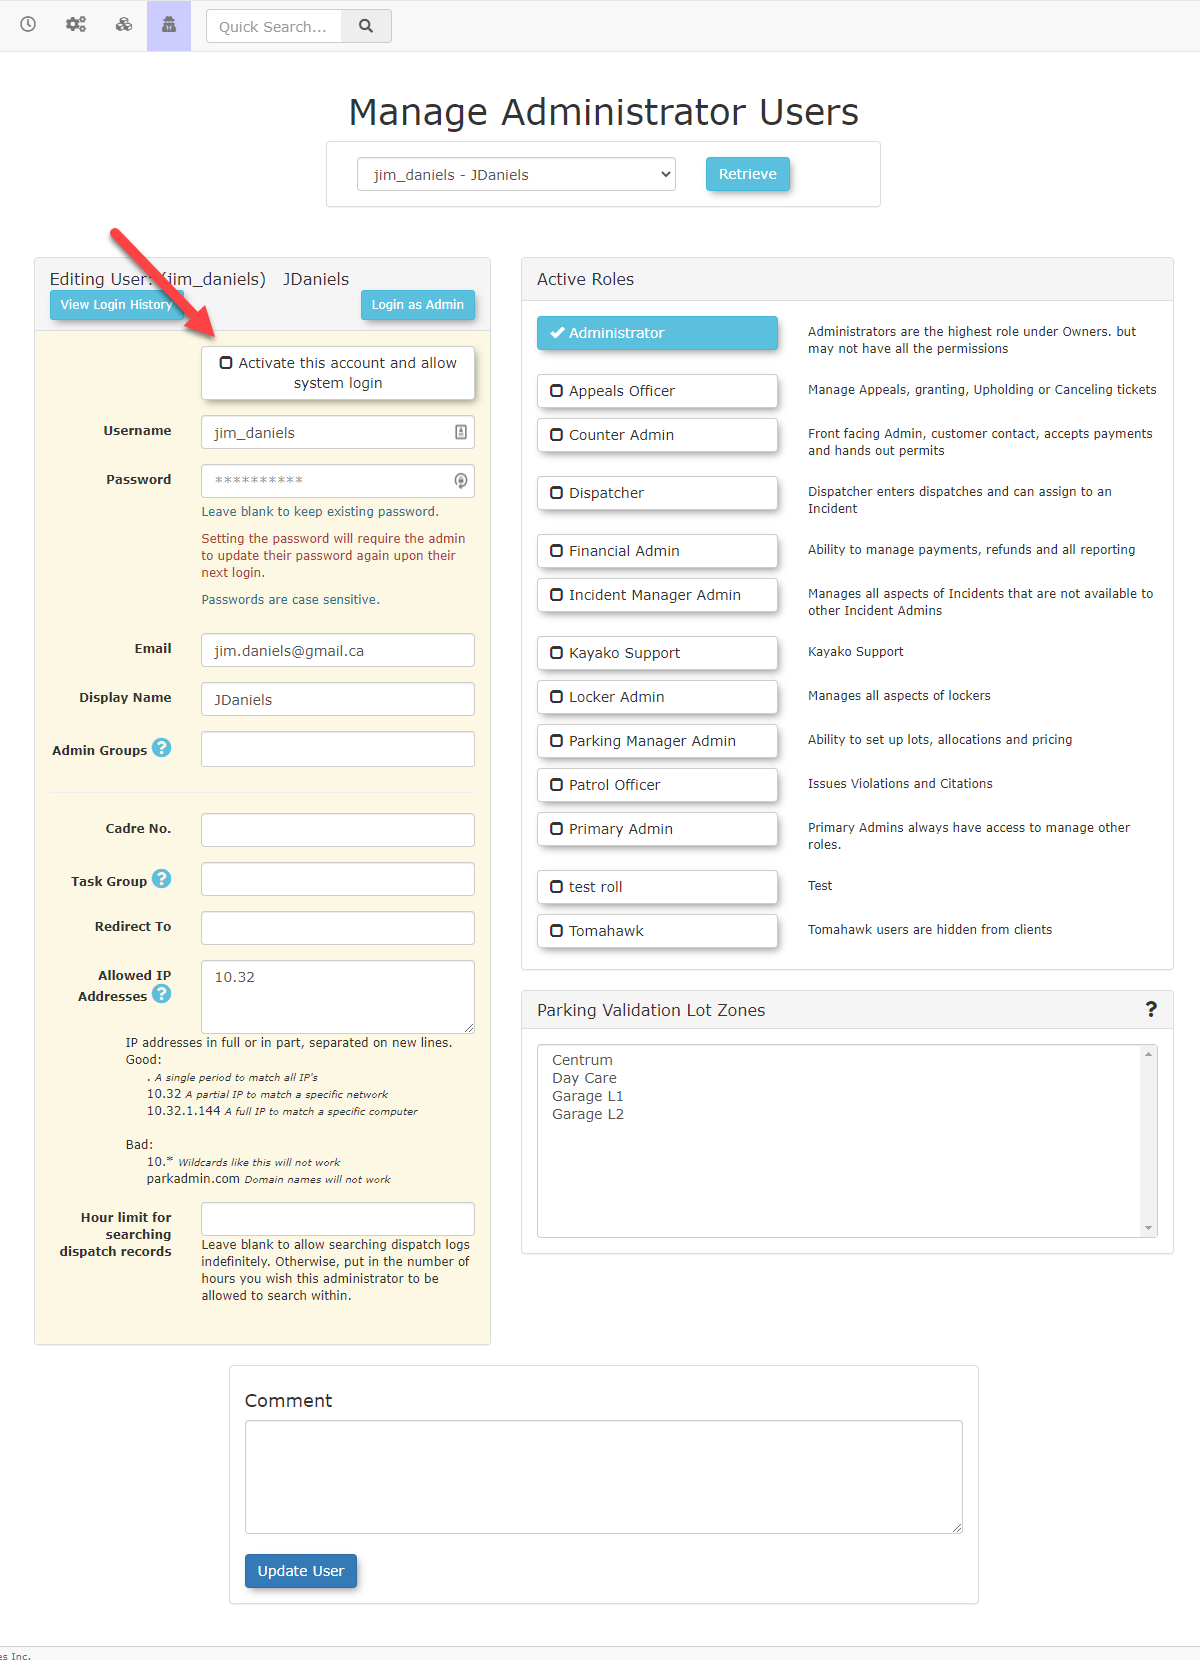
Click on the user being removed from the drop down list, in this example jim_daniels will be used.
The user is in an active state at this point. Uncheck the box titled Activate this account and allow system login.
Click Update User to apply the change.
Notice how, when you go back to the list of Admin Users, the account is now listed under the Disabled Accounts listing.
Note: This action can be reversed at any time by editing the user account and checking Activate this account and allow system login.
Related Video
IP Filtering for access to OPS-COM
An IP address is an address used in order to uniquely identify a device on an IP network. To get your IP address visit whatismyip.net.
The address is typically made up of four groups of numbers called octets.
The first two octets identify the network you are on and the last two octets narrow the address down to the specific machine.
Here is how it works:
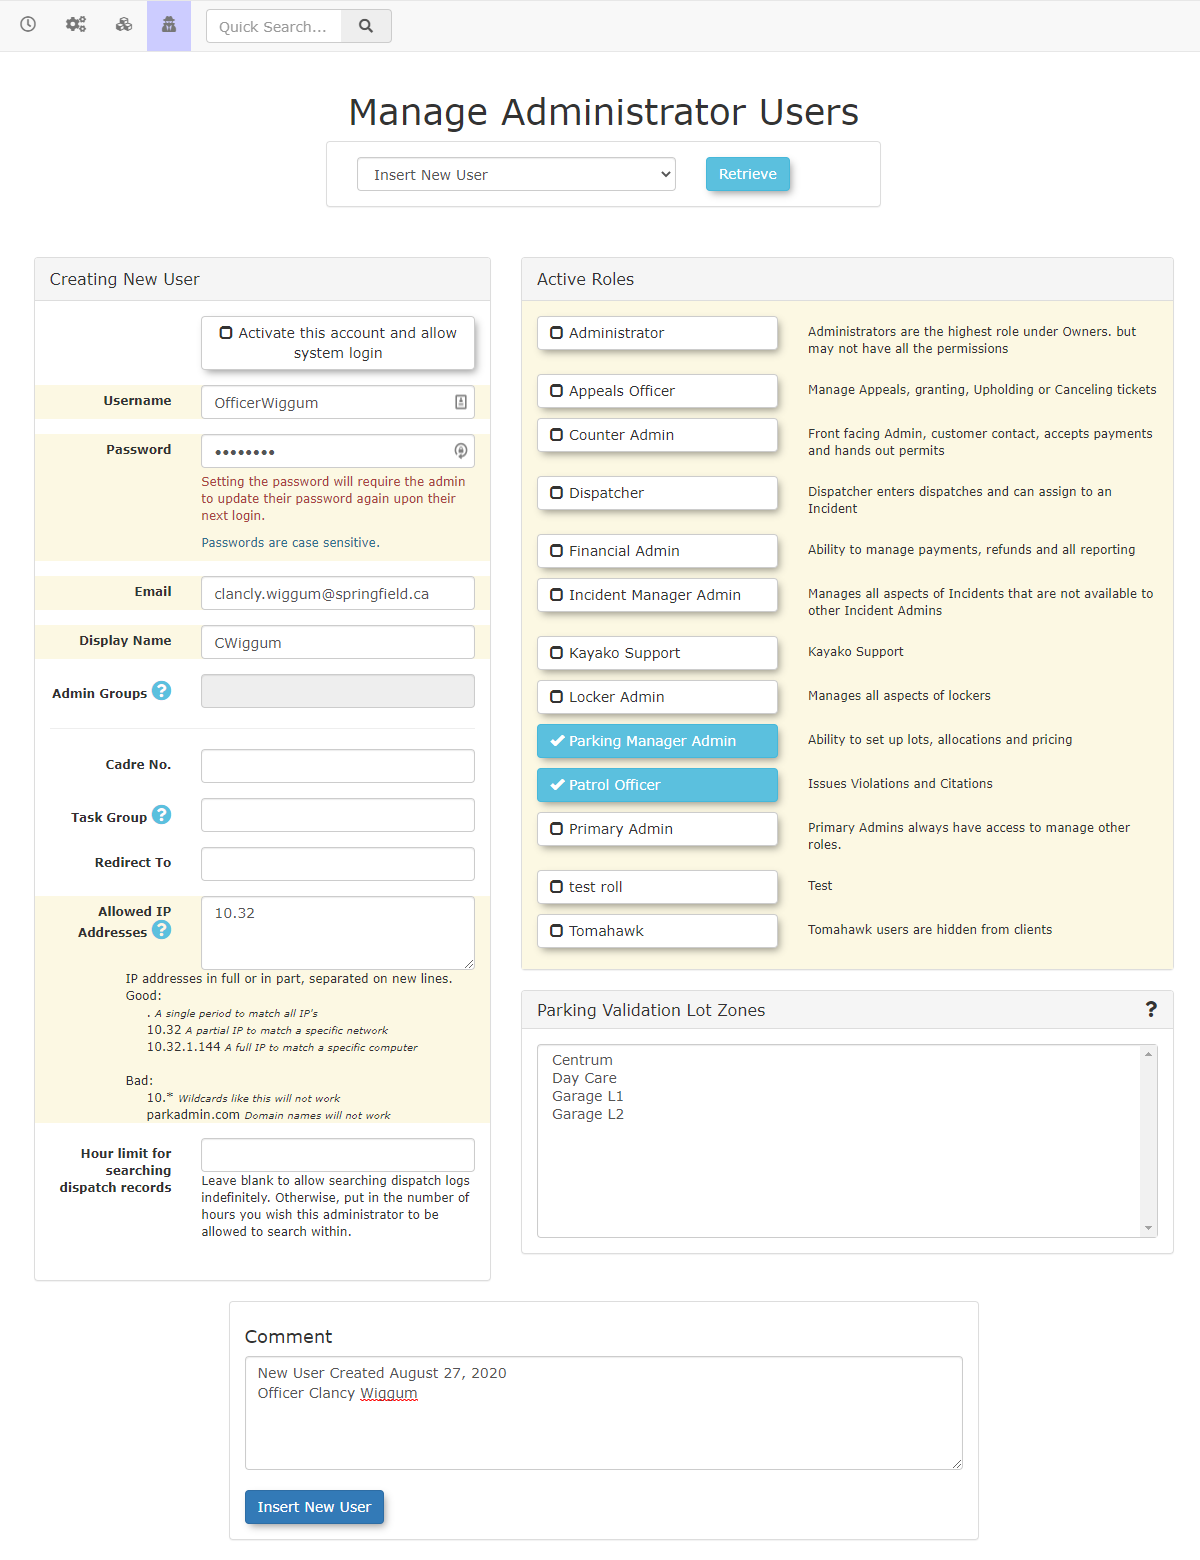
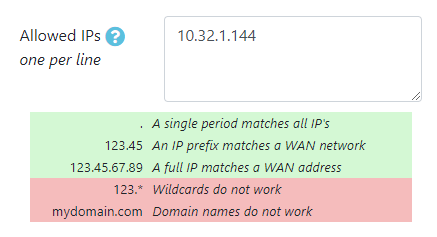
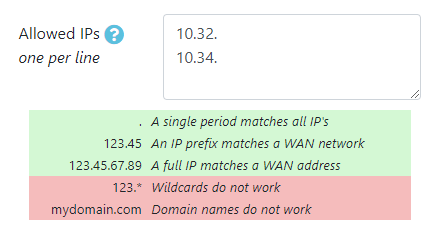
If, for example, the IP address of your specific computer is 10.32.1.144, you can restrict access to just that single computer by entering the full IP address in the Allowed IP Addresses field.
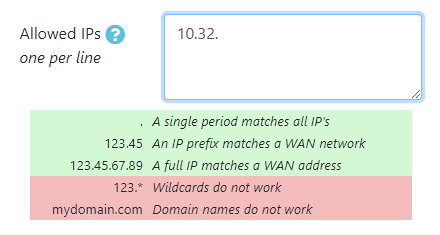
By entering the first two octets only, it will open up access to any computer on that network but still restrict computers on any other network from having access.
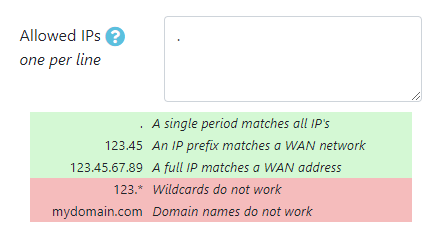
You can further open up access by placing a single dot in the Allowed IP Address field. This allows the user with this configuration to log in from any network.
How does this translate in terms of access to OPS-COM?
The IP configuration of Allowable IP Addresses can be modified for any user in the system and is stored within the admin users profile.
The resulting restrictions or open access to the OPS-COM system is controlled by this configuration and is specific to the user in question.
Here is how you would configure the Allowed IP Addresses in OPS-COM.
Hover over the System Config menu and click on Edit Admin Users.
Once in the Manage Administrator Users window, select the user you wish to edit.
Here is the location of the IP configuration field.
The level of access given to a specific user is usually role based and proportionate to their level of seniority or function within their specific organization.
Managers and directors for example, might require access from anywhere in the world essentially so they would have the single dot as the allowed IP Address, meaning they could literally log in from any network location internal or external to their specific network.
(This admin could log on from an internet cafe for example) Note: In some cases networks might be locked down or behind a firewall. Additional configuration on the part of your IT department may be required.
Regular office workers on the other hand, would only require access from their specific network.
By entering the two fist octets, they could in that case log in to OPS-COM from any computer in their local office provided that computer was on the same network. In our example: 10.32
A part time employee or student worker may only use one specific computer to access OPS-COM, so again here is where you would specify the full IP address to control access. In our example 10.32.1.144
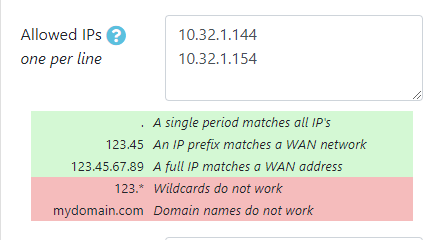
It is even possible to configure a user for access from more than one computer, but still restricted to specific computers. To configure this access you must enter the entire IP address of the two or more computers. For example 10.32.1.144 and 10.32.1.154 could be two computers in an office setting. The two entries can be placed in the Allowed IP Address field listed on two separate lines as follows:
It is also possible to allow access for an admin from two separate local area networks. For example: you may have a situation where an employee is working out of two locations on a campus, or in a municipal organization.
One building may be on the 10.32 network, while the other building or campus is on another. In that case you can configure the allowed IP addresses accordingly.
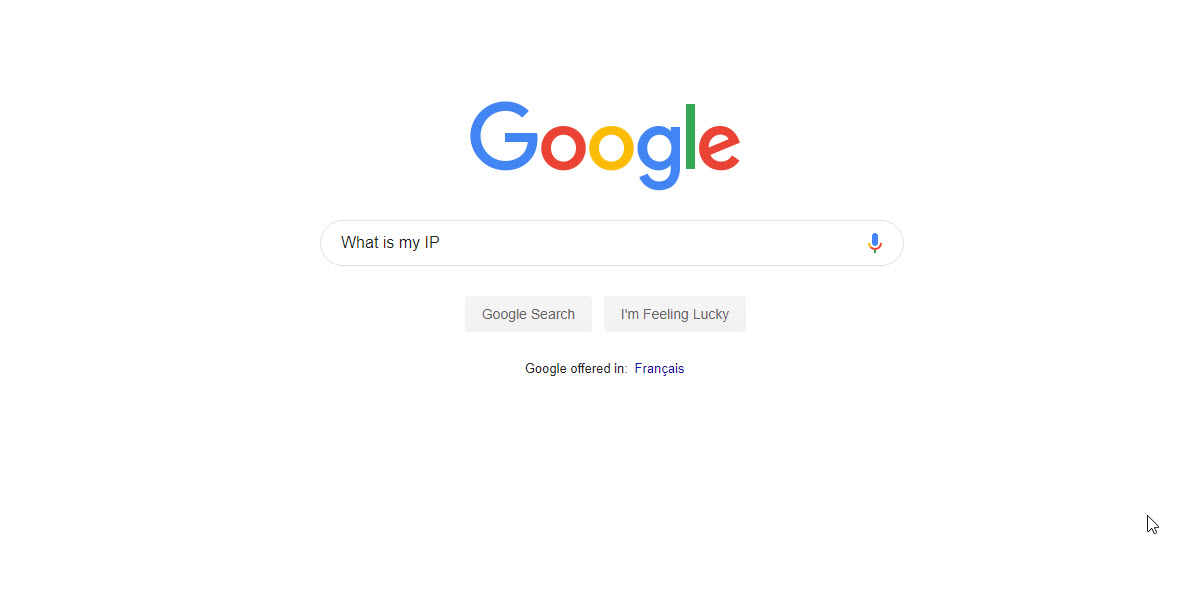
How To Find Your IP
You can view your IP address by searching for it in Google. Simply type in the search bar "What is My IP"
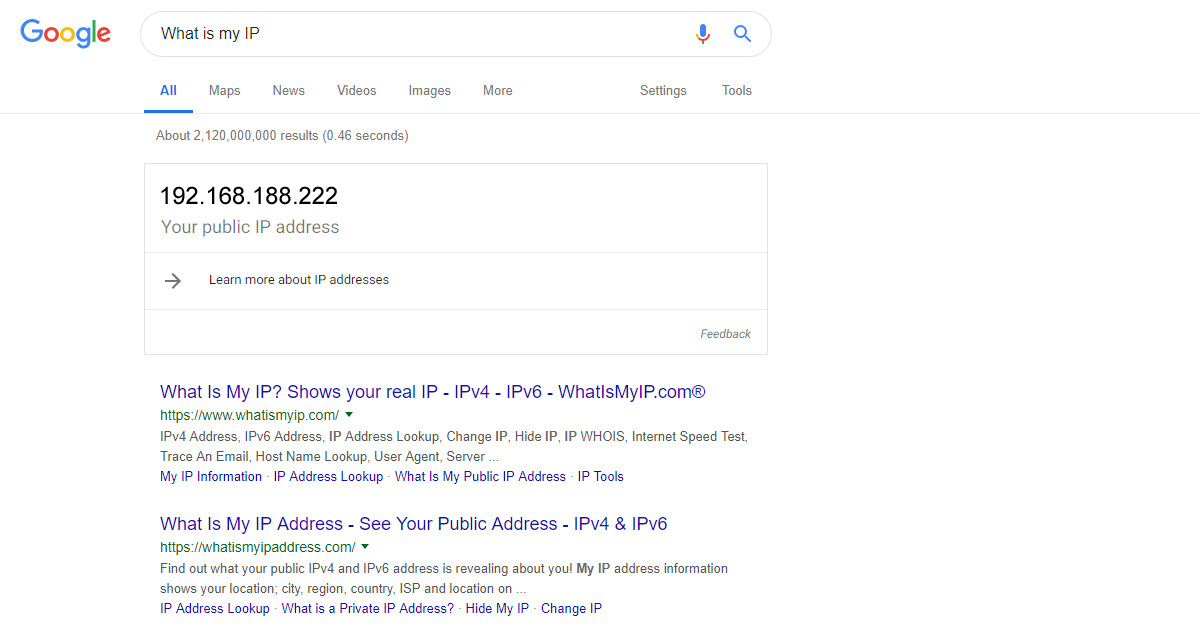
The returned result will display your IP address as follows:
To recap: The Basic Rules
Good:
. A single period to match all IP's
10.32 - A partial IP to match a specific network
10.32.1.144 - A full IP to match a specific computer
Bad:
10.* Wildcards like this will not work
ops-com.com Domain names will not work
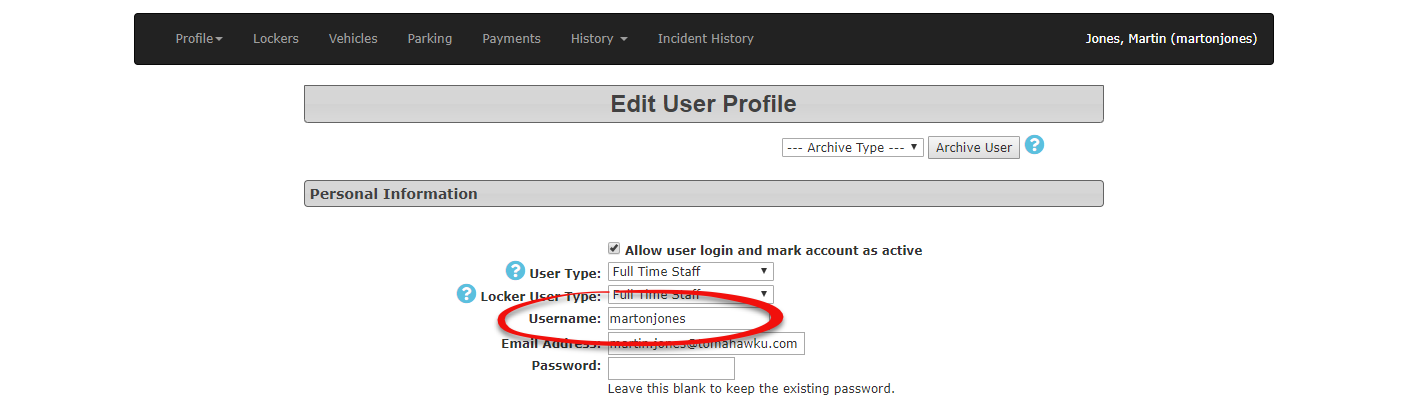
Editing a Username
By default the username field is not editable:

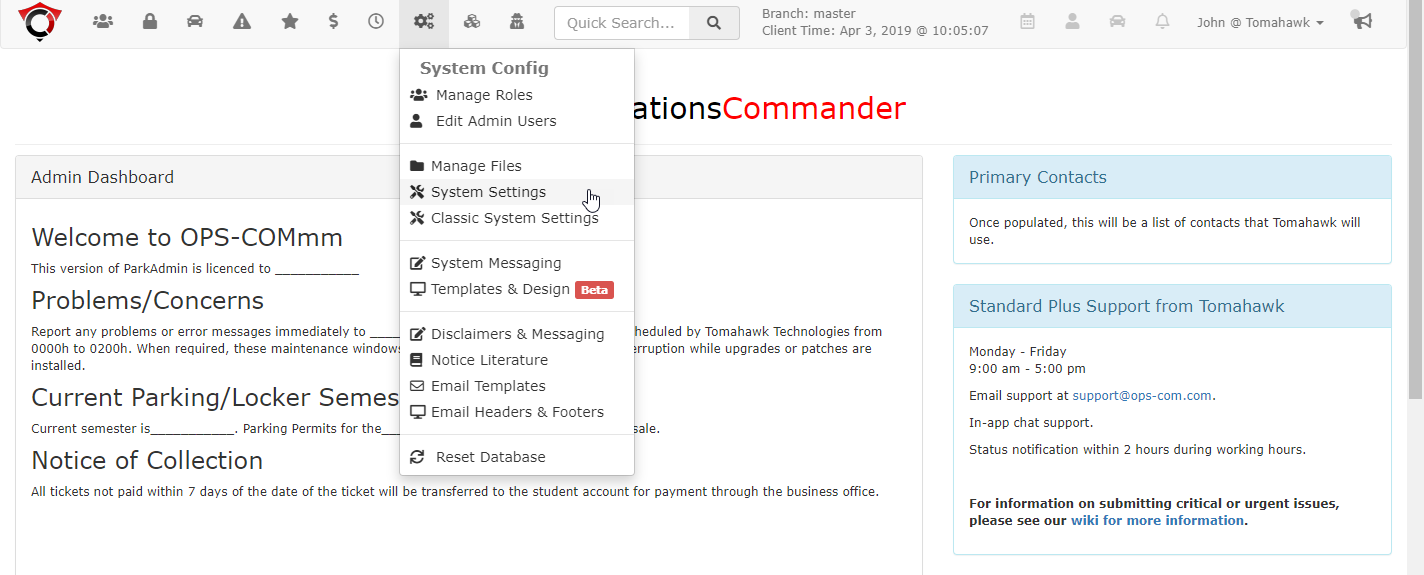
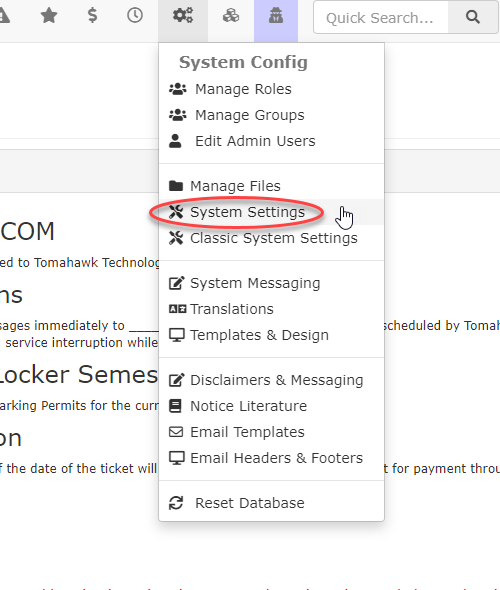
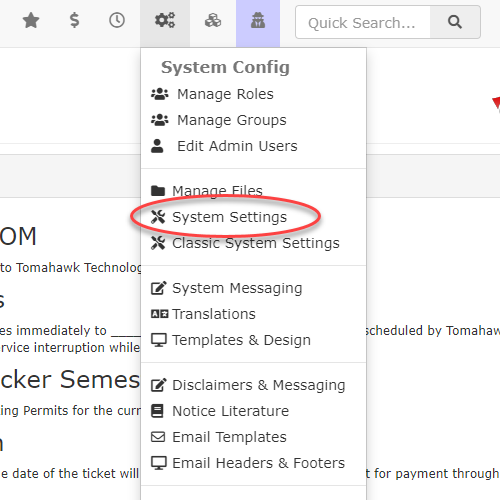
To begin, go to the System Config menu and click on System Settings.
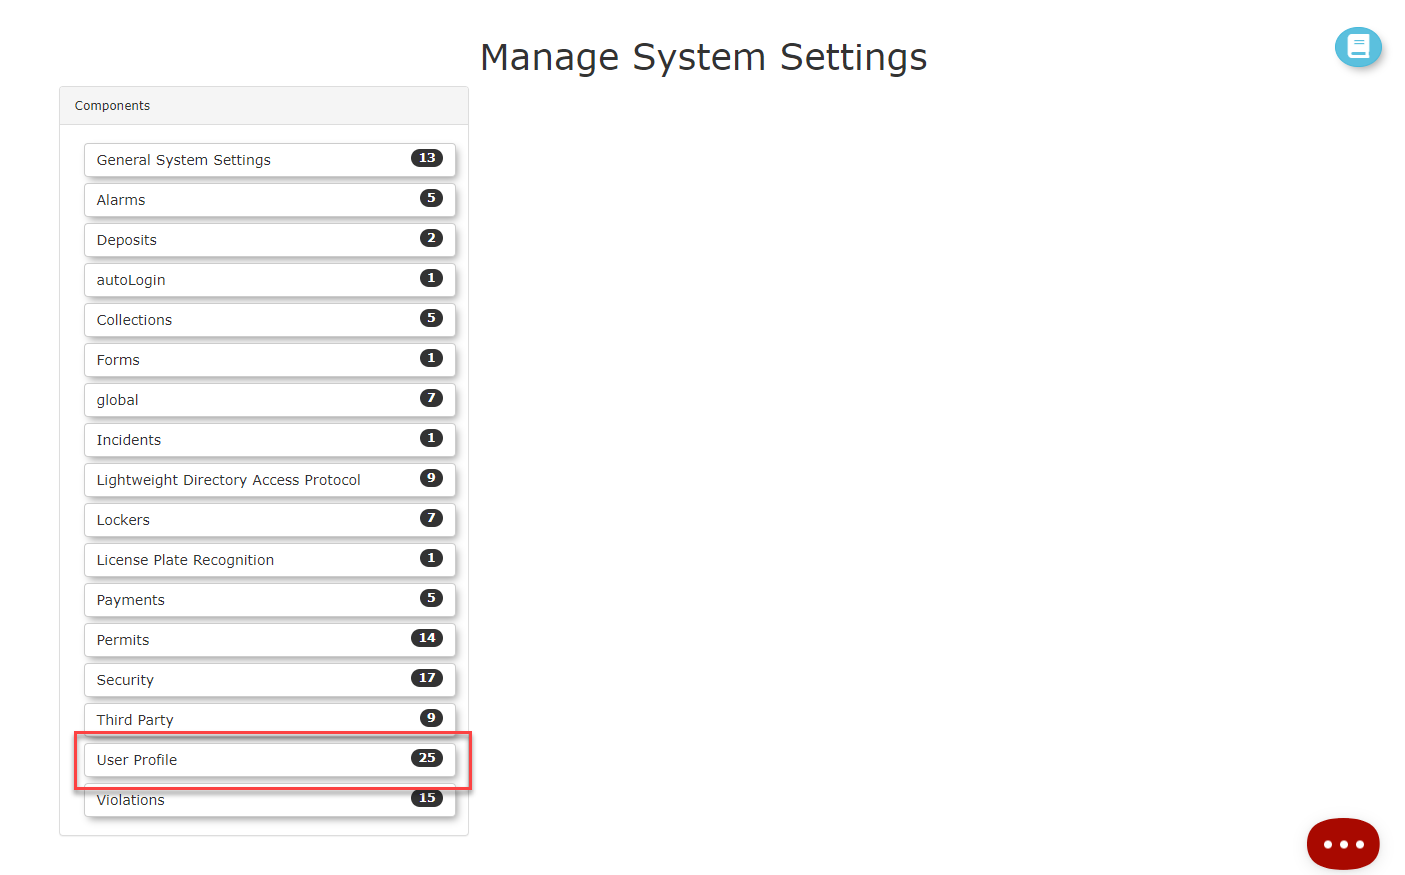
From the resulting list of settings click on User Profile to edit it's settings.
From the list of settings look for Allow Username Edits.
Important Note: This setting can only be toggled by the OPS-COM Support team. Contact OPS-COM support to request changes to this setting.
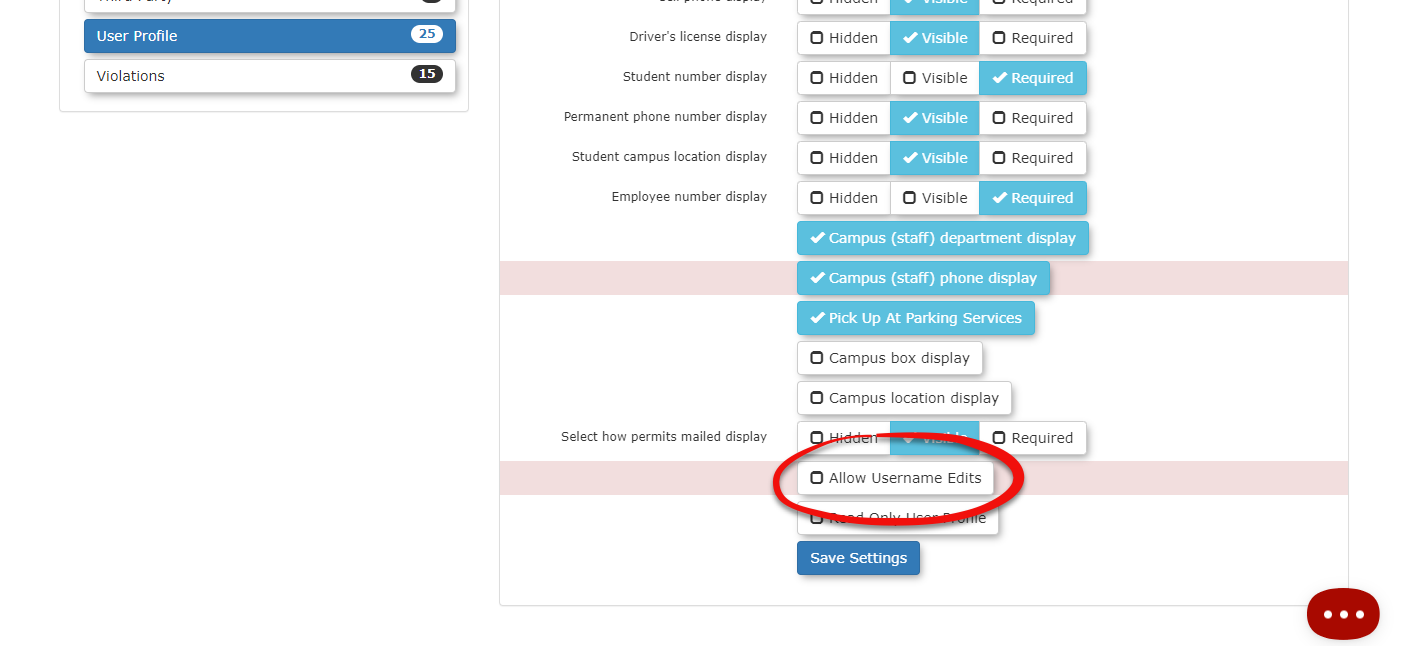
Click on the setting to select it.

Once the setting is activated, as you can see below, the admin now has the ability to edit the username.

Defining User Profile Items

Setting up User Profile Items
To access the profile items click System Config menu and select System Settings.
On the Manage System Settings screen, click User Profile to display the list of possible items that can be added or removed from the profile.
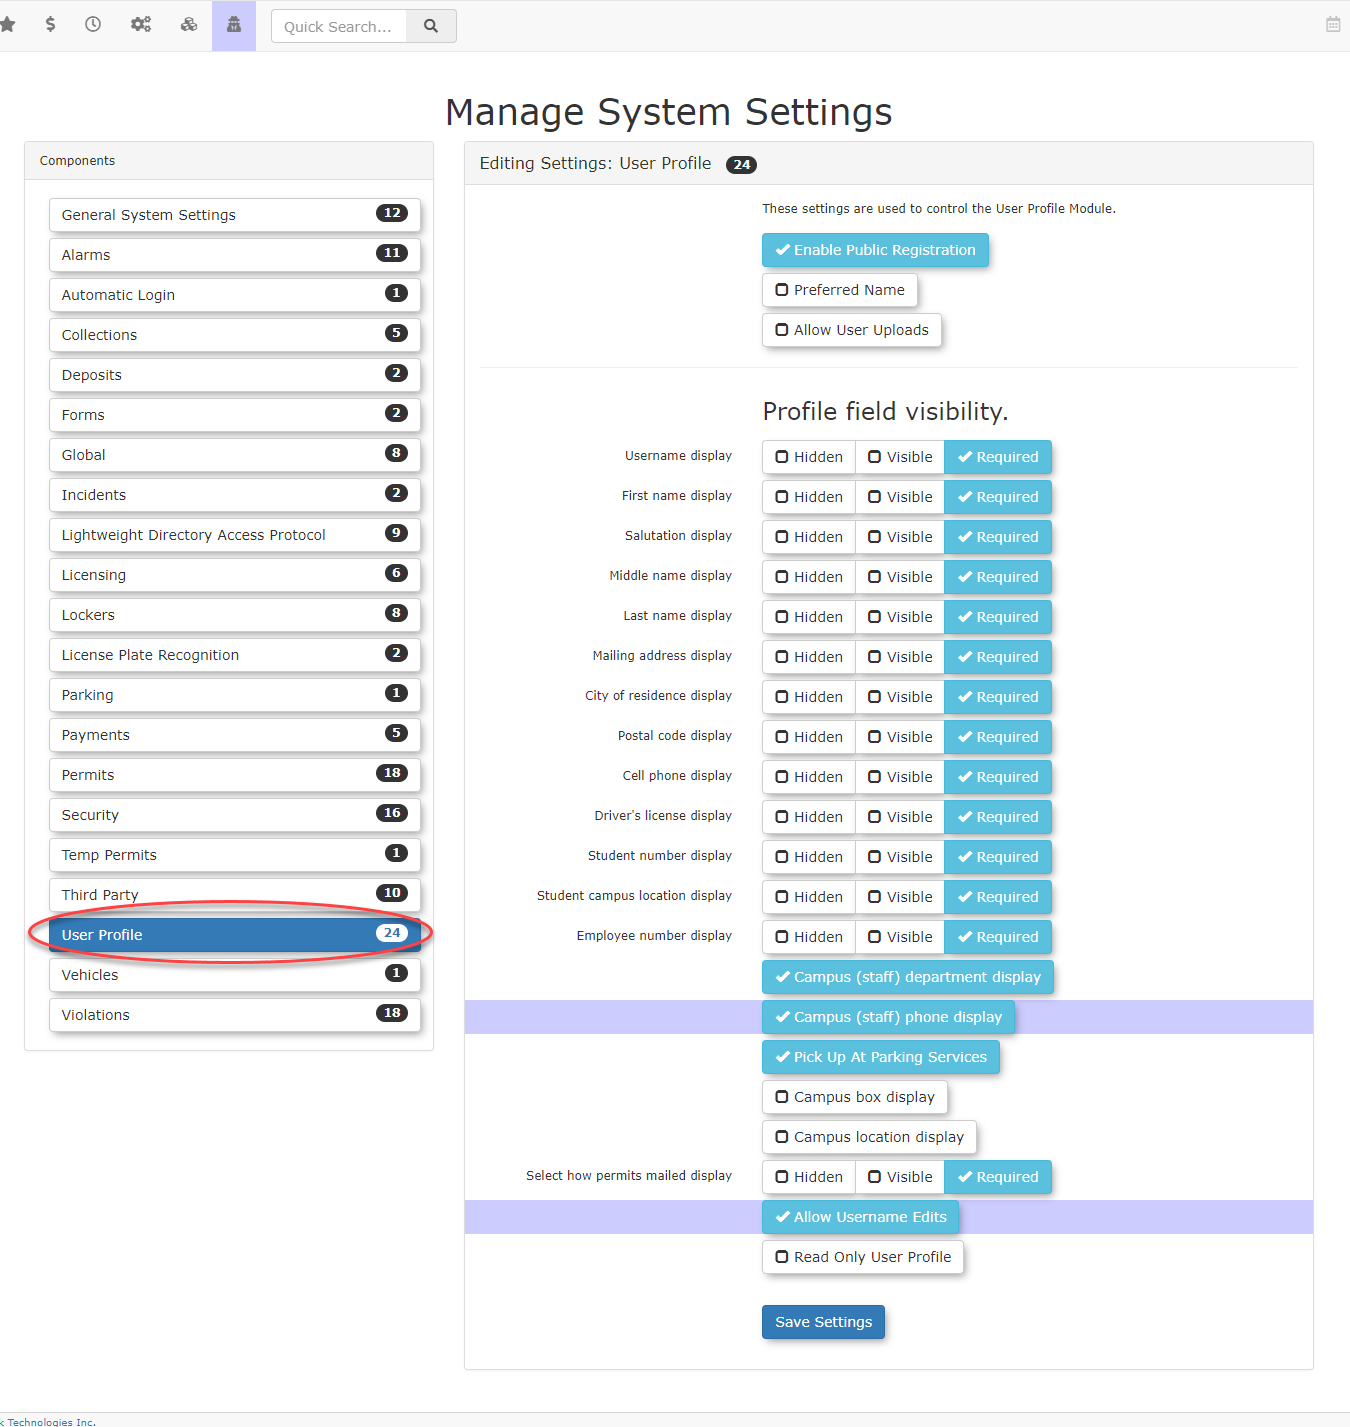
Items in this list can be in one of three states:
(Note: The system will not allow the user to save the profile if there is any required information missing)
The form has 6 essential categories that have various elements that can be set in any one of the three states mentioned above:
- User Name
- Address Information
- Phone Information
- License Information
- Student Information
- Employee Information
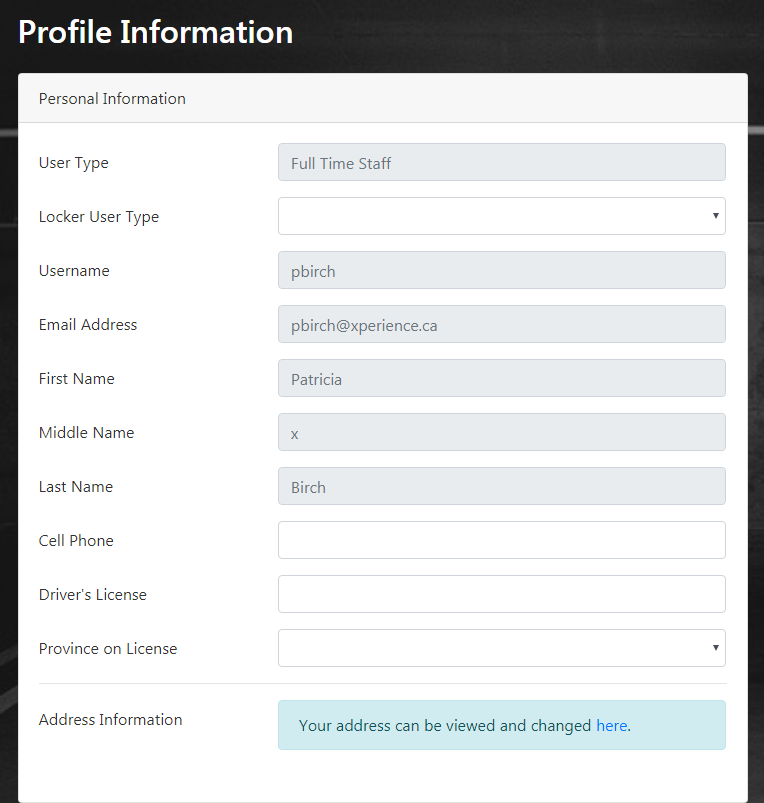
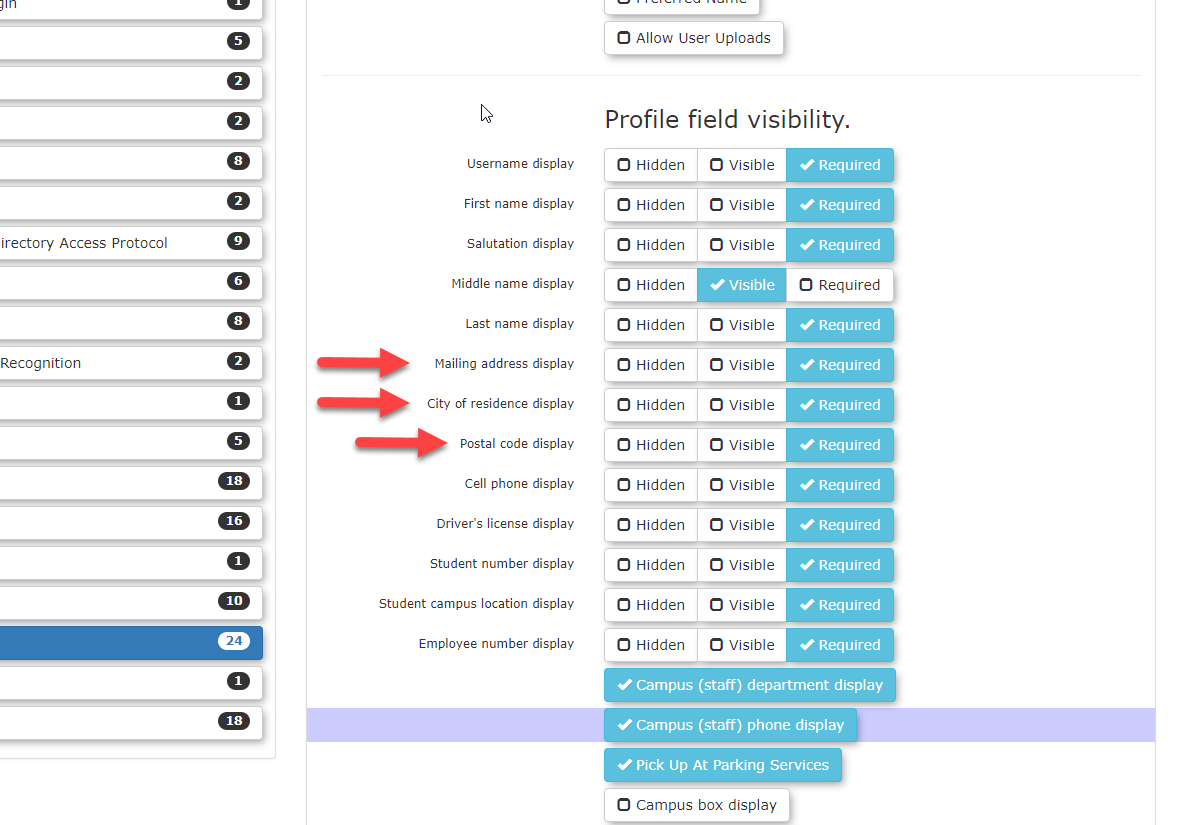
If we hide everything that can be hidden, the system will still require certain pieces of information and may override your settings. Here's what the form looks like for a staff end user in this case.
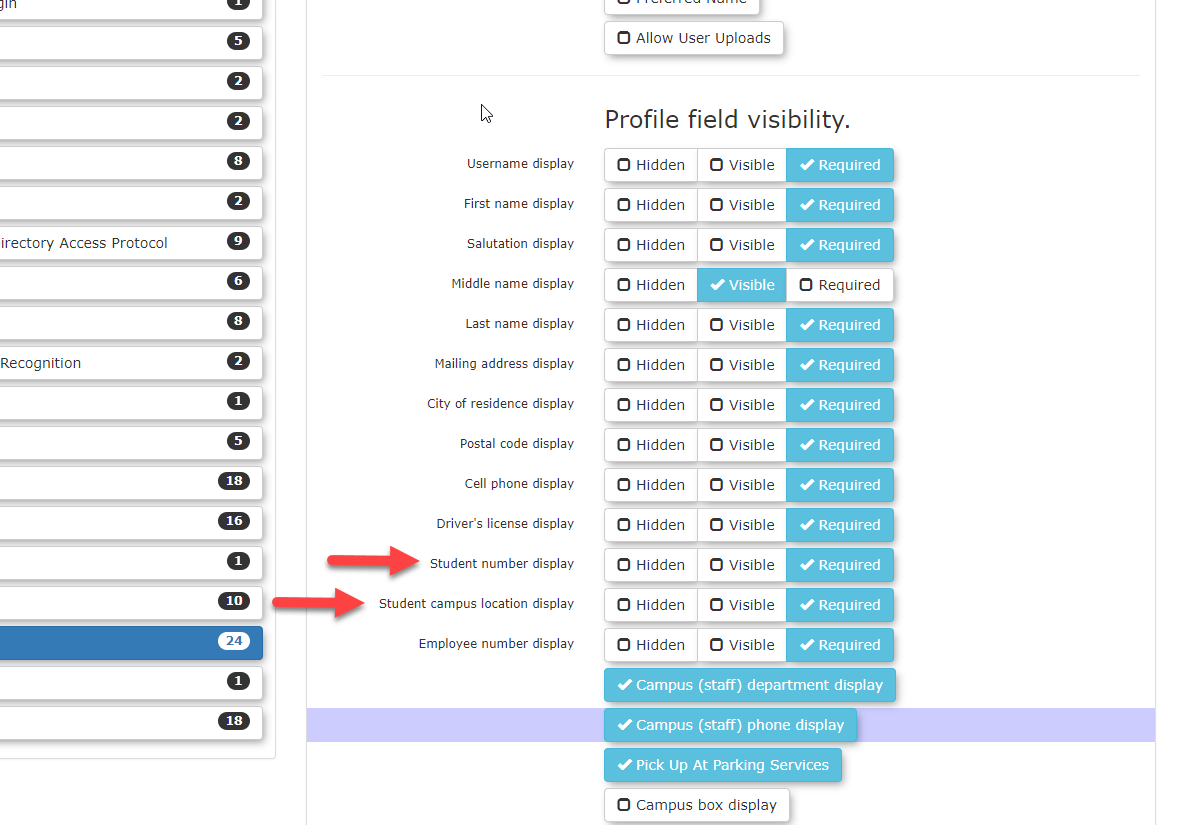
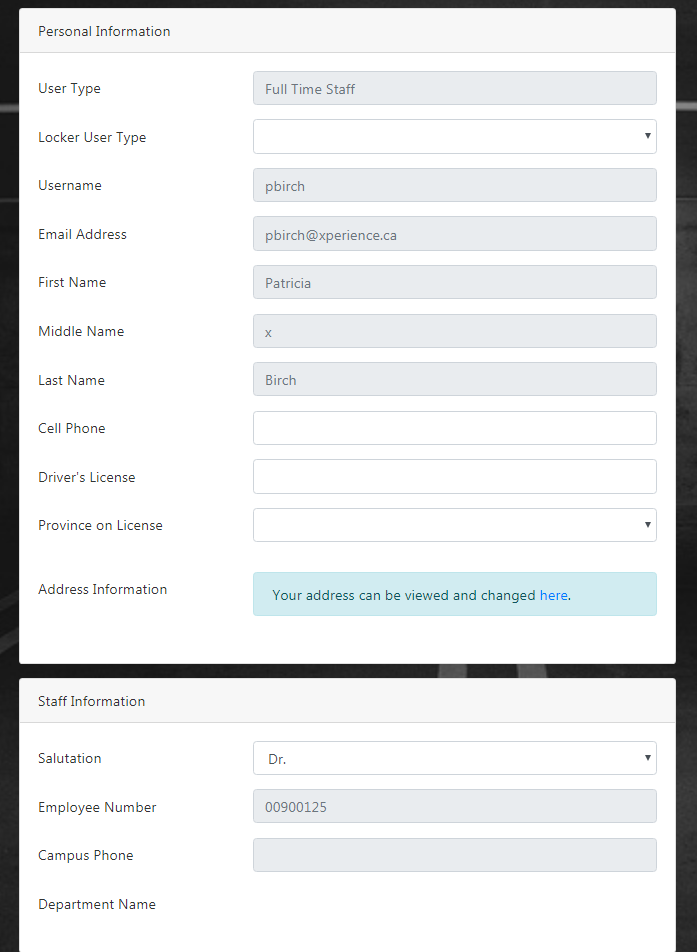
Here is the form with everything visible -
User Name
A User Name is essential. It is one of the unique identifiers required to use the system. However, there are various permutations of the required information associated with the user's name. Best practice tells us a bare minimum might be Username, First Name, and Last Name, although any of these items can be toggled on/off. The state selected is highlighted in blue and a checkmark is added to illustrate the selection.
Note: One scenario where we might hide username would be if an external source such as LDAP is supplying the username.

Address
If you plan to mail permits to end users you will need to collect addresses.
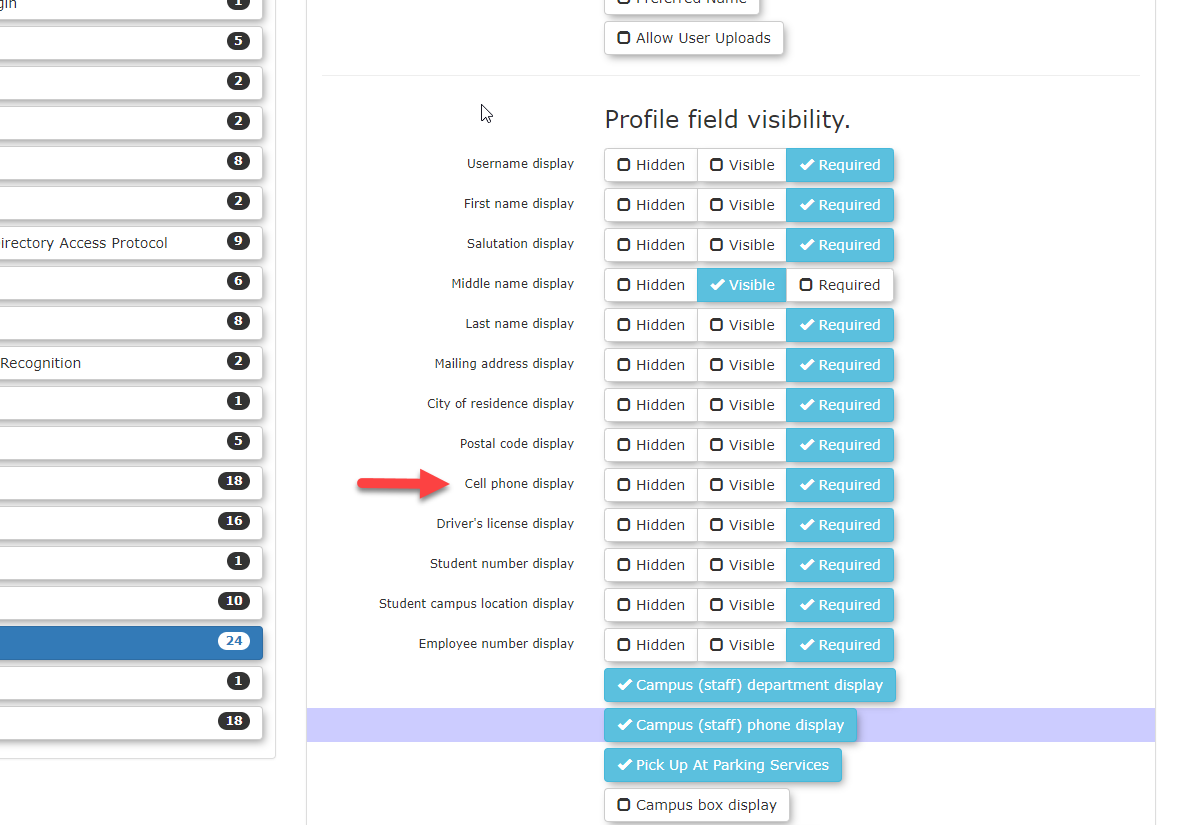
Phone
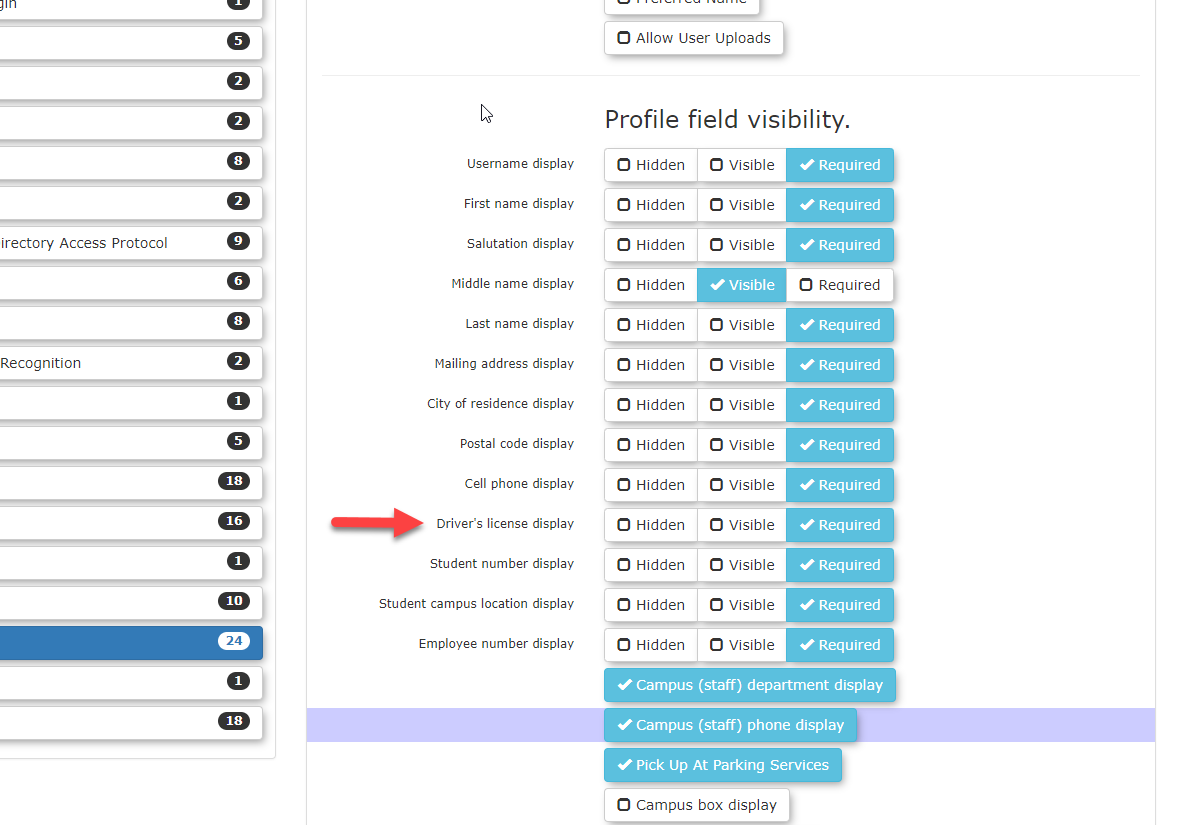
License
This field is for Driver License number (not plate number). If you are connected with local law enforcement you may opt to record this information.
Student Information

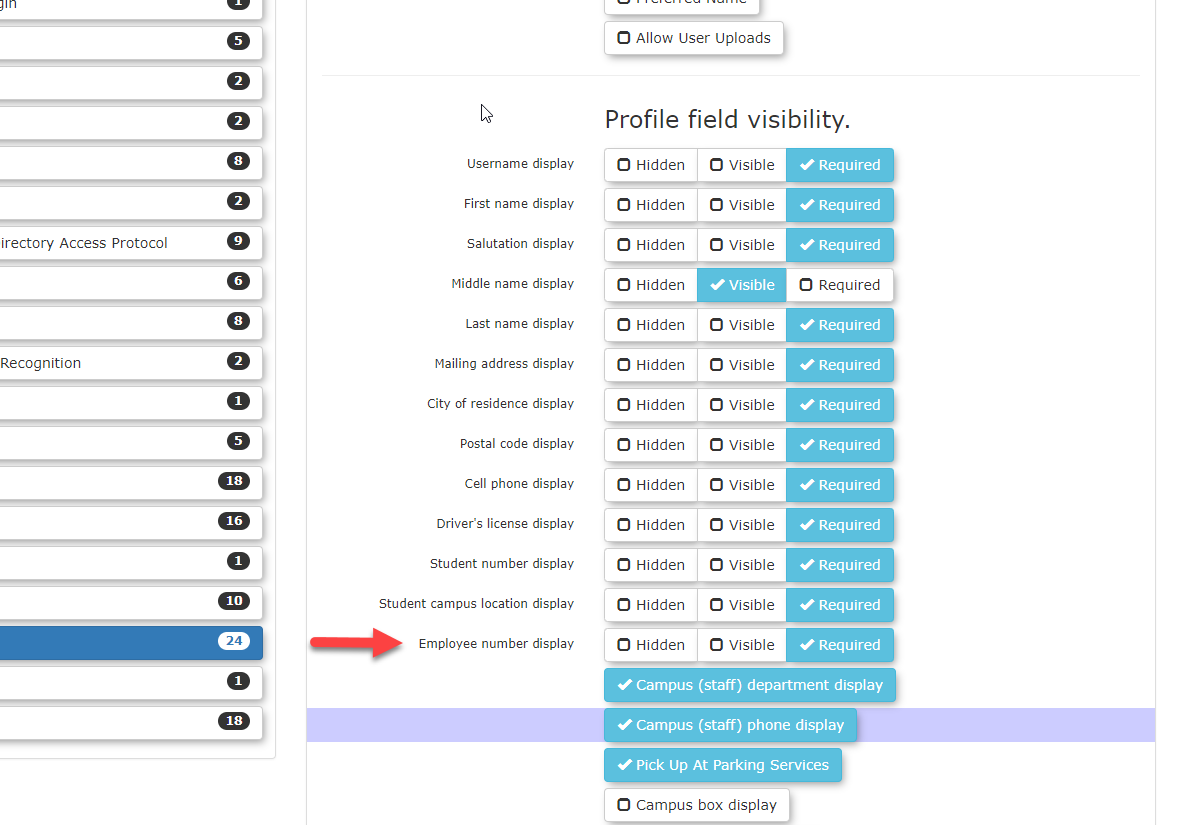
Employee Information
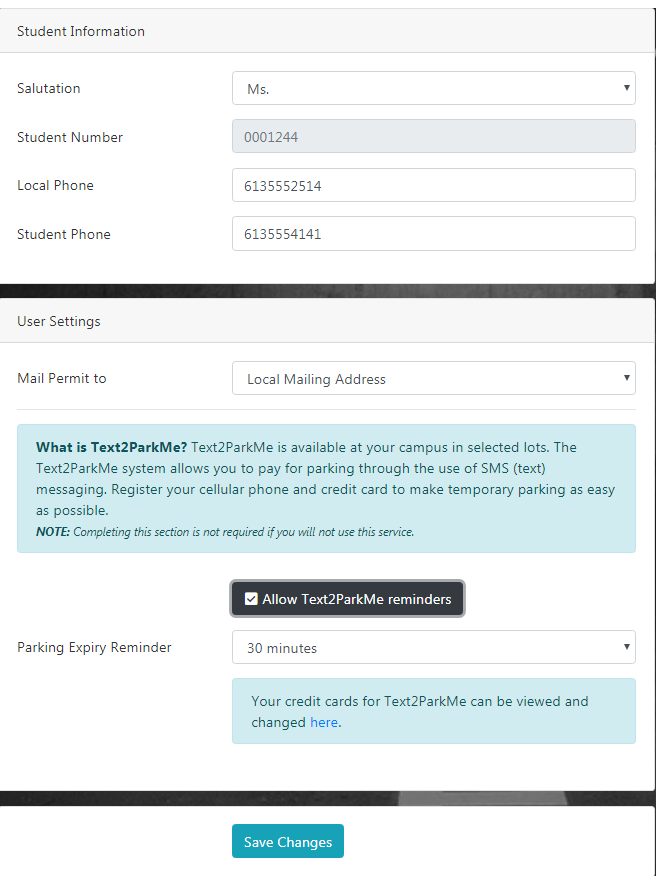
Text2ParkMe
If you are using Text2ParkMe, there will be a second tab on the page where end users can enter additional details including credit card information.
Note: The only field that will show a "required" status is the Student ID. Additionally: If you enter any credit card information it switches all credit card information fields to required.
Email Headers and Footers
Getting to Email Headers & Footers
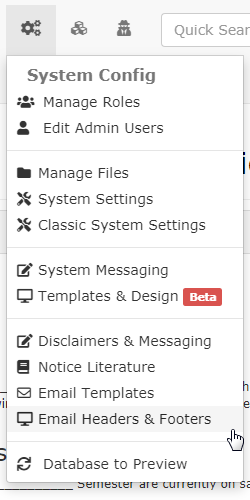
In order to get to Email Headers & Footers, click System Config, Email Headers & Footers
This should take you to the Email Template Layout List where you can select Edit to edit the existing Footer, Header or Style email template.
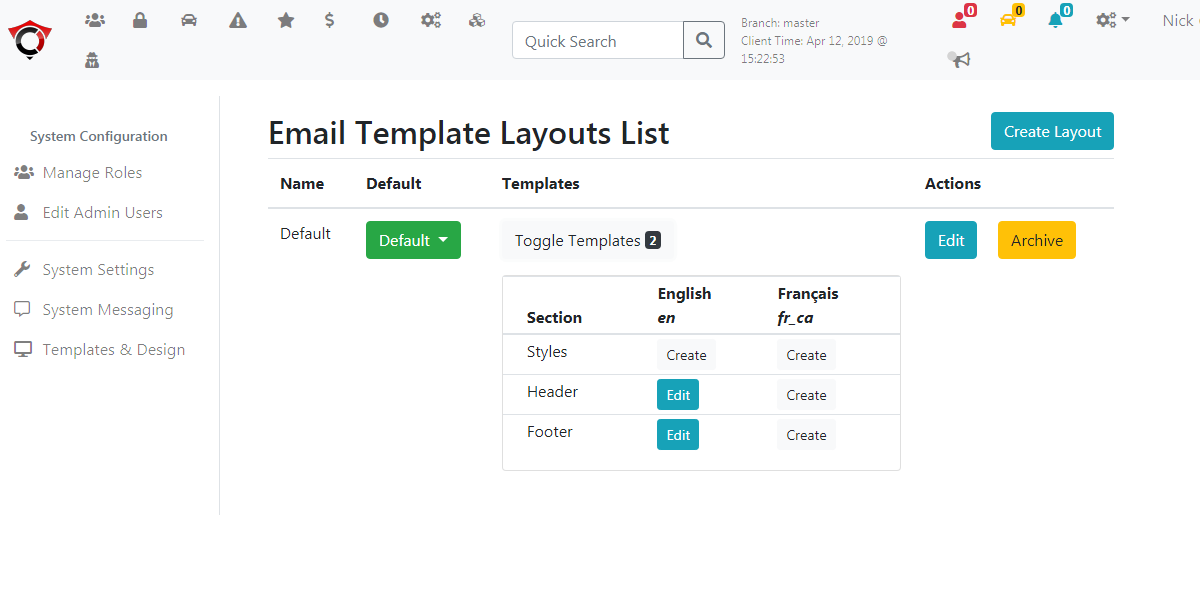
Editing Email Layout Templates
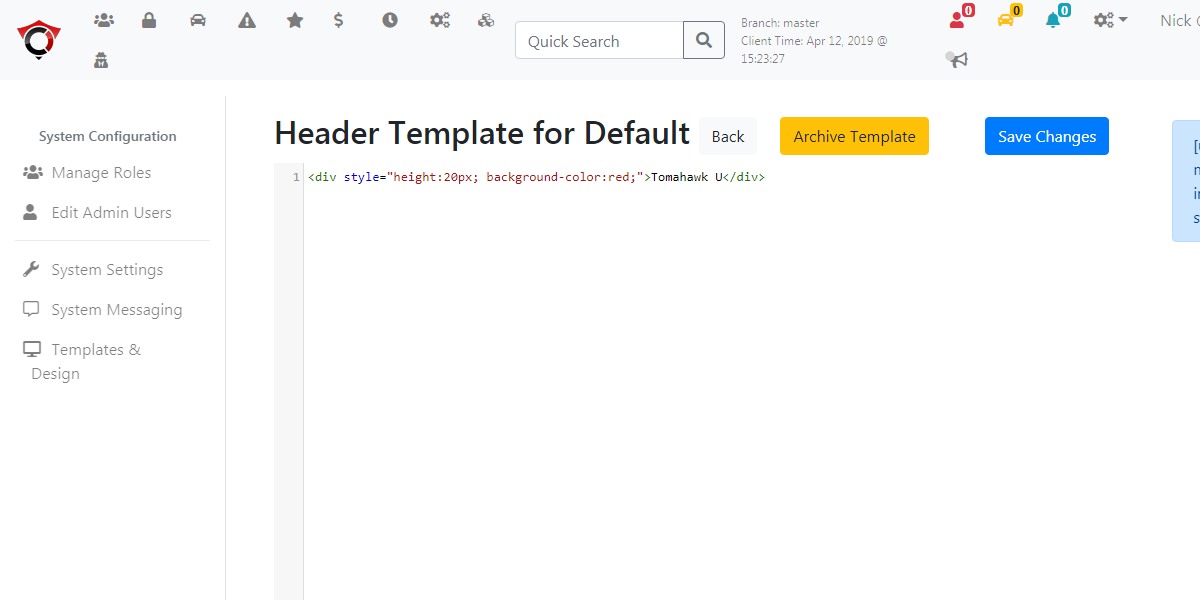
Click edit on the Edit button for the corresponding Section you wish to edit.

This will bring you to the template, in our case it is the Header Template. From here you can edit what appears on the header of each sent email as well as include inline styles.
Guide to System Settings
- To access the system settings, go to System Config and click on System Settings. In most cases these settings affect the admin side of the application.

System Settings Grid
General System Component |
||
|---|---|---|
|
Setting Name |
Definition | Notes |
|
Default Notification Email |
The address you wish all notifications from OPS-COM be sent to | |
|
Organization Name: Website |
Set the name of the Organization | |
|
Organization Name: Handheld |
Set the name of the Organization that appears on the handheld | |
|
Country |
Set the country where the system is located | |
| Company Address | Set your primary street address here | |
|
Time zone |
Set the time zone based on your closest major city | |
|
System Timeout |
Set how long the system can be idle before timeout (can be up to 6 hours) | |
| From Email | This address will be the return address that appears in emails sent from OPS-COM | |
|
Time offset (mins) |
This represents your time offset from Greenwich mean time | |
|
Using daylight savings |
Used to toggle whether or not you are subject to daylight savings time | |
| System Timeout | Set length of time before the admin user is automatically logged out of OPS-COM | |
|
Run the Task Scheduler |
Used to toggle whether or not your system uses the Task Scheduler | |
|
Template Editor |
Choose between RAW HTML Editor and a WYSIWYG Visual Editor | |
|
Select how to show dates |
Used to set the date format | |
Alarms Component |
||
| Setting Name | Definition | Notes |
| Use Alarms System | Controls if the Client can use Alarms module | Admins can see, only OPS-COM Team can change. |
| Alarm Duration | ||
| Generic Alarm Append Threshold |
Picklist that allows you to determine the type of alarm you want to issue, and what Action you want taken. In addition you choose the Dispatch Sub Category that should be associated with this Alarm. For example, People Alarms should generate a System Alert with a Sub-Category of Personal Safety Reports. |
|
| People Alarm Append Threshold | Same as above | |
| Vehicle Alarm Append Threshold | ||
| Stolen Device Append Threshold | ||
| Email Address | Email Address that an alert is sent to | |
| Generic Alarm | Same as above | |
| People Alarm | ||
| Plate Alarm | ||
Collections Component |
||
| Setting Name | Definition | Notes |
| Days before CRC is eligible | Set the length of time before a ticket is sent to court | |
| MTO Lookups on all records | Perform an MTO Lookup on all records even if a user profile exists | |
| Include All Unpaid Violations | When Toggled on: Includes all unpaid Violations when sending violation notices When Toggled off: Only the violation in question will be included in the letter |
|
| Prevent Violation Payment | Prevents violations from being paid through OPS-COM if they have been sent to collections | |
| Prevent Purchases | Prevents Users from making any permit purchases if this is enabled and a violation has been sent to collections | |
| Send Letter To All | When Toggled on: Send collections letter to all users even if they have been emailed a copy | |
| Deposits Component | ||
| Setting Name | Definition | Notes |
| Use Deposits | Toggle the use of deposits on or off | |
| Enable Deposits For Permits | ||
Forms Component |
||
| Setting Name | Definition | Notes |
| Default email for sending form entries | These settings are used to control the Forms Module | |
Global Component |
||
| Setting Name | Definition | Notes |
| Email Image Header | Select an image to appear in the header of all emails | |
| Default Site Logo | Select a logo that appears on the mobile app, Text2ParkMe and the QR code interface | |
| Default Site Header | Select a background image that appears in the header of the mobile app, Text2ParkMe and the QR code interface | |
| Disable nightly email notifications | Disable auto-emails during system maintenance | |
| Symbol before the dollar value | Which currency symbol to use before a dollar value | Accommodates the English format of the dollar value $100.00 |
| Symbol after currency value | Which currency symbol to use after a dollar value | Accommodates the French format of the dollar value 100,00$ |
Handheld Device |
||
| Setting Name | Definition | Notes |
| Network Communication Model | Select Standard or Volley | |
| Setting Name | Definition | Notes |
| Usage Limit | ||
| Enable Megdgate nightly script. | ||
Lightweight Directory Access Protocol Component |
||
| Setting Name | Definition | Notes |
| Log Failed Attempts | ||
| Use SSL | ||
| Servers | ||
| BaseDN | ||
| Account Suffix | ||
| LDAP username | ||
| LDAP password | ||
| Student Group Name | ||
| Staff Group Name | ||
Licensing Component |
||
| Setting Name | Definition | Notes |
| Permits per year | Indicate the number of permits eligible to be used yearly (Usage Limit) | |
| Violations per year | Indicate the number of violations eligible to be written yearly (Usage Limit) | |
| Temp Permits per year | Indicate the number of temp permits eligible to be used yearly (Usage Limit) | |
| Number of Handhelds | Indicate the number of OPS-COM for Android Licenses to be used (Usage Limit) | |
| Mobile PL8RDR Cameras | Indicate the number of Mobile Cameras in use by client | |
| Static LPR Cameras | Indicate the number of Static Cameras in use by client | |
| Lockers per year | Indicate the number of lockers eligible to be used yearly (Usage Limit) | |
| Validation Records per year | Indicate the number of validation records eligible to be used yearly (Usage Limit) | |
| Dispatch Logs per year | Indicate the number of dispatch logs eligible to be used yearly (Usage Limit) | |
| Incidents per year | Indicate the number of incidents records eligible to be used yearly (Usage Limit) | |
Lockers Component |
||
| Setting Name | Definition | Notes |
| Enable Lockers Module | Toggles the use of the Lockers Module | Admins can see, only OPS-COM Team can change. |
| Tax % | Percentage of tax to charge for lockers | |
| Map of Lockers | Used to enter a path to a diagram or map image | |
| Receipt Reply To Address | Reply to address on receipts if only a locker was purchased | |
License Plate Recognition Component |
||
| Setting Name | Definition | Notes |
| Possible plate prefixes | Indicates the prefix of what typical plate reads in your region start with. (ie: 123 for Numbers, ABC for Alpha Characters) | |
| Using Mobile LPR | This checkbox will toggle on or off the use of the LPR functionality on handheld devices | |
Parking Component |
||
| Setting Name | Definition | Notes |
| Validation deletion cutoff minutes | Indicate how long a validation record is editable by an admin before it is locked into the system | |
Payments Component |
||
| Setting Name | Definition | Notes |
| Gateway Online | Toggle to set the status of your payment gateway (Online or Offline) | |
| Invoice Number | An incremental number for invoices. This can be set the first time you want to issue them | |
| EFT Settings | This is used if you are set up to accept EFT payments through OPS-COM. You must be set up by OPS-COM Team first, before you can change anything | Admins can see, only OPS-COM Team can change. |
Permits Component |
||
| Setting Name | Definition | Notes |
| Receipt Reply To Address | Reply to address for receipts that contain permits | |
| Multiple Plate Validator | Allow multiple plates in parking validator | |
| Require Payment for Rollovers | If enabled, only permits that are paid for and processed can be rolled over | |
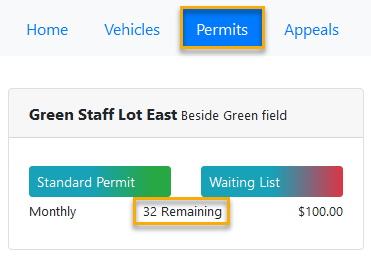
| Show remaining permits |
If enabled, the number of remaining permits in a lot will be shown to site users. e.g. "32 Remaining" If disabled, the number of remaining permits will be replaced with "On Sale" (which hides how many permits are left from users) |
Screenshot:
|
| Enable User Permit Printing |
|
|
| Show Total Spots Taken |
|
|
| Show Waiting List Rank |
|
|
| Show Only Visible Lots |
|
|
| Waitlist Email Managers |
Enter the email address of the admin who will be managing the waitlists |
|
| Waitlist Reservation Duration |
Enter a timeframe for how long a waitlist reservation will be held before being released |
|
| Receipt Reply To Address |
|
|
| Allow Credit Card Processing | Allows credit card payments for rollovers | Admins can see, only OPS-COM Team can change. |
| Personal Information on Permit Print | Include personal information on hang tag printing | |
| Require Mailing Address | Require a mailing address to be completed fully to purchase permits | |
| Show Permit Lots on Landing Page | Show parking permit lots on the landing page | |
| Show Only Visible Lots | Only show lots with an active visibility flag to the end user | |
| Show Waiting List Rank | Allow users to see their rank on the waiting list | |
| Show Total Spots Taken | When being added to a waiting list, show the number of spots that exist within the lot | |
| Enable User Permit Printing | Allow users to print their own permits, this requires you to have a permit PDF message under System Messaging to work | |
| Map of Permit Areas | This is the image of your parking map | |
Security Component |
||
| Setting Name | Definition | Notes |
| Hash and Salt | Enable the hashing of passwords. Once set, it should not be turned off | Admins can see, only OPS-COM Team can change. |
| Require Password Update | Require password resets after an admin changes the password | Admins can see, only OPS-COM Team can change. |
| Toggle Password Expiry | Enable the use of password expiry | Admins can see, only OPS-COM Team can change. |
| Password Expiry in days | Number of days before administrator must change their password | |
| Enable Password History | Prevent passwords from being reused up to X days | Admins can see, only OPS-COM Team can change. |
| How long to remember old passwords | The number of days the system will remember old passwords to prevent re-use | |
| Minimum password length | The minimum password length for administrator passwords | |
| Enable password strength requirements | Used to set standards in password creation based on password security strength | Admins can see, only OPS-COM Team can change. |
| Numerical Characters | The minimum number of numbers required | |
| Lower Case Characters | The minimum number of lower cases needed | |
| Upper Case Characters | The minimum number of upper cases needed | |
| Non-Alpha Numeric | The minimum of a Non-Alpha required | |
| Enable Admin Lockouts | Enable admin lockouts after X invalid attempts within Y minutes | Admins can see, only OPS-COM Team can change. |
| Lockout after X Attempts | Sets the number of retries with a wrong password before the system will lock you out | |
| Login attempt timeframe | Sets the timeframe for wrong entries. For example, if you fail 3 times within 5 minutes the system will lock out this admin | |
| Lock the admin out for X minutes | Sets the length of time in minutes that the admin will be locked out. Set at 120 minutes would mean the admin would be locked out for 2 hours before another attempt at logging in would be allowed | |
Third Party Component |
||
|
Setting Name |
Definition |
Notes |
| Twilio Account Number | Admins can see, only OPS-COM Team can change. | |
| Twilio Auth Token | Admins can see, only OPS-COM Team can change. | |
| T2 API Last Successful Fetch | Admins can see, only OPS-COM Team can change. | |
User Profile Component |
||
| Setting Name | Definition | Notes |
| Enable Public Registration | If disabled, the Admins control the new account registration. Existing users can log in, but no one can create a profile | |
| Profile Field Visibility | This controls the fields for the User Profile page | |
| Max Student Number Digits | The maximum number of digits allowed in a student number. This can be useful if your organization requires student numbers that follow a specific min and max count. | |
| Min Student Number Digits | The minimum number of digits allowed in a student numbers. This can be useful if your organization requires student numbers that follow a specific min and max count. | |
| Max Employee Number Digits | The maximum number of digits in an employee number. This can be useful if your organization requires employee numbers that follow a specific maximum digit count. | |
Vehicles Component |
||
|
Enable VIN |
Toggles the use of VIN on and off | Only seen and edited by OPS-COM Team |
| Require Vehicle Year | If enabled will require the vehicle year when users are adding a new vehicle. | |
Violations Component |
||
| Setting Name | Definition | Notes |
| Enable Violations Module |
Toggles the Violations Module on or off, this effects the web application and handhelds If this is toggled off, clients can chalk vehicles but cannot issue violations |
|
| Hide Zero Dollar Fines | When enabled, this prevents $0.00 violations, that are not warnings, from being displayed on the user side. These violations will still show up on the Admin side and will show on the Report by Officer and the Violation Summary by Officer report | |
| Days until due | Indicates the number of days from the issue date that a user has to pay a ticket before it becomes overdue | |
| Include Random Pin on Handheld Tickets | Select this item if you wish your users to have the ability to pay violations OPS-COM Quick Pay/Guest Payments. The PIN number is required in order to pay OPS-COM Quick Pay/Guest Payments | Admins can see, only OPS-COM Team can change. |
| Handheld Footer | This is the message that will be applied to the end of each ticket that gets printed from the handheld | This footer is for violations only. Admins have the ability to change these settings on their own. |
| Clear Violation Payments | ||
| Appeal days | Indicates the number of days a user has to launch an appeal | |
| Enable OPS-COM Quick Pay/Guest Payments Payments for Violations |
|
|
| Link Violations to users | When enabled allows violations to be the user instead of a vehicle |
Admins can see, only OPS-COM Team can change. |
| Appeal Notification Email | The admin email(s) the system will send notifications to for new appeal requests. Leave blank if you don't want to receive these emails. |
|
| Automated Notification Email | The system will send notifications to this email for automated violation reports like "send overdue violations". |
|
| The prefix to go in front of the ticket number | These characters will appear before the ticket number on the printed ticket | Admins can see, only OPS-COM Team can change. |
| The next number for printing tickets from the web | Sets the next sequential number to be on tickets printed from the web tool | Admins can see, only OPS-COM Team can change. |
| Show Driver's License on Tickets | When selected, shows License number and Province of issuance on ticket | |
| Show Ticket # as barcode on ticket | When selected, will print a bar code representing the ticket number on the ticket | |
Configuration Checklist
Some System Configuration that Must be Done
For more details on system settings please see
System settings:
- Check General System Settings to ensure Date and Time settings are correct for your location
- Check Lockers settings to set Tax rate, upload a locker map, and set a Receipt Reply To Address
- Check Payments if EFT (Electronic Funds Transfer) is configured
- Check Permits to ensure it is configured correctly:
- Enter a Receipt Reply To Address
- Upload a permit map
- If using the Managed Waitlist, configure the Waitlist Email Managers, as well as the Waitlist Reservation Duration
- Check Violations to configure the following:
- Days until violation payment is due
- Number of days to appeal violation before the option to appeal is removed
Classic System Settings:
- Check System Identification settings
- System Name
- Reply-to Admin Email Address
- Reply-to Security Email Address
- Mailing Address
- Safety Address
- Permit Tax %
- Temp Permit Tax %
Template Design
OPS-COM offers powerful flexibility to allow your team to customize the look and feel of your User Portal system. This is done by designing the site template.
You will require your graphics and any messaging you would like to see on the pages.
Uploading Images for Use in Templates
- In order to place images in the different templates, you must upload them to the File Manager. Please refer to this wiki article for more information
- Upload background images for landing page
- Upload your company Logo
- Upload your parking map
Once you have your graphics uploaded:
Setting up the Look and Feel of the User Portal
- Setting up the common header
- Setting up the common footer
- Optional use of content header and footer
System Messaging
- Set up your Vehicle Disclaimer
- Set up your Permit Disclaimer
Email Template Setup
- Appeal Submitted by user
- Lost Password
- Invoice
- User Receipt
- Waitlist Selected
User Setup
- Determine what User Types are required
- Determine what fields of the user profile are required, optional or hidden
System Setup
- You will need to set up the Vehicle description information
- Are there any vehicle types missing?
You will also need to set up your locations.
- Determine what locations you wish to use as descriptors for enforcement
ParkAdmin Setup
- Create Lots
- Create and designate Lot Groups and Zones
- Permits type: Monthly, Daily or Temp
ViolationAdmin Setup
- Create Offence Categories
- Populate the offence types
- Configure days to pay and overdue time frame
Proof and order your Violations stock
- Your Account Executive will be in contact to ensure you are getting the correct tickets and that you approve the design
- If you are sourcing your own Violation stock, please ensure you allow yourself 4-6 weeks to have them printed and shipped to you
Set up your Handhelds and Printers
If you have purchased the hardware through the OPS-COM team, we will ship them directly to you with the software pre-loaded and the printers paired. If you have sourced them yourself, you will need to follow the instructions in the wiki articles to complete the setup of your Android handheld units. You will also need to use the instructions in the wiki articles below to set up and pair your printers.
- Setting Up your Handheld Units for the First Time
- Setting your Android for Auto-Updates
- Ticket Creation Settings
- Setting up your Ticket Footer
Printer Setup
Your Training Coordinator will go through using the handhelds but it is beneficial to work through the Android Handheld Wiki to make the training more meaningful for you.
In particular, it is important to familiarize yourself with the Best Practices for OPS-COM Android wiki article.
Password and Security Features
Manage Security Settings
To edit security settings, hover over System Config and click System Settings.
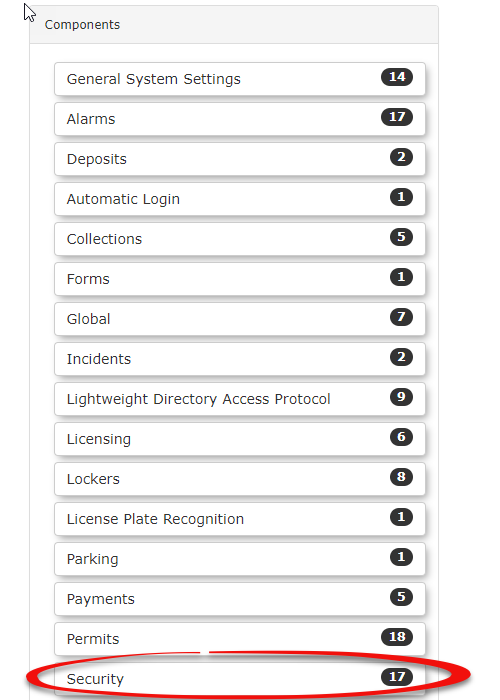
In System Settings, click Security in the list of settings.
The Manage System Settings window will open and all the security settings will be available.

Salted Password Hashing, Password Update, Toggle Password Expiry and Enable Password History
Using salted password hashing adds an extra layer of security to stored passwords. Hashing is a one-way, irreversible process that takes the password a user enters and converts it into a short hash value. Salting randomizes the string of digits for the hash value so that two users have the same password, they will have different hash strings. It is not possible to reverse engineer a hash, so you cannot “look up” what the original password was. Instead, a user who forgets their password, for example, would have to reset it completely. This limits an administrator’s ability to view the passwords of employees and closes up a security vulnerability.
Require Password Update - When activated, this setting will force users to change their passwords on next login.
Toggle Password Expiry - By default passwords do not expire. For added security, it is good practice to have passwords expire every 90 days. You can enter the number of days before a password expiry to conform with your organization's security policy and toggle it on.
Enable Password History - When toggled on, OPS-COM will remember the passwords you have used in the past, and will not allow repeat use of the password for the time set in days.
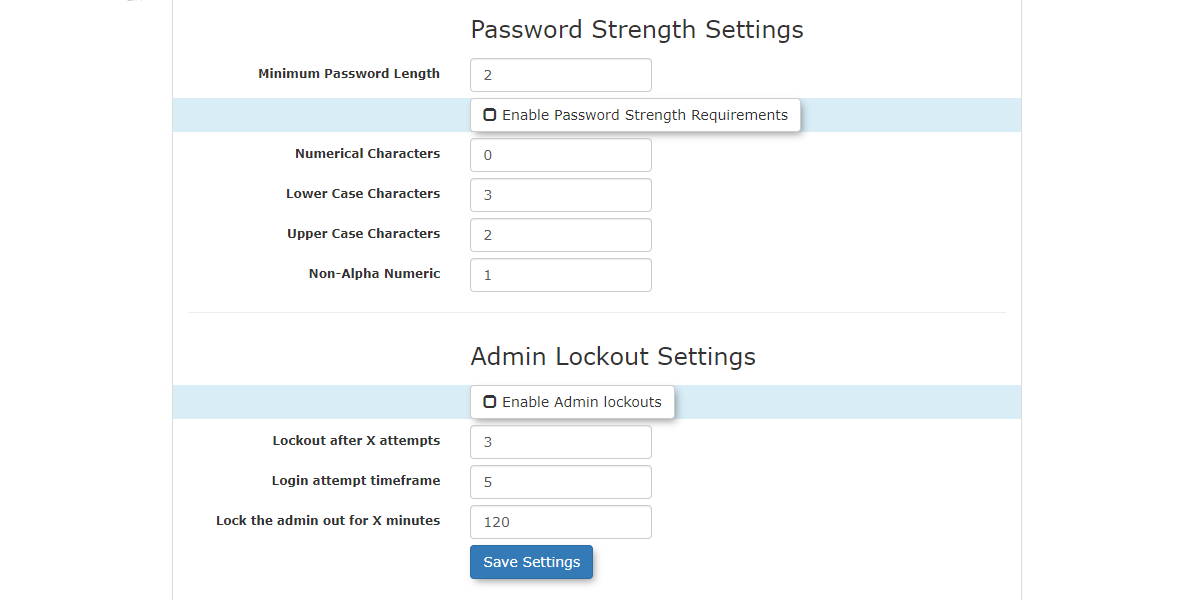
Password Strength and Admin Lockout
Using Password Strength Settings the admin can set rules for how complex a password needs to be to meet security rules.
These settings include:
Minimum Password Length - minimum number of characters in the password
Enable Password Strength Requirements - Toggles on or off the following requirements:
-
Minimum number of Numerical Characters required in the password
-
Minimum number of Lower Case Characters required in the password
-
Minimum number of Upper Case Characters required in the password
-
Minimum number of Non-Alpha numeric Characters required in the password (Special characters such as !,&,#, etc.)
Admins can opt to set up additional security settings that can lock the user out of the system if an incorrect password is entered repeatedly within a specific time frame. In the setting example, 120 minutes would lock the Admin out of their account for 2 hours, if three failed attempts to log in occur during a five minute period.
Manage Files
Uploading Files
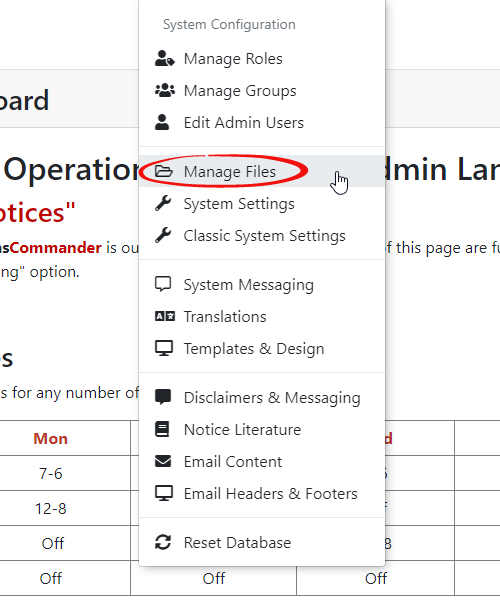
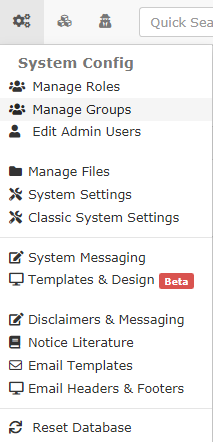
Your OPS-Com Admin site has a page to put files. To get to this page, go to System Config then click Manage Files.
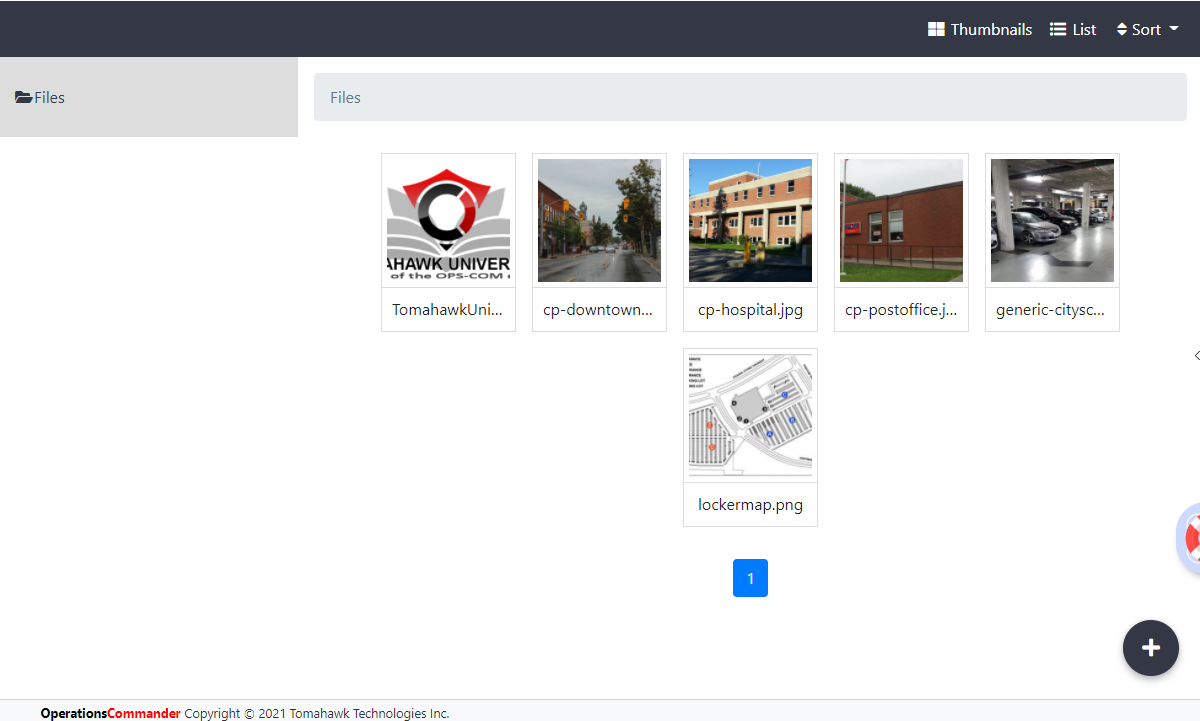
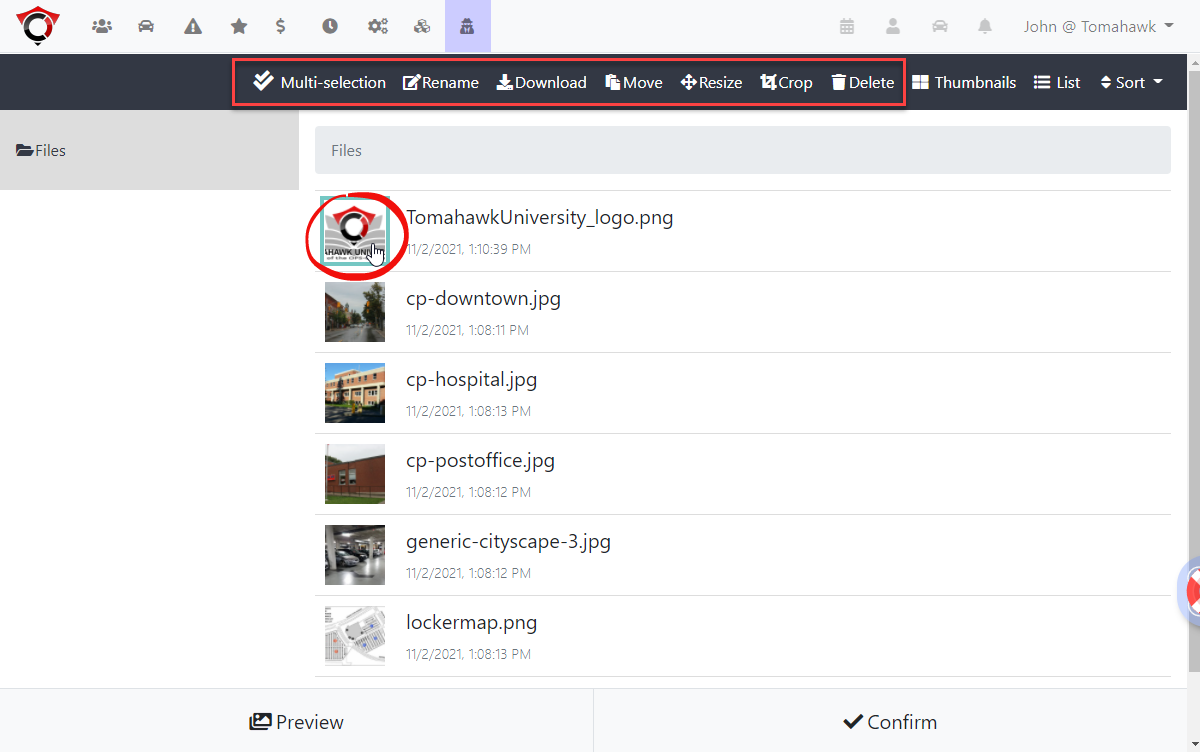
You should now see a page where you can see all files that have been used on your OPS-COM Site.
This is used mainly for images that are on your OPS-COM User and Admin dashboards (banner, etc.)
These files can be viewed in thumbnail mode...
...or in list mode:
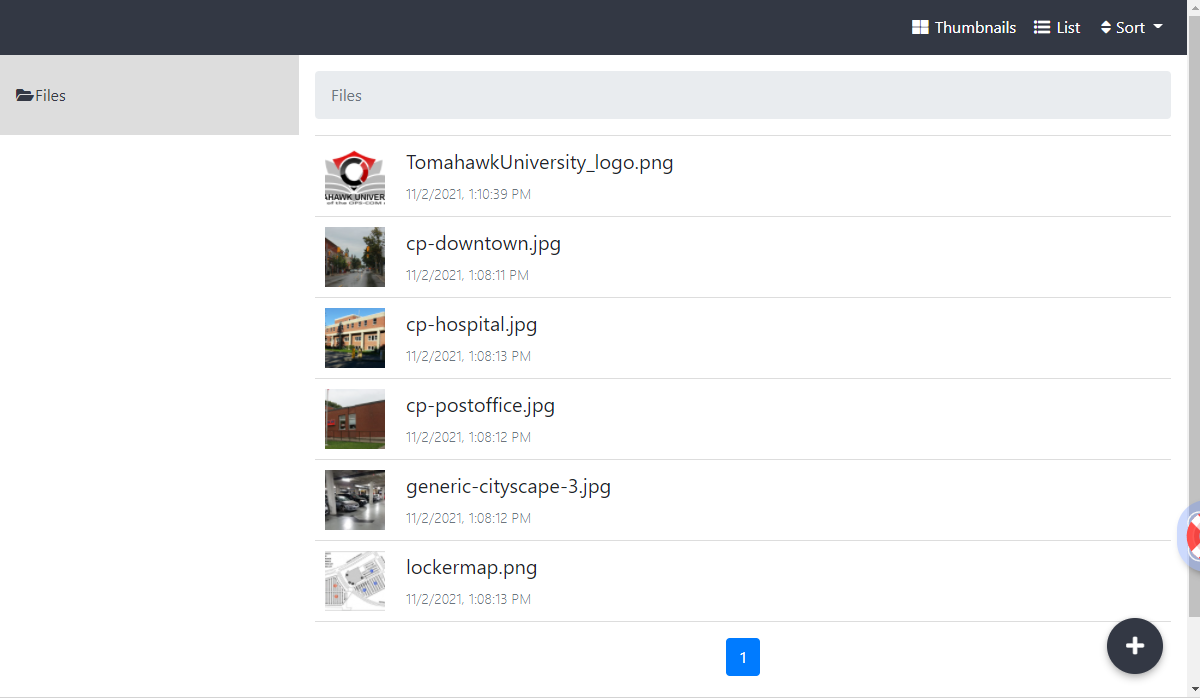
By clicking on an image you turn on the following menu where you can rename, download, move the file to a different folder, as well as resize, crop or delete the file.
Adding Files to Pages
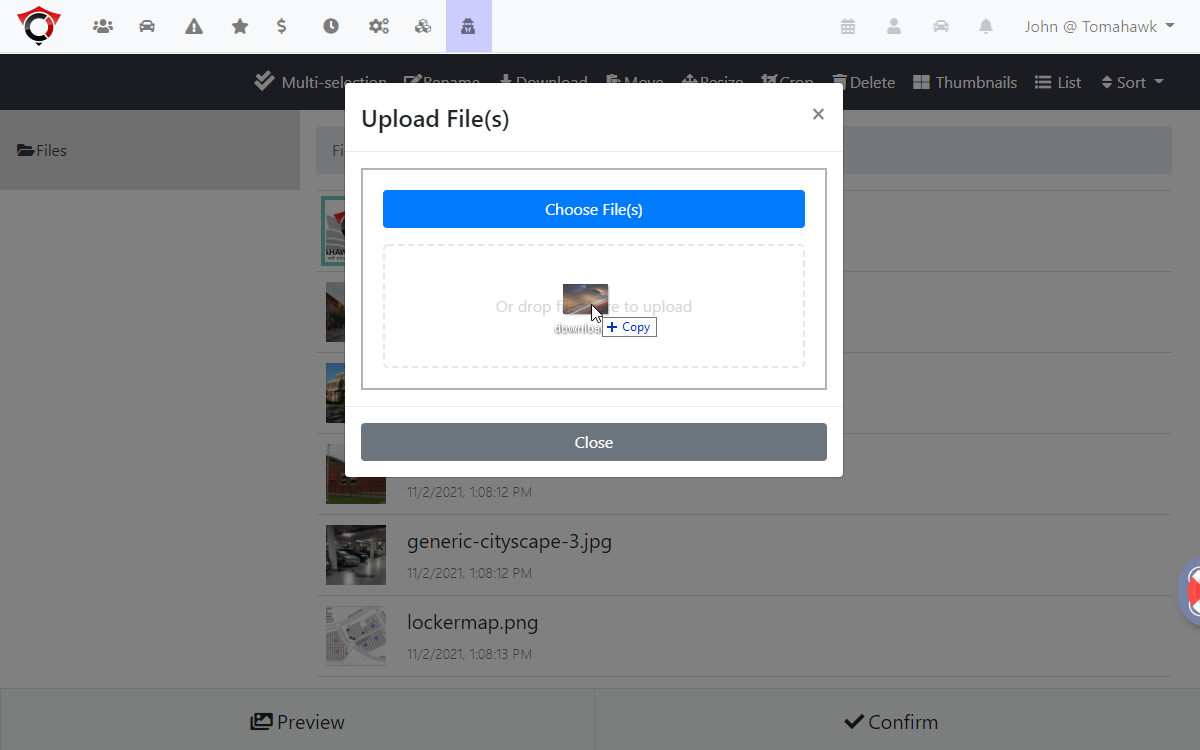
To add files to this repository you can simply drag the file into the screen area where an Upload File(s) interface will appear.
Adding Images to a Page
To add an image on a page, you would insert the path to the image, as follows:
The root folder is /uploads/FILES/
Followed by your customer code
Followed by the file name
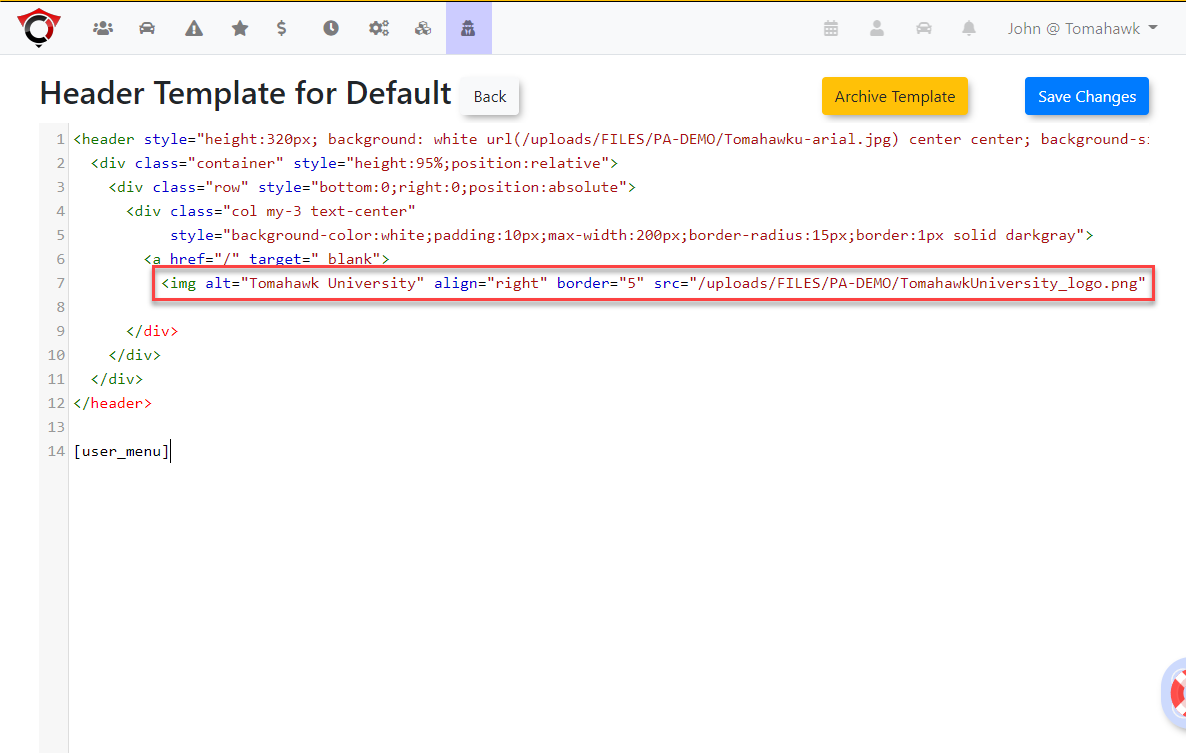
The resulting URL for a logo placement might look like this /uploads/FILES/PA-DEMO/TomahawkUniversity_logo.png
Here's a sample of the URL being used in a typical page header.
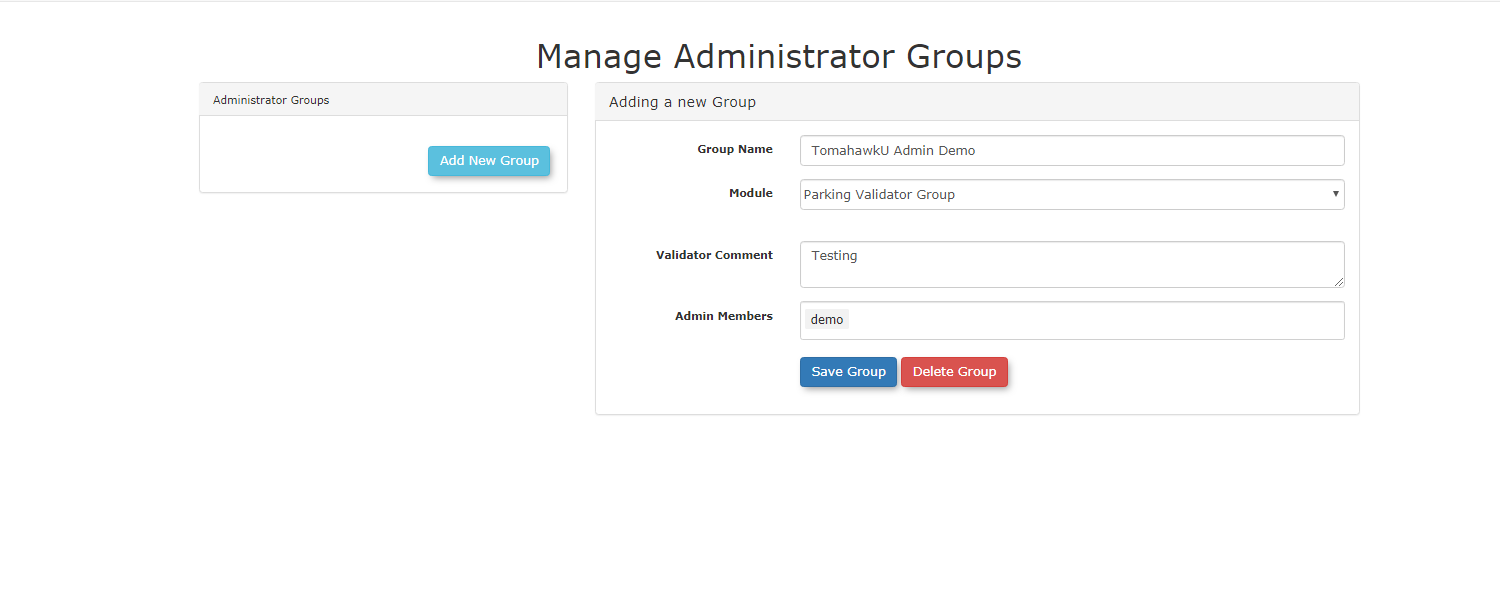
Administrator Groups
- To manage Administrator Groups, go to 'System Config' then click on 'Manage Groups'.
2. You will be directed to a page where you can see your Admin Groups. As you can see, there are no groups on this page. We will be making one for a demo. To make a group, click on 'Add New Group' Fill out the information, then click 'Save Group'. You should now see your group that you made on the left hand side.
The Invoice Template
Editing the template
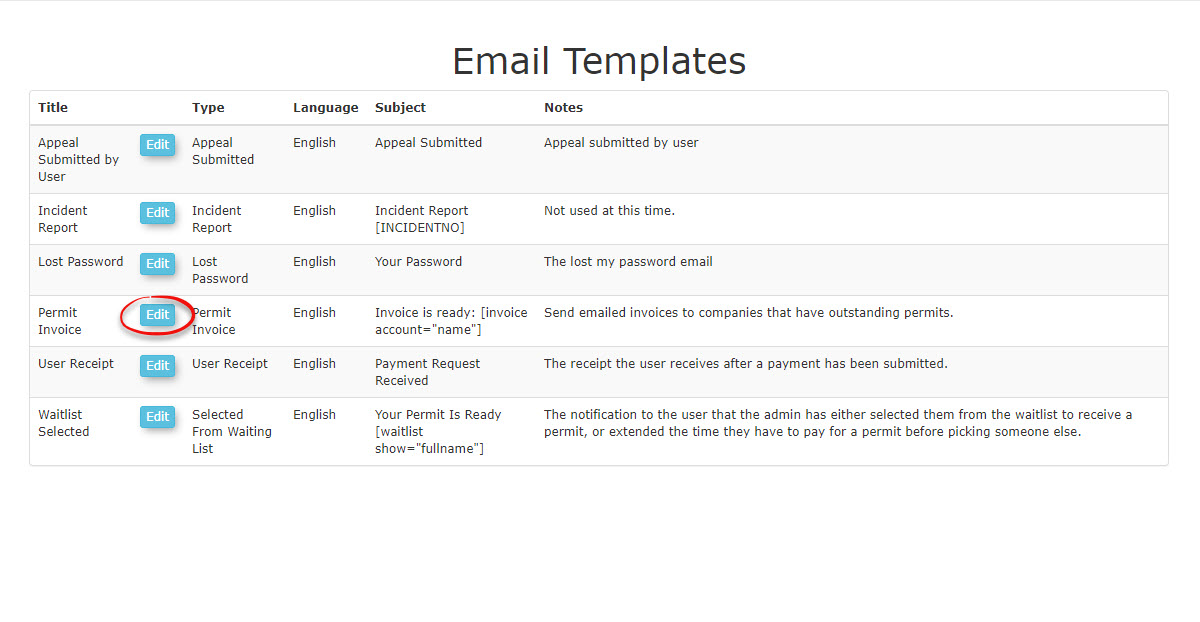
To access the template, go to the System Config menu and click on Email Templates.
The screen will refresh with a list of possible templates to edit. In our case, we want to click on the Edit button for Permit Invoice to access the template.
The screen will refresh with the complete Template form as seen below.
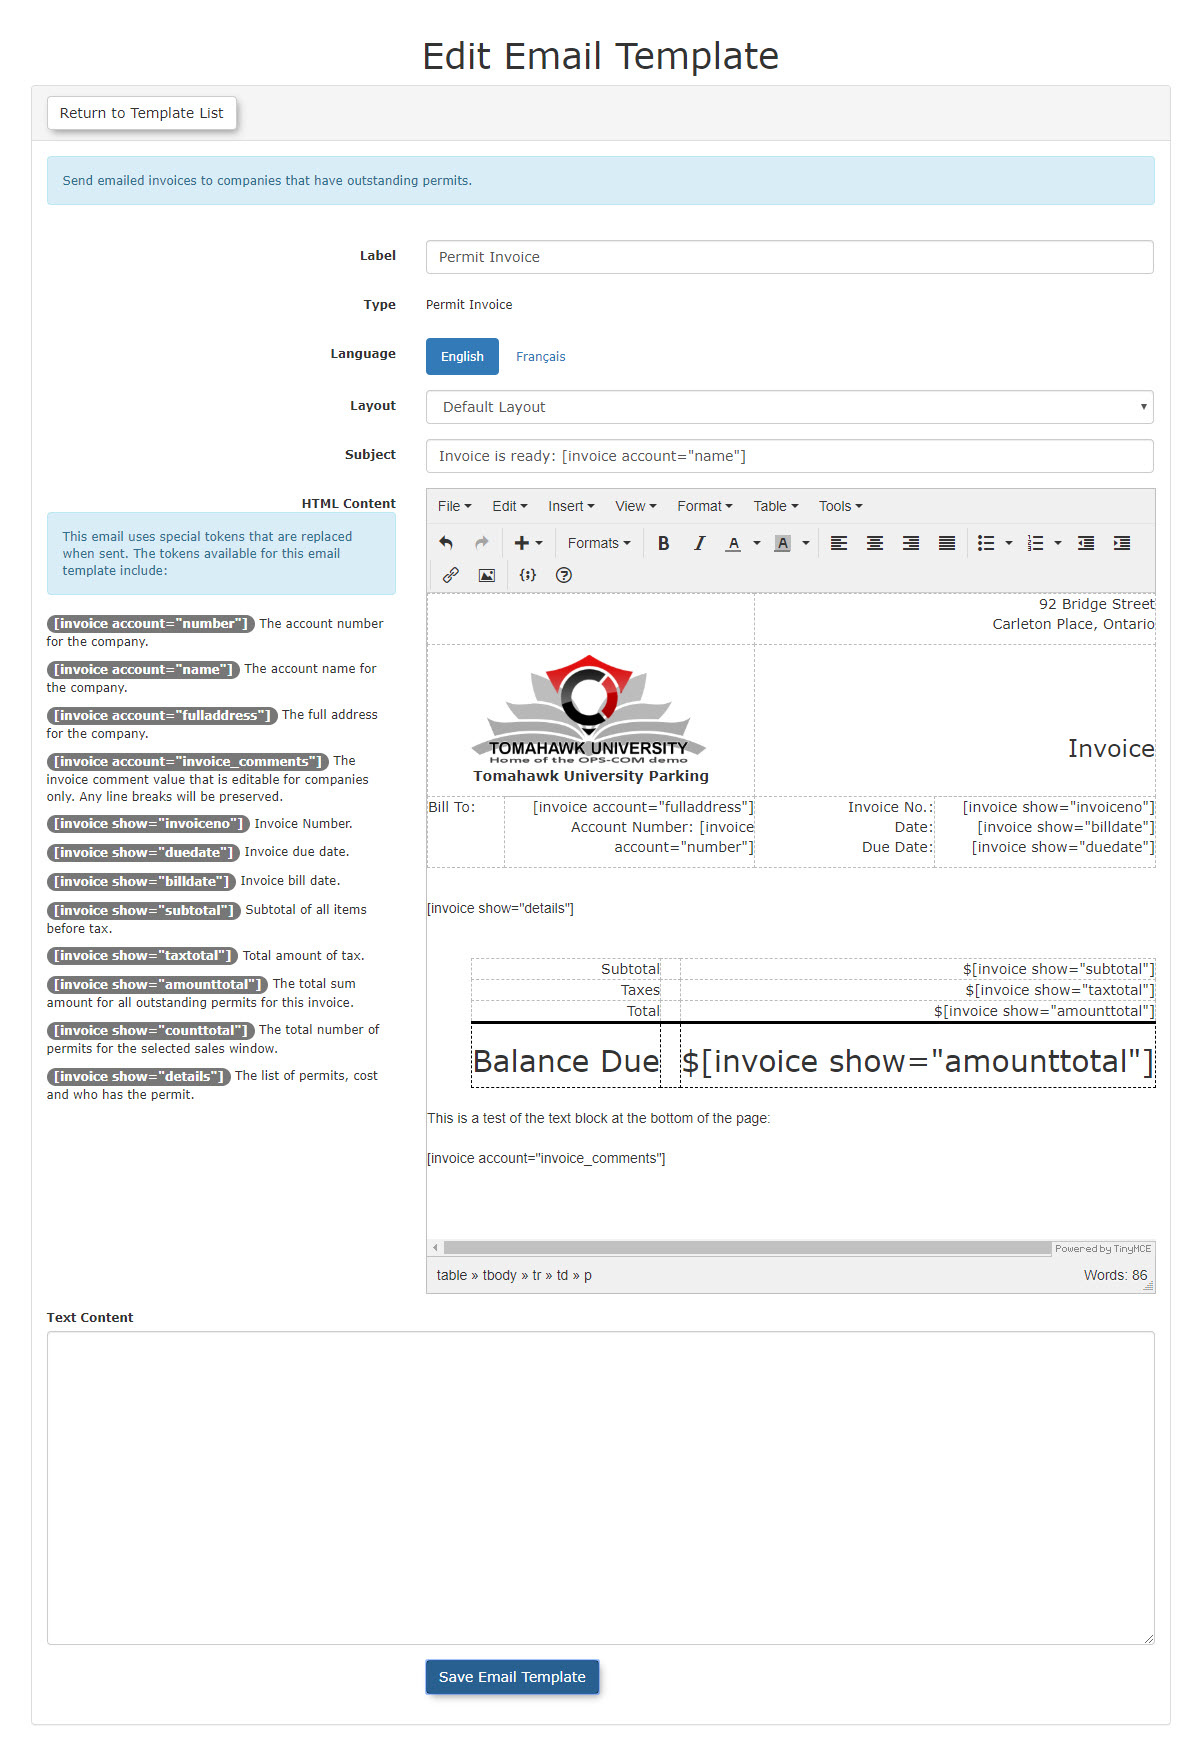
The form contains 4 areas:
At the top, Meta Data for this specific template.
On the left, a list of possible Short Codes that can be used on this template form.
On the right, the actual Template.
At the bottom, a Text Content field (This field can be configured for a plain text version of the
Meta Data
Label - Enter a name for this Template.
Type - This field auto fills.
Language - Choose the language of the template.
Layout - Choose default layout.
Subject - This text will appear as the Email Subject. Note that the use of short code is permitted in this field. In this case, we are calling up the account name for the company being invoiced.
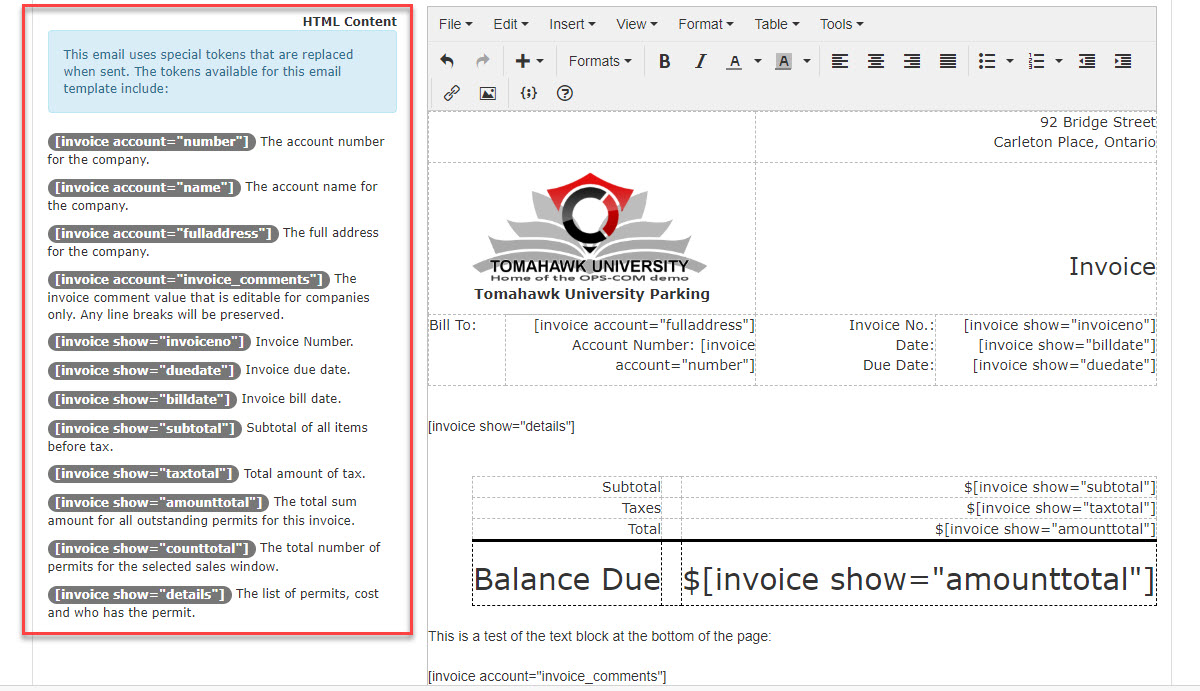
Short Code List
The template allows the use of special tokens, or short codes, to pull information from the database to appear on the invoice when sent.
These include:
[invoice account="number"] The account number for the company.
[invoice account="name"] The account name for the company.
[invoice account="fulladdress"] The full address for the company.
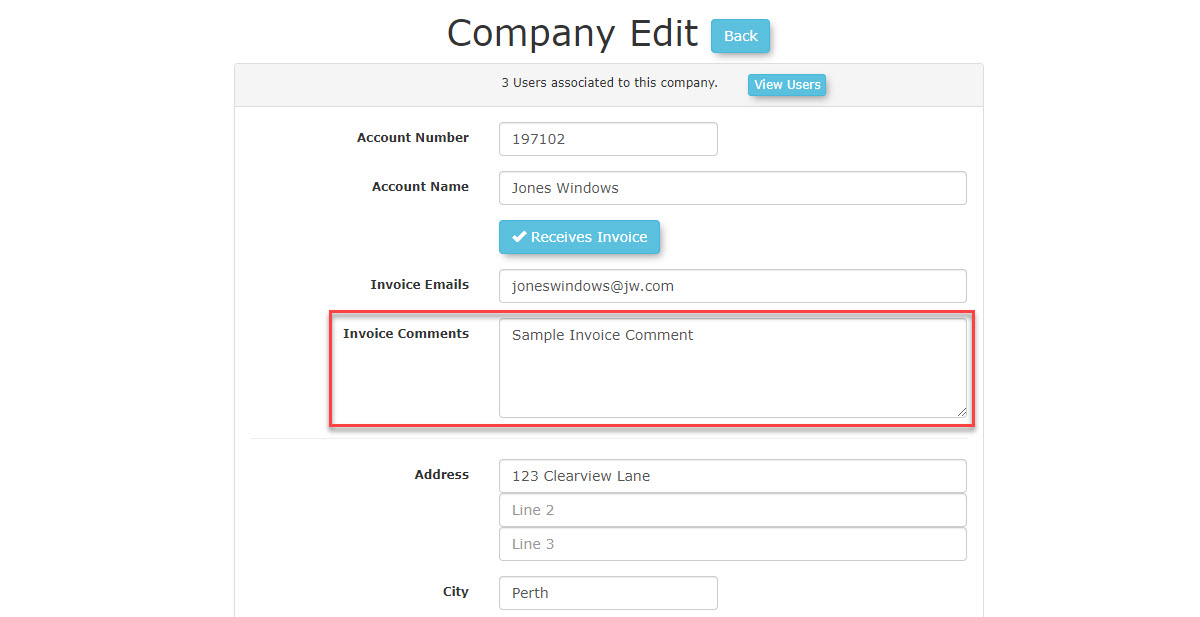
[invoice account="invoice_comments"] The invoice comment value that is editable for companies only. Any line breaks will be preserved.
[invoice show="invoiceno"] Invoice Number.
[invoice show="duedate"] Invoice due date.
[invoice show="billdate"] Invoice bill date.
[invoice show="subtotal"] Subtotal of all items before tax.
[invoice show="taxtotal"] Total amount of tax.
[invoice show="amounttotal"] The total sum amount for all outstanding permits for this invoice.
[invoice show="counttotal"] The total number of permits for the selected sales window.
[invoice show="details"] The list of permits, cost and who has the permit.
These tokens can be placed anywhere on the template and will pull data from the system, similar to a mail merge functionality.
For example, in the Bill To: area, the system will retrieve the Full Address of the Company as well as the Company Account Number using these two short code tokens:
[invoice account="fulladdress"] The full address for the company.
[invoice account="number"] The account number for the company.

The Template
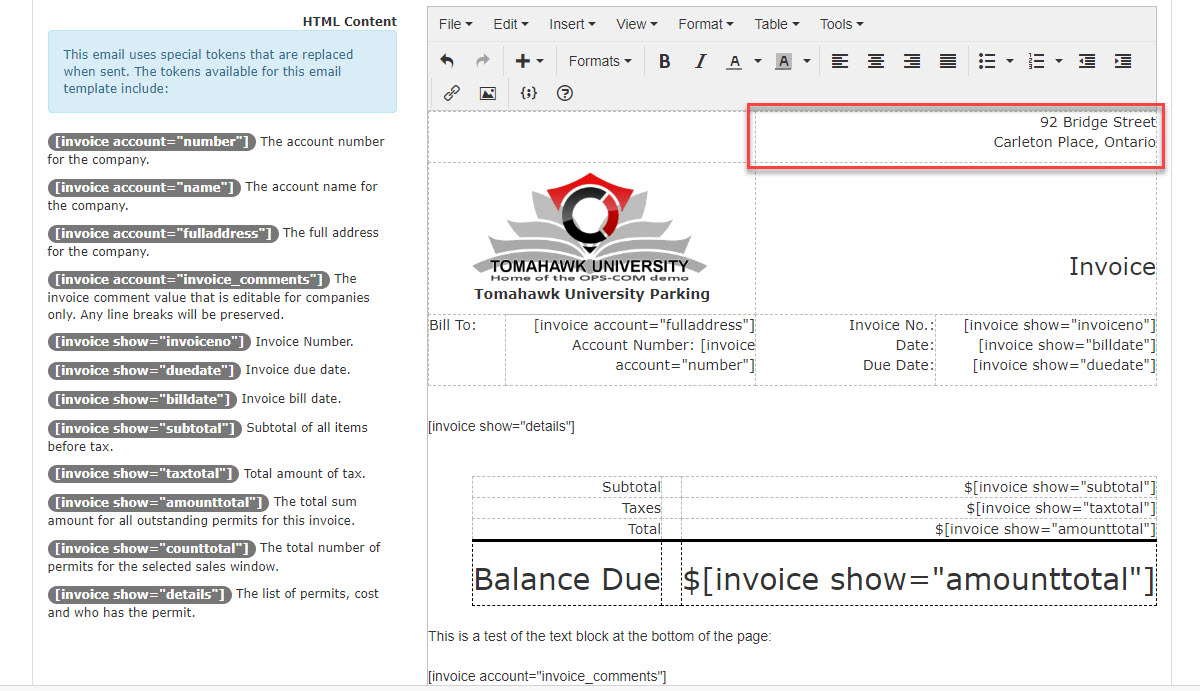
There are a number of areas on the template that can be edited by the admin. To add branding to the template there are two areas that will be of concern.
The Company Logo Field:
This is where you would place your company logo. Using a .JPEG or .PNG file format is recommended.

Your Company Address:
Enter your company address here.
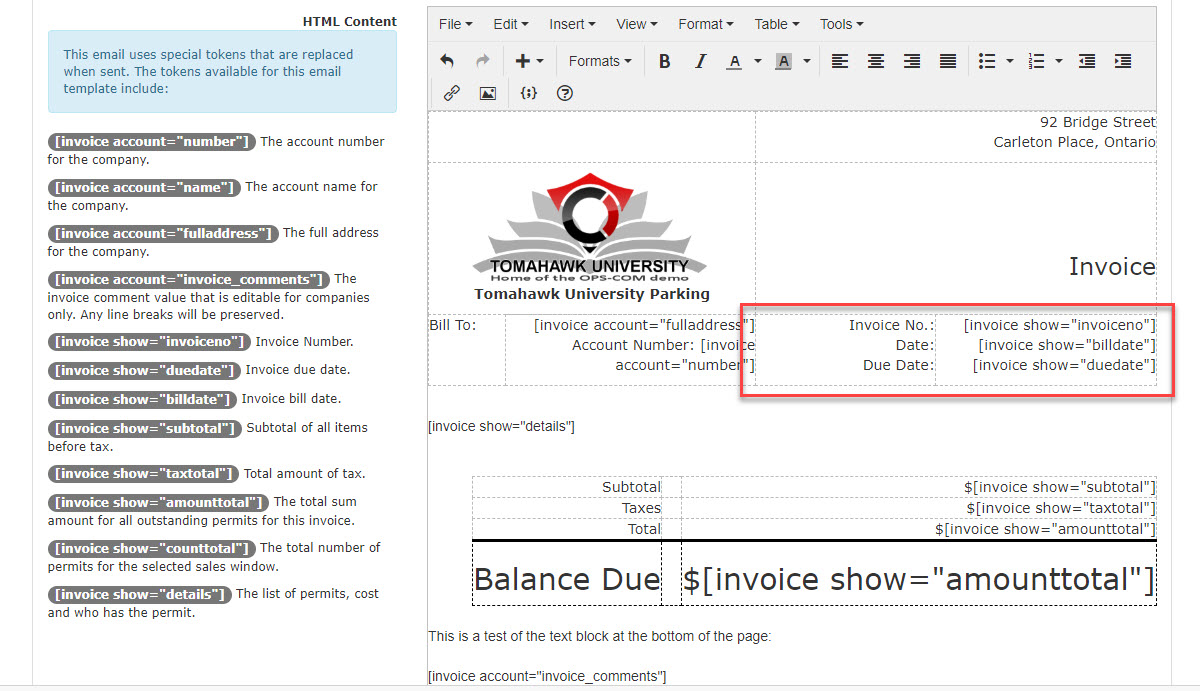
Invoice Identification:
In this section use short code to pull in the Invoice Number, Billing Date, and Due Date.
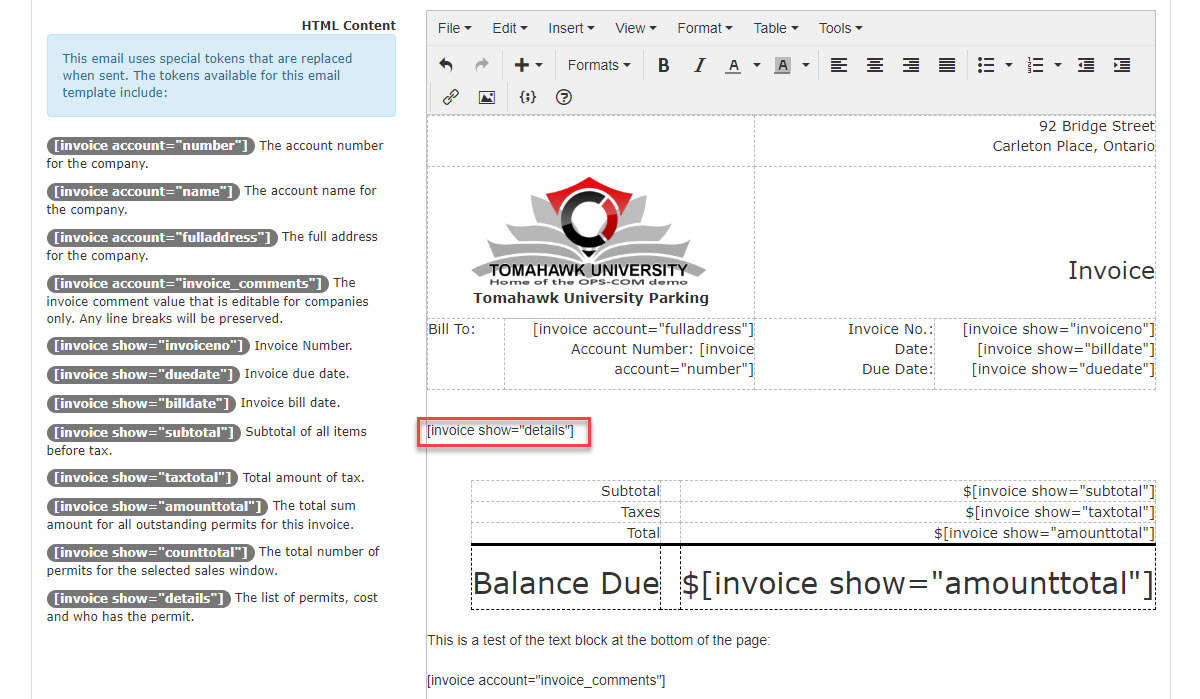
Invoice Details:
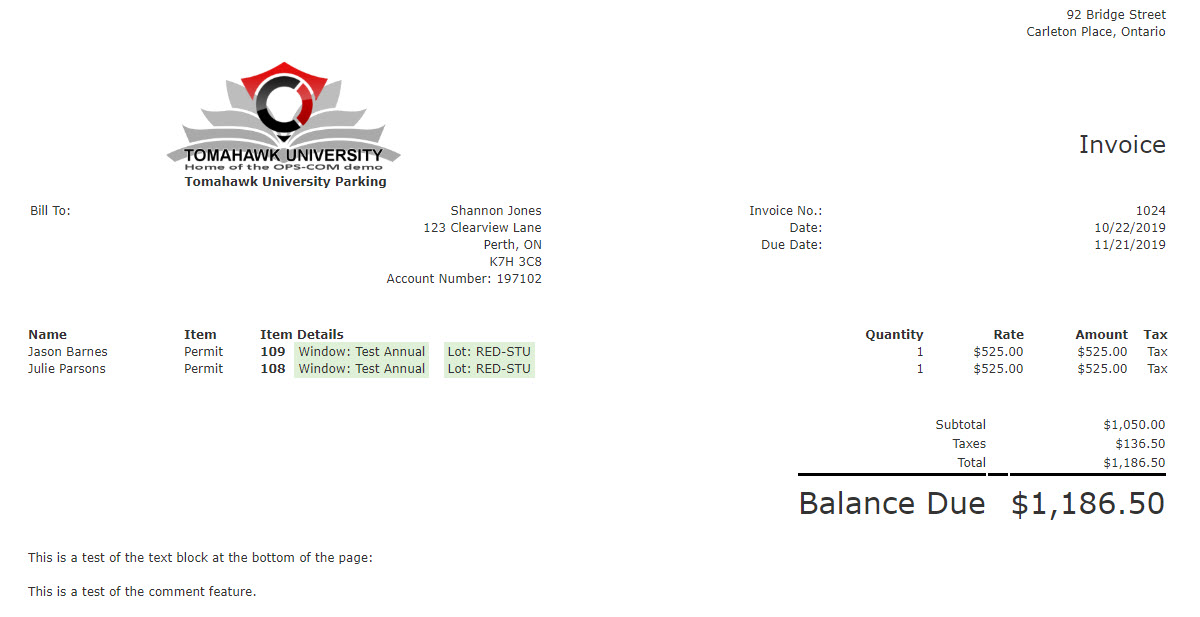
The short code [invoice show="details"] pulls in the list of permits that will appear on the Invoice. (See a sample of the Invoice below)
These include:
Parker's Name
Item type being Paid for (Permit, Access card, etc.)
Item number (Permit Number)
Sales Window
Lot Name
Quantity
Cost
Payment Information (Billing Cost):
In this section use short code to pull in the billing information such as Subtotal, Calculated Taxes, and Total Billing Amount.
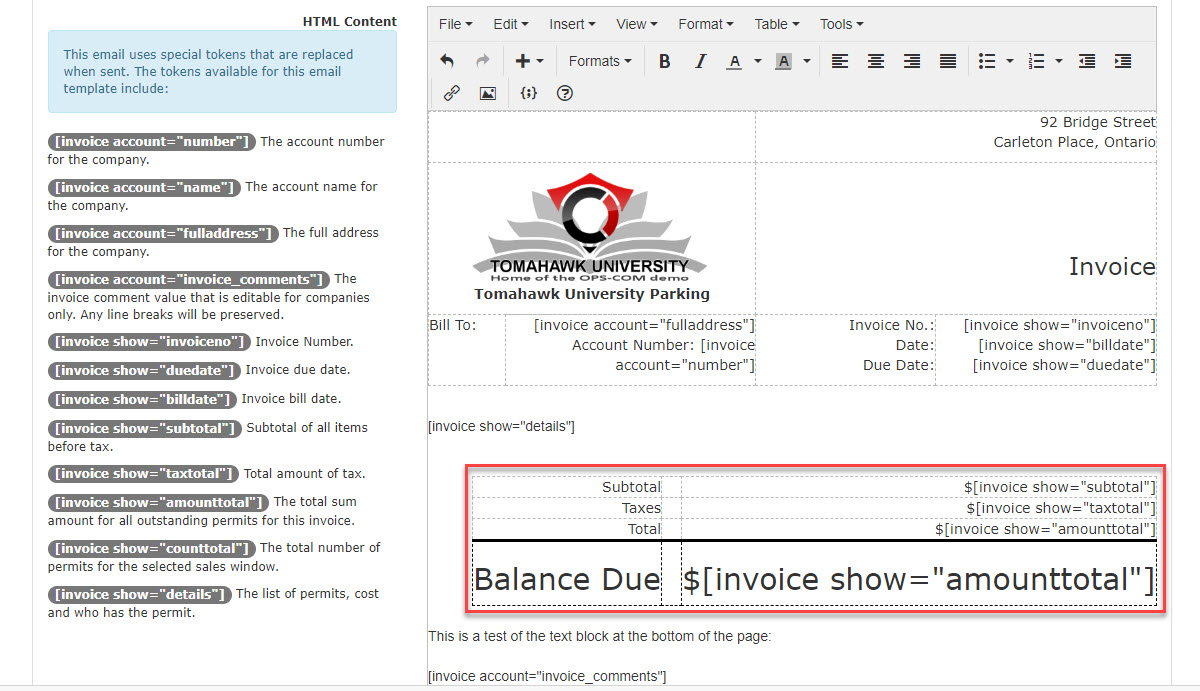
You may also wish to add comments to the invoice. Comments can be added in the company configuration.
The Email with PDF attached:
Here is a sample of what the resulting email would look like. There is also a .PDF version of this invoice attached to the email.
System Messaging Checklist
What Needs Your Attention
Here is the list of all the major pages and messaging you will want to review. There are some that are standard messages and probably don't need customization. These items are listed but marked as optional.
Functional page elements are displayed on the page automatically by the system based on which page you are currently on. For example, the Sign In page boxes that appear for username and password are automatically generated on the page. Therefore, you need not worry about editing these items. However, if you want to add additional content on these pages you may do so.
Templates and Designs
Click on Toggle template to get a list.
You will want to edit the following:
-
Header - You will want to customize this content. This is the common header on all user portal pages.
-
Footer - You will want to customize this content. This is the common footer on all user portal pages.
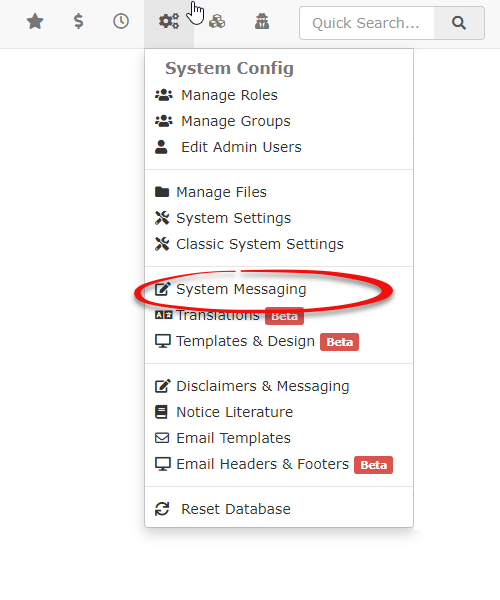
Go into System Messaging and update the following System Messaging:
(These are the actual pages that occupy the content area between the header and footer that you configured above)
The Pages Tab
-
User Dashboard - Currently the generic page. You will want to customize this content.
-
Login Screen - You will want to customize this content.
-
Payments Page - Optional. This content will appear on the Payments page above the functional part of the page.
-
Permits - Most clients customize this message. A good place to put a Campus Map and Messaging about permits.
-
User Registration- Optional.
-
My Vehicles - Optional.
The Messages Tab
- Dashboard Message - Admin Dashboard.
-
noPaymentOptions - Currently a standard generic message. Edits Optional.
-
permitPDF - Set for printing a standard permit.
-
permitTempPDF - Set for printing a temporary permit.
-
tempPermitText - Optional.
Popup Disclaimers
You may opt to place popup disclaimers throughout the system. These popup windows can be triggered to appear based on navigation to a page or associated with a button on a page.
- Appeals Disclaimer
- Locker Disclaimer
- Permit Disclaimer
- Vehicle Disclaimer
Email Headers and Footers Configuration
These are the common elements that will be used for all outgoing emails.
You will probably want to customize the messages as well as add your logo to the header, although there are no rules here you can decide, for example, to put the logo in the footer.
Click on toggle templates and have a look at:
-
Header - You will want to customize this content.
-
Footer - You will want to customize this content.
Email Templates
These are the ones I believe you will be using at this point.
- Appeal Decision
-
Appeal Submitted - Standard. Edits Optional.
-
Lost Password - Standard. Edits Optional.
-
Create Password registration email. - Standard. Edits Optional.
-
User Receipt - Standard. Edits Optional.
-
Waitlist Selected - Standard. Edits Optional.
Disclaimers & Messaging
There are only 2 that would be of concern.
Notice Literature
These are notices that get sent out to end users as an email. They would use the Headers and Footers you configured above.
-
Overdue Notice Literature - sent to a user when they have an overdue violation. You will want to customize this message.
-
New Notice Literature - sent to a user when they have received a violation. You will want to customize this message.
Email Server Communication Errors
Finding Communication Errors
It is possible, that if some of the system settings and classic system settings are not setup correctly to use a From address, that you will receive a communication error as a response. One example would be when trying to submit the Forgot Password form found on the user side login page. An error message of this nature would look something like this:
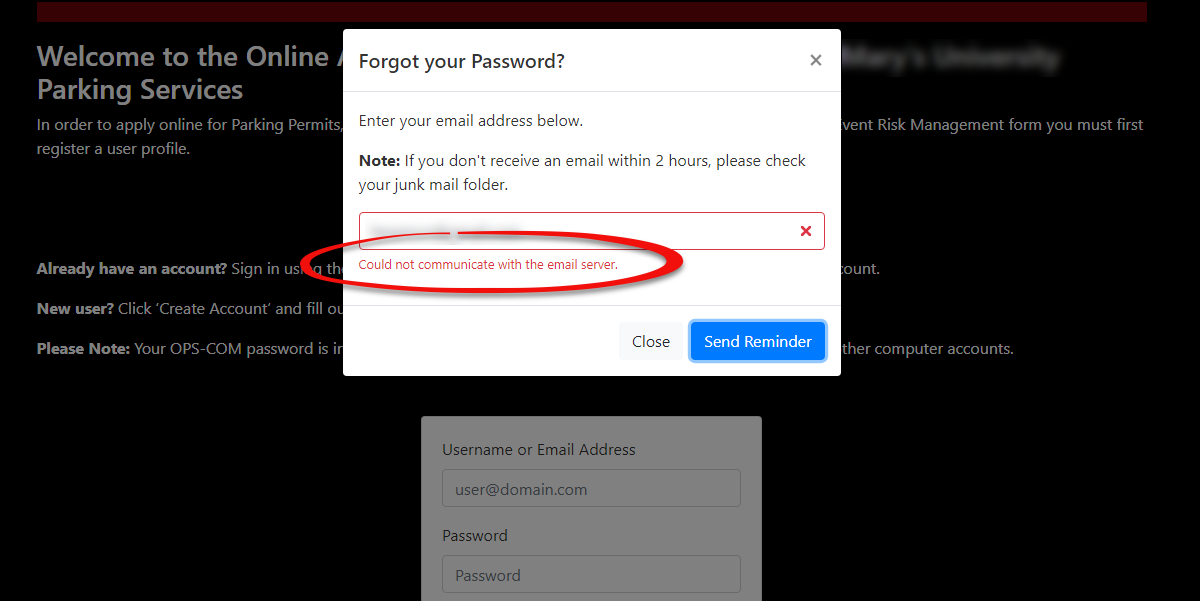
As mentioned, this is because there is no From address setup in the system.
Fixing Communication Errors
To fix this issue you would just need to update the Reply-to Admin Email Address found under Classic System Settings.
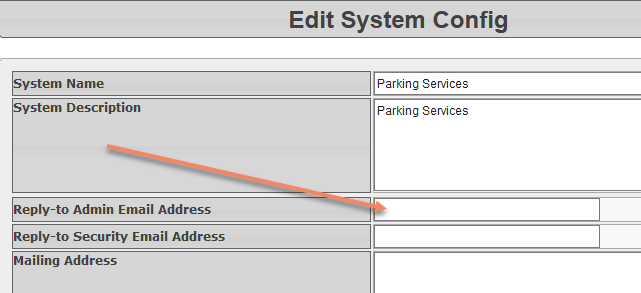
Once you have updated the email address this issue should be resolved. If the issue is still not resolved after completing these fields, please contact support for further assistance.
Default Header and Footer for Mobile Readiness and SwiftDeploy
Accessing System Settings
First we must go into System Settings from the System Configuration menu.
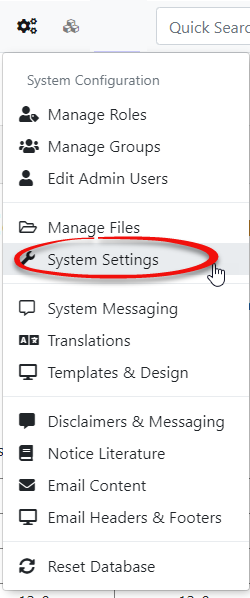
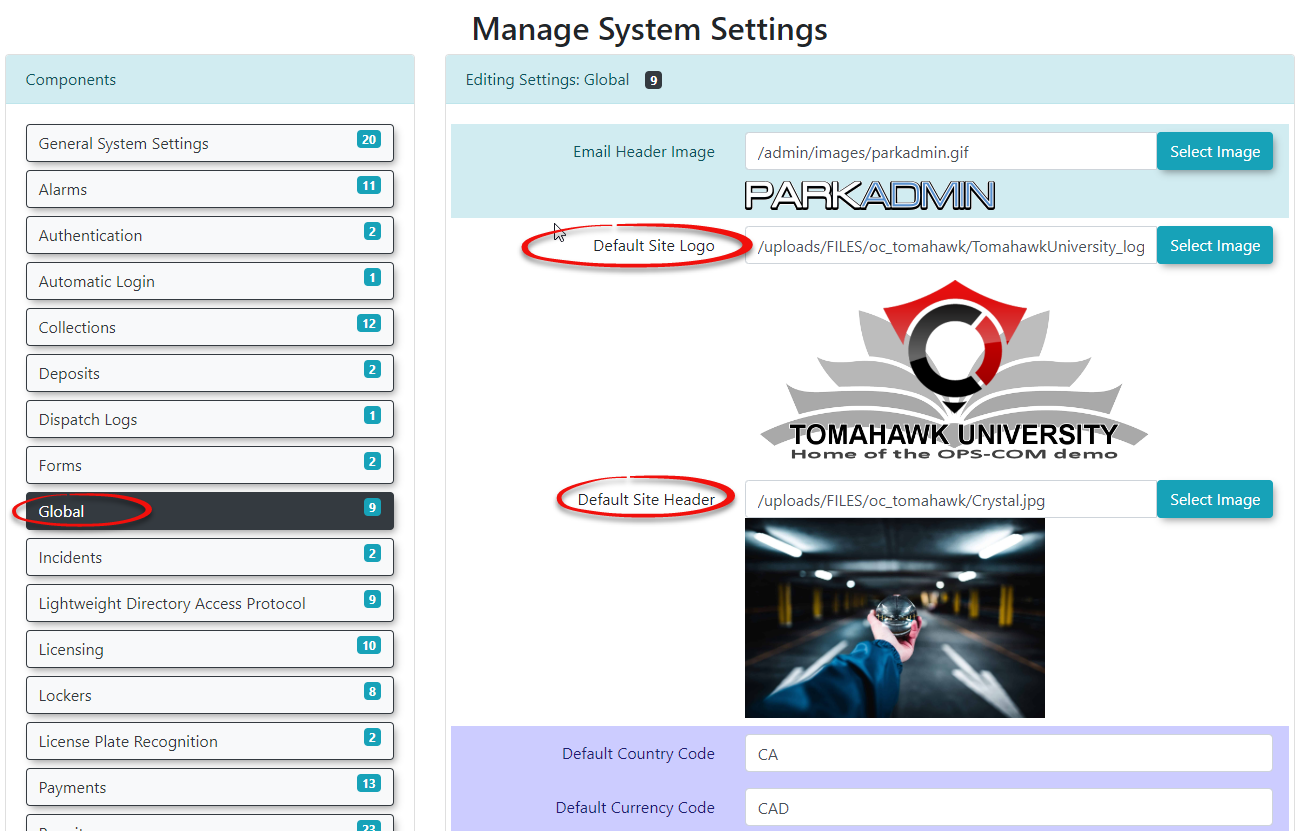
We are looking for the Global component in the list of system setting components.
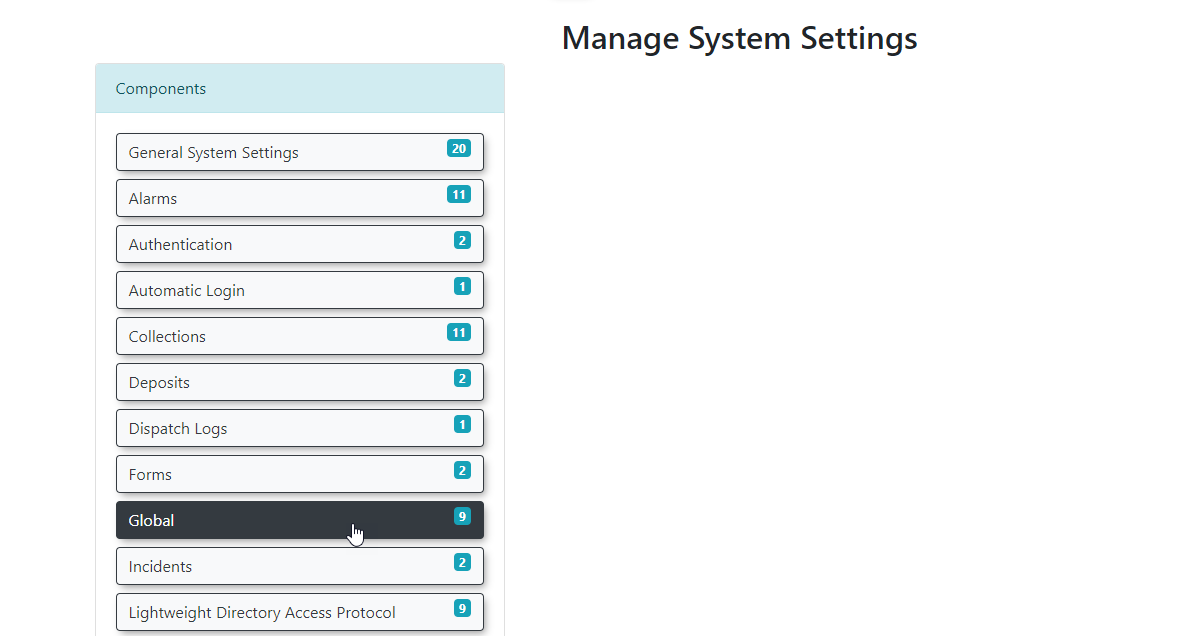
In Global Setting we will see two areas where we can configure images to be used.
- Default Site Logo
- Default Site Header
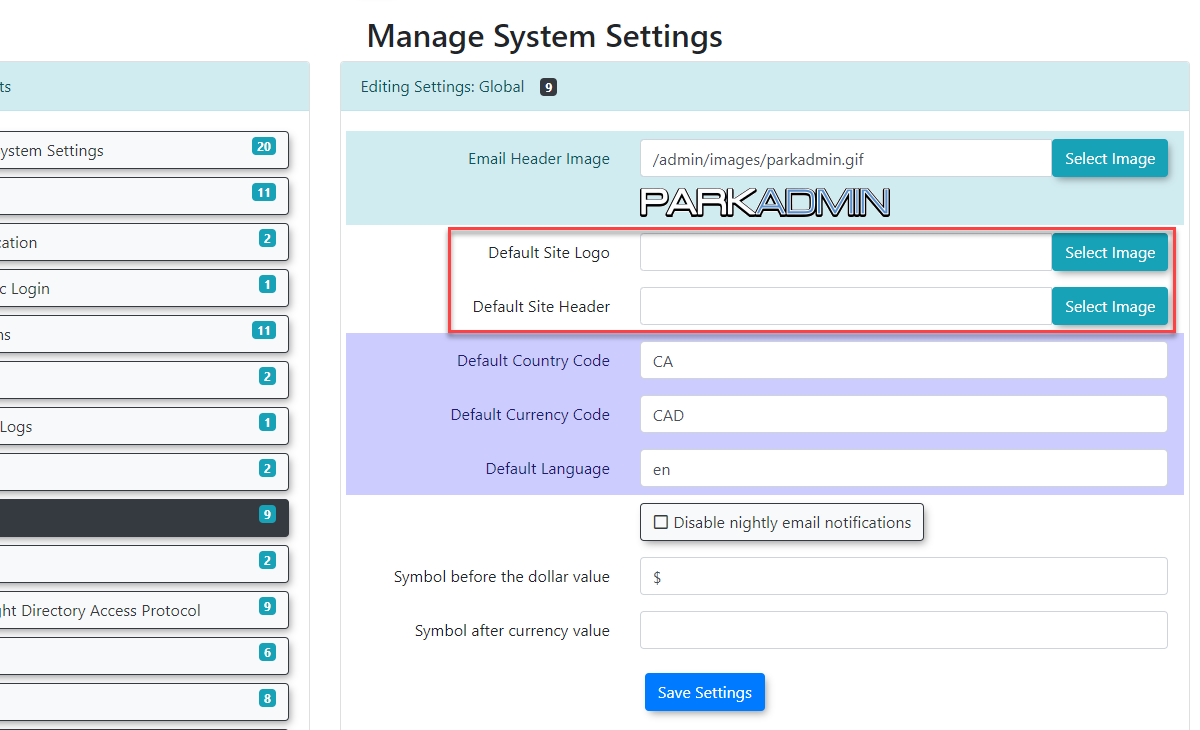
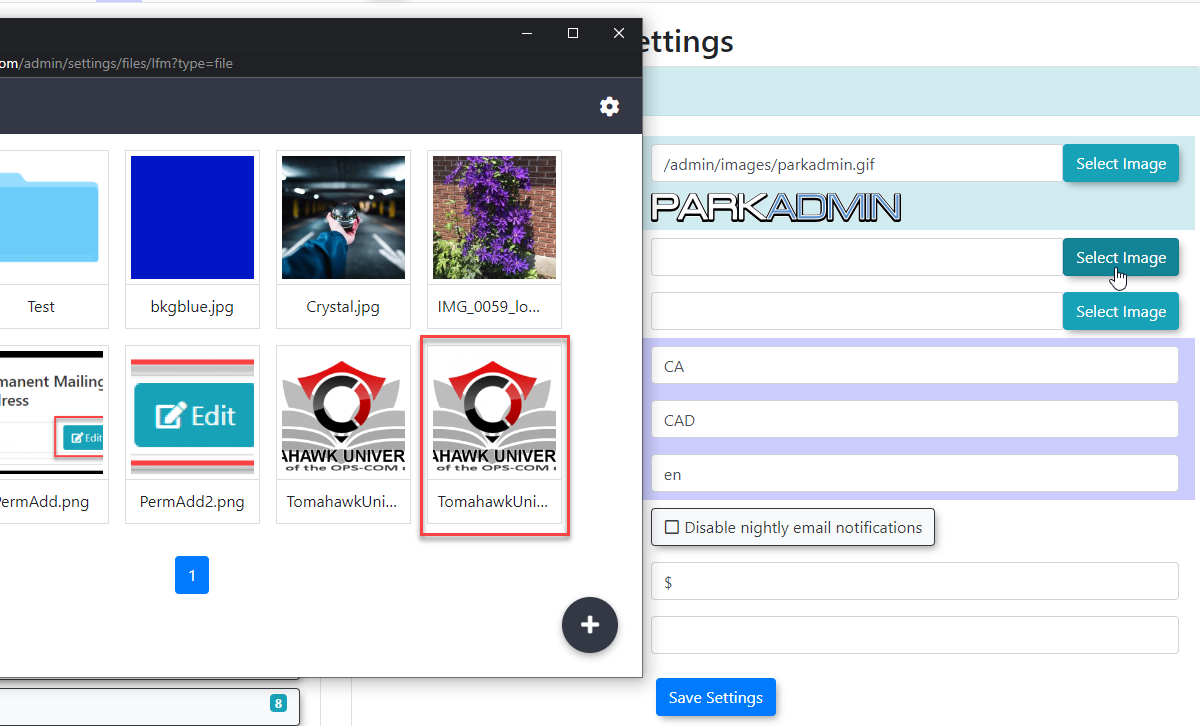
By clicking on Select Image we will be taken to the Manage Files section where images and files are stored.
Setting the Default Logo
Here we will select an image to be used as the default site logo.
Setting the Default Header Image
We can now set the Default Site Header image.
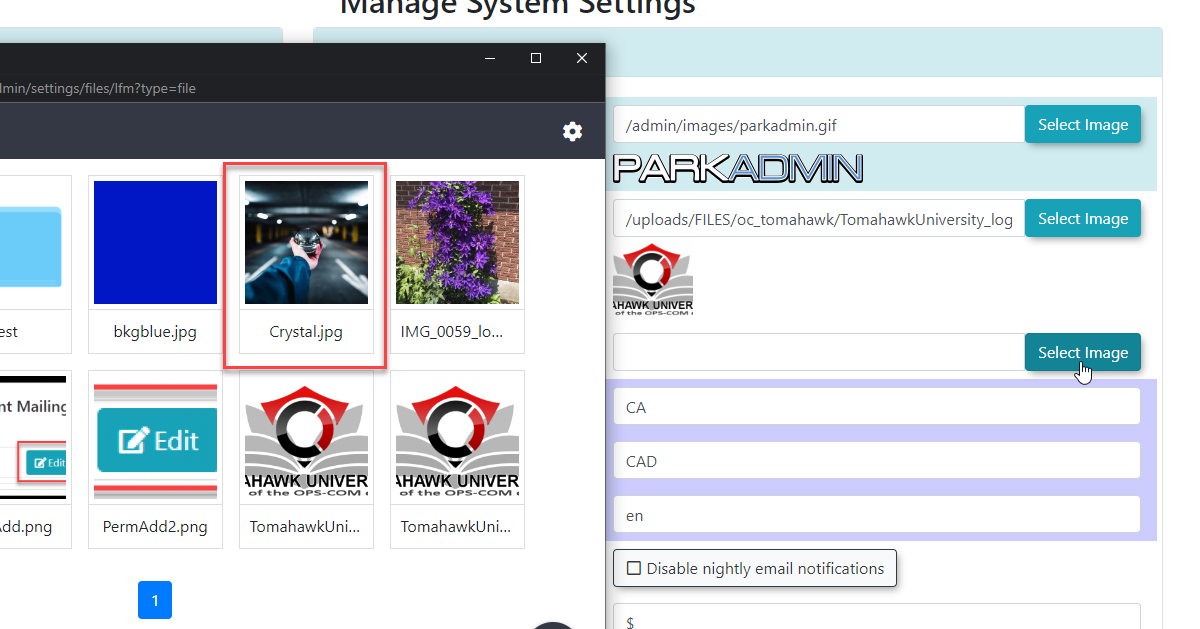
Once the images are selected they will appear in the configuration settings.
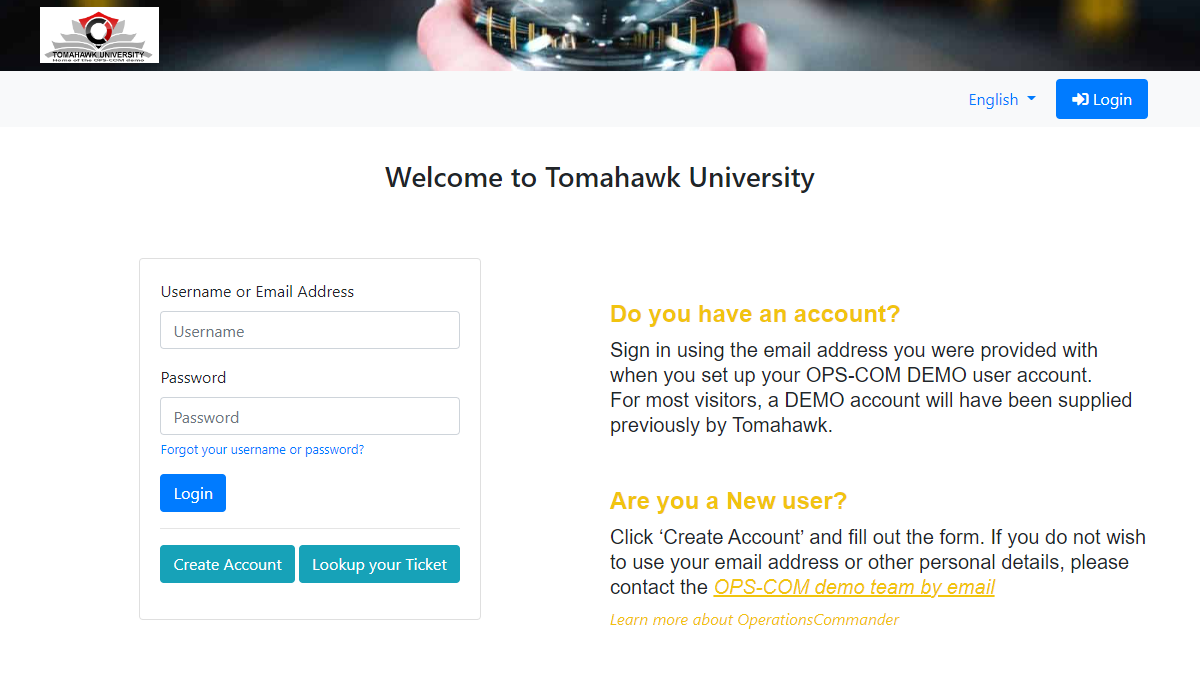
Where The Changes Appear
These images will appear in various places in the system. If no header or logo is set in the Templates and Designs section of the system, these default images will be used.
In our example we are using the default header and logo on the user portal...
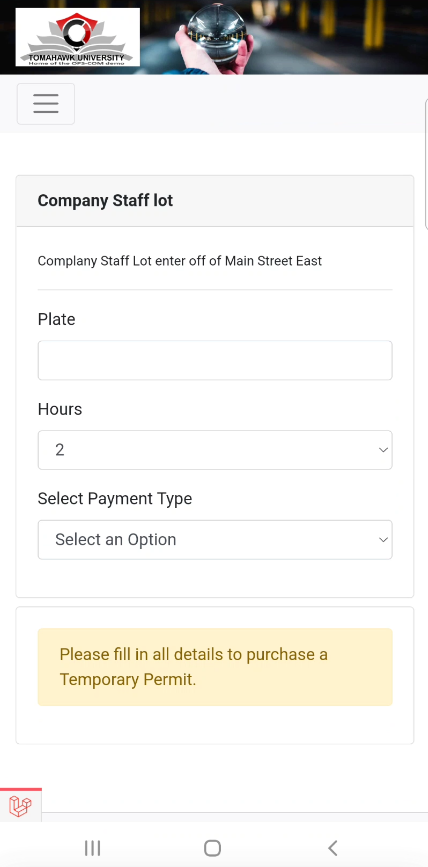
As well as the phone interface utilized in Real-Time Parking.
Email Templates
Navigate to Email Templates
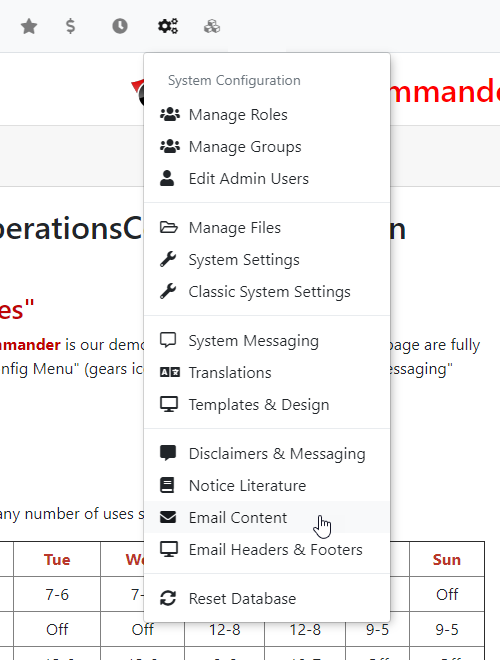
In order to find your current default email templates, you will have to login as an admin and navigate to the system config cog. From this drop-down menu, you should see Email Content.
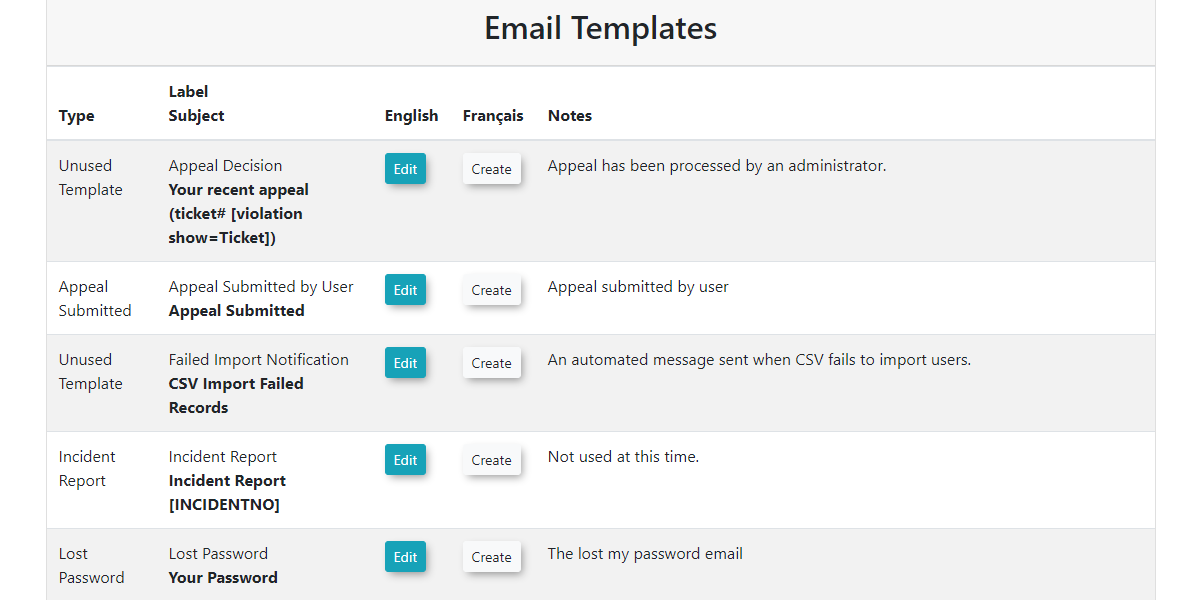
Editing Default Email Templates
To edit the default email templates, you can click the Edit button next to the template you wish to adjust. After you click this, you will be taken to another area where you can make your changes to the current email template.
Using Shortcodes
Each email template will have available shortcodes that you can use to craft your message to your liking. The shortcode tokens are displayed on the left of the template editor. As you can see in the image below, the email template for Appeal Submitted by User offers the ability to craft messages without knowing when the ticket was appealed, as well as the ticket being appealed. This offers you a very quick and seamless way to make your email templates more engaging and informative.
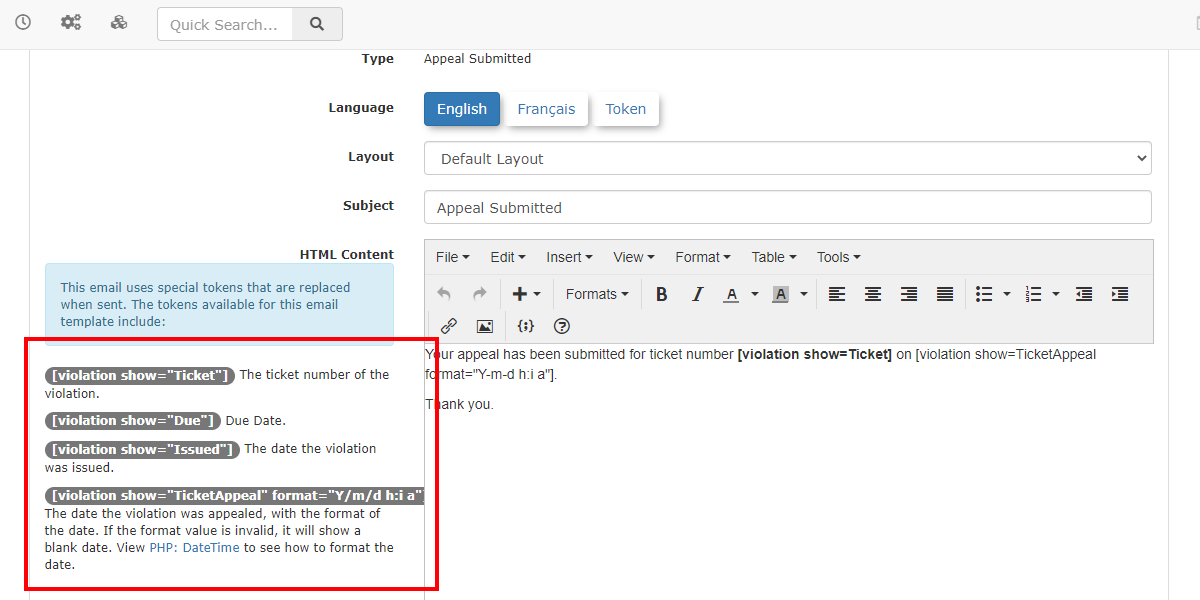
You should be able to use these codes in the smart editor to the right and it will display the appropriate information to the desired user. The smart editor also gives you the ability to add images and format your messages.
Email Template Fields - What do they do?
| Label |
The label field is how you will identify your email templates. |
|---|---|
| Type |
The type is an nonadjustable value that lets you know the type of the email template. |
| Language |
This field contains two options that allow you to select between French or English. |
| Layout |
Select the layout that surrounds your messaging, this allows you to have multiple different layouts for different email templates. These layouts include your email header, footer, and its styling. You can create or adjust email template layouts under System Config → Email Headers & Footers. |
| Subject |
This is the subject of the message you wish to send under the current email template. |
| HTML Content |
Here you will write the message your users will receive. You can insert images, shortcodes, and use the smart editor, to format your messages just like other word processors. |
| Text Content |
This section is a simple text editor that does not offer the use of shortcodes or any formatting. This is simply for the message itself and not necessarily the |
Pages and Content Blocks
Accessing System Messaging
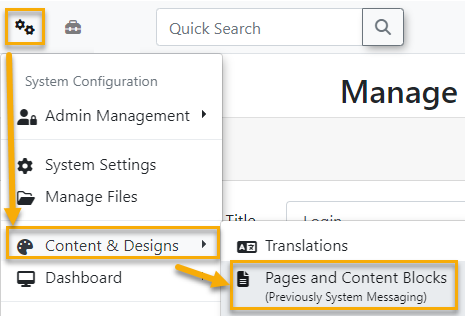
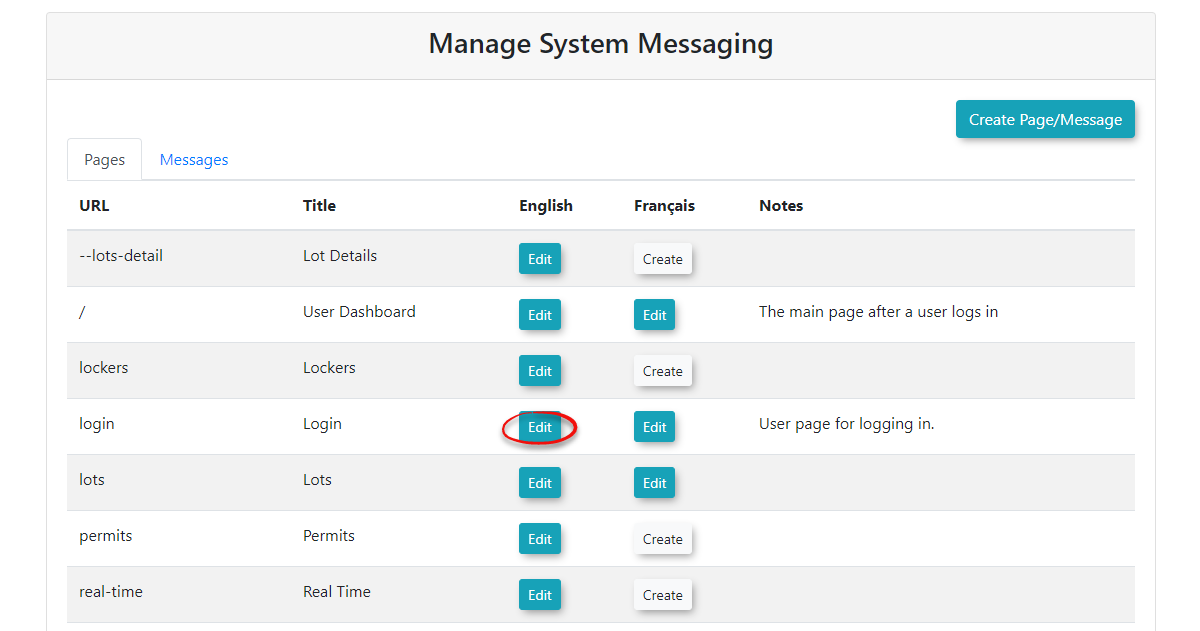
To access and manage your System Messaging navigate to the gears icon  and click on Content & Designs -> Pages and Content Blocks.
Creating Pages
We also provide a video to visually demonstrate how to use system messaging https://drive.google.com/file/d/1DU3qorWnAp_2N9mcNGFYTttNHMeRpXsQ/view
Pages display the visual content found throughout your application. You can edit the contents of your page or post a System Message by using the Disclaimer Shortcode on the Page you want it to show up on. Shortcodes also make it convenient to add interactive content to your pages. For more information on Shortcodes scroll to the bottom of this page.
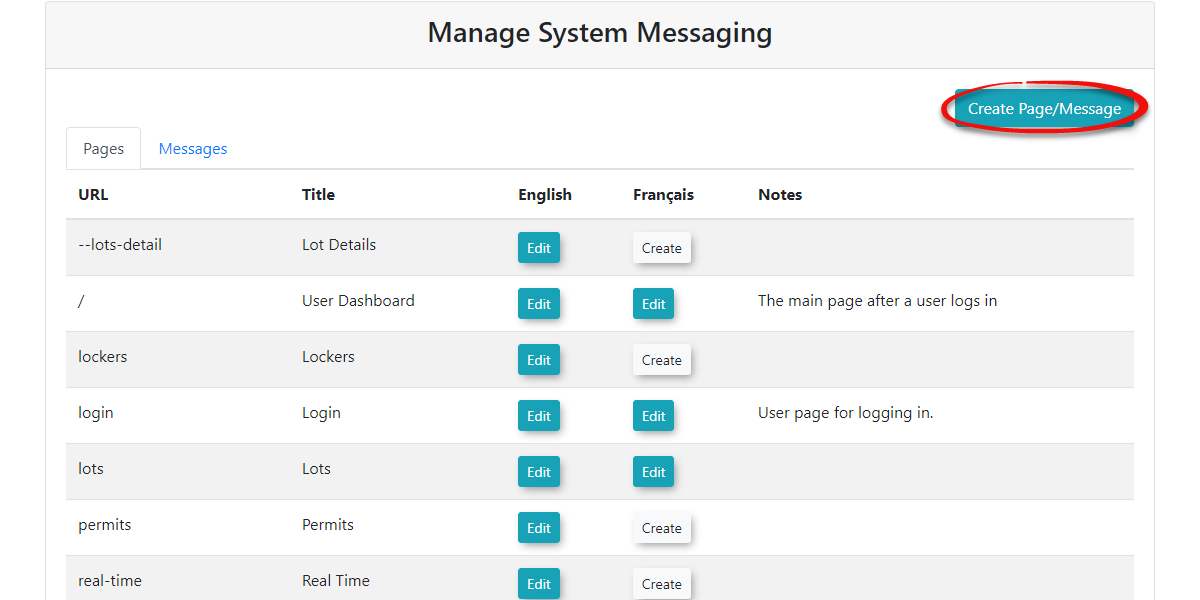
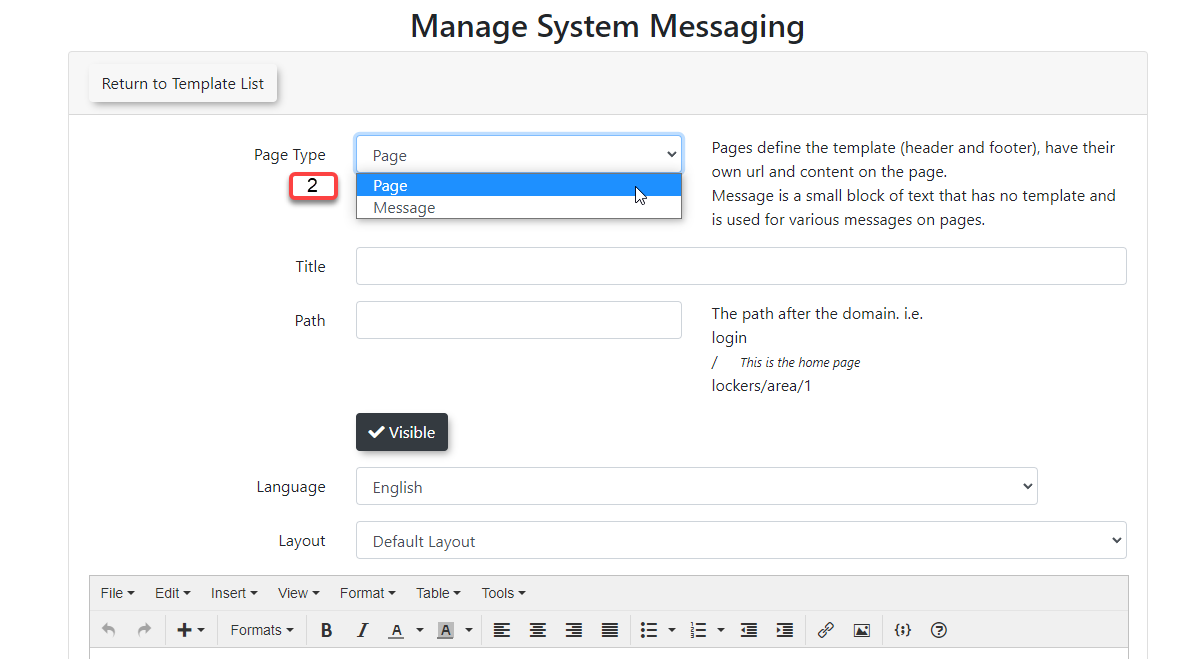
- To create a Page click the Create Page/Message button at the top right of the Manage System Messaging screen. It doesn't matter what tab you're on when you do this as you will specify the Page Type when you go to create the page.

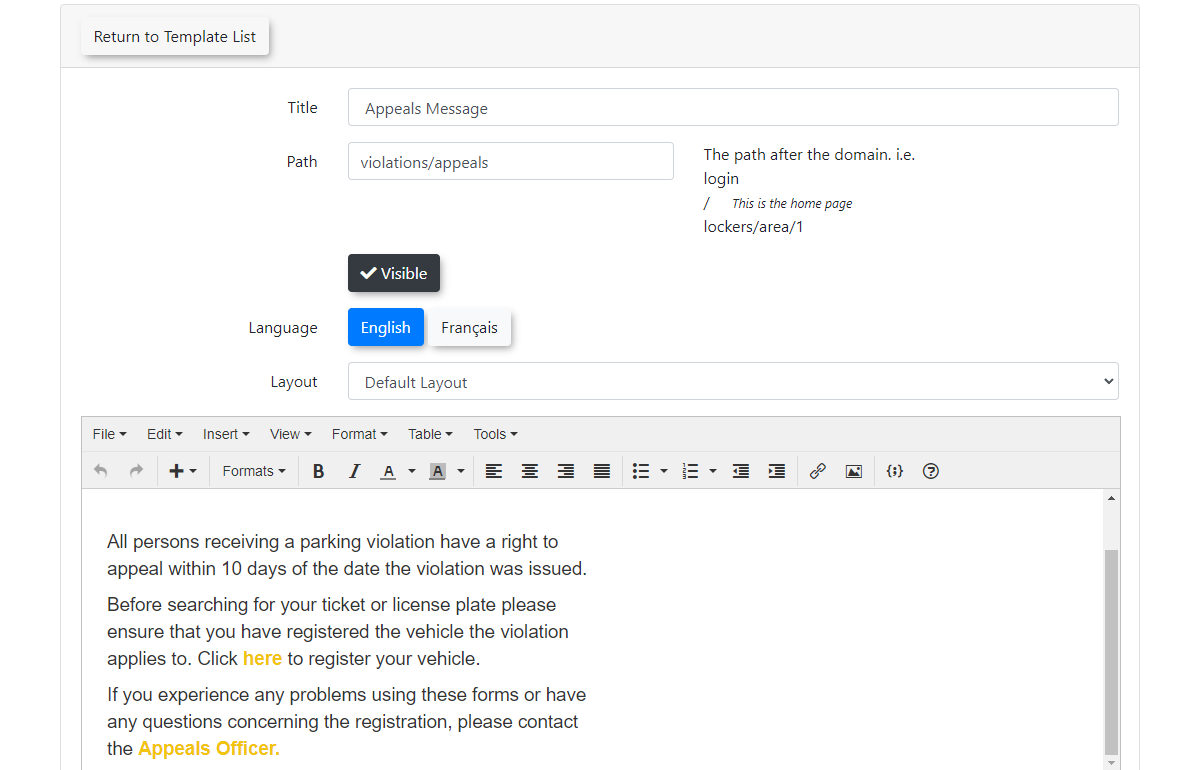
- Once you click this button OPS-COM will take you to a different section where you can set the properties and content of the page. Below is a detailed description of the options available to you when creating new Pages.
| Page Attributes | Short Description |
|---|---|
| Title | The Title of the page you wish to create, which will be the name displayed on the user navigation bar. |
| Path |
The path after the domain. i.e. login/ → This is the home page Changing this to lockers/area/1 will display login/lockers/area/1 as the URL for that page. |
| Visibility | You can toggle the visibility of your pages which will make it so your users can't see the page anymore, but you can still edit it. |
| Language | Use this to select between two language options for a specific page. Tomahawk currently supports English and French. |
| Layout | You can select the layout of your page here. Usually, you will have the Default Layout selected. |
| Content | Your content will be the text on the page you are currently editing. You can also use Shortcodes here to display a body of material or feature. For example, a user login form could be displayed on your homepage. |
- Important: Make sure you select Page under the drop-down menu next to Page Type and not Message. Below we will go into detail on how to create a Page field by field. The images below give you a good visual example of what field is being explained, if there is a certain field you are unsure about you can easily find the picture and read from there.
-
Start by giving your page a Title and specify how you would like the URL at the top of your page to be displayed.

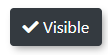
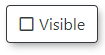
- Adjust the visibility of your page by toggling the Visible button on/off. The Page will still be editable in the System Messaging section but it will not be visible to your users who are on your Page or System Message.
| Toggle On(Visible Page) | Toggled Off(Invisible Page) |
|---|---|
|
|
|


- Toggling the Page as invisible will show it under the Messages tab like seen in the image below to signify it cannot be seen by your users.
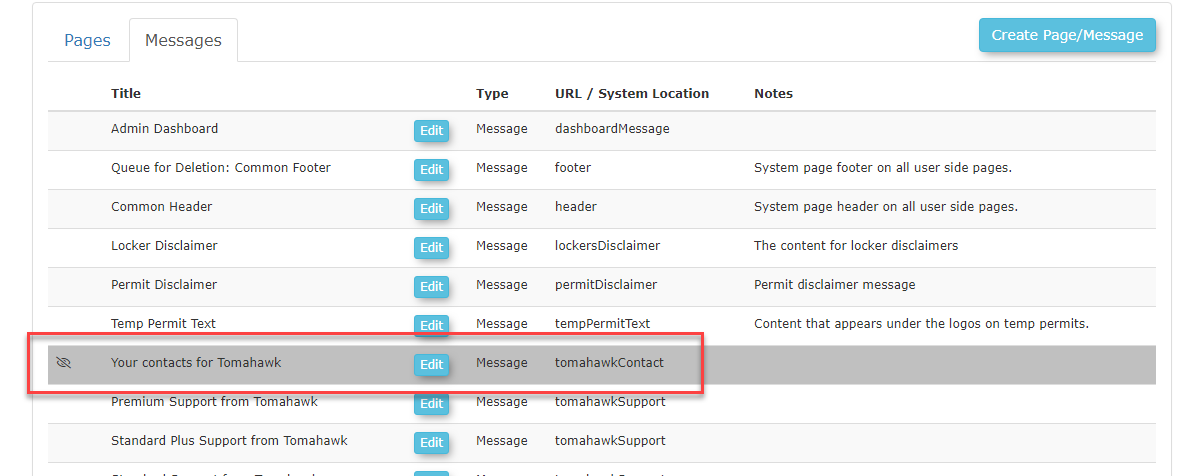
- Select the default Language and Layout of your page. If you are not sure which template to use you can leave it as the Default Layout.

- Provide the content of your page in the editor found under the page settings. This content will be the main content of your Pages; you can use Templates & Design to edit the other sections of your pages such as the Header-Content and Footer-Content.
- OPS-COM uses Shortcodes to display a section of interactive or static content like a user login, permits, etc.

Content Placement
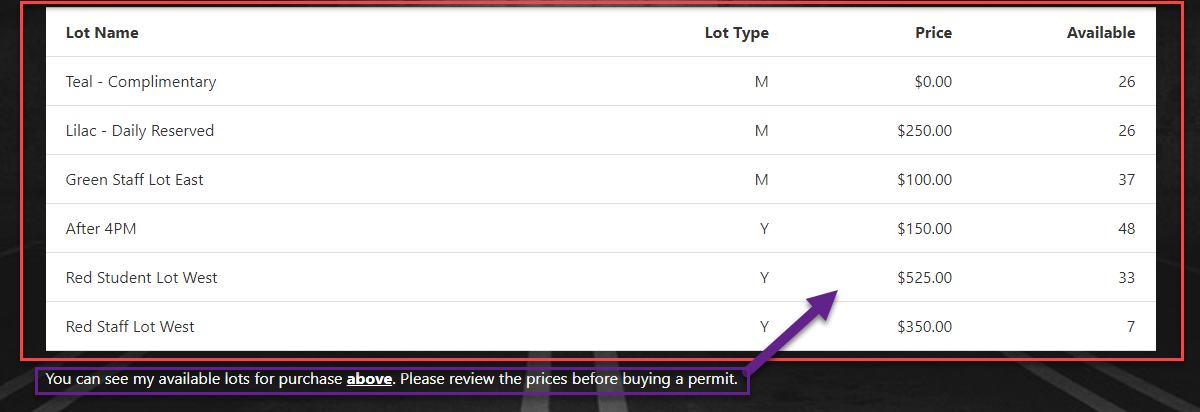
Depending on where you place your content it can appear differently. OPS-COM's smart editor reads content top to bottom, left to right. Meaning that placing a user login Shortcode before your content will look dramatically different than if you placed the Shortcode last. You can see a few visual examples of how this works below.
By Example: Shortcodes Before Content

As you can see this displays our lot information before our content.
By Example: Shortcodes After Content

As you can see this placed the Shortcode after the lot information

Editing Pages
Keep in mind that the URL / System Location next to the page is the area in OPS-COM that you are updating. Therefore, if you wished to update the permit screen, you want to edit the page with a System Location of /permits
You can edit your pages attributes such as the Title, Path, Visibility, Language, Layout, and Content after it has already been created.
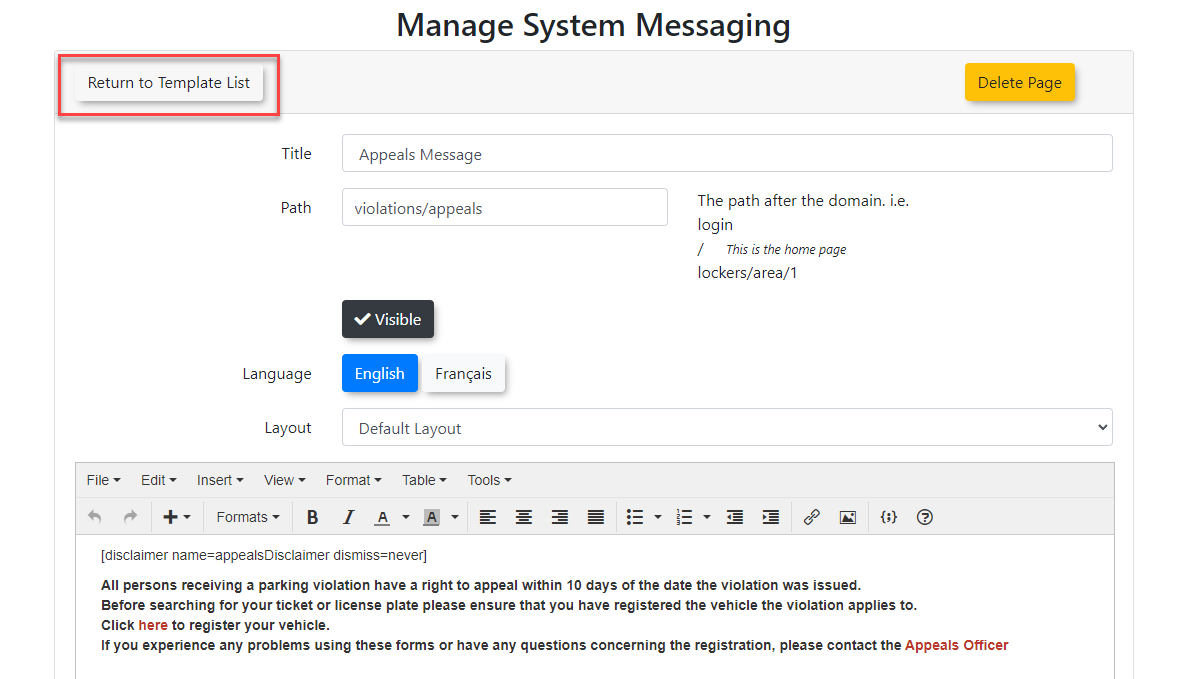
- To Edit a page, simply click on the Edit button next to the page Title you want to edit. As seen in the image below we are going to select and edit the Appeals Message page.

- You can now make any changes to the Pages content or attributes that you like.
See Creating Pages near the top of the page if you are not sure what a specific field does. From here we can edit the format of the text such as the colour, background color, etc..

- If you have not made any changes to the page you are Editing, you may go back to the Page List by clicking Return to Page List at the top of the screen. Clicking this button will discard all changes recently made.

- Once you have finished editing the page, click Save Messaging for your changes to take effect.

Creating System Messages
Important
Users will be brought back to the Users page if users do not agree with a System Message. Meaning, we use System Messaging as a convenient way to offer agreements and disclaimers before users make purchases of permits or lockers.
System Messages and How they work with Pages
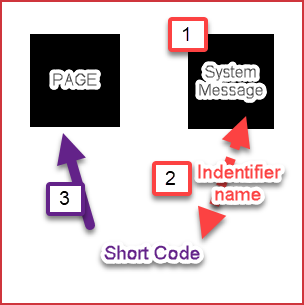
System Messages and Pages work together using Disclaimer Shortcode's. When you create a System Message, you give that message a unique Identifier. System message identifiers may be used in junction with Disclaimer Shortcodes to display your System Messages onto Pages. The idea may be daunting at first, but once you get a better understanding of how these features work together, it will make more sense.
Visual Example
System Messages provide you with a convenient way to add alert messages to your pages that pop-up when a user clicks the page. You may create System Messages to be displayed on specific Pages using Disclaimer Shortcode's.
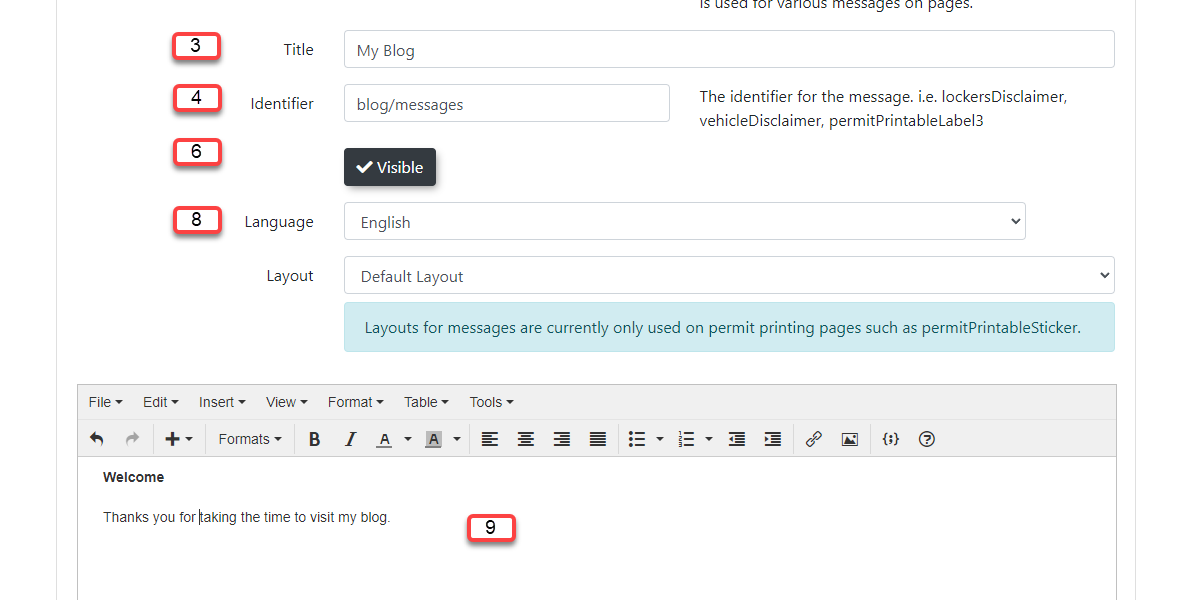
| Message Attributes | Description |
|---|---|
| Title | The title that will be displayed across the top of the System Message when users navigate to that page. |
| Identifier | The identifier is used to know which page you want to display the message by using Shortcodes. |
| Visibility | This section toggles the visibility of your page which will make it so your users may not see the page, but you can still edit it. |
| Language | Select between two language options for a specific page. Tomahawk current supports English and French. |
| Content | Content is what will display on the actual page. You may use Shortcodes here to view predefined static or interactive content. For example, a user login form could be displayed on your homepage. |
- To create a System Message merely click the Create Page / Message button on the top right of the Manage System Messaging screen.

- Make sure to select the Page Type from the drop-down menu and change this to Message. It is essential that you do not select Page when creating a System Message.


- Create a Title for the message.
- Give the message a unique Identifier so it can be accessed on your Pages using Disclaimer Shortcodes. Shortcodes are codes used to link our Pages and System Messages together.
- Once an Identifier is created, It is essential to note that you may not use it anymore or you will get an error message.
-
You may modify the visibility of your System Message by toggling the Visible button on or off.
Toggle On(Visible) Toggled Off(Invisible) 

- Toggling a System Message as invisible ensures your users won't see it. Although, you can still edit and view the System Message on the admin side, but it will be displayed as seen in the image below.

- Select which Language you would like your content to be in. OPS-COM currently supports two languages which are English and French.
- Edit the contents of your System Message in the editor found below the messages fields. This is the content that your users will see and will allow you to edit and format the way the text looks.
Once finished, click Save Messaging.

Warning
Clicking Return to Template List before Save Messaging will discard all the changes you just made, meaning that the System Message will not get created or your changes will not occur.
Editing System Messages
You can manage your System Messages Title, Identifier, Visibility, Language, as well as modify the content to include text, images, or Shortcodes.
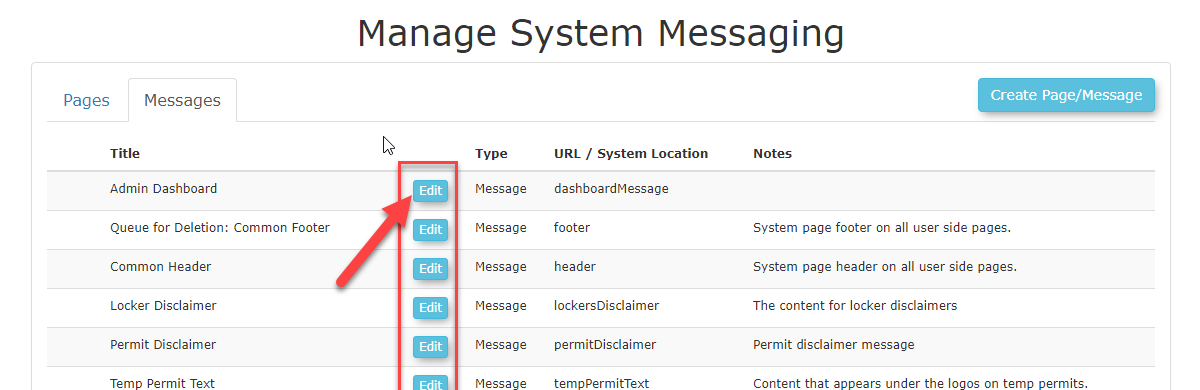
- To Edit your System Messages click the Messages tab under the Manage System Messaging page.
- Select the Edit button next to the System Message you wish to edit. For this example, we will be editing the Admin Dashboard.

-
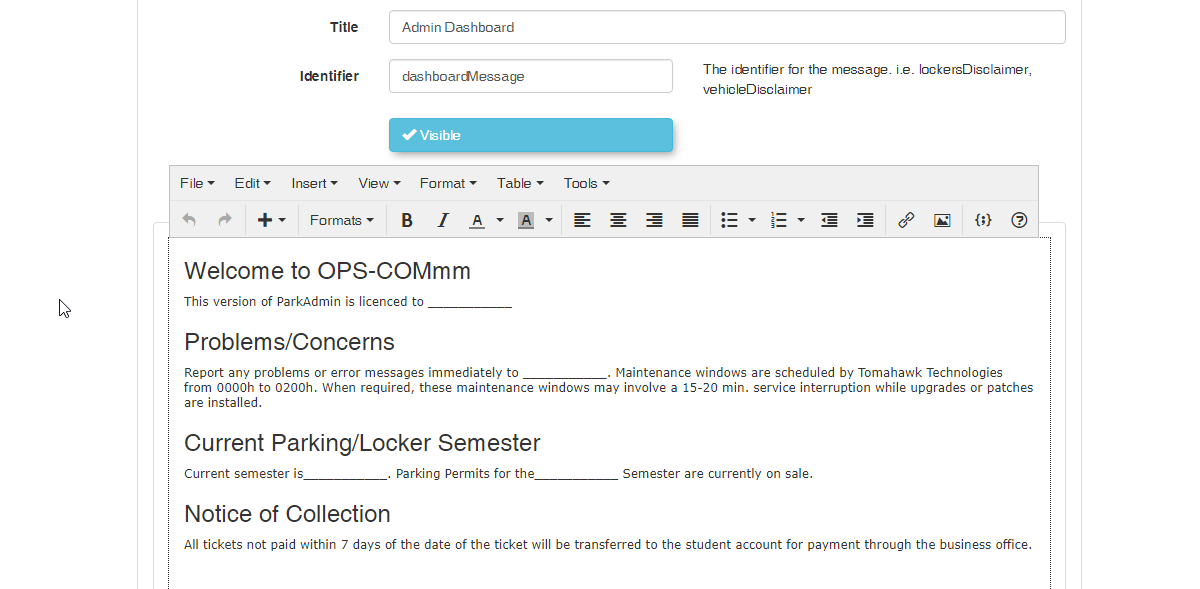
You will now be able to adjust the message your users will see using the System Messaging editor. Below are the fields in which you can use to edit the System Message.
Message Attributes Description Title The title that will be displayed across the top of the System Message when users navigate to that page. Identifier The identifier is used to know which page you want to display the message by using Shortcodes. Visibility This section toggles the visibility of your page which will make it so your users may not see the page, but you can still edit it. Language Select between two language options for a specific page. OPS-COM currently supports English and French. Content Content is what will display on the actual page. You may use Shortcodes here to view predefined static or interactive content. For example, a user login form could be displayed on your homepage. 
- You may use the Title field to change the Title of the System Message.
- You may use the Identifier field to change text used to display a System Message to a Page, but this will require you to modify all Disclaimer Shortcodes using the old unique Identifier for the message you are replacing.
-
You may click Save Messaging when you are finished making your changes.

Add System Messages to Pages using Shortcodes
Now that you know how to create your Pages and System Messages you can bring them together using a Disclaimer Shortcode. A Shortcode is a small body of code surrounded by [ ] used to display complex templates or features. Shortcodes limit the technicality of our system by offering a convenient way to add interactive content without having to know how to script or code.
Please review the Shortcodes for Use on the User Portal for a detailed description of how shortcodes work. You can also find a list of Shortcodes currently available to you by going to the OPS-COM Shortcode Documentation.
Templates and Design
Overview
The User Portal system allows your clients to register, add vehicles, purchase permits and pay violations. It is an important extension of your business, and it should reflect your corporate branding.
Pages and Templates
The OPS-COM user Page will store the functionality and content of your main page, while the Templates will be used to change the functionality of your pages as well as the content around the Page.
Where to Find Templates and Design
Click System Config, Templates & Design to access these features.

All Default Templates
If at any point you feel that you have adjusted the Default <scripts> and <styles> to the point of breaking your site, or you are simply unsure what your changes have done, you can refer to these templates to restore your pages functionality and style.
Understanding Templates & Design
Templates & Designs are the visual functionality of your web page structured around your Page content. OPS-COM provides you with default templates which allow you to get started easily without having to know any code.
- Once you are on the landing page for Templates & Design, you can view a list of your current templates, or create a new one. Templates contain all of the sections found on your User Portal except for the Page content found in the middle of the page. To adjust this you will have to leave Templates & Design and navigate to System Messaging.

- OPS-COM gives you a total of 12 section templates, 6 in English and 6 in French. (Of course, you will have to create the French content yourself as we do not provide a translator).
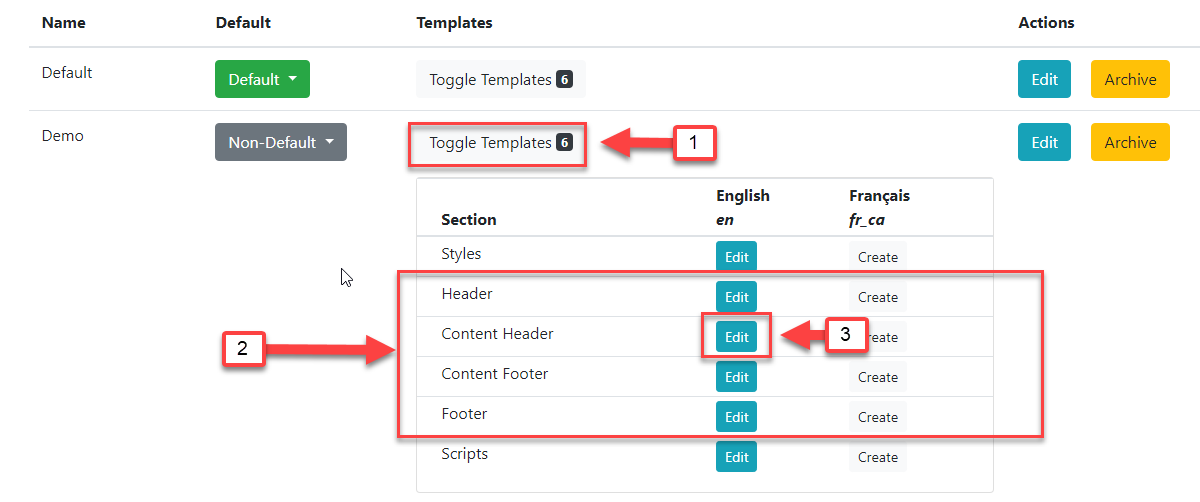
- Clicking on Toggle Templates will display all of the sections attached to that template. Templates can be created in English and French.
- The contents of our pages are split into four separate sections. Header(1), Content Header(2), Content Footer(4), and Footer(5). See Template Layout right below this guide to get a better understanding of the OPS-COM layout.
- To edit a template Section, simply click Edit next to the section name.
Template Layout
Below is a visual example of how your Pages are split into Sections using Templates. All of the Content (3) of our Pages are added through the System Messages under Pages.
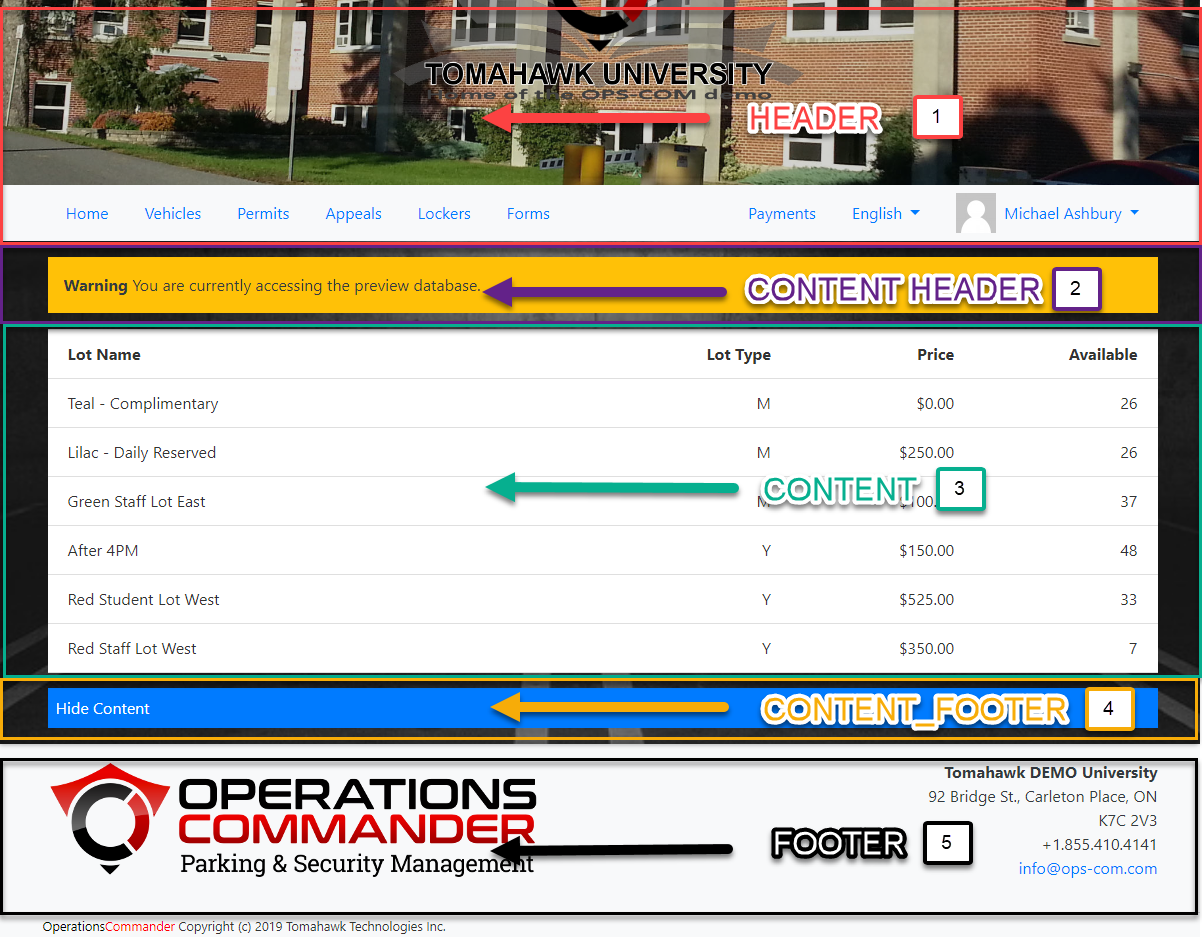
- Header - The header of your page, where you can find your header image and user navigation.
- Content_Header - Another header section for you to place content into, such as alerts or user information. Everything placed here will appear before the Content and Content Footer.
- Content - The content of your pages. Content may not be added from Templates & Design and will require you to navigate to System Messaging.
- Content_Footer - The footer of your Content. Everything placed here will appear after the Content Header and Content. Again, you can use this to display alerts, messages, or additional content to your Template.
- Footer - The footer of your page is where you can find useful information. You can use this area to advertise important information your users might need while using your system.
Page Layouts and Templates
Creating Layouts
To create a layout simply click the Create Layout button found at the top right of the Layouts page.

You will be presented with the Add Layout system message.
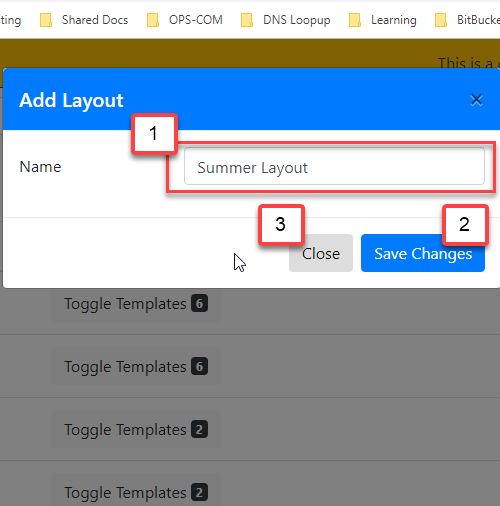
- Provide the name of your layout. In this example, we are going to create our own Summer Layout to be used, instead of the default layout.
- Click Save Changes when you are happy with the name of your layout. Once the Layout has been created, you can see it under the Layouts list.
- If you wish to cancel the creation of your layout simply click Close.
- You can see that our Summer Layout was added to the end of our Layouts List with no sections yet.
- You can choose whether or not your template is the Default template at any time by clicking the Non-Default drop-down and selecting Default.
- Anytime you add sections to your Templates it will display how many are attached next to Toggle Templates. As you can see, we don't have any Sections created yet so there are no numbers to be displayed, otherwise, clicking on Toggle Templates would show you a list of all the templates currently attached to that Layout.
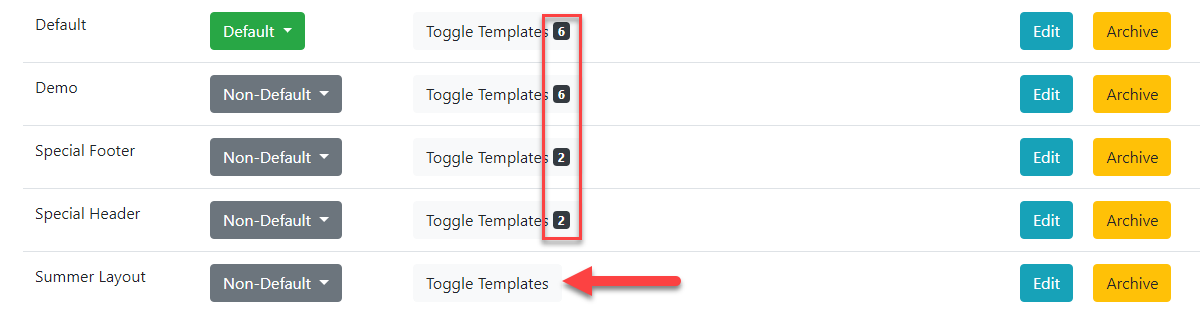
7. You can edit the layout name by clicking on the Edit button next to archive.
8. If you would like to archive a layout that you are no longer using, you can click the Archive button next to edit.
Creating Templates
Now that you have a better understanding of how Templates work with Layouts we can start creating our own.
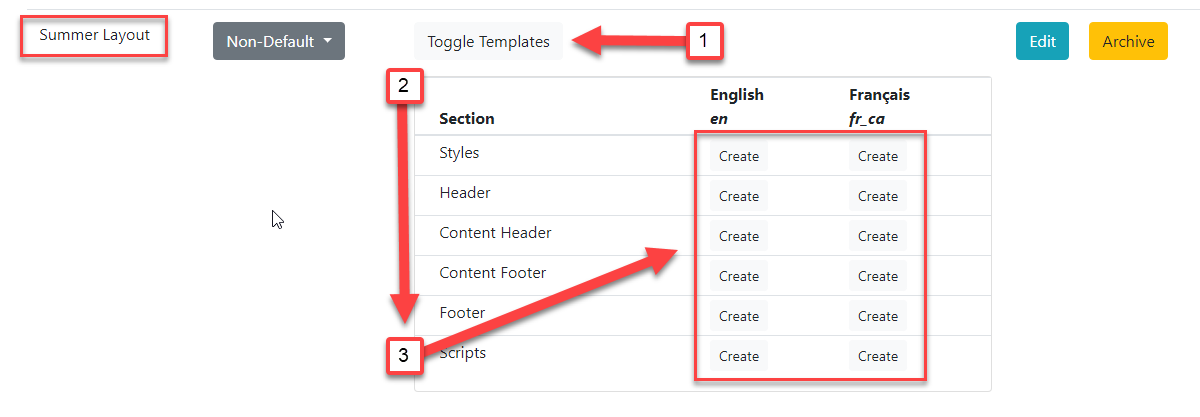
- Click on Toggle Templates.
- Clicking this will display the available Templates attached to the Summer Layout.
- You can now Create a variety of templates for your page, including bilingual support.
- If you are non-technical, it is advised not to change the code for Scripts, Styles, Header, and Footer Templates. You can use the default Style, Script, Header, and Footer Templates from All Default Templates. These can still be edited according to your company and their style guides. See Edit the Page Style and Edit the Page Behaviour below for more information.
Edit the Page Style (CSS)
Important
This guide is used if you intend to adjust the Templates provided to you by OPS-COM. If you choose to rewrite your own Templates you can choose to ignore this.
/* Style properties of our page body, this affects the entire page. */body { background: black url(/uploads/FILES/OC_TOMA/parking-deck.jpg) center center; background-size: cover; background-attachment: fixed; color: #FFF;}/* This changes the color property of --Find where these classes are used .card, .modal, .list-group-item { color: #333;} |
/* Below are all of the styles for our header slideshow at the top of each page. *//*--------------WORD BANK--------------- * ELEMENTS: Elements are the tags with '<>' around them such as <div> and <img> found in the default header and footer template. * We access them here by giving them a Class name or ID. * PROPERTIES: Properties are used to define certain styles to a class or ID. * CLASS: Generally used to assign a style to a group of HTML elements but can be used on single elements as well. * They are assigned within HTML elements like this: <div class="MyClass"></div> where MyClass would be your class name. * ID's: Generally used to assign styles to a single element but can be used on multiple elements as well. * *--------------CLASSES----------------- * * To learn more about the CSS Position Property see: https://www.w3schools.com/cssref/pr_class_position.asp * For more information on CSS Syntax and Selectors see: https://www.w3schools.com/css/css_syntax.asp * It is not recommended to adjust with the position of elements unless you are sure about the changes being made. This can dramatically change how content is positioned. *//* Class Names and Elements * [.slideshow-header]: Container that contains our slides and overlay. * * Properties * @position: Adjust the position of the slideshow-header. For more information see: https://www.w3schools.com/css/css_positioning.asp */ .slideshow-header { position:relative;}/* Class Names and Elements * [.slideshow-header]: Container that contains our slides and overlay. * [.slides]: Controls the style properties of the individual slides. * * Properties * @z-index: Adjust the stack placement of the [.slideshow-header] and [.slides] along the Z axis. * @position: Define the position of the page. * @top:Change in the position from the top of an element. * @left: Change in the position from the left of an element. * @right: Change in the position from the right of an element. * @bottom: Change in the position from the bottom of an element. * @display: Adjusts how the content is displayed on the page. See: https://developer.mozilla.org/en-US/docs/Web/CSS/display and https://www.w3schools.com/css/css_display_visibility.asp * @align-items: Aligns the child elements of this PARENT element to be centered. For a visual example see: https://developer.mozilla.org/en-US/docs/Web/CSS/align-items * @justify-content: Defines how the space disturbed around the child elements. For a visual example see: https://developer.mozilla.org/en-US/docs/Web/CSS/justify-content * * These are the style properties and values of the slideshow header and its individual slides. */.slideshow-header .slides { z-index: 0; position:absolute; top:0px; left:0px; right:0px; bottom:0px; display:flex; align-items: center; justify-content: center;}/* Class Names and Elements * [.slideshow-header]: A container that contains our slides and overlay. * [.overlay]: * * Properties * @z-index: Used to layer elements. Elements with a higher z-index number will appear before elements that are lower. * @position: Set the position property for the element. We recommend you do not adjust this property unless you have knowledge on how the changes will affect your page. * * These are the styles for the overlay, as well as additional properties for the slideshow-header. */ .slideshow-header .overlay { z-index: 1; position:relative;}/*--------------ID'S---------------*//* ID Names and Elements * [#slideshow-header] is the container used to contain the images you have chosen for your header * * Properties * @overflow: * @opacity: * @box-shadow: Create a box shadow for this element. * EX: box-shadow: a, b, c, d(e, f, g, h); */#slideshow-header {} /* ID Names and Elements * [#slideshow-header] is the container used to contain the images you have chosen for your header * * Properties * @width: 100% width will take of 100% of that element. * @position: */#slideshow-header > div { width:100%; position: absolute;} /* ID Names and Elements * [#slideshow-header]: is the container used to contain the images you have chosen for your header. * [div]: Refers to our HTML elements. * [img]: Refers to our images in the slideshow. * * Properties * @width: Defines the width of the images, divs and slideshow-header. A value of 100% will display the image across the entire page. */#slideshow-header div img { width: 100%;} |
Edit the Page Behavior (Scripts)
Disclaimer
Please review the list of supported scripting languages below. If a Javascript vendor is unverified it may break the functionality of your site.
API Integration
Additionally, you can use our API to integrate with pay stations and other devices that will allow you to grab useful information from your users.
Translations
Where are Translations Supported
Currently, translations are only supported on the user side, however, they are managed and set up on the admin side, by admins that have the correct permissions set up to work with languages.
- Translations that are in red, are translations on the adminside which are not yet supported. Since they are not supported you will see them come up in English only until the adminside is supported.
- Translation that are in black, are translations that are on the userside that can currently be changed.
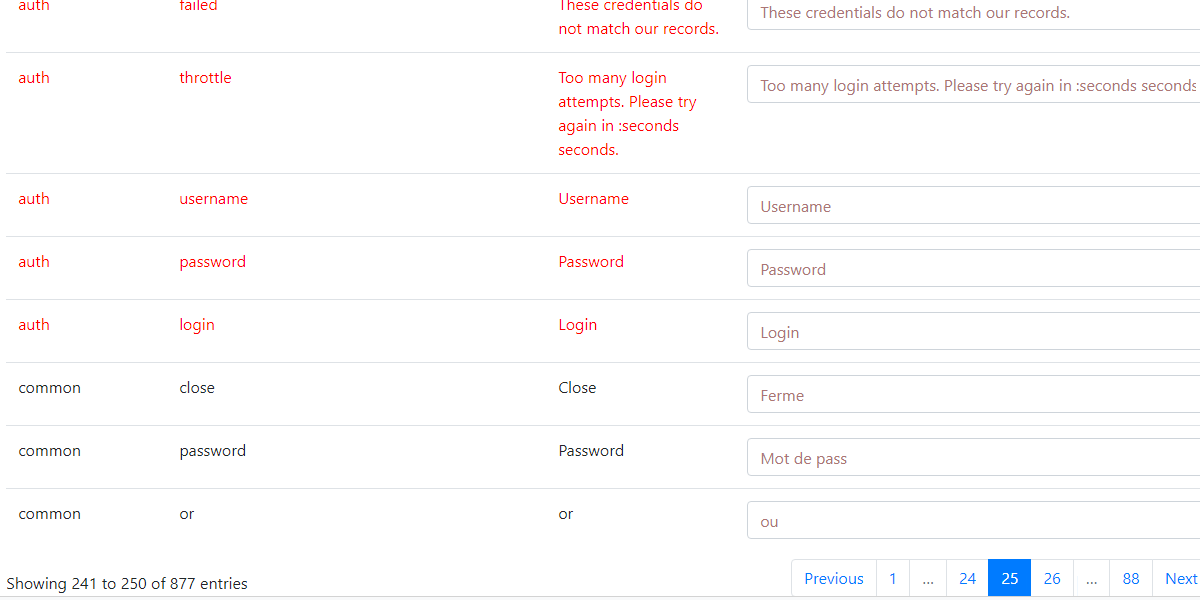
Navigating to Translations
To begin reviewing, editing or creating your translations/languages, you will need to navigate to System Config → Content & Designs → Translations.
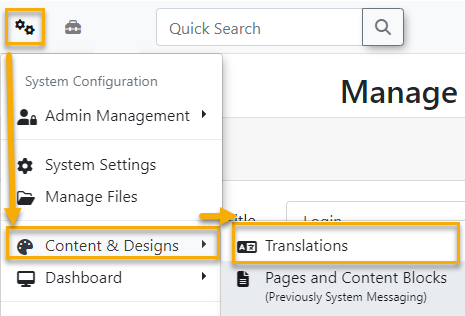
This will take you to the Installed Languages page where you can begin managing your current languages.
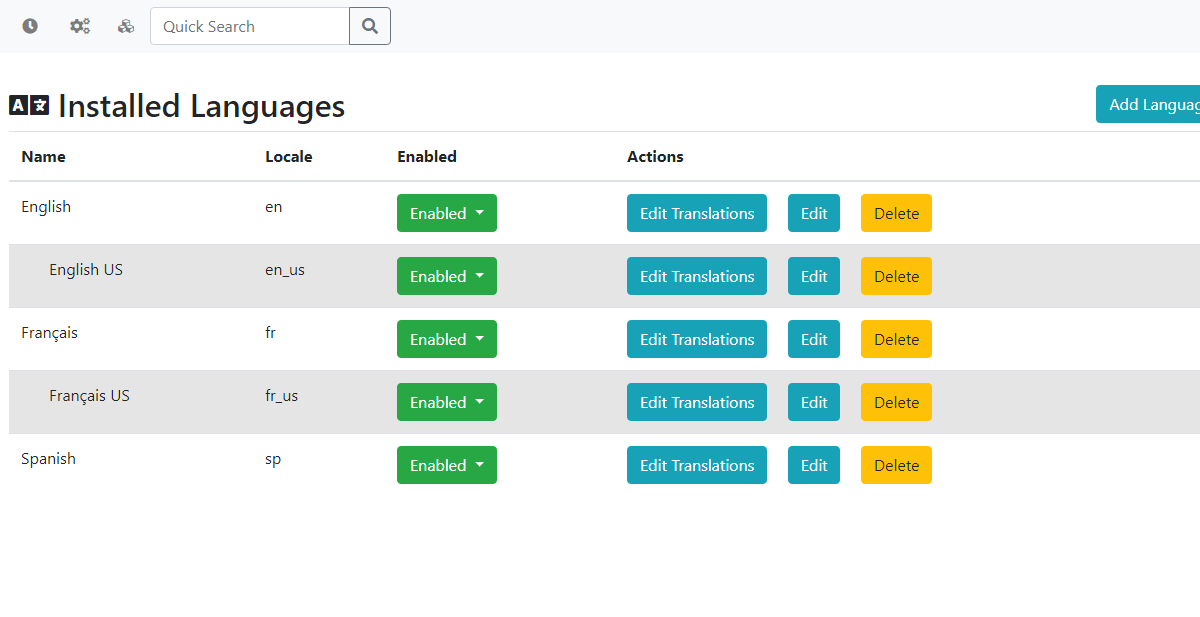
Adding New Languages
To begin adding your own languages simply click Add Language on the Installed Languages page which will bring up a new modal to add a label and locale.
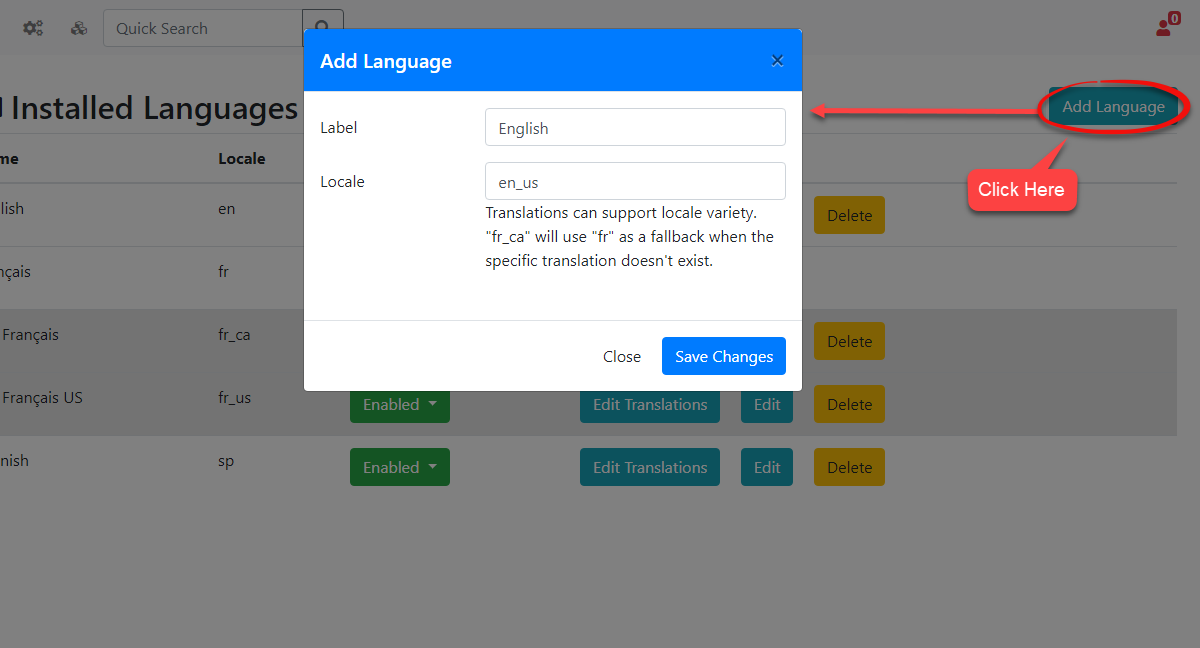
When you are finished click Save Changes and your new language will be instantly added to the list. Once the language has been added, your users can begin using it on the user-side assuming you have the language enabled.
The locales are used when we want to create sub-languages, while the label is used to identify our translations throughout the site.
Adding Sub Languages and How do They Work
Sub-languages are created by using a locale that currently exists with an underscore '_' followed by the sub-language that you want to set up.
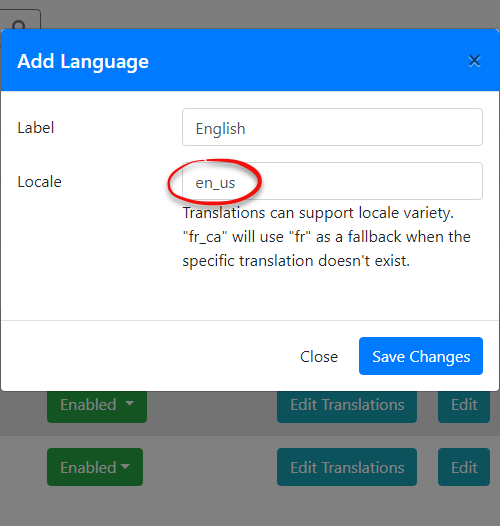
For example, you can support multiple variations of the English language for your users. In the image below I have created a sub-language for American English using the locale en_us.
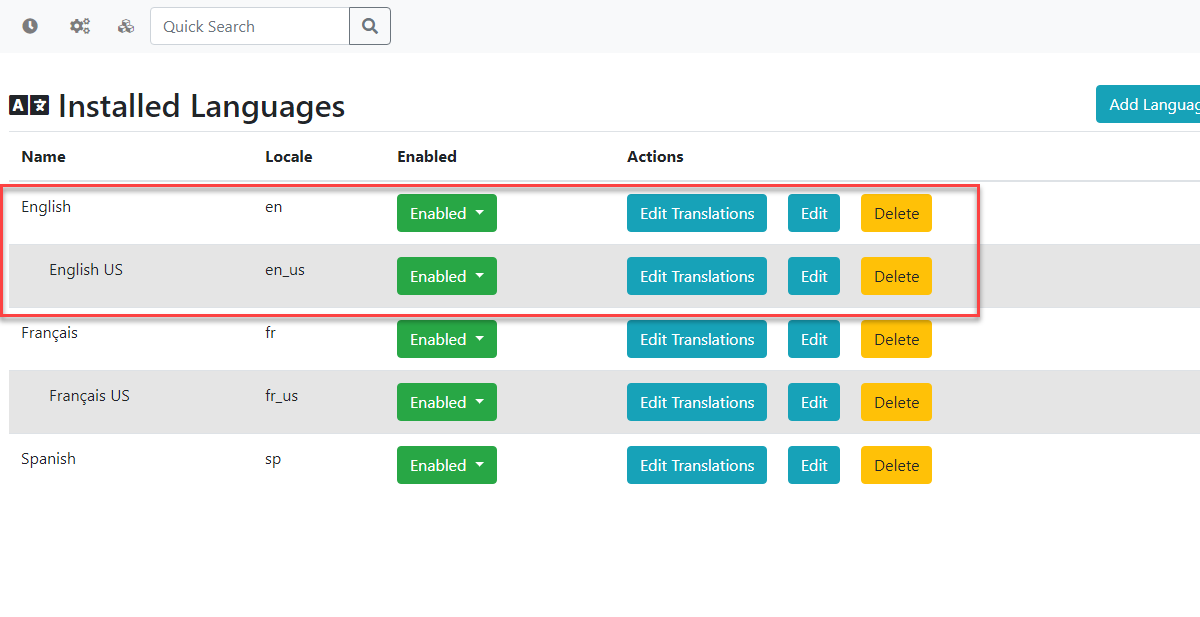
When you create a new sub-language, it will automatically use the translations that have been set up on the main language, which is the locale on the left side of the underscore, such as en_us. You will need to create the main language first before creating any sub-languages, otherwise the sub-language will always default to English instead of the main language you may have intended to use.
Installing Languages
Installing a language will create a new language template with the translations we have set up for it as well as the Name and Locale we have created for you. You can then click Edit Translations to adjust the preset translations to your liking. If there is not a language already in the system that can be installed you will need to add a new language and setup the translations yourself. Currently, we only support the ability to install French and English.
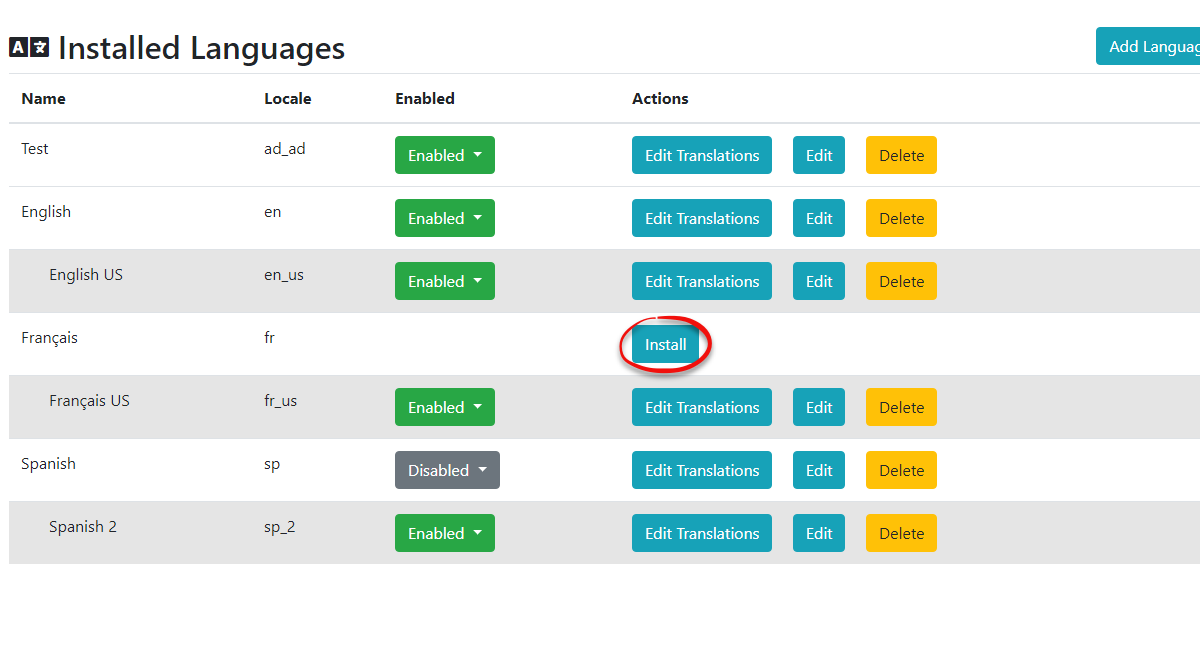
Disabling or Enabling Translations
We can choose to disable particular languages that we don't want to be selectable from the user side. To do this we can toggle the visibly of our languages under the Enabled column on the Installed Languages Page
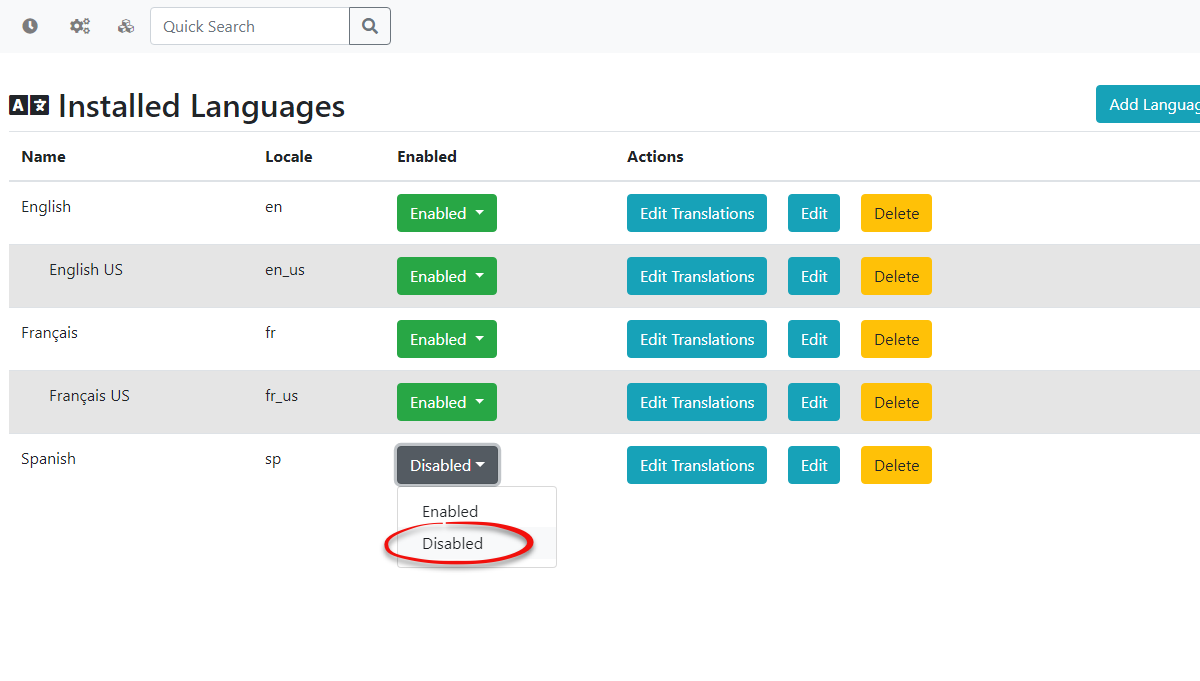
Once a language is toggled as Disabled it can no longer be selected by the users of your site as seen in the example image below.
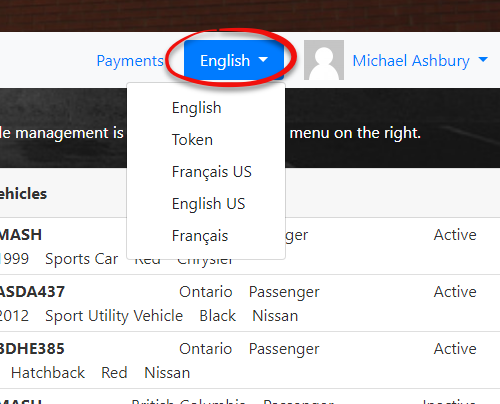
Searching Language Translations
You can search for all translations that relate to a specific component in the system using the search bar at the top right of the Edit Translations page. For example, we can search for permits to find all permit related translations
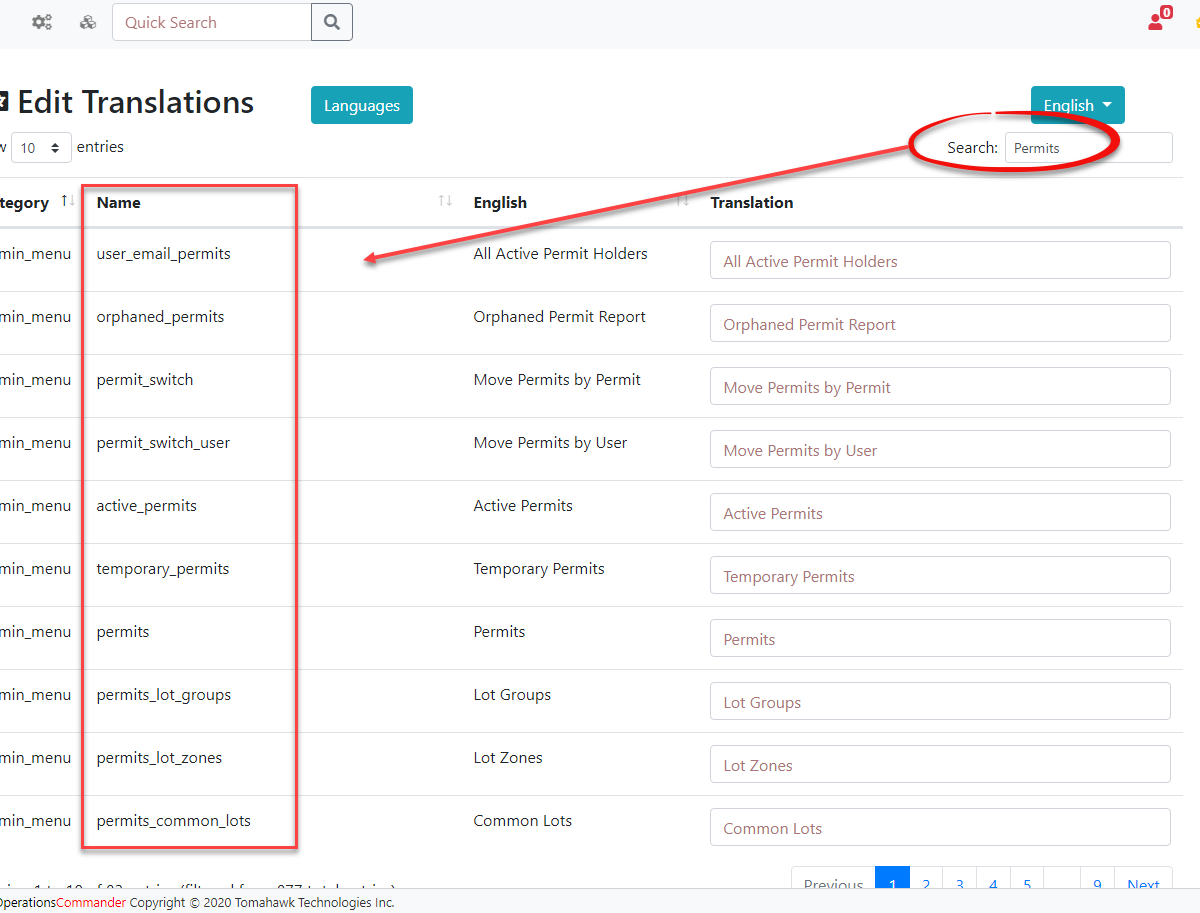
We can also go onto the user side and use the Token language, which will show all of the Names found on the Edit Translations page, under the Name column, (See the image above) to find where that translation exists so it can be changed. This can't be seen by logging is as the user from the user side but requires an admin to go to the profile of a user and click the Login as User button from the admin side. This is to ensure that your regular users don't see the token language option.
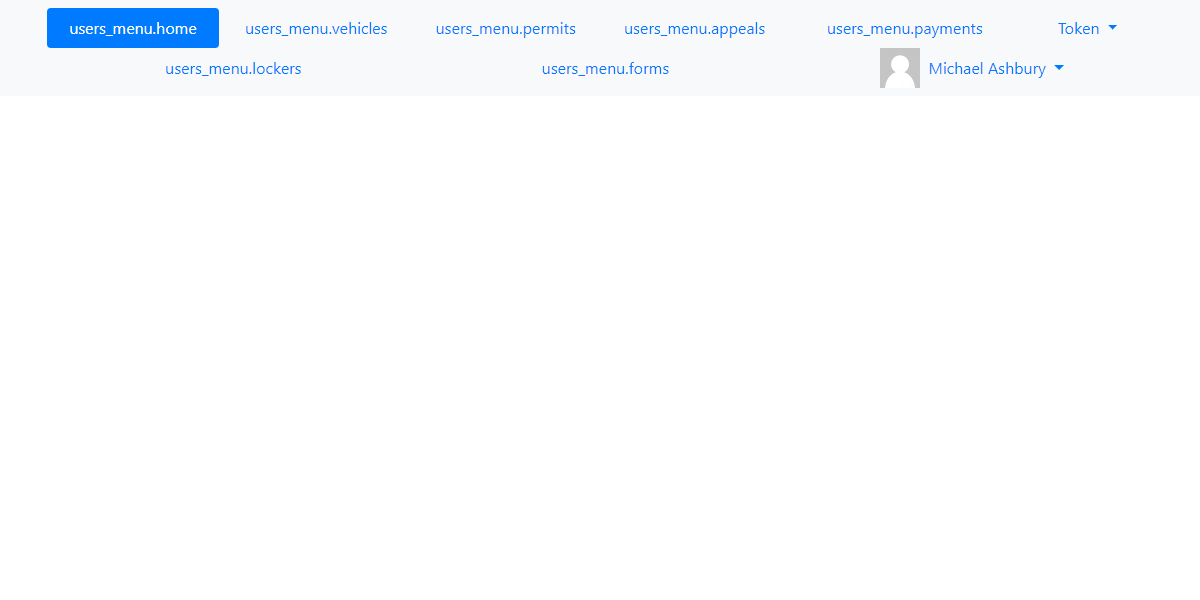
The token language finds the tokens used so you can better search where the translations are being used on the userside.
Edit Translations
To begin editing language translations you have to make your changes and then click away from the input field. Once you do this you will see that the translation gets highlighted in yellow indicating that a change has been made. The number of affected records will also display at the bottom of the translations page.
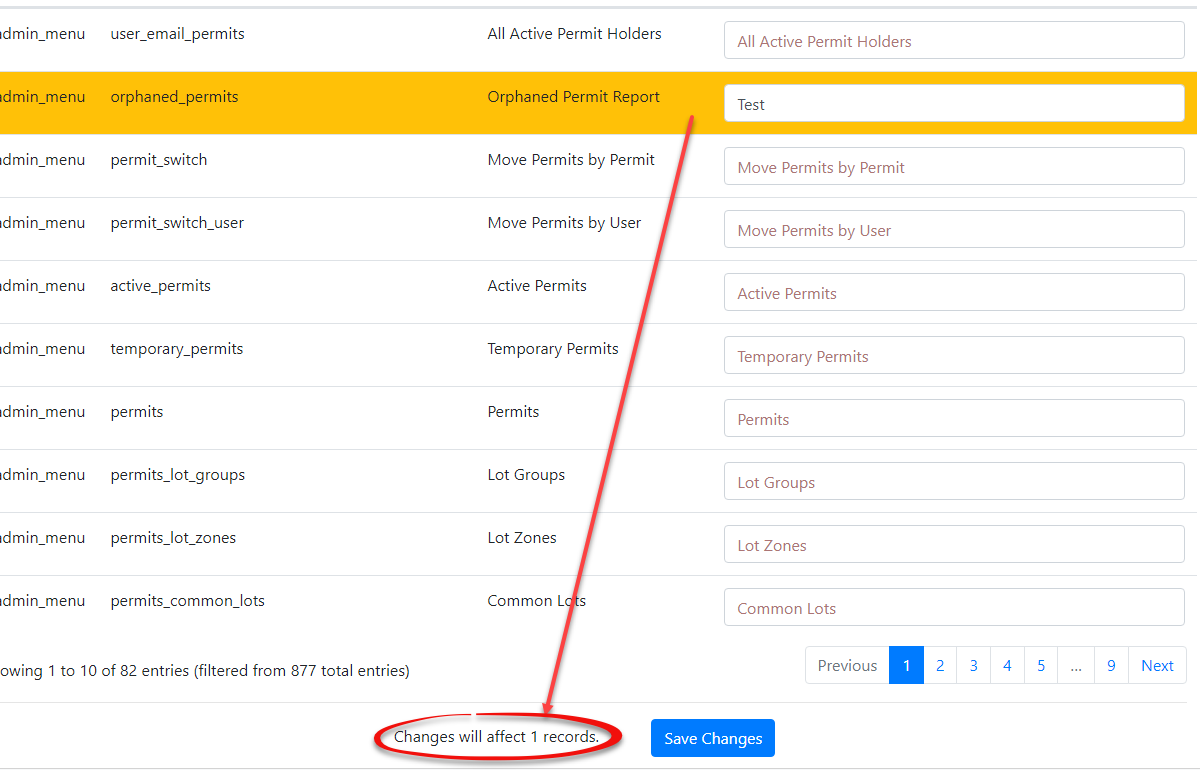
When you are finished making your changes click Save Changes for the update to take effect.
Delete Languages
To delete languages, you can click the delete button next to the language you want to remove. Keep in mind that if you remove the base English and French language it can be re-installed. However, if you delete a language that we do not provide you, then this data will be lost and you will need to contact support for assistance with recovering these translations.
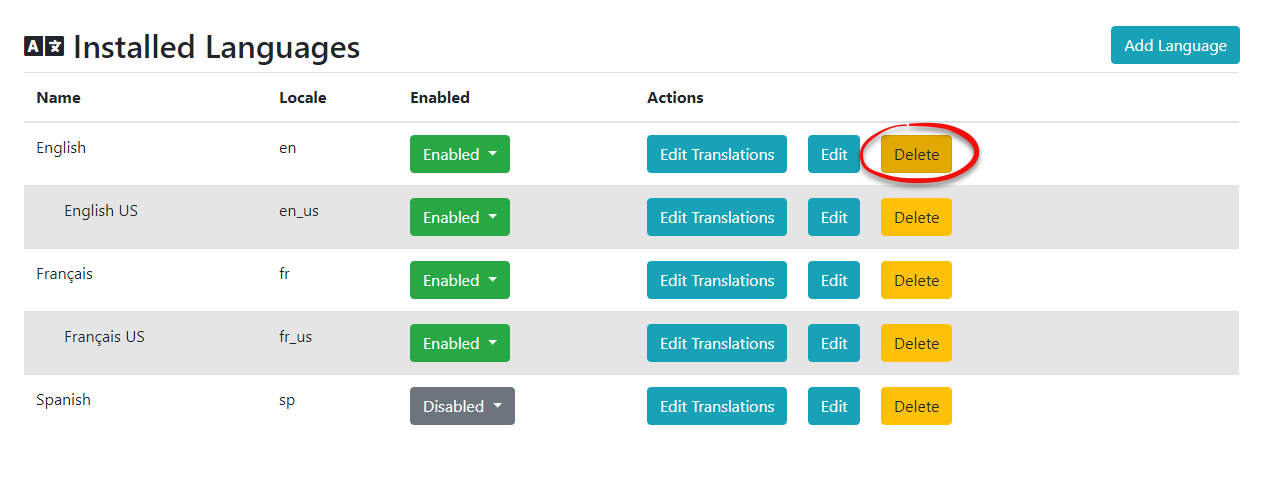
Keep in mind that deleting a language will not delete any of the sub-languages you may have created. For example, if I were to delete English, the English US language would still remain with all of its translations.
Creating Templates and Messaging for New Languages
It's important to note that when you create a new language it will not rely on the default templates and system messaging that you have setup for your previous languages. For example, if I use the new French American language I created, and go onto the userside where languages are supported, then I will see a blank template as well as blank messages.
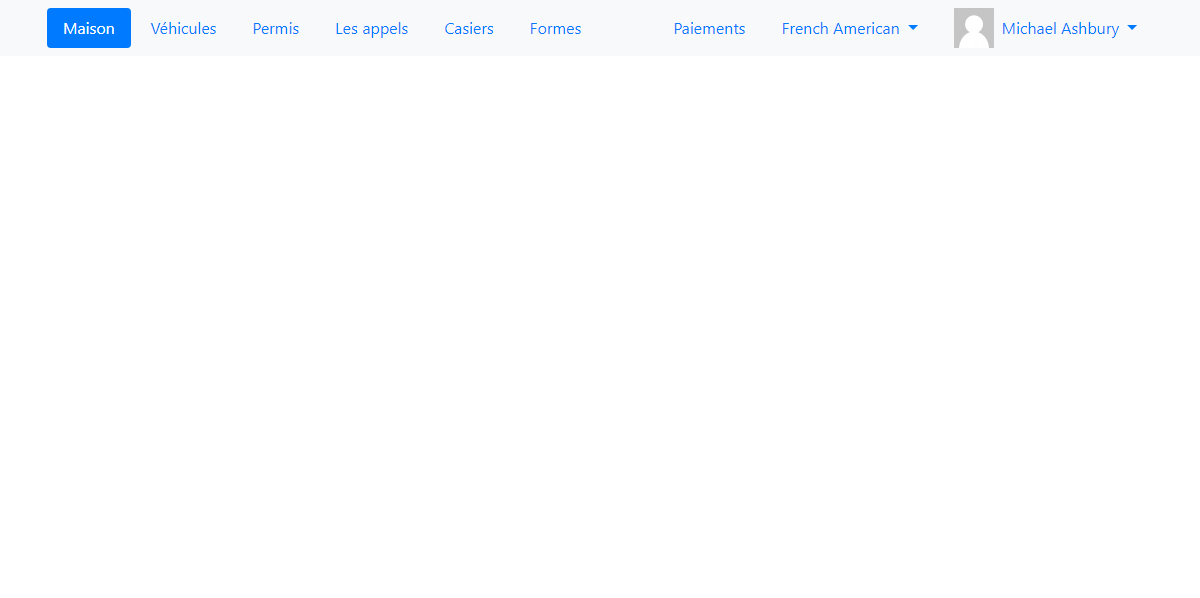
Adding Templates
To add a new template for your languages that you create you will need to go into Templates & Design followed by Toggle Templates for the templates that are currently being used. From there you will have the option to click the Create button to add the new template. If you just want your new language to use the same template, from a language that is already in the system, just go into Edit and copy the text over into your new language, after clicking the Create button.
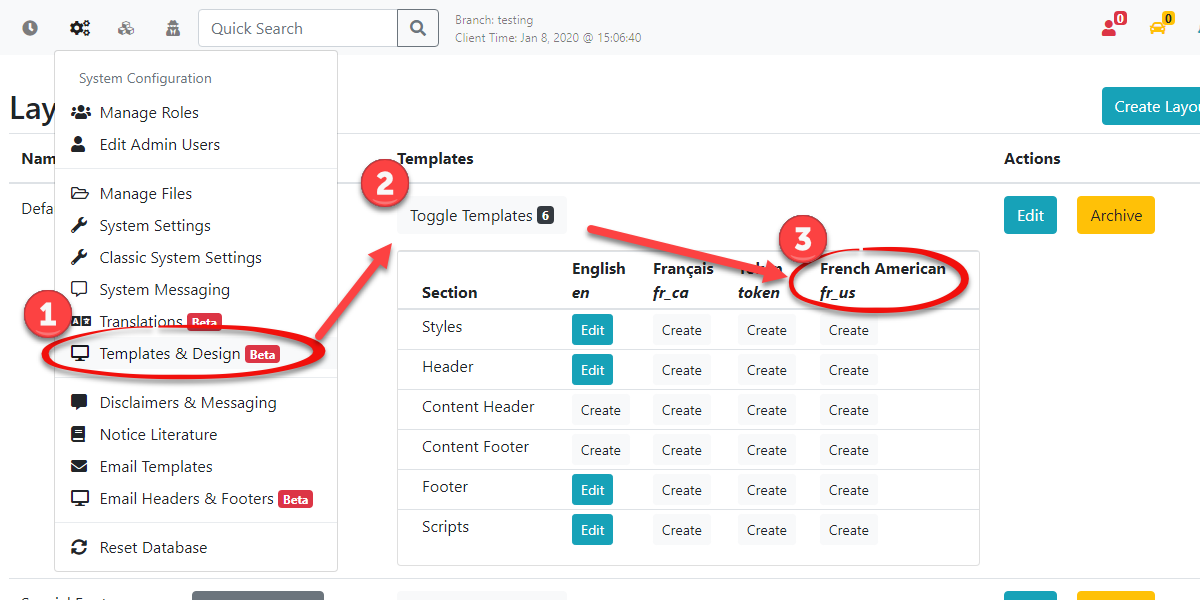
Adding System Messages
System messaging will work a bit differently than templates as you will need to go into each individual message and click the Edit button next to that message
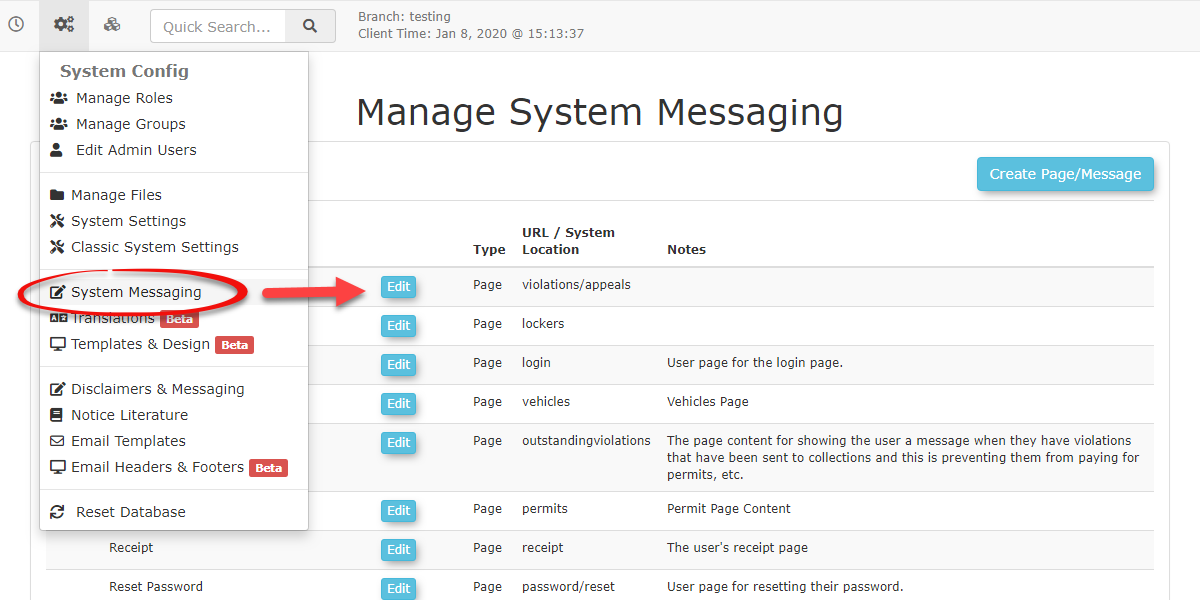
From there you should be able to select your new language.
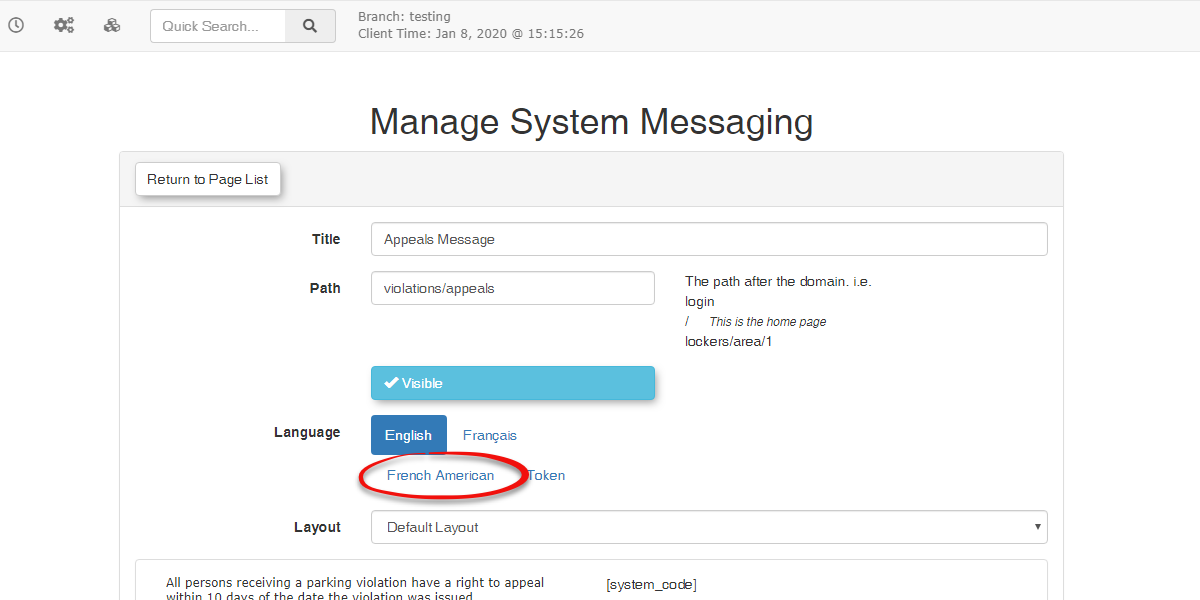
If you want multiple messages to display for all your languages you will need to create a new system message and type out the translations for that language template.
Changing Terminology Using the Translator
There is another use for the translation tool that may not be obvious at first. Since the translator is essentially a list of code terms and a corresponding list of what is actually displayed on any page not only can you edit the various languages but for each language you can also edit the display term to fit a local "version" of the term. A perfect example of this is in some areas one might refer to recieving a "ticket" as receiving a "citation". It is entirely possible to replace any spot in the interface where the term ticket is used with the term citation.
To do so go into the language editor and search for the term you wish to localize. In our example simply enter ticket in the search bar and hit return. A list of all translatable instances of the word ticket will appear. Click the box where the term is editable and type in your preferred term. In this case we are changing Manage Ticket Categories to Manage Citation Categories. Once you save the changes you have made the displayed text associated with Manage Ticket Categories will display as Manage Citation Categories throughout the system. You may edit the remaining instances of the word Ticket that are in the list before saving to change the term in bulk for all entries listed.

Taxes
This page allows administrators with appropriate roles and permissions to configure the tax percentage calculated and charged to users when making payments in OPS-COM.
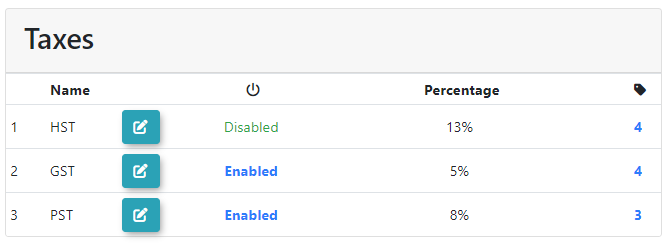
You can find the taxes page under the System Configuration → Payments → Taxes.
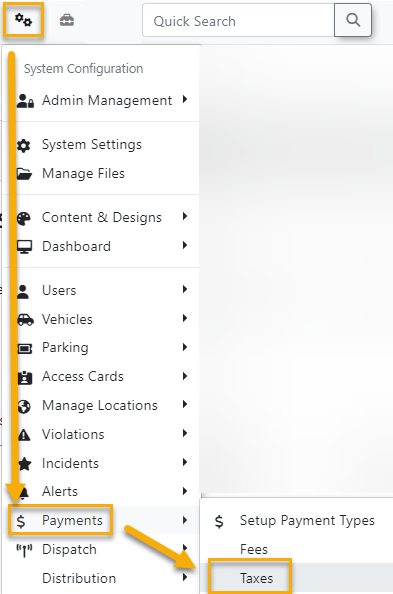
When editing a tax type, there are multiple settings:
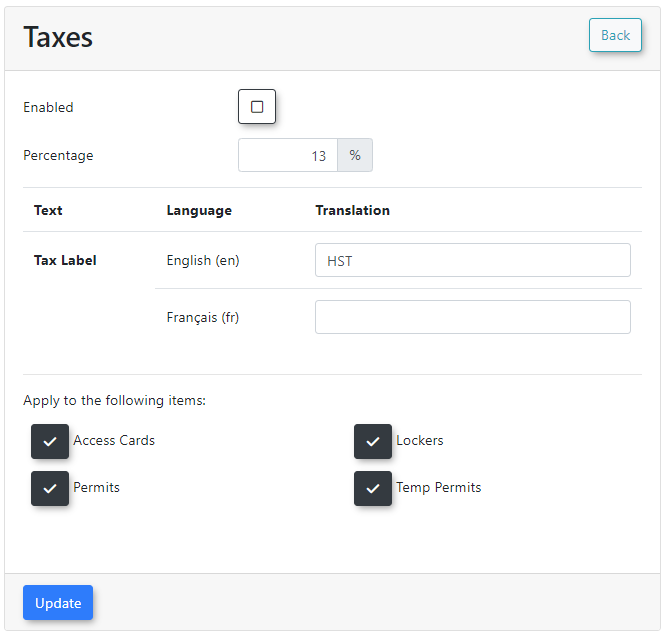
-
Enable: Check or uncheck whether or not this tax type is enabled (checked) or disabled (unchecked).
-
Percentage: The percentage of taxes calculated
-
Tax Label & Translation: How this tax will be displayed to users in the cart/checkout process. Multiple languages supported.
-
Apply to the following items: Check the system modules you want tax to be applied to.