# System Configuration # Roles and Permissions ## Roles and Permissions There are three menu options under the **System Configuration** -> **Admin Management** menu; **Manage Roles, Manage Groups** and **Edit Admin Users**. Click the **Manage Roles** button to begin. [![image.png](https://opscom.wiki/uploads/images/gallery/2024-10/scaled-1680-/siLimage.png)](https://opscom.wiki/uploads/images/gallery/2024-10/siLimage.png) The **Manage Administrator Roles** screen displays. The Primary Administrator role will be available to select. This role will allow you to create new Roles and assign them to other Admin Users. Click the **Add New Role** button. Enter the ***Role name*** and the ***description*** for that role. The description will become the rollover tool tip that displays when you mouse over the **Edit Role** button of an existing role. Click Save Role to save. [![image.png](https://opscom.wiki/uploads/images/gallery/2024-06/scaled-1680-/HfSimage.png)](https://opscom.wiki/uploads/images/gallery/2024-06/HfSimage.png) You can ***edit*** any role by clicking the **Edit Role** button. You can edit the ***Role Name*** and ***Description*** for any Role except Primary Admin. Click the **Permissions** button to edit the permissions for any role. The **Editing Permissions** screen will display. The number next to the icons across the top bar indicate how many permissions in that category have been selected. The icons mirror the OPS-COM menu. Click an icon to display the permissions in that category. [![image.png](https://opscom.wiki/uploads/images/gallery/2024-06/scaled-1680-/FVUimage.png)](https://opscom.wiki/uploads/images/gallery/2024-06/FVUimage.png) To select a permission, enable the check box next to that permission. Once you have gone through each icon and selected all the permissions that are required for the role, click **Save Permissions**. That role is now created. You can assign this role to one or more users. Click the **System Config** menu and select **Edit Admin Users**. The **Manage Administrator Users** screen displays. From this screen you can create a new user or edit an existing one by selecting the appropriate option from the dropdown list. Click **Retrieve** to display the user options below. [![image.png](https://opscom.wiki/uploads/images/gallery/2024-06/scaled-1680-/6Suimage.png)](https://opscom.wiki/uploads/images/gallery/2024-06/6Suimage.png) Add or confirm the User information on the left and select the roles to apply to that user on the right. You can add a comment for any relevant notes about the user. Click **Update User** when you are finished. # New Page # Permissions in OPS-COM
## User Management Permissions
Permission NamesDescription
View UsersAllows the admin user to view, but not change, the users in the system. User Search functionality is enabled.
Edit Users Allows the admin user to edit users in the system including new User Registration. This should be used with the 'View Users' permission. - If 'View Users' is enabled, Admins can see the user history including Permits and Violations issued (but not the details) and any payments outstanding for this user. - If 'View Users' is not enabled, Admins can only use the User Registration portion and cannot search for existing users.
Delete User Aliases This permission allows users to Update User Aliases. It cannot be used without 'View Users' and 'Edit Users' turned on.
Edit Vehicle Information Allows Admin to update vehicles and view the vehicle's history. Admins can also do a Plate Search from the User Management menu. In addition, Admins can see the DNTT reports.
Edit FormsAllows Admins to create, update and view forms.
View FormsAllows Admins to view all forms and see the user-submitted entries of forms. Users cannot create or edit forms without the 'Edit Forms' permission.
Clear Alarms on User ProfileAllows Admins the ability to update and clear alarms on the user's profile. This must be used with 'View Users' and 'Edit Users' permissions enabled.
Send Bulk EmailAllows Admins to send email messages to various groups of Users.
## Locker Permissions
Permission NamesDescription
Building AreasAllows the Admin user to view buildings and building areas and add buildings and building areas. You must use this with the 'View Lockers' permission.
View Lockers Allows the Admin to view lockers and look at locker history. As well the Admin can see lockers awaiting payment.
Edit Locker Information Allows users to edit the locker information.
Allocate Lockers Ability to allocate locker numbers to a building area.
Edit Locker AllocationsAllows creation and editing of locker sales windows, allows Admin users to view active locker sales window
Allocation Locker - Single Admins are able to add new buildings and building areas, able to create and update certain lockers. You must have 'View Lockers' enabled to use this permission effectively.
## Parking Permissions
Permission NamesDescription
Pricing & Lot AdministrationAllows Admins to create and edit lots. This permission will not work by itself. The Admin must also have the following permissions: - View Permits - Edit Permits - Allocate Permits - Edit Permit Allocations
View PermitsThis allows the Admin to view Permit records, do Permit Switches and to view waiting lists.
Edit PermitsThis allows the Admin to edit Permit details. This permission allows access to most functions that relate to permits.
Allocate PermitsGrants the ability to allocate permits to different lots. This permission will also grant all privileges of the 'View Permits' permission.
Edit Permit AllocationsAllows access to edit the Permit Allocation Sales Window and the Active Permit Sales Window.
View Access CardsAllows the Admin to view Access cards. This will not work without the 'View Permits' permission enabled as well.
Edit Access CardsAllows the Admin to edit Access cards. This will not work without the 'View Permits' permission enabled as well.
Add Access CardsAllows the Admin to add Access cards. This will not work without the 'View Permits' permission enabled as well.
Prorate Permit PurchasesAllows the Admin to prorate permit purchases for the end user. This cannot be used without 'User Management' permissions and 'Edit Permits' enabled.
Create Temp Permit EntriesAllows Admins to use the Parking Validation utility. Please note,
## Violations Permissions
Permission NamesDescription
View Violations Allows the Admin to see information about violations including, basic user details and details of any payments.
Edit Violations Allows the Admin to search for violations. This permission requires 'View Violations' to see the details.
Edit Violation ticket number Grants the ability to edit a violation number if you also have the 'View Violations' permission.
Display as Ticket WriterGrants the ability to be a ticket writer on the Handheld or the Web if the Admin also has the 'Add New Violations'.
Add New Violations Allows the Admin to issue a violation. The Admin must have the 'Edit Vehicle Information' permission found in the User Management section.
Grant Violation Appeals Gives the ability to manage Appeals and grant them. The Admin must have the 'View Appeal Reports' permission as well.
View Appeal Reports Allows the Admin to view Appeal reports for different officers. Admins must also have the 'View Violations' and 'Edit Violations' permissions.
Issue / View Violation Notices Allows the Admin the ability to issue and View Violation Notices.
Manage Collections Grants the ability to manage the collections process for violations.
View Violation Reports Allows the Admin to view financial and statistical reports regarding violations. Admins must have the 'View Violations' permission as well.
## Incident Permissions
Permission NamesDescription
Add/Edit Contact History User Notes Grants the Admin the ability to add / edit notes in contact history. You must have User Management permissions to use this since it is accessed through the user profile.
Delete User Contact History NotesGrants the Admin the ability to delete User notes in contact history. You must have User Management permissions to use this since it is accessed through the user profile. You must also have the 'Add/Edit Contact History User Notes' permission.
View All IncidentsThis is a master permission that grants the ability to view all Incidents. This permission is normally used for high-level Admins as it grants access to all information.
Add IncidentsAllows the Admin to add incidents and have an incident reported on their behalf.
Delete IncidentUSE WITH CAUTION - This permission should only be added to a Primary Admin. If this is enabled the Admin can remove the incident and all related records and files where they are not used in other reports. There is a button on the incident to "Delete Incident".
Open IncidentsAllows the Admin to open incidents that are closed. This requires the 'View all Incidents' permission. This permission is normally used for high-level Admins.
Edit IncidentsGrants the ability to edit Incidents. This requires the 'View all Incidents' permission. This permission is normally used for high-level Admins.
View Incidents - SelfAllows the Admin to view Incidents if they are listed as the reporter.
Edit Task Notes on IncidentsGrants the ability to edit comments on Incident tasks. Requires the 'View all Incidents' permission.
Edit Incident summariesAllows the Admin to edit Incident Summaries. Requires the 'View all Incidents' permission.
Incident AdministratorGrants the ability to view and edit incidents. This permission is normally used for high-level Admins.
View/Edit Confidential InformationAllows the Admin to View/Edit Confidential Information on reported incidents. Requires the 'View all Incidents' permission.
Be assigned Tasks DirectlyAllows the Admin to be assigned as an investigator for an Incident.
Edit Incident TasksGrants the ability to edit Incident Tasks. Requires the 'View all Incidents' permission.
Close Incidents / ChecklistsGrants the ability to close Incidents and Checklists. Requires the following permissions: - View all Incidents - Incident Administrator
Assign Incident to Case ManagerAllows the Admin to Ability to assign a Case Manager to an Incident. Requires the 'View all Incidents' permission.
Assign Incident To An InvestigatorAllows the Admin to assign an Investigator to an Incident. Requires the 'View all Incidents' permission. This permission is normally used for high-level Admins.
Assign Incident To A Different InvestigatorAllows the Admin to assign a different Investigator to an Incident. Requires the 'View all Incidents' permission. This permission is normally used for high-level Admins.
Is Incident Case ManagerAllows the Admin to be listed as a Case Manager that can be assigned to an Incident.
Is Incident Shift ManagerAllows the Admin to be listed as an Incident Shift Manager. This will require some other high-level permissions as required for the job.
View Incidents Distribution ReportsGrants the ability to view the Incident Distribution Reports.
View Incident ReportsGrants the ability to view all Incident Reports in OPS-COM.
View Incident In-House ReportGrants the ability to view the Unpaid In-House Incident report.
Export Incident ReportsGrants the ability to export the Recent Incidents Report and the Sub-location Report to Excel.
## Dispatch Permissions
Permission NamesDescription
View License Plate AlarmsAllows Admins to view License Plate alarms.
Receive License Plate Alarms via emailAllows Admins to receive Plate Alarms via email if they also have subscribed to the Alarms list.
View People AlarmsAllows Admins to view People alarms.
Receive People Alarms via emailAllows Admins to receive People Alarms via email if they also have subscribed to the Alarms list.
Add New Dispatch LogsGrants the ability to add dispatch logs.
Edit Dispatch LogsGrants the ability to edit the Admin's own dispatch logs.
Edit All Dispatch LogsGrants the ability to edit the dispatch logs of other Admins.
Open Dispatch LogsAllows Admins to Open dispatch logs.
View Dispatch LogsAllows Admins to View dispatch logs and close log records.
Add/Drop Dispatch LogsGrants the ability to remove the association of a Dispatch Log with an incident.
View CamerasAllows the Admins to view Cameras, if this is configured with OPS-COM.
## Payment Permissions
Permission NamesDescription
Manage User Credit Cards Grants the ability to add, remove and update credit cards from Users.
View PaymentsGrants the ability to view payments. Limited access to user information is also granted.
Edit PaymentsAllows the Admin to process payments. Admin must have the 'View Payments' permission.
Change Payment TypeAllows the Admin to change the Payment Type of a payment.
Drop PaymentsAllows the Admin to drop payments.
Mark Bulk PaymentsGrants the ability to mark Bulk payments for bulk processing.
Refund PaymentsGrants the ability to refund payments, but not process.
Process Refunds/AdjustmentsAllows the Admin to process refunds and adjustments.
## System Content Permissions
Permission NamesDescription
View and Select Files Grants the ability to view and select files for use in editors. Admins must have the 'Manage System Messages' permission as well.
Manage FilesAllows the Admin to add and remove files for use with content editors. Admins must have the 'Manage System Messages' permission as well.
Manage System MessagesGrants the ability to edit the email templates, home page messages, system messages, Temp Permit Text and Notice Literature.
View History SearchAllows the Admin to view history searches if they also have the corresponding User Management permissions.
Purge Old DataAllows the Admin to purge Data older than 7 years.
## System Configuration Permissions
Permission NamesDescription
Manage Roles Grants the ability to manage roles and permissions. This is typically the job of a Primary Admin only.
Edit AdministratorsAllows the Admin to edit other Admin user accounts and assign roles based on their job description. This requires 'Manage Roles' to function. This is typically the job of a Primary Admin only.
Manage System ConfigurationGrants the ability to edit the System Settings. This is typically the job of a Primary Admin only.
Manage User Types and DepartmentsAllows the Admin to manage User Types and Departments.
Manage Vehicle ConfigurationAllows the Admin to setup the different Vehicles descriptions that are used in OPS-COM.
Manage Permit Types and StatesAllows Admins to manage the Zones, Groups, Common Lots and Permit States. This must be used the 'Edit Permits' permission.
Manage Access CardsGrants the ability to setup Access card options.
Manage BarcodesAllows the Admin to setup Barcode options.
Manage LocationsGrants the ability to setup Locations options for use in OPS-COM.
Manage HandheldsAllows the Admin to manage settings stored in the Handheld Commons area
Manage Violation Offence TypesAllows the Admin to manage ticket types and ticket offence items.
Manage Alert ListsAllows the Admin to setup alert and alarm email lists.
Manage Distribution ConfigurationAllows the Admin access the Distribution setup options.
Manage Dispatch ConfigurationGrants the ability to the Dispatch setup options.
Manage Incident ConfigurationAllows the Admin to configure the IncidentAdmin options.
Manage CamerasGrants the ability to Admin to access the Camera options.
Reset DatabaseAllows the Admin to the reset their preview database for testing.
Manage DuplicatesGrants the ability to resolve duplicates in the system.
# Admin User Accounts ## Creating an Admin Account Hover over **System Config** and click **Edit Admin Users.** The **Manage Administrator Users** screen displays. Select **Insert New User** from the drop-down menu, then click **Retrieve**. On the left, you will enter the user information, and on the right, you will select the admin role(s) this person will be responsible for. [![image.png](https://opscom.wiki/uploads/images/gallery/2024-06/scaled-1680-/bhoimage.png)](https://opscom.wiki/uploads/images/gallery/2024-06/bhoimage.png) Enter the admin's information into the **Creating New User** form In the **Active Roles** form select the role(s) the Admin User will be granted. We suggest you view the video demo to fully understand how the Roles and Permissions in OPS-COM function. Click **Insert New User** when complete to add the admin user to the system. [![image.png](https://opscom.wiki/uploads/images/gallery/2024-06/scaled-1680-/3dqimage.png)](https://opscom.wiki/uploads/images/gallery/2024-06/3dqimage.png) ## Editing an Existing Admin Account To manage Administrator Users, select the **System Config** menu, then click on **Edit Admin Users.** [![image.png](https://opscom.wiki/uploads/images/gallery/2024-06/scaled-1680-/Ofzimage.png)](https://opscom.wiki/uploads/images/gallery/2024-06/Ofzimage.png) The **Manage Administrator Users** page will display. To change a user, select the user from the drop-down menu and click **Retrieve**. You can now change the options for that selected user. [![image.png](https://opscom.wiki/uploads/images/gallery/2024-06/scaled-1680-/xrHimage.png)](https://opscom.wiki/uploads/images/gallery/2024-06/xrHimage.png) You can also click on the **Login Activity** button to see when the admin logged into the OPS-COM system or a handheld device. ## Resetting an Admin's Password To reset an admin's password go to the specific user's account and enter a temporary password into the Password field. The password is hidden but you can simply type over the existing symbols "\*\*\*\*\*\*\*\*\*\*". Inform the admin of the temporary password. When they login with the temporary password they will be prompted to update their password and they will have the opportunity to make it more secure. [![image.png](https://opscom.wiki/uploads/images/gallery/2024-06/scaled-1680-/0qIimage.png)](https://opscom.wiki/uploads/images/gallery/2024-06/0qIimage.png) ## Disabling an Admin Account When do we use this? Admin users cannot be deleted as they have data attached to their accounts. If an admin user changes roles or leaves the organization the best practice is to disable their account. **NOTE: It is very important to leave the admin users permissions in place as the permissions will affect reporting. Obviously, once the account is disabled any permissions existing cannot be actioned and will only be used for reporting purposes.** Click on the **System Config** menu and choose **Edit Admin Users**. [![image.png](https://opscom.wiki/uploads/images/gallery/2024-06/scaled-1680-/bknimage.png)](https://opscom.wiki/uploads/images/gallery/2024-06/bknimage.png) Click on the field labeled **Insert New User** to see a drop-down list of active users. [![image.png](https://opscom.wiki/uploads/images/gallery/2024-06/scaled-1680-/46nimage.png)](https://opscom.wiki/uploads/images/gallery/2024-06/46nimage.png) Click on the user being removed from the drop down list, in this example *jim\_daniels* will be used. The user is in an active state at this point. Uncheck the box titled **Activate this account and allow system login.** Click **Update User** to apply the change. [![image.png](https://opscom.wiki/uploads/images/gallery/2024-06/scaled-1680-/Ozjimage.png)](https://opscom.wiki/uploads/images/gallery/2024-06/Ozjimage.png) Notice how, when you go back to the list of Admin Users, the account is now listed under the **Disabled Accounts** listing. Note: This action can be reversed at any time by **editing** the user account and checking **Activate this account and allow system login.** ## Related Video # IP Filtering for access to OPS-COM An IP address is an address used in order to **uniquely identify a device on an IP network**. To get your IP address visit [whatismyip.net](https://www.whatismyip.net/). The address is typically made up of four groups of numbers called octets. The ***first two octets*** identify the network you are on and the ***last two octets*** narrow the address down to the specific machine. **Here is how it works**: If, for example, the IP address of your specific computer is **10.32.1.144**, you can restrict access to just that single computer by entering the full IP address in the **Allowed IP Addresses** field. By entering the first two octets only, it will open up access to any computer on that network but still restrict computers on any other network from having access. You can further open up access by placing a single dot in the **Allowed IP Address** field. This allows the user with this configuration to log in from any network. ## How does this translate in terms of access to OPS-COM? The IP configuration of **Allowable IP Addresses** can be modified for any user in the system and is stored within the admin users profile. The resulting restrictions or open access to the OPS-COM system is controlled by this configuration and is specific to the user in question. Here is how you would configure the **Allowed IP Addresses** in OPS-COM. Hover over the **System Config** menu and click on **Edit Admin Users.** [![image.png](https://opscom.wiki/uploads/images/gallery/2024-06/scaled-1680-/0iWimage.png)](https://opscom.wiki/uploads/images/gallery/2024-06/0iWimage.png) Once in the **Manage Administrator Users** window, select the user you wish to edit. [![image.png](https://opscom.wiki/uploads/images/gallery/2024-06/scaled-1680-/Gypimage.png)](https://opscom.wiki/uploads/images/gallery/2024-06/Gypimage.png) *Here is the location of the IP configuration field.* [![image.png](https://opscom.wiki/uploads/images/gallery/2024-06/scaled-1680-/Ogbimage.png)](https://opscom.wiki/uploads/images/gallery/2024-06/Ogbimage.png) The level of access given to a specific user is usually role based and proportionate to their level of seniority or function within their specific organization. Managers and directors for example, might require access from anywhere in the world essentially so they would have the single **dot** as the allowed IP Address, meaning they could literally log in from any network location internal or external to their specific network. *(This admin could log on from an internet cafe for example) Note: In some cases networks might be locked down or behind a firewall. Additional configuration on the part of your IT department may be required.* [![image.png](https://opscom.wiki/uploads/images/gallery/2024-06/scaled-1680-/z3jimage.png)](https://opscom.wiki/uploads/images/gallery/2024-06/z3jimage.png) Regular office workers on the other hand, would only require access from their specific network. By entering the two fist octets, they could in that case log in to OPS-COM from any computer in their local office provided that computer was on the same network. In our example: 10.32 [![image.png](https://opscom.wiki/uploads/images/gallery/2024-06/scaled-1680-/ifpimage.png)](https://opscom.wiki/uploads/images/gallery/2024-06/ifpimage.png) A part time employee or student worker may only use one specific computer to access OPS-COM, so again here is where you would specify the full IP address to control access. In our example 10.32.1.144 [![image.png](https://opscom.wiki/uploads/images/gallery/2024-06/scaled-1680-/ipJimage.png)](https://opscom.wiki/uploads/images/gallery/2024-06/ipJimage.png) It is even possible to configure a user for access from more than one computer, but still restricted to specific computers. To configure this access you must enter the entire IP address of the two or more computers. For example 10.32.1.144 and 10.32.1.154 could be two computers in an office setting. The two entries can be placed in the Allowed IP Address field listed on two separate lines as follows: [![image.png](https://opscom.wiki/uploads/images/gallery/2024-06/scaled-1680-/yRIimage.png)](https://opscom.wiki/uploads/images/gallery/2024-06/yRIimage.png) It is also possible to allow access for an admin from two separate local area networks. For example: you may have a situation where an employee is working out of two locations on a campus, or in a municipal organization. One building may be on the 10.32 network, while the other building or campus is on another. In that case you can configure the allowed IP addresses accordingly. [![image.png](https://opscom.wiki/uploads/images/gallery/2024-06/scaled-1680-/rPpimage.png)](https://opscom.wiki/uploads/images/gallery/2024-06/rPpimage.png) ## How To Find Your IP You can view your IP address by searching for it in Google. Simply type in the search bar "What is My IP" [![image.png](https://opscom.wiki/uploads/images/gallery/2024-06/scaled-1680-/Rzlimage.png)](https://opscom.wiki/uploads/images/gallery/2024-06/Rzlimage.png) The returned result will display your IP address as follows: [![image.png](https://opscom.wiki/uploads/images/gallery/2024-06/scaled-1680-/4nVimage.png)](https://opscom.wiki/uploads/images/gallery/2024-06/4nVimage.png) ## To recap: The Basic Rules **Good:** **.** A single period to match all IP's **10.32 -** A partial IP to match a specific network **10.32.1.144** - A full IP to match a specific computer **Bad:** **10.\*** **Wildcards** like this will not work ops-com.com **Domain names** will not work # Editing a Username By default the username field is not editable: [![image.png](https://opscom.wiki/uploads/images/gallery/2024-06/scaled-1680-/Ppzimage.png)](https://opscom.wiki/uploads/images/gallery/2024-06/Ppzimage.png) To begin, go to the System Config menu and click on System Settings. [![image.png](https://opscom.wiki/uploads/images/gallery/2024-06/scaled-1680-/iNRimage.png)](https://opscom.wiki/uploads/images/gallery/2024-06/iNRimage.png) From the resulting list of settings click on User Profile to edit it's settings. [![image.png](https://opscom.wiki/uploads/images/gallery/2024-06/scaled-1680-/CsHimage.png)](https://opscom.wiki/uploads/images/gallery/2024-06/CsHimage.png) From the list of settings look for Allow Username Edits. ***Important Note:** This setting can only be toggled by the OPS-COM Support team. Contact OPS-COM support to request changes to this setting.* [![image.png](https://opscom.wiki/uploads/images/gallery/2024-06/scaled-1680-/sKWimage.png)](https://opscom.wiki/uploads/images/gallery/2024-06/sKWimage.png) Click on the setting to select it. [![image.png](https://opscom.wiki/uploads/images/gallery/2024-06/scaled-1680-/jGXimage.png)](https://opscom.wiki/uploads/images/gallery/2024-06/jGXimage.png) Once the setting is activated, as you can see below, the admin now has the ability to edit the username. [![image.png](https://opscom.wiki/uploads/images/gallery/2024-06/scaled-1680-/Yvbimage.png)](https://opscom.wiki/uploads/images/gallery/2024-06/Yvbimage.png) [![image.png](https://opscom.wiki/uploads/images/gallery/2024-06/scaled-1680-/JZsimage.png)](https://opscom.wiki/uploads/images/gallery/2024-06/JZsimage.png) # Defining User Profile Items [![image.png](https://opscom.wiki/uploads/images/gallery/2024-06/scaled-1680-/AgQimage.png)](https://opscom.wiki/uploads/images/gallery/2024-06/AgQimage.png) [![image.png](https://opscom.wiki/uploads/images/gallery/2024-06/scaled-1680-/9ttimage.png)](https://opscom.wiki/uploads/images/gallery/2024-06/9ttimage.png) # Setting up User Profile Items To access the profile items click **System Config** menu and select **System Settings**. [![image.png](https://opscom.wiki/uploads/images/gallery/2024-06/scaled-1680-/AhHimage.png)](https://opscom.wiki/uploads/images/gallery/2024-06/AhHimage.png) On the **Manage System Settings** screen, click **User Profile** to display the list of possible items that can be added or removed from the profile. [![image.png](https://opscom.wiki/uploads/images/gallery/2024-06/scaled-1680-/rMkimage.png)](https://opscom.wiki/uploads/images/gallery/2024-06/rMkimage.png) Items in this list can be in one of three states:
- **Hidden** - Not seen on the user side profile form - **Visible** - Seen on the user side form but optional as far as entering information in the field - **Required** - Seen on the user side form as a required field. Indicated as required by a red asterisk
(Note: The system will not allow the user to save the profile if there is any **required** information missing) The form has **6** essential categories that have various elements that can be set in any one of the three states mentioned above:
- User Name - Address Information - Phone Information - License Information - Student Information - Employee Information
If we hide everything that can be hidden, the system will still require certain pieces of information and may override your settings. Here's what the form looks like for a staff end user in this case. [![image.png](https://opscom.wiki/uploads/images/gallery/2024-06/scaled-1680-/YQ7image.png)](https://opscom.wiki/uploads/images/gallery/2024-06/YQ7image.png) Here is the form with everything visible - [![image.png](https://opscom.wiki/uploads/images/gallery/2024-06/scaled-1680-/DaHimage.png)](https://opscom.wiki/uploads/images/gallery/2024-06/DaHimage.png) ## User Name A User Name is essential. It is one of the unique identifiers required to use the system. However, there are various permutations of the required information associated with the user's name. Best practice tells us a bare minimum might be Username, First Name, and Last Name, although any of these items can be toggled on/off. The state selected is highlighted in blue and a checkmark is added to illustrate the selection. **Note:** One scenario where we might hide username would be if an external source such as LDAP is supplying the username. [![image.png](https://opscom.wiki/uploads/images/gallery/2024-06/scaled-1680-/vezimage.png)](https://opscom.wiki/uploads/images/gallery/2024-06/vezimage.png) ## Address If you plan to mail permits to end users you will need to collect addresses. [![image.png](https://opscom.wiki/uploads/images/gallery/2024-06/scaled-1680-/wKzimage.png)](https://opscom.wiki/uploads/images/gallery/2024-06/wKzimage.png) ## Phone [![image.png](https://opscom.wiki/uploads/images/gallery/2024-06/scaled-1680-/jh1image.png)](https://opscom.wiki/uploads/images/gallery/2024-06/jh1image.png) ## License This field is for Driver License number (not plate number). If you are connected with local law enforcement you may opt to record this information. [![image.png](https://opscom.wiki/uploads/images/gallery/2024-06/scaled-1680-/JRXimage.png)](https://opscom.wiki/uploads/images/gallery/2024-06/JRXimage.png) ## Student Information [![image.png](https://opscom.wiki/uploads/images/gallery/2024-06/scaled-1680-/X5Wimage.png)](https://opscom.wiki/uploads/images/gallery/2024-06/X5Wimage.png) ## Employee Information [![image.png](https://opscom.wiki/uploads/images/gallery/2024-06/scaled-1680-/pa4image.png)](https://opscom.wiki/uploads/images/gallery/2024-06/pa4image.png) # Text2ParkMe If you are using **Text2ParkMe,** there will be a second tab on the page where end users can enter additional details including credit card information. *Note: The only field that will show a "required" status is the Student ID. Additionally: If you enter any credit card information it switches all credit card information fields to required.* [![image.png](https://opscom.wiki/uploads/images/gallery/2024-06/scaled-1680-/C0Vimage.png)](https://opscom.wiki/uploads/images/gallery/2024-06/C0Vimage.png) # Email Headers and Footers ## Getting to Email Headers & Footers In order to get to **Email Headers & Footers,** click System Config, Email Headers & Footers [![image.png](https://opscom.wiki/uploads/images/gallery/2024-06/scaled-1680-/dqIimage.png)](https://opscom.wiki/uploads/images/gallery/2024-06/dqIimage.png) This should take you to the Email Template Layout List where you can select **Edit** to edit the existing Footer, Header or Style email template. [![image.png](https://opscom.wiki/uploads/images/gallery/2024-06/scaled-1680-/lA4image.png)](https://opscom.wiki/uploads/images/gallery/2024-06/lA4image.png) ## Editing Email Layout Templates Click edit on the **Edit** button for the corresponding **Section** you wish to edit. [![image.png](https://opscom.wiki/uploads/images/gallery/2024-06/scaled-1680-/opuimage.png)](https://opscom.wiki/uploads/images/gallery/2024-06/opuimage.png) This will bring you to the template, in our case it is the Header Template. From here you can edit what appears on the header of each sent email as well as include inline styles. [![image.png](https://opscom.wiki/uploads/images/gallery/2024-06/scaled-1680-/iPtimage.png)](https://opscom.wiki/uploads/images/gallery/2024-06/iPtimage.png) # Guide to System Settings 1. To access the system settings, go to System Config and click on System Settings. In most cases these settings affect the admin side of the application. [![image.png](https://opscom.wiki/uploads/images/gallery/2024-06/scaled-1680-/lwpimage.png)](https://opscom.wiki/uploads/images/gallery/2024-06/lwpimage.png) # System Settings Grid
### General System Component
Setting Name DefinitionNotes
Default Notification Email The address you wish all notifications from OPS-COM be sent to
Organization Name: Website Set the name of the Organization
Organization Name: Handheld Set the name of the Organization that appears on the handheld
Country Set the country where the system is located
Company AddressSet your primary street address here
Time zone Set the time zone based on your closest major city
System Timeout Set how long the system can be idle before timeout (can be up to 6 hours)
From EmailThis address will be the return address that appears in emails sent from OPS-COM
Time offset (mins) This represents your time offset from Greenwich mean time
Using daylight savings Used to toggle whether or not you are subject to daylight savings time
System TimeoutSet length of time before the admin user is automatically logged out of OPS-COM
Run the Task Scheduler Used to toggle whether or not your system uses the Task Scheduler
Template Editor Choose between RAW HTML Editor and a WYSIWYG Visual Editor
Select how to show dates Used to set the date format
### Alarms Component
**Setting Name****Definition**Notes
Use Alarms SystemControls if the Client can use Alarms moduleAdmins can see, only OPS-COM Team can change.
Alarm Duration
Generic Alarm Append ThresholdPicklist that allows you to determine the type of alarm you want to issue, and what Action you want taken. In addition you choose the Dispatch Sub Category that should be associated with this Alarm. For example, People Alarms should generate a System Alert with a Sub-Category of Personal Safety Reports.
People Alarm Append ThresholdSame as above
Vehicle Alarm Append Threshold
Stolen Device Append Threshold
Email AddressEmail Address that an alert is sent to
Generic AlarmSame as above
People Alarm
Plate Alarm
### Collections Component
**Setting Name****Definition**Notes
Days before CRC is eligibleSet the length of time before a ticket is sent to court
MTO Lookups on all recordsPerform an MTO Lookup on all records even if a user profile exists
Include All Unpaid ViolationsWhen Toggled on: Includes all unpaid Violations when sending violation notices When Toggled off: Only the violation in question will be included in the letter
Prevent Violation PaymentPrevents violations from being paid through OPS-COM if they have been sent to collections
Prevent PurchasesPrevents Users from making any permit purchases if this is enabled and a violation has been sent to collections
Send Letter To AllWhen Toggled on: Send collections letter to all users even if they have been emailed a copy
**Deposits Component**
**Setting Name****Definition**Notes
Use DepositsToggle the use of deposits on or off
Enable Deposits For Permits
### Forms Component
**Setting Name****Definition**Notes
Default email for sending form entriesThese settings are used to control the Forms Module
### Global Component
Setting NameDefinitionNotes
Email Image HeaderSelect an image to appear in the header of all emails
Default Site LogoSelect a logo that appears on the mobile app, Text2ParkMe and the QR code interface
Default Site HeaderSelect a background image that appears in the header of the mobile app, Text2ParkMe and the QR code interface
Disable nightly email notificationsDisable auto-emails during system maintenance
Symbol before the dollar valueWhich currency symbol to use before a dollar valueAccommodates the English format of the dollar value $100.00
Symbol after currency valueWhich currency symbol to use after a dollar valueAccommodates the French format of the dollar value 100,00$
### Handheld Device
**Setting Name****Definition**Notes
**Network Communication Model**Select Standard or Volley
**Setting Name****Definition**Notes
Usage Limit
Enable Megdgate nightly script.
### Lightweight Directory Access Protocol Component
Setting NameDefinitionNotes
Log Failed Attempts
Use SSL
Servers
BaseDN
Account Suffix
LDAP username
LDAP password
Student Group Name
Staff Group Name
### Licensing Component
Setting NameDefinitionNotes
Permits per yearIndicate the number of permits eligible to be used yearly (Usage Limit)
Violations per yearIndicate the number of violations eligible to be written yearly (Usage Limit)
Temp Permits per yearIndicate the number of temp permits eligible to be used yearly (Usage Limit)
Number of HandheldsIndicate the number of OPS-COM for Android Licenses to be used (Usage Limit)
Mobile PL8RDR CamerasIndicate the number of Mobile Cameras in use by client
Static LPR CamerasIndicate the number of Static Cameras in use by client
Lockers per yearIndicate the number of lockers eligible to be used yearly (Usage Limit)
Validation Records per yearIndicate the number of validation records eligible to be used yearly (Usage Limit)
Dispatch Logs per yearIndicate the number of dispatch logs eligible to be used yearly (Usage Limit)
Incidents per yearIndicate the number of incidents records eligible to be used yearly (Usage Limit)
### Lockers Component
Setting NameDefinitionNotes
Enable Lockers ModuleToggles the use of the Lockers ModuleAdmins can see, only OPS-COM Team can change.
Tax %Percentage of tax to charge for lockers
Map of LockersUsed to enter a path to a diagram or map image
Receipt Reply To AddressReply to address on receipts if only a locker was purchased
### **License Plate Recognition Component**
**Setting Name****Definition****Notes**
Possible plate prefixesIndicates the prefix of what typical plate reads in your region start with. (ie: 123 for Numbers, ABC for Alpha Characters)
Using Mobile LPRThis checkbox will toggle on or off the use of the LPR functionality on handheld devices
### **Parking Component**
**Setting Name****Definition****Notes**
Validation deletion cutoff minutesIndicate how long a validation record is editable by an admin before it is locked into the system
### Payments Component
Setting NameDefinitionNotes
Gateway OnlineToggle to set the status of your payment gateway (Online or Offline)
Invoice NumberAn incremental number for invoices. This can be set the first time you want to issue them
EFT Settings This is used if you are set up to accept EFT payments through OPS-COM. You must be set up by OPS-COM Team first, before you can change anythingAdmins can see, only OPS-COM Team can change.
### Permits Component
Setting NameDefinitionNotes
Receipt Reply To AddressReply to address for receipts that contain permits
Multiple Plate ValidatorAllow multiple plates in parking validator
Require Payment for RolloversIf enabled, only permits that are paid for and processed can be rolled over
Show remaining permitsIf enabled, the number of remaining permits in a lot will be shown to site users. e.g. "32 Remaining" If disabled, the number of remaining permits will be replaced with "On Sale" (which hides how many permits are left from users) Screenshot: [![image.png](https://opscom.wiki/uploads/images/gallery/2024-06/scaled-1680-/F48image.png)
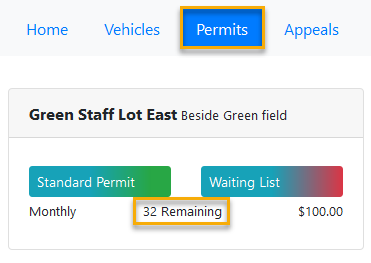
](https://opscom.wiki/uploads/images/gallery/2024-06/F48image.png)
Enable User Permit Printing
Show Total Spots Taken
Show Waiting List Rank
Show Only Visible Lots
Waitlist Email ManagersEnter the email address of the admin who will be managing the waitlists
Waitlist Reservation DurationEnter a timeframe for how long a waitlist reservation will be held before being released
Receipt Reply To Address
Allow Credit Card ProcessingAllows credit card payments for rolloversAdmins can see, only OPS-COM Team can change.
Personal Information on Permit Print Include personal information on hang tag printing
Require Mailing AddressRequire a mailing address to be completed fully to purchase permits
Show Permit Lots on Landing PageShow parking permit lots on the landing page
Show Only Visible Lots Only show lots with an active visibility flag to the end user
Show Waiting List RankAllow users to see their rank on the waiting list
Show Total Spots TakenWhen being added to a waiting list, show the number of spots that exist within the lot
Enable User Permit PrintingAllow users to print their own permits, this requires you to have a permit PDF message under System Messaging to work
Map of Permit AreasThis is the image of your parking map
### Security Component
Setting NameDefinitionNotes
Hash and SaltEnable the hashing of passwords. Once set, it should not be turned offAdmins can see, only OPS-COM Team can change.
Require Password UpdateRequire password resets after an admin changes the passwordAdmins can see, only OPS-COM Team can change.
Toggle Password ExpiryEnable the use of password expiryAdmins can see, only OPS-COM Team can change.
Password Expiry in daysNumber of days before administrator must change their password
Enable Password HistoryPrevent passwords from being reused up to X daysAdmins can see, only OPS-COM Team can change.
How long to remember old passwordsThe number of days the system will remember old passwords to prevent re-use
Minimum password lengthThe minimum password length for administrator passwords
Enable password strength requirementsUsed to set standards in password creation based on password security strengthAdmins can see, only OPS-COM Team can change.
Numerical CharactersThe minimum number of numbers required
Lower Case CharactersThe minimum number of lower cases needed
Upper Case CharactersThe minimum number of upper cases needed
Non-Alpha NumericThe minimum of a Non-Alpha required
Enable Admin LockoutsEnable admin lockouts after X invalid attempts within Y minutesAdmins can see, only OPS-COM Team can change.
Lockout after X AttemptsSets the number of retries with a wrong password before the system will lock you out
Login attempt timeframeSets the timeframe for wrong entries. For example, if you fail 3 times within 5 minutes the system will lock out this admin
Lock the admin out for X minutesSets the length of time in minutes that the admin will be locked out. Set at 120 minutes would mean the admin would be locked out for 2 hours before another attempt at logging in would be allowed
### Third Party Component
Setting Name Definition Notes
Twilio Account Number Admins can see, only OPS-COM Team can change.
Twilio Auth Token Admins can see, only OPS-COM Team can change.
T2 API Last Successful Fetch Admins can see, only OPS-COM Team can change.
### User Profile Component
Setting NameDefinitionNotes
Enable Public RegistrationIf disabled, the Admins control the new account registration. Existing users can log in, but no one can create a profile
Profile Field VisibilityThis controls the fields for the User Profile page
Max Student Number DigitsThe maximum number of digits allowed in a student number. This can be useful if your organization requires student numbers that follow a specific min and max count.
Min Student Number DigitsThe minimum number of digits allowed in a student numbers. This can be useful if your organization requires student numbers that follow a specific min and max count.
Max Employee Number DigitsThe maximum number of digits in an employee number. This can be useful if your organization requires employee numbers that follow a specific maximum digit count.
### Vehicles Component
Enable VIN Toggles the use of VIN on and offOnly seen and edited by OPS-COM Team
Require Vehicle YearIf enabled will require the vehicle year when users are adding a new vehicle.
### Violations Component
Setting NameDefinitionNotes
Enable Violations ModuleToggles the Violations Module on or off, this effects the web application and handhelds If this is toggled off, clients can chalk vehicles but cannot issue violations
Hide Zero Dollar FinesWhen enabled, this prevents $0.00 violations, that are not warnings, from being displayed on the user side. These violations will still show up on the Admin side and will show on the Report by Officer and the Violation Summary by Officer report
Days until dueIndicates the number of days from the issue date that a user has to pay a ticket before it becomes overdue
Include Random Pin on Handheld TicketsSelect this item if you wish your users to have the ability to pay violations OPS-COM Quick Pay/Guest Payments. The PIN number is required in order to pay OPS-COM Quick Pay/Guest PaymentsAdmins can see, only OPS-COM Team can change.
Handheld FooterThis is the message that will be applied to the end of each ticket that gets printed from the handheldThis footer is for violations only. Admins have the ability to change these settings on their own.
Clear Violation Payments
Appeal daysIndicates the number of days a user has to launch an appeal
Enable OPS-COM Quick Pay/Guest Payments Payments for Violations
Link Violations to usersWhen enabled allows violations to be the user instead of a vehicleAdmins can see, only OPS-COM Team can change.
Appeal Notification EmailThe admin email(s) the system will send notifications to for new appeal requests. Leave blank if you don't want to receive these emails.
Automated Notification EmailThe system will send notifications to this email for automated violation reports like "send overdue violations".
The prefix to go in front of the ticket numberThese characters will appear before the ticket number on the printed ticketAdmins can see, only OPS-COM Team can change.
The next number for printing tickets from the webSets the next sequential number to be on tickets printed from the web toolAdmins can see, only OPS-COM Team can change.
Show Driver's License on TicketsWhen selected, shows License number and Province of issuance on ticket
Show Ticket # as barcode on ticketWhen selected, will print a bar code representing the ticket number on the ticket
# Configuration Checklist ## Some System Configuration that Must be Done For more details on system settings please see **System settings:** - Check **General System Settings** to ensure Date and Time settings are correct for your location - Check **Lockers** settings to set Tax rate, upload a locker map, and set a Receipt Reply To Address - Check **Payments** if EFT (Electronic Funds Transfer) is configured - Check **Permits** to ensure it is configured correctly: - Enter a **Receipt Reply To Address** - Upload a permit map - If using the **Managed Waitlist,** configure the **Waitlist Email Managers,** as well as the **Waitlist Reservation Duration** - Check **Violations** to configure the following: - Days until violation payment is due - Number of days to appeal violation before the option to appeal is removed **Classic System Settings:** - Check System Identification settings - System Name - Reply-to Admin Email Address - Reply-to Security Email Address - Mailing Address - Safety Address - Permit Tax % - Temp Permit Tax % ## Template Design OPS-COM offers powerful flexibility to allow your team to customize the look and feel of your User Portal system. This is done by designing the site template. You will require your graphics and any messaging you would like to see on the pages. ## Uploading Images for Use in Templates - In order to place images in the different templates, you must upload them to the File Manager. Please refer to this wiki article for more information - Upload background images for landing page - Upload your company Logo - Upload your parking map ## Once you have your graphics uploaded: ## Setting up the Look and Feel of the User Portal - Setting up the common header - Setting up the common footer - Optional use of content header and footer ## System Messaging - Set up your Vehicle Disclaimer - Set up your Permit Disclaimer ## Email Template Setup - Appeal Submitted by user - Lost Password - Invoice - User Receipt - Waitlist Selected ## User Setup - Determine what User Types are required - Determine what fields of the user profile are required, optional or hidden ## System Setup - You will need to set up the Vehicle description information - Are there any vehicle types missing? You will also need to set up your locations. - Determine what locations you wish to use as descriptors for enforcement ## ParkAdmin Setup - Create Lots - Create and designate Lot Groups and Zones - Permits type: Monthly, Daily or Temp ## ViolationAdmin Setup - Create Offence Categories - Populate the offence types - Configure days to pay and overdue time frame ## Proof and order your Violations stock - Your Account Executive will be in contact to ensure you are getting the correct tickets and that you approve the design - If you are sourcing your own Violation stock, please ensure you allow yourself 4-6 weeks to have them printed and shipped to you ## Set up your Handhelds and Printers If you have purchased the hardware through the OPS-COM team, we will ship them directly to you with the software pre-loaded and the printers paired. If you have sourced them yourself, you will need to follow the instructions in the wiki articles to complete the setup of your Android handheld units. You will also need to use the instructions in the wiki articles below to set up and pair your printers. - Setting Up your Handheld Units for the First Time - Setting your Android for Auto-Updates - Ticket Creation Settings - Setting up your Ticket Footer ## Printer Setup Your Training Coordinator will go through using the handhelds but it is beneficial to work through the Android Handheld Wiki to make the training more meaningful for you. In particular, it is important to familiarize yourself with the Best Practices for OPS-COM Android wiki article. # Password and Security Features ## Manage Security Settings To edit security settings, hover over **System Config** and click **System Settings**. [![image.png](https://opscom.wiki/uploads/images/gallery/2024-06/scaled-1680-/kLkimage.png)](https://opscom.wiki/uploads/images/gallery/2024-06/kLkimage.png) In System Settings, click **Security** in the list of settings. [![image.png](https://opscom.wiki/uploads/images/gallery/2024-06/scaled-1680-/JOaimage.png)](https://opscom.wiki/uploads/images/gallery/2024-06/JOaimage.png) The Manage System Settings window will open and all the security settings will be available. [![image.png](https://opscom.wiki/uploads/images/gallery/2024-06/scaled-1680-/gZtimage.png)](https://opscom.wiki/uploads/images/gallery/2024-06/gZtimage.png) ### Salted Password Hashing, Password Update, Toggle Password Expiry and Enable Password History Using salted password hashing adds an extra layer of security to stored passwords. Hashing is a one-way, irreversible process that takes the password a user enters and converts it into a short hash value. Salting randomizes the string of digits for the hash value so that two users have the same password, they will have different hash strings. It is not possible to reverse engineer a hash, so you cannot “look up” what the original password was. Instead, a user who forgets their password, for example, would have to reset it completely. This limits an administrator’s ability to view the passwords of employees and closes up a security vulnerability. **Require Password Update** - When activated, this setting will force users to change their passwords on next login. **Toggle Password Expiry** - By default passwords do not expire. For added security, it is good practice to have passwords expire every 90 days. You can enter the number of days before a password expiry to conform with your organization's security policy and toggle it on. **Enable Password History -** When toggled on, OPS-COM will remember the passwords you have used in the past, and will not allow repeat use of the password for the time set in days. [![image.png](https://opscom.wiki/uploads/images/gallery/2024-06/scaled-1680-/radimage.png)](https://opscom.wiki/uploads/images/gallery/2024-06/radimage.png) Password Strength and Admin Lockout Using **Password Strength Settings** the admin can set rules for how complex a password needs to be to meet security rules. These settings include: **Minimum Password Length** - minimum number of characters in the password **Enable Password Strength Requirements** - Toggles on or off the following requirements: - Minimum number of Numerical Characters required in the password - Minimum number of Lower Case Characters required in the password - Minimum number of Upper Case Characters required in the password - Minimum number of Non-Alpha numeric Characters required in the password (Special characters such as !,&,#, etc.) Admins can opt to set up additional security settings that can lock the user out of the system if an incorrect password is entered repeatedly within a specific time frame. In the setting example, 120 minutes would lock the Admin out of their account for 2 hours, if three failed attempts to log in occur during a five minute period. # Manage Files ## Uploading Files Your OPS-Com Admin site has a page to put files. To get to this page, go to **System Config** then click **Manage Files**. [![image.png](https://opscom.wiki/uploads/images/gallery/2024-06/scaled-1680-/Hblimage.png)](https://opscom.wiki/uploads/images/gallery/2024-06/Hblimage.png) You should now see a page where you can see all files that have been used on your OPS-COM Site. This is used mainly for images that are on your OPS-COM User and Admin dashboards (banner, etc.) These files can be viewed in thumbnail mode... [![image.png](https://opscom.wiki/uploads/images/gallery/2024-06/scaled-1680-/TMBimage.png)](https://opscom.wiki/uploads/images/gallery/2024-06/TMBimage.png) ...or in list mode: [![image.png](https://opscom.wiki/uploads/images/gallery/2024-06/scaled-1680-/IEHimage.png)](https://opscom.wiki/uploads/images/gallery/2024-06/IEHimage.png) By clicking on an image you turn on the following menu where you can rename, download, move the file to a different folder, as well as resize, crop or delete the file. [![image.png](https://opscom.wiki/uploads/images/gallery/2024-06/scaled-1680-/xMJimage.png)](https://opscom.wiki/uploads/images/gallery/2024-06/xMJimage.png) Adding Files to Pages To add files to this repository you can simply drag the file into the screen area where an Upload File(s) interface will appear. [![image.png](https://opscom.wiki/uploads/images/gallery/2024-06/scaled-1680-/Okmimage.png)](https://opscom.wiki/uploads/images/gallery/2024-06/Okmimage.png) ## Adding Images to a Page To add an image on a page, you would insert the path to the image, as follows: The root folder is /uploads/FILES/ Followed by your customer code Followed by the file name The resulting URL for a logo placement might look like this /uploads/FILES/PA-DEMO/TomahawkUniversity\_logo.png Here's a sample of the URL being used in a typical page header. [![image.png](https://opscom.wiki/uploads/images/gallery/2024-06/scaled-1680-/mFQimage.png)](https://opscom.wiki/uploads/images/gallery/2024-06/mFQimage.png) # Administrator Groups 1. To manage Administrator Groups, go to **'System Config'** then click on **'Manage Groups'**. [![image.png](https://opscom.wiki/uploads/images/gallery/2024-06/scaled-1680-/mvvimage.png)](https://opscom.wiki/uploads/images/gallery/2024-06/mvvimage.png) 2\. You will be directed to a page where you can see your Admin Groups. As you can see, there are no groups on this page. We will be making one for a demo. To make a group, click on **'Add New Group'** Fill out the information, then click **'Save Group'**. You should now see your group that you made on the left hand side. [![image.png](https://opscom.wiki/uploads/images/gallery/2024-06/scaled-1680-/b9Ximage.png)](https://opscom.wiki/uploads/images/gallery/2024-06/b9Ximage.png) # The Invoice Template ## Editing the template To access the template, go to the **System Config** menu and click on **Email Templates.** The screen will refresh with a list of possible templates to edit. In our case, we want to click on the **Edit** button for **Permit Invoice** to access the template. [![image.png](https://opscom.wiki/uploads/images/gallery/2024-06/scaled-1680-/Tpcimage.png)](https://opscom.wiki/uploads/images/gallery/2024-06/Tpcimage.png) The screen will refresh with the complete Template form as seen below. [![image.png](https://opscom.wiki/uploads/images/gallery/2024-06/scaled-1680-/Wr2image.png)](https://opscom.wiki/uploads/images/gallery/2024-06/Wr2image.png) The form contains 4 areas: At the top, **Meta Data** for this specific template. On the left, a list of possible **Short Codes** that can be used on this template form. On the right, the actual **Template**. At the bottom, a **Text Content field** (This field can be configured for a plain text version of the ## Meta Data **Label -** Enter a name for this Template. **Type -** This field auto fills. **Language -** Choose the language of the template. **Layout -** Choose default layout. **Subject -** This text will appear as the Email Subject. Note that the use of short code is permitted in this field. In this case, we are calling up the account name for the company being invoiced. ## Short Code List The template allows the use of special tokens, or short codes, to pull information from the database to appear on the invoice when sent. These include: **\[invoice account="number"\]** The account number for the company. **\[invoice account="name"\]** The account name for the company. **\[invoice account="fulladdress"\]** The full address for the company. **\[invoice account="invoice\_comments"\]** The invoice comment value that is editable for companies only. Any line breaks will be preserved. **\[invoice show="invoiceno"\]** Invoice Number. **\[invoice show="duedate"\]** Invoice due date. **\[invoice show="billdate"\]** Invoice bill date. **\[invoice show="subtotal"\] **Subtotal of all items before tax. **\[invoice show="taxtotal"\]** Total amount of tax. **\[invoice show="amounttotal"\]** The total sum amount for all outstanding permits for this invoice. **\[invoice show="counttotal"\]** The total number of permits for the selected sales window. **\[invoice show="details"\]** The list of permits, cost and who has the permit. [![image.png](https://opscom.wiki/uploads/images/gallery/2024-06/scaled-1680-/Yosimage.png)](https://opscom.wiki/uploads/images/gallery/2024-06/Yosimage.png) These tokens can be placed anywhere on the template and will pull data from the system, similar to a mail merge functionality. For example, in the **Bill To:** area, the system will retrieve the **Full Address of the Company** as well as the **Company Account Number** using these two short code tokens: **\[invoice account="fulladdress"\]** The full address for the company. **\[invoice account="number"\]** The account number for the company. [![image.png](https://opscom.wiki/uploads/images/gallery/2024-06/scaled-1680-/54gimage.png)](https://opscom.wiki/uploads/images/gallery/2024-06/54gimage.png) ## The Template There are a number of areas on the template that can be edited by the admin. To add branding to the template there are two areas that will be of concern. **The Company Logo Field:** This is where you would place your company logo. Using a .JPEG or .PNG file format is recommended. [![image.png](https://opscom.wiki/uploads/images/gallery/2024-06/scaled-1680-/L35image.png)](https://opscom.wiki/uploads/images/gallery/2024-06/L35image.png) **Your Company Address:** Enter your company address here. [![image.png](https://opscom.wiki/uploads/images/gallery/2024-06/scaled-1680-/eqBimage.png)](https://opscom.wiki/uploads/images/gallery/2024-06/eqBimage.png) **Invoice Identification:** In this section use short code to pull in the **Invoice Number, Billing Date, and Due Date**. [![image.png](https://opscom.wiki/uploads/images/gallery/2024-06/scaled-1680-/uoVimage.png)](https://opscom.wiki/uploads/images/gallery/2024-06/uoVimage.png) **Invoice Details:** The short code **\[invoice show="details"\] **pulls in the list of permits that will appear on the Invoice. (See a sample of the Invoice below) These include: Parker's Name Item type being Paid for (Permit, Access card, etc.) Item number (Permit Number) Sales Window Lot Name Quantity Cost [![image.png](https://opscom.wiki/uploads/images/gallery/2024-06/scaled-1680-/19Nimage.png)](https://opscom.wiki/uploads/images/gallery/2024-06/19Nimage.png) **Payment Information** (Billing Cost)**:** In this section use short code to pull in the billing information such as **Subtotal, Calculated Taxes, and Total Billing Amount. [![image.png](https://opscom.wiki/uploads/images/gallery/2024-06/scaled-1680-/4xEimage.png)](https://opscom.wiki/uploads/images/gallery/2024-06/4xEimage.png) You may also wish to add comments to the invoice. Comments can be added in the company configuration. [![image.png](https://opscom.wiki/uploads/images/gallery/2024-06/scaled-1680-/SInimage.png)](https://opscom.wiki/uploads/images/gallery/2024-06/SInimage.png) **The Email with PDF attached:** Here is a sample of what the resulting email would look like. There is also a .PDF version of this invoice attached to the email. [![image.png](https://opscom.wiki/uploads/images/gallery/2024-06/scaled-1680-/UANimage.png)](https://opscom.wiki/uploads/images/gallery/2024-06/UANimage.png) # System Messaging Checklist ## What Needs Your Attention Here is the list of all the major pages and messaging you will want to review. There are some that are standard messages and probably don't need customization. These items are listed but marked as optional. Functional page elements are displayed on the page automatically by the system based on which page you are currently on. For example, the Sign In page boxes that appear for username and password are automatically generated on the page. Therefore, you need not worry about editing these items. However, if you want to add additional content on these pages you may do so. ## Templates and Designs Click on Toggle template to get a list. You will want to edit the following: - Header - You will want to customize this content. This is the common header on all user portal pages. - Footer - You will want to customize this content. This is the common footer on all user portal pages.
**Header**
`<``header` `style``=``"height:320px; background: white url(/uploads/FILES/PA-DEMO/Tomahawku-arial.jpg) center center; background-size: cover;"``>`
`  ``<``div` `class``=``"container"` `style``=``"height:95%;position:relative"``>`
`    ``<``div` `class``=``"row"` `style``=``"bottom:0;right:0;position:absolute"``>`
`      ``<``div` `class``=``"col my-3 text-center"`
`           ``style``=``"background-color:white;padding:10px;max-width:200px;border-radius:15px;border:1px solid darkgray"``>`
`        ``<``a` `href``=``"/"` `target``=``"_blank"``>`
`          ``<``img` `alt``=``"Tomahawk University"` `align``=``"right"` `border``=``"5"` `src``=``"/uploads/FILES/PA-DEMO/TomahawkUniversity_logo.png"` `class``=``"img-fluid"``>`
`        `
`      ```
`    ```
`  ```
``
`[user_menu]`
**Footer**
`<``div` `class``=``"bg-light text-dark"``>`
`    ``<``div` `class``=``"container py-3"``>`
`        ``<``div` `class``=``"row"``>`
`            ``<``div` `class``=``"col-sm"``>`
`                ``<``a` `href``=``"https://ops-com.com"``><``img`
`                     ``class``=``"img-fluid mb-3 mb-md-0"` `style``=``"max-width:250px;padding-top:10px"`
`                     ``src``=``"https://kp.ops-com.com/uploads/FILES/PA-DEMO/Banner_W_Tagline.png"`
`                     ``alt``=``"OperationsCommander"` `/>`
`                ``<``address` `style``=``"padding-left:25px;padding-top:5px;"``>`
`                ``92 Bridge St., Carleton Place, Ont., K7C 2V3<``br` `/>`
`                ```
`            ```
`            ``<``div` `class``=``"col-sm text-right"` `style``=``"padding-top:15px"``>`
`              ``<``strong``>Learn about Parking & Security Management<``br``/>`
`              ``<``a` `href``=``"mailto:info@ops-com.com"``>info@ops-com.com <``br``/>`
`              ``855.410.4141`
`            ```
`        ```
`    ```
``
Go into System Messaging and update the following System Messaging: (These are the actual pages that occupy the content area between the header and footer that you configured above) ## The Pages Tab - User Dashboard - Currently the generic page. You will want to customize this content. - Login Screen - You will want to customize this content. - Payments Page - Optional. This content will appear on the Payments page above the functional part of the page. - Permits - Most clients customize this message. A good place to put a Campus Map and Messaging about permits. - User Registration- Optional. - My Vehicles - Optional.
**Login Screen**
`<``h3` `style``=``"text-align: center;"``>Welcome to Tomahawk University <``br` `/><``span` `style``=``"color: #ffffff;"``>Parking and Security Services`
`<``div` `class``=``"row my-3"``>`
`<``div` `class``=``"col-s-12 col-md-6"``>[system_code]`
`<``div` `class``=``"col-s-12 col-md-6"``>`
`<``h4` `style``=``"padding-top: 25px;"``><``span` `style``=``"color: #f1c40f;"``><``span` `style``=``"font-family: arial,helvetica,sans-serif;"``><``br` `/><``strong``>Do you have an account? `
`<``h5``><``span` `style``=``"font-family: arial,helvetica,sans-serif;"``>Sign in using the email address you were provided with when you set up your OPS-COM DEMO user account. <``br` `/>For most visitors, a DEMO account will have been supplied previously by Tomahawk.`
`<``p``> `
`<``h4``><``span` `style``=``"font-family: arial, helvetica, sans-serif; color: #f1c40f;"``><``strong``>Are you a New user?`
`<``h5``><``span` `style``=``"font-family: arial,helvetica,sans-serif;"``> Click ‘Create Account’ and fill out the form. If you do not wish to use your email address or other personal details, please contact the <``span` `style``=``"color: #f1c40f;"``><``a` `style``=``"color: #f1c40f; text-decoration: underline; font-style: italic;"` `title``=``"Email OPS-COM"` `href``=``"mailto:sales@ops-com.com"` `target``=``"_blank"` `rel``=``"noopener"``>OPS-COM demo team by email `
`<``span` `style``=``"color: #f1c40f;"``><``em``>Learn more about <``a` `style``=``"color: #f1c40f;"` `href``=``"https://ops-com.com"``>OperationsCommander`
``
**Permits**
`<``p``>[disclaimer name=permitDisclaimer dismiss=never]`
`<``div` `class``=``"row"``>`
`<``div` `class``=``"col-md-4"``><``a` `title``=``"Tomahawk U Parking Map"` `href``=``"/uploads/FILES/PA-DEMO/TomahawkU_Map.jpg"` `target``=``"_blank"` `rel``=``"noopener"``><``img` `class``=``"img-thumbnail modal-image"` `src``=``"/uploads/FILES/PA-DEMO/TomahawkU_Map.jpg"` `width``=``"385"` `height``=``"400"` `/>`
`<``div` `class``=``"col-md-8"``>`
`<``p``>Parking availability changes considerably during the year and permits are offered for sale in select lots. Like any parking lot, there are fewer spaces in parking lots that needed over the course of an average day because not all parkers are there at the same time. Permit allocations are processed and maintained by the Parking Services Office. (Y)early, (S)emester, and (M)onthly parking permits are available for sale below. Please select from one of the parking permit options on the side of the map. If no permit options are available, permits may be temporarily sold out. If this is the case, please select the option to add yourself to the Waiting List - you will be contacted by e-mail to advise when further permit selection/options become available. Permit prices and parking rates are based on our fiscal-year schedule and are pro-rated for users throughout the year. Persons requiring parking during the summer months (May to August) must purchase a Summer parking permit.`
`<``p``>FOR STAFF/ FULL-TIME PARKING PERMITS, PLEASE SELECT OPTION TO PLACE YOUR NAME ON THE WAITING LIST (select waiting list link below). `
`<``p` `style``=``"font-style: italic; font-weight: bold;"``>Attention Residents -  All those living in Residence at must purchase RESIDENCE  ONLY parking permits. `
``
``
`<``p``>[system_code]`
`<``p``> `
**User Registration**
`<``div` `class``=``"row my-3"``>`
`<``div` `class``=``"col-s-12 col-md-6"``>`
`<``p``>[system_code]`
``
`<``div` `class``=``"col-s-12 col-md-6"``>`
`<``p``><``img` `style``=``"width: 400px; height: 209px; float: left; margin: 5px;"` `src``=``"/uploads/FILES/PA-DEMO\TomahawkUniversity_logo_white_bg.png"` `alt``=``""` `/>`
`<``p``> `
`<``p``> `
`<``p``> `
`<``p``> `
`<``p``> `
`<``p``> `
`<``p``><``span` `style``=``"font-size: 10pt;"``>Already Registered? <``span` `style``=``"color: #f1c40f;"``><``a` `style``=``"color: #f1c40f;"` `href``=``"/login"``><``strong``>Click here to login.`
`<``p``><``span` `style``=``"font-size: 10pt;"``>To register, please follow the registration process below.`
`<``ol``>`
`<``li``><``span` `style``=``"color: #236fa1; font-size: 10pt;"``><``strong``><``span` `class``=``"title"``><``span` `style``=``"color: #f1c40f;"``>Complete the Registration Form <``br` `/><``span` `style``=``"font-size: 10pt;"``>Simply fill out the registration form below, review your information for accuracy, and click the Submit button.<``br` `/><``br` `/>`
`<``li``><``span` `class``=``"title"` `style``=``"color: #fbeeb8; font-size: 10pt;"``><``strong``><``span` `style``=``"color: #f1c40f;"``>Receive Confirmation Instructions <``br` `/><``span` `style``=``"font-size: 10pt;"``>We will send you an email message with a link to activate your account and setup your password. <``br` `/><``span` `style``=``"font-size: 10pt;"``>If you have already completed Step 1 and would like us to resend the activation link, please<``span` `style``=``"color: #f1c40f;"``> <``a` `style``=``"color: #f1c40f;"` `href``=``"#"` `data-toggle``=``"modal"` `data-target``=``"#modalForgotPassword"``><``strong``> click here .<``br` `/><``br` `/>`
`<``li``><``span` `style``=``"font-size: 10pt;"``><``strong``><``span` `class``=``"title"` `style``=``"color: #f1c40f;"``>Confirm Your Registration <``br` `/><``span` `style``=``"font-size: 10pt;"``>Once you have received your password, you can visit the<``span` `style``=``"color: #f1c40f;"``><``strong``> <``a` `style``=``"color: #f1c40f;"` `href``=``"/account/profile"``>edit profile page to change your password or profile information.`
``
``
``
**Appeals Message**
`<``p``>[disclaimer name=appealsDisclaimer dismiss=never]`
`<``p``><``strong``>All persons receiving a parking violation have a right to appeal within 10 days of the date the violation was issued.<``br` `/><``strong``>Before searching for your ticket or license plate please ensure that you have registered the vehicle the violation applies to. <``br` `/>Click <``span` `style``=``"color: #ba372a;"``><``a` `style``=``"color: #ba372a;"` `href``=``"/vehicles"``>here to register your vehicle.<``br` `/><``strong``>If you experience any problems using these forms or have any questions concerning the registration, please contact the <``span` `style``=``"color: #ba372a;"``><``a` `style``=``"color: #ba372a;"` `href``=``"mailto:support@parkadmin.com?Subject=Online%20Appeal%20Question/Comment"``>Appeals Officer`
`<``p``><``span` `style``=``"color: #000000;"``>[system_code]`
## The Messages Tab - Dashboard Message - Admin Dashboard. - noPaymentOptions - Currently a standard generic message. Edits Optional. - permitPDF - Set for printing a standard permit. - permitTempPDF - Set for printing a temporary permit. - tempPermitText - Optional.
**Admin Dashboard**
`<``h2` `id``=``"mcetoc_1d6qrcts00"``>Welcome to OperationsCommander Admin Landing Page`
`<``h3` `id``=``"mcetoc_1d6qrcts11"``><``span` `style``=``"color: #bf0404;"``>"Important Notices"`
`<``p``>This version of <``strong``>Operations<``span` `style``=``"color: #bf0404;"``>Commander is our demo environment.  The details of this page are fully customizable in the "System Config Menu" (gears icon ) under the "Manage System Messaging" option.`
`<``p``> `
`<``h3` `id``=``"mcetoc_1d6qrcts12"``>Staff Schedules`
`<``p``>You can use these sections for any number of uses such as Staff schedules`
`<``table` `style``=``"width: 100%;"` `border``=``"1"` `cellspacing``=``"0"` `cellpadding``=``"5"``><``caption``>Spring Schedule?`
`<``tbody``>`
`<``tr``>`
`<``td` `style``=``"height: 35px; text-align: center; width: 150px;"``><``strong``><``span` `style``=``"color: #ba372a;"``>Officer`
`<``td` `style``=``"height: 35px; text-align: center;"``><``strong``><``span` `style``=``"color: #ba372a;"``>Mon`
`<``td` `style``=``"height: 35px; text-align: center;"``><``strong``><``span` `style``=``"color: #ba372a;"``>Tue`
`<``td` `style``=``"height: 35px; text-align: center;"``><``strong``><``span` `style``=``"color: #ba372a;"``>Wed`
`<``td` `style``=``"height: 35px; text-align: center;"``><``strong``><``span` `style``=``"color: #ba372a;"``>Thu`
`<``td` `style``=``"height: 35px; text-align: center;"``><``strong``><``span` `style``=``"color: #ba372a;"``>Fri`
`<``td` `style``=``"height: 35px; text-align: center;"``><``strong``><``span` `style``=``"color: #ba372a;"``>Sat`
`<``td` `style``=``"height: 35px; text-align: center;"``><``strong``><``span` `style``=``"color: #ba372a;"``>Sun`
``
`<``tr``>`
`<``td` `style``=``"height: 35px; text-align: center;"``>Kevin`
`<``td` `style``=``"height: 35px; text-align: center;"``>7-6`
`<``td` `style``=``"height: 35px; text-align: center;"``>Off`
``
`<``tr``>`
`<``td` `style``=``"height: 35px; text-align: center;"``>Mary Beth`
`<``td` `style``=``"height: 35px; text-align: center;"``>12-8`
`<``td` `style``=``"height: 35px; text-align: center;"``>Off`
`<``td` `style``=``"height: 35px; text-align: center;"``>12-8`
`<``td` `style``=``"height: 35px; text-align: center;"``>9-5`
``
`<``tr``>`
`<``td` `style``=``"height: 35px; text-align: center;"``>Don `
`<``td` `style``=``"height: 35px; text-align: center;"``> Off`
`<``td` `style``=``"height: 35px; text-align: center;"``> 12-8`
`<``td` `style``=``"height: 35px; text-align: center;"``>12-8`
`<``td` `style``=``"height: 35px; text-align: center;"``>9-6`
`<``td` `style``=``"height: 35px; text-align: center;"``>10-7`
`<``td` `style``=``"height: 35px; text-align: center;"``>Off`
`<``td` `style``=``"height: 35px; text-align: center;"``> Off`
``
`<``tr``>`
`<``td` `style``=``"height: 35px; text-align: center;"``>Jerome`
`<``td` `style``=``"height: 35px; text-align: center;"``>Off`
`<``td` `style``=``"height: 35px; text-align: center;"``>8-4`
``
``
``
`<``p``> `
`<``p``> `
`<``h3` `id``=``"mcetoc_1d6qrcts13"``>Current Parking Session`
`<``p``>Our current parking session is April.  May permits will be made available soon.`
`<``h3` `id``=``"mcetoc_1d6qrcts14"``>Notes on Database of the demo`
`<``h5``>Date of Last DB restore :  `
`<``p``>Set T2P number in Preview to:  6135196060  613-800-3392 `
`<``p``> `
**No Payment Options**
`<``p` `class``=``"alert alert-danger"``>There are no payment options available. Please contact an administrator for more information.`
**Permit PDF Layout**
`<``div` `id``=``"header-img"``>`
`<``table` `style``=``"width: 850px;"``>`
`<``tbody``>`
`<``tr``>`
`<``td` `style``=``"width: 600px;"``><``img` `style``=``"display: block; margin-left: auto; margin-right: auto;"` `src``=``"/uploads/FILES/OC_TOMA/TomahawkUniversity_logo.png"` `width``=``"314"` `height``=``"81"` `/>`
``
``
``
`<``br` `/>`
`<``table` `style``=``"height: 500px; width: 852px;"``>`
`<``tbody``>`
`<``tr``>`
`<``td` `style``=``"width: 560px; text-align: center;"``>`
`<``h2` `id``=``"mcetoc_1dholgses1"``> `
`<``table` `class``=``"table table-striped"``>`
`<``tbody``>`
`<``tr``>`
`<``td``>Permit Holder`
`<``td``>[permitpdf user=fullname]`
``
`<``tr``>`
`<``td``>Lot`
`<``td``>`
`<``p``>[permitpdf permit=lotshortname]: [permitpdf permit=lotname]`
`<``p``>[permitpdf permit=location]`
``
``
`<``tr``>`
`<``td``>Permit No.`
`<``td``>[permitpdf permit=permitno]`
``
`<``tr``>`
`<``td``>Vehicle(s)`
`<``td``>`
`<``p``>[permitpdf vehicle=all]`
`<``p``>[permitpdf vehicle=1]`
``
``
`<``tr``>`
`<``td``>Expiry`
`<``td``>`
`<``p``>[permitpdf permit=expiry]`
``
``
`<``tr``>`
`<``td``> `
`<``td``>`
`<``h1` `class``=``"barcode"``>*[permitpdf permit=permitno]TT*`
``
``
``
``
``
`<``td` `style``=``"width: 560px; text-align: center;"``> `
`<``h4``><``span` `style``=``"color: #ff0000;"``>Automated License Plate Recognition`
`<``p``>We offer full integration with <``span` `style``=``"color: #ff0000;"``><``a` `style``=``"color: #ff0000;"` `href``=``"https://ops-com.com/parking-security-platform/license-plate-recognition/"``><``em``>three types<``a` `style``=``"color: #ff0000;"` `href``=``"https://ops-com.com/parking-security-platform/license-plate-recognition/"``> of fixe<``a` `style``=``"color: #ff0000;"` `href``=``"https://ops-com.com/parking-security-platform/license-plate-recognition/"``>d and mobile LPR.  <``a` `style``=``"color: #ff0000;"` `href``=``"https://ops-com.com/parking-security-platform/parking-enforcement/"``>Android integration makes it as simple as taking a picture.  Mobile ANPR hardware is so lightweight it can be easily transferred from one vehicle to another.  Our static mounted cameras allow tracking 24 hours a day 7 days a week.`
`<``p``>Leave behind the need for multiple integrations, numerous troubleshooting environments and licensing fees.  Our <``span` `style``=``"color: #ff0000;"``><``a` `style``=``"color: #ff0000;"` `href``=``"https://ops-com.com/parking-security-platform/license-plate-recognition/pl8rdr-lpr/"``><``strong``>PL8RDR license plate reader hardware sets a new standard in simplified LPR and ANPR camera technology.`
`<``p``>Automated parking software and electronic parking ticket system.`
`<``h4` `id``=``"mcetoc_1dholej2b0"``><``span` `style``=``"color: #ff0000;"``>Temporary Parking with Text2Park.Me`
`<``p``><``strong``><``span` `style``=``"color: #ff0000;"``><``a` `style``=``"color: #ff0000;"` `href``=``"https://ops-com.com/parking-security-platform/parking-management/temp-parking/"``>Text2Park.Me is an integrated feature of our<``strong``> parking and security management solution!  Offers parking services to any client through the use of standard cellular phone <``span` `style``=``"color: #ff0000;"``><``a` `style``=``"color: #ff0000;"` `href``=``"https://en.wikipedia.org/wiki/SMS"``>SMS/text messaging.`
``
``
``
``
``
**Temp Permit Layout**
`<``p` `style``=``"text-align: center;"``><``img` `src``=``"/uploads/FILES/OC_TOMA/TomahawkUniversity_logo.png"` `alt``=``"Round Purple"` `width``=``"250"` `height``=``"100"` `/>`
`<``p``>This permit is valid only for the date(s) as purchased and printed on the face of this permit via <``em``><``strong``>ParkAdmin - UNA Transportation Services. This permit is valid in specified parking areas only and is not transferable to any other vehicle or user. Vehicles found displaying fraudulent permits will be ticketed and/or towed. Permit must be displayed and visible from the front windshield of the parked vehicle while parked on campus. It is the responsibility of the permit holder to display in accordance with this permit any supporting documentation required to substantiate the validity of said permit.  `
`<``div` `style``=``"border: solid 1px black; padding: 10px; text-align: center; font-size: 24pt; text-transform: uppercase;"``>[permittemppdf vehicle=plate]`
`<``p``> `
`<``table` `style``=``"width: 851px; height: 117px;"` `cellpadding``=``"5"` `align``=``"center"``>`
`<``tbody``>`
`<``tr` `style``=``"height: 49px;"``>`
`<``td` `style``=``"width: 118.667px; height: 49px;"` `align``=``"right"``><``strong``>Vehicle:`
`<``td` `style``=``"width: 730.667px; height: 49px;"``>[conditional var=permittemp.VehicleID test=equal value=-1][permittemppdf vehicle=guest][/conditional][conditional var=permittemp.VehicleID test=notequal value=-1][permittemppdf vehicle=year] [permittemppdf vehicle=colour] [permittemppdf vehicle=make] [permittemppdf vehicle=type][/conditional]`
``
`<``tr` `style``=``"height: 17px;"``>`
`<``td` `style``=``"width: 118.667px; height: 17px;"` `align``=``"right"``><``strong``>Permit No:`
`<``td` `style``=``"width: 730.667px; height: 17px;"``>[permittemppdf permit=permitno]`
``
`<``tr` `style``=``"height: 17px;"``>`
`<``td` `style``=``"width: 118.667px; height: 17px;"` `align``=``"right"``><``strong``>Lot Name:`
`<``td` `style``=``"width: 730.667px; height: 17px;"``>[permittemppdf permit=lotname]`
``
`<``tr` `style``=``"height: 17px;"``>`
`<``td` `style``=``"width: 118.667px; height: 17px;"` `align``=``"right"``><``strong``>Location:`
`<``td` `style``=``"width: 730.667px; height: 17px;"``>[permittemppdf permit=location]`
``
``
``
`<``p``> `
`<``p` `style``=``"text-align: center;"``>Valid For`
`<``p` `style``=``"text-align: center;"``>[permittemppdf permit=expiry]`
`<``div` `style``=``"text-align: center;"``>[conditional var=permittemp.DoNotTow test=true]`
`<``p` `style``=``"color: red; font-size: 18pt;"``>Do Not Tow`
`[/conditional]`
`<``div` `class``=``"barcode stretch1-2"` `style``=``"padding: 10px; text-align: center; font-size: 30pt;"``>[permittemppdf permit=barcode]`
**Temp Permit Text**
`<``p``>This permit is valid only for dates as purchased and printed on the face of this permit only. This permit is valid in specified parking areas only and is not transferable to any other vehicle or user. Vehicles found displaying fraudulent permits will be ticketed and/or towed.<``br` `/><``br` `/>Permit must be displayed and visible from the front windshield of the parked vehicle while parked on campus.<``br` `/><``br` `/>It is the responsibility of the permit holder to display in accordance with this permit any supporting documentation required to substantiate the validity of said permit.<``br` `/><``br` `/>Parking Services`
## Popup Disclaimers You may opt to place popup disclaimers throughout the system. These popup windows can be triggered to appear based on navigation to a page or associated with a button on a page. - Appeals Disclaimer - Locker Disclaimer - Permit Disclaimer - Vehicle Disclaimer
**Appeals Disclaimer**
`<``p``>Please NOTE: By Appealing this citation, <``br` `/>You will be waiving the early Payment Discount`
**Locker Disclaimer**
`<``p``><``span` `style``=``"font-size: 14px;"``><``span` `style``=``"font-family: verdana,geneva,sans-serif;"``><``strong``>Summer rentals and extensions, must be made in person  *an additional rental fee may apply<``br` `/>        <``br` `/><``strong``>Fees and Registration Cost : <``br` `/><``strong``>    $23 for ½ locker valid for use between August 15 to April 30      <``br` `/>    <``strong``>$35 for Full Lockers valid for use between August 15 to April 30           <``span` `style``=``"font-size: 14px;"``><``span` `style``=``"font-family: verdana,geneva,sans-serif;"``>    `
`<``p``><``span` `style``=``"font-size: 14px;"``><``span` `style``=``"font-family: verdana,geneva,sans-serif;"``>Please note due to supply and demand lockers located in X are subject to rental restrictions of <``strong``>ONE LOCKER PER STUDENT. Students are able to purchase multiple lockers in all other areas of the school. `
`<``p``><``span` `style``=``"font-size: 14px;"``><``span` `style``=``"font-family: verdana,geneva,sans-serif;"``><``strong``>Terms and Conditions`
`<``p``><``span` `style``=``"font-size: 14px;"``><``span` `style``=``"font-family: verdana,geneva,sans-serif;"``><``strong``>Reminders about the End of Rental Terms<``br` `/>Two weeks before the end of your Rental Term, an email will be sent to you to remind you that you need to vacate your locker; student should verify that email address and update it. If your locker has not been emptied after your Rental Term expires, your lock will be cut and the contents of your locker will be removed and put into storage. If you do not come to reclaim your belongings from the Locker Administrator within <``strong``>ten business days, they will be donated or thrown out. The Locker Program is not responsible for any items subject to removal from a locker.`
`<``p``><``span` `style``=``"font-size: 14px;"``><``span` `style``=``"font-family: verdana,geneva,sans-serif;"``><``strong``>Locker Access<``br` `/>The Locker Program reserves the right to access lockers at its sole discretion if there is a suspected security risk or there is an environmental concern such as pest control or odors. Security has the right to enter a locker at any time should they suspect it contains items that put the college or university environment in danger. Any criminal activity will be reported to police. The college or university is required to provide police with access in the event of a criminal investigation.       `
**The Permit Disclaimer**
`<``p``><``span` `style``=``"font-size: 14px;"``><``span` `style``=``"font-family: verdana,geneva,sans-serif;"``><``strong``>The Permit Disclaimer Information `
`<``p``><``span` `style``=``"font-size: 14px;"``><``span` `style``=``"font-family: verdana,geneva,sans-serif;"``><``img` `style``=``"float: right; height: 120px; width: 256px; margin: 5px;"` `src``=``"/MEDIA/demo_extras/TomahawkUniversity_logo.png"` `alt``=``""` `/>`
`<``p` `style``=``"text-align: justify;"``><``span` `style``=``"font-size: 14px;"``><``span` `style``=``"font-family: verdana,geneva,sans-serif;"``>Set your terms and conditions here and insist that users agree prior to the purchase.  `
`<``p` `style``=``"text-align: justify;"``><``span` `style``=``"font-size: 14px;"``><``span` `style``=``"font-family: verdana,geneva,sans-serif;"``>By Purchasing your parking permit you agree to the terms and conditions set forth herein and further agree to purchase parking here on this day and that other day, from this day forward.`
`<``p` `style``=``"text-align: justify;"``><``span` `style``=``"font-size: 14px;"``><``span` `style``=``"font-family: verdana,geneva,sans-serif;"``>You agree to park between the lines and only take up one spot. It is also understood that parking here is at your own risk and that you will not sell , lend, copy or distribute your pass to any other individual with out written consent which has been noterized and seal by the govenment of this university countersigned by the Dean. President, Vice President CEO, grounds keeper and the crossing guard. All Permits are the property of the school and willl be returned at the end of use. Failure to return the  physical permit is subject to a fee of $38,496.98 applied to your pre approved credit card.`
`<``p` `style``=``"text-align: justify;"``><``span` `style``=``"font-size: 14px;"``><``span` `style``=``"font-family: verdana,geneva,sans-serif;"``>Thank you  for using the Parking Service`
**The Vehicle Disclaimer**
`<``p``><``span` `style``=``"font-family: verdana, geneva, sans-serif; font-size: 14px;"``>By adding this vehicle/license plate to my OperationsCommander profile, I agree to assume all responsibilities for the vehicles registered herein, to adhere to the Traffic and Parking Regulations, as amended from time to time and authorized by the Board of Governors, and to accept all the conditions contained therein. I acknowledge having read these regulations, and further certify that I am in possession of a valid driver's license and that the vehicle registered for parking is properly licensed and insured.`
Email Headers and Footers Configuration These are the common elements that will be used for all outgoing emails. You will probably want to customize the messages as well as add your logo to the header, although there are no rules here you can decide, for example, to put the logo in the footer. Click on toggle templates and have a look at: - Header - You will want to customize this content. - Footer - You will want to customize this content.
**Header Template for Default Email Template**
## Email Templates These are the ones I believe you will be using at this point. - Appeal Decision - Appeal Submitted - Standard. Edits Optional. - Lost Password - Standard. Edits Optional. - Create Password registration email. - Standard. Edits Optional. - User Receipt - Standard. Edits Optional. - Waitlist Selected - Standard. Edits Optional.
**Appeal Decision**
`<``p``>Dear [user show=firstname] [user show=lastname],<``br` `/> <``br` `/> Your violation [violation show=Ticket] has been: [violation show=appeal_type].<``br` `/> [conditional var=violation.appealType test=eq value=2]`
`<``table``>`
`<``tbody``>`
`<``tr``>`
`<``th` `style``=``"text-align: right;"``>Original Value:`
`<``td``>[violation show=fine]`
``
`<``tr``>`
`<``th` `style``=``"text-align: right;"``>Current Value:`
`<``td``>[violation show=final_fine]`
``
``
``
`<``p``>[conditional] <``br` `/> <``strong``>Administrator Comments: [violation show=AppealAdminComment]`
**Appeal Submitted**
`<``p``>Your appeal has been submitted for ticket number <``strong``>[violation show=Ticket] on [violation show=TicketAppeal format="Y-m-d h:i a"].`
`<``p``>Thank you.`
**Lost Password**
`<``p``>Hello [user firstname],`
`<``p``>Please click <``a` `href``=``"[passwordreset]"``>here to reset your password.`
`<``p``>You may change your profile at the following location:`
`<``p``> `
**Permit Invoice**
`<``table` `style``=``"width: 100%;"``>`
`<``tbody``>`
`<``tr``>`
`<``td` `style``=``"width: 50%;"` `colspan``=``"2"``> `
`<``td` `style``=``"text-align: right;"` `colspan``=``"2"``>`
`<``p``> Address of Invoicing Company<``br` `/>Address line 2<``br` `/>Address line 3`
``
``
`<``tr``>`
`<``td` `colspan``=``"2"``>`
`<``h1` `style``=``"text-align: center;"``>Sample Invoice<``img` `style``=``"display: block; margin-left: auto; margin-right: auto;"` `src``=``"/uploads/FILES/PA-DEMO/Banner_W_Tagline.png"` `alt``=``""` `width``=``"242"` `height``=``"58"` `/> `
`<``p``> `
``
`<``td` `style``=``"text-align: right;"` `colspan``=``"2"``>`
`<``h3``> `
`<``h3``>Invoice`
``
``
`<``tr``>`
`<``td` `style``=``"vertical-align: top;"``>Bill To:`
`<``td` `style``=``"text-align: right; vertical-align: top;"``>`
`<``p``>[invoice account="name"]`
`<``p``>[invoice account="fulladdress"]`
``
`<``td` `style``=``"text-align: right; vertical-align: top;"``>`
`<``p``>Invoice No.:`
`<``p``>Date:`
`<``p``>Due Date:`
``
`<``td` `style``=``"text-align: right; vertical-align: top;"``>`
`<``p``>[invoice show="invoiceno"]`
`<``p``>[invoice show="billdate"]`
`<``p``>[invoice show="duedate"]`
``
``
``
``
`<``p``> `
`<``p``>[invoice show="details"]`
`<``p``> `
`<``table` `style``=``"float: right;"` `border``=``"0"` `cellspacing``=``"0"``>`
`<``tbody``>`
`<``tr``>`
`<``td` `style``=``"text-align: right;"``>Subtotal`
`<``td` `style``=``"text-align: right;"``> `
`<``td` `style``=``"text-align: right;"``>$[invoice show="subtotal"]`
``
`<``tr``>`
`<``td` `style``=``"text-align: right;"``>Taxes`
`<``td` `style``=``"text-align: right;"``> `
`<``td` `style``=``"text-align: right;"``>$[invoice show="taxtotal"]`
``
`<``tr``>`
`<``td` `style``=``"text-align: right;"``>Total`
`<``td` `style``=``"text-align: right;"``> `
`<``td` `style``=``"text-align: right;"``>$[invoice show="amounttotal"]`
``
`<``tr``>`
`<``td` `style``=``"border-top: solid 3px #000000; border-color: #000000;"``>`
`<``h2``>Balance Due`
``
`<``td` `style``=``"border-top: 3px solid #000000; border-right-color: #000000; border-bottom-color: #000000; border-left-color: #000000; width: 20px; text-align: right;"``> `
`<``td` `style``=``"border-top: 3px solid #000000; border-right-color: #000000; border-bottom-color: #000000; border-left-color: #000000; text-align: right;"``>`
`<``h2` `style``=``"text-align: right;"``>$[invoice show="amounttotal"]`
``
``
``
``
`<``p``> `
`<``p``> `
**Create password registration email**
`<``p``> `
`<``p``><``strong``>Hello!`
`<``p``> `
`<``p``>You are recieving this email because you have created a new account.`
`<``p``> `
`<``p``><``a` `href``=``"[activateinfo]"``>Create password`
`<``p``> `
`<``p``>Please complete your registration.`
`<``p``> `
`<``p``> `
`<``p``>Regards,`
`<``p``><``br` `/>Tomahawk University Parking Services`
`<``p``> `
`<``p``> `
`<``p``> `
`<``p``>If you’re having trouble clicking the "Create Password" button, copy and paste the URL below into your web browser:`
`<``p``> `
`<``p``>[activateinfo]`
**User Receipt**
`<``p``><``img` `style``=``"margin-right: 90px; margin-left: 90px;"` `src``=``"/uploads/FILES/PA-DEMO/TomahawkUniversity_logo.png"` `width``=``"197"` `height``=``"100"` `/><``br` `/><``br` `/>[user_card]`
`<``p``> `
`<``table``>`
`<``tbody``>`
`<``tr``>`
`<``td``><``strong``>Name:  `
`<``td``>[payinfo user=fullname]`
``
`<``tr``>`
`<``td``><``strong``>Company:  `
`<``td``>N/A`
``
`<``tr``>`
`<``td``><``strong``>Submitted:  `
`<``td``>[payinfo payment=submitdate]`
``
`<``tr``>`
`<``td``><``strong``>Amount:  `
`<``td``>[payinfo payment=amount]`
``
`<``tr``>`
`<``td``><``strong``>Method:  `
`<``td``>[payinfo payment=method]`
``
`<``tr``>`
`<``td``><``strong``>Processed:  `
`<``td``>[payinfo payment=processdate]`
``
`<``tr``>`
`<``td``><``strong``>Confirm Code:  `
`<``td``>[payinfo payment=confirmcode]`
``
``
``
`<``p``> `
`<``p``><``a` `class``=``"btn btn-info"` `href``=``"[payinfo payment=receipt_url]"``>View the receipt online`
`<``p``> `
**Waitlist Selected**
`<``p``>You have been selected to receive a permit in lot [waitlist show="lot"].`
`<``p``>You have until [waitlist show="date_to_pay"] to pay for the permit before losing the permit and being returned to the waiting list.`
## Disclaimers & Messaging There are only 2 that would be of concern. - Payment Footer - Receipt Header
**Payment Footer**
`

Thank you for the payment of your Parking Permit or Violation. By purchasing this permit you have agreed to the terms and conditions prior to moving on to the permit purchase section.

`
`

Permit distribution: Permits are mailed out on the 15th of the month to your selected mailing address. If you wish to pick it up please contact parking@yourschool.com and quote your name and permit #. Any permits purchased after the 15th can only be picked up at the office.

`
`

You may pick up your permit at the Parking Office between

`
`

9:00 am and 3:00 PM Monday to Friday.

`
`

If you have any questions please contact The Parking Office

`
`

855-410-4141

`
**Receipt Header**
`<``table` `align``=``"center"` `width``=``"700"``>`
`    ``<``tbody``>`
`        ``<``tr``>`
`            ``<``td` `align``=``"left"``><``span` `style``=``"font-family:verdana,geneva,sans-serif;"``>Reciept header beside  HST in a table`
`            ``<``td` `align``=``"right"``><``span` `style``=``"font-family:verdana,geneva,sans-serif;"``>HST #1234556789`
`        ```
`        ``<``tr``>`
`            ``<``td` `align``=``"left"``> `
`            ``<``td` `align``=``"right"``> `
`        ```
`        ``<``tr``>`
`            ``<``td` `align``=``"left"` `colspan``=``"2"``>`
`            ``<``p` `style``=``"text-align: center;"``><``span` `style``=``"font-size: 18px;"``>Thank you for parking at Tomahawk University...your payment details appear below.`
`            ``<``p` `style``=``"text-align: center;"``><``span` `style``=``"font-size: 18px;"``><``em``><``strong``><``span` `style``=``"font-size: 14px;"``>If you have purchased a temporary parking permit (print at home parking permit),<``br` `/>`
`            ``please proceed to the (H)istory page of your ParkAdmin profile and select the printer icon<``br` `/>`
`            ``located beside the respective parking permit number.`
`            ```
`        ```
`    ```
``
## Notice Literature These are notices that get sent out to end users as an email. They would use the Headers and Footers you configured above. - Overdue Notice Literature - sent to a user when they have an overdue violation. You will want to customize this message. - New Notice Literature - sent to a user when they have received a violation. You will want to customize this message.
**Overdue Notice Literature**
`<``p``>This letter will serve as notice and advise you that your account with Parking Services is now past due. Please refer to the table below for a report of your outstanding items remaining unpaid with Parking Services at the time of this mailing. Further details regarding this overdue amount are available to you by logging-in to the OperationsCommander system. Your username required to access ParkAdmin is provided above. If you have forgotten your password, please use the "Lost or Forgotten Password" link on the main log-in page or contact Parking Services. For your convenience, your outstanding balance can be paid securely on-line using your credit card (Visa or MasterCard). You can also settle your account with Parking Services by mailing your cheque or money order to our office after selecting your payment option and obtaining a reference number on-line from ParkAdmin - please make your cheque payable to and mail same to Parking Services at the following address: Parking Services If you have already settled your account with Parking Services, we apologize for the inconvenience and thank you for your payment. By this notice, Parking Services advises that overdue accounts listed under a public profile remaining unpaid within 30 days of this notice will be forwarded for collection/recovery. If you are registered as a student at the outstanding balance will be forwarded to the Business Office 14 days post violation date by Parking Services. With this application against your student account, student transcripts will not be released until all accounts are settled. Thank you for your prompt attention to this matter.`
**New Notice Literature**
`<``p``>This communication will serve as notice and advise you that you have received a parking violation notice from Parking Services. Your violation may be eligible for an early payment discount. To view additional details about this violation or to appeal/make payment, please log-in to your ParkAdmin account.`
# Email Server Communication Errors ## Finding Communication Errors It is possible, that if some of the system settings and classic system settings are not setup correctly to use a **From** address, that you will receive a communication error as a response. One example would be when trying to submit the **Forgot Password** form found on the user side login page. An error message of this nature would look something like this: [![image.png](https://opscom.wiki/uploads/images/gallery/2024-06/scaled-1680-/preimage.png)](https://opscom.wiki/uploads/images/gallery/2024-06/preimage.png) As mentioned, this is because there is no **From** address setup in the system. ## Fixing Communication Errors To fix this issue you would just need to update the **Reply-to Admin Email Address** found under **Classic System Settings.** [![image.png](https://opscom.wiki/uploads/images/gallery/2024-06/scaled-1680-/Uwhimage.png)](https://opscom.wiki/uploads/images/gallery/2024-06/Uwhimage.png) Once you have updated the email address this issue should be resolved. If the issue is still not resolved after completing these fields, please contact support for further assistance. # Default Header and Footer for Mobile Readiness and SwiftDeploy ## Accessing System Settings First we must go into **System Settings** from the **System Configuration** menu. [![image.png](https://opscom.wiki/uploads/images/gallery/2024-06/scaled-1680-/yBQimage.png)](https://opscom.wiki/uploads/images/gallery/2024-06/yBQimage.png) We are looking for the **Global** component in the list of system setting components. [![image.png](https://opscom.wiki/uploads/images/gallery/2024-06/scaled-1680-/WPoimage.png)](https://opscom.wiki/uploads/images/gallery/2024-06/WPoimage.png) In Global Setting we will see two areas where we can configure images to be used. - Default Site Logo - Default Site Header [![image.png](https://opscom.wiki/uploads/images/gallery/2024-06/scaled-1680-/33simage.png)](https://opscom.wiki/uploads/images/gallery/2024-06/33simage.png) By clicking on **Select Image** we will be taken to the **Manage Files** section where images and files are stored. ## Setting the Default Logo Here we will select an image to be used as the default site logo. [![image.png](https://opscom.wiki/uploads/images/gallery/2024-06/scaled-1680-/1qyimage.png)](https://opscom.wiki/uploads/images/gallery/2024-06/1qyimage.png) ## Setting the Default Header Image We can now set the Default Site Header image. [![image.png](https://opscom.wiki/uploads/images/gallery/2024-06/scaled-1680-/X2ximage.png)](https://opscom.wiki/uploads/images/gallery/2024-06/X2ximage.png) Once the images are selected they will appear in the configuration settings. [![image.png](https://opscom.wiki/uploads/images/gallery/2024-06/scaled-1680-/zSDimage.png)](https://opscom.wiki/uploads/images/gallery/2024-06/zSDimage.png) ## Where The Changes Appear These images will appear in various places in the system. If no header or logo is set in the Templates and Designs section of the system, these default images will be used. In our example we are using the default header and logo on the user portal... [![image.png](https://opscom.wiki/uploads/images/gallery/2024-06/scaled-1680-/0Pzimage.png)](https://opscom.wiki/uploads/images/gallery/2024-06/0Pzimage.png) As well as the phone interface utilized in **Real-Time Parking**. [![image.png](https://opscom.wiki/uploads/images/gallery/2024-06/scaled-1680-/w1fimage.png)](https://opscom.wiki/uploads/images/gallery/2024-06/w1fimage.png) # Email Templates ## Navigate to Email Templates In order to find your current default email templates, you will have to login as an admin and navigate to the system config cog. From this drop-down menu, you should see **Email Content**. [![image.png](https://opscom.wiki/uploads/images/gallery/2024-06/scaled-1680-/USXimage.png)](https://opscom.wiki/uploads/images/gallery/2024-06/USXimage.png) Editing Default Email Templates To edit the default email templates, you can click the **Edit** button next to the template you wish to adjust. After you click this, you will be taken to another area where you can make your changes to the current email template. [![image.png](https://opscom.wiki/uploads/images/gallery/2024-06/scaled-1680-/79Nimage.png)](https://opscom.wiki/uploads/images/gallery/2024-06/79Nimage.png) Using Shortcodes Each email template will have available shortcodes that you can use to craft your message to your liking. The shortcode tokens are displayed on the left of the template editor. As you can see in the image below, the email template for **Appeal Submitted by User** offers the ability to craft messages without knowing when the ticket was appealed, as well as the ticket being appealed. This offers you a very quick and seamless way to make your email templates more engaging and informative. [![image.png](https://opscom.wiki/uploads/images/gallery/2024-06/scaled-1680-/Uo4image.png)](https://opscom.wiki/uploads/images/gallery/2024-06/Uo4image.png) You should be able to use these codes in the smart editor to the right and it will display the appropriate information to the desired user. The smart editor also gives you the ability to add images and format your messages. Email Template Fields - What do they do?
Label##### The label field is how you will identify your email templates.
Type##### The type is an nonadjustable value that lets you know the type of the email template.
Language##### This field contains two options that allow you to select between French or English.
Layout##### Select the layout that surrounds your messaging, this allows you to have multiple different layouts for different email templates. These layouts include your email header, footer, and its styling. You can create or adjust email template layouts under **System Config → Email Headers & Footers.**
Subject##### This is the subject of the message you wish to send under the current email template.
HTML Content##### Here you will write the message your users will receive. You can insert images, shortcodes, and use the smart editor, to format your messages just like other word processors.
Text Content ##### This section is a simple text editor that does not offer the use of shortcodes or any formatting. This is simply for the message itself and not necessarily the
# Pages and Content Blocks ## Accessing System Messaging To access and manage your **System Messaging** navigate to the gears icon ![](https://ops-com.atlassian.net/wiki/download/attachments/762387/image2019-4-8_9-42-38.png?version=1&modificationDate=1554731403000&cacheVersion=1&api=v2) and click on **Content & Designs** -> **Pages and Content Blocks**. [![2024-10-04_14-34-02.png](https://opscom.wiki/uploads/images/gallery/2024-10/scaled-1680-/2024-10-04-14-34-02.png)](https://opscom.wiki/uploads/images/gallery/2024-10/2024-10-04-14-34-02.png) ## Creating Pages We also provide a video to visually demonstrate how to use system messaging [https://drive.google.com/file/d/1DU3qorWnAp\_2N9mcNGFYTttNHMeRpXsQ/view](https://drive.google.com/file/d/1DU3qorWnAp_2N9mcNGFYTttNHMeRpXsQ/view) **Pages** display the visual content found throughout your application. You can edit the contents of your page or post a **System Message** by using the Disclaimer Shortcode on the **Page** you want it to show up on. **Shortcodes** also make it convenient to add interactive content to your pages. For more information on **Shortcodes** scroll to the bottom of this page.
- To create a **Page** click the **Create Page/Message** button at the top right of the **Manage System Messaging** screen. It doesn't matter what tab you're on when you do this as you will specify the **Page Type** when you go to create the page.
[![image.png](https://opscom.wiki/uploads/images/gallery/2024-06/scaled-1680-/VEYimage.png)](https://opscom.wiki/uploads/images/gallery/2024-06/VEYimage.png)
- Once you click this button OPS-COM will take you to a different section where you can set the properties and content of the page. Below is a detailed description of the options available to you when creating new **Pages**.
Page AttributesShort Description
**Title**The **Title** of the page you wish to create, which will be the name displayed on the user navigation bar.
**Path**The path after the domain. i.e. **login*****/** → This is the home page* Changing this to **lockers/area/1** will display **login/lockers/area/1** as the URL for that page.
**Visibility**You can toggle the visibility of your pages which will make it so your users can't see the page anymore, but you can still edit it.
**Language**Use this to select between two language options for a specific page. Tomahawk currently supports **English** and **French**.
**Layout**You can select the layout of your page here. Usually, you will have the **Default Layout** selected.
**Content**Your content will be the text on the page you are currently editing. You can also use **Shortcodes** here to display a body of material or feature. For example, a user login form could be displayed on your homepage.
- **Important:** Make sure you select **Page** under the drop-down menu next to **Page Type** and not **Message**. Below we will go into detail on how to create a **Page** field by field. The images below give you a good visual example of what field is being explained, if there is a certain field you are unsure about you can easily find the picture and read from there. - Start by giving your page a **Title** and specify how you would like the **URL** at the top of your page to be displayed.
What is a URL?...
[![image.png](https://opscom.wiki/uploads/images/gallery/2024-06/scaled-1680-/C4Limage.png)](https://opscom.wiki/uploads/images/gallery/2024-06/C4Limage.png)
- Adjust the visibility of your page by toggling the **Visible** button on/off. The **Page** will still be editable in the **System Messaging** section but it will not be visible to your users who are on your **Page** or **System Message**.
Toggle On(Visible Page)Toggled Off(Invisible Page)
![](https://ops-com.atlassian.net/wiki/download/thumbnails/762387/visible.png?version=1&modificationDate=1675158301000&cacheVersion=1&api=v2&width=109&height=54) ![](https://ops-com.atlassian.net/wiki/download/thumbnails/762387/2022-12-08_9-31-34.png?version=1&modificationDate=1670491946000&cacheVersion=1&api=v2&width=105&height=55)
- Toggling the **Page** as invisible will show it under the **Messages** tab like seen in the image below to signify it cannot be seen by your users.
[![image.png](https://opscom.wiki/uploads/images/gallery/2024-06/scaled-1680-/dZ1image.png)](https://opscom.wiki/uploads/images/gallery/2024-06/dZ1image.png)
- Select the default **Language** and **Layout** of your page. If you are not sure which template to use you can leave it as the **Default Layout.**
[![image.png](https://opscom.wiki/uploads/images/gallery/2024-06/scaled-1680-/rzPimage.png)](https://opscom.wiki/uploads/images/gallery/2024-06/rzPimage.png)
- Provide the content of your page in the editor found under the page settings. This content will be the main content of your **Pages**; you can use **Templates & Design** to edit the other sections of your pages such as the **Header-Content** and **Footer-Content.**
- OPS-COM uses **Shortcodes** to display a section of interactive or static content like a user login, permits, etc.
[![image.png](https://opscom.wiki/uploads/images/gallery/2024-06/scaled-1680-/7JRimage.png)](https://opscom.wiki/uploads/images/gallery/2024-06/7JRimage.png) ## Content Placement Depending on where you place your content it can appear differently. OPS-COM's smart editor reads content top to bottom, left to right. Meaning that placing a user login **Shortcode** before your content will look dramatically different than if you placed the **Shortcode** last. You can see a few visual examples of how this works below. ### By Example: **Shortcodes Before Content**
We are going to use the Lot Information Shortcode to display our available lots **before** our text content.
[![image.png](https://opscom.wiki/uploads/images/gallery/2024-06/scaled-1680-/ZuRimage.png)](https://opscom.wiki/uploads/images/gallery/2024-06/ZuRimage.png) As you can see this displays our lot information **before** our content. [![image.png](https://opscom.wiki/uploads/images/gallery/2024-06/scaled-1680-/rp2image.png)](https://opscom.wiki/uploads/images/gallery/2024-06/rp2image.png)
### By Example: **Shortcodes After Content**
Once again we are going to use the Lot Information Shortcode to display our available lots **after** our **Content**.
[![image.png](https://opscom.wiki/uploads/images/gallery/2024-06/scaled-1680-/BdIimage.png)](https://opscom.wiki/uploads/images/gallery/2024-06/BdIimage.png) As you can see this placed the **Shortcode** **after** the lot information [![image.png](https://opscom.wiki/uploads/images/gallery/2024-06/scaled-1680-/9fKimage.png)](https://opscom.wiki/uploads/images/gallery/2024-06/9fKimage.png)
## Editing Pages Keep in mind that the **URL / System Location** next to the page is the area in OPS-COM that you are updating. Therefore, if you wished to update the permit screen, you want to edit the page with a **System Location** of /permits You can edit your pages attributes such as the **Title, Path, Visibility, Language, Layout,** and **Content** after it has already been created.
1. To **Edit** a page, simply click on the **Edit** button next to the page **Title** you want to edit. As seen in the image below we are going to select and edit the **Appeals Message** page. [![image.png](https://opscom.wiki/uploads/images/gallery/2024-06/scaled-1680-/u9Kimage.png)](https://opscom.wiki/uploads/images/gallery/2024-06/u9Kimage.png) 2. You can now make any changes to the **Pages** content or attributes that you like. See **Creating Pages** near the top of the page if you are not sure what a specific field does. From here we can edit the format of the text such as the colour, background color, etc.. [![image.png](https://opscom.wiki/uploads/images/gallery/2024-06/scaled-1680-/Alnimage.png)](https://opscom.wiki/uploads/images/gallery/2024-06/Alnimage.png) 3. If you have not made any changes to the page you are **Editing**, you may go back to the **Page List** by clicking **Return to Page List** at the top of the screen. Clicking this button will discard **all** changes recently made. [![image.png](https://opscom.wiki/uploads/images/gallery/2024-06/scaled-1680-/Q6Cimage.png)](https://opscom.wiki/uploads/images/gallery/2024-06/Q6Cimage.png) 4. Once you have finished editing the page, click **Save Messaging** for your changes to take effect. [![image.png](https://opscom.wiki/uploads/images/gallery/2024-06/scaled-1680-/xIaimage.png)](https://opscom.wiki/uploads/images/gallery/2024-06/xIaimage.png)
## Creating System Messages Important Users will be brought back to the **Users** page if users do not agree with a **System Message**. Meaning, we use **System Messaging** as a convenient way to offer agreements and disclaimers before users make purchases of permits or lockers. ### System Messages and How they work with Pages
How do System Messages work?
**System Messages** and **Pages** work together using Disclaimer Shortcode's. When you create a **System Message,** you give that message a unique **Identifier.** System message identifiers may be used in junction with **Disclaimer Shortcodes** to display your **System Messages** onto **Pages**. The idea may be daunting at first, but once you get a better understanding of how these features work together, it will make more sense. ### Visual Example [![image.png](https://opscom.wiki/uploads/images/gallery/2024-06/scaled-1680-/hM6image.png)](https://opscom.wiki/uploads/images/gallery/2024-06/hM6image.png)
1. The **System** **Message** gets created. 2. The **System Message** is given an **Identifier** to be used with a specific **System Message** so we may access it on a **Page**. 3. We add the **Identifier** to the Disclaimer Shortcode on the **Page** that we want to display the message on. 1. ***Shortcode Example- \[disclaimer name=lockersDisclaimer dismiss=never\]*** 2. ***Shortcode Example- \[disclaimer name=vehicleDisclaimer dismiss=session show=".add-vehicle"\]*** 4. **Shortcodes** may also be used on **System Messages** to display useful content such as a detailed description of the current vehicles registered to the user. See below for a list of supported **Shortcodes**.
**System Messages** provide you with a convenient way to add alert messages to your pages that pop-up when a user clicks the page. You may create **System Messages** to be displayed on specific **Pages** using Disclaimer Shortcode's.
Message AttributesDescription
**Title**The title that will be displayed across the top of the **System Message** when users navigate to that page.
**Identifier**The identifier is used to know which page you want to display the message by using **Shortcodes**.
**Visibility**This section toggles the visibility of your page which will make it so your users may not see the page, but you can still edit it.
**Language**Select between two language options for a specific page. Tomahawk current supports **English** and **French**.
**Content**Content is what will display on the actual page. You may use **Shortcodes** here to view predefined static or interactive content. For example, a user login form could be displayed on your homepage.
1. To create a **System Message** merely click the **Create Page / Message** button on the top right of the **Manage System Messaging** screen. [![image.png](https://opscom.wiki/uploads/images/gallery/2024-06/scaled-1680-/iFKimage.png)](https://opscom.wiki/uploads/images/gallery/2024-06/iFKimage.png) 2. Make sure to select the **Page Type** from the drop-down menu and change this to **Message**. It is essential that you do not select **Page** when creating a **System Message**. [![image.png](https://opscom.wiki/uploads/images/gallery/2024-06/scaled-1680-/2Xtimage.png)](https://opscom.wiki/uploads/images/gallery/2024-06/2Xtimage.png) [![image.png](https://opscom.wiki/uploads/images/gallery/2024-06/scaled-1680-/3NSimage.png)](https://opscom.wiki/uploads/images/gallery/2024-06/3NSimage.png) 3. Create a **Title** for the message. 4. Give the message a unique **Identifier** so it can be accessed on your **Pages** using Disclaimer Shortcodes. **Shortcodes** are codes used to link our **Pages** and **System Messages** together. 5. Once an **Identifier** is created, It is essential to note that you may not use it anymore or you will get an error message. 6. You may modify the visibility of your **System Message** by toggling the **Visible** button on or off.
Toggle On(Visible)Toggled Off(Invisible)
[![image.png](https://opscom.wiki/uploads/images/gallery/2024-06/scaled-1680-/XY6image.png)](https://opscom.wiki/uploads/images/gallery/2024-06/XY6image.png) [![image.png](https://opscom.wiki/uploads/images/gallery/2024-06/scaled-1680-/L2Himage.png)](https://opscom.wiki/uploads/images/gallery/2024-06/L2Himage.png)
7. Toggling a **System Message** as invisible ensures your users won't see it. Although, you can still **edit** and **view** the **System Message** on the admin side, but it will be displayed as seen in the image below. [![image.png](https://opscom.wiki/uploads/images/gallery/2024-06/scaled-1680-/vd5image.png)](https://opscom.wiki/uploads/images/gallery/2024-06/vd5image.png) 8. Select which **Language** you would like your content to be in. OPS-COM currently supports two languages which are **English** and **French**. 9. Edit the contents of your **System Message** in the editor found below the messages fields. This is the content that your users will see and will allow you to edit and format the way the text looks. Once finished, click **Save Messaging.**
Warning Clicking **Return to Template List** before **Save Messaging** will discard all the changes you just made, meaning that the **System Message** will not get created or your changes will not occur. [![image.png](https://opscom.wiki/uploads/images/gallery/2024-06/scaled-1680-/Kkyimage.png)](https://opscom.wiki/uploads/images/gallery/2024-06/Kkyimage.png)
## Editing System Messages You can manage your **System Messages** **Title, Identifier, Visibility, Language**, as well as modify the content to include text, images, or **Shortcodes**.
1. To **Edit** your **System Messages** click the **Messages** tab under the **Manage System Messaging** page. 2. Select the **Edit** button next to the **System Message** you wish to edit. For this example, we will be editing the **Admin Dashboard.** [![image.png](https://opscom.wiki/uploads/images/gallery/2024-06/scaled-1680-/elXimage.png)](https://opscom.wiki/uploads/images/gallery/2024-06/elXimage.png) 3. You will now be able to adjust the message your users will see using the **System Messaging** editor. Below are the fields in which you can use to edit the **System Message**.
Message AttributesDescription
**Title**The title that will be displayed across the top of the **System Message** when users navigate to that page.
**Identifier**The identifier is used to know which page you want to display the message by using **Shortcodes**.
**Visibility**This section toggles the visibility of your page which will make it so your users may not see the page, but you can still edit it.
**Language**Select between two language options for a specific page. OPS-COM currently supports **English** and **French**.
**Content**Content is what will display on the actual page. You may use **Shortcodes** here to view predefined static or interactive content. For example, a user login form could be displayed on your homepage.
[![image.png](https://opscom.wiki/uploads/images/gallery/2024-06/scaled-1680-/TZlimage.png)](https://opscom.wiki/uploads/images/gallery/2024-06/TZlimage.png) 4. You may use the **Title** field to change the **Title** of the **System Message**. 5. You may use the **Identifier** field to change text used to display a **System Message** to a **Page,** but this will require you to modify all **Disclaimer Shortcodes** using the old unique **Identifier** for the message you are replacing. 6. You may click **Save Messaging** when you are finished making your changes.
[![image.png](https://opscom.wiki/uploads/images/gallery/2024-06/scaled-1680-/W08image.png)](https://opscom.wiki/uploads/images/gallery/2024-06/W08image.png) ## Add System Messages to Pages using Shortcodes Now that you know how to create your **Pages** and **System Messages** you can bring them together using a Disclaimer Shortcode. A **Shortcode** is a small body of code surrounded by **\[ \]** used to display complex templates or features. Shortcodes limit the technicality of our system by offering a convenient way to add interactive content without having to know how to script or code. Please review the Shortcodes for Use on the User Portal for a detailed description of how shortcodes work. You can also find a list of **Shortcodes** currently available to you by going to the OPS-COM Shortcode Documentation. # Templates and Design ## Overview The User Portal system allows your clients to register, add vehicles, purchase permits and pay violations. It is an important extension of your business, and it should reflect your corporate branding. ### Pages and Templates The OPS-COM user Page will store the functionality and content of your main page, while the Templates will be used to change the functionality of your pages as well as the content around the Page. ## Where to Find Templates and Design Click System Config, **Templates & Design** to access these features. [![image.png](https://opscom.wiki/uploads/images/gallery/2024-06/scaled-1680-/KgQimage.png)](https://opscom.wiki/uploads/images/gallery/2024-06/KgQimage.png) ## All Default Templates If at any point you feel that you have adjusted the **Default** <scripts> and <styles> to the point of breaking your site, or you are simply unsure what your changes have done, you can refer to these templates to restore your pages functionality and style.
**Default Script Template**
1
2
3
4
5
6
7
8
9
10
11
12
13
14
15
16
17
18
19
20
21
22
23
24
25
26
27
28
29
30
31
32
33
34
``
**Default Style Template**
1
2
3
4
5
6
7
8
9
10
11
12
13
14
15
16
17
18
19
20
21
22
23
24
25
26
27
28
29
30
31
32
33
34
35
36
37
38
39
40
41
42
``
**Default Header Template**
1
2
3
4
5
6
7
8
9
10
`<``div` `class``=``"text-center slideshow-header"``>`
`  ``<``div` `class``=``"slides"` `id``=``"slideshow-header"``>`
`  ```
`  ``<``div` `class``=``"overlay"``>`
`    ``<``img` `alt``=``""` `class``=``"img-fluid"` `src``=``"/MEDIA/demo_extras/TomahawkUniversity_logo.png"` `style``=``"display:inline; width: 450px; margin-top: 80px; margin-bottom:80px;"``/>`
`  ```
``
`[user_menu]`
## Understanding Templates & Design **Templates & Designs** are the visual functionality of your web page structured around your **Page** content. OPS-COM provides you with default templates which allow you to get started easily without having to know any code. - Once you are on the landing page for **Templates & Design,** you can view a list of your current templates, or create a new one. **Templates** contain all of the sections found on your **User Portal** except for the **Page** content found in the middle of the page. To adjust this you will have to leave Templates & Design and navigate to **System Messaging**. [![image.png](https://opscom.wiki/uploads/images/gallery/2024-06/scaled-1680-/p7wimage.png)](https://opscom.wiki/uploads/images/gallery/2024-06/p7wimage.png) - OPS-COM gives you a total of 12 section templates, 6 in English and 6 in French. (Of course, you will have to create the French content yourself as we do not provide a translator). [![image.png](https://opscom.wiki/uploads/images/gallery/2024-06/scaled-1680-/ZWOimage.png)](https://opscom.wiki/uploads/images/gallery/2024-06/ZWOimage.png) 1. Clicking on **Toggle Templates** will display all of the sections attached to that template. Templates can be created in English and French. 2. The contents of our pages are split into four separate sections. Header(1)**,** Content Header(2), Content Footer(4), and Footer(5). See **Template Layout** right below this guide to get a better understanding of the OPS-COM layout. 3. To edit a template **Section,** simply click **Edit** next to the section name. ### Template Layout Below is a visual example of how your **Pages** are split into **Sections** using **Templates**. All of the Content (3) of our Pages are added through the **System Messages** under **Pages**. [![image.png](https://opscom.wiki/uploads/images/gallery/2024-06/scaled-1680-/gJrimage.png)](https://opscom.wiki/uploads/images/gallery/2024-06/gJrimage.png) 1. **Header** - The header of your page, where you can find your header image and user navigation. 2. **Content\_Header** - Another header section for you to place content into, such as alerts or user information. Everything placed here will appear before the Content and Content Footer. 3. **Content** - The content of your pages. Content may not be added from Templates & Design and will require you to navigate to **System Messaging**. 4. **Content\_Footer** - The footer of your Content. Everything placed here will appear after the Content Header and Content. Again, you can use this to display alerts, messages, or additional content to your Template. 5. **Footer** - The footer of your page is where you can find useful information. You can use this area to advertise important information your users might need while using your system. ## Page Layouts and Templates ### Creating Layouts To create a layout simply click the **Create Layout** button found at the top right of the **Layouts** page. [![image.png](https://opscom.wiki/uploads/images/gallery/2024-06/scaled-1680-/mvtimage.png)](https://opscom.wiki/uploads/images/gallery/2024-06/mvtimage.png) You will be presented with the **Add Layout** system message. [![image.png](https://opscom.wiki/uploads/images/gallery/2024-06/scaled-1680-/ebMimage.png)](https://opscom.wiki/uploads/images/gallery/2024-06/ebMimage.png) 1. Provide the name of your layout. In this example, we are going to create our own Summer Layout to be used, instead of the default layout. 2. Click **Save Changes** when you are happy with the name of your layout. Once the **Layout** has been created, you can see it under the Layouts list. 3. If you wish to cancel the creation of your layout simply click **Close**. 4. You can see that our **Summer Layout** was added to the end of our Layouts List with no sections yet. 5. You can choose whether or not your template is the **Default** template at any time by clicking the **Non-Default** drop-down and selecting **Default**. 6. Anytime you add sections to your Templates it will display how many are attached next to **Toggle Templates**. As you can see, we don't have any **Sections** created yet so there are no numbers to be displayed, otherwise, clicking on **Toggle Templates** would show you a list of all the templates currently attached to that **Layout**. [![image.png](https://opscom.wiki/uploads/images/gallery/2024-06/scaled-1680-/lNwimage.png)](https://opscom.wiki/uploads/images/gallery/2024-06/lNwimage.png) 7. You can edit the layout name by clicking on the **Edit** button next to archive. 8. If you would like to archive a layout that you are no longer using, you can click the **Archive** button next to edit. ### Creating Templates Now that you have a better understanding of how **Templates** work with **Layouts** we can start creating our own. [![image.png](https://opscom.wiki/uploads/images/gallery/2024-06/scaled-1680-/o02image.png)](https://opscom.wiki/uploads/images/gallery/2024-06/o02image.png) 1. Click on Toggle Templates. 2. Clicking this will display the available Templates attached to the **Summer Layout**. 3. You can now **Create** a variety of templates for your page, including bilingual support. 4. If you are non-technical, it is advised not to change the code for **Scripts, Styles, Header,** and **Footer Templates**. You can use the default Style, Script, Header, and Footer Templates from All Default Templates. These can still be edited according to your company and their style guides. See **Edit the Page Style** and **Edit the Page Behaviour** below for more information. ## Edit the Page Style (CSS) Important This guide is used if you intend to adjust the **Templates** provided to you by OPS-COM. If you choose to rewrite your own Templates you can choose to ignore this.
**Content**
`/* Style properties of our page body, this affects the entire page. */`
`body {`
`    ``background``: ``black` `url``(/uploads/FILES/OC_TOMA/parking-deck.jpg) ``center` `center``;`
`    ``background-``size``: cover;`
`    ``background-attachment``: ``fixed``;`
`    ``color``: ``#FFF``;`
`}`
`/* This changes the color property of --Find where these classes are used `
`.card, .modal, .list-group-item {`
`    ``color``: ``#333``;`
`}`
**Slide Show**
`/* Below are all of the styles for our header slideshow at the top of each page. */`
`/*--------------WORD BANK---------------`
` ``* ELEMENTS: Elements are the tags with '<>' around them such as
and found in the default header and footer template.`
` ``* We access them here by giving them a Class name or ID.                                          `
` ``* PROPERTIES: Properties are used to define certain styles to a class or ID.`
` ``* CLASS: Generally used to assign a style to a group of HTML elements but can be used on single elements as well.`
` ``* They are assigned within HTML elements like this:
where MyClass would be your class name.`
` ``* ID's: Generally used to assign styles to a single element but can be used on multiple elements as well.`
` ``*`
` ``*--------------CLASSES-----------------`
` ``*`
` ``* To learn more about the CSS Position Property see: https://www.w3schools.com/cssref/pr_class_position.asp`
` ``* For more information on CSS Syntax and Selectors see: https://www.w3schools.com/css/css_syntax.asp`
` ``* It is not recommended to adjust with the position of elements unless you are sure about the changes being made. This can dramatically change how content is positioned. `
` ``*/`
`/* Class Names and Elements`
` ``* [.slideshow-header]: Container that contains our slides and overlay.`
` ``*`
` ``* Properties`
` ``* @position: Adjust the position of the slideshow-header. For more information see: https://www.w3schools.com/css/css_positioning.asp`
` ``*/`
`.slideshow-header {`
`    ``position``:``relative``;`
`}`
`/* Class Names and Elements `
` ``* [.slideshow-header]: Container that contains our slides and overlay.`
` ``* [.slides]: Controls the style properties of the individual slides.`
` ``* `
` ``* Properties  `
` ``* @z-index: Adjust the stack placement of the [.slideshow-header] and [.slides] along the Z axis.`
` ``* @position: Define the position of the page. `
` ``* @top:Change in the position from the top of an element.`
` ``* @left: Change in the position from the left of an element.`
` ``* @right: Change in the position from the right of an element.`
` ``* @bottom: Change in the position from the bottom of an element.`
` ``* @display: Adjusts how the content is displayed on the page. See: https://developer.mozilla.org/en-US/docs/Web/CSS/display and https://www.w3schools.com/css/css_display_visibility.asp`
` ``* @align-items: Aligns the child elements of this PARENT element to be centered. For a visual example see: https://developer.mozilla.org/en-US/docs/Web/CSS/align-items`
` ``* @justify-content: Defines how the space disturbed around the child elements. For a visual example see: https://developer.mozilla.org/en-US/docs/Web/CSS/justify-content`
` ``*`
` ``* These are the style properties and values of the slideshow header and its individual slides.`
` ``*/`
`.slideshow-header .slides {`
`    ``z-index``: ``0``;`
`    ``position``:``absolute``;`
`    ``top``:``0px``;`
`    ``left``:``0px``;`
`    ``right``:``0px``;`
`    ``bottom``:``0px``;`
`    ``display``:flex;`
`    ``align-items: ``center``;`
`    ``justify-``content``: ``center``;`
`}`
`/* Class Names and Elements`
` ``* [.slideshow-header]: A container that contains our slides and overlay.`
` ``* [.overlay]:`
` ``*`
` ``* Properties`
` ``* @z-index: Used to layer elements. Elements with a higher z-index number will appear before elements that are lower.`
` ``* @position: Set the position property for the element. We recommend you do not adjust this property unless you have knowledge on how the changes will affect your page.`
` ``*`
` ``* These are the styles for the overlay, as well as additional properties for the slideshow-header.`
` ``*/`
`.slideshow-header .overlay {`
`    ``z-index``: ``1``;`
`    ``position``:``relative``;`
`}`
`/*--------------ID'S---------------*/`
`/* ID Names and Elements`
` ``* [#slideshow-header] is the container used to contain the images you have chosen for your header`
` ``*`
` ``* Properties`
` ``* @overflow:`
` ``* @opacity:`
` ``* @box-shadow: Create a box shadow for this element.`
` ``* EX: box-shadow: a, b, c, d(e, f, g, h); `
` ``*/`
`#slideshow-header {`
`}`
` `
`/* ID Names and Elements`
` ``* [#slideshow-header] is the container used to contain the images you have chosen for your header`
` ``*`
` ``* Properties`
` ``* @width: 100% width will take of 100% of that element.`
` ``* @position:`
` ``*/`
`#slideshow-header > div {`
`    ``width``:``100%``;`
`    ``position``: ``absolute``;`
`}`
` `
`/* ID Names and Elements`
` ``* [#slideshow-header]: is the container used to contain the images you have chosen for your header.`
` ``* [div]: Refers to our HTML elements.  `
` ``* [img]: Refers to our images in the slideshow. `
` ``* `
` ``* Properties`
` ``* @width: Defines the width of the images, divs and slideshow-header. A value of 100% will display the image across the entire page. `
` ``*/`
`#slideshow-header div img {`
`    ``width``: ``100%``;`
`}`
## Edit the Page Behavior (Scripts) Disclaimer Please review the list of supported scripting languages below. If a Javascript vendor is unverified it may break the functionality of your site.
Verified Script Vendors
1. Bootstrap 2. jQuery - To fully customize the slideshow script that displays the slideshow found at the top of each page, you will need to know jQuery. You could choose to rewrite the slideshow script in whichever Javascript vendor that is verified.
## API Integration Additionally, you can use our API to integrate with pay stations and other devices that will allow you to grab useful information from your users. # Translations ## Where are Translations Supported Currently, translations are only supported on the user side, however, they are managed and set up on the admin side, by admins that have the correct permissions set up to work with languages.
1. Translations that are in red, are translations on the adminside which are not yet supported. Since they are not supported you will see them come up in English only until the adminside is supported. 2. Translation that are in **black,** are translations that are on the userside that can currently be changed.
[![image.png](https://opscom.wiki/uploads/images/gallery/2024-06/scaled-1680-/7Zuimage.png)](https://opscom.wiki/uploads/images/gallery/2024-06/7Zuimage.png) ## Navigating to Translations To begin reviewing, editing or creating your translations/languages, you will need to navigate to **System Config → Content & Designs → Translations**. [![2024-10-04_14-34-02.png](https://opscom.wiki/uploads/images/gallery/2024-10/scaled-1680-/IhO2024-10-04-14-34-02.png)](https://opscom.wiki/uploads/images/gallery/2024-10/IhO2024-10-04-14-34-02.png) This will take you to the **Installed Languages** page where you can begin managing your current languages. [![image.png](https://opscom.wiki/uploads/images/gallery/2024-06/scaled-1680-/bn8image.png)](https://opscom.wiki/uploads/images/gallery/2024-06/bn8image.png) ## Adding New Languages To begin adding your own languages simply click **Add Language** on the **Installed Languages** page which will bring up a new modal to add a label and locale. [![image.png](https://opscom.wiki/uploads/images/gallery/2024-06/scaled-1680-/JKKimage.png)](https://opscom.wiki/uploads/images/gallery/2024-06/JKKimage.png) When you are finished click **Save Changes** and your new language will be instantly added to the list. Once the language has been added, your users can begin using it on the user-side assuming you have the language enabled. The locales are used when we want to create sub-languages, while the label is used to identify our translations throughout the site. ## Adding Sub Languages and How do They Work Sub-languages are created by using a locale that currently exists with an underscore '\_' followed by the sub-language that you want to set up. [![image.png](https://opscom.wiki/uploads/images/gallery/2024-06/scaled-1680-/5EPimage.png)](https://opscom.wiki/uploads/images/gallery/2024-06/5EPimage.png) For example, you can support multiple variations of the English language for your users. In the image below I have created a sub-language for American English using the locale en\_us. [![image.png](https://opscom.wiki/uploads/images/gallery/2024-06/scaled-1680-/siaimage.png)](https://opscom.wiki/uploads/images/gallery/2024-06/siaimage.png) When you create a new sub-language, it will automatically use the translations that have been set up on the main language, which is the locale on the left side of the underscore, such as **en**\_us. You will need to create the main language first before creating any sub-languages, otherwise the sub-language will always default to English instead of the main language you may have intended to use. ## Installing Languages Installing a language will create a new language template with the translations we have set up for it as well as the **Name** and **Locale** we have created for you. You can then click **Edit Translations** to adjust the preset translations to your liking. If there is not a language already in the system that can be installed you will need to add a new language and setup the translations yourself. Currently, we only support the ability to install French and English. [![image.png](https://opscom.wiki/uploads/images/gallery/2024-06/scaled-1680-/DsYimage.png)](https://opscom.wiki/uploads/images/gallery/2024-06/DsYimage.png) ## Disabling or Enabling Translations We can choose to disable particular languages that we don't want to be selectable from the user side. To do this we can toggle the visibly of our languages under the **Enabled** column on the **Installed Languages Page** [![image.png](https://opscom.wiki/uploads/images/gallery/2024-06/scaled-1680-/43mimage.png)](https://opscom.wiki/uploads/images/gallery/2024-06/43mimage.png) Once a language is toggled as **Disabled** it can no longer be selected by the users of your site as seen in the example image below. [![image.png](https://opscom.wiki/uploads/images/gallery/2024-06/scaled-1680-/xziimage.png)](https://opscom.wiki/uploads/images/gallery/2024-06/xziimage.png) ## Searching Language Translations You can search for all translations that relate to a specific component in the system using the search bar at the top right of the **Edit Translations** page. For example, we can search for permits to find all permit related translations [![image.png](https://opscom.wiki/uploads/images/gallery/2024-06/scaled-1680-/ieJimage.png)](https://opscom.wiki/uploads/images/gallery/2024-06/ieJimage.png) We can also go onto the user side and use the **Token** language, which will show all of the **Names** found on the **Edit Translations** page, under the **Name** column, (See the image above) to find where that translation exists so it can be changed. This can't be seen by logging is as the user from the user side but requires an admin to go to the profile of a user and click the **Login as User** button from the admin side. This is to ensure that your regular users don't see the token language option. [![image.png](https://opscom.wiki/uploads/images/gallery/2024-06/scaled-1680-/7RXimage.png)](https://opscom.wiki/uploads/images/gallery/2024-06/7RXimage.png) The token language finds the tokens used so you can better search where the translations are being used on the userside. ## Edit Translations To begin editing language translations you have to make your changes and then click away from the input field. Once you do this you will see that the translation gets highlighted in yellow indicating that a change has been made. The number of affected records will also display at the bottom of the translations page. [![image.png](https://opscom.wiki/uploads/images/gallery/2024-06/scaled-1680-/tY5image.png)](https://opscom.wiki/uploads/images/gallery/2024-06/tY5image.png) When you are finished making your changes click **Save Changes** for the update to take effect. ## Delete Languages To delete languages, you can click the delete button next to the language you want to remove. Keep in mind that if you remove the base English and French language it can be re-installed. However, if you delete a language that we do not provide you, then this data will be lost and you will need to contact support for assistance with recovering these translations. [![image.png](https://opscom.wiki/uploads/images/gallery/2024-06/scaled-1680-/GToimage.png)](https://opscom.wiki/uploads/images/gallery/2024-06/GToimage.png) Keep in mind that deleting a language will not delete any of the sub-languages you may have created. For example, if I were to delete English, the English US language would still remain with all of its translations. ## Creating Templates and Messaging for New Languages It's important to note that when you create a new language it will not rely on the default templates and system messaging that you have setup for your previous languages. For example, if I use the new French American language I created, and go onto the userside where languages are supported, then I will see a blank template as well as blank messages. [![image.png](https://opscom.wiki/uploads/images/gallery/2024-06/scaled-1680-/doCimage.png)](https://opscom.wiki/uploads/images/gallery/2024-06/doCimage.png) ### Adding Templates To add a new template for your languages that you create you will need to go into **Templates & Design** followed by **Toggle Templates** for the templates that are currently being used. From there you will have the option to click the **Create** button to add the new template. If you just want your new language to use the same template, from a language that is already in the system, just go into **Edit** and copy the text over into your new language, after clicking the **Create** button. [![image.png](https://opscom.wiki/uploads/images/gallery/2024-06/scaled-1680-/Xktimage.png)](https://opscom.wiki/uploads/images/gallery/2024-06/Xktimage.png) ### Adding System Messages System messaging will work a bit differently than templates as you will need to go into each individual message and click the **Edit** button next to that message [![image.png](https://opscom.wiki/uploads/images/gallery/2024-06/scaled-1680-/jleimage.png)](https://opscom.wiki/uploads/images/gallery/2024-06/jleimage.png) From there you should be able to select your new language. [![image.png](https://opscom.wiki/uploads/images/gallery/2024-06/scaled-1680-/Qxaimage.png)](https://opscom.wiki/uploads/images/gallery/2024-06/Qxaimage.png) If you want multiple messages to display for all your languages you will need to create a new system message and type out the translations for that language template. ## Changing Terminology Using the Translator There is another use for the translation tool that may not be obvious at first. Since the translator is essentially a list of code terms and a corresponding list of what is actually displayed on any page not only can you edit the various languages but for each language you can also edit the display term to fit a local "version" of the term. A perfect example of this is in some areas one might refer to recieving a **"ticket"** as receiving a "**citation**". It is entirely possible to replace any spot in the interface where the term **ticket** is used with the term **citation**. To do so go into the language editor and search for the term you wish to localize. In our example simply enter **ticket** in the search bar and hit return. A list of all translatable instances of the word ticket will appear. Click the box where the term is editable and type in your preferred term. In this case we are changing **Manage Ticket Categories** to **Manage Citation Categories**. Once you save the changes you have made the displayed text associated with **Manage Ticket Categories** will display as **Manage Citation Categories** throughout the system. You may edit the remaining instances of the word Ticket that are in the list before saving to change the term in bulk for all entries listed. [![image.png](https://opscom.wiki/uploads/images/gallery/2024-06/scaled-1680-/Zmpimage.png)](https://opscom.wiki/uploads/images/gallery/2024-06/Zmpimage.png) # Taxes This page allows administrators with appropriate roles and permissions to configure the tax percentage calculated and charged to users when making payments in OPS-COM. [![image.png](https://opscom.wiki/uploads/images/gallery/2024-05/scaled-1680-/5u2image.png)](https://opscom.wiki/uploads/images/gallery/2024-05/5u2image.png) You can find the taxes page under the System Configuration → Payments → Taxes. [![image.png](https://opscom.wiki/uploads/images/gallery/2024-05/scaled-1680-/HQkimage.png)](https://opscom.wiki/uploads/images/gallery/2024-05/HQkimage.png) When editing a tax type, there are multiple settings: [![image.png](https://opscom.wiki/uploads/images/gallery/2024-05/scaled-1680-/yHpimage.png)](https://opscom.wiki/uploads/images/gallery/2024-05/yHpimage.png) - **Enable**: Check or uncheck whether or not this tax type is enabled (checked) or disabled (unchecked). - **Percentage**: The percentage of taxes calculated - **Tax Label & Translation**: How this tax will be displayed to users in the cart/checkout process. Multiple languages supported. - **Apply to the following items**: Check the system modules you want tax to be applied to.