🧰Tools / Miscellaneous
- Disable Browser Auto-fill and Auto-Complete
- Editing the Landing Page Messages
- Quick Search Tool Functionality
- System Dashboard
Disable Browser Auto-fill and Auto-Complete
How does this setting affect OPS-COM?
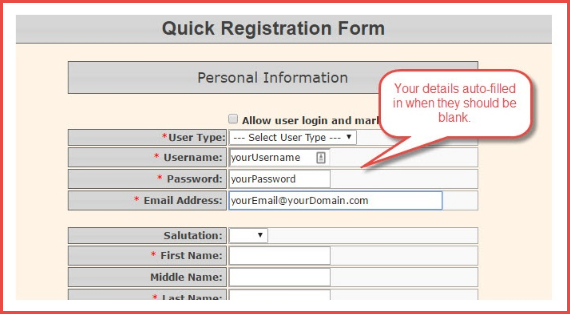
When using OPS-COM to complete User Profile, we are filling out forms with information for other people that is different each time. Auto-complete can become a nuisance by filling in fields you don't want filled in or even popping data that you don't notice. This data gets saved in the profile by mistake. To avoid this issue, we suggest turning off this feature in your browser.
See the screenshot below:
How to Disable Auto-fill
| Please find general instructions for checking and turning off your auto-complete settings based on various browsers below: |
|
|---|---|
 |
Turn off auto-fill in Internet Explorer
|
 |
Turn off auto-fill in Edge
|
 |
Turn off auto-fill in Chrome
|
 |
Turn off auto-fill in Firefox
|
 |
Turn off auto-fill in Safari
|
Editing the Landing Page Messages
What is the Landing Page?
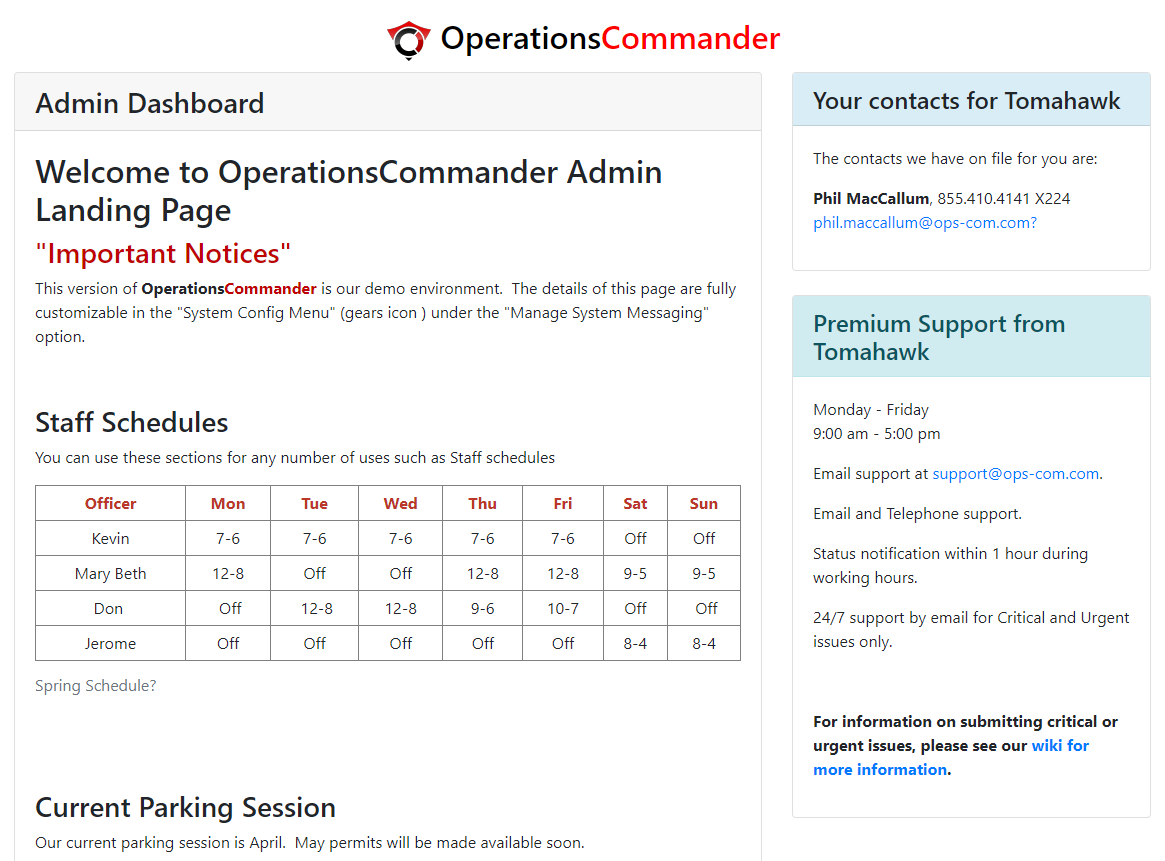
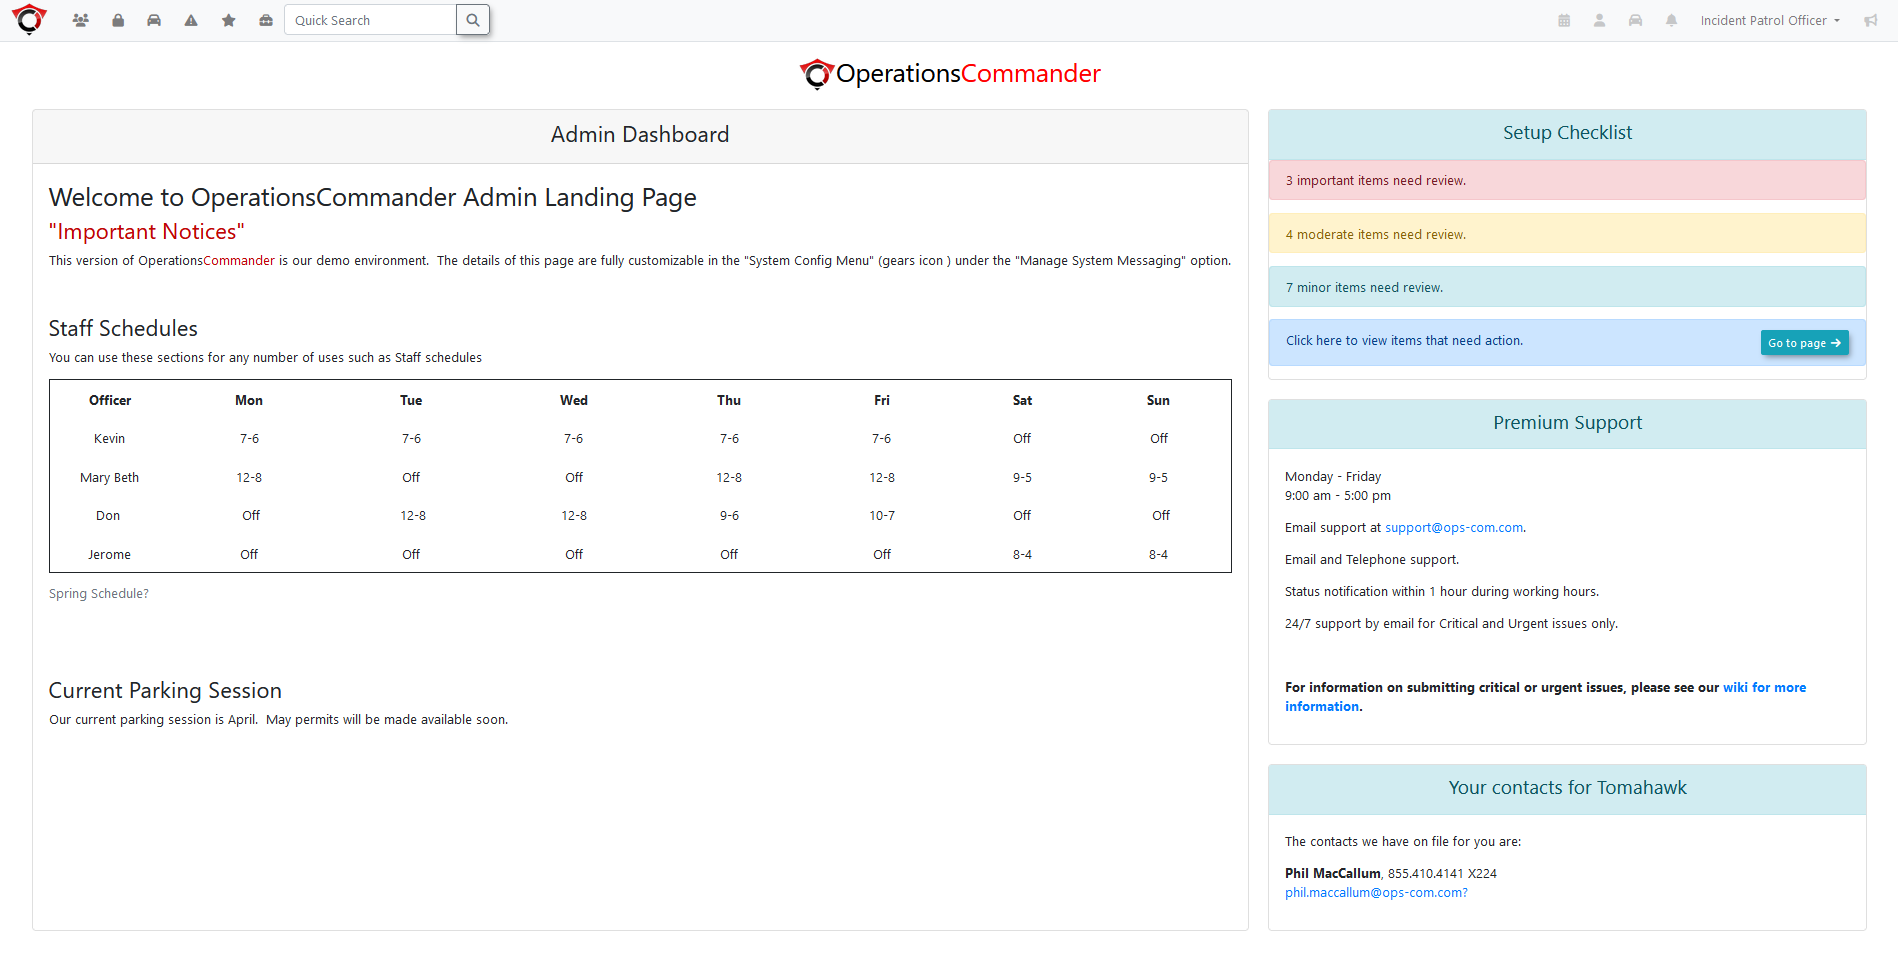
When you sign in to OPS-COM initially, you are presented with a landing page. This message is referred to as the Admin Dashboard. This landing page can be modified or edited to allow organizations to display important information to System Administrators and staff.
Communication Items
Some items to add to this page:
- Pricing Information
- Contact Information
- Scheduling Information
- Organizational Information
- Legal Notices
- General Information
Editing the Landing Page
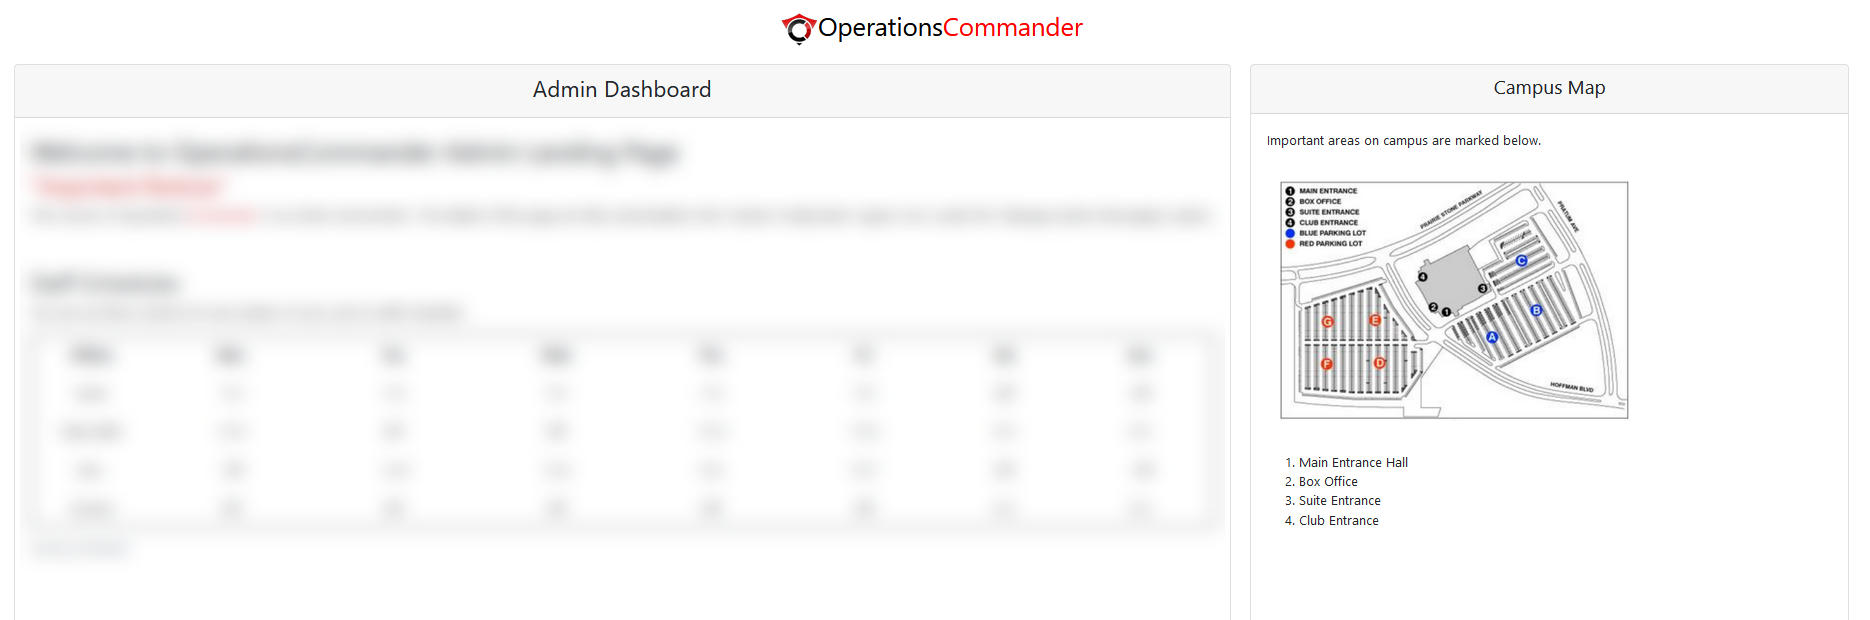
This is typically the default look of the Admin Dashboard message. It appears as the primary landing page after a new installation. Your support information is maintained by the OPS-COM team. You can change any text in the Admin Dashboard box.
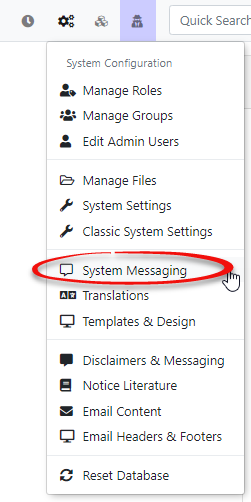
To edit this message, hover over System Config and click System Messaging.
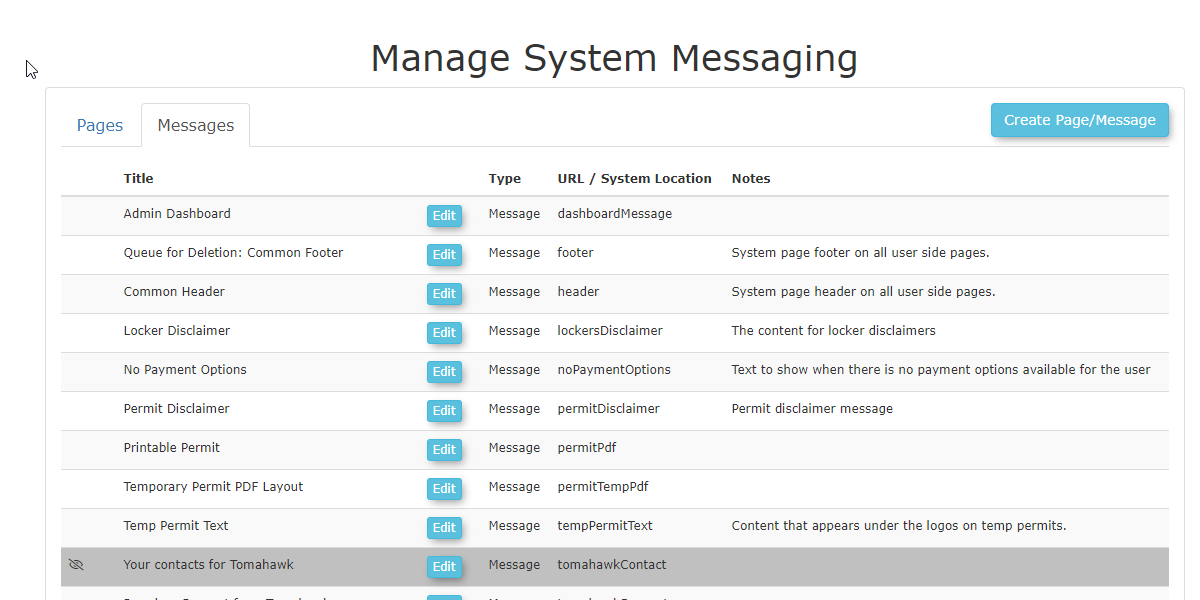
The Manage System Messaging window opens. Click the Messages tab.
The items you are allowed to edit are governed by what permission level you have. Some of the items can only be edited by the OPS-COM Support team. In this case, we wish to edit the Admin Dashboard message. Click the Edit button.
The screen will refresh to display the Message Editor. You can edit the text using the WYSIWYG editor by clicking on the content to open the editor. If you prefer to work in HTML, you can select Source Code from the Tools menu item.
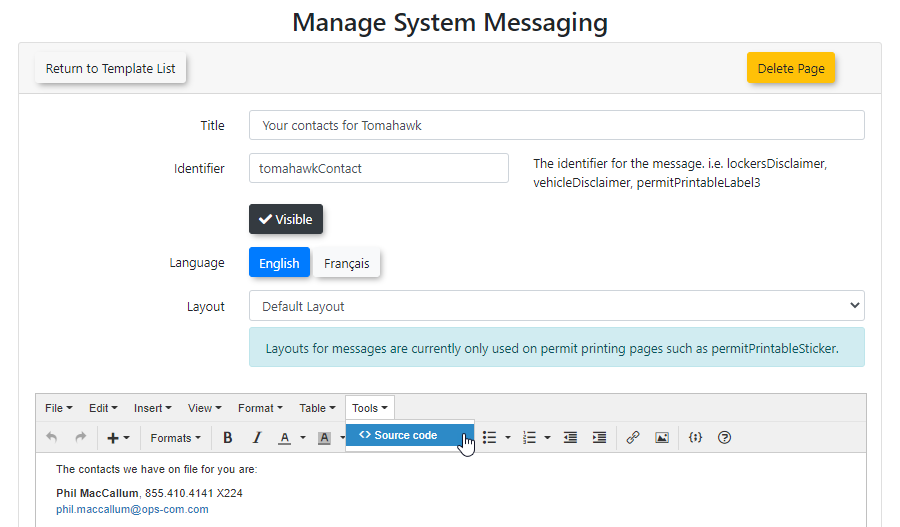
Once you have finished editing the page, click the Save Messaging button to confirm the changes. A pop up message will confirm that your changes have been saved.
Quick Search Tool Functionality
Using Quick Search
The Quick Search tool requires a minimum of 4 characters to perform a query.
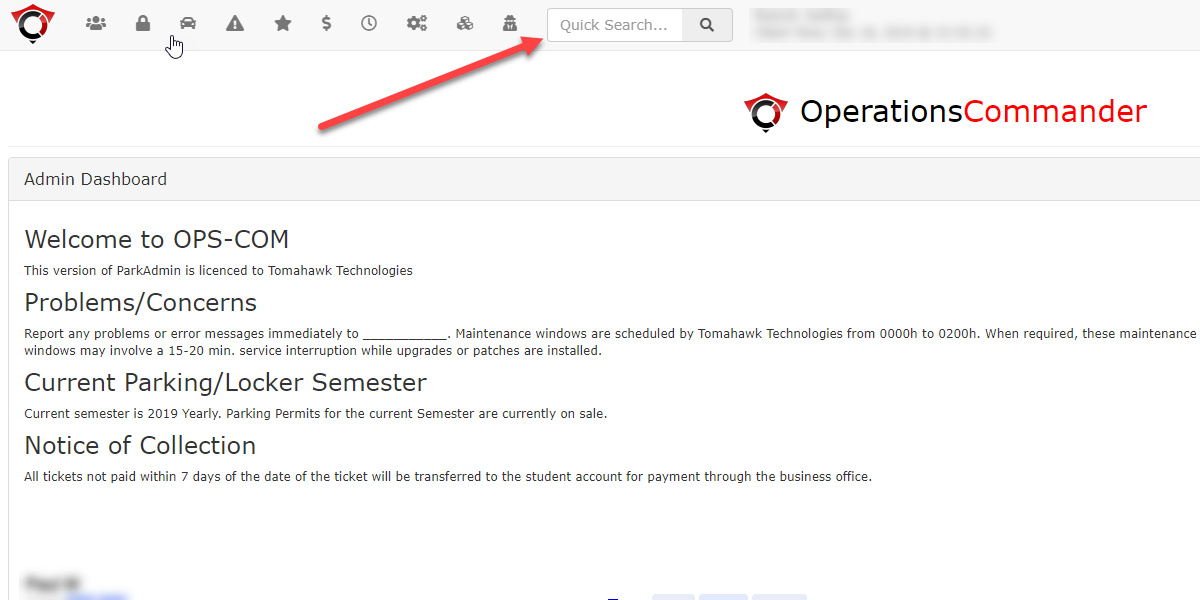
This tool will search the following fields from a single source:
-
Searches vehicles by plate
-
Searches vehicles by VIN number
-
Searches people by:
-
Username
-
Last name
-
Email address
-
Student number
-
Employee number
-
-
Searches violations (in the last 18 months) by:
-
Ticket number
-
Plate of vehicle involved
-
-
Searches incidents (in the last 18 months) by:
-
Incident number
-
-
Payments (last 18 months) by:
-
Confirmation code
-
System Dashboard
Introduction
The system dashboard has been reworked.
Items that appear on the dashboard have been converted into widgets, with it now being possible to create custom dashboard layouts by placing these widgets wherever wanted.
Accessing the Dashboard
The dashboard is the first thing seen on the home page when accessing the admin site.
The home page and dashboard can be accessed from anywhere on the site by clicking the OPS-COM logo in the top left of the screen.

Layouts
Active Layout
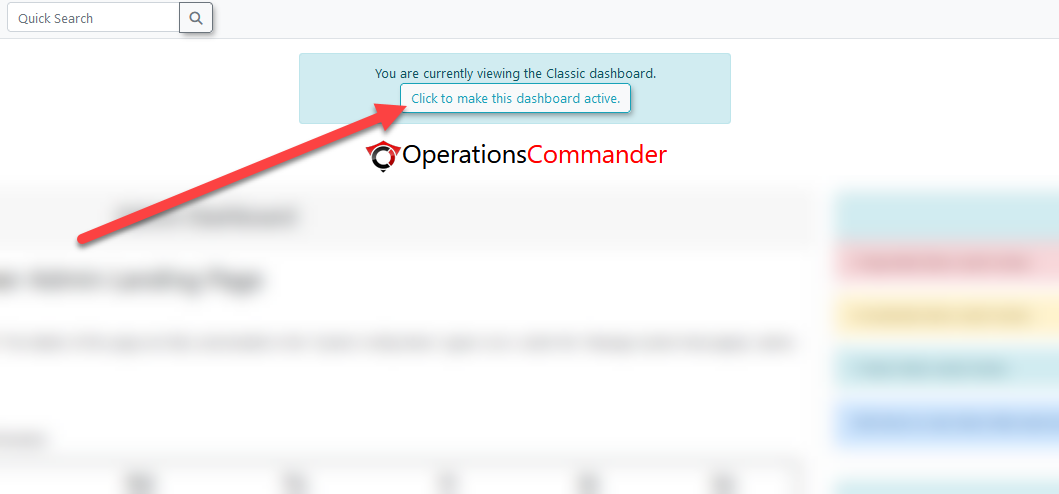
For admin users with the correct permissions, a dropdown menu for dashboards will appear below the user menu in the top right of the screen.
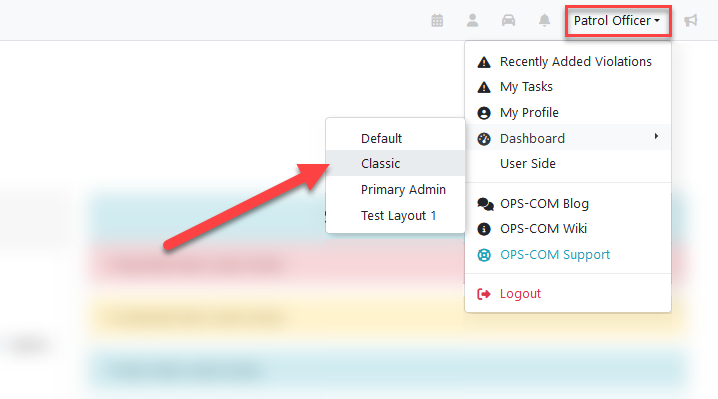
Accessing a dashboard will show a preview of the selected dashboard, with the option to make it the user's active dashboard.
The active dashboard is what the admin sees on their home page.
This change only affects the admin that made it.
Dashboard Layout Management
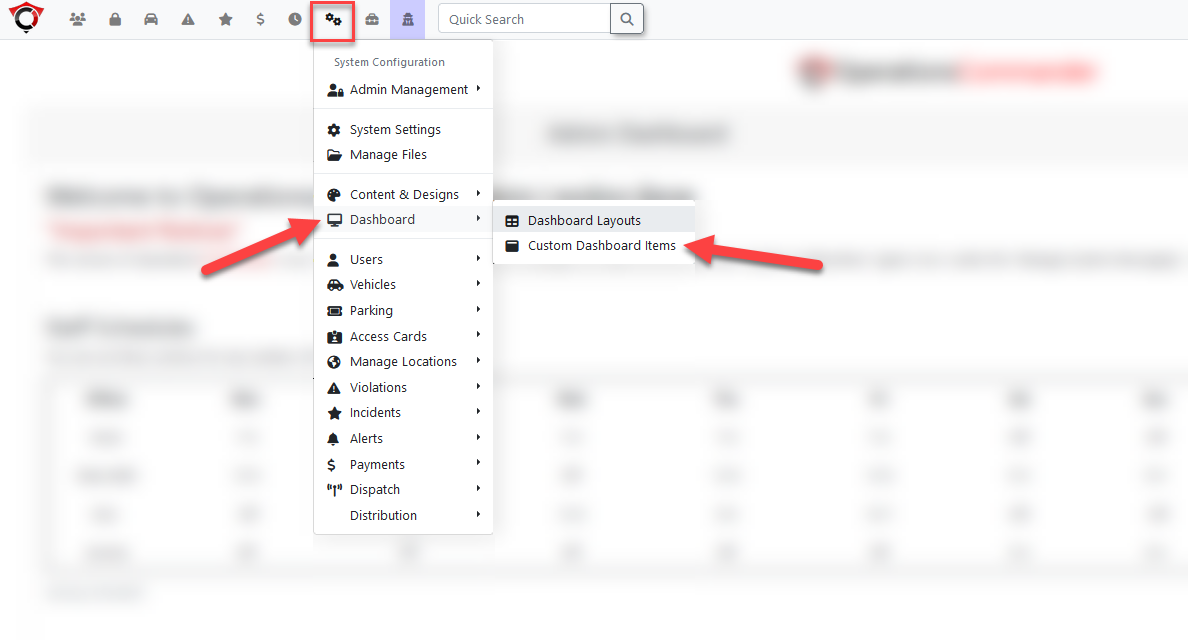
If they have the correct permissions, admins can create and edit their own dashboard layouts by accessing the dashboard layouts and items menu, located under the System Configuration menu.
- Dashboard Layouts - allows the management of dashboard layouts
- Custom Dashboard Items - allows the creation and management of custom widgets
Clicking on Dashboard Layouts will open the dashboard layouts page.
This page contains a list of all existing dashboard layouts, including those created by other admins.
From this page, the user can manage the site's dashboard layouts, including their creation and edit.
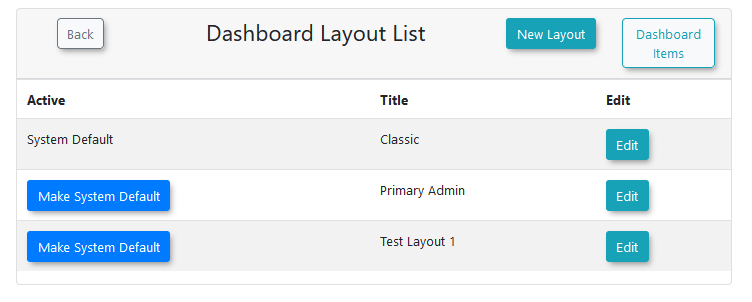
- New layout - creates a new dashboard layout.
- Dashboard Items - takes the user to the custom dashboard items page. This is also accessible from the System Configuration menu.
- Make System Default - sets the system default layout. This is the dashboard that will appear on the home page of users who do not currently have a dashboard set as active. This is separate from the individual user's active dashboard.
- Edit - edit the selected dashboard layout.
Creating Dashboard Layouts
Clicking to Edit an existing layout or to create a New Layout will open the dashboard layout editor.
On this page, admins can drag and drop widgets from the widget storage onto the dashboard layout. The widgets can be moved and resized as desired.
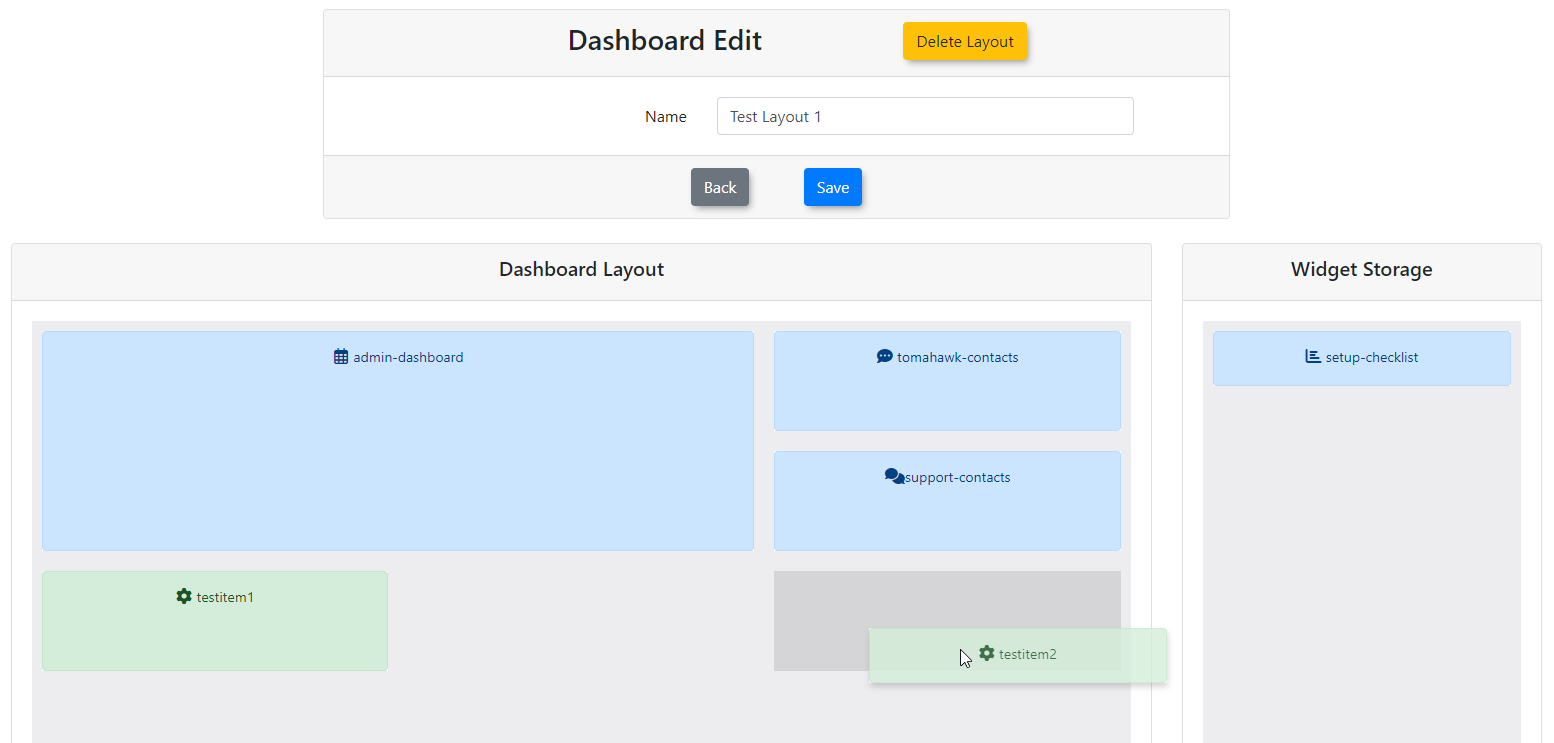
Widgets left in the widget storage will not appear on the dashboard.
Any new widgets, be they system created or admin custom items, will appear here after they are created, where they can then be dragged onto the dashboard.
New system widgets will continue to be added and made available in the widget storage sidebar.
There are several different types of widget, identified by their color.
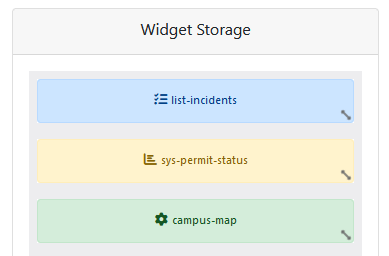
- Blue - system widgets. Show important administration information about the site.
- Yellow - stats widgets. Display site stats and information in different graph formats.
- Green - admin-created custom items. These are the items created on the custom dashboard items page.
Creating Dashboard Items
It is possible for admins to create their own custom dashboard items.
The item management page can be found under System Management, below the Dashboard Management page, or accessed from the management page itself.

When accessed, the page will display a list of the custom dashboard items created by admins.
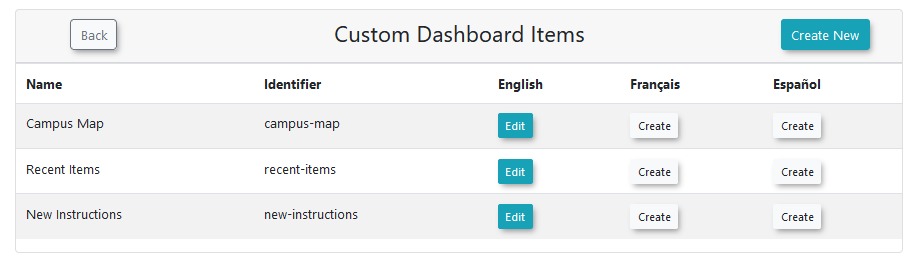
Choosing to Edit an existing item or to Create New will open the dashboard item editor.
A version of the item can be made for each language installed on the site.
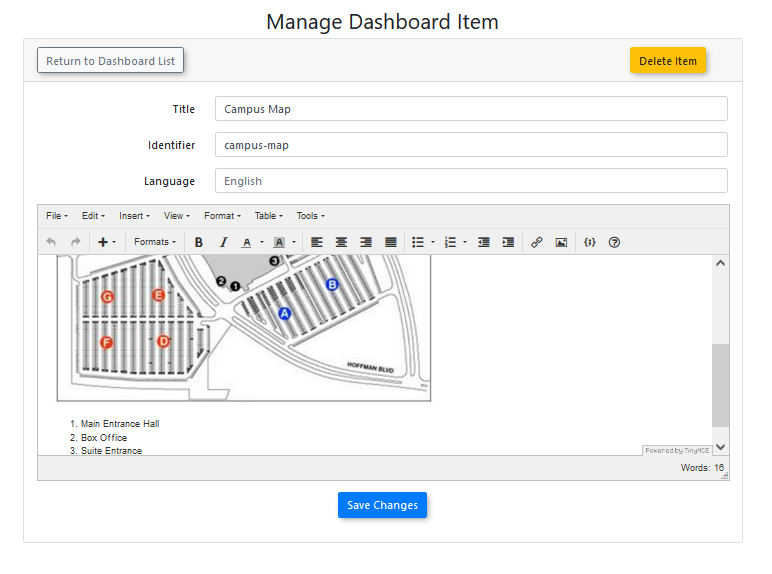
- Title - what appears as the widget header on the dashboard.
- Identifier - the ID name of the item. This is used to identify it on the dashboard layout editor.
- Language - the current language you are creating the item for.
- Content - what will appear on the widget. The widget can include objects like text and images.
If an item is open to be edited, it can be deleted from this page as well.
Once saved, the custom item will appear in the widget storage sidebar when editing a layout.
It can then be dragged onto the dashboard layout.
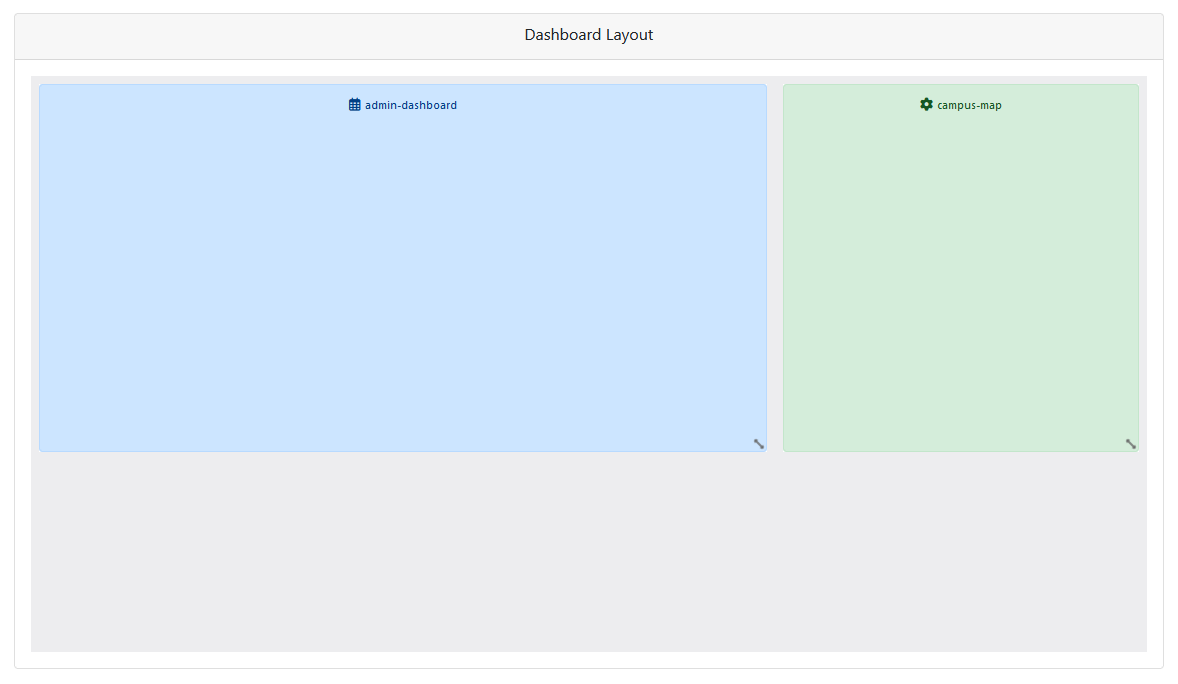
After the layout is saved with the custom widget on it, the item will appear when viewing the dashboard.
Permissions
There are several permissions related to managing dashboards layouts.
Permissions for the dashboard can be found under System Configuration → Admin Management → Manage Roles → Edit a role → System Configuration.
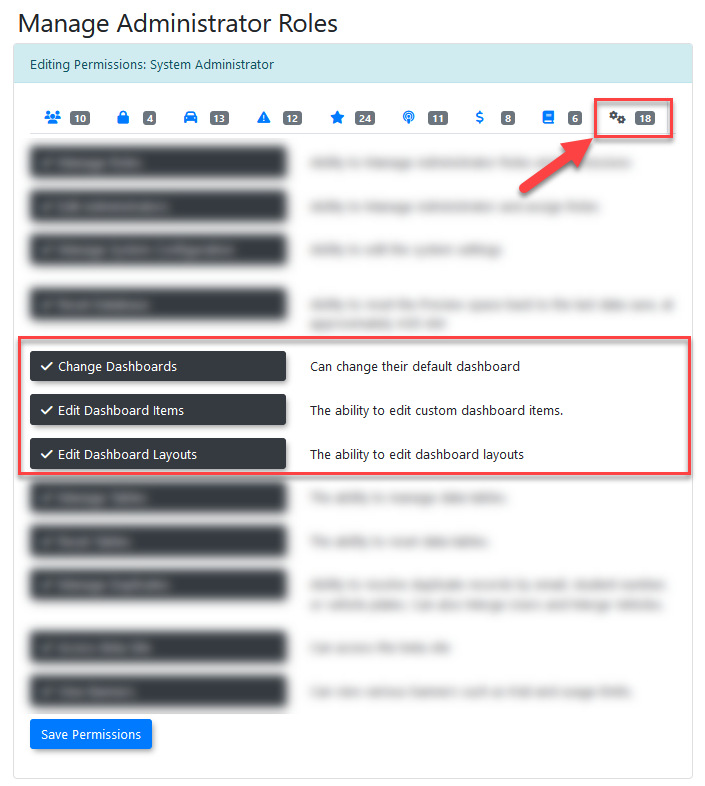
- Change Dashboards - allows the admin to view other dashboards and change their active dashboard.
- Edit Dashboard Layouts - allows the admin to create and manage dashboard layouts.
- Edit Dashboard Items - allows the admin to create and manage custom dashboard items.