👥User Management
- Registering a New User
- User Profile Landing Page
- Payment Type Subscriptions
- Credit Card Management in OPS-COM
- Electronic Funds Transfer (EFT) Subscriptions
- Using Tax Exemption
- User Search
- User - Profile Tab
- Archiving or Disabling a User
- User - Purchase a Locker
- User - Vehicles Tab
- User - Parking Tab
- User - Payments Tab
- User - History Tab
- User - Incident History
- Unlink User and Vehicle
- Bulk User Type Change
- Merge User
- Bulk Email Users
- Primary Driver
- Search by Plate
- Merge Vehicles
- Duplicate Vehicle Handling
- Vehicle DNTT
- Forms Admin
- Adding Forms (old forms)
- List Forms (old forms)
Registering a New User
Manual User Registration
Hover over User Management and click User Registration.
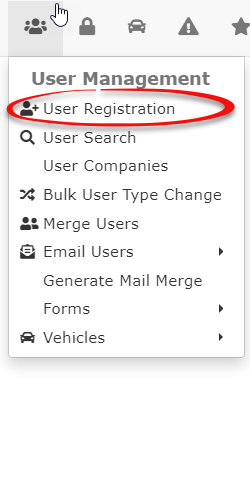
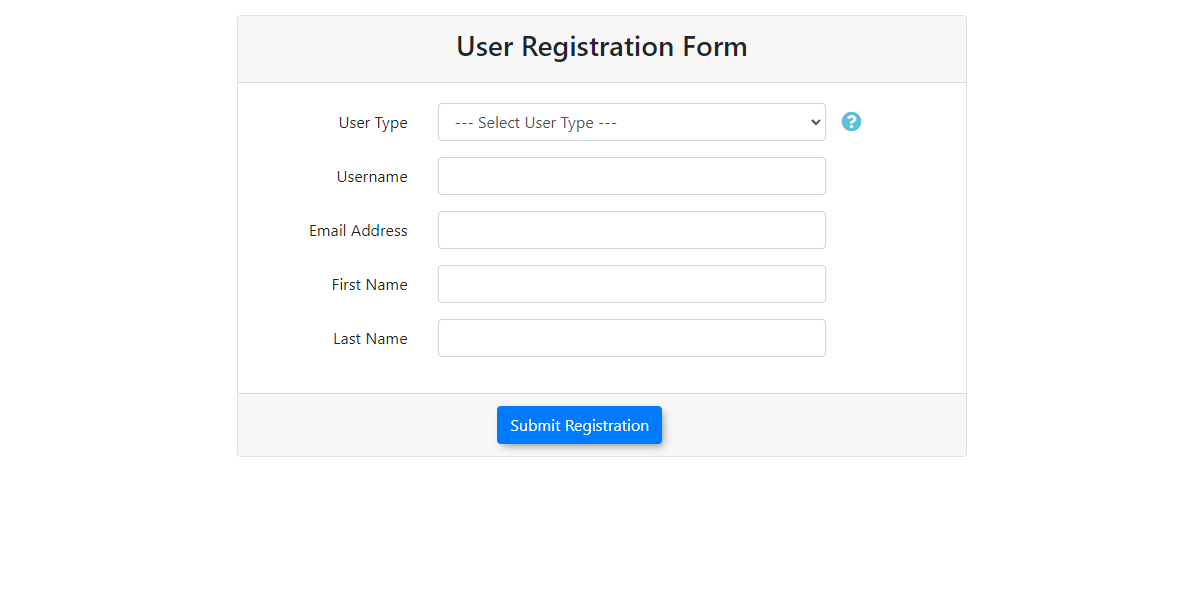
The User Short Registration Form displays.
The initial standard information screen appears. Choose your user type and fill in the username and user info.
The User Full Registration Form displays.
Fields with an asterisk * are mandatory. Admins with the correct permissions can control what fields are mandatory.
Enable the Allow user login and mark the account as Active checkbox. This will allow this user to self-manage on the User Portal. They will be prompted for a password change.
You must select the correct User Type. The User type defines what options are available for the User to Purchase through the User Portal.
Click the Submit Registration Information for Processing button. The Confirm Registration Information screen displays. Verify the information is correct. If you need to edit any information click the Back button. When you are ready to proceed, click the Information Correct button.
The Registration Complete screen will display. You may now add a vehicle or purchase a permit for this user.
User Profile Landing Page
Editing a User's Profile
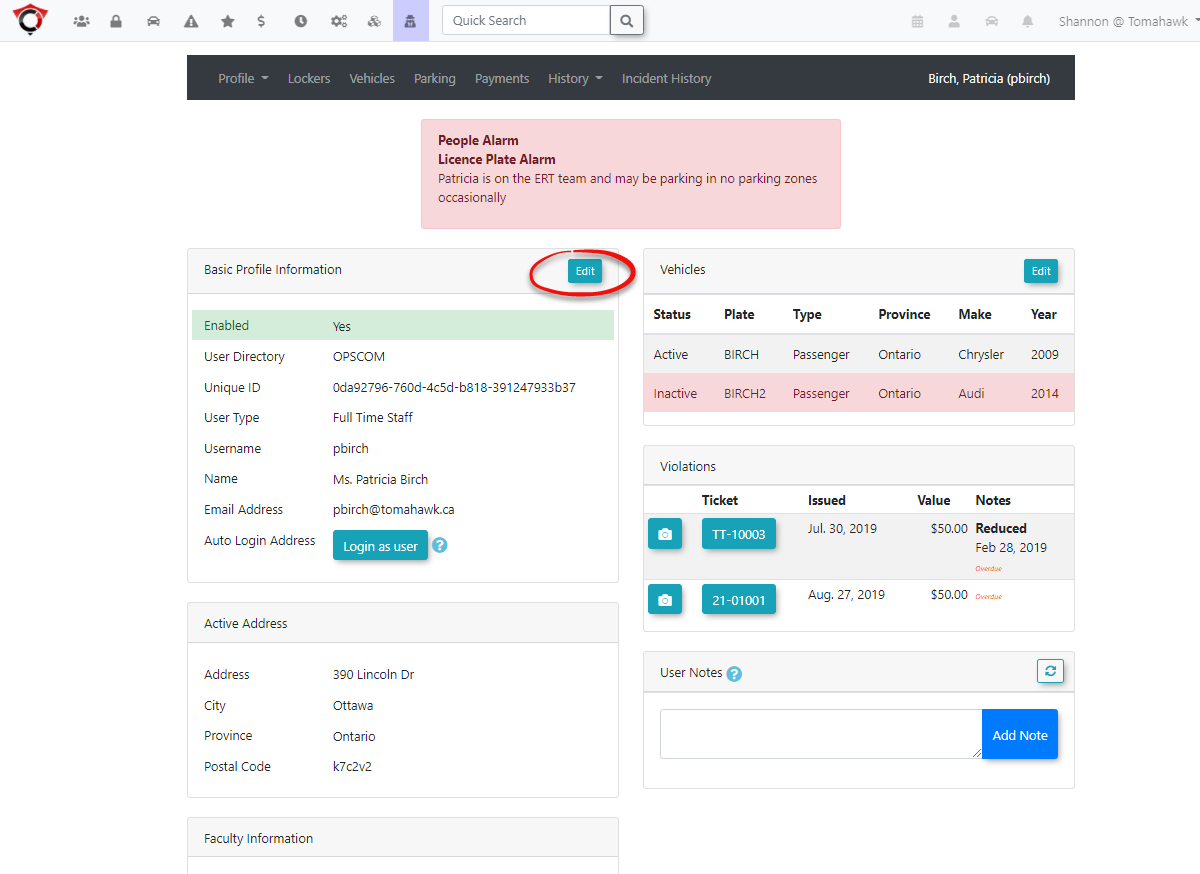
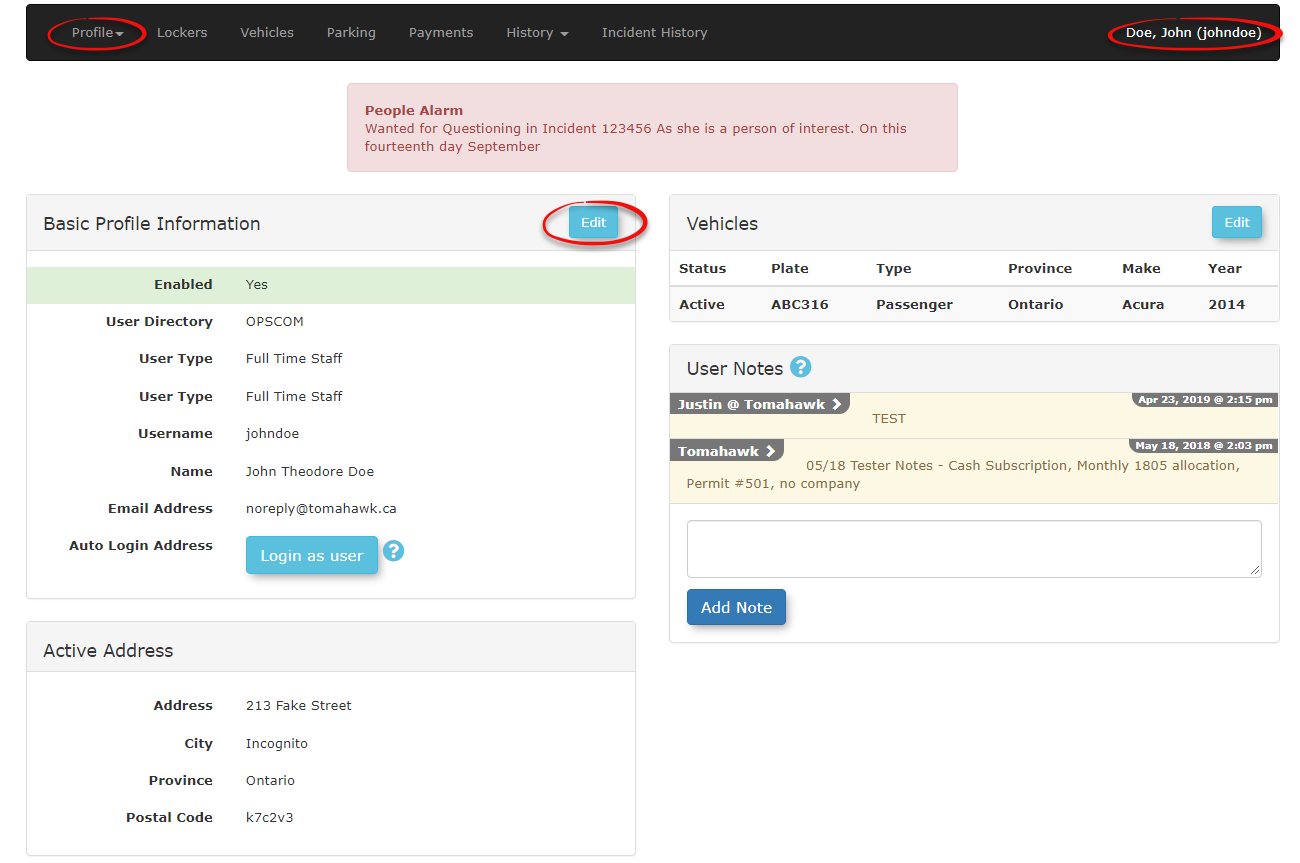
To edit a User's profile, click Edit in the Basic Profile Information section header.
The full profile page will display. You can edit the details of the user's account.
Add or Edit Vehicles
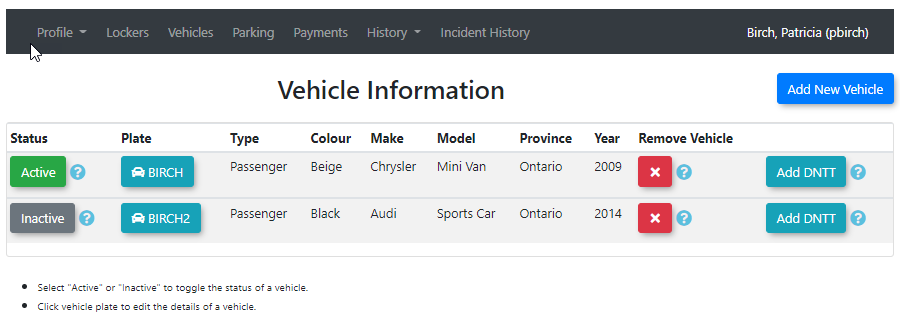
To add to or edit the list of vehicles associated with the user, click Edit in the Vehicles section header.
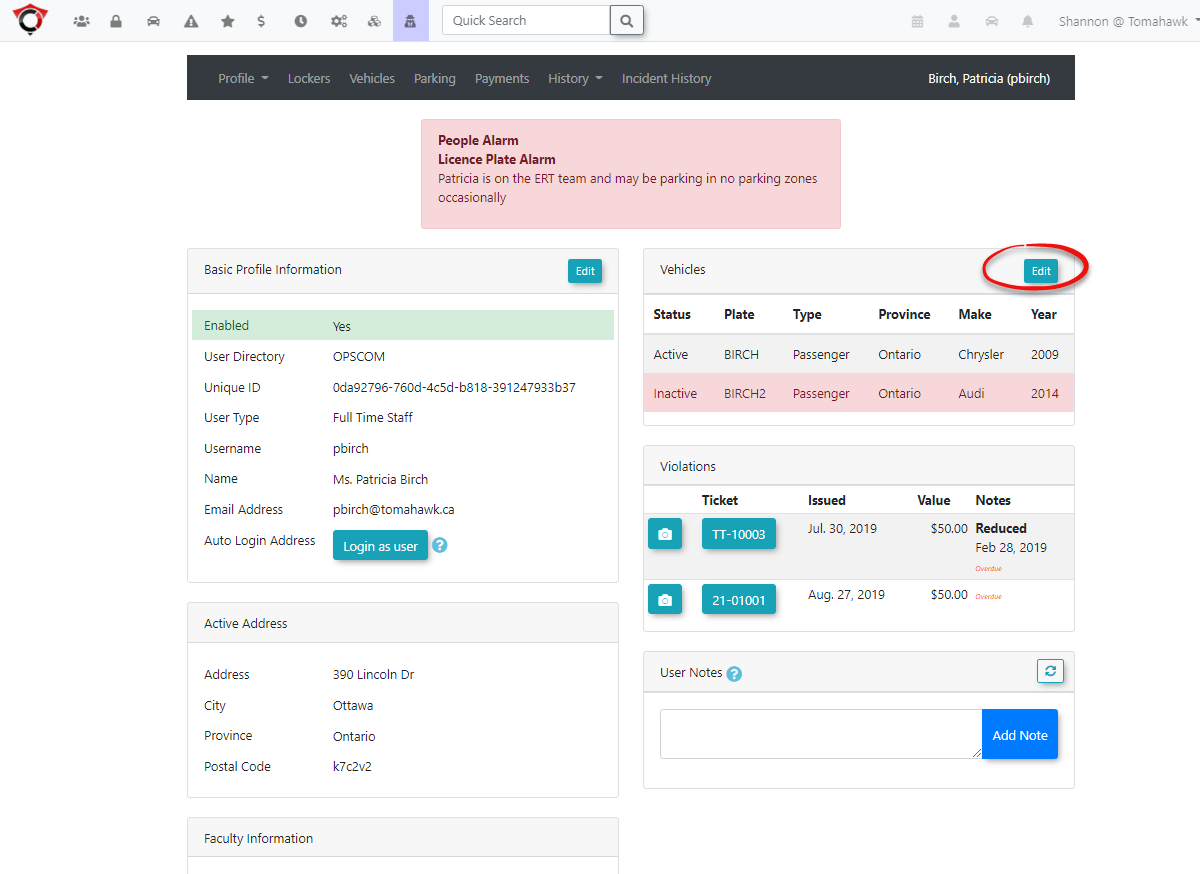
This will bring you to the Vehicle Information screen where you can add, remove and edit vehicle information as well as apply a DNTT to a vehicle.
Logging in as a User
From the User Profile landing page, the admin can log in to the OPS-COM end-user interface as the selected user. Click Login as user. Note, Auto Login must be configured System Settings.
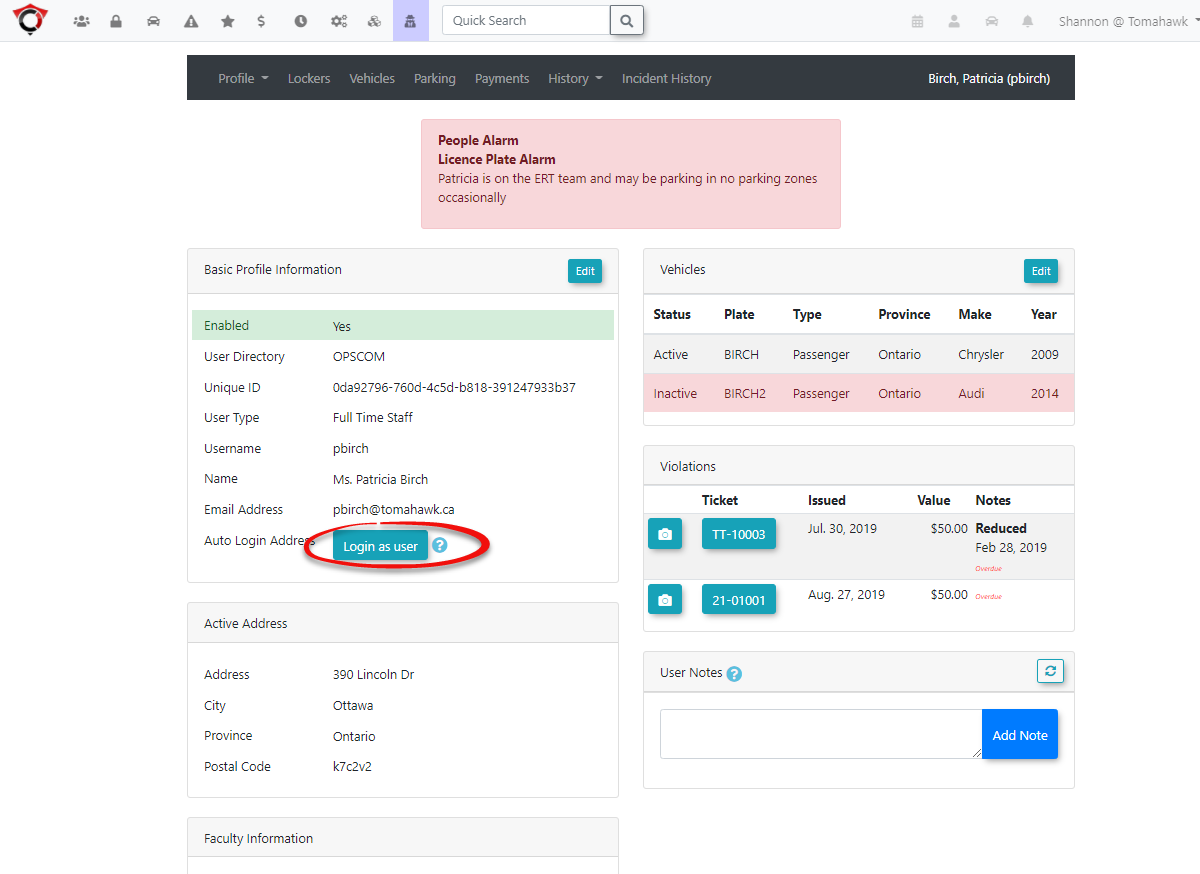
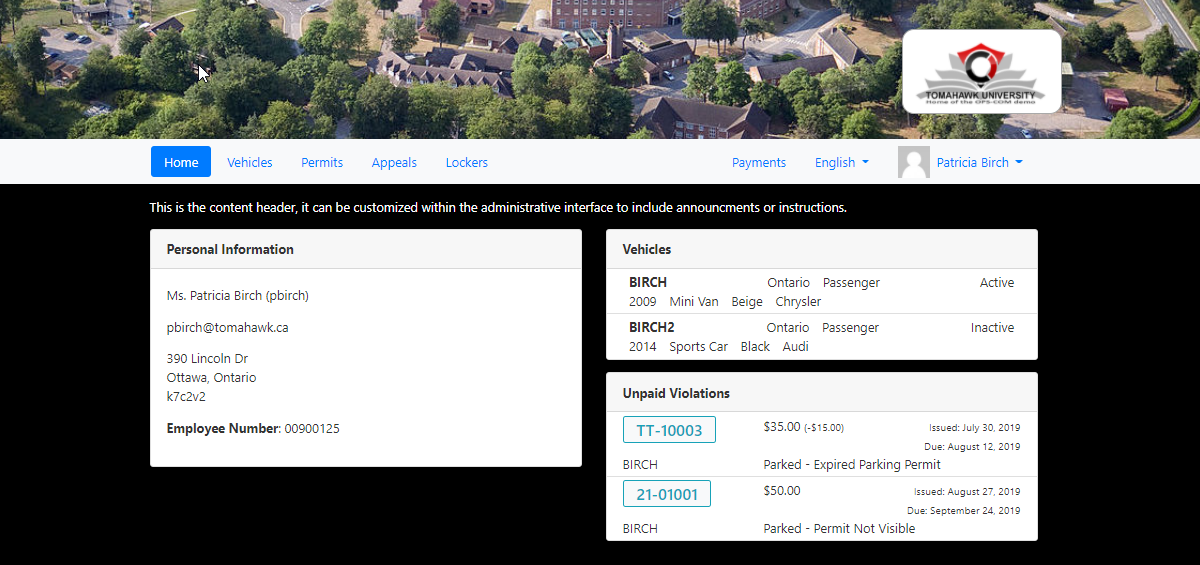
This will launch a new browser window and log you in as the selected user with all the functionality associated with that user.
Additional Information - Alarms, Violations and Permit Details
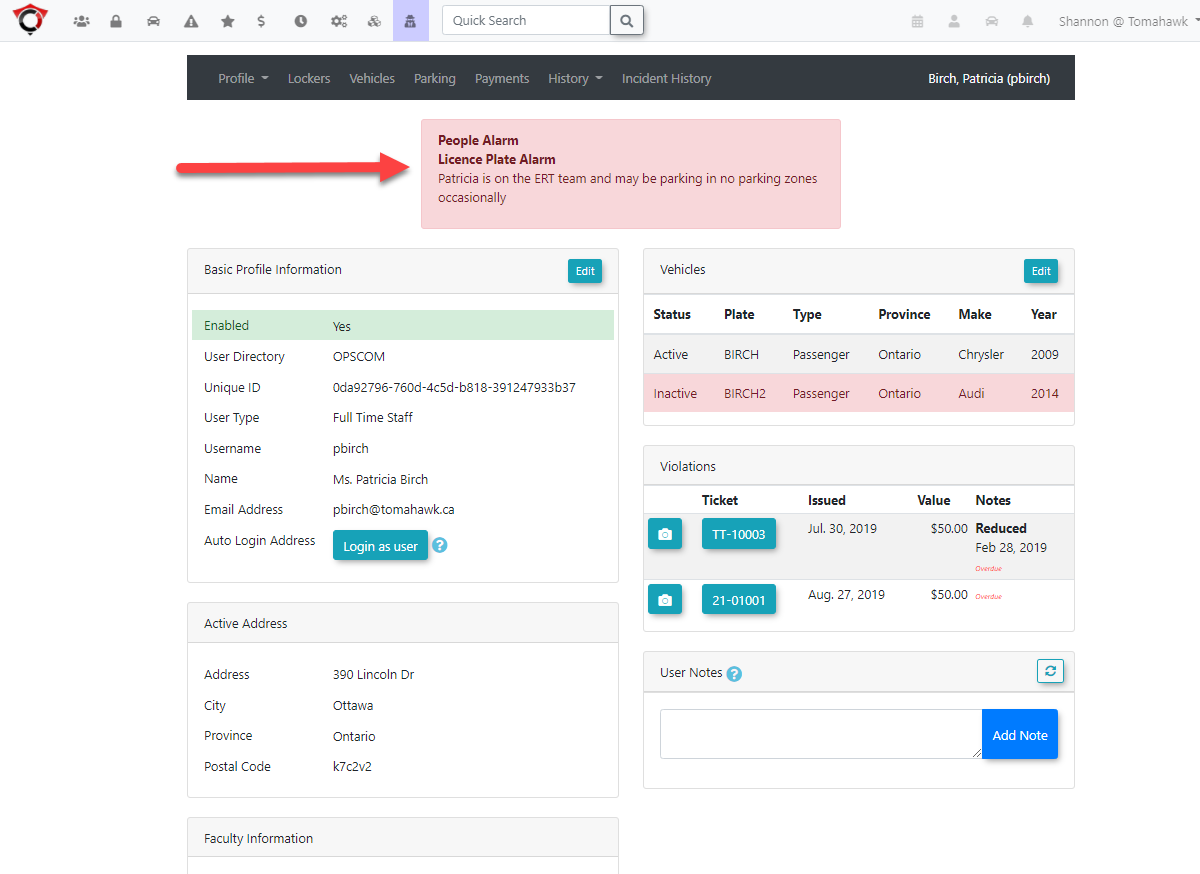
The dashboard also allows the admin to access the latest information on a user's history in regards to alarms, violations and permit ownership. If any warnings or alerts exist in the user's profile, they will be displayed at the top of the dashboard.
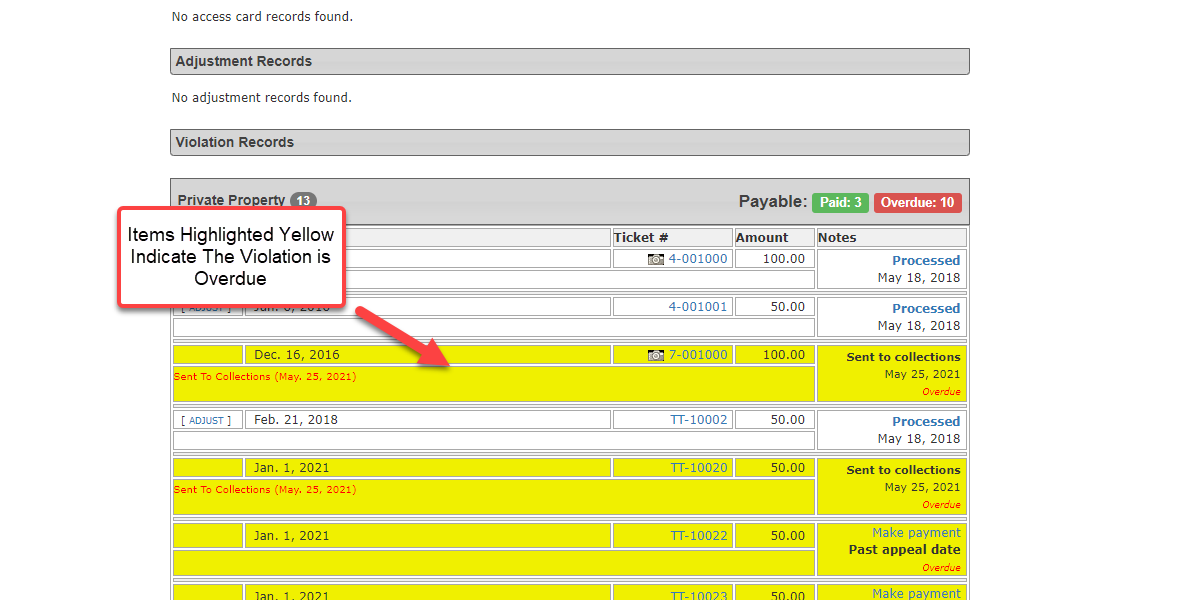
If outstanding violations exist for the user, the admin has the ability to access both images as well as ticket details from the Violations section of the dashboard.
- Access Violation details by clicking on the ticket number in the violations section.
- Access photos associated with the violation by clicking on the camera icon to the left of the ticket number.
Permit details can be accessed by clicking on the permit number under the Active Permits section of the dashboard.
Payment Type Subscriptions
In order for subscription to function, the user must provide information pertaining to the payment method they wish to use for their subscription service.
There are three main payment types that are used for subscription services:
- Electronic Funds Transfer (Must be entered in the system by an Administrator)
- Credit Card (Can be entered both by the client through their online profile as well as by an Administrator)
- Payroll Deduction (Handled by the Administrator through the OPS-COM System.
Credit Card Management in OPS-COM
Managing Credit Cards
Search for the user that you want to manage a credit card for and select the user to get to their profile

Hover over the Profile menu and click Credit Cards.
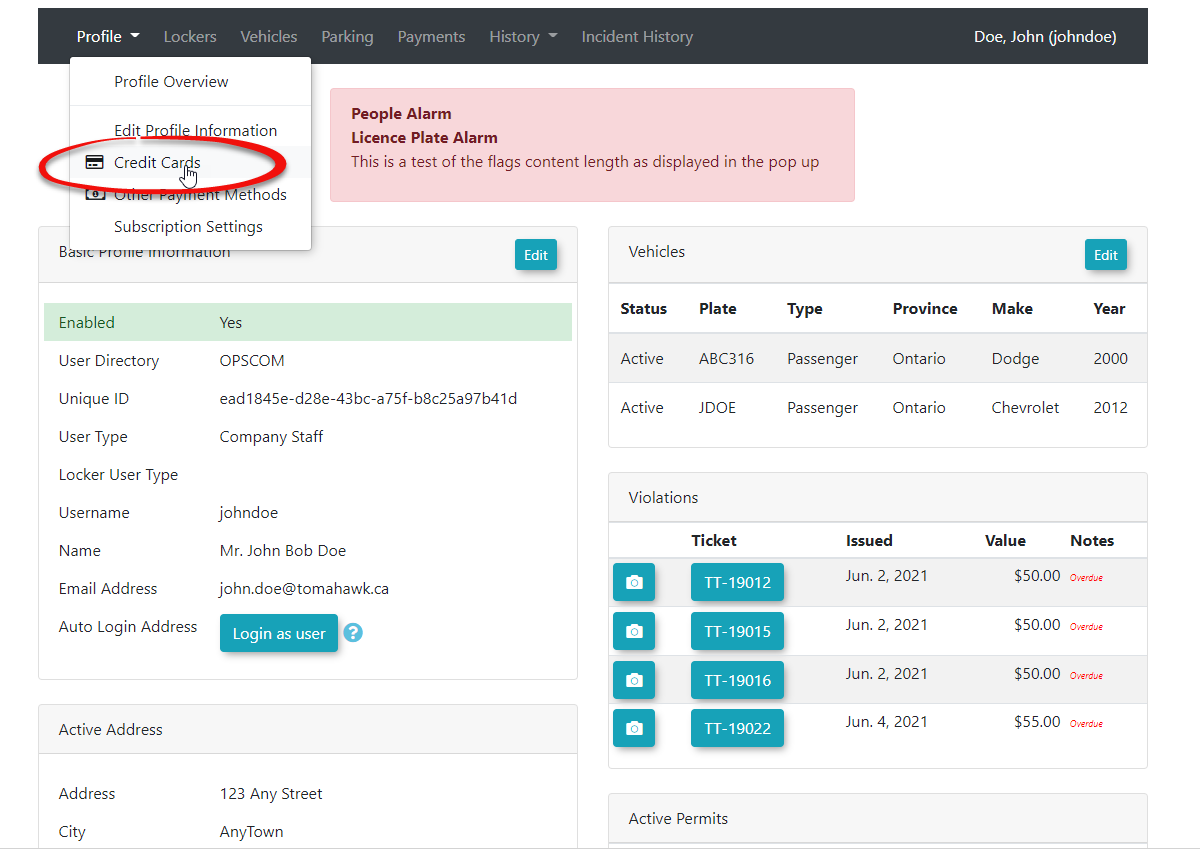
The Credit Card utility will display. The admin can fill out the card information on the right, and click Add Credit Card to register the credit card in the system.
Note
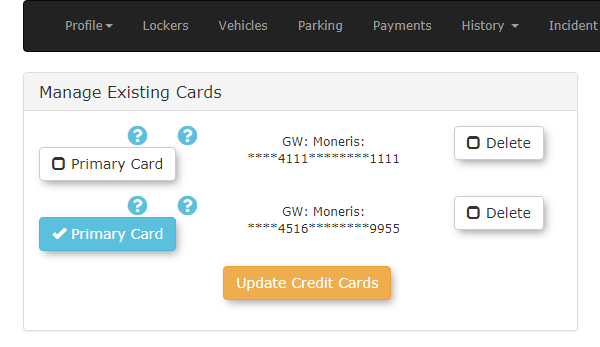
Designate the credit card as the default or Prime Card to allow the rollover process to automatically use this card for recurring permit payments.
Electronic Funds Transfer (EFT) Subscriptions
Setup Payment Type
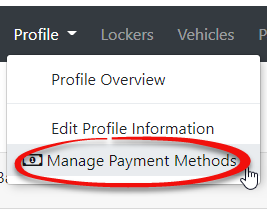
Search for the user and go to their Profile. Click Profile, Manage Payment Methods.
Click Select Payment Type and click Electronic Funds Transfer from the drop down menu.
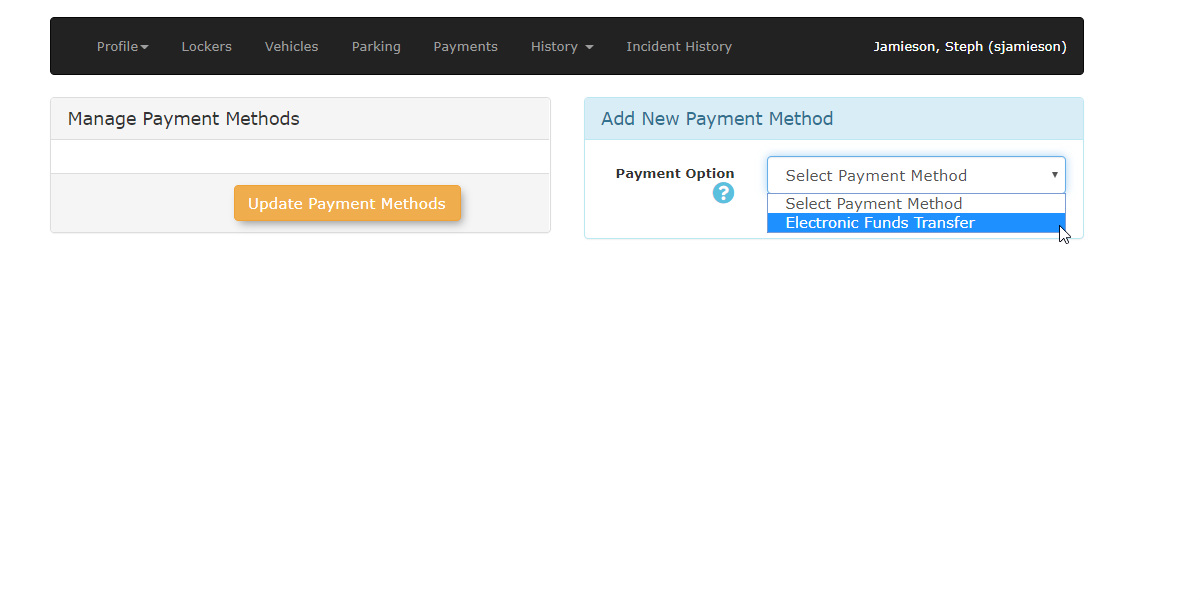
An information form will appear allowing you to record the user banking details. Fill out the following fields from the user's void cheque:
- Label for this payment method (Typically the bank name and an indication as to what type of account you wish to use. ie: Bank of Tomahawk - Savings)
- Transit/Branch Number
- Bank Number
- Account Number
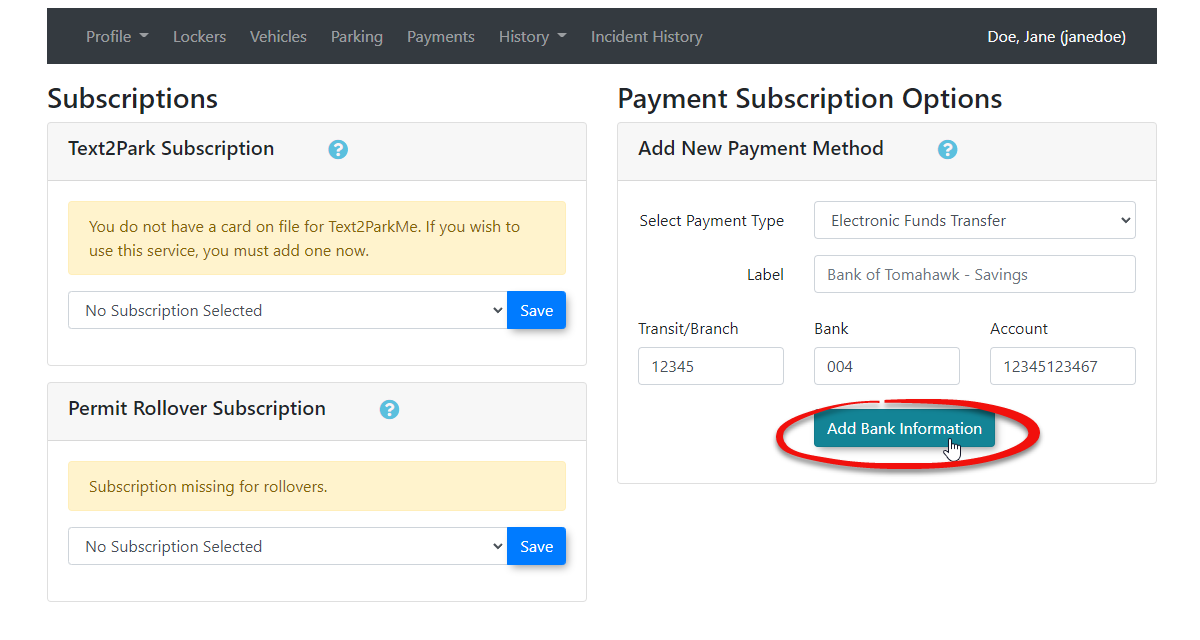
Click Add Bank Information to save this Payment Method.
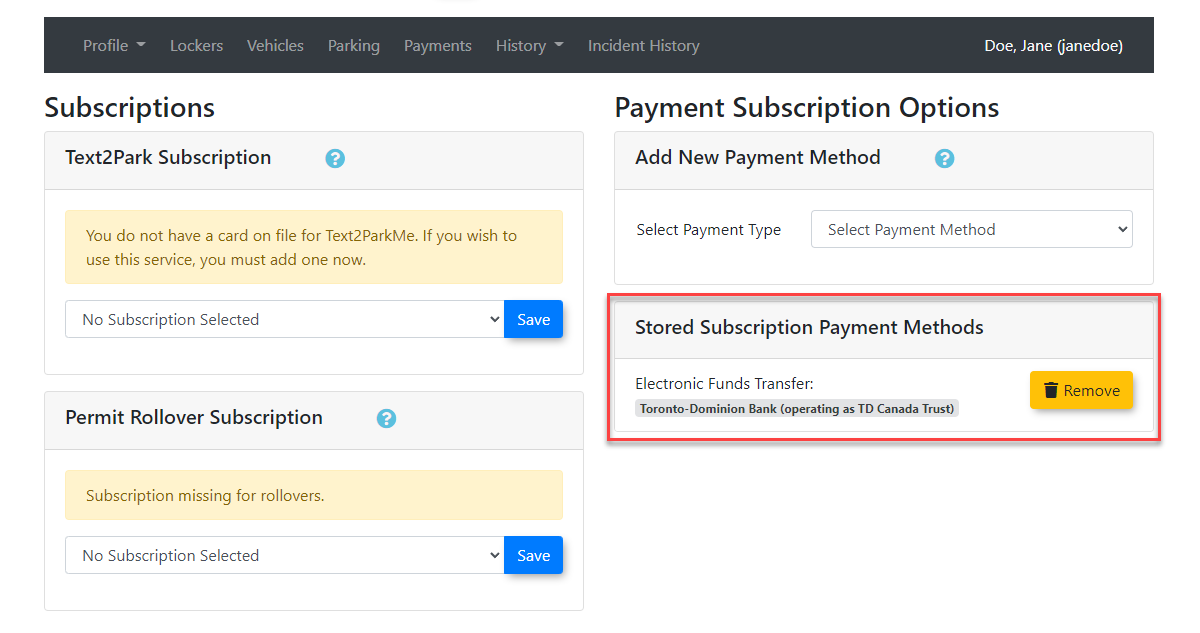
A message is displayed that the payment method was added and it appears on the right hand-side.
Add to Subscription
Click the Payment Method dropdown menu and choose Electronic Funds Transfer.
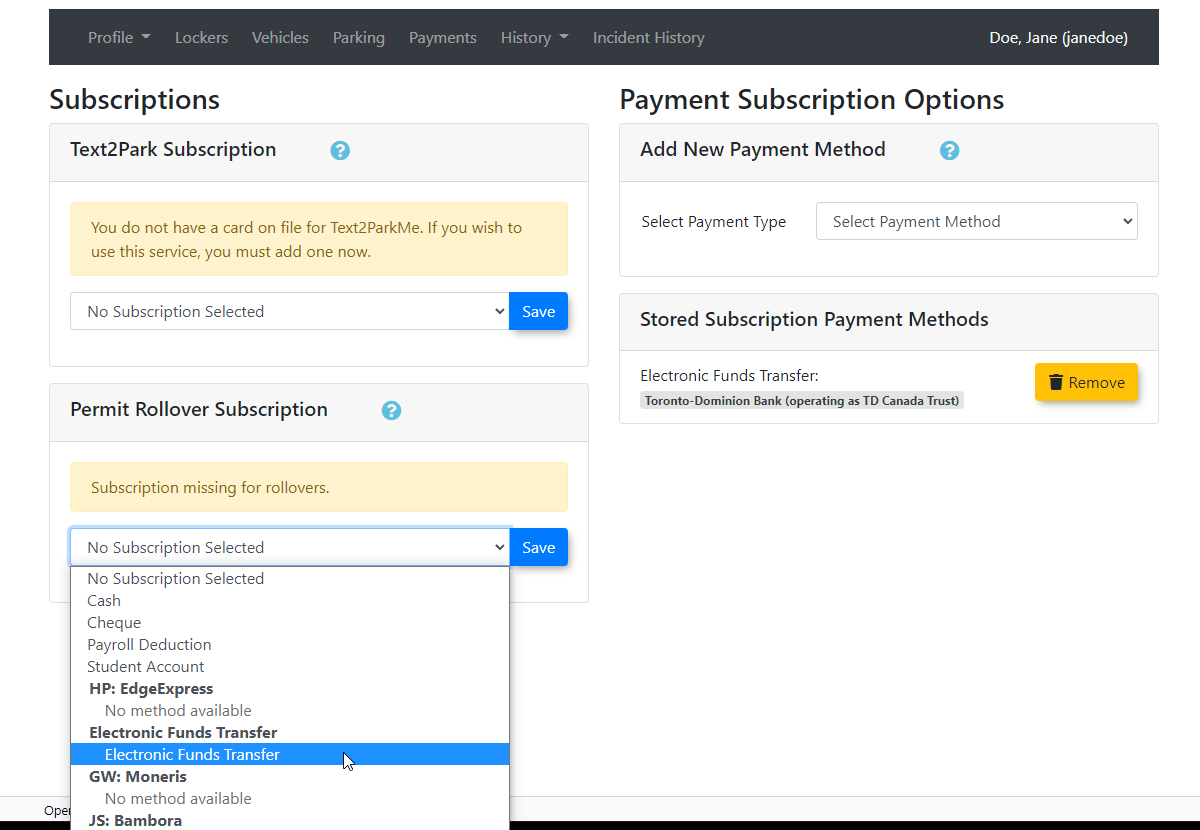
Click the Method Details dropdown menu and choose Bank of Tomahawk. Click the Update Subscriptions button.
This user is now configured for EFT payments for permit rollovers.
Using Tax Exemption
Adding a Tax Exempt ID
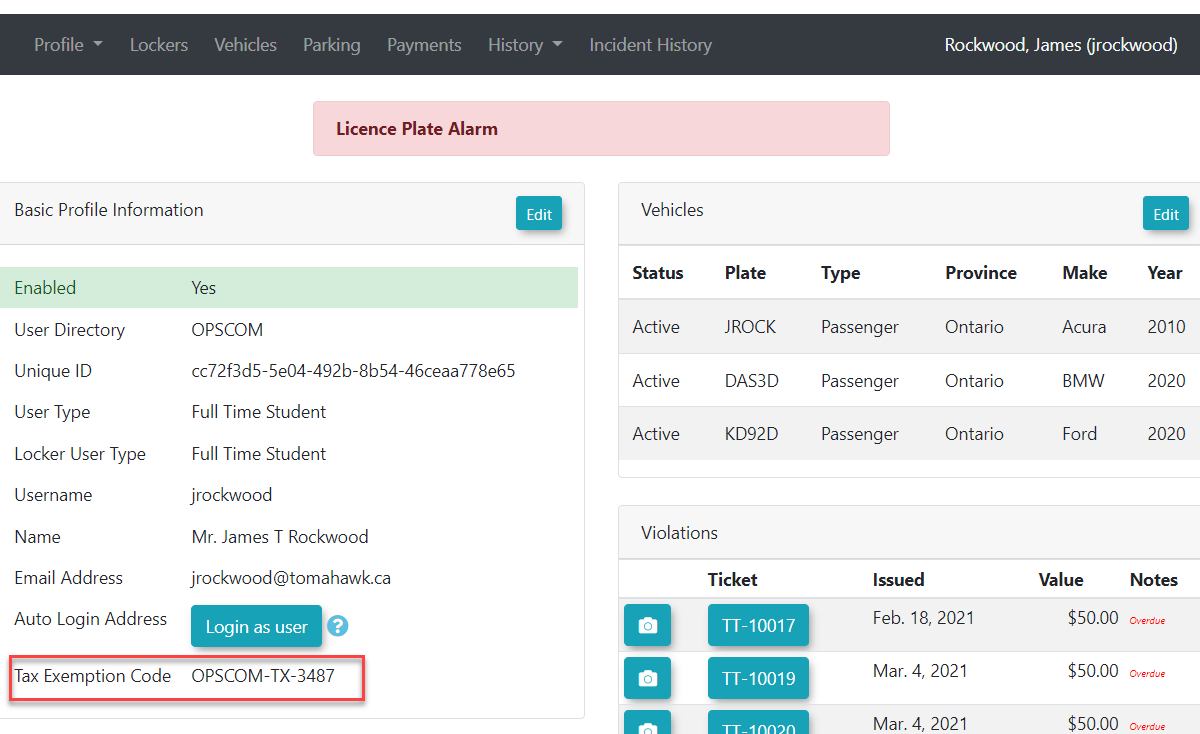
Search for a user and edit their profile. The Tax Exemption field is located on the User Profile screen and can contain alpha-numeric characters. New user profiles will also have this field.

Note, Tax Exemption Code is included for viewing on the Basic Profile Info window for the User Profile.
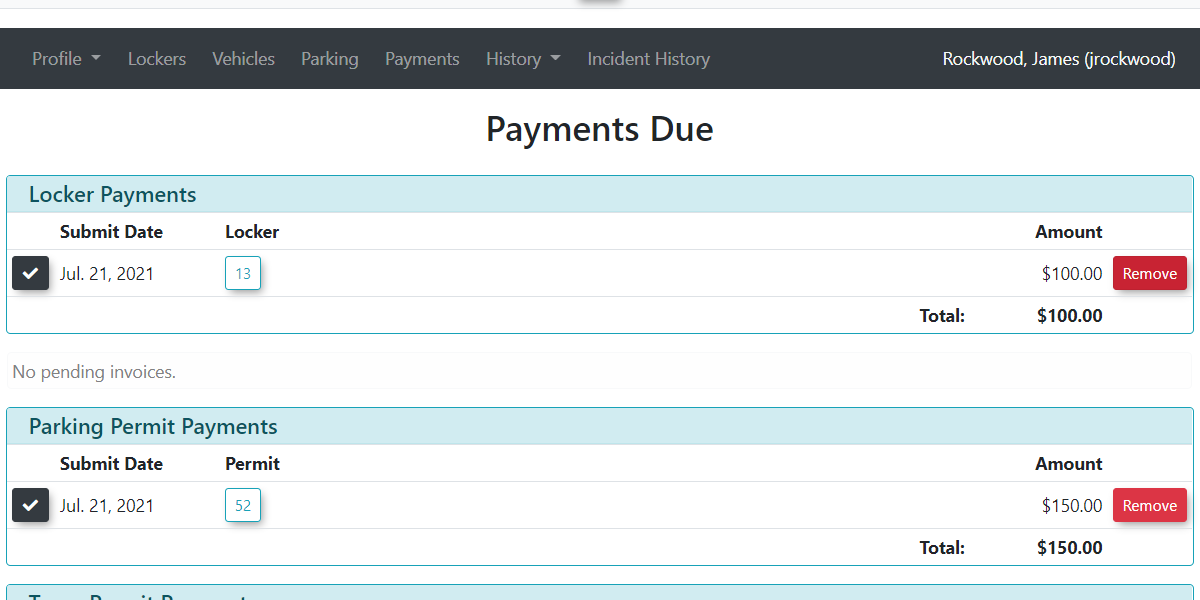
When purchasing a permit with a user that has a tax exemption code taxes will not be shown as a line item of the payment or confirmation page.
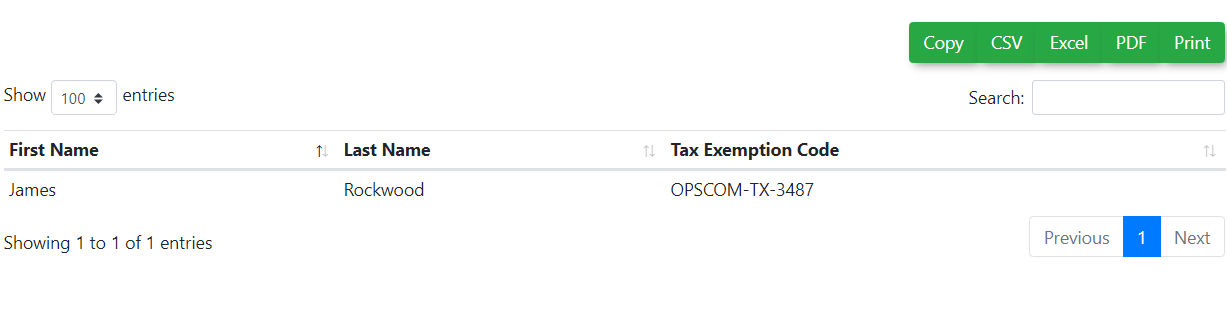
There is a tax exemption report that can be run under the Payments menu. You can choose to copy or export the records from the report which contains 3 fields, First Name, Last Name, Tax Exemption Code.
User Search
User Search Functionality
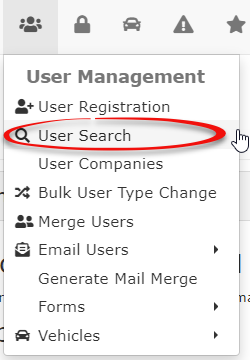
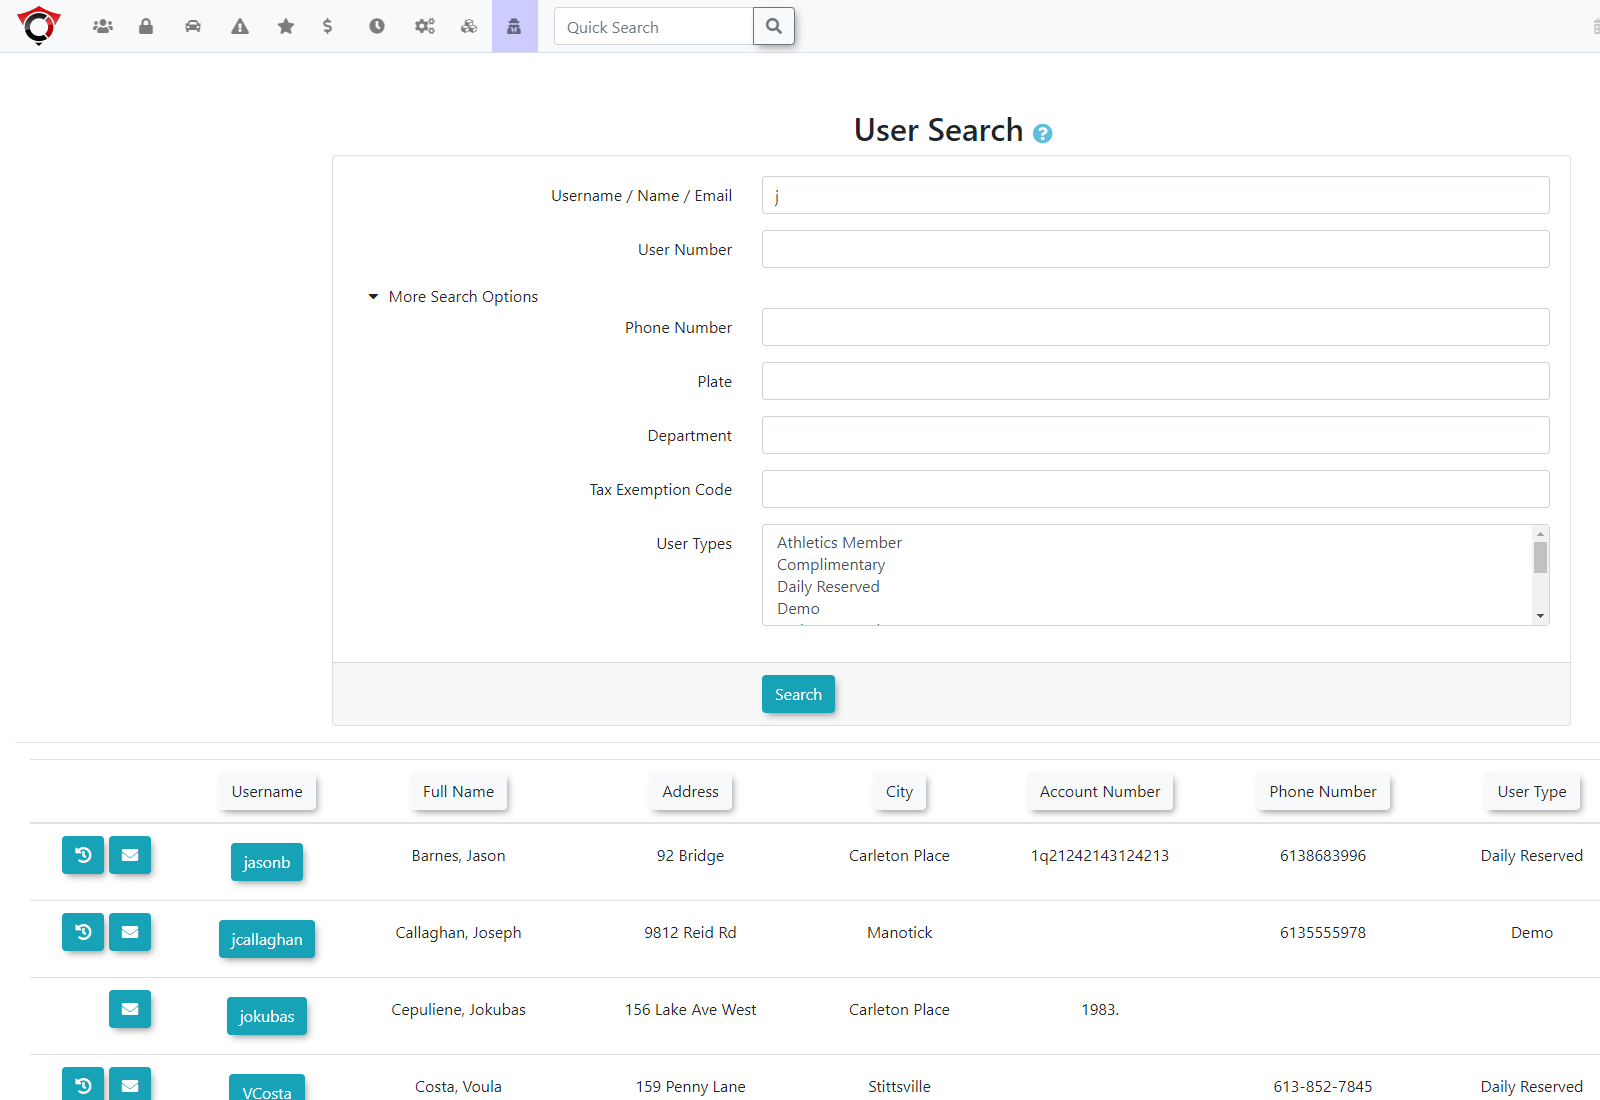
Hover over User Management and click User Search.
The User Search screen displays. Enter your search criteria and click Search.
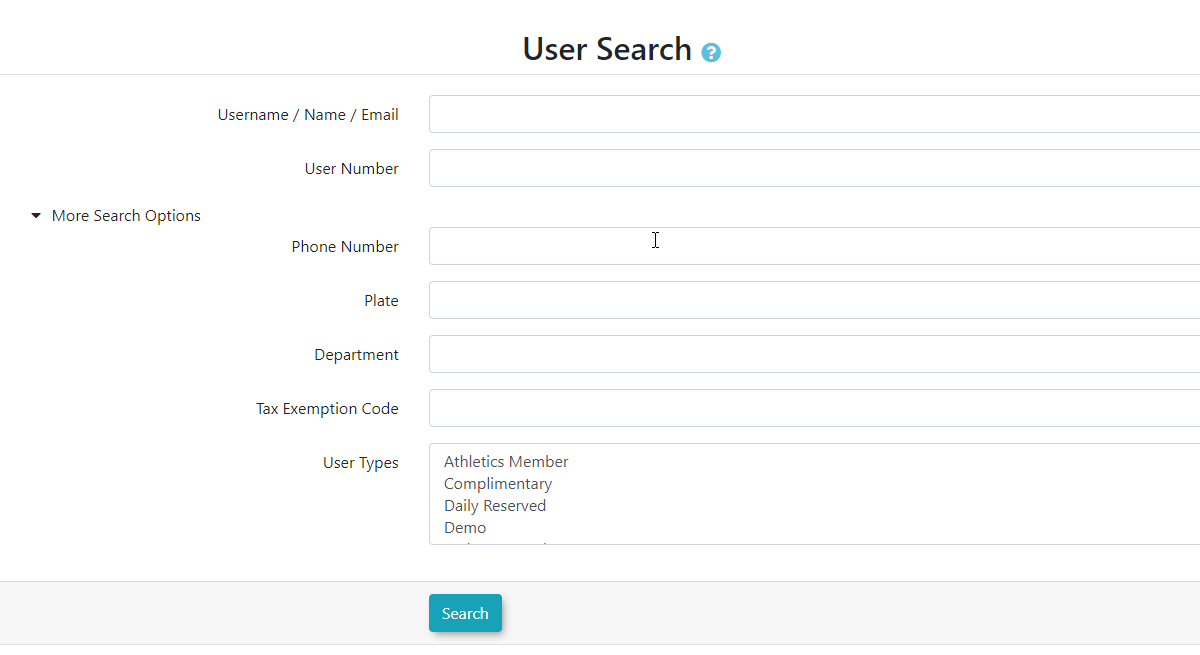
The search findings table will be returned below the criteria box.
User - Profile Tab
Editing a User Profile
Locate the User you wish to edit/update by searching for a user. Click on the Username and the Profile Dashboard will display for that user.
On the top right-hand corner you will see the name of the user that changes will be applied to.
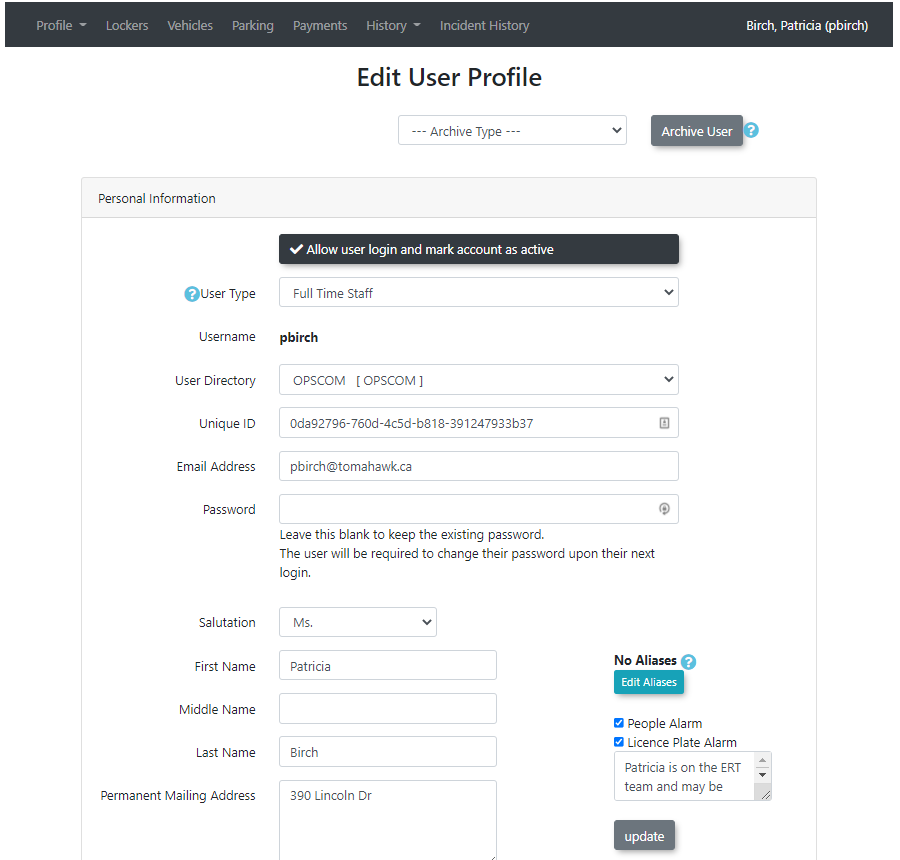
Click the Edit button on the Basic Profile Information bar or click the Profile dropdown and click Edit Profile Information.
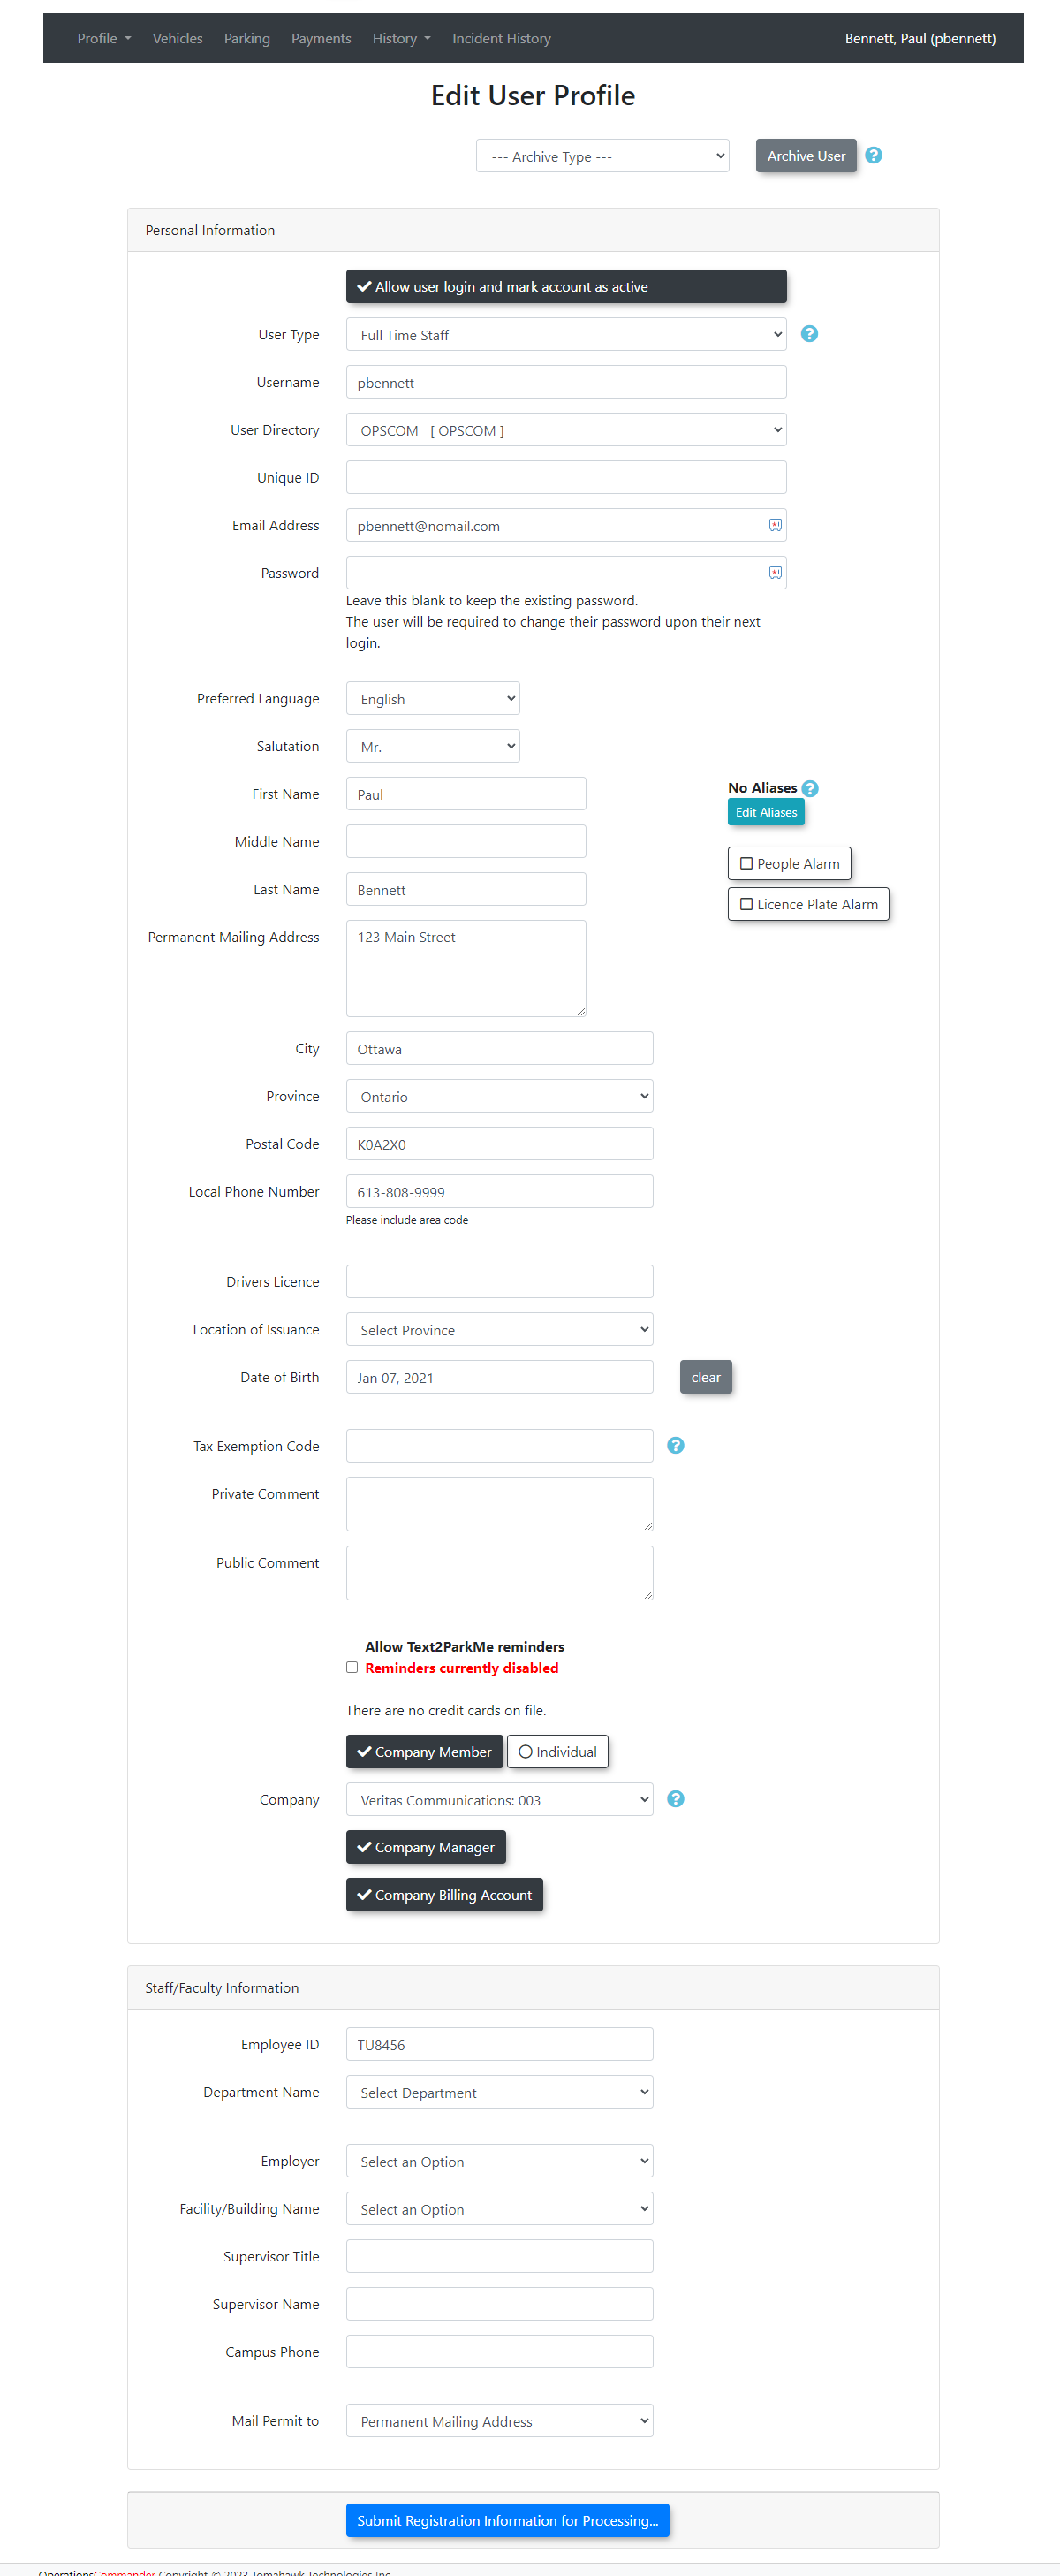
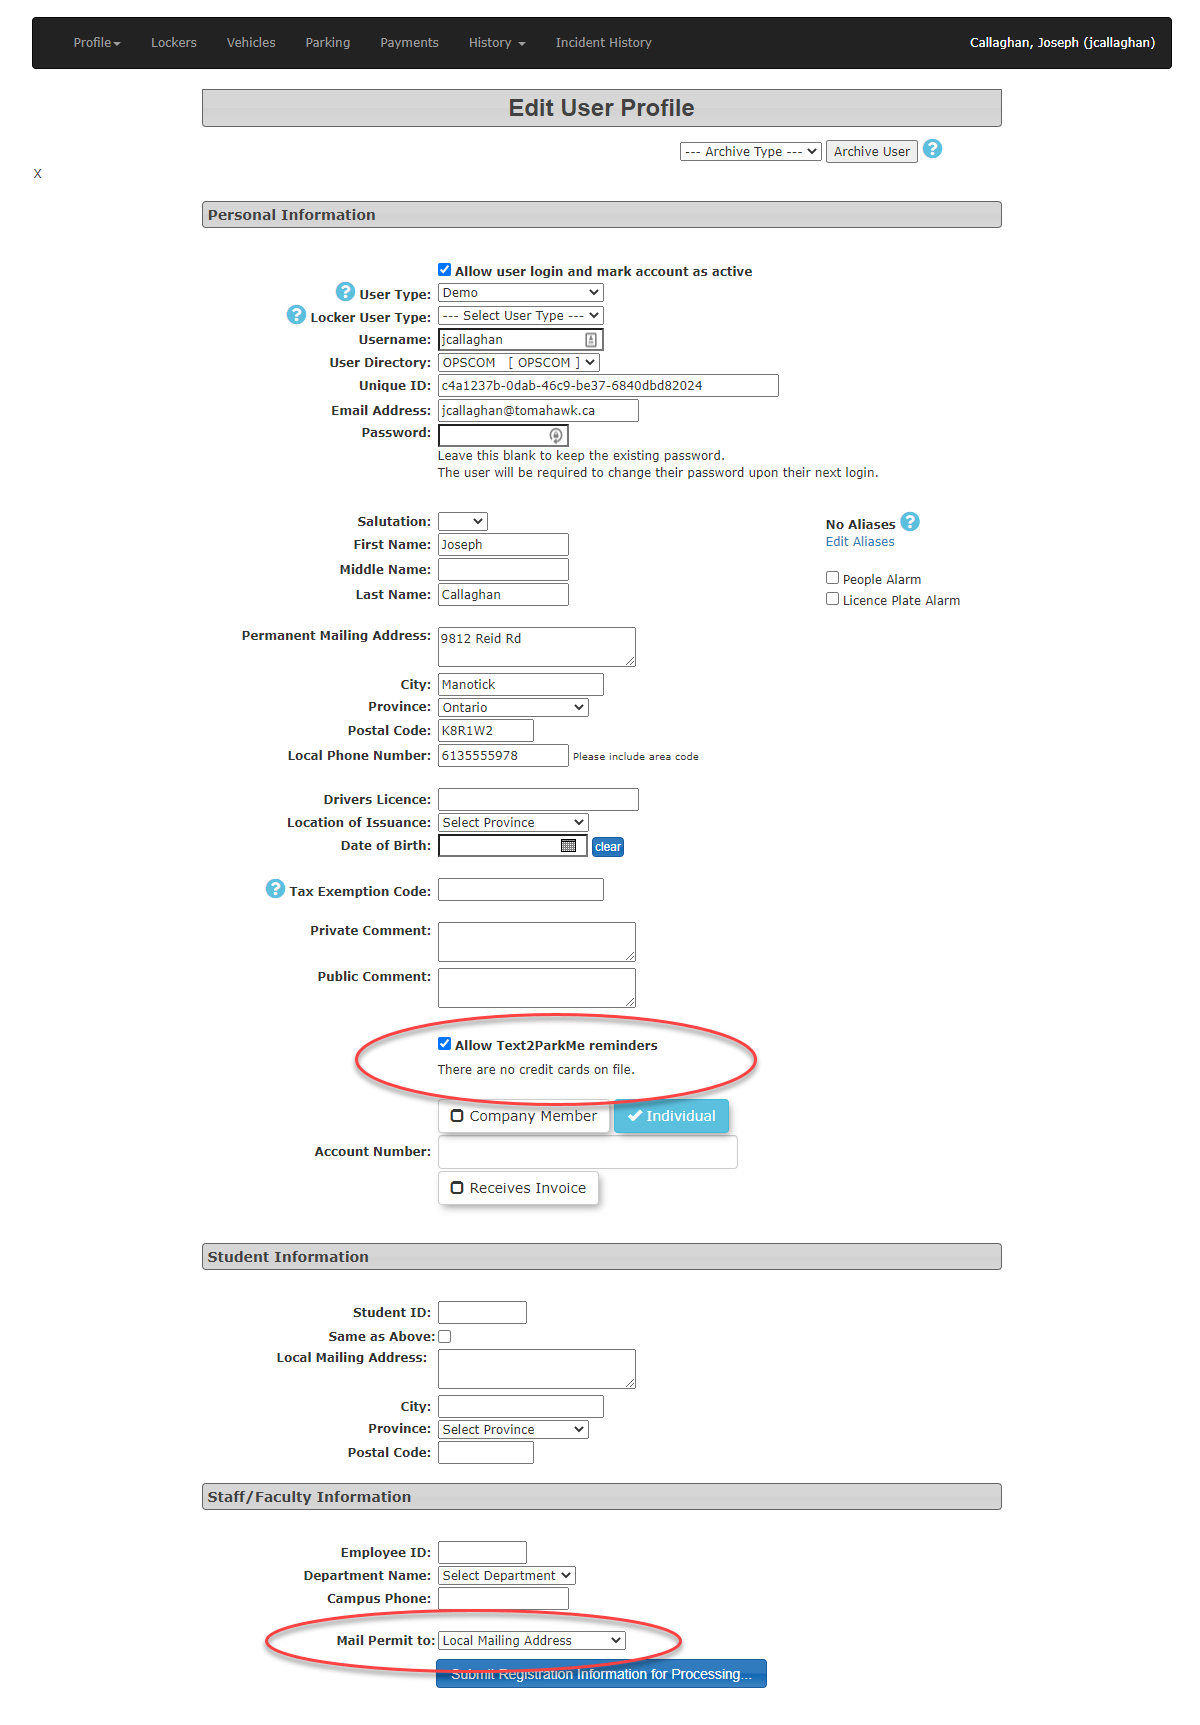
The Edit User Profile screen is displayed. All fields on this screen can be updated by Administrators. Click the Submit Registration Information for Processing button to save the changes.
Information of Note
Enabling Text2ParkMe
To enable a user to use Text2ParkMe, enable the Allow Text2ParkMe Reminders checkbox. A cell phone number and a credit card must also be on file.
Administrators do not have the ability to add credit card information to a user profile (this is for security purposes). Users must log in to their profile on the user portal to add credit card information.
Mail Permit To Address
The Mail Permit To field is used to direct which address prints on the hangtag when a user requests a hangtag permit be mailed to them. Whichever address is shown must be filled out on the profile.
Archiving or Disabling a User
Archive Process
Locate the User you wish to edit/update by searching for a user. Click on the Username and the Profile Dashboard will display for that user.
On the top right-hand corner you will see the name of the user that changes will be applied to.

Click the Edit button on the Basic Profile Information bar or click the Profile dropdown and click Edit Profile Information.
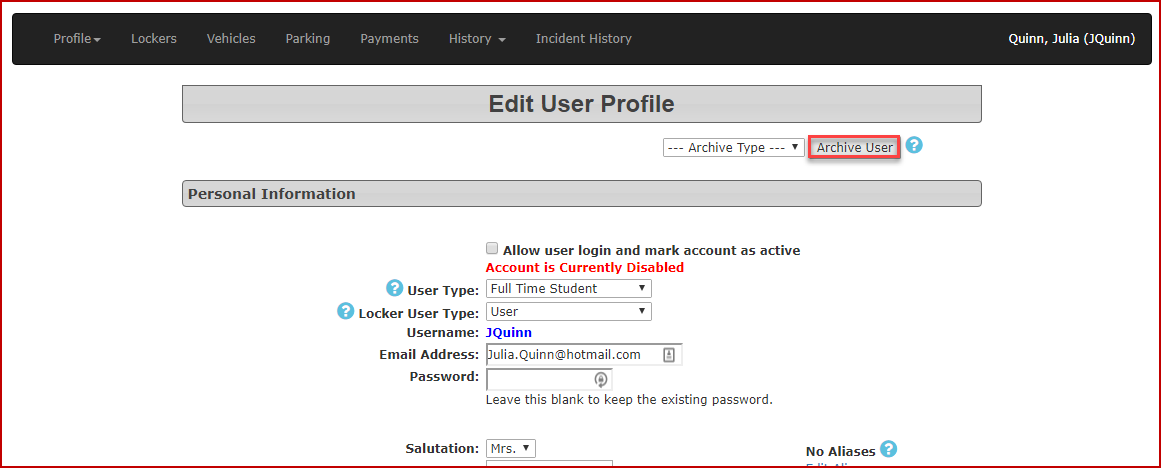
The Edit User Profile screen is displayed.
Disable User Account
Disable the Allow user to login and mark account as active checkbox.
Click the Submit Registration Information for Processing button at the bottom of the page.
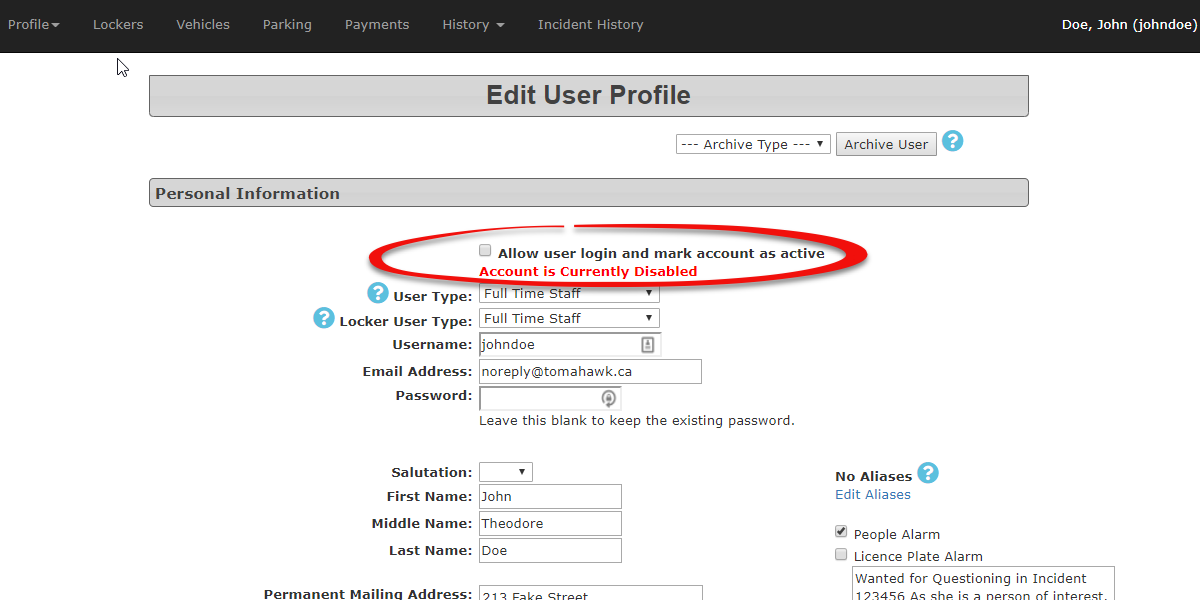
Click the Information Correct button to submit the change.
Archive User Account
Follow the steps above to locate and disable a user. Now choose an Archive User Type from the Archive Type dropdown list.
Click the Archive User button and click OK on the confirmation pop-up.
User - Purchase a Locker
Register a Locker
Locate the User you wish to edit/update by searching for a user. Click on the Username and the Profile Dashboard will display for that user.
Click on Lockers.
On the top right-hand corner you will see the name of the user that changes will be applied to.

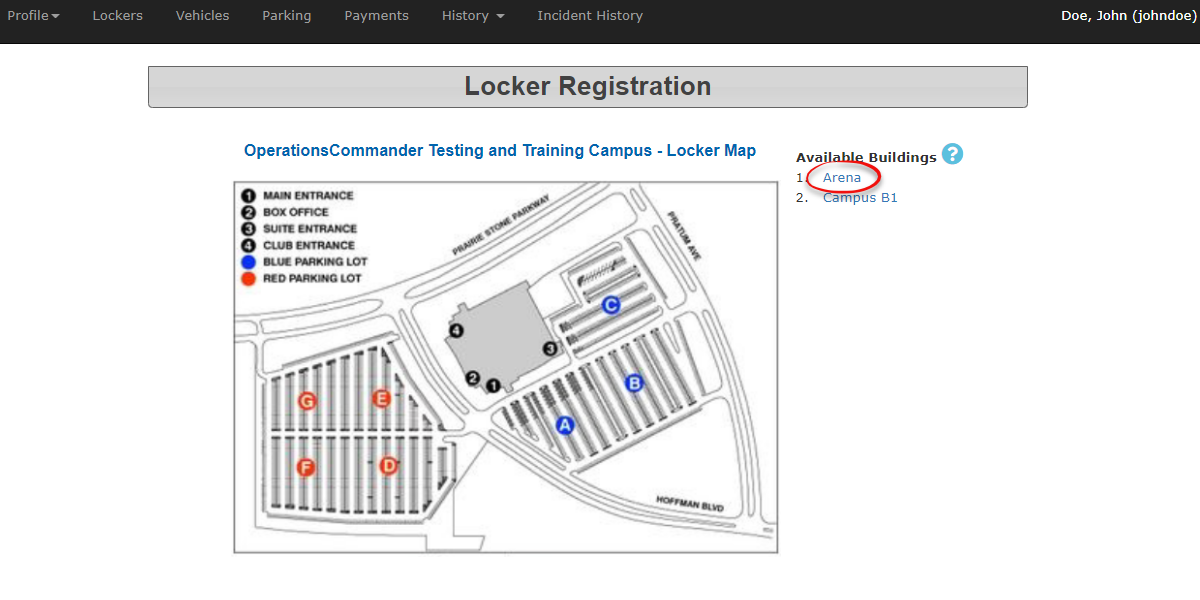
The Locker Registration screen displays. Click Arena under Available Buildings.
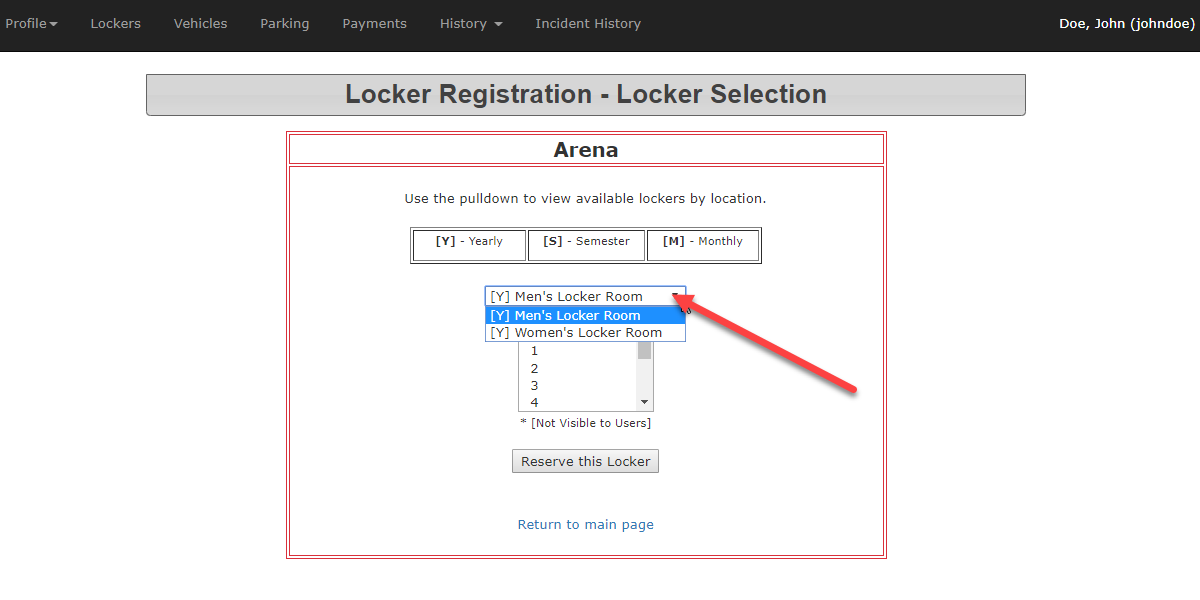
The Locker Registration - Locker Selection screen displays. Click the pull down menu to choose a location within the building.
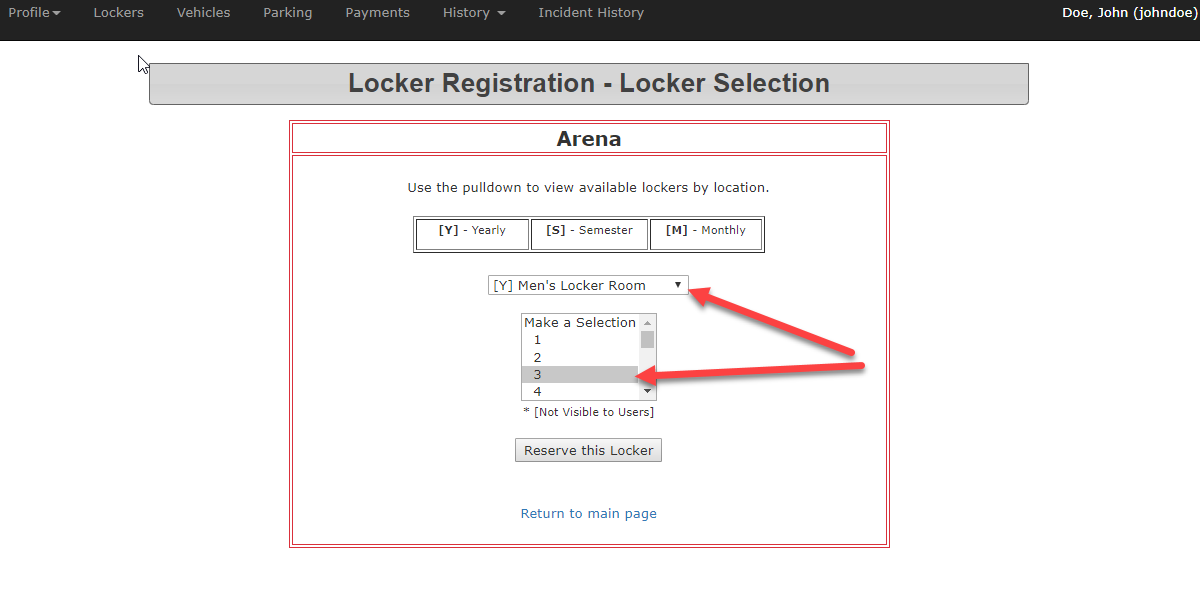
Choose a locker number to sell to that user and click Reserve this Locker.
The Confirm Locker Reservation screen is displayed. Verify all information is correct and click the Confirm Information button.
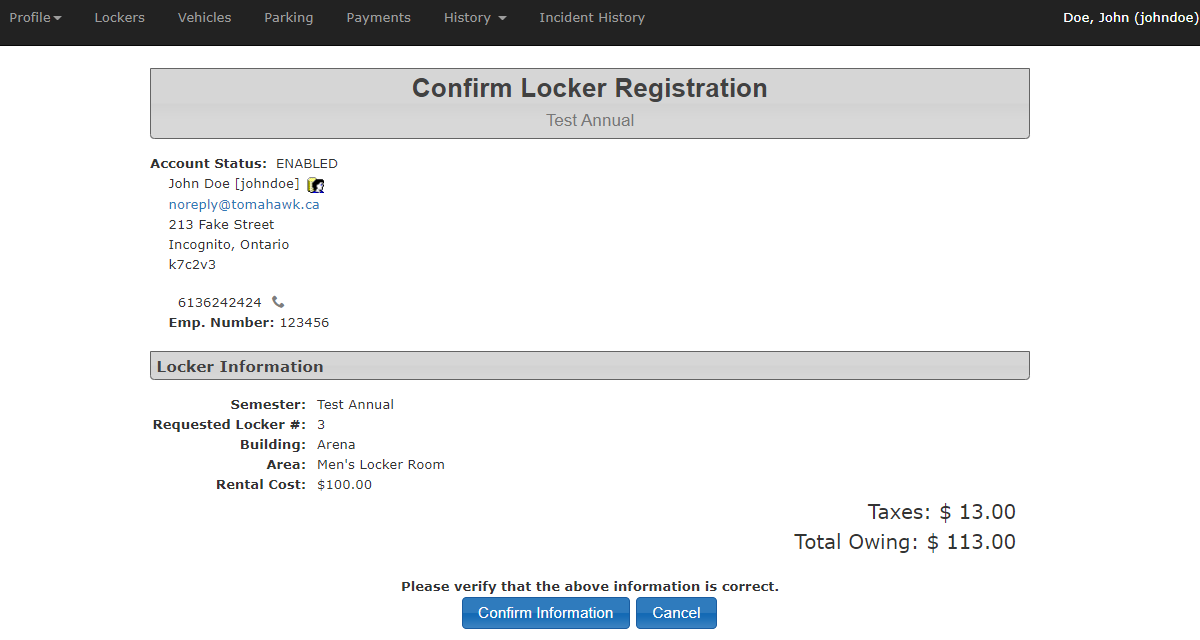
The Payments Due screen is displayed. You may now process the payment.
User - Vehicles Tab
Adding a Vehicle
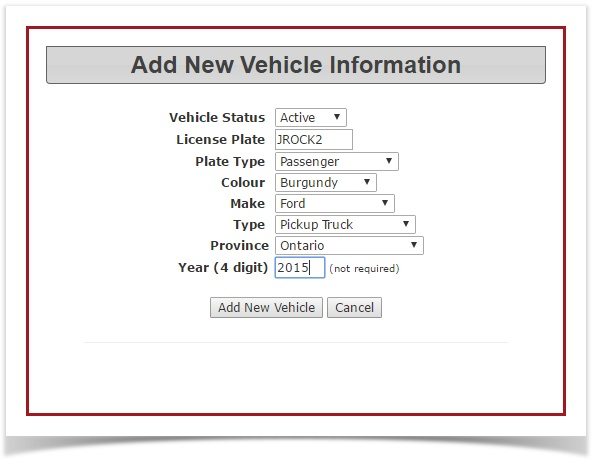
1. To add a new vehicle for a user, Click the 'Add New Vehicle' button at the bottom of the page.
The 'Add New Vehicle Information' screen pops up . Fill in all of the details for the new vehicle and click the 'Add New Vehicle' button to save the changes.
The 'Vehicle Information' screen is displayed again.
2. There are a number of links in the Vehicle tab that will provide administrators with additional information.

If the Plate link is selected the 'Vehicle Information' window will pop-up to allow you to update vehicle information. If you make changes in here, ensure that you click the 'Update Vehicle' button to save the changes.
The Username link takes you to the main profile screen for that user where you can view/edit user profile details.
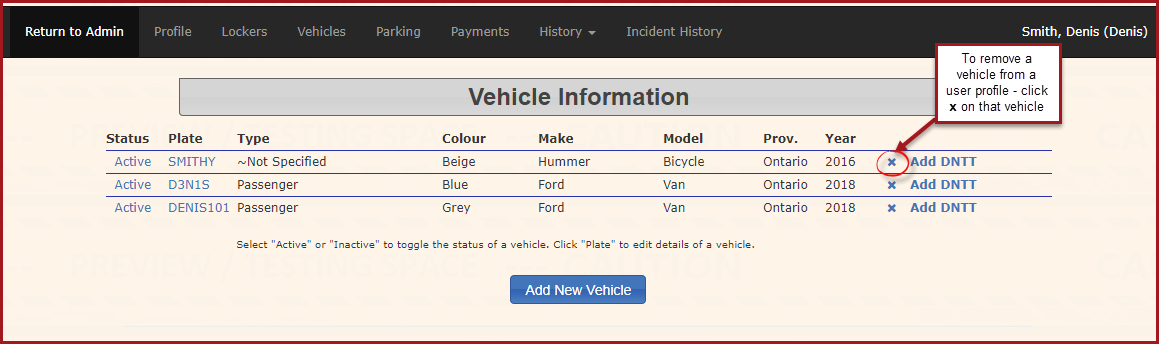
The Removal link allows administrators to permanently remove a vehicle. A pop-up message will ask you to confirm the removal.
The Record DNTT link allows administrators to remove/add/edit a Do Not Ticket or Tow notation for that vehicle. A DNTT Note is used to notify enforcement officers that a particular vehicle should not receive any violations in a particular lot, during a particular date and time.
Edit a Vehicle
- Click the Plate to launch the Vehicle Information window. Make your changes and click 'Update Vehicle'
Activate/Deactivate a Vehicle
- Click the Active or Inactive link under Status.
Removing a Vehicle
When would we use this?
A vehicle can not be completely removed from OPS-COM, however, it can be removed from a person's user profile. You may want to remove a vehicle if:
- The Vehicle changes owners
- A Vehicle was placed on the wrong user profile
If the vehicle had only one user it will be marked as archived. If the vehicle has two users, the vehicle will be removed from the profile you perform the removal on but remains under the second profile. Any violations on the vehicle would remain in place under that second user's profile.
Important - Before removing a vehicle
If there is only one driver listed on the vehicle it is important to ensure any outstanding balances are cleared before removing the vehicle.
- In the vehicle listing in the user's profile you will see an "x" in the vehicle record.
- Clicking the x to start the process.
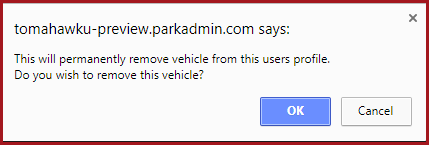
3. You will be prompted to confirm the removal. Once you click OK the vehicle will be removed. The vehicle will remain in the system but not be associated with a user.
User - Parking Tab
Standard Parking Permit
Click the 'Parking' tab.
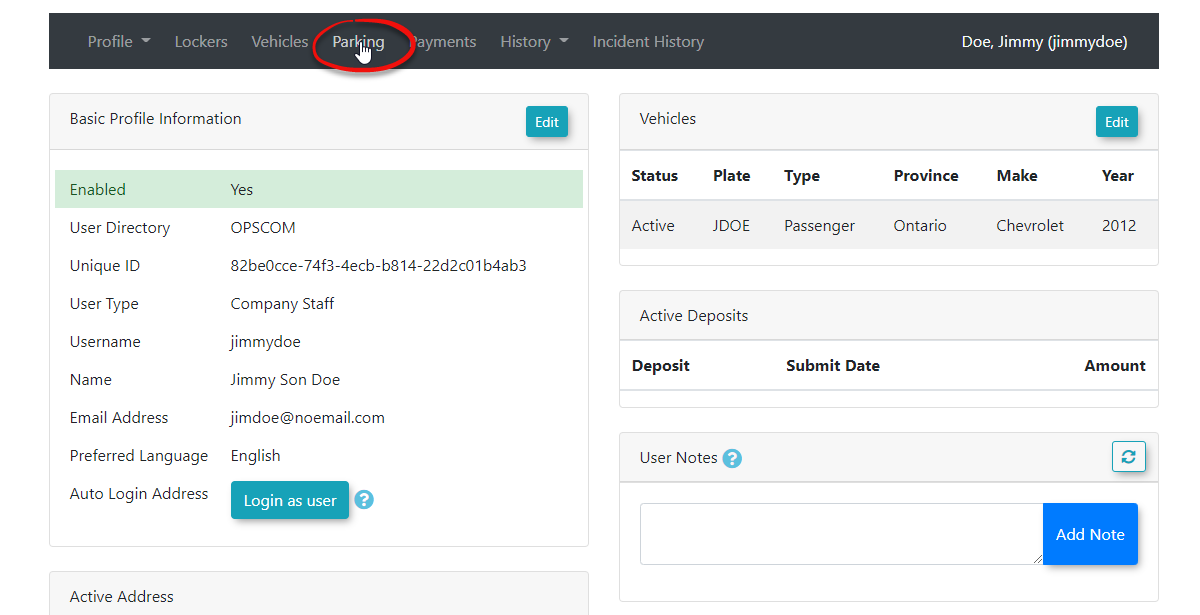
The 'Manage Lots' screen will display.

To sell a Standard Parking Permit, click the 'Standard Parking Permit' button.
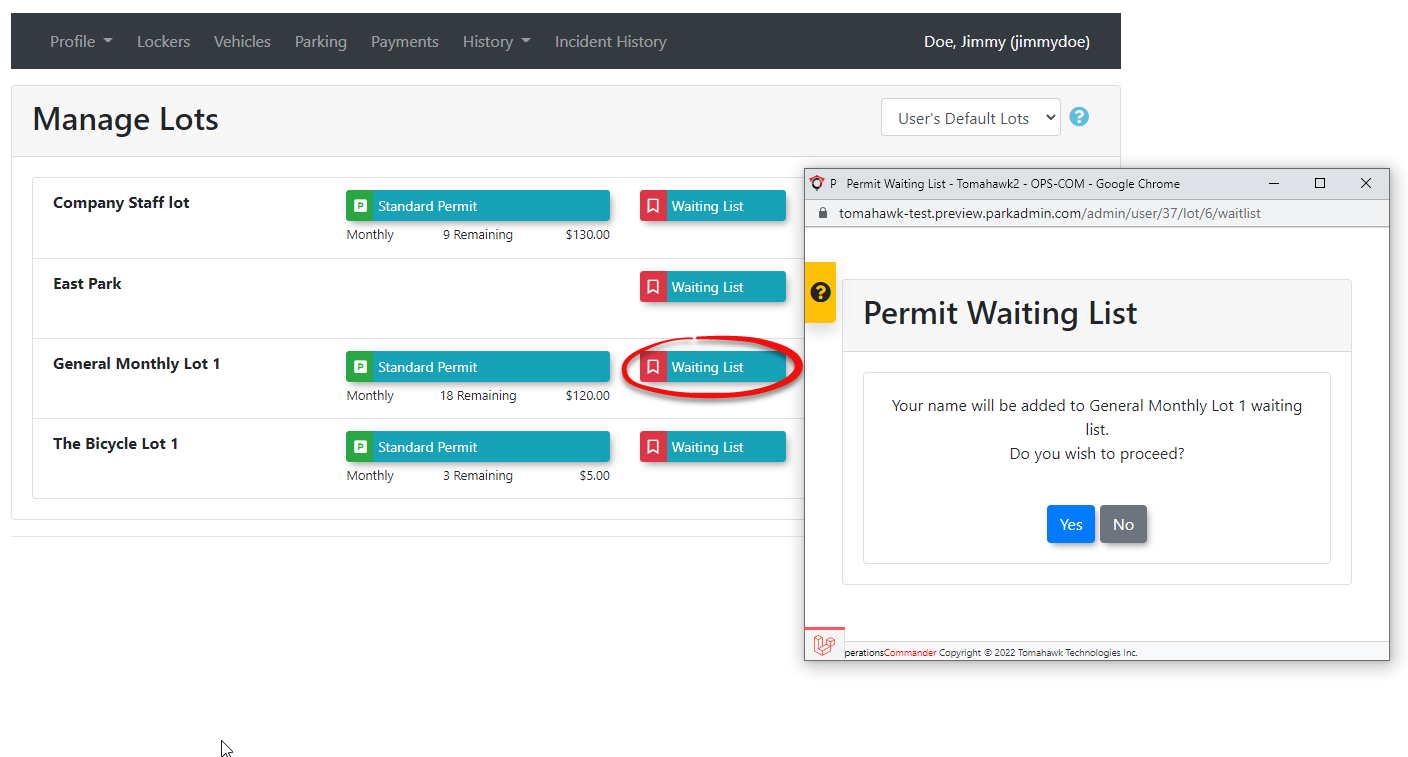
The 'Parking Permit Registration' screen will display. A list of available lots for this user type will display. The list not only shows the lot location but also shows administrators what type of permit is sold in that lot (yearly, monthly, semester or other) and how many permits are still available for sale in that lot.
If you click the User Default Lots drop down you can also select to show 'All Lots', where you are able to see more options in the menu. An admin can deem to issue the user a permit in any lot.
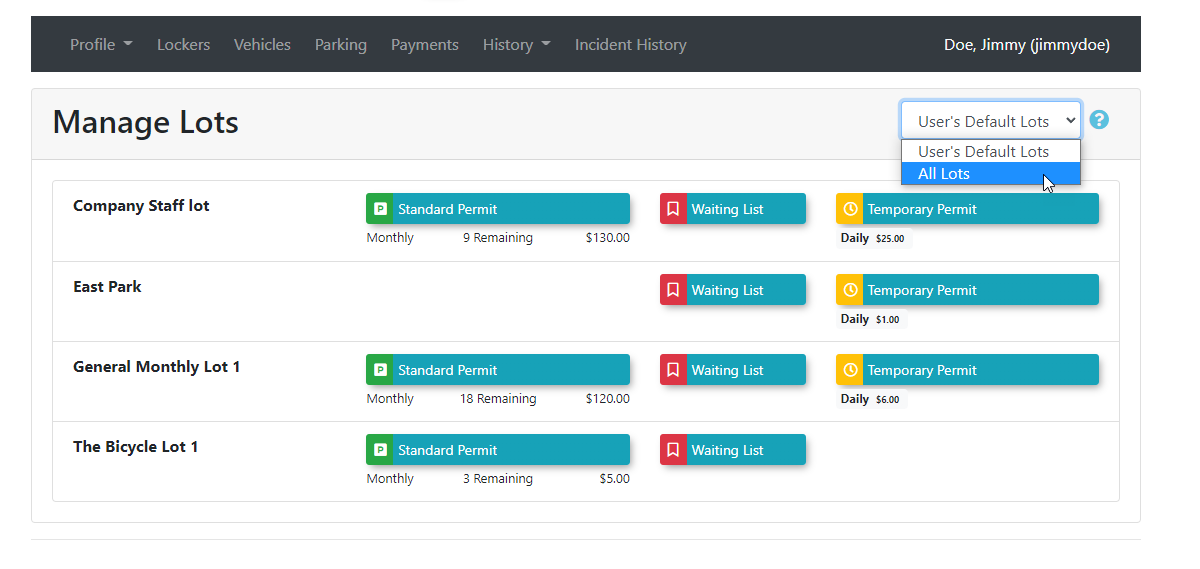
If there are no permits remaining in the chosen lot, you can click the 'Waiting List' link to add the user to the waiting list.
The 'Permit Waiting List' pop-up will display. Click 'Yes' to add the user to the wait list.
Click the 'Register Permit' button.
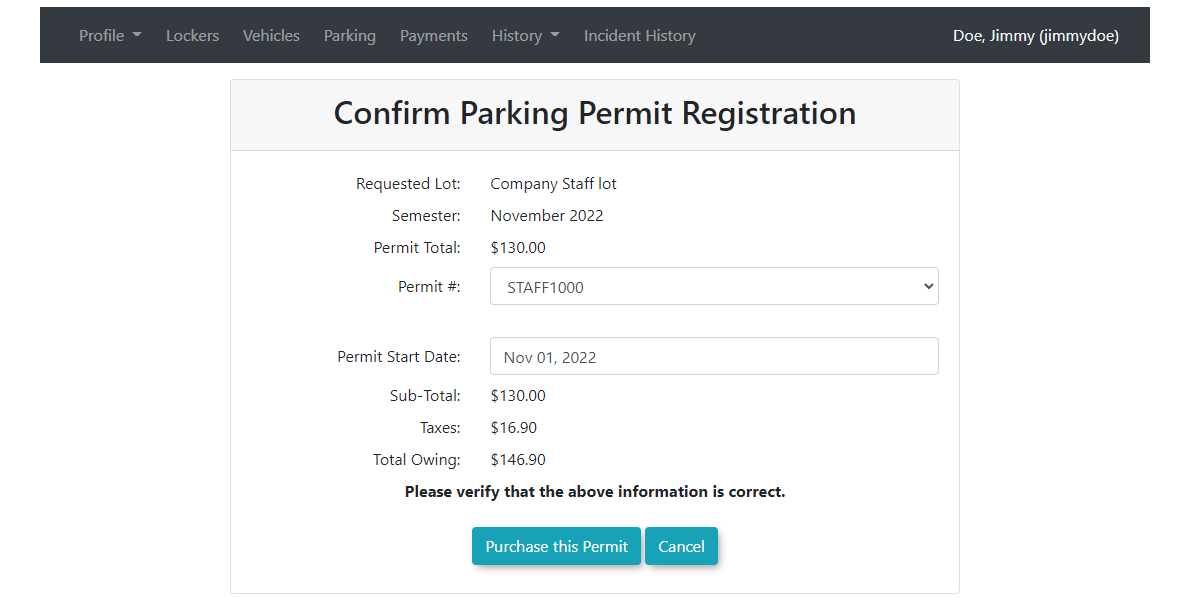
The 'Confirm Parking Permit Registration' screen will display.
Confirm the permit information details. If correct, click the 'Purchase this Permit' button.
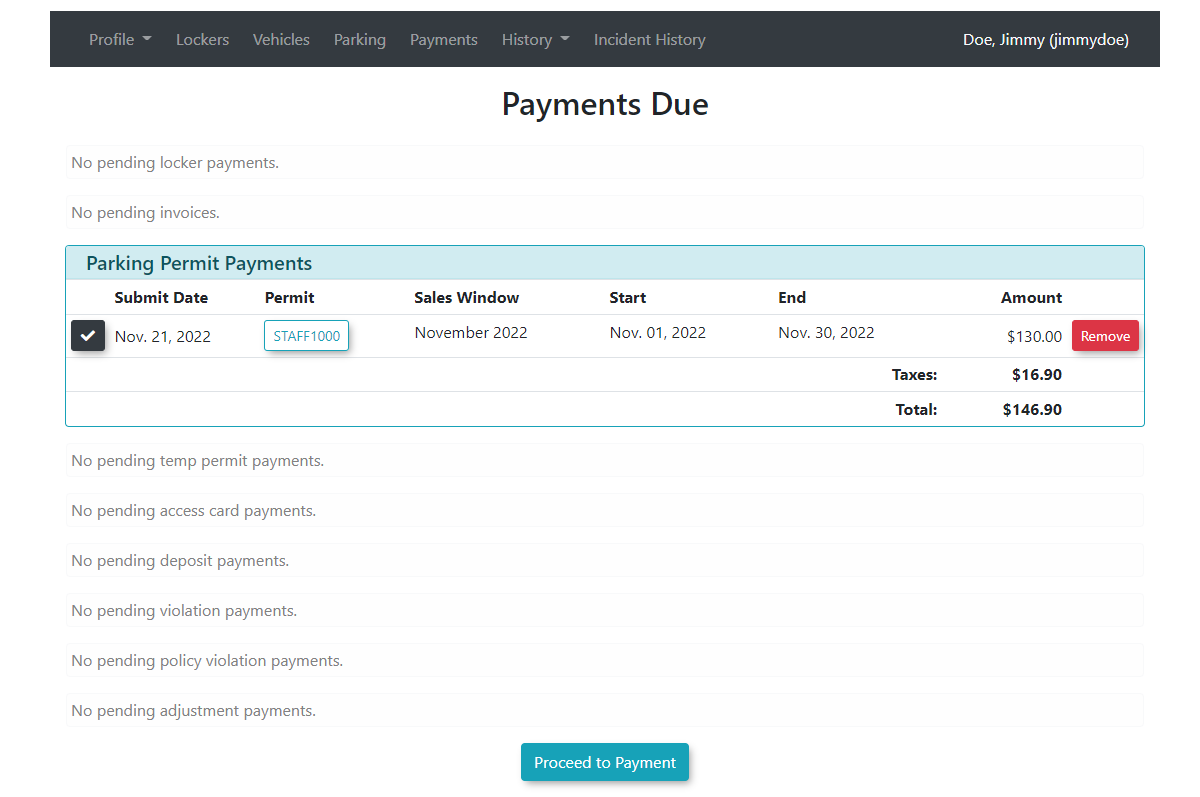
The 'Payments Due' screen will display. Once the permit is paid for, click the 'History' tab, find the permit and click the printer icon to print the permit.
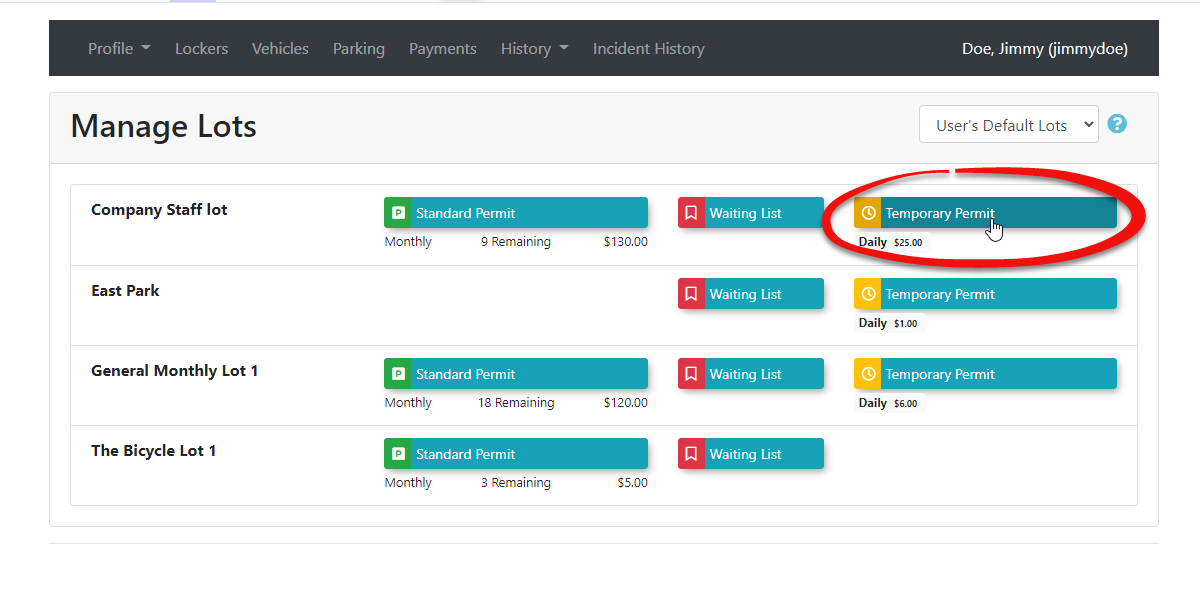
Temp Parking Permit
To sell a Temporary Parking Permit, click the 'Temporary Parking Permit' button on the 'Parking' tab.
The 'Temp. Parking Permit Registration' screen will display.
Choose a lot from the drop-down menu. Enter the start and end dates for when the permit will be valid.
Choose the type of temporary permit (all day permit or hourly permit) and select the vehicle the permit applies to.
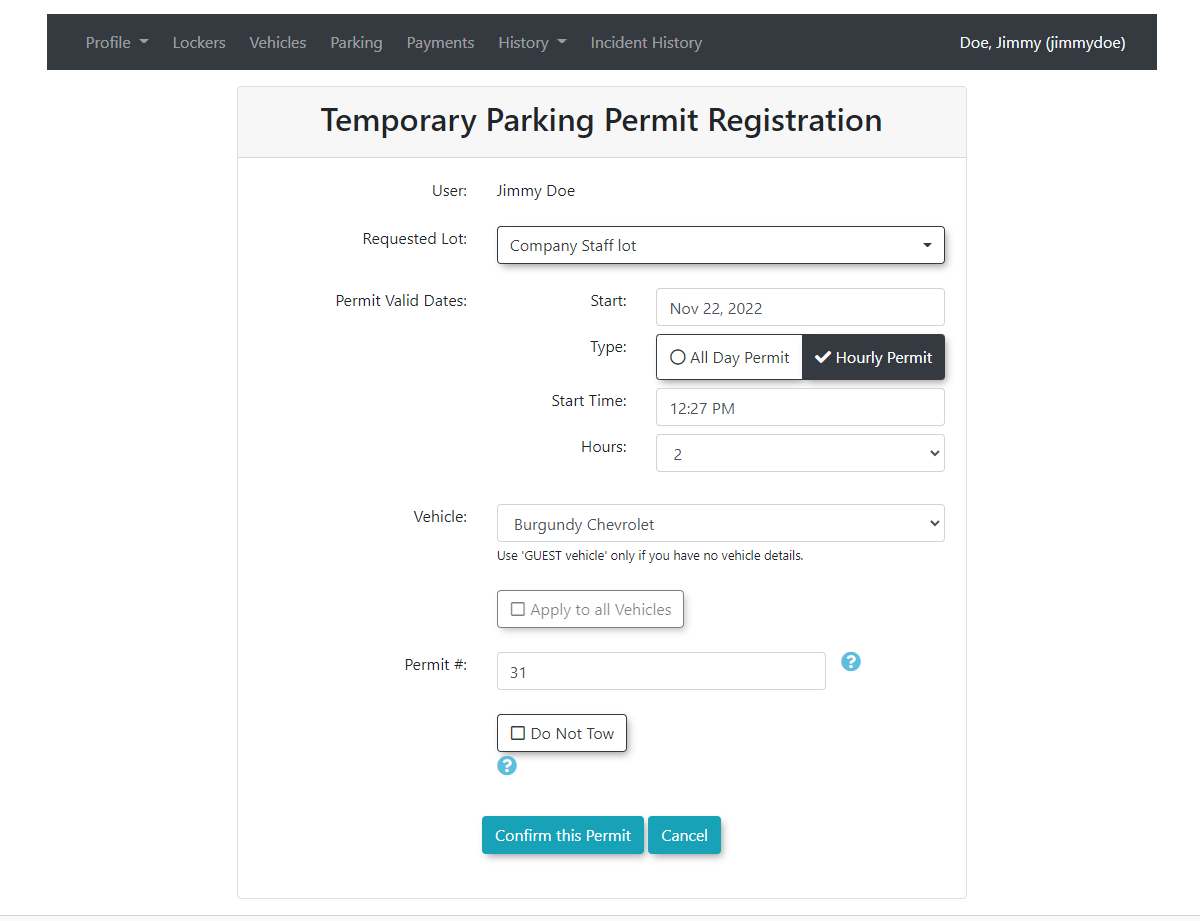
Confirm the Permit Number. If a DNTT (Do Not Ticket or Tow) is required enable the checkbox.
Click the 'Confirm this Permit'
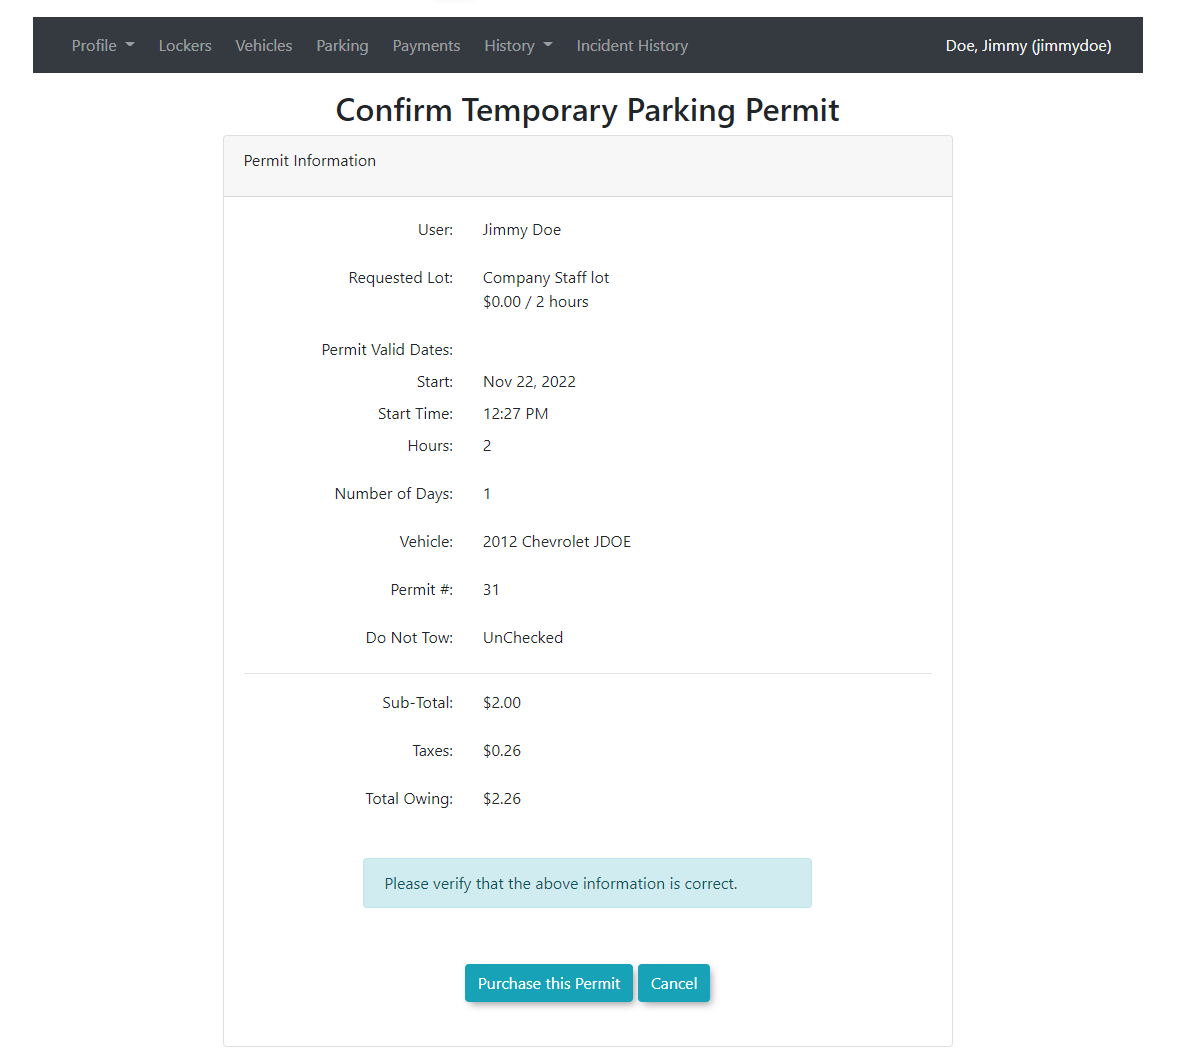
The 'Confirm Parking Permit Registration' screen will display.
Confirm the details are correct and click the 'Purchase this Permit' button.
The 'Payments Due' screen will display.
Once the permit is paid for, click the 'History' tab, find the permit and click the printer icon to print the permit.
Associate an Access Card with this User
Click the 'Associate an Access Card with this User' button on the 'Parking' tab.
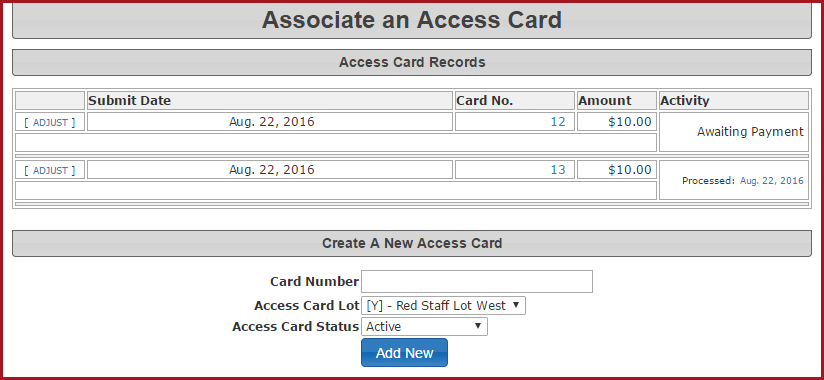
The 'Associate an Access Card' screen displays.
The first section shows the access card records that are currently associated with that user.
There are a number of links in this section that will provide administrators with additional information.
The Processed date link brings up the Transaction Details page.
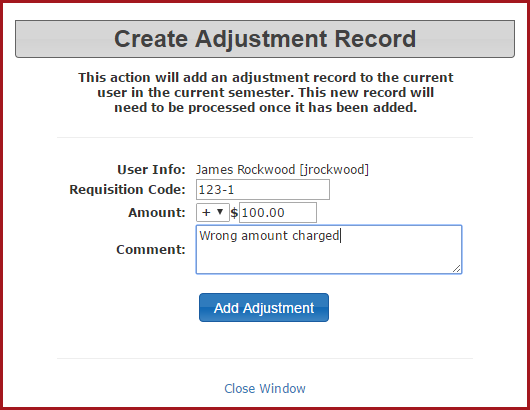
The Adjust link allows administrators to make payment adjustments related to an access card already on file.
Enter the Requisition Code (this is an organization specific code), from the drop-down menu select the + or - depending on if you are crediting the user or increasing the payment amount due, enter in the amount of the adjustment, write any notes needed to explain why the adjustment is being made, and click the 'Add Adjustment' button to save the changes.
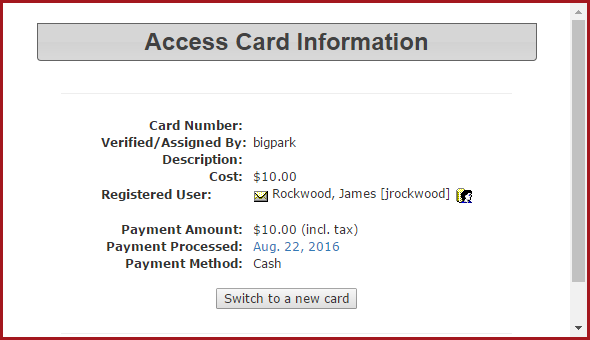
The Card Number link brings up all of the information associated with that particular card.
You can click the envelope icon to send an email to that user or click the person icon beside the login ID to go to the user profile.
Click the 'Switch to a New Card' button to enter a new access card number and click 'Mark as Verified' to save the changes.
To Create a New Access Card, enter the new card number, select the lot where the access card will be associated, update the status of the card using the drop-down menu as necessary (normally this will be active), and select the 'Add New' button at the bottom to save the information.
User - Payments Tab
Select Items to Apply Payment
Enable the check boxes for the items that you wish to make the payment on.
In the example below, only lockers are included in the payment.
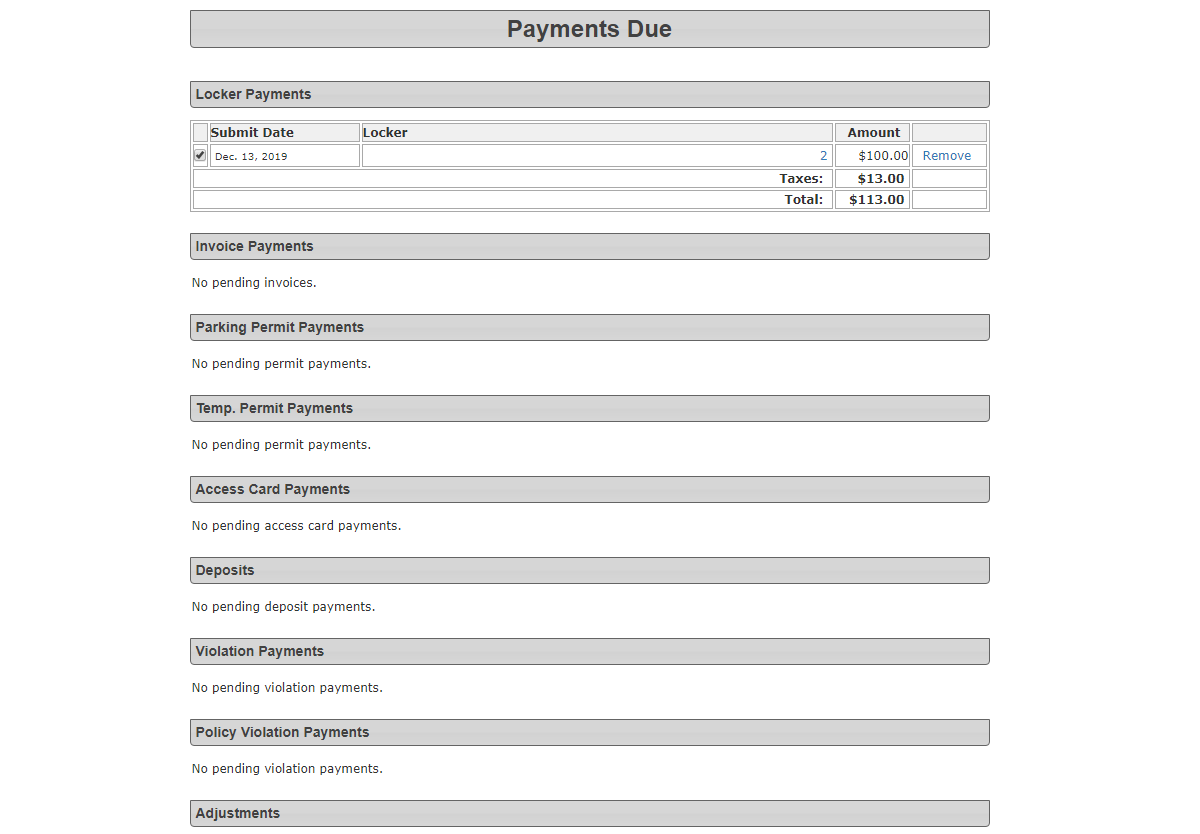
View More Details
Administrators can click on items in blue to link to more information about that item.
If you make changes, always click the 'Update' button to save the new information.
Items can also be removed by clicking the 'Remove' link, however there is no undo option to reverse this action.
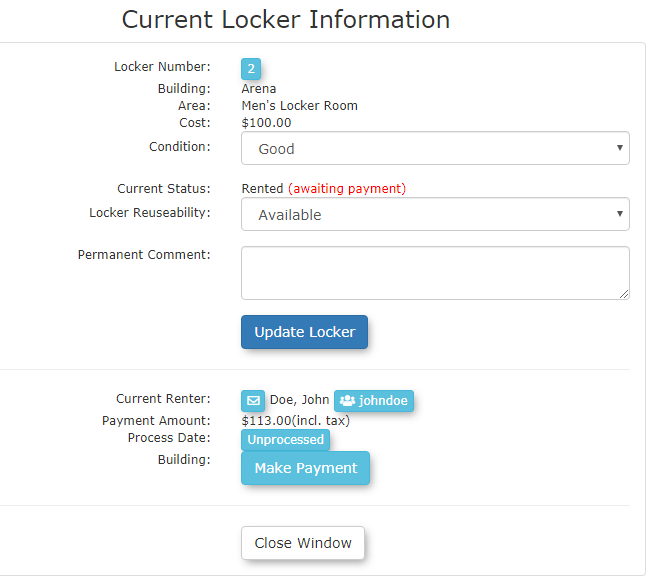
Make a Payment
Click the 'Proceed to Payment' button.
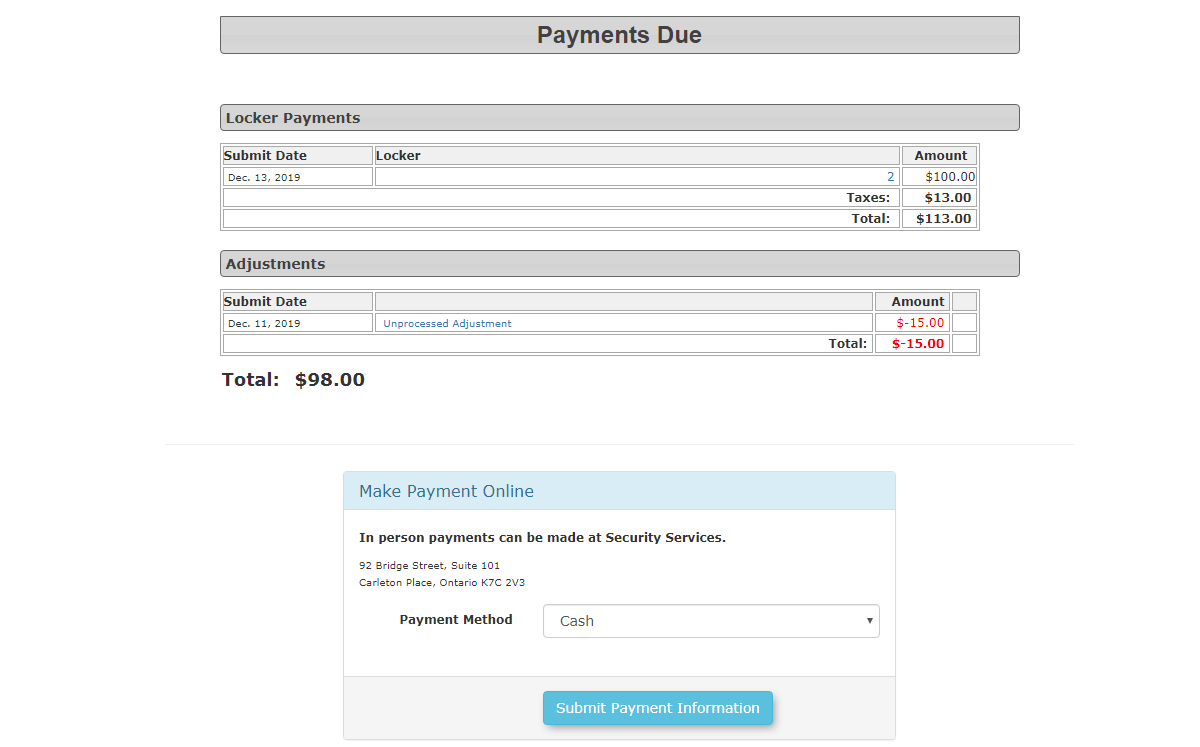
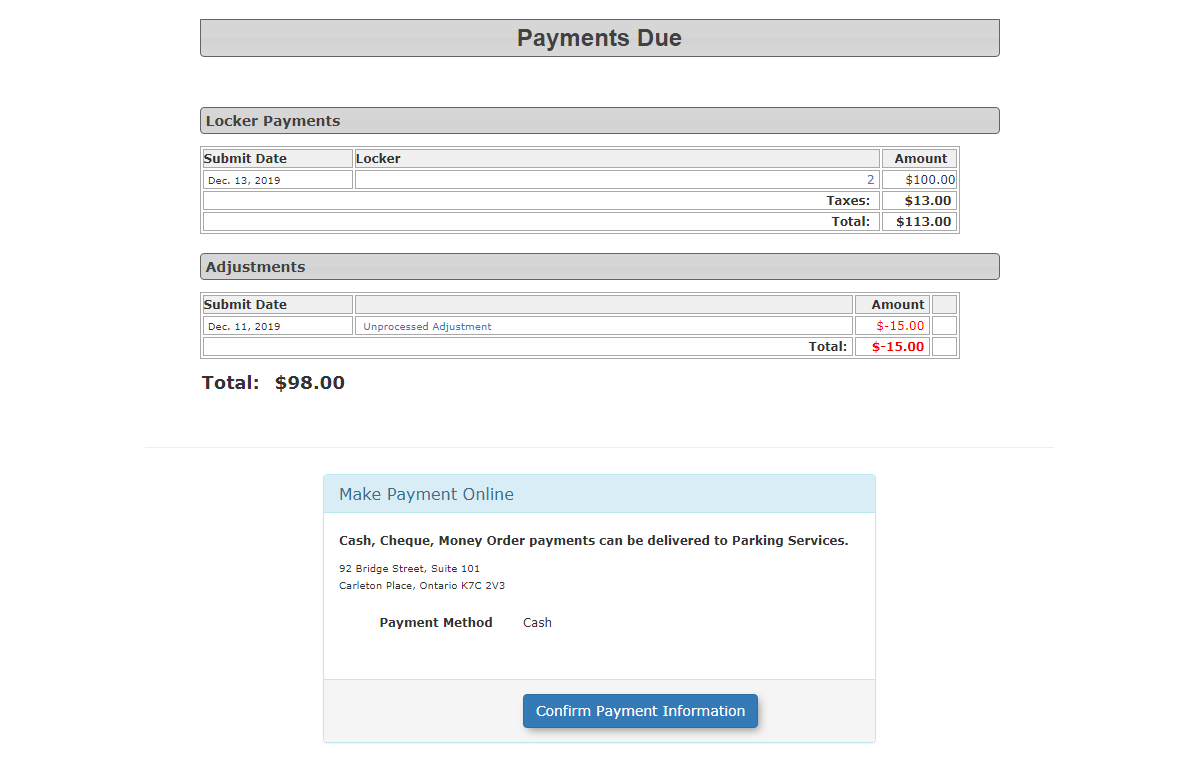
Another 'Payments Due' screen is displayed.
Confirm the details for the payment and choose the payment method from the drop-down list.
Click the 'Submit Payment Information' button.
The 'Payments Due' confirmation screen is displayed.
Verify all payment information and click the 'Confirm Payment Information' button.
Transaction Details
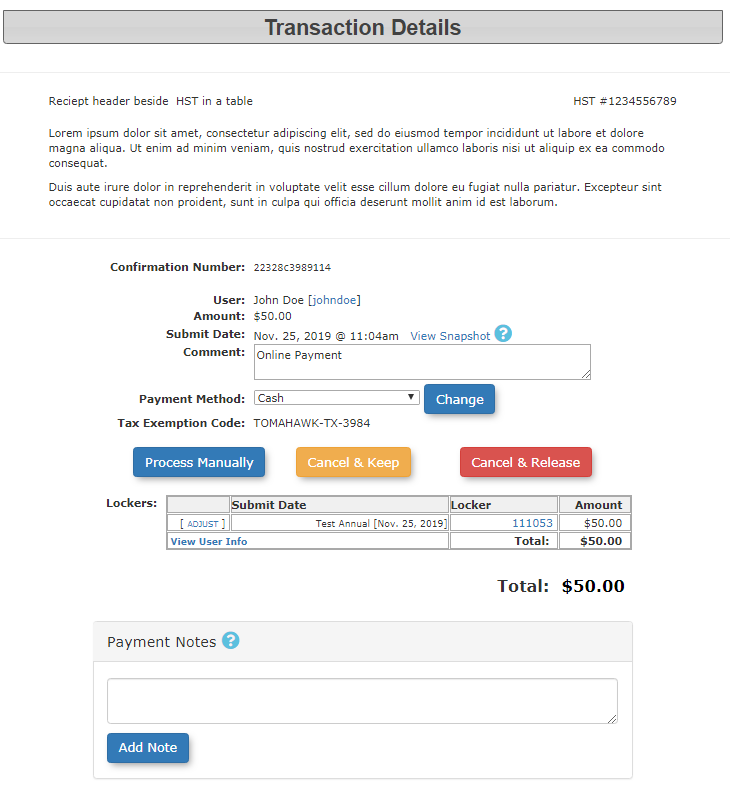
This brings you to the 'Transaction Details' screen where administrators have a final opportunity to make any additional changes to the payment.
You can click the 'Cancel Transaction' button to cancel the promise to pay and release the items back into the inventory.

Administrators can also use the Adjust link to make adjustments to the cost of the item.
This can also be done after the transaction has been completed.
Process a Payment
Systems connected to a payment provider (gateway) will be shown as processed automatically in the case of credit card payments.
Generally this is configured only on the user side while the admin side has broader level of control for incoming payments.
Click the 'Process Manually' button.
The final payment confirmation displays a transaction confirmation number.
The options to make adjustments or to refund a payment are also on this screen.
In the payment process, there are three types of reimbursements:
- Cancel Transactions
- Refunds
- Adjustments
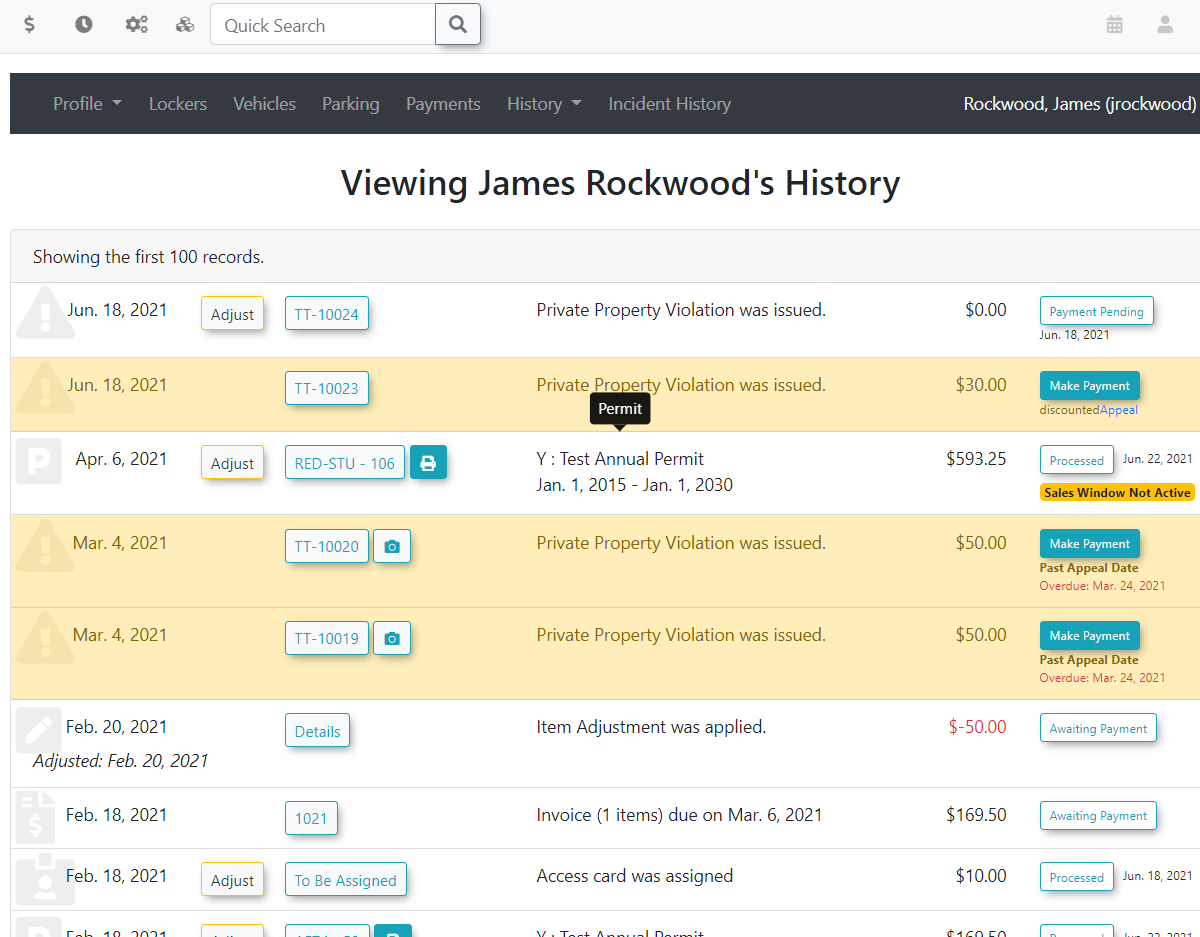
User - History Tab
There are a number of links on this page that administrators can select to get additional information, make edits, adjustments and/or refunds.
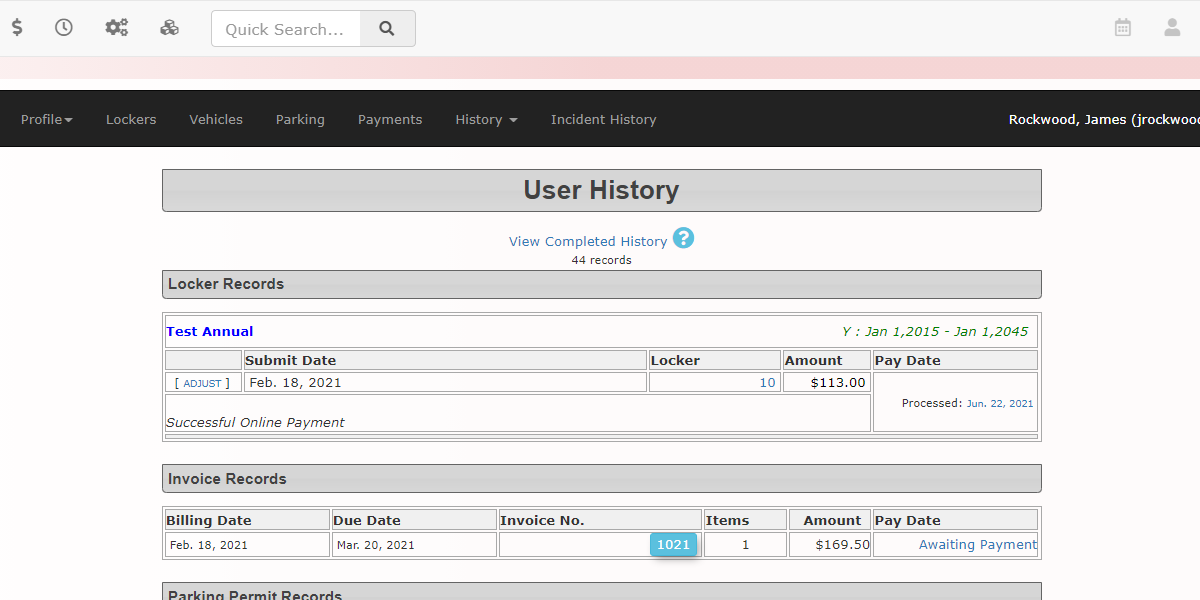
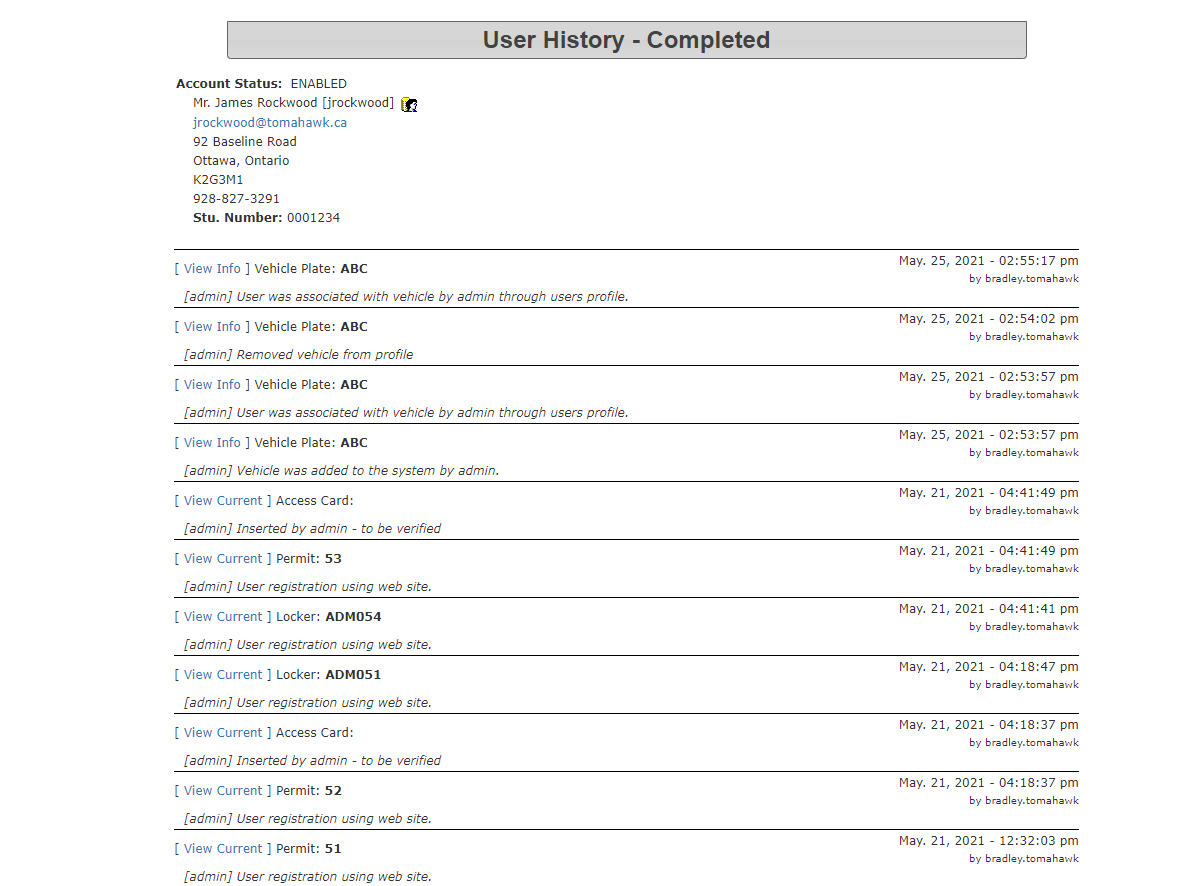
View Completed History
This view has the transactions ordered by date with the most recent transaction at the top of the list.
Administrators can select the View links to get additional information on each of the transactions, make edits, adjustments or refunds.
The Email link brings up a screen that allows administrators to email the specific user.
Click View beside any record to see more information about the transaction listed.
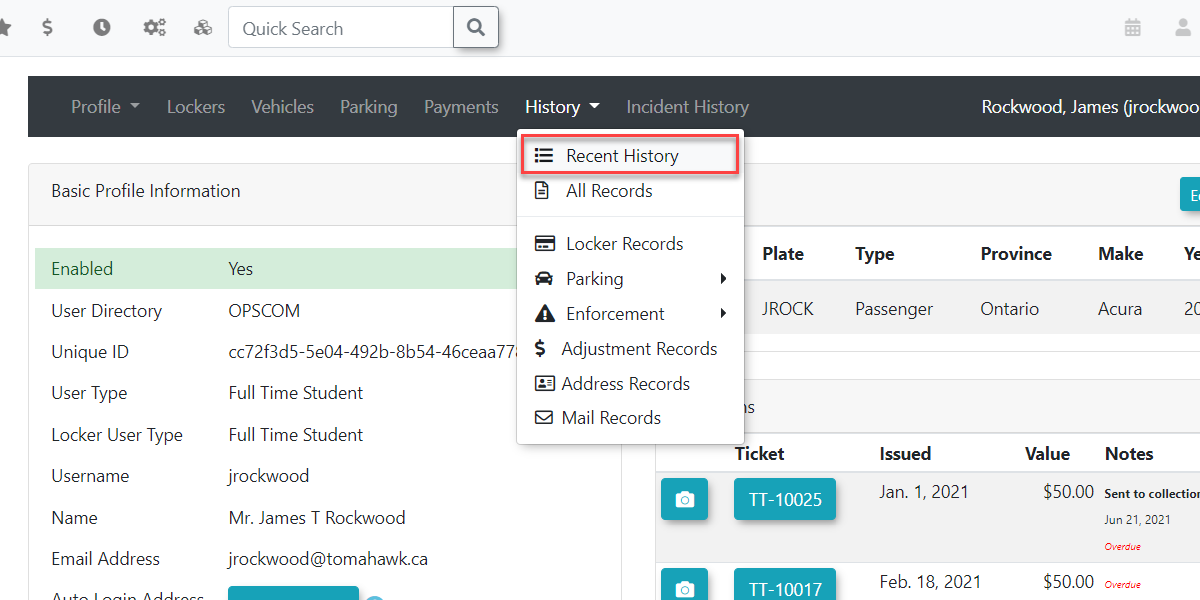
Recent History
Admins can use the Recent History tab to view the top 100 recent history records for a user.
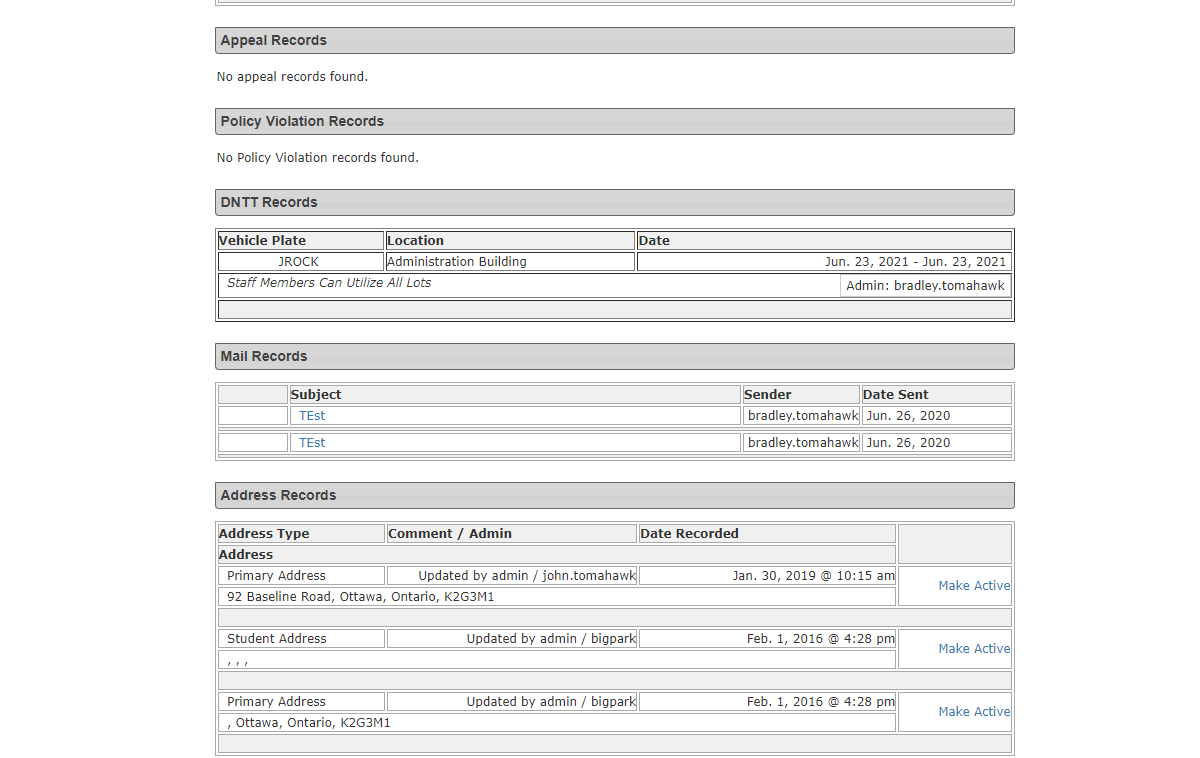
The items included on this history page are a roll up of all of the individual history items such as Locker, Parking, Enforcement Adjustment, Address, and Mail Records. Its important to note that not all records appear on the recent history report and to see more you can use the All Records page for a completed history of that user.
Other Page Links
The Adjust link allows administrators to make adjustments to transactions/payments that have been processed.
The Item Number link (locker number, permit number, violation ticket number, appeals record number) allows administrators to view/edit details about the item.
Click the 'Update' button to save any changes you make.
The Pay Date link indicates whether or not a transaction was fully processed, when it was processed and when selected it links to the payment details.
Administrators can view/edit other details of the transaction, complete the processing of a payment, no refunds or make adjustments.
User - Incident History
There are a number of links on this page that allow administrators to get additional information or make edits to existing information.

The User Profile icon will open the contact's user profile.
The Edit/View Images button allows administrators to attach images of the user and select a default image if more than one image is on file.
The Details link will link to the incident for more details.
Unlink User and Vehicle
Unlink a User and Vehicle
To remove a vehicle from a user profile, follow the steps outlined below.
Perform a User Search to pull up the User's Profile that you wish to remove a vehicle from.
Select the profile of the desired user from your user search, and click on the Vehicles tab.
The page will refresh, and the list of vehicles associated with the user will appear.

The vehicle list gives administrators the ability to add, edit, create a DNTT, and/or delete a vehicle from a user's profile.
Find the vehicle that you wish to remove from the user's profile, and click the "X" (located to the right).
A confirmation pop-up window will appear.
Click OK to confirm removing the associated vehicle, or click Cancel to return to the vehicle list without changing anything.
Bulk User Type Change
Bulk User Type Change Menu Option
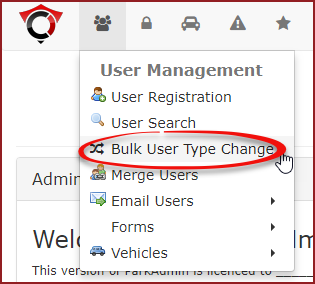
Hover over User Management and click Bulk User Type Change.
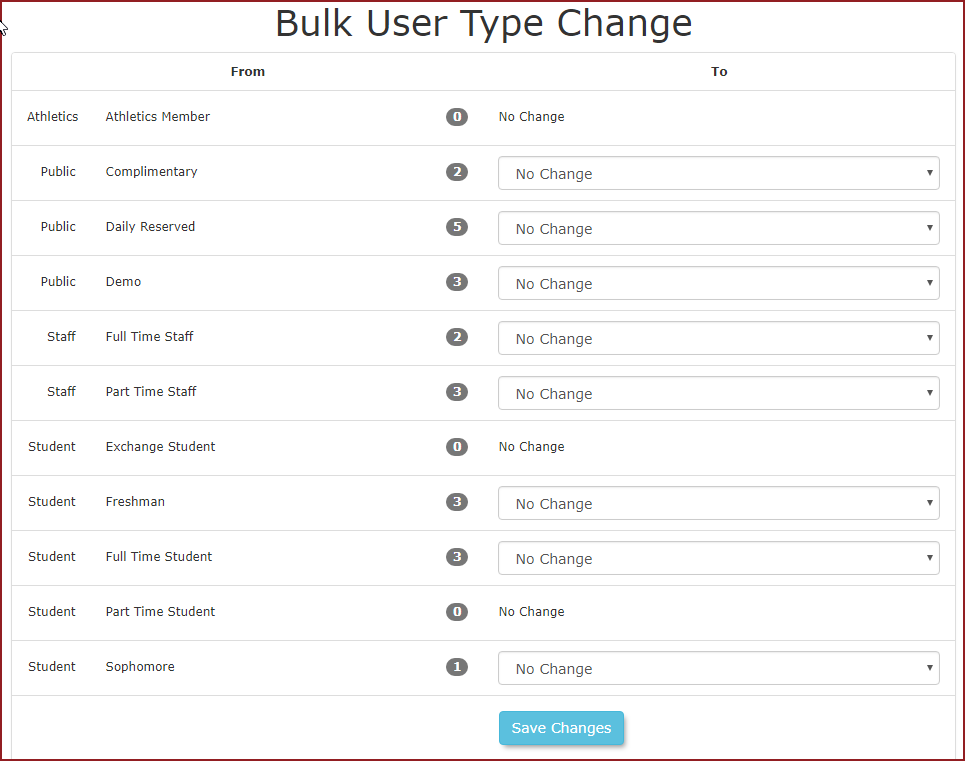
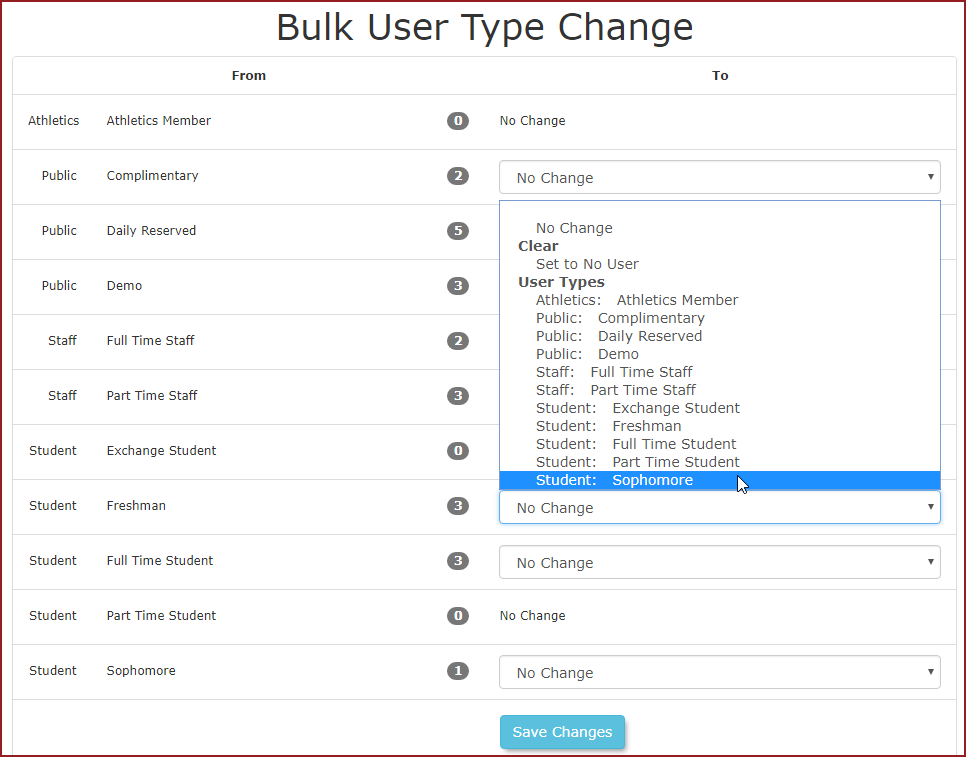
The Bulk User Type Change screen is displayed.
The central column with a number badge represents the number of that specific User Type in the system.
Example Bulk Change User Type
For this example we wish to change all Freshman users to Sophomore.
Click the drop down box next to Freshman and click Sophomore from the list of user types available.
Click Confirm Changes to continue.
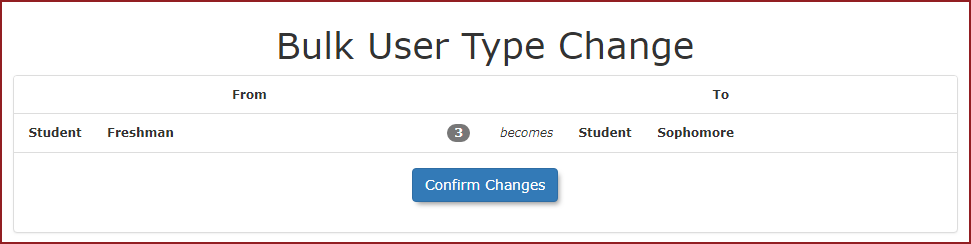
Now you can see there are 4 Sophomore users instead of 1.

Merge User
Merging Users
A user account must be enabled and contain a user type to perform a merge. If the user is not showing on the merge report please go to that users profile and make sure they are enabled and have their user type selected.
To merge two or more users, hover over the User Management icon and click Merge Users.
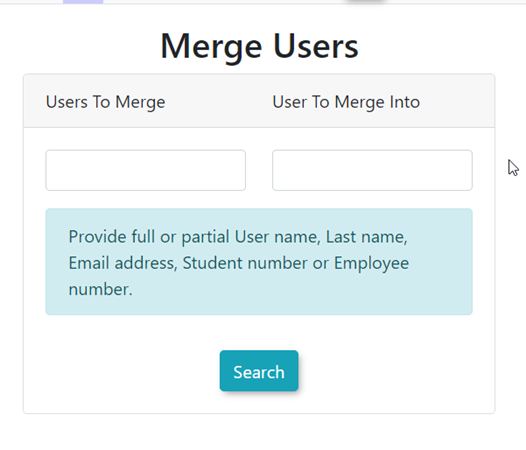
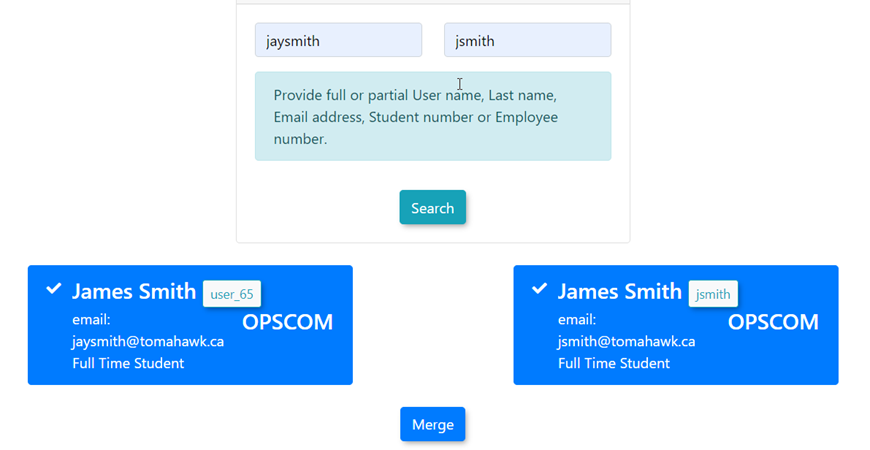
Enter in a valid piece of identification information to search for the users in both fields.
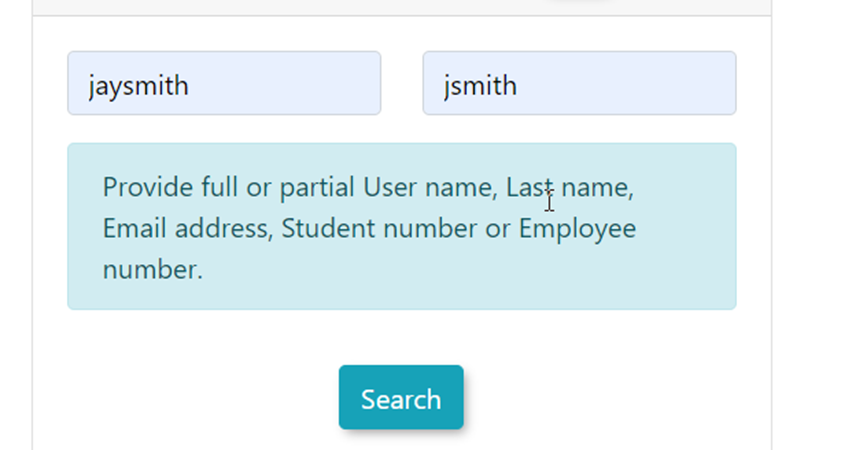
Select the users on the left-hand side that you wish to merge into a single user account on the right-hand side.
Click the Merge button to complete the merge process.
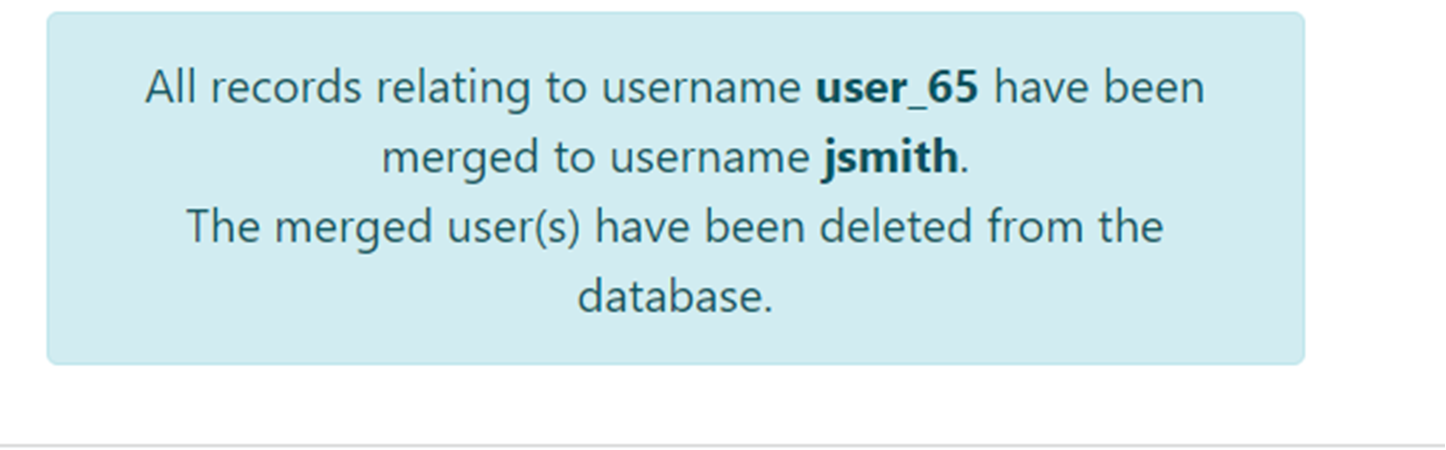
A confirmation page will appear confirming the merge to the username selected. Click Merge to complete the process.
The screen will refresh to the main screen and a further confirmation of the merged user will appear at the bottom of the page.
What is merged and what is NOT?
When a merge is performed the important thing to understand is that the user you are merging TO should be the one with the most up to date or accurate information.
The tool uses a two-column window to facilitate this process.
The TO user will be in the right column. The information for the TO user will take precedence over the FROM user. The FROM user will appear in the left column.
Where information exists in the MERGE TO user it will remain in the profile post-merge.
If there are fields that have no information in the MERGE TO profile yet something exists in the FROM user, the merge will bring this information into the resulting single user profile
The merged items include
- Vehicles
- Violations
- Permits
- Lockers
- Items awaiting Payment
IMPORTANT: The user selected in the left column will be archived. The user in the right column will remain in the database.
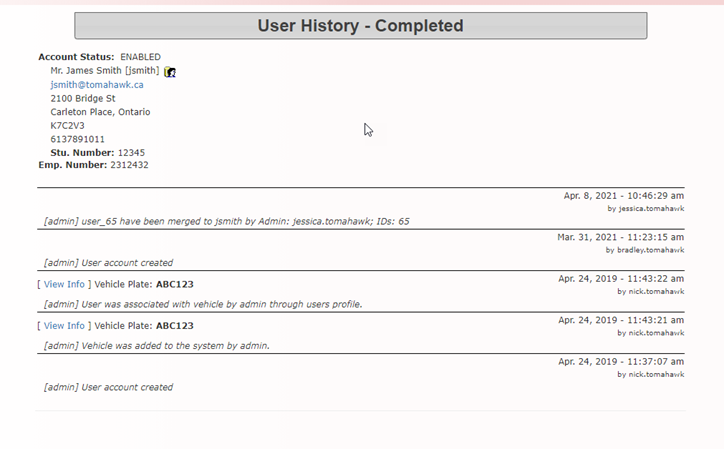
Finding User Merge Records
Once you have performed a user merge you should be able to see the merge record by going to the users profile that you merged to. On the Completed History for that user you will see this:
Bulk Email Users
Locate the Bulk Email Presets
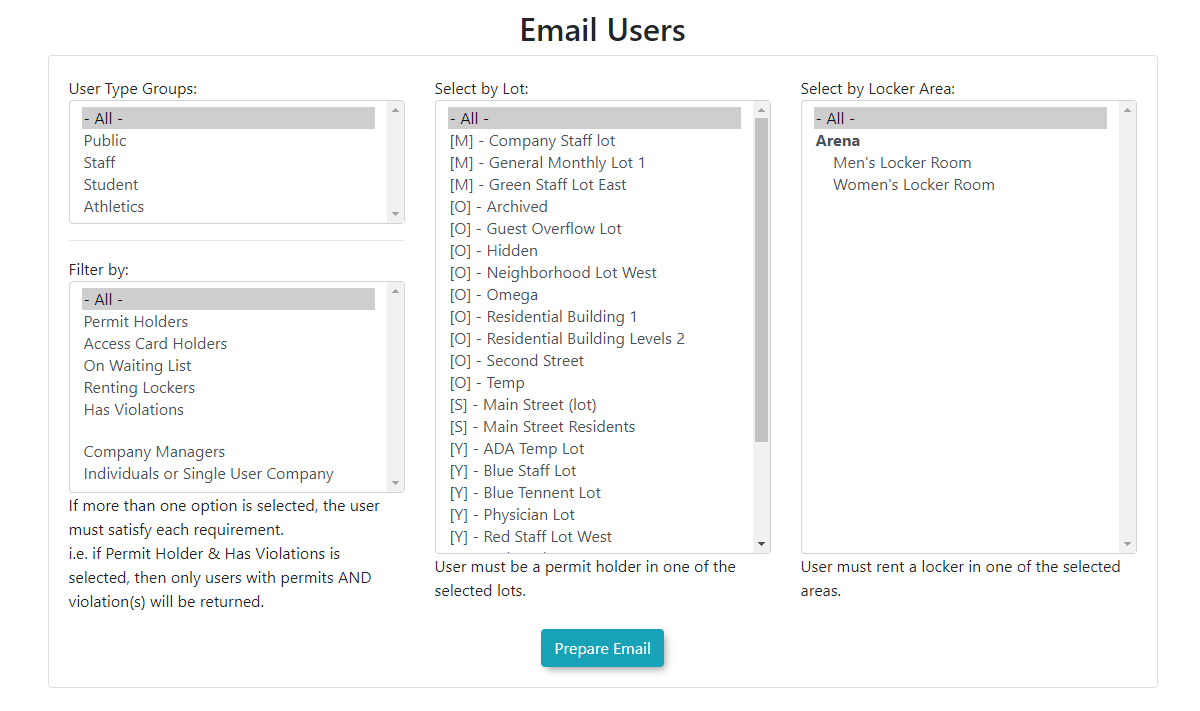
Hover over User Management and click Email Users. Select the group you want to email or click More to access additional preset options.
The Email Message Menu displays. In this interface you can choose the conditions or filters that you wish to apply to the recipents.
For example if I simply select User Type Group of Staff then all staff members will get the resulting email.
If I were to select a User Type Group of Staff, as well as Has Violations, as well as Company Staff Lot, then the email group would be a smaller subsection with Staff Members that also Has Violations and park in the Company Staff Lot and so on.
Sending an Email
After you have chosen your preset recipient list, the Compose Email Message screen will display. In our example we have set the criteria such that we have 26 recipents.
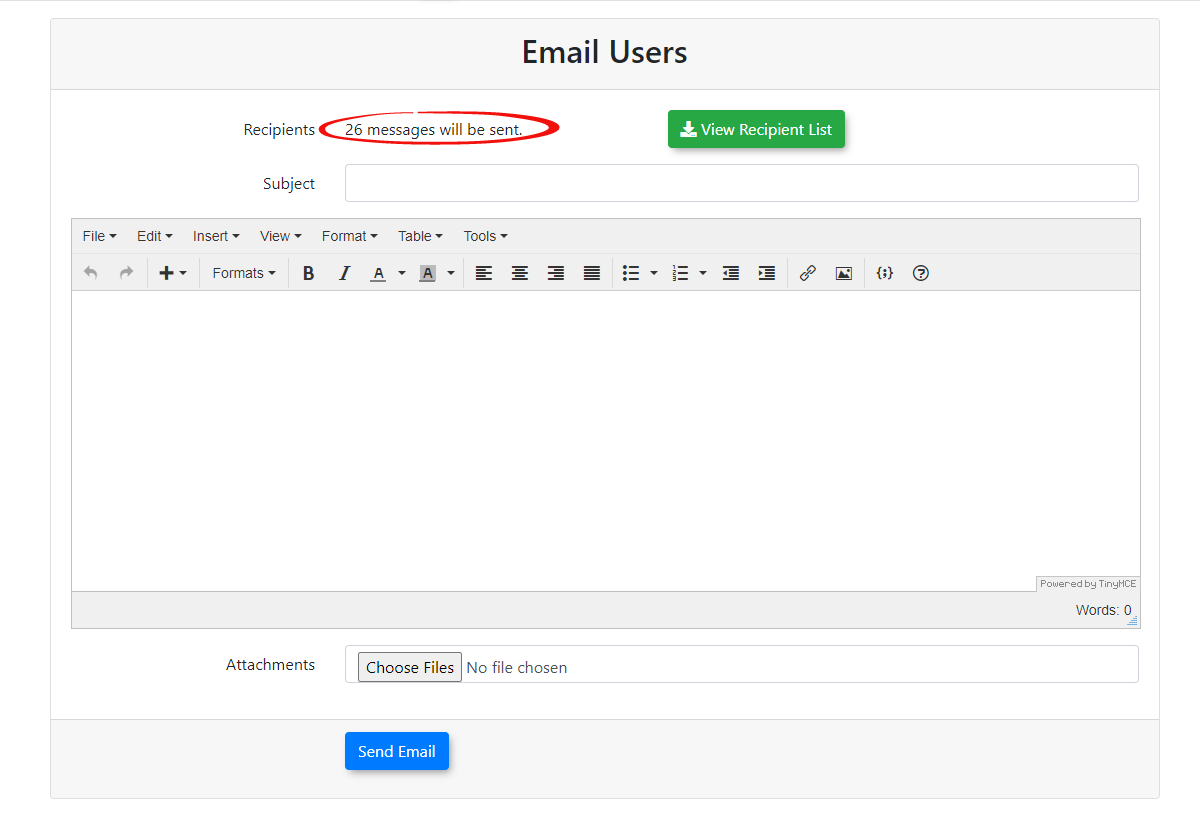
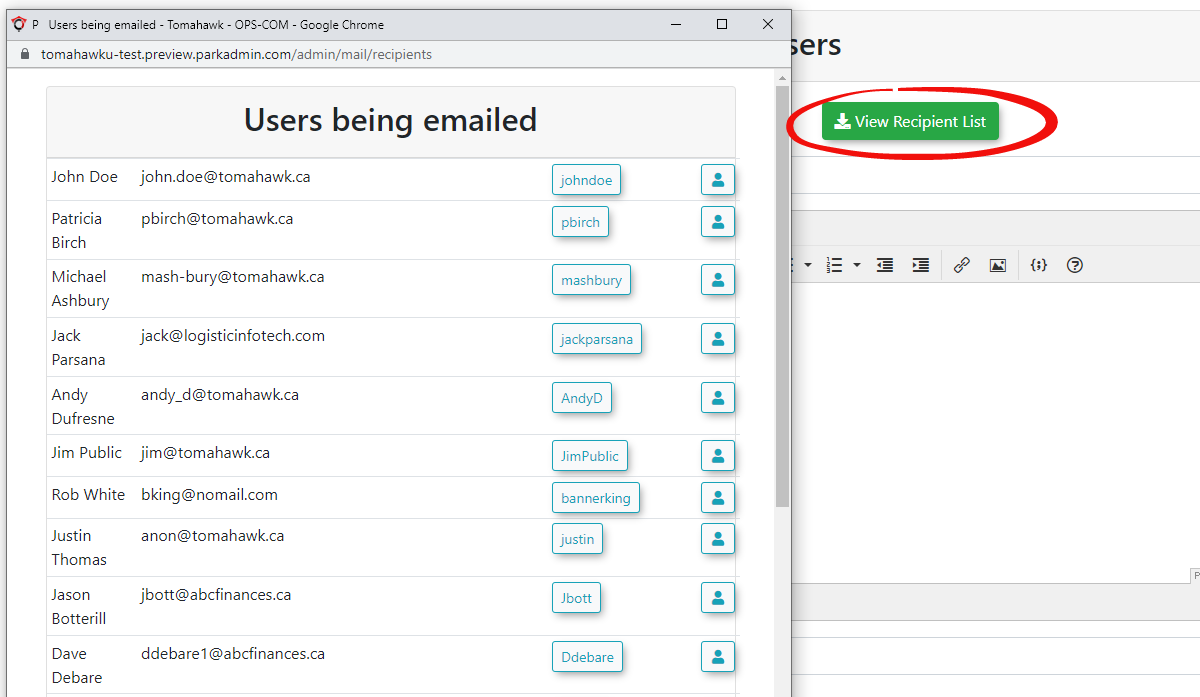
Click the View Email Recipient List button to confirm you are sending the email to the appropriate users.
Type a Subject and a Message. You can also add attachments by clicking the Choose File button. When you have finished composing your email, click the Send Email Message button.
A dialog box will open asking you to confirm you are sending the email. Click Yes.
The message Mail message has been queued for delivery will display.
Primary Driver
Why is there a Primary Driver?
The Primary Driver will receive communication from the system such as violation notices. There is a nightly script that runs which will designate primary driver to any vehicle that has been added to the system. If there is no Primary Driver on a vehicle when an appeal is launched, the person launching the appeal will be automatically designated as the Primary Driver.
Who is the Primary Driver?
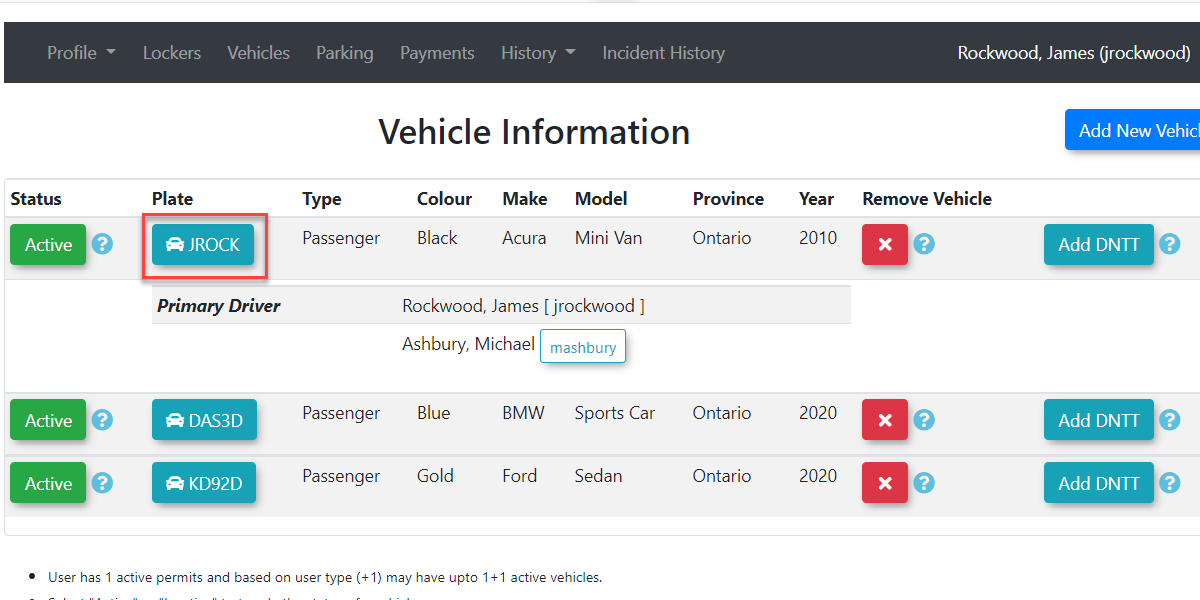
To access and edit the Primary Driver setting for a vehicle. Go to the user's profile and click the Vehicles tab. If any vehicle has more than one driver associated, you will see a list of users as indicated in the screenshot. The current Primary Driver is indicated in bold text.

Edit a Primary Driver
To edit the Primary Driver information click on the Plate link to access the Edit Vehicle screen.
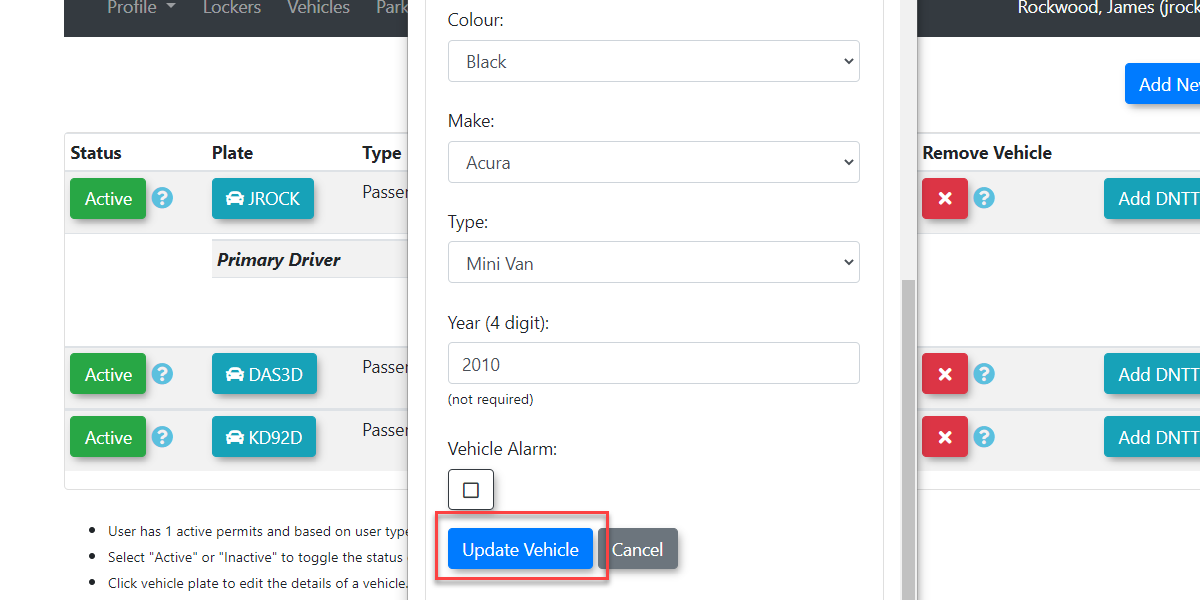
In the Edit Vehicle popup screen you will see the primary driver field. This is a drop down menu that allows you to select one of the associated drivers as the Primary Driver.
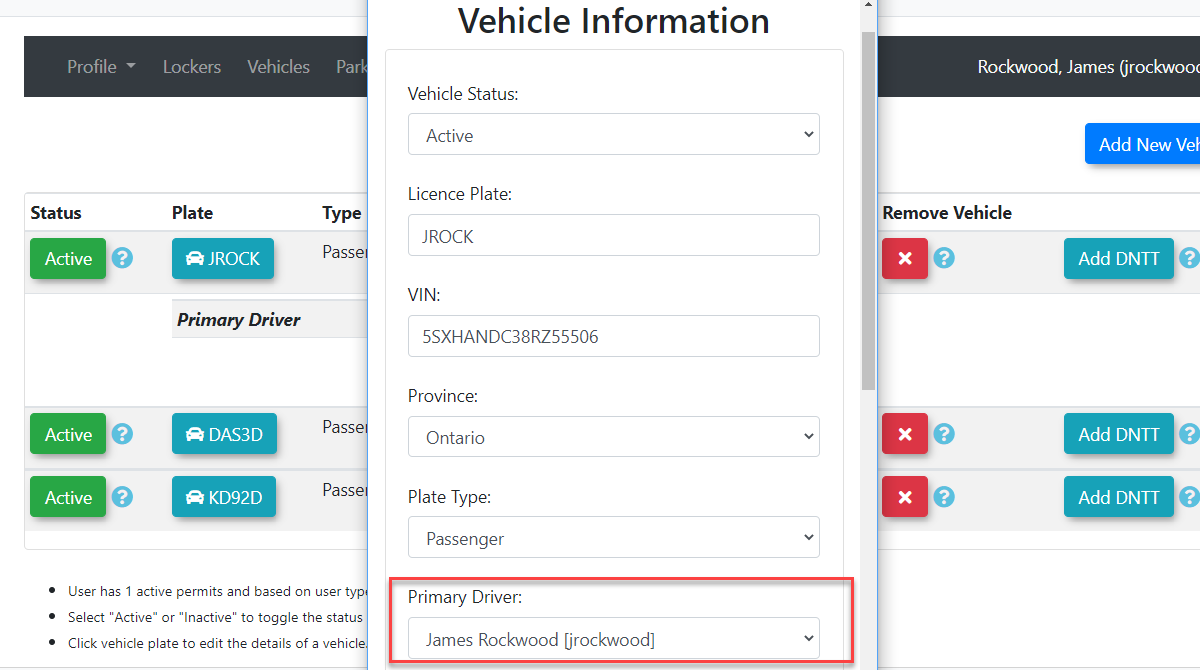
Click on the field to access the drop down list. In our example here we are switching the primary driver from Jrockwood to Mashbury.
Once you have selected your preferred Primary Driver click on Update Vehicle to save your choice.
Notice now that the listing has Mashbury as the Primary Driver.

Troubleshooting Tip
In some rare cases there are legacy records that might have multiple Primary Drivers associated to the same vehicle. In cases like this, you can resolve the issue by going through the steps described above. By setting the Primary Driver through this tool the system will take the latest selected driver as the preferred Primary Driver and remove the designation from any other driver in the system.
Signs you have two Primary Drivers
If there are two or more Primary Drivers designated for a single vehicle it could cause violations to appear duplicated in the payments screen. If you are experiencing duplication in violations please check the Primary Driver status for the vehicle as a first step to resolving the issue.
Search by Plate
Search by Plate Menu Option
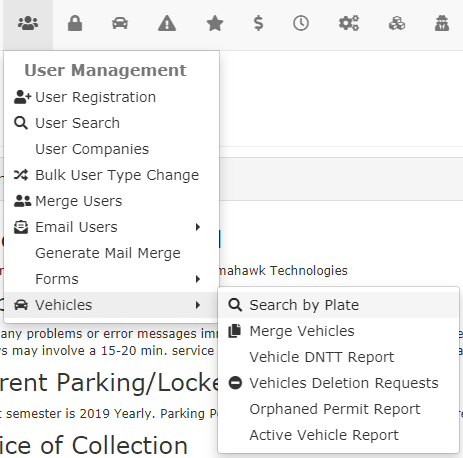
Hover over the 'User Management' icon and then Vehicles. Click 'Search by Plate'.
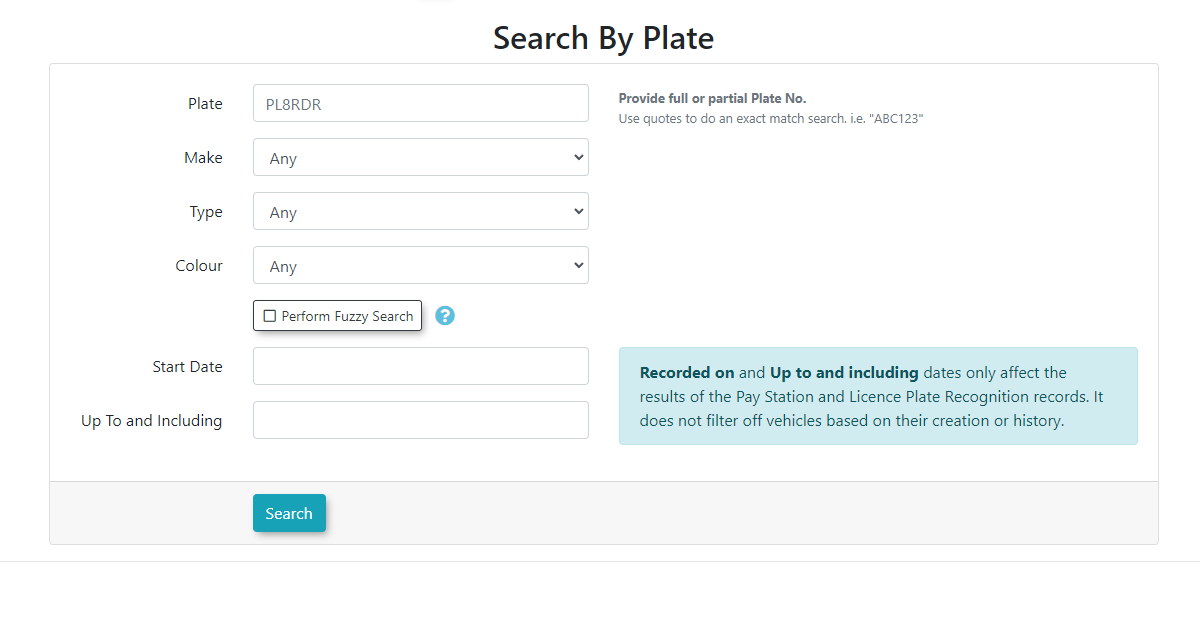
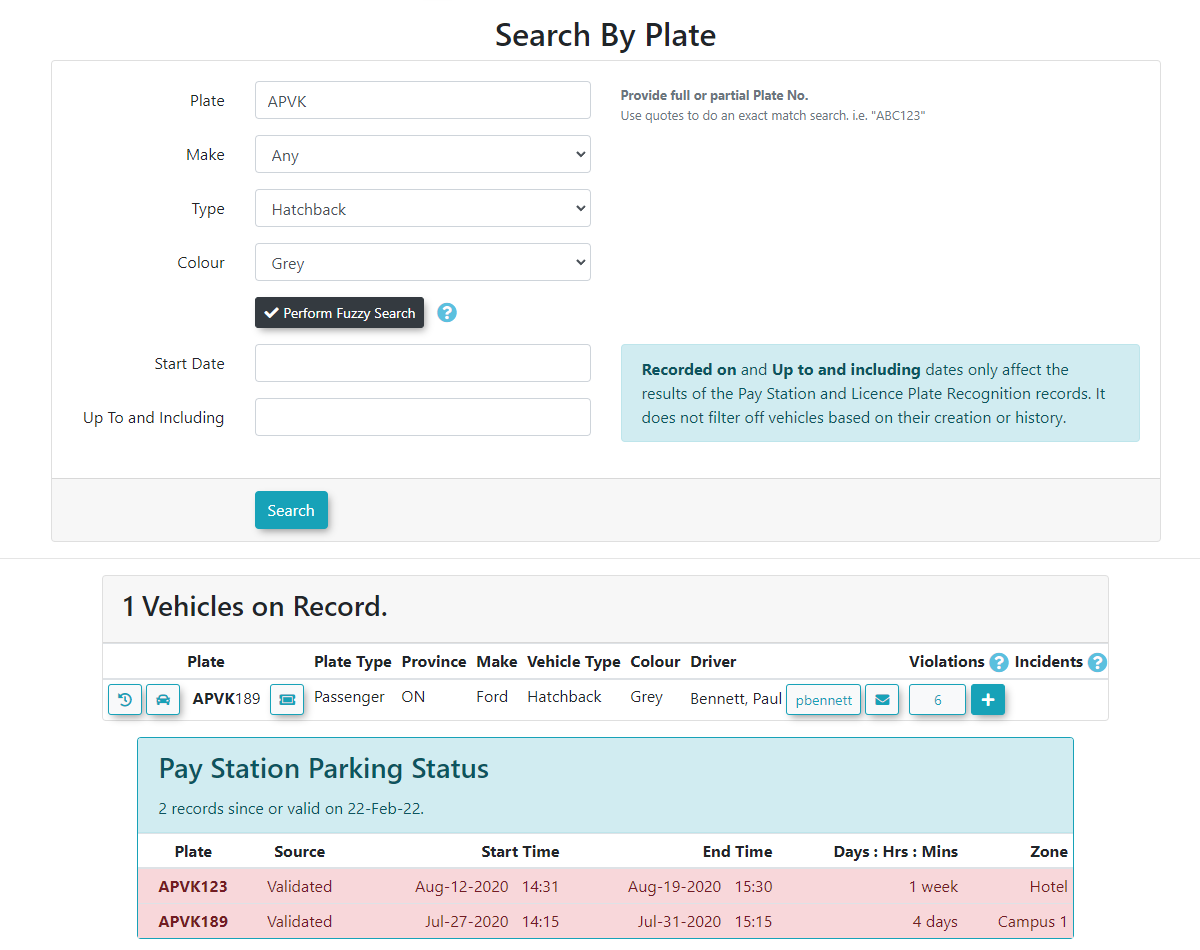
The 'Search By Plate' screen displays.
In this interface you can search for a specific plate or you can enter a vehicle description.
Possible Search criteria:
Plate: You can search by the full plate number or a partial number (see fuzzy search below)
Make: Vehicle Make (Such as Honda, Ford, Tesla, etc)
Type: Vehicle type (Such as hatchback, sports car, compact)
Colour: Vehicle Colour (Such as Red, Blue, Grey, Silver)
The date range is optional and refers mainly to the Pay station parking and LPR events shown in the report. If you leave it blank you will get any instance of the vehicle over it's history.
Click the 'Search Vehicles' button to launch the search.
Search by Plate Report
A list of all users that have matching plate information is returned below the 'Search' box.

- Click the
 see the Vehicle History Log.
 - Click the
 to see details of the vehicle associated with the plate.
 - Click the plate link to enter a new violation associated with that plate.
- Click the username link to edit the user profile for that user.
- Click the envelope icon to email the user.
- Click the number of violations to search and view/edit all previous violations associated to the vehicle.
- Click the number of incidents to search and view/edit all previous incidents associated to the vehicle.
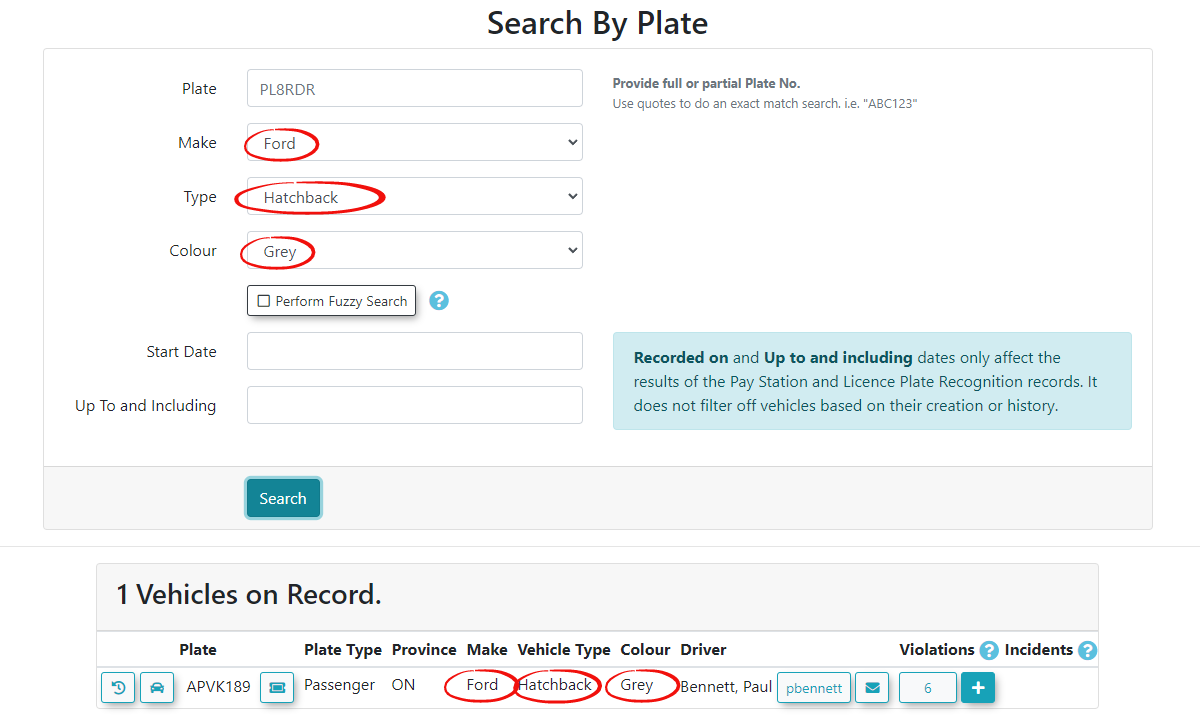
Search by Vehicle Description
If we do not know the vehicles plate number we can search by vehicle description. In this example we are looking for a Grey Ford Hatchback.
Performing a Fuzzy Search
In this example we only have a partial plate and a description. WE can toggle on Perform Fuzzy Search where the system will list vehicles that meet these partial bits of data. IN the following example the officer only caught a partial plate of an individual speeding on campus (Plate: APVK???, Colour: Grey, Type: Hatchback) and wishes to issue a warning.
Note the APVK189 plate appears as well as Pay Station instance for APVK123 where it has found the APVK via fuzzy search.
Pay Station Parking Status
If the user bought a temporary permit in a lot it's history would be displayed here. See above image.
License Plate Recognition (LPR) Captures
This is where all of the vehicle's chalk records are displayed.
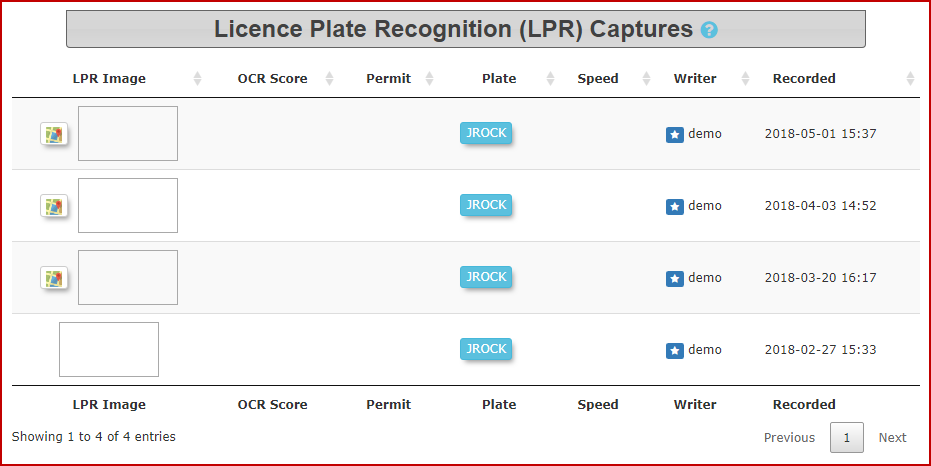
Chalk Details
Plates which have been chalked can be reviewed within the LPR Capture log.
Click the map icon to review the associated map location.
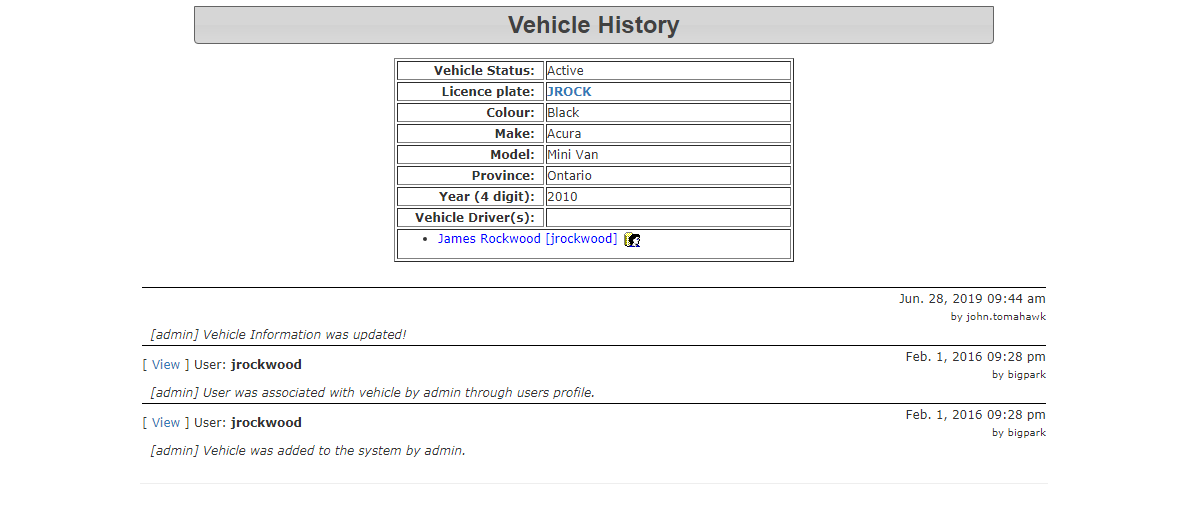
Vehicle History Log
After completing a License Plate search, click on the  icon beside the plate name.
Merge Vehicles
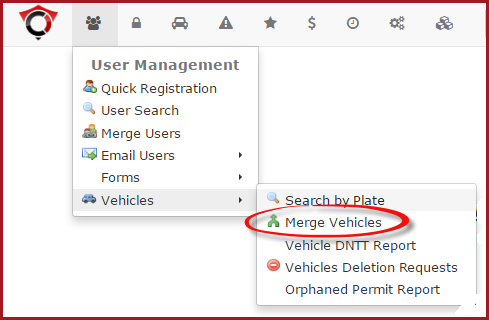
Merge Vehicles Menu Option
Hover over the User Management icon and then Vehicles. Click Merge Vehicles.
Merge Search
Enter the partial or full vehicle plate information or the VIN number of the two vehicles that you want to merge and click the Search button.
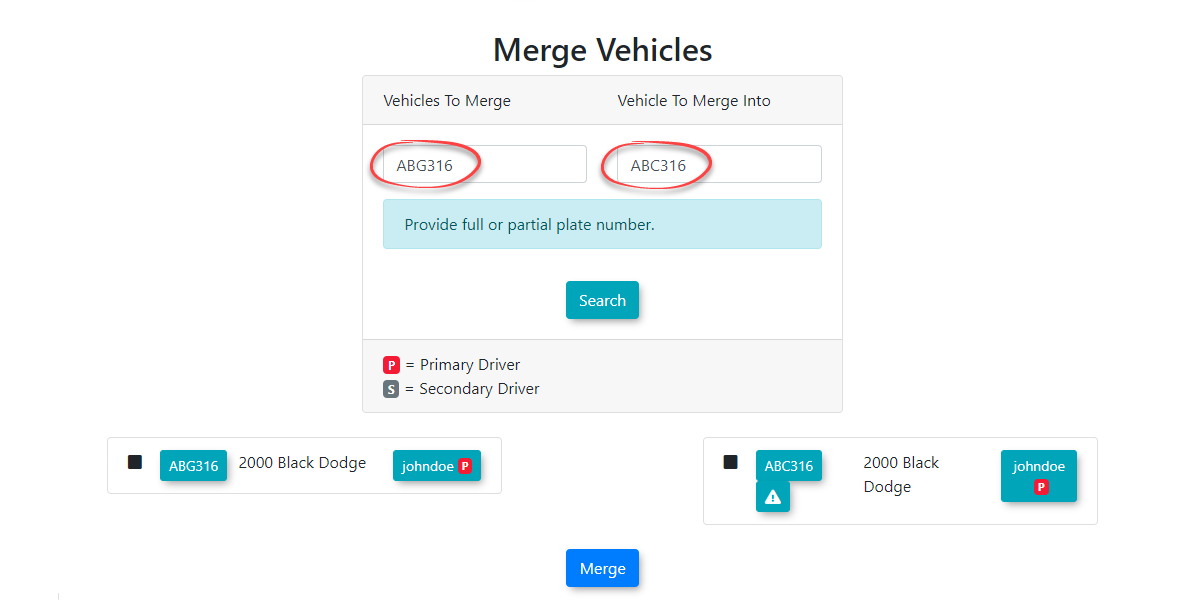
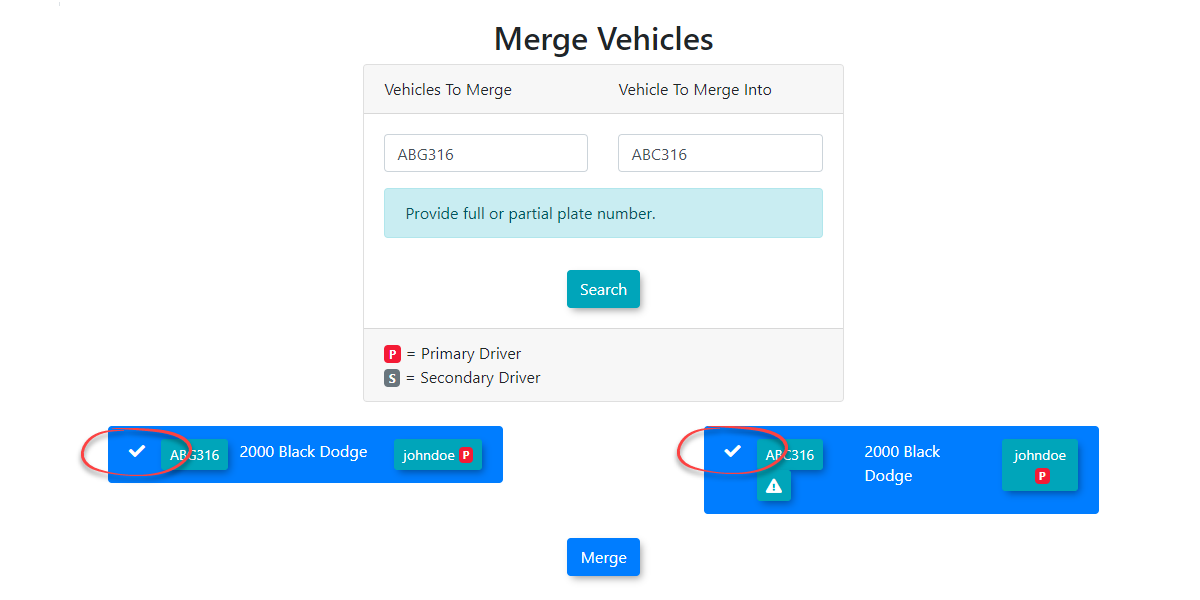
Merge Selection
Select the secondary vehicle(s) to be merged (left) and select the primary vehicle to be merged into (right). Click the Merge button.
Confirm that you want to merge the vehicles.
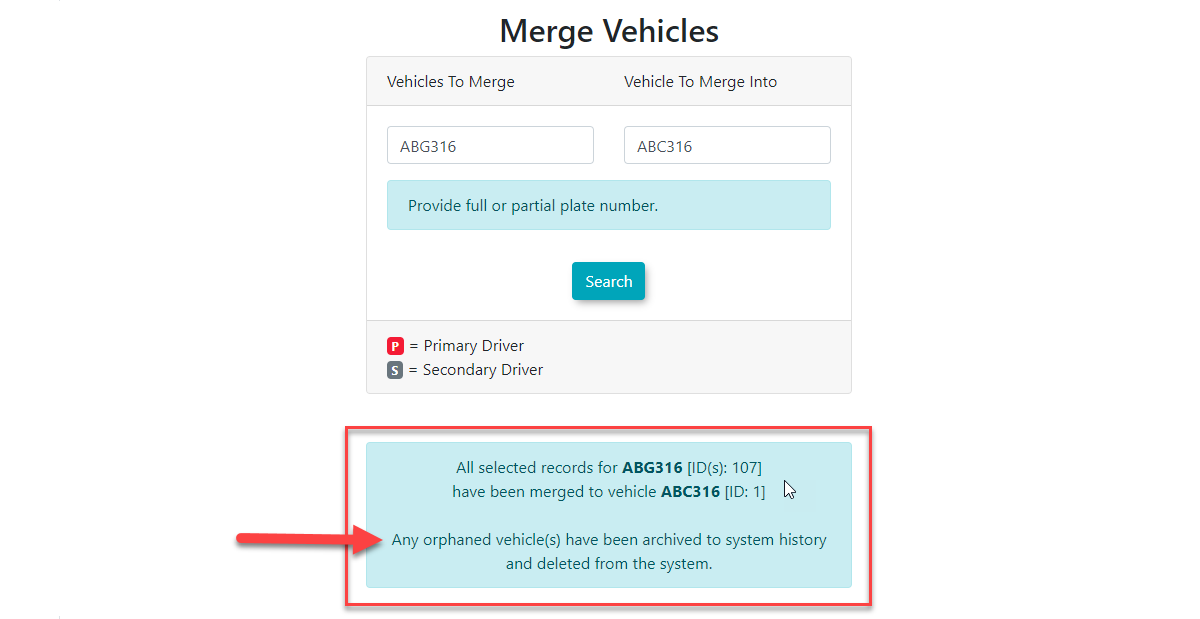
A confirmation screen will appear when the merge is complete.
Duplicate Vehicle Handling
What are Duplicate Vehicles?
Vehicles in OPS-COM are unique based on plate, plate type, and state/province. Often, duplicates can appear in the system due to the plate type or location being recorded incorrectly . Duplicates can create headaches since two similar vehicles may generate duplicate entries when really they are the same vehicle.
Some scenarios that might require a vehicle merge are:
- Duplicate vehicles created in the system due to mismatching vehicle information
- Incorrect plate reads or plate numbers that were manually entered with an error
- Correcting orphaned vehicles
- Correcting orphaned violations
Unique Vehicle Identifiers
There are three items which create a unique identifier for a vehicle.
- Licence Plate
- Province / State
- Plate Type
These three pieces of information are the minimum information you can include when entering a vehicle. For example: One might think that the plate number and state origin of the plate would be enough to make the vehicle unique in the system however this does not take into account the fact that a commercial plate number might repeat the same number sequence as a regular passenger vehicle plate. It is possible to have ABC123 as a passenger plate as well as ABC123 being used on a commercial plate. All three of these unique identifiers are required when inputting a vehicle in the system.
Entering Vehicles
The more information you supply when adding a vehicle the better the chance the system will work efficiently and warn you when you are adding a vehicle more than once.
The best way to ensure easy identification of specific vehicles is to also include the following information:
- Vehicle Colour
- Vehicle Make
- Vehicle Model
- Vehicle Year
Vehicle DNTT
What is a DNTT?
The DNTT feature allows administrators to place a condition on a vehicle that will warn officers in the field not to ticket or tow a vehicle.
This is useful in many situations.
For example: A photographer on assignment is photographing different buildings on campus over a series of days. An administrator could register their vehicle and apply a DNTT for the days of their assignment on campus. No matter where they go on campus, they would be able to park without getting ticketed or towed.
Example 2: The Dean of the School is traveling around the campus for a special event. A DNTT can be applied to his vehicle so that for the time frame of the event he can park outside of his regular lot without penalty. This is what we affectionately refer to as the Anti Embarrassment feature of the tool.
Setting up a DNTT
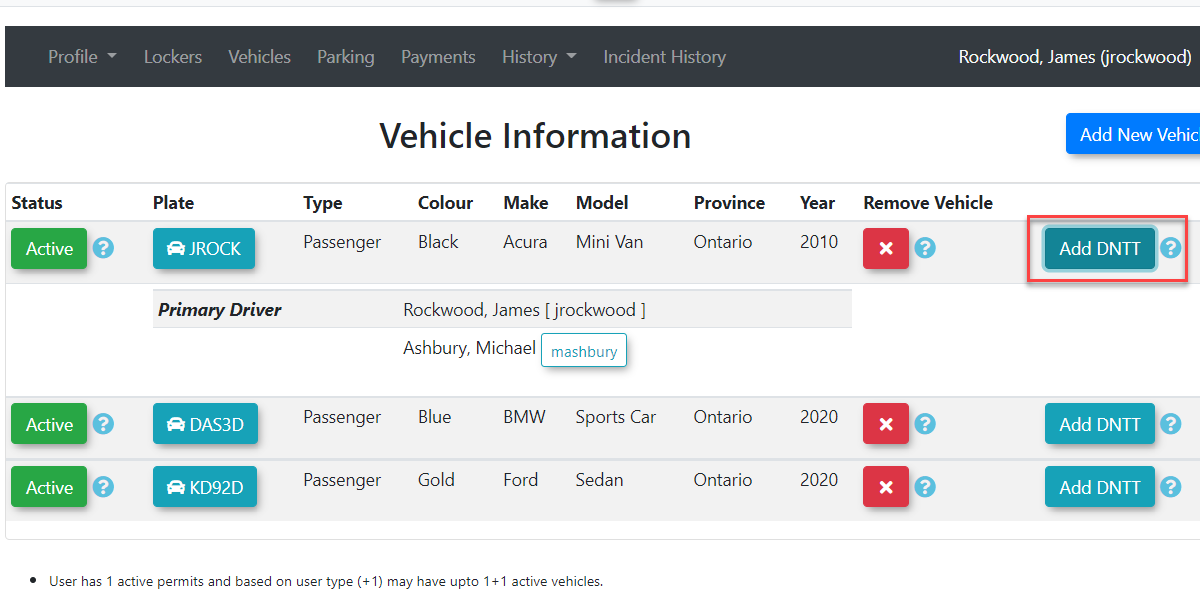
Go to the user's profile and select the Vehicles tab.
Select Vehicle
Select the vehicle of interest by clicking the Add DNTT link.
Select Time Frame
Set up for a temporary time frame by choosing a From Date and time and a To Date and time.
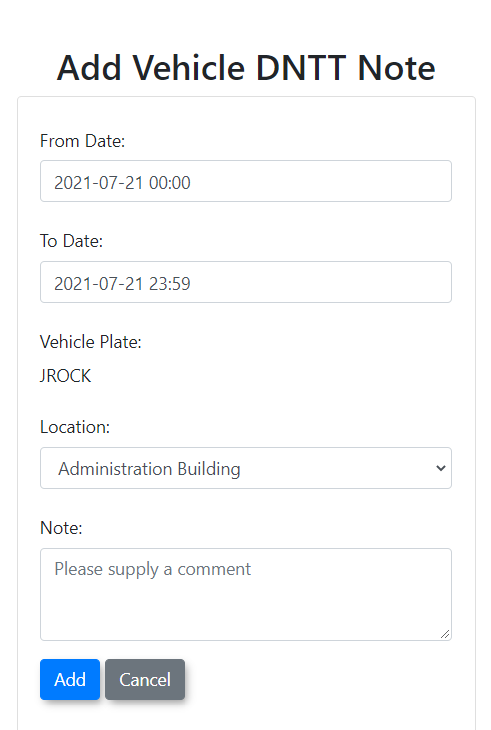
In this case, the Vehicle with Plate JROCK has a DNTT in the Administration building area lasting from Midnight July 21st to 23:59 the same day.
A new location could be configured or added to the system that reads Campus Wide, which would tell officers the vehicle can park anywhere on campus without penalty during the duration of the DNTT time frame.
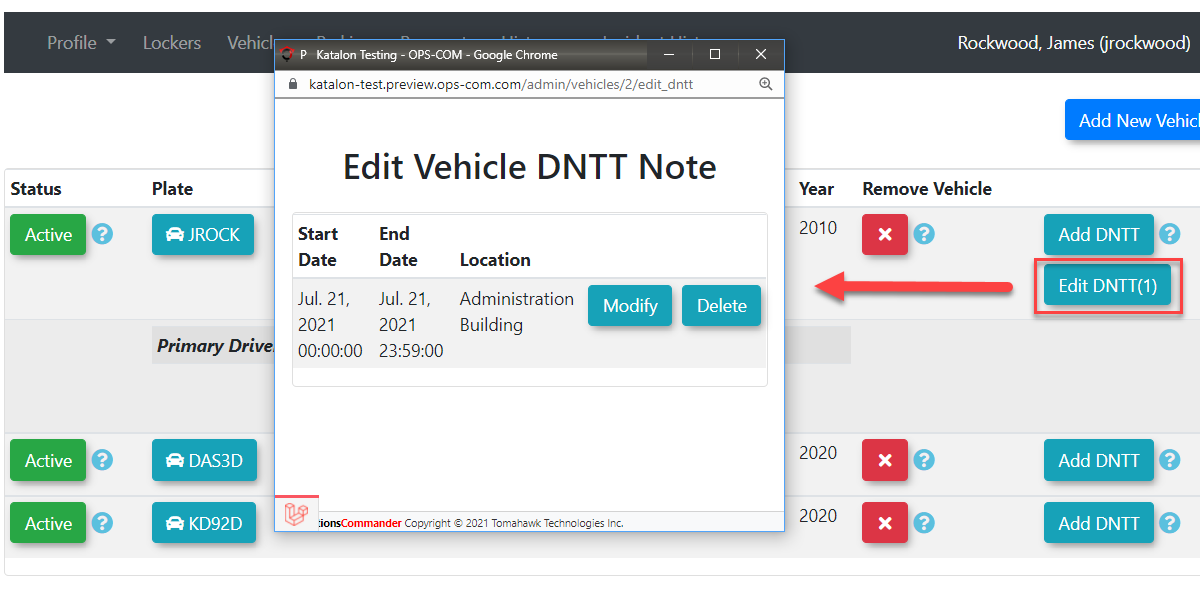
Accessing the DNTT information from the user profile
- Go back to the user's vehicles tab.
- Click on Edit DNTT
- You will see a list of DNTT's assigned to the vehicle.
- You have the ability to Modify or Delete the DNTT order in this window.
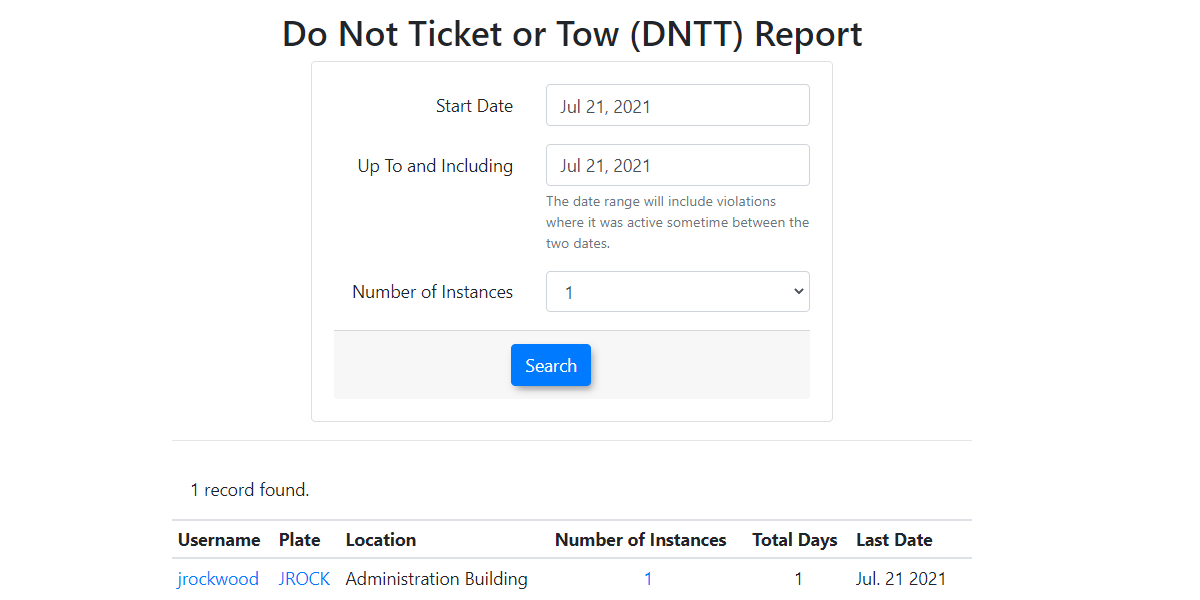
Accessing the DNTT Report
Hover over 'User Management' then Vehicles. Click 'Vehicle DNTT Report'.

Search for DNTT Records
Enter the date range you want to search, and the number of instances and click the Search button.
Take Note
When a number is entered in the 'Number of Instances' field, the report will return users with that number of incidents or more.
For example, if you enter 2, the report is going to list users who have had 2 or more DNTT permissions granted in that time frame.
The report requires the admin to have the manage vehicle permission with their role found under system config.
The Username link will display a pop-up screen that shows the username, email address, address and phone number. If you click on the 'User Profile' icon you will be able to edit the user's information.
The Plate link will display a pop-up screen to view/edit the specific vehicle information.
The # of Instances link displays the user history where you can view all DNTT records on file.
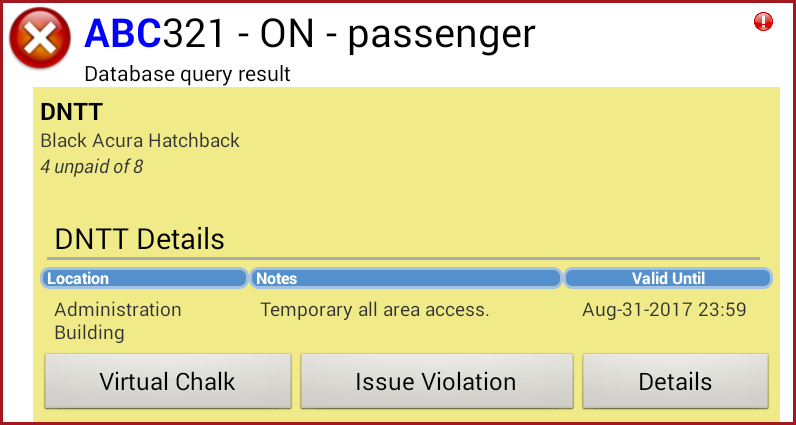
How DNTT's appear on the handheld units
Officers can view DNTT details on a vehicle when looking for the vehicle using Search Vehicles.
Tap on the specific vehicle in the list to view its details.
Forms Admin
Managing Forms
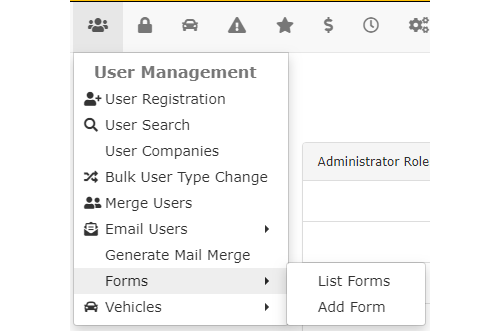
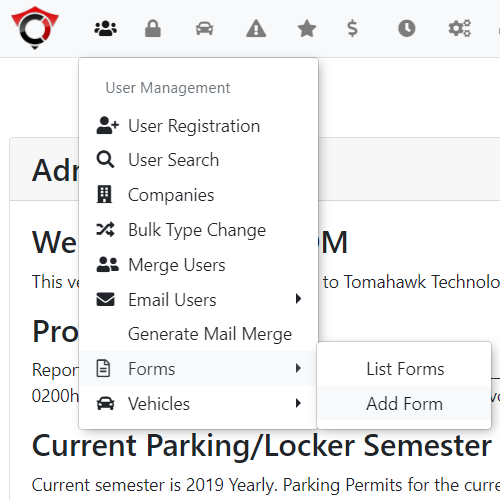
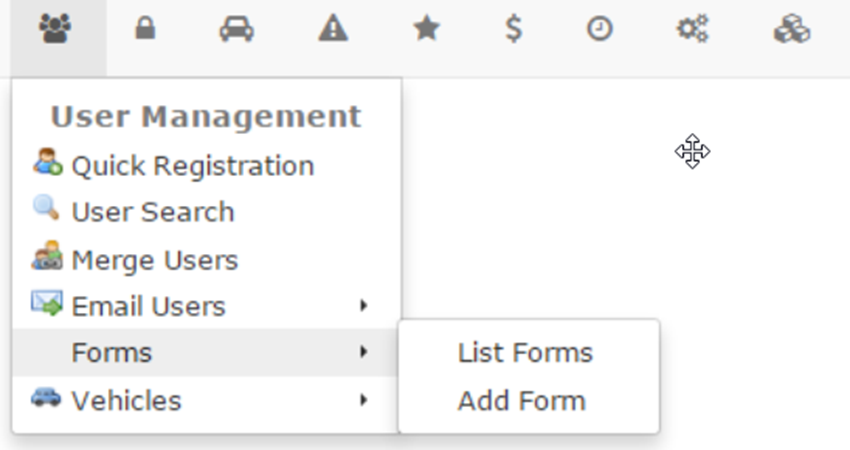
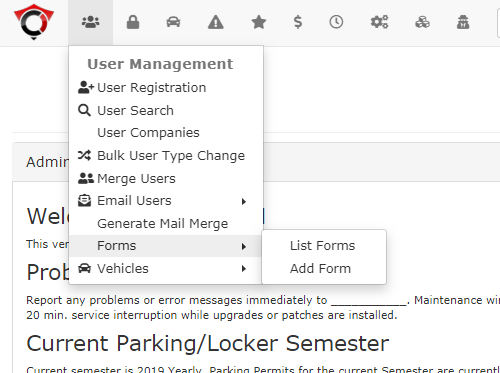
Hover over the User Management icon and click Forms. From here we have two options to List Forms that we have created which will show us the entries for each of these forms. As well as Add Form which allows you to setup new forms for your users.
Required Role Permissions
In order for your admins to properly use this functionality, they require you to have them added to or create a new role that has Edit Forms and View Forms enabled. These are the only permissions required to use Forms.

Adding Forms (old forms)
To add a form on your user side hover over User Management followed by Forms and click Add Form.
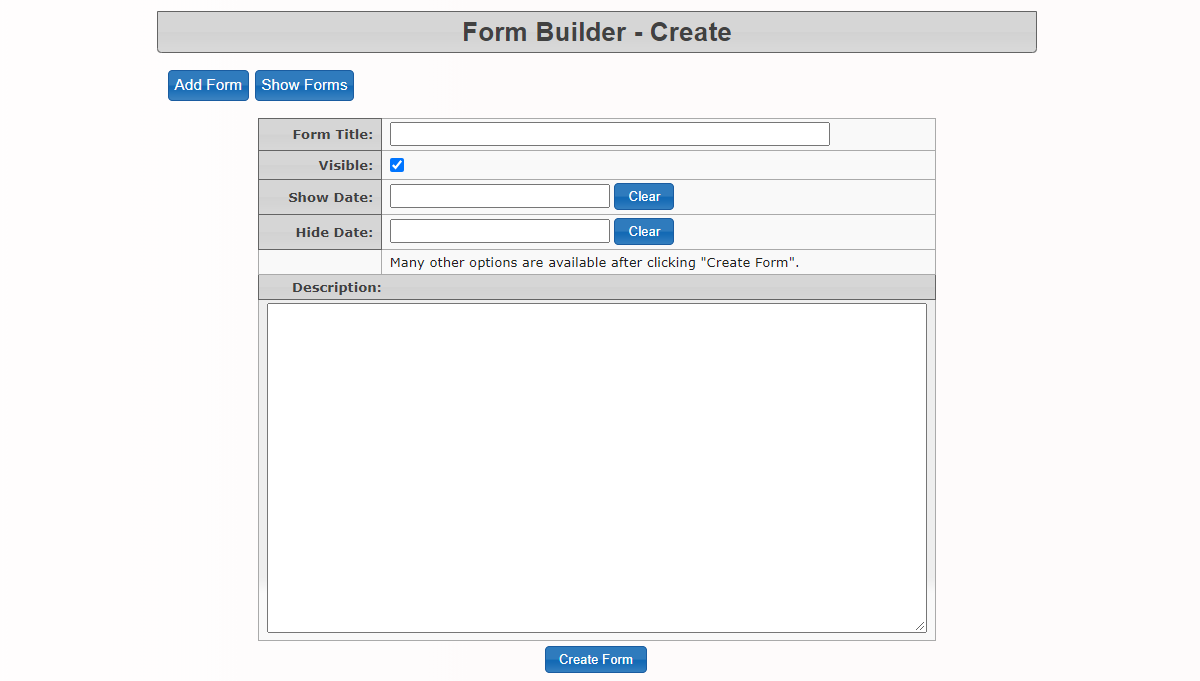
The Form Builder - Create screen will display, some options will be available after clicking Create Form.
- Enter the Form Title.
- Enable the checkbox if you want the form to be visible on the user side.
- Enter the dates that you want the new form to be visible/hidden to users. If you leave the dates blank the form will always appear on the user side.
- Enter a brief description of the form and click Create Form when finished.

After creating the form the Form Builder - Edit screen will appear with three additional tabs that must be completed. Form Description, Post Form, and Questions. You will also have the option to add an External Form field. Ensure you click Update Form after each tab is completed to save the form details.
Form Description
External Form
By supplying a URL in the External Form field, you can link to other forms created by third-party systems such as Survey Money. The URL must have https:// in front of it. EX: https://google.ca. Adding a URL such as www.google.ca will not work.
The Form Description tab is pre-filled with the information you submitted on the previous screen. Administrators have the ability to edit the details.
Post Form
The Post Form tab is where administrators provide instruction for what happens after the form is completed/submitted by the user. Enable the appropriate checkboxes for the actions that should take place when a user submits the form. If you select the option to Mail to specified email, administrators must provide the Email Subject, an 'Email To' address and 'Email From' address. Enter the message text that you want to appear on the form completion page when a user submits their form.
Take Note
If you select the option to 'Show the form submission back to the user', you must copy/paste the following token message into the Completion Text field:
- [%%FORM_RESULTS%%] - ARO user side (user paths end in .aro)
- {$FORM_RESULTS} - PHP user side (user paths end in .php)
Questions
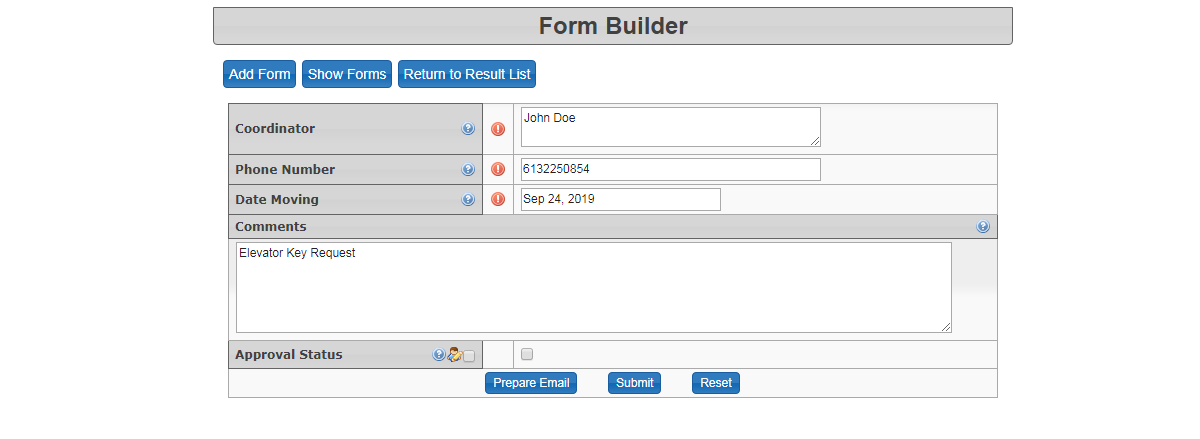
The Questions Tab is the area where form questions are entered and the form database is built. Depending on the type of questions that are being asked, administrators will be asked to complete additional fields. Click the Add button to add additional questions. As labels/questions are added, they will appear at the top of the screen. The Switch image ( ) to the left allows administrators to change the order of the labels/questions. The Edit button allows administrators to edit label/questions information.
- The label field is the question/name for the information that is being requested.
- The type field formats the question based on the type of data that you are requesting (e.g. text field, number field, radio buttons, checkboxes, etc.).
- The Required checkbox indicates the field must be completed by the user.
-
The Tooltip box allows you to provide a field description for the information you are requesting which can be seen by users when they hover over the fields that need to be completed or for admins reviewing the forms.
New in October 2016
Users can now attach files to their form submissions.
Click the Update Form button to save changes.
(TBD) A new tab for Report Options becomes available after you update the form. This tab allows administrators to specify how they want to show/hide the form data in their reports.
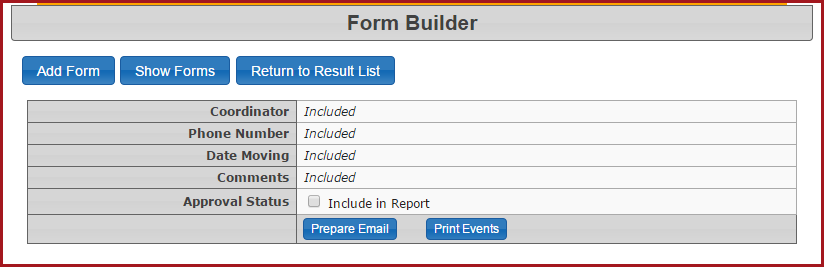
The first section allows administrators to specify which of the four fields they want to be able to display on the summary report to help you identify what form entry you want to view.
The second section allows administrators to specify which of the four fields they want to be able to hide on the summary report if it has a value. This is useful for hiding the forms that have been approved.
Take Note
Additional fields can be shown in a report by using the Bulk Actions button when viewing a form summary report in the List Forms (old forms) option.

The form results are found under the Show Forms button or List Forms option in the User Management menu.
List Forms (old forms)
Getting to Forms
Hover over the 'User Management' icon and then 'Forms'. Click 'List Forms'.
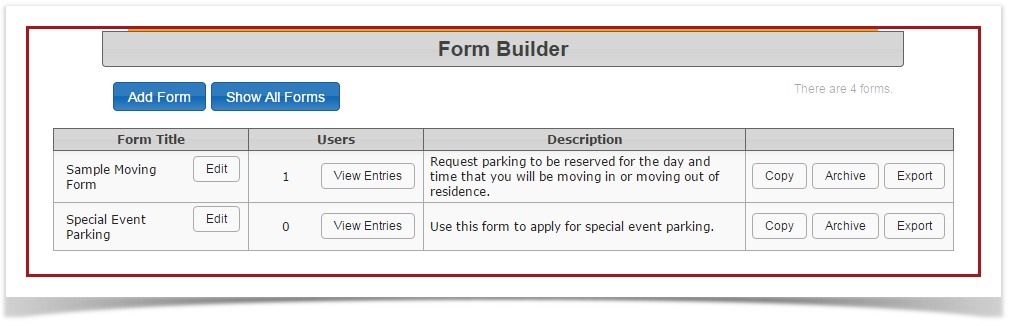
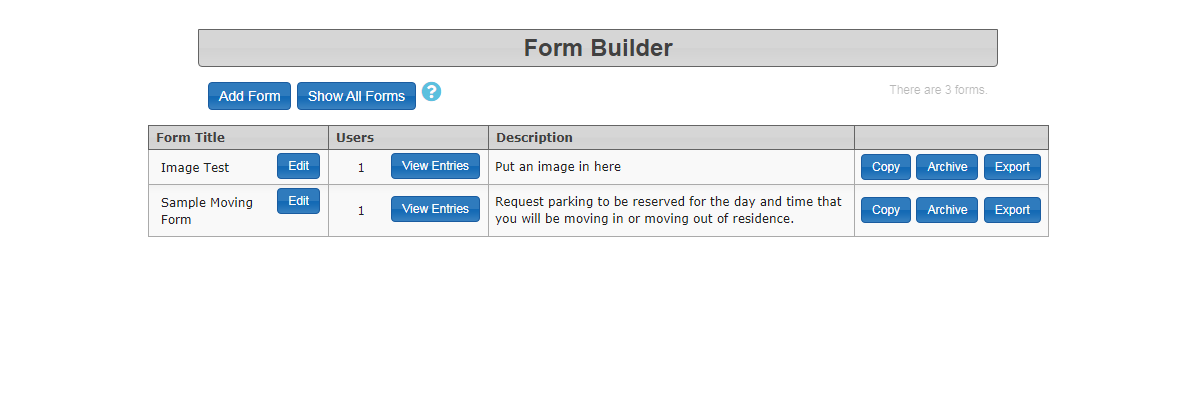
The 'Form Builder' screen is displayed. This table lists all the active forms that have been created.
- The 'Add Forms' button displays the 'Form Builder - Create' screen.
- The 'Show All Forms' button shows both the active and archived forms.
- The 'Edit' button will display the 'Form builder - Edit' page for the selected form. Administrators can view/edit the details of the form here.
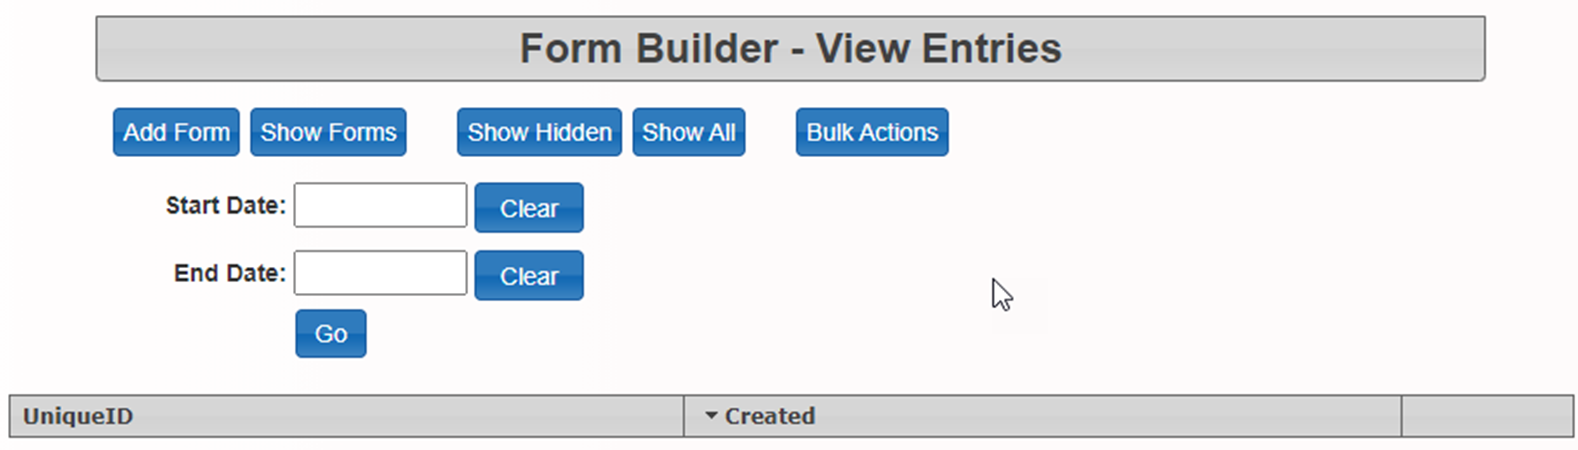
The 'View Entries' button will display a table with the entries that have been submitted by users for the selected form.
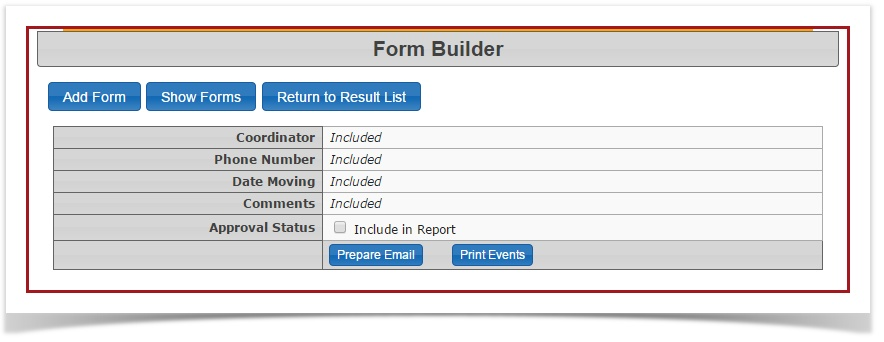
The 'Bulk Actions' button allows administrators to create a report showing additional fields that are hidden in the summary report. It will also allow administrators to email the report on the selected form entries to specific administrators, and/or print the form entries.
The 'Show Forms' button displays the active forms.
The 'List Forms' option allows administrators to view/edit all previously created forms. This is also where administrators go to obtain the form results.
Hover over the 'User Management' icon and then 'Forms'. Click 'List Forms'.
The 'Form Builder' screen is displayed. This table lists all the active forms that have been created.
- The 'Add Forms' button displays the 'Form Builder - Create' screen.
- The 'Show All Forms' button shows both the active and archived forms.
- The 'Edit' button will display the 'Form builder - Edit' page for the selected form. Administrators can view/edit the details of the form here.
The 'View Entries' button will display a table with the entries that have been submitted by users for the selected form.

The 'Bulk Actions' button allows administrators to create a report showing additional fields that are hidden in the summary report. It will also allow administrators to email the report on the selected form entries to specific administrators, and/or print the form entries.