# for Administrators (Staff) # Tools / Miscellaneous # Disable Browser Auto-fill and Auto-Complete ### How does this setting affect OPS-COM? When using OPS-COM to complete User Profile, we are filling out forms with information for other people that is different each time. Auto-complete can become a nuisance by filling in fields you don't want filled in or even popping data that you don't notice. This data gets saved in the profile by mistake. To avoid this issue, we suggest turning off this feature in your browser. See the screenshot below: [![image.png](https://opscom.wiki/uploads/images/gallery/2024-05/scaled-1680-/KNLimage.png)](https://opscom.wiki/uploads/images/gallery/2024-05/KNLimage.png)
There are also some plug-ins that can cause this issue. Password keepers for example are essentially auto-complete utilities. If you are still experiencing similar auto-complete issues after turning off auto-complete you may want to review your installed plugins to see if turning them off fixes the problem.
## How to Disable Auto-fill
Please find general instructions for checking and turning off your auto-complete settings based on various browsers below:
![](https://ops-com.atlassian.net/wiki/download/thumbnails/757869/IE.jpg?version=1&modificationDate=1488300300000&cacheVersion=1&api=v2&width=60&height=60)
### Turn off auto-fill in Internet Explorer 1. Click on the Tools menu icon. 2. Click on Internet Options and select the Content tab. 3. In the Auto Complete section, click on Settings. 4. Uncheck Forms and User Names and Passwords on Forms.
![](https://ops-com.atlassian.net/wiki/download/thumbnails/757869/Edge.jpg?version=1&modificationDate=1488300299000&cacheVersion=1&api=v2&width=80&height=68)
### Turn off auto-fill in Edge 1. Open Edge and click on the more icon (three dots) at the top right of the window. 2. Click on Settings and scroll to the bottom until you see Advanced Settings 3. Look for Save Form Entries and click on the switch to set it to off.
![](https://ops-com.atlassian.net/wiki/download/thumbnails/757869/chrome.jpg?version=1&modificationDate=1488300299000&cacheVersion=1&api=v2&width=60&height=60)
### Turn off auto-fill in Chrome 1. Open Chrome. 2. At the top right, click More Settings. 3. At the bottom, click Show advanced settings. 4. Under "Passwords and forms," uncheck "Enable Autofill to fill out web forms in a single click."
![](https://ops-com.atlassian.net/wiki/download/thumbnails/757869/Firefox.jpg?version=1&modificationDate=1488300299000&cacheVersion=1&api=v2&width=70&height=70)
### Turn off auto-fill in Firefox 1. Open Firefox. 2. In the address field, type about:config and click on "I'll be careful, I'll promise" 3. Look for the following entry "dom.forms.requestAutocomplete" 4. Double-click on it to set it's value to False.
![](https://ops-com.atlassian.net/wiki/download/thumbnails/757869/Safari.jpg?version=2&modificationDate=1488300299000&cacheVersion=1&api=v2&width=80&height=70)
### Turn off auto-fill in Safari 1. Click Safari, Preferences and click AutoFill. 2. Turn AutoFill on or off: Select each type of information you want Safari to fill in, and deselect the rest. 3. Change or delete autofill information: Click Edit for the type of information you want to change or delete.
# Editing the Landing Page Messages ## What is the Landing Page? When you sign in to OPS-COM initially, you are presented with a landing page. This message is referred to as the **Admin Dashboard**. This landing page can be modified or edited to allow organizations to display important information to System Administrators and staff. ## Communication Items Some items to add to this page: - Pricing Information - Contact Information - Scheduling Information - Organizational Information - Legal Notices - General Information ## Editing the Landing Page This is typically the default look of the Admin Dashboard message. It appears as the primary landing page after a new installation. Your support information is maintained by the OPS-COM team. You can change any text in the Admin Dashboard box. [![image.png](https://opscom.wiki/uploads/images/gallery/2024-05/scaled-1680-/YIhimage.png)](https://opscom.wiki/uploads/images/gallery/2024-05/YIhimage.png) To edit this message, hover over **System Config** and click **System Messaging**. [![image.png](https://opscom.wiki/uploads/images/gallery/2024-05/scaled-1680-/u7qimage.png)](https://opscom.wiki/uploads/images/gallery/2024-05/u7qimage.png) The **Manage System Messaging** window opens. Click the **Messages** tab. The items you are allowed to edit are governed by what permission level you have. Some of the items can only be edited by the OPS-COM Support team. In this case, we wish to edit the **Admin Dashboard** message. Click the **Edit** button. [![image.png](https://opscom.wiki/uploads/images/gallery/2024-05/scaled-1680-/R7Simage.png)](https://opscom.wiki/uploads/images/gallery/2024-05/R7Simage.png) The screen will refresh to display the **Message Editor**. You can edit the text using the WYSIWYG editor by clicking on the content to open the editor. If you prefer to work in HTML, you can select **Source Code** from the **Tools** menu item. [![image.png](https://opscom.wiki/uploads/images/gallery/2024-05/scaled-1680-/HW2image.png)](https://opscom.wiki/uploads/images/gallery/2024-05/HW2image.png) Once you have finished editing the page, click the **Save Messaging** button to confirm the changes. A pop up message will confirm that your changes have been saved. # Quick Search Tool Functionality ## Using Quick Search The **Quick Search** tool requires a minimum of 4 characters to perform a query. [![image.png](https://opscom.wiki/uploads/images/gallery/2024-05/scaled-1680-/aXFimage.png)](https://opscom.wiki/uploads/images/gallery/2024-05/aXFimage.png) This tool will search the following fields from a single source: - Searches vehicles by plate - Searches vehicles by VIN number - Searches people by: - Username - Last name - Email address - Student number - Employee number - Searches violations (in the last 18 months) by: - Ticket number - Plate of vehicle involved - Searches incidents (in the last 18 months) by: - Incident number - Payments (last 18 months) by: - Confirmation code # System Dashboard # Introduction The system dashboard has been reworked. Items that appear on the dashboard have been converted into widgets, with it now being possible to create custom dashboard layouts by placing these widgets wherever wanted. # Accessing the Dashboard The dashboard is the first thing seen on the home page when accessing the admin site. [![image.png](https://opscom.wiki/uploads/images/gallery/2024-05/scaled-1680-/Pj8image.png)](https://opscom.wiki/uploads/images/gallery/2024-05/Pj8image.png) The home page and dashboard can be accessed from anywhere on the site by clicking the OPS-COM logo in the top left of the screen. [![image.png](https://opscom.wiki/uploads/images/gallery/2024-05/scaled-1680-/vxgimage.png)](https://opscom.wiki/uploads/images/gallery/2024-05/vxgimage.png) # Layouts ## Active Layout For admin users with the correct permissions, a dropdown menu for dashboards will appear below the user menu in the top right of the screen. The drop-down menu allows the admin to view the different dashboard layouts that have been created. [![image.png](https://opscom.wiki/uploads/images/gallery/2024-05/scaled-1680-/bnNimage.png)](https://opscom.wiki/uploads/images/gallery/2024-05/bnNimage.png) Accessing a dashboard will show a preview of the selected dashboard, with the option to make it the user's active dashboard. The active dashboard is what the admin sees on their home page. This change only affects the admin that made it. [![image.png](https://opscom.wiki/uploads/images/gallery/2024-05/scaled-1680-/Hzximage.png)](https://opscom.wiki/uploads/images/gallery/2024-05/Hzximage.png) ## Dashboard Layout Management If they have the correct permissions, admins can create and edit their own dashboard layouts by accessing the dashboard layouts and items menu, located under the System Configuration menu.
- Dashboard Layouts - allows the management of dashboard layouts - Custom Dashboard Items - allows the creation and management of custom widgets
[![image.png](https://opscom.wiki/uploads/images/gallery/2024-05/scaled-1680-/Rlvimage.png)](https://opscom.wiki/uploads/images/gallery/2024-05/Rlvimage.png) Clicking on Dashboard Layouts will open the dashboard layouts page. This page contains a list of all existing dashboard layouts, including those created by other admins. From this page, the user can manage the site's dashboard layouts, including their creation and edit. [![image.png](https://opscom.wiki/uploads/images/gallery/2024-05/scaled-1680-/mr7image.png)](https://opscom.wiki/uploads/images/gallery/2024-05/mr7image.png)
This page offers several options to manage dashboard layouts. - **New layout** - creates a new dashboard layout. - **Dashboard Items** - takes the user to the custom dashboard items page. This is also accessible from the System Configuration menu. - **Make System Default** - sets the system default layout. This is the dashboard that will appear on the home page of users who do not currently have a dashboard set as active. This is separate from the individual user's active dashboard. - **Edit** - edit the selected dashboard layout.
## Creating Dashboard Layouts Clicking to **Edit** an existing layout or to create a **New Layout** will open the dashboard layout editor. On this page, admins can drag and drop widgets from the widget storage onto the dashboard layout. The widgets can be moved and resized as desired. [![image.png](https://opscom.wiki/uploads/images/gallery/2024-05/scaled-1680-/hnXimage.png)](https://opscom.wiki/uploads/images/gallery/2024-05/hnXimage.png) Widgets left in the widget storage will not appear on the dashboard. Any new widgets, be they system created or admin custom items, will appear here after they are created, where they can then be dragged onto the dashboard. New system widgets will continue to be added and made available in the widget storage sidebar. There are several different types of widget, identified by their color. [![image.png](https://opscom.wiki/uploads/images/gallery/2024-05/scaled-1680-/nCQimage.png)](https://opscom.wiki/uploads/images/gallery/2024-05/nCQimage.png)
- **Blue** - system widgets. Show important administration information about the site. - **Yellow** - stats widgets. Display site stats and information in different graph formats. - **Green** - admin-created custom items. These are the items created on the custom dashboard items page.
# Creating Dashboard Items It is possible for admins to create their own custom dashboard items. The item management page can be found under System Management, below the Dashboard Management page, or accessed from the management page itself. [![image.png](https://opscom.wiki/uploads/images/gallery/2024-05/scaled-1680-/srPimage.png)](https://opscom.wiki/uploads/images/gallery/2024-05/srPimage.png) When accessed, the page will display a list of the custom dashboard items created by admins. [![image.png](https://opscom.wiki/uploads/images/gallery/2024-05/scaled-1680-/865image.png)](https://opscom.wiki/uploads/images/gallery/2024-05/865image.png) Choosing to **Edit** an existing item or to **Create New** will open the dashboard item editor. A version of the item can be made for each language installed on the site. [![image.png](https://opscom.wiki/uploads/images/gallery/2024-05/scaled-1680-/FkRimage.png)](https://opscom.wiki/uploads/images/gallery/2024-05/FkRimage.png)
- **Title** - what appears as the widget header on the dashboard. - **Identifier** - the ID name of the item. This is used to identify it on the dashboard layout editor. - **Language** - the current language you are creating the item for. - **Content** - what will appear on the widget. The widget can include objects like text and images.
If an item is open to be edited, it can be deleted from this page as well. Once saved, the custom item will appear in the widget storage sidebar when editing a layout. It can then be dragged onto the dashboard layout. [![image.png](https://opscom.wiki/uploads/images/gallery/2024-05/scaled-1680-/WNuimage.png)](https://opscom.wiki/uploads/images/gallery/2024-05/WNuimage.png) After the layout is saved with the custom widget on it, the item will appear when viewing the dashboard. [![image.png](https://opscom.wiki/uploads/images/gallery/2024-05/scaled-1680-/8Tuimage.png)](https://opscom.wiki/uploads/images/gallery/2024-05/8Tuimage.png) # Permissions There are several permissions related to managing dashboards layouts. Permissions for the dashboard can be found under **System Configuration → Admin Management → Manage Roles → Edit a role → System Configuration**. [![image.png](https://opscom.wiki/uploads/images/gallery/2024-05/scaled-1680-/K02image.png)](https://opscom.wiki/uploads/images/gallery/2024-05/K02image.png)
- **Change Dashboards** - allows the admin to view other dashboards and change their active dashboard. - **Edit Dashboard Layouts** - allows the admin to create and manage dashboard layouts. - **Edit Dashboard Items** - allows the admin to create and manage custom dashboard items.
# User Management # Registering a New User Manual User Registration Hover over **User Management** and click **User Registration**. [![image.png](https://opscom.wiki/uploads/images/gallery/2024-05/scaled-1680-/ttHimage.png)](https://opscom.wiki/uploads/images/gallery/2024-05/ttHimage.png) The **User Short Registration Form** displays. The initial standard information screen appears. Choose your user type and fill in the username and user info. [![image.png](https://opscom.wiki/uploads/images/gallery/2024-05/scaled-1680-/kgwimage.png)](https://opscom.wiki/uploads/images/gallery/2024-05/kgwimage.png) The **User Full Registration Form** displays. Fields with an asterisk **\*** are mandatory. Admins with the correct permissions can control what fields are mandatory. [![image.png](https://opscom.wiki/uploads/images/gallery/2024-05/scaled-1680-/4e0image.png)](https://opscom.wiki/uploads/images/gallery/2024-05/4e0image.png) Enable the **Allow user login** **and mark the account as Active** checkbox. This will allow this user to self-manage on the User Portal. They will be prompted for a password change. You must select the correct **User Type**. The User type defines what options are available for the User to Purchase through the User Portal. Click the **Submit Registration Information for Processing** button. The **Confirm Registration Information** screen displays. Verify the information is correct. If you need to edit any information click the **Back** button. When you are ready to proceed, click the **Information Correct** button. The **Registration Complete** screen will display. You may now add a vehicle or purchase a permit for this user. # User Profile Landing Page ## Editing a Users Profile To edit a User's profile, click **Edit** in the **Basic Profile Information** section header. [![image.png](https://opscom.wiki/uploads/images/gallery/2024-05/scaled-1680-/OCrimage.png)](https://opscom.wiki/uploads/images/gallery/2024-05/OCrimage.png) The full profile page will display. You can edit the details of the user's account. [![image.png](https://opscom.wiki/uploads/images/gallery/2024-05/scaled-1680-/5jZimage.png)](https://opscom.wiki/uploads/images/gallery/2024-05/5jZimage.png) ## Add or Edit Vehicles To add to or edit the list of vehicles associated with the user, click **Edit** in the **Vehicles** section header. [![image.png](https://opscom.wiki/uploads/images/gallery/2024-05/scaled-1680-/Fihimage.png)](https://opscom.wiki/uploads/images/gallery/2024-05/Fihimage.png) This will bring you to the **Vehicle Information** screen where you can add, remove and edit vehicle information as well as apply a DNTT to a vehicle. [![image.png](https://opscom.wiki/uploads/images/gallery/2024-05/scaled-1680-/7a5image.png)](https://opscom.wiki/uploads/images/gallery/2024-05/7a5image.png) Logging in as a User From the User Profile landing page, the admin can log in to the OPS-COM **end-user interface** as the selected user. Click **Login as user**. Note, Auto Login must be configured System Settings. [![image.png](https://opscom.wiki/uploads/images/gallery/2024-05/scaled-1680-/TGZimage.png)](https://opscom.wiki/uploads/images/gallery/2024-05/TGZimage.png) This will launch a new browser window and log you in as the selected user with all the functionality associated with that user. [![image.png](https://opscom.wiki/uploads/images/gallery/2024-05/scaled-1680-/Rnuimage.png)](https://opscom.wiki/uploads/images/gallery/2024-05/Rnuimage.png) ## Additional Information - Alarms, Violations and Permit Details The dashboard also allows the admin to access the latest information on a user's history in regards to alarms, violations and permit ownership. If any warnings or alerts exist in the user's profile, they will be displayed at the top of the dashboard. [![image.png](https://opscom.wiki/uploads/images/gallery/2024-05/scaled-1680-/YZbimage.png)](https://opscom.wiki/uploads/images/gallery/2024-05/YZbimage.png) If outstanding violations exist for the user, the admin has the ability to access both images as well as ticket details from the **Violations** section of the dashboard.
- Access Violation details by clicking on the ticket number in the violations section. - Access photos associated with the violation by clicking on the camera icon to the left of the ticket number.
Permit details can be accessed by clicking on the permit number under the **Active Permits** section of the dashboard. # Payment Type Subscriptions In order for subscription to function, the user must provide information pertaining to the payment method they wish to use for their subscription service. There are three main payment types that are used for subscription services:
- Electronic Funds Transfer (Must be entered in the system by an Administrator) - Credit Card (Can be entered both by the client through their online profile as well as by an Administrator) - Payroll Deduction (Handled by the Administrator through the OPS-COM System.
# Credit Card Management in OPS-COM ## Managing Credit Cards Search for the user that you want to manage a credit card for and select the user to get to their profile [![image.png](https://opscom.wiki/uploads/images/gallery/2024-05/scaled-1680-/J8himage.png)](https://opscom.wiki/uploads/images/gallery/2024-05/J8himage.png) Hover over the **Profile** menu and click **Credit Cards**. [![image.png](https://opscom.wiki/uploads/images/gallery/2024-05/scaled-1680-/vrqimage.png)](https://opscom.wiki/uploads/images/gallery/2024-05/vrqimage.png) The **Credit Card utility** will display. The admin can fill out the card information on the right, and click **Add Credit Card** to register the credit card in the system. Note Designate the credit card as the default or **Prime Card** to allow the rollover process to automatically use this card for recurring permit payments. [![image.png](https://opscom.wiki/uploads/images/gallery/2024-05/scaled-1680-/TqLimage.png)](https://opscom.wiki/uploads/images/gallery/2024-05/TqLimage.png) # Electronic Funds Transfer (EFT) Subscriptions ## Setup Payment Type Search for the user and go to their Profile. Click **Profile,** **Manage Payment Methods**. [![image.png](https://opscom.wiki/uploads/images/gallery/2024-05/scaled-1680-/RHjimage.png)](https://opscom.wiki/uploads/images/gallery/2024-05/RHjimage.png) Click **Select Payment Type** and click **Electronic Funds Transfer** from the drop down menu. [![image.png](https://opscom.wiki/uploads/images/gallery/2024-05/scaled-1680-/3FVimage.png)](https://opscom.wiki/uploads/images/gallery/2024-05/3FVimage.png) An information form will appear allowing you to record the user banking details. Fill out the following fields from the user's void cheque: - **Label** for this payment method (Typically the bank name and an indication as to what type of account you wish to use. ie: Bank of Tomahawk - Savings) - **Transit/Branch Number** - **Bank Number** - **Account Number** [![image.png](https://opscom.wiki/uploads/images/gallery/2024-05/scaled-1680-/Pdqimage.png)](https://opscom.wiki/uploads/images/gallery/2024-05/Pdqimage.png) Click **Add Bank Information** to save this Payment Method. A message is displayed that the payment method was added and it appears on the right hand-side. [![image.png](https://opscom.wiki/uploads/images/gallery/2024-05/scaled-1680-/UTTimage.png)](https://opscom.wiki/uploads/images/gallery/2024-05/UTTimage.png) ## Add to Subscription Click the **Payment Method** dropdown menu and choose **Electronic Funds Transfer**. [![image.png](https://opscom.wiki/uploads/images/gallery/2024-05/scaled-1680-/1jlimage.png)](https://opscom.wiki/uploads/images/gallery/2024-05/1jlimage.png) Click the **Method Details** dropdown menu and choose **Bank of Tomahawk**. Click the **Update Subscriptions** button. This user is now configured for EFT payments for permit rollovers. # Using Tax Exemption ## Adding a Tax Exempt ID Search for a user and edit their profile. The Tax Exemption field is located on the User Profile screen and can contain alpha-numeric characters. New user profiles will also have this field. [![image.png](https://opscom.wiki/uploads/images/gallery/2024-05/scaled-1680-/e2Oimage.png)](https://opscom.wiki/uploads/images/gallery/2024-05/e2Oimage.png) Note, Tax Exemption Code is included for viewing on the Basic Profile Info window for the User Profile. [![image.png](https://opscom.wiki/uploads/images/gallery/2024-05/scaled-1680-/HIhimage.png)](https://opscom.wiki/uploads/images/gallery/2024-05/HIhimage.png) When purchasing a permit with a user that has a tax exemption code taxes will not be shown as a line item of the payment or confirmation page. [![image.png](https://opscom.wiki/uploads/images/gallery/2024-05/scaled-1680-/OTuimage.png)](https://opscom.wiki/uploads/images/gallery/2024-05/OTuimage.png) There is a tax exemption report that can be run under the Payments menu. You can choose to copy or export the records from the report which contains 3 fields, **First Name**, **Last Name**, **Tax Exemption Code**. [![image.png](https://opscom.wiki/uploads/images/gallery/2024-05/scaled-1680-/YIvimage.png)](https://opscom.wiki/uploads/images/gallery/2024-05/YIvimage.png) # User Search ## User Search Functionality Hover over **User Management** and click **User Search**. [![image.png](https://opscom.wiki/uploads/images/gallery/2024-05/scaled-1680-/216image.png)](https://opscom.wiki/uploads/images/gallery/2024-05/216image.png) The **User Search** screen displays. Enter your search criteria and click **Search**. [![image.png](https://opscom.wiki/uploads/images/gallery/2024-05/scaled-1680-/Sggimage.png)](https://opscom.wiki/uploads/images/gallery/2024-05/Sggimage.png) The search findings table will be returned below the criteria box. [![image.png](https://opscom.wiki/uploads/images/gallery/2024-05/scaled-1680-/g9rimage.png)](https://opscom.wiki/uploads/images/gallery/2024-05/g9rimage.png) # User - Profile Tab ## Editing a User Profile Locate the User you wish to edit/update by searching for a user. Click on the **Username** and the **Profile Dashboard** will display for that user. On the top right-hand corner you will see the name of the user that changes will be applied to. [![image.png](https://opscom.wiki/uploads/images/gallery/2024-05/scaled-1680-/vrsimage.png)](https://opscom.wiki/uploads/images/gallery/2024-05/vrsimage.png) Click the **Edit** button on the **Basic Profile Information** bar or click the **Profile** dropdown and click **Edit Profile Information**. The **Edit User Profile** screen is displayed. All fields on this screen can be updated by Administrators. Click the **Submit Registration Information for Processing** button to save the changes. [![image.png](https://opscom.wiki/uploads/images/gallery/2024-05/scaled-1680-/BNzimage.png)](https://opscom.wiki/uploads/images/gallery/2024-05/BNzimage.png) ## Information of Note ### Enabling Text2ParkMe To enable a user to use **Text2ParkMe**, enable the **Allow Text2ParkMe Reminders** checkbox. A cell phone number and a credit card **must also be on file**. Administrators do not have the ability to add credit card information to a user profile (this is for security purposes). Users must log in to their profile on the user portal to add credit card information. ### Mail Permit To Address The **Mail Permit To** field is used to direct which address prints on the hangtag when a user requests a hangtag permit be mailed to them. Whichever address is shown must be filled out on the profile. # Archiving or Disabling a User ## Archive Process Locate the User you wish to edit/update by searching for a user. Click on the **Username** and the **Profile Dashboard** will display for that user. On the top right-hand corner you will see the name of the user that changes will be applied to. [![image.png](https://opscom.wiki/uploads/images/gallery/2024-05/scaled-1680-/1Y3image.png)](https://opscom.wiki/uploads/images/gallery/2024-05/1Y3image.png) Click the **Edit** button on the **Basic Profile Information** bar or click the **Profile** dropdown and click **Edit Profile Information**. The **Edit User Profile** screen is displayed. ### Disable User Account Disable the **Allow user to login and mark account as active** checkbox. Click the **Submit Registration Information for Processing** button at the bottom of the page. [![image.png](https://opscom.wiki/uploads/images/gallery/2024-05/scaled-1680-/AIhimage.png)](https://opscom.wiki/uploads/images/gallery/2024-05/AIhimage.png) Click the **Information Correct** button to submit the change. ### Archive User Account Follow the steps above to locate and disable a user. Now choose an **Archive User Type** from the **Archive Type** dropdown list. Click the **Archive User** button and click **OK** on the confirmation pop-up. [![image.png](https://opscom.wiki/uploads/images/gallery/2024-05/scaled-1680-/DBiimage.png)](https://opscom.wiki/uploads/images/gallery/2024-05/DBiimage.png) # User - Purchase a Locker ## Register a Locker Locate the User you wish to edit/update by searching for a user. Click on the **Username** and the **Profile Dashboard** will display for that user. Click on **Lockers.** On the top right-hand corner you will see the name of the user that changes will be applied to.
[![image.png](https://opscom.wiki/uploads/images/gallery/2024-05/scaled-1680-/9dEimage.png)](https://opscom.wiki/uploads/images/gallery/2024-05/9dEimage.png)
The **Locker Registration** screen displays. Click **Arena** under **Available Buildings**. [![image.png](https://opscom.wiki/uploads/images/gallery/2024-05/scaled-1680-/kb7image.png)](https://opscom.wiki/uploads/images/gallery/2024-05/kb7image.png) The **Locker Registration - Locker Selection** screen displays. Click the pull down menu to choose a location within the building. [![image.png](https://opscom.wiki/uploads/images/gallery/2024-05/scaled-1680-/LxNimage.png)](https://opscom.wiki/uploads/images/gallery/2024-05/LxNimage.png) Choose a locker number to sell to that user and click **Reserve this Locker**. [![image.png](https://opscom.wiki/uploads/images/gallery/2024-05/scaled-1680-/seQimage.png)](https://opscom.wiki/uploads/images/gallery/2024-05/seQimage.png) The **Confirm Locker Reservation** screen is displayed. Verify all information is correct and click the **Confirm Information** button. [![image.png](https://opscom.wiki/uploads/images/gallery/2024-05/scaled-1680-/1CDimage.png)](https://opscom.wiki/uploads/images/gallery/2024-05/1CDimage.png) The **Payments Due[ ](https://ops-com.atlassian.net/wiki/spaces/OCPUBLIC/pages/755547/User+-+Payments+Tab)**screen is displayed. You may now process the payment. # User - Vehicles Tab ### Adding a Vehicle 1\. To add a new vehicle for a user, Click the '**Add New Vehicle**' button at the bottom of the page. The **'Add New Vehicle Information'** screen pops up . Fill in all of the details for the new vehicle and click the **'Add New Vehicle'** button to save the changes. The **'Vehicle Information'** screen is displayed again. [![image.png](https://opscom.wiki/uploads/images/gallery/2024-05/scaled-1680-/Yd4image.png)](https://opscom.wiki/uploads/images/gallery/2024-05/Yd4image.png) 2\. There are a number of links in the Vehicle tab that will provide administrators with additional information. [![image.png](https://opscom.wiki/uploads/images/gallery/2024-05/scaled-1680-/kWSimage.png)](https://opscom.wiki/uploads/images/gallery/2024-05/kWSimage.png) If the **Plate link** is selected the 'Vehicle Information' window will pop-up to allow you to update vehicle information. If you make changes in here, ensure that you click the 'Update Vehicle' button to save the changes. The **Username link** takes you to the main profile screen for that user where you can view/edit user profile details. The **Removal link** allows administrators to permanently remove a vehicle. A pop-up message will ask you to confirm the removal. The **Record DNTT link** allows administrators to remove/add/edit a Do Not Ticket or Tow notation for that vehicle. A DNTT Note is used to notify enforcement officers that a particular vehicle should not receive any violations in a particular lot, during a particular date and time. # Edit a Vehicle 1. Click the Plate to launch the Vehicle Information window. Make your changes and click 'Update Vehicle' # Activate/Deactivate a Vehicle 1. Click the Active or Inactive link under **Status.** # Removing a Vehicle When would we use this? A vehicle can not be completely removed from OPS-COM, however, it can be removed from a person's user profile. You may want to remove a vehicle if:
- The Vehicle changes owners - A Vehicle was placed on the wrong user profile
If the vehicle had only one user it will be marked as archived. If the vehicle has two users, the vehicle will be removed from the profile you perform the removal on but remains under the second profile. Any violations on the vehicle would remain in place under that second user's profile. ### Important - Before removing a vehicle If there is only one driver listed on the vehicle it is important to ensure ***any outstanding balances*** are cleared before removing the vehicle. 1. In the vehicle listing in the user's profile you will see an "**x**" in the vehicle record. 2. Clicking the **x** to start the process. 3\. You will be prompted to confirm the removal. Once you click **OK** the vehicle will be removed. The vehicle ***will remain in the system** **but not be associated with a user.*** # User - Parking Tab ## Standard Parking Permit Click the **'Parking'** tab. [![image.png](https://opscom.wiki/uploads/images/gallery/2024-05/scaled-1680-/iiMimage.png)](https://opscom.wiki/uploads/images/gallery/2024-05/iiMimage.png) The '**Manage Lots**' screen will display. [![image.png](https://opscom.wiki/uploads/images/gallery/2024-05/scaled-1680-/pR3image.png)](https://opscom.wiki/uploads/images/gallery/2024-05/pR3image.png) To sell a **Standard Parking Permit**, click the '**Standard Parking Permit'** button. The '**Parking Permit Registration'** screen will display. A list of available lots for this user type will display. The list not only shows the lot location but also shows administrators what type of permit is sold in that lot (yearly, monthly, semester or other) and how many permits are still available for sale in that lot. If you click the **User Default Lots** drop down you can also select to show '***All Lots***', where you are able to see more options in the menu. An admin can deem to issue the user a permit in any lot. [![image.png](https://opscom.wiki/uploads/images/gallery/2024-05/scaled-1680-/Traimage.png)](https://opscom.wiki/uploads/images/gallery/2024-05/Traimage.png) If there are no permits remaining in the chosen lot, you can click the **'Waiting List**' link to add the user to the waiting list. The '**Permit Waiting List'** pop-up will display. Click **'Yes'** to add the user to the wait list. [![image.png](https://opscom.wiki/uploads/images/gallery/2024-05/scaled-1680-/uPyimage.png)](https://opscom.wiki/uploads/images/gallery/2024-05/uPyimage.png) Click the **'Register Permit'** button. The '**Confirm Parking Permit Registration**' screen will display. Confirm the permit information details. If correct, click the '**Purchase this Permit**' button. [![image.png](https://opscom.wiki/uploads/images/gallery/2024-05/scaled-1680-/vuSimage.png)](https://opscom.wiki/uploads/images/gallery/2024-05/vuSimage.png) The 'Payments Due' screen will display. Once the permit is paid for, click the 'History' tab, find the permit and click the printer icon to print the permit. [![image.png](https://opscom.wiki/uploads/images/gallery/2024-05/scaled-1680-/Uimimage.png)](https://opscom.wiki/uploads/images/gallery/2024-05/Uimimage.png) ## Temp Parking Permit To sell a **Temporary Parking Permit**, click the '**Temporary Parking Permit**' button on the **'Parking**' tab. The '**Temp. Parking Permit Registration**' screen will display. [![image.png](https://opscom.wiki/uploads/images/gallery/2024-05/scaled-1680-/mLnimage.png)](https://opscom.wiki/uploads/images/gallery/2024-05/mLnimage.png) Choose a lot from the drop-down menu. Enter the start and end dates for when the permit will be valid. Choose the type of temporary permit (all day permit or hourly permit) and select the vehicle the permit applies to. [![image.png](https://opscom.wiki/uploads/images/gallery/2024-05/scaled-1680-/0b2image.png)](https://opscom.wiki/uploads/images/gallery/2024-05/0b2image.png) Confirm the Permit Number. If a DNTT (Do Not Ticket or Tow) is required enable the checkbox. Click the '**Confirm this Permit'** The **'Confirm Parking Permit Registration'** screen will display. Confirm the details are correct and click the '**Purchase this Permit**' button. The 'Payments Due' screen will display. Once the permit is paid for, click the 'History' tab, find the permit and click the printer icon to print the permit. [![image.png](https://opscom.wiki/uploads/images/gallery/2024-05/scaled-1680-/Ynwimage.png)](https://opscom.wiki/uploads/images/gallery/2024-05/Ynwimage.png) ## Associate an Access Card with this User Click the **'Associate an Access Card with this User**' button on the **'Parking'** tab. The **'Associate an Access Card'** screen displays. The first section shows the access card records that are currently associated with that user. There are a number of links in this section that will provide administrators with additional information. [![image.png](https://opscom.wiki/uploads/images/gallery/2024-05/scaled-1680-/inIimage.png)](https://opscom.wiki/uploads/images/gallery/2024-05/inIimage.png) The **Processed** date link brings up the Transaction Details page. The **Adjust** link allows administrators to make payment adjustments related to an access card already on file. Enter the Requisition Code (this is an organization specific code), from the drop-down menu select the + or - depending on if you are crediting the user or increasing the payment amount due, enter in the amount of the adjustment, write any notes needed to explain why the adjustment is being made, and click the '**Add Adjustment'** button to save the changes. [![image.png](https://opscom.wiki/uploads/images/gallery/2024-05/scaled-1680-/b0Bimage.png)](https://opscom.wiki/uploads/images/gallery/2024-05/b0Bimage.png) The **Card Number** link brings up all of the information associated with that particular card. You can click the envelope icon to send an email to that user or click the person icon beside the login ID to go to the user profile. Click the **'Switch to a New Card'** button to enter a new access card number and click **'Mark as Verified'** to save the changes. [![image.png](https://opscom.wiki/uploads/images/gallery/2024-05/scaled-1680-/7lpimage.png)](https://opscom.wiki/uploads/images/gallery/2024-05/7lpimage.png) To **Create a New Access Card**, enter the new card number, select the lot where the access card will be associated, update the status of the card using the drop-down menu as necessary (normally this will be active), and select the '**Add New**' button at the bottom to save the information. # User - Payments Tab ## Select Items to Apply Payment Enable the check boxes for the items that you wish to make the payment on. In the example below, only lockers are included in the payment. [![image.png](https://opscom.wiki/uploads/images/gallery/2024-05/scaled-1680-/OMCimage.png)](https://opscom.wiki/uploads/images/gallery/2024-05/OMCimage.png) ## View More Details Administrators can click on items in blue to link to more information about that item. If you make changes, always click the **'Update'** button to save the new information. [![image.png](https://opscom.wiki/uploads/images/gallery/2024-05/scaled-1680-/mq5image.png)](https://opscom.wiki/uploads/images/gallery/2024-05/mq5image.png) Items can also be removed by clicking the '**Remove**' link, however **there is no undo option to reverse this action**. ## Make a Payment Click the **'Proceed to Paymen**t' button. Another **'Payments Due'** screen is displayed. Confirm the details for the payment and choose the payment method from the drop-down list. Click the **'Submit Payment Information'** button. [![image.png](https://opscom.wiki/uploads/images/gallery/2024-05/scaled-1680-/y1qimage.png)](https://opscom.wiki/uploads/images/gallery/2024-05/y1qimage.png) The '**Payments Due**' confirmation screen is displayed. Verify all payment information and click the **'Confirm Payment Information**' button. [![image.png](https://opscom.wiki/uploads/images/gallery/2024-05/scaled-1680-/3n9image.png)](https://opscom.wiki/uploads/images/gallery/2024-05/3n9image.png) ## Transaction Details This brings you to the '**Transaction Details**' screen where administrators have a final opportunity to make any additional changes to the payment. You can click the 'Cancel Transaction' button to cancel the promise to pay and release the items back into the inventory. [![image.png](https://opscom.wiki/uploads/images/gallery/2024-05/scaled-1680-/IB9image.png)](https://opscom.wiki/uploads/images/gallery/2024-05/IB9image.png) Administrators can also use the Adjust link to make adjustments to the cost of the item. This can also be done after the transaction has been completed. ## Process a Payment Systems connected to a payment provider (gateway) will be shown as processed automatically in the case of credit card payments. *Generally this is configured only on the user side while the admin side has broader level of control for incoming payments.* Click the '**Process Manually'** button. [![image.png](https://opscom.wiki/uploads/images/gallery/2024-05/scaled-1680-/7cXimage.png)](https://opscom.wiki/uploads/images/gallery/2024-05/7cXimage.png) The final payment confirmation displays a transaction confirmation number. The options to make adjustments or to refund a payment are also on this screen. In the payment process, there are three types of reimbursements:
- Cancel Transactions - Refunds - Adjustments
# User - History Tab There are a number of links on this page that administrators can select to get additional information, make edits, adjustments and/or refunds. [![image.png](https://opscom.wiki/uploads/images/gallery/2024-05/scaled-1680-/7h8image.png)](https://opscom.wiki/uploads/images/gallery/2024-05/7h8image.png) [![image.png](https://opscom.wiki/uploads/images/gallery/2024-05/scaled-1680-/XhXimage.png)](https://opscom.wiki/uploads/images/gallery/2024-05/XhXimage.png) [![image.png](https://opscom.wiki/uploads/images/gallery/2024-05/scaled-1680-/VFUimage.png)](https://opscom.wiki/uploads/images/gallery/2024-05/VFUimage.png) ## View Completed History This view has the transactions ordered by date with the most recent transaction at the top of the list. Administrators can select the View links to get additional information on each of the transactions, make edits, adjustments or refunds. [![image.png](https://opscom.wiki/uploads/images/gallery/2024-05/scaled-1680-/cuUimage.png)](https://opscom.wiki/uploads/images/gallery/2024-05/cuUimage.png) The **Email link** brings up a screen that allows administrators to email the specific user. Click **View** beside any record to see more information about the transaction listed. ## Recent History Admins can use the **Recent History** tab to view the top 100 recent history records for a user. [![image.png](https://opscom.wiki/uploads/images/gallery/2024-05/scaled-1680-/icPimage.png)](https://opscom.wiki/uploads/images/gallery/2024-05/icPimage.png) The items included on this history page are a roll up of all of the individual history items such as **Locker**, **Parking**, **Enforcement Adjustment, Address,** and **Mail** **Records**. Its important to note that not all records appear on the recent history report and to see more you can use the **All Records** page for a completed history of that user. [![image.png](https://opscom.wiki/uploads/images/gallery/2024-05/scaled-1680-/tJYimage.png)](https://opscom.wiki/uploads/images/gallery/2024-05/tJYimage.png) ## Other Page Links The **Adjust link** allows administrators to make adjustments to transactions/payments that have been processed. The **Item Number link** (locker number, permit number, violation ticket number, appeals record number) allows administrators to view/edit details about the item. Click the 'Update' button to save any changes you make. The **Pay Date link** indicates whether or not a transaction was fully processed, when it was processed and when selected it links to the payment details. Administrators can view/edit other details of the transaction, complete the processing of a payment, no refunds or make adjustments. # User - Incident History There are a number of links on this page that allow administrators to get additional information or make edits to existing information. [![image.png](https://opscom.wiki/uploads/images/gallery/2024-05/scaled-1680-/yquimage.png)](https://opscom.wiki/uploads/images/gallery/2024-05/yquimage.png) The **User Profile** icon will open the contact's user profile. The **Edit/View Images** button allows administrators to attach images of the user and select a default image if more than one image is on file. The **Details** link will link to the incident for more details. The **Add Note** button allows administrators to add notes to the file. These notes are only visible to administrators. # Unlink User and Vehicle ## Unlink a User and Vehicle To remove a vehicle from a user profile, follow the steps outlined below. Perform a **User Search** to pull up the User's Profile that you wish to remove a vehicle from. Select the profile of the desired user from your ***user search**,* and click on the **Vehicles** tab. The page will refresh, and the list of vehicles associated with the user will appear. [![image.png](https://opscom.wiki/uploads/images/gallery/2024-05/scaled-1680-/ooaimage.png)](https://opscom.wiki/uploads/images/gallery/2024-05/ooaimage.png) The vehicle list gives administrators the ability to add, edit, create a DNTT, and/or delete a vehicle from a user's profile. Find the vehicle that you wish to remove from the user's profile, and click the **"X"** (located to the right). [![image.png](https://opscom.wiki/uploads/images/gallery/2024-05/scaled-1680-/EaIimage.png)](https://opscom.wiki/uploads/images/gallery/2024-05/EaIimage.png) A confirmation pop-up window will appear. Click **OK** to confirm removing the associated vehicle, or click **Cancel** to return to the vehicle list without changing anything. [![image.png](https://opscom.wiki/uploads/images/gallery/2024-05/scaled-1680-/DL9image.png)](https://opscom.wiki/uploads/images/gallery/2024-05/DL9image.png) # Bulk User Type Change ## Bulk User Type Change Menu Option Hover over User Management and click **Bulk User Type Change**. [![image.png](https://opscom.wiki/uploads/images/gallery/2024-05/scaled-1680-/m4Fimage.png)](https://opscom.wiki/uploads/images/gallery/2024-05/m4Fimage.png) The Bulk User Type Change screen is displayed. The central column with a number badge represents the number of that specific User Type in the system. [![image.png](https://opscom.wiki/uploads/images/gallery/2024-05/scaled-1680-/Np3image.png)](https://opscom.wiki/uploads/images/gallery/2024-05/Np3image.png) ## Example Bulk Change User Type For this example we wish to change all Freshman users to Sophomore. Click the drop down box next to Freshman and click Sophomore from the list of user types available. [![image.png](https://opscom.wiki/uploads/images/gallery/2024-05/scaled-1680-/H9timage.png)](https://opscom.wiki/uploads/images/gallery/2024-05/H9timage.png) Click Confirm Changes to continue. [![image.png](https://opscom.wiki/uploads/images/gallery/2024-05/scaled-1680-/cknimage.png)](https://opscom.wiki/uploads/images/gallery/2024-05/cknimage.png) Now you can see there are 4 Sophomore users instead of 1. [![image.png](https://opscom.wiki/uploads/images/gallery/2024-05/scaled-1680-/f2nimage.png)](https://opscom.wiki/uploads/images/gallery/2024-05/f2nimage.png) # Merge User ## Merging Users A user account must be enabled and contain a user type to perform a merge. If the user is not showing on the merge report please go to that users profile and make sure they are enabled and have their user type selected. To merge two or more users, hover over the **User Management** icon and click **Merge Users**. [![image.png](https://opscom.wiki/uploads/images/gallery/2024-05/scaled-1680-/7O7image.png)](https://opscom.wiki/uploads/images/gallery/2024-05/7O7image.png) Enter in a valid piece of identification information to search for the users in both fields. [![image.png](https://opscom.wiki/uploads/images/gallery/2024-05/scaled-1680-/rFBimage.png)](https://opscom.wiki/uploads/images/gallery/2024-05/rFBimage.png) Select the users on the left-hand side that you wish to merge into a single user account on the right-hand side. Click the **Merge** button to complete the merge process. [![image.png](https://opscom.wiki/uploads/images/gallery/2024-05/scaled-1680-/iQsimage.png)](https://opscom.wiki/uploads/images/gallery/2024-05/iQsimage.png) A confirmation page will appear confirming the merge to the username selected. Click **Merge** to complete the process. The screen will refresh to the main screen and a further confirmation of the merged user will appear at the bottom of the page. [![image.png](https://opscom.wiki/uploads/images/gallery/2024-05/scaled-1680-/Brsimage.png)](https://opscom.wiki/uploads/images/gallery/2024-05/Brsimage.png) What is merged and what is NOT? When a merge is performed the important thing to understand is that the user you are merging **TO** should be the one with the most up to date or accurate information. The tool uses a two-column window to facilitate this process. The **TO** user will be in the right column. The information for the **TO** user will take precedence over the **FROM** user. The **FROM** user will appear in the left column. Where information exists in the MERGE TO user it will remain in the profile post-merge. If there are fields that have no information in the MERGE TO profile yet something exists in the FROM user, the merge will bring this information into the resulting single user profile The merged items include - Vehicles - Violations - Permits - Lockers - Items awaiting Payment **IMPORTANT: The user selected in the left column will be archived. The user in the right column will remain in the database.** ## Finding User Merge Records Once you have performed a user merge you should be able to see the merge record by going to the users profile that you merged to. On the **Completed History** for that user you will see this: [![image.png](https://opscom.wiki/uploads/images/gallery/2024-05/scaled-1680-/0bOimage.png)](https://opscom.wiki/uploads/images/gallery/2024-05/0bOimage.png) # Bulk Email Users ## Locate the Bulk Email Presets Hover over **User Management** and click **Email Users**. Select the group you want to email or click **More** to access additional preset options. The **Email Message Menu** displays. In this interface you can choose the conditions or filters that you wish to apply to the recipents. For example if I simply select **User Type Group** of **Staff** then all staff members will get the resulting email. If I were to select a **User Type Group** of **Staff,** as well as **Has Violations,** as well as **Company Staff Lot,** then the email group would be a smaller subsection with **Staff Members** that also **Has Violations** and park in the **Company Staff Lot** and so on. [![image.png](https://opscom.wiki/uploads/images/gallery/2024-05/scaled-1680-/65gimage.png)](https://opscom.wiki/uploads/images/gallery/2024-05/65gimage.png) Sending an Email After you have chosen your preset recipient list, the **Compose Email Message** screen will display. In our example we have set the criteria such that we have 26 recipents. [![image.png](https://opscom.wiki/uploads/images/gallery/2024-05/scaled-1680-/v3iimage.png)](https://opscom.wiki/uploads/images/gallery/2024-05/v3iimage.png) Click the **View Email Recipient List** button to confirm you are sending the email to the appropriate users. [![image.png](https://opscom.wiki/uploads/images/gallery/2024-05/scaled-1680-/eKPimage.png)](https://opscom.wiki/uploads/images/gallery/2024-05/eKPimage.png) Type a Subject and a Message. You can also add attachments by clicking the **Choose File** button. When you have finished composing your email, click the **Send Email Message** button. A dialog box will open asking you to confirm you are sending the email. Click **Yes**. The message **Mail message has been queued for delivery** will display. # Primary Driver ## Why is there a Primary Driver? The Primary Driver will receive communication from the system such as violation notices. There is a nightly script that runs which will designate primary driver to any vehicle that has been added to the system. If there is no Primary Driver on a vehicle when an appeal is launched, the person launching the appeal will be automatically designated as the Primary Driver. ## Who is the Primary Driver? To access and edit the **Primary Driver** setting for a vehicle. Go to the user's profile and click the **Vehicles** tab. If any vehicle has more than one driver associated, you will see a list of users as indicated in the screenshot. The current Primary Driver is indicated in bold text. [![image.png](https://opscom.wiki/uploads/images/gallery/2024-05/scaled-1680-/2E9image.png)](https://opscom.wiki/uploads/images/gallery/2024-05/2E9image.png) ## Edit a Primary Driver To edit the Primary Driver information click on the **Plate** link to access the **Edit Vehicle** screen. [![image.png](https://opscom.wiki/uploads/images/gallery/2024-05/scaled-1680-/nQLimage.png)](https://opscom.wiki/uploads/images/gallery/2024-05/nQLimage.png) In the Edit Vehicle popup screen you will see the primary driver field. This is a drop down menu that allows you to select one of the associated drivers as the Primary Driver. [![image.png](https://opscom.wiki/uploads/images/gallery/2024-05/scaled-1680-/BRQimage.png)](https://opscom.wiki/uploads/images/gallery/2024-05/BRQimage.png) Click on the field to access the drop down list. In our example here we are switching the primary driver from Jrockwood to Mashbury. Once you have selected your preferred Primary Driver click on **Update Vehicle** to save your choice. [![image.png](https://opscom.wiki/uploads/images/gallery/2024-05/scaled-1680-/TDnimage.png)](https://opscom.wiki/uploads/images/gallery/2024-05/TDnimage.png) Notice now that the listing has Mashbury as the Primary Driver. [![image.png](https://opscom.wiki/uploads/images/gallery/2024-05/scaled-1680-/VWQimage.png)](https://opscom.wiki/uploads/images/gallery/2024-05/VWQimage.png) ## Troubleshooting Tip In some rare cases there are legacy records that might have multiple Primary Drivers associated to the same vehicle. In cases like this, you can resolve the issue by going through the steps described above. By setting the Primary Driver through this tool the system will take the latest selected driver as the preferred Primary Driver and remove the designation from any other driver in the system. ### Signs you have two Primary Drivers If there are two or more Primary Drivers designated for a single vehicle it could cause violations to appear duplicated in the payments screen. If you are experiencing duplication in violations please check the Primary Driver status for the vehicle as a first step to resolving the issue. # Search by Plate ## Search by Plate Menu Option Hover over the **'User Management'** icon and then **Vehicles**. Click **'Search by Plate**'. [![image.png](https://opscom.wiki/uploads/images/gallery/2024-05/scaled-1680-/4RHimage.png)](https://opscom.wiki/uploads/images/gallery/2024-05/4RHimage.png) The **'Search By Plate'** screen displays. In this interface you can search for a specific plate or you can enter a vehicle description. Possible Search criteria: **Plate:** You can search by the full plate number or a partial number (see fuzzy search below) **Make:** Vehicle Make (Such as Honda, Ford, Tesla, etc) **Type:** Vehicle type (Such as hatchback, sports car, compact) **Colour:** Vehicle Colour (Such as Red, Blue, Grey, Silver) The date range is optional and refers mainly to the Pay station parking and LPR events shown in the report. If you leave it blank you will get any instance of the vehicle over it's history. Click the '**Search Vehicles**' button to launch the search. [![image.png](https://opscom.wiki/uploads/images/gallery/2024-05/scaled-1680-/i4Zimage.png)](https://opscom.wiki/uploads/images/gallery/2024-05/i4Zimage.png) ## Search by Plate Report A list of all users that have matching plate information is returned below the **'Search'** box. [![image.png](https://opscom.wiki/uploads/images/gallery/2024-05/scaled-1680-/05himage.png)](https://opscom.wiki/uploads/images/gallery/2024-05/05himage.png) - Click the ![](https://ops-com.atlassian.net/wiki/download/attachments/757499/H.png?version=1&modificationDate=1484665032000&cacheVersion=1&api=v2) see the Vehicle History Log. - Click the ![](https://ops-com.atlassian.net/wiki/download/attachments/757499/VehInfo.png?version=1&modificationDate=1484665176000&cacheVersion=1&api=v2) to see details of the vehicle associated with the plate. - Click the **plate link** to enter a new violation associated with that plate. - Click the **username link** to edit the user profile for that user. - Click the **envelope icon** to email the user. - Click the **number of violations** to search and view/edit all previous violations associated to the vehicle. - Click the **number of incidents** to search and view/edit all previous incidents associated to the vehicle. ## Search by Vehicle Description If we do not know the vehicles plate number we can search by vehicle description. In this example we are looking for a Grey Ford Hatchback. [![image.png](https://opscom.wiki/uploads/images/gallery/2024-05/scaled-1680-/5r8image.png)](https://opscom.wiki/uploads/images/gallery/2024-05/5r8image.png) ## Performing a Fuzzy Search In this example we only have a partial plate and a description. WE can toggle on Perform Fuzzy Search where the system will list vehicles that meet these partial bits of data. IN the following example the officer only caught a partial plate of an individual speeding on campus (**Plate:** APVK???, **Colour:** Grey, **Type:** Hatchback) and wishes to issue a warning. Note the **APVK**189 plate appears as well as Pay Station instance for **APVK**123 where it has found the APVK via fuzzy search. [![image.png](https://opscom.wiki/uploads/images/gallery/2024-05/scaled-1680-/1oiimage.png)](https://opscom.wiki/uploads/images/gallery/2024-05/1oiimage.png) ### Pay Station Parking Status If the user bought a temporary permit in a lot it's history would be displayed here. See above image. ### License Plate Recognition (LPR) Captures This is where all of the vehicle's chalk records are displayed. [![image.png](https://opscom.wiki/uploads/images/gallery/2024-05/scaled-1680-/cQpimage.png)](https://opscom.wiki/uploads/images/gallery/2024-05/cQpimage.png) ### Chalk Details Plates which have been chalked can be reviewed within the LPR Capture log. Click the map icon to review the associated map location. ## Vehicle History Log After completing a License Plate search, click on the ![](https://ops-com.atlassian.net/wiki/download/attachments/754811/H.png?version=1&modificationDate=1565782797000&cacheVersion=1&api=v2) icon beside the plate name. [![image.png](https://opscom.wiki/uploads/images/gallery/2024-05/scaled-1680-/4trimage.png)](https://opscom.wiki/uploads/images/gallery/2024-05/4trimage.png) # Merge Vehicles ### Merge Vehicles Menu Option Hover over the **User Management** icon and then **Vehicles**. Click **Merge Vehicles**. [![image.png](https://opscom.wiki/uploads/images/gallery/2024-05/scaled-1680-/EWiimage.png)](https://opscom.wiki/uploads/images/gallery/2024-05/EWiimage.png) ## Merge Search Enter the partial or full vehicle plate information or the VIN number of the two vehicles that you want to merge and click the **Search** button. [![image.png](https://opscom.wiki/uploads/images/gallery/2024-05/scaled-1680-/BBhimage.png)](https://opscom.wiki/uploads/images/gallery/2024-05/BBhimage.png) ### Merge Selection Select the ***secondary*** vehicle(s) to be merged (left) and select the ***primary*** vehicle to be merged into (right). Click the **Merge** button. Confirm that you want to merge the vehicles. [![image.png](https://opscom.wiki/uploads/images/gallery/2024-05/scaled-1680-/amtimage.png)](https://opscom.wiki/uploads/images/gallery/2024-05/amtimage.png) A confirmation screen will appear when the merge is complete. [![image.png](https://opscom.wiki/uploads/images/gallery/2024-05/scaled-1680-/VOOimage.png)](https://opscom.wiki/uploads/images/gallery/2024-05/VOOimage.png) # Duplicate Vehicle Handling ## What are Duplicate Vehicles? Vehicles in OPS-COM are unique based on plate, plate type, and state/province. Often, duplicates can appear in the system due to the plate type or location being recorded incorrectly . Duplicates can create headaches since two similar vehicles may generate duplicate entries when really they are the same vehicle. Some scenarios that might require a vehicle merge are: - Duplicate vehicles created in the system due to mismatching vehicle information - Incorrect plate reads or plate numbers that were manually entered with an error - Correcting orphaned vehicles - Correcting orphaned violations ## Unique Vehicle Identifiers There are three items which create a unique identifier for a vehicle. - Licence Plate - Province / State - Plate Type These three pieces of information are the minimum information you can include when entering a vehicle. For example: One might think that the plate number and state origin of the plate would be enough to make the vehicle unique in the system however this does not take into account the fact that a commercial plate number might repeat the same number sequence as a regular passenger vehicle plate. It is possible to have ABC123 as a passenger plate as well as ABC123 being used on a commercial plate. All three of these unique identifiers are required when inputting a vehicle in the system. ## Entering Vehicles The more information you supply when adding a vehicle the better the chance the system will work efficiently and warn you when you are adding a vehicle more than once. [![image.png](https://opscom.wiki/uploads/images/gallery/2024-05/scaled-1680-/pCmimage.png)](https://opscom.wiki/uploads/images/gallery/2024-05/pCmimage.png) The best way to ensure easy identification of specific vehicles is to also include the following information: - Vehicle Colour - Vehicle Make - Vehicle Model - Vehicle Year # Vehicle DNTT ## What is a DNTT? The **DNTT** feature allows administrators to place a condition on a vehicle that will warn officers in the field not to ticket or tow a vehicle. This is useful in many situations. For example: A photographer on assignment is photographing different buildings on campus over a series of days. An administrator could register their vehicle and apply a **DNTT** for the days of their assignment on campus. No matter where they go on campus, they would be able to park without getting ticketed or towed. Example 2: The Dean of the School is traveling around the campus for a special event. A **DNTT** can be applied to his vehicle so that for the time frame of the event he can park outside of his regular lot without penalty. This is what we affectionately refer to as the Anti Embarrassment feature of the tool. ## Setting up a DNTT Go to the user's profile and select the **Vehicles** tab. ### Select Vehicle Select the vehicle of interest by clicking the **Add DNTT** link. [![image.png](https://opscom.wiki/uploads/images/gallery/2024-05/scaled-1680-/qc2image.png)](https://opscom.wiki/uploads/images/gallery/2024-05/qc2image.png) ### Select Time Frame Set up for a temporary time frame by choosing a **From Date** and time and a **To Date** and time. [![image.png](https://opscom.wiki/uploads/images/gallery/2024-05/scaled-1680-/ik0image.png)](https://opscom.wiki/uploads/images/gallery/2024-05/ik0image.png) In this case, the Vehicle with Plate JROCK has a **DNTT** in the Administration building area lasting from Midnight July 21st to 23:59 the same day. A new location could be configured or added to the system that reads *Campus Wide*, which would tell officers the vehicle can park anywhere on campus without penalty during the duration of the **DNTT** time frame. ## Accessing the DNTT information from the user profile - Go back to the user's vehicles tab. - Click on **Edit DNTT** - You will see a list of DNTT's assigned to the vehicle. - You have the ability to **Modify** or **Delete** the DNTT order in this window. [![image.png](https://opscom.wiki/uploads/images/gallery/2024-05/scaled-1680-/v2mimage.png)](https://opscom.wiki/uploads/images/gallery/2024-05/v2mimage.png) ## Accessing the DNTT Report Hover over **'User Management**' then **Vehicles**. Click **'Vehicle DNTT Report'**. [![image.png](https://opscom.wiki/uploads/images/gallery/2024-05/scaled-1680-/yZWimage.png)](https://opscom.wiki/uploads/images/gallery/2024-05/yZWimage.png) ## Search for DNTT Records Enter the date range you want to search, and the number of instances and click the **Search** button. Take Note When a number is entered in the **'Number of Instances'** field, the report will return users with that number of incidents or more. For example, if you enter 2, the report is going to list users who have had 2 or more **DNTT** permissions granted in that time frame. The report requires the admin to have the manage vehicle permission with their role found under system config. [![image.png](https://opscom.wiki/uploads/images/gallery/2024-05/scaled-1680-/Jt6image.png)](https://opscom.wiki/uploads/images/gallery/2024-05/Jt6image.png) The **Username** link will display a pop-up screen that shows the username, email address, address and phone number. If you click on the **'User Profile'** icon you will be able to edit the user's information. The **Plate** link will display a pop-up screen to view/edit the specific vehicle information. The **\# of Instances** link displays the user history where you can view all DNTT records on file. ## How DNTT's appear on the handheld units Officers can view DNTT details on a vehicle when looking for the vehicle using **Search Vehicles.** Tap on the specific vehicle in the list to view its details. [![image.png](https://opscom.wiki/uploads/images/gallery/2024-05/scaled-1680-/oBzimage.png)](https://opscom.wiki/uploads/images/gallery/2024-05/oBzimage.png) # Forms Admin ## Managing Forms Hover over the **User Management** icon and click **Forms**. From here we have two options to **List Forms** that we have created which will show us the entries for each of these forms. As well as **Add Form** which allows you to setup new forms for your users. [![image.png](https://opscom.wiki/uploads/images/gallery/2024-05/scaled-1680-/my8image.png)](https://opscom.wiki/uploads/images/gallery/2024-05/my8image.png) ## Required Role Permissions In order for your admins to properly use this functionality, they require you to have them added to or create a new role that has **Edit Forms** and **View Forms** enabled. These are the only permissions required to use Forms. [![image.png](https://opscom.wiki/uploads/images/gallery/2024-05/scaled-1680-/TQ0image.png)](https://opscom.wiki/uploads/images/gallery/2024-05/TQ0image.png) # Adding Forms (old forms) To add a form on your user side hover over **User Management** followed by **Forms** and click **Add Form.** [![image.png](https://opscom.wiki/uploads/images/gallery/2024-05/scaled-1680-/2h6image.png)](https://opscom.wiki/uploads/images/gallery/2024-05/2h6image.png) The **Form Builder - Create** screen will display, some options will be available after clicking **Create Form**. - Enter the **Form Title**. - Enable the checkbox if you want the form to be visible on the user side. - Enter the dates that you want the new form to be visible/hidden to users. If you leave the dates blank the form will always appear on the user side. - Enter a brief description of the form and click **Create Form** when finished. [![image.png](https://opscom.wiki/uploads/images/gallery/2024-05/scaled-1680-/6fXimage.png)](https://opscom.wiki/uploads/images/gallery/2024-05/6fXimage.png) After creating the form the **Form Builder - Edit** screen will appear with three additional tabs that must be completed. **Form Description, Post Form**, and **Questions**. You will also have the option to add an **External Form** field. Ensure you click **Update Form** after each tab is completed to save the form details. ## Form Description External Form By supplying a URL in the External Form field, you can link to other forms created by third-party systems such as Survey Money. The URL must have https:// in front of it. EX: [https://google.ca](https://google.ca/). Adding a URL such as [www.google.ca](http://www.google.ca/) will not work. The **Form Description** tab is pre-filled with the information you submitted on the previous screen. Administrators have the ability to edit the details. ## Post Form The **Post Form** tab is where administrators provide instruction for what happens after the form is completed/submitted by the user. Enable the appropriate checkboxes for the actions that should take place when a user submits the form. If you select the option to **Mail to specified email**, administrators must provide the *Email Subject*, an *'Email To*' address and *'Email From'* address. Enter the message text that you want to appear on the form completion page when a user submits their form. Take Note If you select the option to '**Show the form submission back to the user**', you must copy/paste the following token message into the Completion Text field:
- \[%%FORM\_RESULTS%%\] - ARO user side (user paths end in .aro) - {$FORM\_RESULTS} - PHP user side (user paths end in .php)
## Questions The **Questions Tab** is the area where form questions are entered and the form database is built. Depending on the type of questions that are being asked, administrators will be asked to complete additional fields. Click the **Add** button to add additional questions. As labels/questions are added, they will appear at the top of the screen. The **Switch** image (![](https://ops-com.atlassian.net/wiki/download/attachments/755721/image2015-8-5%2011:57:27.png?version=1&modificationDate=1438775847000&cacheVersion=1&api=v2)) to the left allows administrators to change the order of the labels/questions. The **Edit button** allows administrators to edit label/questions information. - The **label field** is the question/name for the information that is being requested. - The **type field** formats the question based on the type of data that you are requesting (e.g. text field, number field, radio buttons, checkboxes, etc.). - The **Required checkbox** indicates the field must be completed by the user. - The **Tooltip box** allows you to provide a field description for the information you are requesting which can be seen by users when they hover over the fields that need to be completed or for admins reviewing the forms. New in October 2016 Users can now attach files to their form submissions. Click the **Update Form** button to save changes. (TBD) A new tab for **Report Options** becomes available after you update the form. This tab allows administrators to specify how they want to show/hide the form data in their reports. The *first section* allows administrators to specify which of the four fields they want to be able to display on the summary report to help you identify what form entry you want to view. The *second section* allows administrators to specify which of the four fields they want to be able to hide on the summary report if it has a value. This is useful for hiding the forms that have been approved. Take Note Additional fields can be shown in a report by using the **Bulk Actions** button when viewing a form summary report in the List Forms (old forms) option. [![image.png](https://opscom.wiki/uploads/images/gallery/2024-05/scaled-1680-/ySwimage.png)](https://opscom.wiki/uploads/images/gallery/2024-05/ySwimage.png) The form results are found under the Show Forms button or List Forms option in the User Management menu. # List Forms (old forms) ## Getting to Forms Hover over the **'User Management'** icon and then **'Forms'**. Click **'List Forms'.** [![image.png](https://opscom.wiki/uploads/images/gallery/2024-05/scaled-1680-/S0qimage.png)](https://opscom.wiki/uploads/images/gallery/2024-05/S0qimage.png) The '**Form Builde**r' screen is displayed. This table lists all the active forms that have been created. - The '**Add Forms'** button displays the **'Form Builder - Create**' screen. - The '**Show All Forms'** button shows both the active and archived forms. - The '**Edit'** button will display the 'Form builder - Edit' page for the selected form. Administrators can view/edit the details of the form here. The '**View Entries'** button will display a table with the entries that have been submitted by users for the selected form. [![image.png](https://opscom.wiki/uploads/images/gallery/2024-05/scaled-1680-/ySRimage.png)](https://opscom.wiki/uploads/images/gallery/2024-05/ySRimage.png) - The '**Show Hidden'** button will display any entries that have been hidden based on the criteria in the original form set-up under the **Report Options**. - The '**Show All'** button displays both active and hidden entries associated with the selected form. - The **Start Date** and **End Date** allows administrators to filter results based on date, select the **Go** button to update the results. - The **envelope icon** allows administrators to email the user that submitted the form. - The **Delete** button will delete the entry. The '**View'** button allows administrators to view/edit all details submitted on the form by the user and also allows administrators to see the '**Administrator Only**' fields created in the form builder. You can click the **'Prepare Email'** button to send a message back to the user, or you can email the form details to someone else by entering their email address. The **'Bulk Actions'** button allows administrators to create a report showing additional fields that are hidden in the summary report. It will also allow administrators to email the report on the selected form entries to specific administrators, and/or print the form entries. [![image.png](https://opscom.wiki/uploads/images/gallery/2024-05/scaled-1680-/5dbimage.png)](https://opscom.wiki/uploads/images/gallery/2024-05/5dbimage.png) The '**Show Forms**' button displays the active forms. [![image.png](https://opscom.wiki/uploads/images/gallery/2024-05/scaled-1680-/uoJimage.png)](https://opscom.wiki/uploads/images/gallery/2024-05/uoJimage.png) - The '**Copy'** button allows administrators to duplicate a form. Administrators can then edit the form if needed. - The '**Archive'** button allows administrators to hide a form from the listing of active forms. If administrators want to copy, restore, delete or export an archived form, click the '**Show All Forms**' button to display the listing of both active and archived forms. - The '**Export'** button exports all form entries for a selected form into an Excel document. The '**List Forms**' option allows administrators to view/edit all previously created forms. This is also where administrators go to obtain the form results. Hover over the **'User Management'** icon and then **'Forms'**. Click **'List Forms'.** [![image.png](https://opscom.wiki/uploads/images/gallery/2024-05/scaled-1680-/eonimage.png)](https://opscom.wiki/uploads/images/gallery/2024-05/eonimage.png) The '**Form Builde**r' screen is displayed. This table lists all the active forms that have been created. - The '**Add Forms'** button displays the **'Form Builder - Create**' screen. - The '**Show All Forms'** button shows both the active and archived forms. - The '**Edit'** button will display the 'Form builder - Edit' page for the selected form. Administrators can view/edit the details of the form here. [![image.png](https://opscom.wiki/uploads/images/gallery/2024-05/scaled-1680-/yvMimage.png)](https://opscom.wiki/uploads/images/gallery/2024-05/yvMimage.png) The '**View Entries'** button will display a table with the entries that have been submitted by users for the selected form. - The '**Show Hidden'** button will display any entries that have been hidden based on the criteria in the original form set-up under the **Report Options**. - The '**Show All'** button displays both active and hidden entries associated with the selected form. - The **Start Date** and **End Date** allows administrators to filter results based on date, select the **Go** button to update the results. - The **envelope icon** allows administrators to email the user that submitted the form. - The **Delete** button will delete the entry. The '**View'** button allows administrators to view/edit all details submitted on the form by the user and also allows administrators to see the '**Administrator Only**' fields created in the form builder. You can click the **'Prepare Email'** button to send a message back to the user, or you can email the form details to someone else by entering their email address. [![image.png](https://opscom.wiki/uploads/images/gallery/2024-05/scaled-1680-/2jiimage.png)](https://opscom.wiki/uploads/images/gallery/2024-05/2jiimage.png) The **'Bulk Actions'** button allows administrators to create a report showing additional fields that are hidden in the summary report. It will also allow administrators to email the report on the selected form entries to specific administrators, and/or print the form entries. [![image.png](https://opscom.wiki/uploads/images/gallery/2024-05/scaled-1680-/2T0image.png)](https://opscom.wiki/uploads/images/gallery/2024-05/2T0image.png) '**Show Forms**' button displays the active forms. [![image.png](https://opscom.wiki/uploads/images/gallery/2024-05/scaled-1680-/KDVimage.png)](https://opscom.wiki/uploads/images/gallery/2024-05/KDVimage.png) - The '**Copy'** button allows administrators to duplicate a form. Administrators can then edit the form if needed. - The '**Archive'** button allows administrators to hide a form from the listing of active forms. If administrators want to copy, restore, delete or export an archived form, click the '**Show All Forms**' button to display the listing of both active and archived forms. - The '**Export'** button exports all form entries for a selected form into an Excel document. # Locker Management # Locker Search ## Locker Search Hover over the **Lockers** icon and click '**Search**'. [![image.png](https://opscom.wiki/uploads/images/gallery/2024-05/scaled-1680-/sGqimage.png)](https://opscom.wiki/uploads/images/gallery/2024-05/sGqimage.png) The **Locker Search** page will display. Enter the search criteria to get a report and click the **'Retrieve**' button. [![image.png](https://opscom.wiki/uploads/images/gallery/2024-05/scaled-1680-/3hLimage.png)](https://opscom.wiki/uploads/images/gallery/2024-05/3hLimage.png) The search criteria displays below. [![image.png](https://opscom.wiki/uploads/images/gallery/2024-05/scaled-1680-/44timage.png)](https://opscom.wiki/uploads/images/gallery/2024-05/44timage.png) The **Generate Mailing List (from listed data)** button, creates an Excel report with locker numbers and user mailing details. [![image.png](https://opscom.wiki/uploads/images/gallery/2024-05/scaled-1680-/DaBimage.png)](https://opscom.wiki/uploads/images/gallery/2024-05/DaBimage.png) The **gold H** **link** (pictured above) displays the **'Locker History**' screen that shows the entire locker history and links to the locker details and transaction history for that specific locker. If the locker has been rented by more than one user, you will see it listed here. [![image.png](https://opscom.wiki/uploads/images/gallery/2024-05/scaled-1680-/WHPimage.png)](https://opscom.wiki/uploads/images/gallery/2024-05/WHPimage.png) The **User Visible column** indicates whether or not that locker is visible on the user side. If administrators want to make all lockers in the list visible to users, they can click the '**Mark All Available'** button. Alternatively, Admins can use the '**Mark All Not Available'** button to make all lockers in the list invisible to users. Click **'Update Records'** to save the changes. The **Rented, Release, and Switch links** allow Admins to see details about the user who has reserved/rented the locker with a link to view/edit their profile and a link to email the specific user. ***Reserved*** means that the permit has been requested but there is no payment made or promise to pay on file. The **Release link** allows Administrators to disassociate a locker from a user and resell it. - Note: Releasing a locker does not affect the payment transaction. If money needs to be credited back to the user, administrators will need to do a financial adjustment as well. The **Switch link** allows administrators to change the locker number associated with a user, and vice versa. The **Locker # link** displays the '**Current Locker Information'** pop-up window. The condition and reusability of the locker can be updated here and comments can be added. Click the **'Update'** button to save changes. Information about the current renter of the locker is available here as well. [![image.png](https://opscom.wiki/uploads/images/gallery/2024-05/scaled-1680-/6nkimage.png)](https://opscom.wiki/uploads/images/gallery/2024-05/6nkimage.png) # Locker Switch 1\. Hover over the **Locker Management** icon and click **'Locker Switch.**' [![image.png](https://opscom.wiki/uploads/images/gallery/2024-05/scaled-1680-/7wGimage.png)](https://opscom.wiki/uploads/images/gallery/2024-05/7wGimage.png) 2\. Select the **'Old Locker Area**' and the **'Old Locker Number'**. Confirm that it is associated with the correct person. Select the **'New Locker Area'** and the **'New Locker Number'**. Click the **'Switch Old to New**' button to change a person's locker assignment, or click the '**Swap Old with New'** button to swap lockers between two registered users. [![image.png](https://opscom.wiki/uploads/images/gallery/2024-05/scaled-1680-/Fqcimage.png)](https://opscom.wiki/uploads/images/gallery/2024-05/Fqcimage.png) 3\. The **Locker Switch Confirmation** page is displayed. You can type comments in the **Reason for Action** section if needed and click the '**Switch User Locker**' button. [![image.png](https://opscom.wiki/uploads/images/gallery/2024-05/scaled-1680-/jDbimage.png)](https://opscom.wiki/uploads/images/gallery/2024-05/jDbimage.png) 4\. The **'Locker Information Updated**' page is displayed. [![image.png](https://opscom.wiki/uploads/images/gallery/2024-05/scaled-1680-/1kXimage.png)](https://opscom.wiki/uploads/images/gallery/2024-05/1kXimage.png) # Awaiting Payment (Lockers) Hover over the **Lockers** icon and click **'Awaiting Payment'**. [![image.png](https://opscom.wiki/uploads/images/gallery/2024-05/scaled-1680-/RbJ821image.png)](https://opscom.wiki/uploads/images/gallery/2024-05/RbJ821image.png) The **Lockers Awaiting Payment** page displays. The search results are listed. [![image.png](https://opscom.wiki/uploads/images/gallery/2024-05/scaled-1680-/MWEimage.png)](https://opscom.wiki/uploads/images/gallery/2024-05/MWEimage.png) The **Envelope icon** allows administrators to email that user. The **Username link** allows administrators to view/edit that user's profile. The **Email Listed Users button** allows administrators to send a single email message to all users listed in the search results. The **Locker Number link** opens a pop-up window with current locker information. The condition of the locker and the ability to reuse a locker can be updated here. You may also add comments. Click the **'Update**' button to save any changes. [![image.png](https://opscom.wiki/uploads/images/gallery/2024-05/scaled-1680-/TLzimage.png)](https://opscom.wiki/uploads/images/gallery/2024-05/TLzimage.png) The **Building Area link** displays the '**Building Area Information**' pop-up window. This allows administrators to view/edit details about the building area. If you edit any details, Click the '**Update this Area'** button. You can also delete the building area from this window. [![image.png](https://opscom.wiki/uploads/images/gallery/2024-05/scaled-1680-/IWSimage.png)](https://opscom.wiki/uploads/images/gallery/2024-05/IWSimage.png) # Allocate Lockers Hover over the **Lockers Management** icon and select **Allocate.** [![image.png](https://opscom.wiki/uploads/images/gallery/2024-05/scaled-1680-/VNAimage.png)](https://opscom.wiki/uploads/images/gallery/2024-05/VNAimage.png) The **Manage Locker Numbers** page is displayed. When doing your initial configuration, you must start by adding **Buildings** to this list. [![image.png](https://opscom.wiki/uploads/images/gallery/2024-05/scaled-1680-/Klvimage.png)](https://opscom.wiki/uploads/images/gallery/2024-05/Klvimage.png) ## Adding Buildings Click on **Add Building** to begin the process. [![image.png](https://opscom.wiki/uploads/images/gallery/2024-05/scaled-1680-/3nKimage.png)](https://opscom.wiki/uploads/images/gallery/2024-05/3nKimage.png) The **Building Information** screen will appear. Enter the **Building Name** and provide any **Location** information. Click **Save Changes** to continue. [![image.png](https://opscom.wiki/uploads/images/gallery/2024-05/scaled-1680-/lo2image.png)](https://opscom.wiki/uploads/images/gallery/2024-05/lo2image.png) ## Adding Building Areas Once the **Building** is added to your list you may then add a **Building Area**. Click on **Add Area** to continue. [![image.png](https://opscom.wiki/uploads/images/gallery/2024-05/scaled-1680-/4ycimage.png)](https://opscom.wiki/uploads/images/gallery/2024-05/4ycimage.png) *Complete the form*: Enter an **Area Name**, a **Description** and then select the **Locker** **User Types** you wish to allow permission to rent lockers in this building area. Select the **Sales Window** type for this particular **Building Area**. You may choose **Yearly, Monthly, Semester** or **Other**. Click on **Save Changes** to continue. [![image.png](https://opscom.wiki/uploads/images/gallery/2024-05/scaled-1680-/uD8image.png)](https://opscom.wiki/uploads/images/gallery/2024-05/uD8image.png) ## Adding Lockers to a Building Area You may now begin to add lockers to the newly created **Building Area.** Click on the **+** symbol to access the **Add Locker To Area** screen. [![image.png](https://opscom.wiki/uploads/images/gallery/2024-05/scaled-1680-/ootimage.png)](https://opscom.wiki/uploads/images/gallery/2024-05/ootimage.png) The **Add Lockers To Area** screen opens. *There are multiple options in this tool:* You may select **Specific Lockers** where you can add a single locker number in *alphanumeric* format or multiple locker numbers separated by a line return. You may also add lockers by **Locker Range** which will allow you to add a numerical sequence (**Start** and **End**) along with an optional **Prefix** or **Postfix**. **NOTE**: *You may also use a combination of these two methods. In our example we are creating LL001, LL002 and LL006 via the **Specific Locker** method and simultaneously creating a **Locker Range** of LL007 through to LL010.* **ALSO NOTE:** *You may opt to create lockers in an area and temporarily have them not visible to the renter. This would allow an admin to prep an area and put the lockers up for rent at a later date, To do so deselect the **Visible** button.* Click **Add Lockers** to continue. [![image.png](https://opscom.wiki/uploads/images/gallery/2024-05/scaled-1680-/wMtimage.png)](https://opscom.wiki/uploads/images/gallery/2024-05/wMtimage.png) A confirmation screen will appear. Note that in our scenario, all the lockers we created either through **Specific Locker** or **Locker Range** methods are now being created in this Building Area. Click **Add Lockers** to continue. [![image.png](https://opscom.wiki/uploads/images/gallery/2024-05/scaled-1680-/ASfimage.png)](https://opscom.wiki/uploads/images/gallery/2024-05/ASfimage.png) You will be taken back to the **Manage Locker Numbers** screen. To view the entire list of lockers for the new area we have added Click on the **Magnifying Glass Icon**. [![image.png](https://opscom.wiki/uploads/images/gallery/2024-05/scaled-1680-/ARZimage.png)](https://opscom.wiki/uploads/images/gallery/2024-05/ARZimage.png) The **Locker Search** screen appears listing the **7** **lockers** we added to this Building Area. **Note:** *From this screen you may also toggle visibility of any or all of these lockers.* [![image.png](https://opscom.wiki/uploads/images/gallery/2024-05/scaled-1680-/Npuimage.png)](https://opscom.wiki/uploads/images/gallery/2024-05/Npuimage.png) ## Removing Lockers from Building Areas It may be neccesary to remove lockers from a Building Area. They can be either toggled off for visibility or they may also be archived. To archive a locker Click on the **Trash Bin Icon.** There are two choices here. Archive **All Lockers** or archive **Selected Lockers**. "All Lockers" will simply archive all lockers in the Building Area. [![image.png](https://opscom.wiki/uploads/images/gallery/2024-05/scaled-1680-/c8yimage.png)](https://opscom.wiki/uploads/images/gallery/2024-05/c8yimage.png) In this scenario we are choosing to archive selected lockers. Click on **Selected Lockers** to continue. In this example we select lockers **LL001** and **LL002** to archive. Click on the **Archive** button to continue. [![image.png](https://opscom.wiki/uploads/images/gallery/2024-05/scaled-1680-/uXvimage.png)](https://opscom.wiki/uploads/images/gallery/2024-05/uXvimage.png) A confirmation message will appear. [![image.png](https://opscom.wiki/uploads/images/gallery/2024-05/scaled-1680-/sQdimage.png)](https://opscom.wiki/uploads/images/gallery/2024-05/sQdimage.png) ## Restoring Archived Lockers It is also possible to restore lockers that have been archived. To do so use the add locker feature by clicking on the + symbol. In this case we are going to restore lockers **LL001** and **LL002** into this **Lower Level 1** Building Area. [![image.png](https://opscom.wiki/uploads/images/gallery/2024-05/scaled-1680-/2j0image.png)](https://opscom.wiki/uploads/images/gallery/2024-05/2j0image.png) A confirmation screen will appear, Note that the lockers are showing "**restored**" rather than created. [![image.png](https://opscom.wiki/uploads/images/gallery/2024-05/scaled-1680-/PLeimage.png)](https://opscom.wiki/uploads/images/gallery/2024-05/PLeimage.png) # Midnight List (Lockers) 1\. Hover over the **Lockers** icon and click **'Midnight List**.' [![image.png](https://opscom.wiki/uploads/images/gallery/2024-05/scaled-1680-/bEiimage.png)](https://opscom.wiki/uploads/images/gallery/2024-05/bEiimage.png) 2\. The search results are displayed below. [![image.png](https://opscom.wiki/uploads/images/gallery/2024-05/scaled-1680-/IzTimage.png)](https://opscom.wiki/uploads/images/gallery/2024-05/IzTimage.png) The **Username link** will allow administrators to view/edit the user profile. The **Locker Number link** will allow administrators to view/edit details about that locker. 3\. If there are records showing that you do not want to be removed from the system at midnight, disable the checkbox under **'Release at Midnight**' and click the **'Update Selection to be Cleared**' button. # Locker Troubleshooting Basic test for checking if the locker availability is set correctly when using Locker UserTypes. # Locker User Types ### Locker User Types You must create the Locker User types you wish to use in OPS-COM. To do so Hover over **Admin Options** and click **Users**, then select **Locker User Types**. [![image.png](https://opscom.wiki/uploads/images/gallery/2024-05/scaled-1680-/21Oimage.png)](https://opscom.wiki/uploads/images/gallery/2024-05/21Oimage.png) The Manage Locker User Types screen appears listing any existing Locker User Types. The list will include the name of the locker user type, the configured short name, and the number of user records which indicates how many of each user type are in the system. To add a Locker User Type click on the **Add Locker User Type** button. [![image.png](https://opscom.wiki/uploads/images/gallery/2024-05/scaled-1680-/S4yimage.png)](https://opscom.wiki/uploads/images/gallery/2024-05/S4yimage.png) A **Locker User Types** screen will open where you enter the **Name** of the User Type along with the preferred **Short Name**. In our example we are creating a **Public User** with the short name **Public**. [![image.png](https://opscom.wiki/uploads/images/gallery/2024-05/scaled-1680-/Y2fimage.png)](https://opscom.wiki/uploads/images/gallery/2024-05/Y2fimage.png) The Manage Locker User Types screen will refresh. Note that the new user type has been added to the list. NOTE: You can see the new user type that was added has an associated delete button. Locker user types can only be deleted if that have not yet been used. Once a user has been assigned the Public User type as an example, that user type will no longer display the delete button. [![image.png](https://opscom.wiki/uploads/images/gallery/2024-05/scaled-1680-/s58image.png)](https://opscom.wiki/uploads/images/gallery/2024-05/s58image.png) You can assign Locker User Types to any profile by editing the user profile and changing the Locker User Type. [![image.png](https://opscom.wiki/uploads/images/gallery/2024-05/scaled-1680-/9pFimage.png)](https://opscom.wiki/uploads/images/gallery/2024-05/9pFimage.png) ***Please Note, Locker User Types is not editable or viewable on the User Side. These must be assigned by the Admin only.*** You must assigned your Locker user types by editing the Locker **Building Area** and choosing the **Locker User Type** as shown. You may select one or multiple user types. For more on Building Areas please see this wiki article. [![image.png](https://opscom.wiki/uploads/images/gallery/2024-05/scaled-1680-/T1Iimage.png)](https://opscom.wiki/uploads/images/gallery/2024-05/T1Iimage.png) # Locker Sales Windows ## Managing Locker Sales Windows To begin managing locker sales windows hover over the locker management icon followed by **Sales Window** [![image.png](https://opscom.wiki/uploads/images/gallery/2024-05/scaled-1680-/2sHimage.png)](https://opscom.wiki/uploads/images/gallery/2024-05/2sHimage.png) This will take you to the **Manage Locker Sales Window** page. [![image.png](https://opscom.wiki/uploads/images/gallery/2024-05/scaled-1680-/dbMimage.png)](https://opscom.wiki/uploads/images/gallery/2024-05/dbMimage.png) ## Adding Sale Windows To add new locker sales windows click the **Add Sale Window** button found at the top-right of the page. [![image.png](https://opscom.wiki/uploads/images/gallery/2024-05/scaled-1680-/s5pimage.png)](https://opscom.wiki/uploads/images/gallery/2024-05/s5pimage.png) Complete the text fields in the new modal window that appears and hit **Save Changes** when you are finished [![image.png](https://opscom.wiki/uploads/images/gallery/2024-05/scaled-1680-/20Oimage.png)](https://opscom.wiki/uploads/images/gallery/2024-05/20Oimage.png) Click **Save Changes** when you have completed the required fields in the modal window. The sales window will start as **Inactive** until you make the window active again. ## Editing Sales Windows To edit your sales windows simply click the **Edit** button next to the sales window you wish to make changes to. [![image.png](https://opscom.wiki/uploads/images/gallery/2024-05/scaled-1680-/6mvimage.png)](https://opscom.wiki/uploads/images/gallery/2024-05/6mvimage.png) If the sales window has been associated with any sales, you won't be able to make any changes to this sales window and you will have to contact OPS-COM to make these changes for you. Sales windows that cannot be edited will have a faded **Edit** button. [![image.png](https://opscom.wiki/uploads/images/gallery/2024-05/scaled-1680-/M8limage.png)](https://opscom.wiki/uploads/images/gallery/2024-05/M8limage.png) ## Activating Sales Windows Activating sales windows determine whether users can purchase permits in a given building area or not. [![image.png](https://opscom.wiki/uploads/images/gallery/2024-05/scaled-1680-/HWPimage.png)](https://opscom.wiki/uploads/images/gallery/2024-05/HWPimage.png) Once you have activated a locker sales window and sold lockers within that window, marking it as inactive will cause all users to lose the current lockers in that window. You can make that window active again which will display all the lockers on the user's profiles. You are able to have a total of 4 sales windows active at a time by creating windows in **Yearly (Y)**, **Monthly (M)**, **Semester (S)**, and **Other (O)**. ## Purchasing a Locker Using the Sales Window Now that the sales window has been activated it can be used with a building by selecting the building type. This will automatically associate that building to whatever locker sales window is currently active and you only have to worry about managing your sales windows at this point. ## Archiving Past Sales Windows To archive the sales window click the **Archive** button [![image.png](https://opscom.wiki/uploads/images/gallery/2024-05/scaled-1680-/8Asimage.png)](https://opscom.wiki/uploads/images/gallery/2024-05/8Asimage.png) You will then see the sales window moved to the **Past Locker Window** section [![image.png](https://opscom.wiki/uploads/images/gallery/2024-05/scaled-1680-/UQvimage.png)](https://opscom.wiki/uploads/images/gallery/2024-05/UQvimage.png) ## Restoring Sales Windows If you ever need to restore a sales window you can do so by clicking the **Restore** button next to the sales windows found under **Past Locker Sales Window**. Keep in mind you cannot edit these windows if they have lockers associated with them. [![image.png](https://opscom.wiki/uploads/images/gallery/2024-05/scaled-1680-/bcrimage.png)](https://opscom.wiki/uploads/images/gallery/2024-05/bcrimage.png) # Non Returning Users Report ## Accessing the Report To access the **Non-Returning Users Report**, hover over the **Lockers Management** icon, and click **Non-Returning Users Report**. [![image.png](https://opscom.wiki/uploads/images/gallery/2024-05/scaled-1680-/rH5image.png)](https://opscom.wiki/uploads/images/gallery/2024-05/rH5image.png) Click on **Yearly** drop down menu under **Old Semesters**, or whichever type your past sales window was, and chose the **Old** **Sales Window**. Click on **Yearly** drop down menu under **Current Semesters**, or whichever type your current sales window is, and chose the **Current** **Sales Window**. [![image.png](https://opscom.wiki/uploads/images/gallery/2024-05/scaled-1680-/b7ximage.png)](https://opscom.wiki/uploads/images/gallery/2024-05/b7ximage.png) Click on **Search**. A table appears below with users that are not returning. [![image.png](https://opscom.wiki/uploads/images/gallery/2024-05/scaled-1680-/r8aimage.png)](https://opscom.wiki/uploads/images/gallery/2024-05/r8aimage.png) Click on **Export** to download a spreadsheet file containing information from the table. [![image.png](https://opscom.wiki/uploads/images/gallery/2024-05/scaled-1680-/sh3image.png)](https://opscom.wiki/uploads/images/gallery/2024-05/sh3image.png) # ParkAdmin - Parking Management # Lot Administration [![image.png](https://opscom.wiki/uploads/images/gallery/2024-06/scaled-1680-/image.png)](https://opscom.wiki/uploads/images/gallery/2024-06/image.png) - [Pricing and Lot Admin](https://opscom.wiki/books/for-administrators-staff/page/pricing-and-lot-admin) - [Lot groups](https://opscom.wiki/books/for-administrators-staff/page/lot-groups) - [Permit Allocations](https://opscom.wiki/books/for-administrators-staff/page/permit-allocations) - [Setting Up A Lot To Be Visible and Available To The End User](https://opscom.wiki/books/for-administrators-staff/page/setting-up-a-lot-to-be-visible-and-available-to-the-end-user) - [Setup Lots to Use Text2ParkMe](https://opscom.wiki/books/for-administrators-staff/page/setup-lots-to-use-text2parkme) # Pricing and Lot Admin Hover over the **Parking Management** icon: ![](https://ops-com.atlassian.net/wiki/download/thumbnails/754861/image2019-5-24_15-47-1.png?version=1&modificationDate=1558712822000&cacheVersion=1&api=v2&width=44&height=50) and click **Lot Administration** followed by **Pricing & Lot Admin** . [![image.png](https://opscom.wiki/uploads/images/gallery/2024-06/scaled-1680-/IFdimage.png)](https://opscom.wiki/uploads/images/gallery/2024-06/IFdimage.png) The **Permit Pricing & Lot Administration** screen will appear. You can edit the prices and visibility of your lots on this screen. Click the **Show Archived** button to view/edit archived lots. Click the **Excel Export** link to present a report of all the permits in a lot. If you are able to edit the price and the checkbox for visible to users, this indicates that the lot is currently part of an active allocation. To activate an allocation, refer to Allocate Permits documentation. Press the **Save Updates** button when you are finished after making any changes. [![image.png](https://opscom.wiki/uploads/images/gallery/2024-06/scaled-1680-/CEqimage.png)](https://opscom.wiki/uploads/images/gallery/2024-06/CEqimage.png) Click the **Lot Name** link to see details for that lot. Lot info is split into 4 tabs; **General**, **Zone & Location**, **Temporary Parking,** and **Statistics**. Click the **Update this Lot** button to save any changes you make to each tab. ## The General Tab Options available on the **General** Tab are as follows: - The option to Archive the lot by enabling **This lot is archived**. - The option to make the lot visible to site users by enabling **This lot is visible to site users** (If this item is not selected the user does not see the lot in the pick list when purchasing a permit) - **Lot Name:** Enter the full name you wish to use. - **Lot Short Name:** Enter an abbreviated name for the lot based on the lot name - **Lot Access:** Lots can be common lots which mean any user type can park in these lots. If you wish to restrict access to certain user types select **User Type** lot and then select what user types you wish to grant access to. Hold the Ctrl key when clicking on user types to select multiple types at the same time. [![image.png](https://opscom.wiki/uploads/images/gallery/2024-06/scaled-1680-/uuMimage.png)](https://opscom.wiki/uploads/images/gallery/2024-06/uuMimage.png) ## Lot Zones and Locations Options available on the **Zones & Location** tab are as follows: - **Location:** The description supplied here will appear on the user side as the description of where the lot is located. - **Image:** Add an image to the lot. This image will appear beside lots as a small image icon which when clicked by users expands into a larger image. Example: [![image.png](https://opscom.wiki/uploads/images/gallery/2024-06/scaled-1680-/PV7image.png)](https://opscom.wiki/uploads/images/gallery/2024-06/PV7image.png) - **Lot Sales Window:** This setting relates to the sales window applies to the lot (Monthly, Yearly, Semester or Other) - **In the Zone section:** In this section, the admin can configure a zone for this lot. - **Access Card Type:** Indicate what type of access card is required for this lot if any. - **Hang Tag items:** If hang tags are required for this lot toggle these two settings on in order to activate hang tag printing [![image.png](https://opscom.wiki/uploads/images/gallery/2024-06/scaled-1680-/aLhimage.png)](https://opscom.wiki/uploads/images/gallery/2024-06/aLhimage.png) ## Map Detail The admin can configure a map location for each particular lot. This information can be used for developing parking maps and future development. Click on **Create Map Marker** and select the colour of the marker you wish to use. In our case we will logically select Blue. *Note: To clarify, colours are for your own preference in reality. There is no actual connection between the lot name which just happens to be Blue Staff Lot.* Once you have selected a colour, a marker will appear on the map. Drag the marker to the lot location and click on **Update this Lot** to save your marker location. [![image.png](https://opscom.wiki/uploads/images/gallery/2024-06/scaled-1680-/LPdimage.png)](https://opscom.wiki/uploads/images/gallery/2024-06/LPdimage.png) Once the location marker has been set you will notice the **GPS location** for this marker will be automatically populated. [![image.png](https://opscom.wiki/uploads/images/gallery/2024-06/scaled-1680-/xXUimage.png)](https://opscom.wiki/uploads/images/gallery/2024-06/xXUimage.png) ## Standard Permits - **Default Cost:** Enter the base amount charged for this lot - **This Lot Can Be Prorated:** If selected this item gives the admin the ability to sell a permit partway through a sales window time frame where the system will calculate a proration based on the number of days left in the sales window. - **This lot can be used for a second permit:** By default, the system is set to limit a user to one permit. When selected the end user will be able to purchase multiple permits in the lot in question. - **Allow the use of waiting list with this lot:** To enable a waiting list when permits are sold out for that lot. - **Lot Category:** Used with the grouping of wait lists. - **Lot Sales Window:** Select what Sales window type you wish their lot to be part of (Yearly, Monthly, Semester or Other) - **Deposits:** If a deposit is required for this lot, select what type of deposit/s apply to this lot. [![image.png](https://opscom.wiki/uploads/images/gallery/2024-06/scaled-1680-/091image.png)](https://opscom.wiki/uploads/images/gallery/2024-06/091image.png) ## Lot Temporary Parking Options on the **Temporary Parking** tab allow the admin to configure all aspects of temporary parking for this lot. - This lot is for temporary parking only. When toggled on this lot can only be used for temporary parking. - **Max Permits per Day:** Enter the number of temporary parking spots available - **Daily Cost:** Enter the maximum fee a parker will be charged if parking for more than 6 hours in the lot - **Hourly Costs:** Enter the fee amount for temporary parking based on a breakdown of the daily rate (If the lot is meant to be a flat rate regardless of time parked, leave these fields blank) - **Allow temp permits to be used for up to 30 days:** Toggle on to limit temp permits from going over 30 days - **Allow temp permits to be used over 30 days:** Toggle on to allow temp permits to exceed 30 days - **Allow all vehicles on profile to receive the permit:** Toggle on to apply permits to all vehicles on a users profile. (By default the system is set to apply the permit to only the vehicle it is registered under.) - **Over 30 days Monthly Cost: **Enter the fee charged for parking over 30 days Important Note: In the example below we have a dollar value for the entire breakdown by **hour** over a **12 hour** period. This option is incredibly flexible. You may wish to have rates based on packages of an hour at a time as in **Figure 1** below, however you can also choose to offer a breakdown in multiples of larger segments of time. In **Figure 2** for example the end user is able to purchase parking time in increments of **2 hour blocks** at a time. **Figure 1.** [![image.png](https://opscom.wiki/uploads/images/gallery/2024-06/scaled-1680-/4Phimage.png)](https://opscom.wiki/uploads/images/gallery/2024-06/4Phimage.png) Here is the resulting display on the user portal for this 12 hour breakdown. Note the increments are displayed with pricing for each selection of hours a parker can select. In this case we provide maximum select ability for the end user. [![image.png](https://opscom.wiki/uploads/images/gallery/2024-06/scaled-1680-/gWwimage.png)](https://opscom.wiki/uploads/images/gallery/2024-06/gWwimage.png) **Figure 2** [![image.png](https://opscom.wiki/uploads/images/gallery/2024-06/scaled-1680-/4NGimage.png)](https://opscom.wiki/uploads/images/gallery/2024-06/4NGimage.png) Note the resulting change in how the rates are displayed. This concept can be applied to any increment of time. Totally flexible and scalable depending on your business needs. [![image.png](https://opscom.wiki/uploads/images/gallery/2024-06/scaled-1680-/tnZimage.png)](https://opscom.wiki/uploads/images/gallery/2024-06/tnZimage.png) ## Lot LPR Settings - **LPR Lot Group:** Select the lot group this lot belongs to. - **Free Parking Time: **This is considered the **grace period** allowed to give patrons time to register their plate with a pay by plate meter. [![image.png](https://opscom.wiki/uploads/images/gallery/2024-06/scaled-1680-/nDtimage.png)](https://opscom.wiki/uploads/images/gallery/2024-06/nDtimage.png) # Using Permit Proration ## Configuration/Setup In Lot Admin and Pricing go into the lot you wish to setup for **Proration**. On the Standard permit tab select **This lot can be prorated**. [![image.png](https://opscom.wiki/uploads/images/gallery/2024-06/scaled-1680-/OWuimage.png)](https://opscom.wiki/uploads/images/gallery/2024-06/OWuimage.png) This lot is now set for proration. ## Using Proration for Permits Search for a user and bring up their profile. In our example we are looking for the user **mashbury.** Click on the **Parking** tab to begin the process of buying a permit. [![image.png](https://opscom.wiki/uploads/images/gallery/2024-06/scaled-1680-/o3fimage.png)](https://opscom.wiki/uploads/images/gallery/2024-06/o3fimage.png) The **Parking Permit Registration** screen displays. Click on **Standard Parking Permit** for the lot you wish the user to park in. Note the full price for this permit is **$130.00**. [![image.png](https://opscom.wiki/uploads/images/gallery/2024-06/scaled-1680-/FZBimage.png)](https://opscom.wiki/uploads/images/gallery/2024-06/FZBimage.png) The **Confirm Parking Permit Registration** page will display. 1. First choose the permit number you wish to associate with the user. 2. Secondly select the start date for the permit to be valid 3. Once the the permit number and start date are selected you will notice the cost is adjusted accordingly and the label \*prorated is applied. In this case the cost is reduced to **$69.33** from **$100.00** Click on **Purchase this Permit** to continue. [![image.png](https://opscom.wiki/uploads/images/gallery/2024-06/scaled-1680-/fmdimage.png)](https://opscom.wiki/uploads/images/gallery/2024-06/fmdimage.png) The resulting cost of the permit will show in the user's profile both on the Admin Portal as well as the User's Portal. [![image.png](https://opscom.wiki/uploads/images/gallery/2024-06/scaled-1680-/5sGimage.png)](https://opscom.wiki/uploads/images/gallery/2024-06/5sGimage.png) # Lot Groups ## Manage Lot Groups Under the **Admin Options** menu, hover on **Parking**, then click **Manage** **Lot Groups.** [![image.png](https://opscom.wiki/uploads/images/gallery/2024-06/scaled-1680-/pnHimage.png)](https://opscom.wiki/uploads/images/gallery/2024-06/pnHimage.png) You will be redirected to the **Manage Lot Groups** page. [![image.png](https://opscom.wiki/uploads/images/gallery/2024-06/scaled-1680-/Poyimage.png)](https://opscom.wiki/uploads/images/gallery/2024-06/Poyimage.png) To create a new lot group, click the **Add Lot Group** button. [![image.png](https://opscom.wiki/uploads/images/gallery/2024-06/scaled-1680-/Onvimage.png)](https://opscom.wiki/uploads/images/gallery/2024-06/Onvimage.png) A popup box will appear. [![image.png](https://opscom.wiki/uploads/images/gallery/2024-06/scaled-1680-/4xeimage.png)](https://opscom.wiki/uploads/images/gallery/2024-06/4xeimage.png) Type in your desired group name in the text-box. You can also set a **Free Parking** time limit. In this case we are configuring a lot with pay by plate meters. This free parking time frame allows the user time to register their plate at the meter. Set the limit for **Vehicle Counts**. Click **Save Changes** to save this lot group**.** [![image.png](https://opscom.wiki/uploads/images/gallery/2024-06/scaled-1680-/Rtzimage.png)](https://opscom.wiki/uploads/images/gallery/2024-06/Rtzimage.png) Your new lot group will now appear in the list of Lot Groups. [![image.png](https://opscom.wiki/uploads/images/gallery/2024-06/scaled-1680-/eJRimage.png)](https://opscom.wiki/uploads/images/gallery/2024-06/eJRimage.png) To **edit** a Lot Group, select the desired group from the drop-down menu, then click the **Edit** button. [![image.png](https://opscom.wiki/uploads/images/gallery/2024-06/scaled-1680-/VuIimage.png)](https://opscom.wiki/uploads/images/gallery/2024-06/VuIimage.png) The following popup will appear. From there, you can Edit your **group name,** and its **free parking time** as desired, then click **Save Changes** to save. [![image.png](https://opscom.wiki/uploads/images/gallery/2024-06/scaled-1680-/qq0image.png)](https://opscom.wiki/uploads/images/gallery/2024-06/qq0image.png) To **delete** a lot group, Click on the **Delete** button associated with the lot you wish to delete. A popup confirmation message will appear. Click **Delete** to remove the lot group. [![image.png](https://opscom.wiki/uploads/images/gallery/2024-06/scaled-1680-/e88image.png)](https://opscom.wiki/uploads/images/gallery/2024-06/e88image.png) *Note: "Deleting" or "Archiving" is not an action that can be undone. The "Deleted" group will no longer appear on your list, however its data will still exist in your OPS-COM system, as it was connected to permits/parking lot data.* # Planning Lot Groups and Lot Zones # **Overview** [![image.png](https://opscom.wiki/uploads/images/gallery/2024-06/scaled-1680-/c8dimage.png)](https://opscom.wiki/uploads/images/gallery/2024-06/c8dimage.png) ## **Using Groups** **A lot** may only belong to **one** group and there are no parameters around validity beyond the grouping. An example of using a group might be a physical parking lot that is chopped up into virtual smaller lots. Consider we have a huge parking lot that we don't want to put physical barriers into and the lot can accommodate 100 staff and 500 students. In summary, one big physical lot with 600 parking stalls:
- Virtual lot #1: Red staff - 100 permits - Virtual lot #2: Red student - 500 permits
When we are doing enforcement, if we select either of these lots we will get misses or "valid permit but wrong lot" type messages. This will slow down enforcement and is unusable in a automatic chalking scenario. We want to be able to group these lots so that anyone parked in this large area with a valid permit in the listed lots, is seen as valid. We'll call the group "**RED Group**". We can call the group whatever we want, it is just a way to link lots as a textual category. ### Create a Lot Group Adding the group designation is easy, as we just type the words as seen here... [![image.png](https://opscom.wiki/uploads/images/gallery/2024-06/scaled-1680-/W37image.png)](https://opscom.wiki/uploads/images/gallery/2024-06/W37image.png) Once the text has been recorded, the next one (here we see the Red Staff lot) prompts with text that is already in the database. [![image.png](https://opscom.wiki/uploads/images/gallery/2024-06/scaled-1680-/41gimage.png)](https://opscom.wiki/uploads/images/gallery/2024-06/41gimage.png) That's it. Now we have our Red lots grouped on the system. Notice that grouping is just a very simple way to group lots, there is no validation around day or time. It allows an enforcement patrol to select the group of lots that they are patrolling. There is definite similarity to Groups and Zones. Groups are a simple grouping mechanism, while Zones offer more flexibility. **Please Note:**
- groups and zones are free text and not bound by the items they group - a lot can only be a member of one group - a lot can have many zones - grouping is a method to track similar lots
Enforcement allows the selection of: lot group, specific lot, zone or a mix of lot group and zone designation ### **Visual: Adding Groups to a Lot** [![image.png](https://opscom.wiki/uploads/images/gallery/2024-06/scaled-1680-/Lwiimage.png)](https://opscom.wiki/uploads/images/gallery/2024-06/Lwiimage.png) ## **Using Zones**
- Generally use is tied directly to enforcement and the handhelds - A lot may belong to many zones - Different zones can supply different time/date validation parameters (ie. after-4pm, day care, weekend, evenings,...) - Zones are not required and are unnecessary if a permit is valid all day every day with no other validation requirement
It is important to keep in mind that **zones** are useful to designate times and days and/or a date range when a zone is valid; or really when a lot is valid in a zone. When creating a lot, the administrator can ***specify what zones a permit is valid in***. **Please note that permits must have one, and only one lot.** This discussion refers to permits and lots interchangeably, but keep in mind that a 'parker' owns a permit, not a lot. Therefore when a lot has a zone, it implies that a permit has a zone since a permit is one of many entities within a lot. Zones allow us to solve a complex issue such as:
- Different zones can supply different time/date validation parameters (ie. after-4pm, day care, weekend, evenings,...) - Zones are not required and are unnecessary if a permit is valid all day every day with no other validation requirement
Example:
- Permit #1234 belongs to the **Green Lot** (we'll call these users Green Parkers) - Green Parkers can park in the **Green Lot** any day of the week - Green Parkers may also park in the **Red Lot** on Fridays
So we could create a zone and understand that it refers to the **Red Lot .** We can call this the "**RED Zone**" to allow admins, patrols, etc. to connect its use to the Red lot. We can add the **"RED Zone"** to the **Green Lot's** zones through the lot admin tool. We can also specify the days, date range or time when Green Parkers can use this zone. ### Create a Zone At this point, our **Green Lot** has no zones. This is completely valid since the lot would simply fall under a "Any zone" type designation. On the handheld during enforcement, there is no requirement to select a zone, as "**Any Zone**" can be selected. Perhaps validation is at the specific lot or lot group level, with no concern around zoning. Now since we want users to be able to park in the "**Red Zone**" on Fridays, let's add it to the zone list. [![image.png](https://opscom.wiki/uploads/images/gallery/2024-06/scaled-1680-/3W2image.png)](https://opscom.wiki/uploads/images/gallery/2024-06/3W2image.png) [![image.png](https://opscom.wiki/uploads/images/gallery/2024-06/scaled-1680-/PsFimage.png)](https://opscom.wiki/uploads/images/gallery/2024-06/PsFimage.png) So for completeness, we should also add the "**RED Zone**" to the Red lot, and select that anyone in that zone can park any day all day. Remember the name "**RED Zone**" has no real connection other than the word "RED" to the Red lot. [![image.png](https://opscom.wiki/uploads/images/gallery/2024-06/scaled-1680-/fqLimage.png)](https://opscom.wiki/uploads/images/gallery/2024-06/fqLimage.png) We also have a RED staff lot, so we should add the zone to that lot as well. [![image.png](https://opscom.wiki/uploads/images/gallery/2024-06/scaled-1680-/CGvimage.png)](https://opscom.wiki/uploads/images/gallery/2024-06/CGvimage.png) In Summary
- users with RED permits (Student and Staff) are allowed to park in the **"RED Zone**" any day of the week all day - Green Staff permit holders can also park in the **"RED Zone**" but only on Fridays
### **Visual: Adding Zones to a Lot** [![image.png](https://opscom.wiki/uploads/images/gallery/2024-06/scaled-1680-/o94image.png)](https://opscom.wiki/uploads/images/gallery/2024-06/o94image.png) ### Supporting Zones in Other Lots
Lot 5*Support a zone in other lots but not in the current lot.*
[![image.png](https://opscom.wiki/uploads/images/gallery/2024-06/scaled-1680-/mAAimage.png)](https://opscom.wiki/uploads/images/gallery/2024-06/mAAimage.png) This configuration shows Lot 5 supports the zone elsewhere and not in this lot. This stops Lot 6 permit holders from having access to Lot 5 due to zone configuration.
Lot6*Support a zone that is linked with another lot.*
[![image.png](https://opscom.wiki/uploads/images/gallery/2024-06/scaled-1680-/6Crimage.png)](https://opscom.wiki/uploads/images/gallery/2024-06/6Crimage.png) Since Lot 5 supports "Day Care", Lot 5 permit holders can park in this lot on evenings and weekends.
## Usage During Enforcement ### Group Selection on the Handheld [![image.png](https://opscom.wiki/uploads/images/gallery/2024-06/scaled-1680-/iyAimage.png)](https://opscom.wiki/uploads/images/gallery/2024-06/iyAimage.png) ### Zone Selection on The Handheld [![image.png](https://opscom.wiki/uploads/images/gallery/2024-06/scaled-1680-/7Sbimage.png)](https://opscom.wiki/uploads/images/gallery/2024-06/7Sbimage.png) ### Enforcement on the Handheld [![image.png](https://opscom.wiki/uploads/images/gallery/2024-06/scaled-1680-/V5qimage.png)](https://opscom.wiki/uploads/images/gallery/2024-06/V5qimage.png) # Permit Allocations [![image.png](https://opscom.wiki/uploads/images/gallery/2024-06/scaled-1680-/bVKimage.png)](https://opscom.wiki/uploads/images/gallery/2024-06/bVKimage.png) - [Adding Permits to a Lot](https://opscom.wiki/books/for-administrators-staff/page/adding-permits-to-a-lot) - [Single Allocate](https://opscom.wiki/books/for-administrators-staff/page/single-allocate) - [Archiving and Restoring Permits](https://opscom.wiki/books/for-administrators-staff/page/archiving-and-restoring-permits) # Adding Permits to a Lot 1. Go to **Parking Management** main menu and hover over **Lot Administration** to view the drop down menu. Click on **Allocate** [![image.png](https://opscom.wiki/uploads/images/gallery/2024-06/scaled-1680-/Djjimage.png)](https://opscom.wiki/uploads/images/gallery/2024-06/Djjimage.png) 2. Locate the lot you wish to manage. In this case we are using **Lot 1 - Library West Lot** Click on **Add Permits to Lot** [![image.png](https://opscom.wiki/uploads/images/gallery/2024-06/scaled-1680-/YdDimage.png)](https://opscom.wiki/uploads/images/gallery/2024-06/YdDimage.png) 3. The Add permits to lot utility opens. 1. In this field the Administrator can add permits with alphanumerical values as one string. For example Staff01, Staff02 etc can be entered here. 2. In these two fields the Administrator can add a range of permit numbers (1 to 20. 50 to 200 etc) 3. The Administrator also has the ability to add a prefix or postfix to the permit number [![image.png](https://opscom.wiki/uploads/images/gallery/2024-06/scaled-1680-/1Ghimage.png)](https://opscom.wiki/uploads/images/gallery/2024-06/1Ghimage.png) 4. Click **Add Permits** The following confirmation screen will appear: Click **Add Permits** again. [![image.png](https://opscom.wiki/uploads/images/gallery/2024-06/scaled-1680-/iEfimage.png)](https://opscom.wiki/uploads/images/gallery/2024-06/iEfimage.png) 5. A pop-up message will appear, confirming the changes you have made. [![image.png](https://opscom.wiki/uploads/images/gallery/2024-06/scaled-1680-/N00image.png)](https://opscom.wiki/uploads/images/gallery/2024-06/N00image.png) 6. Once the permits are added, your lot should look like the following in the **Permit Search** utility: *Note: The image has been edited to shorten the list. On the actual system you will see a full list of permits.* [![image.png](https://opscom.wiki/uploads/images/gallery/2024-06/scaled-1680-/bpYimage.png)](https://opscom.wiki/uploads/images/gallery/2024-06/bpYimage.png) # Single Allocate 1\. Hover over the **Parking Management** icon and click '**Lot Administration**' then **'Allocate**'. [![image.png](https://opscom.wiki/uploads/images/gallery/2024-06/scaled-1680-/Bz5image.png)](https://opscom.wiki/uploads/images/gallery/2024-06/Bz5image.png) 2\. On the **Allocate** page, Locate the lot you wish to add a single permit to. Click on **Add Permits To Lot**. [![image.png](https://opscom.wiki/uploads/images/gallery/2024-06/scaled-1680-/TEmimage.png)](https://opscom.wiki/uploads/images/gallery/2024-06/TEmimage.png) 3\. The **Add Permit**s screen opens. Enter the single permit number , and select the "**Add Permits**" button. This will add the single permit **0023** to the **123 Main Street Lot**. [![image.png](https://opscom.wiki/uploads/images/gallery/2024-06/scaled-1680-/3b1image.png)](https://opscom.wiki/uploads/images/gallery/2024-06/3b1image.png) # Archiving and Restoring Permits 1. Hover over '**Permit Management'** and click '**Lot Administration**' then '**Allocate**'. [![image.png](https://opscom.wiki/uploads/images/gallery/2024-06/scaled-1680-/hMzimage.png)](https://opscom.wiki/uploads/images/gallery/2024-06/hMzimage.png) 2. We will focus on **Test Lot 2** for this example. [![image.png](https://opscom.wiki/uploads/images/gallery/2024-06/scaled-1680-/bFbimage.png)](https://opscom.wiki/uploads/images/gallery/2024-06/bFbimage.png) 3. The permits in this lot range from **TL2-01** through to **TL2-20**. In this exercise we will archive permits **TL2-01** to **TL2-05**. Click the '**Archive Permits'** drop down menu and choose '**Selected Permits'** as we wish to archive only a portion of the permits in the lot. [![image.png](https://opscom.wiki/uploads/images/gallery/2024-06/scaled-1680-/KCiimage.png)](https://opscom.wiki/uploads/images/gallery/2024-06/KCiimage.png) 4. A popup window will appear, allowing the admin to select the permits that are to be removed from the lot and archived. Click '**Remove'** to begin the process. [![image.png](https://opscom.wiki/uploads/images/gallery/2024-06/scaled-1680-/OoWimage.png)](https://opscom.wiki/uploads/images/gallery/2024-06/OoWimage.png) 5. A confirmation screen will open. Click '**Remove'** to complete the process. [![image.png](https://opscom.wiki/uploads/images/gallery/2024-06/scaled-1680-/hhtimage.png)](https://opscom.wiki/uploads/images/gallery/2024-06/hhtimage.png) 6. A popup message will appear to inform the admin that the process has been completed. [![image.png](https://opscom.wiki/uploads/images/gallery/2024-06/scaled-1680-/6w0image.png)](https://opscom.wiki/uploads/images/gallery/2024-06/6w0image.png) 7. If we look at the list of permits in this lot again, you will notice the 5 permits have been removed. [![image.png](https://opscom.wiki/uploads/images/gallery/2024-06/scaled-1680-/oqeimage.png)](https://opscom.wiki/uploads/images/gallery/2024-06/oqeimage.png) # Restoring Permits To A Lot 1. To restore permits in a lot, the admin can simply add the permits back to the lot. To do so, click '**Add Permits To Lot'**. [![image.png](https://opscom.wiki/uploads/images/gallery/2024-06/scaled-1680-/qSQimage.png)](https://opscom.wiki/uploads/images/gallery/2024-06/qSQimage.png) 2. In this case there are two ways to add these permits back to the lot. Either method will work. A) As individual entries: [![image.png](https://opscom.wiki/uploads/images/gallery/2024-06/scaled-1680-/1eaimage.png)](https://opscom.wiki/uploads/images/gallery/2024-06/1eaimage.png) B) As a range: [![image.png](https://opscom.wiki/uploads/images/gallery/2024-06/scaled-1680-/P3limage.png)](https://opscom.wiki/uploads/images/gallery/2024-06/P3limage.png) 3. Click '**Add Permits'** to begin the process. A confirmation popup will appear. Notice the confirmation message indicates the permit as "**restored**" as opposed to "**created**", which is the terminology used when adding a new permit. [![image.png](https://opscom.wiki/uploads/images/gallery/2024-06/scaled-1680-/2Foimage.png)](https://opscom.wiki/uploads/images/gallery/2024-06/2Foimage.png) 4. A popup message will appear to inform the admin that the process has been completed. [![image.png](https://opscom.wiki/uploads/images/gallery/2024-06/scaled-1680-/cH1image.png)](https://opscom.wiki/uploads/images/gallery/2024-06/cH1image.png) 5. If you look at the list of permits now, you will notice that permits **TL2-01** through **TL2-05** have been restored. [![image.png](https://opscom.wiki/uploads/images/gallery/2024-06/scaled-1680-/ESAimage.png)](https://opscom.wiki/uploads/images/gallery/2024-06/ESAimage.png) # Setting Up A Lot To Be Visible and Available To The End User **IMPORTANT NOTE: Show Only Visible Lots can be toggled on or off.** With the checkbox left unchecked (or in the off position) all lots that are set to Visible on the Lot Administration page will show, as well as lots that are not set to be visible but have an active waiting list. With the box checked (or in the on position) only lots that are set as Visible on the Lot Administration page will show and non-visible lots will not show even if they have an active waiting list. The setting can be found in Manage System Settings in the permits tab. See below. [![image.png](https://opscom.wiki/uploads/images/gallery/2024-06/scaled-1680-/4FLimage.png)](https://opscom.wiki/uploads/images/gallery/2024-06/4FLimage.png) When do we use this? This instruction outlines the six factors that come into play when creating a lot for permit sales that will determine if the lot is visible and available to the user when selecting lots to purchase permits for. ### There are 6 factors that affect lot visibility. 1. **Lot creation** as a **visible lot** 2. Lot must **not be a "Temporary Only Lot"** 3. You must **Allocate permits** to the lot 4. You must create a **Permit Allocation** for the lots you want to be visible: 5. You must **activate** the Permit Allocation 6. User type **must match** lot user type --- ### Factor 1 - Create a lot and select it to be visible Once the allocation is set up we can now create our lot. There are 2 of the 6 factors involved in lot creation. Factor 1 - Simply the creation of the lot itself as a visible lot (checkbox) Factor 2 - Make sure the lot is NOT set to Temporary only From the **Parking Managemen**t Menu hover over **Lot Administration** and select **Pricing & Lot Admin** from the resulting drop down menu. [![image.png](https://opscom.wiki/uploads/images/gallery/2024-06/scaled-1680-/ag9image.png)](https://opscom.wiki/uploads/images/gallery/2024-06/ag9image.png) The **Permit Pricing & Lot Administration** window will open. To create a new lot click on **Add New Lot** in the upper right of the screen. [![image.png](https://opscom.wiki/uploads/images/gallery/2024-06/scaled-1680-/Bt5image.png)](https://opscom.wiki/uploads/images/gallery/2024-06/Bt5image.png) In this scenario we will be setting up a lot with the following data: ### Setting up a Lot as Visible: - Check the box beside "**This lot is visible to site users**" to ensure the lot will be visible on the user side. - Lot Name: Parkade Level 1 - Lot Short Name: PL1 - Default Cost: 530.00 - Check to select This lot can be used for a second permit (This allows end users to have more than one permit in the lot however if space is limited Administrators can limit this to a single permit) - Check to select Allow the use of a waiting list with this lot - Set the Lot category to Parkade Building - LPR Lot Group: Hotel (Note. This is for LPR functionality) Click on **Insert this Lot** to save it. [![image.png](https://opscom.wiki/uploads/images/gallery/2024-06/scaled-1680-/Zmcimage.png)](https://opscom.wiki/uploads/images/gallery/2024-06/Zmcimage.png) [![image.png](https://opscom.wiki/uploads/images/gallery/2024-06/scaled-1680-/0Vcimage.png)](https://opscom.wiki/uploads/images/gallery/2024-06/0Vcimage.png) In the L**ocation tab**, enter a description in the Location field. This information will be visible on the user side when selecting lots. Ensure that *Lot Allocation is set to yearly* so it will be in sync with the Allocation you set up earlier. **Temporary Parking Tab** - You can designate a number of spaces as Temporary Parking. In this example we will set up Temp Parking with the following data: - Max permits per Day: 30 - Daily Cost: 12.00 (This is the maximum fee for parking anything over 6 hours.) - Hourly costs: 2 Hours - 3.00, 4 Hours - 6.00, 6 Hours - 9.00 [![image.png](https://opscom.wiki/uploads/images/gallery/2024-06/scaled-1680-/N8Aimage.png)](https://opscom.wiki/uploads/images/gallery/2024-06/N8Aimage.png) **Statistics Tab** - This tab allows the admin to set certain parameters to the lot. - Total Spaces: 100 - ADA: 10 (These are special needs spots, Handicap, Expectant Mothers, etc.) - Visitor: 20 [![image.png](https://opscom.wiki/uploads/images/gallery/2024-06/scaled-1680-/9ymimage.png)](https://opscom.wiki/uploads/images/gallery/2024-06/9ymimage.png) Click **Update this Lot** to save this configuration. --- ### Factor 3 - Allocate Permits to the lot We will now need to set up Permits for this lot. To access the permit setup. Hover over **Lot Administration** to display the submenu and select **Allocate**. [![image.png](https://opscom.wiki/uploads/images/gallery/2024-06/scaled-1680-/CuCimage.png)](https://opscom.wiki/uploads/images/gallery/2024-06/CuCimage.png) As you can see at this point in the process the lot has been created but there are no permits associated with the lot. [![image.png](https://opscom.wiki/uploads/images/gallery/2024-06/scaled-1680-/C5Rimage.png)](https://opscom.wiki/uploads/images/gallery/2024-06/C5Rimage.png) As a best practice, notice there are gaps between permit numbers in as much as we don't have any lots that permit numbers end and start in sequence. That is to say we don't have a permit numbers 1 through 10 in one lot and then the next lot starts at 11 to 20 for example. Important Note: *Note: It is always a good idea to leave a gap in case the lot changes over time. For example if a series of parking spots were redrawn to allow narrower spots for motorcycle parking,* *the number of spots in a lot would increase. Having the gap allows the administrator to add permits to an existing lot.* In our example we will be allocating 100 permits to the lot numbered 520 through 619. Once you have updated the start and end range for this lot Click Update Lot to submit your changes. A pop up will appear confirming your action. [![image.png](https://opscom.wiki/uploads/images/gallery/2024-06/scaled-1680-/okBimage.png)](https://opscom.wiki/uploads/images/gallery/2024-06/okBimage.png) Upon return to the Permit Number Administration page note that the lot now has permit numbers listed. [![image.png](https://opscom.wiki/uploads/images/gallery/2024-06/scaled-1680-/XgAimage.png)](https://opscom.wiki/uploads/images/gallery/2024-06/XgAimage.png) To view the actual permits click on the **Lot name** (Parkade Level 1) This will display a list of permits as shown below. [![image.png](https://opscom.wiki/uploads/images/gallery/2024-06/scaled-1680-/gGgimage.png)](https://opscom.wiki/uploads/images/gallery/2024-06/gGgimage.png) --- ### Factor 4 - Sales Window (originally known as Permit Allocation) The first step is to Set up Sales Windows. To access **Sales Windows** hover over **Allocations** (The clock icon) and select **Sales Windows** from the drop down menu. [![image.png](https://opscom.wiki/uploads/images/gallery/2024-06/scaled-1680-/gnoimage.png)](https://opscom.wiki/uploads/images/gallery/2024-06/gnoimage.png) The **Permit Allocation Screen** will open. From the Select Allocation drop down select **Insert New Allocation** [![image.png](https://opscom.wiki/uploads/images/gallery/2024-06/scaled-1680-/ZQ6image.png)](https://opscom.wiki/uploads/images/gallery/2024-06/ZQ6image.png) In this example we will create an allocation for a yearly lot using the following data. To do that, click the **"New"** button above the current windows - Allocation Title: 2020 Annual - Allocation Type: Yearly - Sale Start: Jan 1, 2020 - Start Date: Jan 1, 2020 - End Date; Dec 31, 2020 [![image.png](https://opscom.wiki/uploads/images/gallery/2024-06/scaled-1680-/8K0image.png)](https://opscom.wiki/uploads/images/gallery/2024-06/8K0image.png) Click on **Insert New** to submit the allocation. Your resulting screen should go back to the main Sales Window page showing that Window that you have just created. --- ### Factor 5 - Activate the Permit Allocation You will now have to make this allocation active. To do so go back to the **Allocations menu** and select **Active Sales Window**. [![image.png](https://opscom.wiki/uploads/images/gallery/2024-06/scaled-1680-/nV5image.png)](https://opscom.wiki/uploads/images/gallery/2024-06/nV5image.png) Select the allocation you just created by clicking the ***radio button*** beside the allocation title. [![image.png](https://opscom.wiki/uploads/images/gallery/2024-06/scaled-1680-/2FDimage.png)](https://opscom.wiki/uploads/images/gallery/2024-06/2FDimage.png) To activate this allocation click **Update Current Allocation**. [![image.png](https://opscom.wiki/uploads/images/gallery/2024-06/scaled-1680-/7h8image.png)](https://opscom.wiki/uploads/images/gallery/2024-06/7h8image.png) --- ## How To Test That The Lot Is Visible On The User Side. ### Factor 6 - User Type Must Match Lot User Type Keeping in mind this lot is set up as a Full Time Staff lot you will need to log in to the system as a full time staff member to test visibility. Simply put if the user type you are testing does not match the lot user type we set above, the lot will not be visible on the user side. Hover over the **User Management** menu icon and select **User search** from the drop down menu. [![image.png](https://opscom.wiki/uploads/images/gallery/2024-06/scaled-1680-/94simage.png)](https://opscom.wiki/uploads/images/gallery/2024-06/94simage.png) Each standard build of **OPS-COM** has a test user by the name John Doe. We will use this user to test visibility. In the search engine, search for the username: **johndoe.** [![image.png](https://opscom.wiki/uploads/images/gallery/2024-06/scaled-1680-/vblimage.png)](https://opscom.wiki/uploads/images/gallery/2024-06/vblimage.png) To access johndoe's user profile click on his username. [![image.png](https://opscom.wiki/uploads/images/gallery/2024-06/scaled-1680-/SLtimage.png)](https://opscom.wiki/uploads/images/gallery/2024-06/SLtimage.png) Ensure that johndoe's user type is set to **Full Time Staff** for this test, as we have designated the lot as a **Full Time Staff** lot. - Select **Full Time Staff** from the user type drop down - Select Human Resources as the department type (any department type will do) [![image.png](https://opscom.wiki/uploads/images/gallery/2024-06/scaled-1680-/Qx0image.png)](https://opscom.wiki/uploads/images/gallery/2024-06/Qx0image.png) - Click on **Submit Registration Information** for Processing - On the confirmation screen click on I**nformation Correct** - On the next screen click on **Return to Profile** Once back in the user profile scroll down to see the **Auto Login Address.** Click the URL to be automatically logged into the system as johndoe [![image.png](https://opscom.wiki/uploads/images/gallery/2024-06/scaled-1680-/lBkimage.png)](https://opscom.wiki/uploads/images/gallery/2024-06/lBkimage.png) Once you are in the users profile, Click on **Permits**. [![image.png](https://opscom.wiki/uploads/images/gallery/2024-06/scaled-1680-/Mdiimage.png)](https://opscom.wiki/uploads/images/gallery/2024-06/Mdiimage.png) Click **I Agree** on the Disclaimer page. [![image.png](https://opscom.wiki/uploads/images/gallery/2024-06/scaled-1680-/x8Limage.png)](https://opscom.wiki/uploads/images/gallery/2024-06/x8Limage.png) Click on **Standard Parking** to advance to the lot selection screen. [![image.png](https://opscom.wiki/uploads/images/gallery/2024-06/scaled-1680-/Bbfimage.png)](https://opscom.wiki/uploads/images/gallery/2024-06/Bbfimage.png) On the **Standard Permit Registration Page** notice the lot is available to be reserved. [![image.png](https://opscom.wiki/uploads/images/gallery/2024-06/scaled-1680-/p0oimage.png)](https://opscom.wiki/uploads/images/gallery/2024-06/p0oimage.png) # Setup Lots to Use Text2ParkMe 1. Hover over **'Parking Management'** and click **'Lot Administration'** then **'Pricing & Lot Admin'**. [![image.png](https://opscom.wiki/uploads/images/gallery/2024-06/scaled-1680-/ahuimage.png)](https://opscom.wiki/uploads/images/gallery/2024-06/ahuimage.png) 2. The **'Permit Pricing & Lot Administration'** window is displayed. Click on a Lot Name to display the **'Lot Administration'** window. Click on the **'Temporary Parking'** tab. You must fill out all the items in the Red box. Text Code is the display name that users will see when choosing this lot to park in. [![image.png](https://opscom.wiki/uploads/images/gallery/2024-06/scaled-1680-/Lpuimage.png)](https://opscom.wiki/uploads/images/gallery/2024-06/Lpuimage.png) 3. Click the **'Update this Lot'** button to save the changes. # Sales Window Management [![image.png](https://opscom.wiki/uploads/images/gallery/2024-06/scaled-1680-/CwXimage.png)](https://opscom.wiki/uploads/images/gallery/2024-06/CwXimage.png) ## Creating a new Sales Window To create a new Sales Window click **NEW** [![image.png](https://opscom.wiki/uploads/images/gallery/2024-06/scaled-1680-/9PDimage.png)](https://opscom.wiki/uploads/images/gallery/2024-06/9PDimage.png) The **Create New Sales Window** window appears. Enter the information for the new sales window. In this example, we are creating a **yearly** permit sales window with the following information: \- Sale Start Date of December 28th, 2019 *(When the permits will be available to purchase)* \- Active Start Date of January 1st, 2020 *(What date the permit becomes valid)* \- Sale/Active end date of December 31st, 2020 *(What date the permit expires)*
Sale Start DateActive Start DateSale / Active End Date
The day that the permits are on sale and users can begin to purchase permits in the lots that use this sales window.The day the permits become valid (Useable, Scannable, Swipe able, LPR/Handheld Reads, etc.). This allows you to sell your permits in the **Sale Start Date** field but not allow them to be valid until a certain date.The official end date that permits can be sold until, or can be active for, in this sales window. Remember **Active** differs from **Sale**.
[![image.png](https://opscom.wiki/uploads/images/gallery/2024-06/scaled-1680-/F3Oimage.png)](https://opscom.wiki/uploads/images/gallery/2024-06/F3Oimage.png) Click **Create Sales Window** to save your information. It will now appear in the list of possible Sales Windows. [![image.png](https://opscom.wiki/uploads/images/gallery/2024-06/scaled-1680-/WlVimage.png)](https://opscom.wiki/uploads/images/gallery/2024-06/WlVimage.png) In the monthly sales window example below: *Permits with this Active Sales window can be purchased any time between Nov 16, 2019 and Dec 31 2019. These permits would be valid from December 1st 2019 to December 31st 2019.* [![image.png](https://opscom.wiki/uploads/images/gallery/2024-06/scaled-1680-/aQIimage.png)](https://opscom.wiki/uploads/images/gallery/2024-06/aQIimage.png) ## Activating the Sales Window Once the sales window has been configured it needs to be made active. To do so, click on **Active Sales Window** to view the list of current and future sales windows. [![image.png](https://opscom.wiki/uploads/images/gallery/2024-06/scaled-1680-/ni1image.png)](https://opscom.wiki/uploads/images/gallery/2024-06/ni1image.png) The list of sales windows appears. Notice the new sales window we created is now in the list but not yet activated. [![image.png](https://opscom.wiki/uploads/images/gallery/2024-06/scaled-1680-/QcPimage.png)](https://opscom.wiki/uploads/images/gallery/2024-06/QcPimage.png) Select the radio button adjacent to the sales window you wish to activate and click on **Update Current Sales Window.** [![image.png](https://opscom.wiki/uploads/images/gallery/2024-06/scaled-1680-/yE5image.png)](https://opscom.wiki/uploads/images/gallery/2024-06/yE5image.png) # Performing Permit Rollovers ## When to Rollover Permits Patrons who pay by payroll deduction or through credit card purchases can also have their payments processed automatically as part of the rollover process. Before attempting rollovers, please follow the steps in these wiki articles to ensure you have activated the correct Sales Window and that you have your information correctly set up for automatic payments. Read Sales Window Management and Credit Card Management in OPS-COM Performing Permit Rollovers To begin a rollover hover over **Permits** and click **Permit Renewals.** Click **Rollover Users** to launch the **Rollover Wizard utility.** [![image.png](https://opscom.wiki/uploads/images/gallery/2024-06/scaled-1680-/FJbimage.png)](https://opscom.wiki/uploads/images/gallery/2024-06/FJbimage.png) ***Important*** Before a rollover can be performed you must make sure that the new sales window you are rolling into has a start date that is equal to or greater than the end date of your previous sales window. You may perform the steps outlined in the Sales Window Management and Credit Card Management in OPS-COM articles, to show you how you can set up sales windows before performing a rollover. ### Select Rollover Options From the permit Renewal window select the current sales window you are rolling over **from** (From Sales Window) on the left side of the form. [![image.png](https://opscom.wiki/uploads/images/gallery/2024-06/scaled-1680-/EZ2image.png)](https://opscom.wiki/uploads/images/gallery/2024-06/EZ2image.png) Then select the Sales Window you wish to roll the permits into. In our example we are rolling permits from the October Sales Window to the November Sales Window. At this point, we have the ability to select what user types we wish to roll over, or simply leave it as the default of **All User Types.** [![image.png](https://opscom.wiki/uploads/images/gallery/2024-06/scaled-1680-/KUpimage.png)](https://opscom.wiki/uploads/images/gallery/2024-06/KUpimage.png) We also have the ability to select what user types we wish to roll over, or simply leave it as the default of **All User Types.** Click on **Show Lots** to list all lots that can be rolled over in the selected Sales Window. The list of lots will appear below the search form. [![image.png](https://opscom.wiki/uploads/images/gallery/2024-06/scaled-1680-/7KQimage.png)](https://opscom.wiki/uploads/images/gallery/2024-06/7KQimage.png) You may choose to include or excuse specific permits from the rollover. To see the list of permits that you can toggle for renewability click on either the **Holders** or the **Renewing** button. [![image.png](https://opscom.wiki/uploads/images/gallery/2024-06/scaled-1680-/PLRimage.png)](https://opscom.wiki/uploads/images/gallery/2024-06/PLRimage.png) A list of permits in this lot will appear where you can toggle whether you wish to have permits renewable or not. In our example below permits STAFF1000 and STAFF1001 are not renewing and therefore should not roll over. Be sure to click **Update Permits** to save your changes. [![image.png](https://opscom.wiki/uploads/images/gallery/2024-06/scaled-1680-/tk9image.png)](https://opscom.wiki/uploads/images/gallery/2024-06/tk9image.png) Here's the logic used for each column:
StateCurrent Permit Renewing (prevent rollover = 0)User exists in target Sale WindowPermit exists in target Sale WindowNotes
RenewingTrueFalseFalseNeither the user, nor the permit exists, but the current permit is set to be renewed.
BlockedTrueFalseTrueThe permit exists in the target sale window, but the user doesn't. This means anywhere for any permit in the lot. If the user has multiple permits and some of them renewed, then they technically are not blocked. If the user has been given a different permit, they also are not blocked.
RenewedTrueTrueN/AThe user is considered renewed when they exist in the target sale window. Just like the note for blocked, it's not intended to be good for users with multiple permits.
Not RenewingFalseFalseN/AThe user was not found in the target sale window and their permit is also not renewing. This is the expected scenario.
Not Renewing, but ExistsFalseTrueN/AThe user WAS found and their permit is not renewing. This could use some investigation to make sure that the user is supposed to have that permit or not.
Once you have completed this process for all lots you wish to include in the rollover process click on **Renew Permits** to continue. [![image.png](https://opscom.wiki/uploads/images/gallery/2024-06/scaled-1680-/2WIimage.png)](https://opscom.wiki/uploads/images/gallery/2024-06/2WIimage.png) The screen will refresh and update the permit counts. As in our example here you can see in the Company Staff Lot the 3 permits we left toggled on for rollover have indeed rolled over and the 2 permits we toggled as not renewing remain in the **Not Renewed** column. These two permits will now be available to be purchased by new users once your sales window for November is active. [![image.png](https://opscom.wiki/uploads/images/gallery/2024-06/scaled-1680-/xAFimage.png)](https://opscom.wiki/uploads/images/gallery/2024-06/xAFimage.png) ### Permit Processing It is important to note how the permits can be processed after or during the rollover process. The system is set up to automatically roll over permits that have been paid through **gateway payment** types such as **Mastercard, Visa. Payroll Deduction** etc. In this example, Users will be rolled over but will need to make a payment in order to secure their Permit. However, if the user has a payment subscription setup they will be rolled over and the payment will be processed automatically. Note that the **Process Payment** will be automatically toggled on (will be processed) as well as the **Credit Card Type** appears in the button for users that can be processed automatically. If for any reason, the person is not continuing to park in a given lot, simply exclude them from the rollover by unchecking the corresponding checkbox under **Rollover.**
1. Click **Rollover Permits** to complete the process. 2. You will need subscriptions set up for payroll deductions, EFT or credit card payments.
You can prevent permits from rolling over by setting the renewable flag on the permit. ## Exporting Users to Rollover After clicking the **Rollover Permits** we can also choose to export an excel spreadsheet of all the users that are associated with the lot we have selected. To do this we click **Export Users** on the **Permit Rollover** page. [![image.png](https://opscom.wiki/uploads/images/gallery/2024-06/scaled-1680-/MyRimage.png)](https://opscom.wiki/uploads/images/gallery/2024-06/MyRimage.png) This will open a new window that generates the excel document for us to open depending on the browser you are using. You may be warned that the file is corrupt in some way however you should still be able to view the output in Excel's protective view. ## Related Video # Enabling Permit Rollovers without Previous Payment 1. Hover over the **System Config** menu and click **System Settings**. [![image.png](https://opscom.wiki/uploads/images/gallery/2024-06/scaled-1680-/aGsimage.png)](https://opscom.wiki/uploads/images/gallery/2024-06/aGsimage.png) 2. The '**Manage System Settings**' window is displayed. Click **Permits** and disable the checkbox next to '**Require Payment for Rollovers**'. This setting will be on by default. [![image.png](https://opscom.wiki/uploads/images/gallery/2024-06/scaled-1680-/Jftimage.png)](https://opscom.wiki/uploads/images/gallery/2024-06/Jftimage.png) 3. Click the **'Save Settings**' button. 4. Proceed with Rollovers to the next allocation period. # Preventing Permit Rollover after Cancellation Purchase a permit as an Administrator for any user. Locate the permit on the **Profile** page and click the permit button to reveal the **Parking Permit Information** window. [![image.png](https://opscom.wiki/uploads/images/gallery/2024-06/scaled-1680-/1OPimage.png)](https://opscom.wiki/uploads/images/gallery/2024-06/1OPimage.png) Change the **Rollover State** to **Prevent Rollover**. Enter a comment to explain why you are changing the state. This is mandatory. [![image.png](https://opscom.wiki/uploads/images/gallery/2024-06/scaled-1680-/ZWcimage.png)](https://opscom.wiki/uploads/images/gallery/2024-06/ZWcimage.png) Click Update Permit. A message will display to let you know you have changed the flag. [![image.png](https://opscom.wiki/uploads/images/gallery/2024-06/scaled-1680-/5tMimage.png)](https://opscom.wiki/uploads/images/gallery/2024-06/5tMimage.png) You should also add notes to indicate why the flag was changed. [![image.png](https://opscom.wiki/uploads/images/gallery/2024-06/scaled-1680-/KBsimage.png)](https://opscom.wiki/uploads/images/gallery/2024-06/KBsimage.png) The process is almost the same for the user portal. An end user can set their permit to not renewing. Simply find the permit on the User Dashboard and click on the permit button. [![image.png](https://opscom.wiki/uploads/images/gallery/2024-06/scaled-1680-/5suimage.png)](https://opscom.wiki/uploads/images/gallery/2024-06/5suimage.png) Select **Not Renewing** from the dropdown list in Permit Information. [![image.png](https://opscom.wiki/uploads/images/gallery/2024-06/scaled-1680-/Cucimage.png)](https://opscom.wiki/uploads/images/gallery/2024-06/Cucimage.png) When you process the rollovers, this permit will not show up in the list. Instead, it will show up in a separate list called **"Permits that will not be rolled over."** [![image.png](https://opscom.wiki/uploads/images/gallery/2024-06/scaled-1680-/0EDimage.png)](https://opscom.wiki/uploads/images/gallery/2024-06/0EDimage.png) # Rollover: Auto Selection and Automatically Processing Payments ## Using Credit Cards on File to Purchase Recurring Permits There are two prerequisites to this function working correctly for credit card purchases on rollover. The user **must have a valid credit card registered in the system,** and the card must be **designated as the Prime Credit Card**. ***Note:** If you are accepting Credit cards that you wish to charge on rollover, you must have a Gateway that allows you to charge client cards directly. This cannot work for a system that is set for Hosted Payments only.* ## Performing Permit Rollovers Hover over **Permits**, then select **Process Payments for Rollovers**. [![image.png](https://opscom.wiki/uploads/images/gallery/2024-06/scaled-1680-/jAmimage.png)](https://opscom.wiki/uploads/images/gallery/2024-06/jAmimage.png) The **Rollover Payment Processing** page will be displayed as seen in the image below. [![image.png](https://opscom.wiki/uploads/images/gallery/2024-06/scaled-1680-/mBUimage.png)](https://opscom.wiki/uploads/images/gallery/2024-06/mBUimage.png) To select which payments will be done click the check box with the payment type. If the invoice or permit says "None Set" then the user must process the payment to get the permit in the next sales window. [![image.png](https://opscom.wiki/uploads/images/gallery/2024-06/scaled-1680-/6Foimage.png)](https://opscom.wiki/uploads/images/gallery/2024-06/6Foimage.png) Select the '**Process Payments for Rollovers**' button [![image.png](https://opscom.wiki/uploads/images/gallery/2024-06/scaled-1680-/ZTcimage.png)](https://opscom.wiki/uploads/images/gallery/2024-06/ZTcimage.png) # Parking Management Reports [![image.png](https://opscom.wiki/uploads/images/gallery/2024-06/scaled-1680-/igcimage.png)](https://opscom.wiki/uploads/images/gallery/2024-06/igcimage.png) - [Company Permit Report](https://opscom.wiki/books/for-administrators-staff/page/company-permit-report) - [Non-Student Wait List](https://opscom.wiki/books/for-administrators-staff/page/non-student-wait-list) - [Waiting List](https://opscom.wiki/books/for-administrators-staff/page/waiting-list) - [Wait List Report](https://opscom.wiki/books/for-administrators-staff/page/wait-list-report) - [Awaiting Payment - Permits](https://opscom.wiki/books/for-administrators-staff/page/awaiting-payment-permits) - [Student Permit and Postal Export](https://opscom.wiki/books/for-administrators-staff/page/student-permit-and-postal-export) - [Permit Sales by Lot by Month](https://opscom.wiki/books/for-administrators-staff/page/permit-sales-by-lot-by-month) - [Detailed Permit Sales Report by Lot](https://opscom.wiki/books/for-administrators-staff/page/detailed-permit-sales-report-by-lot) - [Permit Sales Report](https://opscom.wiki/books/for-administrators-staff/page/permit-sales-report) - [Active Permits Report](https://opscom.wiki/books/for-administrators-staff/page/active-permits-report) - [Temp Permit Sales Report](https://opscom.wiki/books/for-administrators-staff/page/temp-permit-sales-report) - [Midnight List (Permits)](https://opscom.wiki/books/for-administrators-staff/page/midnight-list-permits) - [Invoiced Permits Report - Billing Summary by Date by Lot](https://opscom.wiki/books/for-administrators-staff/page/invoiced-permits-report-billing-summary-by-date-by-lot) - [Lot Value Report](https://opscom.wiki/books/for-administrators-staff/page/lot-value-report) # Company Permit Report 1. In **Parking Management**, hover over **Permit Management** and click **Reports** then **Company Permit Report**. [![image.png](https://opscom.wiki/uploads/images/gallery/2024-06/scaled-1680-/U6Rimage.png)](https://opscom.wiki/uploads/images/gallery/2024-06/U6Rimage.png) 2. The **Company Permit Report** screen will display. You can filter by **Processed On**/**Active on** dates or by **Company**. Enable the check box if you want to show archived permits in your search results. In this case we are looking for 'Jones Windows'. Enter this in the company box and click **Search**. The active on field is the date that the sales window is active for. [![image.png](https://opscom.wiki/uploads/images/gallery/2024-06/scaled-1680-/AjDimage.png)](https://opscom.wiki/uploads/images/gallery/2024-06/AjDimage.png) 3. Click the **Export** button to create a .CSV file. # Non-Student Wait List 1\. In **Parking Management**, hover over the **'Permit Management'** icon and click '**Waiting Lists**' then **'Non-Student Wait List**'. [![image.png](https://opscom.wiki/uploads/images/gallery/2024-06/scaled-1680-/Cboimage.png)](https://opscom.wiki/uploads/images/gallery/2024-06/Cboimage.png) 2\. The '**Non-Student Wait List**' screen displays. Administrators can view/edit details about a user waiting to purchase a permit in a specific lot. Note, if the record is highlighted in yellow, the user currently has a permit in another lot. Administrators can sort the table by clicking on any of the column headings. [![image.png](https://opscom.wiki/uploads/images/gallery/2024-06/scaled-1680-/yOWimage.png)](https://opscom.wiki/uploads/images/gallery/2024-06/yOWimage.png) The **envelope** icon allows administrators to email the user. The **username** link displays a brief overview of the user's contact information. [![image.png](https://opscom.wiki/uploads/images/gallery/2024-06/scaled-1680-/QPsimage.png)](https://opscom.wiki/uploads/images/gallery/2024-06/QPsimage.png) The **User Profile** icon, allows administrators to view/edit the user's profile. This is also the link that administrators would use if they wanted to sell a permit to the user that is on the waiting list (Click the User Profile icon and click the Parking Tab). The **Add** link allows administrators to add comments to the wait list record. If a comment already exist, an **edit link** will appear allowing administrators to update the comments on file. The '**Toggle Selections'** button allows administrators to select all records. Enable the check box to the left of the record to make individual record selections. The '**Remove Selected From Waiting List'** button allows administrators to remove records from the wait list. Organizations should develop a business rule for when to remove a user from the waiting list, after a user has been emailed or after a permit has been purchased. The '**Email All Listed Users'** button allows administrators to send a single email message to all users listed in the table. The '**Email Selected Users'** button allows administrators to email only those users that they have selected. The '**Export to Excel'** button exports the table as an Excel spreadsheet. # Waiting List ## Managing The Waiting List In **Parking Management**, hover over the **Permit Management** icon and click **Waiting Lists** then **Waiting List**. [![image.png](https://opscom.wiki/uploads/images/gallery/2024-06/scaled-1680-/Vg1image.png)](https://opscom.wiki/uploads/images/gallery/2024-06/Vg1image.png) The **Permit Waiting List** screen is displayed. Administrators can view/edit details about a user waiting to purchase a permit in a specific lot. This screen allows the admin to quickly see: - The user's Rank on the waiting list - The date they were added to the waiting list - The user's name - Their user type - Their city - Phone Number - Comments - The lot they are waiting for a permit in If the record is highlighted in blue, the user does not currently have a permit assigned to them. If the record is highlighted in yellow, the user does currently have a permit assigned but has not yet purchased it. [![image.png](https://opscom.wiki/uploads/images/gallery/2024-06/scaled-1680-/3TRimage.png)](https://opscom.wiki/uploads/images/gallery/2024-06/3TRimage.png) The **User Profile** icon, allows administrators to view/edit the user's profile. This is also the link that administrators would use if they wanted to sell a permit to the user that is on the waiting list (Click the User Profile icon and click the Parking Tab). The **Add** link allows administrators to add comments to the waitlist record. If a comment already exist, an **edit link** will appear allowing administrators to update the comments on file. The '**Toggle Selections'** button allows administrators to select all records. Enable the check box to the left of the record to make individual record selections. The '**Remove Selected From Waiting List'** button allows administrators to remove records from the wait list. Organizations should develop a business rule for when to remove a user from the waiting list, after a user has been emailed or after a permit has been purchased. The '**Email All Listed Users'** button allows administrators to send a single email message to all users listed in the table. The '**Email Selected Users'** button allows administrators to email only those users that they have selected. The '**Export to Excel'** button exports the table as an Excel spreadsheet. # Wait List Report ## Getting to the Wait List Report In **Parking Management**, hover over the **Permit Management** icon and click **Waiting Lists** followed by **Wait List Report**. [![image.png](https://opscom.wiki/uploads/images/gallery/2024-06/scaled-1680-/nDSimage.png)](https://opscom.wiki/uploads/images/gallery/2024-06/nDSimage.png) ## Waitlist Report The **Waiting List Report** screen displays. Administrators can view/edit details about a user waiting to purchase a permit in a specific lot. Note If the record is highlighted in yellow or red, the user currently has a permit in another lot. Administrators can sort the table by clicking on any of the column headings. Keep in mind users can only be on a single waitlist at a time. [![image.png](https://opscom.wiki/uploads/images/gallery/2024-06/scaled-1680-/S0Jimage.png)](https://opscom.wiki/uploads/images/gallery/2024-06/S0Jimage.png) The **username** link displays a brief overview of the user's contact information where you can drill into the user's profile from. [![image.png](https://opscom.wiki/uploads/images/gallery/2024-06/scaled-1680-/QTWimage.png)](https://opscom.wiki/uploads/images/gallery/2024-06/QTWimage.png) The users profile icon ( **![](https://ops-com.atlassian.net/wiki/download/thumbnails/757751/image2019-9-6_11-32-59.png?version=1&modificationDate=1567769579000&cacheVersion=1&api=v2&width=21&height=20)**), allows administrators to view/edit the user's profile. This is also the link that administrators would use if they wanted to sell a permit to the user that is on the waiting list (Click the User Profile icon and click the Parking Tab). Exporting the Waitlist to Excel The **Export to Excel** button exports the table as an Excel spreadsheet. # Awaiting Payment - Permits ## Awaiting Payment Report To begin hover over the '**Permit Management**' icon and click '**Awaiting Payment**'. [![image.png](https://opscom.wiki/uploads/images/gallery/2024-06/scaled-1680-/flximage.png)](https://opscom.wiki/uploads/images/gallery/2024-06/flximage.png) The **'Permits Awaiting Payment'** screen is displayed. The **Envelope** icon allows administrators to email that user if an email is on file. The **Profile** icon allows administrators to view/edit the user's profile. The '**Email Listed'** button allows administrators to send a single email message to all users listed in the table. You will be prompted to enter your message for the body of the email and attach any files to the message. After you send the the email you will get a confirmation that the Mail message has been queued for delivery. [![image.png](https://opscom.wiki/uploads/images/gallery/2024-06/scaled-1680-/PDWimage.png)](https://opscom.wiki/uploads/images/gallery/2024-06/PDWimage.png) You may also want to list awaiting payment by lot. Select the lot you wish to report on from the drop down menu. [![image.png](https://opscom.wiki/uploads/images/gallery/2024-06/scaled-1680-/avXimage.png)](https://opscom.wiki/uploads/images/gallery/2024-06/avXimage.png) From this same screen you can generate an exported file. Used the highlighted buttons to export to Excel, csv,PDF or copy to clipboard. You may also send the report to print from here. [![image.png](https://opscom.wiki/uploads/images/gallery/2024-06/scaled-1680-/HBFimage.png)](https://opscom.wiki/uploads/images/gallery/2024-06/HBFimage.png) The **permit number link** allows administrators to view/edit permit details and process payments. [![image.png](https://opscom.wiki/uploads/images/gallery/2024-06/scaled-1680-/Dssimage.png)](https://opscom.wiki/uploads/images/gallery/2024-06/Dssimage.png) # Student Permit and Postal Export 1\. In **Parking Management**, hover over the **'Permit Management'** icon and click **'Student Permit and Postal Export'.** [![image.png](https://opscom.wiki/uploads/images/gallery/2024-06/scaled-1680-/4QLimage.png)](https://opscom.wiki/uploads/images/gallery/2024-06/4QLimage.png) 2\. This will bring up the **Student Permit and Postal Code Report** page. Enter the start date and end date for the report you want to generate. Select the **Create Report** button to have the report exported to an Excel spreadsheet. The report will look similar to the sample below. [![image.png](https://opscom.wiki/uploads/images/gallery/2024-06/scaled-1680-/5RIimage.png)](https://opscom.wiki/uploads/images/gallery/2024-06/5RIimage.png)
Office Excel: spreadsheet preview is finally here! You can now display this file as a spreadsheet, instead of a PDF. Re-upload StudentPer...305D4644813.xls to display the new preview. [https://ops-com.atlassian.net/wiki/download/attachments/755925/StudentPermit\_11-02-2017\_20305D4644813.xls?api=v2](https://ops-com.atlassian.net/wiki/download/attachments/755925/StudentPermit_11-02-2017_20305D4644813.xls?api=v2) # Permit Sales by Lot by Month 1\. In **Parking Management**, hover over the '**Permit Management**' icon and click '**Reports**' then '**Permit Sales by Lot by Month**'. [![image.png](https://opscom.wiki/uploads/images/gallery/2024-06/scaled-1680-/YFXimage.png)](https://opscom.wiki/uploads/images/gallery/2024-06/YFXimage.png) 2\. The '**Permit Sales by Lot by Month**' screen will display. The current month will automatically be displayed, but you can choose the month you wish to report on. Use the drop-down menus to select the month and year and click the '**Retrieve**' button to get the new report. [![image.png](https://opscom.wiki/uploads/images/gallery/2024-06/scaled-1680-/0d1image.png)](https://opscom.wiki/uploads/images/gallery/2024-06/0d1image.png) # Detailed Permit Sales Report by Lot 1. Hover over **Parking Management, Reports** and click **Detailed Permit Sales Report**. [![image.png](https://opscom.wiki/uploads/images/gallery/2024-06/scaled-1680-/B3rimage.png)](https://opscom.wiki/uploads/images/gallery/2024-06/B3rimage.png) 2. The **Detailed Permit Sales Report by Lot** search screen will display. Enter the date range you wish to report on. In this example we are looking at the month of **October 2018**. Click the **List Payments** button to generate the report. [![image.png](https://opscom.wiki/uploads/images/gallery/2024-06/scaled-1680-/95ximage.png)](https://opscom.wiki/uploads/images/gallery/2024-06/95ximage.png) 3. The screen will refresh with the report listed below the search fields. The first section of the report is grouped by lot and displays the payment details for permits in each specific lot. The second section of the report shows a summary of all lots. - There will be one line item for each permit included on an invoice. If an invoice is only for a single item, it will have a single line. If an invoice has multiple permits, then the report will display a line for each. [![image.png](https://opscom.wiki/uploads/images/gallery/2024-06/scaled-1680-/N6Bimage.png)](https://opscom.wiki/uploads/images/gallery/2024-06/N6Bimage.png) Here is a sample of the information presented for each lot. In this case we are looking at the **Payments for Red Staff Lot West**. [![image.png](https://opscom.wiki/uploads/images/gallery/2024-06/scaled-1680-/yM3image.png)](https://opscom.wiki/uploads/images/gallery/2024-06/yM3image.png) The **Summary by Lot** section appears as follows, listing each lot with total sales amounts for each lot. [![image.png](https://opscom.wiki/uploads/images/gallery/2024-06/scaled-1680-/rPZimage.png)](https://opscom.wiki/uploads/images/gallery/2024-06/rPZimage.png) 4. The report can also be exported to excel. The excel report looks like this: [![image.png](https://opscom.wiki/uploads/images/gallery/2024-06/scaled-1680-/4jOimage.png)](https://opscom.wiki/uploads/images/gallery/2024-06/4jOimage.png) # Permit Sales Report In **Parking Management**, hover over the **'Permit Management**' icon and click '**Reports'** then '**Permit Sales Report**'. [![image.png](https://opscom.wiki/uploads/images/gallery/2024-06/scaled-1680-/FYZimage.png)](https://opscom.wiki/uploads/images/gallery/2024-06/FYZimage.png) The **'Permit Sales Report**' screen will display. Select the ***user type(s)*** and ***allocation type(s)*** you want to include in the report. Hold Ctrl and click to select more than one. Enable the check box if you want to show archived sales (this includes all released or switched permits). Choose the start date and end date and click the '**Create Report**' button. The report will display under the search criteria. Click the '**View Details in Excel**' button to export the table. [![image.png](https://opscom.wiki/uploads/images/gallery/2024-06/scaled-1680-/XFuimage.png)](https://opscom.wiki/uploads/images/gallery/2024-06/XFuimage.png) # Active Permits Report ## Navigating to the Report In **Parking Management**, hover over the **Permit Management** icon and click **Reports** then **Active Permit Report**. [![image.png](https://opscom.wiki/uploads/images/gallery/2024-06/scaled-1680-/otNimage.png)](https://opscom.wiki/uploads/images/gallery/2024-06/otNimage.png) The **Active Permit Report** screen will display. ## Searching the Report Select the ***user type(s)*** and ***allocation type(s)*** you want to include in the report. Hold Ctrl and click to select more than one item at a time. Enable the **Show Archived** checkbox if you want to show archived sales (this includes all released or switched permits). Choose the start date and end date and click the **Search** button. The report will display under the search criteria. [![image.png](https://opscom.wiki/uploads/images/gallery/2024-06/scaled-1680-/qOeimage.png)](https://opscom.wiki/uploads/images/gallery/2024-06/qOeimage.png) ## Exporting the Details into Excel Simply click the **Export** button to export the report into an excel file. [![image.png](https://opscom.wiki/uploads/images/gallery/2024-06/scaled-1680-/aCHimage.png)](https://opscom.wiki/uploads/images/gallery/2024-06/aCHimage.png) # Temp Permit Sales Report Under **Parking Management**, hover over the **Permit Management** icon and click **Reports** followed by **Temp Permit Sales Report.** [![image.png](https://opscom.wiki/uploads/images/gallery/2024-06/scaled-1680-/VnCimage.png)](https://opscom.wiki/uploads/images/gallery/2024-06/VnCimage.png) **The Temp Permit Sales Report screen will display. Select the Report Start Date and Up to and including dates as well as the Payment As which will allow you to search for processed or none processed lockers.** [![image.png](https://opscom.wiki/uploads/images/gallery/2024-06/scaled-1680-/ddcimage.png)](https://opscom.wiki/uploads/images/gallery/2024-06/ddcimage.png) **Select Create Report when you are finished supplying the information above. This will display any lots that have been used for a temporary permit. The total amount paid or owing for that lot is also shown under the Total Amount.** [![image.png](https://opscom.wiki/uploads/images/gallery/2024-06/scaled-1680-/YY5image.png)](https://opscom.wiki/uploads/images/gallery/2024-06/YY5image.png) Click the **Lot Name** link to view additional details about who has purchased temporary permits in that particular lot. [![image.png](https://opscom.wiki/uploads/images/gallery/2024-06/scaled-1680-/Yruimage.png)](https://opscom.wiki/uploads/images/gallery/2024-06/Yruimage.png) You can also export the information displayed on the report by clicking **Export to Excel**. This will only display lot names, total permits, and total amounts. [![image.png](https://opscom.wiki/uploads/images/gallery/2024-06/scaled-1680-/rYKimage.png)](https://opscom.wiki/uploads/images/gallery/2024-06/rYKimage.png) # Midnight List (Permits) In **Parking Management**, hover over the **Permits** icon and click '**Reports**' then **'Midnight List'**. [![image.png](https://opscom.wiki/uploads/images/gallery/2024-06/scaled-1680-/bVgimage.png)](https://opscom.wiki/uploads/images/gallery/2024-06/bVgimage.png) As the name implies unpaid permit items are cleared automatically at midnight if they are on the list. From UI on Admin side, you may: See items to be cleared Email the affected users Clear their flag to take them off the list and update the list This is a list of permits that will be cleared at midnight. [![image.png](https://opscom.wiki/uploads/images/gallery/2024-06/scaled-1680-/SSuimage.png)](https://opscom.wiki/uploads/images/gallery/2024-06/SSuimage.png) Note: In order for the midnight list to function it must be triggered by a Task Scheduler. This scheduler is set to off as default. To request the midnight list to be turned on contact OPS-COM Support. # Invoiced Permits Report - Billing Summary by Date by Lot
**Permit Invoicing**
## Searching for an Invoice
1. Click **Allocations > Invoice Search**. [![image.png](https://opscom.wiki/uploads/images/gallery/2024-06/scaled-1680-/lnHimage.png)](https://opscom.wiki/uploads/images/gallery/2024-06/lnHimage.png) 2. The '**Search for Invoices**' screen displays. You can search for a specific invoice or for an invoice issued during a range of dates. You can also eliminate canceled or paid invoices from the search parameters. In this case we are searching for a date range. [![image.png](https://opscom.wiki/uploads/images/gallery/2024-06/scaled-1680-/OEIimage.png)](https://opscom.wiki/uploads/images/gallery/2024-06/OEIimage.png) 3. Click on an ***invoice number*** to see a copy of the invoice that will be sent to the client. **Note:** If you wish to print this you can right click and print it out of your browser. You can also print to a PDF if required. [![image.png](https://opscom.wiki/uploads/images/gallery/2024-06/scaled-1680-/fAUimage.png)](https://opscom.wiki/uploads/images/gallery/2024-06/fAUimage.png) 4. You can also export this report to Excel. This will show you the revenue for a selected date range by Lot. [![image.png](https://opscom.wiki/uploads/images/gallery/2024-06/scaled-1680-/BXoimage.png)](https://opscom.wiki/uploads/images/gallery/2024-06/BXoimage.png)
## Re-Sending an Invoice When do we use this? It is also possible to **re-send** an invoice if the client requests a second copy sent. If for example the client mistakenly deleted the email, the admin has the ability to search up the original invoice and send it again. In our sample here we are looking for an invoice for **Voula Costa**.
1. To do so there are two different methods. You can find the invoice in the **user's profile under History** or you can search for the invoice through the **Search Invoice** utility. 2. Firstly let's search the user in question: In this case using the last name **Costa**. [![image.png](https://opscom.wiki/uploads/images/gallery/2024-06/scaled-1680-/3w2image.png)](https://opscom.wiki/uploads/images/gallery/2024-06/3w2image.png) 3. Click on the **username** to access the user's profile. [![image.png](https://opscom.wiki/uploads/images/gallery/2024-06/scaled-1680-/EHCimage.png)](https://opscom.wiki/uploads/images/gallery/2024-06/EHCimage.png) 4. Once in the user's profile hover over **History** and click on **All Records** to access the list of this user's transactions. [![image.png](https://opscom.wiki/uploads/images/gallery/2024-06/scaled-1680-/Rf9image.png)](https://opscom.wiki/uploads/images/gallery/2024-06/Rf9image.png) 5. Locate and click on the **invoice number** that you wish to resend. [![image.png](https://opscom.wiki/uploads/images/gallery/2024-06/scaled-1680-/2HEimage.png)](https://opscom.wiki/uploads/images/gallery/2024-06/2HEimage.png) 6. Once in the invoice preview you will notice the **Re-Send Email** button. Click on this button to re-send the invoice. [![image.png](https://opscom.wiki/uploads/images/gallery/2024-06/scaled-1680-/Dr6image.png)](https://opscom.wiki/uploads/images/gallery/2024-06/Dr6image.png) 7. The invoice will be re-sent. In the sample below there is an original invoice send as well as a re-send. Notice the email title for the re-send has a prefix added indicating this is a **Re-sent** invoice. [![image.png](https://opscom.wiki/uploads/images/gallery/2024-06/scaled-1680-/soRimage.png)](https://opscom.wiki/uploads/images/gallery/2024-06/soRimage.png) 8. As mentioned above you can also find the invoice you wish to resend using the **Invoice Search tool**. To do so access the tool under the **Permits** menu. Hover over **Permits** and click on **Invoice Search** in the drop down menu. [![image.png](https://opscom.wiki/uploads/images/gallery/2024-06/scaled-1680-/zcoimage.png)](https://opscom.wiki/uploads/images/gallery/2024-06/zcoimage.png) 9. In the search criteria window enter the **Invoice Number** in question and click search. In this case **Invoice Number 1018**. [![image.png](https://opscom.wiki/uploads/images/gallery/2024-06/scaled-1680-/01Uimage.png)](https://opscom.wiki/uploads/images/gallery/2024-06/01Uimage.png) 10. From the resulting search result click on the **Invoice Number** to access the **Invoice Preview Window**. [![image.png](https://opscom.wiki/uploads/images/gallery/2024-06/scaled-1680-/qRwimage.png)](https://opscom.wiki/uploads/images/gallery/2024-06/qRwimage.png) 11. The process after this point is identical to **step 6 and 7** **above**. 12. The Re-Sent Invoice will look identical the original invoice format: [![image.png](https://opscom.wiki/uploads/images/gallery/2024-06/scaled-1680-/hDvimage.png)](https://opscom.wiki/uploads/images/gallery/2024-06/hDvimage.png)
## Printing From Emailed PDF
1. It is important to note that in order to print this PDF document you should follow these next steps 2. You must first navigate to the email of the invoice in the client email where you will find an attachments link circled below [![image.png](https://opscom.wiki/uploads/images/gallery/2024-06/scaled-1680-/dTAimage.png)](https://opscom.wiki/uploads/images/gallery/2024-06/dTAimage.png) 3. After opening the attached PDF file you will be brought to the file opened in the web browser. [![image.png](https://opscom.wiki/uploads/images/gallery/2024-06/scaled-1680-/Qycimage.png)](https://opscom.wiki/uploads/images/gallery/2024-06/Qycimage.png) 4. If you print form here you will receive a cut off version of this PDF. In order to prevent this you should download the file by pressing this button: [![image.png](https://opscom.wiki/uploads/images/gallery/2024-06/scaled-1680-/jvoimage.png)](https://opscom.wiki/uploads/images/gallery/2024-06/jvoimage.png) 5. Save it to your preferred location and open it with the PDF reader of your choosing [![image.png](https://opscom.wiki/uploads/images/gallery/2024-06/scaled-1680-/czT0EDimage.png)](https://opscom.wiki/uploads/images/gallery/2024-06/czT0EDimage.png) 6. From here you just print the invoice like you would a normal document ensuring that the print scale is set to 100% [![image.png](https://opscom.wiki/uploads/images/gallery/2024-06/scaled-1680-/v5wimage.png)](https://opscom.wiki/uploads/images/gallery/2024-06/v5wimage.png)
# Lot Value Report In **Parking Management**, click '**Reports'** then '**Lot Value Report**'. [![image.png](https://opscom.wiki/uploads/images/gallery/2024-06/scaled-1680-/d8Fimage.png)](https://opscom.wiki/uploads/images/gallery/2024-06/d8Fimage.png) The **'Lot Usage**' screen will display. You will see the number of Rented permits vs the Total Available permits expressed as a percentage under Utilization. The Total Value of the rented permits will also be displayed. This report can also be exported to excel for further data manipulation. [![image.png](https://opscom.wiki/uploads/images/gallery/2024-06/scaled-1680-/zTVimage.png)](https://opscom.wiki/uploads/images/gallery/2024-06/zTVimage.png) # Managed Wait List ## Set Up To set up the system to be able to use this you need to set up 3 settings 1. Select the cog menu item, then System Settings [![image.png](https://opscom.wiki/uploads/images/gallery/2024-06/scaled-1680-/KV1image.png)](https://opscom.wiki/uploads/images/gallery/2024-06/KV1image.png) 2. Select Permits [![image.png](https://opscom.wiki/uploads/images/gallery/2024-06/scaled-1680-/173image.png)](https://opscom.wiki/uploads/images/gallery/2024-06/173image.png) 3. To enable this functionality, enable the 'Enable Managed Waitlist' checkbox, enter admin emails into the Waitlist Email Managers field, then enter the amount of time that is being given to users to purchase permits in the Waitlist Reservation Duration box. [![image.png](https://opscom.wiki/uploads/images/gallery/2024-06/scaled-1680-/Qggimage.png)](https://opscom.wiki/uploads/images/gallery/2024-06/Qggimage.png) ## Assigning a User a Permit from the Wait list When a permit becomes available in a lot with a wait list admin will be notified and the permit will be reserved for the people on the wait list. The admin can then go into the OPS-COM system and assign the permit to a person who is on the wait list. 1. Open the Parking Management menu option, then select Waiting lists. Select Student or Non-Stu Wait List depending on which user types you are managing the wait lists for. [![image.png](https://opscom.wiki/uploads/images/gallery/2024-06/scaled-1680-/84Nimage.png)](https://opscom.wiki/uploads/images/gallery/2024-06/84Nimage.png) 2. The Waiting List scree opens. [![image.png](https://opscom.wiki/uploads/images/gallery/2024-06/scaled-1680-/S6Cimage.png)](https://opscom.wiki/uploads/images/gallery/2024-06/S6Cimage.png) 3. Select **Assign** to associate the selected user to the permit you wish them to have. [![image.png](https://opscom.wiki/uploads/images/gallery/2024-06/scaled-1680-/RPZimage.png)](https://opscom.wiki/uploads/images/gallery/2024-06/RPZimage.png) ## Releasing an Assigned Permit When a user passes the allocated amount of time to pay for the permit they have been assigned the admin will be sent an email. The admin then has the option to release the permit, so that it can be assigned again or to Extend the users time to pay for the permit. 1. From the Waiting List page, select the permit icon beside the user name. [![image.png](https://opscom.wiki/uploads/images/gallery/2024-06/scaled-1680-/k4Timage.png)](https://opscom.wiki/uploads/images/gallery/2024-06/k4Timage.png) 2. From the Parking Permit Information page, select Release Permit [![image.png](https://opscom.wiki/uploads/images/gallery/2024-06/scaled-1680-/rD3image.png)](https://opscom.wiki/uploads/images/gallery/2024-06/rD3image.png) ## Extending a Users Time to Purchase the Permit 1. From the Wait List page, select the information icon beside the permit number [![image.png](https://opscom.wiki/uploads/images/gallery/2024-06/scaled-1680-/fcpimage.png)](https://opscom.wiki/uploads/images/gallery/2024-06/fcpimage.png) 2. From the Parking Permit Information page, select Extend [![image.png](https://opscom.wiki/uploads/images/gallery/2024-06/scaled-1680-/Dboimage.png)](https://opscom.wiki/uploads/images/gallery/2024-06/Dboimage.png) # Permit Search In **Parking Management**, hover over the **Permit Management** icon and click '**Permit Search**': [![image.png](https://opscom.wiki/uploads/images/gallery/2024-06/scaled-1680-/Spdimage.png)](https://opscom.wiki/uploads/images/gallery/2024-06/Spdimage.png) Enter the search criteria. If you are looking for ***Archived Permit Data***, enable the **checkbox**. Click the '**Retrieve**' button. The results will display below the search criteria. [![image.png](https://opscom.wiki/uploads/images/gallery/2024-06/scaled-1680-/Acyimage.png)](https://opscom.wiki/uploads/images/gallery/2024-06/Acyimage.png) Toggle More Options Additional permit search options can be found under the "Toggle More Options" button and you can pin these additional options so they appear on the default permit search page next time without having to go into the toggle more options area. Example: [![image.png](https://opscom.wiki/uploads/images/gallery/2024-06/scaled-1680-/uaKimage.png)](https://opscom.wiki/uploads/images/gallery/2024-06/uaKimage.png) ## Include Only Active You are also able to search by active permits only using the **Include Only Active Permits** check box. A drop-down menu allows administrators to pick from a variety of reports to be generated. Select the report you want and click the '**Perform Selected Action**' button. The reports include: - - Generate Mailing List (from listed data) - Generate User Usage Report - Send Email to Permit Users - Generate Status Report - Generate Permits for Printing The **Clock** link displays the Permit History screen that shows the entire permit history and links to the permit details and transaction history for that specific permit. If the permit has been rented by more than one user, you will see more than one user listed here. The **Toggle Availability** column indicates whether or not that specific permit is visible on the user side. If the checkbox is enabled, the permit is visible to purchase. If the checkbox is disabled, the permit is not visible for purchase. Permits can be marked 'Visible' individually or in bulk by using the 'Mark all Available' or 'Mark all Not Available' buttons. Click the 'Update Records' button to save any changes made. The **Reserved/Rented** link displays details about the user who has reserved/rented the permit with a link to view/edit their profile and a link to email the specific user. Reserved means that the permit has been requested but there is no payment made or promise to pay on file yet. Rented means the permit has been reserved and a promise to pay is on file.
- **Requested** is when a user has selected an item but has not yet selected how it will be paid for - **Reserved** is when there is an associated unprocessed payment (promise to pay; eg. cheque) - **Rented** is when the payment is processed and linked to a processed payment
## Permit Counts Explained When viewing your Permits either in permit search or the listing in Permit Allocate there is a legend across the top that indicates a count for various states of permits in the lot. - **Total** = Total found by search - **Requested** = State is Good, Payment is Null, User associated to permit - **Rented/Reserved** = State is Good, Payment associated (doesn't have to be processed) - **Visible To User** = State is Good, Lot & Permit is Visible, No user associated - **Visible to Admins** = State is Good, Lot OR **Permit is Hidden**, No User associated - There's an option that is available that may show another number with Visible to Admins: State is Good, Lot OR Permit is Hidden, User IS associated. - **Unavailable** = State is Not Good or Valid Or Usable. [![image.png](https://opscom.wiki/uploads/images/gallery/2024-06/scaled-1680-/ikAimage.png)](https://opscom.wiki/uploads/images/gallery/2024-06/ikAimage.png) The **Release** link allows administrators to disassociate a permit from a user. This allows it to be resold. Take Note
Releasing a permit does not affect the payment transaction. If money needs to be refunded, administrators must do a financial adjustment as well.
The switch **link[ ](https://wiki.ops-com.com/display/OCPUBLIC/Locker+Switch)**allows administrators to change the permit number associated with a user. The **Permit Number** link displays the 'Parking Permit Information' screen. On this screen you can change the Permit State and look at the User Profile associated with this permit. You can also see the Payment Details. If the payment has been received you can click on the 'Processed Date' link to view more details. Click the 'Update Permit State' button to save any changes you make. [![image.png](https://opscom.wiki/uploads/images/gallery/2024-06/scaled-1680-/LUAimage.png)](https://opscom.wiki/uploads/images/gallery/2024-06/LUAimage.png) # Permit Switch #### Performing Permit Switches Between Permits [![image.png](https://opscom.wiki/uploads/images/gallery/2024-06/scaled-1680-/gfmimage.png)](https://opscom.wiki/uploads/images/gallery/2024-06/gfmimage.png) Select the lot that the user's permit is currently in, and select their current permit number. In the **Current Permit** field select the permit number you wish to switch. In the **New Permit Lot** we select the lot that we are switching the permit to. Permits that are already rented by other users will appear with a color highlight along with the username who owns the permit as you can see in the image below. The Blue highlight indicates the line item you are hovering over in order to make your selection. [![image.png](https://opscom.wiki/uploads/images/gallery/2024-06/scaled-1680-/fVBimage.png)](https://opscom.wiki/uploads/images/gallery/2024-06/fVBimage.png) The resulting screen will look like this image seen below when the permits have been selected. Click on **Switch two permits** to enact the process. You can review the changes and select weather to choose the **Full Price** or **Prorated Price**. You need to complete the **Reason for Action** and click the **Switch User Permit** button to confirm the changes. [![image.png](https://opscom.wiki/uploads/images/gallery/2024-06/scaled-1680-/6uUimage.png)](https://opscom.wiki/uploads/images/gallery/2024-06/6uUimage.png) If the permit values are the same then the differences will not display, however, if the values are not the same then you will be shown the difference between both the prorated and the full price of the permits being switch. [![image.png](https://opscom.wiki/uploads/images/gallery/2024-06/scaled-1680-/vKPimage.png)](https://opscom.wiki/uploads/images/gallery/2024-06/vKPimage.png) Once the permit switch has been completed you a new window will display. [![image.png](https://opscom.wiki/uploads/images/gallery/2024-06/scaled-1680-/Q80image.png)](https://opscom.wiki/uploads/images/gallery/2024-06/Q80image.png) **Important Things To Note:** Notice there is a cost difference between the two lots. The system will calculate the difference. In this case the lot we are moving to is less cost resulting in a credit that is listed at the bottom of the screen in Green. The credit will show in the users profile as follows. [![image.png](https://opscom.wiki/uploads/images/gallery/2024-06/scaled-1680-/baximage.png)](https://opscom.wiki/uploads/images/gallery/2024-06/baximage.png) ## Moving Permits from One User to the Next Moving permits from one user to the next will not carry over any invoices. [![image.png](https://opscom.wiki/uploads/images/gallery/2024-06/scaled-1680-/DhFimage.png)](https://opscom.wiki/uploads/images/gallery/2024-06/DhFimage.png) In this scenario, we are switching permit number between James Rockwood (Permit 60) with Mashbury (Permit 59). Start by searching for your current permit holder and click **Search** followed by **Select**. [![image.png](https://opscom.wiki/uploads/images/gallery/2024-06/scaled-1680-/HC0image.png)](https://opscom.wiki/uploads/images/gallery/2024-06/HC0image.png) All of the permits that user currently owns will be displayed along with the second user search input field. Select the permit you want to switch and add the second user to the search field followed by **Search** [![image.png](https://opscom.wiki/uploads/images/gallery/2024-06/scaled-1680-/nYRimage.png)](https://opscom.wiki/uploads/images/gallery/2024-06/nYRimage.png) Click **Move Permit** followed by **Ok** to confirm the permit move. In this example we will be moving the permit 59 to James Rockwood. [![image.png](https://opscom.wiki/uploads/images/gallery/2024-06/scaled-1680-/aSHimage.png)](https://opscom.wiki/uploads/images/gallery/2024-06/aSHimage.png) The permit will be automatically moved from the selected user to the next after the confirmation alert box has been confirmed. # Releasing a Permit 1. If you know the permit number perform a permit search. If you do not know the permit number, go to the user profile for whom you wish to release a permit. Click on the **permit number** on the user dashboard. [![image.png](https://opscom.wiki/uploads/images/gallery/2024-06/scaled-1680-/Qt7image.png)](https://opscom.wiki/uploads/images/gallery/2024-06/Qt7image.png) 2. From the permit detail click on the **permit number.** [![image.png](https://opscom.wiki/uploads/images/gallery/2024-06/scaled-1680-/xpNimage.png)](https://opscom.wiki/uploads/images/gallery/2024-06/xpNimage.png) 3. You will be taken to permit search where you can release the permit [![image.png](https://opscom.wiki/uploads/images/gallery/2024-06/scaled-1680-/oKzimage.png)](https://opscom.wiki/uploads/images/gallery/2024-06/oKzimage.png) 4. It is advisable to leave a comment in order to track the reason the permit was released. Click **Release This Permit.** [![image.png](https://opscom.wiki/uploads/images/gallery/2024-06/scaled-1680-/tssimage.png)](https://opscom.wiki/uploads/images/gallery/2024-06/tssimage.png) 5. A pop up window will appear. Click **OK** to confirm the release of the permit. [![image.png](https://opscom.wiki/uploads/images/gallery/2024-06/scaled-1680-/booimage.png)](https://opscom.wiki/uploads/images/gallery/2024-06/booimage.png) 6. A confirmation message will appear. [![image.png](https://opscom.wiki/uploads/images/gallery/2024-06/scaled-1680-/ftSimage.png)](https://opscom.wiki/uploads/images/gallery/2024-06/ftSimage.png) 7. Now when you search the permit it will appear as available. [![image.png](https://opscom.wiki/uploads/images/gallery/2024-06/scaled-1680-/Dv3image.png)](https://opscom.wiki/uploads/images/gallery/2024-06/Dv3image.png) # Temporary Permit Printing 1\. In **Parking Management**, hover over the **Permits** icon and click '**Temp Permit Printing**'. [![image.png](https://opscom.wiki/uploads/images/gallery/2024-06/scaled-1680-/zUDimage.png)](https://opscom.wiki/uploads/images/gallery/2024-06/zUDimage.png) 2\. In the **Retrieve** drop-down menu, select the permits that you want. Select the **Permit Lot** that you want. Enter the Start Date and the Up to and Including date and select the **Retrieve** button. The results will appear below the search criteria. [![image.png](https://opscom.wiki/uploads/images/gallery/2024-06/scaled-1680-/jxqimage.png)](https://opscom.wiki/uploads/images/gallery/2024-06/jxqimage.png) 3\. Select the checkbox for the permits you wish to print and press “**print selected hang tags**” button. Below is a sample Temp Permit. [![image.png](https://opscom.wiki/uploads/images/gallery/2024-06/scaled-1680-/RENimage.png)](https://opscom.wiki/uploads/images/gallery/2024-06/RENimage.png) [![image.png](https://opscom.wiki/uploads/images/gallery/2024-06/scaled-1680-/A1Uimage.png)](https://opscom.wiki/uploads/images/gallery/2024-06/A1Uimage.png) Note, temp permits can also be printed by going to a user's history. Under the Temp Permit section, under the Permit #, select the printer icon to print just that one permit. [![image.png](https://opscom.wiki/uploads/images/gallery/2024-06/scaled-1680-/Kzximage.png)](https://opscom.wiki/uploads/images/gallery/2024-06/Kzximage.png) # Hang Tag Printing ## Printing Hangtags In **Parking Management**, hover over the **Permit Management** icon and click **Hang Tag Printing.** [![image.png](https://opscom.wiki/uploads/images/gallery/2024-06/scaled-1680-/59oimage.png)](https://opscom.wiki/uploads/images/gallery/2024-06/59oimage.png) The **Vehicle Hang Tag Printing** screen will display. Select the **Semester** from the drop-down menu and select the files that you want to retrieve for printing. Enable the checkbox is *if you only to print tags for which the payment has been fully processed*. Select the **Permit Lot Name** from the drop-down menu or enable the checkbox to disregard the lot type. Select the distribution method and the permitted range. Click the **Retrieve** button to submit the search criteria. [![image.png](https://opscom.wiki/uploads/images/gallery/2024-06/scaled-1680-/xg6image.png)](https://opscom.wiki/uploads/images/gallery/2024-06/xg6image.png) The results will display below the search criteria. Note, permits paid by Payroll Deduction will be highlighted. - Click the **Username** link to see an overview of the user. You can select the User Profile icon to open the user profile. - Click the **Permit Number** link to see parking permit information. Enable the Email checkbox(es) to chose users to send the hang tag by email to. Click the **Email Selected** button, then fill in the details of your email. To **print hang tags**, enable the **P****rint checkbox(es)**. If you wish to print hang tags for all users, click the **Select All** button. Click the **Deselect All** button to clear all selections. If you do not want to include an expiry date on the permits being printed, ensure that the 'Do not print date' checkbox is enabled. Otherwise, select the expiry date to be printed on the hangtag and click the **Print Selected Hang Tags** button. This will open up a new window displaying the username and address (positioned to fit in a windowed envelope) in the top left, the lot long name and permit number in the top right as well as the actual permit at the bottom. Note, some organizations use perforated paper to make it easier to remove the permits to be laminated. The empty space on both sides of the paper can be pre-printed to provide parking information, rules and regulations to your users. Some organizations will also purchase holograms to go on the permit as well. ## Expected Results Important In order for the correct address to display on the hangtag, you will need to have the **Mail Permit to** selected on the user's profile, and the appropriate address filled out. For example, if you select **Local Mailing Address** and the user only has their **Personal Mailing Address** completed, the user's address will not be printed to the hangtag. (See **Edit User Profile - Profile Tab**) After printing the hangtag and placing it in its cover, the completed print job could look something like this: [![image.png](https://opscom.wiki/uploads/images/gallery/2024-06/scaled-1680-/eakimage.png)](https://opscom.wiki/uploads/images/gallery/2024-06/eakimage.png) [![image.png](https://opscom.wiki/uploads/images/gallery/2024-06/scaled-1680-/GnWimage.png)](https://opscom.wiki/uploads/images/gallery/2024-06/GnWimage.png) Select the print option from your browser (ctrl+p is the print shortcut). A sample printed parking permit front and back would look similar to this: [![image.png](https://opscom.wiki/uploads/images/gallery/2024-06/scaled-1680-/bGlimage.png)](https://opscom.wiki/uploads/images/gallery/2024-06/bGlimage.png) [![image.png](https://opscom.wiki/uploads/images/gallery/2024-06/scaled-1680-/vVIimage.png)](https://opscom.wiki/uploads/images/gallery/2024-06/vVIimage.png) ## Printer Settings Below are sample margin settings.
Margins Inches Millimeters
Left 0.88 22.35
Right 0.254 6.45
Top 0.96 24.38
Bottom 0.169 4.29
Do not select "Shrink to Fit" and instead always use "100%". # Access Cards - Search 1\. In **Parking Management,** hover over the **'Permit Management**' icon and click **'Access Cards**' then '**Search**'. [![image.png](https://opscom.wiki/uploads/images/gallery/2024-06/scaled-1680-/EZYimage.png)](https://opscom.wiki/uploads/images/gallery/2024-06/EZYimage.png) 2\. The '**Access Card Search**' screen is displayed. Select the **Lot name** that you want to search. Note, only lots that have access cards associated with it will be listed in the Lot Name drop-down menu. Enter the **Access Card Range** and click the '**Retrieve'** button. Any access cards that match your search will appear below the search criteria. [![image.png](https://opscom.wiki/uploads/images/gallery/2024-06/scaled-1680-/nU0image.png)](https://opscom.wiki/uploads/images/gallery/2024-06/nU0image.png) # Refundable Parking Deposits ## Setup Deposit Options Setup and manage your Deposit options. ## Apply Deposit Types Now that your deposit types are in place, they can be applied to specific lots. To do so, go to the **Parking Management Menu** and hover over **Lot Administration**, then click on **Pricing and Lot Admin**. [![image.png](https://opscom.wiki/uploads/images/gallery/2024-06/scaled-1680-/m8uimage.png)](https://opscom.wiki/uploads/images/gallery/2024-06/m8uimage.png) Once in **Pricing and Administration**, select the lot you wish to apply the deposit to by clicking on the lot name. In this case we are selecting the **Green Staff Lot East**. [![image.png](https://opscom.wiki/uploads/images/gallery/2024-06/scaled-1680-/PjSimage.png)](https://opscom.wiki/uploads/images/gallery/2024-06/PjSimage.png) Once in **Lot Administration**, select the **Zone & Location** tab to view the available deposit types. [![image.png](https://opscom.wiki/uploads/images/gallery/2024-06/scaled-1680-/G5rimage.png)](https://opscom.wiki/uploads/images/gallery/2024-06/G5rimage.png) From the list of **Deposits**, click the deposit you wish to apply. You can select more than one deposit type by holding the **Ctrl** or **Shift** key and selecting the deposits you wish to apply. [![image.png](https://opscom.wiki/uploads/images/gallery/2024-06/scaled-1680-/Fnqimage.png)](https://opscom.wiki/uploads/images/gallery/2024-06/Fnqimage.png) Once the deposit type is associated to a lot, it will then be included in the purchase of a permit in that lot for admins only. Let's have a look at a permit purchase with deposits in place. Go to a user's profile and select the **Parking** tab. [![image.png](https://opscom.wiki/uploads/images/gallery/2024-06/scaled-1680-/C2Nimage.png)](https://opscom.wiki/uploads/images/gallery/2024-06/C2Nimage.png) Click on **Standard Parking Permit** to begin the permit purchasing process. Select the lot you wish to register the client to. In this case we select the **Green Staff Lot East**. [![image.png](https://opscom.wiki/uploads/images/gallery/2024-06/scaled-1680-/ZWRimage.png)](https://opscom.wiki/uploads/images/gallery/2024-06/ZWRimage.png) Once the lot is selected, click on **Register Permit**. [![image.png](https://opscom.wiki/uploads/images/gallery/2024-06/scaled-1680-/Jf3image.png)](https://opscom.wiki/uploads/images/gallery/2024-06/Jf3image.png) The **Confirm Parking Permit Registration** window will appear. Note the two deposits are included and listed in the **Total Owing** costs. [![image.png](https://opscom.wiki/uploads/images/gallery/2024-06/scaled-1680-/RQrimage.png)](https://opscom.wiki/uploads/images/gallery/2024-06/RQrimage.png) Click on **Purchase this Permit** to begin the payment process. [![image.png](https://opscom.wiki/uploads/images/gallery/2024-06/scaled-1680-/xdBimage.png)](https://opscom.wiki/uploads/images/gallery/2024-06/xdBimage.png) ## Editing Assignable Text In this step, the admin can record the access card and hang tag numbers. To do so, click on the **Deposit Item** name. In this case click on **Access Card Deposit: Enter access card number here**. [![image.png](https://opscom.wiki/uploads/images/gallery/2024-06/scaled-1680-/w6iimage.png)](https://opscom.wiki/uploads/images/gallery/2024-06/w6iimage.png) In the **Deposit Information** pop-up window, enter the access card number in the **Assigned Text** field and click **Update Deposit**. [![image.png](https://opscom.wiki/uploads/images/gallery/2024-06/scaled-1680-/2j4image.png)](https://opscom.wiki/uploads/images/gallery/2024-06/2j4image.png) Once entered, the number will now appear on the **Payments** screen under **Deposits**. [![image.png](https://opscom.wiki/uploads/images/gallery/2024-06/scaled-1680-/PPuimage.png)](https://opscom.wiki/uploads/images/gallery/2024-06/PPuimage.png) You may now proceed with the purchase in the usual manner. # Text2ParkMe - Usage In **Parking Management**, hover over **Permit Management, Temporary Permits,** and click '**Text2ParkMe**' then '**Current Usage'**. [![image.png](https://opscom.wiki/uploads/images/gallery/2024-06/scaled-1680-/zF0image.png)](https://opscom.wiki/uploads/images/gallery/2024-06/zF0image.png) This will take you to the **Text2ParkMe - Usage** page where you can enter information to get the usage report that you want to view. [![image.png](https://opscom.wiki/uploads/images/gallery/2024-06/scaled-1680-/5oPimage.png)](https://opscom.wiki/uploads/images/gallery/2024-06/5oPimage.png) Enter in the information that you want to search - ***User, Plate, Lot, and/or start/end date***. Select the **Search** button to create the report. The report will appear below where the search criteria were entered. [![image.png](https://opscom.wiki/uploads/images/gallery/2024-06/scaled-1680-/WO6image.png)](https://opscom.wiki/uploads/images/gallery/2024-06/WO6image.png) The **Username link** will take you to the user's profile. # Text2ParkMe - Active Permits 1\. In **Parking Management**, hover over the **Permit Management** icon and select **Text2ParkMe - Active Permits.** [![image.png](https://opscom.wiki/uploads/images/gallery/2024-06/scaled-1680-/vsqimage.png)](https://opscom.wiki/uploads/images/gallery/2024-06/vsqimage.png) 2\. This will take you to the **Text2ParkMe - Active Permits** page that automatically displays all Text2ParkMe permits that are currently active and not yet expired. [![image.png](https://opscom.wiki/uploads/images/gallery/2024-06/scaled-1680-/BYCimage.png)](https://opscom.wiki/uploads/images/gallery/2024-06/BYCimage.png) 3\. You can filter this listing by entering the data that you want to filter by in the search criteria above. This report can be filtered by ***User, Plate, or Lot Name***. Select the **Filter Report** button to bring up the new report using the filters entered. - The **Username link** will take you to the user's profile. # Improve LPR Read Rates ## What is the optical range for the reader? The sweet spot for plate reads is 1.5 to 2.5 meters between camera and plate. Also check to make sure the lens is clean. Another issue may be camera angle. The optimum angle for the camera is straight on (parallel) to the plate [![image.png](https://opscom.wiki/uploads/images/gallery/2024-06/scaled-1680-/VJUimage.png)](https://opscom.wiki/uploads/images/gallery/2024-06/VJUimage.png) ## Fuzzy Searching The PL8-RDR system supports fuzzy searching based on user supplied values. In the case of the LPR system "seeing" **ABC123**, it will also validate against **A8C123** and **ABC128** or **A8C12B**. ## Manual Corrections You can improve plate reads by making corrections and verifying correct plates on the system. OPS-COM has an algorithm that includes the human updates as part of the read score. Therefore, if a plate is misread and corrected, it is very probable that the system will return the (human) updated version. Further, the system does fuzzy searching... this means it will look for a plate in the system that matches a pattern. For example, a plate of ABC123 may be read as A8C128. With fuzzy searching and based on time of day etc. the system will return ABC123 if that plate has a permit (but will also note that it was a "fuzzy" read of the plate). If you see a score of 100% in the LPR report that means that the system determined a human updated version was the best match since a score of 100% is theoretically impossible with LPR cameras. As an Example here's a tweak you can do for Ontario users once the camera is setup... Go into the Web Interface Page Plate Reader Camera OCR and set the following Characters dimensions: CHAR SIZE Min W: 10 Max W: 50 Min H:30 Max H: 100 [![image.png](https://opscom.wiki/uploads/images/gallery/2024-06/scaled-1680-/AsGimage.png)](https://opscom.wiki/uploads/images/gallery/2024-06/AsGimage.png) ## Improving Exposure For dark plate reads: Set Max Shutter to 500 Set Max Gain to 256 (If images are too dark this setting can be increased. However it is not recommended to go over 1000.) Set Iris Level to 15 [![image.png](https://opscom.wiki/uploads/images/gallery/2024-06/scaled-1680-/4Pdimage.png)](https://opscom.wiki/uploads/images/gallery/2024-06/4Pdimage.png) Adjusting the Bounding Box The LPR camera has the ability to customize the area that is being analyzed during the plate read. This article explains how to adjust the read area (Bounding Box). The bounding box refers to the area that can be adjusted to narrow the view or area that is analyzed by the LPR camera. The settings involved are located in the Plate Reader Settings. [![image.png](https://opscom.wiki/uploads/images/gallery/2024-06/scaled-1680-/9ISimage.png)](https://opscom.wiki/uploads/images/gallery/2024-06/9ISimage.png) The default settings for full frame are as follows. Measurements for height are always considered the distance from the top of the screen. Measurements for width are based on distance from the left of the screen Win MinX Pixel - 0 *(From the left)* Win MinY Pixel - 0 *(from the top)* Win MaxX Pixel - 1279 *(From the left)* Win MaxY Pixel - 1023 *(from the top)* [![image.png](https://opscom.wiki/uploads/images/gallery/2024-06/scaled-1680-/zALimage.png)](https://opscom.wiki/uploads/images/gallery/2024-06/zALimage.png) To view the location of the bounding box go into the Camera OCR tab. [![image.png](https://opscom.wiki/uploads/images/gallery/2024-06/scaled-1680-/bk0image.png)](https://opscom.wiki/uploads/images/gallery/2024-06/bk0image.png) Here is the full frame view of the bounding box. See the red outlined box in the image below. [![image.png](https://opscom.wiki/uploads/images/gallery/2024-06/scaled-1680-/8j0image.png)](https://opscom.wiki/uploads/images/gallery/2024-06/8j0image.png) ## Adjusting Height To adjust the box edit the number in the settings. In this case we will narrow the bounding box in height to restrict the read area. Here are the settings: Win MinX Pixel - 0 *(from the left)* Win MinY Pixel - **100** *(from the top)* Win MaxX Pixel - 1279 *(from the left)* Win MaxY Pixel - **700** *(from the top)* [![image.png](https://opscom.wiki/uploads/images/gallery/2024-06/scaled-1680-/Of4image.png)](https://opscom.wiki/uploads/images/gallery/2024-06/Of4image.png) IMPORTANT Once the settings are changed and you click on Apply, the camera will reboot. This process will take a couple of minutes to complete before you can navigate away from the page. The resulting Bounding Box will look like this: [![image.png](https://opscom.wiki/uploads/images/gallery/2024-06/scaled-1680-/ul6image.png)](https://opscom.wiki/uploads/images/gallery/2024-06/ul6image.png) Let's now say we want to lower the box in the view. I would have to increase the values in both Y axis settings. Here are the settings Win MinX Pixel - 0 *(from the left)* Win MinY Pixel - **200** *(From the top)* Win MaxX Pixel - 1279 *(from the left)* Win MaxY Pixel - **800** *(From the top)* [![image.png](https://opscom.wiki/uploads/images/gallery/2024-06/scaled-1680-/rqeimage.png)](https://opscom.wiki/uploads/images/gallery/2024-06/rqeimage.png) Here is the resulting bounding box: [![image.png](https://opscom.wiki/uploads/images/gallery/2024-06/scaled-1680-/LYjimage.png)](https://opscom.wiki/uploads/images/gallery/2024-06/LYjimage.png) ## Adjusting Width Additionally you can narrow the width of the bounding box if need be. In this case we will narrow the bounding box by 100 pixels on both sides. Here are the settings Win MinX Pixel - **100** *(from the left)* Win MinY Pixel - 200 *(From the top)* Win MaxX Pixel - **1179** *(from the left)* Win MaxY Pixel - 800 *(From the top)* [![image.png](https://opscom.wiki/uploads/images/gallery/2024-06/scaled-1680-/7cgimage.png)](https://opscom.wiki/uploads/images/gallery/2024-06/7cgimage.png) Here is the resulting bounding box. [![image.png](https://opscom.wiki/uploads/images/gallery/2024-06/scaled-1680-/fcqimage.png)](https://opscom.wiki/uploads/images/gallery/2024-06/fcqimage.png) By selective use of these settings you can customize the area that is processed by the LPR read. As a result LPR reads could be faster and more accurate since the camera is reading a smaller more focused area and ignores anything outside of the bounding box. On the Handheld For NOREADs you can check the setting in **System Settings** to see if that can be reduced. It may mean more noise, but it may also help with determining what is going on (ie. reading but not seeing it as a **READ** result) To adjust this setting go into system settings and tap on Include NOREAD (ie. vanity) Results [![image.png](https://opscom.wiki/uploads/images/gallery/2024-06/scaled-1680-/OTsimage.png)](https://opscom.wiki/uploads/images/gallery/2024-06/OTsimage.png) Set the percentage to 50% to start. We can tweak it once we see how the system reacts. [![image.png](https://opscom.wiki/uploads/images/gallery/2024-06/scaled-1680-/kX0image.png)](https://opscom.wiki/uploads/images/gallery/2024-06/kX0image.png) # Viewing and Editing LPR Events 1. Hover over '**Parking Management**' then '**License Plate Recognition**.' Click '**View LPR Events**'. [![image.png](https://opscom.wiki/uploads/images/gallery/2024-06/scaled-1680-/9Hpimage.png)](https://opscom.wiki/uploads/images/gallery/2024-06/9Hpimage.png) 2. A list of Events will appear. The following information is displayed: - - Plate Image - Plate Number - Province - Score (relates to how accurate the system analyzes the capture to be) - Km/h (Speed, as well as direction - approaching or going away from the camera) - Recorded (Date and Time of capture) - Events (How many times this plate has been captured) - Status (Valid or Invalid) - Lot Group - Violations [![image.png](https://opscom.wiki/uploads/images/gallery/2024-06/scaled-1680-/Txfimage.png)](https://opscom.wiki/uploads/images/gallery/2024-06/Txfimage.png) 3\. If the admin wants to refine their search more, they can enter the date and time range that is being reported on, by entering values in the recorded on and Up to and including field. [![image.png](https://opscom.wiki/uploads/images/gallery/2024-06/scaled-1680-/lpLimage.png)](https://opscom.wiki/uploads/images/gallery/2024-06/lpLimage.png) 4\. To search for partial plates, turn on the Perform fuzzy search option then enter the partial plate into the license plate text box. [![image.png](https://opscom.wiki/uploads/images/gallery/2024-06/scaled-1680-/dM2image.png)](https://opscom.wiki/uploads/images/gallery/2024-06/dM2image.png) The admin has the ability to correct plate reads that are wrong or partial. [![image.png](https://opscom.wiki/uploads/images/gallery/2024-06/scaled-1680-/NUEimage.png)](https://opscom.wiki/uploads/images/gallery/2024-06/NUEimage.png) 5\. To correct the plate number click on the **pencil icon** to edit the entry [![image.png](https://opscom.wiki/uploads/images/gallery/2024-06/scaled-1680-/5pfimage.png)](https://opscom.wiki/uploads/images/gallery/2024-06/5pfimage.png) 6\. Enter the Correct Plate Number. [![image.png](https://opscom.wiki/uploads/images/gallery/2024-06/scaled-1680-/v2wimage.png)](https://opscom.wiki/uploads/images/gallery/2024-06/v2wimage.png) 7\. Select the appropriate province [![image.png](https://opscom.wiki/uploads/images/gallery/2024-06/scaled-1680-/YOVimage.png)](https://opscom.wiki/uploads/images/gallery/2024-06/YOVimage.png) 8\. Click the **Blue Icon** to save the changes [![image.png](https://opscom.wiki/uploads/images/gallery/2024-06/scaled-1680-/uiKimage.png)](https://opscom.wiki/uploads/images/gallery/2024-06/uiKimage.png) # **Other Information that can be viewed from this interface.** --- 1. Hover over the **thumbnail in the record** and the full image capture can be displayed. [![image.png](https://opscom.wiki/uploads/images/gallery/2024-06/scaled-1680-/kHCimage.png)](https://opscom.wiki/uploads/images/gallery/2024-06/kHCimage.png) # LPR Audit Log ## Viewing the LPR Audit Log To access the LPR Audit Log, go to the Parking Management menu and hover over License Plate Recognition. Select View LPR Audit Log from the resulting drop down menu. [![image.png](https://opscom.wiki/uploads/images/gallery/2024-06/scaled-1680-/4sIimage.png)](https://opscom.wiki/uploads/images/gallery/2024-06/4sIimage.png) The initial screen will display with the current day's information [![image.png](https://opscom.wiki/uploads/images/gallery/2024-06/scaled-1680-/sMUimage.png)](https://opscom.wiki/uploads/images/gallery/2024-06/sMUimage.png) ## Filtering Results Search results can be filtered to display specific information. The two filter fields are Camera selection and Event type. [![image.png](https://opscom.wiki/uploads/images/gallery/2024-06/scaled-1680-/fHPimage.png)](https://opscom.wiki/uploads/images/gallery/2024-06/fHPimage.png) Event type refers to one of five selections: Any Event Entry Events Exit Events Patrol Events (These are LPR chalking records from a Patrol Officer's hand held unit. Tracking (These could be cameras that track movement such as moving from one floor of a multilevel garage to another floor. [![image.png](https://opscom.wiki/uploads/images/gallery/2024-06/scaled-1680-/hxjimage.png)](https://opscom.wiki/uploads/images/gallery/2024-06/hxjimage.png) # Apply Temp Permit to User Vehicles 1. To begin, you must set the ability to apply the permit to multiple vehicles in **Lot Administration** under the **Temporary Parking** Tab. You must enable the following items: **- Allow temp permits to be used over 30 days.** **- Allow All Vehicles on profile to receive permit.** [![image.png](https://opscom.wiki/uploads/images/gallery/2024-06/scaled-1680-/qiXimage.png)](https://opscom.wiki/uploads/images/gallery/2024-06/qiXimage.png) 2. Once this is set, you are ready to issue a temporary permit to multiple vehicles. To begin, go to the user's profile and click on the **Parking Tab**. [![image.png](https://opscom.wiki/uploads/images/gallery/2024-06/scaled-1680-/D3Dimage.png)](https://opscom.wiki/uploads/images/gallery/2024-06/D3Dimage.png) 3. Select **Temporary Parking Permit**. [![image.png](https://opscom.wiki/uploads/images/gallery/2024-06/scaled-1680-/QyQimage.png)](https://opscom.wiki/uploads/images/gallery/2024-06/QyQimage.png) 4. The **Temporary Parking Permit Registration** window opens. In our example, we will select the **Green Staff Lot East** where we had configured the ability to apply the permit to all vehicles (Step 1 above) Set the **start date** and **end date**. The date range must be for a period longer than 30 days in order to activate the **Apply to all Vehicles** button. Click the button to apply the permit to all vehicles. [![image.png](https://opscom.wiki/uploads/images/gallery/2024-06/scaled-1680-/bT2image.png)](https://opscom.wiki/uploads/images/gallery/2024-06/bT2image.png) 5. Click **Confirm This Permit** to proceed to the Confirmation window. You can verify the information before proceeding to purchase the permit. *Note: the two vehicles are listed in the Vehicle list.* Click **Purchase this Permit** to continue. [![image.png](https://opscom.wiki/uploads/images/gallery/2024-06/scaled-1680-/22uimage.png)](https://opscom.wiki/uploads/images/gallery/2024-06/22uimage.png) 6. The payment screen displays. Start the purchase process. [![image.png](https://opscom.wiki/uploads/images/gallery/2024-06/scaled-1680-/Dvoimage.png)](https://opscom.wiki/uploads/images/gallery/2024-06/Dvoimage.png) 7. Select your method of payment and click the **Submit Payment Information** button. [![image.png](https://opscom.wiki/uploads/images/gallery/2024-06/scaled-1680-/bT4image.png)](https://opscom.wiki/uploads/images/gallery/2024-06/bT4image.png) 8. Select **Confirm Payment Information** to proceed. Click **Process Manually** to complete the purchase. [![image.png](https://opscom.wiki/uploads/images/gallery/2024-06/scaled-1680-/MlTimage.png)](https://opscom.wiki/uploads/images/gallery/2024-06/MlTimage.png) 9. You will be taken to the **Transaction Details** screen, where you can see a final record of your purchase. [![image.png](https://opscom.wiki/uploads/images/gallery/2024-06/scaled-1680-/NrRimage.png)](https://opscom.wiki/uploads/images/gallery/2024-06/NrRimage.png) # The Validator - a Parking Validation Utility You must create a new role to apply the permissions correctly. For more information refer to this article on Roles and Permissions [![image.png](https://opscom.wiki/uploads/images/gallery/2024-06/scaled-1680-/14Simage.png)](https://opscom.wiki/uploads/images/gallery/2024-06/14Simage.png) In our example, we created a Role entitled **Parking Validator**. The new role will appear in the list of roles. [![image.png](https://opscom.wiki/uploads/images/gallery/2024-06/scaled-1680-/wW3image.png)](https://opscom.wiki/uploads/images/gallery/2024-06/wW3image.png) You must add the "**Create Temp Permit Entries**" permission to the role you just created. [![image.png](https://opscom.wiki/uploads/images/gallery/2024-06/scaled-1680-/hGYimage.png)](https://opscom.wiki/uploads/images/gallery/2024-06/hGYimage.png) Create or edit an Admin user who will manage the parking validation. [![image.png](https://opscom.wiki/uploads/images/gallery/2024-06/scaled-1680-/zpFimage.png)](https://opscom.wiki/uploads/images/gallery/2024-06/zpFimage.png) Select the **lot zone(s)** this Admin will manage and save the user. These will be the lots that you intend to use with the **Parking Validator** utility. [![image.png](https://opscom.wiki/uploads/images/gallery/2024-06/scaled-1680-/RbLimage.png)](https://opscom.wiki/uploads/images/gallery/2024-06/RbLimage.png) Note: These zones have to be set in the lots you wish to validate. In Lot Administration go to the Zone & Location tab to select the zone associated with the lot. [![image.png](https://opscom.wiki/uploads/images/gallery/2024-06/scaled-1680-/pH0image.png)](https://opscom.wiki/uploads/images/gallery/2024-06/pH0image.png) ## Accessing the Validator Tool Log in as this user. Only one menu item entitled '**Create Validations**' will be available. *(Note: The following screen represents the view of the validation tool that would be used by admins who have restricted access to the OPS-COM system and would have access to the Validation Tool Only)* [![image.png](https://opscom.wiki/uploads/images/gallery/2024-06/scaled-1680-/Ynnimage.png)](https://opscom.wiki/uploads/images/gallery/2024-06/Ynnimage.png) The Validate Parking screen will appear. [![image.png](https://opscom.wiki/uploads/images/gallery/2024-06/scaled-1680-/iLiimage.png)](https://opscom.wiki/uploads/images/gallery/2024-06/iLiimage.png) Click '**Create Validations**'. From this page you can: 1. Enter plate number(s) 2. Enter a comment 3. Select the lot zone in which you want to validate the vehicle 4. Select the date range you wish the validation to be in effect. 5. Set the Valid Time Frame (These blocks represent a full hour. In our example below we are setting the Valid times between 7am and 7pm). 6. Select the Valid Days you wish to have the validation in effect. 7. Click Validate to apply the validation. *In this example we are validating three vehicles to park in the Garage Level 1 zone, between the hours of 8:00pm to 10:00pm, for the six week period between March 23rd to May 4th, on Monday, Wednesday, and Thursday.* [![image.png](https://opscom.wiki/uploads/images/gallery/2024-06/scaled-1680-/LrBimage.png)](https://opscom.wiki/uploads/images/gallery/2024-06/LrBimage.png) The list of valid vehicles appears below the submit form. [![image.png](https://opscom.wiki/uploads/images/gallery/2024-06/scaled-1680-/u82image.png)](https://opscom.wiki/uploads/images/gallery/2024-06/u82image.png) Advanced Features With full access to the tool within OPS-COM there are several additional features to take into account. Not only do you have the validator tool, you also have the ability to run reports and Manage validations. [![image.png](https://opscom.wiki/uploads/images/gallery/2024-06/scaled-1680-/dMeimage.png)](https://opscom.wiki/uploads/images/gallery/2024-06/dMeimage.png) # How Do Temporary Validated Parkers Appear on the Handheld Devices Parkers who are validated through this tool will appear as a "**Temp Parker**" on the Android version of **OPS-COM.** [![image.png](https://opscom.wiki/uploads/images/gallery/2024-06/scaled-1680-/V0Kimage.png)](https://opscom.wiki/uploads/images/gallery/2024-06/V0Kimage.png) By tapping on the plate number you will get an expanded view with further detailed information. In our example, we see the parker has a **Validator** created permission to park in the **Day Care Lot Zone**. [![image.png](https://opscom.wiki/uploads/images/gallery/2024-06/scaled-1680-/cbIimage.png)](https://opscom.wiki/uploads/images/gallery/2024-06/cbIimage.png) To see even finer detail on this permission, tap the green rectangle labelled **Validator - Day Care**. A pop up will appear showing a **reference number** and the **Expiry date** of the permission. [![image.png](https://opscom.wiki/uploads/images/gallery/2024-06/scaled-1680-/3Uiimage.png)](https://opscom.wiki/uploads/images/gallery/2024-06/3Uiimage.png) A closer look: [![image.png](https://opscom.wiki/uploads/images/gallery/2024-06/scaled-1680-/405image.png)](https://opscom.wiki/uploads/images/gallery/2024-06/405image.png) # Branding the Validator Tool ## Accessing the Validator Pages to Edit the Look and Feel From the **System Config** Menu click on **System Messaging**. [![image.png](https://opscom.wiki/uploads/images/gallery/2024-06/scaled-1680-/wilimage.png)](https://opscom.wiki/uploads/images/gallery/2024-06/wilimage.png) A page with two tabs will appear. Click on the **Messages** tab to access the list of editable messages. [![image.png](https://opscom.wiki/uploads/images/gallery/2024-06/scaled-1680-/cQMimage.png)](https://opscom.wiki/uploads/images/gallery/2024-06/cQMimage.png) There are three messages to edit for the Validator Tool. They are: The Validator Entry message The Validator Manage message The Validator Report message Each of these pages represent the three Validator Tool Pages. [![image.png](https://opscom.wiki/uploads/images/gallery/2024-06/scaled-1680-/MsHimage.png)](https://opscom.wiki/uploads/images/gallery/2024-06/MsHimage.png) Here's what they look like in the **Message System Editor**. [![image.png](https://opscom.wiki/uploads/images/gallery/2024-06/scaled-1680-/nC3image.png)](https://opscom.wiki/uploads/images/gallery/2024-06/nC3image.png) To edit the message click on the **Edit** button [![image.png](https://opscom.wiki/uploads/images/gallery/2024-06/scaled-1680-/XGoimage.png)](https://opscom.wiki/uploads/images/gallery/2024-06/XGoimage.png) The edit page will display. On this screen you will enter a title for your page as well as an identifier. This identifier must be unique. You may also select a language setting for your page. The page can be edited in the WYSIWYG editor where you can visually design the page. ***NOTE:** The main graphic image used in our example measures **1448 pixels in width and 227 pixels in height**. **Best practice** would be to **maintain the same width** but the **height can be your preference**. Upload the preferred image to your **Files Folder** using the **Manage Files** functionality.* [![image.png](https://opscom.wiki/uploads/images/gallery/2024-06/scaled-1680-/96Bimage.png)](https://opscom.wiki/uploads/images/gallery/2024-06/96Bimage.png) It is also possible to edit the page in straight **HTML**. To do so go to the **Tools** menu and click on **<>Source Code.** [![image.png](https://opscom.wiki/uploads/images/gallery/2024-06/scaled-1680-/Ujyimage.png)](https://opscom.wiki/uploads/images/gallery/2024-06/Ujyimage.png) A popup will appear with the code presented. [![image.png](https://opscom.wiki/uploads/images/gallery/2024-06/scaled-1680-/tC1image.png)](https://opscom.wiki/uploads/images/gallery/2024-06/tC1image.png) ## Sample Code
**Validator Entry** Expand source
The Resulting Page [![image.png](https://opscom.wiki/uploads/images/gallery/2024-06/scaled-1680-/ol3image.png)](https://opscom.wiki/uploads/images/gallery/2024-06/ol3image.png) # Managing Validator Records In this example, we will add a validation for a vehicle with the plate number **BIRCH** in the **GARAGE L1 Lot** starting **June 4th** and expiring on **June 4th**. Enter the **plate number** Choose Garage L1 as the **Lot Zone** Enter your time frame and click on **Validate** [![image.png](https://opscom.wiki/uploads/images/gallery/2024-06/scaled-1680-/nrHimage.png)](https://opscom.wiki/uploads/images/gallery/2024-06/nrHimage.png) Once we have created the record, it will appear in the **Validate Parking Report**. If the entry was done in error, it can be removed through the **Manage Validation** tool. To do so, hover over **Parking Validation** under the **Parking Management Menu** and select **Manage Validations** from the drop down menu. [![image.png](https://opscom.wiki/uploads/images/gallery/2024-06/scaled-1680-/Lz0image.png)](https://opscom.wiki/uploads/images/gallery/2024-06/Lz0image.png) In the management tool, enter the **Plate Number** in question along with the **Lot Zone** you wish to view. To delete the record click on the **Delete** button associated with the record to highlight it with the check mark. [![image.png](https://opscom.wiki/uploads/images/gallery/2024-06/scaled-1680-/NFLimage.png)](https://opscom.wiki/uploads/images/gallery/2024-06/NFLimage.png) You will be prompted to confirm the archiving of the record. Click **Archive** to continue. [![image.png](https://opscom.wiki/uploads/images/gallery/2024-06/scaled-1680-/5w3image.png)](https://opscom.wiki/uploads/images/gallery/2024-06/5w3image.png) A pop-up message will confirm the deletion of the record. [![image.png](https://opscom.wiki/uploads/images/gallery/2024-06/scaled-1680-/ri9image.png)](https://opscom.wiki/uploads/images/gallery/2024-06/ri9image.png) Once the record is deleted, you will notice it will be removed from the **Validator Parking Report**. [![image.png](https://opscom.wiki/uploads/images/gallery/2024-06/scaled-1680-/KUwimage.png)](https://opscom.wiki/uploads/images/gallery/2024-06/KUwimage.png) # Validate Parking Report 1. To access the report, the admin responsible for parker validation would need "**View Validator Report**" set as a permission. [![image.png](https://opscom.wiki/uploads/images/gallery/2024-06/scaled-1680-/1dsimage.png)](https://opscom.wiki/uploads/images/gallery/2024-06/1dsimage.png) 2. To run the report, go into the **Parking Management** menu and select **Parking Validation Report.** [![image.png](https://opscom.wiki/uploads/images/gallery/2024-06/scaled-1680-/K8Vimage.png)](https://opscom.wiki/uploads/images/gallery/2024-06/K8Vimage.png) 3. The **Validate Parking Report** search tool opens. [![image.png](https://opscom.wiki/uploads/images/gallery/2024-06/scaled-1680-/brbimage.png)](https://opscom.wiki/uploads/images/gallery/2024-06/brbimage.png) 4. Here, you enter the date range you wish to report on. In this case we are looking at **March 1st through to March 14, 2018.** [![image.png](https://opscom.wiki/uploads/images/gallery/2024-06/scaled-1680-/tdaimage.png)](https://opscom.wiki/uploads/images/gallery/2024-06/tdaimage.png) 5. Click on **search** to bring up the record listing that can be viewed onscreen or exported as an Excel file. [![image.png](https://opscom.wiki/uploads/images/gallery/2024-06/scaled-1680-/64Cimage.png)](https://opscom.wiki/uploads/images/gallery/2024-06/64Cimage.png) # Validator Admin Groups User Level Capabilities within the Validator Tool Here is a description of what each user level can do with the **Validator Tool**. 1. The **Super Admin** can set up new **Groups** with a **Group Name**, as well as assign **Managers** and **Group Members**. Only the Super Admin can add Managers and Admins. 1. Definition: The Super Admin will also be any Primary Admin with permissions in OPS-COM to manage the Validator; they can create groups and have the ability to add users to the group. The permissions that the Super Admin assigns to the individual group members will determine their access level on the system. All permissions must be added or removed by the Super Admin and cannot be done by any other user. 2. The Super Admin will be able to see all current, pending, past and archived (deleted) validations. These are the permissions required to use the **Super User Manager** role. [![image.png](https://opscom.wiki/uploads/images/gallery/2024-06/scaled-1680-/ogCimage.png)](https://opscom.wiki/uploads/images/gallery/2024-06/ogCimage.png) 3. Group Managers and Admins will be able to see all of their Groups, current/pending validations and delete future/current validations up to the 15-minute mark of the Start Date. Group Managers can only manage one group at a time. 1. Please note that deletions would only be available from the Manage Validations page. These are the permissions required to be the **Validator Admin** role: [![image.png](https://opscom.wiki/uploads/images/gallery/2024-06/scaled-1680-/9bTimage.png)](https://opscom.wiki/uploads/images/gallery/2024-06/9bTimage.png) 4. The Super User will be able to delete any future, current, and past validations. 1. Please note that archived is considered deleted. Archived information is not purged from the system. This is due to the need to keep system data integrity. These are the permissions required to be the **Validator Entry** role: [![image.png](https://opscom.wiki/uploads/images/gallery/2024-06/scaled-1680-/lTLimage.png)](https://opscom.wiki/uploads/images/gallery/2024-06/lTLimage.png) ## User Level Display within the Validator Tool Here is the description of what each user level can see in the Validator Report and Manage Validations tools. 1. The **Super Admin** will be able to see all **Validator Groups** via the drop-down menu of **All/Individual** **Validators** within each group. The Super Admin should be able to delete any entry at any time, pre or post validation. 2. Group Managers will only be able to see their own Validator Groups within a drop-down of **All/Individual Validators** within their group. They will also be able to delete any entry pre-validation. 3. **Admins** will only be able to see and delete their own entries pre-validation or within a 15-minute leeway (as described below). 4. Please set-up a 15-minute grace period on deletions. This will allow a current validation to be deleted up to 15-minutes past the start date, in the case of an input error. (Setting) 5. **Users** will be able to search for a partial or full plate, by entering the time period. No admin name or lot should be required. If the entry was made within the appropriate time period, it should show accordingly. If an Admin name is required then an **All** Admins option, and individual admins within their group are required. ## How to create a Group 1. Navigate to **Manage Groups** under **System Config**. [![image.png](https://opscom.wiki/uploads/images/gallery/2024-06/scaled-1680-/fB1image.png)](https://opscom.wiki/uploads/images/gallery/2024-06/fB1image.png) 2. This brings you to the **Manage Administrator Roles** page. [![image.png](https://opscom.wiki/uploads/images/gallery/2024-06/scaled-1680-/V7Fimage.png)](https://opscom.wiki/uploads/images/gallery/2024-06/V7Fimage.png) 3. To create a group click on **Add New Group** and the Adding a new Group window will appear. [![image.png](https://opscom.wiki/uploads/images/gallery/2024-06/scaled-1680-/1nximage.png)](https://opscom.wiki/uploads/images/gallery/2024-06/1nximage.png)
**Adding a new Group**Info
**1. Group Name** The Group Name is how you change the name of a group.
**2. Module** The Module is where you can set the purpose of the group.
**3. Validator Comment** The Validator Comment is a spot where you can add any comments that you need to.
**4. Admin Members**The Admin is the area in which you can add admin members to the group
4. When you are finished click the **Save Group** button. You will see your group added to the bottom of the Administrator Groups. [![image.png](https://opscom.wiki/uploads/images/gallery/2024-06/scaled-1680-/4pKimage.png)](https://opscom.wiki/uploads/images/gallery/2024-06/4pKimage.png) ## How to Add Members to a Group 1. First, you will have to navigate to **Manage Groups** under **System Config**. [![image.png](https://opscom.wiki/uploads/images/gallery/2024-06/scaled-1680-/weZimage.png)](https://opscom.wiki/uploads/images/gallery/2024-06/weZimage.png) 2. You can edit a group by clicking the blue button with a pencil icon next to the Administrator Groups you wish to edit. [![image.png](https://opscom.wiki/uploads/images/gallery/2024-06/scaled-1680-/Nbgimage.png)](https://opscom.wiki/uploads/images/gallery/2024-06/Nbgimage.png) 3. You can then click on the **Admin Members** bar to add more members to the group. [![image.png](https://opscom.wiki/uploads/images/gallery/2024-06/scaled-1680-/sjWimage.png)](https://opscom.wiki/uploads/images/gallery/2024-06/sjWimage.png) 4. When finished click the **Save Group** button found at the bottom of the Editing Group. [![image.png](https://opscom.wiki/uploads/images/gallery/2024-06/scaled-1680-/sQNimage.png)](https://opscom.wiki/uploads/images/gallery/2024-06/sQNimage.png) ## Zones and How They are Assigned 1. Navigate to **System Config** → **Edit Admin Users** [![image.png](https://opscom.wiki/uploads/images/gallery/2024-06/scaled-1680-/5cgimage.png)](https://opscom.wiki/uploads/images/gallery/2024-06/5cgimage.png) 2. Select an **Admin User** which you want to edit and apply the **Parking Validation Lot Zones** they will manage. [![image.png](https://opscom.wiki/uploads/images/gallery/2024-06/scaled-1680-/fMDimage.png)](https://opscom.wiki/uploads/images/gallery/2024-06/fMDimage.png) 3. Scroll to the bottom of the page to find the **Parking Validation Lot Zones** window. Select the **Zone(s)** in which this admin will be managing validations. [![image.png](https://opscom.wiki/uploads/images/gallery/2024-06/scaled-1680-/haeimage.png)](https://opscom.wiki/uploads/images/gallery/2024-06/haeimage.png) 4. Click any **Zones** that apply to this Admin and click **Update User** at the bottom of the page to finish. [![image.png](https://opscom.wiki/uploads/images/gallery/2024-06/scaled-1680-/VhJimage.png)](https://opscom.wiki/uploads/images/gallery/2024-06/VhJimage.png) # Printing Permit from Home Setup ## Setup Printable Permit Template Before you can allow your users to print from home you must setup the correct messaging under **System Config → System Messaging**, follow the instructions below on how to set this up ### Page Type Once you are on the **Manage System Messaging** page make sure that you click the **Messages** tab before clicking **Create Page/Message**, if you forget to do this you will automatically be prompted to create a **Page** instead of a **Message**. You will know if you are creating a message by looking under the **Page Type** drop-down, make sure that **Message** is selected instead of **Page**. [![image.png](https://opscom.wiki/uploads/images/gallery/2024-06/scaled-1680-/ZKtimage.png)](https://opscom.wiki/uploads/images/gallery/2024-06/ZKtimage.png) ### Page Title You can set the title of the messaging to be whatever you like but we suggest to name it something obvious such as **Permit Printing from Home** or **Print from Home**. [![image.png](https://opscom.wiki/uploads/images/gallery/2024-06/scaled-1680-/5FDimage.png)](https://opscom.wiki/uploads/images/gallery/2024-06/5FDimage.png) ### Setting the Correct Identifier The **Identifier** field is important and must be a specific set of text to ensure that the messaging works as intended throughout the system. Make the identifier for your permit printing **permitPdf** [![image.png](https://opscom.wiki/uploads/images/gallery/2024-06/scaled-1680-/upGimage.png)](https://opscom.wiki/uploads/images/gallery/2024-06/upGimage.png) ## Creating the Print from Home Content Important Make sure that you are physically printing this message out to test and ensure that the layout is being displayed correctly. ### Available Permitpdf Shortcodes Shortcodes allow you to display dynamic content onto a static page. By providing these shortcodes we allow our users to customize their messaging however they would like. *\[permitpdf user=fullname\]* *\[permitpdf vehicle=all\] will show a comma separated list of vehicles up to 3.* *\[permitpdf vehicle=1\] will show the first vehicle in the list. Available numbers include 1, 2, and 3* *\[permitpdf permit=expiry\] the expiry of the permit* *\[permitpdf permit=permitno\]* *\[permitpdf permit=lotshortname\]* *\[permitpdf permit=lotname\]* *\[permitpdf permit=location\]* To print the permit information you must supply specific shortcodes such as permitpdf user=fullname, see a list below for the available permit print shortcodes that you can use. ### Permit Print Sample Content by Image Below is an image of how we recommend you layout your permit printing as well as what shortcodes to use. [![image.png](https://opscom.wiki/uploads/images/gallery/2024-06/scaled-1680-/SuFimage.png)](https://opscom.wiki/uploads/images/gallery/2024-06/SuFimage.png) ### Permit Print Sample Content by Source Code If you would like to copy our permitPrint template you will need to copy the source code and paste it into your messages source code. See below on how you can edit the source code.
**Permit Print from Home Source Code** Expand source
### How to Edit the Messaging Source Code To edit the source-code of your messages click into the body content which will make a grey editor box appear above the text. The source code can be edited by going to **Tools → Source Code** [![image.png](https://opscom.wiki/uploads/images/gallery/2024-06/scaled-1680-/LwCimage.png)](https://opscom.wiki/uploads/images/gallery/2024-06/LwCimage.png) ## Enabling Permit Print Settings To get to the System settings hover over the cog wheel at the top of the page and click **System Settings**. [![image.png](https://opscom.wiki/uploads/images/gallery/2024-06/scaled-1680-/dskimage.png)](https://opscom.wiki/uploads/images/gallery/2024-06/dskimage.png) Select **Permits** and click **Enable User Permit Printing** [![image.png](https://opscom.wiki/uploads/images/gallery/2024-06/scaled-1680-/ygximage.png)](https://opscom.wiki/uploads/images/gallery/2024-06/ygximage.png) ## How Users Print from Home We have written a separate article that demonstrates how users can use the print from home functionality. Reference this article on Printing Permits from the User Portal to learn how printing permits from home can be done. # Zebra Sticker Printers ## Creating the Template To use sticker printers you first need to create a new template to be used with the messaging. Start by going to the **Templates & Design** page under **System Config**. [![image.png](https://opscom.wiki/uploads/images/gallery/2024-06/scaled-1680-/WrHimage.png)](https://opscom.wiki/uploads/images/gallery/2024-06/WrHimage.png) This will take you to the **Layouts List** page where you want to click the **Create Layout** button to create a new layout. This will bring up the **Add Layout** model window. [![image.png](https://opscom.wiki/uploads/images/gallery/2024-06/scaled-1680-/NAjimage.png)](https://opscom.wiki/uploads/images/gallery/2024-06/NAjimage.png) Name the layout whatever makes sense for you, in this case I will be naming mine layout Zebra Printing. Click **Save Changes** when you are finished. ### Providing the Sections Click **Toggle Templates** to bring up a list of the available sections we can create. For this template we only care about creating the **Styles** and **Scripts** sections. [![image.png](https://opscom.wiki/uploads/images/gallery/2024-06/scaled-1680-/NpFimage.png)](https://opscom.wiki/uploads/images/gallery/2024-06/NpFimage.png) Copy the styling and scripts found below into each of the sections for the languages you wish to support.
**Styles Section** Expand source
**Script Section** Expand source
## Creating the System Messaging Next we will need to create the system message that uses our new layout. [![image.png](https://opscom.wiki/uploads/images/gallery/2024-06/scaled-1680-/BYAimage.png)](https://opscom.wiki/uploads/images/gallery/2024-06/BYAimage.png) From the **Manage System Messaging** page click the **Create Page/Message** button [![image.png](https://opscom.wiki/uploads/images/gallery/2024-06/scaled-1680-/Q9Yimage.png)](https://opscom.wiki/uploads/images/gallery/2024-06/Q9Yimage.png) Complete the fields with the data shown below. [![image.png](https://opscom.wiki/uploads/images/gallery/2024-06/scaled-1680-/7k8image.png)](https://opscom.wiki/uploads/images/gallery/2024-06/7k8image.png) Next we need to include the shortcodes that will be used to display the actual permit information displayed on the sticker. To do this hover over the content box followed by **Tools** and click **Source Code**. [![image.png](https://opscom.wiki/uploads/images/gallery/2024-06/scaled-1680-/ioMimage.png)](https://opscom.wiki/uploads/images/gallery/2024-06/ioMimage.png) Add the following text to the source code section of your message followed by **Save** when you are finished.
**System Message Source Code** Expand source
## Setup the Printer Drivers This guide will show you how to set up the printer drivers on your machine. We will be showing you how this can be done on Windows machines. Start by going into the **Windows Settings** followed by **Devices** [![image.png](https://opscom.wiki/uploads/images/gallery/2024-06/scaled-1680-/Hpcimage.png)](https://opscom.wiki/uploads/images/gallery/2024-06/Hpcimage.png) Click **Printers & Scanners** as well as the printer you wish to manage followed by the **Manage** button. [![image.png](https://opscom.wiki/uploads/images/gallery/2024-06/scaled-1680-/9rRimage.png)](https://opscom.wiki/uploads/images/gallery/2024-06/9rRimage.png) Select the **Printer Properties** and click the **Stocks** tab. From there you want to click the **New...** button to create a new stock to use for printing. [![image.png](https://opscom.wiki/uploads/images/gallery/2024-06/scaled-1680-/39Rimage.png)](https://opscom.wiki/uploads/images/gallery/2024-06/39Rimage.png) Next we want to select the **Printing Preferences** followed by the new stock we just created. [![image.png](https://opscom.wiki/uploads/images/gallery/2024-06/scaled-1680-/Mgdimage.png)](https://opscom.wiki/uploads/images/gallery/2024-06/Mgdimage.png) ## Setup the Browser Print Settings Before adjusting the browsers print settings we need to go into the layout template of system message and comment out the **Scripts** section so that the sticker is not automatically printed which will allow us to adjust these settings ourselves. ### Chrome To make sure that the sticker prints properly on the chrome browser we need to adjust some of the printer properties. Below you can see some of the default properties that will cause problems when trying to print with your device. [![image.png](https://opscom.wiki/uploads/images/gallery/2024-06/scaled-1680-/8lbimage.png)](https://opscom.wiki/uploads/images/gallery/2024-06/8lbimage.png) Make sure that you change these settings to match the image seen below [![image.png](https://opscom.wiki/uploads/images/gallery/2024-06/scaled-1680-/G6bimage.png)](https://opscom.wiki/uploads/images/gallery/2024-06/G6bimage.png) ### Firefox To make sure the sticker prints properly on the Firefox browser we need to go into the print settings from Firefox and adjust some of the properties. To do this click the hamburger followed by **Print**. [![image.png](https://opscom.wiki/uploads/images/gallery/2024-06/scaled-1680-/R4yimage.png)](https://opscom.wiki/uploads/images/gallery/2024-06/R4yimage.png) Next you should see some of the default settings used to print in Firefox as seen below. [![image.png](https://opscom.wiki/uploads/images/gallery/2024-06/scaled-1680-/VXIimage.png)](https://opscom.wiki/uploads/images/gallery/2024-06/VXIimage.png) We want to adjust the fields so that they match all fields shown in the image below. [![image.png](https://opscom.wiki/uploads/images/gallery/2024-06/scaled-1680-/JDJimage.png)](https://opscom.wiki/uploads/images/gallery/2024-06/JDJimage.png) You should now be able to begin printing your new labels from the admin side. ## Where to Print Permits Printing permits from the admin side can now be done from the **Parking Permit Information** page by clicking the green print buttons next to the **Update Permit** button. [![image.png](https://opscom.wiki/uploads/images/gallery/2024-06/scaled-1680-/XGBimage.png)](https://opscom.wiki/uploads/images/gallery/2024-06/XGBimage.png) # Active Deposit Report ## Navigating to the Deposit Report You can find the active deposit report by going to Parking Management → Reports → Active Deposit Report. [![image.png](https://opscom.wiki/uploads/images/gallery/2024-06/scaled-1680-/wrcimage.png)](https://opscom.wiki/uploads/images/gallery/2024-06/wrcimage.png) From there the Deposit Report By Lot page will appear [![image.png](https://opscom.wiki/uploads/images/gallery/2024-06/scaled-1680-/Zdgimage.png)](https://opscom.wiki/uploads/images/gallery/2024-06/Zdgimage.png) ## Finding Outstanding Deposits All the outstanding deposits within this report that have been forgotten during a sales window switch or have no active permit will be highlighted. [![image.png](https://opscom.wiki/uploads/images/gallery/2024-06/scaled-1680-/hYnimage.png)](https://opscom.wiki/uploads/images/gallery/2024-06/hYnimage.png) Any deposits that have been rolled over but have not been processed yet will be highlighted in yellow. [![image.png](https://opscom.wiki/uploads/images/gallery/2024-06/scaled-1680-/W9Nimage.png)](https://opscom.wiki/uploads/images/gallery/2024-06/W9Nimage.png) ## Managing Active Deposits on the Users Profile There are three different ways that admins can manage deposits depending on the actions required at the time. ### Refunding Refunding a deposit allows you to refund the amount paid by the user if their deposit is in good standing and they have finished parking with you. ### Consuming Consuming a deposit can be useful in two different scenarios when users have finished parking with you. A. The user is finished parking with you and has not returned their deposit or the deposit was not returned in good standing B. The user has lost their deposit and is finished parking with you. Consuming deposits will not charge, refund, or renew the deposit to the users account since you are essentially consuming the amount they paid. ### Renewing Renewing a deposit is similar to consuming it, however, we would use this in the case that the user wants to continue parking with you but requires to pay for the deposit due to A. Damages B. Misplacement # Pay Station Status ## Searching Pay Station Status To get to this report hover over **Parking Management** → **Temporary Permits** and click on **Pay Station Status**. From there you can click the blue **Search** button to get all results since or valid on the date that is entered in the **Valid Date/Time** field. [![image.png](https://opscom.wiki/uploads/images/gallery/2024-06/scaled-1680-/YMlimage.png)](https://opscom.wiki/uploads/images/gallery/2024-06/YMlimage.png) ## Search Options 1. The **Plate** field is used to search for a specific plate. 2. The **Valid Date/Time** field is used to search for records since or on the date that is supplied. 3. The **Zones** field is used to search for specific zones that are associated with the lots and machines. 4. The **Sort Order** will sort the individual column data and not shift the rows based on the data provided. 5. The **Validity Filter** will allow you to search between valid, non-valid, or all records. # Parking Logix - Parking Sensor Integration ## Enable Parking Logix Integration Before you can use the Parking Logix integration on your system you will need to navigate to your **Third Party** settings under **System Settings**. From there you should see the option to enable **Parking Logix Integration**. [![image.png](https://opscom.wiki/uploads/images/gallery/2024-06/scaled-1680-/3x1image.png)](https://opscom.wiki/uploads/images/gallery/2024-06/3x1image.png) ## Adding the Lot Group Next, add a new lot group to your system making sure you include the API code. It is possible but unlikely that there will be multiple API keys if lot access is split over several keys. Create a specific group for each lot you will be collecting data from. [![image.png](https://opscom.wiki/uploads/images/gallery/2024-06/scaled-1680-/5JZimage.png)](https://opscom.wiki/uploads/images/gallery/2024-06/5JZimage.png) Once the Lot Group has been configured you would need to assign it to the lot on the **LPR Settings Tab** of the Lot Administration tool. [![image.png](https://opscom.wiki/uploads/images/gallery/2024-06/scaled-1680-/3Jzimage.png)](https://opscom.wiki/uploads/images/gallery/2024-06/3Jzimage.png) ## Enable the System Task A system task must be enabled for the Parking Logix sensors to communicate with our system. This must be enabled by OPS-COM integration staff and you can contact us through support to set this up. Please email for assistance. Once the system task has been run you should see updated on the lot counts under **Manage Parking Lot Groups** [![image.png](https://opscom.wiki/uploads/images/gallery/2024-06/scaled-1680-/ve5image.png)](https://opscom.wiki/uploads/images/gallery/2024-06/ve5image.png) ## Displaying the Map on the User Side Finally, enter the short code on the user side to any of your pages using **System Messaging**. The short code is **\[parking\_logix\]** and you can pass addition parameters such as: *only, show, filter,* or *name.* This will restrict the list to show only specific lots. [![image.png](https://opscom.wiki/uploads/images/gallery/2024-06/scaled-1680-/VXJimage.png)](https://opscom.wiki/uploads/images/gallery/2024-06/VXJimage.png) By design, it will only show lots that have a group assigned to it that have an API key stored in it. [![image.png](https://opscom.wiki/uploads/images/gallery/2024-06/scaled-1680-/6Lhimage.png)](https://opscom.wiki/uploads/images/gallery/2024-06/6Lhimage.png) # QR Code Guest Temporary Permitting # Quick Steps to Configure Zero Dollar or Paid QR Codes 1. System Configuration>Users>Types - Make sure you have added the User Type of “Guest User” to the User Types in your system. 2. Continue to System Settings>Temp Permits and select the checkbox to Enable QR Codes. 3. Parking Management>Lot Administration>Pricing and Lot Admin, choose the correct lot and then, under the General tab, select Guest User as the User Type for that lot. (Removing Guest User will shut off QR code functionality for that specific lot) 4. Continue to the Temporary Parking tab and select the checkbox “This lot is for temporary parking only”. 5. For Zero dollar or Free permitting, set your hourly and/or daily costs as $0.00 where applicable, otherwise, set the correct amounts for the timeframes that you wish your users to be able to select. 6. Print, download, or click to copy the direct link to the QR code. 7. *\**Optional - Customize the look of the QR Code with your company logo by uploading the logo to the media bin then selecting it in the QR code configuration Logo field. 8. Click Update Lot and you are ready to post the QR code or provide the link to your users so they can easily scan, choose from the timeframes you have added, and add their license plate number to reserve their temp parking. # Configuring your Lots for QR Code Functionality Important Information In order to have QR code functionality for each lot, you need to Enable QR Codes in System Settings under Temp Permits. You must then add the User Type of Guest User to the user types in your system. Then in Lot Administration, choose the correct lot and under the General tab, select Guest User as a User Type for that lot. Removing Guest User will shut off QR code functionality for that specific lot. To begin using QR codes for a specific lot, you must set up the functionality in Lot Administration under the Temporary Parking tab. As you can see below, the QR code is automatically generated when you create a lot. You can customize the QR code of each lot with an image placed at the center. This image is typically your company logo which is used to brand the QR code. Upload the logo you wish to use to the media bin, and you will then be able to select it through the Logo field in QR code configuration. [![image.png](https://opscom.wiki/uploads/images/gallery/2024-06/scaled-1680-/mBVimage.png)](https://opscom.wiki/uploads/images/gallery/2024-06/mBVimage.png) It is important to set your hourly costs in order for the user to be able to select the timeframe and cost they wish to book for. Note: You can break down the pricing whatever way you wish. In the example below, the user has a choice of renting either all day or for one hour, both being free. [![image.png](https://opscom.wiki/uploads/images/gallery/2024-06/scaled-1680-/8pgimage.png)](https://opscom.wiki/uploads/images/gallery/2024-06/8pgimage.png) To print the QR code, click on the **Print QR Code** button. There is also an option to **Download QR Code** (as an SVG file), or you can click the **direct link** to copy it. The QR code and the direct link both point to the same guest permit reservation page for that lot. [![image.png](https://opscom.wiki/uploads/images/gallery/2024-06/scaled-1680-/44Pimage.png)](https://opscom.wiki/uploads/images/gallery/2024-06/44Pimage.png) # QR Code User Experience # The User Experience The user will scan the QR code with their phone [![image.png](https://opscom.wiki/uploads/images/gallery/2024-06/scaled-1680-/6Ouimage.png)](https://opscom.wiki/uploads/images/gallery/2024-06/6Ouimage.png) and be taken to the Purchase Permit page for that lot. Alternately, the user can use the direct link associated with the QR code (if provided) [![image.png](https://opscom.wiki/uploads/images/gallery/2024-06/scaled-1680-/NZ3image.png)](https://opscom.wiki/uploads/images/gallery/2024-06/NZ3image.png) Upon your first visit to the page, you will be prompted to accept the Guest Disclaimer. [![image.png](https://opscom.wiki/uploads/images/gallery/2024-06/scaled-1680-/gQMimage.png)](https://opscom.wiki/uploads/images/gallery/2024-06/gQMimage.png) Since the QR code is specific to the lot you wish to make a booking in, the lot will already be selected. You must then enter your vehicle plate and the expected duration of your stay. [![image.png](https://opscom.wiki/uploads/images/gallery/2024-06/scaled-1680-/oPGimage.png)](https://opscom.wiki/uploads/images/gallery/2024-06/oPGimage.png) Once you have selected the plate and duration, you will need to select the payment method. In most cases, the list will only contain the payment provider you are supported by. In this example, the payment method is EdgeExpress. Note: the process from this point may vary slightly from one payment provider to another, but all follow a similar path. [![image.png](https://opscom.wiki/uploads/images/gallery/2024-06/scaled-1680-/3Ulimage.png)](https://opscom.wiki/uploads/images/gallery/2024-06/3Ulimage.png) At this point, you will be taken to the payment provider where you can enter your credit card information. [![image.png](https://opscom.wiki/uploads/images/gallery/2024-06/scaled-1680-/s6Wimage.png)](https://opscom.wiki/uploads/images/gallery/2024-06/s6Wimage.png) Once the needed information has been entered, tap on **Make Payment** to proceed. [![image.png](https://opscom.wiki/uploads/images/gallery/2024-06/scaled-1680-/q0Yimage.png)](https://opscom.wiki/uploads/images/gallery/2024-06/q0Yimage.png) Once the payment has processed, you will be presented with an on-screen transaction record. [![image.png](https://opscom.wiki/uploads/images/gallery/2024-06/scaled-1680-/h6Kimage.png)](https://opscom.wiki/uploads/images/gallery/2024-06/h6Kimage.png) ## The User Receipt You will also be sent a receipt by email at this point. [![image.png](https://opscom.wiki/uploads/images/gallery/2024-06/scaled-1680-/4Woimage.png)](https://opscom.wiki/uploads/images/gallery/2024-06/4Woimage.png) # Real-Time Parking Map ## System Settings To begin using Real-Time Map for a specific lot, you must set up the functionality in Lot Administration under the Temporary Parking tab. [![image.png](https://opscom.wiki/uploads/images/gallery/2024-06/scaled-1680-/OkYimage.png)](https://opscom.wiki/uploads/images/gallery/2024-06/OkYimage.png) You must also create a page in System Messaging under the page tab. [![image.png](https://opscom.wiki/uploads/images/gallery/2024-06/scaled-1680-/YnMimage.png)](https://opscom.wiki/uploads/images/gallery/2024-06/YnMimage.png) The page you create needs to house two lines of short code: \[real-time-map\] will display a google map style window \[real-time-legend\] will display a legend indicating a definition of what the colors in the map marker represent [![image.png](https://opscom.wiki/uploads/images/gallery/2024-06/scaled-1680-/eCPimage.png)](https://opscom.wiki/uploads/images/gallery/2024-06/eCPimage.png) In lot administration there are a few required configuration elements that must be in place for the map to display properly. Firstly, in the general tab you must include Guest User as a preferred user type. It can be used alone or along with other user types if you are combining temporary parking with standard parking. [![image.png](https://opscom.wiki/uploads/images/gallery/2024-06/scaled-1680-/Cfhimage.png)](https://opscom.wiki/uploads/images/gallery/2024-06/Cfhimage.png) In the Zones and Locations Page, you must set a map marker. The color of the marker can be whatever you like in the configuration as the color will be controlled by the lot availability on the actual Real-Time map. It is preferable to have a description, or information about the lot, in the Location field. [![image.png](https://opscom.wiki/uploads/images/gallery/2024-06/scaled-1680-/gBPimage.png)](https://opscom.wiki/uploads/images/gallery/2024-06/gBPimage.png) In the Temporary Permits tab it is essential to select the following: - The Maximum number of Temp Permits - You must select either of the 30 day settings which are: Allow temp permits to be used up to 30 days or Allow temp permits to be used over 30 days. - If selecting the Over 30 Days setting, you must indicate a monthly cost in the Over 30 days Monthly Cost field (otherwise, nothing is required in this field) - You must enter a Daily Cost - You must enter Hourly costs. These can vary as required. - You must also select the Allow this lot to appear on the Real-Time Parking Map checkbox. [![image.png](https://opscom.wiki/uploads/images/gallery/2024-06/scaled-1680-/l83image.png)](https://opscom.wiki/uploads/images/gallery/2024-06/l83image.png) ## Viewing the Real-Time Map from a Publicly Accessible Link Once this information is configured you will be able to display the Real-Time Map by going to https://yourdomain.parkadmin.com/**real-time**. Hovering over the map marker will display the Lot Name and the Location Description you configured above. [![image.png](https://opscom.wiki/uploads/images/gallery/2024-06/scaled-1680-/EmQimage.png)](https://opscom.wiki/uploads/images/gallery/2024-06/EmQimage.png) Clicking on the map marker will bring you to an interface that shows more information about the lot availability and present a button whereby you can purchase a permit. Click on Book Now to continue. [![image.png](https://opscom.wiki/uploads/images/gallery/2024-06/scaled-1680-/vmoimage.png)](https://opscom.wiki/uploads/images/gallery/2024-06/vmoimage.png) ## Purchasing a Permit This will bring you to the Permit Purchase screen where you can enter your vehicle plate number and select the length of time you wish to park. [![image.png](https://opscom.wiki/uploads/images/gallery/2024-06/scaled-1680-/tVBimage.png)](https://opscom.wiki/uploads/images/gallery/2024-06/tVBimage.png) ## Viewing the Real-Time Map from an Admin Portal Menu Admins can also view the Real-time map from within the Admin Portal. To do so, go to the Parking Management menu and click on Real-Time Map. [![image.png](https://opscom.wiki/uploads/images/gallery/2024-06/scaled-1680-/xTcimage.png)](https://opscom.wiki/uploads/images/gallery/2024-06/xTcimage.png) The map will present itself in a similar fashion to the public view. [![image.png](https://opscom.wiki/uploads/images/gallery/2024-06/scaled-1680-/nvCimage.png)](https://opscom.wiki/uploads/images/gallery/2024-06/nvCimage.png) Admins can click on the map markers to see stats on the lot. [![image.png](https://opscom.wiki/uploads/images/gallery/2024-06/scaled-1680-/Ywjimage.png)](https://opscom.wiki/uploads/images/gallery/2024-06/Ywjimage.png) ## Special Spots Admins can indicate special spots in each lot. This information is displayed in the Real-Time Parking Map in the lot detail. As indicated this is informational only. This information may contain such details as the number of spaces designated for special purposes. ie: Electric Vehicle Charging, Expectant Mothers, Handicapped Accessible, etc. [![image.png](https://opscom.wiki/uploads/images/gallery/2024-06/scaled-1680-/hBximage.png)](https://opscom.wiki/uploads/images/gallery/2024-06/hBximage.png) To configure the special spots go to the parking management menu and hover over Lot Administration. Select Manage Special Space Types. [![image.png](https://opscom.wiki/uploads/images/gallery/2024-06/scaled-1680-/aBQimage.png)](https://opscom.wiki/uploads/images/gallery/2024-06/aBQimage.png) The page will refresh with the list of special space types. Click on Add New to add a Special Space Type. [![image.png](https://opscom.wiki/uploads/images/gallery/2024-06/scaled-1680-/hRhimage.png)](https://opscom.wiki/uploads/images/gallery/2024-06/hRhimage.png) Enter the description of the Special Space type. [![image.png](https://opscom.wiki/uploads/images/gallery/2024-06/scaled-1680-/hojimage.png)](https://opscom.wiki/uploads/images/gallery/2024-06/hojimage.png) To add this information to a lot, go to Lot Admin for the specific lot you wish to add information to and select the General tab. [![image.png](https://opscom.wiki/uploads/images/gallery/2024-06/scaled-1680-/Hwaimage.png)](https://opscom.wiki/uploads/images/gallery/2024-06/Hwaimage.png) Enter the number of spaces available for each Special Space type. [![image.png](https://opscom.wiki/uploads/images/gallery/2024-06/scaled-1680-/qoEimage.png)](https://opscom.wiki/uploads/images/gallery/2024-06/qoEimage.png) This information will show on the public facing Real-Time Parking Map. [![image.png](https://opscom.wiki/uploads/images/gallery/2024-06/scaled-1680-/D5gimage.png)](https://opscom.wiki/uploads/images/gallery/2024-06/D5gimage.png) # Selling Permits Using Tablet Kiosks with OPS-COM With the use of third-party apps, many tablets can be set up to act as kiosks. This means that an app or webpage can be “locked in place”, allowing users to use that page without being able to use the tablet’s other features. By combining this with OPS-COM’s guest permit links, permits can be sold from tablet kiosks. ## Background: guest permits in OPS-COM Although this is covered in other documentation pages, understanding guest permits in OPS-COM is essential for setting up kiosks, so it’s discussed briefly here. Guest permits are a way for users to reserve temporary permits (i.e. daily or hourly permits) without having to create an account and log in. Users are given a URL (often a QR code) which sends them directly to a booking page for a specific lot. There, they enter their license plate, reserve a temp permit, and proceed through a checkout. Each lot in OPS-COM has its own guest booking link for reserving temp permits. It can be accessed in the lot settings; go to *Lot Administration → Pricing & Lot Admin*, and click on the relevant lot name. Then, click on the *Temporary Permits* tab, and find the section with a QR code; the link is right below it: [![image.png](https://opscom.wiki/uploads/images/gallery/2024-06/scaled-1680-/26Uimage.png)](https://opscom.wiki/uploads/images/gallery/2024-06/26Uimage.png) This link is the page you’ll want to display on a kiosk. How to set up the lot for temporary permits and guest booking is outside the scope of this document, but there are other articles which cover it. The rest of this article will cover how to set up a tablet to stay “locked into” this booking page, so it can be used as a kiosk. ## Enabling kiosk compatible mode in OPS-COM The first step is to enable “kiosk compatible” mode from the OPS-COM admin site. Go to *System Settings → General System Settings* and toggle the option for *Enable Kiosk Compatible Mode*. This setting alters the guest checkout process in a few ways: [![image.png](https://opscom.wiki/uploads/images/gallery/2024-06/scaled-1680-/js3image.png)](https://opscom.wiki/uploads/images/gallery/2024-06/js3image.png) - Normally, after proceeding through a guest checkout, the user is directed to a receipt page. With this setting enabled, they are instead sent back to the booking page (a pop-up message tells the user whether their payment was successful or not). This way, the page is ready for the next person in line to reserve a permit. - While on a guest booking page, the navigation menu which contains the login button is hidden. This is to prevent users from logging into an account on a public kiosk. - While on a guest booking page, the site header and footer are hidden. This is because they sometimes contain links to other pages on the site, which might display the login button. - Note that these changes **only affect guest bookings**; on any page that isn’t a guest booking link, the header and footer are still displayed, users can still log in, and when logged in they can reserve permits as they normally would. Here is an example guest booking page (viewed on a tablet) with kiosk compatible mode disabled (top) and enabled (bottom): [![image.png](https://opscom.wiki/uploads/images/gallery/2024-06/scaled-1680-/t5Fimage.png)](https://opscom.wiki/uploads/images/gallery/2024-06/t5Fimage.png) [![image.png](https://opscom.wiki/uploads/images/gallery/2024-06/scaled-1680-/lGXimage.png)](https://opscom.wiki/uploads/images/gallery/2024-06/lGXimage.png) **Note:** enabling kiosk compatible mode will also affect the experience for users making a guest booking on personal devices (for example, via QR code). For this reason, **we recommend enabling this setting only if you intend to use kiosks**. ## Setting up a tablet as a kiosk Now that you have a guest booking link, and have enabled the necessary setting in OPS-COM, it’s time to address the main problem: how to prevent users from leaving the booking page when they use the tablet kiosk. There are many third-party applications that allow you to do exactly this, with varying degrees of control. For the purposes of this document, we’ll show one way this can be set up using a combination of a (free) app and some built-in features on Android. However, feel free to explore other options (“Android/iPad/Windows/etc. kiosk mode” is a good search starting point). ### Setting up a kiosk browser on Android On an Android tablet, go to the Google Play Store, and search “Fully Kiosk”. Find and download *Fully Kiosk Browser & Lockdown*: [![image.png](https://opscom.wiki/uploads/images/gallery/2024-06/scaled-1680-/f3Himage.png)](https://opscom.wiki/uploads/images/gallery/2024-06/f3Himage.png) When you first open the app, it will display some basic settings. Enter your guest permit booking link as the *Start URL*. *Fullscreen Mode* should be toggled on, while *Show Action Bar* and *Show Address Bar* should be off. Then click the “start” button. [![image.png](https://opscom.wiki/uploads/images/gallery/2024-06/scaled-1680-/GIFimage.png)](https://opscom.wiki/uploads/images/gallery/2024-06/GIFimage.png) You can access more settings in the browser by swiping from the left edge of the screen towards the middle: [![image.png](https://opscom.wiki/uploads/images/gallery/2024-06/scaled-1680-/farimage.png)](https://opscom.wiki/uploads/images/gallery/2024-06/farimage.png) If you wish to change which lot to offer parking at, the starting URL can be changed under *Web Content Settings → Start URL*. Some other settings to consider changing are: - *Web Browsing Settings → Enable Pull to Refresh* and/or *Load Start URL on Home Button*: both these options allow easy ways for users to get back to the booking page if the previous user leaves mid-process. However, be aware that clumsy users may accidentally send themselves back to the starting page when they don’t intend to! - *Web Auto Reload → Auto Reload on Idle* (setting this to 30 is recommended): this will automatically reload the start page after some seconds of inactivity, for example if the previous user leaves the kiosk mid-process. Be careful not to set this too short, or it may reload the starting page while the user fumbles for their card! - *Web Auto Reload → Auto Reload on Screen On*: reloads the starting page when the tablet screen is powered on. This only scratches the surface of the browser settings. Feel free to look more into this app (or other kiosk browser options), to see what else is possible. ### Configuring built-in Android options With the webpage locked in using a kiosk browser, the next step is to make sure users cannot leave the kiosk browser app. This can be done using built-in features in Android. The settings layout may vary slightly for different devices, but should be similar enough to follow these instructions. First, make sure the device has a security PIN or password enabled. This can be done in the *Settings* app, under *Lock screen*. Next, you’ll probably want to set the screen timeout to the maximum length possible. This can be done in the *Settings* app, under *Display → Screen timeout*. Finally, we want to “pin” the kiosk browser app. Again, go to the *Settings* app, then go to *Security and privacy → More security settings → Pin app* (enable this option). Now tap the “recent apps” button (the three bars at the bottom left of the screen). Swipe up to close each app except for the kiosk browser. Tap on the icon for the for the kiosk browser app (on the open app, not at the bottom of the screen; see the picture below) and choose *Pin this app*. [![image.png](https://opscom.wiki/uploads/images/gallery/2024-06/scaled-1680-/0Yyimage.png)](https://opscom.wiki/uploads/images/gallery/2024-06/0Yyimage.png) There should now be a notification saying the app has been pinned: [![image.png](https://opscom.wiki/uploads/images/gallery/2024-06/scaled-1680-/GDAimage.png)](https://opscom.wiki/uploads/images/gallery/2024-06/GDAimage.png) Users will now be unable to exit the app; in order to do so, they would have to hold the “recent apps” and “back” buttons at the same time, then enter the device password. # FinanceAdmin - Companies and Invoices # Company Setup and Invoices ### Create the Acme company An Admin for ABC Parking must create a company entry for ACME in OPS-COM. Hover over **User Management** and click **User Companies**. [![image.png](https://opscom.wiki/uploads/images/gallery/2024-06/scaled-1680-/8YKVuIimage.png)](https://opscom.wiki/uploads/images/gallery/2024-06/8YKVuIimage.png) The Company Search page displays. Click the **'Create New Company'** button ![](https://wiki.ops-com.com/download/attachments/39617979/2017-11-30_11-22-33.png?version=1&modificationDate=1512148430000&api=v2&effects=border-simple,shadow-kn) The Company Edit page displays. For this example the Admin will enter the following information about the ACME company. \- **Account Number:**19380688 \- **Company Name:** ACME Incorporated \- **Receives Invoices:** Checked \- **Address (Company):** 2946 Jerome Avenue \- **Invoice Emails:**James.Rockwood@ACMEINC.com \- **Contact Name:** James Rockwood \- **Address (Contact):** 4777 Ersel Street [![image.png](https://opscom.wiki/uploads/images/gallery/2024-06/scaled-1680-/I4Zimage.png)](https://opscom.wiki/uploads/images/gallery/2024-06/I4Zimage.png) Click the **'Add New Company'** button to save the information. A green confirmation message displays that the company has been added. [![image.png](https://opscom.wiki/uploads/images/gallery/2024-06/scaled-1680-/xEPimage.png)](https://opscom.wiki/uploads/images/gallery/2024-06/xEPimage.png) # Assign Users to the Acme company Search for the user profiles of the users you wish to add to the Acme company. Click User Management, User Search. [![image.png](https://opscom.wiki/uploads/images/gallery/2024-06/scaled-1680-/cpsimage.png)](https://opscom.wiki/uploads/images/gallery/2024-06/cpsimage.png) Edit the User profile and indicate if the user is an individual or as a company member. In this case they are a Company Member for Acme Company. [![image.png](https://opscom.wiki/uploads/images/gallery/2024-06/scaled-1680-/sIwimage.png)](https://opscom.wiki/uploads/images/gallery/2024-06/sIwimage.png) To designate a Company Manager, enable the **Company Manager** and **Company Billing Account** checkboxes. James Rockwood is the company manager for this example. He is the person who will pay for invoices for all users assigned to ACME. [![image.png](https://opscom.wiki/uploads/images/gallery/2024-06/scaled-1680-/zkwimage.png)](https://opscom.wiki/uploads/images/gallery/2024-06/zkwimage.png) Click the **Submit Registration Information for Processing... button to save this. In this example we added user **Colby** to the company as well. They are regular users. These user accounts that are created for the Company will not be used by the end user and are only for the Company Manager to use. # Manage the Company Account The company manager (**John Doe Welch**) logs into the **OPS-COM** user portal. Now he can manage permits for his user Colby. Click on the **Company Users** icon. [![image.png](https://opscom.wiki/uploads/images/gallery/2024-06/scaled-1680-/cnuimage.png)](https://opscom.wiki/uploads/images/gallery/2024-06/cnuimage.png) James wishes to purchase a permit for **Colbin.** He must login as the user to do so. Click the **Login as User button to the right of **Colbin's** name. [![image.png](https://opscom.wiki/uploads/images/gallery/2024-06/scaled-1680-/xthimage.png)](https://opscom.wiki/uploads/images/gallery/2024-06/xthimage.png) A blue message appears telling **John Doe Welch** that he is logged in as another user. ![](https://ops-com.atlassian.net/wiki/download/thumbnails/762653/image2018-7-10_10-24-24.png?version=1&modificationDate=1531218265000&cacheVersion=1&api=v2&width=887&height=56) Click the **Parking icon to buy a permit for **Colbin.** [![image.png](https://opscom.wiki/uploads/images/gallery/2024-06/scaled-1680-/yfLimage.png)](https://opscom.wiki/uploads/images/gallery/2024-06/yfLimage.png) In this example we selected a Standard Parking permit in **Red Student Lot West.** If the company is planning to pay for the permit through the user side (not using invoices) then **John Doe Welch** *(the company manager)* would select the ***"proceed to payment"*** button. In this example ACME company is using invoices to purchase permits. John Doe Welch would logout of the User Portal at this point. # Prepare Invoices The admin user at ABC Parking must create the invoice for the company. This is done by hovering over the Allocations menu and clicking Prepare Invoices. [![image.png](https://opscom.wiki/uploads/images/gallery/2024-06/scaled-1680-/Xjtimage.png)](https://opscom.wiki/uploads/images/gallery/2024-06/Xjtimage.png) Click the **Prepare Invoices** button beside the active sales window. The number of invoices that can be prepared for that time frame show as a number to the left of the button. [![image.png](https://opscom.wiki/uploads/images/gallery/2024-06/scaled-1680-/CyKimage.png)](https://opscom.wiki/uploads/images/gallery/2024-06/CyKimage.png) The invoice for the ACME company will be displayed, including one permit (the one created for the user **Joseph Callaghan**). Click the **Send Invoices button to send the invoice to the ACME company. **NOTE:** An invoice email template must be already in place prior to being able to prepare invoices. The email template can be modified by the Admin by going to **System Config/ Email Templates.** [![image.png](https://opscom.wiki/uploads/images/gallery/2024-06/scaled-1680-/WmIimage.png)](https://opscom.wiki/uploads/images/gallery/2024-06/WmIimage.png) A green confirmation message is displayed indicating the invoice is scheduled. [![image.png](https://opscom.wiki/uploads/images/gallery/2024-06/scaled-1680-/qNsimage.png)](https://opscom.wiki/uploads/images/gallery/2024-06/qNsimage.png) There will be an icon on the top right of the menu bar that will indicate the progress of the invoices being created. Once completed it will then be sent to the **Company Billing Account** designate. [![image.png](https://opscom.wiki/uploads/images/gallery/2024-06/scaled-1680-/m5Ximage.png)](https://opscom.wiki/uploads/images/gallery/2024-06/m5Ximage.png) In the event of an error, the Admin may opt to cancel the invoice, correct the error and then reissue the invoice. # Paying an Invoice as a Company Manager Once the company manager at ACME receives the invoice, they must log in to the **OPS-COM** user portal and click the **Payments** icon. **Joseph Callaghan's** permit now available for payment. [![image.png](https://opscom.wiki/uploads/images/gallery/2024-06/scaled-1680-/wMVimage.png)](https://opscom.wiki/uploads/images/gallery/2024-06/wMVimage.png) The Company Manager can Continue to Checkout and submit the payment in the method they prefer. This completes the cycle. # Sending Invoices in Advance of Payment 1. To begin, start a regular rollover process, by going into the **Permits** menu and selecting **Active Sales Window.** Click on **Rollover Users** to enter the rollover wizard. [![image.png](https://opscom.wiki/uploads/images/gallery/2024-06/scaled-1680-/dfqimage.png)](https://opscom.wiki/uploads/images/gallery/2024-06/dfqimage.png) 2. By **deselecting** the preferred payment method here you can perform a rollover that will not process automated payments. [![image.png](https://opscom.wiki/uploads/images/gallery/2024-06/scaled-1680-/JQximage.png)](https://opscom.wiki/uploads/images/gallery/2024-06/JQximage.png) 3. By clicking **Rollover Permits,** the system will enter these permits in a state of awaiting payment and allow for an invoice to be created. To access the invoicing tool, go into the **Payments Menu** and select **Prepare Company Invoices**. [![image.png](https://opscom.wiki/uploads/images/gallery/2024-06/scaled-1680-/xi4image.png)](https://opscom.wiki/uploads/images/gallery/2024-06/xi4image.png) 4. The **Prepare Invoice** window will open showing the users who have been set up for invoicing through the rollover process. [![image.png](https://opscom.wiki/uploads/images/gallery/2024-06/scaled-1680-/RIUimage.png)](https://opscom.wiki/uploads/images/gallery/2024-06/RIUimage.png) 5. By clicking on **Prepare Invoice**, the system will generate an email with the invoice as the body of message. # Re-Sending an Invoice When do we use this? It is also possible to change the email and **re-send** or just resend an invoice if the client requests a second copy sent. If for example the client mistakenly deleted the email, the admin has the ability to search up the original invoice and send it again. In our sample here we are looking for an invoice for **Voula Costa**. 1. To do so there are two different methods. You can find the invoice in the **user's profile under History** or you can search for the invoice through the **Search Invoice** utility. 2. Firstly let's search the user in question: In this case using the last name **Costa**. [![image.png](https://opscom.wiki/uploads/images/gallery/2024-06/scaled-1680-/8lXimage.png)](https://opscom.wiki/uploads/images/gallery/2024-06/8lXimage.png) 3. Click on the **username** to access the user's profile. [![image.png](https://opscom.wiki/uploads/images/gallery/2024-06/scaled-1680-/czwimage.png)](https://opscom.wiki/uploads/images/gallery/2024-06/czwimage.png) 4. Once in the user's profile hover over **History** and click on **All Records** to access the list of this user's transactions. [![image.png](https://opscom.wiki/uploads/images/gallery/2024-06/scaled-1680-/JLrimage.png)](https://opscom.wiki/uploads/images/gallery/2024-06/JLrimage.png) 5. Locate and click on the **invoice number** that you wish to resend. [![image.png](https://opscom.wiki/uploads/images/gallery/2024-06/scaled-1680-/tyZimage.png)](https://opscom.wiki/uploads/images/gallery/2024-06/tyZimage.png) 6. Once in the invoice preview you will notice the **Re-Send Email** button. Click on this button to re-send the invoice. [![image.png](https://opscom.wiki/uploads/images/gallery/2024-06/scaled-1680-/MDqimage.png)](https://opscom.wiki/uploads/images/gallery/2024-06/MDqimage.png) 7. The invoice will be re-sent. In the sample below there is an original invoice send as well as a re-send. Notice the email title for the re-send has a prefix added indicating this is a **Re-sent** invoice. [![image.png](https://opscom.wiki/uploads/images/gallery/2024-06/scaled-1680-/0uwimage.png)](https://opscom.wiki/uploads/images/gallery/2024-06/0uwimage.png) 8. As mentioned above you can also find the invoice you wish to resend using the **Invoice Search tool**. To do so access the tool under the **Permits** menu. Hover over **Permits** and click on **Invoice Search** in the drop down menu. [![image.png](https://opscom.wiki/uploads/images/gallery/2024-06/scaled-1680-/A8ximage.png)](https://opscom.wiki/uploads/images/gallery/2024-06/A8ximage.png) 9. In the search criteria window enter the **Invoice Number** in question and click search. In this case **Invoice Number 1018**. [![image.png](https://opscom.wiki/uploads/images/gallery/2024-06/scaled-1680-/MwOimage.png)](https://opscom.wiki/uploads/images/gallery/2024-06/MwOimage.png) 10. From the resulting search result click on the **Invoice Number** to access the **Invoice Preview Window**. [![image.png](https://opscom.wiki/uploads/images/gallery/2024-06/scaled-1680-/CMpimage.png)](https://opscom.wiki/uploads/images/gallery/2024-06/CMpimage.png) 11. The process after this point is identical to **step 6 and 7** **above**. 12. The Re-Sent Invoice will look identical the original invoice format: [![image.png](https://opscom.wiki/uploads/images/gallery/2024-06/scaled-1680-/xpYimage.png)](https://opscom.wiki/uploads/images/gallery/2024-06/xpYimage.png) 13. It is important to note that in order to print this PDF document you should follow these next steps 14. You must first navigate to the aforementioned email where you will find an attachments link circled below [![image.png](https://opscom.wiki/uploads/images/gallery/2024-06/scaled-1680-/hJfimage.png)](https://opscom.wiki/uploads/images/gallery/2024-06/hJfimage.png) 15. After opening the attached PDF file you will be brought to the file opened in the web browser. [![image.png](https://opscom.wiki/uploads/images/gallery/2024-06/scaled-1680-/RQbimage.png)](https://opscom.wiki/uploads/images/gallery/2024-06/RQbimage.png) 16. If you print form here you will receive a cut off version of this PDF. In order to prevent this you should download the file by pressing this button: [![image.png](https://opscom.wiki/uploads/images/gallery/2024-06/scaled-1680-/tkGimage.png)](https://opscom.wiki/uploads/images/gallery/2024-06/tkGimage.png) 17. Save it to your preferred location and open it with the PDF reader of your choosing [![image.png](https://opscom.wiki/uploads/images/gallery/2024-06/scaled-1680-/2Lzimage.png)](https://opscom.wiki/uploads/images/gallery/2024-06/2Lzimage.png) 18. From here you just print the invoice like you would a normal document ensuring that the print scale is set to 100% [![image.png](https://opscom.wiki/uploads/images/gallery/2024-06/scaled-1680-/lRJimage.png)](https://opscom.wiki/uploads/images/gallery/2024-06/lRJimage.png) # Permit Invoicing ## Preparing to Invoice Click **System Config** > System Settings** > **Payments**. To choose the starting Invoice number enter it in the Invoice number field. [![image.png](https://opscom.wiki/uploads/images/gallery/2024-06/scaled-1680-/TxMimage.png)](https://opscom.wiki/uploads/images/gallery/2024-06/TxMimage.png) 1. You must also setup your Invoicing template. You can do that by editing the Permit Invoice template. 2. Decide if you wish to allow unpaid permits to rollover to the next period. ## Setup Invoice Contacts There are different flags you must set so that your Companies and Individuals that require invoices will receive them. Instructions are below. 1. On the Company Edit screen, you must set the 'Invoice Emails' field to contain the email addresses you want. They can be separated by colons ( : ) or by commas as shown. This will ensure that the invoices go to the correct company contact. [![image.png](https://opscom.wiki/uploads/images/gallery/2024-06/scaled-1680-/tipimage.png)](https://opscom.wiki/uploads/images/gallery/2024-06/tipimage.png) 2. Once you have configured a user to be part of a company they will then see additional items to configure in the user's profile. For **Company Members,** an admin must designate a member to act as **Company Billing Manager**. This will be the company member that receives invoices. Note: This person **does not have to be** a Company Manager although they often designated with both roles. There can be more than one Company Manager but there should only be one Company Billing Manager. Also be aware that a **Billing Manager must be designated** in order for invoicing to be activated. 3. [![image.png](https://opscom.wiki/uploads/images/gallery/2024-06/scaled-1680-/3iXimage.png)](https://opscom.wiki/uploads/images/gallery/2024-06/3iXimage.png) 4. For **Individual users** that are not part of a company but you wish to invoice, you must edit their user profile and enable the 'Individual' checkbox and the 'Receives Invoice' checkbox. [![image.png](https://opscom.wiki/uploads/images/gallery/2024-06/scaled-1680-/NJnimage.png)](https://opscom.wiki/uploads/images/gallery/2024-06/NJnimage.png) ## Creating Permit Invoices Click **Allocations** > **Prepare Company Invoices.** [![image.png](https://opscom.wiki/uploads/images/gallery/2024-06/scaled-1680-/Sgzimage.png)](https://opscom.wiki/uploads/images/gallery/2024-06/Sgzimage.png) The 'Prepare Invoices' screen displays. A list of invoices that are ready to send will be displayed. Click **Prepare Invoice**. **Note - Currently, only permits for user types that are not Student or Staff will be shown as available for invoicing.** [![image.png](https://opscom.wiki/uploads/images/gallery/2024-06/scaled-1680-/u3Zimage.png)](https://opscom.wiki/uploads/images/gallery/2024-06/u3Zimage.png) ### **Setting Invoice Billing and Due Dates** 1. A list of invoicing for the selected allocation will display. The Admin can toggle off invoices that they do not want to send, but typically you would send all selected. **All Invoices are toggled on by default.** Set the **Billing Date** and **Due Date**. In this case billing was done on **October 25th** and the payment is due **November 1st**. [![image.png](https://opscom.wiki/uploads/images/gallery/2024-06/scaled-1680-/Haoimage.png)](https://opscom.wiki/uploads/images/gallery/2024-06/Haoimage.png) 2. Click **Send Invoices** to schedule the invoices for sending. The following message will pop up. [![image.png](https://opscom.wiki/uploads/images/gallery/2024-06/scaled-1680-/xFhimage.png)](https://opscom.wiki/uploads/images/gallery/2024-06/xFhimage.png) 3. After a few seconds the Invoicing task will be displayed on the Task Manager Icon as below. You can see the status of the task. In this case it is complete. You can click the blue "X" to clear it or leave it be. [![image.png](https://opscom.wiki/uploads/images/gallery/2024-06/scaled-1680-/uTFimage.png)](https://opscom.wiki/uploads/images/gallery/2024-06/uTFimage.png) 4. Emails will be sent to the companies selected. By default, the email will be formatted as follows: The invoice will list the names users as well as the permit numbers being purchased. **Note the Date and Due Date:** The **Date** indicated is the billing date and the **Due Date** indicates when the invoice is expected to be paid. [![image.png](https://opscom.wiki/uploads/images/gallery/2024-06/scaled-1680-/S1gimage.png)](https://opscom.wiki/uploads/images/gallery/2024-06/S1gimage.png) ## Searching for an Invoice 1. Click **Allocations > Invoice Search**. [![image.png](https://opscom.wiki/uploads/images/gallery/2024-06/scaled-1680-/gFgimage.png)](https://opscom.wiki/uploads/images/gallery/2024-06/gFgimage.png) 2. The '**Search for Invoices**' screen displays. You can search for a specific invoice or for an invoice issued during a range of dates. You can also eliminate canceled or paid invoices from the search parameters. In this case we are searching for a date range. [![image.png](https://opscom.wiki/uploads/images/gallery/2024-06/scaled-1680-/dkiimage.png)](https://opscom.wiki/uploads/images/gallery/2024-06/dkiimage.png) 3. Click on an ***invoice number*** to see a copy of the invoice that will be sent to the client. **Note:** If you wish to print this you can right click and print it out of your browser. You can also print to a PDF if required. [![image.png](https://opscom.wiki/uploads/images/gallery/2024-06/scaled-1680-/vhTimage.png)](https://opscom.wiki/uploads/images/gallery/2024-06/vhTimage.png) 4. You can also export this report to Excel. This will show you the revenue for a selected date range by Lot. [![image.png](https://opscom.wiki/uploads/images/gallery/2024-06/scaled-1680-/589image.png)](https://opscom.wiki/uploads/images/gallery/2024-06/589image.png) ## Re-Sending an Invoice When do we use this? It is also possible to **re-send** an invoice if the client requests a second copy sent. If for example the client mistakenly deleted the email, the admin has the ability to search up the original invoice and send it again. In our sample here we are looking for an invoice for **Voula Costa**. 1. To do so there are two different methods. You can find the invoice in the **user's profile under History** or you can search for the invoice through the **Search Invoice** utility. 2. Firstly let's search the user in question: In this case using the last name **Costa**. [![image.png](https://opscom.wiki/uploads/images/gallery/2024-06/scaled-1680-/qhdimage.png)](https://opscom.wiki/uploads/images/gallery/2024-06/qhdimage.png) 3. Click on the **username** to access the user's profile. [![image.png](https://opscom.wiki/uploads/images/gallery/2024-06/scaled-1680-/iO3image.png)](https://opscom.wiki/uploads/images/gallery/2024-06/iO3image.png) 4. Once in the user's profile hover over **History** and click on **All Records** to access the list of this user's transactions. [![image.png](https://opscom.wiki/uploads/images/gallery/2024-06/scaled-1680-/zw3image.png)](https://opscom.wiki/uploads/images/gallery/2024-06/zw3image.png) 5. Locate and click on the **invoice number** that you wish to resend. [![image.png](https://opscom.wiki/uploads/images/gallery/2024-06/scaled-1680-/geuimage.png)](https://opscom.wiki/uploads/images/gallery/2024-06/geuimage.png) 6. Once in the invoice preview you will notice the **Re-Send Email** button. Click on this button to re-send the invoice. [![image.png](https://opscom.wiki/uploads/images/gallery/2024-06/scaled-1680-/7Dbimage.png)](https://opscom.wiki/uploads/images/gallery/2024-06/7Dbimage.png) 7. The invoice will be re-sent. In the sample below there is an original invoice send as well as a re-send. Notice the email title for the re-send has a prefix added indicating this is a **Re-sent** invoice. [![image.png](https://opscom.wiki/uploads/images/gallery/2024-06/scaled-1680-/53Uimage.png)](https://opscom.wiki/uploads/images/gallery/2024-06/53Uimage.png) 8. As mentioned above you can also find the invoice you wish to resend using the **Invoice Search tool**. To do so access the tool under the **Permits** menu. Hover over **Permits** and click on **Invoice Search** in the drop down menu. [![image.png](https://opscom.wiki/uploads/images/gallery/2024-06/scaled-1680-/DDUimage.png)](https://opscom.wiki/uploads/images/gallery/2024-06/DDUimage.png) 9. In the search criteria window enter the **Invoice Number** in question and click search. In this case **Invoice Number 1018**. [![image.png](https://opscom.wiki/uploads/images/gallery/2024-06/scaled-1680-/kXgimage.png)](https://opscom.wiki/uploads/images/gallery/2024-06/kXgimage.png) 10. From the resulting search result click on the **Invoice Number** to access the **Invoice Preview Window**. [![image.png](https://opscom.wiki/uploads/images/gallery/2024-06/scaled-1680-/oG7image.png)](https://opscom.wiki/uploads/images/gallery/2024-06/oG7image.png) 11. The process after this point is identical to **step 6 and 7** **above**. 12. The Re-Sent Invoice will look identical the original invoice format: [![image.png](https://opscom.wiki/uploads/images/gallery/2024-06/scaled-1680-/Bumimage.png)](https://opscom.wiki/uploads/images/gallery/2024-06/Bumimage.png) ## Printing From Emailed PDF 1. It is important to note that in order to print this PDF document you should follow these next steps 2. You must first navigate to the email of the invoice in the client email where you will find an attachments link circled below [![image.png](https://opscom.wiki/uploads/images/gallery/2024-06/scaled-1680-/RPTimage.png)](https://opscom.wiki/uploads/images/gallery/2024-06/RPTimage.png) 3. After opening the attached PDF file you will be brought to the file opened in the web browser. [![image.png](https://opscom.wiki/uploads/images/gallery/2024-06/scaled-1680-/3Btimage.png)](https://opscom.wiki/uploads/images/gallery/2024-06/3Btimage.png) 4. If you print form here you will receive a cut off version of this PDF. In order to prevent this you should download the file by pressing this button: [![image.png](https://opscom.wiki/uploads/images/gallery/2024-06/scaled-1680-/nj8image.png)](https://opscom.wiki/uploads/images/gallery/2024-06/nj8image.png) 5. Save it to your preferred location and open it with the PDF reader of your choosing [![image.png](https://opscom.wiki/uploads/images/gallery/2024-06/scaled-1680-/VhLimage.png)](https://opscom.wiki/uploads/images/gallery/2024-06/VhLimage.png) 6. From here you just print the invoice like you would a normal document ensuring that the print scale is set to 100% [![image.png](https://opscom.wiki/uploads/images/gallery/2024-06/scaled-1680-/v8Dimage.png)](https://opscom.wiki/uploads/images/gallery/2024-06/v8Dimage.png) ## Cancelling an Invoice Note If you have issued an invoice then the company would like users removed or changes made, you **MUST** cancel the invoice from the **Invoice Search** page. If you don't it will show up twice as revenue for that month and **both** invoices will be due for payment. You cannot remove invoices directly from users payment tabs. 1. If you wish to cancel and invoice click the ***cancel*** button. The following prompt will display. [![image.png](https://opscom.wiki/uploads/images/gallery/2024-06/scaled-1680-/cFkimage.png)](https://opscom.wiki/uploads/images/gallery/2024-06/cFkimage.png) 2. Click '**Cancel Invoice**' and the invoice will now show up as Cancelled on the report. [![image.png](https://opscom.wiki/uploads/images/gallery/2024-06/scaled-1680-/OQSimage.png)](https://opscom.wiki/uploads/images/gallery/2024-06/OQSimage.png) 3. Make your changes as required to the permits and users then go back to Prepare Invoices. That company should be there to reissue as long as the changes you made are not further back than a year. # ViolationAdmin and Appeals # Ticket Warnings Explained Below is, a **sample of a warning ticket, a sample of an actual violation ticket** and a **sample of the back of a ticket/warning** provided by the OPS-COM software. [![image.png](https://opscom.wiki/uploads/images/gallery/2024-06/scaled-1680-/bjXimage.png)](https://opscom.wiki/uploads/images/gallery/2024-06/bjXimage.png) ## Explanation of the Front of the Ticket/Warning **Ticket Number** - This is a system assigned number that identifies each individual violation/warning. **Date** - This is the date that the violation/warning was issued on. **Ticket Type** - This identifies the type of violation that occurred (broad range category). **License Plate** - This is the license plate number for the vehicle that incurred the violation. **Province** - This is the province that the license plate is issued in. **Offense Type** - This identifies the specific violation that occurred. **Location** - This identifies the location where the violation occurred. **Writer** - This is a system assigned number that identifies the enforcement officer that issued the violation. Each enforcement officer has their own unique number and can be verified by administrators. The writer is identified by a unique identifier to provide security to the enforcement officer. If you require more information about the ticket writer you can search the violation on the admin side and get an actual name for the person who wrote the ticket. **Fine** - This is the amount owed for the particular violation. Note, on the warning ticket the amount is followed by "\*Warning". This indicates that the amount on the ticket is not owing, but this is the amount that would be due if a ticket for the same violation was issued. **Towing** - This is the amount due if the vehicle that incurred the violation had to be towed. **Comments** - This section includes any additional notes that the enforcement officer wants to include. ## Explanation of the Back of the Ticket/Warning The back of the ticket provides details about the organization that issued the ticket and the policies and procedures regarding the ticket. The back ***clearly identifies how the violator can pay or appeal the ticket*** with a section for the violator to identify themselves and sign off on the ticket. The back also identifies where to find additional information on the organization and the office hours. ## Warnings and Spoiled Tickets **Warning** is a warning that the user has broken the rules. The warning is tracked as a zero dollar violation that is processed immediately upon syncing to the server. The idea here is that a user will still get a ticket, but won't have to pay for it. A slap on the wrist as they say.. **Spoiled** refers to the old concept of spoiling a ticket. Back in the day (of paper!) a patrol might be writing up a ticket and the user shows up and moves their car. The ticket is then said to be spoiled, or another example might be a patrol entering the wrong plate/vehicle details. This is also a void type ticket and in this case like it never happened. # Security PIN on Violations - How is it used ## The Ticket PIN The ***additional dash*** and ***2 digits*** at the end of the violations are known as a "**Ticket Security PIN**". It may look like it's part of the ticket number, but it's not. It's only used as a password for the ticket when appealing it. [![image.png](https://opscom.wiki/uploads/images/gallery/2024-06/scaled-1680-/Eb0image.png)](https://opscom.wiki/uploads/images/gallery/2024-06/Eb0image.png) As an example when creating a violation, it appeared as **TT-10016-8T** The actual internal ticket number is TT-10016-8T, same format as it has always been. If you search violation TT-10016 in violation search it will appear as TT-10016. Additionally, if someone did type in the ticket number and PIN (TT-10016-8T) it would return the same ticket. This means the reports in the FTP file, for example, will only reference TT-10016 as the ticket number, not the additional -8T. Additionally, the code that generates the FTP files isn't going to change/add the pin. FTP reports will remain unchanged by the addition of the violation PIN. No PIN will be shown in the mailed out the violation. The PIN is only used when appealing tickets if the user isn't logged in. As an example, you can see the "**Lookup your** **Ticket**" box on the login screen here. The PIN is used in that box to give some protection from public users just looking up sequential ticket numbers. [![image.png](https://opscom.wiki/uploads/images/gallery/2024-06/scaled-1680-/ICgimage.png)](https://opscom.wiki/uploads/images/gallery/2024-06/ICgimage.png) Click on the box that says "**Lookup your** **Ticket**". You should now see the following screen. Enter in the ticket number and PIN. [![image.png](https://opscom.wiki/uploads/images/gallery/2024-06/scaled-1680-/W7timage.png)](https://opscom.wiki/uploads/images/gallery/2024-06/W7timage.png) Once you click check you will be presented with a screen that allows you to appeal or pay the ticket. Notice when the record of the ticket is found it does not include the PIN. [![image.png](https://opscom.wiki/uploads/images/gallery/2024-06/scaled-1680-/OXHimage.png)](https://opscom.wiki/uploads/images/gallery/2024-06/OXHimage.png) ## Removing the Pin 1. If you wish to remove the **PIN** from the printed ticket, this can be done from the **System Settings** located under the **System Config** tab. [![image.png](https://opscom.wiki/uploads/images/gallery/2024-06/scaled-1680-/Lfpimage.png)](https://opscom.wiki/uploads/images/gallery/2024-06/Lfpimage.png) 2. Look for **Violations** in the list of components on the left: [![image.png](https://opscom.wiki/uploads/images/gallery/2024-06/scaled-1680-/KGgimage.png)](https://opscom.wiki/uploads/images/gallery/2024-06/KGgimage.png) 3. Click on **Violations** to view and edit the settings. By default the setting for including a random PIN number to the ticket number when printed is enabled. To remove the PIN, ensure that the **Include Random PIN on Handheld Tickets** box is toggled off. [![image.png](https://opscom.wiki/uploads/images/gallery/2024-06/scaled-1680-/xYBimage.png)](https://opscom.wiki/uploads/images/gallery/2024-06/xYBimage.png) # Manual Violation Entry ## Entering a Violation Hover over the **Violations** icon and click **Violation Entry**. [![image.png](https://opscom.wiki/uploads/images/gallery/2024-06/scaled-1680-/8vgimage.png)](https://opscom.wiki/uploads/images/gallery/2024-06/8vgimage.png) The **Enter Basic Violation Information** screen is displayed. The numbered fields are explained below: **\#1 - Spoiled** - This is used to cancel a manual ticket. This allows incrementally numbered paper violations to be accounted for. **\#2 - Auto Generated** - Ticket numbers can now be Auto Generated if this checkbox is enabled. **\#3 - Warning** - All violations can now be issued as a warning by enabling the 'Warning' checkbox. You will no longer pick 'Warning' as a Ticket Type. **\#4 and #5** - Vehicle or Person - If you have the features enabled you can issue a violation to a Vehicle or a Person. [![image.png](https://opscom.wiki/uploads/images/gallery/2024-06/scaled-1680-/rQcimage.png)](https://opscom.wiki/uploads/images/gallery/2024-06/rQcimage.png) Enter all known information in the fields provided. Click the **Search Vehicles** button to find vehicle information by the license plate or VIN number. You can choose a vehicle or add a new one from the Search area. There are a number of actions you can take from this screen. - If you click the Plate number, you will select the vehicle. - If you click the Pencil ![](https://ops-com.atlassian.net/wiki/download/thumbnails/757499/pencil.png?version=1&modificationDate=1494342268000&cacheVersion=1&api=v2&width=30&height=28)you can edit the vehicle details - If you click the Permit you![](https://ops-com.atlassian.net/wiki/download/thumbnails/757499/permitbut.png?version=1&modificationDate=1494342268000&cacheVersion=1&api=v2&width=30&height=25) can look at the Permit details for the vehicle. - If you click the Red Flag, you can view Alarms related to this individual. Note, this will only be available if you have the Alarms features enabled. - If you click the Red Alerts button, you can see the Incident Alerts associated with this individual. Note, this will only be available if you have the Incidents features turned on. [![image.png](https://opscom.wiki/uploads/images/gallery/2024-06/scaled-1680-/3plimage.png)](https://opscom.wiki/uploads/images/gallery/2024-06/3plimage.png) After you have selected the correct fields click the **Enter Violation** button to proceed. ## Entering and Confirming Violation Information The **Enter Violation Information** screen is displayed. Allowing the Administrator to enter more details about the Violation. [![image.png](https://opscom.wiki/uploads/images/gallery/2024-06/scaled-1680-/KVrimage.png)](https://opscom.wiki/uploads/images/gallery/2024-06/KVrimage.png) Click the **Record this Violation** button. The **Confirm Violation Information** screen is displayed. Verify the details are correct and click the **Information Correct** button to save the violation. [![image.png](https://opscom.wiki/uploads/images/gallery/2024-06/scaled-1680-/DZAimage.png)](https://opscom.wiki/uploads/images/gallery/2024-06/DZAimage.png) ## Violation Entry Completed Once you have submitted the violation the Violation Entry Complete screen will appear where you can choose to print, view, search violations. [![image.png](https://opscom.wiki/uploads/images/gallery/2024-06/scaled-1680-/A2Pimage.png)](https://opscom.wiki/uploads/images/gallery/2024-06/A2Pimage.png) ## Manually Entering Hard Copy or Anonymous Ticket Searching a vehicle that does not exist in the system will allow you to write an anonymous ticket to that plate or to transcribe hard copied tickets with no users. The user can then navigate to the login screen and pay for the ticket using OPS-COM Quick Pay/Guest Payments without logging in. [![image.png](https://opscom.wiki/uploads/images/gallery/2024-06/scaled-1680-/2rWimage.png)](https://opscom.wiki/uploads/images/gallery/2024-06/2rWimage.png) # Configure Violations to a Person #### Setting up Violation Entries Before you can issue violations you must enable **Link violations to users** in System Settings, Violations before issuing violations by person or vehicle. [![image.png](https://opscom.wiki/uploads/images/gallery/2024-06/scaled-1680-/KKNimage.png)](https://opscom.wiki/uploads/images/gallery/2024-06/KKNimage.png) ## Managing Ticket Categories Hover over **Admin Options**, select **Violations**, then **Manage Ticket Categories** [![image.png](https://opscom.wiki/uploads/images/gallery/2024-06/scaled-1680-/DGIimage.png)](https://opscom.wiki/uploads/images/gallery/2024-06/DGIimage.png) Select the Ticket Category that is being updated to allow users to receive violations, in this example Municipal is being selected [![image.png](https://opscom.wiki/uploads/images/gallery/2024-06/scaled-1680-/oyuimage.png)](https://opscom.wiki/uploads/images/gallery/2024-06/oyuimage.png) Select Users in the **Violation Applies To** section [![image.png](https://opscom.wiki/uploads/images/gallery/2024-06/scaled-1680-/060image.png)](https://opscom.wiki/uploads/images/gallery/2024-06/060image.png) Now when entering a violation of this offence type it will be possible to apply the violation to a person. [![image.png](https://opscom.wiki/uploads/images/gallery/2024-06/scaled-1680-/FTlimage.png)](https://opscom.wiki/uploads/images/gallery/2024-06/FTlimage.png) # Search for a Violation To search for violations hover over the **Violations** icon and click **Search** [![image.png](https://opscom.wiki/uploads/images/gallery/2024-06/scaled-1680-/Wmbimage.png)](https://opscom.wiki/uploads/images/gallery/2024-06/Wmbimage.png) The **Violation Search** screen is displayed. Type the plate number or violation you want to search for and click the **Search using only text** button. You can also **Search with text and date range** if you want to narrow down the search parameters to a specific date range. As you can see below, there are a number of search parameters you can choose from to further enhance your search results. [![image.png](https://opscom.wiki/uploads/images/gallery/2024-06/scaled-1680-/Esfimage.png)](https://opscom.wiki/uploads/images/gallery/2024-06/Esfimage.png) At the bottom of the '**Violation Search'** screen, the returned records will be displayed. [![image.png](https://opscom.wiki/uploads/images/gallery/2024-06/scaled-1680-/Fvximage.png)](https://opscom.wiki/uploads/images/gallery/2024-06/Fvximage.png) 4\. Click the **Ticket Number** to open the '**Violation Information**' window. Click '**Edit/Update**' to display the '**Edit Violation Information'** screen to make changes if required. From this window, you can also link the Violation to an incident if you have the Incident Module available. Alternatively, you can make a payment or add Notes to the Violation. [![image.png](https://opscom.wiki/uploads/images/gallery/2024-06/scaled-1680-/JIKimage.png)](https://opscom.wiki/uploads/images/gallery/2024-06/JIKimage.png) ### Searching By Time Frame 1. It is also possible to search for violations using a time frame filter. In our example here we are searching for any violation written between the hours of 4:00pm and 8:00pm on February 27th. To access the time setting click on "with time" beside the date field. [![image.png](https://opscom.wiki/uploads/images/gallery/2024-06/scaled-1680-/pqIimage.png)](https://opscom.wiki/uploads/images/gallery/2024-06/pqIimage.png) This will bring up a an interface where you can chose both date and time: In this example for the start time we are selecting Feb. 27th at 4:00pm (1600 hours). [![image.png](https://opscom.wiki/uploads/images/gallery/2024-06/scaled-1680-/q17image.png)](https://opscom.wiki/uploads/images/gallery/2024-06/q17image.png) 2. Set the up to and including date and time in a similar fashion. Note that the time blocks are in one hour segments so to choose 8:00pm you would need to select hour 19 which would include 7:00 to 7:59 and appear in the date and time field as 19:59 (see above) 3. [![image.png](https://opscom.wiki/uploads/images/gallery/2024-06/scaled-1680-/WqSimage.png)](https://opscom.wiki/uploads/images/gallery/2024-06/WqSimage.png) By using this filtering method the search will return only violations that were issued between 4:00PM and 7:59pm on February 27th, [![image.png](https://opscom.wiki/uploads/images/gallery/2024-06/scaled-1680-/aBvimage.png)](https://opscom.wiki/uploads/images/gallery/2024-06/aBvimage.png) # Paying a Violation 1. Click **Violations** then **Search**. [![image.png](https://opscom.wiki/uploads/images/gallery/2024-06/scaled-1680-/svPimage.png)](https://opscom.wiki/uploads/images/gallery/2024-06/svPimage.png) 2.The **Violation Search** screen displays. Enter the ***violation number*** in the Search Text field. [![image.png](https://opscom.wiki/uploads/images/gallery/2024-06/scaled-1680-/yFyimage.png)](https://opscom.wiki/uploads/images/gallery/2024-06/yFyimage.png) In this case we are looking for Ticket Numeber 10-01004 [![image.png](https://opscom.wiki/uploads/images/gallery/2024-06/scaled-1680-/vFFimage.png)](https://opscom.wiki/uploads/images/gallery/2024-06/vFFimage.png) 3\. In the search results. click on the ***ticket number*** to see the **Violation Information.** [![image.png](https://opscom.wiki/uploads/images/gallery/2024-06/scaled-1680-/M9Jimage.png)](https://opscom.wiki/uploads/images/gallery/2024-06/M9Jimage.png) 4\. From the Violation information window click '**Make Payment'**. [![image.png](https://opscom.wiki/uploads/images/gallery/2024-06/scaled-1680-/Lddimage.png)](https://opscom.wiki/uploads/images/gallery/2024-06/Lddimage.png) 5\. The **Payment Due screen** for the user's profile will display. Note: If there are more than one item to be paid the Admin can select by checkbox the items the user wishes to pay. 6\. Click **'Proceed to Payment.'** [![image.png](https://opscom.wiki/uploads/images/gallery/2024-06/scaled-1680-/jhiimage.png)](https://opscom.wiki/uploads/images/gallery/2024-06/jhiimage.png) 7\. The screen will refresh with the specific purchase information you requested. Select the payment type you wish to process the item with. In our case we are processing a cash transaction. 8\. Click **Submit Payment Information**. [![image.png](https://opscom.wiki/uploads/images/gallery/2024-06/scaled-1680-/9Myimage.png)](https://opscom.wiki/uploads/images/gallery/2024-06/9Myimage.png) 9\. The screen will refresh with a confirmation screen. Click **'Confirm Payment Information**' to continue. [![image.png](https://opscom.wiki/uploads/images/gallery/2024-06/scaled-1680-/VZjimage.png)](https://opscom.wiki/uploads/images/gallery/2024-06/VZjimage.png) 10\. The **Transaction Details** window opens. This will list the item/s being paid for. Click **'Process Manually'** to complete the transaction. You may also choose **'Cancel Transaction'** to back out of this action. [![image.png](https://opscom.wiki/uploads/images/gallery/2024-06/scaled-1680-/j32image.png)](https://opscom.wiki/uploads/images/gallery/2024-06/j32image.png) 11\. The system will process the payment and return to the **Transaction Details** page. There are several pieces of information that can be seen here. - The confirmation number of the transaction - The violation information (User's Name, Amount of the fine, The date Submitted, Comments and Payment Type) - The Date Processed and the name of the Admin user who processed the payment [![image.png](https://opscom.wiki/uploads/images/gallery/2024-06/scaled-1680-/Vpgimage.png)](https://opscom.wiki/uploads/images/gallery/2024-06/Vpgimage.png) Once the payment has been made you can see in the user's history that the violation has been paid and marked processed. [![image.png](https://opscom.wiki/uploads/images/gallery/2024-06/scaled-1680-/SKyimage.png)](https://opscom.wiki/uploads/images/gallery/2024-06/SKyimage.png) # Edit a Violation ## Searching for the Violation Follow the steps to search for a violation - Search for a Violation as an Administrator At the bottom of the **Violation Search** screen, the returned records will be displayed. Getting to the Violation Information Click the **TICKET#** to open the **Violation Information** window. [![image.png](https://opscom.wiki/uploads/images/gallery/2024-06/scaled-1680-/WjHimage.png)](https://opscom.wiki/uploads/images/gallery/2024-06/WjHimage.png) A new window will appear with the **Violation Information.** You can edit the violation from the **Edit** button at the top right, or by using the **Action** dropdown menu. [![image.png](https://opscom.wiki/uploads/images/gallery/2024-06/scaled-1680-/MSnimage.png)](https://opscom.wiki/uploads/images/gallery/2024-06/MSnimage.png) You will be taken to the Edit Violation Information window. [![image.png](https://opscom.wiki/uploads/images/gallery/2024-06/scaled-1680-/3rCimage.png)](https://opscom.wiki/uploads/images/gallery/2024-06/3rCimage.png) ## Editing the Violation and Important Information IMPORTANT **APPEALS GRANTED, REDUCED OR CANCELLED TICKETS CANNOT BE EDITED AGAIN AND ARE NO LONGER ELIGIBLE FOR DISCOUNTS.** **Violation Notes can be used for further comments. If the ticket has been appealed and the user goes to a higher power to have the ticket overturned, then you can edit the ticket and change it to a warning this will keep the information and change it to a zero value and complete the processing. This will also keep the history so that the Admin will still know that they had a ticket in the past. A comment can be added to the warning to further explain** Administrators can make changes to basic information and deal with appeals for this Violation however once a user pays for the violation the comments are locked and admins must use the **Violation Notes** for further comments. Simply click the **Ticket has not been appealed. Show appeals form** text to get the appeal information. Highlighted in yellow is the Appeals section. The different fields in the 'Appeals Area' are explained below: **Ticket Appealed -** This is the date in the first picker and how the appeal was filed in the second picker. **Fine Action -** Choose from Upheld, Reduced or Cancelled **Offense Value -** The amount can be manually edited if Reduced on appeal but will automatically be reduced to 0.00 if Cancelled. You can also edit the Offence Value directly. **Appeal Reason -** The reason for launching the appeal can be recorded here. This field can be viewed by the user. **Appeal Admin Comment -** This is for private appeal notes. These notes are not viewable by the user. [![image.png](https://opscom.wiki/uploads/images/gallery/2024-06/scaled-1680-/2VUimage.png)](https://opscom.wiki/uploads/images/gallery/2024-06/2VUimage.png) Change the Actioned per: field by selecting the Admin account making the changes from the picker. Click **Update this Violation** and a message will appear letting you know that the violation has been updated. [![image.png](https://opscom.wiki/uploads/images/gallery/2024-06/scaled-1680-/A0Qimage.png)](https://opscom.wiki/uploads/images/gallery/2024-06/A0Qimage.png) # Appeals Report To review appeals as an admin hover over the **Violations** icon and click **Appeals** and then select **Appeals Report**. [![image.png](https://opscom.wiki/uploads/images/gallery/2024-06/scaled-1680-/iKzimage.png)](https://opscom.wiki/uploads/images/gallery/2024-06/iKzimage.png) The **Appeals Report** page is displayed with information related to the violation and appeal date. [![image.png](https://opscom.wiki/uploads/images/gallery/2024-06/scaled-1680-/In6image.png)](https://opscom.wiki/uploads/images/gallery/2024-06/In6image.png) Click **View Info** beside a person's name to get details on that appeal. The **User Appeal History** screen displays. Additional Options If you click the person's ***username***, you will be taken to the **Edit User Profile** page. If you click the ticket number, you will be able to view the **Violation Information** page. [![image.png](https://opscom.wiki/uploads/images/gallery/2024-06/scaled-1680-/3Egimage.png)](https://opscom.wiki/uploads/images/gallery/2024-06/3Egimage.png) All information on the appeal is displayed. The user history is displayed as well as user and vehicle information. Click the **Action Taken** picker and choose to **Uphold, Reduce or Cancel this violation**. In this example, **Reduce Violation** has been selected and a new fine amount is entered. In the box for **Comments to Send to Appellant**, enter your comments regarding your appeal decision. Click the **Submit** button when finished to process the appeal and to email the user. This is an example of the email that will go to the user, your email might look different from ours depending on your set up. [![image.png](https://opscom.wiki/uploads/images/gallery/2024-06/scaled-1680-/Ropimage.png)](https://opscom.wiki/uploads/images/gallery/2024-06/Ropimage.png) Alternatively, you can follow steps taken from the 'Edit a Violation as an Administrator' page excerpted below:
**Edit a Violation**
Administrators can make changes to basic information and deal with appeals for this Violation however once a user pays for the violation the comments are locked and admins must use the **Violation Notes** for further comments. Simply click the **Ticket has not been appealed. Show appeals form** text to get the appeal information.
Highlighted in yellow is the Appeals section. The different fields in the 'Appeals Area' are explained below: **Ticket Appealed -** This is the date in the first picker and how the appeal was filed in the second picker. **Fine Action -** Choose from Upheld, Reduced or Cancelled **Offense Value -** The amount can be manually edited if Reduced on appeal but will automatically be reduced to 0.00 if Cancelled. You can also edit the Offence Value directly. **Appeal Reason -** The reason for launching the appeal can be recorded here. This field can be viewed by the user. **Appeal Admin Comment -** This is for private appeal notes. These notes are not viewable by the user. [![image.png](https://opscom.wiki/uploads/images/gallery/2024-06/scaled-1680-/Fybimage.png)](https://opscom.wiki/uploads/images/gallery/2024-06/Fybimage.png) Change the Actioned per: field by selecting the Admin account making the changes from the picker. Click **Update this Violation** and a message will appear letting you know that the violation has been updated. [![image.png](https://opscom.wiki/uploads/images/gallery/2024-06/scaled-1680-/w0Vimage.png)](https://opscom.wiki/uploads/images/gallery/2024-06/w0Vimage.png) # Handhelds Devices Settings ## Navigate to Handhelds Devices Select **System Configuration → Violations → Handhelds Devices.** [![image.png](https://opscom.wiki/uploads/images/gallery/2024-06/scaled-1680-/ryAimage.png)](https://opscom.wiki/uploads/images/gallery/2024-06/ryAimage.png) The **Handhelds - Common Settings** screen appears where you can edit the number of days before a ticket is due, customize the ticket footer, view device information, and manage handhelds. [![image.png](https://opscom.wiki/uploads/images/gallery/2024-06/scaled-1680-/2KMimage.png)](https://opscom.wiki/uploads/images/gallery/2024-06/2KMimage.png) ## Adding A New Device When adding a new handheld device start by installing the OPS-COM for Android software. After first login you will get a notice that the device is not registered and the message will give you a UUID number to be used. It's a 16 digit alphanumeric code that appears under your login screen. Use that UUID to configure your Handheld Common registration process. Once in Handheld Common click on **Add New Device**. A screen will open up where you must add: - The **UUID *(****Where is the UUID? **First Time Installation - Android)*** - Set a **Server to Sync with** (always start with the Production Server) - A **name** you'd like to use to identify this device by. Also important is to ensure Enabled is selected at the top of the entry form. Once you have this information in place click on **Add Device** [![image.png](https://opscom.wiki/uploads/images/gallery/2024-06/scaled-1680-/u40image.png)](https://opscom.wiki/uploads/images/gallery/2024-06/u40image.png) ## Pushing Messages You can also push messages out to handheld units. Click the '**Push Message**' button and follow the prompts. [![image.png](https://opscom.wiki/uploads/images/gallery/2024-06/scaled-1680-/7deimage.png)](https://opscom.wiki/uploads/images/gallery/2024-06/7deimage.png) [![image.png](https://opscom.wiki/uploads/images/gallery/2024-06/scaled-1680-/6Weimage.png)](https://opscom.wiki/uploads/images/gallery/2024-06/6Weimage.png) ## Updating Device Data Click the device you wish to update to get a drop-down list of the settings you can change. [![image.png](https://opscom.wiki/uploads/images/gallery/2024-06/scaled-1680-/cj3image.png)](https://opscom.wiki/uploads/images/gallery/2024-06/cj3image.png) Make sure you select **Process Updates** when you are finished. Important Note - Additional Information By virtue of how the Handheld Common tool functions. It's always part of the process to start setting up a unit on the production side regardless of whether it is to be used in Production or as a test unit on Preview. For initial handheld connection, the system always connects to production first, then looks at the PA Common/handheld assignment table where the units are registered to then know if they are registered on Production or Preview. That's the logic path so it is important to always write the tables from production side first. Additionally, this is why we can refresh preview sites without loosing the Handheld units that are configured to specific preview sites. ## Adding a Handheld Unit to Preview for Testing To add a handheld unit to preview you must first add it to handheld common on the production admin portal. You would fill everything in as normal but select the preview server as the entry in **Sync With**. This will set the proper route for the handheld unit in the database. You will then need to go to the preview server and enter the same information into the preview site. Then perform a reinstall of the software. This will allow the handheld to pick up the new path to preview that you have set. Once the entry is in both Production and Preview you can switch back and forth fairly easily. You repoint the sync with setting to the preferred path on both Production and Preview. You have to do a reinstall each time you change the path in order for the handheld unit itself to be updated with the selected path. # Municipal Violations and Collections ## Introduction Municipal clients located within Ontario have specific processes for violation offences to be sent through. The two relevant processes are the **POA (Provincial Offenses Act)** and the **AMPS (Administrative Monetary Penalty System)**. Municipalities will prescribe to one process or the other. OPS-COM supports most aspects of the POA process and is considered as a Permitted Recipient under ARIS rules. The POA process is used when a violation is given to a vehicle that has no user information present within the system. This process involves sending out vehicle data to the transportation authority (MTO) to receive additional user information, so any outstanding violations on the vehicle can be sent to court for collections. This article will explain the process involved in the life-cycle of a violation for one municipality in Ontario, including interactions with the Ministry of Transportation (MTO) and the Ontario court system. It is important to note these violations would be issued to a vehicle by license plate number. Unless the driver is a registered user in the OPS-COM system, the actual owner of the vehicle would not be known. ---
> A client must be setup beforehand to use the MTO Lookup and the Court Requested Conviction status and workflow. This could require custom development fees to handle the client’s setup. Currently, this process is only available for use within the Ontario court system. > > In addition to the OPS-COM setup, the client must work with the MTO to become an Authorized Requester of the MTO information. The process can be started by contacting [ARIS@ontario.ca](mailto:ARIS@ontario.ca "mailto:ARIS@ontario.ca") and requesting a RAW data account. > > *Please contact your sales representative for more information.* ## An Example Consider a municipal client that has the following violation life-cycle: 1. A violation is issued with **7 days** to pay during which the fine amount may be discounted. 2. On the 8th day, the fine is no longer discounted. 3. Weekly, all tickets that have reached their **15th day** of non-payment are sent to the MTO to do a lookup of relevant driver info. 4. The MTO will send a return file containing the driver information for the vehicle involved in the violation, including address and driver's license number, to be stored temporarily in the database. 1. Notice letters can be issued to drivers who have not paid their violations. This is done using the letter report. 5. If the violation is still outstanding on **day 65** it will be sent to court and an additional court fee can be applied to the violation. 1. A file can be generated that is compatible with the Ontario court system if upload is available. In addition, a summary file can be generated to include all cases submitted to court in a particular timeframe. 6. When the ticket has been paid, the court will send a report back to the parking manager to let them know what the outcome was. Admins can then use the information in the report process the payment on the violation within the OPS-COM system. > #### Important Note about MTO Information > > ARIS rules dictate the use of MTO information, requiring the information from the MTO is only temporarily stored within the OPS-COM system. > > Once a violation has been cancelled, paid, or sent to collections, all information from the MTO related to the violation will be purged from the system. ## Starting the Process The interaction with the MTO begins after a violation is past due. The admin will run a weekly report to determine if there are outstanding violations in the system that have gone unpaid for 7 days after they were marked as due. This is done using the Vehicle Lookup Export page. This page can be found by following this menu tree: - **Violations → Collections** → **Vehicle Lookup Export** [![image.png](https://opscom.wiki/uploads/images/gallery/2024-06/scaled-1680-/uhkimage.png)](https://opscom.wiki/uploads/images/gallery/2024-06/uhkimage.png)
## Vehicle Lookup Export Tool Several search options are present on the page: - Minimum number of violations - Vehicle province or state - To search by issue date or by due date - Date range of the lookup
[![image.png](https://opscom.wiki/uploads/images/gallery/2024-06/scaled-1680-/l2Gimage.png)](https://opscom.wiki/uploads/images/gallery/2024-06/l2Gimage.png) Clicking on export will generate a file to be sent to the MTO containing the vehicle information that is additional information is being requested for. Notice there are various formats for this export: - **Aris Raw Data Account:** Used with an ARIS client using raw format lookups. - **Aris Abstract Account:** Used with an ARIS client using abstract format lookups. - **Send to Collections:** Used to send a report to a typical collections agency outside of the MTO process. [![image.png](https://opscom.wiki/uploads/images/gallery/2024-06/scaled-1680-/H9Yimage.png)](https://opscom.wiki/uploads/images/gallery/2024-06/H9Yimage.png) A text file will be generated with the filename as SendToMTO-XX-XX-XX.txt, with the Xs acting as placeholders for the timestamp at the time of file creation.
[![image.png](https://opscom.wiki/uploads/images/gallery/2024-06/scaled-1680-/CkNimage.png)](https://opscom.wiki/uploads/images/gallery/2024-06/CkNimage.png) ## MTO Export File Here is a sample of what the exported text file will look like. The file is formatted in a custom format required for the MTO to lookup driver information. [![image.png](https://opscom.wiki/uploads/images/gallery/2024-06/scaled-1680-/Bc0image.png)](https://opscom.wiki/uploads/images/gallery/2024-06/Bc0image.png) ## MTO Response File The file that is returned from MTO Lookup will include driver information such as the registered vehicle owner's name and home address. This information is **temporarily** stored in the OPS-COM system. As governed by ARIS rules, the information will be purged from the system after it is no longer needed. The document return from the MTO will look like the following: [![image.png](https://opscom.wiki/uploads/images/gallery/2024-06/scaled-1680-/dmlimage.png)](https://opscom.wiki/uploads/images/gallery/2024-06/dmlimage.png) ## Simulated Response File There is an option to generate a mock version of an MTO response file using the file previously exported. This can be done using the Third Party Simulator page, located under the menu tree:

" data-macro-parameters="{"specialUsername":"authenticated","matchUsing":"any"}" data-testid="legacy-macro-element" style="margin: 0px; padding: 0px; white-space: normal; clear: both;">

- **Tomahawk Options → Third Party Simulators** ![image-20240417-211012.png](https://ops-com.atlassian.net/wiki/download/thumbnails/761065/image-20240417-211012.png?version=1&modificationDate=1713388215423&cacheVersion=1&api=v2&width=764&height=200)
## Importing the MTO Response File To import the information received back from the MTO into the OPS-COM system, navigate to the vehicle lookup import found under the menu tree: - **Violations → Collections** → **Vehicle Lookup Import**
[![image.png](https://opscom.wiki/uploads/images/gallery/2024-06/scaled-1680-/Juhimage.png)](https://opscom.wiki/uploads/images/gallery/2024-06/Juhimage.png) The **Vehicle Lookup Import** file selector tool opens. Choose the file that came back from MTO and navigate to the file you wish to select for import. [![image.png](https://opscom.wiki/uploads/images/gallery/2024-06/scaled-1680-/aoximage.png)](https://opscom.wiki/uploads/images/gallery/2024-06/aoximage.png) Click the **Import** button. A confirmation message will appear in the top right of the page. [![image.png](https://opscom.wiki/uploads/images/gallery/2024-06/scaled-1680-/GNqimage.png)](https://opscom.wiki/uploads/images/gallery/2024-06/GNqimage.png) ## Generating Notice Letters Once the information has been imported, the data will be used to populate any missing notice letter information. Violations that have had MTO information associated to them can be viewed from the Letter Report page. After the notice letters have been printed, they must be sent to the drivers of the vehicles by mail. ## Sending to Collections If the ticket still remains unpaid after the notice letter has been sent, it is eligible to be sent to the Ontario court system for collections. The page can be found under the menu tree: - **Violations → Collections** → **Send to Court** [![image.png](https://opscom.wiki/uploads/images/gallery/2024-06/scaled-1680-/NmSimage.png)](https://opscom.wiki/uploads/images/gallery/2024-06/NmSimage.png) The number of days since the violation was issued can be specified, and violations that have not been issued a notice letter can also be included. [![image.png](https://opscom.wiki/uploads/images/gallery/2024-06/scaled-1680-/Z9Gimage.png)](https://opscom.wiki/uploads/images/gallery/2024-06/Z9Gimage.png) An admin fee can be added to the violation on export. Some municipalities have a fee and some do not. [![image.png](https://opscom.wiki/uploads/images/gallery/2024-06/scaled-1680-/2inimage.png)](https://opscom.wiki/uploads/images/gallery/2024-06/2inimage.png) The page will then generate a file to be sent to the Ontario court system, named in the format of SendToCRC-XX-XX-XX.txt, with the Xs acting as placeholders for the timestamp at the time of file creation. The report generated by the system is in a format specified by the Ontario court system for processing, and must be customized for each municipality. It will look something like this: [![image.png](https://opscom.wiki/uploads/images/gallery/2024-06/scaled-1680-/OR5image.png)](https://opscom.wiki/uploads/images/gallery/2024-06/OR5image.png) ## Client MTO Codes For each client sending information to the MTO, there are 4 codes required by the Ontario court system that must be set up on the client’s site. **NOTE - The client must request a RAW Data account from the MTO to use this process. This system will not work otherwise.** Here's a reference for all the provincial forms: [https://ontariocourtforms.on.ca/en/provincial-offences-act-forms/](https://ontariocourtforms.on.ca/en/provincial-offences-act-forms/) The provincial forms are:
https://ontariocourtforms.on.ca/en/provincial-offences-act-forms/

The provincial forms are:

  • Case Court: starts at character 3 - a 4 digit number (Parry Sound is 3060, Perth's is 1860). This is repeated starting at character 57 and again at character 186.

  • Case Jurisdiction: starts at character 7 - a 3 digit number (Parry Sound is 658, Perth's is 073). This is repeated starting at character 61 and again at character 190.

  • The Agency Code: 3 alphanumeric characters followed by 3 numbers (Parry Sound is BYL390, Perth's is BYL658).

  • Disbursement Code: 1 alphanumeric character followed by 3 numbers (Parry Sound is M525, Perth's is M658).

To set these codes up within the site, go to System Settings and select the Collections Component.

Enter the values in the designated fields, and then click on save settings.

For municipalities using the extra-detailed version of the notice letter where one notice is sent out for each violation rather than in bulk, the "Include All Unpaid Violations" setting must be disabled.

" data-macro-parameters="{"specialUsername":"authenticated","matchUsing":"any"}" data-testid="legacy-macro-element" style="margin: 0px; padding: 0px; white-space: normal; clear: both;">

- **Case Court:** starts at character 3 - a 4 digit number (Parry Sound is 3060, Perth's is 1860). This is repeated starting at character 57 and again at character 186. - **Case Jurisdiction:** starts at character 7 - a 3 digit number (Parry Sound is 658, Perth's is 073). This is repeated starting at character 61 and again at character 190. - **The Agency Code:** 3 alphanumeric characters followed by 3 numbers (Parry Sound is BYL390, Perth's is BYL658). - **Disbursement Code:** 1 alphanumeric character followed by 3 numbers (Parry Sound is M525, Perth's is M658).
To set these codes up within the site, go to System Settings and select the **Collections** Component. Enter the values in the designated fields, and then click on save settings.
https://ontariocourtforms.on.ca/en/provincial-offences-act-forms/

The provincial forms are:

  • Case Court: starts at character 3 - a 4 digit number (Parry Sound is 3060, Perth's is 1860). This is repeated starting at character 57 and again at character 186.

  • Case Jurisdiction: starts at character 7 - a 3 digit number (Parry Sound is 658, Perth's is 073). This is repeated starting at character 61 and again at character 190.

  • The Agency Code: 3 alphanumeric characters followed by 3 numbers (Parry Sound is BYL390, Perth's is BYL658).

  • Disbursement Code: 1 alphanumeric character followed by 3 numbers (Parry Sound is M525, Perth's is M658).

To set these codes up within the site, go to System Settings and select the Collections Component.

Enter the values in the designated fields, and then click on save settings.

For municipalities using the extra-detailed version of the notice letter where one notice is sent out for each violation rather than in bulk, the "Include All Unpaid Violations" setting must be disabled.

" data-macro-parameters="{"specialUsername":"authenticated","matchUsing":"any"}" data-testid="legacy-macro-element" style="margin: 0px; padding: 0px; white-space: normal; clear: both;">

![image-20240417-204520.png](https://ops-com.atlassian.net/wiki/download/thumbnails/761065/image-20240417-204520.png?version=1&modificationDate=1713386721346&cacheVersion=1&api=v2&width=800&height=549)
For municipalities using the extra-detailed version of the notice letter where one notice is sent out for each violation rather than in bulk, the "**Include All Unpaid Violations**" setting must be disabled.
https://ontariocourtforms.on.ca/en/provincial-offences-act-forms/

The provincial forms are:

  • Case Court: starts at character 3 - a 4 digit number (Parry Sound is 3060, Perth's is 1860). This is repeated starting at character 57 and again at character 186.

  • Case Jurisdiction: starts at character 7 - a 3 digit number (Parry Sound is 658, Perth's is 073). This is repeated starting at character 61 and again at character 190.

  • The Agency Code: 3 alphanumeric characters followed by 3 numbers (Parry Sound is BYL390, Perth's is BYL658).

  • Disbursement Code: 1 alphanumeric character followed by 3 numbers (Parry Sound is M525, Perth's is M658).

To set these codes up within the site, go to System Settings and select the Collections Component.

Enter the values in the designated fields, and then click on save settings.

For municipalities using the extra-detailed version of the notice letter where one notice is sent out for each violation rather than in bulk, the "Include All Unpaid Violations" setting must be disabled.

" data-macro-parameters="{"specialUsername":"authenticated","matchUsing":"any"}" data-testid="legacy-macro-element" style="margin: 0px; padding: 0px; white-space: normal; clear: both;">

![image-20240417-204725.png](https://ops-com.atlassian.net/wiki/download/thumbnails/761065/image-20240417-204725.png?version=1&modificationDate=1713386846113&cacheVersion=1&api=v2&width=800&height=457)
## Generating the Ontario Court Report A file can be generated and exported to Excel, containing a summary of all violations being sent to court in a particular time frame. The page can be found under the menu tree: - **Violations → Collections** → **Sent to Court Report**
[![image.png](https://opscom.wiki/uploads/images/gallery/2024-06/scaled-1680-/9nqimage.png)](https://opscom.wiki/uploads/images/gallery/2024-06/9nqimage.png) This will open the Court Requested Conviction - Already Sent Report. [![image.png](https://opscom.wiki/uploads/images/gallery/2024-06/scaled-1680-/kiHimage.png)](https://opscom.wiki/uploads/images/gallery/2024-06/kiHimage.png) Clicking on export will download an Excel file to the browser. A copy can be printed to bring to court on the day of the hearings. It is exported in the format recommended by the courts: [![image.png](https://opscom.wiki/uploads/images/gallery/2024-06/scaled-1680-/m53image.png)](https://opscom.wiki/uploads/images/gallery/2024-06/m53image.png) ## Court Requested Conviction Fee If a conviction fee was added on to the violations sent to court, it can be viewed when looking at the violation’s info page. A record for the Court Requested Conviction (CRC) fee will have been added. [![image.png](https://opscom.wiki/uploads/images/gallery/2024-06/scaled-1680-/xNpimage.png)](https://opscom.wiki/uploads/images/gallery/2024-06/xNpimage.png) ## Flagging Paid Records When a report is received back from the court indicating a violation was paid, it must be flagged in the system as being paid. The report to flag as paid is located under the collections menu, within the menu tree: - **Violations → Collections** → **Flag as Paid by Court** [![image.png](https://opscom.wiki/uploads/images/gallery/2024-06/scaled-1680-/gVyimage.png)](https://opscom.wiki/uploads/images/gallery/2024-06/gVyimage.png)
Enter a date range and press the search button. [![image.png](https://opscom.wiki/uploads/images/gallery/2024-06/scaled-1680-/eZgimage.png)](https://opscom.wiki/uploads/images/gallery/2024-06/eZgimage.png) A list of the violations that have been sent to court will be returned by the page. [![image.png](https://opscom.wiki/uploads/images/gallery/2024-06/scaled-1680-/H3himage.png)](https://opscom.wiki/uploads/images/gallery/2024-06/H3himage.png) Click **Flag as paid** to process all selected violations to be marked as paid. Violations flagged as paid will also appear on the Daily Processed Report with a payment type of paid by court. [![image.png](https://opscom.wiki/uploads/images/gallery/2024-06/scaled-1680-/4P5image.png)](https://opscom.wiki/uploads/images/gallery/2024-06/4P5image.png) Additionally, when looking at the vehicle information for this violation, the MTO information will have been purged from the system. Note the vehicle shows there are no associated drivers. [![image.png](https://opscom.wiki/uploads/images/gallery/2024-06/scaled-1680-/EzXimage.png)](https://opscom.wiki/uploads/images/gallery/2024-06/EzXimage.png) # Collections - Flag as Sent to Collections 1. To set the flag, open the violation search page. [![image.png](https://opscom.wiki/uploads/images/gallery/2024-06/scaled-1680-/OXIimage.png)](https://opscom.wiki/uploads/images/gallery/2024-06/OXIimage.png) 2. Enter the violation that is being flagged. In this case it is TT-10001. Select the ticket # to open the Violation Information page. [![image.png](https://opscom.wiki/uploads/images/gallery/2024-06/scaled-1680-/Ancimage.png)](https://opscom.wiki/uploads/images/gallery/2024-06/Ancimage.png) 3. Select the Action box and enable 'Flag as Sent to Collections'. Click Ok. [![image.png](https://opscom.wiki/uploads/images/gallery/2024-06/scaled-1680-/iDHimage.png)](https://opscom.wiki/uploads/images/gallery/2024-06/iDHimage.png) # MTO Annual Report ## Running the Report To begin go to the **Violations** menu and hover over **Reports**. Select **MTO Report** from the drop down menu. [![image.png](https://opscom.wiki/uploads/images/gallery/2024-06/scaled-1680-/FPEimage.png)](https://opscom.wiki/uploads/images/gallery/2024-06/FPEimage.png) Enter the date range you wish to report on. In this case we are looking at the full 2020 year end report (January 1st 2020 - December 31st 2020). Click **Search** to continue. [![image.png](https://opscom.wiki/uploads/images/gallery/2024-06/scaled-1680-/2JXimage.png)](https://opscom.wiki/uploads/images/gallery/2024-06/2JXimage.png) The screen will refresh with a list of items required in the **Annual MTO Report**. [![image.png](https://opscom.wiki/uploads/images/gallery/2024-06/scaled-1680-/6Cnimage.png)](https://opscom.wiki/uploads/images/gallery/2024-06/6Cnimage.png) # Printing the Certificate of Parking Infraction ## Create Form 11 Template If it already exists, the Form 11 template will be found under the Content & Designs menu, in Pages and Content Blocks: [![image.png](https://opscom.wiki/uploads/images/gallery/2024-06/scaled-1680-/Imrimage.png)](https://opscom.wiki/uploads/images/gallery/2024-06/Imrimage.png) It will be found under the Messages tab. The System Location value is "form11": [![image.png](https://opscom.wiki/uploads/images/gallery/2024-06/scaled-1680-/Ontimage.png)](https://opscom.wiki/uploads/images/gallery/2024-06/Ontimage.png) If the template doesn't already exist, it can be created by clicking "Create Page/Message". Set Page Type to "Message", and for Identifier enter "form11". (Be sure to click "Save Messaging" once done.) [![image.png](https://opscom.wiki/uploads/images/gallery/2024-06/scaled-1680-/OWSimage.png)](https://opscom.wiki/uploads/images/gallery/2024-06/OWSimage.png) ## Edit Form 11 The content of the form can be edited in Pages and Content Blocks. Locate "form11" under the Messages tab and click "Edit". On this page is a text editor where the content of the form can be set. (Be sure to click "Save Messaging" once done.) Although it's possible for admins to set Form 11 content themselves, *it's strongly recommended to request the form content from OPS-COM support*. This is because the content of Form 11 is very specific, and requires the use of shortcodes to auto-fill information such as date, plate number, fine amount, etc. ## Print Form 11 To download and print Form 11 for a violation, first find the violation on the Violation Search page and click on the violation number: [![image.png](https://opscom.wiki/uploads/images/gallery/2024-06/scaled-1680-/uGqimage.png)](https://opscom.wiki/uploads/images/gallery/2024-06/uGqimage.png) Under the Action menu, click "Generate (title of form)": [![image.png](https://opscom.wiki/uploads/images/gallery/2024-06/scaled-1680-/JJuimage.png)](https://opscom.wiki/uploads/images/gallery/2024-06/JJuimage.png) The form will be downloaded as a PDF, which can then be printed. ## Adding a Digital Signature There is an option to add a digital signature when writing a violation on an enforcement handheld. When that option is enabled, the patrol is required to sign the violation on the handheld screen. When uploaded to the server, the timestamped signature is sent with the other images. When using this option, the signature will also appear on Form 11 when printed. The option to use signatures on tickets can be enabled in System Settings under Violations: [![image.png](https://opscom.wiki/uploads/images/gallery/2024-06/scaled-1680-/EdBimage.png)](https://opscom.wiki/uploads/images/gallery/2024-06/EdBimage.png) When this setting is enabled, a signature tab will appear when writing a violation on a handheld: [![image.png](https://opscom.wiki/uploads/images/gallery/2024-06/scaled-1680-/tM9image.png)](https://opscom.wiki/uploads/images/gallery/2024-06/tM9image.png) The signature will show up on Form 11: [![image.png](https://opscom.wiki/uploads/images/gallery/2024-06/scaled-1680-/b24image.png)](https://opscom.wiki/uploads/images/gallery/2024-06/b24image.png) # Restricting Payment of Violations in Court Requested Conviction (CRC) Status 1. Click **System Config**, **System Settings** to ensure the settings that pertain to **Collections** are set to disallow payments while violations are under the CRC status. [![image.png](https://opscom.wiki/uploads/images/gallery/2024-06/scaled-1680-/Jw7image.png)](https://opscom.wiki/uploads/images/gallery/2024-06/Jw7image.png) 2. Ensure that the following settings are enabled and save the settings: **- Prevent Violation Payment** **- Prevent Purchases** [![image.png](https://opscom.wiki/uploads/images/gallery/2024-06/scaled-1680-/ipximage.png)](https://opscom.wiki/uploads/images/gallery/2024-06/ipximage.png) 3. There are two permissions that deal with the treatment of payments for **CRC** items. To setup these permissions, click **System Config, Manage Roles**. [![image.png](https://opscom.wiki/uploads/images/gallery/2024-06/scaled-1680-/2Fgimage.png)](https://opscom.wiki/uploads/images/gallery/2024-06/2Fgimage.png) 4. Select the role you wish to add these abilities to. In this example we will add them to **Primary Admin**. Click on Permissions to access the settings. [![image.png](https://opscom.wiki/uploads/images/gallery/2024-06/scaled-1680-/JbHimage.png)](https://opscom.wiki/uploads/images/gallery/2024-06/JbHimage.png) 5. Under the violations Tab ensure that these two settings are enabled: (A) **Pay Violations In Collections**. (Allows the Admin to process payments on violations that are in collections.) (B) **Purchase While Outstanding** (Allows the Admin to purchase items for the user while the user has a violation that has been sent to collections. This is only necessary while **Prevent Purchases** is turned on in the settings. [![image.png](https://opscom.wiki/uploads/images/gallery/2024-06/scaled-1680-/nY4image.png)](https://opscom.wiki/uploads/images/gallery/2024-06/nY4image.png) 6. The following two screens show how this functionality appears to the End User and the Admin: This is what the **User** will see if they have violations with the 'Sent to CRC' status. Note the notices indicating the violation has been **Sent to Collections**. [![image.png](https://opscom.wiki/uploads/images/gallery/2024-06/scaled-1680-/izsimage.png)](https://opscom.wiki/uploads/images/gallery/2024-06/izsimage.png) Here is what the **Admin** sees if they have the permission to pay these violations while in collection status. Note the notices indicating the violation has been **Sent to Collections**. Here's the **Admin** view with the permission to pay these violations while in collection status **enabled.** Note the fact that the violation is still shown as **Sent to Collections** yet is still payable by the Admin. [![image.png](https://opscom.wiki/uploads/images/gallery/2024-06/scaled-1680-/8RXimage.png)](https://opscom.wiki/uploads/images/gallery/2024-06/8RXimage.png) In addition, if the **User** tried to pay the violation through OPS-COM Quick Pay/Guest Payments they would see the same message disallowing the payment of the violation. [![image.png](https://opscom.wiki/uploads/images/gallery/2024-06/scaled-1680-/dvPimage.png)](https://opscom.wiki/uploads/images/gallery/2024-06/dvPimage.png) # Search Repeat Offenders Report ## Introduction The search repeat offenders page allows site admins to find vehicles and users on the site that have received multiple parking violations on their account. ## Navigation To navigate to the page, look under the menu tree: - **Violations -> Search Repeat Offenders** [![image.png](https://opscom.wiki/uploads/images/gallery/2024-07/scaled-1680-/image.png)](https://opscom.wiki/uploads/images/gallery/2024-07/image.png) --- ## Page Usage The page will appear as displayed. [![image.png](https://opscom.wiki/uploads/images/gallery/2024-07/scaled-1680-/MtMimage.png)](https://opscom.wiki/uploads/images/gallery/2024-07/MtMimage.png) Several options are available to narrow the search. - **Start Date and End Date**: specifies the range in which the violations were received. - **Ticket Category**: the category of the violation received. - **Number of Violations**: the min number of violations the user or vehicle has received. - **Processed Value**: categorizes violations based on their processing status. - - **Unprocessed**: violations that have not been processed yet. - **Processed**: violations that have been paid for and processed. - **Warning Only**: violations that were marked as a warning instead issuing a fine. - **Unknown Users Only**: only shows violations assigned to vehicles without a known user tied to them. - **Search By:** - **Vehicle/Plate**: outputs the count of violations tied to license plates. Will not include violations attached directly to a user. - **User/Driver**: outputs the count of violations tied to users. Includes violations attached directly to the user and any violations attached to their vehicles. Will not include violations attached to a vehicle with no assigned driver. ## Output The grouping of the output will vary depending on whether it is selected to be output by vehicle or by user. ### By Vehicle/Plate Grouping on the vehicle will show the number of violations on each plate, and any associated drivers of the vehicle. ### [![image.png](https://opscom.wiki/uploads/images/gallery/2024-07/scaled-1680-/YItimage.png)](https://opscom.wiki/uploads/images/gallery/2024-07/YItimage.png) Individual violations can be viewed by clicking on the violation count. The warning icon next to the username will show a list of the violations associated to that user. ### By User/Driver Grouping on the user will show the number of violations given to the user, including any violations given to vehicles the user is the driver of. [![image.png](https://opscom.wiki/uploads/images/gallery/2024-07/scaled-1680-/DUuimage.png)](https://opscom.wiki/uploads/images/gallery/2024-07/DUuimage.png)Individual violations can be viewed by clicking on the violation count. The icon next to the total violation count shows the breakdown of the total, showing the number of violations assigned to the user and the number of violations assigned to that user's vehicles. ### Exporting Results After searching, the results can be exported in a chosen format by clicking one of the green buttons at the top right of the search results. [![image.png](https://opscom.wiki/uploads/images/gallery/2024-07/scaled-1680-/52Limage.png)](https://opscom.wiki/uploads/images/gallery/2024-07/52Limage.png) # Violations by Location/Officer Report ## Using the Report Hover over the **Violations** icon and click **Report by Location/Officers**. [![image.png](https://opscom.wiki/uploads/images/gallery/2024-06/scaled-1680-/eACimage.png)](https://opscom.wiki/uploads/images/gallery/2024-06/eACimage.png) The **Violation Summary by Location/Officer** screen is displayed. Select your date parameters for the search. [![image.png](https://opscom.wiki/uploads/images/gallery/2024-06/scaled-1680-/8D9image.png)](https://opscom.wiki/uploads/images/gallery/2024-06/8D9image.png) Click **Display Summary** and the report will appear at the bottom of the screen. [![image.png](https://opscom.wiki/uploads/images/gallery/2024-06/scaled-1680-/YRyimage.png)](https://opscom.wiki/uploads/images/gallery/2024-06/YRyimage.png) # Paid Violations Summary by Type Report ## Accessing the Report Hover over the **Violations** icon and click **Paid Summary by Type**. [![image.png](https://opscom.wiki/uploads/images/gallery/2024-06/scaled-1680-/jdAimage.png)](https://opscom.wiki/uploads/images/gallery/2024-06/jdAimage.png) The **Paid Violations Summary by Type** screen is displayed. Select your date parameters for the search. Click **Display Summary** and the report will appear at the bottom of the screen. [![image.png](https://opscom.wiki/uploads/images/gallery/2024-06/scaled-1680-/Waqimage.png)](https://opscom.wiki/uploads/images/gallery/2024-06/Waqimage.png) # Violations by Officer Report ## Using the Report Hover over **Violations** and click Reports, Report **by Officers**. [![image.png](https://opscom.wiki/uploads/images/gallery/2024-06/scaled-1680-/x9iimage.png)](https://opscom.wiki/uploads/images/gallery/2024-06/x9iimage.png) The **Violations by Officer** screen is displayed. Select your parameters for the search. Search Criteria include: **Ticket Writer:** You can select a specific officer or List all violations grouped by officer **Spoiled:** Select a spoiled state **Ticket Category:** Select a specific ticket category such as Private Property **Include Archived Categories:** Toggle the item on to apply the search filter **Warnings:** Select to hide, include, or show warnings only **Show Only Due:** Toggle the item on to apply the search filter **Date Search By:** Select either the Due Date or the Issued Date **Start Date** and **Up To and Including:** Set the date range you wish to report on You can then click **Search** to view the report onscreen or click **Export** to download the report as an excel document. [![image.png](https://opscom.wiki/uploads/images/gallery/2024-06/scaled-1680-/di9image.png)](https://opscom.wiki/uploads/images/gallery/2024-06/di9image.png) The report will appear at the bottom of the screen. [![image.png](https://opscom.wiki/uploads/images/gallery/2024-06/scaled-1680-/h60image.png)](https://opscom.wiki/uploads/images/gallery/2024-06/h60image.png) If you wish to view more information about each violation, click on the **violation number**. If you wish to view the pictures associated with a violation click on the **Camera** icon. ## Exporting the Report You can export the information to a .csv file and manipulate the data in Excel. Click **Export** to download the file. [![image.png](https://opscom.wiki/uploads/images/gallery/2024-06/scaled-1680-/J2Limage.png)](https://opscom.wiki/uploads/images/gallery/2024-06/J2Limage.png) # Summary Report by Officer 1\. Hover over the **Violations** icon and hover over **Reports.** Click on **Summary Report by Officers** in the drop down menu. [![image.png](https://opscom.wiki/uploads/images/gallery/2024-06/scaled-1680-/LU5image.png)](https://opscom.wiki/uploads/images/gallery/2024-06/LU5image.png) 2\. The **Violation Summary by Officer** screen is displayed. Select your **Ticket Writer** and **date parameters** for the search. You can search individual officers or select either one of the full list options: **Summary Only** or Group led **By Officer** Click **Display Summary** and the report will appear at the bottom of the screen. The report can also be exported to **Excel**. To do so click on the **Export** button. [![image.png](https://opscom.wiki/uploads/images/gallery/2024-06/scaled-1680-/YPIimage.png)](https://opscom.wiki/uploads/images/gallery/2024-06/YPIimage.png) The report will display based on your search criteria. [![image.png](https://opscom.wiki/uploads/images/gallery/2024-06/scaled-1680-/XkXimage.png)](https://opscom.wiki/uploads/images/gallery/2024-06/XkXimage.png)
# List Overdue Report ## Accessing the Report From the **Violations** menu hover over **Reports** and click the **List Overdue** menu item to access the **Overdue Violation Payments** report. [![image.png](https://opscom.wiki/uploads/images/gallery/2024-06/scaled-1680-/Os9image.png)](https://opscom.wiki/uploads/images/gallery/2024-06/Os9image.png) The **Overdue Violation Payments** screen is displayed. Enter your search criteria and click **List Overdue Records.** In this case we are looking at violations between **May1st 2020** and **February 8th 2021** The report will appear at the bottom of the screen with the violation number, details, amount, and offender details. [![image.png](https://opscom.wiki/uploads/images/gallery/2024-06/scaled-1680-/P6Rimage.png)](https://opscom.wiki/uploads/images/gallery/2024-06/P6Rimage.png) ## Emailing Users You can click on the user email address to email users directly related to their overdue violations. You can also select **Email Listed Users** at the bottom of the report to send an email to **all users** on the report. ## Generating an Excel Report Click **Generate Excel Report** to create an excel document for your records or further manipulation. # Violations by Pay Type by Month Report ## Running the Report To begin go to the **Violations** menu and hover over **Reports**. Select **List By Type By Month** Report. [![image.png](https://opscom.wiki/uploads/images/gallery/2024-06/scaled-1680-/KiCimage.png)](https://opscom.wiki/uploads/images/gallery/2024-06/KiCimage.png) The **Violations by Pay Type by Month** screen opens. [![image.png](https://opscom.wiki/uploads/images/gallery/2024-06/scaled-1680-/TIfimage.png)](https://opscom.wiki/uploads/images/gallery/2024-06/TIfimage.png) Select the month you wish to report on. In our example we will look at **November of 2020**. Click on **Retrieve** to continue. [![image.png](https://opscom.wiki/uploads/images/gallery/2024-06/scaled-1680-/lOsimage.png)](https://opscom.wiki/uploads/images/gallery/2024-06/lOsimage.png) The resulting report will display onscreen. [![image.png](https://opscom.wiki/uploads/images/gallery/2024-06/scaled-1680-/06Ximage.png)](https://opscom.wiki/uploads/images/gallery/2024-06/06Ximage.png) The report may also be exported as an excel file. [![image.png](https://opscom.wiki/uploads/images/gallery/2024-06/scaled-1680-/jcfimage.png)](https://opscom.wiki/uploads/images/gallery/2024-06/jcfimage.png) # Hiding Zero Dollar Violations 1. Hover over '**System Config**' and click '**System Settings**' [![image.png](https://opscom.wiki/uploads/images/gallery/2024-06/scaled-1680-/Yg9image.png)](https://opscom.wiki/uploads/images/gallery/2024-06/Yg9image.png) 2. Click '**Violations**' to open the Violations settings [![image.png](https://opscom.wiki/uploads/images/gallery/2024-06/scaled-1680-/zcjimage.png)](https://opscom.wiki/uploads/images/gallery/2024-06/zcjimage.png) 3. Enable the '**Hide Zero Dollar Fines**' checkbox to hide zero dollar violations. [![image.png](https://opscom.wiki/uploads/images/gallery/2024-06/scaled-1680-/B8Fimage.png)](https://opscom.wiki/uploads/images/gallery/2024-06/B8Fimage.png) # Cancelling a Violation ## How to cancel a violation Hover over **Violations**, select **Search** [![image.png](https://opscom.wiki/uploads/images/gallery/2024-06/scaled-1680-/qyvimage.png)](https://opscom.wiki/uploads/images/gallery/2024-06/qyvimage.png) Enter the violation being cancelled into the **Search Text** field, then select **Search using only text**. In this case the violation being cancelled is **TT-10063.** [![image.png](https://opscom.wiki/uploads/images/gallery/2024-06/scaled-1680-/ekQimage.png)](https://opscom.wiki/uploads/images/gallery/2024-06/ekQimage.png) Click on the **Ticket Number** of the violation being cancelled [![image.png](https://opscom.wiki/uploads/images/gallery/2024-06/scaled-1680-/FHpimage.png)](https://opscom.wiki/uploads/images/gallery/2024-06/FHpimage.png) Click on the **Edit** button [![image.png](https://opscom.wiki/uploads/images/gallery/2024-06/scaled-1680-/dGAimage.png)](https://opscom.wiki/uploads/images/gallery/2024-06/dGAimage.png) Select **Cancelled** in **Fine Action** field and enter the reason for the cancellation into the **Appeal Admin Comment** field [![image.png](https://opscom.wiki/uploads/images/gallery/2024-06/scaled-1680-/f8Himage.png)](https://opscom.wiki/uploads/images/gallery/2024-06/f8Himage.png) Click on **Update this Violation** [![image.png](https://opscom.wiki/uploads/images/gallery/2024-06/scaled-1680-/PLoimage.png)](https://opscom.wiki/uploads/images/gallery/2024-06/PLoimage.png) The **Violation Information Updated** page displays, showing the violation has been updated [![image.png](https://opscom.wiki/uploads/images/gallery/2024-06/scaled-1680-/xmDimage.png)](https://opscom.wiki/uploads/images/gallery/2024-06/xmDimage.png) # Spoiling a Violation ## How to Spoil a Violation To spoil a violation start by searching for the violation through the **Quick Search** or **Violation Search** tool. [![image.png](https://opscom.wiki/uploads/images/gallery/2024-06/scaled-1680-/Ajjimage.png)](https://opscom.wiki/uploads/images/gallery/2024-06/Ajjimage.png) Drill into the payment details on the **Violation Information** page [![image.png](https://opscom.wiki/uploads/images/gallery/2024-06/scaled-1680-/uh1image.png)](https://opscom.wiki/uploads/images/gallery/2024-06/uh1image.png) Select **Edit** at the top right of the violation and change the **Spoiled** status from **Valid - not spoiled** to **Spoiled**. [![image.png](https://opscom.wiki/uploads/images/gallery/2024-06/scaled-1680-/Vi3image.png)](https://opscom.wiki/uploads/images/gallery/2024-06/Vi3image.png) Submit the changed violation details and your ticket will now be marked as **Spoiled** the next time you go to search for it. # Violations From Static Cameras / Mailout Violations Violations/Infractions can be created from a report that looks at chalk records. Before this can work, ensure that OPS-COM has set your static cameras up with the necessary settings to report on the lot group and gps location of the camera. Some cameras report on more vehicle information than others. This can be helpful in the report later. The next setup would be to map your Lot Groups to the appropriate Offence Location: [![image.png](https://opscom.wiki/uploads/images/gallery/2024-07/scaled-1680-/dgjimage.png)](https://opscom.wiki/uploads/images/gallery/2024-07/dgjimage.png) With this set up, logs will be available as they come in: [![image.png](https://opscom.wiki/uploads/images/gallery/2024-07/scaled-1680-/jztimage.png)](https://opscom.wiki/uploads/images/gallery/2024-07/jztimage.png) [![image.png](https://opscom.wiki/uploads/images/gallery/2024-07/scaled-1680-/dbSimage.png)](https://opscom.wiki/uploads/images/gallery/2024-07/dbSimage.png) Report type will contain all available filters that we support at the time. - No Permit & Over Lot Time - This option will only list vehicles where they have no permits and the duration exceeds the lot group's free parking time. The following is an explanation of each field. [![image.png](https://opscom.wiki/uploads/images/gallery/2024-07/scaled-1680-/Pl5image.png)](https://opscom.wiki/uploads/images/gallery/2024-07/Pl5image.png) Vehicles can appear in one of three formats. No existing vehicle record, a single vehicle record, or multiple vehicle records. They will change the violation creation screen as follows: [![image.png](https://opscom.wiki/uploads/images/gallery/2024-07/scaled-1680-/1xuimage.png)](https://opscom.wiki/uploads/images/gallery/2024-07/1xuimage.png) Clicking a row will display the violation entry form. The entry and exit cameras will show the chalk image associated to this entry: [![image.png](https://opscom.wiki/uploads/images/gallery/2024-07/scaled-1680-/doMimage.png)](https://opscom.wiki/uploads/images/gallery/2024-07/doMimage.png) Once the details are entered, the chalk record will disappear from the list and the violation can be found by searching for it: [![image.png](https://opscom.wiki/uploads/images/gallery/2024-07/scaled-1680-/4MLimage.png)](https://opscom.wiki/uploads/images/gallery/2024-07/4MLimage.png) # IncidentAdmin # IncidentAdmin Workflow Incidents can be reported in several ways: - Campus Security may observe violations as they occur - Individuals may contact campus security to report incidents - Staff may report incidents on behalf of fellow staff or students - Requests to investigate may come from campus administration - Incidents may be caught on surveillance cameras etc. Initiating the entry of incidents into the system can be done in a couple of ways. - Dispatch Logs - Incident Entry These items can be generated in any order. Once an incident is recorded in the system **Security Administrators** can track the progress of any resulting investigation or follow-up events related to the incident. Tasks can be created and assigned to officers, primary investigators, case workers and security administration through the incidents tool. Investigators can track their progress from initial discovery through to resolution. Steps taken in the process as well as the outcome for individuals involved can be recorded, and in turn reported on through **IncidentAdmin**. The following subjects are the main highlights in the workflow process in **IncidentAdmin**. 1. Searching, viewing and editing incident records 2. Working with related occurrences and violations 3. Viewing "**My Tasks**" within **IncidentAdmin** 4. Generating reports from records stored in **IncidentAdmin** ## A Word About Reports There are a number of reports that can be generated in **IncidentAdmin.** 1. **Recent Incidents Summary Report -** Lists the last 30 days of incident records. 2. **Search Repeat Offenders -** Report on individuals involved in multiple incidents 3. **Weekly Stat Report -** Reports on the number of all types of incidents that happened during a specified time span 4. **Calls for Service** 5. **Summary Search -** Allows administrators to get a summary of all incidents that have been recorded within a specified time frame. 6. **Summary Report -** Allows administrators to produce a list in a spreadsheet format of incident summaries based on a date range**.** 7. **Report by Category** - Search for incidents under defined categories within a specific time frame. 8. **Sub Location Report** - Search incidents filtered by sub location. # Configuring Incidents Here is the list of items that would have to be set up in the system prior to using the incident module. [![image.png](https://opscom.wiki/uploads/images/gallery/2024-06/scaled-1680-/cNbimage.png)](https://opscom.wiki/uploads/images/gallery/2024-06/cNbimage.png) 1. **Categories**: Incident Categories are a listings of the types of Incidents that occur. Each **Category** can have multiple **sub categories**. Here's an example of a category and it's sub-category items. In this case the category is **Break and Enter**. The subcategories appear on the right. [![image.png](https://opscom.wiki/uploads/images/gallery/2024-06/scaled-1680-/pbPimage.png)](https://opscom.wiki/uploads/images/gallery/2024-06/pbPimage.png) 2. **Flags**: Incidents may be **flagged** for information, and/or importance. An example would be: "Was violence involved?" or "Were there weapons involved?" For more information Refer to this Article. 3. **Ethnicity**: Within incident reporting you have the ability to enter a description of people associated with the incident, whether it be the victim, a related person, the suspect or person who committed the incident. Ethnicity is one of the descriptors typically used in identifying a person related to an incident. 4. **Relations**: In this area you can define the relationship/involvement the individual has with the particular incident. Examples could be: Complainant, Witness, Victim etc. 5. **Ext. User Profile Options**: These items are **extended values** used in describing an individual within incident reporting. Examples could be: Physical descriptors such as hair colour, hair style, Body Build Type, Clothing Style etc. (**Note:** These descriptions will only be seen in the incidents module and not in the user's profile.) 6. **Missing Property Types**: An incident may include theft or damage to property. This item allows you to create **pick lists** that can describe property involved in an incident. Examples could be: Vehicles, personal property such as jewelry, computers, electronic devices, money, etc. 7. **Cameras**: In this section admins can configure input from surveillance cameras that may have captured the incident. # Search Incidents 1\. Hover over the **Incidents** icon and select **Search Incidents**. [![image.png](https://opscom.wiki/uploads/images/gallery/2024-06/scaled-1680-/RWtimage.png)](https://opscom.wiki/uploads/images/gallery/2024-06/RWtimage.png) 2\. This will take you to the **Search Incidents** screen. Here you can do an Incident Search, People Search or a Vehicle Search. Fill in the information you want to search by and select the "**Search**" button at the bottom of that particular section. ## Search Criteria **Occurrence #:** When an incident is created in the system a unique ID number is designated to the incident that can be referenced in this search module. **Police Occurrence #:** If you partner with a police force they may have a reference number that can be assigned and searched. **Reported by (Officer):** This search filter will narrow your search to incidents reported by specific officers selected from a drop down pick list. **Reported Dates**: Enter the date on which the incident was reported. **Status:** Select from a drop down pick list incidents that have a status of **Open, Closed,** or **Close Requested** **Summary:** Enter a short description of the incident in question. **Between Dates: **Enter a date range in which the incident occurred. **Location** and **Sub-Location:** Select areas where the incident occurred. **Room Number:** If the incident occurred in a specific room on campus, enter the room number here. **Category:** Select the general type of incident being searched from a drop down pick list. **Sub Category:** Select the specific type of incident in relation to the general type being searched from a drop down pick list. The list changes based on which general category is chosen. **PON/Summons Issued:** Select whether or not a PON (Provincial Offence Notice) or Summons has been issued. **Arrest/Apprehension Made:** Select whether or not an arrest or apprehension of an individual was made. **Violence Involved:** Select whether or not violence was involved in the incident. **Weapons Involved:** Select whether or not weapons of any kind were involved in the incident. **Text:** Use this field to enter related key words, descriptions, locations etc. This search field searches both the narrative, and location description. **Last Updated Between Dates: **Select a date range of when an update to the incident information might have occurred. **Has Been Read:** Select yes, no or either. This will select incidents that have been previously reviewed or those that have not. **Case Manager**: Select from a drop down pick list to filter on specific case managers assigned to the incident in question. **Primary Investigator:** Select from a drop down pick list to filter on specific primary investigator assigned to the incident in question. **Task Assignments:** Select from a drop down pick list to filter on a specific assignee who has been tasked with investigating the incident in question. **Requires a Checklist:** Select whether or not the incident has a related checklist. **Include Checklist Details: **If the item above it checked as yes or either, check this box if you wish to have the checklist details appear in your search results. [![image.png](https://opscom.wiki/uploads/images/gallery/2024-06/scaled-1680-/lbUimage.png)](https://opscom.wiki/uploads/images/gallery/2024-06/lbUimage.png) **People Search:** In this section you can enter typical details about a specific person to perform an incident search on. **Vehicle Search:** In this section you can enter typical details about vehicles that are involved in the incident being searched. [![image.png](https://opscom.wiki/uploads/images/gallery/2024-06/scaled-1680-/K5Vimage.png)](https://opscom.wiki/uploads/images/gallery/2024-06/K5Vimage.png) # Incident Entry 1\. Hover over the **Incidents** icon and select **Incident Entry.** [![image.png](https://opscom.wiki/uploads/images/gallery/2024-06/scaled-1680-/ab7image.png)](https://opscom.wiki/uploads/images/gallery/2024-06/ab7image.png) 2\. This will take you to the **Opened Incidents** page. Here you can select the link for a particular ***Incident Number*** to view the details of that particular incident or you can select the ***Create a*** ***New** **Incident*** **button**. [![image.png](https://opscom.wiki/uploads/images/gallery/2024-06/scaled-1680-/QnXimage.png)](https://opscom.wiki/uploads/images/gallery/2024-06/QnXimage.png) 3\. When you select the link to **Enter New Incidents**, this will take you to STEP 1: Finding individuals and vehicles related to an incident. Select the appropriate link to search by Users, Vehicles or Missing Property. If the incident is not associated with a particular user, vehicle or missing property, select the "**Enter Specific Incident Details**" button. [![image.png](https://opscom.wiki/uploads/images/gallery/2024-06/scaled-1680-/TgAimage.png)](https://opscom.wiki/uploads/images/gallery/2024-06/TgAimage.png) 4\. Once you find the user that you are looking for, select the "**Add User to Incident"** button at the bottom right. If there is no user found with the information you are searching, you can select the "**Add a New Individual to the Database**" button at the very bottom, in the center. This will take you to the STEP 1: Quick Registration Form where you can enter all the details that you have on the individual. [![image.png](https://opscom.wiki/uploads/images/gallery/2024-06/scaled-1680-/PdSimage.png)](https://opscom.wiki/uploads/images/gallery/2024-06/PdSimage.png) 5\. Once the user is selected or added you will be taken to a page where you can identify specifics about the individuals involved in the incident. Fill in all the details that you have. You must fill in the **Relation** field which identifies person's relationship to the incident (e.g. victim, witness, prime suspect, etc.) Select the "**Save User Details"** button to save the details. Select the "**Search for Additional Individuals**" button to add other individuals involved in the incident. You can also add vehicle details and property details by selecting the appropriate link. You can also select the **"Enter Specific Incident Details"** button at the bottom right if there are no other details to add related to people, vehicles, and property. [![image.png](https://opscom.wiki/uploads/images/gallery/2024-06/scaled-1680-/NgJimage.png)](https://opscom.wiki/uploads/images/gallery/2024-06/NgJimage.png) Sample Vehicle Search [![image.png](https://opscom.wiki/uploads/images/gallery/2024-06/scaled-1680-/V3Rimage.png)](https://opscom.wiki/uploads/images/gallery/2024-06/V3Rimage.png) Sample Missing Property Search [![image.png](https://opscom.wiki/uploads/images/gallery/2024-06/scaled-1680-/sHyimage.png)](https://opscom.wiki/uploads/images/gallery/2024-06/sHyimage.png) 6\. Once you select the **"Enter Specific Incident Details"** button you will be taken to STEP 2: Entering Incident Information. A summary of the people involved, vehicles involved and/or the missing property involved will appear at the top of the page. Next, you will find the **Incident Information** section where you will fill in all information that you have on the incident. (**OPS Number** is an abbreviation for ***Other Police Services Number*** used for tracking the incident. **PON Summons** is an abbreviation for ***Provincial Offences Notice Summons.***) To attach images, select the **"Choose File"** button beside the line for Attach Image, find and select the file that you want to attach and select the **"Open"** button. This will upload the file and attach it to the incident. When all information is submitted in the Incident Information section, select **"Save Incident"** at the bottom of the page. [![image.png](https://opscom.wiki/uploads/images/gallery/2024-06/scaled-1680-/e1eimage.png)](https://opscom.wiki/uploads/images/gallery/2024-06/e1eimage.png) 7\. Once the incident has been saved you will be taken to the **"Incidents - Last 30 Days"** summary screen. If you need to edit any details, select the **"View Incident"** link to the right of the incident that you want to reopen. [![image.png](https://opscom.wiki/uploads/images/gallery/2024-06/scaled-1680-/P2Vimage.png)](https://opscom.wiki/uploads/images/gallery/2024-06/P2Vimage.png) # Editing Incidents 1. From the **Incident Information** page, select the '**Edit Incident**' button [![image.png](https://opscom.wiki/uploads/images/gallery/2024-06/scaled-1680-/XZuimage.png)](https://opscom.wiki/uploads/images/gallery/2024-06/XZuimage.png) 2. Enter or change any new information, then select '**Update Incident Details**' [![image.png](https://opscom.wiki/uploads/images/gallery/2024-06/scaled-1680-/v4Cimage.png)](https://opscom.wiki/uploads/images/gallery/2024-06/v4Cimage.png) 3. Select '**View Incident**' to return to the **Incident Information** page [![image.png](https://opscom.wiki/uploads/images/gallery/2024-06/scaled-1680-/fiqimage.png)](https://opscom.wiki/uploads/images/gallery/2024-06/fiqimage.png) 4. There are other options listed down the side bar. An explanation for each button is below: [![image.png](https://opscom.wiki/uploads/images/gallery/2024-06/scaled-1680-/hOXimage.png)](https://opscom.wiki/uploads/images/gallery/2024-06/hOXimage.png) Close Incident - Select this button to toggle the incident between Closed and Open. Edit Incident - Select this button to toggle between viewing and editing the incident. Distribute Incident - Select this button to create a distribution report. This locks the incident from being edited. Email Incident - Select this button to generate an email about the incident. Download Incident - Select this button to download a PDF copy of the incident. This locks the incident from being further edited. Toggle Read Status - Select this button to toggle the read status from '**unread**' to '**read**' or '**read**' to '**unread**' # Incident Reports - [Recent Incidents Summary Report (Last 30 Days)](https://opscom.wiki/books/for-administrators-staff/page/recent-incidents-summary-report-last-30-days) - [Incidents Summary Report](https://opscom.wiki/books/for-administrators-staff/page/incidents-summary-report) - [Incidents Summary Report by Category](https://opscom.wiki/books/for-administrators-staff/page/incidents-summary-report-by-category) - [Incident Summary Report by Sub-Location](https://opscom.wiki/books/for-administrators-staff/page/incident-summary-report-by-sub-location) # Recent Incidents Summary Report (Last 30 Days) 1\. Hover over the **Incidents** icon and select **Recent Incidents**. [![image.png](https://opscom.wiki/uploads/images/gallery/2024-06/scaled-1680-/GNsimage.png)](https://opscom.wiki/uploads/images/gallery/2024-06/GNsimage.png) 2\. This will bring up a table of all incidents that have been recorded in the previous 30 days. You can get the details of an individual incident by selecting the "**View Incidents**" button to the right of the particular incident that you want to review. You can also sort the table by selecting the column heading to sort by. [![image.png](https://opscom.wiki/uploads/images/gallery/2024-06/scaled-1680-/iEKimage.png)](https://opscom.wiki/uploads/images/gallery/2024-06/iEKimage.png) Note: The ability to export this report to excel is now a permission that can be given to admins. [![image.png](https://opscom.wiki/uploads/images/gallery/2024-06/scaled-1680-/3KCimage.png)](https://opscom.wiki/uploads/images/gallery/2024-06/3KCimage.png) # Incidents Summary Report Hover over the **Incidents** icon, click **Reports** then select **Summary Report.** [![image.png](https://opscom.wiki/uploads/images/gallery/2024-06/scaled-1680-/0fTimage.png)](https://opscom.wiki/uploads/images/gallery/2024-06/0fTimage.png) This will take you to the **Incident Summary Report** page. Here you can get a summary of all incidents that have been recorded within a specified time frame. [![image.png](https://opscom.wiki/uploads/images/gallery/2024-06/scaled-1680-/twIimage.png)](https://opscom.wiki/uploads/images/gallery/2024-06/twIimage.png) Enter the ***start date*** and ***end date*** for the report that you want to create and select the button at the bottom for **"Search Incidents**". If you wish to include incidents that do not have a summary in the results, uncheck the **Show only Items with Summaries** checkbox. This will bring up the **Incident Summary Report** at the bottom of the screen. You can export this information to an Excel file by selecting the **"Export to Excel"** button. You can also get the details of an individual incident by selecting the **"Details"** button to the right of the particular incident that you want to review. [![image.png](https://opscom.wiki/uploads/images/gallery/2024-06/scaled-1680-/zhQimage.png)](https://opscom.wiki/uploads/images/gallery/2024-06/zhQimage.png) # Incidents Summary Report by Category 1\. Hover over the **Incidents** icon, click **Reports** and select **Report by Category** [![image.png](https://opscom.wiki/uploads/images/gallery/2024-06/scaled-1680-/Hocimage.png)](https://opscom.wiki/uploads/images/gallery/2024-06/Hocimage.png) 2\. This will take you to the **Incidents Summary by Category** screen. Select the selection boxes beside the categories that you want to include in your report, select the dates that you want the report to include, select location and/or select the sub-location. Select the Search Incidents button at the bottom once you have selected all of the criteria that you want to search by. Note, you do not need to select an option in all sections, only the ones that you specifically want information on. [![image.png](https://opscom.wiki/uploads/images/gallery/2024-06/scaled-1680-/iPeimage.png)](https://opscom.wiki/uploads/images/gallery/2024-06/iPeimage.png) 3.This will bring up a table at the bottom of the page that provides an overview of the incidents that have occurred in each category based off of your search criteria (sample below). From here you can select any of the links listed as a sub-category to get a **Sub-Category Report.** [![image.png](https://opscom.wiki/uploads/images/gallery/2024-06/scaled-1680-/lE4image.png)](https://opscom.wiki/uploads/images/gallery/2024-06/lE4image.png) 4\. In the **Sub-Category Report,** administrators can sort the table by selecting the column headings. Administrators can select the Details link beside a particular incident to view/edit details within that incident. [![image.png](https://opscom.wiki/uploads/images/gallery/2024-06/scaled-1680-/R9Himage.png)](https://opscom.wiki/uploads/images/gallery/2024-06/R9Himage.png) # Incident Summary Report by Sub-Location 1\. Hover over the **Incidents icon**, click **Reports** and select **Sub-Location Report**. [![image.png](https://opscom.wiki/uploads/images/gallery/2024-06/scaled-1680-/vREimage.png)](https://opscom.wiki/uploads/images/gallery/2024-06/vREimage.png) 2\. This will bring up the **Search Incidents** page. Select the specific dates that they want to search as well as the specific sub-location that they want to search. Select the **"Search"** button when all criteria have been entered. [![image.png](https://opscom.wiki/uploads/images/gallery/2024-06/scaled-1680-/drHimage.png)](https://opscom.wiki/uploads/images/gallery/2024-06/drHimage.png) 3\. This will bring up a table at the top of the page that provides an overview of the incidents that have occurred in each sub-location based on the time frame specified (sample below). Administrators can also select the **Details link** to the right of a particular incident to view/edit that particular incident. [![image.png](https://opscom.wiki/uploads/images/gallery/2024-06/scaled-1680-/kevimage.png)](https://opscom.wiki/uploads/images/gallery/2024-06/kevimage.png) # View Open Incidents 1\. Hover over the **Incidents** icon and select **View Open Incidents.** [![image.png](https://opscom.wiki/uploads/images/gallery/2024-06/scaled-1680-/NDbimage.png)](https://opscom.wiki/uploads/images/gallery/2024-06/NDbimage.png) 2\. This will take administrators to the **Open Incidents Report Page**. Administrators can select the specific ***Incident Number link*** to view/edit that particular incident. [![image.png](https://opscom.wiki/uploads/images/gallery/2024-06/scaled-1680-/SToimage.png)](https://opscom.wiki/uploads/images/gallery/2024-06/SToimage.png) # Dispatch Logs ## Reviewing Dispatch Logs Hover over the **Incidents** icon, **Dispatch**, and select **Dispatch Logs**. [![image.png](https://opscom.wiki/uploads/images/gallery/2024-06/scaled-1680-/zl2image.png)](https://opscom.wiki/uploads/images/gallery/2024-06/zl2image.png) This will bring up the **View/Edit Dispatch Log Records** page. Here administrators/dispatchers can view all open logs that still need to be followed-up on. [![image.png](https://opscom.wiki/uploads/images/gallery/2024-06/scaled-1680-/UzYimage.png)](https://opscom.wiki/uploads/images/gallery/2024-06/UzYimage.png) ## Printing a Dispatch Log To print the currently selected dispatch logs, select the appropriate source in the list of current dispatch logs followed by **Print Selected** to get a printed list of these logs. [![image.png](https://opscom.wiki/uploads/images/gallery/2024-06/scaled-1680-/DwJimage.png)](https://opscom.wiki/uploads/images/gallery/2024-06/DwJimage.png) ## Creating new Dispatch Log Records To create a new log record select one of the options from the **Create New Log Record** [![image.png](https://opscom.wiki/uploads/images/gallery/2024-06/scaled-1680-/SuDimage.png)](https://opscom.wiki/uploads/images/gallery/2024-06/SuDimage.png) Once the source contact for the new log has been selected, this will bring up the **Add New Log Record** screen. [![image.png](https://opscom.wiki/uploads/images/gallery/2024-06/scaled-1680-/qg1image.png)](https://opscom.wiki/uploads/images/gallery/2024-06/qg1image.png) Select the appropriate **Category** from the drop-down menu and type in any details that need to go with the log in the ***Note section.*** Select the **Add New** button at the bottom of the screen to save the information. Once the information has been saved, the log will show at the top of the listing of Dispatch Log Records. ## Adding Additional Log Notes If dispatchers want to add a separate log that is attached to the first log, select the **Add link** in the **Add column**. This will bring up an **Add Log Note** screen where dispatchers can include the source of the information, the category and any notes that need to be included. To save the log select the **Add** button at the bottom. To save the log and to also close the log, if it is completed, select the **Add & Close** button at the bottom. [![image.png](https://opscom.wiki/uploads/images/gallery/2024-06/scaled-1680-/8CXimage.png)](https://opscom.wiki/uploads/images/gallery/2024-06/8CXimage.png) If dispatchers want to assign an admin user to act on the log or if they want to attach an incident report, select the **Assign** link at the far right of the log. When an assignment is made, the incident number will appear in the listing of Dispatch Log Records. This link can be selected to gain access to view/edit the incident report. ## Viewing Additional Notes / Rolled-Up Alerts We can view all of the available log records associated with the dispatch log In the **View/Edit Dispatch Log Records**, by selecting the **+** symbol to the left of the log. [![image.png](https://opscom.wiki/uploads/images/gallery/2024-06/scaled-1680-/a3Fimage.png)](https://opscom.wiki/uploads/images/gallery/2024-06/a3Fimage.png) Dispatchers can add additional information to the initial log by selecting the link for the dispatch number. To close a log once it has been dealt with, select the **"C"** in the Status column to change the status to closed. ## Bulk Closing of Dispatch Logs It is also possible to close multiple Dispatch Logs in bulk. Select the logs you wish to close by selecting the checkbox associated with the log in question. Once you have selected all the log records you wish to close, click on Close Selected. [![image.png](https://opscom.wiki/uploads/images/gallery/2024-06/scaled-1680-/RcjxFhimage.png)](https://opscom.wiki/uploads/images/gallery/2024-06/RcjxFhimage.png) # Related Occurrences 1. Click the **'Incidents Menu'** select '**Search Incidents**'. [![image.png](https://opscom.wiki/uploads/images/gallery/2024-06/scaled-1680-/Rt6image.png)](https://opscom.wiki/uploads/images/gallery/2024-06/Rt6image.png) 2. In the Occurrence# field enter the **Incident Number** you wish to relate to another. [![image.png](https://opscom.wiki/uploads/images/gallery/2024-06/scaled-1680-/PoDimage.png)](https://opscom.wiki/uploads/images/gallery/2024-06/PoDimage.png) 3. The **Incident Information** screen displays. *Note: the tabs along the top of the form,* they provide a quick summary of information. Under the **'Related'** tab we currently see the numeral 0 indicating that there are no incidents related at this time. When you select the **Related** tab, the button to **Track Related Occurrences** will appear. [![image.png](https://opscom.wiki/uploads/images/gallery/2024-06/scaled-1680-/0QAimage.png)](https://opscom.wiki/uploads/images/gallery/2024-06/0QAimage.png) 4. Click the **'Track Related Occurrences**' button to display the **'Track Related Occurrences'** screen. The buttons across the top allow different options to search for. The '**Add Related Occurrences**' form is now available, by selecting **New Related List**. [![image.png](https://opscom.wiki/uploads/images/gallery/2024-06/scaled-1680-/GOYimage.png)](https://opscom.wiki/uploads/images/gallery/2024-06/GOYimage.png) 5. The first step is to **Name** and **Create** the list. In our example, we are naming the list "***Suspicious Activity March 20***". In the notes field, you can add a description of what the purpose of the list is. Click '**Save**' to save the list name and information. The screen will refresh with a **Search** box now showing at the bottom. [![image.png](https://opscom.wiki/uploads/images/gallery/2024-06/scaled-1680-/foFimage.png)](https://opscom.wiki/uploads/images/gallery/2024-06/foFimage.png) 6. Enter the **Current Incident Number** you are working with. For this example we are using16-0004. Click **'Search.'** [![image.png](https://opscom.wiki/uploads/images/gallery/2024-06/scaled-1680-/iaaimage.png)](https://opscom.wiki/uploads/images/gallery/2024-06/iaaimage.png) 7. Click '**Add**' to add this incident to the list entitled ***'Suspicious Activity March 20th'***. 8. Repeat the search process by entering the *Incident number* you would like to relate to the first incident. For example, Incident 16-0004 as 16-0006 and click **'Search'**. Add this incident to the list. The resulting screen will look like this: Note both 16-0004 and 16-0005 are listed. [![image.png](https://opscom.wiki/uploads/images/gallery/2024-06/scaled-1680-/qREimage.png)](https://opscom.wiki/uploads/images/gallery/2024-06/qREimage.png) 9. To see the result of this process, search once again for the original Incident 16-0004 from the **Search Incidents** menu. Note the change in the Related Tab now indicates 1 related occurrence. [![image.png](https://opscom.wiki/uploads/images/gallery/2024-06/scaled-1680-/ptRimage.png)](https://opscom.wiki/uploads/images/gallery/2024-06/ptRimage.png) 10. Click on **Related** to see the **Related Incident Information**. Note: the related incident is now listed. This information will show up on the incident information for both incidents in question. [![image.png](https://opscom.wiki/uploads/images/gallery/2024-06/scaled-1680-/dEQimage.png)](https://opscom.wiki/uploads/images/gallery/2024-06/dEQimage.png) # View Cameras 1. To view the cameras, go to Incidents icon, and click on View Camera [![image.png](https://opscom.wiki/uploads/images/gallery/2024-06/scaled-1680-/04timage.png)](https://opscom.wiki/uploads/images/gallery/2024-06/04timage.png) 2\. Next, you will see a page that has a button that says "**Launch Cameras**". Click on it [![image.png](https://opscom.wiki/uploads/images/gallery/2024-06/scaled-1680-/as1image.png)](https://opscom.wiki/uploads/images/gallery/2024-06/as1image.png) 3. A new window will open so you can see the Cameras [![image.png](https://opscom.wiki/uploads/images/gallery/2024-06/scaled-1680-/HY3image.png)](https://opscom.wiki/uploads/images/gallery/2024-06/HY3image.png) # My Incident Tasks ## Accessing your Tasks To access your tasks, click on **Incidents**, then click **My Tasks** [![image.png](https://opscom.wiki/uploads/images/gallery/2024-06/scaled-1680-/Epbimage.png)](https://opscom.wiki/uploads/images/gallery/2024-06/Epbimage.png) To view tasks, click on the *blue drop-down menu*, select your **name**. [![image.png](https://opscom.wiki/uploads/images/gallery/2024-06/scaled-1680-/AsKimage.png)](https://opscom.wiki/uploads/images/gallery/2024-06/AsKimage.png) Click on the **Incident Number** to display the **Incident information** page for more information. [![image.png](https://opscom.wiki/uploads/images/gallery/2024-06/scaled-1680-/lhLimage.png)](https://opscom.wiki/uploads/images/gallery/2024-06/lhLimage.png) # Incident Checklist ### Accessing the Checklist To access the checklist go into any incident and click on the **Checklist tab**. To access the form click on **Open Checklist**. The checklist form will open. [![image.png](https://opscom.wiki/uploads/images/gallery/2024-06/scaled-1680-/xTTimage.png)](https://opscom.wiki/uploads/images/gallery/2024-06/xTTimage.png) # Checklist Fields Defined **CCTV Reviewed:** Indicate if the closed-circuit television cameras were reviewed. (Yes/No/Not Required) State the reason for what was selected or additional details. E.g. What was found in the footage? Why was the footage not reviewed? **Other Resources Reviewed:** Indicate if other resources were reviewed as a part of the incident. (Yes/No/Not Required) State all resources used or additional details. E.g. Social media, Canada 411 or OPS-COM. **Witness(es) Interviewed:** Indicate if witnesses were interviewed as a part of the incident. (Yes/No/Not Required) State all witnesses, and their contribution to the incident resolution or additional details. E.g. Mike Lawson - Saw the incident. **Suspect(s) / Person(s) of Interest Interviewed:** Indicate if the suspects were interviewed as a part of the incident. (Yes/No/Not Required) State all suspects involved, and their involvement with the incident or additional details. E.g. Sandra Morra - Admitted fault after evidence had been found. **Statements Obtained:** Indicate if statements were collected as a part of the incident. (Yes/No/Not Required) State all the statements provided in relation to the incident or additional details. E.g. No other people at the scene to make a statement. **Other Evidence Collected:** Indicate if other physical or virtual evidence was reviewed as a part of the incident. (Yes/No/Not Required) State all the evidence collected, where it is stored and important information about it, or additional details. E.g. Beer bottle - given to the police - had fingerprints of the suspect. **Safe Plan and Community Resources Discussed with Complainant:** Indicate if a safe plan and community resources were discussed with the complainant. (Yes/No/Not Required) State what specifically was discussed, or additional details. E.g. Complainant was informed that the police were updated on the case and that the complainant's information was given to them. **Other Departments / Agencies Consulted or Notified:** Indicate if other departments were notified as a part of the incident. (Yes/No/Not Required) State all departments notified and the reason why, or additional details. E.g. Housing - Students need to be moved to separate buildings. **Community Notified:** Indicate if the community was notified as a part of the incident. (Yes/No/Not Required) State how and why the community was notified, or additional details. E.g. Flyers put up on west residence building to inform other students of the case, due to its nature and school policy. **Security / CPTED Audit Conducted:** Indicate if security and/or CPTED (Crime Prevention Through Environmental Design) audit was conducted as a part of the incident. (Yes/No/Not Required) State what was audited, any problems found, and steps taken to resolve them, or additional details. E.g. Audit of residence building security shows blind spots in lobby cameras by front desks. Additional cameras were added. **Recommendations Made to Prevent a Re-occurrence:** Indicate if recommendations to prevent future incidents were made. (Yes/No/Not Required) State all recommendations, or additional details. E.g. An employee will be posted at the front desk of the residence building at all times, to ensure the safety of all in the main lobby. **Complainant Notified of Outcome:** Indicate if the complainant was notified of the outcome. (Yes/No/Not Required) State what the complainant was told, or additional details. E.g. Bob Gant was informed that there would be an employee posted at the front desk, who could help prevent future incidents. **Documentation Updated & Filed:** Indicate if documentation was updated and filed for the incident. (Yes/No/Not Required) State what documentation was updated, or additional details. E.g Security audit has been saved to the security network drive and camera layout has been updated for all buildings. **Status at time of Closing:** Indicate the status of the incident at the time the case is closed. (Solved/Unsolved/Unfounded) **Reason For Report Being Closed:** Indicate the reasons for the report being closed. (Drop down box) E.g Reason beyond the control of service **Closing Comments:** Indicate any final comments or details of the case. E.g. Case has been closed, recommendations have been implemented for security and staffing. This type of incident should no longer be possible on the lobby floors of all residence buildings across campus. # Filling out the Incident Form (WIP) Here is a sample of what the Incident report looks like. Basic information describing what occurred can be registered here in the overview. This includes what one might consider the essential information about the incident. - Description - Status - Time - Place - Any related information or events [![image.png](https://opscom.wiki/uploads/images/gallery/2024-06/scaled-1680-/DQaimage.png)](https://opscom.wiki/uploads/images/gallery/2024-06/DQaimage.png) The incident report also allows the admin to record details: - Dispatch Logs - People Involved - Vehicles Involved - Missing Property if any - Tasks to be completed - Checklist (A Custom form that can be generated) - Related issues or incidents - External (Follow-Up Items) - Related Violations [![image.png](https://opscom.wiki/uploads/images/gallery/2024-06/scaled-1680-/dslimage.png)](https://opscom.wiki/uploads/images/gallery/2024-06/dslimage.png) # Viewing an Incident You can get to the view incident screen from multiple areas. Searches, reports, links from other places. Once there, you can view something similar to this: [![view-image1.png](https://opscom.wiki/uploads/images/gallery/2024-07/scaled-1680-/view-image1.png)](https://opscom.wiki/uploads/images/gallery/2024-07/view-image1.png) ### Viewing Permissions To view the page, you must have one of the following permissions: - View All Incidents - View Incidents - Self - AND you must be one of the following: - The reporter - Primary Investigator - Case Manager - Be on a task group that’s assigned in the tasks - Be assigned directly to a task. The edit option is only available if you have one of the following permissions: - Custom Permission - Open All - Edit Incidents - View Incidents - Self - AND you are the reporting admin - AND the incident is Open [![view-image2.png](https://opscom.wiki/uploads/images/gallery/2024-07/scaled-1680-/view-image2.png)](https://opscom.wiki/uploads/images/gallery/2024-07/view-image2.png) - If the incident is locked and the admin has the permission "incident\_admin" - Incident Administrator, then they can view the lock reason. - If the admin has the permission: View/Edit Confidential Information, they can see a Confidential Info section near the bottom above files. ### **Dispatch Logs** Anyone who can view the incident can view the dispatch logs. To add or drop dispatch logs from this incident, the admin must have the permission: “Add/Drop Dispatch Logs.” Linking dispatch logs can be done from either the dispatch entry screen or from the link Log button: [![view-image3.png](https://opscom.wiki/uploads/images/gallery/2024-07/scaled-1680-/view-image3.png)](https://opscom.wiki/uploads/images/gallery/2024-07/view-image3.png) Dropping a log can be done from the Dispatch Logs tab. It will prompt the admin prior to dropping the log: [![view-image4.png](https://opscom.wiki/uploads/images/gallery/2024-07/scaled-1680-/view-image4.png)](https://opscom.wiki/uploads/images/gallery/2024-07/view-image4.png) ### **Linking People** [![view-image5.png](https://opscom.wiki/uploads/images/gallery/2024-07/scaled-1680-/view-image5.png)](https://opscom.wiki/uploads/images/gallery/2024-07/view-image5.png) The show more section will show all the extended details about a user that isn’t on the screen above: [![view-image6.png](https://opscom.wiki/uploads/images/gallery/2024-07/scaled-1680-/view-image6.png)](https://opscom.wiki/uploads/images/gallery/2024-07/view-image6.png) ### **Linking Other Items** Linking other items such as vehicles, missing property and violations can also be done from here. There’s less information to show than with users. Related incidents can be viewed here. [![view-image7.png](https://opscom.wiki/uploads/images/gallery/2024-07/scaled-1680-/view-image7.png)](https://opscom.wiki/uploads/images/gallery/2024-07/view-image7.png) Useful for when several incidents are all related in some way. How these are linked and managed are done elsewhere. ### **Checklists** Some incidents require a checklist to be filled out prior to closing or requesting the incident be closed. The subcategory is what defines this requirement: [![image8.png](https://opscom.wiki/uploads/images/gallery/2024-07/scaled-1680-/image8.png)](https://opscom.wiki/uploads/images/gallery/2024-07/image8.png) To view the checklist, the admin must have one of the following permissions: View All Incidents or Incident Administrator. When the issue is still open, a warning will appear: [![image9.png](https://opscom.wiki/uploads/images/gallery/2024-07/scaled-1680-/image9.png)](https://opscom.wiki/uploads/images/gallery/2024-07/image9.png) Then they can fill out the details and depending if they have the right permission, close or request the incident be closed: [![image10.png](https://opscom.wiki/uploads/images/gallery/2024-07/scaled-1680-/image10.png)](https://opscom.wiki/uploads/images/gallery/2024-07/image10.png) ### **Tasks and assignment** [![image11.png](https://opscom.wiki/uploads/images/gallery/2024-07/scaled-1680-/image11.png)](https://opscom.wiki/uploads/images/gallery/2024-07/image11.png) #### **Case Manager assignment** To assign an incident to a case manager, the admin editing the report must have the permission “Assign Incident To Case Manager” or they must already be the case manager. Further to this, to be able to be the case manager, only the admins with the permission “Is Incident Case Manager” or “Is Incident Shift Manager” will be available. In the above example, Maximillion Smith is not the case manager, nor do they have the assign permission so they can only view who is assigned the case manager role. #### **Primary Investigator assignment** Similarly with Primary Investigator, the admin must meet one of the following criteria: - Permission: Edit Incident Tasks - Permission: Is Incident Shift Manager - Permission: Assign Incident To A Different Investigator - Role: Is the case manager for this incident - Scenario: No Primary Investigator is selected and they have the permission Assign Incident to An Investigator Only admins with the permission “Be Assigned Tasks Directly” will be available. In the above example, Max has the permission Edit Incident Tasks and therefore can change the primary investigator. #### **Editing Tasks and Comments** If the admin is: - Permission: Edit Incident Tasks - Permission: Is Incident Shift Manager - Role: Is the primary investigator or case manager They can add and edit tasks. They can also edit the text in the task. [![image12.png](https://opscom.wiki/uploads/images/gallery/2024-07/scaled-1680-/image12.png)](https://opscom.wiki/uploads/images/gallery/2024-07/image12.png) If the admin does not have the permission, but is assigned to a task either directly or they are part of the task group, they get the reassign option as indicated above. ### **Use of Force Forms** The use of force form is available for clients in the province of Ontario as this is a Government of Ontario form as indicated below. It requires the setting for Use of Force to be enabled. On the view incident page, the use of force forms are read only. [![image.png](https://opscom.wiki/uploads/images/gallery/2024-07/scaled-1680-/L1Jimage.png)](https://opscom.wiki/uploads/images/gallery/2024-07/L1Jimage.png) ### **Side Buttons & Permissions** 1\. The first button is available and visible if the admin has the Open Incidents permission. It will either be in a state of open or close depending on the current open/close status. 2\. The second button can either be View, Edit, Edit Summary, or hidden. If the admin meets one of the following requirements: - Permission: Custom Permission - Open All - Permission: Edit Incidents - Permission: Edit Incident Summaries - Permission: View Incidents - Self - AND you are the reporting admin What the button does will depend on other states. - If the admin also has the Incident Admin permission then: - AND the incident is open, the admin can edit the incident. - AND the incident is closed, the link will take the admin to the edit summary screen. - If the admin has the Edit Incident Summaries permission: - AND the incident is locked, they can edit the summary. - AND the incident is unlocked, they can edit the incident - If the incident is open - They can edit the incident - If none of the scenarios above match, the admin is not able to edit this incident, nor the summary. 3\. The Distribute & Email buttons are only available to admins with the Incident Admin permission. 4\. The download incident only requires the admin can view the incident at all. 5\. The toggling of read status will switch the state of the read status back and forth between read and unread. 6\. If the admin has the Delete Incident permission, then they can see the next button. - If the Incident can be deleted, a delete option will appear. This requires that all details on the incident are over seven years old. Any update to any item will render the delete option disabled. - The message will appear as "Delete Not Avaialble" if the incident or any detail has been created or updated in the last seven years. # Payments and Transaction Flow # Payments and Transaction Flow The flow is a 3 step process, which includes: 1. User/Admin link item to user 2. User makes payment promise 3. Admin processes payment ## Step #1: A user or an administrator links a permit to the user. At this point, there is no payment link and the item is "**Awaiting Payment**" since the user has not selected a payment method (*made a promise of payment*). As well, items (permits) are not accessible to any other system user. *There is a midnight clearing list which can automatically release permits linked to users that do not have promises for payment.* ## Step #2: User or admin links a **payment type** (ie. cheque, cash, etc.) This puts the user on the **Unprocessed Payments** list, and that list needs to be checked regularly. This allows a user to mail in a cheque or to stop by the office to make payment. In these cases, a user has "promised" to pay. We suggest that permits be released (Drop Payment) after 2 weeks since that offers users enough time to make payment. ## Step #3: Once payment is received (cheque is received in the mail, or the user stops by the office to make a payment) the transaction is marked as **processed** and the user is linked to the item. At this point, the item is marked processed and is actually (completely) linked to the user. # Payment Processing Models ## Using a Gateway This is being phased out as the method for handling payments. ## Using Hosted Payments This is the preferred method for handling payments. [![image.png](https://opscom.wiki/uploads/images/gallery/2024-06/scaled-1680-/G8Yimage.png)](https://opscom.wiki/uploads/images/gallery/2024-06/G8Yimage.png) # Types of Reimbursement ## Cancel Transaction - To cancel a transaction **before** a payment is processed **When would you cancel a transaction?** - User decides not to follow through on a promise to pay **Note:** - Items in the transaction are released back to the system - The promise to pay is removed from the user (user no longer owes money) ## Adjustments - Alter the cost of an item **before** it has been paid for - Alter the value of a transaction **after** it has been paid for **When would you apply an adjustment?** - User was charged too much or too little for an item - User is being refunded part of a transaction (ie. not longer using item; pro-rated refund) - Adjustments can be positive or negative - Can also be considered refunds, but full transaction refunds are a different option **Note:** - Items are not released back to the system ## What does a refund look like in the system? - Item is (or items are) returned **after** it has been paid for - Transaction needs to be cancelled **after** it has been paid for **When would you give a refund?** - User has decided against the purchase - Transaction is totally incorrect and it is easier to start over - A refund can be used to **reverse** the transaction **Note:** - Transaction items are released back to the system - If there is more than one item in the transaction, all items will be reimbursed and all items are released back to the system. If only one item needs to be refunded/reimbursed, do an adjustment and release the item separately. # Adjusting a violation to zero dollars ## Adjusting the fine amount by editing the ticket: 1. To adjust the fine amount on the ticket go to the user's profile and locate the **violation** you wish to reduce. [![image.png](https://opscom.wiki/uploads/images/gallery/2024-06/scaled-1680-/d1Simage.png)](https://opscom.wiki/uploads/images/gallery/2024-06/d1Simage.png) 2. Click on the **ticket number** to access the **Violation Information** detail screen. [![image.png](https://opscom.wiki/uploads/images/gallery/2024-06/scaled-1680-/Sa9image.png)](https://opscom.wiki/uploads/images/gallery/2024-06/Sa9image.png) 3. Click on the **Edit** button in the upper right corner to access the **Edit Violation Information** page. Halfway down the page you will see the offence listed as well as the amount of the violation. Edit the dollar value of the fine to **$0.00.** Click on **Update this Violation** to save your changes. [![image.png](https://opscom.wiki/uploads/images/gallery/2024-06/scaled-1680-/qu6image.png)](https://opscom.wiki/uploads/images/gallery/2024-06/qu6image.png) 4. The violation will now appear in the user profile as a zero dollar fine. [![image.png](https://opscom.wiki/uploads/images/gallery/2024-06/scaled-1680-/YUBimage.png)](https://opscom.wiki/uploads/images/gallery/2024-06/YUBimage.png) ## Cancelling a fine by changing the ticket to a warning: An admin can change a ticket to a warning which will result in cancelling the fine amount. 1. To do so **edit** the ticket as described above. 2. Check the box next to the word **Warning** to change the state of the ticket. Click on **Update this Violation** to save your changes. [![image.png](https://opscom.wiki/uploads/images/gallery/2024-06/scaled-1680-/C9wimage.png)](https://opscom.wiki/uploads/images/gallery/2024-06/C9wimage.png) 3. The ticket will appear as follows in the user history. (Captured here from the admin side.) [![image.png](https://opscom.wiki/uploads/images/gallery/2024-06/scaled-1680-/i5Himage.png)](https://opscom.wiki/uploads/images/gallery/2024-06/i5Himage.png) 4. This is how it would appear on the user side: [![image.png](https://opscom.wiki/uploads/images/gallery/2024-06/scaled-1680-/l6vimage.png)](https://opscom.wiki/uploads/images/gallery/2024-06/l6vimage.png) ## Adjusting the fine amount by processing an adjustment: This scenario is slightly different as adjustments to fines are done **after** the initial fine has been paid for. 1. To begin, go to the user's history and locate the violation you wish to zero out. In our example we are using Ticket number **TT-10011.** Click on the **Adjust** link on the left. [![image.png](https://opscom.wiki/uploads/images/gallery/2024-06/scaled-1680-/7HRimage.png)](https://opscom.wiki/uploads/images/gallery/2024-06/7HRimage.png) 2. The **Create Adjustment Record** window will open. Enter the amount you wish to reduce the fine by. In this case the current fine is $*40.00* (the violation had a fine of $*50.00,* but was paid within the widow where the discount of *$10.00* applied) It is advisable to enter a comment as to why the fine is being reduced. [![image.png](https://opscom.wiki/uploads/images/gallery/2024-06/scaled-1680-/Jw2image.png)](https://opscom.wiki/uploads/images/gallery/2024-06/Jw2image.png) 3. This method will place an adjustment on the user's account. This is what it will look like in the payments tab. This adjustment can be applied to a future payment or be processed as a refund. [![image.png](https://opscom.wiki/uploads/images/gallery/2024-06/scaled-1680-/Uj5image.png)](https://opscom.wiki/uploads/images/gallery/2024-06/Uj5image.png) ## Adjusting the fine through the appeals process A fine can be adjusted or reduced to zero through the appeals process. # Adjustments ## Making an Adjustment as an Admin 1\. Note that the top right-hand corner will always identify the name of the user file that is being worked in. [![image.png](https://opscom.wiki/uploads/images/gallery/2024-06/scaled-1680-/ncfimage.png)](https://opscom.wiki/uploads/images/gallery/2024-06/ncfimage.png) 2\. For this example, when finished going through the payment process, on the **Transaction Details** screen, select the **Adjust** link. (Note the process is the same if you select the adjustment link before a transaction is completed.) This will bring up the **Create Adjustment Record** pop-up screen. Enter in the internal organization **Requisition Code**, change the amount sign to positive if you are charging the user more or change the amount sign to a negative if you are reimbursing the user, enter the dollar amount of the adjustment, enter any comments to be associated with the adjustment and select the **Add Adjustment** button at the bottom of the screen. This will bring you back to the **Payment Details** screen with the adjustment listed below the original transaction. Note, at this point, the adjustment is not processed. [![image.png](https://opscom.wiki/uploads/images/gallery/2024-06/scaled-1680-/FtFimage.png)](https://opscom.wiki/uploads/images/gallery/2024-06/FtFimage.png) 3\. Select the **Not processed** link. This will bring up the **Adjustment Information** pop-up screen where you verify the adjustment details are correct. [![image.png](https://opscom.wiki/uploads/images/gallery/2024-06/scaled-1680-/QgFimage.png)](https://opscom.wiki/uploads/images/gallery/2024-06/QgFimage.png) 4\. If the adjustment details are correct, select the **Process this Adjustment** button at the bottom of the screen. You will notice the **Payment Status** line will change from **Not Processed** to **Submitted** and the date. This completes the adjustment process, altering the dollar amount associated with the item. Note, no items are released back into the inventory system using the adjustment process. If an item needs to be released back into the inventory, this will need to be done separately. ## **Adjusting a Violation Before Payment** # Cancel Transaction ### Cancelling On the **Transaction Details** screen you can see the different options available. You can choose to **Cancel & Keep** or **Cancel & Release**. - **Cancel & Keep** will cancel the transaction but keep the transaction details and reserve the permit so that you can process the payment at another time. - **Cancel and Release** will cancel the payment and release the permit back into the system [![image.png](https://opscom.wiki/uploads/images/gallery/2024-06/scaled-1680-/Qtjimage.png)](https://opscom.wiki/uploads/images/gallery/2024-06/Qtjimage.png) A pop-up message will ask that you confirm. Click OK to confirm the cancellation of the transaction. # What does a refund look like in the system? Locate the user profile for the user you want to refund for. Note: The top right-hand corner will always identify the name of the user that is being worked on. In our example we will refund **Permit #1** at **$395.50** but keep in mind the process is identical for and refund such as Standard Permits, Temporary Permits, Locker rentals, violations etc. [![image.png](https://opscom.wiki/uploads/images/gallery/2024-06/scaled-1680-/fItimage.png)](https://opscom.wiki/uploads/images/gallery/2024-06/fItimage.png) From the **History Tab** select **All Records.** [![image.png](https://opscom.wiki/uploads/images/gallery/2024-06/scaled-1680-/nfQimage.png)](https://opscom.wiki/uploads/images/gallery/2024-06/nfQimage.png) **For Standard permits and Temporary permits:** Find the permit you want to refund and click on the Processed **date** link. [![image.png](https://opscom.wiki/uploads/images/gallery/2024-06/scaled-1680-/HLoimage.png)](https://opscom.wiki/uploads/images/gallery/2024-06/HLoimage.png) **For Violations:** Click on the word **Processed** to access the transaction details. [![image.png](https://opscom.wiki/uploads/images/gallery/2024-06/scaled-1680-/0QUimage.png)](https://opscom.wiki/uploads/images/gallery/2024-06/0QUimage.png) **For Lockers:** Click on the Processed **date** link. [![image.png](https://opscom.wiki/uploads/images/gallery/2024-06/scaled-1680-/5T2image.png)](https://opscom.wiki/uploads/images/gallery/2024-06/5T2image.png) The **Transaction Details** screen appears. Click on the **Refund** button to begin the refund process. [![image.png](https://opscom.wiki/uploads/images/gallery/2024-06/scaled-1680-/81qimage.png)](https://opscom.wiki/uploads/images/gallery/2024-06/81qimage.png) The **Refund Payment Record** window will pop up. Enter the internal organization **Requisition Code** (optional) and the **Refund Amount** (including taxes). You are required to enter a **comment** in order to proceed. [![image.png](https://opscom.wiki/uploads/images/gallery/2024-06/scaled-1680-/S4Ximage.png)](https://opscom.wiki/uploads/images/gallery/2024-06/S4Ximage.png) Click the **Refund Payment Record** button to continue. A confirmation pop-up will appear. Click **OK** to continue. **IMPORTANT**: As noted on this screen, **By using refund for permits and lockers you will be releasing all items associated with this Confirmation Number. Violations however will simply go back to awaiting payment status.** [![image.png](https://opscom.wiki/uploads/images/gallery/2024-06/scaled-1680-/bjkimage.png)](https://opscom.wiki/uploads/images/gallery/2024-06/bjkimage.png) The **Adjustment Information** pop-up will display showing the refund details. You have the ability to select the type of refund in this window. In our example this will be a **Cash Refund.** Click on **Process This Adjustment** to proceed. [![image.png](https://opscom.wiki/uploads/images/gallery/2024-06/scaled-1680-/XIhimage.png)](https://opscom.wiki/uploads/images/gallery/2024-06/XIhimage.png) You will return to the **Transaction Detail** window showing the details of the refund. Notice the refund amount of **$-395.50** is listed as an **adjustment**. [![image.png](https://opscom.wiki/uploads/images/gallery/2024-06/scaled-1680-/4cNimage.png)](https://opscom.wiki/uploads/images/gallery/2024-06/4cNimage.png) To see how this appears in the user's profile on the admin side, go back into the history tab and select **All Records**. [![image.png](https://opscom.wiki/uploads/images/gallery/2024-06/scaled-1680-/YPaimage.png)](https://opscom.wiki/uploads/images/gallery/2024-06/YPaimage.png) In the user history we see the record of the original purchase as well as; (1) **Released** date and a note indicating the permit is **"Released back to system by refund process"** and (2) **w**e can also see the refund under **Adjustment Records.** [![image.png](https://opscom.wiki/uploads/images/gallery/2024-06/scaled-1680-/7fsimage.png)](https://opscom.wiki/uploads/images/gallery/2024-06/7fsimage.png) ## Refunding to Deal with a NSF Payment When a payment is made and processed the item is considered paid for. If the payment fails to pass at the bank (NSF) you would need to perform a refund in order to remove the payment from the system. Why do we refund a NSF Payment? Refunding for a NSF payment is essentially a bookkeeping issue. For example, if a cheque is returned NSF, the admin must remove the payment from the system in a manner that shows the incoming cheque as a payment and the refund as the removal of the payment that in reality never happened due to the NSF payment. After you process the refund, the Processed Payment Report for this transaction should show the payment on the report as well as the refund. This is normal as with any refund you will see the incoming payment and then the refund (outgoing) payment. These both need to be there to record the attempt to pay (for lack of a better term) which would show as income. Since the cheque bounced that income has to be removed from the OPS-COM system (system of record). By doing the refund and processing it you essentially remove that payment from the system and you do so in accordance with typical book keeping entries. Be sure to process the refund with the same payment type (cheque) as the original payment attempt. This will make more sense to anyone doing you accounting. It is also very important to leave good clear notes to document the failed payment and the reason for the refund. # Collections Module ## Accessing the Collections Module [![image.png](https://opscom.wiki/uploads/images/gallery/2024-06/scaled-1680-/Serimage.png)](https://opscom.wiki/uploads/images/gallery/2024-06/Serimage.png) There are several steps leading up to a collection since often notification of a user is all that may be needed to collect on overdue funds. The collections module is currently tied to the Violations menu, but may in the future work with all modules in the system. Originally the implementation worked around the idea that people parking on campus may be unknown users. By having a collection module (and the MTO lookup functionality) unknown user details can be determined from a vehicle tag (plate, province, etc.). Students and staff users can be dealt with in a different manner but can also be sent to collections. In the case of a student, they can be denied graduation if their account is not paid in full. ## Collection Module Operation In this particular case, the items related to MTO lookup are based on a data format for the Ministry or Transportation Ontario, but could be adjusted to match requirement in any area. - ### **Vehicle Lookup Export** - allows an administrator to export data in a MTO friendly format. This export can be imported to the MTO terminals by MTO staff (or automation) and the result is an MTO Lookup Report. [![image.png](https://opscom.wiki/uploads/images/gallery/2024-06/scaled-1680-/w3oimage.png)](https://opscom.wiki/uploads/images/gallery/2024-06/w3oimage.png) - ### **Import from Lookup (MTO)** - allows an administrator to import the unknown user details back into the system and populate address and contact fields. - ### **Known Report** - allows an administrator to query and package accounts (as an Excel export) that should be sent to a collection service provider - Internally it sets the "SentToCollections" flag on the associated violations so that future queries will not duplicate listings logic around this report is defined as follows: - **If** (the user has an email and an **overdue notice** *(details below)* that was sent more than 30 days ago) **OR** (the user does not have an email and the violation is past due date)**Then** include them on the report based on the supplied parameters (user type and days overdue) [![image.png](https://opscom.wiki/uploads/images/gallery/2024-06/scaled-1680-/g2nimage.png)](https://opscom.wiki/uploads/images/gallery/2024-06/g2nimage.png) - ### **Send to Known & Unknown Report** - generates a report of the accounts "SentToCollections" based on the date and user type - the report includes details related to payment where applicable [![image.png](https://opscom.wiki/uploads/images/gallery/2024-06/scaled-1680-/R95image.png)](https://opscom.wiki/uploads/images/gallery/2024-06/R95image.png) ## Overdue Notices See also: Technical Schematic - Step #1 *This document highlights the first steps leading to a collection.* As part of system automation, overdue notices on violations can be sent out each night. If this is not enabled on your system, please contact Tomahawk Support to have this feature enabled. Each night the system will create an email list and send overdue notices to any known users that have emails on the system. Essentially the system looks up overdue violations, then looks up vehicles and users associated with those vehicles. From that information it may be able to obtain an email address and formulates a message for delivery to the user. When the message is sent, the violation field "AutoNotice" is flagged in the database. In the event a user does not have an email address, or the users are unknown, a report is compiled containing that information and is sent to the system administrator. An overdue sample message follows: [![image.png](https://opscom.wiki/uploads/images/gallery/2024-06/scaled-1680-/dEbimage.png)](https://opscom.wiki/uploads/images/gallery/2024-06/dEbimage.png) # Automatic Violation Notice The Automatic Violation Notice Script sends New and Past Due violation notice emails to ParkAdmin users. For a Lucid Chart Diagram See: Technical Schematic - Step #1 ## OPS-COM Settings to be Confirmed: There are additional settings that will affect whether or not all unpaid violations will be added to the letter or if the selected violations will only be included when it comes time to create the letter report. These settings are found under **System Settings →** **Collections** → **Include All Unpaid Violations.** As mentioned this will allow you to select a single violation in the list and generate a report for all violations associated with that user. Keep in mind that means it will also remove the associated violations from the pick-list on the Printable Violation Notice Report page even if you only have one of the violations selected. [![image.png](https://opscom.wiki/uploads/images/gallery/2024-06/scaled-1680-/TT9image.png)](https://opscom.wiki/uploads/images/gallery/2024-06/TT9image.png) ## Notice/Email Summary: In total there are 4 different types of emails that will be sent once the above is setup:
- **User overdue account notice** (lets normal users know they have a violation(s) past due in OPS-COM).
View email
[![image.png](https://opscom.wiki/uploads/images/gallery/2024-06/scaled-1680-/GF3image.png)](https://opscom.wiki/uploads/images/gallery/2024-06/GF3image.png)
- **User new violation notice** (lets normal users know they have a new violation issued to them the day of, \*note: it seems this will NOT notify older violations once enabled, e.g. violation that is 3 days old vs 1 day old, would only notify the 1 day old user since it's "new").
View email
[![image.png](https://opscom.wiki/uploads/images/gallery/2024-06/scaled-1680-/iwTimage.png)](https://opscom.wiki/uploads/images/gallery/2024-06/iwTimage.png)
- **Admin new violation report notice** (emails the OPS-COM administrator telling them how many new violation emails were sent).
View email
[![image.png](https://opscom.wiki/uploads/images/gallery/2024-06/scaled-1680-/IO1image.png)](https://opscom.wiki/uploads/images/gallery/2024-06/IO1image.png)
- **Admin past due violation report notice** (emails the OPS-COM administrator telling them how many users were emailed past due violation emails AND also how many users couldn't be emailed because they didn't have an email address in the system. These users are added to the "letter report", more info below).
View email
[![image.png](https://opscom.wiki/uploads/images/gallery/2024-06/scaled-1680-/vvDimage.png)](https://opscom.wiki/uploads/images/gallery/2024-06/vvDimage.png)
## The NIC Letter As part of the MTO process an admin can set up a **N**otice of **I**mpending **C**onviction (NIC) letter that can be sent to users who have outstanding violations that will be collected through Ontario courts. To configure this letter go to System Messaging and edit the Notice Letter found in the Messages tab. You can read more about Notice Letters/NIC on this page. Letter Report: Users who couldn't be emailed their overdue violations are added to the letter report, which is accessible under Violations > Letter report on the OPS-COM Website. The letter report was created so that OPS-COM administrators can print and mail out overdue violations if they so choose. [![image.png](https://opscom.wiki/uploads/images/gallery/2024-06/scaled-1680-/GYAimage.png)](https://opscom.wiki/uploads/images/gallery/2024-06/GYAimage.png) Note: When arriving at this page the results can fall into two categories: Printable Violation Notices and Unprintable. The Unprintable means that there is an incomplete mailing address. [![image.png](https://opscom.wiki/uploads/images/gallery/2024-06/scaled-1680-/Otfimage.png)](https://opscom.wiki/uploads/images/gallery/2024-06/Otfimage.png) ## Resending a NIC Letter Once a NIC letter has been sent it is stored with the associated violation. If for any reason you wish to resend or re-output the letter you can do so from the ticket detail. Search for the ticket or locate it on the user's profile then click on the ticket number to view the ticket detail. From here you will see the Overdue Letter button. By clicking on this button you will be able to view and resend the notice. [![image.png](https://opscom.wiki/uploads/images/gallery/2024-06/scaled-1680-/Mzdimage.png)](https://opscom.wiki/uploads/images/gallery/2024-06/Mzdimage.png) # Technical Schematic - Step #1 Setting Up 1. Send an email to the offenders primary driver that they have a new violation. Generally you would issue the ticket on the same day as the violation. 2. Set a flag in preparation for collections. (If the violation is older than AutoNoticeDays) 1. If the violations connected user is primary driver and has an email address 1. send an email and flag appropriately (**AutoNotice** = 1) 2. set **Violation.AutoNotice** to 1 2. If the violations attached to the user are for the primary driver and they have no email 1. set flag to be added to the Letter Report (2) 2. set **Violation.AutoNotice** to 2 3. 30 days after items are tagged with either 1 or 2 **Violation.AutoNotice** and that have an associated Violation Notice will appear on the "send to collections" report 1. that report allows the administrator to select who/which items will be sent to collections # Hosted Payments # Authorize.Net [![image.png](https://opscom.wiki/uploads/images/gallery/2024-06/scaled-1680-/ofiimage.png)](https://opscom.wiki/uploads/images/gallery/2024-06/ofiimage.png) Development: [https://sandbox.authorize.net/](https://sandbox.authorize.net/) This space is primarily for development against the Authorize.Net API. The sandbox area ensures no transactions are accidentally pushed through a "real" payment processor. Production: [https://account.authorize.net/](https://account.authorize.net/) The production space is the portal to access transactions and live account settings. ## Production (or Testing) Setup There are several places where setup is required. The hosted payments page will need to be updated to present a consistent look for the end user. This can be done under the "Payment Form" option under the "Account" area as noted below. As well, it should be noted that the receipt page and response details do not need to be completed. As part of the payment protocol OPS-COM supplies this information to Authorize.Net [![image.png](https://opscom.wiki/uploads/images/gallery/2024-06/scaled-1680-/G9limage.png)](https://opscom.wiki/uploads/images/gallery/2024-06/G9limage.png) Please be aware your Authorize.net merchant account needs to have the following settings: Product Type: **Card Not Present (CNP)** Market Type: **eCommerce** These settings are usually setup by your Authorize.net contact on the initial account creation. If you want to confirm the correct settings go to Account > Merchant Profile. Under the Business Information heading it will show your product and market type. ### API Credentials API credentials are required for communication between OPS-COM and Authorize.Net. You will need 3 pieces of unique identification, one of which (API Login ID) is defined at the time of the account creation. OPS-COM will need the following ID's - API Login ID - Transaction Key - Signature Key *Where to obtain these values is noted below.* [![image.png](https://opscom.wiki/uploads/images/gallery/2024-06/scaled-1680-/2uYimage.png)](https://opscom.wiki/uploads/images/gallery/2024-06/2uYimage.png) In the above screen shot we have chosen to generate a new Transaction Key. Upon selecting Submit, the new transaction key is presented. [![image.png](https://opscom.wiki/uploads/images/gallery/2024-06/scaled-1680-/0ENimage.png)](https://opscom.wiki/uploads/images/gallery/2024-06/0ENimage.png) NOTE The generated **Transaction Key** and **Signature Key** together with the **API Login ID** need to be supplied to Tomahawk Technologies Inc. to complete the OPS-COM setup. ### Payment Form You can style the payment form and add additional details to the hosted payment input page. As well, fields such as shipping address can be hidden on the payment form to remove any confusion for the end user. [![image.png](https://opscom.wiki/uploads/images/gallery/2024-06/scaled-1680-/Zzximage.png)](https://opscom.wiki/uploads/images/gallery/2024-06/Zzximage.png) Suggested payment form options: Note Personal details can also be removed from the form since OPS-COM will automatically connect the payment to a user. Since users will often use credit cards that are not their own (spouse, parents, corporate) adding the additional fields is suggested. [![image.png](https://opscom.wiki/uploads/images/gallery/2024-06/scaled-1680-/zdjimage.png)](https://opscom.wiki/uploads/images/gallery/2024-06/zdjimage.png) AVS (Address Verification Service) If AVS is enabled please make sure to set the following address fields required: See [https://support.authorize.net/knowledgebase/Knowledgearticle/?code=000001490](https://support.authorize.net/knowledgebase/Knowledgearticle/?code=000001490) for additional information on AVS ## Site Testing Testing This page includes ways to generate failure states: [http://developer.authorize.net/hello\_world/testing\_guide/](http://developer.authorize.net/hello_world/testing_guide/) # Bambora (formerly Beanstream) [![image.png](https://opscom.wiki/uploads/images/gallery/2024-06/scaled-1680-/bFuimage.png)](https://opscom.wiki/uploads/images/gallery/2024-06/bFuimage.png) **OperationsCommander (OPS-COM) supports Bambora as a compatible hosted payment provider. Please use the following screenshot for reference to the **\[Steps\]** listed below. [![image.png](https://opscom.wiki/uploads/images/gallery/2024-06/scaled-1680-/WBOimage.png)](https://opscom.wiki/uploads/images/gallery/2024-06/WBOimage.png) **\*Important\*** These updates should only be made to a Bambora gateway that is **NOT** currently in production/live use. If you have a current Bambora gateway that is being used by another system for payments, you may need to contact Bambora to have them setup another new gateway/merchant account for use with **OperationsCommander (OPS-COM) hosted payments. The requirements for a Bambora gateway to work with **OperationsCommander (OPS-COM) are as follows: **\[Step 1\]** **-** Login to your Bambora account and navigate to the order settings page . **\[Step 2\] - Merchant ID:** Please send us this value. **\[Step 3\] - Approval Redirect:** We will supply you with the URL to paste here. **\[Step 3\] - Decline Redirect:** We will supply you with the URL to paste here. **\[Step 3\] - Payment Gateway:** We will supply you with the URL to paste here. **\[Step 4\] - Require Hash Validation on all Payment Gateway Transaction Requests:** Check this box. **\[Step 5\] - Hash Algorithm:** Select SHA-1. **\[Step 6\] - Hash Key:** Send us this value. # Bambora Checkout ## Order Setting Configuration Please use the following screenshot for reference to the **\[Steps\]** listed below. [![image.png](https://opscom.wiki/uploads/images/gallery/2024-06/scaled-1680-/Unoimage.png)](https://opscom.wiki/uploads/images/gallery/2024-06/Unoimage.png) **\*Important\*** These updates should only be made to a Bambora gateway that is **NOT** currently in production/live use. If you have a current Bambora gateway that is being used by another system for payments, you may need to contact Bambora to have them setup another new gateway/merchant account for use with **OperationsCommander (OPS-COM) hosted payments. The requirements for a Bambora gateway to work with **OperationsCommander (OPS-COM) are as follows: **\[Step 1\]** **-** Login to your Bambora account and navigate to the order settings page . **\[Step 2\] - Merchant ID:** Please send us this value. **\[Step 3\] - Select:** Allow any domain name in the approval/decline redirect parameters **\[Step 4\] - Approval Redirect:** We will supply you with the URL to paste here. **\[Step 5\] - Require Hash Validation on all Payment Gateway Transaction Requests:** Select this button. **\[Step 6\] - Hash Algorithm:** Select SHA-1. **\[Step 7\] - Hash Key:** Send us this hash tag value. **\[Step 8\] - Select:** CVD Mismatch, AVS Street Mismatch and AVS Postal/Zip Code Mismatch conditions # Chase Exact Hosted Payments ## Setting up Chase Exact Payments In order to configure the client OPS-COM site to use Chase Exact Hosted Payments the client must supply the following credentials. - Company Name - Their exacted - The password used to access the account # Moneris Hosted Paypage ![](https://ops-com.atlassian.net/wiki/download/thumbnails/761893/Moneris_R_MD_BIL_RGB_2016.png?version=1&modificationDate=1524134847000&cacheVersion=1&api=v2&width=200&height=63) ## Setting up Moneris Gateway **\[Step 1\]** - Login to your Moneris account: **Development**/Testing Login: [https://esqa.moneris.com/mpg/](https://esqa.moneris.com/mpg/) **Production**/Live Login: [https://www3.moneris.com/mpg](https://www3.moneris.com/mpg) **\[Step 2\]** - Once logged into your Moneris account select **Admin** > **Hosted Paypage Config**. **\[Step 3\]** - Along the top of the Hosted Paypage Configuration you should see your **ps\_store\_id** and **hpp\_key**. Please copy these details and send them to your **OperationsCommander (OPS-COM) contact. [![image.png](https://opscom.wiki/uploads/images/gallery/2024-06/scaled-1680-/PTRimage.png)](https://opscom.wiki/uploads/images/gallery/2024-06/PTRimage.png) **\[Step 4\]** - On the Hosted Paypage Configuration page select the settings shown in the below screenshot. **\*Note**: We will send you the correct **Approved URL** and **Declined URL** to use. That being said, the URLs are listed below. If you do not know what URLs to use (**Development** or **Production**) please consult your **OperationsCommander (OPS-COM) contact. **Development**/Testing: Approved URL: [https://hostedpayments.**preview**.parkadmin.com/hook/moneris/](https://hostedpayments-dev.parkadmin.com/hook/moneris/) Declined URL: [https://hostedpayments.**preview**.parkadmin.com/hook/moneris/](https://hostedpayments-dev.parkadmin.com/hook/moneris/) **Production**/Live: Approved URL: [https://hostedpayments.parkadmin.com/hook/moneris/](https://hostedpayments.parkadmin.com/hook/moneris/) Declined URL: [https://hostedpayments.parkadmin.com/hook/moneris/](https://hostedpayments.parkadmin.com/hook/moneris/) [![image.png](https://opscom.wiki/uploads/images/gallery/2024-06/scaled-1680-/bWvimage.png)](https://opscom.wiki/uploads/images/gallery/2024-06/bWvimage.png) **\*Note**: The following **\[Steps\]** are related to the additional configuration pages along the bottom of the main Hosted Paypage Configuration: [![image.png](https://opscom.wiki/uploads/images/gallery/2024-06/scaled-1680-/XYQimage.png)](https://opscom.wiki/uploads/images/gallery/2024-06/XYQimage.png) **\[Step 5\]** - **Paypage Appearance** These are all optional settings related to the appearance of your Moneris Hosted Paypage. There is a preview button that allows you to view changes. This will be the page that your customers see when supplying their payment details during the checkout process through **OperationsCommander (OPS-COM). **\[Step 6\]** - **Response/Receipt Data** Select the settings shown in the below screenshot. **\*Note**: We will send you the correct **Async Response URL** to use. That being said, the URLs are listed below. If you do not know what URLs to use (**Development** or **Production**) please consult your **OperationsCommander (OPS-COM) contact. **Development**/Testing: Async Response URL: [https://hostedpayments.**preview**.parkadmin.com/hook/moneris/](https://hostedpayments-dev.parkadmin.com/hook/moneris/) **Production**/Live: Async Response URL: [https://hostedpayments.parkadmin.com/hook/moneris/](https://hostedpayments.parkadmin.com/hook/moneris/) [![image.png](https://opscom.wiki/uploads/images/gallery/2024-06/scaled-1680-/RVdimage.png)](https://opscom.wiki/uploads/images/gallery/2024-06/RVdimage.png) **\[Step 7\]** - **Security Features** Select the settings shown in the below screenshot. **\*Note**: We will send you the correct **Response URL** to use. That being said, the URLs are listed below. If you do not know what URLs to use (**Development** or **Production**) please consult your **OperationsCommander (OPS-COM) contact. **Development**/Testing: Response URL: [https://hostedpayments.**preview**.parkadmin.com/hook/moneris/](https://hostedpayments-dev.parkadmin.com/hook/moneris/) **Production**/Live: Response URL: [https://hostedpayments.parkadmin.com/hook/moneris/](https://hostedpayments.parkadmin.com/hook/moneris/) [![image.png](https://opscom.wiki/uploads/images/gallery/2024-06/scaled-1680-/Qyfimage.png)](https://opscom.wiki/uploads/images/gallery/2024-06/Qyfimage.png) **\[Step 8\]** - **Email Receipts** These are optional settings related to sending customers email receipts. **OperationsCommander (OPS-COM) doesn't currently send email receipts so you may wish to enable this functionality. By default **OperationsCommander (OPS-COM) will display a receipt back to users after a successful or failed transaction and allow successful payments to be reviewed at a later date under the users account history. ## Moneris Test Credit Cards Moneris provides a list of credit card numbers you may use to test against during your penny testing ## Payments Declined If you are having payments declined issue after you have set up please make sure that you are checking your total against the penny value simulator. This chart allows you to force certain callback responses based on the amount paid by the test visa gateway: [https://developer.moneris.com/en/More/Testing/Penny%20Value%20Simulator](https://developer.moneris.com/en/More/Testing/Penny%20Value%20Simulator) # Moneris Checkout Information the client will supply: store\_id: **store#** api\_token: **xxxxxxx** checkout\_id: **xxxxxxxxStore#** [![image.png](https://opscom.wiki/uploads/images/gallery/2024-06/scaled-1680-/lcsimage.png)](https://opscom.wiki/uploads/images/gallery/2024-06/lcsimage.png) We do need to know if billing address needs to be supplied (AVS or other security options are enabled). That changes what we prompt for. What they use for settings ## Checkout type Select the following checkout configuration type: [![image.png](https://opscom.wiki/uploads/images/gallery/2024-06/scaled-1680-/Ev5image.png)](https://opscom.wiki/uploads/images/gallery/2024-06/Ev5image.png) ## Multi-Currency [![image.png](https://opscom.wiki/uploads/images/gallery/2024-06/scaled-1680-/choimage.png)](https://opscom.wiki/uploads/images/gallery/2024-06/choimage.png) Note the following. If multi-currency is enabled recurring billing, gift cards, 3-DSecure 1.0 and Google Pay and not supported. [![image.png](https://opscom.wiki/uploads/images/gallery/2024-06/scaled-1680-/dBoimage.png)](https://opscom.wiki/uploads/images/gallery/2024-06/dBoimage.png) ## Payment Set the following perameters. [![image.png](https://opscom.wiki/uploads/images/gallery/2024-06/scaled-1680-/cqQimage.png)](https://opscom.wiki/uploads/images/gallery/2024-06/cqQimage.png) ## Payment security options It's up to the client to enable these options or not. Note the issue about 3D Secure and Multi-currency above. Transaction Type Only development for purchase is coded for now. We do not tokenize the card either so that stays off. Branding and Design The only setting think is important is setting "Enable Fullscreen" to Off. [![image.png](https://opscom.wiki/uploads/images/gallery/2024-06/scaled-1680-/2Jiimage.png)](https://opscom.wiki/uploads/images/gallery/2024-06/2Jiimage.png) ## Order Confirmation Settings [![image.png](https://opscom.wiki/uploads/images/gallery/2024-06/scaled-1680-/akqimage.png)](https://opscom.wiki/uploads/images/gallery/2024-06/akqimage.png) Email Communication Settings [![image.png](https://opscom.wiki/uploads/images/gallery/2024-06/scaled-1680-/yxnimage.png)](https://opscom.wiki/uploads/images/gallery/2024-06/yxnimage.png) # OpenEdge Hosted Payments ## Credentials Required: ### Sign up for your new OpenEdge Account Here: OPS-COM / OpenEdge. On the sign up form you will be asked for **Representative Information.** Here is the correct information to enter: - **Rep First Name**: Phil - **Rep Last Name**: MacCallum - **Rep Email**: [phil.maccallum@ops-com.com](mailto:phil@ops-com.com) - **Rep Phone**: 855.410.4141 x 224 Your OpenEdge Account Manager can provide you with the following information: - **Auth Key**: a multi-digit string key - **Terminal ID**: a 8 digit numeric key - **X-Web ID**: a 12 digit numeric key This will be given to you for both a Sandbox and a Production environment. ## Create OpenEdge Payment Type: You can create a new payment type by selecting **System Configuration** (![](https://ops-com.atlassian.net/wiki/download/thumbnails/766855/image-2023-6-29_12-36-16.png?version=1&modificationDate=1688042177000&cacheVersion=1&api=v2&width=35&height=28) icon in the OPS-COM admin side menu ) → **Payments** → **Setup Payment Types** →**Add Type.** [![image.png](https://opscom.wiki/uploads/images/gallery/2024-06/scaled-1680-/AIIimage.png)](https://opscom.wiki/uploads/images/gallery/2024-06/AIIimage.png) Select "**EdgeExpress - Hosted**" as your provider → **Next Step**. [![image.png](https://opscom.wiki/uploads/images/gallery/2024-06/scaled-1680-/D7Ximage.png)](https://opscom.wiki/uploads/images/gallery/2024-06/D7Ximage.png) You should now be brought to the "**Edit Payment Type**" page: [![image.png](https://opscom.wiki/uploads/images/gallery/2024-06/scaled-1680-/vOmimage.png)](https://opscom.wiki/uploads/images/gallery/2024-06/vOmimage.png) **Type Name:** The Type name can be whatever you want it to be, though please note this will also be the name displayed to users when using payment checkout and selecting a payment method. You can reference the specific hosted payment provider such as OpenEdge/Edge Express or something more generic such as "Online Credit Card Payment", "Online payment", "Credit Card", etc. Really it's up to you and what you think makes most sense to your site users when making a payment, also might depend on what payment methods your OpenEdge/EdgeExpress. **Enabled for User Types**: Select the User Types you wish this new Payment Type to be visible to so they can select it during payment checkout. You can change these user types at any time There are additional required configuration fields in the **Settings** area: [![image.png](https://opscom.wiki/uploads/images/gallery/2024-06/scaled-1680-/CGTimage.png)](https://opscom.wiki/uploads/images/gallery/2024-06/CGTimage.png) **Enable for Text2ParkMe**: if you aren't using this module leave the button unchecked. **Enable for Permit Renewal Payments**: if you aren't using this feature leave the button unchecked. **Enable for Guest Payments**: if you aren't using this feature leave the button unchecked. **Prompt Information**: Only "Email Address" is supported with OpenEdge Hosted Payments at this time. **Credentials**: - **Production/Sandbox**: Select whether you are using your OpenEdge Production/Live credentials or Sandbox/Testing credentials. Additionally, although not required you may find your OPS-COM preview space helpful for testing Sandbox/testing credentials, this way you can keep your production/live OPS-COM data (permits, users, payments, violations, etc) clean/untouched during any testing. As referenced above, your OpenEdge Account Manager can provide you with the following credentials: - **Auth Key**: a multi-digit string key. - **Terminal ID**: a 8 digit numeric key. - **X-Web ID**: a 12 digit numeric key. Don't forget to save your new payment type by clicking the "Update Payment Type" button along the bottom of the page: ![](https://ops-com.atlassian.net/wiki/download/thumbnails/766855/image-2023-6-29_13-54-43.png?version=1&modificationDate=1688046883000&cacheVersion=1&api=v2&width=172&height=31) Done, the new OpenEdge/Edge Express hosted payment type has been added to your OPS-COM system and you should be ready to test the payment/checkout process using this new payment type. For some additional reference/clarification this is what the OpenEdge hosted payment page looks like to website users during the checkout/payment process: [![image.png](https://opscom.wiki/uploads/images/gallery/2024-06/scaled-1680-/4nkimage.png)](https://opscom.wiki/uploads/images/gallery/2024-06/4nkimage.png) # PayPal ## Step #1: Create a PayPal Account Configure OPS-COM with your PayPal email address, selected currency and whether you are configuring for production use. ## Step #2: Add credentials to OPS-COM [![image.png](https://opscom.wiki/uploads/images/gallery/2024-06/scaled-1680-/yGTimage.png)](https://opscom.wiki/uploads/images/gallery/2024-06/yGTimage.png) Supply appropriate credentials. [![image.png](https://opscom.wiki/uploads/images/gallery/2024-06/scaled-1680-/mEwimage.png)](https://opscom.wiki/uploads/images/gallery/2024-06/mEwimage.png) # SchoolPay ## Add a new Payment Type: You can create a new payment type by selecting **System Configuration** → **Payments** → **Setup Payment Types** →**Add Type.** [![image.png](https://opscom.wiki/uploads/images/gallery/2024-06/scaled-1680-/rldimage.png)](https://opscom.wiki/uploads/images/gallery/2024-06/rldimage.png) If you don't see "Setup Payment Type" as shown above you may need to give your [role the permission](https://wiki.ops-com.com/x/B4DjAQ) to do so. [![image.png](https://opscom.wiki/uploads/images/gallery/2024-06/scaled-1680-/Wq2image.png)](https://opscom.wiki/uploads/images/gallery/2024-06/Wq2image.png) Select "**SchoolPay - Hosted**" as your provider → **Next Step**. [![image.png](https://opscom.wiki/uploads/images/gallery/2024-06/scaled-1680-/Tb7image.png)](https://opscom.wiki/uploads/images/gallery/2024-06/Tb7image.png) ## Edit Payment Type User Types: You should now be brought to the "**Edit Payment Type**" page: [![image.png](https://opscom.wiki/uploads/images/gallery/2024-06/scaled-1680-/VPuimage.png)](https://opscom.wiki/uploads/images/gallery/2024-06/VPuimage.png) **Type Name:** The type name can be whatever you want it to be, though please note this will also be the name displayed to users when using payment checkout and selecting a payment method. You can reference the specific hosted payment provider such as SchoolPay or something more generic such as "Online Credit Card Payment", "Online payment", "Credit Card", etc. Really it's up to you and what you think makes most sense to your site users when making a payment, also might depend on what payment methods your SchoolPay account supports. **Enabled for User Types**: Select the User Types you wish this new Payment Type to be visible to so they can select it during payment checkout. You can change these user types at any time ## Edit Payment Type Settings: There are additional required configuration fields in the **Settings** area: [![image.png](https://opscom.wiki/uploads/images/gallery/2024-06/scaled-1680-/0ZKimage.png)](https://opscom.wiki/uploads/images/gallery/2024-06/0ZKimage.png) **Enable for Text2ParkMe**: This payment setting isn't currently supported using OPS-COM SchoolPay integration. **Enable for Permit Renewal Payments**: This payment setting isn't currently supported using OPS-COM SchoolPay integration. **Enable for Guest Payments**: if you aren't using this feature leave the button unchecked. **Prompt Information**: Only "Email Address" is supported with SchoolPay Hosted Payments at this time. **Credentials**: - **Username**: Obtained from SchoolPay. - **Password**: Obtained from SchoolPay. - **Item ID**: Obtained from SchoolPay. - **Production/Sandbox**: Select whether you are using your SchoolPay Production/Live credentials or Sandbox/Testing credentials. Additionally, although not required you may find your OPS-COM preview space helpful for testing Sandbox/testing credentials, this way you can keep your production/live OPS-COM data (permits, users, payments, violations, etc) clean/separate during any testing. Don't forget to save your new payment type by clicking the "Update Payment Type" button along the bottom of the page: [![image.png](https://opscom.wiki/uploads/images/gallery/2024-06/scaled-1680-/Cxqimage.png)](https://opscom.wiki/uploads/images/gallery/2024-06/Cxqimage.png) Nothing further needs to be done, however if you are curious what the user process looks like when purchasing something in OPS-COM using SchoolPay a number of screenshots are below to show this. ## User flow screenshots: User selects SchoolPay payment type in OPS-COM and supplies an email address for identification and email receipt: [![image.png](https://opscom.wiki/uploads/images/gallery/2024-06/scaled-1680-/RKPimage.png)](https://opscom.wiki/uploads/images/gallery/2024-06/RKPimage.png) User confirms payment in OPS-COM: [![image.png](https://opscom.wiki/uploads/images/gallery/2024-06/scaled-1680-/xeiimage.png)](https://opscom.wiki/uploads/images/gallery/2024-06/xeiimage.png) User is then redirected to SchoolPay's secure system for payment details and processing: [![image.png](https://opscom.wiki/uploads/images/gallery/2024-06/scaled-1680-/Unkimage.png)](https://opscom.wiki/uploads/images/gallery/2024-06/Unkimage.png) User confirms payment details and selects "Finish" at which point their payment method is charged for the transaction: [![image.png](https://opscom.wiki/uploads/images/gallery/2024-06/scaled-1680-/KISimage.png)](https://opscom.wiki/uploads/images/gallery/2024-06/KISimage.png) If the payment is successful users will be automatically redirected back to OPS-COM checkout with a payment confirmation: [![image.png](https://opscom.wiki/uploads/images/gallery/2024-06/scaled-1680-/LMIimage.png)](https://opscom.wiki/uploads/images/gallery/2024-06/LMIimage.png) Email receipts will also be sent from SchoolPay and OPS-COM to the user supplied email address. # TouchNet (uPay) Hosted Payments ##### Credentials Required: Your TouchNet Account Manager can provide you with the following information: - **uPay Site ID**: Usually a 3 digit number for example 013 - **uPay**: A secure URL that uniquely identifies your account - **T-Link web service**: Another secure URL that uniquely identifies your account These credentials will be given to you for both a Sandbox (Test) and a Production (Live) environment. Please provide these details to your OPS-COM Account Manager. Charges for setup may apply. ##### T-Link Web Service: OperationsCommander's parent company Tomahawk Technologies is a [TouchNet ready partner](https://partners.touchnet.com/english/directory/partner/1512039/tomahawk-technologies). When configuring the T-Link in your TouchNet account you maybe asked to select a TouchNet ready partner from a dropdown, please select "Tomahawk Technologies". If you don't have the ability to configure a T-Link web service URL and your TouchNet Account Manager hasn't supplied one, you may need to request TouchNet setup a "uPay" site for you which supports T-Link web services. ##### GL (General Ledger) Codes: OperationsCommander's TouchNet integration currently supports multiple GL (General Ledger) codes. One code can be specified for parking permits, another for all other payments (violations, lockers, etc). The GL code can also be the same for all purchases. If using GL codes please let your OPS-COM Account Manage know the GL code name(s) you setup in your TouchNet account. # Transact Campus/CashNet Hosted Payment Setup ## Setting up the Payment Page Details you will have to provide to OPS-COM support
Setting Details
merchant The merchant code we will be submitting items against. This is the Merchant Code on the clients system.
item code They need to set up an item and give us the code. The item will need to be allowed to change the value. See below for the screen. These codes need to match exactly what the client has configured or the transactions will fail.
## Payment Page Details OPS-COM will give to clients Found in Store Settings
Setting Value
Sign-out & Complete payment [https://hostedpayments.parkadmin.com/hook/cashnet/CLIENTS-UNIQUE-HOSTED-ID/?a=r](https://hostedpayments.parkadmin.com/hook/cashnet/CLIENTS-UNIQUE-HOSTED-ID/?a=r)
Sign-out & Incomplete [https://hostedpayments.parkadmin.com/hook/cashnet/CLIENTS-UNIQUE-HOSTED-ID/?a=f](https://hostedpayments.parkadmin.com/hook/cashnet/CLIENTS-UNIQUE-HOSTED-ID/?a=f)
Pass information to calling system Append Data using GET
## Found in Notifications
Setting Value
Successful & Failed Transactions [https://hostedpayments.parkadmin.com/hook/cashnet/CLIENTS-UNIQUE-HOSTED-ID/?cb=TO-BE-DETERMINED](https://hostedpayments.parkadmin.com/hook/cashnet/CLIENTS-UNIQUE-HOSTED-ID/?cb=TO-BE-DETERMINED)
Select format for HTTP content Name Value Format (POST)
## Store Settings Under Store Settings you will need to configure the following settings based on the URLs supplied by OPS-COM. [![image.png](https://opscom.wiki/uploads/images/gallery/2024-05/scaled-1680-/PgLimage.png)](https://opscom.wiki/uploads/images/gallery/2024-05/PgLimage.png) ## Configure CashNet "HTTP Notifications" Section Go to the "HTTP Notifications" configuration with CashNet: HTTP Notifications If you would like HTTP notifications, enter the URL next to each category. If you leave the field blank you will not receive notifications for that category. New outbound connections from [CASHNet.com](http://cashnet.com/) will not work until they are allowed through the CASHNet firewall. Please contact CASHNet Client Support if you need to enable a new connection. [![image.png](https://opscom.wiki/uploads/images/gallery/2024-05/scaled-1680-/wRCimage.png)](https://opscom.wiki/uploads/images/gallery/2024-05/wRCimage.png) ## Setting Item codes On the item code itself, we need this set the following: [![image.png](https://opscom.wiki/uploads/images/gallery/2024-05/scaled-1680-/f4pimage.png)](https://opscom.wiki/uploads/images/gallery/2024-05/f4pimage.png) # Permit Purchase by an Admin ## Purchasing a Permit 1. To begin go to **pbirch's** user profile and click on the **Parking** menu item. [![image.png](https://opscom.wiki/uploads/images/gallery/2024-06/scaled-1680-/XaPimage.png)](https://opscom.wiki/uploads/images/gallery/2024-06/XaPimage.png) 2. The screen will refresh with the following option screen. You may purchase a **Standard Permit**, a **Temporary Permit** or **Associate an Access Card with the User** from this screen. In our case we will select a Standard Parking Permit. [![image.png](https://opscom.wiki/uploads/images/gallery/2024-06/scaled-1680-/N3fimage.png)](https://opscom.wiki/uploads/images/gallery/2024-06/N3fimage.png) 3. The screen will refresh with the lot selection tool. [![image.png](https://opscom.wiki/uploads/images/gallery/2024-06/scaled-1680-/F87image.png)](https://opscom.wiki/uploads/images/gallery/2024-06/F87image.png) The drop down allows the admin to select various lots that are available for this user based on user type. In this scenario lots available to staff members can be selected. [![image.png](https://opscom.wiki/uploads/images/gallery/2024-06/scaled-1680-/o9Vimage.png)](https://opscom.wiki/uploads/images/gallery/2024-06/o9Vimage.png) As suggested we will select the **Yearly After 4PM lot**. Notice the number of available spaces in each lot is displayed here as well. 4. The screen will refresh with a confirmation screen that displays the purchase details. [![image.png](https://opscom.wiki/uploads/images/gallery/2024-06/scaled-1680-/vP1image.png)](https://opscom.wiki/uploads/images/gallery/2024-06/vP1image.png) The system will bring up the next available permit in sequence by default, however if there were a requirement to have a specific permit issued to the user, the admin may expand the **permit #** drop down to select a specific permit. [![image.png](https://opscom.wiki/uploads/images/gallery/2024-06/scaled-1680-/r6Yimage.png)](https://opscom.wiki/uploads/images/gallery/2024-06/r6Yimage.png) Once the permit is selected Click on **Purchase this Permit** to proceed. 5. The screen will refresh with the **Payments Screen** listing the permit as well as any other payment that would be due at this time. Click **Proceed to Payment** to continue. [![image.png](https://opscom.wiki/uploads/images/gallery/2024-06/scaled-1680-/gvgimage.png)](https://opscom.wiki/uploads/images/gallery/2024-06/gvgimage.png) 6. The screen will refresh with the **Payment Type** selection tool. [![image.png](https://opscom.wiki/uploads/images/gallery/2024-06/scaled-1680-/S0Uimage.png)](https://opscom.wiki/uploads/images/gallery/2024-06/S0Uimage.png) The admin may select whatever payment type they wish to process this payment with from the drop down list. In our case we will select **cash** as the payment type. Click **Submit Payment Type** to proceed. [![image.png](https://opscom.wiki/uploads/images/gallery/2024-06/scaled-1680-/IO4image.png)](https://opscom.wiki/uploads/images/gallery/2024-06/IO4image.png) 7. The screen will refresh with a confirmation screen showing the payment details with totals. Click on **Confirm Payment Information** to proceed. [![image.png](https://opscom.wiki/uploads/images/gallery/2024-06/scaled-1680-/Hloimage.png)](https://opscom.wiki/uploads/images/gallery/2024-06/Hloimage.png) 8. The screen will refresh with the **Transaction Details** screen. There are several sections on this screen that display specific information about your transaction. 1- The **Confirmation Number** for this transaction. 2- The **Submit Date** along with a **View Snapshot** link which allows you to see the payment information for this purchase, however, it does not allow you to drill into the details of each transaction from the snapshot (In the example below, Permit No. 60). It will only display the total of all items and the value of each item individually. [![image.png](https://opscom.wiki/uploads/images/gallery/2024-06/scaled-1680-/FN7image.png)](https://opscom.wiki/uploads/images/gallery/2024-06/FN7image.png) 3- The **Payment Method** which can actually be changed at this point if needed. 4- Three options are available: **Process Manually** which will complete the purchase **Cancel & Keep** which will cancel the transaction but keep the transaction details and reserve the permit so that you can process the payment at another time. Click on **Process Manually** to complete the purchase. [![image.png](https://opscom.wiki/uploads/images/gallery/2024-06/scaled-1680-/7z9image.png)](https://opscom.wiki/uploads/images/gallery/2024-06/7z9image.png) 1. The screen will refresh with the final Transaction Detail screen. This information screen can be accessed in the future from the user's history in order to view this information. The admin has the option from this screen to perform a refund if needed. [![image.png](https://opscom.wiki/uploads/images/gallery/2024-06/scaled-1680-/U0qimage.png)](https://opscom.wiki/uploads/images/gallery/2024-06/U0qimage.png) ## Payment Notes Payment Notes allow Admins to annotate refunds and other payment anomalies. These notes are private and not visible to the end user. [![image.png](https://opscom.wiki/uploads/images/gallery/2024-06/scaled-1680-/X7bimage.png)](https://opscom.wiki/uploads/images/gallery/2024-06/X7bimage.png) # Paying a Violation Anonymously on the Administrator Interface To begin, go to the **Violations Menu** and select **Search.** [![image.png](https://opscom.wiki/uploads/images/gallery/2024-06/scaled-1680-/8X1image.png)](https://opscom.wiki/uploads/images/gallery/2024-06/8X1image.png) Enter either the ***Ticket Number*** or the ***License Plate*** number in the Search Text Field and click on **Search** **using only text**. [![image.png](https://opscom.wiki/uploads/images/gallery/2024-06/scaled-1680-/twdimage.png)](https://opscom.wiki/uploads/images/gallery/2024-06/twdimage.png) This will return a listing of violations. Note that the **Plate Number** has been found. (1) By clicking on the Ticket Number (2) you will bring up the **Violation Information** pop up screen. Click on the **Make Anonymous Payment** button to proceed to the Payment Entry process. [![image.png](https://opscom.wiki/uploads/images/gallery/2024-06/scaled-1680-/lX1image.png)](https://opscom.wiki/uploads/images/gallery/2024-06/lX1image.png) The **Payments Due** window will open allowing you to check to select the ticket you wish to pay. (4) Click **Proceed to Payment** (5) in order to advance to the payment due window. [![image.png](https://opscom.wiki/uploads/images/gallery/2024-06/scaled-1680-/KL4image.png)](https://opscom.wiki/uploads/images/gallery/2024-06/KL4image.png) In the **Payment Due** window, you can select the method of payment. (6) [![image.png](https://opscom.wiki/uploads/images/gallery/2024-06/scaled-1680-/nL4image.png)](https://opscom.wiki/uploads/images/gallery/2024-06/nL4image.png) Note the list of payment types. Click **Submit Payment** to continue to process the payment. [![image.png](https://opscom.wiki/uploads/images/gallery/2024-06/scaled-1680-/33himage.png)](https://opscom.wiki/uploads/images/gallery/2024-06/33himage.png) The screen will refresh, listing the transaction you are about to process. Click **Confirm Payment Information** (7) [![image.png](https://opscom.wiki/uploads/images/gallery/2024-06/scaled-1680-/i8vimage.png)](https://opscom.wiki/uploads/images/gallery/2024-06/i8vimage.png) The payment will process and the screen will refresh with the **Transaction Detail** Window. At this point the transaction is complete. [![image.png](https://opscom.wiki/uploads/images/gallery/2024-06/scaled-1680-/B7Ximage.png)](https://opscom.wiki/uploads/images/gallery/2024-06/B7Ximage.png) Once the transaction is complete, you can search the violation and see that it is marked as "**PROCESSED**" [![image.png](https://opscom.wiki/uploads/images/gallery/2024-06/scaled-1680-/Y2limage.png)](https://opscom.wiki/uploads/images/gallery/2024-06/Y2limage.png) # Electronic Fund Transfer Configurations # Setup by Tomahawk If you will be using EFT as a payment method, you must provide Tomahawk with the client number. This is provided by the Royal Bank and will be the identifier they use to deposit to your account. This information can be setup under the Payments section of the Manage System Settings page. [![image.png](https://opscom.wiki/uploads/images/gallery/2024-06/scaled-1680-/wv1image.png)](https://opscom.wiki/uploads/images/gallery/2024-06/wv1image.png) # Creating EFT Files to Send to your Bank Once the subscription is set up and you have performed a rollover, you can export the flat file that contains the EFT information. This file can be sent to your bank for processing. For details about submitting this to your bank, please contact your representative at the Royal Bank of Canada. 1. Go to the payments menu and select **EFT Export.** This will generate the file you need to send to your banking institution. [![image.png](https://opscom.wiki/uploads/images/gallery/2024-06/scaled-1680-/oT1image.png)](https://opscom.wiki/uploads/images/gallery/2024-06/oT1image.png) # **Marking EFT Items as Paid** 1. Once the payment has been processed at the bank, a report will be made available to you by your Banking institution. This report will contain information about what payments you submitted were successful. You can update the OPS-COM system and mark these as paid or NSF. To do this go to the Payment Menu and select **EFT Process.** [![image.png](https://opscom.wiki/uploads/images/gallery/2024-06/scaled-1680-/U0simage.png)](https://opscom.wiki/uploads/images/gallery/2024-06/U0simage.png) 2. The **Electronic Funds Transfer Process** window opens. Here you have the ability to select three states for the payments: **- Waiting -** This is the default status of the payment. If the payment has not been processed at the bank leave the payment record in Waiting status. **- Paid -** Toggle this state by clicking on the **Paid** checkbox. **- Failed -** Select this checkbox if the payment failed for any reason. This will return the item to the user's profile as awaiting payment and archive the record. Once you have completed this process click **Mark as Indicated** to finalize the process. [![image.png](https://opscom.wiki/uploads/images/gallery/2024-06/scaled-1680-/fquimage.png)](https://opscom.wiki/uploads/images/gallery/2024-06/fquimage.png) # Payment Adjustments ## Releasing a Permit. 1. If you know the permit number perform a permit search. If you do not know the permit number, go to the user profile for whom you wish to release a permit. Click on the permit number on the user dashboard. [![image.png](https://opscom.wiki/uploads/images/gallery/2024-06/scaled-1680-/zPaimage.png)](https://opscom.wiki/uploads/images/gallery/2024-06/zPaimage.png) 2. From the permit detail click on the permit number [![image.png](https://opscom.wiki/uploads/images/gallery/2024-06/scaled-1680-/67zimage.png)](https://opscom.wiki/uploads/images/gallery/2024-06/67zimage.png) 3. You will be taken to permit search where you can released the permit [![image.png](https://opscom.wiki/uploads/images/gallery/2024-06/scaled-1680-/aSDimage.png)](https://opscom.wiki/uploads/images/gallery/2024-06/aSDimage.png) 4. It is advisable to leave a comment in order to track the reason the permit was released. Click release this permit. [![image.png](https://opscom.wiki/uploads/images/gallery/2024-06/scaled-1680-/Sazimage.png)](https://opscom.wiki/uploads/images/gallery/2024-06/Sazimage.png) 5. A pop up window will appear. Click OK to confirm the release of the permit. [![image.png](https://opscom.wiki/uploads/images/gallery/2024-06/scaled-1680-/Xl2image.png)](https://opscom.wiki/uploads/images/gallery/2024-06/Xl2image.png) 6. A confirmation message will app\[ear. [![image.png](https://opscom.wiki/uploads/images/gallery/2024-06/scaled-1680-/BAwimage.png)](https://opscom.wiki/uploads/images/gallery/2024-06/BAwimage.png) 7. Now when you search the permit it will appear as available. [![image.png](https://opscom.wiki/uploads/images/gallery/2024-06/scaled-1680-/Btzimage.png)](https://opscom.wiki/uploads/images/gallery/2024-06/Btzimage.png) ## Refunding a Violation 1. Once a user has paid a violation it can be refunded and placed back in awaiting payment status. 2. Go to the user's history and search for the violation you wish to refund. Click on the work Processed to access the transaction details. [![image.png](https://opscom.wiki/uploads/images/gallery/2024-06/scaled-1680-/lqCimage.png)](https://opscom.wiki/uploads/images/gallery/2024-06/lqCimage.png) 3. Click on the Refund button to begin the process of refunding the violation [![image.png](https://opscom.wiki/uploads/images/gallery/2024-06/scaled-1680-/nzMimage.png)](https://opscom.wiki/uploads/images/gallery/2024-06/nzMimage.png) 4. A Refund payment Record window will open. It is advisable to enter a comment as to the reason the refund is being given. [![image.png](https://opscom.wiki/uploads/images/gallery/2024-06/scaled-1680-/xjjimage.png)](https://opscom.wiki/uploads/images/gallery/2024-06/xjjimage.png) 5. Click on OK in the resulting pop up confirmation screen to complete the process. [![image.png](https://opscom.wiki/uploads/images/gallery/2024-06/scaled-1680-/Gaiimage.png)](https://opscom.wiki/uploads/images/gallery/2024-06/Gaiimage.png) 6. The adjustment Information window will appear. Click on Process This Adjustment. [![image.png](https://opscom.wiki/uploads/images/gallery/2024-06/scaled-1680-/l4Rimage.png)](https://opscom.wiki/uploads/images/gallery/2024-06/l4Rimage.png) 7. The transaction screen will refresh indicating "The associated transaction was dropped or refunded; any refund details will appear below." Notice the refund appears as an adjustment in the transaction record. [![image.png](https://opscom.wiki/uploads/images/gallery/2024-06/scaled-1680-/hzximage.png)](https://opscom.wiki/uploads/images/gallery/2024-06/hzximage.png) 8. If you were to look at the user's history you will see the violation is back to requiring a payment. [![image.png](https://opscom.wiki/uploads/images/gallery/2024-06/scaled-1680-/p1gimage.png)](https://opscom.wiki/uploads/images/gallery/2024-06/p1gimage.png) ## Refunding a Locker 1. To refund a locker, find the locker in the user's profile history. Click on the process date to access the transaction detail. [![image.png](https://opscom.wiki/uploads/images/gallery/2024-06/scaled-1680-/z7simage.png)](https://opscom.wiki/uploads/images/gallery/2024-06/z7simage.png) 2. Refund the locker by clicking the refund button. [![image.png](https://opscom.wiki/uploads/images/gallery/2024-06/scaled-1680-/3y8image.png)](https://opscom.wiki/uploads/images/gallery/2024-06/3y8image.png) 3. The refund payment record window will open. It is advisable to enter a comment as to why the locker is being refunded. Click Refund Payment Record [![image.png](https://opscom.wiki/uploads/images/gallery/2024-06/scaled-1680-/CUvimage.png)](https://opscom.wiki/uploads/images/gallery/2024-06/CUvimage.png) 4. A confirmation screen will open. Click OK to continue. [![image.png](https://opscom.wiki/uploads/images/gallery/2024-06/scaled-1680-/gSNimage.png)](https://opscom.wiki/uploads/images/gallery/2024-06/gSNimage.png) 5. the adjustment Information screen will open. Click on Process This Adjustment to complete the process. 6. In the user's history the locker now shows as released. [![image.png](https://opscom.wiki/uploads/images/gallery/2024-06/scaled-1680-/x5nimage.png)](https://opscom.wiki/uploads/images/gallery/2024-06/x5nimage.png) 7. In the list of lockers in the building area the locker will appear as available after this process. [![image.png](https://opscom.wiki/uploads/images/gallery/2024-06/scaled-1680-/vMiimage.png)](https://opscom.wiki/uploads/images/gallery/2024-06/vMiimage.png) ## Refunding a Temp Permit 1. Buy a Temp Permit 2. Pay Temp Permit 3. Refund Temp Permit 4. Temp Permit is Released ## Refunding a Violation and a Permit 1. Buy Permit 2. Get Violation 3. Pay for Violation and Permit 4. Refund Payment 5. Violation needs to be paid, permit is now available ## Adjusting a violation to $0 1. CAN'T BE DONE 2. Well I guess it can be done but the process is rough 3. Create a Payment with a permit and a violation 4. Adjust permit to cover the violation as well as the permit 5. Release the permit # Mark Items as Paid ## Marking Items Paid Menu Option Hover over **Payments** and click **Mark Items Paid** [![image.png](https://opscom.wiki/uploads/images/gallery/2024-06/scaled-1680-/B0zimage.png)](https://opscom.wiki/uploads/images/gallery/2024-06/B0zimage.png) Select Items to Mark Paid The **Mark Outstanding Items Paid** screen displays. You can select different parameters such as user type, item type and time period. [![image.png](https://opscom.wiki/uploads/images/gallery/2024-06/scaled-1680-/OI5image.png)](https://opscom.wiki/uploads/images/gallery/2024-06/OI5image.png) As an example, this setting will mark all locker rentals for **Full Time Staff**, purchased before April 1st, 2018 as paid. [![image.png](https://opscom.wiki/uploads/images/gallery/2024-06/scaled-1680-/zCGimage.png)](https://opscom.wiki/uploads/images/gallery/2024-06/zCGimage.png) ## Bulk Mark Violations Paid In cases where violations have been sent for collection, the admin would get a list back from the collection agency as to what payment have been retrieved. The admin would then be able to mark these violations as paid. To do so click on **Bulk by Number** beside Violations. [![image.png](https://opscom.wiki/uploads/images/gallery/2024-06/scaled-1680-/9Ajimage.png)](https://opscom.wiki/uploads/images/gallery/2024-06/9Ajimage.png) Enter the violations in the tool separated by a line return. Keep in mind that you should not include the PIN with the violation number. eg. 2-001345-**92** (92 is the PIN in this case) [![image.png](https://opscom.wiki/uploads/images/gallery/2024-06/scaled-1680-/u4Uimage.png)](https://opscom.wiki/uploads/images/gallery/2024-06/u4Uimage.png) Select **Violations Paid Through Collection** from the drop-down list. Click on **Mark Listed Paid** to complete the process. [![image.png](https://opscom.wiki/uploads/images/gallery/2024-06/scaled-1680-/uHcimage.png)](https://opscom.wiki/uploads/images/gallery/2024-06/uHcimage.png) # Failed Payments Report 1. To access the report go to the **Payments** drop down menu and select **Search Failed Payments**. [![image.png](https://opscom.wiki/uploads/images/gallery/2024-06/scaled-1680-/2U9image.png)](https://opscom.wiki/uploads/images/gallery/2024-06/2U9image.png) 2. The **Failed Payments Report** screen will open. Enter a date range you wish to report on and click **Search**. [![image.png](https://opscom.wiki/uploads/images/gallery/2024-06/scaled-1680-/ZX0image.png)](https://opscom.wiki/uploads/images/gallery/2024-06/ZX0image.png) 3. The screen will refresh with a list of failed payment for that date range. In our example we are looking at **October 1st, 2018** to **October 15th, 2018.** During that time period there were **5 failed payments**. The list shows the pay Id, confirmation code, amount of the payment, the date of the failed payment and the user name associated with the payment. [![image.png](https://opscom.wiki/uploads/images/gallery/2024-06/scaled-1680-/u6Mimage.png)](https://opscom.wiki/uploads/images/gallery/2024-06/u6Mimage.png) 4. To drill down further click on the **Confirmation Code** button to access the transaction record. [![image.png](https://opscom.wiki/uploads/images/gallery/2024-06/scaled-1680-/iBuimage.png)](https://opscom.wiki/uploads/images/gallery/2024-06/iBuimage.png) 5. The transaction record screen will open where you can see details about the failed transaction. [![image.png](https://opscom.wiki/uploads/images/gallery/2024-06/scaled-1680-/tqYimage.png)](https://opscom.wiki/uploads/images/gallery/2024-06/tqYimage.png) 6. Some payment providers will return detailed information with an explanation as to why the payment failed, while other providers will simply supply an error code. In this case note that there is a response code of **481** indicated in the information. [![image.png](https://opscom.wiki/uploads/images/gallery/2024-06/scaled-1680-/jGAimage.png)](https://opscom.wiki/uploads/images/gallery/2024-06/jGAimage.png) A **481** code indicates there is an error in the information provided. Usually an incorrect expiration date or an incorrect billing address. The definition for these codes are easily found in a web search. In this case a search for **Credit card response code 481** provided the explanation. [![image.png](https://opscom.wiki/uploads/images/gallery/2024-06/scaled-1680-/cbaimage.png)](https://opscom.wiki/uploads/images/gallery/2024-06/cbaimage.png) # Admin Portal Violation Payments with Credit Card ## Paying a Violation with Visa Log in with your admin credentials on the admin side. [![image.png](https://opscom.wiki/uploads/images/gallery/2024-06/scaled-1680-/rvvimage.png)](https://opscom.wiki/uploads/images/gallery/2024-06/rvvimage.png) Navigate under the violations tab to the search tab. [![image.png](https://opscom.wiki/uploads/images/gallery/2024-06/scaled-1680-/oUTimage.png)](https://opscom.wiki/uploads/images/gallery/2024-06/oUTimage.png) Type the ticket number into the search text box. [![image.png](https://opscom.wiki/uploads/images/gallery/2024-06/scaled-1680-/Vudimage.png)](https://opscom.wiki/uploads/images/gallery/2024-06/Vudimage.png) In this case we looked up ticket TT-10016 and found that it belongs to user jsmith with a plate that is ABC123. [![image.png](https://opscom.wiki/uploads/images/gallery/2024-06/scaled-1680-/DB4image.png)](https://opscom.wiki/uploads/images/gallery/2024-06/DB4image.png) Click the Ticket # and you will be brought to the Violation Information tab [![image.png](https://opscom.wiki/uploads/images/gallery/2024-06/scaled-1680-/etyimage.png)](https://opscom.wiki/uploads/images/gallery/2024-06/etyimage.png) Afterwards click on the actions tab and click on Make Payment. [![image.png](https://opscom.wiki/uploads/images/gallery/2024-06/scaled-1680-/5bkimage.png)](https://opscom.wiki/uploads/images/gallery/2024-06/5bkimage.png) This will bring you to the user's payment page so you can process said violation. [![image.png](https://opscom.wiki/uploads/images/gallery/2024-06/scaled-1680-/17fimage.png)](https://opscom.wiki/uploads/images/gallery/2024-06/17fimage.png) In this case you want to deselect any other objects that are not being paid for at the moment (in this case the permit) and click proceed to payment. [![image.png](https://opscom.wiki/uploads/images/gallery/2024-06/scaled-1680-/ulhimage.png)](https://opscom.wiki/uploads/images/gallery/2024-06/ulhimage.png) This brings you to the checkout page where you have three ways you can handle this detailed below. [![image.png](https://opscom.wiki/uploads/images/gallery/2024-06/scaled-1680-/HOaimage.png)](https://opscom.wiki/uploads/images/gallery/2024-06/HOaimage.png) Click on the drop down menu in order to pick Credit Card, MasterCard or Visa. In this case we're going to use Visa. [![image.png](https://opscom.wiki/uploads/images/gallery/2024-06/scaled-1680-/BNyimage.png)](https://opscom.wiki/uploads/images/gallery/2024-06/BNyimage.png) It will bring up the proper options for you to enter in credit card information and click 'Submit Payment Information' [![image.png](https://opscom.wiki/uploads/images/gallery/2024-06/scaled-1680-/0YGimage.png)](https://opscom.wiki/uploads/images/gallery/2024-06/0YGimage.png) This will bring you to a payment type confirmation page, to continue press the 'Confirm Payment Information' button [![image.png](https://opscom.wiki/uploads/images/gallery/2024-06/scaled-1680-/1Zfimage.png)](https://opscom.wiki/uploads/images/gallery/2024-06/1Zfimage.png) The payment processes. [![image.png](https://opscom.wiki/uploads/images/gallery/2024-06/scaled-1680-/6yQimage.png)](https://opscom.wiki/uploads/images/gallery/2024-06/6yQimage.png) Then you get brought to a transaction details page [![image.png](https://opscom.wiki/uploads/images/gallery/2024-06/scaled-1680-/o2Iimage.png)](https://opscom.wiki/uploads/images/gallery/2024-06/o2Iimage.png) ## Paying with Visa (External) This payment type is used when the customer chooses to pay by credit card at the parking office where a pin pad or cash register is used. # Payroll Deduction Workflow ## Purchasing a permit using Payroll Deduction In this scenario Patricia Birch will purchase a permit via Payroll Deduction. We will cover the purchase process on both admin and user side. ## From the Admin Web App Here is the payment listed in the payments screen. Click on **Proceed to Payment**. [![image.png](https://opscom.wiki/uploads/images/gallery/2024-06/scaled-1680-/LJuimage.png)](https://opscom.wiki/uploads/images/gallery/2024-06/LJuimage.png) The screen will refresh with the payment type selection tool. Select Payroll Deduction as the payment type and click on Submit Payment Information to continue. [![image.png](https://opscom.wiki/uploads/images/gallery/2024-06/scaled-1680-/gobimage.png)](https://opscom.wiki/uploads/images/gallery/2024-06/gobimage.png) The confirmation screen appears. Please check the information to ensure it is correct. Then click Confirm Payment Information to continue. [![image.png](https://opscom.wiki/uploads/images/gallery/2024-06/scaled-1680-/klAimage.png)](https://opscom.wiki/uploads/images/gallery/2024-06/klAimage.png) The screen will refresh with the Transaction Detail screen. To complete the purchase click on Process Manually to continue. [![image.png](https://opscom.wiki/uploads/images/gallery/2024-06/scaled-1680-/4pwimage.png)](https://opscom.wiki/uploads/images/gallery/2024-06/4pwimage.png) The screen will refresh with the final screen in the purchase process. The system considers the permit purchased at this point. [![image.png](https://opscom.wiki/uploads/images/gallery/2024-06/scaled-1680-/nvgimage.png)](https://opscom.wiki/uploads/images/gallery/2024-06/nvgimage.png) To collect on Payroll Deduction purchases, use the Payroll Deduction Report to help track purchases. # Setting Payment Types by User Type ## Configuring Payment Types The first step is to find the user type you wish to apply the permission to use a specific payment type to. This tool can be found In the Admin Options Menu. Hover over Users and select User Types from the drop down list. [![image.png](https://opscom.wiki/uploads/images/gallery/2024-06/scaled-1680-/lI9image.png)](https://opscom.wiki/uploads/images/gallery/2024-06/lI9image.png) Once the User Type Administration screen appears click edit on the user type for which you wish to configure a payment type. [![image.png](https://opscom.wiki/uploads/images/gallery/2024-06/scaled-1680-/zXzimage.png)](https://opscom.wiki/uploads/images/gallery/2024-06/zXzimage.png) The screen will refresh with the following form for you to make your selections. (See the section on the bottom labeled Allowed Payment types.) Payment types that are active for this specific user will list in the section labeled **Active Payment Types**. [![image.png](https://opscom.wiki/uploads/images/gallery/2024-06/scaled-1680-/BIPimage.png)](https://opscom.wiki/uploads/images/gallery/2024-06/BIPimage.png) ## Adding Payment Types Payment types that are not active for the user will appear in a section labeled **Inactive Payment Types**. By selecting these additional payment types and clicking on **Update User Type** the page will refresh and the new allowed payment type will then appear in the Active Payment Types list. [![image.png](https://opscom.wiki/uploads/images/gallery/2024-06/scaled-1680-/XGWimage.png)](https://opscom.wiki/uploads/images/gallery/2024-06/XGWimage.png) ## Extended Payment Information For each payment type selected there is extended information. You will see a general description of the payment type as well as an indication of what the user will be prompted for when selecting the payment type. For example in a Hosted Payment scenario such as EdgeExpress the user will be prompted to enter an email address prior to being directed to the payment provider where they will enter their credit card information. There are also three columns on the far right that will indicate by X or checkmark for specific uses of the payment type: Column 1 - Indicates this payment type can be used for guest payments Column 2 - Indicates this payment type can be used for permit and invoice renewal payments Column 3 - Indicates this payment type can be used for Text2ParkMe subscriptions [![image.png](https://opscom.wiki/uploads/images/gallery/2024-06/scaled-1680-/g8zimage.png)](https://opscom.wiki/uploads/images/gallery/2024-06/g8zimage.png) ## Refunds Refunds are listed in Yellow boxes. Be sure to also select the corresponding refund types to allow the admin to refund to the appropriate payment type. Click on Update User Type to save your selections. [![image.png](https://opscom.wiki/uploads/images/gallery/2024-06/scaled-1680-/57uimage.png)](https://opscom.wiki/uploads/images/gallery/2024-06/57uimage.png) ## Configuring Payment Types for Subscriptions When using a payment provider we can set up payment types to be used in subscriptions and guest payments. To begin click on the edit icon. [![image.png](https://opscom.wiki/uploads/images/gallery/2024-06/scaled-1680-/ORVimage.png)](https://opscom.wiki/uploads/images/gallery/2024-06/ORVimage.png) You will land on a page that shows the current user types that are allowed to use this payment type. To edit the subscription configuration click on settings. [![image.png](https://opscom.wiki/uploads/images/gallery/2024-06/scaled-1680-/Wdwimage.png)](https://opscom.wiki/uploads/images/gallery/2024-06/Wdwimage.png) In this section you will see items that can be selected for the use of this payment type. [![image.png](https://opscom.wiki/uploads/images/gallery/2024-06/scaled-1680-/zGwimage.png)](https://opscom.wiki/uploads/images/gallery/2024-06/zGwimage.png) Select the items you wish to allow the payment type to be used for. In this case we are enabling Text2ParkMe, subscriptions to permit renewals as well as guest payments. [![image.png](https://opscom.wiki/uploads/images/gallery/2024-06/scaled-1680-/frgimage.png)](https://opscom.wiki/uploads/images/gallery/2024-06/frgimage.png) Once set and saved you will see indicators on the payment type lists showing what the payment type can be used for. [![image.png](https://opscom.wiki/uploads/images/gallery/2024-06/scaled-1680-/fvwimage.png)](https://opscom.wiki/uploads/images/gallery/2024-06/fvwimage.png) ## Processing as an Admin When processing payments as an Admin you will now see the payment types split up between what the user would be allowed to use for that User Type and what an Admin can choose. [![image.png](https://opscom.wiki/uploads/images/gallery/2024-06/scaled-1680-/pdlimage.png)](https://opscom.wiki/uploads/images/gallery/2024-06/pdlimage.png) # Payroll Deduction Report ## The Payroll Deduction Report To access the report: Go to the Payments Menu and select **Processed Payroll Deduction**. [![image.png](https://opscom.wiki/uploads/images/gallery/2024-06/scaled-1680-/4VUimage.png)](https://opscom.wiki/uploads/images/gallery/2024-06/4VUimage.png) The screen will refresh with a listing of processed Payroll Deductions. [![image.png](https://opscom.wiki/uploads/images/gallery/2024-06/scaled-1680-/hX3image.png)](https://opscom.wiki/uploads/images/gallery/2024-06/hX3image.png) ## Viewing the Transaction Details From this screen you can select to look at the actual transaction record if you wish. Click on the **transaction number** to access the detailed information. [![image.png](https://opscom.wiki/uploads/images/gallery/2024-06/scaled-1680-/vMzimage.png)](https://opscom.wiki/uploads/images/gallery/2024-06/vMzimage.png) This will bring you to the **Transaction Details** Screen. [![image.png](https://opscom.wiki/uploads/images/gallery/2024-06/scaled-1680-/rM6image.png)](https://opscom.wiki/uploads/images/gallery/2024-06/rM6image.png) ## Export to Excel Typically the admin would export the list to excel to supply to the financial department to collect these permit fees through the user's Payroll Deduction. Simply click on the **Generate Excel Report** button to download the report as an Excel file format. [![image.png](https://opscom.wiki/uploads/images/gallery/2024-06/scaled-1680-/T3yimage.png)](https://opscom.wiki/uploads/images/gallery/2024-06/T3yimage.png) In Excel the report will look like the following: [![image.png](https://opscom.wiki/uploads/images/gallery/2024-06/scaled-1680-/Gnpimage.png)](https://opscom.wiki/uploads/images/gallery/2024-06/Gnpimage.png) # Flex Payments ## Configuring a Lot For Flex Payments To begin create a **Flex Payment Lot** and added 10 permits to it (FLX001...FLX010) To do so first go to **Lot Administration** and select **Pricing & Lot Admin.** [![image.png](https://opscom.wiki/uploads/images/gallery/2024-06/scaled-1680-/oLKimage.png)](https://opscom.wiki/uploads/images/gallery/2024-06/oLKimage.png) Name the lot **Flex Payment Lot** or something you consider appropriate. Set the cost at **$0.00** Set the **Usertype** to the users who will be using Flex Payments. In our example we are using **Full Time Staff**. **Note: the lot does not have to be set to visible to users as this functionality will only be used on the Admin Portal** [![image.png](https://opscom.wiki/uploads/images/gallery/2024-06/scaled-1680-/sGGimage.png)](https://opscom.wiki/uploads/images/gallery/2024-06/sGGimage.png) Set the **Sales Window** to **Yearly** [![image.png](https://opscom.wiki/uploads/images/gallery/2024-06/scaled-1680-/npAimage.png)](https://opscom.wiki/uploads/images/gallery/2024-06/npAimage.png) ## Adding Flex Permits to the Lot Go to **Allocate** and add your ten permits. [![image.png](https://opscom.wiki/uploads/images/gallery/2024-06/scaled-1680-/oiJimage.png)](https://opscom.wiki/uploads/images/gallery/2024-06/oiJimage.png) ## Testing Flex Payments To test find a **Full Time Staff** user with a vehicle in our example we are using **John Doe**. Click on the **Parking** tab to begin the purchase process. [![image.png](https://opscom.wiki/uploads/images/gallery/2024-06/scaled-1680-/rOpimage.png)](https://opscom.wiki/uploads/images/gallery/2024-06/rOpimage.png) Purchase a permit from the **Flex Payment Lot**. [![image.png](https://opscom.wiki/uploads/images/gallery/2024-06/scaled-1680-/hZjimage.png)](https://opscom.wiki/uploads/images/gallery/2024-06/hZjimage.png) Process it as if it were a **zero dollar cash purchase**. [![image.png](https://opscom.wiki/uploads/images/gallery/2024-06/scaled-1680-/pznimage.png)](https://opscom.wiki/uploads/images/gallery/2024-06/pznimage.png) The **Payments Due** screen will open. Select **Proceed to Payment** to continue. [![image.png](https://opscom.wiki/uploads/images/gallery/2024-06/scaled-1680-/gy2image.png)](https://opscom.wiki/uploads/images/gallery/2024-06/gy2image.png) On the very last confirmation screen click on **Adjust** to bring up the adjustment screen. [![image.png](https://opscom.wiki/uploads/images/gallery/2024-06/scaled-1680-/2YDimage.png)](https://opscom.wiki/uploads/images/gallery/2024-06/2YDimage.png) Set a -200.00 value (credit). Added a comment (Flex Payment Adjustment) and clicked on **Add Adjustment**. [![image.png](https://opscom.wiki/uploads/images/gallery/2024-06/scaled-1680-/zycimage.png)](https://opscom.wiki/uploads/images/gallery/2024-06/zycimage.png) ## How the credit is displayed on the user Portal Do not process the credit yet as it will appear as a credit on the users account. [![image.png](https://opscom.wiki/uploads/images/gallery/2024-06/scaled-1680-/JZiimage.png)](https://opscom.wiki/uploads/images/gallery/2024-06/JZiimage.png) This credit can now be applied to a permit purchase. # Banner Report ## Generating the Report To begin look for the **Banner Report** menu item under the **Payments Menu** [![image.png](https://opscom.wiki/uploads/images/gallery/2024-06/scaled-1680-/qxFimage.png)](https://opscom.wiki/uploads/images/gallery/2024-06/qxFimage.png) The screen will refresh and display the **Banner Report Search** page. On this page you select: **User Types:** Select the User Type you wish to report and pay for. **Choose Item Type:** Select the item you wish to pay for. In our example we are paying for yearly permits. **Up To and Including:** Select the end date of the period you wish to pay for. **Banner Code:** Enter the payment or identifying code that you wish to apply to this record in Banner. (Code 100) **Detail Code:** Enter the code that represents the item you are paying for. In our case it will be a yearly permit for 2020. (YP2020) **Admin Code:** Enter your admin ID number to track who is making this payment report. [![image.png](https://opscom.wiki/uploads/images/gallery/2024-06/scaled-1680-/3CXimage.png)](https://opscom.wiki/uploads/images/gallery/2024-06/3CXimage.png) There are two functions you can perform here. **Mark as Paid** or **Export to Excel**. ## Exporting to Excel The export to Excel functionality allows the admin to export a spreadsheet of names and payments that will be made. [![image.png](https://opscom.wiki/uploads/images/gallery/2024-06/scaled-1680-/uNBimage.png)](https://opscom.wiki/uploads/images/gallery/2024-06/uNBimage.png) Here is a sample of an exported spreadsheet. This report can then be imported into Banner to facilitate payment through a Student or Staff account. [![image.png](https://opscom.wiki/uploads/images/gallery/2024-06/scaled-1680-/gwAimage.png)](https://opscom.wiki/uploads/images/gallery/2024-06/gwAimage.png) ## Mark Items as Paid To mark these reported items paid in OPS-COM Select Mark as Paid. [![image.png](https://opscom.wiki/uploads/images/gallery/2024-06/scaled-1680-/NjFimage.png)](https://opscom.wiki/uploads/images/gallery/2024-06/NjFimage.png) A popup window will appear for the admin to confirm the transaction. Click **Confirm** to continue. [![image.png](https://opscom.wiki/uploads/images/gallery/2024-06/scaled-1680-/al4image.png)](https://opscom.wiki/uploads/images/gallery/2024-06/al4image.png) A confirmation screen will appear displaying the **transaction code** for the payment. [![image.png](https://opscom.wiki/uploads/images/gallery/2024-06/scaled-1680-/2ioimage.png)](https://opscom.wiki/uploads/images/gallery/2024-06/2ioimage.png) If you searched the transaction code you would see this return. Note: All three items here are now paid for, [![image.png](https://opscom.wiki/uploads/images/gallery/2024-06/scaled-1680-/ehtimage.png)](https://opscom.wiki/uploads/images/gallery/2024-06/ehtimage.png) # Search Payments ## Accessing the Report From the Payments menu click on **Search**. [![image.png](https://opscom.wiki/uploads/images/gallery/2024-06/scaled-1680-/eUTimage.png)](https://opscom.wiki/uploads/images/gallery/2024-06/eUTimage.png) The page will refresh with the **Payments Reporting** search form that gives you the ability to search by **Confirm Code, Transaction ID, Order ID**, as well as a number of present search items below. [![image.png](https://opscom.wiki/uploads/images/gallery/2024-06/scaled-1680-/2O2image.png)](https://opscom.wiki/uploads/images/gallery/2024-06/2O2image.png) Here is an example of searching based on the **confirm code 7d444zbcdffe54b50bde** [![image.png](https://opscom.wiki/uploads/images/gallery/2024-06/scaled-1680-/EGEimage.png)](https://opscom.wiki/uploads/images/gallery/2024-06/EGEimage.png) Provided the confirm code exists in the system the screen will refresh with the **Transaction Details** for that purchase. [![image.png](https://opscom.wiki/uploads/images/gallery/2024-06/scaled-1680-/wEwimage.png)](https://opscom.wiki/uploads/images/gallery/2024-06/wEwimage.png) ## Pre-Configured Searches The search tool also has a number of additional pre configured searches that will help you find information quickly. Some of the reports will have the ambility to set a date range where others do not require a specified range. **List Cheque Refunds** [![image.png](https://opscom.wiki/uploads/images/gallery/2024-06/scaled-1680-/vorimage.png)](https://opscom.wiki/uploads/images/gallery/2024-06/vorimage.png) **List unprocessed Cash, Cheque and Money Order payments** [![image.png](https://opscom.wiki/uploads/images/gallery/2024-06/scaled-1680-/o5jimage.png)](https://opscom.wiki/uploads/images/gallery/2024-06/o5jimage.png) **List unprocessed Credit Card payments** [![image.png](https://opscom.wiki/uploads/images/gallery/2024-06/scaled-1680-/6RRimage.png)](https://opscom.wiki/uploads/images/gallery/2024-06/6RRimage.png) **List unprocessed Payroll Deduction payments** [![image.png](https://opscom.wiki/uploads/images/gallery/2024-06/scaled-1680-/kS7image.png)](https://opscom.wiki/uploads/images/gallery/2024-06/kS7image.png) **List unprocessed Internal payments** [![image.png](https://opscom.wiki/uploads/images/gallery/2024-06/scaled-1680-/IMnimage.png)](https://opscom.wiki/uploads/images/gallery/2024-06/IMnimage.png) **List ALL unprocessed payments** [![image.png](https://opscom.wiki/uploads/images/gallery/2024-06/scaled-1680-/mB9image.png)](https://opscom.wiki/uploads/images/gallery/2024-06/mB9image.png) **List ALL unprocessed adjustments** [![image.png](https://opscom.wiki/uploads/images/gallery/2024-06/scaled-1680-/wS1image.png)](https://opscom.wiki/uploads/images/gallery/2024-06/wS1image.png) **List ALL Processed Payroll Deductions** [![image.png](https://opscom.wiki/uploads/images/gallery/2024-06/scaled-1680-/iXMimage.png)](https://opscom.wiki/uploads/images/gallery/2024-06/iXMimage.png) **List All Processed Violations (by date range)** [![image.png](https://opscom.wiki/uploads/images/gallery/2024-06/scaled-1680-/Ddfimage.png)](https://opscom.wiki/uploads/images/gallery/2024-06/Ddfimage.png) **List Daily Processed/Submitted Payments (by date range)** You may search for submitted payments as well as Processed payment in this report. The search criteria screen will look like this: [![image.png](https://opscom.wiki/uploads/images/gallery/2024-06/scaled-1680-/lKUimage.png)](https://opscom.wiki/uploads/images/gallery/2024-06/lKUimage.png) The resulting report will have two sections to it. One that lists the payments in detail. [![image.png](https://opscom.wiki/uploads/images/gallery/2024-06/scaled-1680-/KErimage.png)](https://opscom.wiki/uploads/images/gallery/2024-06/KErimage.png) ...And one that lists a daily summary. [![image.png](https://opscom.wiki/uploads/images/gallery/2024-06/scaled-1680-/XpLimage.png)](https://opscom.wiki/uploads/images/gallery/2024-06/XpLimage.png) # Payment Data Export via Banner SFTP # Configuration There are several items that must be configured in order for the right information to display in the exported CVS file. # User Profile In the user profile, a **unique user ID** must be configured. This information will likely be populated by a user data import. [![image.png](https://opscom.wiki/uploads/images/gallery/2024-06/scaled-1680-/XOEimage.png)](https://opscom.wiki/uploads/images/gallery/2024-06/XOEimage.png) # Lot Administration Each lot requires a unique **banner detail code**. To set the banner detail code, go to **Lot Administration** and click on **Pricing & Lot Admin**. [![image.png](https://opscom.wiki/uploads/images/gallery/2024-06/scaled-1680-/AWoimage.png)](https://opscom.wiki/uploads/images/gallery/2024-06/AWoimage.png) Select the lot you wish to add the detail code to. Click on the **lot name** to access the configuration screens. [![image.png](https://opscom.wiki/uploads/images/gallery/2024-06/scaled-1680-/K1pimage.png)](https://opscom.wiki/uploads/images/gallery/2024-06/K1pimage.png) Once you are in the lot configuration tool, select the **Additional** tab. [![image.png](https://opscom.wiki/uploads/images/gallery/2024-06/scaled-1680-/X5Aimage.png)](https://opscom.wiki/uploads/images/gallery/2024-06/X5Aimage.png) Enter the **Lot Detail Code**. (These codes are established in the preliminary planning phase of the project) [![image.png](https://opscom.wiki/uploads/images/gallery/2024-06/scaled-1680-/64Eimage.png)](https://opscom.wiki/uploads/images/gallery/2024-06/64Eimage.png) # Ticket Categories From the **Options Menu**, hover over **Violations** and select **Manage Ticket Categories**. [![image.png](https://opscom.wiki/uploads/images/gallery/2024-06/scaled-1680-/Hb9image.png)](https://opscom.wiki/uploads/images/gallery/2024-06/Hb9image.png) Click **Edit** on the **Category** you wish to configure. [![image.png](https://opscom.wiki/uploads/images/gallery/2024-06/scaled-1680-/tgCimage.png)](https://opscom.wiki/uploads/images/gallery/2024-06/tgCimage.png) Enter the detail code for the ticket category. In this case, the Detail Code is **PRKB** for the **Boot Fee** category. [![image.png](https://opscom.wiki/uploads/images/gallery/2024-06/scaled-1680-/h12image.png)](https://opscom.wiki/uploads/images/gallery/2024-06/h12image.png) # Sales Window On the sales window configuration page, we need to enter a **Term Code** used for **Permits** only. To do so go to the **Permits** Menu and select **Sales Windows** [![image.png](https://opscom.wiki/uploads/images/gallery/2024-06/scaled-1680-/pXJimage.png)](https://opscom.wiki/uploads/images/gallery/2024-06/pXJimage.png) To access the configuration screen, click on **EDIT.** [![image.png](https://opscom.wiki/uploads/images/gallery/2024-06/scaled-1680-/Qzwimage.png)](https://opscom.wiki/uploads/images/gallery/2024-06/Qzwimage.png) Here you will enter the **Term Code** for the selected **Sales Window** that you want to appear on the permit purchases export. [![image.png](https://opscom.wiki/uploads/images/gallery/2024-06/scaled-1680-/cl1image.png)](https://opscom.wiki/uploads/images/gallery/2024-06/cl1image.png) # Activate Script to Run on a Schedule You must now ensure the **System Task** is set to active and has an active schedule set. In the **Options** menu, click on **View System Task Logs**. [![image.png](https://opscom.wiki/uploads/images/gallery/2024-06/scaled-1680-/5eEimage.png)](https://opscom.wiki/uploads/images/gallery/2024-06/5eEimage.png) In this example, the Task is set to run at 2:00 am Nightly [![image.png](https://opscom.wiki/uploads/images/gallery/2024-06/scaled-1680-/bBeimage.png)](https://opscom.wiki/uploads/images/gallery/2024-06/bBeimage.png) # The User Portal You are now set to make a payment on the user portal. In this example, we will purchase a permit. Go to the user portal and click on the **Permits** menu item. [![image.png](https://opscom.wiki/uploads/images/gallery/2024-06/scaled-1680-/3kCimage.png)](https://opscom.wiki/uploads/images/gallery/2024-06/3kCimage.png) Select the Lot you wish to purchase a permit in. [![image.png](https://opscom.wiki/uploads/images/gallery/2024-06/scaled-1680-/BtDimage.png)](https://opscom.wiki/uploads/images/gallery/2024-06/BtDimage.png) Click **Reserve Permit** [![image.png](https://opscom.wiki/uploads/images/gallery/2024-06/scaled-1680-/9DBimage.png)](https://opscom.wiki/uploads/images/gallery/2024-06/9DBimage.png) **Continue to Checkout** to view your **Cart**. [![image.png](https://opscom.wiki/uploads/images/gallery/2024-06/scaled-1680-/0QZimage.png)](https://opscom.wiki/uploads/images/gallery/2024-06/0QZimage.png) Select **Banner Payment** as your **Payment Type.** This can be configured so that Banner Payment is your only selection available. [![image.png](https://opscom.wiki/uploads/images/gallery/2024-06/scaled-1680-/KGCimage.png)](https://opscom.wiki/uploads/images/gallery/2024-06/KGCimage.png) Click **Submit Payment.** The screen will refresh to show the **Confirm Payment** page. Click on **Confirm Payment.** [![image.png](https://opscom.wiki/uploads/images/gallery/2024-06/scaled-1680-/6Xgimage.png)](https://opscom.wiki/uploads/images/gallery/2024-06/6Xgimage.png) Once the payment is processed, you will get an online receipt. [![image.png](https://opscom.wiki/uploads/images/gallery/2024-06/scaled-1680-/32Iimage.png)](https://opscom.wiki/uploads/images/gallery/2024-06/32Iimage.png) Some additional information on how the Banner export process works: Export to Banner will run whenever the system task is set to, and gathers any violations that can be sent to banner that haven't been exported yet. When a violation has been exported by the system task, it has a flag put on it that marks it has been exported to Banner. It will export the violations it found into a new file, and does not affect any previously output files, meaning it doesn't create a cumulative file that gets more added each day. Rather, it creates a new file every time it runs; this isn't necessarily daily, it runs at whatever interval the client has decided for it. This would mean if they missed a day, there would be more than one new file in the output folder for them to process in Banner. # Paying for a Violation from the Admin Portal ## Searching for a Violation There are two methods to searching a violation. You can place the violation number in the **quick search** bar and click on the resulting drop down. [![image.png](https://opscom.wiki/uploads/images/gallery/2024-06/scaled-1680-/Tv2image.png)](https://opscom.wiki/uploads/images/gallery/2024-06/Tv2image.png) Or... Alternately you can use the **Violation Search** from the **Violations** menu. [![image.png](https://opscom.wiki/uploads/images/gallery/2024-06/scaled-1680-/Fffimage.png)](https://opscom.wiki/uploads/images/gallery/2024-06/Fffimage.png) Enter the **ticket number** or **plate number** in the **Search Text** box and click on **Search Using Only Text** to retrieve a list of violations. Click on the **ticket number** to proceed. *Note: Using the Ticket Number will list the specific ticket. Using the Plate Number will list all tickets associated with the plate.* [![image.png](https://opscom.wiki/uploads/images/gallery/2024-06/scaled-1680-/jFoimage.png)](https://opscom.wiki/uploads/images/gallery/2024-06/jFoimage.png) ## Choosing an Action The **Violation Information** window will pop up. Click on **Action** to proceed. [![image.png](https://opscom.wiki/uploads/images/gallery/2024-06/scaled-1680-/d8ximage.png)](https://opscom.wiki/uploads/images/gallery/2024-06/d8ximage.png) A list of possible actions will appear. Click on **Make Payment** to access the payment screen. [![image.png](https://opscom.wiki/uploads/images/gallery/2024-06/scaled-1680-/iMlimage.png)](https://opscom.wiki/uploads/images/gallery/2024-06/iMlimage.png) ## The Payment Screen The payment screen will display any item that is awaiting payment. This could include **Violations, Permits,** and **Deposits**. [![image.png](https://opscom.wiki/uploads/images/gallery/2024-06/scaled-1680-/vWAimage.png)](https://opscom.wiki/uploads/images/gallery/2024-06/vWAimage.png) You may opt to pay for all items or decide to pay for the specific violation by toggling off the items you wish to pay for at another time. *Note: If items are past due you will be required to pay for them and will not be able to toggle them off.* [![image.png](https://opscom.wiki/uploads/images/gallery/2024-06/scaled-1680-/ZtMimage.png)](https://opscom.wiki/uploads/images/gallery/2024-06/ZtMimage.png) Click **Proceed to Payment** to continue. [![image.png](https://opscom.wiki/uploads/images/gallery/2024-06/scaled-1680-/CxJimage.png)](https://opscom.wiki/uploads/images/gallery/2024-06/CxJimage.png) ## Choosing a Payment Type Select the payment type you wish to use. In this case we are using **cash** as a payment type. You may also select **cheque** or **debit card** payment here. *Note: As an admin you may choose any payment type available in your system. If the payment was being made from the user portal you can see only **Credit Card** in this case would be available as a payment type.* [![image.png](https://opscom.wiki/uploads/images/gallery/2024-06/scaled-1680-/wj6image.png)](https://opscom.wiki/uploads/images/gallery/2024-06/wj6image.png) In our example we are choosing **cash**. Click on **Submit Payment** Information to proceed. [![image.png](https://opscom.wiki/uploads/images/gallery/2024-06/scaled-1680-/es5image.png)](https://opscom.wiki/uploads/images/gallery/2024-06/es5image.png) A confirmation screen will appear noting the payment method. Click on **Submit Payment Information** once again to proceed. [![image.png](https://opscom.wiki/uploads/images/gallery/2024-06/scaled-1680-/cTqimage.png)](https://opscom.wiki/uploads/images/gallery/2024-06/cTqimage.png) ## Making the Payment The **Transaction Detail** screen will appear. You may wish to update the **Comment** at this point. *Note: You may also cancel the transaction at this point if there is reason to do so. Be aware that canceling a payment for a violation simply places the violation back into awaiting payment status.* *For a permit you may opt to cancel the transaction yet keep the permit in awaiting payment status (**Cancel and Keep**) or you may **Cancel and Release** the permit.* [![image.png](https://opscom.wiki/uploads/images/gallery/2024-06/scaled-1680-/scximage.png)](https://opscom.wiki/uploads/images/gallery/2024-06/scximage.png) In our example we will **Process the payment manually** and accept the cash payment. [![image.png](https://opscom.wiki/uploads/images/gallery/2024-06/scaled-1680-/PsUimage.png)](https://opscom.wiki/uploads/images/gallery/2024-06/PsUimage.png) ## The Final Transaction Detail Screen The **Transaction Detail** page will refresh showing the details of the purchase. [![image.png](https://opscom.wiki/uploads/images/gallery/2024-06/scaled-1680-/U9pimage.png)](https://opscom.wiki/uploads/images/gallery/2024-06/U9pimage.png) # Admin Portal Cash, Cheque or Debit Payment ## Purchasing a Permit To begin let's have a look at purchasing a permit for the admin portal. Select the **Parking Tab** and the click the **Standard Permit** button to access the permit purchase screen. [![image.png](https://opscom.wiki/uploads/images/gallery/2024-06/scaled-1680-/HNqimage.png)](https://opscom.wiki/uploads/images/gallery/2024-06/HNqimage.png) The **Confirm Parking Permit Registration** page appears. An admin can simply use the next permit available or select a specific permit to assign to the user. The cost of the permit will show in this interface. Click on **Purchase this Permit** to proceed. [![image.png](https://opscom.wiki/uploads/images/gallery/2024-06/scaled-1680-/9ekimage.png)](https://opscom.wiki/uploads/images/gallery/2024-06/9ekimage.png) This will then take you to the **Confirm Parking Permit Registration** page. [![image.png](https://opscom.wiki/uploads/images/gallery/2024-06/scaled-1680-/Xykimage.png)](https://opscom.wiki/uploads/images/gallery/2024-06/Xykimage.png) If everything looks good as far as what you expect the payment to be you may then select the payment type you wish to use. [![image.png](https://opscom.wiki/uploads/images/gallery/2024-06/scaled-1680-/3wGimage.png)](https://opscom.wiki/uploads/images/gallery/2024-06/3wGimage.png) In our example we will choose **Cash** however **Cheque, Money Order** and **Debit Card** work in the same manner. [![image.png](https://opscom.wiki/uploads/images/gallery/2024-06/scaled-1680-/WQiimage.png)](https://opscom.wiki/uploads/images/gallery/2024-06/WQiimage.png) Once the payment type is selected you will be directed to the **Payment Due** screen where you will see the important information of what you are paying for and what payment type was selected. Click **Submit Payment** Information to proceed with the purchase. [![image.png](https://opscom.wiki/uploads/images/gallery/2024-06/scaled-1680-/SA9image.png)](https://opscom.wiki/uploads/images/gallery/2024-06/SA9image.png) The screen will refresh with three choices that can be made at this point. **Process Manually** - which will process the payment. It is at this point you would collect the cash, cheque, money order, or debit card to process. **Cancel and Keep** - This will terminate this transaction but keep the permit in awaiting payment status. **Cancel & Release** - This will terminate this transaction and release the permit back into the pool of available permits. In our example we will select Process Manually to complete the transaction. [![image.png](https://opscom.wiki/uploads/images/gallery/2024-06/scaled-1680-/xgiimage.png)](https://opscom.wiki/uploads/images/gallery/2024-06/xgiimage.png) The screen will refresh with a confirmation screen record of the purchase. [![image.png](https://opscom.wiki/uploads/images/gallery/2024-06/scaled-1680-/gR8image.png)](https://opscom.wiki/uploads/images/gallery/2024-06/gR8image.png) # Admin Portal Permit Purchase with Credit Card ## The Permit We begin by going to a user's dashboard on the admin portal and proceeding to the Parking tab. In our example we are issuing and paying for a permit on behalf of user over the phone. [![image.png](https://opscom.wiki/uploads/images/gallery/2024-06/scaled-1680-/hkyimage.png)](https://opscom.wiki/uploads/images/gallery/2024-06/hkyimage.png) We then get taken to the Confirm Parking Permit Registration page where the admin can choose either the next permit available or select a specific permit number. Click on Purchase this Permit to Continue. [![image.png](https://opscom.wiki/uploads/images/gallery/2024-06/scaled-1680-/HEZimage.png)](https://opscom.wiki/uploads/images/gallery/2024-06/HEZimage.png) The Payments Due screen will open listing items that require payment. [![image.png](https://opscom.wiki/uploads/images/gallery/2024-06/scaled-1680-/YX4image.png)](https://opscom.wiki/uploads/images/gallery/2024-06/YX4image.png) ## The Payment Type From the payment Due screen the admin can choose a payment method to be used for this purchase. In our example we choose a payment provider. Click on Submit Payment Information to continue. [![image.png](https://opscom.wiki/uploads/images/gallery/2024-06/scaled-1680-/LuYimage.png)](https://opscom.wiki/uploads/images/gallery/2024-06/LuYimage.png) A confirmation Screen will appear listing the payment type. Click on Submit Payment Information button to proceed to the payment gateway. [![image.png](https://opscom.wiki/uploads/images/gallery/2024-06/scaled-1680-/7Zjimage.png)](https://opscom.wiki/uploads/images/gallery/2024-06/7Zjimage.png) You will be directed to the payment provider's input form. Fill out the form and click Make Payment to complete the purchase. [![image.png](https://opscom.wiki/uploads/images/gallery/2024-06/scaled-1680-/fLZimage.png)](https://opscom.wiki/uploads/images/gallery/2024-06/fLZimage.png) A transaction record will appear. This information is stored and can be accessed form the user's payment history or you can search for the Confirmation Number in various search tools. [![image.png](https://opscom.wiki/uploads/images/gallery/2024-06/scaled-1680-/UMJimage.png)](https://opscom.wiki/uploads/images/gallery/2024-06/UMJimage.png) # Payment for a locker from the Admin Portal ## Paying for a locker. To begin click on the **Lockers** menu item in the user's profile on the admin portal. [![image.png](https://opscom.wiki/uploads/images/gallery/2024-06/scaled-1680-/0imimage.png)](https://opscom.wiki/uploads/images/gallery/2024-06/0imimage.png) The locker registration page appears with a list of buildings with lockers available. [![image.png](https://opscom.wiki/uploads/images/gallery/2024-06/scaled-1680-/XQ8image.png)](https://opscom.wiki/uploads/images/gallery/2024-06/XQ8image.png) The locker selection page will open allowing the admin to chose the locker area within the building chosen. In this case we are looking for a locker in the women's locker room. [![image.png](https://opscom.wiki/uploads/images/gallery/2024-06/scaled-1680-/1jHimage.png)](https://opscom.wiki/uploads/images/gallery/2024-06/1jHimage.png) The admin may then select the specific locker number they wish to assign to the user. Click on **Reserve Locker** to continue. [![image.png](https://opscom.wiki/uploads/images/gallery/2024-06/scaled-1680-/upJimage.png)](https://opscom.wiki/uploads/images/gallery/2024-06/upJimage.png) The confirm **Locker Registration** page will open where the admin can verify the information about the locker being assigned. Click on **Confirm Info** to continue. [![image.png](https://opscom.wiki/uploads/images/gallery/2024-06/scaled-1680-/4q2image.png)](https://opscom.wiki/uploads/images/gallery/2024-06/4q2image.png) The payment due page will appear. Click on **Proceed to Payment** to continue. [![image.png](https://opscom.wiki/uploads/images/gallery/2024-06/scaled-1680-/cL2image.png)](https://opscom.wiki/uploads/images/gallery/2024-06/cL2image.png) The screen will refresh and the admin will be presented with the Payment Selection section of the process. [![image.png](https://opscom.wiki/uploads/images/gallery/2024-06/scaled-1680-/0Phimage.png)](https://opscom.wiki/uploads/images/gallery/2024-06/0Phimage.png) In this case we have selected a **Cash** payment. Click **Submit Payment** to continue. [![image.png](https://opscom.wiki/uploads/images/gallery/2024-06/scaled-1680-/lSfimage.png)](https://opscom.wiki/uploads/images/gallery/2024-06/lSfimage.png) The transaction Details screen will appear. There are three choices available. - Process Manually which will complete the transaction - Cancel and Keep which will terminate the transaction but return the locker to awaiting payment status - Cancel and Release which will also terminate the transaction and release the locker back into the pool of available lockers to rent. IN our example we will select Process Manually to complete the transaction. [![image.png](https://opscom.wiki/uploads/images/gallery/2024-06/scaled-1680-/2UGimage.png)](https://opscom.wiki/uploads/images/gallery/2024-06/2UGimage.png) The payment will be processed and the Transaction Details screen will display a receipt. [![image.png](https://opscom.wiki/uploads/images/gallery/2024-06/scaled-1680-/xUrimage.png)](https://opscom.wiki/uploads/images/gallery/2024-06/xUrimage.png) # Accepting a Student Account Payment from the Admin Portal ## Accepting a Student Account Payment To Begin lets select a permit to purchase. In this case the admin is assigning a permit to a student and taking payment via Student Account. [![image.png](https://opscom.wiki/uploads/images/gallery/2024-06/scaled-1680-/gWVimage.png)](https://opscom.wiki/uploads/images/gallery/2024-06/gWVimage.png) In this example we are purchasing a permit in the General Monthly Lot for Patricia Birch. [![image.png](https://opscom.wiki/uploads/images/gallery/2024-06/scaled-1680-/r7Yimage.png)](https://opscom.wiki/uploads/images/gallery/2024-06/r7Yimage.png) Once the lot has been selected, the admin can then choose a permit to assign to the user. Click on **Purchase this Permit** to continue. [![image.png](https://opscom.wiki/uploads/images/gallery/2024-06/scaled-1680-/Xjyimage.png)](https://opscom.wiki/uploads/images/gallery/2024-06/Xjyimage.png) The payment due page will appear. Click on **Proceed to Payment** to continue. [![image.png](https://opscom.wiki/uploads/images/gallery/2024-06/scaled-1680-/Z8Yimage.png)](https://opscom.wiki/uploads/images/gallery/2024-06/Z8Yimage.png) The screen will refresh and the admin will be presented with the **Payment Selection** section of the process. [![image.png](https://opscom.wiki/uploads/images/gallery/2024-06/scaled-1680-/1DZimage.png)](https://opscom.wiki/uploads/images/gallery/2024-06/1DZimage.png) In this case we have selected a **Student Account** payment. Click **Submit Payment** to continue. [![image.png](https://opscom.wiki/uploads/images/gallery/2024-06/scaled-1680-/iCnimage.png)](https://opscom.wiki/uploads/images/gallery/2024-06/iCnimage.png) The screen will refresh and the admin will be presented with the Payment Selection section of the process. In this case we have selected a cash payment. Click **Submit Payment** to continue. [![image.png](https://opscom.wiki/uploads/images/gallery/2024-06/scaled-1680-/atYimage.png)](https://opscom.wiki/uploads/images/gallery/2024-06/atYimage.png) The **Transaction Details** screen will appear. There are three choices available. - Process Manually which will complete the transaction - Cancel and Keep which will terminate the transaction but return the locker to awaiting payment status - Cancel and Release which will also terminate the transaction and release the locker back into the pool of available lockers to rent. IN our example we will select Process Manually to complete the transaction. [![image.png](https://opscom.wiki/uploads/images/gallery/2024-06/scaled-1680-/tpbimage.png)](https://opscom.wiki/uploads/images/gallery/2024-06/tpbimage.png) The payment will be processed and the **Transaction Details** screen will display a receipt. Because the payment method is **Student Account** the item will be marked as paid by student account. A report can be run of daily payments filtered by Student Account. This report can be provided to the financial department to allow finance to retrieve the funds from the student account. [![image.png](https://opscom.wiki/uploads/images/gallery/2024-06/scaled-1680-/fcnimage.png)](https://opscom.wiki/uploads/images/gallery/2024-06/fcnimage.png) # Payment Reconciliation: Submitted / Processed The Payment Reconciliation page can be found under Payments -> Payment Reconciliation: [![2024-08-08_14-35-13.png](https://opscom.wiki/uploads/images/gallery/2024-08/scaled-1680-/YDr2024-08-08-14-35-13.png)](https://opscom.wiki/uploads/images/gallery/2024-08/YDr2024-08-08-14-35-13.png) On this page your can filter for submitted or processed payments based on a date range and payment type: [![2024-08-08_14-42-10.png](https://opscom.wiki/uploads/images/gallery/2024-08/scaled-1680-/2024-08-08-14-42-10.png)](https://opscom.wiki/uploads/images/gallery/2024-08/2024-08-08-14-42-10.png) Results will then be displayed below the search criteria and allow for ordering the data based off columns, searching the data: [![image.png](https://opscom.wiki/uploads/images/gallery/2024-08/scaled-1680-/image.png)](https://opscom.wiki/uploads/images/gallery/2024-08/image.png) Export options shown in green are: [![image.png](https://opscom.wiki/uploads/images/gallery/2024-08/scaled-1680-/Tytimage.png)](https://opscom.wiki/uploads/images/gallery/2024-08/Tytimage.png) - **Copy**: Copies row data to clipboard to be pasted into program of choice, such as excel. - **CSV**: Creates and prompts you to download a CSV (Comma-separated values, .csv) file for use in your program of choice. - **Excel**: Creates and prompts you to download a Excel (Microsoft Excel, .xls) file for use in your program of choice. - **Print**: Prompts for printing the page. # System Configuration # Roles and Permissions ## Roles and Permissions There are two menu options on the **System Config** menu; **Manage Roles** and **Edit Admin Users**. Click the **Manage Roles** button to begin. [![image.png](https://opscom.wiki/uploads/images/gallery/2024-06/scaled-1680-/Njyimage.png)](https://opscom.wiki/uploads/images/gallery/2024-06/Njyimage.png) The **Manage Administrator Roles** screen displays. The Primary Administrator role will be available to select. This role will allow you to create new Roles and assign them to other Admin Users. Click the **Add New Role** button. Enter the ***Role name*** and the ***description*** for that role. The description will become the rollover tool tip that displays when you mouse over the **Edit Role** button of an existing role. Click Save Role to save. [![image.png](https://opscom.wiki/uploads/images/gallery/2024-06/scaled-1680-/HfSimage.png)](https://opscom.wiki/uploads/images/gallery/2024-06/HfSimage.png) You can ***edit*** any role by clicking the **Edit Role** button. You can edit the ***Role Name*** and ***Description*** for any Role except Primary Admin. Click the **Permissions** button to edit the permissions for any role. The **Editing Permissions** screen will display. The number next to the icons across the top bar indicate how many permissions in that category have been selected. The icons mirror the OPS-COM menu. Click an icon to display the permissions in that category. [![image.png](https://opscom.wiki/uploads/images/gallery/2024-06/scaled-1680-/FVUimage.png)](https://opscom.wiki/uploads/images/gallery/2024-06/FVUimage.png) To select a permission, enable the check box next to that permission. Once you have gone through each icon and selected all the permissions that are required for the role, click **Save Permissions**. That role is now created. You can assign this role to one or more users. Click the **System Config** menu and select **Edit Admin Users**. The **Manage Administrator Users** screen displays. From this screen you can create a new user or edit an existing one by selecting the appropriate option from the dropdown list. Click **Retrieve** to display the user options below. [![image.png](https://opscom.wiki/uploads/images/gallery/2024-06/scaled-1680-/6Suimage.png)](https://opscom.wiki/uploads/images/gallery/2024-06/6Suimage.png) Add or confirm the User information on the left and select the roles to apply to that user on the right. You can add a comment for any relevant notes about the user. Click **Update User** when you are finished. # New Page # Permissions in OPS-COM
## User Management Permissions
Permission NamesDescription
View UsersAllows the admin user to view, but not change, the users in the system. User Search functionality is enabled.
Edit Users Allows the admin user to edit users in the system including new User Registration. This should be used with the 'View Users' permission. - If 'View Users' is enabled, Admins can see the user history including Permits and Violations issued (but not the details) and any payments outstanding for this user. - If 'View Users' is not enabled, Admins can only use the User Registration portion and cannot search for existing users.
Delete User Aliases This permission allows users to Update User Aliases. It cannot be used without 'View Users' and 'Edit Users' turned on.
Edit Vehicle Information Allows Admin to update vehicles and view the vehicle's history. Admins can also do a Plate Search from the User Management menu. In addition, Admins can see the DNTT reports.
Edit FormsAllows Admins to create, update and view forms.
View FormsAllows Admins to view all forms and see the user-submitted entries of forms. Users cannot create or edit forms without the 'Edit Forms' permission.
Clear Alarms on User ProfileAllows Admins the ability to update and clear alarms on the user's profile. This must be used with 'View Users' and 'Edit Users' permissions enabled.
Send Bulk EmailAllows Admins to send email messages to various groups of Users.
## Locker Permissions
Permission NamesDescription
Building AreasAllows the Admin user to view buildings and building areas and add buildings and building areas. You must use this with the 'View Lockers' permission.
View Lockers Allows the Admin to view lockers and look at locker history. As well the Admin can see lockers awaiting payment.
Edit Locker Information Allows users to edit the locker information.
Allocate Lockers Ability to allocate locker numbers to a building area.
Edit Locker AllocationsAllows creation and editing of locker sales windows, allows Admin users to view active locker sales window
Allocation Locker - Single Admins are able to add new buildings and building areas, able to create and update certain lockers. You must have 'View Lockers' enabled to use this permission effectively.
## Parking Permissions
Permission NamesDescription
Pricing & Lot AdministrationAllows Admins to create and edit lots. This permission will not work by itself. The Admin must also have the following permissions: - View Permits - Edit Permits - Allocate Permits - Edit Permit Allocations
View PermitsThis allows the Admin to view Permit records, do Permit Switches and to view waiting lists.
Edit PermitsThis allows the Admin to edit Permit details. This permission allows access to most functions that relate to permits.
Allocate PermitsGrants the ability to allocate permits to different lots. This permission will also grant all privileges of the 'View Permits' permission.
Edit Permit AllocationsAllows access to edit the Permit Allocation Sales Window and the Active Permit Sales Window.
View Access CardsAllows the Admin to view Access cards. This will not work without the 'View Permits' permission enabled as well.
Edit Access CardsAllows the Admin to edit Access cards. This will not work without the 'View Permits' permission enabled as well.
Add Access CardsAllows the Admin to add Access cards. This will not work without the 'View Permits' permission enabled as well.
Prorate Permit PurchasesAllows the Admin to prorate permit purchases for the end user. This cannot be used without 'User Management' permissions and 'Edit Permits' enabled.
Create Temp Permit EntriesAllows Admins to use the Parking Validation utility. Please note,
## Violations Permissions
Permission NamesDescription
View Violations Allows the Admin to see information about violations including, basic user details and details of any payments.
Edit Violations Allows the Admin to search for violations. This permission requires 'View Violations' to see the details.
Edit Violation ticket number Grants the ability to edit a violation number if you also have the 'View Violations' permission.
Display as Ticket WriterGrants the ability to be a ticket writer on the Handheld or the Web if the Admin also has the 'Add New Violations'.
Add New Violations Allows the Admin to issue a violation. The Admin must have the 'Edit Vehicle Information' permission found in the User Management section.
Grant Violation Appeals Gives the ability to manage Appeals and grant them. The Admin must have the 'View Appeal Reports' permission as well.
View Appeal Reports Allows the Admin to view Appeal reports for different officers. Admins must also have the 'View Violations' and 'Edit Violations' permissions.
Issue / View Violation Notices Allows the Admin the ability to issue and View Violation Notices.
Manage Collections Grants the ability to manage the collections process for violations.
View Violation Reports Allows the Admin to view financial and statistical reports regarding violations. Admins must have the 'View Violations' permission as well.
## Incident Permissions
Permission NamesDescription
Add/Edit Contact History User Notes Grants the Admin the ability to add / edit notes in contact history. You must have User Management permissions to use this since it is accessed through the user profile.
Delete User Contact History NotesGrants the Admin the ability to delete User notes in contact history. You must have User Management permissions to use this since it is accessed through the user profile. You must also have the 'Add/Edit Contact History User Notes' permission.
View All IncidentsThis is a master permission that grants the ability to view all Incidents. This permission is normally used for high-level Admins as it grants access to all information.
Add IncidentsAllows the Admin to add incidents and have an incident reported on their behalf.
Delete IncidentUSE WITH CAUTION - This permission should only be added to a Primary Admin. If this is enabled the Admin can remove the incident and all related records and files where they are not used in other reports. There is a button on the incident to "Delete Incident".
Open IncidentsAllows the Admin to open incidents that are closed. This requires the 'View all Incidents' permission. This permission is normally used for high-level Admins.
Edit IncidentsGrants the ability to edit Incidents. This requires the 'View all Incidents' permission. This permission is normally used for high-level Admins.
View Incidents - SelfAllows the Admin to view Incidents if they are listed as the reporter.
Edit Task Notes on IncidentsGrants the ability to edit comments on Incident tasks. Requires the 'View all Incidents' permission.
Edit Incident summariesAllows the Admin to edit Incident Summaries. Requires the 'View all Incidents' permission.
Incident AdministratorGrants the ability to view and edit incidents. This permission is normally used for high-level Admins.
View/Edit Confidential InformationAllows the Admin to View/Edit Confidential Information on reported incidents. Requires the 'View all Incidents' permission.
Be assigned Tasks DirectlyAllows the Admin to be assigned as an investigator for an Incident.
Edit Incident TasksGrants the ability to edit Incident Tasks. Requires the 'View all Incidents' permission.
Close Incidents / ChecklistsGrants the ability to close Incidents and Checklists. Requires the following permissions: - View all Incidents - Incident Administrator
Assign Incident to Case ManagerAllows the Admin to Ability to assign a Case Manager to an Incident. Requires the 'View all Incidents' permission.
Assign Incident To An InvestigatorAllows the Admin to assign an Investigator to an Incident. Requires the 'View all Incidents' permission. This permission is normally used for high-level Admins.
Assign Incident To A Different InvestigatorAllows the Admin to assign a different Investigator to an Incident. Requires the 'View all Incidents' permission. This permission is normally used for high-level Admins.
Is Incident Case ManagerAllows the Admin to be listed as a Case Manager that can be assigned to an Incident.
Is Incident Shift ManagerAllows the Admin to be listed as an Incident Shift Manager. This will require some other high-level permissions as required for the job.
View Incidents Distribution ReportsGrants the ability to view the Incident Distribution Reports.
View Incident ReportsGrants the ability to view all Incident Reports in OPS-COM.
View Incident In-House ReportGrants the ability to view the Unpaid In-House Incident report.
Export Incident ReportsGrants the ability to export the Recent Incidents Report and the Sub-location Report to Excel.
## Dispatch Permissions
Permission NamesDescription
View License Plate AlarmsAllows Admins to view License Plate alarms.
Receive License Plate Alarms via emailAllows Admins to receive Plate Alarms via email if they also have subscribed to the Alarms list.
View People AlarmsAllows Admins to view People alarms.
Receive People Alarms via emailAllows Admins to receive People Alarms via email if they also have subscribed to the Alarms list.
Add New Dispatch LogsGrants the ability to add dispatch logs.
Edit Dispatch LogsGrants the ability to edit the Admin's own dispatch logs.
Edit All Dispatch LogsGrants the ability to edit the dispatch logs of other Admins.
Open Dispatch LogsAllows Admins to Open dispatch logs.
View Dispatch LogsAllows Admins to View dispatch logs and close log records.
Add/Drop Dispatch LogsGrants the ability to remove the association of a Dispatch Log with an incident.
View CamerasAllows the Admins to view Cameras, if this is configured with OPS-COM.
## Payment Permissions
Permission NamesDescription
Manage User Credit Cards Grants the ability to add, remove and update credit cards from Users.
View PaymentsGrants the ability to view payments. Limited access to user information is also granted.
Edit PaymentsAllows the Admin to process payments. Admin must have the 'View Payments' permission.
Change Payment TypeAllows the Admin to change the Payment Type of a payment.
Drop PaymentsAllows the Admin to drop payments.
Mark Bulk PaymentsGrants the ability to mark Bulk payments for bulk processing.
Refund PaymentsGrants the ability to refund payments, but not process.
Process Refunds/AdjustmentsAllows the Admin to process refunds and adjustments.
## System Content Permissions
Permission NamesDescription
View and Select Files Grants the ability to view and select files for use in editors. Admins must have the 'Manage System Messages' permission as well.
Manage FilesAllows the Admin to add and remove files for use with content editors. Admins must have the 'Manage System Messages' permission as well.
Manage System MessagesGrants the ability to edit the email templates, home page messages, system messages, Temp Permit Text and Notice Literature.
View History SearchAllows the Admin to view history searches if they also have the corresponding User Management permissions.
Purge Old DataAllows the Admin to purge Data older than 7 years.
## System Configuration Permissions
Permission NamesDescription
Manage Roles Grants the ability to manage roles and permissions. This is typically the job of a Primary Admin only.
Edit AdministratorsAllows the Admin to edit other Admin user accounts and assign roles based on their job description. This requires 'Manage Roles' to function. This is typically the job of a Primary Admin only.
Manage System ConfigurationGrants the ability to edit the System Settings. This is typically the job of a Primary Admin only.
Manage User Types and DepartmentsAllows the Admin to manage User Types and Departments.
Manage Vehicle ConfigurationAllows the Admin to setup the different Vehicles descriptions that are used in OPS-COM.
Manage Permit Types and StatesAllows Admins to manage the Zones, Groups, Common Lots and Permit States. This must be used the 'Edit Permits' permission.
Manage Access CardsGrants the ability to setup Access card options.
Manage BarcodesAllows the Admin to setup Barcode options.
Manage LocationsGrants the ability to setup Locations options for use in OPS-COM.
Manage HandheldsAllows the Admin to manage settings stored in the Handheld Commons area
Manage Violation Offence TypesAllows the Admin to manage ticket types and ticket offence items.
Manage Alert ListsAllows the Admin to setup alert and alarm email lists.
Manage Distribution ConfigurationAllows the Admin access the Distribution setup options.
Manage Dispatch ConfigurationGrants the ability to the Dispatch setup options.
Manage Incident ConfigurationAllows the Admin to configure the IncidentAdmin options.
Manage CamerasGrants the ability to Admin to access the Camera options.
Reset DatabaseAllows the Admin to the reset their preview database for testing.
Manage DuplicatesGrants the ability to resolve duplicates in the system.
# Admin User Accounts ## Creating an Admin Account Hover over **System Config** and click **Edit Admin Users.** The **Manage Administrator Users** screen displays. Select **Insert New User** from the drop-down menu, then click **Retrieve**. On the left, you will enter the user information, and on the right, you will select the admin role(s) this person will be responsible for. [![image.png](https://opscom.wiki/uploads/images/gallery/2024-06/scaled-1680-/bhoimage.png)](https://opscom.wiki/uploads/images/gallery/2024-06/bhoimage.png) Enter the admin's information into the **Creating New User** form In the **Active Roles** form select the role(s) the Admin User will be granted. We suggest you view the video demo to fully understand how the Roles and Permissions in OPS-COM function. Click **Insert New User** when complete to add the admin user to the system. [![image.png](https://opscom.wiki/uploads/images/gallery/2024-06/scaled-1680-/3dqimage.png)](https://opscom.wiki/uploads/images/gallery/2024-06/3dqimage.png) ## Editing an Existing Admin Account To manage Administrator Users, select the **System Config** menu, then click on **Edit Admin Users.** [![image.png](https://opscom.wiki/uploads/images/gallery/2024-06/scaled-1680-/Ofzimage.png)](https://opscom.wiki/uploads/images/gallery/2024-06/Ofzimage.png) The **Manage Administrator Users** page will display. To change a user, select the user from the drop-down menu and click **Retrieve**. You can now change the options for that selected user. [![image.png](https://opscom.wiki/uploads/images/gallery/2024-06/scaled-1680-/xrHimage.png)](https://opscom.wiki/uploads/images/gallery/2024-06/xrHimage.png) You can also click on the **Login Activity** button to see when the admin logged into the OPS-COM system or a handheld device. ## Resetting an Admin's Password To reset an admin's password go to the specific user's account and enter a temporary password into the Password field. The password is hidden but you can simply type over the existing symbols "\*\*\*\*\*\*\*\*\*\*". Inform the admin of the temporary password. When they login with the temporary password they will be prompted to update their password and they will have the opportunity to make it more secure. [![image.png](https://opscom.wiki/uploads/images/gallery/2024-06/scaled-1680-/0qIimage.png)](https://opscom.wiki/uploads/images/gallery/2024-06/0qIimage.png) ## Disabling an Admin Account When do we use this? Admin users cannot be deleted as they have data attached to their accounts. If an admin user changes roles or leaves the organization the best practice is to disable their account. **NOTE: It is very important to leave the admin users permissions in place as the permissions will affect reporting. Obviously, once the account is disabled any permissions existing cannot be actioned and will only be used for reporting purposes.** Click on the **System Config** menu and choose **Edit Admin Users**. [![image.png](https://opscom.wiki/uploads/images/gallery/2024-06/scaled-1680-/bknimage.png)](https://opscom.wiki/uploads/images/gallery/2024-06/bknimage.png) Click on the field labeled **Insert New User** to see a drop-down list of active users. [![image.png](https://opscom.wiki/uploads/images/gallery/2024-06/scaled-1680-/46nimage.png)](https://opscom.wiki/uploads/images/gallery/2024-06/46nimage.png) Click on the user being removed from the drop down list, in this example *jim\_daniels* will be used. The user is in an active state at this point. Uncheck the box titled **Activate this account and allow system login.** Click **Update User** to apply the change. [![image.png](https://opscom.wiki/uploads/images/gallery/2024-06/scaled-1680-/Ozjimage.png)](https://opscom.wiki/uploads/images/gallery/2024-06/Ozjimage.png) Notice how, when you go back to the list of Admin Users, the account is now listed under the **Disabled Accounts** listing. Note: This action can be reversed at any time by **editing** the user account and checking **Activate this account and allow system login.** ## Related Video # IP Filtering for access to OPS-COM An IP address is an address used in order to **uniquely identify a device on an IP network**. To get your IP address visit [whatismyip.net](https://www.whatismyip.net/). The address is typically made up of four groups of numbers called octets. The ***first two octets*** identify the network you are on and the ***last two octets*** narrow the address down to the specific machine. **Here is how it works**: If, for example, the IP address of your specific computer is **10.32.1.144**, you can restrict access to just that single computer by entering the full IP address in the **Allowed IP Addresses** field. By entering the first two octets only, it will open up access to any computer on that network but still restrict computers on any other network from having access. You can further open up access by placing a single dot in the **Allowed IP Address** field. This allows the user with this configuration to log in from any network. ## How does this translate in terms of access to OPS-COM? The IP configuration of **Allowable IP Addresses** can be modified for any user in the system and is stored within the admin users profile. The resulting restrictions or open access to the OPS-COM system is controlled by this configuration and is specific to the user in question. Here is how you would configure the **Allowed IP Addresses** in OPS-COM. Hover over the **System Config** menu and click on **Edit Admin Users.** [![image.png](https://opscom.wiki/uploads/images/gallery/2024-06/scaled-1680-/0iWimage.png)](https://opscom.wiki/uploads/images/gallery/2024-06/0iWimage.png) Once in the **Manage Administrator Users** window, select the user you wish to edit. [![image.png](https://opscom.wiki/uploads/images/gallery/2024-06/scaled-1680-/Gypimage.png)](https://opscom.wiki/uploads/images/gallery/2024-06/Gypimage.png) *Here is the location of the IP configuration field.* [![image.png](https://opscom.wiki/uploads/images/gallery/2024-06/scaled-1680-/Ogbimage.png)](https://opscom.wiki/uploads/images/gallery/2024-06/Ogbimage.png) The level of access given to a specific user is usually role based and proportionate to their level of seniority or function within their specific organization. Managers and directors for example, might require access from anywhere in the world essentially so they would have the single **dot** as the allowed IP Address, meaning they could literally log in from any network location internal or external to their specific network. *(This admin could log on from an internet cafe for example) Note: In some cases networks might be locked down or behind a firewall. Additional configuration on the part of your IT department may be required.* [![image.png](https://opscom.wiki/uploads/images/gallery/2024-06/scaled-1680-/z3jimage.png)](https://opscom.wiki/uploads/images/gallery/2024-06/z3jimage.png) Regular office workers on the other hand, would only require access from their specific network. By entering the two fist octets, they could in that case log in to OPS-COM from any computer in their local office provided that computer was on the same network. In our example: 10.32 [![image.png](https://opscom.wiki/uploads/images/gallery/2024-06/scaled-1680-/ifpimage.png)](https://opscom.wiki/uploads/images/gallery/2024-06/ifpimage.png) A part time employee or student worker may only use one specific computer to access OPS-COM, so again here is where you would specify the full IP address to control access. In our example 10.32.1.144 [![image.png](https://opscom.wiki/uploads/images/gallery/2024-06/scaled-1680-/ipJimage.png)](https://opscom.wiki/uploads/images/gallery/2024-06/ipJimage.png) It is even possible to configure a user for access from more than one computer, but still restricted to specific computers. To configure this access you must enter the entire IP address of the two or more computers. For example 10.32.1.144 and 10.32.1.154 could be two computers in an office setting. The two entries can be placed in the Allowed IP Address field listed on two separate lines as follows: [![image.png](https://opscom.wiki/uploads/images/gallery/2024-06/scaled-1680-/yRIimage.png)](https://opscom.wiki/uploads/images/gallery/2024-06/yRIimage.png) It is also possible to allow access for an admin from two separate local area networks. For example: you may have a situation where an employee is working out of two locations on a campus, or in a municipal organization. One building may be on the 10.32 network, while the other building or campus is on another. In that case you can configure the allowed IP addresses accordingly. [![image.png](https://opscom.wiki/uploads/images/gallery/2024-06/scaled-1680-/rPpimage.png)](https://opscom.wiki/uploads/images/gallery/2024-06/rPpimage.png) ## How To Find Your IP You can view your IP address by searching for it in Google. Simply type in the search bar "What is My IP" [![image.png](https://opscom.wiki/uploads/images/gallery/2024-06/scaled-1680-/Rzlimage.png)](https://opscom.wiki/uploads/images/gallery/2024-06/Rzlimage.png) The returned result will display your IP address as follows: [![image.png](https://opscom.wiki/uploads/images/gallery/2024-06/scaled-1680-/4nVimage.png)](https://opscom.wiki/uploads/images/gallery/2024-06/4nVimage.png) ## To recap: The Basic Rules **Good:** **.** A single period to match all IP's **10.32 -** A partial IP to match a specific network **10.32.1.144** - A full IP to match a specific computer **Bad:** **10.\*** **Wildcards** like this will not work ops-com.com **Domain names** will not work # Editing a Username By default the username field is not editable: [![image.png](https://opscom.wiki/uploads/images/gallery/2024-06/scaled-1680-/Ppzimage.png)](https://opscom.wiki/uploads/images/gallery/2024-06/Ppzimage.png) To begin, go to the System Config menu and click on System Settings. [![image.png](https://opscom.wiki/uploads/images/gallery/2024-06/scaled-1680-/iNRimage.png)](https://opscom.wiki/uploads/images/gallery/2024-06/iNRimage.png) From the resulting list of settings click on User Profile to edit it's settings. [![image.png](https://opscom.wiki/uploads/images/gallery/2024-06/scaled-1680-/CsHimage.png)](https://opscom.wiki/uploads/images/gallery/2024-06/CsHimage.png) From the list of settings look for Allow Username Edits. ***Important Note:** This setting can only be toggled by the OPS-COM Support team. Contact OPS-COM support to request changes to this setting.* [![image.png](https://opscom.wiki/uploads/images/gallery/2024-06/scaled-1680-/sKWimage.png)](https://opscom.wiki/uploads/images/gallery/2024-06/sKWimage.png) Click on the setting to select it. [![image.png](https://opscom.wiki/uploads/images/gallery/2024-06/scaled-1680-/jGXimage.png)](https://opscom.wiki/uploads/images/gallery/2024-06/jGXimage.png) Once the setting is activated, as you can see below, the admin now has the ability to edit the username. [![image.png](https://opscom.wiki/uploads/images/gallery/2024-06/scaled-1680-/Yvbimage.png)](https://opscom.wiki/uploads/images/gallery/2024-06/Yvbimage.png) [![image.png](https://opscom.wiki/uploads/images/gallery/2024-06/scaled-1680-/JZsimage.png)](https://opscom.wiki/uploads/images/gallery/2024-06/JZsimage.png) # Defining User Profile Items [![image.png](https://opscom.wiki/uploads/images/gallery/2024-06/scaled-1680-/AgQimage.png)](https://opscom.wiki/uploads/images/gallery/2024-06/AgQimage.png) [![image.png](https://opscom.wiki/uploads/images/gallery/2024-06/scaled-1680-/9ttimage.png)](https://opscom.wiki/uploads/images/gallery/2024-06/9ttimage.png) # Setting up User Profile Items To access the profile items click **System Config** menu and select **System Settings**. [![image.png](https://opscom.wiki/uploads/images/gallery/2024-06/scaled-1680-/AhHimage.png)](https://opscom.wiki/uploads/images/gallery/2024-06/AhHimage.png) On the **Manage System Settings** screen, click **User Profile** to display the list of possible items that can be added or removed from the profile. [![image.png](https://opscom.wiki/uploads/images/gallery/2024-06/scaled-1680-/rMkimage.png)](https://opscom.wiki/uploads/images/gallery/2024-06/rMkimage.png) Items in this list can be in one of three states:
- **Hidden** - Not seen on the user side profile form - **Visible** - Seen on the user side form but optional as far as entering information in the field - **Required** - Seen on the user side form as a required field. Indicated as required by a red asterisk
(Note: The system will not allow the user to save the profile if there is any **required** information missing) The form has **6** essential categories that have various elements that can be set in any one of the three states mentioned above:
- User Name - Address Information - Phone Information - License Information - Student Information - Employee Information
If we hide everything that can be hidden, the system will still require certain pieces of information and may override your settings. Here's what the form looks like for a staff end user in this case. [![image.png](https://opscom.wiki/uploads/images/gallery/2024-06/scaled-1680-/YQ7image.png)](https://opscom.wiki/uploads/images/gallery/2024-06/YQ7image.png) Here is the form with everything visible - [![image.png](https://opscom.wiki/uploads/images/gallery/2024-06/scaled-1680-/DaHimage.png)](https://opscom.wiki/uploads/images/gallery/2024-06/DaHimage.png) ## User Name A User Name is essential. It is one of the unique identifiers required to use the system. However, there are various permutations of the required information associated with the user's name. Best practice tells us a bare minimum might be Username, First Name, and Last Name, although any of these items can be toggled on/off. The state selected is highlighted in blue and a checkmark is added to illustrate the selection. **Note:** One scenario where we might hide username would be if an external source such as LDAP is supplying the username. [![image.png](https://opscom.wiki/uploads/images/gallery/2024-06/scaled-1680-/vezimage.png)](https://opscom.wiki/uploads/images/gallery/2024-06/vezimage.png) ## Address If you plan to mail permits to end users you will need to collect addresses. [![image.png](https://opscom.wiki/uploads/images/gallery/2024-06/scaled-1680-/wKzimage.png)](https://opscom.wiki/uploads/images/gallery/2024-06/wKzimage.png) ## Phone [![image.png](https://opscom.wiki/uploads/images/gallery/2024-06/scaled-1680-/jh1image.png)](https://opscom.wiki/uploads/images/gallery/2024-06/jh1image.png) ## License This field is for Driver License number (not plate number). If you are connected with local law enforcement you may opt to record this information. [![image.png](https://opscom.wiki/uploads/images/gallery/2024-06/scaled-1680-/JRXimage.png)](https://opscom.wiki/uploads/images/gallery/2024-06/JRXimage.png) ## Student Information [![image.png](https://opscom.wiki/uploads/images/gallery/2024-06/scaled-1680-/X5Wimage.png)](https://opscom.wiki/uploads/images/gallery/2024-06/X5Wimage.png) ## Employee Information [![image.png](https://opscom.wiki/uploads/images/gallery/2024-06/scaled-1680-/pa4image.png)](https://opscom.wiki/uploads/images/gallery/2024-06/pa4image.png) # Text2ParkMe If you are using **Text2ParkMe,** there will be a second tab on the page where end users can enter additional details including credit card information. *Note: The only field that will show a "required" status is the Student ID. Additionally: If you enter any credit card information it switches all credit card information fields to required.* [![image.png](https://opscom.wiki/uploads/images/gallery/2024-06/scaled-1680-/C0Vimage.png)](https://opscom.wiki/uploads/images/gallery/2024-06/C0Vimage.png) # Email Headers and Footers ## Getting to Email Headers & Footers In order to get to **Email Headers & Footers,** click System Config, Email Headers & Footers [![image.png](https://opscom.wiki/uploads/images/gallery/2024-06/scaled-1680-/dqIimage.png)](https://opscom.wiki/uploads/images/gallery/2024-06/dqIimage.png) This should take you to the Email Template Layout List where you can select **Edit** to edit the existing Footer, Header or Style email template. [![image.png](https://opscom.wiki/uploads/images/gallery/2024-06/scaled-1680-/lA4image.png)](https://opscom.wiki/uploads/images/gallery/2024-06/lA4image.png) ## Editing Email Layout Templates Click edit on the **Edit** button for the corresponding **Section** you wish to edit. [![image.png](https://opscom.wiki/uploads/images/gallery/2024-06/scaled-1680-/opuimage.png)](https://opscom.wiki/uploads/images/gallery/2024-06/opuimage.png) This will bring you to the template, in our case it is the Header Template. From here you can edit what appears on the header of each sent email as well as include inline styles. [![image.png](https://opscom.wiki/uploads/images/gallery/2024-06/scaled-1680-/iPtimage.png)](https://opscom.wiki/uploads/images/gallery/2024-06/iPtimage.png) # Guide to System Settings 1. To access the system settings, go to System Config and click on System Settings. In most cases these settings affect the admin side of the application. [![image.png](https://opscom.wiki/uploads/images/gallery/2024-06/scaled-1680-/lwpimage.png)](https://opscom.wiki/uploads/images/gallery/2024-06/lwpimage.png) # System Settings Grid
### General System Component
Setting Name DefinitionNotes
Default Notification Email The address you wish all notifications from OPS-COM be sent to
Organization Name: Website Set the name of the Organization
Organization Name: Handheld Set the name of the Organization that appears on the handheld
Country Set the country where the system is located
Company AddressSet your primary street address here
Time zone Set the time zone based on your closest major city
System Timeout Set how long the system can be idle before timeout (can be up to 6 hours)
From EmailThis address will be the return address that appears in emails sent from OPS-COM
Time offset (mins) This represents your time offset from Greenwich mean time
Using daylight savings Used to toggle whether or not you are subject to daylight savings time
System TimeoutSet length of time before the admin user is automatically logged out of OPS-COM
Run the Task Scheduler Used to toggle whether or not your system uses the Task Scheduler
Template Editor Choose between RAW HTML Editor and a WYSIWYG Visual Editor
Select how to show dates Used to set the date format
### Alarms Component
**Setting Name****Definition**Notes
Use Alarms SystemControls if the Client can use Alarms moduleAdmins can see, only OPS-COM Team can change.
Alarm Duration
Generic Alarm Append ThresholdPicklist that allows you to determine the type of alarm you want to issue, and what Action you want taken. In addition you choose the Dispatch Sub Category that should be associated with this Alarm. For example, People Alarms should generate a System Alert with a Sub-Category of Personal Safety Reports.
People Alarm Append ThresholdSame as above
Vehicle Alarm Append Threshold
Stolen Device Append Threshold
Email AddressEmail Address that an alert is sent to
Generic AlarmSame as above
People Alarm
Plate Alarm
### Collections Component
**Setting Name****Definition**Notes
Days before CRC is eligibleSet the length of time before a ticket is sent to court
MTO Lookups on all recordsPerform an MTO Lookup on all records even if a user profile exists
Include All Unpaid ViolationsWhen Toggled on: Includes all unpaid Violations when sending violation notices When Toggled off: Only the violation in question will be included in the letter
Prevent Violation PaymentPrevents violations from being paid through OPS-COM if they have been sent to collections
Prevent PurchasesPrevents Users from making any permit purchases if this is enabled and a violation has been sent to collections
Send Letter To AllWhen Toggled on: Send collections letter to all users even if they have been emailed a copy
**Deposits Component**
**Setting Name****Definition**Notes
Use DepositsToggle the use of deposits on or off
Enable Deposits For Permits
### Forms Component
**Setting Name****Definition**Notes
Default email for sending form entriesThese settings are used to control the Forms Module
### Global Component
Setting NameDefinitionNotes
Email Image HeaderSelect an image to appear in the header of all emails
Default Site LogoSelect a logo that appears on the mobile app, Text2ParkMe and the QR code interface
Default Site HeaderSelect a background image that appears in the header of the mobile app, Text2ParkMe and the QR code interface
Disable nightly email notificationsDisable auto-emails during system maintenance
Symbol before the dollar valueWhich currency symbol to use before a dollar valueAccommodates the English format of the dollar value $100.00
Symbol after currency valueWhich currency symbol to use after a dollar valueAccommodates the French format of the dollar value 100,00$
### Handheld Device
**Setting Name****Definition**Notes
**Network Communication Model**Select Standard or Volley
**Setting Name****Definition**Notes
Usage Limit
Enable Megdgate nightly script.
### Lightweight Directory Access Protocol Component
Setting NameDefinitionNotes
Log Failed Attempts
Use SSL
Servers
BaseDN
Account Suffix
LDAP username
LDAP password
Student Group Name
Staff Group Name
### Licensing Component
Setting NameDefinitionNotes
Permits per yearIndicate the number of permits eligible to be used yearly (Usage Limit)
Violations per yearIndicate the number of violations eligible to be written yearly (Usage Limit)
Temp Permits per yearIndicate the number of temp permits eligible to be used yearly (Usage Limit)
Number of HandheldsIndicate the number of OPS-COM for Android Licenses to be used (Usage Limit)
Mobile PL8RDR CamerasIndicate the number of Mobile Cameras in use by client
Static LPR CamerasIndicate the number of Static Cameras in use by client
Lockers per yearIndicate the number of lockers eligible to be used yearly (Usage Limit)
Validation Records per yearIndicate the number of validation records eligible to be used yearly (Usage Limit)
Dispatch Logs per yearIndicate the number of dispatch logs eligible to be used yearly (Usage Limit)
Incidents per yearIndicate the number of incidents records eligible to be used yearly (Usage Limit)
### Lockers Component
Setting NameDefinitionNotes
Enable Lockers ModuleToggles the use of the Lockers ModuleAdmins can see, only OPS-COM Team can change.
Tax %Percentage of tax to charge for lockers
Map of LockersUsed to enter a path to a diagram or map image
Receipt Reply To AddressReply to address on receipts if only a locker was purchased
### **License Plate Recognition Component**
**Setting Name****Definition****Notes**
Possible plate prefixesIndicates the prefix of what typical plate reads in your region start with. (ie: 123 for Numbers, ABC for Alpha Characters)
Using Mobile LPRThis checkbox will toggle on or off the use of the LPR functionality on handheld devices
### **Parking Component**
**Setting Name****Definition****Notes**
Validation deletion cutoff minutesIndicate how long a validation record is editable by an admin before it is locked into the system
### Payments Component
Setting NameDefinitionNotes
Gateway OnlineToggle to set the status of your payment gateway (Online or Offline)
Invoice NumberAn incremental number for invoices. This can be set the first time you want to issue them
EFT Settings This is used if you are set up to accept EFT payments through OPS-COM. You must be set up by OPS-COM Team first, before you can change anythingAdmins can see, only OPS-COM Team can change.
### Permits Component
Setting NameDefinitionNotes
Receipt Reply To AddressReply to address for receipts that contain permits
Multiple Plate ValidatorAllow multiple plates in parking validator
Require Payment for RolloversIf enabled, only permits that are paid for and processed can be rolled over
Show remaining permitsIf enabled, the number of remaining permits in a lot will be shown to site users. e.g. "32 Remaining" If disabled, the number of remaining permits will be replaced with "On Sale" (which hides how many permits are left from users) Screenshot: [![image.png](https://opscom.wiki/uploads/images/gallery/2024-06/scaled-1680-/F48image.png)
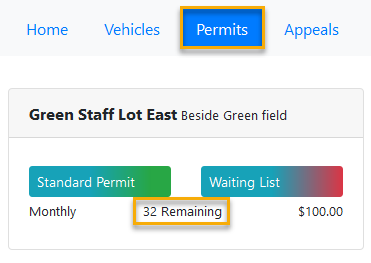
](https://opscom.wiki/uploads/images/gallery/2024-06/F48image.png)
Enable User Permit Printing
Show Total Spots Taken
Show Waiting List Rank
Show Only Visible Lots
Waitlist Email ManagersEnter the email address of the admin who will be managing the waitlists
Waitlist Reservation DurationEnter a timeframe for how long a waitlist reservation will be held before being released
Receipt Reply To Address
Allow Credit Card ProcessingAllows credit card payments for rolloversAdmins can see, only OPS-COM Team can change.
Personal Information on Permit Print Include personal information on hang tag printing
Require Mailing AddressRequire a mailing address to be completed fully to purchase permits
Show Permit Lots on Landing PageShow parking permit lots on the landing page
Show Only Visible Lots Only show lots with an active visibility flag to the end user
Show Waiting List RankAllow users to see their rank on the waiting list
Show Total Spots TakenWhen being added to a waiting list, show the number of spots that exist within the lot
Enable User Permit PrintingAllow users to print their own permits, this requires you to have a permit PDF message under System Messaging to work
Map of Permit AreasThis is the image of your parking map
### Security Component
Setting NameDefinitionNotes
Hash and SaltEnable the hashing of passwords. Once set, it should not be turned offAdmins can see, only OPS-COM Team can change.
Require Password UpdateRequire password resets after an admin changes the passwordAdmins can see, only OPS-COM Team can change.
Toggle Password ExpiryEnable the use of password expiryAdmins can see, only OPS-COM Team can change.
Password Expiry in daysNumber of days before administrator must change their password
Enable Password HistoryPrevent passwords from being reused up to X daysAdmins can see, only OPS-COM Team can change.
How long to remember old passwordsThe number of days the system will remember old passwords to prevent re-use
Minimum password lengthThe minimum password length for administrator passwords
Enable password strength requirementsUsed to set standards in password creation based on password security strengthAdmins can see, only OPS-COM Team can change.
Numerical CharactersThe minimum number of numbers required
Lower Case CharactersThe minimum number of lower cases needed
Upper Case CharactersThe minimum number of upper cases needed
Non-Alpha NumericThe minimum of a Non-Alpha required
Enable Admin LockoutsEnable admin lockouts after X invalid attempts within Y minutesAdmins can see, only OPS-COM Team can change.
Lockout after X AttemptsSets the number of retries with a wrong password before the system will lock you out
Login attempt timeframeSets the timeframe for wrong entries. For example, if you fail 3 times within 5 minutes the system will lock out this admin
Lock the admin out for X minutesSets the length of time in minutes that the admin will be locked out. Set at 120 minutes would mean the admin would be locked out for 2 hours before another attempt at logging in would be allowed
### Third Party Component
Setting Name Definition Notes
Twilio Account Number Admins can see, only OPS-COM Team can change.
Twilio Auth Token Admins can see, only OPS-COM Team can change.
T2 API Last Successful Fetch Admins can see, only OPS-COM Team can change.
### User Profile Component
Setting NameDefinitionNotes
Enable Public RegistrationIf disabled, the Admins control the new account registration. Existing users can log in, but no one can create a profile
Profile Field VisibilityThis controls the fields for the User Profile page
Max Student Number DigitsThe maximum number of digits allowed in a student number. This can be useful if your organization requires student numbers that follow a specific min and max count.
Min Student Number DigitsThe minimum number of digits allowed in a student numbers. This can be useful if your organization requires student numbers that follow a specific min and max count.
Max Employee Number DigitsThe maximum number of digits in an employee number. This can be useful if your organization requires employee numbers that follow a specific maximum digit count.
### Vehicles Component
Enable VIN Toggles the use of VIN on and offOnly seen and edited by OPS-COM Team
Require Vehicle YearIf enabled will require the vehicle year when users are adding a new vehicle.
### Violations Component
Setting NameDefinitionNotes
Enable Violations ModuleToggles the Violations Module on or off, this effects the web application and handhelds If this is toggled off, clients can chalk vehicles but cannot issue violations
Hide Zero Dollar FinesWhen enabled, this prevents $0.00 violations, that are not warnings, from being displayed on the user side. These violations will still show up on the Admin side and will show on the Report by Officer and the Violation Summary by Officer report
Days until dueIndicates the number of days from the issue date that a user has to pay a ticket before it becomes overdue
Include Random Pin on Handheld TicketsSelect this item if you wish your users to have the ability to pay violations OPS-COM Quick Pay/Guest Payments. The PIN number is required in order to pay OPS-COM Quick Pay/Guest PaymentsAdmins can see, only OPS-COM Team can change.
Handheld FooterThis is the message that will be applied to the end of each ticket that gets printed from the handheldThis footer is for violations only. Admins have the ability to change these settings on their own.
Clear Violation Payments
Appeal daysIndicates the number of days a user has to launch an appeal
Enable OPS-COM Quick Pay/Guest Payments Payments for Violations
Link Violations to usersWhen enabled allows violations to be the user instead of a vehicleAdmins can see, only OPS-COM Team can change.
The prefix to go in front of the ticket numberThese characters will appear before the ticket number on the printed ticketAdmins can see, only OPS-COM Team can change.
The next number for printing tickets from the webSets the next sequential number to be on tickets printed from the web toolAdmins can see, only OPS-COM Team can change.
Show Driver's License on TicketsWhen selected, shows License number and Province of issuance on ticket
Show Ticket # as barcode on ticketWhen selected, will print a bar code representing the ticket number on the ticket
# Configuration Checklist ## Some System Configuration that Must be Done For more details on system settings please see **System settings:** - Check **General System Settings** to ensure Date and Time settings are correct for your location - Check **Lockers** settings to set Tax rate, upload a locker map, and set a Receipt Reply To Address - Check **Payments** if EFT (Electronic Funds Transfer) is configured - Check **Permits** to ensure it is configured correctly: - Enter a **Receipt Reply To Address** - Upload a permit map - If using the **Managed Waitlist,** configure the **Waitlist Email Managers,** as well as the **Waitlist Reservation Duration** - Check **Violations** to configure the following: - Days until violation payment is due - Number of days to appeal violation before the option to appeal is removed **Classic System Settings:** - Check System Identification settings - System Name - Reply-to Admin Email Address - Reply-to Security Email Address - Mailing Address - Safety Address - Permit Tax % - Temp Permit Tax % ## Template Design OPS-COM offers powerful flexibility to allow your team to customize the look and feel of your User Portal system. This is done by designing the site template. You will require your graphics and any messaging you would like to see on the pages. ## Uploading Images for Use in Templates - In order to place images in the different templates, you must upload them to the File Manager. Please refer to this wiki article for more information - Upload background images for landing page - Upload your company Logo - Upload your parking map ## Once you have your graphics uploaded: ## Setting up the Look and Feel of the User Portal - Setting up the common header - Setting up the common footer - Optional use of content header and footer ## System Messaging - Set up your Vehicle Disclaimer - Set up your Permit Disclaimer ## Email Template Setup - Appeal Submitted by user - Lost Password - Invoice - User Receipt - Waitlist Selected ## User Setup - Determine what User Types are required - Determine what fields of the user profile are required, optional or hidden ## System Setup - You will need to set up the Vehicle description information - Are there any vehicle types missing? You will also need to set up your locations. - Determine what locations you wish to use as descriptors for enforcement ## ParkAdmin Setup - Create Lots - Create and designate Lot Groups and Zones - Permits type: Monthly, Daily or Temp ## ViolationAdmin Setup - Create Offence Categories - Populate the offence types - Configure days to pay and overdue time frame ## Proof and order your Violations stock - Your Account Executive will be in contact to ensure you are getting the correct tickets and that you approve the design - If you are sourcing your own Violation stock, please ensure you allow yourself 4-6 weeks to have them printed and shipped to you ## Set up your Handhelds and Printers If you have purchased the hardware through the OPS-COM team, we will ship them directly to you with the software pre-loaded and the printers paired. If you have sourced them yourself, you will need to follow the instructions in the wiki articles to complete the setup of your Android handheld units. You will also need to use the instructions in the wiki articles below to set up and pair your printers. - Setting Up your Handheld Units for the First Time - Setting your Android for Auto-Updates - Ticket Creation Settings - Setting up your Ticket Footer ## Printer Setup Your Training Coordinator will go through using the handhelds but it is beneficial to work through the Android Handheld Wiki to make the training more meaningful for you. In particular, it is important to familiarize yourself with the Best Practices for OPS-COM Android wiki article. # Password and Security Features ## Manage Security Settings To edit security settings, hover over **System Config** and click **System Settings**. [![image.png](https://opscom.wiki/uploads/images/gallery/2024-06/scaled-1680-/kLkimage.png)](https://opscom.wiki/uploads/images/gallery/2024-06/kLkimage.png) In System Settings, click **Security** in the list of settings. [![image.png](https://opscom.wiki/uploads/images/gallery/2024-06/scaled-1680-/JOaimage.png)](https://opscom.wiki/uploads/images/gallery/2024-06/JOaimage.png) The Manage System Settings window will open and all the security settings will be available. [![image.png](https://opscom.wiki/uploads/images/gallery/2024-06/scaled-1680-/gZtimage.png)](https://opscom.wiki/uploads/images/gallery/2024-06/gZtimage.png) ### Salted Password Hashing, Password Update, Toggle Password Expiry and Enable Password History Using salted password hashing adds an extra layer of security to stored passwords. Hashing is a one-way, irreversible process that takes the password a user enters and converts it into a short hash value. Salting randomizes the string of digits for the hash value so that two users have the same password, they will have different hash strings. It is not possible to reverse engineer a hash, so you cannot “look up” what the original password was. Instead, a user who forgets their password, for example, would have to reset it completely. This limits an administrator’s ability to view the passwords of employees and closes up a security vulnerability. **Require Password Update** - When activated, this setting will force users to change their passwords on next login. **Toggle Password Expiry** - By default passwords do not expire. For added security, it is good practice to have passwords expire every 90 days. You can enter the number of days before a password expiry to conform with your organization's security policy and toggle it on. **Enable Password History -** When toggled on, OPS-COM will remember the passwords you have used in the past, and will not allow repeat use of the password for the time set in days. [![image.png](https://opscom.wiki/uploads/images/gallery/2024-06/scaled-1680-/radimage.png)](https://opscom.wiki/uploads/images/gallery/2024-06/radimage.png) Password Strength and Admin Lockout Using **Password Strength Settings** the admin can set rules for how complex a password needs to be to meet security rules. These settings include: **Minimum Password Length** - minimum number of characters in the password **Enable Password Strength Requirements** - Toggles on or off the following requirements: - Minimum number of Numerical Characters required in the password - Minimum number of Lower Case Characters required in the password - Minimum number of Upper Case Characters required in the password - Minimum number of Non-Alpha numeric Characters required in the password (Special characters such as !,&,#, etc.) Admins can opt to set up additional security settings that can lock the user out of the system if an incorrect password is entered repeatedly within a specific time frame. In the setting example, 120 minutes would lock the Admin out of their account for 2 hours, if three failed attempts to log in occur during a five minute period. # Manage Files ## Uploading Files Your OPS-Com Admin site has a page to put files. To get to this page, go to **System Config** then click **Manage Files**. [![image.png](https://opscom.wiki/uploads/images/gallery/2024-06/scaled-1680-/Hblimage.png)](https://opscom.wiki/uploads/images/gallery/2024-06/Hblimage.png) You should now see a page where you can see all files that have been used on your OPS-COM Site. This is used mainly for images that are on your OPS-COM User and Admin dashboards (banner, etc.) These files can be viewed in thumbnail mode... [![image.png](https://opscom.wiki/uploads/images/gallery/2024-06/scaled-1680-/TMBimage.png)](https://opscom.wiki/uploads/images/gallery/2024-06/TMBimage.png) ...or in list mode: [![image.png](https://opscom.wiki/uploads/images/gallery/2024-06/scaled-1680-/IEHimage.png)](https://opscom.wiki/uploads/images/gallery/2024-06/IEHimage.png) By clicking on an image you turn on the following menu where you can rename, download, move the file to a different folder, as well as resize, crop or delete the file. [![image.png](https://opscom.wiki/uploads/images/gallery/2024-06/scaled-1680-/xMJimage.png)](https://opscom.wiki/uploads/images/gallery/2024-06/xMJimage.png) Adding Files to Pages To add files to this repository you can simply drag the file into the screen area where an Upload File(s) interface will appear. [![image.png](https://opscom.wiki/uploads/images/gallery/2024-06/scaled-1680-/Okmimage.png)](https://opscom.wiki/uploads/images/gallery/2024-06/Okmimage.png) ## Adding Images to a Page To add an image on a page, you would insert the path to the image, as follows: The root folder is /uploads/FILES/ Followed by your customer code Followed by the file name The resulting URL for a logo placement might look like this /uploads/FILES/PA-DEMO/TomahawkUniversity\_logo.png Here's a sample of the URL being used in a typical page header. [![image.png](https://opscom.wiki/uploads/images/gallery/2024-06/scaled-1680-/mFQimage.png)](https://opscom.wiki/uploads/images/gallery/2024-06/mFQimage.png) # Administrator Groups 1. To manage Administrator Groups, go to **'System Config'** then click on **'Manage Groups'**. [![image.png](https://opscom.wiki/uploads/images/gallery/2024-06/scaled-1680-/mvvimage.png)](https://opscom.wiki/uploads/images/gallery/2024-06/mvvimage.png) 2\. You will be directed to a page where you can see your Admin Groups. As you can see, there are no groups on this page. We will be making one for a demo. To make a group, click on **'Add New Group'** Fill out the information, then click **'Save Group'**. You should now see your group that you made on the left hand side. [![image.png](https://opscom.wiki/uploads/images/gallery/2024-06/scaled-1680-/b9Ximage.png)](https://opscom.wiki/uploads/images/gallery/2024-06/b9Ximage.png) # The Invoice Template ## Editing the template To access the template, go to the **System Config** menu and click on **Email Templates.** The screen will refresh with a list of possible templates to edit. In our case, we want to click on the **Edit** button for **Permit Invoice** to access the template. [![image.png](https://opscom.wiki/uploads/images/gallery/2024-06/scaled-1680-/Tpcimage.png)](https://opscom.wiki/uploads/images/gallery/2024-06/Tpcimage.png) The screen will refresh with the complete Template form as seen below. [![image.png](https://opscom.wiki/uploads/images/gallery/2024-06/scaled-1680-/Wr2image.png)](https://opscom.wiki/uploads/images/gallery/2024-06/Wr2image.png) The form contains 4 areas: At the top, **Meta Data** for this specific template. On the left, a list of possible **Short Codes** that can be used on this template form. On the right, the actual **Template**. At the bottom, a **Text Content field** (This field can be configured for a plain text version of the ## Meta Data **Label -** Enter a name for this Template. **Type -** This field auto fills. **Language -** Choose the language of the template. **Layout -** Choose default layout. **Subject -** This text will appear as the Email Subject. Note that the use of short code is permitted in this field. In this case, we are calling up the account name for the company being invoiced. ## Short Code List The template allows the use of special tokens, or short codes, to pull information from the database to appear on the invoice when sent. These include: **\[invoice account="number"\]** The account number for the company. **\[invoice account="name"\]** The account name for the company. **\[invoice account="fulladdress"\]** The full address for the company. **\[invoice account="invoice\_comments"\]** The invoice comment value that is editable for companies only. Any line breaks will be preserved. **\[invoice show="invoiceno"\]** Invoice Number. **\[invoice show="duedate"\]** Invoice due date. **\[invoice show="billdate"\]** Invoice bill date. **\[invoice show="subtotal"\] **Subtotal of all items before tax. **\[invoice show="taxtotal"\]** Total amount of tax. **\[invoice show="amounttotal"\]** The total sum amount for all outstanding permits for this invoice. **\[invoice show="counttotal"\]** The total number of permits for the selected sales window. **\[invoice show="details"\]** The list of permits, cost and who has the permit. [![image.png](https://opscom.wiki/uploads/images/gallery/2024-06/scaled-1680-/Yosimage.png)](https://opscom.wiki/uploads/images/gallery/2024-06/Yosimage.png) These tokens can be placed anywhere on the template and will pull data from the system, similar to a mail merge functionality. For example, in the **Bill To:** area, the system will retrieve the **Full Address of the Company** as well as the **Company Account Number** using these two short code tokens: **\[invoice account="fulladdress"\]** The full address for the company. **\[invoice account="number"\]** The account number for the company. [![image.png](https://opscom.wiki/uploads/images/gallery/2024-06/scaled-1680-/54gimage.png)](https://opscom.wiki/uploads/images/gallery/2024-06/54gimage.png) ## The Template There are a number of areas on the template that can be edited by the admin. To add branding to the template there are two areas that will be of concern. **The Company Logo Field:** This is where you would place your company logo. Using a .JPEG or .PNG file format is recommended. [![image.png](https://opscom.wiki/uploads/images/gallery/2024-06/scaled-1680-/L35image.png)](https://opscom.wiki/uploads/images/gallery/2024-06/L35image.png) **Your Company Address:** Enter your company address here. [![image.png](https://opscom.wiki/uploads/images/gallery/2024-06/scaled-1680-/eqBimage.png)](https://opscom.wiki/uploads/images/gallery/2024-06/eqBimage.png) **Invoice Identification:** In this section use short code to pull in the **Invoice Number, Billing Date, and Due Date**. [![image.png](https://opscom.wiki/uploads/images/gallery/2024-06/scaled-1680-/uoVimage.png)](https://opscom.wiki/uploads/images/gallery/2024-06/uoVimage.png) **Invoice Details:** The short code **\[invoice show="details"\] **pulls in the list of permits that will appear on the Invoice. (See a sample of the Invoice below) These include: Parker's Name Item type being Paid for (Permit, Access card, etc.) Item number (Permit Number) Sales Window Lot Name Quantity Cost [![image.png](https://opscom.wiki/uploads/images/gallery/2024-06/scaled-1680-/19Nimage.png)](https://opscom.wiki/uploads/images/gallery/2024-06/19Nimage.png) **Payment Information** (Billing Cost)**:** In this section use short code to pull in the billing information such as **Subtotal, Calculated Taxes, and Total Billing Amount. [![image.png](https://opscom.wiki/uploads/images/gallery/2024-06/scaled-1680-/4xEimage.png)](https://opscom.wiki/uploads/images/gallery/2024-06/4xEimage.png) You may also wish to add comments to the invoice. Comments can be added in the company configuration. [![image.png](https://opscom.wiki/uploads/images/gallery/2024-06/scaled-1680-/SInimage.png)](https://opscom.wiki/uploads/images/gallery/2024-06/SInimage.png) **The Email with PDF attached:** Here is a sample of what the resulting email would look like. There is also a .PDF version of this invoice attached to the email. [![image.png](https://opscom.wiki/uploads/images/gallery/2024-06/scaled-1680-/UANimage.png)](https://opscom.wiki/uploads/images/gallery/2024-06/UANimage.png) # System Messaging Checklist ## What Needs Your Attention Here is the list of all the major pages and messaging you will want to review. There are some that are standard messages and probably don't need customization. These items are listed but marked as optional. Functional page elements are displayed on the page automatically by the system based on which page you are currently on. For example, the Sign In page boxes that appear for username and password are automatically generated on the page. Therefore, you need not worry about editing these items. However, if you want to add additional content on these pages you may do so. ## Templates and Designs Click on Toggle template to get a list. You will want to edit the following: - Header - You will want to customize this content. This is the common header on all user portal pages. - Footer - You will want to customize this content. This is the common footer on all user portal pages.
**Header**
`<``header` `style``=``"height:320px; background: white url(/uploads/FILES/PA-DEMO/Tomahawku-arial.jpg) center center; background-size: cover;"``>`
`  ``<``div` `class``=``"container"` `style``=``"height:95%;position:relative"``>`
`    ``<``div` `class``=``"row"` `style``=``"bottom:0;right:0;position:absolute"``>`
`      ``<``div` `class``=``"col my-3 text-center"`
`           ``style``=``"background-color:white;padding:10px;max-width:200px;border-radius:15px;border:1px solid darkgray"``>`
`        ``<``a` `href``=``"/"` `target``=``"_blank"``>`
`          ``<``img` `alt``=``"Tomahawk University"` `align``=``"right"` `border``=``"5"` `src``=``"/uploads/FILES/PA-DEMO/TomahawkUniversity_logo.png"` `class``=``"img-fluid"``>`
`        `
`      ```
`    ```
`  ```
``
`[user_menu]`
**Footer**
`<``div` `class``=``"bg-light text-dark"``>`
`    ``<``div` `class``=``"container py-3"``>`
`        ``<``div` `class``=``"row"``>`
`            ``<``div` `class``=``"col-sm"``>`
`                ``<``a` `href``=``"https://ops-com.com"``><``img`
`                     ``class``=``"img-fluid mb-3 mb-md-0"` `style``=``"max-width:250px;padding-top:10px"`
`                     ``src``=``"https://kp.ops-com.com/uploads/FILES/PA-DEMO/Banner_W_Tagline.png"`
`                     ``alt``=``"OperationsCommander"` `/>`
`                ``<``address` `style``=``"padding-left:25px;padding-top:5px;"``>`
`                ``92 Bridge St., Carleton Place, Ont., K7C 2V3<``br` `/>`
`                ```
`            ```
`            ``<``div` `class``=``"col-sm text-right"` `style``=``"padding-top:15px"``>`
`              ``<``strong``>Learn about Parking & Security Management<``br``/>`
`              ``<``a` `href``=``"mailto:info@ops-com.com"``>info@ops-com.com <``br``/>`
`              ``855.410.4141`
`            ```
`        ```
`    ```
``
Go into System Messaging and update the following System Messaging: (These are the actual pages that occupy the content area between the header and footer that you configured above) ## The Pages Tab - User Dashboard - Currently the generic page. You will want to customize this content. - Login Screen - You will want to customize this content. - Payments Page - Optional. This content will appear on the Payments page above the functional part of the page. - Permits - Most clients customize this message. A good place to put a Campus Map and Messaging about permits. - User Registration- Optional. - My Vehicles - Optional.
**Login Screen**
`<``h3` `style``=``"text-align: center;"``>Welcome to Tomahawk University <``br` `/><``span` `style``=``"color: #ffffff;"``>Parking and Security Services`
`<``div` `class``=``"row my-3"``>`
`<``div` `class``=``"col-s-12 col-md-6"``>[system_code]`
`<``div` `class``=``"col-s-12 col-md-6"``>`
`<``h4` `style``=``"padding-top: 25px;"``><``span` `style``=``"color: #f1c40f;"``><``span` `style``=``"font-family: arial,helvetica,sans-serif;"``><``br` `/><``strong``>Do you have an account? `
`<``h5``><``span` `style``=``"font-family: arial,helvetica,sans-serif;"``>Sign in using the email address you were provided with when you set up your OPS-COM DEMO user account. <``br` `/>For most visitors, a DEMO account will have been supplied previously by Tomahawk.`
`<``p``> `
`<``h4``><``span` `style``=``"font-family: arial, helvetica, sans-serif; color: #f1c40f;"``><``strong``>Are you a New user?`
`<``h5``><``span` `style``=``"font-family: arial,helvetica,sans-serif;"``> Click ‘Create Account’ and fill out the form. If you do not wish to use your email address or other personal details, please contact the <``span` `style``=``"color: #f1c40f;"``><``a` `style``=``"color: #f1c40f; text-decoration: underline; font-style: italic;"` `title``=``"Email OPS-COM"` `href``=``"mailto:sales@ops-com.com"` `target``=``"_blank"` `rel``=``"noopener"``>OPS-COM demo team by email `
`<``span` `style``=``"color: #f1c40f;"``><``em``>Learn more about <``a` `style``=``"color: #f1c40f;"` `href``=``"https://ops-com.com"``>OperationsCommander`
``
**Permits**
`<``p``>[disclaimer name=permitDisclaimer dismiss=never]`
`<``div` `class``=``"row"``>`
`<``div` `class``=``"col-md-4"``><``a` `title``=``"Tomahawk U Parking Map"` `href``=``"/uploads/FILES/PA-DEMO/TomahawkU_Map.jpg"` `target``=``"_blank"` `rel``=``"noopener"``><``img` `class``=``"img-thumbnail modal-image"` `src``=``"/uploads/FILES/PA-DEMO/TomahawkU_Map.jpg"` `width``=``"385"` `height``=``"400"` `/>`
`<``div` `class``=``"col-md-8"``>`
`<``p``>Parking availability changes considerably during the year and permits are offered for sale in select lots. Like any parking lot, there are fewer spaces in parking lots that needed over the course of an average day because not all parkers are there at the same time. Permit allocations are processed and maintained by the Parking Services Office. (Y)early, (S)emester, and (M)onthly parking permits are available for sale below. Please select from one of the parking permit options on the side of the map. If no permit options are available, permits may be temporarily sold out. If this is the case, please select the option to add yourself to the Waiting List - you will be contacted by e-mail to advise when further permit selection/options become available. Permit prices and parking rates are based on our fiscal-year schedule and are pro-rated for users throughout the year. Persons requiring parking during the summer months (May to August) must purchase a Summer parking permit.`
`<``p``>FOR STAFF/ FULL-TIME PARKING PERMITS, PLEASE SELECT OPTION TO PLACE YOUR NAME ON THE WAITING LIST (select waiting list link below). `
`<``p` `style``=``"font-style: italic; font-weight: bold;"``>Attention Residents -  All those living in Residence at must purchase RESIDENCE  ONLY parking permits. `
``
``
`<``p``>[system_code]`
`<``p``> `
**User Registration**
`<``div` `class``=``"row my-3"``>`
`<``div` `class``=``"col-s-12 col-md-6"``>`
`<``p``>[system_code]`
``
`<``div` `class``=``"col-s-12 col-md-6"``>`
`<``p``><``img` `style``=``"width: 400px; height: 209px; float: left; margin: 5px;"` `src``=``"/uploads/FILES/PA-DEMO\TomahawkUniversity_logo_white_bg.png"` `alt``=``""` `/>`
`<``p``> `
`<``p``> `
`<``p``> `
`<``p``> `
`<``p``> `
`<``p``> `
`<``p``><``span` `style``=``"font-size: 10pt;"``>Already Registered? <``span` `style``=``"color: #f1c40f;"``><``a` `style``=``"color: #f1c40f;"` `href``=``"/login"``><``strong``>Click here to login.`
`<``p``><``span` `style``=``"font-size: 10pt;"``>To register, please follow the registration process below.`
`<``ol``>`
`<``li``><``span` `style``=``"color: #236fa1; font-size: 10pt;"``><``strong``><``span` `class``=``"title"``><``span` `style``=``"color: #f1c40f;"``>Complete the Registration Form <``br` `/><``span` `style``=``"font-size: 10pt;"``>Simply fill out the registration form below, review your information for accuracy, and click the Submit button.<``br` `/><``br` `/>`
`<``li``><``span` `class``=``"title"` `style``=``"color: #fbeeb8; font-size: 10pt;"``><``strong``><``span` `style``=``"color: #f1c40f;"``>Receive Confirmation Instructions <``br` `/><``span` `style``=``"font-size: 10pt;"``>We will send you an email message with a link to activate your account and setup your password. <``br` `/><``span` `style``=``"font-size: 10pt;"``>If you have already completed Step 1 and would like us to resend the activation link, please<``span` `style``=``"color: #f1c40f;"``> <``a` `style``=``"color: #f1c40f;"` `href``=``"#"` `data-toggle``=``"modal"` `data-target``=``"#modalForgotPassword"``><``strong``> click here .<``br` `/><``br` `/>`
`<``li``><``span` `style``=``"font-size: 10pt;"``><``strong``><``span` `class``=``"title"` `style``=``"color: #f1c40f;"``>Confirm Your Registration <``br` `/><``span` `style``=``"font-size: 10pt;"``>Once you have received your password, you can visit the<``span` `style``=``"color: #f1c40f;"``><``strong``> <``a` `style``=``"color: #f1c40f;"` `href``=``"/account/profile"``>edit profile page to change your password or profile information.`
``
``
``
**Appeals Message**
`<``p``>[disclaimer name=appealsDisclaimer dismiss=never]`
`<``p``><``strong``>All persons receiving a parking violation have a right to appeal within 10 days of the date the violation was issued.<``br` `/><``strong``>Before searching for your ticket or license plate please ensure that you have registered the vehicle the violation applies to. <``br` `/>Click <``span` `style``=``"color: #ba372a;"``><``a` `style``=``"color: #ba372a;"` `href``=``"/vehicles"``>here to register your vehicle.<``br` `/><``strong``>If you experience any problems using these forms or have any questions concerning the registration, please contact the <``span` `style``=``"color: #ba372a;"``><``a` `style``=``"color: #ba372a;"` `href``=``"mailto:support@parkadmin.com?Subject=Online%20Appeal%20Question/Comment"``>Appeals Officer`
`<``p``><``span` `style``=``"color: #000000;"``>[system_code]`
## The Messages Tab - Dashboard Message - Admin Dashboard. - noPaymentOptions - Currently a standard generic message. Edits Optional. - permitPDF - Set for printing a standard permit. - permitTempPDF - Set for printing a temporary permit. - tempPermitText - Optional.
**Admin Dashboard**
`<``h2` `id``=``"mcetoc_1d6qrcts00"``>Welcome to OperationsCommander Admin Landing Page`
`<``h3` `id``=``"mcetoc_1d6qrcts11"``><``span` `style``=``"color: #bf0404;"``>"Important Notices"`
`<``p``>This version of <``strong``>Operations<``span` `style``=``"color: #bf0404;"``>Commander is our demo environment.  The details of this page are fully customizable in the "System Config Menu" (gears icon ) under the "Manage System Messaging" option.`
`<``p``> `
`<``h3` `id``=``"mcetoc_1d6qrcts12"``>Staff Schedules`
`<``p``>You can use these sections for any number of uses such as Staff schedules`
`<``table` `style``=``"width: 100%;"` `border``=``"1"` `cellspacing``=``"0"` `cellpadding``=``"5"``><``caption``>Spring Schedule?`
`<``tbody``>`
`<``tr``>`
`<``td` `style``=``"height: 35px; text-align: center; width: 150px;"``><``strong``><``span` `style``=``"color: #ba372a;"``>Officer`
`<``td` `style``=``"height: 35px; text-align: center;"``><``strong``><``span` `style``=``"color: #ba372a;"``>Mon`
`<``td` `style``=``"height: 35px; text-align: center;"``><``strong``><``span` `style``=``"color: #ba372a;"``>Tue`
`<``td` `style``=``"height: 35px; text-align: center;"``><``strong``><``span` `style``=``"color: #ba372a;"``>Wed`
`<``td` `style``=``"height: 35px; text-align: center;"``><``strong``><``span` `style``=``"color: #ba372a;"``>Thu`
`<``td` `style``=``"height: 35px; text-align: center;"``><``strong``><``span` `style``=``"color: #ba372a;"``>Fri`
`<``td` `style``=``"height: 35px; text-align: center;"``><``strong``><``span` `style``=``"color: #ba372a;"``>Sat`
`<``td` `style``=``"height: 35px; text-align: center;"``><``strong``><``span` `style``=``"color: #ba372a;"``>Sun`
``
`<``tr``>`
`<``td` `style``=``"height: 35px; text-align: center;"``>Kevin`
`<``td` `style``=``"height: 35px; text-align: center;"``>7-6`
`<``td` `style``=``"height: 35px; text-align: center;"``>Off`
``
`<``tr``>`
`<``td` `style``=``"height: 35px; text-align: center;"``>Mary Beth`
`<``td` `style``=``"height: 35px; text-align: center;"``>12-8`
`<``td` `style``=``"height: 35px; text-align: center;"``>Off`
`<``td` `style``=``"height: 35px; text-align: center;"``>12-8`
`<``td` `style``=``"height: 35px; text-align: center;"``>9-5`
``
`<``tr``>`
`<``td` `style``=``"height: 35px; text-align: center;"``>Don `
`<``td` `style``=``"height: 35px; text-align: center;"``> Off`
`<``td` `style``=``"height: 35px; text-align: center;"``> 12-8`
`<``td` `style``=``"height: 35px; text-align: center;"``>12-8`
`<``td` `style``=``"height: 35px; text-align: center;"``>9-6`
`<``td` `style``=``"height: 35px; text-align: center;"``>10-7`
`<``td` `style``=``"height: 35px; text-align: center;"``>Off`
`<``td` `style``=``"height: 35px; text-align: center;"``> Off`
``
`<``tr``>`
`<``td` `style``=``"height: 35px; text-align: center;"``>Jerome`
`<``td` `style``=``"height: 35px; text-align: center;"``>Off`
`<``td` `style``=``"height: 35px; text-align: center;"``>8-4`
``
``
``
`<``p``> `
`<``p``> `
`<``h3` `id``=``"mcetoc_1d6qrcts13"``>Current Parking Session`
`<``p``>Our current parking session is April.  May permits will be made available soon.`
`<``h3` `id``=``"mcetoc_1d6qrcts14"``>Notes on Database of the demo`
`<``h5``>Date of Last DB restore :  `
`<``p``>Set T2P number in Preview to:  6135196060  613-800-3392 `
`<``p``> `
**No Payment Options**
`<``p` `class``=``"alert alert-danger"``>There are no payment options available. Please contact an administrator for more information.`
**Permit PDF Layout**
`<``div` `id``=``"header-img"``>`
`<``table` `style``=``"width: 850px;"``>`
`<``tbody``>`
`<``tr``>`
`<``td` `style``=``"width: 600px;"``><``img` `style``=``"display: block; margin-left: auto; margin-right: auto;"` `src``=``"/uploads/FILES/OC_TOMA/TomahawkUniversity_logo.png"` `width``=``"314"` `height``=``"81"` `/>`
``
``
``
`<``br` `/>`
`<``table` `style``=``"height: 500px; width: 852px;"``>`
`<``tbody``>`
`<``tr``>`
`<``td` `style``=``"width: 560px; text-align: center;"``>`
`<``h2` `id``=``"mcetoc_1dholgses1"``> `
`<``table` `class``=``"table table-striped"``>`
`<``tbody``>`
`<``tr``>`
`<``td``>Permit Holder`
`<``td``>[permitpdf user=fullname]`
``
`<``tr``>`
`<``td``>Lot`
`<``td``>`
`<``p``>[permitpdf permit=lotshortname]: [permitpdf permit=lotname]`
`<``p``>[permitpdf permit=location]`
``
``
`<``tr``>`
`<``td``>Permit No.`
`<``td``>[permitpdf permit=permitno]`
``
`<``tr``>`
`<``td``>Vehicle(s)`
`<``td``>`
`<``p``>[permitpdf vehicle=all]`
`<``p``>[permitpdf vehicle=1]`
``
``
`<``tr``>`
`<``td``>Expiry`
`<``td``>`
`<``p``>[permitpdf permit=expiry]`
``
``
`<``tr``>`
`<``td``> `
`<``td``>`
`<``h1` `class``=``"barcode"``>*[permitpdf permit=permitno]TT*`
``
``
``
``
``
`<``td` `style``=``"width: 560px; text-align: center;"``> `
`<``h4``><``span` `style``=``"color: #ff0000;"``>Automated License Plate Recognition`
`<``p``>We offer full integration with <``span` `style``=``"color: #ff0000;"``><``a` `style``=``"color: #ff0000;"` `href``=``"https://ops-com.com/parking-security-platform/license-plate-recognition/"``><``em``>three types<``a` `style``=``"color: #ff0000;"` `href``=``"https://ops-com.com/parking-security-platform/license-plate-recognition/"``> of fixe<``a` `style``=``"color: #ff0000;"` `href``=``"https://ops-com.com/parking-security-platform/license-plate-recognition/"``>d and mobile LPR.  <``a` `style``=``"color: #ff0000;"` `href``=``"https://ops-com.com/parking-security-platform/parking-enforcement/"``>Android integration makes it as simple as taking a picture.  Mobile ANPR hardware is so lightweight it can be easily transferred from one vehicle to another.  Our static mounted cameras allow tracking 24 hours a day 7 days a week.`
`<``p``>Leave behind the need for multiple integrations, numerous troubleshooting environments and licensing fees.  Our <``span` `style``=``"color: #ff0000;"``><``a` `style``=``"color: #ff0000;"` `href``=``"https://ops-com.com/parking-security-platform/license-plate-recognition/pl8rdr-lpr/"``><``strong``>PL8RDR license plate reader hardware sets a new standard in simplified LPR and ANPR camera technology.`
`<``p``>Automated parking software and electronic parking ticket system.`
`<``h4` `id``=``"mcetoc_1dholej2b0"``><``span` `style``=``"color: #ff0000;"``>Temporary Parking with Text2Park.Me`
`<``p``><``strong``><``span` `style``=``"color: #ff0000;"``><``a` `style``=``"color: #ff0000;"` `href``=``"https://ops-com.com/parking-security-platform/parking-management/temp-parking/"``>Text2Park.Me is an integrated feature of our<``strong``> parking and security management solution!  Offers parking services to any client through the use of standard cellular phone <``span` `style``=``"color: #ff0000;"``><``a` `style``=``"color: #ff0000;"` `href``=``"https://en.wikipedia.org/wiki/SMS"``>SMS/text messaging.`
``
``
``
``
``
**Temp Permit Layout**
`<``p` `style``=``"text-align: center;"``><``img` `src``=``"/uploads/FILES/OC_TOMA/TomahawkUniversity_logo.png"` `alt``=``"Round Purple"` `width``=``"250"` `height``=``"100"` `/>`
`<``p``>This permit is valid only for the date(s) as purchased and printed on the face of this permit via <``em``><``strong``>ParkAdmin - UNA Transportation Services. This permit is valid in specified parking areas only and is not transferable to any other vehicle or user. Vehicles found displaying fraudulent permits will be ticketed and/or towed. Permit must be displayed and visible from the front windshield of the parked vehicle while parked on campus. It is the responsibility of the permit holder to display in accordance with this permit any supporting documentation required to substantiate the validity of said permit.  `
`<``div` `style``=``"border: solid 1px black; padding: 10px; text-align: center; font-size: 24pt; text-transform: uppercase;"``>[permittemppdf vehicle=plate]`
`<``p``> `
`<``table` `style``=``"width: 851px; height: 117px;"` `cellpadding``=``"5"` `align``=``"center"``>`
`<``tbody``>`
`<``tr` `style``=``"height: 49px;"``>`
`<``td` `style``=``"width: 118.667px; height: 49px;"` `align``=``"right"``><``strong``>Vehicle:`
`<``td` `style``=``"width: 730.667px; height: 49px;"``>[conditional var=permittemp.VehicleID test=equal value=-1][permittemppdf vehicle=guest][/conditional][conditional var=permittemp.VehicleID test=notequal value=-1][permittemppdf vehicle=year] [permittemppdf vehicle=colour] [permittemppdf vehicle=make] [permittemppdf vehicle=type][/conditional]`
``
`<``tr` `style``=``"height: 17px;"``>`
`<``td` `style``=``"width: 118.667px; height: 17px;"` `align``=``"right"``><``strong``>Permit No:`
`<``td` `style``=``"width: 730.667px; height: 17px;"``>[permittemppdf permit=permitno]`
``
`<``tr` `style``=``"height: 17px;"``>`
`<``td` `style``=``"width: 118.667px; height: 17px;"` `align``=``"right"``><``strong``>Lot Name:`
`<``td` `style``=``"width: 730.667px; height: 17px;"``>[permittemppdf permit=lotname]`
``
`<``tr` `style``=``"height: 17px;"``>`
`<``td` `style``=``"width: 118.667px; height: 17px;"` `align``=``"right"``><``strong``>Location:`
`<``td` `style``=``"width: 730.667px; height: 17px;"``>[permittemppdf permit=location]`
``
``
``
`<``p``> `
`<``p` `style``=``"text-align: center;"``>Valid For`
`<``p` `style``=``"text-align: center;"``>[permittemppdf permit=expiry]`
`<``div` `style``=``"text-align: center;"``>[conditional var=permittemp.DoNotTow test=true]`
`<``p` `style``=``"color: red; font-size: 18pt;"``>Do Not Tow`
`[/conditional]`
`<``div` `class``=``"barcode stretch1-2"` `style``=``"padding: 10px; text-align: center; font-size: 30pt;"``>[permittemppdf permit=barcode]`
**Temp Permit Text**
`<``p``>This permit is valid only for dates as purchased and printed on the face of this permit only. This permit is valid in specified parking areas only and is not transferable to any other vehicle or user. Vehicles found displaying fraudulent permits will be ticketed and/or towed.<``br` `/><``br` `/>Permit must be displayed and visible from the front windshield of the parked vehicle while parked on campus.<``br` `/><``br` `/>It is the responsibility of the permit holder to display in accordance with this permit any supporting documentation required to substantiate the validity of said permit.<``br` `/><``br` `/>Parking Services`
## Popup Disclaimers You may opt to place popup disclaimers throughout the system. These popup windows can be triggered to appear based on navigation to a page or associated with a button on a page. - Appeals Disclaimer - Locker Disclaimer - Permit Disclaimer - Vehicle Disclaimer
**Appeals Disclaimer**
`<``p``>Please NOTE: By Appealing this citation, <``br` `/>You will be waiving the early Payment Discount`
**Locker Disclaimer**
`<``p``><``span` `style``=``"font-size: 14px;"``><``span` `style``=``"font-family: verdana,geneva,sans-serif;"``><``strong``>Summer rentals and extensions, must be made in person  *an additional rental fee may apply<``br` `/>        <``br` `/><``strong``>Fees and Registration Cost : <``br` `/><``strong``>    $23 for ½ locker valid for use between August 15 to April 30      <``br` `/>    <``strong``>$35 for Full Lockers valid for use between August 15 to April 30           <``span` `style``=``"font-size: 14px;"``><``span` `style``=``"font-family: verdana,geneva,sans-serif;"``>    `
`<``p``><``span` `style``=``"font-size: 14px;"``><``span` `style``=``"font-family: verdana,geneva,sans-serif;"``>Please note due to supply and demand lockers located in X are subject to rental restrictions of <``strong``>ONE LOCKER PER STUDENT. Students are able to purchase multiple lockers in all other areas of the school. `
`<``p``><``span` `style``=``"font-size: 14px;"``><``span` `style``=``"font-family: verdana,geneva,sans-serif;"``><``strong``>Terms and Conditions`
`<``p``><``span` `style``=``"font-size: 14px;"``><``span` `style``=``"font-family: verdana,geneva,sans-serif;"``><``strong``>Reminders about the End of Rental Terms<``br` `/>Two weeks before the end of your Rental Term, an email will be sent to you to remind you that you need to vacate your locker; student should verify that email address and update it. If your locker has not been emptied after your Rental Term expires, your lock will be cut and the contents of your locker will be removed and put into storage. If you do not come to reclaim your belongings from the Locker Administrator within <``strong``>ten business days, they will be donated or thrown out. The Locker Program is not responsible for any items subject to removal from a locker.`
`<``p``><``span` `style``=``"font-size: 14px;"``><``span` `style``=``"font-family: verdana,geneva,sans-serif;"``><``strong``>Locker Access<``br` `/>The Locker Program reserves the right to access lockers at its sole discretion if there is a suspected security risk or there is an environmental concern such as pest control or odors. Security has the right to enter a locker at any time should they suspect it contains items that put the college or university environment in danger. Any criminal activity will be reported to police. The college or university is required to provide police with access in the event of a criminal investigation.       `
**The Permit Disclaimer**
`<``p``><``span` `style``=``"font-size: 14px;"``><``span` `style``=``"font-family: verdana,geneva,sans-serif;"``><``strong``>The Permit Disclaimer Information `
`<``p``><``span` `style``=``"font-size: 14px;"``><``span` `style``=``"font-family: verdana,geneva,sans-serif;"``><``img` `style``=``"float: right; height: 120px; width: 256px; margin: 5px;"` `src``=``"/MEDIA/demo_extras/TomahawkUniversity_logo.png"` `alt``=``""` `/>`
`<``p` `style``=``"text-align: justify;"``><``span` `style``=``"font-size: 14px;"``><``span` `style``=``"font-family: verdana,geneva,sans-serif;"``>Set your terms and conditions here and insist that users agree prior to the purchase.  `
`<``p` `style``=``"text-align: justify;"``><``span` `style``=``"font-size: 14px;"``><``span` `style``=``"font-family: verdana,geneva,sans-serif;"``>By Purchasing your parking permit you agree to the terms and conditions set forth herein and further agree to purchase parking here on this day and that other day, from this day forward.`
`<``p` `style``=``"text-align: justify;"``><``span` `style``=``"font-size: 14px;"``><``span` `style``=``"font-family: verdana,geneva,sans-serif;"``>You agree to park between the lines and only take up one spot. It is also understood that parking here is at your own risk and that you will not sell , lend, copy or distribute your pass to any other individual with out written consent which has been noterized and seal by the govenment of this university countersigned by the Dean. President, Vice President CEO, grounds keeper and the crossing guard. All Permits are the property of the school and willl be returned at the end of use. Failure to return the  physical permit is subject to a fee of $38,496.98 applied to your pre approved credit card.`
`<``p` `style``=``"text-align: justify;"``><``span` `style``=``"font-size: 14px;"``><``span` `style``=``"font-family: verdana,geneva,sans-serif;"``>Thank you  for using the Parking Service`
**The Vehicle Disclaimer**
`<``p``><``span` `style``=``"font-family: verdana, geneva, sans-serif; font-size: 14px;"``>By adding this vehicle/license plate to my OperationsCommander profile, I agree to assume all responsibilities for the vehicles registered herein, to adhere to the Traffic and Parking Regulations, as amended from time to time and authorized by the Board of Governors, and to accept all the conditions contained therein. I acknowledge having read these regulations, and further certify that I am in possession of a valid driver's license and that the vehicle registered for parking is properly licensed and insured.`
Email Headers and Footers Configuration These are the common elements that will be used for all outgoing emails. You will probably want to customize the messages as well as add your logo to the header, although there are no rules here you can decide, for example, to put the logo in the footer. Click on toggle templates and have a look at: - Header - You will want to customize this content. - Footer - You will want to customize this content.
**Header Template for Default Email Template**
## Email Templates These are the ones I believe you will be using at this point. - Appeal Decision - Appeal Submitted - Standard. Edits Optional. - Lost Password - Standard. Edits Optional. - Create Password registration email. - Standard. Edits Optional. - User Receipt - Standard. Edits Optional. - Waitlist Selected - Standard. Edits Optional.
**Appeal Decision**
`<``p``>Dear [user show=firstname] [user show=lastname],<``br` `/> <``br` `/> Your violation [violation show=Ticket] has been: [violation show=appeal_type].<``br` `/> [conditional var=violation.appealType test=eq value=2]`
`<``table``>`
`<``tbody``>`
`<``tr``>`
`<``th` `style``=``"text-align: right;"``>Original Value:`
`<``td``>[violation show=fine]`
``
`<``tr``>`
`<``th` `style``=``"text-align: right;"``>Current Value:`
`<``td``>[violation show=final_fine]`
``
``
``
`<``p``>[conditional] <``br` `/> <``strong``>Administrator Comments: [violation show=AppealAdminComment]`
**Appeal Submitted**
`<``p``>Your appeal has been submitted for ticket number <``strong``>[violation show=Ticket] on [violation show=TicketAppeal format="Y-m-d h:i a"].`
`<``p``>Thank you.`
**Lost Password**
`<``p``>Hello [user firstname],`
`<``p``>Please click <``a` `href``=``"[passwordreset]"``>here to reset your password.`
`<``p``>You may change your profile at the following location:`
`<``p``> `
**Permit Invoice**
`<``table` `style``=``"width: 100%;"``>`
`<``tbody``>`
`<``tr``>`
`<``td` `style``=``"width: 50%;"` `colspan``=``"2"``> `
`<``td` `style``=``"text-align: right;"` `colspan``=``"2"``>`
`<``p``> Address of Invoicing Company<``br` `/>Address line 2<``br` `/>Address line 3`
``
``
`<``tr``>`
`<``td` `colspan``=``"2"``>`
`<``h1` `style``=``"text-align: center;"``>Sample Invoice<``img` `style``=``"display: block; margin-left: auto; margin-right: auto;"` `src``=``"/uploads/FILES/PA-DEMO/Banner_W_Tagline.png"` `alt``=``""` `width``=``"242"` `height``=``"58"` `/> `
`<``p``> `
``
`<``td` `style``=``"text-align: right;"` `colspan``=``"2"``>`
`<``h3``> `
`<``h3``>Invoice`
``
``
`<``tr``>`
`<``td` `style``=``"vertical-align: top;"``>Bill To:`
`<``td` `style``=``"text-align: right; vertical-align: top;"``>`
`<``p``>[invoice account="name"]`
`<``p``>[invoice account="fulladdress"]`
``
`<``td` `style``=``"text-align: right; vertical-align: top;"``>`
`<``p``>Invoice No.:`
`<``p``>Date:`
`<``p``>Due Date:`
``
`<``td` `style``=``"text-align: right; vertical-align: top;"``>`
`<``p``>[invoice show="invoiceno"]`
`<``p``>[invoice show="billdate"]`
`<``p``>[invoice show="duedate"]`
``
``
``
``
`<``p``> `
`<``p``>[invoice show="details"]`
`<``p``> `
`<``table` `style``=``"float: right;"` `border``=``"0"` `cellspacing``=``"0"``>`
`<``tbody``>`
`<``tr``>`
`<``td` `style``=``"text-align: right;"``>Subtotal`
`<``td` `style``=``"text-align: right;"``> `
`<``td` `style``=``"text-align: right;"``>$[invoice show="subtotal"]`
``
`<``tr``>`
`<``td` `style``=``"text-align: right;"``>Taxes`
`<``td` `style``=``"text-align: right;"``> `
`<``td` `style``=``"text-align: right;"``>$[invoice show="taxtotal"]`
``
`<``tr``>`
`<``td` `style``=``"text-align: right;"``>Total`
`<``td` `style``=``"text-align: right;"``> `
`<``td` `style``=``"text-align: right;"``>$[invoice show="amounttotal"]`
``
`<``tr``>`
`<``td` `style``=``"border-top: solid 3px #000000; border-color: #000000;"``>`
`<``h2``>Balance Due`
``
`<``td` `style``=``"border-top: 3px solid #000000; border-right-color: #000000; border-bottom-color: #000000; border-left-color: #000000; width: 20px; text-align: right;"``> `
`<``td` `style``=``"border-top: 3px solid #000000; border-right-color: #000000; border-bottom-color: #000000; border-left-color: #000000; text-align: right;"``>`
`<``h2` `style``=``"text-align: right;"``>$[invoice show="amounttotal"]`
``
``
``
``
`<``p``> `
`<``p``> `
**Create password registration email**
`<``p``> `
`<``p``><``strong``>Hello!`
`<``p``> `
`<``p``>You are recieving this email because you have created a new account.`
`<``p``> `
`<``p``><``a` `href``=``"[activateinfo]"``>Create password`
`<``p``> `
`<``p``>Please complete your registration.`
`<``p``> `
`<``p``> `
`<``p``>Regards,`
`<``p``><``br` `/>Tomahawk University Parking Services`
`<``p``> `
`<``p``> `
`<``p``> `
`<``p``>If you’re having trouble clicking the "Create Password" button, copy and paste the URL below into your web browser:`
`<``p``> `
`<``p``>[activateinfo]`
**User Receipt**
`<``p``><``img` `style``=``"margin-right: 90px; margin-left: 90px;"` `src``=``"/uploads/FILES/PA-DEMO/TomahawkUniversity_logo.png"` `width``=``"197"` `height``=``"100"` `/><``br` `/><``br` `/>[user_card]`
`<``p``> `
`<``table``>`
`<``tbody``>`
`<``tr``>`
`<``td``><``strong``>Name:  `
`<``td``>[payinfo user=fullname]`
``
`<``tr``>`
`<``td``><``strong``>Company:  `
`<``td``>N/A`
``
`<``tr``>`
`<``td``><``strong``>Submitted:  `
`<``td``>[payinfo payment=submitdate]`
``
`<``tr``>`
`<``td``><``strong``>Amount:  `
`<``td``>[payinfo payment=amount]`
``
`<``tr``>`
`<``td``><``strong``>Method:  `
`<``td``>[payinfo payment=method]`
``
`<``tr``>`
`<``td``><``strong``>Processed:  `
`<``td``>[payinfo payment=processdate]`
``
`<``tr``>`
`<``td``><``strong``>Confirm Code:  `
`<``td``>[payinfo payment=confirmcode]`
``
``
``
`<``p``> `
`<``p``><``a` `class``=``"btn btn-info"` `href``=``"[payinfo payment=receipt_url]"``>View the receipt online`
`<``p``> `
**Waitlist Selected**
`<``p``>You have been selected to receive a permit in lot [waitlist show="lot"].`
`<``p``>You have until [waitlist show="date_to_pay"] to pay for the permit before losing the permit and being returned to the waiting list.`
## Disclaimers & Messaging There are only 2 that would be of concern. - Payment Footer - Receipt Header
**Payment Footer**
`

Thank you for the payment of your Parking Permit or Violation. By purchasing this permit you have agreed to the terms and conditions prior to moving on to the permit purchase section.

`
`

Permit distribution: Permits are mailed out on the 15th of the month to your selected mailing address. If you wish to pick it up please contact parking@yourschool.com and quote your name and permit #. Any permits purchased after the 15th can only be picked up at the office.

`
`

You may pick up your permit at the Parking Office between

`
`

9:00 am and 3:00 PM Monday to Friday.

`
`

If you have any questions please contact The Parking Office

`
`

855-410-4141

`
**Receipt Header**
`<``table` `align``=``"center"` `width``=``"700"``>`
`    ``<``tbody``>`
`        ``<``tr``>`
`            ``<``td` `align``=``"left"``><``span` `style``=``"font-family:verdana,geneva,sans-serif;"``>Reciept header beside  HST in a table`
`            ``<``td` `align``=``"right"``><``span` `style``=``"font-family:verdana,geneva,sans-serif;"``>HST #1234556789`
`        ```
`        ``<``tr``>`
`            ``<``td` `align``=``"left"``> `
`            ``<``td` `align``=``"right"``> `
`        ```
`        ``<``tr``>`
`            ``<``td` `align``=``"left"` `colspan``=``"2"``>`
`            ``<``p` `style``=``"text-align: center;"``><``span` `style``=``"font-size: 18px;"``>Thank you for parking at Tomahawk University...your payment details appear below.`
`            ``<``p` `style``=``"text-align: center;"``><``span` `style``=``"font-size: 18px;"``><``em``><``strong``><``span` `style``=``"font-size: 14px;"``>If you have purchased a temporary parking permit (print at home parking permit),<``br` `/>`
`            ``please proceed to the (H)istory page of your ParkAdmin profile and select the printer icon<``br` `/>`
`            ``located beside the respective parking permit number.`
`            ```
`        ```
`    ```
``
## Notice Literature These are notices that get sent out to end users as an email. They would use the Headers and Footers you configured above. - Overdue Notice Literature - sent to a user when they have an overdue violation. You will want to customize this message. - New Notice Literature - sent to a user when they have received a violation. You will want to customize this message.
**Overdue Notice Literature**
`<``p``>This letter will serve as notice and advise you that your account with Parking Services is now past due. Please refer to the table below for a report of your outstanding items remaining unpaid with Parking Services at the time of this mailing. Further details regarding this overdue amount are available to you by logging-in to the OperationsCommander system. Your username required to access ParkAdmin is provided above. If you have forgotten your password, please use the "Lost or Forgotten Password" link on the main log-in page or contact Parking Services. For your convenience, your outstanding balance can be paid securely on-line using your credit card (Visa or MasterCard). You can also settle your account with Parking Services by mailing your cheque or money order to our office after selecting your payment option and obtaining a reference number on-line from ParkAdmin - please make your cheque payable to and mail same to Parking Services at the following address: Parking Services If you have already settled your account with Parking Services, we apologize for the inconvenience and thank you for your payment. By this notice, Parking Services advises that overdue accounts listed under a public profile remaining unpaid within 30 days of this notice will be forwarded for collection/recovery. If you are registered as a student at the outstanding balance will be forwarded to the Business Office 14 days post violation date by Parking Services. With this application against your student account, student transcripts will not be released until all accounts are settled. Thank you for your prompt attention to this matter.`
**New Notice Literature**
`<``p``>This communication will serve as notice and advise you that you have received a parking violation notice from Parking Services. Your violation may be eligible for an early payment discount. To view additional details about this violation or to appeal/make payment, please log-in to your ParkAdmin account.`
# Email Server Communication Errors ## Finding Communication Errors It is possible, that if some of the system settings and classic system settings are not setup correctly to use a **From** address, that you will receive a communication error as a response. One example would be when trying to submit the **Forgot Password** form found on the user side login page. An error message of this nature would look something like this: [![image.png](https://opscom.wiki/uploads/images/gallery/2024-06/scaled-1680-/preimage.png)](https://opscom.wiki/uploads/images/gallery/2024-06/preimage.png) As mentioned, this is because there is no **From** address setup in the system. ## Fixing Communication Errors To fix this issue you would just need to update the **Reply-to Admin Email Address** found under **Classic System Settings.** [![image.png](https://opscom.wiki/uploads/images/gallery/2024-06/scaled-1680-/Uwhimage.png)](https://opscom.wiki/uploads/images/gallery/2024-06/Uwhimage.png) Once you have updated the email address this issue should be resolved. If the issue is still not resolved after completing these fields, please contact support for further assistance. # Default Header and Footer for Mobile Readiness and SwiftDeploy ## Accessing System Settings First we must go into **System Settings** from the **System Configuration** menu. [![image.png](https://opscom.wiki/uploads/images/gallery/2024-06/scaled-1680-/yBQimage.png)](https://opscom.wiki/uploads/images/gallery/2024-06/yBQimage.png) We are looking for the **Global** component in the list of system setting components. [![image.png](https://opscom.wiki/uploads/images/gallery/2024-06/scaled-1680-/WPoimage.png)](https://opscom.wiki/uploads/images/gallery/2024-06/WPoimage.png) In Global Setting we will see two areas where we can configure images to be used. - Default Site Logo - Default Site Header [![image.png](https://opscom.wiki/uploads/images/gallery/2024-06/scaled-1680-/33simage.png)](https://opscom.wiki/uploads/images/gallery/2024-06/33simage.png) By clicking on **Select Image** we will be taken to the **Manage Files** section where images and files are stored. ## Setting the Default Logo Here we will select an image to be used as the default site logo. [![image.png](https://opscom.wiki/uploads/images/gallery/2024-06/scaled-1680-/1qyimage.png)](https://opscom.wiki/uploads/images/gallery/2024-06/1qyimage.png) ## Setting the Default Header Image We can now set the Default Site Header image. [![image.png](https://opscom.wiki/uploads/images/gallery/2024-06/scaled-1680-/X2ximage.png)](https://opscom.wiki/uploads/images/gallery/2024-06/X2ximage.png) Once the images are selected they will appear in the configuration settings. [![image.png](https://opscom.wiki/uploads/images/gallery/2024-06/scaled-1680-/zSDimage.png)](https://opscom.wiki/uploads/images/gallery/2024-06/zSDimage.png) ## Where The Changes Appear These images will appear in various places in the system. If no header or logo is set in the Templates and Designs section of the system, these default images will be used. In our example we are using the default header and logo on the user portal... [![image.png](https://opscom.wiki/uploads/images/gallery/2024-06/scaled-1680-/0Pzimage.png)](https://opscom.wiki/uploads/images/gallery/2024-06/0Pzimage.png) As well as the phone interface utilized in **Real-Time Parking**. [![image.png](https://opscom.wiki/uploads/images/gallery/2024-06/scaled-1680-/w1fimage.png)](https://opscom.wiki/uploads/images/gallery/2024-06/w1fimage.png) # Email Templates ## Navigate to Email Templates In order to find your current default email templates, you will have to login as an admin and navigate to the system config cog. From this drop-down menu, you should see **Email Content**. [![image.png](https://opscom.wiki/uploads/images/gallery/2024-06/scaled-1680-/USXimage.png)](https://opscom.wiki/uploads/images/gallery/2024-06/USXimage.png) Editing Default Email Templates To edit the default email templates, you can click the **Edit** button next to the template you wish to adjust. After you click this, you will be taken to another area where you can make your changes to the current email template. [![image.png](https://opscom.wiki/uploads/images/gallery/2024-06/scaled-1680-/79Nimage.png)](https://opscom.wiki/uploads/images/gallery/2024-06/79Nimage.png) Using Shortcodes Each email template will have available shortcodes that you can use to craft your message to your liking. The shortcode tokens are displayed on the left of the template editor. As you can see in the image below, the email template for **Appeal Submitted by User** offers the ability to craft messages without knowing when the ticket was appealed, as well as the ticket being appealed. This offers you a very quick and seamless way to make your email templates more engaging and informative. [![image.png](https://opscom.wiki/uploads/images/gallery/2024-06/scaled-1680-/Uo4image.png)](https://opscom.wiki/uploads/images/gallery/2024-06/Uo4image.png) You should be able to use these codes in the smart editor to the right and it will display the appropriate information to the desired user. The smart editor also gives you the ability to add images and format your messages. Email Template Fields - What do they do?
Label##### The label field is how you will identify your email templates.
Type##### The type is an nonadjustable value that lets you know the type of the email template.
Language##### This field contains two options that allow you to select between French or English.
Layout##### Select the layout that surrounds your messaging, this allows you to have multiple different layouts for different email templates. These layouts include your email header, footer, and its styling. You can create or adjust email template layouts under **System Config → Email Headers & Footers.**
Subject##### This is the subject of the message you wish to send under the current email template.
HTML Content##### Here you will write the message your users will receive. You can insert images, shortcodes, and use the smart editor, to format your messages just like other word processors.
Text Content ##### This section is a simple text editor that does not offer the use of shortcodes or any formatting. This is simply for the message itself and not necessarily the
# Pages and Content Blocks ## Accessing System Messaging To access and manage your **System Messaging** navigate to the gears icon ![](https://ops-com.atlassian.net/wiki/download/attachments/762387/image2019-4-8_9-42-38.png?version=1&modificationDate=1554731403000&cacheVersion=1&api=v2) and click on **System Messaging**. [![image.png](https://opscom.wiki/uploads/images/gallery/2024-06/scaled-1680-/RKdimage.png)](https://opscom.wiki/uploads/images/gallery/2024-06/RKdimage.png) ## Creating Pages We also provide a video to visually demonstrate how to use system messaging [https://drive.google.com/file/d/1DU3qorWnAp\_2N9mcNGFYTttNHMeRpXsQ/view](https://drive.google.com/file/d/1DU3qorWnAp_2N9mcNGFYTttNHMeRpXsQ/view) **Pages** display the visual content found throughout your application. You can edit the contents of your page or post a **System Message** by using the Disclaimer Shortcode on the **Page** you want it to show up on. **Shortcodes** also make it convenient to add interactive content to your pages. For more information on **Shortcodes** scroll to the bottom of this page.
- To create a **Page** click the **Create Page/Message** button at the top right of the **Manage System Messaging** screen. It doesn't matter what tab you're on when you do this as you will specify the **Page Type** when you go to create the page.
[![image.png](https://opscom.wiki/uploads/images/gallery/2024-06/scaled-1680-/VEYimage.png)](https://opscom.wiki/uploads/images/gallery/2024-06/VEYimage.png)
- Once you click this button OPS-COM will take you to a different section where you can set the properties and content of the page. Below is a detailed description of the options available to you when creating new **Pages**.
Page AttributesShort Description
**Title**The **Title** of the page you wish to create, which will be the name displayed on the user navigation bar.
**Path**The path after the domain. i.e. **login*****/** → This is the home page* Changing this to **lockers/area/1** will display **login/lockers/area/1** as the URL for that page.
**Visibility**You can toggle the visibility of your pages which will make it so your users can't see the page anymore, but you can still edit it.
**Language**Use this to select between two language options for a specific page. Tomahawk currently supports **English** and **French**.
**Layout**You can select the layout of your page here. Usually, you will have the **Default Layout** selected.
**Content**Your content will be the text on the page you are currently editing. You can also use **Shortcodes** here to display a body of material or feature. For example, a user login form could be displayed on your homepage.
- **Important:** Make sure you select **Page** under the drop-down menu next to **Page Type** and not **Message**. Below we will go into detail on how to create a **Page** field by field. The images below give you a good visual example of what field is being explained, if there is a certain field you are unsure about you can easily find the picture and read from there. - Start by giving your page a **Title** and specify how you would like the **URL** at the top of your page to be displayed.
What is a URL?...
[![image.png](https://opscom.wiki/uploads/images/gallery/2024-06/scaled-1680-/C4Limage.png)](https://opscom.wiki/uploads/images/gallery/2024-06/C4Limage.png)
- Adjust the visibility of your page by toggling the **Visible** button on/off. The **Page** will still be editable in the **System Messaging** section but it will not be visible to your users who are on your **Page** or **System Message**.
Toggle On(Visible Page)Toggled Off(Invisible Page)
![](https://ops-com.atlassian.net/wiki/download/thumbnails/762387/visible.png?version=1&modificationDate=1675158301000&cacheVersion=1&api=v2&width=109&height=54) ![](https://ops-com.atlassian.net/wiki/download/thumbnails/762387/2022-12-08_9-31-34.png?version=1&modificationDate=1670491946000&cacheVersion=1&api=v2&width=105&height=55)
- Toggling the **Page** as invisible will show it under the **Messages** tab like seen in the image below to signify it cannot be seen by your users.
[![image.png](https://opscom.wiki/uploads/images/gallery/2024-06/scaled-1680-/dZ1image.png)](https://opscom.wiki/uploads/images/gallery/2024-06/dZ1image.png)
- Select the default **Language** and **Layout** of your page. If you are not sure which template to use you can leave it as the **Default Layout.**
[![image.png](https://opscom.wiki/uploads/images/gallery/2024-06/scaled-1680-/rzPimage.png)](https://opscom.wiki/uploads/images/gallery/2024-06/rzPimage.png)
- Provide the content of your page in the editor found under the page settings. This content will be the main content of your **Pages**; you can use **Templates & Design** to edit the other sections of your pages such as the **Header-Content** and **Footer-Content.**
- OPS-COM uses **Shortcodes** to display a section of interactive or static content like a user login, permits, etc.
[![image.png](https://opscom.wiki/uploads/images/gallery/2024-06/scaled-1680-/7JRimage.png)](https://opscom.wiki/uploads/images/gallery/2024-06/7JRimage.png) ## Content Placement Depending on where you place your content it can appear differently. OPS-COM's smart editor reads content top to bottom, left to right. Meaning that placing a user login **Shortcode** before your content will look dramatically different than if you placed the **Shortcode** last. You can see a few visual examples of how this works below. ### By Example: **Shortcodes Before Content**
We are going to use the Lot Information Shortcode to display our available lots **before** our text content.
[![image.png](https://opscom.wiki/uploads/images/gallery/2024-06/scaled-1680-/ZuRimage.png)](https://opscom.wiki/uploads/images/gallery/2024-06/ZuRimage.png) As you can see this displays our lot information **before** our content. [![image.png](https://opscom.wiki/uploads/images/gallery/2024-06/scaled-1680-/rp2image.png)](https://opscom.wiki/uploads/images/gallery/2024-06/rp2image.png)
### By Example: **Shortcodes After Content**
Once again we are going to use the Lot Information Shortcode to display our available lots **after** our **Content**.
[![image.png](https://opscom.wiki/uploads/images/gallery/2024-06/scaled-1680-/BdIimage.png)](https://opscom.wiki/uploads/images/gallery/2024-06/BdIimage.png) As you can see this placed the **Shortcode** **after** the lot information [![image.png](https://opscom.wiki/uploads/images/gallery/2024-06/scaled-1680-/9fKimage.png)](https://opscom.wiki/uploads/images/gallery/2024-06/9fKimage.png)
## Editing Pages Keep in mind that the **URL / System Location** next to the page is the area in OPS-COM that you are updating. Therefore, if you wished to update the permit screen, you want to edit the page with a **System Location** of /permits You can edit your pages attributes such as the **Title, Path, Visibility, Language, Layout,** and **Content** after it has already been created.
1. To **Edit** a page, simply click on the **Edit** button next to the page **Title** you want to edit. As seen in the image below we are going to select and edit the **Appeals Message** page. [![image.png](https://opscom.wiki/uploads/images/gallery/2024-06/scaled-1680-/u9Kimage.png)](https://opscom.wiki/uploads/images/gallery/2024-06/u9Kimage.png) 2. You can now make any changes to the **Pages** content or attributes that you like. See **Creating Pages** near the top of the page if you are not sure what a specific field does. From here we can edit the format of the text such as the colour, background color, etc.. [![image.png](https://opscom.wiki/uploads/images/gallery/2024-06/scaled-1680-/Alnimage.png)](https://opscom.wiki/uploads/images/gallery/2024-06/Alnimage.png) 3. If you have not made any changes to the page you are **Editing**, you may go back to the **Page List** by clicking **Return to Page List** at the top of the screen. Clicking this button will discard **all** changes recently made. [![image.png](https://opscom.wiki/uploads/images/gallery/2024-06/scaled-1680-/Q6Cimage.png)](https://opscom.wiki/uploads/images/gallery/2024-06/Q6Cimage.png) 4. Once you have finished editing the page, click **Save Messaging** for your changes to take effect. [![image.png](https://opscom.wiki/uploads/images/gallery/2024-06/scaled-1680-/xIaimage.png)](https://opscom.wiki/uploads/images/gallery/2024-06/xIaimage.png)
## Creating System Messages Important Users will be brought back to the **Users** page if users do not agree with a **System Message**. Meaning, we use **System Messaging** as a convenient way to offer agreements and disclaimers before users make purchases of permits or lockers. ### System Messages and How they work with Pages
How do System Messages work?
**System Messages** and **Pages** work together using Disclaimer Shortcode's. When you create a **System Message,** you give that message a unique **Identifier.** System message identifiers may be used in junction with **Disclaimer Shortcodes** to display your **System Messages** onto **Pages**. The idea may be daunting at first, but once you get a better understanding of how these features work together, it will make more sense. ### Visual Example [![image.png](https://opscom.wiki/uploads/images/gallery/2024-06/scaled-1680-/hM6image.png)](https://opscom.wiki/uploads/images/gallery/2024-06/hM6image.png)
1. The **System** **Message** gets created. 2. The **System Message** is given an **Identifier** to be used with a specific **System Message** so we may access it on a **Page**. 3. We add the **Identifier** to the Disclaimer Shortcode on the **Page** that we want to display the message on. 1. ***Shortcode Example- \[disclaimer name=lockersDisclaimer dismiss=never\]*** 2. ***Shortcode Example- \[disclaimer name=vehicleDisclaimer dismiss=session show=".add-vehicle"\]*** 4. **Shortcodes** may also be used on **System Messages** to display useful content such as a detailed description of the current vehicles registered to the user. See below for a list of supported **Shortcodes**.
**System Messages** provide you with a convenient way to add alert messages to your pages that pop-up when a user clicks the page. You may create **System Messages** to be displayed on specific **Pages** using Disclaimer Shortcode's.
Message AttributesDescription
**Title**The title that will be displayed across the top of the **System Message** when users navigate to that page.
**Identifier**The identifier is used to know which page you want to display the message by using **Shortcodes**.
**Visibility**This section toggles the visibility of your page which will make it so your users may not see the page, but you can still edit it.
**Language**Select between two language options for a specific page. Tomahawk current supports **English** and **French**.
**Content**Content is what will display on the actual page. You may use **Shortcodes** here to view predefined static or interactive content. For example, a user login form could be displayed on your homepage.
1. To create a **System Message** merely click the **Create Page / Message** button on the top right of the **Manage System Messaging** screen. [![image.png](https://opscom.wiki/uploads/images/gallery/2024-06/scaled-1680-/iFKimage.png)](https://opscom.wiki/uploads/images/gallery/2024-06/iFKimage.png) 2. Make sure to select the **Page Type** from the drop-down menu and change this to **Message**. It is essential that you do not select **Page** when creating a **System Message**. [![image.png](https://opscom.wiki/uploads/images/gallery/2024-06/scaled-1680-/2Xtimage.png)](https://opscom.wiki/uploads/images/gallery/2024-06/2Xtimage.png) [![image.png](https://opscom.wiki/uploads/images/gallery/2024-06/scaled-1680-/3NSimage.png)](https://opscom.wiki/uploads/images/gallery/2024-06/3NSimage.png) 3. Create a **Title** for the message. 4. Give the message a unique **Identifier** so it can be accessed on your **Pages** using Disclaimer Shortcodes. **Shortcodes** are codes used to link our **Pages** and **System Messages** together. 5. Once an **Identifier** is created, It is essential to note that you may not use it anymore or you will get an error message. 6. You may modify the visibility of your **System Message** by toggling the **Visible** button on or off.
Toggle On(Visible)Toggled Off(Invisible)
[![image.png](https://opscom.wiki/uploads/images/gallery/2024-06/scaled-1680-/XY6image.png)](https://opscom.wiki/uploads/images/gallery/2024-06/XY6image.png) [![image.png](https://opscom.wiki/uploads/images/gallery/2024-06/scaled-1680-/L2Himage.png)](https://opscom.wiki/uploads/images/gallery/2024-06/L2Himage.png)
7. Toggling a **System Message** as invisible ensures your users won't see it. Although, you can still **edit** and **view** the **System Message** on the admin side, but it will be displayed as seen in the image below. [![image.png](https://opscom.wiki/uploads/images/gallery/2024-06/scaled-1680-/vd5image.png)](https://opscom.wiki/uploads/images/gallery/2024-06/vd5image.png) 8. Select which **Language** you would like your content to be in. OPS-COM currently supports two languages which are **English** and **French**. 9. Edit the contents of your **System Message** in the editor found below the messages fields. This is the content that your users will see and will allow you to edit and format the way the text looks. Once finished, click **Save Messaging.**
Warning Clicking **Return to Template List** before **Save Messaging** will discard all the changes you just made, meaning that the **System Message** will not get created or your changes will not occur. [![image.png](https://opscom.wiki/uploads/images/gallery/2024-06/scaled-1680-/Kkyimage.png)](https://opscom.wiki/uploads/images/gallery/2024-06/Kkyimage.png)
## Editing System Messages You can manage your **System Messages** **Title, Identifier, Visibility, Language**, as well as modify the content to include text, images, or **Shortcodes**.
1. To **Edit** your **System Messages** click the **Messages** tab under the **Manage System Messaging** page. 2. Select the **Edit** button next to the **System Message** you wish to edit. For this example, we will be editing the **Admin Dashboard.** [![image.png](https://opscom.wiki/uploads/images/gallery/2024-06/scaled-1680-/elXimage.png)](https://opscom.wiki/uploads/images/gallery/2024-06/elXimage.png) 3. You will now be able to adjust the message your users will see using the **System Messaging** editor. Below are the fields in which you can use to edit the **System Message**.
Message AttributesDescription
**Title**The title that will be displayed across the top of the **System Message** when users navigate to that page.
**Identifier**The identifier is used to know which page you want to display the message by using **Shortcodes**.
**Visibility**This section toggles the visibility of your page which will make it so your users may not see the page, but you can still edit it.
**Language**Select between two language options for a specific page. OPS-COM currently supports **English** and **French**.
**Content**Content is what will display on the actual page. You may use **Shortcodes** here to view predefined static or interactive content. For example, a user login form could be displayed on your homepage.
[![image.png](https://opscom.wiki/uploads/images/gallery/2024-06/scaled-1680-/TZlimage.png)](https://opscom.wiki/uploads/images/gallery/2024-06/TZlimage.png) 4. You may use the **Title** field to change the **Title** of the **System Message**. 5. You may use the **Identifier** field to change text used to display a **System Message** to a **Page,** but this will require you to modify all **Disclaimer Shortcodes** using the old unique **Identifier** for the message you are replacing. 6. You may click **Save Messaging** when you are finished making your changes.
[![image.png](https://opscom.wiki/uploads/images/gallery/2024-06/scaled-1680-/W08image.png)](https://opscom.wiki/uploads/images/gallery/2024-06/W08image.png) ## Add System Messages to Pages using Shortcodes Now that you know how to create your **Pages** and **System Messages** you can bring them together using a Disclaimer Shortcode. A **Shortcode** is a small body of code surrounded by **\[ \]** used to display complex templates or features. Shortcodes limit the technicality of our system by offering a convenient way to add interactive content without having to know how to script or code. Please review the Shortcodes for Use on the User Portal for a detailed description of how shortcodes work. You can also find a list of **Shortcodes** currently available to you by going to the OPS-COM Shortcode Documentation. # Templates and Design ## Overview The User Portal system allows your clients to register, add vehicles, purchase permits and pay violations. It is an important extension of your business, and it should reflect your corporate branding. ### Pages and Templates The OPS-COM user Page will store the functionality and content of your main page, while the Templates will be used to change the functionality of your pages as well as the content around the Page. ## Where to Find Templates and Design Click System Config, **Templates & Design** to access these features. [![image.png](https://opscom.wiki/uploads/images/gallery/2024-06/scaled-1680-/KgQimage.png)](https://opscom.wiki/uploads/images/gallery/2024-06/KgQimage.png) ## All Default Templates If at any point you feel that you have adjusted the **Default** <scripts> and <styles> to the point of breaking your site, or you are simply unsure what your changes have done, you can refer to these templates to restore your pages functionality and style.
**Default Script Template**
1
2
3
4
5
6
7
8
9
10
11
12
13
14
15
16
17
18
19
20
21
22
23
24
25
26
27
28
29
30
31
32
33
34
``
**Default Style Template**
1
2
3
4
5
6
7
8
9
10
11
12
13
14
15
16
17
18
19
20
21
22
23
24
25
26
27
28
29
30
31
32
33
34
35
36
37
38
39
40
41
42
``
**Default Header Template**
1
2
3
4
5
6
7
8
9
10
`<``div` `class``=``"text-center slideshow-header"``>`
`  ``<``div` `class``=``"slides"` `id``=``"slideshow-header"``>`
`  ```
`  ``<``div` `class``=``"overlay"``>`
`    ``<``img` `alt``=``""` `class``=``"img-fluid"` `src``=``"/MEDIA/demo_extras/TomahawkUniversity_logo.png"` `style``=``"display:inline; width: 450px; margin-top: 80px; margin-bottom:80px;"``/>`
`  ```
``
`[user_menu]`
## Understanding Templates & Design **Templates & Designs** are the visual functionality of your web page structured around your **Page** content. OPS-COM provides you with default templates which allow you to get started easily without having to know any code. - Once you are on the landing page for **Templates & Design,** you can view a list of your current templates, or create a new one. **Templates** contain all of the sections found on your **User Portal** except for the **Page** content found in the middle of the page. To adjust this you will have to leave Templates & Design and navigate to **System Messaging**. [![image.png](https://opscom.wiki/uploads/images/gallery/2024-06/scaled-1680-/p7wimage.png)](https://opscom.wiki/uploads/images/gallery/2024-06/p7wimage.png) - OPS-COM gives you a total of 12 section templates, 6 in English and 6 in French. (Of course, you will have to create the French content yourself as we do not provide a translator). [![image.png](https://opscom.wiki/uploads/images/gallery/2024-06/scaled-1680-/ZWOimage.png)](https://opscom.wiki/uploads/images/gallery/2024-06/ZWOimage.png) 1. Clicking on **Toggle Templates** will display all of the sections attached to that template. Templates can be created in English and French. 2. The contents of our pages are split into four separate sections. Header(1)**,** Content Header(2), Content Footer(4), and Footer(5). See **Template Layout** right below this guide to get a better understanding of the OPS-COM layout. 3. To edit a template **Section,** simply click **Edit** next to the section name. ### Template Layout Below is a visual example of how your **Pages** are split into **Sections** using **Templates**. All of the Content (3) of our Pages are added through the **System Messages** under **Pages**. [![image.png](https://opscom.wiki/uploads/images/gallery/2024-06/scaled-1680-/gJrimage.png)](https://opscom.wiki/uploads/images/gallery/2024-06/gJrimage.png) 1. **Header** - The header of your page, where you can find your header image and user navigation. 2. **Content\_Header** - Another header section for you to place content into, such as alerts or user information. Everything placed here will appear before the Content and Content Footer. 3. **Content** - The content of your pages. Content may not be added from Templates & Design and will require you to navigate to **System Messaging**. 4. **Content\_Footer** - The footer of your Content. Everything placed here will appear after the Content Header and Content. Again, you can use this to display alerts, messages, or additional content to your Template. 5. **Footer** - The footer of your page is where you can find useful information. You can use this area to advertise important information your users might need while using your system. ## Page Layouts and Templates ### Creating Layouts To create a layout simply click the **Create Layout** button found at the top right of the **Layouts** page. [![image.png](https://opscom.wiki/uploads/images/gallery/2024-06/scaled-1680-/mvtimage.png)](https://opscom.wiki/uploads/images/gallery/2024-06/mvtimage.png) You will be presented with the **Add Layout** system message. [![image.png](https://opscom.wiki/uploads/images/gallery/2024-06/scaled-1680-/ebMimage.png)](https://opscom.wiki/uploads/images/gallery/2024-06/ebMimage.png) 1. Provide the name of your layout. In this example, we are going to create our own Summer Layout to be used, instead of the default layout. 2. Click **Save Changes** when you are happy with the name of your layout. Once the **Layout** has been created, you can see it under the Layouts list. 3. If you wish to cancel the creation of your layout simply click **Close**. 4. You can see that our **Summer Layout** was added to the end of our Layouts List with no sections yet. 5. You can choose whether or not your template is the **Default** template at any time by clicking the **Non-Default** drop-down and selecting **Default**. 6. Anytime you add sections to your Templates it will display how many are attached next to **Toggle Templates**. As you can see, we don't have any **Sections** created yet so there are no numbers to be displayed, otherwise, clicking on **Toggle Templates** would show you a list of all the templates currently attached to that **Layout**. [![image.png](https://opscom.wiki/uploads/images/gallery/2024-06/scaled-1680-/lNwimage.png)](https://opscom.wiki/uploads/images/gallery/2024-06/lNwimage.png) 7. You can edit the layout name by clicking on the **Edit** button next to archive. 8. If you would like to archive a layout that you are no longer using, you can click the **Archive** button next to edit. ### Creating Templates Now that you have a better understanding of how **Templates** work with **Layouts** we can start creating our own. [![image.png](https://opscom.wiki/uploads/images/gallery/2024-06/scaled-1680-/o02image.png)](https://opscom.wiki/uploads/images/gallery/2024-06/o02image.png) 1. Click on Toggle Templates. 2. Clicking this will display the available Templates attached to the **Summer Layout**. 3. You can now **Create** a variety of templates for your page, including bilingual support. 4. If you are non-technical, it is advised not to change the code for **Scripts, Styles, Header,** and **Footer Templates**. You can use the default Style, Script, Header, and Footer Templates from All Default Templates. These can still be edited according to your company and their style guides. See **Edit the Page Style** and **Edit the Page Behaviour** below for more information. ## Edit the Page Style (CSS) Important This guide is used if you intend to adjust the **Templates** provided to you by OPS-COM. If you choose to rewrite your own Templates you can choose to ignore this.
**Content**
`/* Style properties of our page body, this affects the entire page. */`
`body {`
`    ``background``: ``black` `url``(/uploads/FILES/OC_TOMA/parking-deck.jpg) ``center` `center``;`
`    ``background-``size``: cover;`
`    ``background-attachment``: ``fixed``;`
`    ``color``: ``#FFF``;`
`}`
`/* This changes the color property of --Find where these classes are used `
`.card, .modal, .list-group-item {`
`    ``color``: ``#333``;`
`}`
**Slide Show**
`/* Below are all of the styles for our header slideshow at the top of each page. */`
`/*--------------WORD BANK---------------`
` ``* ELEMENTS: Elements are the tags with '<>' around them such as
and found in the default header and footer template.`
` ``* We access them here by giving them a Class name or ID.                                          `
` ``* PROPERTIES: Properties are used to define certain styles to a class or ID.`
` ``* CLASS: Generally used to assign a style to a group of HTML elements but can be used on single elements as well.`
` ``* They are assigned within HTML elements like this:
where MyClass would be your class name.`
` ``* ID's: Generally used to assign styles to a single element but can be used on multiple elements as well.`
` ``*`
` ``*--------------CLASSES-----------------`
` ``*`
` ``* To learn more about the CSS Position Property see: https://www.w3schools.com/cssref/pr_class_position.asp`
` ``* For more information on CSS Syntax and Selectors see: https://www.w3schools.com/css/css_syntax.asp`
` ``* It is not recommended to adjust with the position of elements unless you are sure about the changes being made. This can dramatically change how content is positioned. `
` ``*/`
`/* Class Names and Elements`
` ``* [.slideshow-header]: Container that contains our slides and overlay.`
` ``*`
` ``* Properties`
` ``* @position: Adjust the position of the slideshow-header. For more information see: https://www.w3schools.com/css/css_positioning.asp`
` ``*/`
`.slideshow-header {`
`    ``position``:``relative``;`
`}`
`/* Class Names and Elements `
` ``* [.slideshow-header]: Container that contains our slides and overlay.`
` ``* [.slides]: Controls the style properties of the individual slides.`
` ``* `
` ``* Properties  `
` ``* @z-index: Adjust the stack placement of the [.slideshow-header] and [.slides] along the Z axis.`
` ``* @position: Define the position of the page. `
` ``* @top:Change in the position from the top of an element.`
` ``* @left: Change in the position from the left of an element.`
` ``* @right: Change in the position from the right of an element.`
` ``* @bottom: Change in the position from the bottom of an element.`
` ``* @display: Adjusts how the content is displayed on the page. See: https://developer.mozilla.org/en-US/docs/Web/CSS/display and https://www.w3schools.com/css/css_display_visibility.asp`
` ``* @align-items: Aligns the child elements of this PARENT element to be centered. For a visual example see: https://developer.mozilla.org/en-US/docs/Web/CSS/align-items`
` ``* @justify-content: Defines how the space disturbed around the child elements. For a visual example see: https://developer.mozilla.org/en-US/docs/Web/CSS/justify-content`
` ``*`
` ``* These are the style properties and values of the slideshow header and its individual slides.`
` ``*/`
`.slideshow-header .slides {`
`    ``z-index``: ``0``;`
`    ``position``:``absolute``;`
`    ``top``:``0px``;`
`    ``left``:``0px``;`
`    ``right``:``0px``;`
`    ``bottom``:``0px``;`
`    ``display``:flex;`
`    ``align-items: ``center``;`
`    ``justify-``content``: ``center``;`
`}`
`/* Class Names and Elements`
` ``* [.slideshow-header]: A container that contains our slides and overlay.`
` ``* [.overlay]:`
` ``*`
` ``* Properties`
` ``* @z-index: Used to layer elements. Elements with a higher z-index number will appear before elements that are lower.`
` ``* @position: Set the position property for the element. We recommend you do not adjust this property unless you have knowledge on how the changes will affect your page.`
` ``*`
` ``* These are the styles for the overlay, as well as additional properties for the slideshow-header.`
` ``*/`
`.slideshow-header .overlay {`
`    ``z-index``: ``1``;`
`    ``position``:``relative``;`
`}`
`/*--------------ID'S---------------*/`
`/* ID Names and Elements`
` ``* [#slideshow-header] is the container used to contain the images you have chosen for your header`
` ``*`
` ``* Properties`
` ``* @overflow:`
` ``* @opacity:`
` ``* @box-shadow: Create a box shadow for this element.`
` ``* EX: box-shadow: a, b, c, d(e, f, g, h); `
` ``*/`
`#slideshow-header {`
`}`
` `
`/* ID Names and Elements`
` ``* [#slideshow-header] is the container used to contain the images you have chosen for your header`
` ``*`
` ``* Properties`
` ``* @width: 100% width will take of 100% of that element.`
` ``* @position:`
` ``*/`
`#slideshow-header > div {`
`    ``width``:``100%``;`
`    ``position``: ``absolute``;`
`}`
` `
`/* ID Names and Elements`
` ``* [#slideshow-header]: is the container used to contain the images you have chosen for your header.`
` ``* [div]: Refers to our HTML elements.  `
` ``* [img]: Refers to our images in the slideshow. `
` ``* `
` ``* Properties`
` ``* @width: Defines the width of the images, divs and slideshow-header. A value of 100% will display the image across the entire page. `
` ``*/`
`#slideshow-header div img {`
`    ``width``: ``100%``;`
`}`
## Edit the Page Behavior (Scripts) Disclaimer Please review the list of supported scripting languages below. If a Javascript vendor is unverified it may break the functionality of your site.
Verified Script Vendors
1. Bootstrap 2. jQuery - To fully customize the slideshow script that displays the slideshow found at the top of each page, you will need to know jQuery. You could choose to rewrite the slideshow script in whichever Javascript vendor that is verified.
## API Integration Additionally, you can use our API to integrate with pay stations and other devices that will allow you to grab useful information from your users. # Translations ## Where are Translations Supported Currently, translations are only supported on the user side, however, they are managed and set up on the admin side, by admins that have the correct permissions set up to work with languages.
1. Translations that are in red, are translations on the adminside which are not yet supported. Since they are not supported you will see them come up in English only until the adminside is supported. 2. Translation that are in **black,** are translations that are on the userside that can currently be changed.
[![image.png](https://opscom.wiki/uploads/images/gallery/2024-06/scaled-1680-/7Zuimage.png)](https://opscom.wiki/uploads/images/gallery/2024-06/7Zuimage.png) ## Navigating to Translations To begin reviewing, editing or creating your translations/languages, you will need to navigate to **System Config → Content & Designs → Translations**. This will take you to the **Installed Languages** page where you can begin managing your current languages. [![image.png](https://opscom.wiki/uploads/images/gallery/2024-06/scaled-1680-/bn8image.png)](https://opscom.wiki/uploads/images/gallery/2024-06/bn8image.png) ## Adding New Languages To begin adding your own languages simply click **Add Language** on the **Installed Languages** page which will bring up a new modal to add a label and locale. [![image.png](https://opscom.wiki/uploads/images/gallery/2024-06/scaled-1680-/JKKimage.png)](https://opscom.wiki/uploads/images/gallery/2024-06/JKKimage.png) When you are finished click **Save Changes** and your new language will be instantly added to the list. Once the language has been added, your users can begin using it on the user-side assuming you have the language enabled. The locales are used when we want to create sub-languages, while the label is used to identify our translations throughout the site. ## Adding Sub Languages and How do They Work Sub-languages are created by using a locale that currently exists with an underscore '\_' followed by the sub-language that you want to set up. [![image.png](https://opscom.wiki/uploads/images/gallery/2024-06/scaled-1680-/5EPimage.png)](https://opscom.wiki/uploads/images/gallery/2024-06/5EPimage.png) For example, you can support multiple variations of the English language for your users. In the image below I have created a sub-language for American English using the locale en\_us. [![image.png](https://opscom.wiki/uploads/images/gallery/2024-06/scaled-1680-/siaimage.png)](https://opscom.wiki/uploads/images/gallery/2024-06/siaimage.png) When you create a new sub-language, it will automatically use the translations that have been set up on the main language, which is the locale on the left side of the underscore, such as **en**\_us. You will need to create the main language first before creating any sub-languages, otherwise the sub-language will always default to English instead of the main language you may have intended to use. ## Installing Languages Installing a language will create a new language template with the translations we have set up for it as well as the **Name** and **Locale** we have created for you. You can then click **Edit Translations** to adjust the preset translations to your liking. If there is not a language already in the system that can be installed you will need to add a new language and setup the translations yourself. Currently, we only support the ability to install French and English. [![image.png](https://opscom.wiki/uploads/images/gallery/2024-06/scaled-1680-/DsYimage.png)](https://opscom.wiki/uploads/images/gallery/2024-06/DsYimage.png) ## Disabling or Enabling Translations We can choose to disable particular languages that we don't want to be selectable from the user side. To do this we can toggle the visibly of our languages under the **Enabled** column on the **Installed Languages Page** [![image.png](https://opscom.wiki/uploads/images/gallery/2024-06/scaled-1680-/43mimage.png)](https://opscom.wiki/uploads/images/gallery/2024-06/43mimage.png) Once a language is toggled as **Disabled** it can no longer be selected by the users of your site as seen in the example image below. [![image.png](https://opscom.wiki/uploads/images/gallery/2024-06/scaled-1680-/xziimage.png)](https://opscom.wiki/uploads/images/gallery/2024-06/xziimage.png) ## Searching Language Translations You can search for all translations that relate to a specific component in the system using the search bar at the top right of the **Edit Translations** page. For example, we can search for permits to find all permit related translations [![image.png](https://opscom.wiki/uploads/images/gallery/2024-06/scaled-1680-/ieJimage.png)](https://opscom.wiki/uploads/images/gallery/2024-06/ieJimage.png) We can also go onto the user side and use the **Token** language, which will show all of the **Names** found on the **Edit Translations** page, under the **Name** column, (See the image above) to find where that translation exists so it can be changed. This can't be seen by logging is as the user from the user side but requires an admin to go to the profile of a user and click the **Login as User** button from the admin side. This is to ensure that your regular users don't see the token language option. [![image.png](https://opscom.wiki/uploads/images/gallery/2024-06/scaled-1680-/7RXimage.png)](https://opscom.wiki/uploads/images/gallery/2024-06/7RXimage.png) The token language finds the tokens used so you can better search where the translations are being used on the userside. ## Edit Translations To begin editing language translations you have to make your changes and then click away from the input field. Once you do this you will see that the translation gets highlighted in yellow indicating that a change has been made. The number of affected records will also display at the bottom of the translations page. [![image.png](https://opscom.wiki/uploads/images/gallery/2024-06/scaled-1680-/tY5image.png)](https://opscom.wiki/uploads/images/gallery/2024-06/tY5image.png) When you are finished making your changes click **Save Changes** for the update to take effect. ## Delete Languages To delete languages, you can click the delete button next to the language you want to remove. Keep in mind that if you remove the base English and French language it can be re-installed. However, if you delete a language that we do not provide you, then this data will be lost and you will need to contact support for assistance with recovering these translations. [![image.png](https://opscom.wiki/uploads/images/gallery/2024-06/scaled-1680-/GToimage.png)](https://opscom.wiki/uploads/images/gallery/2024-06/GToimage.png) Keep in mind that deleting a language will not delete any of the sub-languages you may have created. For example, if I were to delete English, the English US language would still remain with all of its translations. ## Creating Templates and Messaging for New Languages It's important to note that when you create a new language it will not rely on the default templates and system messaging that you have setup for your previous languages. For example, if I use the new French American language I created, and go onto the userside where languages are supported, then I will see a blank template as well as blank messages. [![image.png](https://opscom.wiki/uploads/images/gallery/2024-06/scaled-1680-/doCimage.png)](https://opscom.wiki/uploads/images/gallery/2024-06/doCimage.png) ### Adding Templates To add a new template for your languages that you create you will need to go into **Templates & Design** followed by **Toggle Templates** for the templates that are currently being used. From there you will have the option to click the **Create** button to add the new template. If you just want your new language to use the same template, from a language that is already in the system, just go into **Edit** and copy the text over into your new language, after clicking the **Create** button. [![image.png](https://opscom.wiki/uploads/images/gallery/2024-06/scaled-1680-/Xktimage.png)](https://opscom.wiki/uploads/images/gallery/2024-06/Xktimage.png) ### Adding System Messages System messaging will work a bit differently than templates as you will need to go into each individual message and click the **Edit** button next to that message [![image.png](https://opscom.wiki/uploads/images/gallery/2024-06/scaled-1680-/jleimage.png)](https://opscom.wiki/uploads/images/gallery/2024-06/jleimage.png) From there you should be able to select your new language. [![image.png](https://opscom.wiki/uploads/images/gallery/2024-06/scaled-1680-/Qxaimage.png)](https://opscom.wiki/uploads/images/gallery/2024-06/Qxaimage.png) If you want multiple messages to display for all your languages you will need to create a new system message and type out the translations for that language template. ## Changing Terminology Using the Translator There is another use for the translation tool that may not be obvious at first. Since the translator is essentially a list of code terms and a corresponding list of what is actually displayed on any page not only can you edit the various languages but for each language you can also edit the display term to fit a local "version" of the term. A perfect example of this is in some areas one might refer to recieving a **"ticket"** as receiving a "**citation**". It is entirely possible to replace any spot in the interface where the term **ticket** is used with the term **citation**. To do so go into the language editor and search for the term you wish to localize. In our example simply enter **ticket** in the search bar and hit return. A list of all translatable instances of the word ticket will appear. Click the box where the term is editable and type in your preferred term. In this case we are changing **Manage Ticket Categories** to **Manage Citation Categories**. Once you save the changes you have made the displayed text associated with **Manage Ticket Categories** will display as **Manage Citation Categories** throughout the system. You may edit the remaining instances of the word Ticket that are in the list before saving to change the term in bulk for all entries listed. [![image.png](https://opscom.wiki/uploads/images/gallery/2024-06/scaled-1680-/Zmpimage.png)](https://opscom.wiki/uploads/images/gallery/2024-06/Zmpimage.png) # Taxes This page allows administrators with appropriate roles and permissions to configure the tax percentage calculated and charged to users when making payments in OPS-COM. [![image.png](https://opscom.wiki/uploads/images/gallery/2024-05/scaled-1680-/5u2image.png)](https://opscom.wiki/uploads/images/gallery/2024-05/5u2image.png) You can find the taxes page under the System Configuration → Payments → Taxes. [![image.png](https://opscom.wiki/uploads/images/gallery/2024-05/scaled-1680-/HQkimage.png)](https://opscom.wiki/uploads/images/gallery/2024-05/HQkimage.png) When editing a tax type, there are multiple settings: [![image.png](https://opscom.wiki/uploads/images/gallery/2024-05/scaled-1680-/yHpimage.png)](https://opscom.wiki/uploads/images/gallery/2024-05/yHpimage.png) - **Enable**: Check or uncheck whether or not this tax type is enabled (checked) or disabled (unchecked). - **Percentage**: The percentage of taxes calculated - **Tax Label & Translation**: How this tax will be displayed to users in the cart/checkout process. Multiple languages supported. - **Apply to the following items**: Check the system modules you want tax to be applied to. # Notice Letters Articles related to setting up Notice Letters. # Notice Letter Report # Introduction The letter report page shows a list of users within the system who are eligible to be sent a notice letter, also known as a Notice of Impending Conviction (NIC) letter. Notice letters are part of the MTO process, and are sent out to let a user know of an impending conviction for any outstanding violations on their account, to be collected through the Ontario court system. Notice letters printed from this page are intended to be printed and physically sent to the user who incurred the violation. # Page Location The letter report page can be found under the violations menu, within the reports sub menu. If the letter report tab is not present in the menu, it will need to be enabled within the system settings. The enable letter report option is located under the violations tab. [![image.png](https://opscom.wiki/uploads/images/gallery/2024-06/scaled-1680-/OCGimage.png)](https://opscom.wiki/uploads/images/gallery/2024-06/OCGimage.png) # Letter Reports Page The letter report page consists of two sections, listing the notice reports that can be printed, and those that cannot be printed. ## Printable Violation Notice Report This section contains a list of all violations within the system that are able to have a notice letter printed. [![image.png](https://opscom.wiki/uploads/images/gallery/2024-06/scaled-1680-/0wQimage.png)](https://opscom.wiki/uploads/images/gallery/2024-06/0wQimage.png) ### Selected Template A notice at the top of the section notes which template will be used for the print-out, based on the value of the system setting “Include all unpaid violations”. Having this setting enabled will make all violations for a user be printed on a single notice letter. Otherwise, a single notice letter will be created for each violation. ### Not Ready to be Sent Enabling this setting will cause violations that are not ready to have their notice letter sent to appear within the list. These violations will have greyed-out text. The notice-ready column will display the amount of time left before a notice letter is able to be sent for the violation. By default, notice letters are able to be sent 7 days after the payment for a violation is past due. ### Printing the Notice Letter There are two locations from which a notice letter can be printed; a single notice letter can be printed using the print button to the right, or multiple notice letters can be selected and printed at once. The notice letters will be generated as a PDF file and downloaded by the web browser. ### Uploading a Notice Letter It is possible to upload a notice letter in place of generating one. This is used when a letter or document has already been sent to the user in place of a system-generated notice letter, enabling it to be associated to the violation as if it were system-generated. ## Un-Printable Violation Notice Report This section lists violations that are unable to have notice letters printed. A notice letter is considered to be unprintable when the associated vehicle is missing user details. This can happen when a user has not filled out all their details, or when a user is not present within the system. In the latter case, the unknown vehicle data must be exported and sent to the MTO for information lookup using the Vehicle Lookup Export. The MTO will return the data lookup in the form of a file, which must then be imported back into the system using the Vehicle Lookup import. After the data has been imported, the user details will be automatically entered into the system and the notice letters can be printed right away. The user data imported in this way is considered temporary and is notated as being from the MTO. For security reasons, MTO import data will be cleared from the system after all violations associated to a vehicle have been cleared. The violations on a vehicle are considered to be cleared after being paid by the driver, or by being sent to collections. [![image.png](https://opscom.wiki/uploads/images/gallery/2024-06/scaled-1680-/Ckmimage.png)](https://opscom.wiki/uploads/images/gallery/2024-06/Ckmimage.png) Various details are listed for the affected violations, including the reason the notice letter is unable to be printed, and if the vehicle has had its data exported yet. A reminder will be listed for the vehicle if it has had its data exported to the MTO, but hasn’t had its return data imported back into the system yet. # Viewing Issued Notice Letters Notice letters that have been issued previously can be viewed from the violation search page. The violation search page can be found under the violations menu. [![image.png](https://opscom.wiki/uploads/images/gallery/2024-06/scaled-1680-/rGSimage.png)](https://opscom.wiki/uploads/images/gallery/2024-06/rGSimage.png) From the violations search page, additional search options can be found by clicking the toggle additional options button located in the top right. [![image.png](https://opscom.wiki/uploads/images/gallery/2024-06/scaled-1680-/5B1image.png)](https://opscom.wiki/uploads/images/gallery/2024-06/5B1image.png) This will expand the search box with additional search options. The relevant search option here is Notice Letter Issued. By checking this option, only violations that have had notice letters issued for them will be returned. [![image.png](https://opscom.wiki/uploads/images/gallery/2024-06/scaled-1680-/jFsimage.png)](https://opscom.wiki/uploads/images/gallery/2024-06/jFsimage.png) Notice letters can be viewed from within the violation info window, found by clicking on the ticket number of a violation in the results screen. [![image.png](https://opscom.wiki/uploads/images/gallery/2024-06/scaled-1680-/Hbbimage.png)](https://opscom.wiki/uploads/images/gallery/2024-06/Hbbimage.png) The notice letters for the violation are listed near the bottom of the window. [![image.png](https://opscom.wiki/uploads/images/gallery/2024-06/scaled-1680-/M12image.png)](https://opscom.wiki/uploads/images/gallery/2024-06/M12image.png) This will open the notice letter view window, from which the notice letter content can be viewed, or re-downloaded by pressing the print button. [![image.png](https://opscom.wiki/uploads/images/gallery/2024-06/scaled-1680-/z4Qimage.png)](https://opscom.wiki/uploads/images/gallery/2024-06/z4Qimage.png) ## Regenerating A Notice Letter In the cases such as when the template of the notice letter is changed, there may be a need to regenerate an existing notice letter. The existing notice letter for the violation can be archived by clicking on the trash icon next to it. This will flag the notice letter as archived, allowing the violation to reappear on the letter report page so it can be printed again. [![image.png](https://opscom.wiki/uploads/images/gallery/2024-06/scaled-1680-/qiqimage.png)](https://opscom.wiki/uploads/images/gallery/2024-06/qiqimage.png) Archiving a notice letter will not delete it from the system, and it will continue to appear on the violation info page, with a notice indicating it has been archived. # Templates The appearance and layouts of notice letters is setup within the notice letter templates page. The templates page for notice letters can be found under the system configuration menu, within the content & designs submenu. [![image.png](https://opscom.wiki/uploads/images/gallery/2024-06/scaled-1680-/J63image.png)](https://opscom.wiki/uploads/images/gallery/2024-06/J63image.png) # System Settings There are several settings associated to notice letters. There is one setting located under the violations tab. - **Enable Letter Report** - If this setting is enabled, the letter report page will be made available for use. [![image.png](https://opscom.wiki/uploads/images/gallery/2024-06/scaled-1680-/SAqimage.png)](https://opscom.wiki/uploads/images/gallery/2024-06/SAqimage.png) There are two settings located under the collections tab. - **Send Letter To All** - If this setting is enabled, notice letters will appear in the list for users who have already had the notice letter sent to them by email. - **Include All Unpaid Violations** - If this setting is enabled, all unpaid violations for the user will be included on a single notice letter. When disabled, each notice letter will be limited to a single violation. [![image.png](https://opscom.wiki/uploads/images/gallery/2024-05/scaled-1680-/2Mdimage.png)](https://opscom.wiki/uploads/images/gallery/2024-05/2Mdimage.png) # Notice Letter Templates # Introduction This page allows the admin to manage, create, and edit the content and appearance for notice letters used within the system. Notice letters, also known as a Notice of Impending Conviction (NIC) letter, are part of the MTO process, and are sent out to let a user know of an impending conviction for any outstanding violations on their account, to be collected through the Ontario court system. # Templates The appearance and layout of notice letters is setup within the notice letter templates page. The templates page for notice letters can be found under the system configuration menu, within the content & designs submenu. [![image.png](https://opscom.wiki/uploads/images/gallery/2024-06/scaled-1680-/jGKimage.png)](https://opscom.wiki/uploads/images/gallery/2024-06/jGKimage.png) On the templates page, an overview of all notice letter content within the system is shown. Different content and templates must be created for each language that is installed on the site. The notice letter templates page consists of two sections: ## **Content** **noticeLetter** - the template used when printing a notice letter containing a single violation. - **noticeLetterMultiple** - the template used when printing a notice letter that contains multiple violations. ## **Templates** **styles** - element styling to be applied to the notice letters. This is done using Cascading Style Sheets (CSS), a type of coding used to affect how parts of the notice letter looks, such as assigning a specific colour and size to a paragraph of text. - **Header** - the content that appears in the header of the notice letter.
[![image.png](https://opscom.wiki/uploads/images/gallery/2024-05/scaled-1680-/uF0image.png)](https://opscom.wiki/uploads/images/gallery/2024-05/uF0image.png) # Content Editor This page is where the content of the notice letters can be edited. The content section is a type of WYSIWYG (What You See Is What You Get) editor. [![image.png](https://opscom.wiki/uploads/images/gallery/2024-05/scaled-1680-/r2vimage.png)](https://opscom.wiki/uploads/images/gallery/2024-05/r2vimage.png) When editing the notice letter content, some basic knowledge of HTML (Hyper Text Markup Language) is beneficial. The WYSIWYG (What You See Is What You Get) editor isn't meant for templates, and when editing directly through the interface, problems can occur where the final printed page doesn’t lineup with the template correctly. Minor changes can be made with the editor, but it is recommended for most changes to be made through editing the HTML directly. You can edit the HTML in the editor by selecting Tools → Source Code. [![image.png](https://opscom.wiki/uploads/images/gallery/2024-05/scaled-1680-/PIvimage.png)](https://opscom.wiki/uploads/images/gallery/2024-05/PIvimage.png) Alternatively, the layout of the template can be designed in an external HTML editor, and the source code copy and pasted into the HTML source code box. [![image.png](https://opscom.wiki/uploads/images/gallery/2024-05/scaled-1680-/6o8image.png)](https://opscom.wiki/uploads/images/gallery/2024-05/6o8image.png) # Short Codes Notice Letters use a functionality called short codes, which are pieces of text used as placeholders for user information when setting up a template. When a notice letter is generated, the short code will be automatically replaced with the relevant user information in the print out. Short codes usable on each type of notice letter template are listed at the bottom of the edit content page, below the content box. [![image.png](https://opscom.wiki/uploads/images/gallery/2024-05/scaled-1680-/9Bdimage.png)](https://opscom.wiki/uploads/images/gallery/2024-05/9Bdimage.png) A short code placed in the template will automatically be replaced with the details of the user when the notice letter is being generated. For example, if the following short code was placed within the body of the notice letter template: - Vehicle: **\[values show=vehicle.plate\]** It would be automatically replaced with the vehicle plate when the notice letter is generated, resulting in something like: - Vehicle: **ABC123** ## Using Short Codes A short code can be inserted into the content by copy and pasting the short code from the list into the content where the information is wanted to be output in the final notice letter printout. A short code can be copied to the clipboard by using these steps: - Highlight the short code within the list - Right click the highlighted text - Click copy - The short code will now be contained within the clipboard The short code can then be pasted into the content using these steps: - Left click in the desired area within the content where the information is wanted to appear - Press the Ctrl and V buttons on the keyboard at the same time - The short code will now be pasted to the location selected within the content Using right click will open a content-specific menu within the content menu, and so can’t be used to paste into the window. # Shortcodes Shortcodes - What are they?  Shortcodes are small bits of code that allow you to do various things with little effort. They allow you to implement functionality that would normally require complicated code to use. Shortcodes are tied to predefined elements and can be used throughout the system with minimal effort. Articles detailing different shortcodes available for use are located here. # System_code Shortcode ## Special System\_Code Shortcode The system\_code is the most common short code used on the OPS-COM system. It will provide and display the system information related to that page. For example, if you were to add the system\_code shortcode to the end of the **Permits** page you will see system information related to permits such as available permits and lots. If the page is a system page, like /login, and it doesn't have the shortcode anywhere, it will append it to the bottom of the content page at least once. ## Example Uses ### Vehicles Page Using the system\_code tag on the **Vehicles** page will show you all of the vehicles you have registered to that user. [![image.png](https://opscom.wiki/uploads/images/gallery/2024-06/scaled-1680-/B0wimage.png)](https://opscom.wiki/uploads/images/gallery/2024-06/B0wimage.png) ### Permits Page Using the system\_code tag on the **Permits** page will provide information related to all the permits and lots your users have available to them. [![image.png](https://opscom.wiki/uploads/images/gallery/2024-06/scaled-1680-/cw3image.png)](https://opscom.wiki/uploads/images/gallery/2024-06/cw3image.png) As an option, on the permits page, you can display the current permits the user has. Using the shortcode \[permit\_card\] on the permits page will display the list of the user's current permits. In fact, using this code on whatever page you wish it to be on, will show the permit\_card which is the list of current permits. [![image.png](https://opscom.wiki/uploads/images/gallery/2024-06/scaled-1680-/Nlzimage.png)](https://opscom.wiki/uploads/images/gallery/2024-06/Nlzimage.png) Here is the resulting page content. [![image.png](https://opscom.wiki/uploads/images/gallery/2024-06/scaled-1680-/8q4image.png)](https://opscom.wiki/uploads/images/gallery/2024-06/8q4image.png) ### Appeals Page Using the system\_code tag on the **Appeals** page will provide a convenient search window to search for plates or tickets. [![image.png](https://opscom.wiki/uploads/images/gallery/2024-06/scaled-1680-/gPsimage.png)](https://opscom.wiki/uploads/images/gallery/2024-06/gPsimage.png) # User Information Shortcodes ## Shortcodes Shortcodes used to display user information. Keep in mind that the shortcode descriptions are also on the email template page for lost passwords.
**Shortcode** **Description**
\[user show="firstname"\]The first name of the user account receiving the email or messaging.
\[user show="lastname"\]The last name of the user account receiving the email or messaging.
\[user show="email"\]The email address of the user account receiving the email or messaging.
\[user show="username"\]The username of the user account receiving the email or messaging.
\[user show="salutation"\]The salutation of the user account receiving the email or messaging.
# User_card Shortcode ## How to use the Shortcode To use the **User\_card** shortcode simply add **\[user\_card\]** anywhere to the content of your **Page** or **System Message**. ## Example Using the **\[user\_card\]** shortcode will display useful user information as seen below. [![image.png](https://opscom.wiki/uploads/images/gallery/2024-06/scaled-1680-/bq5image.png)](https://opscom.wiki/uploads/images/gallery/2024-06/bq5image.png) # Lot Information Shortcode ## Lot Information Display This shortcode can be used anywhere on the site. It does not need to be initialized. You simply need to add it to your template to display it. The available options are:
**Option****Type****Default****Purpose**
pricebooleantrueShows the price. Set to false/off/0 etc. to turn off
sold\_outbooleanfalseIf true, it will include the lots that are sold out. They will have the warning background to highlight they are sold out
remainingbooleanfalseIf true, it will show a column for how many remaining permits are in this lot
typestring If a value is set, it will filter the list to only show this lot type. Blank, or not set, will show all
`[permitlots remaining=true sold_out=true price=true]`
In the example above, this shortcode would display all lots even if they are sold out, the price of the permits for that lot, and the total number spaces in the lots. Refer to the screenshot below. [![image.png](https://opscom.wiki/uploads/images/gallery/2024-06/scaled-1680-/IUMimage.png)](https://opscom.wiki/uploads/images/gallery/2024-06/IUMimage.png) # PermitTempPdf and Conditional Shortcode ## PermitTempPdf Shortcode The use of permittemppdf is fairly straight forward. The shortcode has two different arguments it can accept to change the information it will output: permit and vehicle. ### Permit Shortcode format: - **\[permittemppdf permit=\_\_\_\_\_\_\]** The options to fill the blank space are: - barcode - permitno - lotshortname - lotname - location - expiry Expiry will show a snippet of html that is not editable because of the complexity of the expiry information. ### Vehicle Shortcode format: - **\[permittemppdf vehicle=\_\_\_\_\_\_\]** The options to fill the blank space are: - plate - guest - year - colour - make - type ## Conditional Shortcode The conditional shortcode is somewhat complex. It will only work with shortcodes that have been set it up for. Right now, that only includes the permittemppdf shortcode. The formats that can be used are as follows: - **\[conditional var=\*\*\*\*\*\* test=!!!!!!!!\]CONTENT\[/condtional\]** - **\[conditional var=\*\*\*\*\*\* test=!!!!!!!! value=\_\_\_\_\_\_\_\_\_\_\]CONTENT\[/condtional\]** This will test the value of \*\*\*\*\*\*. If the value is a success, then it will show the CONTENT. The options for var currently are: - permittemp - permit For example, to test if there are hours on a temp permit, the value would be: **var=permittemp.hours** This is the variable name that has been defined (permittemp) and the case-sensitive column to return the information of. The second argument "test" can take the following values: - hasvalue = if not empty or false, returns true - true = if the variable is a boolean true. i.e. 1, true, "true" - false = if the variable is a boolean false. - eq or equal = if the variable matches the contents of "value" - ne, neq or notequal = if the variable does not match the contents of "value"
# Form 11 Shortcodes ## Information When issuing a Form 11, there are a number of shortcodes that can be placed in the template to auto-fill values relating to the violation. The base short code is formatted like: - **\[values show=violation.\_\_\_\_\_\]** The blank value must be filled with a value to pull from the violation info. For each nested value in the data packet, the packet name must be added as part of the variable name, each part separated by a period, with the variable to be output by the shortcode as the final part of the variable. The packet itself is called by 'violation', and the name must be placed at the start of any value call. ### Violation Packet The violation info packet is formatted like this example. The values on the left are the variable names, the values on the right are the example values returned by this packet. ```json { "ViolationID": 237, "SemPermitID": null, "Ticket": "TT-19026", "VehicleID": 5, "Spoiled": 0, "TicketType": 1, "Issued": "2024-07-17 16:11:00", "convNotice": null, "Due": "2024-07-27 16:11:00", "ViolationTypeID": -1, "Fine": "50.0000", "AdjustedFine": "20.0000", "Towing": "0.0000", "taxAmount": "0.0000", "Writer": 7, "LocationID": 10, "Comment": null, "TicketAppeal": null, "appealType": 0, "appealFormat": null, "AccessAdminID": 50, "ActionedPer": null, "Created": "2024-07-17 20:12:08", "AppealUserID": 0, "AppealProcessDate": null, "AppealAdminID": 0, "AppealComment": null, "AppealAdminComment": null, "AutoNotice": 0, "ProcessedByCollection": null, "SentToCollections": null, "PrivateComments": "", "DriveAway": 0, "UUID": null, "VioNotice": null, "latitude": null, "longitude": null, "Warning": null, "userid": null, "incidentID": null, "failToIdentify": null, "pin": "YL", "duplicate": null, "AdjustmentReason": null, "notices_count": 1, "user_info": { "UserID": 5, "studentNo": null, "employNo": "00800147", "username": "mashbury", "firstName": "Michael", "preferredname": null, "lastName": "Ashbury", "street": "688 Zaproxy Ridge", "city": "East Romaineburgh", "prov": 9, "postal": "K2G5B1", "email": "mash-bury@tomahawk.ca", "display_name": "Michael Ashbury", "account_no": "00800147", "prov_name": "Ontario", }, "writer": { "AdminAccessID": 7, "Username": "admin", "DisplayName": "Administrator" }, "vehicle": { "VehicleID": 5, "Active": 1, "Plate": "MASH", "Year": 1998, "TotalVio": 12, "TotalUnpaid": 2, "TotalWarning": 0, "vehicleAlert": true, "vin": "JNAMA43H9XGE50339", "electric_vehicle": false, "province": { "ProvName": "West Virginia", "ProvCode": "WV", }, "make": { "MakeName": "Toyota" }, "colour": { "ColourName": "Black" }, "plate_type": { "TypeName": " Passenger" } "vehicle_type": { "TypeName": " Van" }, }, "location": { "LocationID": 10, "LocationName": "Hospital & Administration Building", }, "details": { "ViolationsDetailID": 359, "ViolationID": 237, "Ticket": "TT-19026", "ViolationTypeID": 16, "LocationID": 10, "offenceFine": 50, "discountFlag": 1, "discountAmount": 20, "discountHours": 240, "type": { "ViolationTypeID": 16, "ViolationDescr": "No Parking Snow Route - Mandatory Towing", "DefaultCost": 50, "discountFlag": true, "discountAmount": 20, "discountHours": 240, } } } ``` ### Examples An example shortcode is provided for each section. To return a specific value in the same section, replace the provided variable name with the sibling value wanted for output.
**Example Shortcode** **Description**
\[values show=violation.Ticket\] Returns the violation ticket number.
\[values show=violation.user\_info.username\]Returns the username of the user the violation belongs to.
\[values show=violation.writer.DisplayName\]Returns the display name of the admin who assigned the violation to the user.
\[values show=violation.vehicle.Plate\]Returns the plate of the vehicle the violation was assigned to, if applicable.
\[values show=violation.vehicle.province.ProvName\]Returns the province or state of the vehicle plate.
\[values show=violation.vehicle.colour.ColourName\]Returns the colour of the vehicle.
\[values show=violation.vehicle.plate\_type.TypeName\]Returns the plate type of the vehicle.
\[values show=violation.vehicle.vehicle\_type.TypeName\]Returns the type of the vehicle.
\[values show=violation.vehicle.make.MakeName\]Returns the make of the vehicle.
\[values show=violation.location.LocationName\]Returns the name of the location the infraction happened.
\[values show=violation.details.0.Ticket\]Returns the violation ticket number. Alternate value location.
\[values show=violation.details.0.type.ViolationDescr\]Returns the violation type description.
# Admin Options # User Setup - [User Types](https://opscom.wiki/books/for-administrators-staff/page/user-types) - [User Departments](https://opscom.wiki/books/for-administrators-staff/page/user-departments) - [User Company Editor](https://opscom.wiki/books/for-administrators-staff/page/user-company-editor) - [Login Sources (SSO)](https://opscom.wiki/books/for-administrators-staff/page/login-sources-sso) # User Types ## User Types Configuration To setup a user type, go to the **Admin Options** menu and hover over **Users** to select **Types**. ![](https://ops-com.atlassian.net/wiki/download/thumbnails/759013/2023-10-16_14-55-08.png?version=1&modificationDate=1697468164000&cacheVersion=1&api=v2&height=250) ## Create a New User Type The **User Type Administration** tool opens. The list of existing User Types will appear. To add a user type, click on the **Create New User Type** In this example, we are creating a user type of **Public Parker**. [![image.png](https://opscom.wiki/uploads/images/gallery/2024-06/scaled-1680-/UEbimage.png)](https://opscom.wiki/uploads/images/gallery/2024-06/UEbimage.png) Enter the **Type Name** and set the **Grouping** to **Public**, we also have the ability to toggle if the user type is select able upon registration to your users by clicking **Visible to Users** as well as the number of **Extra Active Vehicles** that user can have. By default users can have a single vehicle at a time unless this field is specified. [![image.png](https://opscom.wiki/uploads/images/gallery/2024-06/scaled-1680-/PRzimage.png)](https://opscom.wiki/uploads/images/gallery/2024-06/PRzimage.png) Next you may scroll to choose allowed payment types for this User Type. [![image.png](https://opscom.wiki/uploads/images/gallery/2024-06/scaled-1680-/WHzimage.png)](https://opscom.wiki/uploads/images/gallery/2024-06/WHzimage.png) A Note On Extend Info: **Extend Info** is the internal system master user types. There are four categories. These master user types are important as they govern access to other items in the system. Payment types for example, can be restricted as far as being visible in the system to internal users, end users both as staff or student. You may want Payroll deduction only visible to Staff users, as an example. The look and feel of the profile form itself is also affected by master user type. Student users would see items in the profile registration form that staff users would not see and vice versa. The user type you create as a subset to these must fit one of these categories. **Staff** **Student** **Public** **Athletics** Now when you look at the list of user type, notice **Public Parker** is now one of the user types. [![image.png](https://opscom.wiki/uploads/images/gallery/2024-06/scaled-1680-/WZximage.png)](https://opscom.wiki/uploads/images/gallery/2024-06/WZximage.png) ## Apply User Type to User Applying a **User Type** to a user can be done when the user account is created. It can also be changed at any time in the future. In the user profile, click in the field labeled **Select User Type** to display the pick list where you can choose **Public Parker**. [![image.png](https://opscom.wiki/uploads/images/gallery/2024-06/scaled-1680-/Gopimage.png)](https://opscom.wiki/uploads/images/gallery/2024-06/Gopimage.png) The user profile will now look like the following: [![image.png](https://opscom.wiki/uploads/images/gallery/2024-06/scaled-1680-/ERpimage.png)](https://opscom.wiki/uploads/images/gallery/2024-06/ERpimage.png) ## User Types in Searches User Type can be used in search criteria as well. In the user search tool select **Public Parker** with no other search parameters set, [![image.png](https://opscom.wiki/uploads/images/gallery/2024-06/scaled-1680-/MCnimage.png)](https://opscom.wiki/uploads/images/gallery/2024-06/MCnimage.png) You will now see the **elleb** user in the returned search results simply based on the user type. [![image.png](https://opscom.wiki/uploads/images/gallery/2024-06/scaled-1680-/Oj2image.png)](https://opscom.wiki/uploads/images/gallery/2024-06/Oj2image.png) ## Configure Access to Lots with User Types In **Lot Administration**, the user type can be applied to provide or restrict access by user type. In the **General Tab,** you can select what users have access to the lot in question by selecting the user types you wish to allow access to in the **Lot Types** section. Under **User Type Lot,** select the user types you wish to have park in this lot. In our example, we are choosing **Full Time Student**, **Part Time Student** and our recently created **Public Parker**. The scenario for this lot is that we will allow students as well as **Public Parkers** to purchase permits in this lot but not Staff/Faculty users. [![image.png](https://opscom.wiki/uploads/images/gallery/2024-06/scaled-1680-/Hluimage.png)](https://opscom.wiki/uploads/images/gallery/2024-06/Hluimage.png) When looking at the list of lots in **Lot Administration**, you can see what user types a lot is configured for by clicking on ***Show/Hide Lot User Types.*** In the example below **Red Staff Lot** is restricted to **Full Time** and **Part Time Staff** whereas **Red Student Lot** is accessible to both **Full** and **Part Time Students** as well as **Public Parkers**. [![image.png](https://opscom.wiki/uploads/images/gallery/2024-06/scaled-1680-/vCVimage.png)](https://opscom.wiki/uploads/images/gallery/2024-06/vCVimage.png) By adding user type to lots the user side will appear as follows. In this example we are logged on as **Joseph Callaghan**. When you go into the process of purchasing a permit, the system will only display lots that are configured for that user type. In this example we see our **Standard Permit Lot and Text2Park** only. [![image.png](https://opscom.wiki/uploads/images/gallery/2024-06/scaled-1680-/nrwimage.png)](https://opscom.wiki/uploads/images/gallery/2024-06/nrwimage.png) # Limiting Active Vehicles ## On the Administration Interface Active vehicle restriction is controlled through user types. To edit the number of additional vehicles allowed to be active, hover over **Admin Options** -> **Users** and click **User Types**. [![image.png](https://opscom.wiki/uploads/images/gallery/2024-06/scaled-1680-/DTUimage.png)](https://opscom.wiki/uploads/images/gallery/2024-06/DTUimage.png) Select the user type to edit from the drop down list. In this case, we are choosing to edit **Full Time Student**. [![image.png](https://opscom.wiki/uploads/images/gallery/2024-06/scaled-1680-/3Lvimage.png)](https://opscom.wiki/uploads/images/gallery/2024-06/3Lvimage.png) The screen will refresh with the configuration parameters for **Full Time Student**. Edit the **Active Vehicles** number to reflect how many additional active vehicles may be on a profile. Once a single vehicle has been added to a profile, the user must always have at least one active vehicle, so this number represents how many additional active vehicles can exist. This setting would mean the user may have a maximum of 2 active vehicles. [![image.png](https://opscom.wiki/uploads/images/gallery/2024-06/scaled-1680-/9XBimage.png)](https://opscom.wiki/uploads/images/gallery/2024-06/9XBimage.png) ## What Users See on the User Portal Now that the limit has been set, let's have a look at how it affects the user's ability to add vehicles. To add a vehicle to a profile, click on the **Vehicle** tab to access the vehicle information section of the user profile. In this tab, you will see what vehicles, if any, are already associated with the user. [![image.png](https://opscom.wiki/uploads/images/gallery/2024-06/scaled-1680-/n9Pimage.png)](https://opscom.wiki/uploads/images/gallery/2024-06/n9Pimage.png) In this case we have a **beige Acura** with plate number **ABC316.** Click on **Add New Vehicle** to add another vehicle. [![image.png](https://opscom.wiki/uploads/images/gallery/2024-06/scaled-1680-/Kinimage.png)](https://opscom.wiki/uploads/images/gallery/2024-06/Kinimage.png) Fill out the vehicle information, then click **Save Changes** to register the new vehicle. [![image.png](https://opscom.wiki/uploads/images/gallery/2024-06/scaled-1680-/rDximage.png)](https://opscom.wiki/uploads/images/gallery/2024-06/rDximage.png) The user will see a pop up message indicating the vehicle was successfully added. [![image.png](https://opscom.wiki/uploads/images/gallery/2024-06/scaled-1680-/2iFimage.png)](https://opscom.wiki/uploads/images/gallery/2024-06/2iFimage.png) The vehicle will be added to the user's profile and appear on the Vehicles tab. [![image.png](https://opscom.wiki/uploads/images/gallery/2024-06/scaled-1680-/anGimage.png)](https://opscom.wiki/uploads/images/gallery/2024-06/anGimage.png) Now we will try to add a third vehicle. Recall that we have set the user type to only allow a **maximum of 2 active vehicles**. Enter the vehicle information and click save changes to register this vehicle. [![image.png](https://opscom.wiki/uploads/images/gallery/2024-06/scaled-1680-/Na8image.png)](https://opscom.wiki/uploads/images/gallery/2024-06/Na8image.png) Again, you will receive the pop up message indicating the vehicle was successfully added. [![image.png](https://opscom.wiki/uploads/images/gallery/2024-06/scaled-1680-/MiFimage.png)](https://opscom.wiki/uploads/images/gallery/2024-06/MiFimage.png) The vehicle will be added to the **Vehicles** page however, notice this time the vehicle has been added in an **Inactive** state. [![image.png](https://opscom.wiki/uploads/images/gallery/2024-06/scaled-1680-/zKMimage.png)](https://opscom.wiki/uploads/images/gallery/2024-06/zKMimage.png) At this point, if the user attempts to make this third vehicle active by toggling the vehicle state, it will fail. [![image.png](https://opscom.wiki/uploads/images/gallery/2024-06/scaled-1680-/mPjimage.png)](https://opscom.wiki/uploads/images/gallery/2024-06/mPjimage.png) They will receive a pop up message indicating that the vehicle can not be made active due to the limit you have set for this user type. [![image.png](https://opscom.wiki/uploads/images/gallery/2024-06/scaled-1680-/oRaimage.png)](https://opscom.wiki/uploads/images/gallery/2024-06/oRaimage.png) Conversely, if a user tried to make all vehicles on their profile inactive, this would cause a pop up to appear indicating that the user must have at least one active vehicle. [![image.png](https://opscom.wiki/uploads/images/gallery/2024-06/scaled-1680-/qGIimage.png)](https://opscom.wiki/uploads/images/gallery/2024-06/qGIimage.png) Important Note
- If the vehicle being added is already in the system but not currently associated with the user, the user will be prompted by asking if they wish to add this existing vehicle to the profile. In this case the same rules described here will still apply. - It is also important to note that if you reduce the number of allowed active vehicles, users who currently have more active vehicles than the newly reduced setting will not be affected and are essentially grandfathered in. The new rule will only come into effect when the user attempts to add vehicles in the future.
# User Departments ## Managing User Departments Click **Admin Options**, **Users** followed by **Manage User Departments.** [![image.png](https://opscom.wiki/uploads/images/gallery/2024-06/scaled-1680-/MKGimage.png)](https://opscom.wiki/uploads/images/gallery/2024-06/MKGimage.png) The **Manage User Departments** page displays with all of the available choices. [![image.png](https://opscom.wiki/uploads/images/gallery/2024-06/scaled-1680-/uSPimage.png)](https://opscom.wiki/uploads/images/gallery/2024-06/uSPimage.png) ## Adding User Departments To add a new user department click **Add User Department** and complete the required field followed by **Save Changes**. [![image.png](https://opscom.wiki/uploads/images/gallery/2024-06/scaled-1680-/MlLimage.png)](https://opscom.wiki/uploads/images/gallery/2024-06/MlLimage.png) ## Editing User Departments To edit user departments click the **Edit** button next to the department you wish to make updates to. This will open a new modal window allowing you to change the existing name of that item. [![image.png](https://opscom.wiki/uploads/images/gallery/2024-06/scaled-1680-/NDTimage.png)](https://opscom.wiki/uploads/images/gallery/2024-06/NDTimage.png) ## Deleting User Departments To delete departments simply click the **Delete** button next to the make you wish to remove from the list. A modal window will appear asking you if you are sure you wish to delete this user department. Important In order to delete a user department it must not be used in the system. Admins will first need to make sure that no users are using this department before it can be removed. This is to prevent profiles from having blank information by deleting these departments while they're in use. [![image.png](https://opscom.wiki/uploads/images/gallery/2024-06/scaled-1680-/sGQimage.png)](https://opscom.wiki/uploads/images/gallery/2024-06/sGQimage.png) ## Related Video Please view the following video. # User Company Editor ## Accessing the User Company Editor Under **User Management**, click **User Companies**. [![image.png](https://opscom.wiki/uploads/images/gallery/2024-06/scaled-1680-/fe9image.png)](https://opscom.wiki/uploads/images/gallery/2024-06/fe9image.png) The **Company Search** window will display. To add a company click **Create New Company.** [![image.png](https://opscom.wiki/uploads/images/gallery/2024-06/scaled-1680-/OPQimage.png)](https://opscom.wiki/uploads/images/gallery/2024-06/OPQimage.png) The **Company Edit** window will display. In our example we are using the following entries: - - **Account Number:** ABC-12345 - **Company Name:** Widgets Incorporated - **Address:** 100 Main Street, Ottawa, Ontario, K2K 2E6 - **Contact Name:** John Doe - **Address:** 1110 Main Street, Carleton Place, Ontario, K2K 1R4 - **Invoice Emails:** This is the email address they would like the invoices mailed to. Once the data is entered, click **Add New Company** [![image.png](https://opscom.wiki/uploads/images/gallery/2024-06/scaled-1680-/Y69image.png)](https://opscom.wiki/uploads/images/gallery/2024-06/Y69image.png) After you have added the company you will see a green message confirming the company has been added. [![image.png](https://opscom.wiki/uploads/images/gallery/2024-06/scaled-1680-/GN1image.png)](https://opscom.wiki/uploads/images/gallery/2024-06/GN1image.png) ## Using Company Search When we return to the Company Search page, it should be displayed as a search result. *Notice how we now have our company in place but no users at this point.* [![image.png](https://opscom.wiki/uploads/images/gallery/2024-06/scaled-1680-/Ouoimage.png)](https://opscom.wiki/uploads/images/gallery/2024-06/Ouoimage.png) ## Archiving a Company Note Only Companies with zero associated users can be archived. To archive a company, search for it and click the **Edit** button to open the Company Edit screen. Click the **Archive** button in the top right hand corner. [![image.png](https://opscom.wiki/uploads/images/gallery/2024-06/scaled-1680-/t00image.png)](https://opscom.wiki/uploads/images/gallery/2024-06/t00image.png) ## Adding Users to a Company To add users, navigate to the user's profile. In our example we are adding John Doe as the company contact and the Billing Account Contact. In John's profile enter **Widgets Incorporated** in the company field to link John to that company. Enable the **Company Manager** checkbox to select John as a Company Manager. This will allow him to access the profiles of other people in his company. Enable the **Company Billing Account** checkbox. This will allow him to setup a payment method to pay for all permits for users he manages. Click '**Submit for Processing**' and then click the '**Information Correct'** button**.** [![image.png](https://opscom.wiki/uploads/images/gallery/2024-06/scaled-1680-/fH9image.png)](https://opscom.wiki/uploads/images/gallery/2024-06/fH9image.png) You can continue to add users to the company in the same manner as described above, however if you try to add another Company Billing Account contact, you will see a message that indicates that John Doe is already the current Billing Account contact. [![image.png](https://opscom.wiki/uploads/images/gallery/2024-06/scaled-1680-/6bYimage.png)](https://opscom.wiki/uploads/images/gallery/2024-06/6bYimage.png) Go back to Search for a Company. If you click on the ***number 2*** , the system will take you to the user search screen displaying the 2 users associated with the company. [![image.png](https://opscom.wiki/uploads/images/gallery/2024-06/scaled-1680-/Rbfimage.png)](https://opscom.wiki/uploads/images/gallery/2024-06/Rbfimage.png) You will see the users displayed for that Company and the Manager and Billing contact will be indicated. [![image.png](https://opscom.wiki/uploads/images/gallery/2024-06/scaled-1680-/EFVimage.png)](https://opscom.wiki/uploads/images/gallery/2024-06/EFVimage.png) # Login Sources (SSO) ## Working with Login Sources Login Sources define where the user comes from. For example, if the user authenticates with a username and password stored in OPS-COM then OPSCOM is the source. They could also come from SAML, LDAP etc. You can add login sources in the **Admin Options** under **Users.** [![image.png](https://opscom.wiki/uploads/images/gallery/2024-06/scaled-1680-/Vg2image.png)](https://opscom.wiki/uploads/images/gallery/2024-06/Vg2image.png) By default, you will have the **OPSCOM** login source. You can see that this will give users the option of entering their username and password. [![image.png](https://opscom.wiki/uploads/images/gallery/2024-06/scaled-1680-/NKMimage.png)](https://opscom.wiki/uploads/images/gallery/2024-06/NKMimage.png) If we were to disable this option then we would only be left with our SAML login source. [![image.png](https://opscom.wiki/uploads/images/gallery/2024-06/scaled-1680-/nxEimage.png)](https://opscom.wiki/uploads/images/gallery/2024-06/nxEimage.png) ## Adding Login Sources To add login sources we click the **Add Login Source** button at the top right corner of the page. [![image.png](https://opscom.wiki/uploads/images/gallery/2024-06/scaled-1680-/5LFimage.png)](https://opscom.wiki/uploads/images/gallery/2024-06/5LFimage.png) Any required fields will be displayed in red letting you know they must be completed before you can save. [![image.png](https://opscom.wiki/uploads/images/gallery/2024-06/scaled-1680-/Nu6image.png)](https://opscom.wiki/uploads/images/gallery/2024-06/Nu6image.png) Important The fields have multiple states which are reflected by the color they are highlighted with.
1. Red fields are required to click save. 2. Yellow fields are required to work but still allow empty or invalid values to be saved. 3. Yellow fields can also indicate that a change has been made.
The **Code** field is what the user profile will match against when adding users to the new login source. However, only one login source code can be activated at a time. Managing Login Sources We can manage our login sources by either editing or deleting them using the two buttons to the right of each source. [![image.png](https://opscom.wiki/uploads/images/gallery/2024-06/scaled-1680-/BfFimage.png)](https://opscom.wiki/uploads/images/gallery/2024-06/BfFimage.png) Archiving a login source means that it will no longer display on the user side and any users associated with this source will be removed from logging in this way. # SAML SSO # Configuring SAML Any fields displayed in red are required, meaning they must be filled in before any settings can be saved. [![image.png](https://opscom.wiki/uploads/images/gallery/2024-06/scaled-1680-/4H1image.png)](https://opscom.wiki/uploads/images/gallery/2024-06/4H1image.png) Important The fields have multiple states, which are reflected by the color they are highlighted with.
1. Red fields are required to click save. 2. Yellow fields are required to work, but still allow empty or invalid values to be saved. 3. Yellow fields can also indicate that a change has been made.
The **Code** field is what the user profile will be matched against when adding users to the new login source. Only one login source code can be activated at a time. Since OPS-COM can support a system where some users require SSO and some do not, there can be multiple login sources. For example, If no SSO is required, the login source for each user would be OPSCOM. - If you use SAML, then the login source could be called SAML. - If you use LDAP, the login source could be named LDAP. The source name is up to the Identity Provider, except for OPSCOM. ## **Service Provider Fields** The **Unique Identifier** is part of the XML communication between OPSCOM and your SAML system. It is supplied by your SAML system and it is what OPS-COM uses to match against our UniqueID field. The **Entity ID** for **Service Provider** defines the SAML integration path of the URL in the metadata. If there is more than one SAML integration in the system, each ID needs to be unique. The value supplied ends up in the path like this: "[https://client.ops-com.com/auth/saml2/](https://client.ops-com.com/auth/saml2/) ENTITY\_ID\_FIELD /acs" The **x509 certificate** can be generated and added to the service provider. You, the Identity Provider provide this. ## **Identity Provider Fields** These fields come from the system you are working with, such as SAML, when communicating with OPS-COM. For example, SAML should display its metadata under **Federation → Show Metadata** on the SAML installation page. Once the settings have been completed and saved, you will have access to the **MetaData, Synchronization,** and **Translations** tabs. [![image.png](https://opscom.wiki/uploads/images/gallery/2024-06/scaled-1680-/Om4image.png)](https://opscom.wiki/uploads/images/gallery/2024-06/Om4image.png) ## Metadata The Metadata tab provides the XML that would be provided to the Service Provider. [![image.png](https://opscom.wiki/uploads/images/gallery/2024-06/scaled-1680-/BLMimage.png)](https://opscom.wiki/uploads/images/gallery/2024-06/BLMimage.png) ## Sample XML File The following is an example of a response from an external system to OPS-COM. In this case, it is a SimpleSAMLPhp service set up as the identity provider. At the bottom, are several attributes within an saml:AttributeStatement tag. These are required for our system to match to a user within our system. The one field that matters in this attribute section is the value being used as the permanently-unique identifier for a user. In this case it is "uid". Since "uid" is being sent back, then the setup for Identity Provider Fields should have "uid" as the Unique ID Field. If the unique ID is something else, such as SAMaccountName, then that should be used for the UniqueID. ... DEV-2K8 - DEBUG: Saml2 Incoming User Array ( \[uid\] => Array ( \[0\] => 6ddf4027-3397-4e45-8628-0189f60fe91e ) \[full name\] => Array ( \[0\] => Sarah Knowles ) \[email\] => Array ( \[0\] => ) ) \[\]
``
`        ``<``samlp:Response` `xmlns:samlp``=``"urn:oasis:names:tc:SAML:2.0:protocol"` `xmlns:saml``=``"urn:oasis:names:tc:SAML:2.0:assertion"` `ID``=``"_aa1963115aa6490e728c7376f4c8849813bbb..."``>`
`          ``...`
`          ``<``saml:Assertion` `xmlns:xsi``=``"http://www.w3.org/2001/XMLSchema-instance"` `xmlns:xs``=``"http://www.w3.org/2001/XMLSchema"` `ID``=``"_9efd79bf6425983ee9176f3d33a99d1a9176180..."``>`
`            ``...`
`            ``<``saml:Subject``>`
`              ``<``saml:NameID` `SPNameQualifier``=``"MinionOpsComStaff"` `Format``=``"urn:oasis:names:tc:SAML:2.0:nameid-format:transient"``>_7a426e0be71f14c1f349db00d7d543b6f7dcb52baa`
`              ``<``saml:SubjectConfirmation` `Method``=``"urn:oasis:names:tc:SAML:2.0:cm:bearer"``>`
`                ``<``saml:SubjectConfirmationData` `NotOnOrAfter``=``"2021-08-24T16:00:41Z"` `Recipient``=``"https://minion-3.dev.parkadmin.com/auth/saml2/MinionOpsComStaff/acs"` `InResponseTo``=``"ONELOGIN_bb8a09203c888cf59af4c621a71cfa8f7559c016"``/>`
`              ```
`            ```
`            ``<``saml:Conditions` `NotBefore``=``"2021-08-24T15:55:11Z"` `NotOnOrAfter``=``"2021-08-24T16:00:41Z"``>`
`              ``<``saml:AudienceRestriction``>`
`                ``<``saml:Audience``>MinionOpsComStaff`
`              ```
`            ```
`            ``<``saml:AuthnStatement` `AuthnInstant``=``"2021-08-24T15:34:46Z"` `SessionNotOnOrAfter``=``"2021-08-24T23:34:46Z"` `SessionIndex``=``"_a7a68666092117d24aab8adecf1b0830622855b85..."``>`
`              ``<``saml:AuthnContext``>`
`                ``<``saml:AuthnContextClassRef``>urn:oasis:names:tc:SAML:2.0:ac:classes:PasswordProtectedTransport`
`              ```
`            ```
`            ``<``saml:AttributeStatement``>`
`              ``<``saml:Attribute` `Name``=``"uid"` `NameFormat``=``"urn:oasis:names:tc:SAML:2.0:attrname-format:basic"``>`
`                ``<``saml:AttributeValue` `xsi:type``=``"xs:string"``>6ddf4027-3397-4e45-8628-0189f60fe91e`
`              ```
`              ``<``saml:Attribute` `Name``=``"full name"` `NameFormat``=``"urn:oasis:names:tc:SAML:2.0:attrname-format:basic"``>`
`                ``<``saml:AttributeValue` `xsi:type``=``"xs:string"``>Sarah Knowles`
`              ```
`              ``<``saml:Attribute` `Name``=``"email"` `NameFormat``=``"urn:oasis:names:tc:SAML:2.0:attrname-format:basic"``>`
`                ``<``saml:AttributeValue` `xsi:type``=``"xs:string"``>sknowles@tomahawk.ca`
`              ```
`            ```
`          ```
`        ```
## Translations Translations can be used to change the text displayed on your login button from the user side. We can create as many different translations as we have available on our system. For this example, we have English and French. [![image.png](https://opscom.wiki/uploads/images/gallery/2024-06/scaled-1680-/0Bpimage.png)](https://opscom.wiki/uploads/images/gallery/2024-06/0Bpimage.png) ## Synchronization The synchronization tab allows you to create users in OPS-COM when they login from SAML if they do not already exist by mapping your user attributes to our system. This also lets you update existing users information in the system. In this example, any field that is mapped and has a value from your SSO side should get updated to the value from SAML. To begin, ensure that you enable **Auto Create/Update User**. Keep in mind that these are sample values from our test system, and that your SAML system may differ. [![image.png](https://opscom.wiki/uploads/images/gallery/2024-06/scaled-1680-/W2qimage.png)](https://opscom.wiki/uploads/images/gallery/2024-06/W2qimage.png) After you have supplied the information in each field, you can click **Save Changes** and your users will begin to be created/updated. If any of the supplied fields are incorrect, then the information will be blank when the user logs in, or it will be unchanged if the user already existed. # Vehicles Setup
- [Vehicle Plate Types](https://opscom.wiki/books/for-administrators-staff/page/vehicle-plate-types) - [Vehicle Colours](https://opscom.wiki/books/for-administrators-staff/page/vehicle-colours) - [Vehicle Makes](https://opscom.wiki/books/for-administrators-staff/page/vehicle-makes) - [Vehicle Types](https://opscom.wiki/books/for-administrators-staff/page/vehicle-types)
## Related Video # Vehicle Plate Types ## Managing Vehicle Plate Types Click **Admin Options**, **Vehicles** followed by **Vehicle Plate Types**. [![image.png](https://opscom.wiki/uploads/images/gallery/2024-06/scaled-1680-/klaimage.png)](https://opscom.wiki/uploads/images/gallery/2024-06/klaimage.png) The **Manage Vehicle Plate Types** page displays with all of the available choices. [![image.png](https://opscom.wiki/uploads/images/gallery/2024-06/scaled-1680-/Mspimage.png)](https://opscom.wiki/uploads/images/gallery/2024-06/Mspimage.png) ## Adding Plate Types To add a new plate type click **Add Plate Type** and complete the two required fields followed by **Save Changes**. The **Short Name** is used with handheld devices. [![image.png](https://opscom.wiki/uploads/images/gallery/2024-06/scaled-1680-/UiLimage.png)](https://opscom.wiki/uploads/images/gallery/2024-06/UiLimage.png) ## Editing Plate Types To edit plate types click the **Edit** button next to the plate type you wish to make updates to. This will open a new modal window allowing you to change the existing name and short name for that plate type. [![image.png](https://opscom.wiki/uploads/images/gallery/2024-06/scaled-1680-/XIUimage.png)](https://opscom.wiki/uploads/images/gallery/2024-06/XIUimage.png) ## Deleting Plate Types To delete plate types simply click the **Delete** button next to the plate type you wish to remove from the list. A modal window will appear asking you if you are sure you wish to delete this vehicle plate type. Important In order to delete a vehicle plate type it must not be used in the system. Admins will first need to make sure that no users are using this plate type before it can be removed. This is to prevent vehicles from having blank information by deleting these plate types while they're in use. [![image.png](https://opscom.wiki/uploads/images/gallery/2024-06/scaled-1680-/oC8image.png)](https://opscom.wiki/uploads/images/gallery/2024-06/oC8image.png) # Vehicle Colours ## Managing the Vehicle Colour Picklist Hover over **Admin Options** and click **Vehicles** followed by **Vehicle Colors.** [![image.png](https://opscom.wiki/uploads/images/gallery/2024-06/scaled-1680-/T12image.png)](https://opscom.wiki/uploads/images/gallery/2024-06/T12image.png) The **Manage Vehicle Colours** page will display. [![image.png](https://opscom.wiki/uploads/images/gallery/2024-06/scaled-1680-/RVjimage.png)](https://opscom.wiki/uploads/images/gallery/2024-06/RVjimage.png) ## Adding Vehicle Colours To add a new colour, click the **Add Colour** button. The **Manage Vehicle Colours** modal will be displayed. Enter the colour name and click **Save Changes** when you are finished. [![image.png](https://opscom.wiki/uploads/images/gallery/2024-06/scaled-1680-/1JYimage.png)](https://opscom.wiki/uploads/images/gallery/2024-06/1JYimage.png) ## Editing Vehicle Colours To edit a colour name, click the **Edit** button and follow the prompts. [![image.png](https://opscom.wiki/uploads/images/gallery/2024-06/scaled-1680-/emnimage.png)](https://opscom.wiki/uploads/images/gallery/2024-06/emnimage.png) Click **Save Changes** to make the changes, if there are any errors while editing the vehicle colour name they will be displayed before allowing you to save. ## Deleting Vehicle Colours To delete a colour name, click the **Delete** button and follow the prompts. Important If the vehicle colour is currently being used in the system it cannot be deleted by admins. You first need to go into each vehicle record associated to this colour and change their colour type. [![image.png](https://opscom.wiki/uploads/images/gallery/2024-06/scaled-1680-/a9Gimage.png)](https://opscom.wiki/uploads/images/gallery/2024-06/a9Gimage.png) The **Delete Vehicle Colour** modal window will appear asking you if you are sure you would like to delete this colour from the list. [![image.png](https://opscom.wiki/uploads/images/gallery/2024-06/scaled-1680-/gqUimage.png)](https://opscom.wiki/uploads/images/gallery/2024-06/gqUimage.png) # Vehicle Makes ## Managing Vehicle Makes Click **Admin Options**, **Vehicles** followed by **Manage Vehicle Makes.** [![image.png](https://opscom.wiki/uploads/images/gallery/2024-06/scaled-1680-/eGbimage.png)](https://opscom.wiki/uploads/images/gallery/2024-06/eGbimage.png) The **Manage Vehicle Makes** page displays with all of the available choices. [![image.png](https://opscom.wiki/uploads/images/gallery/2024-06/scaled-1680-/O0oimage.png)](https://opscom.wiki/uploads/images/gallery/2024-06/O0oimage.png) ## Adding Vehicle Makes To add a new make click **Add Make** and complete the two required fields followed by **Save Changes**. [![image.png](https://opscom.wiki/uploads/images/gallery/2024-06/scaled-1680-/Yv1image.png)](https://opscom.wiki/uploads/images/gallery/2024-06/Yv1image.png) ## Editing Vehicle Makes To edit vehicle makes click the **Edit** button next to the make you wish to make updates to. This will open a new modal window allowing you to change the existing name of that item. [![image.png](https://opscom.wiki/uploads/images/gallery/2024-06/scaled-1680-/gjJimage.png)](https://opscom.wiki/uploads/images/gallery/2024-06/gjJimage.png) ## Deleting Vehicle Makes To delete makes simply click the **Delete** button next to the make you wish to remove from the list. A modal window will appear asking you if you are sure you wish to delete this vehicle make. Important In order to delete a vehicle make it must not be used in the system. Admins will first need to make sure that no users are using this make before it can be removed. This is to prevent vehicles from having blank information by deleting these makes while they're in use. [![image.png](https://opscom.wiki/uploads/images/gallery/2024-06/scaled-1680-/NDYimage.png)](https://opscom.wiki/uploads/images/gallery/2024-06/NDYimage.png) # Vehicle Types ## Managing Vehicle Types Click **Admin Options**, **Vehicles** followed by **Manage Vehicle Types.** [![image.png](https://opscom.wiki/uploads/images/gallery/2024-06/scaled-1680-/v3ximage.png)](https://opscom.wiki/uploads/images/gallery/2024-06/v3ximage.png) The **Manage Vehicle Types** page displays with all of the available choices. [![image.png](https://opscom.wiki/uploads/images/gallery/2024-06/scaled-1680-/gDPimage.png)](https://opscom.wiki/uploads/images/gallery/2024-06/gDPimage.png) ## Adding Vehicle Types To add a new vehicle type click **Add Type** and complete the required field followed by **Save Changes**. [![image.png](https://opscom.wiki/uploads/images/gallery/2024-06/scaled-1680-/ZJfimage.png)](https://opscom.wiki/uploads/images/gallery/2024-06/ZJfimage.png) ## Editing Types To edit vehicle types click the **Edit** button next to the type you wish to make updates to. This will open a new modal window allowing you to change the existing name for that vehicle type. [![image.png](https://opscom.wiki/uploads/images/gallery/2024-06/scaled-1680-/KfYimage.png)](https://opscom.wiki/uploads/images/gallery/2024-06/KfYimage.png) ## Deleting Vehicle Types To delete vehicle types simply click the **Delete** button next to the type you wish to remove from the list. A modal window will appear asking you if you are sure you wish to delete this item. Important In order to delete vehicle types it must not be used in the system. Admins will first need to make sure that no users are using this type before it can be removed. This is to prevent vehicles from having blank information by deleting these types while they're in use. [![image.png](https://opscom.wiki/uploads/images/gallery/2024-06/scaled-1680-/n0Pimage.png)](https://opscom.wiki/uploads/images/gallery/2024-06/n0Pimage.png) # Parking Setup - [Lot Zones](https://opscom.wiki/books/for-administrators-staff/page/lot-zones) - [Common Lots](https://opscom.wiki/books/for-administrators-staff/page/common-lots) - [Permit States](https://opscom.wiki/books/for-administrators-staff/page/permit-states) # Lot Zones ## Managing your Lot Zones Click **Admin Options**, **Parking** and **Manage Lot Zones.** [![image.png](https://opscom.wiki/uploads/images/gallery/2024-06/scaled-1680-/NYCimage.png)](https://opscom.wiki/uploads/images/gallery/2024-06/NYCimage.png) The **Manage Lot Zones** page will display and you can choose to **Add** or **Edit** a **Lot Zone.** [![image.png](https://opscom.wiki/uploads/images/gallery/2024-06/scaled-1680-/q1pimage.png)](https://opscom.wiki/uploads/images/gallery/2024-06/q1pimage.png) To **Add** a new Lot Zone, click the **Add Lot Zone** button. Enter the name of your new Parking Zone. When finished, click **Save Changes.** [![image.png](https://opscom.wiki/uploads/images/gallery/2024-06/scaled-1680-/igpimage.png)](https://opscom.wiki/uploads/images/gallery/2024-06/igpimage.png) To **Edit** a Lot Zone, click **Edit** next to the Lot Zone that you want to edit. Enter the changes that are being made, then click **Save Changes**. [![image.png](https://opscom.wiki/uploads/images/gallery/2024-06/scaled-1680-/Qarimage.png)](https://opscom.wiki/uploads/images/gallery/2024-06/Qarimage.png) Only Zones with no records can be deleted, to delete a Zone, click **Delete.** Then on the confirmation window, select **Delete.** [![image.png](https://opscom.wiki/uploads/images/gallery/2024-06/scaled-1680-/IBNimage.png)](https://opscom.wiki/uploads/images/gallery/2024-06/IBNimage.png) # Common Lots ## Navigating to Common Lots To get to the common lots page click **Admin Options** then **Parking** followed by **Common Lots.** [![image.png](https://opscom.wiki/uploads/images/gallery/2024-06/scaled-1680-/sZZimage.png)](https://opscom.wiki/uploads/images/gallery/2024-06/sZZimage.png) The **Common Lot Type Administration** page displays. ## **Managing Common Lot Types** ### Adding Common Lot Types To add a common lot type click the **Add Common Lot Type** button at the top of the page. A new modal window will appear allowing you to create your lot type. When you are finished making your changes click **Save Changes**. [![image.png](https://opscom.wiki/uploads/images/gallery/2024-06/scaled-1680-/nD1image.png)](https://opscom.wiki/uploads/images/gallery/2024-06/nD1image.png) ### Editing Common Lot Types To edit common lot types click the **Edit** button next to the type you want to update. A modal window will appear allowing you to make your changes. Click **Save Changes** when you are finished editing your common lot type. [![image.png](https://opscom.wiki/uploads/images/gallery/2024-06/scaled-1680-/TwAimage.png)](https://opscom.wiki/uploads/images/gallery/2024-06/TwAimage.png) Making changes to lot types that are being used will reflect the entire system. ### Deleting Common Lot Types To delete a common lot type click the **Delete** button next to the type you wish to remove. Keep in mind you are not able to delete items that are currently being used in the system. [![image.png](https://opscom.wiki/uploads/images/gallery/2024-06/scaled-1680-/Ez1image.png)](https://opscom.wiki/uploads/images/gallery/2024-06/Ez1image.png) # Permit States ## Managing Permit States Click **Admin Options**, **Parking** followed by **Manage Permit States.** [![image.png](https://opscom.wiki/uploads/images/gallery/2024-06/scaled-1680-/npdimage.png)](https://opscom.wiki/uploads/images/gallery/2024-06/npdimage.png) The **Manage Permit States** page displays with all of the available choices. [![image.png](https://opscom.wiki/uploads/images/gallery/2024-06/scaled-1680-/gE9image.png)](https://opscom.wiki/uploads/images/gallery/2024-06/gE9image.png) ## Adding Permit States To add a new permit state click **Add Permit State** and complete the required field followed by **Save Changes**. [![image.png](https://opscom.wiki/uploads/images/gallery/2024-06/scaled-1680-/gNeimage.png)](https://opscom.wiki/uploads/images/gallery/2024-06/gNeimage.png) ## Editing Permit States To edit permit states click the **Edit** button next to the permit state you wish to make updates to. This will open a new modal window allowing you to change the existing name of that item. [![image.png](https://opscom.wiki/uploads/images/gallery/2024-06/scaled-1680-/c6timage.png)](https://opscom.wiki/uploads/images/gallery/2024-06/c6timage.png) ## Deleting Permit States To delete permit states simply click the **Delete** button next to the permit state you wish to remove from the list. A modal window will appear asking you if you are sure you wish to delete this permit state. Important In order to delete a permit state it must not be used in the system. Admins will first need to make sure that no permits are using this permit state before it can be removed. This is to prevent permits from having blank information by deleting these permit states while they're in use. [![image.png](https://opscom.wiki/uploads/images/gallery/2024-06/scaled-1680-/D7iimage.png)](https://opscom.wiki/uploads/images/gallery/2024-06/D7iimage.png) # Access Card Setup - [Access Card Status](https://opscom.wiki/books/for-administrators-staff/page/access-card-status) - [Access Cards - Add Singles](https://opscom.wiki/books/for-administrators-staff/page/access-cards-add-singles) - [Access Cards - Add Bulk](https://opscom.wiki/books/for-administrators-staff/page/access-cards-add-bulk) - [Access Cards - Edit Bulk](https://opscom.wiki/books/for-administrators-staff/page/access-cards-edit-bulk) # Access Card Status 1. Click **Admin Options, Access Cards**, and click **Statuses.** [![image.png](https://opscom.wiki/uploads/images/gallery/2024-06/scaled-1680-/nfeimage.png)](https://opscom.wiki/uploads/images/gallery/2024-06/nfeimage.png) 2\. The **'Access Card Status Administration'** page displays. You can view a list of Access Card Statuses or Add a New status. To see a ***list*** of all Access Cards, click on the ***drop-down list***. [![image.png](https://opscom.wiki/uploads/images/gallery/2024-06/scaled-1680-/at5image.png)](https://opscom.wiki/uploads/images/gallery/2024-06/at5image.png) 3\. To Add a new Access Card Status, click on "**Add New Card Status**" and click "**Go**". Enter the Card Status name and click "**Add Status Name**". If you want to change the name of an existing status, choose one of the Status options from the drop-down menu and click **"Go"**. Make your changes and click "**Update Status Name**". [![image.png](https://opscom.wiki/uploads/images/gallery/2024-06/scaled-1680-/8Ubimage.png)](https://opscom.wiki/uploads/images/gallery/2024-06/8Ubimage.png) # Access Cards - Add Singles 1. Click **Admin Options**, **Access Cards**, and "**Add Singles**". [![image.png](https://opscom.wiki/uploads/images/gallery/2024-06/scaled-1680-/U2timage.png)](https://opscom.wiki/uploads/images/gallery/2024-06/U2timage.png) 2. The "**Create A New Access Card"** page is displayed. To **add** a new entry - Enter the *card number*, choose the *Access Card Lot and* choose the *Status* of the Access Card. Click **"Add New"**. [![image.png](https://opscom.wiki/uploads/images/gallery/2024-06/scaled-1680-/gAeimage.png)](https://opscom.wiki/uploads/images/gallery/2024-06/gAeimage.png) # Access Cards - Add Bulk
1. Click **Admin Options**, **Access Cards**, and **Add Bulk.**
[![image.png](https://opscom.wiki/uploads/images/gallery/2024-06/scaled-1680-/CZmimage.png)](https://opscom.wiki/uploads/images/gallery/2024-06/CZmimage.png) 2\. The **Access Card Number Administration** page displays. To add **Bulk Access Cards**, fill out the required boxes, and click "**Add Access Cards and Associations**". Please note, the range must be contiguous. You cannot have gaps in the range or you must add them as separated ranges. [![image.png](https://opscom.wiki/uploads/images/gallery/2024-06/scaled-1680-/28Ximage.png)](https://opscom.wiki/uploads/images/gallery/2024-06/28Ximage.png)
# Access Cards - Edit Bulk
1. Click **Admin Options, Access Cards**, and **Edit Bulk.** [![image.png](https://opscom.wiki/uploads/images/gallery/2024-06/scaled-1680-/Rxuimage.png)](https://opscom.wiki/uploads/images/gallery/2024-06/Rxuimage.png)
2\. You will be redirected to the **Access Card Number Administration** page. Fill out the required changes/information in the boxes and click '**Update Lot/Card Association**". [![image.png](https://opscom.wiki/uploads/images/gallery/2024-06/scaled-1680-/ZLbimage.png)](https://opscom.wiki/uploads/images/gallery/2024-06/ZLbimage.png)
# Barcode Setup - [Barcodes - Add Singles](https://opscom.wiki/books/for-administrators-staff/page/barcodes-add-singles) - [Barcodes - Add Bulk](https://opscom.wiki/books/for-administrators-staff/page/barcodes-add-bulk) - [Barcodes - Edit Bulk](https://opscom.wiki/books/for-administrators-staff/page/barcodes-edit-bulk) - [Barcodes - Edit Gates](https://opscom.wiki/books/for-administrators-staff/page/barcodes-edit-gates) - [Barcodes - Edit Barcodes](https://opscom.wiki/books/for-administrators-staff/page/barcodes-edit-barcodes) # Barcodes - Add Singles 1. Click **Admin Options**, **Barcodes** and **Add Singles** [![image.png](https://opscom.wiki/uploads/images/gallery/2024-06/scaled-1680-/y4Jimage.png)](https://opscom.wiki/uploads/images/gallery/2024-06/y4Jimage.png) 2\. The **Add A New Barcode** page will display. To **add a new barcode**, fill out the required information fields and click **"Add New"** [![image.png](https://opscom.wiki/uploads/images/gallery/2024-06/scaled-1680-/5nYimage.png)](https://opscom.wiki/uploads/images/gallery/2024-06/5nYimage.png) # Barcodes - Add Bulk
1. Click **Admin Options**, **Barcodes** and click **Add Bulk.**
[![image.png](https://opscom.wiki/uploads/images/gallery/2024-06/scaled-1680-/RxSimage.png)](https://opscom.wiki/uploads/images/gallery/2024-06/RxSimage.png) 2\. The **Barcodes Administration** page will display. To create a bulk set of Barcodes, fill out the required information fields and click "**Add Barcodes and Associations**". [![image.png](https://opscom.wiki/uploads/images/gallery/2024-06/scaled-1680-/XWgimage.png)](https://opscom.wiki/uploads/images/gallery/2024-06/XWgimage.png) # Barcodes - Edit Bulk 1. Click **Admin options**, **Barcodes** and **Edit Bulk.** [![image.png](https://opscom.wiki/uploads/images/gallery/2024-06/scaled-1680-/yKQimage.png)](https://opscom.wiki/uploads/images/gallery/2024-06/yKQimage.png) 2\. The **Barcodes Administration** page displays. To change/edit information associated with bulk barcodes, fill out the required information fields then click "**Update Barcodes and Associations"** [![image.png](https://opscom.wiki/uploads/images/gallery/2024-06/scaled-1680-/TxOimage.png)](https://opscom.wiki/uploads/images/gallery/2024-06/TxOimage.png) # Barcodes - Edit Gates 1. Click **Admin Options**, **Barcodes**, and **Edit Gates.** [![image.png](https://opscom.wiki/uploads/images/gallery/2024-06/scaled-1680-/Gphimage.png)](https://opscom.wiki/uploads/images/gallery/2024-06/Gphimage.png) 2. You will be redirected to the **Gates Administration** page. To register a ***New Gate***, click "**New**" under "**IP Address**". [![image.png](https://opscom.wiki/uploads/images/gallery/2024-06/scaled-1680-/oB7image.png)](https://opscom.wiki/uploads/images/gallery/2024-06/oB7image.png) 3\. The **Gates Administration** page will refresh, to display information fields. Fill out the required information, and click "**Update Gate**". [![image.png](https://opscom.wiki/uploads/images/gallery/2024-06/scaled-1680-/24Oimage.png)](https://opscom.wiki/uploads/images/gallery/2024-06/24Oimage.png) # Barcodes - Edit Barcodes 1. Select **Admin Options**, hover over **Barcodes** and click on **Edit Barcodes** [![image.png](https://opscom.wiki/uploads/images/gallery/2024-06/scaled-1680-/Yhkimage.png)](https://opscom.wiki/uploads/images/gallery/2024-06/Yhkimage.png) 2\. You will be redirected to the **Barcodes Administration** page. [![image.png](https://opscom.wiki/uploads/images/gallery/2024-06/scaled-1680-/ux2image.png)](https://opscom.wiki/uploads/images/gallery/2024-06/ux2image.png) To **edit a barcode**, fill in the required information fields, then select **Search.** This will bring up any barcodes related to the information you supplied. # Location Setup - [Locations](https://opscom.wiki/books/for-administrators-staff/page/locations) - [Locations - Sub Locations](https://opscom.wiki/books/for-administrators-staff/page/locations-sub-locations) # Locations Click **Admin Options**, **Manage** **Locations** and **Locations.** [![image.png](https://opscom.wiki/uploads/images/gallery/2024-06/scaled-1680-/9Cyimage.png)](https://opscom.wiki/uploads/images/gallery/2024-06/9Cyimage.png) The **Manage Locations** page displays. [![image.png](https://opscom.wiki/uploads/images/gallery/2024-06/scaled-1680-/cQaimage.png)](https://opscom.wiki/uploads/images/gallery/2024-06/cQaimage.png) | ## Adding a Location Click the **Add Location** button to begin. [![image.png](https://opscom.wiki/uploads/images/gallery/2024-06/scaled-1680-/freimage.png)](https://opscom.wiki/uploads/images/gallery/2024-06/freimage.png)
- Enter the name of your new location. In our example the name is **Mulloy Library**. - Select the Sub-Location(s) you would like associated with this location. Sub-Locations are used in incident reporting and do not apply to vehicle violations. - To have the location be **Writer Visible**, click on the **"Writer Visible"** checkbox beside the location. - The GIS **Number** is optional and is used by clients who use a geographic location code. - Click on **Save Changes** to continue.
[![image.png](https://opscom.wiki/uploads/images/gallery/2024-06/scaled-1680-/u2aimage.png)](https://opscom.wiki/uploads/images/gallery/2024-06/u2aimage.png) The Manage Locations page will refresh and display a confirmation message indicating the **Location has been updated**. [![image.png](https://opscom.wiki/uploads/images/gallery/2024-06/scaled-1680-/Z9kimage.png)](https://opscom.wiki/uploads/images/gallery/2024-06/Z9kimage.png) ## Deleting a Location A location can be deleted from the system provided it is not associated to any records. If a location is eligible for deletion you will see a delete button for that specific Location. In our example you see the delete button on the Arena location. Click on the Delete button to begin the process. [![image.png](https://opscom.wiki/uploads/images/gallery/2024-06/scaled-1680-/Y9Pimage.png)](https://opscom.wiki/uploads/images/gallery/2024-06/Y9Pimage.png) A confirmation popup will appear. Click the Delete button to continue. This action will remove the location from the system. [![image.png](https://opscom.wiki/uploads/images/gallery/2024-06/scaled-1680-/6cKimage.png)](https://opscom.wiki/uploads/images/gallery/2024-06/6cKimage.png) # Locations - Sub Locations Click **Admin Options**, **Locations** and **Sub-locations.** [![image.png](https://opscom.wiki/uploads/images/gallery/2024-06/scaled-1680-/sqHimage.png)](https://opscom.wiki/uploads/images/gallery/2024-06/sqHimage.png) You will be redirected to the **Manage Sub-Locations** page. - To ***add*** a new sub-location: Click on **Add Sub-Location.** [![image.png](https://opscom.wiki/uploads/images/gallery/2024-06/scaled-1680-/VAFimage.png)](https://opscom.wiki/uploads/images/gallery/2024-06/VAFimage.png) To ***edit*** an existing sub-location: Click on **Edit** [![image.png](https://opscom.wiki/uploads/images/gallery/2024-06/scaled-1680-/6Vwimage.png)](https://opscom.wiki/uploads/images/gallery/2024-06/6Vwimage.png) There are two fileds to configure. The name of the location and the GIS Number (geographic information system) [![image.png](https://opscom.wiki/uploads/images/gallery/2024-06/scaled-1680-/LvFimage.png)](https://opscom.wiki/uploads/images/gallery/2024-06/LvFimage.png) Click **Save Changes** to complete the process. [![image.png](https://opscom.wiki/uploads/images/gallery/2024-06/scaled-1680-/sDcimage.png)](https://opscom.wiki/uploads/images/gallery/2024-06/sDcimage.png) # Violations Setup - [Ticket Categories](https://opscom.wiki/books/for-administrators-staff/page/ticket-categories) - [Sort Violations for Quick Access](https://opscom.wiki/books/for-administrators-staff/page/sort-violations-for-quick-access) - [Ticket Offence Items](https://opscom.wiki/books/for-administrators-staff/page/ticket-offence-items) - [Sending Alerts to Handhelds](https://opscom.wiki/books/for-administrators-staff/page/sending-alerts-to-handhelds) # Ticket Categories ## How to Edit Ticket Types Hover over the **Admin Options** icon and click '**Violations**' then '**Manage Ticket Categories**' [![image.png](https://opscom.wiki/uploads/images/gallery/2024-06/scaled-1680-/4jqimage.png)](https://opscom.wiki/uploads/images/gallery/2024-06/4jqimage.png) The '**Manage Ticket Types**' screen will display. You will see a list of ticket types that currently exist. From this menu you can ***add*** or ***edit*** Ticket Types. Note: Ticket Types can be hidden from handheld devices. This setting can be changed by Ticket Type. See Administration Fee below. [![image.png](https://opscom.wiki/uploads/images/gallery/2024-06/scaled-1680-/5zGimage.png)](https://opscom.wiki/uploads/images/gallery/2024-06/5zGimage.png) Click '**Edit Type**' next to Municipal. This opens the options for that ticket type. Enable **'Visible on Handhelds**' to toggle whether or not this ticket type will be available on the handheld units. Other options will be available to you if you have purchased the **Violations Plus** Module. **Violations Plus** users can chose the following: - Enable Failed to Identify - This is used when giving violations to users who fail to produce their ID. You can chose to log the violation against their vehicle instead. - Violation Applies To - Vehicles - This the standard way to issue tickets for parking infractions. - Violation Applies To - Users - This is used to issue infractions to Users, such as Smoking or Trespassing where a vehicle may not be involved. [![image.png](https://opscom.wiki/uploads/images/gallery/2024-06/scaled-1680-/I0Dimage.png)](https://opscom.wiki/uploads/images/gallery/2024-06/I0Dimage.png) Remember to click '**Save Ticket Type**' after making changes. Ticket Types can be deleted, however they are not actually removed from the system. They are archived to preserve the integrity of any data associated with this Ticket Type. ## Add New Ticket Type To add a new ticket type click '**Add New Ticket Type'**. A blank form will appear. [![image.png](https://opscom.wiki/uploads/images/gallery/2024-06/scaled-1680-/9Xpimage.png)](https://opscom.wiki/uploads/images/gallery/2024-06/9Xpimage.png) In this example we will add **Bicycle** as a New Ticket Type. - Ticket Type Name = Bicycle - Allow it to be Visible on Handhelds If you have **Violations Plus** you can enable the following options: - Select both Vehicle and Users for Violation Applies To - You also have an option to enable "Fail to Identify" [![image.png](https://opscom.wiki/uploads/images/gallery/2024-06/scaled-1680-/ze8image.png)](https://opscom.wiki/uploads/images/gallery/2024-06/ze8image.png) Click '**Save Ticket Type**'. The list will now include Bicycle as a Ticket Type. [![image.png](https://opscom.wiki/uploads/images/gallery/2024-06/scaled-1680-/AKqimage.png)](https://opscom.wiki/uploads/images/gallery/2024-06/AKqimage.png) ## Personal Violations Ops-Com offers the ability to write up a violation against an individual person. These types of offences could include violations for smoking, alcohol related offences, personal conduct, etc. When configuring this type of category simply select "Applies to" Users only, [![image.png](https://opscom.wiki/uploads/images/gallery/2024-06/scaled-1680-/sJZimage.png)](https://opscom.wiki/uploads/images/gallery/2024-06/sJZimage.png) # Sort Violations for Quick Access ## The Challenge When selecting an Offence, is there a way to change the order so that I can more quickly access it as opposed to scrolling down a long list?" ## The Approach It is possible to add some order to the list by adding spaces to the beginning of the violation name. In the example below we will reorder the list using this method. ## Changing Alphabetic Order The basic concept that we are taking advantage of the fact a <space> character comes before everything in the ASCII character table. So prefix a space (or multiple) will list first. - <space><space>zebra - <space>telephone - apple - bottle ### An Example As a practical example of this we will look at a sample list of violations where we'd like to change the sort order. To do so follow these steps. Click Admin Options, Violations, Manage Ticket Offence Items. [![image.png](https://opscom.wiki/uploads/images/gallery/2024-06/scaled-1680-/0syimage.png)](https://opscom.wiki/uploads/images/gallery/2024-06/0syimage.png) On the 'Manage Ticket Offence Items' screen, click the Offence Types drop down picker. [![image.png](https://opscom.wiki/uploads/images/gallery/2024-06/scaled-1680-/3ihimage.png)](https://opscom.wiki/uploads/images/gallery/2024-06/3ihimage.png) In our example we will select Private Property as the ticket type. [![image.png](https://opscom.wiki/uploads/images/gallery/2024-06/scaled-1680-/Kw9image.png)](https://opscom.wiki/uploads/images/gallery/2024-06/Kw9image.png) This will open another screen with the list of Violations under the Private Property ticket type. [![image.png](https://opscom.wiki/uploads/images/gallery/2024-06/scaled-1680-/HYQimage.png)](https://opscom.wiki/uploads/images/gallery/2024-06/HYQimage.png) ### Another Example In this example we will change the sort order so that Parked in No Parking Area lists first, Parked Blocking Fire Hydrant list second and the rest of the violations list in alphabetical order after that. 1. Click on 'Parked in No Parking Area' to select it. The screen will refresh with the Entry information for the violation. 2. Add a single space to the beginning of the Violation Type Description 3. Click on Save Violation Type [![image.png](https://opscom.wiki/uploads/images/gallery/2024-06/scaled-1680-/UVvimage.png)](https://opscom.wiki/uploads/images/gallery/2024-06/UVvimage.png) Note the resulting list now shows Parked in No Parking Area as first. [![image.png](https://opscom.wiki/uploads/images/gallery/2024-06/scaled-1680-/GpSimage.png)](https://opscom.wiki/uploads/images/gallery/2024-06/GpSimage.png) If we do the same process with Parked Blocking Fire Hydrant the listing will change once again putting the violation to the top of the list. [![image.png](https://opscom.wiki/uploads/images/gallery/2024-06/scaled-1680-/apNimage.png)](https://opscom.wiki/uploads/images/gallery/2024-06/apNimage.png) The space worked to bring the item up in the list but the list still sorts in alphabetical order placing Parked Blocking Fire Hydrant first. However we want this violation to be second in the listing. [![image.png](https://opscom.wiki/uploads/images/gallery/2024-06/scaled-1680-/fFtimage.png)](https://opscom.wiki/uploads/images/gallery/2024-06/fFtimage.png) To move 'Parked in No Parking Area' back on top add a second space to the beginning of the Violation Type Description and save the violation type.
The list on the left now shows 'Parked in No Parking Area' in first position and 'Parked Blocking Fire Hydrant' in second position.
[![image.png](https://opscom.wiki/uploads/images/gallery/2024-06/scaled-1680-/fVfimage.png)](https://opscom.wiki/uploads/images/gallery/2024-06/fVfimage.png) # Ticket Offence Items ## Managing Ticket Offence Items Hover over the **Admin Options** icon and click **Violations** then **Manage Ticket Offence Items.** [![image.png](https://opscom.wiki/uploads/images/gallery/2024-06/scaled-1680-/27rimage.png)](https://opscom.wiki/uploads/images/gallery/2024-06/27rimage.png) The **Manage** **Ticket Offence Items** screen lists the available **Ticket Types** and their associated offences. The default view will be **Unassigned Offence Items.** [![image.png](https://opscom.wiki/uploads/images/gallery/2024-06/scaled-1680-/9Oiimage.png)](https://opscom.wiki/uploads/images/gallery/2024-06/9Oiimage.png) ## Add New Offence Item In this example we will add a violation type to Private Property. Click on **Add New Offence Item** The screen will refresh with eh blank violation entry form. **Note:** The **Parked in Loading Zone** text is for placement only and simple stands as an example. [![image.png](https://opscom.wiki/uploads/images/gallery/2024-06/scaled-1680-/fD9image.png)](https://opscom.wiki/uploads/images/gallery/2024-06/fD9image.png) Edit this text to reflect the name of the violation you wish to configure. In our example here we are setting up **Parked With No Proof Of Payment** and selecting **Private Property** as the category. [![image.png](https://opscom.wiki/uploads/images/gallery/2024-06/scaled-1680-/0wkimage.png)](https://opscom.wiki/uploads/images/gallery/2024-06/0wkimage.png) ## Applying Discounts to Violations In the Future It is possible that you could issue a violation in the system with an offence item that had the **Apply Discount** button toggled off by accident or in the past. If you would like to apply a discount to these violations, you need to toggle the **Apply Discount** button as well as update the violation in question. Please follow this short video that demonstrates how we can do this. ## Setting the Fine Amount We can now set up the basic monetary perimeters of this violation. (See image below) In this example the fine amount is set at $30.00 The Apply Discount state is selected in order to allow the discount to apply. The discount amount is set to $10.00 and the number of days where the discount applies is set to 14. **Which means**: The fine is $30.00 but a discount of $10.00 will be applied if the fine is paid within 14 days making the collected fine $20.00. After 14 days the discount does not apply and the collected fine will be the full $30.00. Click on **Save Ticket Offence Item** to save this configuration. You will be returned to the list view with your new offence listed below the Ticket Type. [![image.png](https://opscom.wiki/uploads/images/gallery/2024-06/scaled-1680-/Mpdimage.png)](https://opscom.wiki/uploads/images/gallery/2024-06/Mpdimage.png) ## Optional Configurations **Key** The **Key** field is typically used by clients who want to indicate tracking codes for violations. **By-Law Code** The **By-Law Code** field is used by municipalities to send violations to court for collections. It is a text field that accepts 20 alpha-numeric characters. Ticket Offence Items can be deleted if there are no violations written for that particular violation. Once the violation has been used the violation can be archived but not deleted. They are archived in order to preserve the integrity of any data associated with this Offence Item. ## Adjust Fine Amount By selecting the "Adjust Fine Amount" box in the ticket configuration screen this will allow the patrol officer to change the fine amount i the field on the handheld unit. By default this feature is turned off and the fine amount will appear on the handheld unit as a grey text figure amount and it can not be edited. Once turned on however the fine amount will be in black text and officers will have the ability to edit the amount. Scenarios where this may be useful is for example, are repeat offenders or multiple offences. The officers can, at their discretion, increase the ticket amount and add a note explaining the augmentation of the fine due to repeat violations. Conversely, the fine may be reduced in some cases. When giving multiple violations for example should you not want to charge the full amount of two or three combined violations, the officer can adjust the fine amount lower in accordance with your business rules. ## Administration Fees You can create admin fees to be used in the system by selecting the **Administrative Fee** checkbox. This is useful for Conviction Fees or Booting Fees. It is also important to note that items designated as **Administration fees** do not show on the Handheld units. They will only be visible on the admin interface. In our example below we are setting up an $20.00 administration fee charged for **removing a boot from a vehicle**. Click on the **Administration Fee** box to toggle it on. This will make it so the offence item is no longer synced with the handheld stopping patrol officers from having the option to select this offence item in the future. Set the **Fine Amount** to $20.00 Click on **Save Ticket Offence Item** to save the item [![image.png](https://opscom.wiki/uploads/images/gallery/2024-06/scaled-1680-/DKKimage.png)](https://opscom.wiki/uploads/images/gallery/2024-06/DKKimage.png) ## Helpful information **Ordering the list of Violation Types** If you would like to sort the list of violations in a specific order the system will sort the list alphanumerically. Therefore if you number the **Violations Type Description** they will appear in the order you number them both on the admin interface as well as the handheld unit. Spaces also work; a space is considered higher than an 'A'.. So you can prefix the offences with spaces to assist with the sort order. For example: <space><space>Zebra offence <space>Test offence A test offence # Sending Alerts to Handhelds In the **Admin Options** menu, hover over **Violations**, then click **Handheld Common**. [![image.png](https://opscom.wiki/uploads/images/gallery/2024-06/scaled-1680-/9hKimage.png)](https://opscom.wiki/uploads/images/gallery/2024-06/9hKimage.png) The **Handhelds - Common Settings** page displays. Click the '**Push Message'** button beside the handheld that the alert is being sent to. [![image.png](https://opscom.wiki/uploads/images/gallery/2024-06/scaled-1680-/1UHimage.png)](https://opscom.wiki/uploads/images/gallery/2024-06/1UHimage.png) The '**Push Message Alert to Device**' screen displays. Enter the text for the alert being sent out in the Message section. You can change the Icon that will be sent to the handheld to show the ***type of alert*** by opening the Icon drop down menu. Click **'Send'** to push the alert to the chosen handheld. [![image.png](https://opscom.wiki/uploads/images/gallery/2024-06/scaled-1680-/tj5image.png)](https://opscom.wiki/uploads/images/gallery/2024-06/tj5image.png) # Incidents Setup - [Cameras](https://opscom.wiki/books/for-administrators-staff/page/cameras) - [Categories](https://opscom.wiki/books/for-administrators-staff/page/categories) - [Ethnic Types](https://opscom.wiki/books/for-administrators-staff/page/ethnic-types) - [Extended User Profile Options](https://opscom.wiki/books/for-administrators-staff/page/extended-user-profile-options) - [Flags](https://opscom.wiki/books/for-administrators-staff/page/flags) - [Missing Property Types](https://opscom.wiki/books/for-administrators-staff/page/missing-property-types) - [Relations](https://opscom.wiki/books/for-administrators-staff/page/relations) # Cameras 1. Under the **Admin Options**, hover over **Incidents**, then click on **Cameras.** [![image.png](https://opscom.wiki/uploads/images/gallery/2024-06/scaled-1680-/c0Fimage.png)](https://opscom.wiki/uploads/images/gallery/2024-06/c0Fimage.png) 2\. You will be redirected to the **Camera Administration** page. [![image.png](https://opscom.wiki/uploads/images/gallery/2024-06/scaled-1680-/igwimage.png)](https://opscom.wiki/uploads/images/gallery/2024-06/igwimage.png) To **add** a new camera: Type in the **Camera Name** and, **URL** in the provided textboxes, and choose a refresh time. If you would like the public to have access to this camera, click on the box that says **"Public Access"** to enable **Public Access.** Unselect the box if you wish to disable public access. Once all required information has been filled out, click **Insert** to save. [![image.png](https://opscom.wiki/uploads/images/gallery/2024-06/scaled-1680-/iw3image.png)](https://opscom.wiki/uploads/images/gallery/2024-06/iw3image.png) To **edit** a camera: Make your desired changes in the textboxes, then click **Update** to save. [![image.png](https://opscom.wiki/uploads/images/gallery/2024-06/scaled-1680-/UGBimage.png)](https://opscom.wiki/uploads/images/gallery/2024-06/UGBimage.png) To **delete** a camera: Select the camera you wish to delete, then click the **Delete** button to the right of that camera. A confirmation pop-up will appear. Click **OK** to continue and delete, or click **Cancel** to return to your previous screen. [![image.png](https://opscom.wiki/uploads/images/gallery/2024-06/scaled-1680-/ZpIimage.png)](https://opscom.wiki/uploads/images/gallery/2024-06/ZpIimage.png) # Categories ## How to Get to Categorize to Create or Edit
Click **Admin Options**, **Incidents**, and **Categories.**
[![image.png](https://opscom.wiki/uploads/images/gallery/2024-06/scaled-1680-/7fYimage.png)](https://opscom.wiki/uploads/images/gallery/2024-06/7fYimage.png) The **Edit Categories and Sub Categories** main page will display. To ***edit** a* Category, select the desired category from the listed items and click the pencil icon to edit. [![image.png](https://opscom.wiki/uploads/images/gallery/2024-06/scaled-1680-/zMmimage.png)](https://opscom.wiki/uploads/images/gallery/2024-06/zMmimage.png) The page will refresh and you will be able to ***edit*** your **Incident Category**. Change the category name and/or details as desired and click **"Save Incident Category".** [![image.png](https://opscom.wiki/uploads/images/gallery/2024-06/scaled-1680-/m7gimage.png)](https://opscom.wiki/uploads/images/gallery/2024-06/m7gimage.png) To **add** a new **Incident Category**, return to the **Edit Categories and Sub Categories** main page, and click **"Add New Category"** located at the bottom of the page. [![image.png](https://opscom.wiki/uploads/images/gallery/2024-06/scaled-1680-/e5Himage.png)](https://opscom.wiki/uploads/images/gallery/2024-06/e5Himage.png) The page will refresh. Fill out the details for your new ***Category Name***, select whether it's "***In-House***", enter the GIS number, and select if you'd like this category included in Reports. Click **"Save Incident Category".** [![image.png](https://opscom.wiki/uploads/images/gallery/2024-06/scaled-1680-/Y0Simage.png)](https://opscom.wiki/uploads/images/gallery/2024-06/Y0Simage.png) To check a category for **Sub-Categories**, return to the **Edit Categories and Sub Categories** main page. Select one of the categories by clicking on **Sub**. [![image.png](https://opscom.wiki/uploads/images/gallery/2024-06/scaled-1680-/Ipsimage.png)](https://opscom.wiki/uploads/images/gallery/2024-06/Ipsimage.png) The page will refresh, and you will have the option to ***add a sub-category***. [![image.png](https://opscom.wiki/uploads/images/gallery/2024-06/scaled-1680-/poYimage.png)](https://opscom.wiki/uploads/images/gallery/2024-06/poYimage.png) To ***add*** a new sub-category, enter the name you want for your sub-category. Enable the functions you wish to have in this subcategory. - If a ***Checklist*** is required, click **"Required".** - If it's to be ***Included in*** **Reports**, click **"Include"**. - Once you have finished, click **"Save SubCategory"**. # Ethnic Types ## Navigation to Ethnicity Administration To get to **Ethnicity Administration** click **Admin Options**, **Incidents,** followed by **Ethnicity.** [![image.png](https://opscom.wiki/uploads/images/gallery/2024-06/scaled-1680-/TF9image.png)](https://opscom.wiki/uploads/images/gallery/2024-06/TF9image.png) The **Ethnicity Administration** page will be displayed. This page will list all Ethnicity labels currently used in OPS-COM. ## Managing Ethnic Types ### Adding Types To add a new ethnicity, click **Add Ethnic Type**. A modal window will display allowing you to add your type. When you are finished adding your type click **Save Changes.** [![image.png](https://opscom.wiki/uploads/images/gallery/2024-06/scaled-1680-/Bfrimage.png)](https://opscom.wiki/uploads/images/gallery/2024-06/Bfrimage.png) ### Editing Types To edit/update an Ethnicity, click the **Edit** button next to the ethnicity you want to update. This will display a similar modal window as seen when adding an ethnic type and allow you to make your changes. When you are finished updating your type click **Save Changes**. When you make changes to records that are already used in the system then you will be changing this for all records in the system using that ethnic type. [![image.png](https://opscom.wiki/uploads/images/gallery/2024-06/scaled-1680-/r1gimage.png)](https://opscom.wiki/uploads/images/gallery/2024-06/r1gimage.png) ### Delete Types To delete an ethnic type, click the **Delete** button next to the type you wish to remove. Keep in mind that if ethnic types are in use then they cannot be deleted. [![image.png](https://opscom.wiki/uploads/images/gallery/2024-06/scaled-1680-/YFOimage.png)](https://opscom.wiki/uploads/images/gallery/2024-06/YFOimage.png) # Extended User Profile Options Under the **Admin Options**, hover over **Incidents**, then click on **Ext. Profile Options.** [![image.png](https://opscom.wiki/uploads/images/gallery/2024-06/scaled-1680-/HwUimage.png)](https://opscom.wiki/uploads/images/gallery/2024-06/HwUimage.png) You will be redirected to the **User Extended Values Administration** page. [![image.png](https://opscom.wiki/uploads/images/gallery/2024-06/scaled-1680-/WWRimage.png)](https://opscom.wiki/uploads/images/gallery/2024-06/WWRimage.png) Notice the various **types** you can choose form to narrow your description. [![image.png](https://opscom.wiki/uploads/images/gallery/2024-06/scaled-1680-/l3Nimage.png)](https://opscom.wiki/uploads/images/gallery/2024-06/l3Nimage.png) This is where you can **add** and **update** Extended Values. To **add** an extended value: Scroll to the bottom of the values list to the blank textbox line. Select **value type** from the drop-down menu. Type the **value description** in the textbox provided. Click **Insert New** to add and save user value. [![image.png](https://opscom.wiki/uploads/images/gallery/2024-06/scaled-1680-/4Wuimage.png)](https://opscom.wiki/uploads/images/gallery/2024-06/4Wuimage.png) Note: A **Value Type** is a category you select to distinguish what your value description will be about. Example: If your **value type** is Hair Type, then your **value description** would be what the users' hair is like. **Value Description** can include a range of physical features/identifiers of a user. Some examples could include; the location of a tattoo on a users' body, the colour of clothing they're wearing, or the style of hair they have. Value descriptions allow officers to save unique identifiers of a user involved in an incident. ## Editing an Extended Value Click on **Update** to edit the value. [![image.png](https://opscom.wiki/uploads/images/gallery/2024-06/scaled-1680-/7zmimage.png)](https://opscom.wiki/uploads/images/gallery/2024-06/7zmimage.png) Adjust the **category, and name by selecting the textbox and making the desired changes. In this case we are changing Bald to Balding. [![image.png](https://opscom.wiki/uploads/images/gallery/2024-06/scaled-1680-/m9Mimage.png)](https://opscom.wiki/uploads/images/gallery/2024-06/m9Mimage.png) When you are finished updating, click **Save Changes** to save and continue. # Flags ## Adding or Editing an Incident Flag From the **Admin Options** menu, hover over **Incidents**, then click on **Flags.** [![image.png](https://opscom.wiki/uploads/images/gallery/2024-06/scaled-1680-/AYHimage.png)](https://opscom.wiki/uploads/images/gallery/2024-06/AYHimage.png) You will be redirected to the **Edit Flags** page. [![image.png](https://opscom.wiki/uploads/images/gallery/2024-06/scaled-1680-/kAsimage.png)](https://opscom.wiki/uploads/images/gallery/2024-06/kAsimage.png) To ***add*** a flag: Click on the empty text box, and fill in the name you want for this flag. You can then choose to toggle whether this item appears on reports. The **Include In Reports** checkmark is on by default. Click **"Add"** to complete the item entry. [![image.png](https://opscom.wiki/uploads/images/gallery/2024-06/scaled-1680-/W4Iimage.png)](https://opscom.wiki/uploads/images/gallery/2024-06/W4Iimage.png) The new Flag entry will now appear in the list and is ready to use in incident reporting. [![image.png](https://opscom.wiki/uploads/images/gallery/2024-06/scaled-1680-/wBvimage.png)](https://opscom.wiki/uploads/images/gallery/2024-06/wBvimage.png) # Missing Property Types 1. Click **Admin Options**, I**ncidents** and **Missing Property Types.** [![image.png](https://opscom.wiki/uploads/images/gallery/2024-06/scaled-1680-/DrDimage.png)](https://opscom.wiki/uploads/images/gallery/2024-06/DrDimage.png) 2. The **Edit Missing Property Types and Fields** page will display. You can edit, retrieve and/or add a new Property Type. [![image.png](https://opscom.wiki/uploads/images/gallery/2024-06/scaled-1680-/X32image.png)](https://opscom.wiki/uploads/images/gallery/2024-06/X32image.png) 3. To **add** a new missing property type: - Click the **Add Type** button, and the page will refresh. - Type the type of missing property in the textbox provided. - When finished, click **Save Type**. It will now say **SAVED** across the bottom. [![image.png](https://opscom.wiki/uploads/images/gallery/2024-06/scaled-1680-/qYPimage.png)](https://opscom.wiki/uploads/images/gallery/2024-06/qYPimage.png) [![image.png](https://opscom.wiki/uploads/images/gallery/2024-06/scaled-1680-/mDIimage.png)](https://opscom.wiki/uploads/images/gallery/2024-06/mDIimage.png) [![image.png](https://opscom.wiki/uploads/images/gallery/2024-06/scaled-1680-/oKbimage.png)](https://opscom.wiki/uploads/images/gallery/2024-06/oKbimage.png) 4\. To ***edit*** a missing property type: - Select the missing property type you wish to edit from the drop-down menu, then click **"Retrieve"** - The page will refresh to show the property type, and fields associated with it. To add a field to this property, click on **"Add New Field".** - Type in the **Field Name** in the textbox, select the **Field Type** from the dropdown menu (i.e checkbox, textbox etc.) and select whether or not it is ***a required field*** by clicking on the **Required** box. - Once you have finished, click **Save Field** to save. [![image.png](https://opscom.wiki/uploads/images/gallery/2024-06/scaled-1680-/pc8image.png)](https://opscom.wiki/uploads/images/gallery/2024-06/pc8image.png) [![image.png](https://opscom.wiki/uploads/images/gallery/2024-06/scaled-1680-/i73image.png)](https://opscom.wiki/uploads/images/gallery/2024-06/i73image.png) 5\. To **delete** a missing property type: - Select the property type you wish to delete from the drop down menu, and click **Retrieve**. - If there are **no** fields found associated with that property, you can immediately click **Delete**. [![image.png](https://opscom.wiki/uploads/images/gallery/2024-06/scaled-1680-/evTimage.png)](https://opscom.wiki/uploads/images/gallery/2024-06/evTimage.png) - If there **are** fields found associated with that property, select the **Delete** checkbox attached to that field, then click **Save All**. - The field attached to that property will be deleted. You may then follow the above instructions to **Delete** the property type. [![image.png](https://opscom.wiki/uploads/images/gallery/2024-06/scaled-1680-/dx6image.png)](https://opscom.wiki/uploads/images/gallery/2024-06/dx6image.png) # Relations ## Adding a Relation to the List Click **Admin Options**, **Incidents** then **Relations.** [![image.png](https://opscom.wiki/uploads/images/gallery/2024-06/scaled-1680-/HbOimage.png)](https://opscom.wiki/uploads/images/gallery/2024-06/HbOimage.png) You will be redirected to the **Relation Administration** page. [![image.png](https://opscom.wiki/uploads/images/gallery/2024-06/scaled-1680-/Hazimage.png)](https://opscom.wiki/uploads/images/gallery/2024-06/Hazimage.png) You can **add** or **edit** your Relation Options. - To **edit: Select the relation you wish to edit, change the textbox as desired, and click **update**. - To **add: Select the empty textbox at the bottom, type in what you want as the relation, and click **Insert New.** [![image.png](https://opscom.wiki/uploads/images/gallery/2024-06/scaled-1680-/Df7image.png)](https://opscom.wiki/uploads/images/gallery/2024-06/Df7image.png) # Alarms Setup ## Setting up Alarms in OPS-COM please refer to the following article Guide to System Settings to see how we can set up **Generic, People,** and **Plate** **Alarms**. We can get to the alarm settings by going to **System Settings** → **Alarms** [![image.png](https://opscom.wiki/uploads/images/gallery/2024-06/scaled-1680-/Qjfimage.png)](https://opscom.wiki/uploads/images/gallery/2024-06/Qjfimage.png) ## Additional OPS-COM Triggers ### Warning Email Trigger List See the child page ### Email Alert List See the child page # Email Alert List ## Getting to Alerts & Alarms To get to the alerts and alarms go to **Admin Options**, **Alerts & Alarms** followed by **Email Alert List.** [![image.png](https://opscom.wiki/uploads/images/gallery/2024-06/scaled-1680-/CA8image.png)](https://opscom.wiki/uploads/images/gallery/2024-06/CA8image.png) The **Alert Email Trigger List** page will display. [![image.png](https://opscom.wiki/uploads/images/gallery/2024-06/scaled-1680-/Vq3image.png)](https://opscom.wiki/uploads/images/gallery/2024-06/Vq3image.png) ## Adding and Adjusting Emails ### Adding Emails To add an email to receive alerts via E-Mail, click the **Add Alert Email** button at the top. A new modal window will appear allowing you to add a new email address as well as the option to make the alert inactive.| [![image.png](https://opscom.wiki/uploads/images/gallery/2024-06/scaled-1680-/N9gimage.png)](https://opscom.wiki/uploads/images/gallery/2024-06/N9gimage.png) ### Editing Emails To update an email that currently exists under the alert email list, click on the **Edit** button on the same row as the email you wish to change. This will bring up a modal window similar to the one you see when adding an email. This window allows you to update the email address as well as toggle the email as either active or inactive. If the button is darkened this indicated the email is active. If the button is white then it indicates the user is inactive. [![image.png](https://opscom.wiki/uploads/images/gallery/2024-06/scaled-1680-/mRrimage.png)](https://opscom.wiki/uploads/images/gallery/2024-06/mRrimage.png) ## Deleting Emails To delete an email from the list, click the **Delete** button on the same row as the email you wish to delete. This will bring up a modal window asking if you are sure you want to delete the email alert. Simply click the **Delete** button from the modal window to remove the email. [![image.png](https://opscom.wiki/uploads/images/gallery/2024-06/scaled-1680-/LVEimage.png)](https://opscom.wiki/uploads/images/gallery/2024-06/LVEimage.png) Keep in mind that deleting an email is not the same as archiving/deactivating an email. Once the email has been deleted it is removed from both the archived and active lists. ## Archiving Alert Emails You can also choose to archive a particular email if you would like to make it temporarily unavailable to receive email alerts. By default you will not see the archived users as this requires you to click the **Toggle Archived** button. [![image.png](https://opscom.wiki/uploads/images/gallery/2024-06/scaled-1680-/sAZimage.png)](https://opscom.wiki/uploads/images/gallery/2024-06/sAZimage.png) This will display the highlighted users in red and allow you to edit or delete the email if you wish. To activate emails again make sure that you toggle the **Active** field on. # Warning Email Trigger List ## Getting to Warning Email Trigger List Under the **Admin Options**, hover over **Alerts & Alarms**, then click **Warning Email Trigger List.** [![image.png](https://opscom.wiki/uploads/images/gallery/2024-06/scaled-1680-/w5jimage.png)](https://opscom.wiki/uploads/images/gallery/2024-06/w5jimage.png) You will be redirected to the **Warning Email Trigger List** page. From here, you can add, edit, or delete your **Warning Email.** [![image.png](https://opscom.wiki/uploads/images/gallery/2024-06/scaled-1680-/tfUimage.png)](https://opscom.wiki/uploads/images/gallery/2024-06/tfUimage.png) ## Adding and Adjusting Email To **add** an email: Select Add Warning Email, then enter the email address in the text box and click **Save Changes.** [![image.png](https://opscom.wiki/uploads/images/gallery/2024-06/scaled-1680-/5pzimage.png)](https://opscom.wiki/uploads/images/gallery/2024-06/5pzimage.png) To **edit** an email: Select Edit then make the desired changes, then click **Save Changes.** [![image.png](https://opscom.wiki/uploads/images/gallery/2024-06/scaled-1680-/Ddsimage.png)](https://opscom.wiki/uploads/images/gallery/2024-06/Ddsimage.png) To **delete** an email: Click on the **Delete** button to the right side of the email you want to delete. A pop-up confirmation window will appear. Click **Delete to delete, or click **Cancel** to return to previous page. [![image.png](https://opscom.wiki/uploads/images/gallery/2024-06/scaled-1680-/hwCimage.png)](https://opscom.wiki/uploads/images/gallery/2024-06/hwCimage.png) # Dispatch Setup - [Dispatch Categories](https://opscom.wiki/books/for-administrators-staff/page/dispatch-categories) - [Sources - Dispatch](https://opscom.wiki/books/for-administrators-staff/page/sources-dispatch) # Dispatch Categories ## Navigating to Dispatch Categories To get to this page, click on **Admin Options**, hover over **Dispatch**, then click **Categories.** [![image.png](https://opscom.wiki/uploads/images/gallery/2024-06/scaled-1680-/Cylimage.png)](https://opscom.wiki/uploads/images/gallery/2024-06/Cylimage.png) You will be redirected to the **Dispatch Categories Administration** page. It will display a list of all categories currently in your system. From this page, you may add/edit/remove a **Category**. ## Managing Dispatch Categories ### Adding Categories To add a new dispatch category click on **Add Dispatch Category.** A new modal window will appear allowing you to type your category name. Click **Save Changes** when you are finished. [![image.png](https://opscom.wiki/uploads/images/gallery/2024-06/scaled-1680-/4k7image.png)](https://opscom.wiki/uploads/images/gallery/2024-06/4k7image.png) Edit Categories To edit dispatch categories click the **Edit** button next to the category name. This will bring up a modal window similar to the one seen when adding categories. Click **Save Changes** when you are finished editing the category. [![image.png](https://opscom.wiki/uploads/images/gallery/2024-06/scaled-1680-/mQKimage.png)](https://opscom.wiki/uploads/images/gallery/2024-06/mQKimage.png) Editing dispatch categories that are being used will update them across the entire system. Delete Categories To delete a dispatch category simply click the **Delete** button next to the category name. Keep in mind you will not be able to delete categories that are being used. [![image.png](https://opscom.wiki/uploads/images/gallery/2024-06/scaled-1680-/1Gqimage.png)](https://opscom.wiki/uploads/images/gallery/2024-06/1Gqimage.png) # Sources - Dispatch 1. Click **Admin Options**, **Dispatch** and **Sources.** [![image.png](https://opscom.wiki/uploads/images/gallery/2024-06/scaled-1680-/Gsbimage.png)](https://opscom.wiki/uploads/images/gallery/2024-06/Gsbimage.png) 2. The **Dispatch Category Link Administration** page will display. From here, you can add, edit, and/or delete **Source Names**, and **Categories** as needed. [![image.png](https://opscom.wiki/uploads/images/gallery/2024-06/scaled-1680-/8B9image.png)](https://opscom.wiki/uploads/images/gallery/2024-06/8B9image.png) 3. To ***add*** a new source: - Scroll to the bottom of the **Dispatch Category Link Administration** page. Select the blank text box and type in the name of your new source. - Select the categories that should be linked to this source from the connected drop-down menu. - *Note: If you want to select all categories when you create this new source, you may left-click on the first category in the list (which will show up highlighted in blue once selected) and scroll down to select all.* - Click on Insert Newto add your new source, and the selected category links. [![image.png](https://opscom.wiki/uploads/images/gallery/2024-06/scaled-1680-/SkUimage.png)](https://opscom.wiki/uploads/images/gallery/2024-06/SkUimage.png) 4\. To ***edit*** a source: - Choose the source you wish to edit from the list of sources (found on the **Dispatch Category Link Administration** page). - Make the desired changes to the textbox (source name) and categories selected, then click **Update** to save. [![image.png](https://opscom.wiki/uploads/images/gallery/2024-06/scaled-1680-/fIdimage.png)](https://opscom.wiki/uploads/images/gallery/2024-06/fIdimage.png) 5\. To ***delete*** a source: - Find the source you wish to delete in the list of sources, then click the **Delete** button, found on the right-hand side of the page. - A confirmation pop-up will appear. Click **OK** to confirm the delete, or click **Cancel** to return to previous page. [![image.png](https://opscom.wiki/uploads/images/gallery/2024-06/scaled-1680-/ITkimage.png)](https://opscom.wiki/uploads/images/gallery/2024-06/ITkimage.png) [![image.png](https://opscom.wiki/uploads/images/gallery/2024-06/scaled-1680-/Yr0image.png)](https://opscom.wiki/uploads/images/gallery/2024-06/Yr0image.png) # Distribution Setup - [Users - Distribution Admin Options](https://opscom.wiki/books/for-administrators-staff/page/users-distribution-admin-options) - [Search for a User](https://opscom.wiki/books/for-administrators-staff/page/search-for-a-user) - [Departments](https://opscom.wiki/books/for-administrators-staff/page/departments) - [Alerts - Distribution](https://opscom.wiki/books/for-administrators-staff/page/alerts-distribution) - [Actions - Distribution](https://opscom.wiki/books/for-administrators-staff/page/actions-distribution) - [Status - Distribution](https://opscom.wiki/books/for-administrators-staff/page/status-distribution) - [Warnings - Distribution](https://opscom.wiki/books/for-administrators-staff/page/warnings-distribution) # Users - Distribution Admin Options
1. Under **Admin Options**, hover over **Distribution**, then click **Users**.
[![image.png](https://opscom.wiki/uploads/images/gallery/2024-06/scaled-1680-/kVzimage.png)](https://opscom.wiki/uploads/images/gallery/2024-06/kVzimage.png) 2\. You will be redirected to the **Distribution User Admin** page. Complete the required fields, (marked with a red** \***). Select the checkbox to allow the user to log in and manage Distribution Reports. Select **YES** if this user can view **Private Details,** or select **NO** to not allow this function. Once you are finished, click **Add New** to save. [![image.png](https://opscom.wiki/uploads/images/gallery/2024-06/scaled-1680-/QGkimage.png)](https://opscom.wiki/uploads/images/gallery/2024-06/QGkimage.png)
# Search for a User
1. To get to this page, click on **Admin Options**, hover over **Distribution**, then click **Search by a User.**
[![image.png](https://opscom.wiki/uploads/images/gallery/2024-06/scaled-1680-/BQ3image.png)](https://opscom.wiki/uploads/images/gallery/2024-06/BQ3image.png) 2\. You will be redirected to the **Distribution User Search** page. To search for a user, fill out the form provided, then click **"Search".** [![image.png](https://opscom.wiki/uploads/images/gallery/2024-06/scaled-1680-/TVXimage.png)](https://opscom.wiki/uploads/images/gallery/2024-06/TVXimage.png)
# Departments 1. Under **Admin Options**, hover over **Distribution**, then click **Departments.** [![image.png](https://opscom.wiki/uploads/images/gallery/2024-06/scaled-1680-/3Olimage.png)](https://opscom.wiki/uploads/images/gallery/2024-06/3Olimage.png) 2\. You will be redirected to the **Distribution Department Administration** page. [![image.png](https://opscom.wiki/uploads/images/gallery/2024-06/scaled-1680-/Q7gimage.png)](https://opscom.wiki/uploads/images/gallery/2024-06/Q7gimage.png) 3\. To ***add*** a new Department: Click on the drop-down menu, and select "**Add a New Distribution Department**", then click "**Go".** Type in the name you'd like for the department, then click **"Add New".** [![image.png](https://opscom.wiki/uploads/images/gallery/2024-06/scaled-1680-/Racimage.png)](https://opscom.wiki/uploads/images/gallery/2024-06/Racimage.png) 4\. To ***edit*** a Department: Select the department you wish to edit from the drop-down menu, and click **Go**. Make the desired changes to the department name in the textbox, and click **Update** to save. [![image.png](https://opscom.wiki/uploads/images/gallery/2024-06/scaled-1680-/wxYimage.png)](https://opscom.wiki/uploads/images/gallery/2024-06/wxYimage.png) # Alerts - Distribution 1. Click **Admin Options**, **Distribution** then **Alerts.** [![image.png](https://opscom.wiki/uploads/images/gallery/2024-06/scaled-1680-/u06image.png)](https://opscom.wiki/uploads/images/gallery/2024-06/u06image.png) 2\. The **Distribution Alert Administration** page displays. To see a list of existing Distribution Alerts, click on the drop-down menu. If you would like to **add** a new **Distribution Alert,** click on the drop-down menu, and select "**Add a New Distribution Alert**". [![image.png](https://opscom.wiki/uploads/images/gallery/2024-06/scaled-1680-/PPXimage.png)](https://opscom.wiki/uploads/images/gallery/2024-06/PPXimage.png) 3\. The **Distribution Alert Administration** page will refresh, with detail-options for your ***new*** **Distribution Alert**. Fill out the required information fields, and click **"Add New".** [![image.png](https://opscom.wiki/uploads/images/gallery/2024-06/scaled-1680-/spbimage.png)](https://opscom.wiki/uploads/images/gallery/2024-06/spbimage.png) 4\. To **edit** your distribution alert, click on the dropdown menu, select the alert that you want to edit and click **"Go"**. - If you want to have the Alert ***visible***, enable **"Yes".** If you do not want the Alert visible, enable**"No".** To **edit** the Alert Name, click on the current alert name to edit it. - If you want to change the Alert Colour (HEX) click on the text box beside **"Alert Colour (HEX)"**. - To change the sort order, click the box beside "**Sort Order**". - If you would like to **delete/archive** an alert, click on the dropdown menu, select the item you want to delete and click **"Delete".** [![image.png](https://opscom.wiki/uploads/images/gallery/2024-06/scaled-1680-/igQimage.png)](https://opscom.wiki/uploads/images/gallery/2024-06/igQimage.png) # Actions - Distribution 1. Click **Admin Options**, **Distribution** then **Actions.** [![image.png](https://opscom.wiki/uploads/images/gallery/2024-06/scaled-1680-/Umdimage.png)](https://opscom.wiki/uploads/images/gallery/2024-06/Umdimage.png) 2\. The **Distribution Action Administration** page will display. To see your current "**Actions**", click on the dropdown menu. To add a new action click on **"Add a New Distribution Action"**, and click "**Go".** [![image.png](https://opscom.wiki/uploads/images/gallery/2024-06/scaled-1680-/7rKimage.png)](https://opscom.wiki/uploads/images/gallery/2024-06/7rKimage.png) 3\. Fill out the fields below and click **"Add New".** If you want to *delete* this Action, repeat step 2 and click "Delete". [![image.png](https://opscom.wiki/uploads/images/gallery/2024-06/scaled-1680-/VGSimage.png)](https://opscom.wiki/uploads/images/gallery/2024-06/VGSimage.png) 4\. To ***edit*** this action, repeat step 2. When the screen refreshes you can edit the Action name by clicking on the name and changing it. To change the sort order click on the box beside **"Sort Order"**. If you want to keep the action visible, enable either ***"Yes"*** or ***"No"*** beside **"Action Visible".** [![image.png](https://opscom.wiki/uploads/images/gallery/2024-06/scaled-1680-/0xGimage.png)](https://opscom.wiki/uploads/images/gallery/2024-06/0xGimage.png) # Status - Distribution 1. Click **Admin Options**, **Distribution** and **"Status".** [![image.png](https://opscom.wiki/uploads/images/gallery/2024-06/scaled-1680-/DlqgwAimage.png)](https://opscom.wiki/uploads/images/gallery/2024-06/DlqgwAimage.png) 2\. The **Distribution Status Administration** page displays. To add a ***new*** **Status**, click on the drop-down menu . Select **"Add new Distribution Status"** from the listed options and click **"Go".** [![image.png](https://opscom.wiki/uploads/images/gallery/2024-06/scaled-1680-/dU7image.png)](https://opscom.wiki/uploads/images/gallery/2024-06/dU7image.png) 3\. The page will refresh and you can fill out the form to add a new status. Click **"Add New"** to save the information. [![image.png](https://opscom.wiki/uploads/images/gallery/2024-06/scaled-1680-/lw0image.png)](https://opscom.wiki/uploads/images/gallery/2024-06/lw0image.png) - To ***edit*** a status, choose a status from the dropdown menu. When the page refreshes, fill in the required information fields and click**"Update"**. - To ***delete*** a status, choose a status from the dropdown menu. When the page refreshes, click **"Delete".** [![image.png](https://opscom.wiki/uploads/images/gallery/2024-06/scaled-1680-/v8Pimage.png)](https://opscom.wiki/uploads/images/gallery/2024-06/v8Pimage.png) # Warnings - Distribution 1. Click **Admin Options**, **Distribution** and **"Warnings".** [![image.png](https://opscom.wiki/uploads/images/gallery/2024-06/scaled-1680-/BT5image.png)](https://opscom.wiki/uploads/images/gallery/2024-06/BT5image.png) 2\. The **Distribution Warning Administration** page displays. To ***add*** a new warning, click **"Add a New Distribution Warning"** and click **"Go".** [![image.png](https://opscom.wiki/uploads/images/gallery/2024-06/scaled-1680-/xHiimage.png)](https://opscom.wiki/uploads/images/gallery/2024-06/xHiimage.png) 3\. Once the page has refreshed, fill out the required information fields and click **"Add New"**. [![image.png](https://opscom.wiki/uploads/images/gallery/2024-06/scaled-1680-/WyMimage.png)](https://opscom.wiki/uploads/images/gallery/2024-06/WyMimage.png) 4\. To **edit** an existing Distribution Warning, click the dropdown menu and choose the warning you want to edit. Click **"Go"**. Once the page has refreshed, ***edit*** the items that you want to change on this warning and click **"Update"**. [![image.png](https://opscom.wiki/uploads/images/gallery/2024-06/scaled-1680-/NHAimage.png)](https://opscom.wiki/uploads/images/gallery/2024-06/NHAimage.png) 5\. To delete/archive your selected warning, click "**Delete**"**.** [![image.png](https://opscom.wiki/uploads/images/gallery/2024-06/scaled-1680-/fZ9image.png)](https://opscom.wiki/uploads/images/gallery/2024-06/fZ9image.png) # Resolve Duplicate Report 1. To address this issue, go into **Tools** , hover over **Resolve Duplicates**, then click **By Vehicle.** [![2024-08-13_14-42-30.png](https://opscom.wiki/uploads/images/gallery/2024-08/2024-08-13-14-42-30.png)](https://opscom.wiki/uploads/images/gallery/2024-06/GbXimage.png) 2\. You will be presented with two choices: '**Strict Duplicate**' or '**Include Different Plate Types**'. - '**Strict Duplicate**' will generate a list of vehicles where all three unique identifiers are identical (Plate, State/Province, Plate Type) - '**Include Different Plate Types**' will generate a list of vehicles where Plate and State might be identical but the Plate Type differs. This list will allow you to see what vehicles may be duplicated in error. The easiest way to recognize the duplicates in question is to compare the vehicle description. If, for example a vehicle, is a beige BMW sports car with the plate ABC123, province is Ontario, and the Plate Type is unspecified but there is another vehicle that is a beige BMW sports car with the plate ABC123, province is Ontario and the Plate Type is Passenger it is likely a duplicate and the two vehicles could be merged. See Below: [![2024-08-13_14-42-54.png](https://opscom.wiki/uploads/images/gallery/2024-08/2024-08-13-14-42-54.png)](https://opscom.wiki/uploads/images/gallery/2024-06/PF2image.png) 3\. By clicking on the provided **Merge** button you will be taken to the merge function window where you can merge the two vehicles together. [![2024-08-13_14-41-29.png](https://opscom.wiki/uploads/images/gallery/2024-08/2024-08-13-14-41-29.png)](https://opscom.wiki/uploads/images/gallery/2024-06/UZrimage.png) # History Search ## Performing a History Search Click **Admin Options** and **History Search.** [![image.png](https://opscom.wiki/uploads/images/gallery/2024-06/scaled-1680-/07wimage.png)](https://opscom.wiki/uploads/images/gallery/2024-06/07wimage.png) The **History Dump** page will be displayed. You can search by typing in any ***Student/Employee Number***, [![image.png](https://opscom.wiki/uploads/images/gallery/2024-06/scaled-1680-/HBeimage.png)](https://opscom.wiki/uploads/images/gallery/2024-06/HBeimage.png) ***Violation Ticket...*** [![image.png](https://opscom.wiki/uploads/images/gallery/2024-06/scaled-1680-/seOimage.png)](https://opscom.wiki/uploads/images/gallery/2024-06/seOimage.png) ***History Description*** or a combination of the three. In this example, we are searching by the Violation Ticket. Click **"Submit"** to search. The page will refresh - here you will see some, or all of the ParkAdmin history based on your search criteria entered above. [![image.png](https://opscom.wiki/uploads/images/gallery/2024-06/scaled-1680-/lNtimage.png)](https://opscom.wiki/uploads/images/gallery/2024-06/lNtimage.png) # What Does Purge Old Data Do? Under the **Admin Options** menu, click on "**Purge Old Data**". [![image.png](https://opscom.wiki/uploads/images/gallery/2024-06/scaled-1680-/iEtimage.png)](https://opscom.wiki/uploads/images/gallery/2024-06/iEtimage.png) When you click on '**Purge Old Data**', a progress bar will appear indicating the number of records to be purged as it finds them. [![image.png](https://opscom.wiki/uploads/images/gallery/2024-06/scaled-1680-/oL0image.png)](https://opscom.wiki/uploads/images/gallery/2024-06/oL0image.png) A list is formulated of any user activity, and any associated record updates that have occurred in the last seven years. To complete the process, click on **Purge these records**. [![image.png](https://opscom.wiki/uploads/images/gallery/2024-06/scaled-1680-/Qpzimage.png)](https://opscom.wiki/uploads/images/gallery/2024-06/Qpzimage.png) A record can remain dormant for 6 years and a small update will restart the 7-year clock. The activity list is used to determine what to exclude from a purge. The script then purges any data that is not on the activity list. **What gets purged?** The following will get purged if there has been no activity in the last 7 years: - User profiles - Vehicles - Violations - Permits - Appeals - Temp Permits - Payments - Lockers - Access Cards - Gate Events - Refunds - Waitlist Records - User History The following will **NOT** get purged regardless of the last updated date: - Incident Users - Contact History # Purging Incidents from OPS-COM 1. You must add the "Delete Incidents" permission to the Admins you want to give this ability to. 2. There are two ways to purge selected Incidents: either by searching for a particular incident and clicking the "Delete Incident" button or by using the "Purge Incidents" tool. # Using the Delete Incident Button 1. Search for the incident you wish to purge. You can see the "Delete Incident" button is available with the incident if it is older than 7 years. [![image.png](https://opscom.wiki/uploads/images/gallery/2024-06/scaled-1680-/dZUimage.png)](https://opscom.wiki/uploads/images/gallery/2024-06/dZUimage.png) 2. You can see that the "Delete Not Available" button is greyed out when the incident is less than 7 years old. [![image.png](https://opscom.wiki/uploads/images/gallery/2024-06/scaled-1680-/QJ9image.png)](https://opscom.wiki/uploads/images/gallery/2024-06/QJ9image.png) Follow the prompts to delete the incident. # Using the Purge Incidents Tool 1. Click Admin Options, Purge Incidents. 2. The 'Search for Incidents to Purge' screen displays. Enter your criteria. *Note, only the oldest 300 records will be displayed. **Note that the Number of Instances is greater than or equal to the search field. Therefore supplying 1 here could still display incident instances greater than 1.*** 3. Enable the "Delete" checkbox next to the incident you wish to purge. [![image.png](https://opscom.wiki/uploads/images/gallery/2024-06/scaled-1680-/21kimage.png)](https://opscom.wiki/uploads/images/gallery/2024-06/21kimage.png) 4. Click the 'Purge Records' button. A confirmation prompt will display. Click the 'Delete' button. [![image.png](https://opscom.wiki/uploads/images/gallery/2024-06/scaled-1680-/b9Rimage.png)](https://opscom.wiki/uploads/images/gallery/2024-06/b9Rimage.png) 5. The incident will be purged. ***Note, this is not reversible. Use Caution when deleting records.*** # Deposit Options ## Navigating to Deposits To get to the Manage Deposits page: - Select the **Admin Options** icon - Select the **Manage Deposit Types** option - Select **Manage Deposit Type** from the drop-down menu (Currently, this menu item cannot be accessed from any pages that are still in **Beta**.) [![image.png](https://opscom.wiki/uploads/images/gallery/2024-06/scaled-1680-/pIqimage.png)](https://opscom.wiki/uploads/images/gallery/2024-06/pIqimage.png) This will take you to the **Manage Deposits** page. [![image.png](https://opscom.wiki/uploads/images/gallery/2024-06/scaled-1680-/Uu1image.png)](https://opscom.wiki/uploads/images/gallery/2024-06/Uu1image.png) ## Creating New Deposits On the **Manage Deposits** screen, new deposit types can be added by clicking **Add Deposit Type.** [![image.png](https://opscom.wiki/uploads/images/gallery/2024-06/scaled-1680-/GFdimage.png)](https://opscom.wiki/uploads/images/gallery/2024-06/GFdimage.png) Fill out the information as needed and click **Save Changes**. Below are descriptions of the different fields, but are not all required: - **Label** - The name that will be used to identify the deposit type. - **Placeholder Text** - This field is optional. The prompt or sample information that will appear in the deposit information text. - **Flags** - Toggles the ability to edit the **Assignable Text** field in the resulting active deposit record. This will appear in the user's profile. (See below) - **Deposit Amount** - The amount the deposit will cost. [![image.png](https://opscom.wiki/uploads/images/gallery/2024-06/scaled-1680-/a2Limage.png)](https://opscom.wiki/uploads/images/gallery/2024-06/a2Limage.png) ## Editing Existing Deposits Click **Edit** to make changes to existing deposits. Make any changes needed, then press **Save Changes** when finished. [![image.png](https://opscom.wiki/uploads/images/gallery/2024-06/scaled-1680-/EHeimage.png)](https://opscom.wiki/uploads/images/gallery/2024-06/EHeimage.png) See the information under **Creating New Deposits** in this article for more information on what the individual fields are used for. ## Finding Deposit Usage A list of all deposits that have been setup and those currently in use can be viewed from the **Manage Deposits** page. A deposit can only be deleted if it is not currently being used anywhere in the system. Once a deposit has been assigned or used in the system, the option to delete it will no longer be available and will instead be replaced by a count of its usage. [![image.png](https://opscom.wiki/uploads/images/gallery/2024-06/scaled-1680-/dsiimage.png)](https://opscom.wiki/uploads/images/gallery/2024-06/dsiimage.png) # View System Task Logs ## Viewing the Logs To view System Task Logs, go to **'Admin Options'** then click on **'View System Task Logs'** [![image.png](https://opscom.wiki/uploads/images/gallery/2024-06/scaled-1680-/kYVimage.png)](https://opscom.wiki/uploads/images/gallery/2024-06/kYVimage.png) You will be redirected to this page. This is where you can see the System Task Logs. There are two sections to the page which are recurring tasks and single tasks. From this screen we can see stats on when the task has run and how long it took to run. [![image.png](https://opscom.wiki/uploads/images/gallery/2024-06/scaled-1680-/xTEimage.png)](https://opscom.wiki/uploads/images/gallery/2024-06/xTEimage.png) ## Viewing Recurring Tasks To view an output about a recurring task task, click on the **'Logs'** button to pop up a window that will will show details on the task. For recurring tasks the pop up screen will list ststitics on the multiplr times the task was run. [![image.png](https://opscom.wiki/uploads/images/gallery/2024-06/scaled-1680-/XB5image.png)](https://opscom.wiki/uploads/images/gallery/2024-06/XB5image.png) ## Viewing Single Tasks To view details on single tasks click on the **Logs** button to popup a window with details on the task. The details popup will display: - **Invoice Date:** When the invoice was made - **Total recipients invoiced:** Amount of invoices run by this task - **Total Amount Invoiced:** Amount of the invoice [![image.png](https://opscom.wiki/uploads/images/gallery/2024-06/scaled-1680-/sIeimage.png)](https://opscom.wiki/uploads/images/gallery/2024-06/sIeimage.png) # Reports Overview
Report TitleWhen do we use this?
**Parking Reports**
Permit Sales by Lot By MonthThe 'Permit Sales by Lot by Month' report displays the lots, payment types, amount of sales processed and the number of permits sold based on a particular month. This report also provides the total sales for the month and the total number of permits sold that month.
Permit Sales ReportThe Permit Sales Report provides a breakdown of sales for a selected allocation type and time period.
Active Permit ReportThe Active Permits Report provides a breakdown of who owns permits for a selected allocation type and time period.
Temp Permit Sales ReportThe Temp Permit Sales Report provides a breakdown of who has purchased temp permits within a selected time period.
Athletic Permit SalesThe Athletic Permit Sales report provides purchase details based on user types that include 'Athletics' or has the athletic user type included in their lot.
Lot Value ReportThe Lot Value report will summarize your Lot utilization and total value of the permits sold in each lot.
Active Parker Report
Midnight ListThis is a list of permits that will be cleared at midnight. The permits will automatically be released from users that do not have promises for payment (e.g. the permit was reserved but the user did not specify how they were going to pay). These permits will be available for purchase again the next day.
**Violation Reports**
Violations by Location/Officer ReportThe Summary Report by Officer report allows administrators to search for Violations issued by an officer and see a summary of how many violations were : issued of each type, How many were appealed, how many were upheld, reduced or canceled, how many spoils and warnings, how many paid or unpaid
Paid Violations Summary by Type ReportThe Paid Violations Summary by Type report allows administrators to search for Violations issued by Date and Type. The report will display the number of violations issued by type and the Total amounts for each type including Warnings.
Violations by Officer ReportThe Violations by Officer report allows administrators to search for Violations issued by the officer. You can filter on Date, Ticket Writer, Spoil Type, and Ticket Type. The report will display the number of violations each officer has issued, the plates they were issued to, the date of the violation and the fine amounts.
Summary Report by OfficerThe Summary Report by Officer report allows administrators to search for Violations issued by the officer and see a summary of how many violations were : issued of each type, How many were appealed, how many were upheld, reduced or canceled, how many spoils and warnings, how many paid or unpaid
List Overdue ReportThe List Overdue report allows administrators to report on violations that have not been paid before the due date. Once the violation is paid it would drop off of this report. You can filter on User Type, Ticket Type, and Date.
Violations by Pay Type by Month ReportThe Violations by Pay Type by Month report allows administrators to search for Violations issued by Month and Payment Type.
**Incident Reports**
Recent Incidents Summary Report (Last 30 Days)The Recent Incidents option provides administrators with a table of all incidents that have been recorded in the previous 30 days.
Search Repeat Offenders ReportThe Search Repeat Offenders report allows administrators to search for users with Multiple Violations issued. You can filter on Date, Ticket Type, Number of Violations and User Types.
Weekly Stat ReportThe Weekly Stat Report is a listing of the number of Incidents listed by category and sub category filtered by date.
Calls For Service
Incidents Summary ReportThe Incidents Summary Report allows administrators to get a summary of all incidents that have been recorded within a specified time frame. From here, administrators can also get the details of a particular incident and make updates.
Incidents Summary Report by CategoryThe Incidents Summary Report by Category allows administrators to get a summary of all incidents that have been recorded based on specified incident categories for a specified time frame. From here, administrators can also get the details of a particular incident and make updates.
Incident Summary Report by Sub-LocationThe Incidents Summary Report by Location allows administrators to get a summary of all incidents that have been recorded based on a specified location for a specified time frame. From here, administrators can also get the details of a particular incident and make updates.
Incidents GIS Report (Carleton Only)
Unpaid In-house Report
**Payments Reports**
Daily PaymentsThe Daily Payments report shows all of the submitted or processed payments in a certain time frame. It can be reduced to only show certain payment types during that time frame.
Unprocessed PaymentsThe Unprocessed Payment report will show all promises to pay that have been submitted but not yet marked as payments you have received. This report can be exported to Excel.
Processed Payroll DeductionThe Processed Payroll Deduction Report allows the admin user to report on payments processed as payroll deductions through the system grouped by day for a user defined time frame.
More...: Payment ReportsBy clicking on "More..." the admin user will be taken to a page that offers several additional preset reports such as: List Cheque Refunds List unprocessed Cash, Cheque, and Money Order payments List unprocessed Credit Card payments List unprocessed Payroll Deduction payments List unprocessed Internal payments List ALL unprocessed payments List ALL unprocessed adjustments List ALL Processed Payroll Deductions List Daily Processed Payments (by date range) List Daily Submitted Payments (by date range)
Tax Exemption ReportThis report will output an excel file listing all individuals that have a tax exemption number providing first name. last name and their respective tax exemption code.
Failed PaymentsThis report will show any automatic credit card payments that have failed at a certain point in time. If the payment is redone and successful after appearing in this report once it will still show up as a failed payment from during the original time frame unless it is cleared.
Billing Account Setup ReportThis report shows a list of users who do not have their subscription settings set, meaning they will not be able to pay for automatic payments, such as rollovers. It also lists any company that is not setup with a billing account.
# Retrieving Uploaded Files ## Where to Manage Uploaded Files Admins can view files uploaded by specific users by going into their profiles from the admin-side and looking for the **Uploaded Files** section of the users dashboard. Only users can upload files, so admins will need to login as the user and follow the instructions on **Uploading Files from the User-side** to do this. [![image.png](https://opscom.wiki/uploads/images/gallery/2024-06/scaled-1680-/BZYimage.png)](https://opscom.wiki/uploads/images/gallery/2024-06/BZYimage.png) Keep in mind that only the first 5 uploaded images will display in this area, and if you wanted to view more uploads you would need to select the **Manage** button. ## Viewing Files Admins may view the uploaded files by selecting the file name, or by clicking the **Manage** button from the users dashboard. This will take you to the **Uploaded Files** the user has submitted. [![image.png](https://opscom.wiki/uploads/images/gallery/2024-06/scaled-1680-/0SZimage.png)](https://opscom.wiki/uploads/images/gallery/2024-06/0SZimage.png) ## Deleting Files Once you are managing the files that have been uploaded by a specific user, you can choose to remove that file by clicking the **Delete** button. This will bring up a confirmation dialog for you to select before confirming that the file will be deleted. [![image.png](https://opscom.wiki/uploads/images/gallery/2024-06/scaled-1680-/hWrimage.png)](https://opscom.wiki/uploads/images/gallery/2024-06/hWrimage.png) # Active Vehicle Report ## Accessing the Report To view the report go into the **User Managent** menu and hover over **Vehicles** and select **Active Vehicles Report** from the dropdown list. [![image.png](https://opscom.wiki/uploads/images/gallery/2024-06/scaled-1680-/fdrimage.png)](https://opscom.wiki/uploads/images/gallery/2024-06/fdrimage.png) The report will automatically run and supply a list of user that have at least **2 more active vehicles** than the number of valid permits on their profile. [![image.png](https://opscom.wiki/uploads/images/gallery/2024-06/scaled-1680-/go5image.png)](https://opscom.wiki/uploads/images/gallery/2024-06/go5image.png) # Athletics Module ## Accessing the Athletics Module The athletics module is a stand-alone module that has its own specific URL. It is not found in any of the typical menus. To access the module, use your typical admin portal URL, but instead of using /admin, use the following URL: https://'client\_ID'.parkadmin.com/**athletics** [![image.png](https://opscom.wiki/uploads/images/gallery/2024-06/scaled-1680-/QSgimage.png)](https://opscom.wiki/uploads/images/gallery/2024-06/QSgimage.png) ## Registering an Athletics Member To register an Athletics Member, click on **Athletics User Registration**. The quick registration form will appear where you can enter the user's information. Click **Submit Registration Information for Processing** to continue. [![image.png](https://opscom.wiki/uploads/images/gallery/2024-06/scaled-1680-/NtTimage.png)](https://opscom.wiki/uploads/images/gallery/2024-06/NtTimage.png) A confirmation screen will appear. If all information is correct, click on **Information Correct** to continue. [![image.png](https://opscom.wiki/uploads/images/gallery/2024-06/scaled-1680-/03iimage.png)](https://opscom.wiki/uploads/images/gallery/2024-06/03iimage.png) ## Registering the User's Vehicle The user information will now appear, providing a prompt to associate a vehicle with the user's information. [![image.png](https://opscom.wiki/uploads/images/gallery/2024-06/scaled-1680-/9oMimage.png)](https://opscom.wiki/uploads/images/gallery/2024-06/9oMimage.png) Click on 'Associate a vehicle with this user' to add the user's vehicle information. Once you have filled in the form, click on **Add New Vehicle**. [![image.png](https://opscom.wiki/uploads/images/gallery/2024-06/scaled-1680-/e3pimage.png)](https://opscom.wiki/uploads/images/gallery/2024-06/e3pimage.png) ## Purchasing a Permit The user's information will be updated with the vehicle, and the admin will now be able to assign a permit to the user. [![image.png](https://opscom.wiki/uploads/images/gallery/2024-06/scaled-1680-/OPzimage.png)](https://opscom.wiki/uploads/images/gallery/2024-06/OPzimage.png) In our example, we will issue a permit in the Company Staff Lot. Click on Purchase this Permit to complete the purchase process. [![image.png](https://opscom.wiki/uploads/images/gallery/2024-06/scaled-1680-/M9Vimage.png)](https://opscom.wiki/uploads/images/gallery/2024-06/M9Vimage.png) A message confirming the registration will be shown on screen. The admin may print the user's permit information from this page. [![image.png](https://opscom.wiki/uploads/images/gallery/2024-06/scaled-1680-/xUoimage.png)](https://opscom.wiki/uploads/images/gallery/2024-06/xUoimage.png) ## Athletics User Search From within the module, you can search Athletic Users. Only users who have been assigned the user type Athletics will appear in this search. Click **Athletics User Search** to begin. [![image.png](https://opscom.wiki/uploads/images/gallery/2024-06/scaled-1680-/x9aimage.png)](https://opscom.wiki/uploads/images/gallery/2024-06/x9aimage.png) Enter the search criteria suggested onscreen and click **Search** to proceed. From this page, several options are available: - User history can be viewed by clicking on the gold **H.** - An email can be sent to the user by clicking on the envelope icon. - Additional information on a user can be viewed by clicking on their username. [![image.png](https://opscom.wiki/uploads/images/gallery/2024-06/scaled-1680-/IDbimage.png)](https://opscom.wiki/uploads/images/gallery/2024-06/IDbimage.png) ## Permit Printing It is possible for an admin to print a user's permit information. To begin, click on **Print Permits**. [![image.png](https://opscom.wiki/uploads/images/gallery/2024-06/scaled-1680-/2LNimage.png)](https://opscom.wiki/uploads/images/gallery/2024-06/2LNimage.png) Select the **Permit Lot** and the **Permit Text** (permit number) and click on **Print Selected Hang Tag** to complete the process. [![image.png](https://opscom.wiki/uploads/images/gallery/2024-06/scaled-1680-/cNdimage.png)](https://opscom.wiki/uploads/images/gallery/2024-06/cNdimage.png) ## List Athletics Users To get a list of all users who have been assigned the user type Athletics for use in the portal, click on **List Current Athletic Users**. [![image.png](https://opscom.wiki/uploads/images/gallery/2024-06/scaled-1680-/2Xwimage.png)](https://opscom.wiki/uploads/images/gallery/2024-06/2Xwimage.png) A list of all current Athletics users will appear. Further information can been seen on this screen. [![image.png](https://opscom.wiki/uploads/images/gallery/2024-06/scaled-1680-/DuMimage.png)](https://opscom.wiki/uploads/images/gallery/2024-06/DuMimage.png) To see a user's details, click on their username. [![image.png](https://opscom.wiki/uploads/images/gallery/2024-06/scaled-1680-/pvHimage.png)](https://opscom.wiki/uploads/images/gallery/2024-06/pvHimage.png) The screen will refresh and display a detailed view of the user's information. A list of all the vehicles associated to the user can be seen here. Additional details on a vehicle can be viewed by clicking on the vehicle plate number. Also from this page: - A new vehicle can be added to the user's profile. - Permit hang tags can be printed. [![image.png](https://opscom.wiki/uploads/images/gallery/2024-06/scaled-1680-/9M1image.png)](https://opscom.wiki/uploads/images/gallery/2024-06/9M1image.png) By clicking on the permit number in **Current Athletics Users**, a pop-up will appear with permit details. [![image.png](https://opscom.wiki/uploads/images/gallery/2024-06/scaled-1680-/R8Simage.png)](https://opscom.wiki/uploads/images/gallery/2024-06/R8Simage.png) Click "Log Out" to exit the Athletics module. # Resetting an Administrators Password ## Ressetting a Forgotten Admin Password From the Admin Login page click on **Forgot your Username or Password** to begin the process. [![image.png](https://opscom.wiki/uploads/images/gallery/2024-06/scaled-1680-/Nttimage.png)](https://opscom.wiki/uploads/images/gallery/2024-06/Nttimage.png) You will be prompted to enter your **valid email address**. This address must match the currently one that exists on the Admin user's Profile. [![image.png](https://opscom.wiki/uploads/images/gallery/2024-06/scaled-1680-/YYaimage.png)](https://opscom.wiki/uploads/images/gallery/2024-06/YYaimage.png) Once you have entered the email address click on **Send Reminder** to proceed. [![image.png](https://opscom.wiki/uploads/images/gallery/2024-06/scaled-1680-/6CNimage.png)](https://opscom.wiki/uploads/images/gallery/2024-06/6CNimage.png) The screen wil refresh and you will get a message indicating an email has been sent with a reset password link included. [![image.png](https://opscom.wiki/uploads/images/gallery/2024-06/scaled-1680-/ZEHimage.png)](https://opscom.wiki/uploads/images/gallery/2024-06/ZEHimage.png) This is a sample of what that email could look look like. This email can be edited and configured in **Email Templates**. See **Lost Passwords.** [![image.png](https://opscom.wiki/uploads/images/gallery/2024-06/scaled-1680-/4EXimage.png)](https://opscom.wiki/uploads/images/gallery/2024-06/4EXimage.png) The email link will take you to an interface where the admin will enter the email address discussed above and a new password. The new password is required to be entered twice for confirmation. [![image.png](https://opscom.wiki/uploads/images/gallery/2024-06/scaled-1680-/SkQimage.png)](https://opscom.wiki/uploads/images/gallery/2024-06/SkQimage.png) Once a new password is chosen and entered, click on **Reset Password** to complete the process. [![image.png](https://opscom.wiki/uploads/images/gallery/2024-06/scaled-1680-/ScSimage.png)](https://opscom.wiki/uploads/images/gallery/2024-06/ScSimage.png) The admin will now be able to log in using the new password they entered. [![image.png](https://opscom.wiki/uploads/images/gallery/2024-06/scaled-1680-/QMuimage.png)](https://opscom.wiki/uploads/images/gallery/2024-06/QMuimage.png) # Public-Facing Lot Pages # Overview Within the system, there is the option to create a custom lots page, which will display a list of lots that users can book from. The page consists of two subpages: - Lots List - Contains the list of lots on the system for the user to choose from - Lot Detail - Contains detailed information pertaining to the lot selected by the user Setting up these pages requires the use of shortcodes within the system. ## **Page Setup** The custom pages can be setup from the **Pages and Content Blocks** page. It can be found under **System Configuration → Content & Designs → Pages and Content Blocks** [![image.png](https://opscom.wiki/uploads/images/gallery/2024-05/scaled-1680-/mbSimage.png)](https://opscom.wiki/uploads/images/gallery/2024-05/mbSimage.png) ## Pages and Content Blocks The pages and content blocks section, or system messaging, allows the setup of custom user pages. ## Shortcodes A shortcode is a bit of text that has been coded to return a specific value when placed within the body of the page layout. The value it returns can be anything from single variable, to a module laid out within a template, like a table or a form. A shortcode looks like this: **\[lots\_list\]** In this case, the shortcode returns a list of the lots in the system. By placing the shortcode in the body of the message, it will show up on the corresponding page in that location. Shortcodes will be used to create the layout of the lot subpages. # Lot List Page The first subpage that must be created is the page where the list of lots will appear. It does not need to have a dedicated page, and the lot list can be placed on any custom page that is wanted. In this example, the lots list will be placed on a custom page. [![image.png](https://opscom.wiki/uploads/images/gallery/2024-05/scaled-1680-/uZGimage.png)](https://opscom.wiki/uploads/images/gallery/2024-05/uZGimage.png) The path that is chosen here is what the path will be in the url. This would make the lots\_list module show up when the address has /lots at the end of the base URL. The lots list is a module, meaning its appearance is fixed and cannot be modified further. Only its location on the site can be customized. ### Lot List Shortcode The shortcodes must be typed exactly as they appear, or they will not work. There is only one short code relevant to the lot lists page:
**Shortcode** **Description** **Additional Options**
\[lots\_list\] Displays a list of the currently available lots. Can be placed on any page. \[lots\_list include\_hidden=1\] - By default, lots set as not visible will not appear in the list. This option will include those lots in the list. \[lots\_list only\_text2parkme=1\] - This will restrict the list to only show lots that have Text2ParkMe enabled.
Additional options are modifiers that can be added to the base shortcode to influence the output. Multiple can be chained together at once. For instance, both additional options can be included in the lot list shortcode by writing it like this: - **\[lots\_list include\_hidden=1 only\_text2parkme=1\]** ## Lot Detail Page The specific lot detail page is set up a bit differently from the lot list page, in that it is coded to only work if the path is set as **--lots-detail**. This will make the details for the individual lot that is selected appear for the path /lots/{id}, with the id supplied being passed to the page to fetch the correct lot information. The information that goes on this page can be customized to include anything from the relevant shortcodes, but should at least include the permit cost and buy now button. [![image.png](https://opscom.wiki/uploads/images/gallery/2024-05/scaled-1680-/8R0image.png)](https://opscom.wiki/uploads/images/gallery/2024-05/8R0image.png) ### Lot Details Shortcodes Here is a list of the shortcodes that are related to the lot details page. The shortcodes must be typed exactly as they appear, or they will not work.
**Shortcode** **Description**
\[values show=lotname\] Displays the name of the lot.
\[values show=lottype\] Displays the initial of the lot's type.
\[values show=lotnameid\] Displays the lot's id.
\[values show=defaultcost format=currency\] Displays how much renting a permit for the lot costs.
\[values show=location\] Displays the location set for the lot. It is an address or a short description.
\[values show=textcode\] The Text2ParkMe code for the lot.
\[values show=ratePer10Min format=currency\] The Text2ParkMe rate for the lot.
\[lot show=buy\_now\] Displays a button that will take the user to the page to purchase a permit for the lot. Will take the user to the login screen if they are not logged in or do not have an account.
\[lot show=map\] Displays a small map with the lot's location according to the latitude and longitude values that are stored for it.
\[lot show=photo\] Displays the photo that has been selected for the lot. A photo can be assigned from the Lot Administration page /admin/config/permits/lot/{id}/edit.
# User-Side Results # The Lot List Page The lot list from the example appears on the website like this: [![image.png](https://opscom.wiki/uploads/images/gallery/2024-05/scaled-1680-/kiiimage.png)](https://opscom.wiki/uploads/images/gallery/2024-05/kiiimage.png) ## The Lot Detail Page The lot detail page from the example would appear on the website like this: [![image.png](https://opscom.wiki/uploads/images/gallery/2024-05/scaled-1680-/3RFimage.png)](https://opscom.wiki/uploads/images/gallery/2024-05/3RFimage.png) # Forms Module Documentation of the new forms module. # New Forms
## Introduction The forms module has been refactored, and has new functionality. Existing form data is not compatible with the new format, which means any old forms will need to be recreated in the new form format. ## Accessing Forms The new forms module can be found under the menu tree: - **User Management → Forms → List Forms (new)** [![1.png](https://opscom.wiki/uploads/images/gallery/2024-07/scaled-1680-/9Xk1.png)](https://opscom.wiki/uploads/images/gallery/2024-07/9Xk1.png)
--- ## Forms List This will open the forms list page. [![567.png](https://opscom.wiki/uploads/images/gallery/2024-07/scaled-1680-/567.png)](https://opscom.wiki/uploads/images/gallery/2024-07/567.png) [![2.png](https://opscom.wiki/uploads/images/gallery/2024-07/scaled-1680-/Wmz2.png)](https://opscom.wiki/uploads/images/gallery/2024-07/Wmz2.png)
Several options are presented to the user from this page. - **Add new** - creates a new form. - **Edit form** - existing forms can be edited by clicking on the pen icon next to the form title. - **View entries** - entries submitted by users for a form can be viewed by clicking the buttons in the column. - Options: - **Copy** - this will create a duplicate of the form without any of the entries. Useful when changes are to be made to the form structure without affecting existing entries. - **Archive** - this will archive the form and all its entries, removing them from view. - **Export** - this will export the form and all entry data to an Excel file. ## Creating a New Form To create a new form, click on the **Add Form** button. [![3.png](https://opscom.wiki/uploads/images/gallery/2024-07/scaled-1680-/ATI3.png)](https://opscom.wiki/uploads/images/gallery/2024-07/ATI3.png) Upon opening the add new form screen, the user is presented with a menu with three tabs. - Form Basics - Post Form Actions - Questions ### Form Basics The initial form setup. [![4.png](https://opscom.wiki/uploads/images/gallery/2024-07/scaled-1680-/5wo4.png)](https://opscom.wiki/uploads/images/gallery/2024-07/5wo4.png) - **Title** - the name of the form. The orange box to the right of the text field is used to set the title in each language installed on the site. - **Visible** - whether or not the form is visible to users. - **Description** - text describing the purpose of the form. The orange box to the right of the text field is used to set the description in each language installed on the site. - **Show At** - the date and time at which the form becomes visible to users. - **Hide At** - the date and time at which the form becomes hidden from users. - **External Form** - a URL to a form on an external site. If this field is provided, below sections can be ignored. Clicking one of the orange boxes next to a text field will open a modal where the translation for the field can be set for each language installed on the site. [![5.png](https://opscom.wiki/uploads/images/gallery/2024-07/scaled-1680-/r9Y5.png)](https://opscom.wiki/uploads/images/gallery/2024-07/r9Y5.png)
## Post Form Actions Set the actions to take after the user submits the form. [![6.png](https://opscom.wiki/uploads/images/gallery/2024-07/scaled-1680-/h1I6.png)](https://opscom.wiki/uploads/images/gallery/2024-07/h1I6.png) - **Perform After Submit** - **Mail to specific email** - after a submission is made, a notification email will be sent to the email address specified below in the email to field. - **Show form back to user** - after a submission is made, the form data will be shown back to the submitter. - **Email Subject** - the subject line of the email notification to be sent back to the creator of the form when a submission is made by a user. - **Email To** - the email address the notification email is sent to. - **Email From** - the from address assigned to the notification email. - **Completion Text** - the message shown back to the user after making a submission. ## Questions Under this tab is where the form questions are built. [![7.png](https://opscom.wiki/uploads/images/gallery/2024-07/scaled-1680-/jrL7.png)](https://opscom.wiki/uploads/images/gallery/2024-07/jrL7.png) The right side of the form builder contains the field types that can be added to the form. This can be done by dragging and dropping the fields from the box on the right into the questions area on the left. After the question has been created, the details can be filled in. Each field can be **removed, edited,** or **copied** by using these buttons: [![8.png](https://opscom.wiki/uploads/images/gallery/2024-07/scaled-1680-/R5V8.png)](https://opscom.wiki/uploads/images/gallery/2024-07/R5V8.png)
### Question Types For a detailed breakdown of form field types, refer to the Form Fields Type wiki documentation. **Checkbox Group** - presents the user with a list of checkboxes, from which they can choose multiple options. - **Date Field** - a selectable date time for user input. - **Header** - a header or title to present information to the user. No information is entered by the user. - **Number** - a number for the user to input. - **Paragraph** - a paragraph of text to present information to the user. No information is entered by the user. - **Radio Group** - presents the user with a list of radio buttons, from which they can choose one. - **Select** - presents the user with a dropdown menu of multiple pre-defined options. Multiple items can be selected if enabled, or only a single when not. - **Text Field** - a short text field used for user input. - **Text Area** - a long text field used for user input. ### Question Options When editing a field, there are some common attributes to lookout for: - **Required** - enabling this will make it so the user must answer the question before they are able to submit the form. - **Label** - the name or title of the question. - **Help Text** - will give the user additional information or context about the question. Makes a question mark icon appear next to the question that will display the text in a tooltip when clicked. - **Placeholder** - for a question where the user provides the answer, will display the text in the background of the text field before the user enters a value. - **Value** - the default value for a question. - **Searchable** - this enables the field contents to be searched on when searching through form entries. - **Admin Only** - questions marked as admin-only will not be shown to users. It is used for admins to add comments or notes to a form entry submitted by a user, such as if an application was approved or denied. --- ## Form Options ### Editing a Form A form should only be edited when it doesn’t have any user entries, as it may cause existing entries to display their data incorrectly. If changes need to be made to an existing form, it should be copied first, and the changes be made on the copy while it doesn’t have any entries. ### Archiving a Form Archiving acts as a form of deletion for forms. When a form has been archived, the form and all its entries will be removed from view and can no longer be accessed. ### Exporting a Form Exporting a form will take all user entries given for a form and place the contents into an Excel document that will be downloaded by the browser. ### Viewing Form Entries User form submissions can be viewed by clicking on the view entries button next to the form title. Further details can be found in the Viewing Form Entries wiki documentation. # Form Field Types
## Introduction A variety of field types are available when building form questions. The functions of each field are detailed here. ## Field Types ### Checkbox Group Used to allow the user to choose **one or more** options from the options listed. [![1.png](https://opscom.wiki/uploads/images/gallery/2024-07/scaled-1680-/xjb1.png)](https://opscom.wiki/uploads/images/gallery/2024-07/xjb1.png) - **Enable “Other”:** Allow the user to input an option that isn’t provided as an option here. - **Options:** The list of options for the user to choose from. options can be added by clicking on the Add Option button. - Options can be pre-selected for the user by checking the corresponding box.
[![2.png](https://opscom.wiki/uploads/images/gallery/2024-07/scaled-1680-/nSp2.png)](https://opscom.wiki/uploads/images/gallery/2024-07/nSp2.png) [![3.png](https://opscom.wiki/uploads/images/gallery/2024-07/scaled-1680-/Ime3.png)](https://opscom.wiki/uploads/images/gallery/2024-07/Ime3.png)
### Date Field Used to get a date from the user. [![4.png](https://opscom.wiki/uploads/images/gallery/2024-07/scaled-1680-/nF74.png)](https://opscom.wiki/uploads/images/gallery/2024-07/nF74.png) - **Type:** the type of date field - **Min:** the minimum allowed date - **Max:** the maximum allowed date - **Step:** date steps When the user clicks on the date field, they get a calendar date picker. [![5.png](https://opscom.wiki/uploads/images/gallery/2024-07/scaled-1680-/FoR5.png)](https://opscom.wiki/uploads/images/gallery/2024-07/FoR5.png)
### Header Used to set a header or subheader for the form. This is a field used to display information to the user, and is not editable by them. [![6.png](https://opscom.wiki/uploads/images/gallery/2024-07/scaled-1680-/Iqu6.png)](https://opscom.wiki/uploads/images/gallery/2024-07/Iqu6.png) - **Label:** Header text - **Type:** Header size (H1 is the largest) [![7.png](https://opscom.wiki/uploads/images/gallery/2024-07/scaled-1680-/2bG7.png)](https://opscom.wiki/uploads/images/gallery/2024-07/2bG7.png)
### Number Used to input only numerical digits. [![8.png](https://opscom.wiki/uploads/images/gallery/2024-07/scaled-1680-/TcP8.png)](https://opscom.wiki/uploads/images/gallery/2024-07/TcP8.png) - **Type:** The type of number field. - **Min:** The minimum allowed number. - **Max:** The maximum allowed number. - **Step:** The amount the user can increment/decrement by clicking on the up and down arrows without entering the number using a keyboard. [![9.png](https://opscom.wiki/uploads/images/gallery/2024-07/scaled-1680-/fGy9.png)](https://opscom.wiki/uploads/images/gallery/2024-07/fGy9.png)
### Paragraph Used to set a paragraph of text. This is a field used to display information to the user, and is not editable by them. [![10.png](https://opscom.wiki/uploads/images/gallery/2024-07/scaled-1680-/10.png)](https://opscom.wiki/uploads/images/gallery/2024-07/10.png) - **Content:** The paragraph text or content. [![12.png](https://opscom.wiki/uploads/images/gallery/2024-07/scaled-1680-/12.png)](https://opscom.wiki/uploads/images/gallery/2024-07/12.png)
### Radio Group Used to allow the user to choose **one** option from the options listed [![13.png](https://opscom.wiki/uploads/images/gallery/2024-07/scaled-1680-/13.png)](https://opscom.wiki/uploads/images/gallery/2024-07/13.png) - **Options:** The list of options for the user to choose from. options can be added by clicking on the Add Option button. - Options can be pre-selected for the user by checking the corresponding radio button. [![15.png](https://opscom.wiki/uploads/images/gallery/2024-07/scaled-1680-/15.png)](https://opscom.wiki/uploads/images/gallery/2024-07/15.png) [![17.png](https://opscom.wiki/uploads/images/gallery/2024-07/scaled-1680-/17.png)](https://opscom.wiki/uploads/images/gallery/2024-07/17.png)
### Select Menu Presents a drop-down list the user can select an option from. This is similar in function to radio-groups and checkbox groups, ideally used when there are many options to choose from to save screen space. [![19.png](https://opscom.wiki/uploads/images/gallery/2024-07/scaled-1680-/19.png)](https://opscom.wiki/uploads/images/gallery/2024-07/19.png) - **Allow Multiple Selections:** To allow the user to select more than one option (similar functionality to a checkbox group). - **Options:** The list of options for the user to choose from. options can be added by clicking on the Add Option button. - Note: options can be pre-selected for the user by checking the corresponding radio button [![222.png](https://opscom.wiki/uploads/images/gallery/2024-07/scaled-1680-/222.png)](https://opscom.wiki/uploads/images/gallery/2024-07/222.png) ### Text Field Used to allow the user to input text. [![20.png](https://opscom.wiki/uploads/images/gallery/2024-07/scaled-1680-/20.png)](https://opscom.wiki/uploads/images/gallery/2024-07/20.png) - **Type:** Select what type of input is needed: - **Text Field:** is used for regular text. - **Password:** is used for sensitive information. - **Email:** is used to only accept email addresses. - **Tel:** is used to only accept phone number, will display a number pad keyboard instead of the regular keyboard. - **Max Length:** maximum number of characters allowed.
[![21.png](https://opscom.wiki/uploads/images/gallery/2024-07/scaled-1680-/21.png)](https://opscom.wiki/uploads/images/gallery/2024-07/21.png)
### Text Area Similar to a text field, but allows for a larger area to enter text.
[![22.png](https://opscom.wiki/uploads/images/gallery/2024-07/scaled-1680-/22.png)](https://opscom.wiki/uploads/images/gallery/2024-07/22.png)
- **Max Length:** The maximum number of characters allowed. - **Rows:** How many rows/lines does the text area initially takes up. [![24.png](https://opscom.wiki/uploads/images/gallery/2024-07/scaled-1680-/24.png)](https://opscom.wiki/uploads/images/gallery/2024-07/24.png)
# Viewing Form Entries
## Accessing User Form Entries Access the forms module under the menu tree: - **User Management → Forms → List Forms** [![1.png](https://opscom.wiki/uploads/images/gallery/2024-07/scaled-1680-/RhX1.png)](https://opscom.wiki/uploads/images/gallery/2024-07/RhX1.png)
Click on the entries button for the form in question. [![2.png](https://opscom.wiki/uploads/images/gallery/2024-07/scaled-1680-/kfE2.png)](https://opscom.wiki/uploads/images/gallery/2024-07/kfE2.png)
## Form Entries Search Form The form entry search page will be presented. [![3.png](https://opscom.wiki/uploads/images/gallery/2024-07/scaled-1680-/YPE3.png)](https://opscom.wiki/uploads/images/gallery/2024-07/YPE3.png) Several search options are available. - **Start date** - the starting date for the search. - **Up to and including** - the ending date of the search. - **Show in results** - which columns to include in the search results. Only fields marked as searchable will appear here. Additional search options can be shown by clicking the **toggle more options** button in the top right. [![4.png](https://opscom.wiki/uploads/images/gallery/2024-07/scaled-1680-/xyu4.png)](https://opscom.wiki/uploads/images/gallery/2024-07/xyu4.png)
Any fields marked searchable will appear here, providing a text box a search query can be placed in. This can be used to narrow the search to specific values on each field. [![5.png](https://opscom.wiki/uploads/images/gallery/2024-07/scaled-1680-/ZkA5.png)](https://opscom.wiki/uploads/images/gallery/2024-07/ZkA5.png)
The search results will show the selected columns in the output. [![6.png](https://opscom.wiki/uploads/images/gallery/2024-07/scaled-1680-/era6.png)](https://opscom.wiki/uploads/images/gallery/2024-07/era6.png) From the search results, each individual entry can be viewed to see the entirety of the user’s submission, including fields not marked as searchable. Entries can also be deleted from here. ## Entry View The submitter’s information will be displayed at the top of entry, and their answers below. [![7.png](https://opscom.wiki/uploads/images/gallery/2024-07/scaled-1680-/hb57.png)](https://opscom.wiki/uploads/images/gallery/2024-07/hb57.png) The field entries can be edited as needed, and values can be added to any admin-only fields. To save any changes, press the button at the bottom of the menu. ### Admin-Only Fields Form fields marked as admin-only will be marked by a blue border. Hovering the mouse over top of the border will show a tool-tip about the field. [![8.png](https://opscom.wiki/uploads/images/gallery/2024-07/scaled-1680-/UZx8.png)](https://opscom.wiki/uploads/images/gallery/2024-07/UZx8.png)
### Replying to User Submissions An email can be sent in response to a user entry by clicking the **prepare email** button at the top of the entry menu. [![9.png](https://opscom.wiki/uploads/images/gallery/2024-07/scaled-1680-/DF19.png)](https://opscom.wiki/uploads/images/gallery/2024-07/DF19.png)
This will open the email users page, pre-filling the user’s information into the email form. The form name will be set as the email subject line. [![10.png](https://opscom.wiki/uploads/images/gallery/2024-07/scaled-1680-/mPr10.png)](https://opscom.wiki/uploads/images/gallery/2024-07/mPr10.png)
# Data Importer Information related to the data importer. # Using the Database Importer ## Introduction The database importer allows the admin to import their existing information into the OPS-COM system. Given a CSV file, the importer will transfer the data into the selected destination table. The database importer only allows data to be imported into a select number of tables. The currently allowed tables are as follows: - UserProfile - OffenceLocations - Vehicle - Permits - Violations Support for additional tables will continue to be added in the future. --- ## Initial Setup The database importer can be found listed under the tools tab. [![1.png](https://opscom.wiki/uploads/images/gallery/2024-07/scaled-1680-/1.png)](https://opscom.wiki/uploads/images/gallery/2024-07/1.png)
If the database importer page is not visible, the user may not have the proper permissions. Before a user can import data, they must have the necessary permissions enabled on their account. There are two permissions associated to table imports. - Manage tables - allows the user to view the manage tables page, and use the uploads functionality, but NOT the ability to reset tables - Reset tables - allows the user to reset the tables (empty them). Won't allow them to see the manage tables page. The permissions can be found under the systems tab of the permissions management page. Enable them to allow a user access to the page. For more information on permissions, refer to this article: [https://wiki.ops-com.com/x/B4DjAQ](https://wiki.ops-com.com/x/B4DjAQ)
--- ## Importing Data into a Table To start a new import, click on the upload button next to the destination table the information will be imported into. [![2.png](https://opscom.wiki/uploads/images/gallery/2024-07/scaled-1680-/2.png)](https://opscom.wiki/uploads/images/gallery/2024-07/2.png) This will open a modal window prompting the user to select the CSV file they will be importing into the destination table. The imported CSV file can be comma-differentiated or semi-colon-differentiated.
[![3.png](https://opscom.wiki/uploads/images/gallery/2024-07/scaled-1680-/3.png)](https://opscom.wiki/uploads/images/gallery/2024-07/3.png) Once a file has been selected, press the submit button to begin the process.
[![4.png](https://opscom.wiki/uploads/images/gallery/2024-07/scaled-1680-/4.png)](https://opscom.wiki/uploads/images/gallery/2024-07/4.png) Once the CSV file has been uploaded, the table import screen will appear.
[![5.png](https://opscom.wiki/uploads/images/gallery/2024-07/scaled-1680-/5.png)](https://opscom.wiki/uploads/images/gallery/2024-07/5.png) ### Column Matching On this page, the columns in the imported file are matched to the columns existing in the destination table. This is to let the program know where the data from the CSV file belongs in the destination table. If the CSV file contained recognized column names, they will be automatically selected. For more information on what each column is used for, or whether a column is required or optional, refer to this guide here: [https://opscom.wiki/books/for-administrators-staff/page/importer-field-descriptions](https://opscom.wiki/books/for-administrators-staff/page/importer-field-descriptions) [![6.png](https://opscom.wiki/uploads/images/gallery/2024-07/scaled-1680-/6.png)](https://opscom.wiki/uploads/images/gallery/2024-07/6.png) One the columns have been properly matched and the process button has been pressed, the user will be redirected back to the main page while the import is completed in the background. If an email address is setup on the importing user's account, they will be informed on the progress of the import by emails sent to their email address. Another import cannot be started until the current one is either completed or has been terminated. Terminating the progressing import will delete the temp tables created during the import, and isn’t recommended unless the import has become stuck. [![8.png](https://opscom.wiki/uploads/images/gallery/2024-07/scaled-1680-/G6l8.png)](https://opscom.wiki/uploads/images/gallery/2024-07/G6l8.png)
--- ## Post-Import Processing After the initial import of the data into the base table, some tables run additional processing on the information. These processes run separately from the import process, and are not affected by the duplicate settings chosen for the import. After this process has been completed, the user will be sent a second email containing the final details of the import, including how many records were imported, updated, and any post-processing details. ### Permits - If the user association column is matched, the created permit will have a booking automatically created for the associated user through the creation of a PermitJoin record. - If the option was selected, the newly-created permits that were booked to users will be automatically marked as paid. Otherwise, they will be located in the users' carts and the users must pay for them. ### UserProfile - When users are imported, if they aren't provided a LoginSource, it will be automatically set to OPSCOM. - Users that are created are set to enabled automatically. ### Vehicle - If the user association column is matched, the created vehicle will be automatically associated to the user through the creation of a VehicleJoin record. - If the alert column is matched, an alert will be created and automatically attached to the associated vehicle through the creation of an AlertComments records. The vehicle will also be flagged. ### Violations - Any violations created that don’t have an Issued date and Due date will have one created for them at the time of the import. ### OffenseLocations - This table has no post-processing. --- ## Additional Settings Additional details on import settings. [![7.png](https://opscom.wiki/uploads/images/gallery/2024-07/scaled-1680-/7.png)](https://opscom.wiki/uploads/images/gallery/2024-07/7.png) ## Order of Operations Imports that contain related information have a general order they should be done in, as some of the tables contain information from another table. The imports are able to be done out of order, but the records cannot be associated correctly to each other when done out of order. In general, the imports the table requires should be imported before it is.
**Table Import** **Requires** **Notes**
UserProfile Should be the first thing imported.
Vehicles - UserProfile Having the user record created before the vehicle is what allows the user to be associated to the vehicle by a vehicleJoin record created during the post-import processing.
OffenceLocations Doesn’t require any data beforehand, but should be included when creating a violation.
Permits - Vehicles - UserProfile Having a vehicle record created before the permit is what allows the permit to be associated to the vehicle by a permitJoin created during the post-import processing. If there is also an associated user record, the permit is able to be marked as paid by joining the user and permit through a payment record.
Violations - Vehicles - UserProfile - OffenceLocations A violation requires the existence of a vehicle record beforehand to have the violation be created at all. Offence locations should be imported before violations in order for the violation to have its location properly marked.
## User-Association Settings Some tables have additional processing that is run after the import is completed to associate the newly-created records to existing users. For this, the record identifying the uniqueness of the user must be selected. It can either be UserUUID or Email, so make sure the same value is selected for both sections. The tables that currently have this as an option are: - Vehicles - Permits ## Mark Permits as Paid Permit importing has an additional option for if you would like to have the booked permits that are created automatically marked as paid. Otherwise, when they are created, they will be located in the associated users' carts. ## Vehicle Alerts Vehicle importing has an additional option for setting up an alert on a vehicle automatically when they are created. Include a column containing vehicle alert comments within the imported CSV file and select the column in the alert section of the vehicle import page. Alerts will be automatically associated to the proper vehicle after import. The list of vehicles being marked with alerts may also be called a hotlist. ## Unique Identifiers & Duplicate Settings This is the column that is used to tell if the information in the record is unique. If the information in this column is duplicated in the file or already exists in the system, it will be ignored or overwritten based on the selected setting. - Ignoring a duplicate will have the system do nothing with the record. - Overwrite existing will take the information in the new record and replace the existing record with it. The number of columns that mark a record as unique varies from table to table. - **UserProfile** uses one identifier, which can either be UserUUID or Email. For this table, it is one or the other, with UserUUID taking precedence over Email if both columns are supplied. - **OffenceLocations** uses one identifier, which is LocationName. - **Vehicle** uses one identifier, which is Plate. - **Permits** uses two primary identifiers, PermitNo and LotNameID. Both are required to make a unique record, meaning identical PermitNo can be in use if they have different LotNameIDs. - **Violations** uses one identifier, which is Ticket. ## Foreign Lookup Columns Some information in one table comes from another table and is stored as an ID in the destination table. The data in these columns should be entered as normal, then the system will automatically look to see if there is a match in the corresponding table and input the correct ID value into the destination table. For instance, one of the foreign keys for the Vehicle table is Colour, stored in the VehicleColour table. If any of the values in the column imported for Colour exist in the VehicleColour table, it will match them by name and store the proper ID in the Vehicle table. If it doesn't find a matching value in the lookup table, it will enter a Null as the value instead. A list of the import tables are listed below. ### UserProfile Table
**Inserting Into** **Sourced From Table**
prov Provinces
UserTypeID UserTypes
### Vehicle Table
**Inserting Into** **Sourced From Table**
ProvID Provinces
ColourID VehicleColours
MakeID VehicleMake
TypeID VehicleType
PlateTypeID VehiclePlateType
### Permits Table
**Inserting Into** **Sourced From Table**
LotNameID LotName
StateID PermitState
### Violations Table
**Inserting Into** **Sourced From Table**
VehicleID Vehicle
TicketType TicketCategory
LocationID OffenceLocations
## Status Emails Over the course of the import process, a total of two emails will be sent to the user who initiated the import: - The first email is sent after the data from the CSV has been inserted into the temp table, and records the number of rows that were successful, and the rows that failed to be imported because they were malformed. - The second email is sent after the data has been inserted into the base table. It contains the number of records that were updated in the base table, the number of records inserted into the base table, and any relevant information from the post-import processing that happened. --- ## Table Reset In addition to table imports, the page also allows for the purging of a table. Click on the button that says Reset next to the table to be emptied. This will open a new modal window, prompting the user to confirm they wish to delete the contents of the table. This action is permanent, and once the data is deleted, it cannot be recovered. [![9.png](https://opscom.wiki/uploads/images/gallery/2024-07/scaled-1680-/9.png)](https://opscom.wiki/uploads/images/gallery/2024-07/9.png)
If it is certain the data should be deleted, enter DELETE into the confirmation text field and press the delete button. The selected table will then be purged of all records. Some tables are closely connected to the records of a related table, and removing the data they contain will also purge the contents of the related table. - Purging the Vehicle table will also purge the VehicleJoin table. - Purging the Permits table will also purge the PermitJoin table. Note that only the table contents are deleted, and the table itself remains intact. ## Related Pages
- [https://opscom.wiki/books/for-administrators-staff/page/importer-field-descriptions](https://opscom.wiki/books/for-administrators-staff/page/importer-field-descriptions)
# Importer Field Descriptions
## Introduction A list of all the columns used in the importer and a description of what the field is used for in the system. - **Unique ID** fields are required, and are used to identify a record as being a unique entity in the system before it has been imported and an ID can be assigned to it. - They contain the bare-minimum information needed to import the record. - **Recommended** fields are not technically required, and a record can be made without them, but they contain information that make the record a useful entity in the system. - This is information like the first and last names of a user or the value of the fine on a violation. - A record is able to exist in the system without these fields, but it won’t do much without them. - **Optional** fields are not required, and a record without them can still function as a useful entity in the system. - They contain supplemental information that can be filled in later or aren’t needed for the basic functionality of the record, such as the year a vehicle was made. ## Importer Columns ### UserProfile Table
**Column Name** **Internal Name** **Requirement** **Type** **Description**
User Unique ID (UUID) UserUUID Unique ID - This or Email is Required Standard The primary identifier. If UUID is not supplied, email will be used as the key identifier instead. This value identifies the user as a unique record and it or the email is required to import a record.
Email Address email Unique ID - This or UUID is Required Standard The secondary identifier. If UUID is not supplied, email will be used as the key identifier instead. This value identifies the user as a unique record and it or the UUID is required to import a record.
Username username Recommended Standard The username of the user.
First Name firstName Recommended Standard The first name of the user.
Middle Name middleName Optional Standard The middle name of the user.
Last Name lastName Recommended Standard The last name of the user.
Password password Optional Standard The password of the user.
User Type UserTypeID Recommended Foreign Key - UserTypes Table The user type of the user. Attaches to the UserTypes table. The values supplied by the user in the uploaded file are expected to be values from the TypeName column of the UserTypes table, as these are the values that will be matched against. The values in the uploaded file must be an exact match to the values in the TypeName column, matching the capitalization, spelling, and spacing exactly, or else it won’t be counted as a match. The UserTypeID from the UserTypes table matching the name will inserted into the record in the base table. The value will be left blank in the imported record if no matches are found.
Street Address street Optional Standard The street address of the user.
City city Optional Standard The city of the user.
Province/State prov Optional Foreign Key - Provinces Table The province or state of the user. Attaches to the Provinces table. The values supplied by the user in the uploaded file are expected to be values from the ProvName column of the Provinces table, as these are the values that will be matched against. These are the long names of the province and not the abbreviation; as in, Ontario and not ON. The values in the uploaded file must be an exact match to the values in the ProvName column, matching the capitalization, spelling, and spacing exactly, or else it won’t be counted as a match. The ProvID from the Provinces table matching the name will inserted into the record in the base table. The value will be left blank in the imported record if no matches are found.
Postal Code postal Optional Standard The postal or ZIP code of the user.
Cellphone Number phonecell Optional Standard The cellphone number of the user.
Employee Number employNo Optional Standard The employee number of the user.
Student Number studentNo Optional Standard The student number of the user.
Secondary Phone Number sPhone Optional Standard The secondary phone number of the user.
Date of Birth DOB Optional Standard The date of birth of the user.
Preferred Name preferredname Optional Standard The preferred name of the user.
Public Comment publicComment Optional Standard The public comment for the user. Visible to the user.
Private Comment privateComment Optional Standard The private comment for the user. Not visible to the user.
Login Source loginSource Optional Standard The method by which the user logs into the system. If a login source is not supplied for a user, it will be set to OPSCOM by default.
### OffenseLocations Table For additional information on this table, refer to this article: [https://ops-com.atlassian.net/wiki/x/9ZYL](https://ops-com.atlassian.net/wiki/x/9ZYL)
**Column Name** **Internal Name** **Requirement** **Type** **Description**
Location Name LocationName Unique ID - Required Standard The name of the location being imported. This value identifies the location as a unique record and is required to import a record.
Writer Visible WriterVisible Optional Standard Whether the writer of a violation of a ticket made in the location is visible to the user.
GIS Number GisNo Optional Standard The GIS number is a geographic location code and is only used by certain clients. Associated with GIS maps ([https://www.gismaps.org/](https://www.gismaps.org/)).
### Vehicle Table
**Column Name** **Internal Name** **Requirement** **Type** **Description**
Licence Plate Plate Unique ID - Required Standard The license plate number of the vehicle. This value identifies the vehicle as a unique record and is required to import a record.
Vehicle Year Year Optional Standard The year of the vehicle.
Active Vehicle active Optional Standard Indicates whether the vehicle is active or not. If not supplied, vehicles will be set to active by default.
Plate Type Name PlateTypeID Optional Foreign Key - VehiclePlateType Table The plate type of the vehicle. Attaches to the VehiclePlateType table. The values supplied by the user in the uploaded file are expected to be values from the TypeName column of the VehiclePlateType table, as these are the values that will be matched against. The values in the uploaded file must be an exact match to the values in the TypeName column, matching the capitalization, spelling, and spacing exactly, or else it won’t be counted as a match. The TypeID from the VehiclePlateType table matching the name will inserted into the record in the base table. The value will be left blank in the imported record if no matches are found.
Province/State ProvID Optional Foreign Key - Provinces Table The province or state of the user. Attaches to the Provinces table. The values supplied by the user in the uploaded file are expected to be values from the ProvName column of the Provinces table, as these are the values that will be matched against. These are the long names of the province and not the abbreviation; as in, Ontario and not ON. The values in the uploaded file must be an exact match to the values in the ProvName column, matching the capitalization, spelling, and spacing exactly, or else it won’t be counted as a match. The ProvID from the Provinces table matching the name will inserted into the record in the base table. The value will be left blank in the imported record if no matches are found.
Vehicle Make Name MakeID Optional Foreign Key - VehicleMake Table The make of the vehicle. Attaches to the VehicleMake table. The values supplied by the user in the uploaded file are expected to be values from the MakeName column of the VehicleMake table, as these are the values that will be matched against. The values in the uploaded file must be an exact match to the values in the MakeName column, matching the capitalization, spelling, and spacing exactly, or else it won’t be counted as a match. The MakeID from the VehicleMake table matching the name will inserted into the record in the base table. The value will be left blank in the imported record if no matches are found.
Vehicle Type Name TypeID Optional Foreign Key - VehicleType Table The type of the vehicle. Attaches to the VehicleType table. The values supplied by the user in the uploaded file are expected to be values from the TypeName column of the VehicleType table, as these are the values that will be matched against. The values in the uploaded file must be an exact match to the values in the TypeName column, matching the capitalization, spelling, and spacing exactly, or else it won’t be counted as a match. The TypeID from the VehicleType table matching the name will inserted into the record in the base table. The value will be left blank in the imported record if no matches are found.
Vehicle Colour Name ColourID Optional Foreign Key - VehicleColours Table The colour of the vehicle. Attaches to the VehicleColours table. The values supplied by the user in the uploaded file are expected to be values from the ColourName column of the VehicleColours table, as these are the values that will be matched against. The values in the uploaded file must be an exact match to the values in the ColourName column, matching the capitalization, spelling, and spacing exactly, or else it won’t be counted as a match. The ColourID from the VehicleColours table matching the name will inserted into the record in the base table. The value will be left blank in the imported record if no matches are found.
VIN Number vin Optional Standard The Vehicle Identification Number (VIN) of the vehicle.
### Permits Table
**Column Name** **Internal Name** **Requirement** **Type** **Description**
Permit Number PermitNo Unique ID - Required Standard This field is the first primary identifier. Both it and LotNameID must be provided to create a new permit This value identifies the permit as a unique record and is required to import a record.
Lot Name (Long) LotNameID Unique ID - Required Foreign Key - LotNames Table The long name of the lot associated with the permit. Attaches to the LotNames table. This field is the second primary identifier. Both it and PermitNo must be provided to create a new permit. This value identifies the permit as a unique record and is required to import a record. The values supplied by the user in the uploaded file are expected to be values from the LotName column of the LotNames table, as these are the values that will be matched against. These are the long form version of the lot name, and not the lot short name. The values in the uploaded file must be an exact match to the values in the LotName column, matching the capitalization, spelling, and spacing exactly, or else it won’t be counted as a match. The LotNameID from the LotNames table matching the name will inserted into the record in the base table. The value will be left blank in the imported record if no matches are found.
Visible visible Optional Standard Indicates whether the permit is visible or not.
Permit Status status Optional Standard The status of the permit.
Permit State StateID Optional Foreign Key - PermitState Table The state of the permit.
### Violations Table
**Column Name** **Internal Name** **Requirement** **Type** **Description**
Ticket Number Ticket Unique ID - Required Standard The unique identifier for the violation. This value identifies the violation as a unique record and is required to import a record.
Licence Plate VehicleID Recommended Foreign Key - Vehicle Table The license plate number of the associated vehicle. Attaches to the Vehicle table. The values supplied by the user in the uploaded file are expected to be values from the Plate column of the Vehicle table, as these are the values that will be matched against. The values in the uploaded file must be an exact match to the values in the Plate column, matching the capitalization, spelling, and spacing exactly, or else it won’t be counted as a match. The VehicleID from the Vehicle table matching the name will inserted into the record in the base table. The value will be left blank in the imported record if no matches are found.
Ticket Type Name TicketType Recommended Foreign Key - TicketCategory Table The type of the ticket. Attaches to the TicketCategory table. The values supplied by the user in the uploaded file are expected to be values from the TicketTypeName column of the TicketCategory table, as these are the values that will be matched against. The values in the uploaded file must be an exact match to the values in the TicketTypeName column, matching the capitalization, spelling, and spacing exactly, or else it won’t be counted as a match. The TicketTypeID from the TicketCategory table matching the name will inserted into the record in the base table. The value will be left blank in the imported record if no matches are found.
Fine Amount Fine Recommended Standard The amount of fine associated with the ticket.
Towing Amount Towing Optional Standard The amount of towing charges associated with the ticket.
Tax Amount taxAmount Optional Standard The amount of tax associated with the ticket.
Issued Date Issued Recommended Standard The date the ticket was issued.
Due Date Due Recommended Standard The due date for payment of the ticket.
Ticket Writer Writer Optional Standard The admin who wrote the ticket.
Violation Location Name LocationID Recommended Foreign Key - OffenceLocations Table The name of the location where the violation occurred. Attaches to the OffenceLocations table. The values supplied by the user in the uploaded file are expected to be values from the LocationName column of the OffenceLocations table, as these are the values that will be matched against. The values in the uploaded file must be an exact match to the values in the LocationName column, matching the capitalization, spelling, and spacing exactly, or else it won’t be counted as a match. The LocationID from the OffenceLocations table matching the name will inserted into the record in the base table. The value will be left blank in the imported record if no matches are found.
# Alarms Information related to different alarms. # Plate and Vehicle Alarms ## Setting up the Proper Account Settings to View Alarms First we will need to get to **Manage Administration Roles** so that we can manage how our admins can view alarms on the system. [![image.png](https://opscom.wiki/uploads/images/gallery/2024-06/scaled-1680-/IdJimage.png)](https://opscom.wiki/uploads/images/gallery/2024-06/IdJimage.png) From here we can go into the **Role** we wish to manage and under the **Dispatch** section we can toggle all the settings related to dispatch logs and alarms. [![image.png](https://opscom.wiki/uploads/images/gallery/2024-06/scaled-1680-/1cEimage.png)](https://opscom.wiki/uploads/images/gallery/2024-06/1cEimage.png) ## Using Plate Alarms Plate alarms are triggered when a plate in the system has an alarm attached to it. We can also add a vehicle alarm to a users profile which will be triggered when any plate that user is associated is triggered by any camera or officer reads/scans. These alarms will be triggered by Fixed Cameras (Entrance and Exit Cameras), Handheld Violation Entries by Officers in the Field, and LPR Camera Reads. Not only is there an alarm that gets triggered in the system but you can also provide an email address to send the alarm details to. If a fixed camera was used then the name of that camera will be listed on the Plate Alarm. Keep in mind that manually **Chalking Vehicles** from the handheld does not trigger the alert. ### **Attaching an Alarm to a Plate without a Profile** #### How do plates get into the system without profiles? The only way for a plate to make it into the system without a profile is by Issue a **New Violation**, **Violation Warning** or **Chalking Record** through the handheld or adminside as well as by linking the plate to an **Incident** from the adminside. When you search a plate on the handheld that does not exist in the system you will see the black plus symbol which indicates that the vehicle currently does not exist. [![image.png](https://opscom.wiki/uploads/images/gallery/2024-06/scaled-1680-/rPIimage.png)](https://opscom.wiki/uploads/images/gallery/2024-06/rPIimage.png) If you are on the admin-side, then you would need to issue a violation or incident which will give you an option to add a new vehicle. You are then prompted to update the correct vehicle information which is where the alarm can be added. Important Essentially, to add an alarm to a plate without a profile there needs to be an incident, violation or warning associated with the plate to add an alarm to it when searching for the plate in the system. If the plate only has a chalking record you will need to issue a violation to the plate and add the vehicle information there. You have to do this because when you chalk a plate through the handheld you don't provide the vehicle information on the handheld. As seen in the image below once I added the violation to my plate JROCK and searched the vehicle I was then able to click the vehicle information and add the alarm. [![image.png](https://opscom.wiki/uploads/images/gallery/2024-06/scaled-1680-/q1yimage.png)](https://opscom.wiki/uploads/images/gallery/2024-06/q1yimage.png) As you can see with chalking records, we don't have any option to view the vehicle details but we do with violations and incidents. When we click vehicle information without a profile we have to click **Edit Vehicle** to see the information we need. [![image.png](https://opscom.wiki/uploads/images/gallery/2024-06/scaled-1680-/mlWimage.png)](https://opscom.wiki/uploads/images/gallery/2024-06/mlWimage.png) #### Finding the Plate To find the plate we want to add the vehicle to without going to their profile we need to navigate to **Violations → Vehicles → Search by Plate** [![image.png](https://opscom.wiki/uploads/images/gallery/2024-06/scaled-1680-/Hqximage.png)](https://opscom.wiki/uploads/images/gallery/2024-06/Hqximage.png) From here enter the plate we wish to add the alarm too and then click on the **Vehicle Info** icon, in this example I have added a plate with no profile called JROCK that we will add an alarm to. [![image.png](https://opscom.wiki/uploads/images/gallery/2024-06/scaled-1680-/Dgiimage.png)](https://opscom.wiki/uploads/images/gallery/2024-06/Dgiimage.png) #### Adding the Alarm to the Plate Once you find the vehicle info through the profile, violation, or incident we can click the **Vehicle Information** where we can add the alarm. [![image.png](https://opscom.wiki/uploads/images/gallery/2024-06/scaled-1680-/Ralimage.png)](https://opscom.wiki/uploads/images/gallery/2024-06/Ralimage.png) **Step 1:** Toggle the **Vehicle Alarm**, you will know this is working as you will see a check-mark in the box. **Step 2:** Once you click this you will have an option to add the **Alarm Comment** which will be seen by officers and admins. **Step 3:** Click **Update Vehicle** to have the vehicle alarm applied correctly. When this plate gets LPR scanned by mobile or fixed cameras you ding sound is made so offices in cars will notice it and can write a dispatch report before moving on. ### Adding Plate Alarms to Specific Plates If you know the user you wish to add the plate alarm to, we can do this by going into this users profile from the admin side and clicking **Vehicles** Once there you should see a list of vehicles and the plate associated to them. Clicking the target plate will bring up a new window with **Vehicle Information** where we can add the alarm. [![image.png](https://opscom.wiki/uploads/images/gallery/2024-06/scaled-1680-/4Odimage.png)](https://opscom.wiki/uploads/images/gallery/2024-06/4Odimage.png) See **Adding the Vehicle Alarm** under **Attaching an Alarm to a Plate without a Profile** for instruction visual instructions on adding the actual alarm. ### **Adding a Plate Alarm to All Vehicles on a Users Profile** We can add a vehicle alarm to all of the users plates through their profile by clicking **Edit** next to the **Basic Profile Information**. [![image.png](https://opscom.wiki/uploads/images/gallery/2024-06/scaled-1680-/2gIimage.png)](https://opscom.wiki/uploads/images/gallery/2024-06/2gIimage.png) Once you are on the user's profile you should see two check boxes called **Plate alarm** and **People alarm** as seen in the image below. [![image.png](https://opscom.wiki/uploads/images/gallery/2024-06/scaled-1680-/JRfimage.png)](https://opscom.wiki/uploads/images/gallery/2024-06/JRfimage.png) We can now toggle the alarm and add a comment that will get utilized in the alert. Click the **Update** button when you are finished to put the alarms into affect. Keep in mind **People Alarms** and **License Plate Alarm** share this same message. (Assuming you have both alarms toggled on the users profile) # People Alarms ## Setting up Alarm Permissions Before admins can use alarms in the system they will need to have the proper dispatch permissions added to their administrative role. [![image.png](https://opscom.wiki/uploads/images/gallery/2024-06/scaled-1680-/GSdimage.png)](https://opscom.wiki/uploads/images/gallery/2024-06/GSdimage.png) Select the permissions you wish to add to the role and click **Save Permissions** at the bottom when you are finished. ## Adding People Alarms to Users You can add people alarms to users profile by first clicking the **Edit** button next to their **Basic Profile Information** [![image.png](https://opscom.wiki/uploads/images/gallery/2024-06/scaled-1680-/XM1image.png)](https://opscom.wiki/uploads/images/gallery/2024-06/XM1image.png) This will take you to the **Edit User Profile** window where you should see the option to toggle the **People Alarm**. If the profile does not have alarms toggles or an alarm comment associated to their profile when an alarm is triggered for the specific student/staff number the system will still be alerted. Once you toggle this option you will have the ability to add your alarm comment. Just keep in mind you won't be able to add the comment until you do this. Keep in mind **License Plate Alarm** and **Plate Alarm** will both share this message. [![image.png](https://opscom.wiki/uploads/images/gallery/2024-06/scaled-1680-/IVnimage.png)](https://opscom.wiki/uploads/images/gallery/2024-06/IVnimage.png) ## Viewing People Alarms You can view the alarms and dispatch logs from the top right panel on the admin side. All of the alarms associated to a profile or plate are rolled up into a single dispatch log if the alarm is sent within 30 minutes from the first. Otherwise it will start a new dispatch record. This is to stop a large number of alarms from flooding into the system. [![image.png](https://opscom.wiki/uploads/images/gallery/2024-06/scaled-1680-/cicimage.png)](https://opscom.wiki/uploads/images/gallery/2024-06/cicimage.png) Keep in mind that if the API call for the person alarm is triggered with an unknown student/staff account number it will be moved to the **generic alarms** which is the bell icon next to the people and plate alarms section. It will continue to be rolled up in the same dispatch log within 30 minutes of the first alarm. ### Clearing Alarms We can clear the alarm from flashing if we no longer need to be notified on a specific admin. This will only remove the alert from the admin that cleared it and will keep it for other admins until they choose to clear it for themselves. When you clear the alarm it can still be viewed from the Dispatch Log Report [![image.png](https://opscom.wiki/uploads/images/gallery/2024-06/scaled-1680-/BJEimage.png)](https://opscom.wiki/uploads/images/gallery/2024-06/BJEimage.png) # Generic Alarms ## Setting up Alarm Permissions Before Admins can use alarms in the system they will need to have the proper dispatch permissions added to their administrative role. [![image.png](https://opscom.wiki/uploads/images/gallery/2024-06/scaled-1680-/G4Nimage.png)](https://opscom.wiki/uploads/images/gallery/2024-06/G4Nimage.png) Select the permissions you wish to add to the role and click **Save Permissions** at the bottom when you are finished. ## How Generic Alarms Get Pushed to the System ### Unknown Student/Staff Number One way for a generic alarm to hit the system would be if a people alarm was sent in with a student or staff number that is not in the system, the message will be provided from the access point as well as any other provided details. ### ITS-Networking Alerts Systems This must be setup and configured by OPS-COM before you can use this. In this case an email alert is pushed to OPS-COM. This gets parsed and sent out as a generic alert. Some of our clients are utilizing these systems for stolen devices which have the systems push us the incident and MAC Address. Just like people and plate alarms, if you submit an alert on the same MAC address or Incident within a 30 minute time frame they will all be rolled up into a single dispatch log that can then be acted on. If a valid incident is pushed along to the system the incident will be associated to the dispatch log. ## Dispatch Logs and Alert Rollups ### Dispatch Logs Once you have received the alert the system automatically creates the dispatch report and links the provided incident if there was a valid incident passed to our system. ### Alert Rollups To prevent a large number of alerts being pushed to dispatch and admins of the system. We have made it so that if the same alert is triggered within 30 minutes of the first. Then all of the log records will be rolled up and added to a single dispatch log record / alert. [![image.png](https://opscom.wiki/uploads/images/gallery/2024-06/scaled-1680-/3oEimage.png)](https://opscom.wiki/uploads/images/gallery/2024-06/3oEimage.png) ## Clearing/Viewing Alarms Admins are able to clear, view, and close alarms for their accounts only, which means that other admins will still continue to see the alerts until they clear them. To do this hover over the bell icon at the top right of your screen and select the alert you wish to clear. [![image.png](https://opscom.wiki/uploads/images/gallery/2024-06/scaled-1680-/awzimage.png)](https://opscom.wiki/uploads/images/gallery/2024-06/awzimage.png) From here we can **Go To Entry** which will take us to the dispatch log report and search for the specific alert. Or **Clear Alarm** which will remove the alert icon from the top right of the screen but will not remove the dispatch log from the dispatch records. # Flex Permits ## Introduction Flex permits allow clients to specify variable prices for a lot, with the possibility of a different price for every hour. This allows more options for the customization of permit prices, useful for situations like making permits more expensive during peak hours. Flex permits are counted as type of temp permit, as an addition to the existing daily and hourly permits. They function most similarly to hourly permits and their uses have some overlap. It is intended for a site to choose between hourly permits and flex permits and not use both, although clients are not restricted from using both at the same time if they choose to. ## Flex Permits Tab Flex permits and related sections can be accessed on the lot edit page, from the new flex permits tab. [![Untitled.png](https://opscom.wiki/uploads/images/gallery/2024-07/scaled-1680-/untitled.png)](https://opscom.wiki/uploads/images/gallery/2024-07/untitled.png)
The page consists of three sections: - An options section - A time slot section, used for defining prices - An hourly grid, used to assign prices to hours in the week ### Options
A list of options related to flex permits.
[![image.png](https://opscom.wiki/uploads/images/gallery/2024-08/scaled-1680-/v9Eimage.png)](https://opscom.wiki/uploads/images/gallery/2024-08/v9Eimage.png)
There is only one option for flex permits.
- **Enable flex permits** - this will enable the use of flex permits for this lot. - If not enabled, users will not have the option to selected flex permits for this lot, even if the hourly grid is filled out.
### Time Slots Flex permits are controlled by a grid of customizable timeslots, which are configured for each lot from the lot edit page. The time slot section is located below the options section. [![image.png](https://opscom.wiki/uploads/images/gallery/2024-08/scaled-1680-/o2Pimage.png)](https://opscom.wiki/uploads/images/gallery/2024-08/o2Pimage.png) Time slots created by the admin are located here. - **Name** - a user-friendly name to identify what the slot should be used for - **Price** - the price of booking a permit for the selected hour - **Colour** - the colour that the time cells in the week grid will be marked with when they are assigned this price
### Time-slot Creation Click the add new button to bring up the add time slot modal. Fill in the required fields and press save changes to save the new time slot. [![3.png](https://opscom.wiki/uploads/images/gallery/2024-07/scaled-1680-/5gK3.png)](https://opscom.wiki/uploads/images/gallery/2024-07/5gK3.png)
The time slot selection menu will reload and the saved item will appear. The modal will also be brought up when editing the details of an existing time slot. Once a time slot has been created, there is no way to delete it . ### Hourly Cell Grid Below the time slot section, the hourly cell grid can be found. This is a representation of each hour within the week. [![4e.png](https://opscom.wiki/uploads/images/gallery/2024-07/scaled-1680-/4e.png)](https://opscom.wiki/uploads/images/gallery/2024-07/4e.png) Here, each hour time slot within a week can be assigned a specific cost. When a user books a permit for a number of hours, the final price will be calculated using the prices associated to each hour selected within the booking. Above the cell grid, several buttons can be found. - **Clear** - will clear the grid of all filled cells - **Fill** - will fill in the grid with the selected colour - **Reload** - will reload the grid data stored within the database, erasing any changes that were made ### Hourly Price Assignment To fill in the cell grid, first select one of the prices to assign to cells on the grid. This can be done by clicking on the one of the selectable colours. [![image.png](https://opscom.wiki/uploads/images/gallery/2024-08/scaled-1680-/E3Pimage.png)](https://opscom.wiki/uploads/images/gallery/2024-08/E3Pimage.png) This will change the active colour to the colour selected, as indicated by the blue outline. Cells on the grid can now be filled in by clicking and dragging the mouse across the cells. [![2024-04-08_13-35-56.gif](https://opscom.wiki/uploads/images/gallery/2024-07/2024-04-08-13-35-56.gif)](https://opscom.wiki/uploads/images/gallery/2024-07/2024-04-08-13-35-56.gif)
The grid can be filled in using any number of time slots. Note that any sections left blank (using the default option) will be set to free. [![8.png](https://opscom.wiki/uploads/images/gallery/2024-07/scaled-1680-/rU68.png)](https://opscom.wiki/uploads/images/gallery/2024-07/rU68.png) Cell price layouts will only be saved upon clicking the update lot button. ## User-Side Permits Once the flex permits have been filled in, they will begin to appear for sale on the user side. On lots where flex permits are enabled, the permits page will show a preview of flex permits as a price range. [![image.png](https://opscom.wiki/uploads/images/gallery/2024-08/scaled-1680-/vc9image.png)](https://opscom.wiki/uploads/images/gallery/2024-08/vc9image.png)
Flex permit options will now be available as a separate option to the page.
[![image.png](https://opscom.wiki/uploads/images/gallery/2024-08/scaled-1680-/YMAimage.png)](https://opscom.wiki/uploads/images/gallery/2024-08/YMAimage.png)
Selecting the flex option will show the input requirements to book a permit.
[![image.png](https://opscom.wiki/uploads/images/gallery/2024-08/scaled-1680-/WFtimage.png)](https://opscom.wiki/uploads/images/gallery/2024-08/WFtimage.png) Flex permit inputs: - **Date** - the day the permit is being booked for. - **Start Time** - The time the booking will start at. - Flex permits are limited to booking on the hour. They do not currently support proration, meaning if a user arrives during the middle of an hour, they must pay for the entire price of the hour. - **Duration** - the number of hours to book the permit for. - A permit can be booked for a limit of 12 hours. If the booking would go beyond the bounds of the day, the user will be required to pick a shorter duration. - **Vehicle** - like normal for temp permits, the user can either select a vehicle on their account or enter a new plate as a guest vehicle.
Selecting an option in the date input will cause the prices for that day of the week to appear in a box to the left side of the page.
- If the user selects one of the other options after selecting flex, the flex prices box should disappear again. - Selecting flex again should make it reappear.
[![image.png](https://opscom.wiki/uploads/images/gallery/2024-08/scaled-1680-/X8yimage.png)](https://opscom.wiki/uploads/images/gallery/2024-08/X8yimage.png) Selecting a different day will cause the flex prices box to reload with the new day's prices. [![2024-08-08_16-29-39.gif](https://opscom.wiki/uploads/images/gallery/2024-08/2024-08-08-16-29-39.gif)](https://opscom.wiki/uploads/images/gallery/2024-08/2024-08-08-16-29-39.gif) The cost of the permit will be calculated using the prices of each hour in the selected range added together. [![image.png](https://opscom.wiki/uploads/images/gallery/2024-08/scaled-1680-/AUqimage.png)](https://opscom.wiki/uploads/images/gallery/2024-08/AUqimage.png) Pressing to reserve the permit, the permit will be added to the user's cart. [![image.png](https://opscom.wiki/uploads/images/gallery/2024-08/scaled-1680-/22Nimage.png)](https://opscom.wiki/uploads/images/gallery/2024-08/22Nimage.png) ### Real-Time Map On the real-time map, the flex permits range of cost will be listed under rental costs. [![image.png](https://opscom.wiki/uploads/images/gallery/2024-08/scaled-1680-/0YDimage.png)](https://opscom.wiki/uploads/images/gallery/2024-08/0YDimage.png) Clicking here to book a permit will take the user to the guest checkout page, the same place as if they had scanned a QR code to access the lot. If enabled, the user does not need to be logged in to access this page. In the case where a lot group is used as an icon in place of a single lot, it will also show the range on the lot groups page. [![image.png](https://opscom.wiki/uploads/images/gallery/2024-08/scaled-1680-/8P2image.png)](https://opscom.wiki/uploads/images/gallery/2024-08/8P2image.png) ### QR Code / Guest Checkout Similar to the standard temp permit checkout, the flex permit prices for the day will be displayed to the left side of the page. As guest checkout permits are intended for immediate bookings, the day and time will be limited to the current date. [![image.png](https://opscom.wiki/uploads/images/gallery/2024-08/scaled-1680-/fVcimage.png)](https://opscom.wiki/uploads/images/gallery/2024-08/fVcimage.png) Upon filling in the information, the permit cost will be calculated and the user will be able to checkout immediately. [![image.png](https://opscom.wiki/uploads/images/gallery/2024-08/scaled-1680-/gN4image.png)](https://opscom.wiki/uploads/images/gallery/2024-08/gN4image.png) Clicking on make payment, the user will be redirected to their selected payment gateway to make a payment.
# Tracking Electrical Vehicles ## Introduction A flag has been added to vehicles that can be used to mark them as electrical. This makes it possible to track the number of electric vehicles present on the website. ## Admin Side Vehicles can be viewed and edited from the user vehicle list, accessible from any user's profile. Viewing the user vehicle list page, a column is present listing if each vehicle is electrical or not. [![image.png](https://opscom.wiki/uploads/images/gallery/2024-07/scaled-1680-/OxYimage.png)](https://opscom.wiki/uploads/images/gallery/2024-07/OxYimage.png) The vehicles can be edited from this page by clicking on the plate buttons in the plate column. On the popup that appears containing the vehicle information, the electric vehicle flag can be enabled for the vehicle using the checkbox: [![image.png](https://opscom.wiki/uploads/images/gallery/2024-07/scaled-1680-/b4rimage.png)](https://opscom.wiki/uploads/images/gallery/2024-07/b4rimage.png) Once saved, the vehicle will be counted as an electric vehicle in the system. On the user profile, electric vehicles are marked by a blue thunderbolt icon next to the plate name. [![image.png](https://opscom.wiki/uploads/images/gallery/2024-07/scaled-1680-/Fn4image.png)](https://opscom.wiki/uploads/images/gallery/2024-07/Fn4image.png) The thunderbolt icon will show a tool tip when moused over. [![image.png](https://opscom.wiki/uploads/images/gallery/2024-07/scaled-1680-/VABimage.png)](https://opscom.wiki/uploads/images/gallery/2024-07/VABimage.png) ### Vehicle Report To quickly see all electric vehicles in the system, the option to search electric vehicles is available on the vehicle search page: [![image.png](https://opscom.wiki/uploads/images/gallery/2024-07/scaled-1680-/ihaimage.png)](https://opscom.wiki/uploads/images/gallery/2024-07/ihaimage.png) The records returned will contain a column called 'EV' showing if the vehicle is an electric vehicle. Clicking on the plate buttons on this page will open a modal showing vehicle information. Electric vehicle status will be shown at the bottom of the modal: [![image.png](https://opscom.wiki/uploads/images/gallery/2024-07/scaled-1680-/knBimage.png)](https://opscom.wiki/uploads/images/gallery/2024-07/knBimage.png) ## User Side A user can tell if their vehicle is marked as electric by the presence of a blue thunderbolt icon displayed next to their plate number on the user vehicle list. [![image.png](https://opscom.wiki/uploads/images/gallery/2024-07/scaled-1680-/cXAimage.png)](https://opscom.wiki/uploads/images/gallery/2024-07/cXAimage.png) On the user vehicle page, electric vehicles are also marked by a blue thunderbolt icon. [![image.png](https://opscom.wiki/uploads/images/gallery/2024-07/scaled-1680-/p3vimage.png)](https://opscom.wiki/uploads/images/gallery/2024-07/p3vimage.png) A user is able to mark their vehicle as electric from this page by clicking on the vehicle edit button. In the modal that appears, a check box is present to mark the vehicle as an electric vehicle. [![image.png](https://opscom.wiki/uploads/images/gallery/2024-07/scaled-1680-/bOximage.png)](https://opscom.wiki/uploads/images/gallery/2024-07/bOximage.png) # Auto Email Notifications for Warnings ## Introduction There is now the option to have a warning letter sent to those who have received a violation marked as a warning. Violations marked as a warning have had their fine amount waived. ## Setup There is a new setting used to enable the sending of warning notices. It can be found on the **System Settings** page. [![image.png](https://opscom.wiki/uploads/images/gallery/2024-07/scaled-1680-/2YYimage.png)](https://opscom.wiki/uploads/images/gallery/2024-07/2YYimage.png) The setting can be found under the **Violations** sub-menu. [![image.png](https://opscom.wiki/uploads/images/gallery/2024-07/scaled-1680-/cHtimage.png)](https://opscom.wiki/uploads/images/gallery/2024-07/cHtimage.png) The setting is named **Send Notices For Warnings**. [![image.png](https://opscom.wiki/uploads/images/gallery/2024-07/scaled-1680-/SDlimage.png)](https://opscom.wiki/uploads/images/gallery/2024-07/SDlimage.png) Once enabled, warning notices will be sent when the system task is run. ## Template The layout of the warning letter can be edited on the **Email Templates** page, found under the menu tree: - **System Configuration -> Content & Designs -> Email Templates** [![image.png](https://opscom.wiki/uploads/images/gallery/2024-07/scaled-1680-/FMqimage.png)](https://opscom.wiki/uploads/images/gallery/2024-07/FMqimage.png) The template is called **New Warning Notice**. [![image.png](https://opscom.wiki/uploads/images/gallery/2024-07/scaled-1680-/jYUimage.png)](https://opscom.wiki/uploads/images/gallery/2024-07/jYUimage.png) Here the content of the notice is setup for the email to be sent out to users with warning violations. [![image.png](https://opscom.wiki/uploads/images/gallery/2024-07/scaled-1680-/45mimage.png)](https://opscom.wiki/uploads/images/gallery/2024-07/45mimage.png) ## System Task To have the warning notices be sent out, the system task must be run. Tasks can be accessed from the **View System Task Logs** page, located under the **Tools** menu. [![image.png](https://opscom.wiki/uploads/images/gallery/2024-07/scaled-1680-/c0Eimage.png)](https://opscom.wiki/uploads/images/gallery/2024-07/c0Eimage.png) The system task used to send violation notices is called **New Violation Notices**. [![image.png](https://opscom.wiki/uploads/images/gallery/2024-07/scaled-1680-/d32image.png)](https://opscom.wiki/uploads/images/gallery/2024-07/d32image.png) Like other system tasks, **New Violation Notices** is set to run at a scheduled time while it is enabled. It can also be run immediately by pressing the run button. While the setting **Send Notices for Warnings** is enabled, this task will include warning violations in its output. When disabled, the task will only send notices out for violations issued with a fine. # Daily Payments - Itemized The Daily Payments - Itemized page can be found under Payments -> Daily Payments - Itemized. [![2024-08-08_15-15-19.png](https://opscom.wiki/uploads/images/gallery/2024-08/scaled-1680-/2024-08-08-15-15-19.png)](https://opscom.wiki/uploads/images/gallery/2024-08/2024-08-08-15-15-19.png) On this page your can filter for submitted or processed payments based on a date range and payment type: [![2024-08-08_15-18-09.png](https://opscom.wiki/uploads/images/gallery/2024-08/scaled-1680-/2024-08-08-15-18-09.png)](https://opscom.wiki/uploads/images/gallery/2024-08/2024-08-08-15-18-09.png) Two options for excel export exist: [![image.png](https://opscom.wiki/uploads/images/gallery/2024-08/scaled-1680-/yZximage.png)](https://opscom.wiki/uploads/images/gallery/2024-08/yZximage.png) - **Export to Excel (Group)**: payment items such as permits, deposits, violations, lockers, etc that are part of the same payment are grouped together. Example: [![image.png](https://opscom.wiki/uploads/images/gallery/2024-08/scaled-1680-/lJIimage.png)](https://opscom.wiki/uploads/images/gallery/2024-08/lJIimage.png) - **Export to Excel (Line)**: payment items such as permits, deposits, violations, lockers, etc that are part of the same payment are listed on separate lines/rows. Example: [![image.png](https://opscom.wiki/uploads/images/gallery/2024-08/scaled-1680-/MPeimage.png)](https://opscom.wiki/uploads/images/gallery/2024-08/MPeimage.png) After clicking "List Payments" results will then be displayed below the search criteria, grouped by day: [![image.png](https://opscom.wiki/uploads/images/gallery/2024-08/scaled-1680-/nYrimage.png)](https://opscom.wiki/uploads/images/gallery/2024-08/nYrimage.png) Additionally along the bottom of the page a table breakdown of daily processed orders is shown:[![image.png](https://opscom.wiki/uploads/images/gallery/2024-08/scaled-1680-/Nucimage.png)](https://opscom.wiki/uploads/images/gallery/2024-08/Nucimage.png) # Review Emails Sent to Users ### Overview All internal communications, including mass and automatic messages sent by the system, are now able to be viewed from user profiles. The history page now lists each message sent, making it easy to track that emails have been received by their intended recipients and are being sent as expected. Internal and automatic messaging are generated in these situations: - New violation notices are sent - Overdue violation notices are sent - A receipt is sent - An invoice is sent These emails will now appear in the user history page. ### Viewing Emails Emails a user has received can be viewed by going to the history section of a user's profile and selecting the sent mail page. [![image.png](https://opscom.wiki/uploads/images/gallery/2024-08/scaled-1680-/ewaimage.png)](https://opscom.wiki/uploads/images/gallery/2024-08/ewaimage.png) On the view emails page, the emails sent will be listed. The email sent can be viewed by clicking on the subject button of the email. [![image.png](https://opscom.wiki/uploads/images/gallery/2024-08/scaled-1680-/RIwimage.png)](https://opscom.wiki/uploads/images/gallery/2024-08/RIwimage.png) This will open a popup displaying the email sent. [![image.png](https://opscom.wiki/uploads/images/gallery/2024-08/scaled-1680-/qlAimage.png)](https://opscom.wiki/uploads/images/gallery/2024-08/qlAimage.png) #### New Violation Notices When the System Task "Send New Violation Notices" is run, it will send out notice letters to the owners of the violations by email. The link presented on the history page will show the notice letter that was sent. This is the same view shown as when viewing the notice letter from the violation info page. #### Overdue Violation Notices When the System Task "Overdue Violation Notices" is run, it will send out notice letters to the owners of the violations by email. The link presented on the history page will show the notice letter that was sent. This is the same view shown as when viewing the notice letter from the violation info page. #### Receipts When a user makes a payment on the website, an email will be sent to them containing the payment details. The link presented on the history page will show a popup of the email of the receipt that was sent. Since the content of the receipt in the email that was sent can be different than is what is on an OPS-COM receipt, it will show the actual email that was sent. #### Invoices When an invoice is generated, it will be sent by email to the user set to receive it. The link presented on the history page will show the invoice itself.