for Enforcement (Android)
- Locate Application Version
- Handheld Training
- Device is in Preview Mode
- Testing Your WIFI Connection
- Search Vehicles
- Search Vehicles
- Search Vehicle Results
- Permits Tab
- Violations Tab
- Chalks Tab
- Permit Misuse Notification
- Violations and Chalking
- Plate Capture Using Handheld
- Reprint Violation
- LPR Scanning
- Updating Incorrect LPR Reads
- System Settings
- System Settings
- Setting Device to Auto-Update
- Reset Settings for OPS-COM for Android
- Displaying Towing Charges on a Violation
- OPS-COM for Android Admin System Settings
- Replication Status
- Handheld Operation Log
- Message Alerts
- OPS-COM on the Web
- Dispatch Log
- Application Logout
- Best Practices
- Setup Installation and Maintenance
- First Time Installation - Android
- Manual Update or Installation
- Reinstalling OPS-COM for Android
- Uninstalling the Application
- Install Bluetooth Printer
- Changing Bluetooth Mode
- Choosing and Configuring Printers
- SM-T300 Printer
- Zebra Printer
- Retrieve Local Tablet Backups
- Connecting as USB Hard Drive
- Google Account
- Using OPS-COM For Android in DEMO Mode
Locate Application Version
If in doubt you can search for the OPS-COM application in the Google Play Store and when viewing the details of the application you will see the button that is typically labeled "Install" will instead show "Update". This indicates that the handheld is running an older version of the application which can be updated.
Locate the Version Details
Login Screen
Under the login box the version details and handheld identifier are clearly listed.

About Screen
Select the About menu option.

A pop-up message will display a brief description of OPS-COM application including the version number.
Tap OK to go back to the main menu.
- Alternately you can find the version number on the login screen.
Handheld Training
Slides Presentation
Videos Linked in the Presentation
Device is in Preview Mode
Preview Mode
While in this mode, the handheld can be used for testing and training without any concern of corrupting production data.
Related Pages
Testing Your WIFI Connection

Download a WIFI Analyzer Application
This app could be installed on a cell phone and it allows you to take a measure of wifi strength and source as far as channel.
The app we recommend is a product of the company VREM Software Group and is called WifiAnalyzer (OpenSource). It's a free download on the Google Playstore.
This app will give you a graphic representation of the signal strength. There are two screens we are interested in. One is Access Points and the other is Channel Graph. Both are available from the hamburger Icon (three parallel lines) at the top left of the app. 
The Menu Items We Are Interested In:
The Access Points Screen

The Channel Graph Screen

Help with Troubleshooting WIFI
This is something that would be great to look at throughout the day and especially when you have these drops in signal. What we are looking for is how much it goes up and down through the day.
The signal strength is shown as a column of colour rising up from the bottom of the graph that ranges from minus 100db to minus 20db.
The smaller the number the higher the signal (keep in mind that these numbers are negative so -100 is much better than -20)
To best assist in troubleshooting, we are looking for the reading of how low the db number is for your WIFI source.
The second thing we are looking for is how many devices are on the same channel.
Too many devices trying to access on the same channel will have an adverse affect on connectivity strength.
Please provide screen captures of these items when contacting support.
Related Pages
Search Vehicles
Search Vehicles
Search Vehicles Menu
Tap on the Search Vehicles option

Search Vehicle Panel
The green dot indicates the unit is connected to a wifi or 3G/LTE source.
Static connection is not necessary since the device does maintain a cache of information.
If the dot is yellow that would indicate the unit does not have a connection but searches may still be performed.

Entering Search Criteria
There are three methods to enter the plate information.
Text using the keypad
Voice command using the built in mic
LPR using OCR technology through the tablet's camera

Text Search
Using Text - On the Vehicle Search screen, enter the plate number or VIN number that you want to search and tap on the Search button.
The vehicle details will appear below the search area.
Example using a plate:

Example using a VIN:

Voice Search
Using Voice - Select the microphone.
The google voice recognition "Say Something" page appears, say the license plate number out loud.
LPR/OCR Camera Search
Tap the camera icon to enter LPR Search mode.

Line up the plate with the rectangle.
Long press the screen to take a shot and the screen refreshes with a list of possible plate numbers. 
Select the plate number that matches the image. In this case tap BDHE385.
Selecting the vehicle being searched for expands a yellow ribbon which displays available options.
Three buttons will appear beneath the license plate for Virtual Chalk, Issue Violation, and Details. 
Select the permit that appears underneath the license plate number to review the expiry details.
Alternately select the Details button to view all permit details.
Search Vehicle Results
Typical Vehicle Search
During a typical plate search there is a lot of information at the patrol officers fingertips.
Let's have a look at the Details section of the OPS-COM for android software. In this example we are searching for plate number APVK123.
View Extended Details
By tapping on the plate read in the list you can view more detailed information.
You may also Chalk the vehicle, Issue a violation or view further details.
Tap the Details button to drill into this area.
Permit, Violation and Chalk Details
Notice there are three tabs presented.
- Permits
- Violations
- Chalks
The officer can either tap each tab to access the information as well as swipe back and forth between these screens.
Permits Tab
Vehicle Permit Details
- This displays the expiry date of the permit
- You also have the ability to set custom expiry dates such as permit 52 which has a custom expiry of Sep-01-2018.
- The green and red bars represent whether the vehicle is valid in specific zones or not. If the users is associated to a zone it will display which zone they are in. For example we can see permit 52 is associated to the Day Care zone from 4:00 pm to midnight. While permit R102 is valid all week from 10:00 am to midnight for zones Centrum and Test Zone.
- This section shows which days of the which the permit is valid as well as the times that it can park on those particular days.

Violations Tab
Review Past Violations
In this case we see three violations. Two have been paid for and one is yet unpaid.
The date, location, and type of violation is also shown in this view.

Chalks Tab
Review Past Chalk Items
In the Chalks tab you are able to see a number of items.
- Chalks are listed from the most recent to the oldest.
- There is a map location that illustrates where the vehicle was chalked
- There is a date and time stamp for the chalk event
- There is a camera icon that can be tapped to display the image that was taken with the chalk event. See below.
- There is a comment displayed on two of the items. This comment is made at the time of chalking. See below.
- There is also a distance in meters reading that indicates the distance from the first chalk record to your present position.

Here is a closer look at one of these listings:

Review Chalk Images
By tapping on the camera Icon you will see the image you captured at the time you performed your chalking event.

Review Map and Chalk Comments
For the comment that appears in the records above. Here is the chalking screen.
You can see where the patrol officer added the comment.

Permit Misuse Notification
Setting up the Permit Misuse Timer
Select the System Settings menu item

Scroll to the Advanced Settings section of the settings, select Permit Sharing and Misuse

When you tap on Permit Sharing and Misuse Timer, a menu will open allowing you to chose the length of time the first vehicle capture will be "remembered" by the system. Once you set a time the function is turned on.
In our example the system will present a warning if the second vehicle is scanned within an hour of the first vehicle scan. After that point the first read is forgotten so to speak and the process starts over again.

Permit Misuse Alert
When you search for a vehicle that shares a permit with another that was recently seen, an alert will appear on the device to notify you of possible permit misuse.

Violations and Chalking
Issuing a Person Violation
Person Search
To issue a violation to a person tap on Person Search from the main menu of the OPS-COM app. 
This will bring up the Person Search interface which will allow you to search an existing user or create a new one. 
Name Search
Supply an existing user in the Name Search and tap Search to find the person you are looking for. If supplied by the user their full name, phone number, driver license and student/staff id will be shown here. You will also see the people alarms associated with that user which will let off a sound notification from your tablet. This allows you to perform a search on a user without issuing a violation to gather additional details about them. 
Wildcard Search
You can also perform a wildcard search that will allow you to search users based on their phone number, student/staff ID or drivers licence. 
Creating Users
If a person is not known in your system you are able to use the Create button to create a new user. The violation will then be associated to that users account.
To create a user you will need to add their personal details manually.
If the user fails to supply their personal information you can select the Failed to Identify box above the user details to continue issuing the violation.
Issuing Person Violations
Setting up Person Violations
The system allows you to issue personal, vehicle or both personal and vehicle violations. This allows officers to write tickets with both plate and personal information or issue violations unrelated to vehicles.
In order for these violations to be issued you must have a ticket category that applies to users. For more information see our article on Ticket Categories.
To begin issuing a violation to a person tap their name on the Person Search interface. This brings up the Add Violation Record window where you can begin recording your violation details. 
Supply the Ticket Type and Offence Type.
Next we can move to the person tab to get more information about the user and correct anything that might not be correct.
If the user fails to supply their personal information you can select the Failed to Identify box above the user details to continue issuing the violation. 
We can also search for a user by tapping the Person Search button. This will allow us to search for a different user or to complete the user info if you were issuing a violation from Plate Search.
Click Save or Save & Print to finish issuing the violation.
Make sure to sync your tablet as soon as possible to ensure the data is pushed to the admin side database.
Person Search "Cancels" Violation
It may seem like searching for a person from the violation screen cancels the process however hitting the back button on your handheld device will take you back to your violation information.
Printing a Person Violation
Printer Setup
Before you can print a ticket you must have the printer connected by Bluetooth and selected in your printer settings under System Settings. For more info see: Choosing and Configuring Printers
Unlike vehicles, personal violations allow you to display the users name and drivers licence on the ticket. This also allows you to conveniently issue violations that aren't relate to vehicles.
To print a person violation follow the steps above on searching the user and tap Save & Print. 
This will print the ticket on your Bluetooth printer and take you back to the person search interface.
Printer Ticket Example
Below is an example of a ticket that with both person and vehicle information.
If you issue a person only violation then the license plate will not be included on the ticket.
.jpg?version=1&modificationDate=1592844802000&cacheVersion=1&api=v2&width=500&height=801)
Explanation of the Front of the Ticket/Warning
Ticket Number - This is a system assigned number that identifies each individual violation/warning.
Date - This is the date that the violation/warning was issued on.
Ticket Type - This identifies the type of violation that occurred (broad range category).
License Plate - This is the license plate number for the vehicle that incurred the violation.
Province - This is the province that the license plate is issued in.
Offense Type - This identifies the specific violation that occurred.
Location - This identifies the location where the violation occurred.
Writer - This is a system assigned number that identifies the enforcement officer that issued the violation. Each enforcement officer has their own unique number and can be verified by administrators. The writer is identified by a unique identifier to provide security to the enforcement officer. If you require more information about the ticket writer you can search the violation on the admin side and get an actual name for the person who wrote the ticket.
Fine - This is the amount owed for the particular violation. Note, on the warning ticket the amount is followed by "*Warning". This indicates that the amount on the ticket is not owing, but this is the amount that would be due if a ticket for the same violation was issued.
Towing - This is the amount due if the vehicle that incurred the violation had to be towed.
Comments - This section includes any additional notes that the enforcement officer wants to include.
Explanation of the Back of the Ticket/Warning
The back of the ticket provides details about the organization that issued the ticket and the policies and procedures regarding the ticket. The back clearly identifies how the violator can pay or appeal the ticket with a section for the violator to identify themselves and sign off on the ticket. The back also identifies where to find additional information on the organization and the office hours.
Related Pages
Issuing a Plate Violation
Issuing Violations by Plate
When logged into OPS-COM for Android, tap on the Search Vehicle menu.
After entering the plate number by OCR, voice or typing, the screen refreshes with a list of possible plate numbers.
Note: The red x indicating this vehicle is in violation and the + indicates that the plate isn't in the system yet. 
After searching the vehicle tap the plate that is in violation which will give you more options to perform on it such as chalking, violations, details and more. 
This will take you to the Add Violation Record screen where you can add the vehicle details as well as add any images associated with the violation. If the user has a DNTT or valid permit then a warning message will appear before allowing you to write the violation. 
If the plate is known in the system then the vehicle information will be automatically completed and you can save or save & print the ticket.
- Tap the Select Offence Location. A drop-down menu appears for you to select the appropriate response.
- Tap to select an Offence Type, and a drop-down menu appears for you to choose the appropriate response. To change the fee from the default amount decided by the offence types you can select the fee amount.
- Tap on Towing Fee to add one if required. The cursor blinks to indicate you are in input mode. Enter an amount.
- Take pictures for proof in case of a dispute.
For an example of what the ticket would look like see New Vehicle Violations.
New Vehicle Violations
To issue a violation to an unknown vehicle you just need to make sure that you complete the vehicle information yourself. This will add them to the system the next time you sync your handheld.
To continue issuing the violation
- Add vehicle details. Tap to add a vehicle description.
- Tap the Select Offence Location. A drop-down menu appears for you to select the appropriate response.
- Tap to select an Offence Type, and a drop-down menu appears for you to choose the appropriate response. To change the fee from the default amount decided by the offence types you can select the fee amount.
- Tap on Towing Fee to add one if required. The cursor blinks to indicate you are in input mode. Enter an amount.
- Take pictures for proof in case of a dispute.
Tap Save and Print. Ensure that the printer is powered on and connected. A Ticket will print, and the handheld device will return to the Vehicle Search screen.
If a violation is entered on a plate, the VIN number will not appear on the ticket unless the vehicle only has a VIN number, then the VIN number will appear on the ticket in the license plate field.
Explanation of the Front of the Ticket/Warning
Ticket Number - This is a system assigned number that identifies each individual violation/warning.
Date - This is the date that the violation/warning was issued on.
Ticket Type - This identifies the type of violation that occurred (broad range category).
License Plate - This is the license plate number for the vehicle that incurred the violation.
Province - This is the province that the license plate is issued in.
Offense Type - This identifies the specific violation that occurred.
Location - This identifies the location where the violation occurred.
Writer - This is a system assigned number that identifies the enforcement officer that issued the violation. Each enforcement officer has their own unique number and can be verified by administrators. The writer is identified by a unique identifier to provide security to the enforcement officer. If you require more information about the ticket writer you can search the violation on the admin side and get an actual name for the person who wrote the ticket.
Fine - This is the amount owed for the particular violation. Note, on the warning ticket the amount is followed by "*Warning". This indicates that the amount on the ticket is not owing, but this is the amount that would be due if a ticket for the same violation was issued.
Towing - This is the amount due if the vehicle that incurred the violation had to be towed.
Comments - This section includes any additional notes that the enforcement officer wants to include.
Explanation of the Back of the Ticket/Warning
The back of the ticket provides details about the organization that issued the ticket and the policies and procedures regarding the ticket. The back clearly identifies how the violator can pay or appeal the ticket with a section for the violator to identify themselves and sign off on the ticket. The back also identifies where to find additional information on the organization and the office hours.
Important Note:
Best Practice TipNote the reminder at the top of the screen indicating there is data to sync. This is especially important at the end of a shift. You don't have to sync when you see the flashing bar immediately. |
|
|---|

Using Groups and Zones
Plate searching and vetting can be focused on using groups and zones.
When using virtual lots, you can specify groups and specific zones within the group.
For example, there may be parking available closer to a building that could be reserved for specific groups of people.
In our example Building, 1 has spots for Day Care parking.
Tap on Any Parking Group to access a list of groups. Here we select BLDG1 for example.
Tap Any Zone to select the specific zone you are patrolling. In this example we are going to patrol the Day Care zone.
The following is an example of a vehicle permitted to use daycare parking after 12:00 pm.
With the handheld unit set up as described above the plate was scanned using the LPR/OCR functionality.
The Green Check Mark indicating the vehicle is permitted to park in the specified Group and Zone.
Tapping the vehicle and viewing the Vehicle Details shows you extended permit information. 
Secondary Check On Permit Validity
When creating violations, the handheld units will perform a secondary check on the vehicle to alert the patrol officer if the plate has a valid permit.
In our example, the plate JROCK has a valid monthly permit in the Red Student Lot Yearly (Y-RED-STU).
If the officer proceeds to Issue a Violation the unit will issue a warning that the plate has a valid permit. It will still allow a violation to be created at the officer's discretion in the case that the violation is for something other than a valid permit.
Virtual Chalking
What is E-Chalking (Virtual Chalking) in OPS-COM?
- Virtual chalking, or e-chalking is an electronic process that mirrors how an officer would manually chalk a vehicle's tire, in order to see how long they have been parked.
- Virtual chalking creates a Time-Stamped image, of both the license plate & the entire car, in order to track how long they've been parked
- Virtual chalking provides an image that can be attached to the violation and is acceptable in a court-of-law, provided the date/time stamp is visible & clear. The chalked image is part of the violation, unless the patrol officer deletes the image.
- When LPR software is capturing plates, officers can simply click "Virtual Chalk" to create/save the image
Why "Chalk" a Vehicle?
There are some situations where chalking is very useful, for example; If a vehicle is parked and the owner is going to purchase a permit, there can be a grace period to allow the client to obtain the permit and return to the vehicle to display the permit. Alternately, in areas where parking is provided on a timed basis where a vehicle can park free for 2 hours, the officer can virtually chalk the vehicle on a first pass earlier in the day and then be able to check the vehicle later in the day to determine if it has been parked longer than the permitted time frame.
Chalking vehicles manually is time consuming, so being able to virtually-chalk vehicles makes a time-efficient solution for a necessary aspect of parking management.
Chalk records stored with a violation help when dealing with Appeals as a time-stamped image is available as "proof" of the infraction.
How to "Chalk" a Vehicle on the Handhelds
On the OperationsCommander for Android application, tap the Search Vehicle menu item to open the Vehicle Search window.
Enter a Plate Number and tap the search icon. In this case, we are searching for AAWXY410.

The screen will refresh with a list of valid vehicles. Long press the listed vehicle to access the advanced information screen.

Note the Virtual Chalk button. Tap Virtual Chalk to access the chalking function and information screen.

To capture an image, tap on the image icon to enter camera mode. Snap an image. The screen refreshes with the image of the vehicle in a thumbnail view. Tap Save to save the chalking timestamp.
Allow 10 minutes to pass and compare the chalking captures. Repeat steps 1 through 3 above. The screen will refresh, and we can see in the red text, a note indicating the vehicle was chalked 10 minutes ago.

Long tap on the listing to bring up the advanced information again. Note: If you tap the information box, you will see a full frame view of the image captured.

Verifying the vehicle chalking in the event of a dispute/appeal?
The question has come up often, as to what proof we'd be able to show for when a virtual chalking has occurred. The first important rule when chalking is to be sure to capture an image. If you read the plate using the camera LPR/OCR capture, the image will automatically attach the the chalking record with a date stamp in place. If a violation is subsequently written up on the vehicle, this chalking image will also be saved with the violation information.
If you enter the plate in manually please remember to also capture an image of the vehicle when chalking.
Here is a sample of the plate read image.

Along with that cropped image taken when performing a virtual chalk, the handheld unit will store a full frame image, with the date stamp at the bottom right of the image.

Here's a close up of the Time and Date stamp.

NOTE:
Chalking can be done in a couple of ways. If you are photographing the plate to read it through character recognition the system automatically captures a close up image of the plate as well as a contextual image of the full back of the vehicle. Both are time stamped.
If you enter in a plate via text or voice when chalking you will want to take a contextual image so that you record the time stamp.
The same is true when you actually capture the plate a second time and then issue a violation. It's advisable to take a couple images at least, plus you have the time on the ticket that the violation was written so using both methods (timestamp and time on printed ticket) you can calculate the time the vehicle was parked. There is no limit as to how many images you can take.
Plate Capture Using Handheld
Bounding Box is a Guide
For best results especially on non-standard license plates we found if you try to capture the plate too tightly to the size of the box in the viewfinder it has trouble distinguishing between the actual plate number and the other text on the plate.
In the sample below it actually captured the digits on the upper left of the plate.
In this case, an attempt to match the edges of the plate with the bounding region confused the image processor.

If the plate frame is not in the picture, the LPR engine tries to find a suitable "plate" in the picture.
It is better to include the entire plate plus some of the background during LPR reads. This allows the technology to find the plate and the text which is bounded by the plate.
Step Back and Try Again
We were able to accurately capture the plate by backing up.
In fact we exaggerated the distance pulling back by quite a bit and still got an accurate reading.
Second listed entry is the plate... captured without a problem.
So the lesson here is not to be afraid to back off quite a bit and it may yield better results.

It is quite amazing how small we can make the plate in the viewfinder and still get a read.
Using the guide boxes
Different devices may have different properties when it comes to the built in cameras. The viewfinder in OPS-COM is designed to help determine if minor adjustments need to be made in order to properly line up a plate to be read into the system.
There are two outlined boxes to help align the plate. The Red box indicates the maximum area you wish to view the plate in. If the plate extends outside of the red area it will not be read. It is advisable to keep the plate inside the blue box to ensure it does get read properly. As discussed above the plate can actually be captured at a very small size in the viewfinder.

Here is an example of a plate read. This is a perfect example of focusing the view on the plate number, excluding the Logo on this vanity plate.
Once the plate is captured the screen goes back to the Plate read screen.

The image of the plate can be tapped to see a full context image. The red bounding box represents where the blue bounding box was on plate capture.
You can see the relationship between the viewfinder screen and the actual image captured. With some devices the plate looks centered but the actual shot comes out off center. This context image will allow you to see any offset so you can adjust the centering when capturing a plate. Note the contextual image is date stamped as well.
Reprint Violation
Reprinting Tickets
Tap on the second option in the main menu for Reprint Violation.

This will take you to the Reprint Violation Notice screen. Tap on the violation that you want to reprint and follow the printer instructions.

LPR Scanning
Interpreting LPR flags
Here we have a typical LPR display. Notice the last read plate came from the right side Camera (indicated by the orange arrow beside the plate image)

Running Scan Total
The running total of how many reads you have done in a session is located on the right, just above the read list.
In this case we have 30 reads total.

Visual Indicators During Scanning
Plates in Violation
Reads that are in violation are indicated by a red flag.
Plates that are Valid
Reads that are valid are flagged as green.
Valid reads will list on the handheld unit but will not be chalked or passed into the system as part of the LPR events report.
Plates Chalked
Reads that are still in the grace period configured in your system will be indicated by an orange flag.
To continue scanning plates be sure to engage the ON button, make sure it's green before continuing.

Updating Incorrect LPR Reads
On the OperationsCommander Android application, tap the LPR Scanning menu item to open the PL8-RDR LPR Scanning window.
When patrolling a list of plate reads will appear.
Find the plate that has been incorrectly read. Enter the fix to the plate, in this case the plate read as VZ7281, but the actual plate was BVZT282.
Notice the LPR mode goes into OFF mode when adjusting plate reads.

Select the Search & Update button. Notice the read will change to the updated plate which now includes the missing B.

In the database the plate has been updated to now reference the updated plate. At this point do not forget to toggle the off button back to ON to continue patrolling.
System Settings
System Settings
Local Device Settings
The first section of the System Settings screen contains device information under the Local Device Settings. All of these items are set on the admin side.


Printer Settings
The next section is directed at Printer Settings: This section sets what printer is used and offers several options as to what prints on the ticket.
Tap on each item to edit it's settings.

Bluetooth print driver (default: Star Micronics): Select the printer model you plan to use. (This must match what is selected in the Bluetooth Printer setting.)
Bluetooth Printer: Select the printer model you plan to use. (This must match what is selected in the Bluetooth printer driver setting.)
Characters per line: Indicates the number of characters across the width of a printed ticket.
Lines Before Ticket: Indicates the number of blank lines before the first line of text is printed on the ticket.
There is already a buffer zone where the company logo is printed which allows further adjustment to this buffer zone.
Lines per Ticket: Sets the maximum number of printed lines on the ticket.
Ticket Footer: Displays the footer message. This message is not editable on the handheld unit. It can be accessed through the admin web tool in the Handheld Common area.
Include Client Name: In the case where the company logo does not include the Client Name this setting can be toggled on to allow the client name to be printed at the time of the ticket being printed.
Include Dotted Header: Select this item to print an optional dotted line under the company logo before the body of the ticket.
Include Warning Value: Toggle on to display the value of the warnings on the printout. This shows us what the fine would be if the ticket was not a warning.
Include Discount Value: Toggle on to show the discount amount assuming the ticket is paid within a set time frame.
Include $0.00 Towing Charge: Toggle on to show the towing cost on ticket.
Include Barcode: Toggle on to print the violation number as a bar-code on the ticket.
LPR Settings
LPR Settings are used to set up a camera, enable chalking, and other chalking information related to the LPR device connected.
Important Note
To be able to use LPR on a handheld unit you must first toggle the functionality on in System Settings on the Admin Portal. For more on License Plate Recognition system settings please see this article.

LPR Proxy IP Address: Enter the LPR Proxy IP Address (The default IP is 192.18.8.1 which is used to connect to a PL8RDR)
LPR Proxy Port: Enter the port number for the LPR Proxy Port (The default proxy port is 32000)

Include NOREAD Results: Set the level of NOREADS that you wish to include.
For example setting the level greater than 50% would only include reads with a 50% or greater read score.
Auto Chalk Vehicles: Toggles auto chalking of vehicles while reading plates.
Trigger on Inactive Vehicle: Toggle whether or not you are sent an alarm when you scan a vehicle marked as inactive.
Time until chalked vehicle in violation: This feature allows you to set the amount of time in which it takes for a vehicle that is parked illegally to be flagged as a violation.
Chalk Units: Toggles whether or not you display the virtual chalking information in meters.
Advanced Settings
Advanced settings are used to adjust ticket formatting, offence details and add barcodes.

Next Offence Number: This number is set on the admin side. It would be set to the next ticket number you wish to apply to the next offence written. (Next ticket number)
Show Hyphen in Ticket: Toggles the option of whether or not there is a hyphen between the device ID and ticket number.
Auto Synchronization Frequency: This sub-menu allows you to change the amount of time between each auto synchronization of data from the handheld and the database.
Temp Permit Barcodes: Toggles on or off the Temporary Parking Barcode Scanning Function.
System Debugging: Toggle on to put the device into debug mode for testing.
Reset Settings: Re-syncs the settings with information on the Operations Commander in order for you to return to default settings.
Setting Device to Auto-Update
- Open Google Play Store.

- Tap the hamburger icon (three horizontal lines) on the top-left.

- Tap Settings.

- Tap Auto-update apps.

- To enable automatic app updates, select Auto-update apps at any time. Data charges may apply.
To disable automatic app updates, select Do not auto-update apps.
Reset Settings for OPS-COM for Android
From time to time you may be told to perform the "Reset Settings" function in the OPS-COM for Android app. Said setting can be found in the system settings area of the OPS-COM for android app.
The reset settings function should only be performed if you have been told to do so by us. Below is a step by step guide on how to reset settings.
Step-by-step guide
-
Login to the OPS-COM App.
-
Click System Settings.
-
Scroll down and check "Reset Settings".
-
Logout of the app (back, logout).
-
Fully close the OPS-COM application.
- Restart the tablet/handheld.
-
When you next login to the app it will re-download all system settings related data.

Displaying Towing Charges on a Violation
When do we use this?
Depending on your policy, some institutions tow vehicles and some do not. If you do charge a fee for towing, this can be shown on the violation you give to the parker. Even though a towing cost may not apply in all cases, some organizations have it display a $0.00 value just as a reminder that a vehicle could possibly be towed. This is a setting that can be enabled on the handheld unit. This article will walk through the process of enabling Tow Charges to print on a Violation.
- To enable this setting, go to System Settings on the handheld units. By default, the setting is disabled. This means that no Towing charges would print.

This is an example of the Violation with no Towing Charge:

2. Enable the Show $0.00 Towing Charge checkbox and the $0.00 cost will appear on the ticket.

This is an example of the Violation with a $0.00 Towing Charge:

Please Note:
It is important to note that if a towing charge was actually applied to the violation, in all cases, the towing charge would appear regardless of this setting.
OPS-COM for Android Admin System Settings
Administrator System Settings
There are settings that will need to be populated in order to have the handheld units work with common core settings.
There settings include:
- Organization Name
- Country
- Ticket footer
Setting the Organization Name and Country
To access the settings go to the System Configuration andf click on System Settings.
Once in system settings click on General System Settings in the list of components.

Edit the Organization Name and Country to reflect your specific location.
Click Save Settings to proceed.

Editing the Handheld Footer
Click on Violations in the list of Components.

In the top portion of the form you will see a field labeled Handheld Footer. Edit this field to display what you would like printed in the ticket footer area.
The message should look something like this:
This parking ticket is due within 14 days. Failure to settle this parking ticket will result in the account becoming delinquent and subject your vehicle to collections and/or towing.
Note: You can also toggle the appearance of the pin numbers on the violation in this area as well.

Handheld Settings
The settings that you setup for your device are pushed to the preview or production site you used to setup. This means that if you setup your device on production, it will not be configured for preview and if you setup your device on preview it will not be configured for production. The proper method for adding devices would be to first add the device through preview. And then setup your device on production which will add the settings to both the production and preview PA_Common tables.
Replication Status
System Status
The Replication Status area displays all database table data on your unit and whether or not the tables/data are synchronized with the server.
Tap on the Replication Status option.

This will bring you to the Record Counts and Data Table Tools.
Tap and hold an option to open a pop-up message with additional options.
Status Report

Status Icons
The following icons are used to indicate status:
- Green Check-mark - Table data is synchronized with the server.
- Red X - Table data is NOT synchronized with the server.
 Please note it is normal for some tables such as VehicleTransfer and ViolationsTransfer to become out of sync during usage (when issuing violations). This indicates new violations and/or vehicles are on your device and need to be pushed/synced to the server at some point.
 - Blue exclamation point - This indicates there is no table data that needs to be synchronized between the handheld and the server.
Replication Actions

There are a number of actions that can be performed in the Replication Status area by holding down with your finger on an individual table.  Warning, none of these options should have to be used if your unit is working correctly. We suggest logging in and out of the application as needed for proper synchronization. Please contact us if there are any issues before performing any replication status functions as detailed below.
- Push table data to the server - This will attempt to upload the local devices table data to the server (i.e. synchronize) and is generally safe to do as nothing is overwritten or removed, though if you do push table data make sure all tables marked with a red X are synchronized.
- Rebuild and retrieve table data - Warning, this option will delete/drop the local table data and retrieve the newest available table data from the server. This could result in violations and/or vehicle data that hasn't yet been synchronized to the server and is still only on the local handheld from being lost. If a table is showing as out of sync never rebuild and retrieve table data unless instructed to by us.
- Delete local table data - Warning, this will delete the local table data but has no effect on the server. Similar to the above this could result in the loss of local table data if not synchronized to the server first. Never select this function unless told to by us.
- Email debug details to Tomahawk - This will send an email log file to us containing helpful information for debugging/troubleshooting issues. Select if requested to by us, or notify us first before sending if possible.
Replication Options

There are additional options available in the Replication Status area accessible by selecting your devices options/menu button (![]() icon in the top right-hand corner):
icon in the top right-hand corner):
- Rebuild database - Warning, this will delete ALL local table data but has no effect on the server. This could result in the loss of local table data if not synchronized to the server first. Never select this function unless told to by us.
- Synchronize all - This function is safe to select and is similar, if not the same as logging in or out of the device. The device will attempt to synchronize ALL table data with the server. We still recommend logging in and out instead of using this function in-case another option is selected by accident.
- Send config to Tomahawk - This will send an email log file to us containing helpful information for debugging/troubleshooting issues. Select if requested to by us, or notify us first before sending if possible.
- Download new config - When selected the device will re-download all relevant system settings on next startup (organization, device name, ticket footer, etc).
Handheld Operation Log
Log Overview
From time to time OPS-COM support personnel may request you send a log file to us so that we can better assist you. The log file sent allows us to view the data logs the handheld stores when any operations/functions are performed on the handheld itself and generally helps us determine what may be causing issues.
Log files are normally automatically uploaded to our server for later review once they have become more than 1 day old. However, this assumes the handheld is online and performs a successful synchronization at some point after any log files on the device are older than 1 day. For example, logs created on Monday should be uploaded to our server Tuesday around midnight, assuming the handheld is online and synchronizes Tuesday around or after midnight.
Send Log to Tomahawk
To send the log to perform the following steps.
Login to the Android app and select Replication Status from the main menu:
Select the additional options dialog icon along the top right of the replication status area (1), then click Send Log to Tomahawk (2):
If you don't see the 3 dots as shown below you may have a tablet that has an "overflow" button on it which is usually located near the home and back button.
Look for and click the one that appears to be 3 lines/dots for additional context settings.


About Panel Log
The log can also be reviewed on the About panel.

Logs On Device
Logs may also be accessed on the device through a USB or wireless connection.
In this case, the log can be copied and sent through email.

Message Alerts
Review Message Alerts
Patrol officers now have the ability to see important news by viewing message alerts on the handheld device. Alert messages are pushed out to all or individual handhelds by the Administrators of the OPS-COM software.
Alerts will display on the handhelds as they come in or you can view them later. To view recent Alerts click the Message Alerts area within the Handheld software.

Types of Alerts
There are 3 types of Alerts that can be pushed out to the handhelds.
- Yellow Alerts - These alerts are used to inform users of events that should be monitored.
- Blue Alerts - These alerts are for informational purposes.
- Red Alerts - These alerts are for situations that require immediate action.

Message Notification
New messages will appear in the header bar where they can be selected to view in the OPS-COM application.

The pulled down header allows for easy viewing of the alert message. Tapping the alert takes the user to the Message Alert list.

The application shortcut icon will show any new messages as a badge on the shortcut.

OPS-COM on the Web
Menu Option
Using the OPS-COM on the Web option opens an internet browser and redirects the user to the OPS-COM administrator login page.
First tap on the OPS-COM on the Web option.

Open Browser
Depending on the browsing apps that are installed on your tablet, you will be asked what program you want to use to open the website with (e.g. Browser, Chrome, etc.).
Tap on the browser that you want to use followed by Just Once or Always.

Login to Web Portal
This takes you to the OPS-COM login page.

Dispatch Log
Dispatch Logs allows administrators/dispatchers to record and track all inquiries that come into the office. These dispatch logs can be linked to incidents for further tracking.
1. Tap on the option for Dispatch Log.

2. This will take you to the Add Dispatch Log Entry screen.

3. Select the appropriate Log Category in the first drop-down menu, key in any notes that should be recorded related to the dispatch log and attach up to two supporting images. To attach images, select one of the icons towards the bottom of the screen that has a vehicle with a camera in it. This will bring up the camera function on the tablet, select the circle with a camera in it to take a picture. Select the check mark if you are happy with the image (if you need to retake the picture, select the arrow to go back to the camera).
When you have all of the information entered into the dispatch log, tap on the Save button at the bottom of the screen. A pop-up message will appear to confirm that your dispatch log has been recorded. Tap on the OK button to go back to the main menu.

Application Logout
Shutdown Process
It is very important that the tablets are shut down properly at the end of every shift. This ensures that the OPS-COM software is secure (a password is required to log back into the software) and that all of the information recorded from that shift has been properly synchronized with the main database (i.e. uploading of violations and new vehicles created during your session).
Before logging off the OPS-COM software, ensure that the tablet is in an area where it is getting an internet connection.
Tap on the Application Logout option.

This will bring up a pop-up message asking the user to confirm that you do want to log off the program.
When you select the OK option, the program will automatically synchronize all data with the main database before closing the program.

Logout Without Connectivity
If you log off in a location that does not have internet access, the software will be secure (a password is required to log back into the software) and the data will be saved locally on the tablet.
The data itself will not be synchronized with the main database. In this case, users will want to ensure a synchronization occurs when they sign into the OPS-COM program.
Confirming Data Synchronization
Before logout synchronize data to ensure that all data is in sync with the main database.
Upon logout if you receive an error message or if it seems like the data was not synchronized users can force a synchronization using the Synchronize Data option.
Login Screen
When you log off the program will automatically go back to the sign in screen.

Best Practices
Best Practices
Know your Version
It is important to always be running the latest version of OPS-COM for Android.
Available Update
Visit the Google Play store and search for "OPSCOM". Click the red and black icon (currently listed second). On the resulting page, there can be several buttons labelled; Install, Uninstall, Update, Open If the button reads Update, there is a new version available. Prior to updating be sure to close the running application first.
Reset Handheld Units Daily
It is good practice to reset all Handheld units before each shift. Resetting the unit will refresh the network connections and allow auto-updates to be installed. If the app is always running then the system cannot auto-update and you will miss out on recent changes. It is recommended that you kill (or close all) background applications when your shift is complete or before you start a shift.
Database Connection States
The connection to the database systems is denoted by a green dot in the top left panel of Search pages on the Handheld units. If the dot is orange, it means that the system has lost the connection but does have cached data. An orange dot indicates the system is still usable, however, if the orange dot remains for an extended period of time it would be best to restart the application to reset the connections.
Regularly Synchronize Your Data
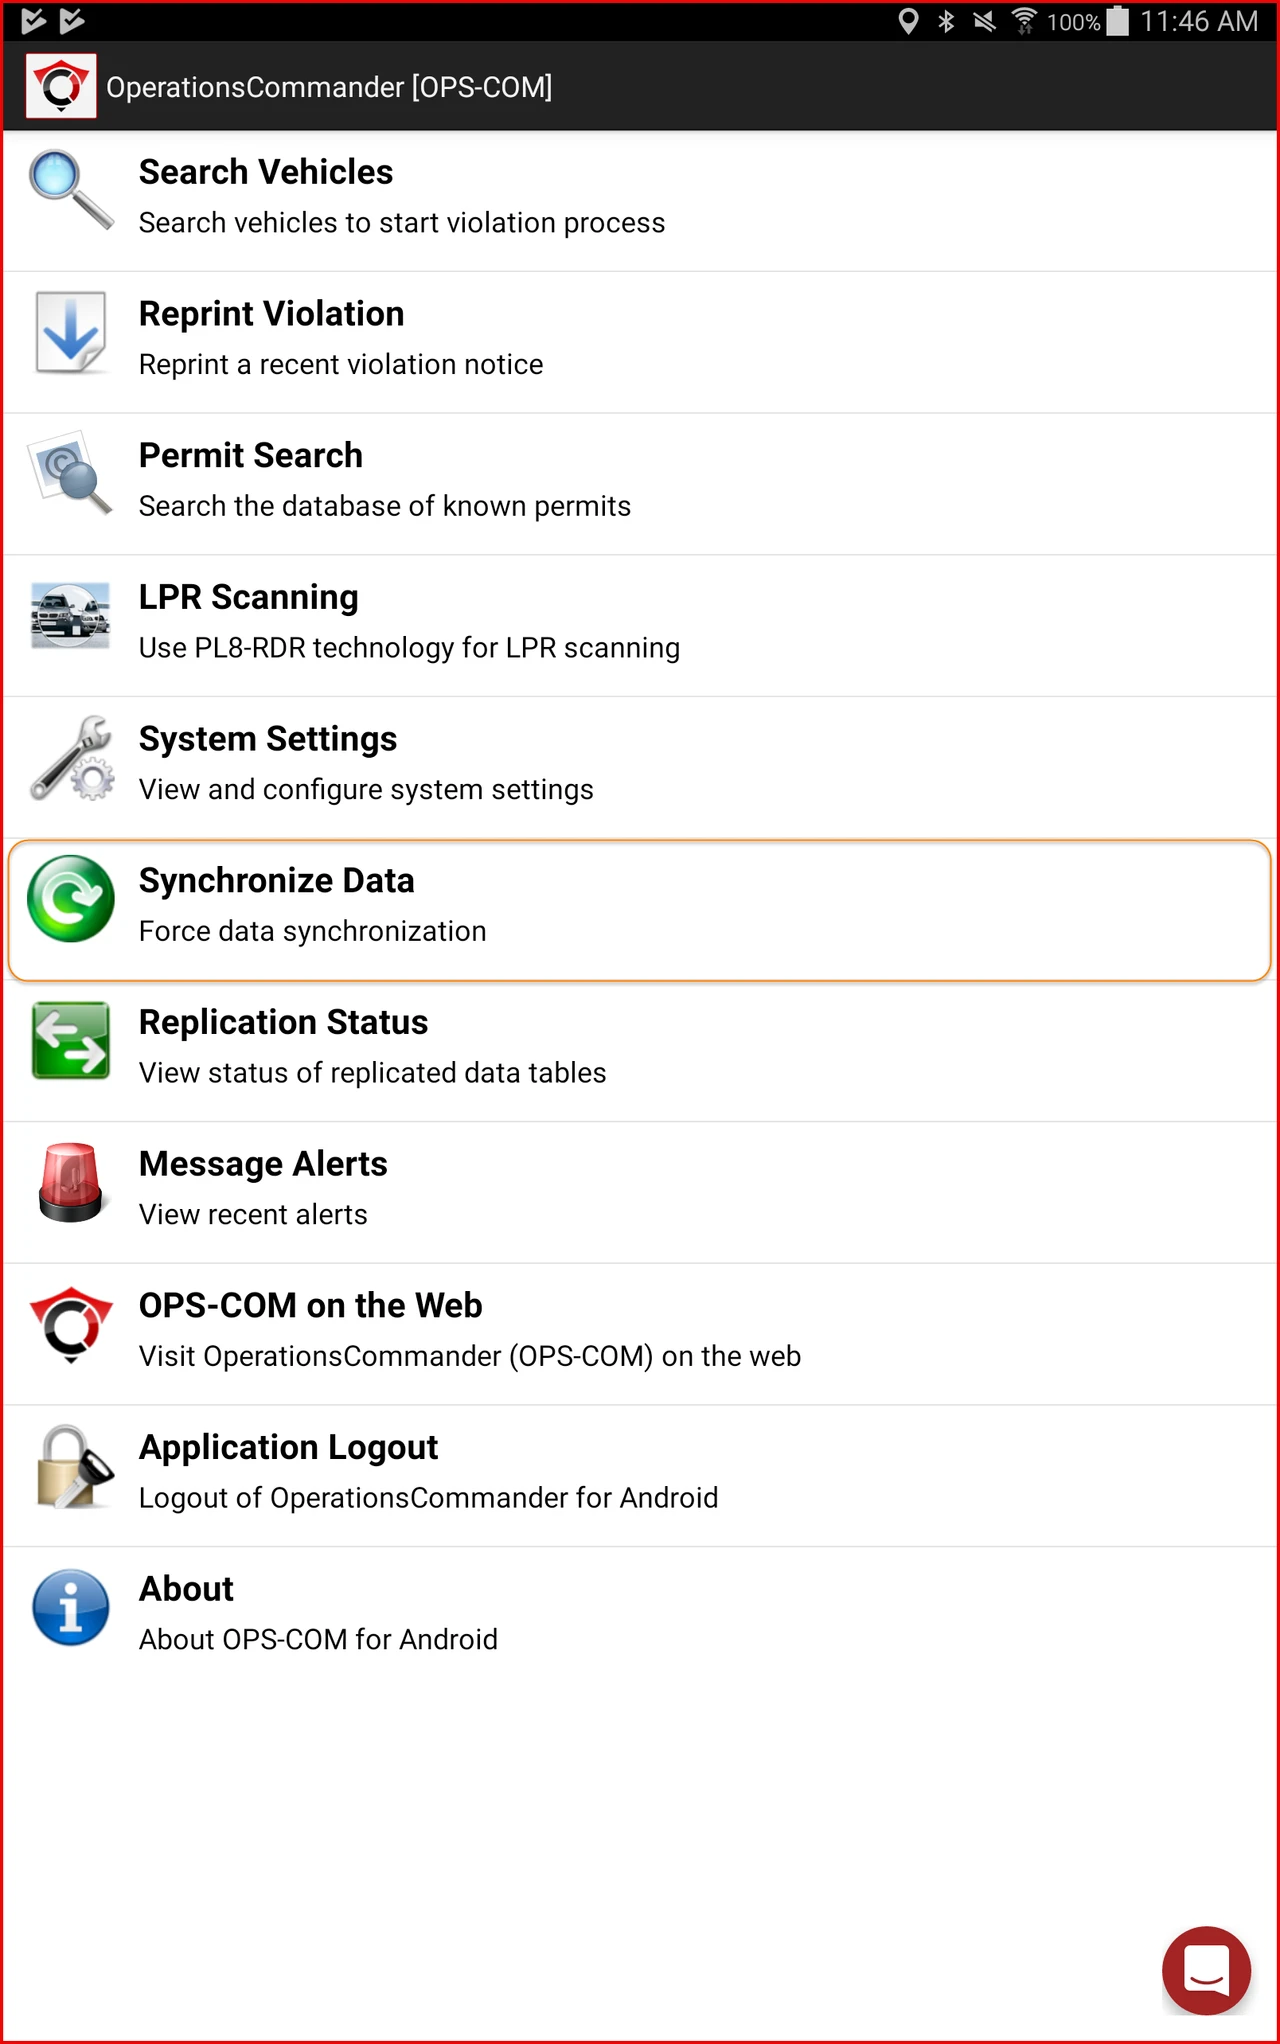
The Synchronize Data option allows tablet users to force their table to synchronize all data on their tablet with the main database.
Note, in order for the forced synchronization to work, the tablet must be in an area where it is getting an internet connection. To do this tap on the Synchronize Data option.
As soon as this option is tapped, the synchronization will begin.
How weak Wi-Fi can affect OPS-COM
Typical issues that affect Wi-Fi strength
- Proximity to your Wi-Fi source is the number one factor in signal strength. The further you get from the closest Wi-Fi source the weaker the signal.
- Structural objects (buildings, walls, etc.) can contribute to weakening signal strength. Even a load bearing wall in a building can severely affect signal strength. Therefore, both the placement of your source as well as your location in relation to the source is important to consider.
- Other materials in your area can also cause signal degradation. Along with concrete, brick and stone, foil-backed insulation foam and even some wallpapers can dampen and hinder the radio waves. It's normally quite difficult to determine which materials are installed in your place of business, and which are causing issues, but using a Wi-Fi repeater or relocating your router can help improve things. You may want to keep this in mind if patrolling interiors such as parking garages, parking levels below ground etc.
- Electrical devices around you may also cause problems with your Wi-Fi network. Devices such as microwaves and refrigerators can interfere with the radio signal from your router; anything that communicates on the 2.4GHz frequency can interfere. It's not common for these items to cause major problems, however it could be worth keeping them in mind if you are having problems resolving any issues you have.
Simple test to ensure you are connected
When in the field patrolling it may be difficult to tell if you have enough signal strength to be confident that OPS-COM is communicating through Wi-Fi with the main server. A quick and easy test would be to go to the browser on your tablet to test connecting to any web page. If the browser can not connect to a web site it will not connect with OPS-COM.
Syncing
First rule: Don't Panic! If you can't sync immediately, it's not a critical issue. As long as you perform a sync when you get to an area with better connectivity.
Manual Sync
The system is setup to sync information in two ways.
Through a forced manual sync that the patrol officer can initiate from the main menu entitled Synchronize Data.

Auto-Sync
Auto-Sync occurs in three different instances on the handheld unit.
On startup of the app a sync is performed automatically provided you have connectivity. If you have poor connectivity, OPS-COM will show an error and will not allow you to login.
On logging out of the app the unit will run an auto-sync. Be sure to log out properly for this to happen. Simply putting the app in the background will not run the sync. NOTE: Be careful not to close the app or power off the unit if the app is running in the background.
It's important to remember autosync is a precaution put into effect to ensure syncing happens when an officer has not done a sync in a while and the unit is idle. With a setting of 15 minutes, the unit would have to be idle for 15 minutes. if you have any use of the tablet in that time the timer restarts. So if your officers are active with writing tickets it's not going to auto sync until they leave the unit idle for the entire 15 minutes. The idle time frame can be modified in the system settings.
You can select various time intervals or disable autoisync all together.
Was Syncing Successful?
The system has a built in indicator when there is data available to sync. A red flashing message will appear at the top of the screen indicating "Data available to sync:" and the number of violations and vehicles that need to be synced with the main server.
Once a proper sync has occurred the data available warning will disappear.

Working in Low and Bright Light
Control Screen Brightness
Patrol Officers often find that in low light situations the Android screen can be a little bright to work comfortably with.
To adjust the screen brightness swipe down from the top of the screen to reveal the following settings screen.
You can either adjust the screen brightness manually with the slider or you can set the device to auto adjust if that feature is available.
Auto brightness will adjust the screen brightness based on available ambient light. (darker for low light and brighter for daylight or a lit room.

Taking Photos at Night
Some tips on taking photos at night (working with the flash)
- In your camera settings set metering to matrix rather than centered reading, flash always on, low light detection on.
- Some units do have a brightness override that will work very well and should help getting better images.
Example Options

Setup Installation and Maintenance
First Time Installation - Android
Google Play Store Access
On the device Apps screen, locate the Google Play Store app.

Tap to open the app and search for OperationsCommander or OPSCOM

Tap the icon to begin the install process.
Install the OPS-COM Application
The following window opens, tap the Install button.

This settings window will pop up to allow access to integrated apps on the handheld device.
Tap Accept.

Once the app has installed the screen will refresh with the following:

Launch the Application
To launch the application, use the Open button, or go to the device's main screen and start the app from the shortcut.
Application UUID
On first launch of the application a message will pop up saying the device is not registered; The message will include a UUID number.

Permission to Use the Software
To use this software, your user profile must have the "Add New Violation" permission under Violations Permissions.
If your account login does not work, please contact the OPS-COM high-level administrator for your organization.
Your application admin will ensure your user account has been given the appropriate permissions to use the handheld devices.
Manual Update or Installation
Open Google Play
On the device Apps screen, locate the Google Play Store app.

Search for OpeartionsCommander for Android
Tap to open the app and search for operationscommander or opscom
Tap the icon to start the install / update process.

Options Install and Update
- shortcut will be created
- database will be created
- database will not be created and existing data should not be disrupted

Application and Device Permissions
At the install/update stage, permissions relate to the access granted by the operating system to the application.
This settings window will pop up to allow access to integrated apps on the handheld device.
Tap Accept
In newer tablets, permissions will be displayed during initial startup of the application.
It is important to grant access for the software to work correctly.

Open or Start the Application
To launch the application, use the Open button, or go to the device's main screen and start the app from the shortcut.

Note:
To use this software, your user profile must have the OPS-COM "Wireless handheld" permission.
If your account login does not work, please contact the OPS-COM high-level administrator for your organization.
This is accessed through, System Config > Manage Roles
Select one the Administrator Roles you wish to add this ability to. Logically it would be something like Patrol Officer.
Click on Permissions beside the specific role you wish to edit.
Go into the Violations tab.
Select Display as Ticket Writer.
Reinstalling OPS-COM for Android
Step one - Uninstalling
To uninstall the OperationsCommander app for Android follow these steps.
From the main applications select Settings

Once in settings:
Select the General Tab.
Under Device Manager on the Left of the screen Tap Applications to bring up a list of Apps on the right.
Locate the OperationsCommander application in the list.

Tap the application to bring up the following screen:
Tap Uninstall to remove the application from the unit.

Step two - Reinstalling
Uninstalling the Application
Application Uninstall
To uninstall the OperationsCommander app for Android follow these steps.
- From the main applications select Settings

2. Once in settings:
3. Select the General Tab.
4. Under Device Manager on the Left of the screen Tap Applications to bring up a list of Apps on the right.
5. Locate the OperationsCommander application in the list.

6. Tap the application to bring up the following screen:
7. Tap Uninstall to remove the application from the unit.

Full Clean Install with Data Purge
In some rare cases, you may be asked by OPS-COM support to do a full clean install that requires removing not only the OPS-COM app, but all it's associated files as well.
To do so, you will need to first uninstall the software as described in steps 1 to 7 above.
Warning
It bears repeating that if you are uninstalling the software to then reinstall it, do not uninstall the software if ViolationTransfer and/or VehicleTransfer tables contain data (view under Replication Status). These tables must be replicated to the server first to avoid data integrity issues.
There are two methods to remove these files for the android handheld device. It can be done directly from the handheld unit or by connecting the device to your PC.
The following instruction describes both processes.
Delete files with Handheld Tools
- Tap on the App Tray at the bottom right of the home screen display.

- Locate and tap on the icon labeled My Files.

- The screen will refresh with a listing of file folder on the device. Locate and Long Press the folder labeled OPS-COM.

- A pop up window will appear giving you three options. Tap Delete to remove the folder.

- A confirmation screen will appear. Tap on OK to confirm. This will remove the OPS-COM folder and all it's contents.

Delete File using PC Connected via USB Cable
- Go into Windows Explorer and locate the device under This PC. In this example the device is called Tomahawku-Galaxy Tab S.
Click on Tablet to see the file content of the device.
- Locate the folder entitled OPS-COM.
Right mouse click to bring up the drop down menu.
- From the list click on delete to remove the OPS-COM folder and all it's contents.

You are now able to reinstall the software with no possibility of artifacts from older installs affecting the new install.
Install Bluetooth Printer
Connect the Hardware
First step is to make sure that the device can see and talk to the printer. This has nothing to do with the OperationsCommander commander and can actually be setup before installing the software.
Once the operating system sees and connects to the printer OperationsCommander can use that printer.
Initial Setup
- ensure the printer is setup and able to connect to the tablet
- if the printer is Star Micronics please review our supporting documentation
Changing Bluetooth Mode
- if the printer is Star Micronics please review our supporting documentation
- ensure that the tablet has bluetooth enabled
Enable Bluetooth on the Tablet
Make sure Bluetooth is enabled on your device. Tap on Bluetooth to get more options.
Select the option to Search for Devices.
Your printer should appear in the listing.
Pair the Printer
Tap on the printer to pair/link your printer and tablet together.Type in the printer PIN if your printer requires one.

Changing Bluetooth Mode
Android Bluetooth Mode
Some Star Micronics printers have a mode called Bluetooth (iAP). This mode is intended for Apple/iOS devices only and won't work properly with Android devices.
Even if the device appears to be pairing with the printer in the bluetooth settings area.
To fix this you must go into the printers settings and change the Bluetooth Mode from Bluetooth (iAP) to Bluetooth Mode or Bluetooth.
Changing the Printers Bluetooth Mode
- To begin power on the printer by holding the Power Button down for 3 seconds until the printer beeps.
-
To enter the Printer Settings hold down both the Power Button and Feed Button simultaneously for roughly 5 seconds. You should see the printer enter settings mode (LED will flash). After 5 seconds have passed let go of the buttons. You have now entered the Printer Settings configuration area.
When in the Printer settings mode:
- Selecting the Power Button will change the setting you're currently looking at (Bluetooth iAP most likely).
- Selecting the Feed Button will skip to the next available setting that can be changed.
- When you first enter the Printer Settings you should be looking at the Bluetooth (iAP) mode which is shown on the LED indicator. Simply click the Power Button to change the current mode to either Bluetooth Mode or Bluetooth (whichever one doesn't have iAP).
- Once you have a Bluetooth mode selected hold down the Power Button and Feed Button simultaneously for another 5 seconds to exit and save your changes to the Printer Settings.
Your device will print a detailed list showing your new settings. - The correct Bluetooth mode should now be shown on the LED indicator screen (i.e. iAP shouldn't be selected).
Confirm Settings
Follow the instructions to pair your device to the OperationsCommander Android application.
- Install Bluetooth Printer
Once done, perform a test to ensure you can print from your Android device.
Choosing and Configuring Printers
Selecting a Bluetooth Printer
To begin navigate to the System Settings:
Access System Settings
Once in System Settings look for the following two items:
- Bluetooth print driver
- Bluetooth Printer

Select the Printer
Tap on Bluetooth print driver to select the proper driver for the printer you are using.
By default the printer is set to Star Micronics. If you are using a Zebra printer, tap to select Zebra.
Selecting the driver will close the pop up and return to the main settings menu.
Click on Bluetooth Printer to select the printer you are using.
It is important that these two setting match as far as printer type.
If they do not match the printer will either not work or it will start to print odd code and characters.
Testing the Printer
It is always a good idea to issue a test violation to ensure that the printer is working as expected.
SM-T300 Printer
Reset mode on SM-T300
To change the settings on the printer, you need to hold down the feed and power button at the same time until it enters setup mode (about 6 seconds).
Once in setup mode, press the power button to go through the modes.
The three (possible) modes are: Bluetooth, UART, and Bluetooth (iAP).
Once you’re on the mode you want, (Bluetooth) press both buttons down again (about 6 seconds) to confirm the setting.
Setting the Power Down
You may need to ensure your time out (power down) is set properly. It can be set as no power down in use, or power down anywhere between 1 minute to 5 minutes.
To check your setting, turn the printer on, then press the power button first and then keep it down while you press and hold the feed button until you see the screen change to the Settings mode and will be backlit. (about 5 seconds)
You can then step through the settings using the feed button. Step through until you see PWDN X min off (where X will be the number of minutes to power down) you can change the setting by pressing the power button to step through the different times.
Once you have selected your desired wait time before power down press both the power button as well as the feed button. The printer will print out a short summary of your settings and go back into standby mode.
Supporting References
Star Micronics Settings (Android) Application
Zebra Printer
Pairing the Printer
- Go into the device settings and select Connections, then Bluetooth. The printer you are attempting to pair with should be listed as available. In this case we see the ZQ520BT printer is available.

- Tap the printer name to begin pairing. A number will appear on the printer screen as well as on the Android device. A message instructing you to ensure the numbers match will also appear. Tap the check mark button on the printer and then tap the message on the Android device. You will see a message indicating the pairing was successful. If not simple repeat the process.

Setting up the Printer for Use
- You must install the Zebra Printer Setup Utility from the Google Play store.

- This utility will allow you to set up the configuration for the printer. (Media size, Orientation etc.)

- Tap the Media Settings menu and then tap Media Settings again.

- In Media settings we are setting up for a 3x7 printer roll. To do this enter the following:
- Set the format to Receipt
- Set the width to 3.1
- Set the Length to 7.85
- Set the Orientation to Inverted

- Tap Next.
- Set the Media Type to Continuous.
- Set The Type of Transfer to Direct Thermal.
- Set The Mobile Handling to Rewind.
- Tap Next

- On the last screen tap Apply.

- On the Media Settings screen tap Print Test Label to check that the print is centered and oriented properly.
- You are now ready to select the printer from apps on the Android device.
Supporting References
Retrieve Local Tablet Backups
By default all violations created on a tablet through the OPS-COM Android app are stored in local backup files in-case they ever need to be retrieved should anything happen to the violations before they are uploaded to our servers (software is uninstalled, data tables are manually removed/dropped, etc).
To retrieve the local tablet backups do the following:
Plug the tablet into your computer via USB
-
Make sure the tablet is unlocked once plugged into your computer, otherwise it won't appear.
-
Once you plug the tablet into your PC you should see a notification appear, similar to plugging in a USB thumb drive.

-
If you don't see anything you may just need to navigate to the tablet manually by going into windows file explorer and going under computer (where you normally see your C drive, D drive, network shares, thumb drives, etc).

If you don't seem to have a wire to plug the tablet into your PC check where you charge the tablets, most of the time the plug of the tablet charging wire can be removed to allow USB connections instead of power outlet.
Navigate to appropriate folder
-
At this point you should see all backup files located on the tablet. Either copy the specific files you have been requested to send, or copy all backup files. The copy location can be anywhere on your local computer (this is a temporary file location before we upload the backups to Google Drive). As an example you could create a folder on your Desktop called "tablet backups", then copy and paste the backup files into it.

Share your backup with Support
- Email backup to support@ops-com.com
-
or Login to Google Drive.
-
Go to https://drive.google.com
-
Upload the backup files into Google Drive
-
Once logged into Google Drive Select New > Folder Upload, navigate to and select the folder you copied the the backup files to (mentioned in step 2.b above).

-
Wait for the backup files to upload to Google Drive, this could take some time depending on how many backups you are uploading.
There should be a upload status window along the bottom right of Google Drive. - Share the file with support@ops-com.com
-
Notify us once you have uploaded the backup files so we can retrieve them.
You can remove the backup files and folder you created on your computer at this point since said files have already been uploaded to Google Drive.
Connecting as USB Hard Drive
On the Android Device
1. Turn on USB debugging by click Menu > Settings > Applications > Development > USB debugging
If you do not have the Development option, please follow these steps:
-
- Go to the Settings menu, and scroll down to "About phone." Tap it.
- Scroll down to the bottom again, where you see "Build number."
- Tap it seven (7) times. After the third tap, you'll see a playful dialog that says you're four taps away from being a developer. Keep on tapping, and *poof*, you've got the Developer setting.
2. Plug the USB cable into your PC and connect it to your device. A USB icon will![]() appear in the status bar when the device has been recognized.
appear in the status bar when the device has been recognized.

3. In the main screen of your Android device, use your finger to pull down the top status bar. Then touch the USB Connected and select the button to mount the USB device (Connect USB storage or Mount).

Tap “Ok“. When the green Android icon turns orange, the phone is now in USB Mass Storage mode and should now appear as USB disk drives in “Devices with Removable Storage” and be assigned drive letters.
NOTE: Turn off USB hard drive mode when you are finished copying files to avoid issues with the OPS-COM (ParkAdmin for Android) software.
On the Desktop Computer

Two hard drives appeared on this desktop. Navigating each of them, and one has an OPS-COM (ParkAdmin) folder (J: in this case)

Descend into the appropriate folder to copy or transfer files.
Google Account
Clearing Google Play Cache
Google Play will cache application details for hours to even a day or more.
Clearing the cache ensures that the most recent version that is available is accessible.
Other troubleshooting options related to not seeing an app on the Play Store:
https://www.maketecheasier.com/fixes-for-google-play-store-my-apps-not-showing/
The below video demonstrates clearing everything from memory and then accessing the Google Play properties to "Clear cache"
OPS-COM Beta Program
We recommend that only one device be used for the Beta program as these releases may be unstable.
Our BETA program is open, which allows users to self-manage (add or remove) themselves from the beta testing group at any time.
At times, new beta (non-production) releases may be offered that address client reported issues or new functionality. Clients may test the beta versions to ensure issues are resolved and that normal functionality is not disrupted. If you are a beta tester you will have access to these updated versions.
At any time you can remove yourself from the beta program to not receive these updates.
| Join on the web | https://play.google.com/apps/testing/com.operationscommander.handheld |
| Join on Android | https://play.google.com/store/apps/details?id=com.operationscommander.handheld |
The handheld operates under a specific profile and that profile should be the one that is added to the Beta program.
If you are not sure what account you are using, you can review the linked accounts under settings within Android.
Alternately, just follow the above link to use whatever profile you are currently logged into.
Joining or Leaving the Beta Program
Simply follow the link listed above (on Android) and scroll down to determine your status.
Notice that you can select either to "Join" or "Leave" under the Joining Beta.. header.
| Join | Confirm | Leave |
|---|---|---|
|
|
|
|


Step-by-step guide
This guide outlines how to add an OPS-COM (ParkAdmin) Google account to an Android enabled device.
Depending on your Android version the steps may be slightly different, however mostly similar.
You will require a GMail email account and password to access the Google Play Store
Using OPS-COM For Android in DEMO Mode
Demo Mode
The OPS-COM for Android app can be used in Demo mode without the need to register a device. Booting up the device after installation will bring you to a screen where you can choose to register the handheld unit or run in DEMO MODE.

DEMO Login
By tapping on DEMO MODE the user will be sent to the sign in screen where the sign in credentials are already supplied. The user will be able to sign in with these credentials and explore the app.
Simply tap on LOGIN to access the Main Index screen.

Testing in Demo Mode
Once you log into DEMO mode you may test:
- Searching Vehicles
- Searching Permits
- Searching People
The following chart supplies a sample of the data available for testing in the demo site.
|
Username |
First Name |
Last Name |
User Type |
Plate |
VIN Number |
Violations |
Permits |
|
spencer |
Spencer |
Carr |
Full Time Staff |
SPENCE |
|||
|
jparsons |
Julie |
Parsons |
Complimentary |
JULPAR ASDA347 |
1q21242143124213 |
COM100 - Unpaid |
|
|
jrockwood |
James |
Rockwood |
F/T Student |
JROCK |
5SXHANDC38RZ55506 |
R102 - Red Student Lot W |
|
|
sjamieson |
Steph |
Jamieson |
P/T Student |
SJAM SJAM2 |
2T1BU4EE5DC972469 1N4AL3AP5DN517821 |
TT-10001 |
100 - Red Student W 102 Red Student W |
|
johndoe |
John |
Doe |
F/T Staff |
ABC316 |
1FMCU0EG1CKB65454 |
501 - Unpaid |
|
|
skjones |
Jones |
Sarah |
Daily Reserved |
AKRJ259 |
|||
|
vcosta |
Voula |
Costa |
Daily Reserved |
VCOST |
2GCEC19V531113601 |
L103 - Unpaid |
|
|
bcameron |
Brady |
Cameron |
Complimentary |
BCAM |
COM100 - Unpaid |
||
|
sbyers |
Sheldon |
Byers |
Daily Reserved |
SHELBY |
1G8ZN12871Z117051 |
L100 - Unpaid |
|
|
pbirch |
Patricia |
Birch |
F/T Staff |
BIRCH No Plate |
1N6AD0ER5FN709323 1GKS1AKC7FR518845 |
TT-10003 |
None |
|
mashbury |
Micheal |
Ashbury |
P/T Staff |
MASH ASDA437 BDHE385 |
JNAMA43H9XGE50339 |
15-170420 TT-10010 |
Monthly 0005 - Red Staff Lot West 0002 - Red Staff Lot West 50 -After 4PM 500 - Green Staff Lot East - UNPAID |
Some Things to Test
The following is a list of articles that will guide you through some features of the software.
-
Searching for a plate.
-
Issuing a Person Violation
-
Issuing a Plate Violation
-
Virtual Chalking
-
Permits Search