OPS-COM User Portal
Your OPS-COM journey starts here! The User Portal is where you manage your profile, payments, and vehicles. Buy parking, handle infractions, and view your history—all with just a few clicks. Let's get started!
- Registering as a User
- Your OPS-COM Dashboard: Your Parking Central!
- Manage your Account
- Recovering a Password
- Multi-Factor Authentication - User Portal
- Manage your Payment Methods & Subscriptions
- Viewing your History
- User Side: Managing Email Preferences
- Add, Edit, and Activate Your Vehicles
- Purchase a Parking Permit
- Printing Your Parking Permits Made Easy!
- Viewing Your Waitlist Position
- Appealing Your Parking Violation
- How to Make a Payment in Your User Profile (Or as a guest)
- Quick & Easy Guest Payments
- Using Forms on the User Portal
- Uploading Files
- Purchasing a Locker
- Managing Company Users (for Company Managers)
- Getting Started with Text2ParkMe!
- Self-Release Boot System: User Portal
Registering as a User
New to OPS-COM? Let's get you set up! To unlock all the cool features like buying parking and managing your stuff, you'll need to register. Depending on your parking provider's setup, you may be asked to register as auto login (when enabled, users are automatically logged in after signup without requiring them to verify their account first) or as email verification required (when enabled, users will need to create their account using email verification). We will review both setups here.
Quick Steps:
- Choose your language and click Continue.
- Click Create Account to start.
- Complete the profile registration questions.
- Click Create Account to submit.
- Important Next Step (this depends on how your parking office has configured Registration):
- If Auto Login: You'll be automatically logged in.
- If Email Verification Required: You'll see a message to check your email for an activation link. Proceed to Step 6.
- Check your email for an activation/confirmation link.
- If Auto Login: This link will help you create a password if you haven't already.
- If Email Verification Required: Click this link to create a password and Confirm it to save.
- Log in (if you weren't auto-logged in, or after setting your password).
- You'll be directed to your profile page. Add any remaining profile info.
- Click Save Changes to lock it in.
Just so you know: You'll need to finish your profile before exploring. If you run into any issues, contact your Parking Provider.
Detailed Instructions:
- Choose your language and click Continue.
- On the login page, click the Create Account button and complete the initial profile registration questions.
- Click the Create Account button to submit your details.
- At this point, your experience will depend on your parking provider's setup:
- If Auto Login is Enabled: You will be automatically logged in and directed to your user profile page. You will also see a green message that says "Please check your email for an activation link."
- If Email Verification is Required: You will not be logged in automatically. Instead, you will see a message indicating that an email has been sent for validation (e.g., "An e-mail has been sent for validation, please click on the link").
- Check your email and locate the confirmation or activation email from OPS-COM. Look for the Create Password link within this email.
- If Auto Login: This link is for setting your password after you've already accessed the site.
- If Email Verification Required: Clicking this link is a mandatory step to create your password and gain access.
- Click on the password creation link in the email. This will take you to a page where you can create your password.
- Create your password by entering it into the provided fields, and then Confirm it to save it in the system.
- Log in to your account:
- If Auto Login: If you haven't been prompted for a password yet, use this new password. If you were already logged in, you can continue.
- If Email Verification Required: You will be redirected to the login page. Log in with your newly created password.
- Once logged in, you will be directed to your user profile page. You must fill out any missing Profile details to continue, as these are required by your parking provider.
- Click Save Changes. You will now have full access to your account and can begin exploring and using OPS-COM features.
Your OPS-COM Dashboard: Your Parking Central!
Think of your User Dashboard as your go-to starting point in OPS-COM! It's designed to give you a quick overview of your parking situation and easy access to all the important features. Let's take a look around!
Quick Steps (Navigating Your Dashboard):
- Log in to the 'User Portal'.
- You'll automatically land on your 'Home' dashboard.
- Here you'll find sections like 'Unpaid Violations', 'Active Permits', 'Vehicles', and 'Active Lockers'. The information you see on your dashboard is personalized to your account and it provides a snapshot of your current parking status laid out on cards like the picture below.
- You can click on the Permit card to see more information about that permit and print a copy!

Manage your Account
Want to tweak your profile? Super easy! Here's how to change your details, update your address, or switch up your password:
Quick Steps:
- Log in.
- Click your name, then 'Your Profile'.
- Edit what you need, and 'Save Changes'.
- For your address, click 'Addresses', then 'Edit', fill it in, and 'Save Changes'.
- For your password, click 'Security', then 'Change Password', enter your old and new passwords, and 'Change Password'.
- If you parking provider supports this, you may be able to store your credit cards to pay for purchases. Check out the documentation here.
- For your User History, click History.
- You can also access Forms and Upload Documents if your Parking Provider supports this!
Easy Peasy! Just remember, some fields are required to save. This is determined by your Parking Provider.
Detailed Instructions:
- Log in to the 'User Portal' and click on your name in the top left corner of the page.
- Select 'Your Profile' from the drop-down menu.
- On your 'Profile Page', you can make changes to any fields that are not greyed out. After making your changes, click the 'Save Changes' button.
- To update your address, click on 'Address' which is located below 'Your Profile'. Click 'Edit' to begin editing your profile.
- Under 'Edit Address', fill in the necessary fields. When you're done, click the 'Save Changes' button to save your new address.
- You can change your password by going to the 'Security' tab which is located below 'Addresses'.
- Click on 'Change Password' to begin. Enter your 'Current Password' and create a new password for your account. Re-enter your new password under 'Confirm Password'.
- Save your changes by clicking 'Change Password'.
Recovering a Password
Locked out? Let's get that sorted! Here's how to reset your password and get back into OPS-COM.
Quick Steps:
- Head to the Login page and click 'Forgot Password'.
- Type in your email and hit 'Send Reminder'.
- Keep an eye on your inbox for the password reset link.
- Click the link to open the 'Reset Password' page.
- Enter your email and your new password, then click 'Reset Password'.
- Confirm the reset, and click the link to return to the 'Login Page'.
- Log back in with your shiny new password.
Pro Tip: If you can't find the email, give your spam or junk folder a quick look.
Detailed Instructions:
- Go to the 'Login Page' of the OPS-COM User Portal.
- Click 'Forgot Password' to start the password recovery process.
- Enter 'Your Email Address' in the 'Forgot Password' dialog box. Make sure the email is correct and that you can receive emails from it. If you don’t see the email in your inbox, check your 'Spam Folder'.
- Click 'Send Reminder' to request the reset link.
- You will receive an email with a link to reset your password. Click the link in the email to go to the 'Reset Password' screen.
- On the 'Update Password' screen, enter a new password in the provided fields and click 'Reset Password'.
- Once your password is reset, you’ll see a confirmation message. Click the link provided to return to the 'Login Page'.
- Login with 'Your New Password'.
Multi-Factor Authentication - User Portal
Some parking providers support Multi-Factor Authentication (MFA). To enable MFA, and start using one-time passwords, follow these steps:
Quick Steps:
-
Login then click on your name. In the dropdown click Security.
- Click Change Multifactor Authentication Settings.
- Choose Disable MFA or Enable One-Time Passwords.
-
Click Send One-Time Password To Email and go into your email and copy your one time password.
- Enter your one-time password as well as your current password then click Submit.
The one-time password is only valid for 15 minutes. If the password has expired, a new one will be generated.
Step-by-Step Instructions:
- Login then click on your name. In the dropdown click Security.
- Find the Multi-Factor Authentication section. This section shows the current MFA status and includes a button to manage the settings.
- Click the Change Multifactor Authentication Settings button at the bottom of the page to open the Multi-Factor Authentication settings.
-
Either: Disable MFA, or Enable One-Time Passwords.
-
Click on the Send One-Time Password To Email then enter: Your current password, and the one-time password (OTP).
-
To receive an OTP, click the button to send it to your registered email address. The OTP will be sent to you by email and is valid for 15 minutes.
-
Select your OTP option from the picklist below the current password field. Press Submit to confirm your changes and update your MFA settings. These are your choices:
- OTP Expiry: Any unused OTPs will be invalidated if a new OTP is generated, even if they haven't expired yet.
- OTP Email Format: The OTP email will follow the template set for your account.
- Session Storage: Once you enter an OTP, it is stored in your session data. If you clear your browser's local storage, you'll need to enter a new OTP.
- Different Devices: OTPs do not persist across different browsers or devices. If you log in from another device, you'll be prompted to enter a new OTP.
-
Login by entering your username and password as normal.
-
After logging in, you'll be prompted to enter a one-time password.
-
You will be redirected to the OTP screen when accessing any page other than:
/login– Login page/logout– Logout page/one_time_password– OTP entry screen/account/send_email– Send OTP email/account/multiauth– Multi-auth settings page
-
Enter your OTP, submit it, and you'll be able to access the rest of the site.
Manage your Payment Methods & Subscriptions
Ready to add a credit card? The following guide will walk you through that!
Please note: Not all parking providers support this feature. If you don't see the Manage Credit Cards option, you might want to reach out to your parking provider to request they enable this functionality. We do not store your card information, this is hosted and stored exclusively by our integrated payment providers. (Moneris, Bambora, EdgeExpress, etc.)
Quick Steps:
- Log in and go to your Profile.
- Click on your Profile name
- Click on Manage Credit Cards.
- Click Add Payment Method and choose your Payment Subscription type.
- Follow the prompts to add your credit card details.
- You'll see your card and a "Credit Card successfully stored" message.
- You can remove a card by clicking the trash can.
Heads up: If your parking provider allows it, you can setup your card to pay for items like temporary parking. If they don't allow this, your card can only be used for subscription term parking payments.
Detailed Steps
- Log in to your user account on the OPS-COM portal and click on your Profile.
- Click Add Payment Method.
- Choose your subscription type and follow the instructions on the screen and click Add Payment Method.
- The stored credit card will appear in the Stored Subscription Payment Methods area and you will see "Credit Card successfully stored" in green.
Subscription Setup
Some payment methods, such as Payroll Deduction and EFT cannot be setup by a user. Contact your parking provider to find out about setting these options up.
If you want to enable your card to pay for monthly permits that recur, toggle on Permit Rollover.
Viewing your History
Curious about your parking activity? Let's take a peek! You can view your lockers, permits, payments and more right here:
Quick Steps:
- Log in.
- Click your name, then 'History'.
- Check out your history summary.
- Need more? Contact your parking provider; they have all your details.
Detailed Instructions:
1. Log into the 'User Portal'.
2. Click your name in the top left corner of your screen.
3. From the dropdown menu, select 'History'.
4. This will open the 'User History' page, where you'll see a summary of your account's activity. If you need to see more history, you can contact your parking provider.
User Side: Managing Email Preferences
This article describes the feature that allows users to unsubscribe from non-essential email communications. This feature aims to improve user experience, ensure compliance with data privacy regulations, and reduce the volume of manual unsubscribe requests.
User Side: Managing Email Preferences
When the feature is enabled, users can manage their email preferences through an Email Preferences page within their account settings.
Users can access the Email Preferences page in two ways:
On the Email Preferences page, users will find the following:
-
Checkboxes for each email category: Users can select or deselect categories to manage their subscriptions.
-
Popover icon (?): Clicking this icon next to a checkbox will display the category description.
-
Select/Deselect All: An option to manage all checkboxes at once.
-
Essential Categories: A list of essential email categories that cannot be unsubscribed from will be shown at the bottom of the page.
After making changes, the user must click the Save Changes button. A confirmation message will be displayed.
If the unsubscribe functionality is turned off after users have already unsubscribed, their subscription settings will be ignored, and they will receive all emails again.
Add, Edit, and Activate Your Vehicles
Buying permits? You'll add your vehicle here! Edit existing ones, and manage active vehicles—quick and easy. Let's get rolling!
Quick Steps:
- Log in, click 'Vehicles'.
- 'Add New Vehicle', agree to the disclaimer.
- Enter plate, state, year, plate type. 'Save Changes'.
- To edit: click 'Edit', make changes, 'Save'.
- To activate/deactivate: toggle 'Active' button.
Step-by-Step Instructions:
- Log in to your profile and click 'Vehicles'.
- Click 'Add New Vehicle', and read the Disclaimer. Click 'I Agree' to continue.
- Enter your plate, state/province, plate type, and vehicle year. Click 'Save Changes'.
- To Edit your vehicle, find it and click 'Edit'. Make your changes and click 'Save'.
- To Activate/Deactivate, find your vehicle and toggle the 'Active' button.
Please note: Not all parking providers support deleting or removing a vehicle after it has been added. Mark your vehicle as 'inactive' before adding a new one. Contact your parking provider to delete the inactive vehicle if it will no longer be used.
Purchase a Parking Permit
Time to buy parking! You can purchase a standard permit that usually covers a specific time period like one month or more, or you can purchase a Temp permit for short term parking.
Quick Steps:
-
Log in to the portal and click Permits.
-
Read and Agree to the Permit Disclaimer, if applicable.
-
Choose a Permit Type: Standard, Temporary, or Waiting List.
-
Click Reserve Permit for Standard and Temporary permits or Join Waiting List for the Waitlist option.
Step-by-Step Instructions:
- Log in to the User Portal. Click on Permits.
- If you haven't registered a vehicle, the Vehicles screen will appear.
- Carefully read over the Permit Disclaimer then, click "I Agree" to accept the terms and proceed to the Permits screen.
- On the Permits screen, you can select either: a Regular Parking Permit, a Temporary Parking Permit, or join a Waiting List, if applicable.
- Purchase a Standard Permit: Click on Standard Permit. View the details and click the Reserve Permit button.
- Finalize purchase: Proceed to Payments and complete the purchase.
-
Purchase a Temporary Permit: Find the Temporary Permit you wish to purchase then click Get Temp Permit.
-
Choose the time and vehicle for the permit: Choose the start and end dates or choose the number of hours for your permit and select the vehicle you will be using.
-
Click on Check Availability.
-
Click on Reserve Permit and proceed to payment.
-
-
Join a Waitlist: From the Permits screen, expand the Waiting List option on the lot card of your choice.
- Follow the instructions on this page to see your rank if this is allowed by your parking organization.
- Purchase a Standard Permit: Click on Standard Permit. View the details and click the Reserve Permit button.
Note: Temporary permits are only valid for up to 30 days. If you need a permit for longer than 30 days, you’ll need to buy a regular permit.
Printing Your Parking Permits Made Easy!
Print Permit from the User Portal
Need a hard copy of your parking permit? No problem! You can easily print your active and even past permits directly from the OPS-COM User Portal. Here's how:
Quick Steps:
- For Active Permits:
- Log in to the 'User Portal' and click the 'Home' button.
- Under 'Permits', click on the permit number you want to print.
- In the 'Permit Information' window, click the 'Print' button.
- Your permit will download as a PDF, ready for printing!
- For Permits in User History:
- Log in and go to your 'Profile'.
- Navigate to the 'User History' section.
- Click on the confirmation code for the payment you made for the permit.
- On the receipt page, click on the permit details to open the 'Permit Information' window.
- Click the 'Print' button to download your permit PDF.
- For Temporary Permits: The process is the same as printing active or past permits!
You can only print this once. If you have already printed it, you will see a last printed date and time.
Viewing Your Waitlist Position
Ever wonder where you stand on a waitlist? OPS-COM makes it easy to keep track! You can see your position for any waitlist directly from the Permits page. Please note, this must be enabled by your Parking organization.
Quick Steps:
- Go to the Permits page.
- Expand the waitlist menu to see your current position.
- After joining, watch the indicator update with your live position.

Details:
- When you're on the Permits page, you'll see your waitlist information.
- Expanding the menu for a specific waitlist gives you more details. Before you even join, it will show you the position you'd have if you were to add yourself to that waitlist. This is super helpful for making an informed decision!
- Once you add yourself to the waitlist, the indicator will automatically update to show your current, live position. The expanded message will also reflect this change, always keeping you informed.
Appealing Your Parking Violation
Think a parking ticket might have landed on your windshield unfairly? No worries, we're here to help! This page will guide you through the easy steps to submit an appeal for a parking violation right here in OPS-COM. Let's get that looked into! 😊
Quick Steps:
Make sure to submit your appeal within the allowable timeframe for the violation or you won't be able to see it.
-
Log in to the User Portal and click on the Appeals tab.
-
The Appeals page displays any violations.
-
Click Details on the Ticket number you wish to appeal and then click More Info.
- After clicking Request Appeal, enter your reason for appeal in the Reason for Appeal text box.
- If your parking office allows it, upload your appeal evidence. You can upload multiple PDF, JPG or PNG files. The max file size is 12MB per file. You will be able to see your files as thumbnails.
- Click Submit Appeal.
- Keep an eye on your email for confirmation and the appeal decision.
Appeal a ticket for a vehicle owned by someone else
- Click on Lookup All Tickets then search for the violation using the Search Plate or Ticket field.
- Click Request Appeal.
- Confirm vehicle association by clicking Associate.
- Click Request Appeal again to finish.
When you associate the vehicle with your profile, it will show up under your profile as the vehicle being linked to you. For example, if Patricia Birch submits an appeal, the vehicle will be associated with her profile after the appeal is made.
Step-by-Step Instructions:
- First things first, log in to your OPS-COM user profile. Once you're in, click on the Appeals tab located in the navigation bar. This page will display all the parking violations currently linked to your account.
- If you're looking for a specific violation, you can use the Search my Tickets field. Just enter the ticket number you want to appeal, and it will pop right up.
- If the violation is still within the allowed appeal period, click on the More Info button on the ticket you wish to appeal. This will open the ticket information window.
- After clicking Request Appeal, in the Reason for Appeal text box, carefully type out the reasons why you believe the violation should be reconsidered. Be clear and provide any relevant details.
- If your Parking office allows this, look for the Select Files to Upload option.
o Click this button to browse and select the image or text files you want to attach from your device or take a photo.
o You can upload multiple files.
o Supported file types include JPG, PNG, and PDF.
o The maximum file size is 12MB per file. - Review Uploaded Files: Once selected, your files will be displayed in the appeal form, often as thumbnails for images or icons for documents. If you need to remove a file before submitting, there is an option to do so.
- Once you've explained your reasoning, click the Submit Appeal button. If you have a valid email address associated with your account, you'll receive an email confirming that your appeal has been successfully submitted.
- Your Parking Office will review your submission. You'll receive another email notification with their decision.
- To check the status and details of your appeal after you've submitted it, simply click on More Info and then Show Appeal Information. This will display the reason you provided for the appeal and the Administrator's response once a decision has been made.
Appeal a Ticket for a Vehicle Owned by Someone Else
- Click on Lookup All Tickets then use the Search Plate or Ticket field to find the ticket you want to appeal by entering the Ticket Number.
-
Click Request Appeal to start the process.
-
A message will appear to let you know that the vehicle will be associated with your profile temporarily during the appeal. This allows you to manage the appeal and see any future violations for that vehicle. Click Associate to confirm.
-
With the vehicle now associated, the violation will be listed on the page. Click Request Appeal again to complete the appeal process as described in steps 4 and 5 above.
Unable to Appeal
-
If you are past the appeal deadline or the violation is overdue, you will not be able to submit an appeal.
How to Make a Payment in Your User Profile (Or as a guest)
This guide provides step-by-step instructions on how to pay for permits, violations, or other services through your OPS-COM user profile.
Getting Started
Before you begin, log in to your User Profile and navigate to the Payments tab. This page lists all your current expenses and payment history. You will see a list of items, such as permits or violation tickets, with a checkbox next to each one.
-
Select the checkboxes next to the items you intend to pay for. To select or deselect all items at once, you can hold the Shift key and click.
-
Click the Continue to Checkout button to proceed to the payment method screen.
Violations Under Review: If you have a violation that is currently under appeal or review, do not select the checkbox for it. You should only pay for a violation after the review process is complete.
After clicking Continue to Checkout, follow the instructions below for your chosen payment method.
Paying with a Credit Card
Experiencing issues with payments? If you're having trouble with payments on the OPS-COM web version, it's likely because your Safari browser's pop-up blocker is preventing the payment window from opening. This is a known issue with certain payment providers. To fix this, simply go to your Safari settings and turn off "Block Pop-ups."
This method allows you to complete your payment online immediately.
-
On the Payment Method screen, select the Credit Card option.
-
You will be securely redirected to our payment provider's website to enter your payment details safely.
-
On the payment provider's page, fill in all required fields, including your credit card number, expiration date, CVV code, and billing address.
-
Click the button to process the payment (e.g., Process Transaction or Pay Now).
-
Once the payment is successful, you will be brought back to a receipt page in OPS-COM, confirming your transaction is complete.
Paying with Cash or Cheque (Promise to Pay)
This method allows you to indicate your intent to pay in person at the parking services office.
Please Note: This payment method is not available from all service providers. If you do not see this option, you will need to pay by credit card.
-
On the Payment Method screen, select the Cash or Cheque option.
-
Click the Submit Payment button.
-
Your selected items will now be marked with a status of Paid but not Processed.
-
To finalize your payment, you must visit your parking provider's office to pay with physical cash or a cheque. The office staff will then update the transaction status in the system to complete the process.
Quick & Easy Guest Payments
Just got a parking violation and want to take care of it without creating an account? No problem at all! OPS-COM offers a handy "Quick Pay" option that lets you pay your ticket without needing to register or enter personal info. Here's how it works: 😊
Quick Steps:
- Go to the 'Login Page' and click 'Pay your Ticket'.
- Enter your 'Ticket Number' and the last two characters of the Ticket Number in the field (e.g., for ticket TT-10133-3K, enter TT-10133-3K).
- Click 'Search'.
- Click 'Guest Payment'.
- Choose your payment method and enter your email address. Click 'Submit Payment'.
- Enter your card and billing details (if applicable).
- Click 'Pay Now' and confirm your payment! 🎉
Step-by-Step Instructions:
-
Go to the 'Login Page' and click on 'Pay your Ticket'.
-
In the field, enter your 'Ticket Number' along with the 'Security PIN'. The PIN is the last two digits of the ticket number (e.g. TT-10133-3K, where '3K' is the PIN).
-
This will take you to the 'Violation Ticket Login' screen.
-
This opens the 'Payment' window.
-
Select your preferred payment method and enter your email address. Then, click 'Submit Payment'.
-
Based on your chosen payment method, you'll be prompted to enter the required payment details. If using a hosted payment method, enter your card and billing information.
-
Click 'Pay Now'. You’ll see a confirmation screen once the payment is processed.
Using Forms on the User Portal
Need to communicate a special request to your parking provider? You're in the right place! If enabled, the Forms module in OPS-COM lets you easily submit requests for things like move-in/move-out assistance, special parking arrangements, event parking needs, and more. Let's get those requests rolling! 😊
Quick Steps:
- Log in to the 'User Portal'.
- Click 'Forms' to see what's available.
- Click 'Open Form' to get started.
- Fill out all the necessary information.
- Click 'Submit' to send it off.
- Look for a green confirmation message on the page.
- Keep an eye on your email for an approval update from your parking provider.
Step-by-Step Instructions:
- Log in to the 'User Portal'.
- Click on 'Forms'. This will take you to the 'Forms' page, where all available forms are listed.
- Click the 'Open Form' button to open the form.
- Complete the form as needed.
- Once done, click the 'Submit' button. Your completed form will be sent to your parking provider.
- After submission, the admin will receive a confirmation email. On the page, you will see a green confirmation message (as shown in the image below).
- Once your form is approved, you will receive an email from your parking provider.
If you can't find a form for your specific request, don't hesitate to contact your parking provider directly!
Uploading Files
This article will walk users through how they can upload files through the user portal.
Quick Steps:
- Login to the 'User Portal' then go to your 'Profile' menu and click 'Upload Documents'.
- Click 'Select Files to Upload' and select your file.
- Click 'Upload File'.
Step-by-Step Instructions:
- Access Your Profile Menu: After logging into the 'User Portal', click on your name to access your profile menu and click on 'Upload Documents'.
- Go to the Account Uploads Screen: After selecting 'Upload Documents', you'll be directed to the 'Account Uploads' screen.
- Choose Your File: On the 'Account Uploads' screen, click the 'Select Files to Upload' button and select the file you want to upload.
- Save Your Changes: Once you've selected the file, click 'Upload File' to save your changes.
- Confirmation: You should now be able to your file under 'Uploaded Documents' on the 'Account Uploads' screen.
Only the following file types are currently supported for upload: .pdf, .png, .jpg, .jpeg. If you try to upload unsupported files (such as videos or Excel files), you will receive an error message.
Purchasing a Locker
Some parking providers allow you to purchase a Locker in addition permits. If you see the option, follow the instructions below.
Quick Steps:
-
Click the 'Lockers' tab.
-
Read and agree to the 'Locker Disclaimer'.
-
Select your desired locker location.
-
Click 'Get Locker'.
-
Choose a locker number and click 'Reserve Locker'.
-
Proceed to the 'Payments Due' page.
Step-by-Step Instructions:
-
Sign into the User Portal and click on the 'Lockers' tab.
-
If your organization has set one up, the 'Locker Disclaimer' will appear. Take time to read it carefully, and then click "I Agree" to proceed.
-
Select the location where you wish to rent a locker. For example: "Women's Locker Room at the Main Street Arena".
-
Click on 'Get Locker' to see available lockers.
-
Click the locker number you wish to reserve. Then, click 'Reserve Locker'.
-
You will be taken to your 'Cart'. Click 'Next' and proceed to payment.
Managing Company Users (for Company Managers)
Getting to Company Users
Welcome, Company Managers! 👋 This guide will show you how to easily access and manage the accounts of your associated users within OPS-COM. This powerful tool allows you to help your team with things like updating their profiles, purchasing permits, and handling violations. Let's dive in! 😊
Quick Steps:
- Log in to OPS-COM as a Company Manager.
- Click on the 'Company Manager' menu item.
- You'll see a list of your associated users.
- To manage a user's account, click the login icon next to their name.
- A pop-up will confirm which user's account you're now accessing.
- You can now perform actions on their behalf.
Step-by-Step Instructions:
-
First, log in to your OPS-COM account using your Company Manager credentials. You will only be able to do this if you have been granted the correct permissions in OPS-COM.
-
Once you're logged in, you'll notice an additional menu item in the navigation bar labeled 'Company Manager'. Click on this link.
-
Clicking 'Company Manager' will take you to a page displaying a list of all the users associated with your company. You'll see their names and potentially other identifying information.
-
Next to each staff member's name in the list, you'll find a login icon. To access and manage a specific staff member's account, click on this icon next to their name.
-
After clicking the login icon, a pop-up message will appear on your screen. This message will clearly indicate the name of the staff member whose account you are now logged in as.
-
Once you've confirmed the login, you'll be taken to the home menu screen of the selected staff member. From this interface, as the Company Manager, you have the ability to perform all the actions that the staff member themselves can do within their profile. This includes:
- Updating their profile information.
- Buying parking permits on their behalf.
- Paying any parking violations associated with their account.
- Adding or managing their registered vehicles.
- And essentially any other function available to a regular user.
-
Navigate through the staff member's profile and perform the necessary actions on their behalf, just as if you were logged into their account directly.
Getting Started with Text2ParkMe!
User Setup (One-Time Thing!)
Not all parking providers support Text2ParkMe. Always confirm with your Parking provider before attempting to set this up.
Before you can text your way to parking, there are a few quick things to set up in your OPS-COM user profile. Don't worry, you only need to do this once!
Quick Steps (User Setup):
- If you're new, create your profile on the User Portal.
- Log in and click 'Your Profile' to add your info.
- Enter your mobile phone number in the 'Personal Information' section.
- Find these in the 'Users Settings' section.
- Under 'Parking Expiry Reminder', choose how you'd like to be reminded before your parking expires via SMS (or select 'No reminder').
- If you haven't already, 'Register a Credit Card' and ensure your Text2ParkMe subscription is active.
- If you haven't added your vehicle(s) yet, do so in the 'Register the Vehicle(s)' section.
Detailed Instructions (User Setup):
-
If you haven't used the User Portal before, click the 'Register' button and follow the steps to create your account.
-
Once logged in, click on 'Your Profile' in the navigation menu.
-
In the first section, labeled 'Personal Information', locate the field for your mobile phone number and enter it. Make sure it's accurate!
-
Scroll down to the 'Users Settings' section. Here, you'll find the options for Text2ParkMe.
-
Look for 'Parking Expiry Reminder'. You can choose to receive an SMS reminder 5, 10, 15, 20, 25, or 30 minutes before your parking booking expires. If you don't want reminders, select 'No reminder'.
-
If you haven't already, navigate to the section for managing payment methods (this might be a separate tab or within your profile settings). Follow the instructions to 'Register a Credit Card' as your primary payment method and ensure that the Text2ParkMe subscription is active.
-
If you haven't done so, find the section for 'Register the Vehicle(s)' and add the license plate number(s) of the vehicle(s) you'll be parking.
Using Text2ParkMe (Once Setup is Complete!)
Now for the fun part – texting to park! Here's how it works:
Quick Steps (Using Text2ParkMe):
- Using your registered phone, text ParkMe to the Text2ParkMe phone number provided by your organization.
- Text P to start parking or Q to quit.
- Text the number corresponding to the parking lot you want.
- Text the number of minutes you want to park.
- If the time is correct, text C to continue or L to go back to lot selection.
- Text the number for your license plate or the plate number if unregistered.
- Text C to confirm your purchase or L to go back to options.
- You'll get a confirmation text and email with your expiry time.
- To extend: Text E and follow the prompts.
Just so you know (Using Text2ParkMe):
-
Every time you text the access number, the system will reply with instructions for the next step.
-
You'll receive a text reminder 5 minutes before your parking expires (if you set it up).
-
You can text STOP, STOPALL, UNSUBSCRIBE, CANCEL, END, or QUIT to stop messages.
-
Text START, YES, or UNSTOP to opt back in.
-
Text HELP or INFO for information on controlling messages.
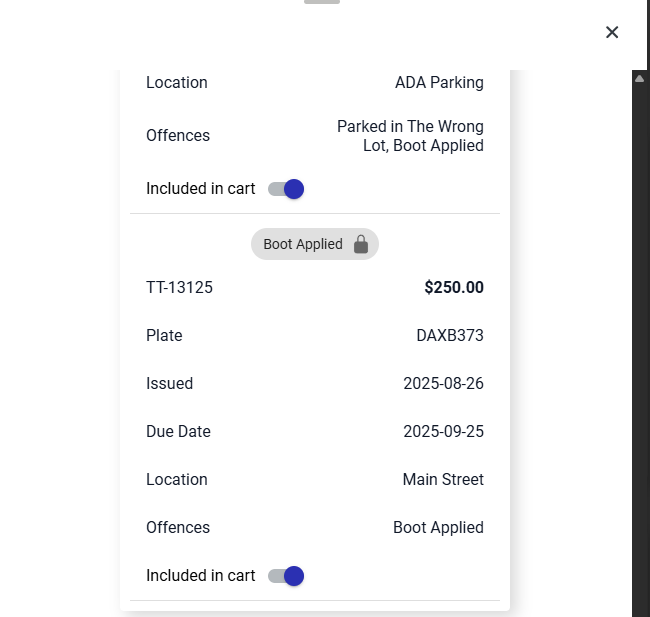
Self-Release Boot System: User Portal
This article provides an overview of the self-release boot system for vehicle owners. This feature allows you to pay for a parking violation associated with a vehicle boot and receive a release code, enabling you to remove the device yourself. The primary purpose is to offer a faster and more convenient way for you to resolve parking violations and get your vehicle back in service.
How to Self-Release Your Vehicle
This section explains the process of paying for your violation, receiving your unique release code, and returning the boot.
Important: A valid email address is required to receive your boot release code and instructions.
-
Begin the payment process for your violation online through the payment portal. You can pay by logging into your user account or by using Guest Payment. For the Guest Payment guide click here.
-
When viewing your cart, violations that have a boot attached will be marked with a grey lock.

-
Depending on the parking authority's policy, you may be required to pay for only the single violation the boot is attached to, or you may need to pay for all outstanding violations on your account before the code is released.
-
Upon successful payment, two separate emails will be sent to the email address you provided.
-
One email will be your payment receipt.
-
A second email will contain your unique boot release code and detailed instructions for how to remove the boot and where to return it.
-
-
Follow the instructions provided in the email to remove the boot from your vehicle.
-
Return the boot to the specified drop-off location as outlined in the instructions.
It is crucial to return the boot promptly according to the provided instructions. Failure to return the boot within the allotted time may result in additional fines or the forfeiture of your deposit.
Best Practices & Considerations
-
Boot as a Deposit: In certain situations, a refundable deposit fee may be included with your violation. This deposit will be refunded to you through the original payment method after the boot has been returned within the specified timeframe and is in good condition.
-
Keep Instructions: Be sure to save the email containing the removal and return instructions until after you have successfully returned the boot.