OPSCOM Enforce - iOS & Android
The new beta admin enforcement app compatible with both iOS and Android, called "OPSCOM Enforce".
Note: Not to be confused with the current in-use legacy app for Android only, "OPSCOM Parking Enforcement".
- Troubleshooting & Info
- Locate Application Version (OPSCOM Enforce App)
- Testing Your WIFI Connection
- Replication Status - OPSCOM Enforce App
- Ionic - Handheld Training (Coming Soon)
- Ionic - Search Vehicles
- Violations
- Virtual Chalking Explanation
- Plate Capture using Hand Held
- Printers & Printing
Troubleshooting & Info
For the Ionic App.
Locate Application Version (OPSCOM Enforce App)
The OPSCOM Enforce App can be downloaded from the Apple Store or the Google Play Store.
If in doubt you can search for the "OPSCOM Enforce" app in the Google Play or Apple Store and when viewing the details of the application you will see the button that is typically labeled "Install" will instead show "Update". This indicates that the handheld is running an older version of the application which can be updated.
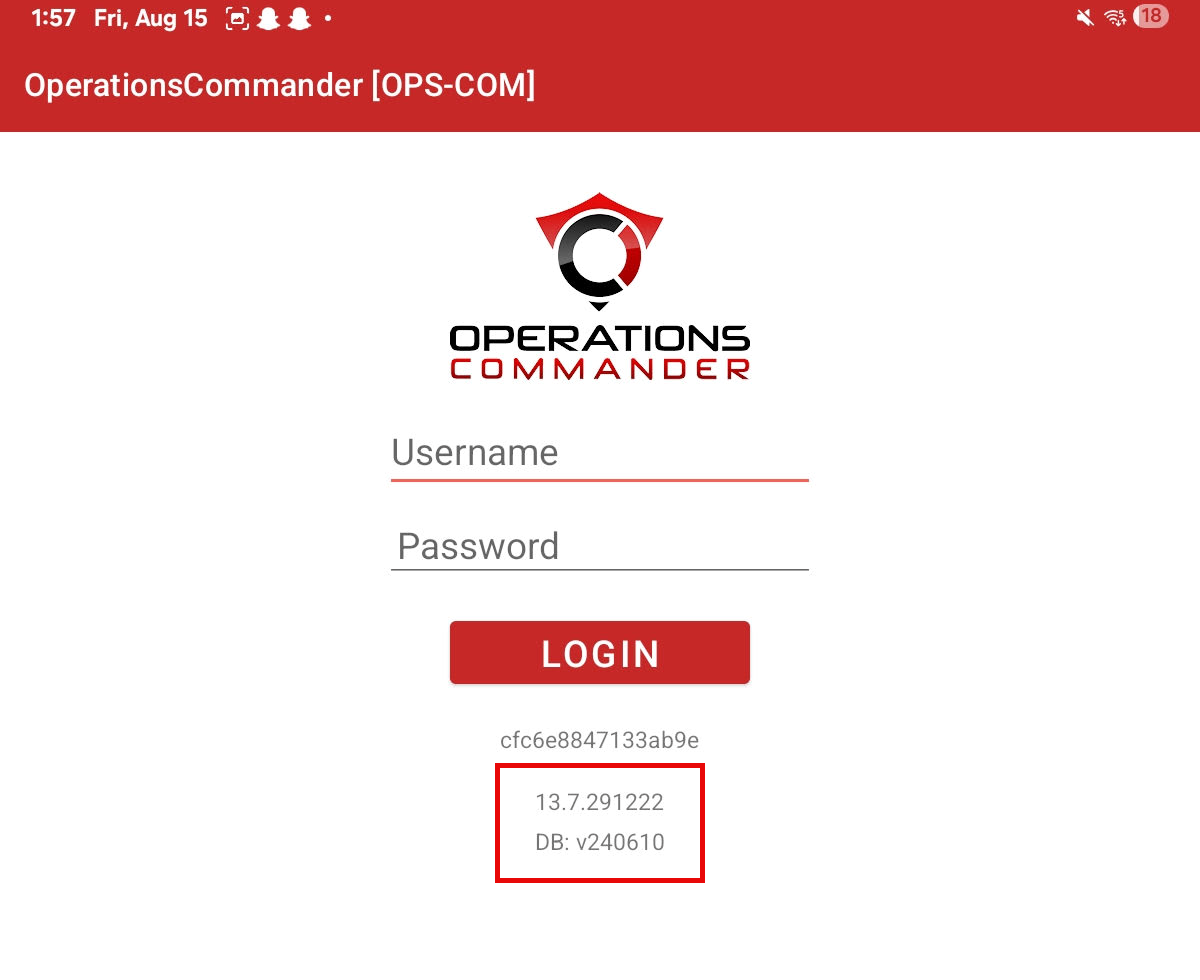
Locate the Version Details
Login Screen
Under the login box the version details and handheld identifier are clearly listed.
(This article will be combined with a similar relevant article in the future)
Testing Your WIFI Connection

Download a WIFI Analyzer Application
This app could be installed on a cell phone and it allows you to take a measure of wifi strength and source as far as channel.
The app we recommend is a product of the company VREM Software Group and is called WifiAnalyzer (OpenSource). It's a free download on the Google Playstore.

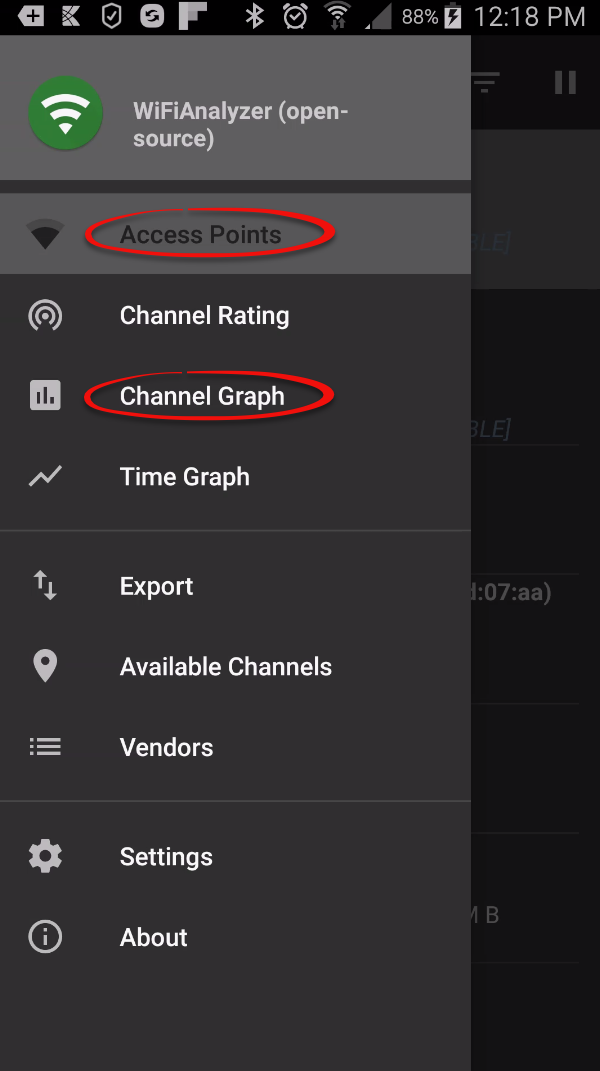
This app will give you a graphic representation of the signal strength. There are two screens we are interested in. One is Access Points and the other is Channel Graph. Both are available from the hamburger Icon (three parallel lines) at the top left of the app.
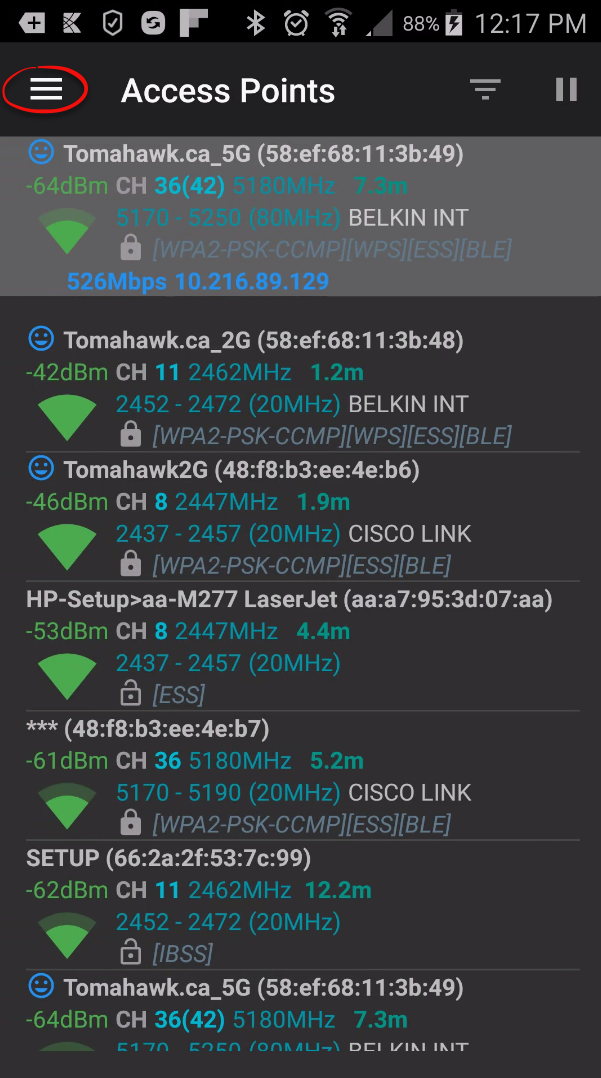
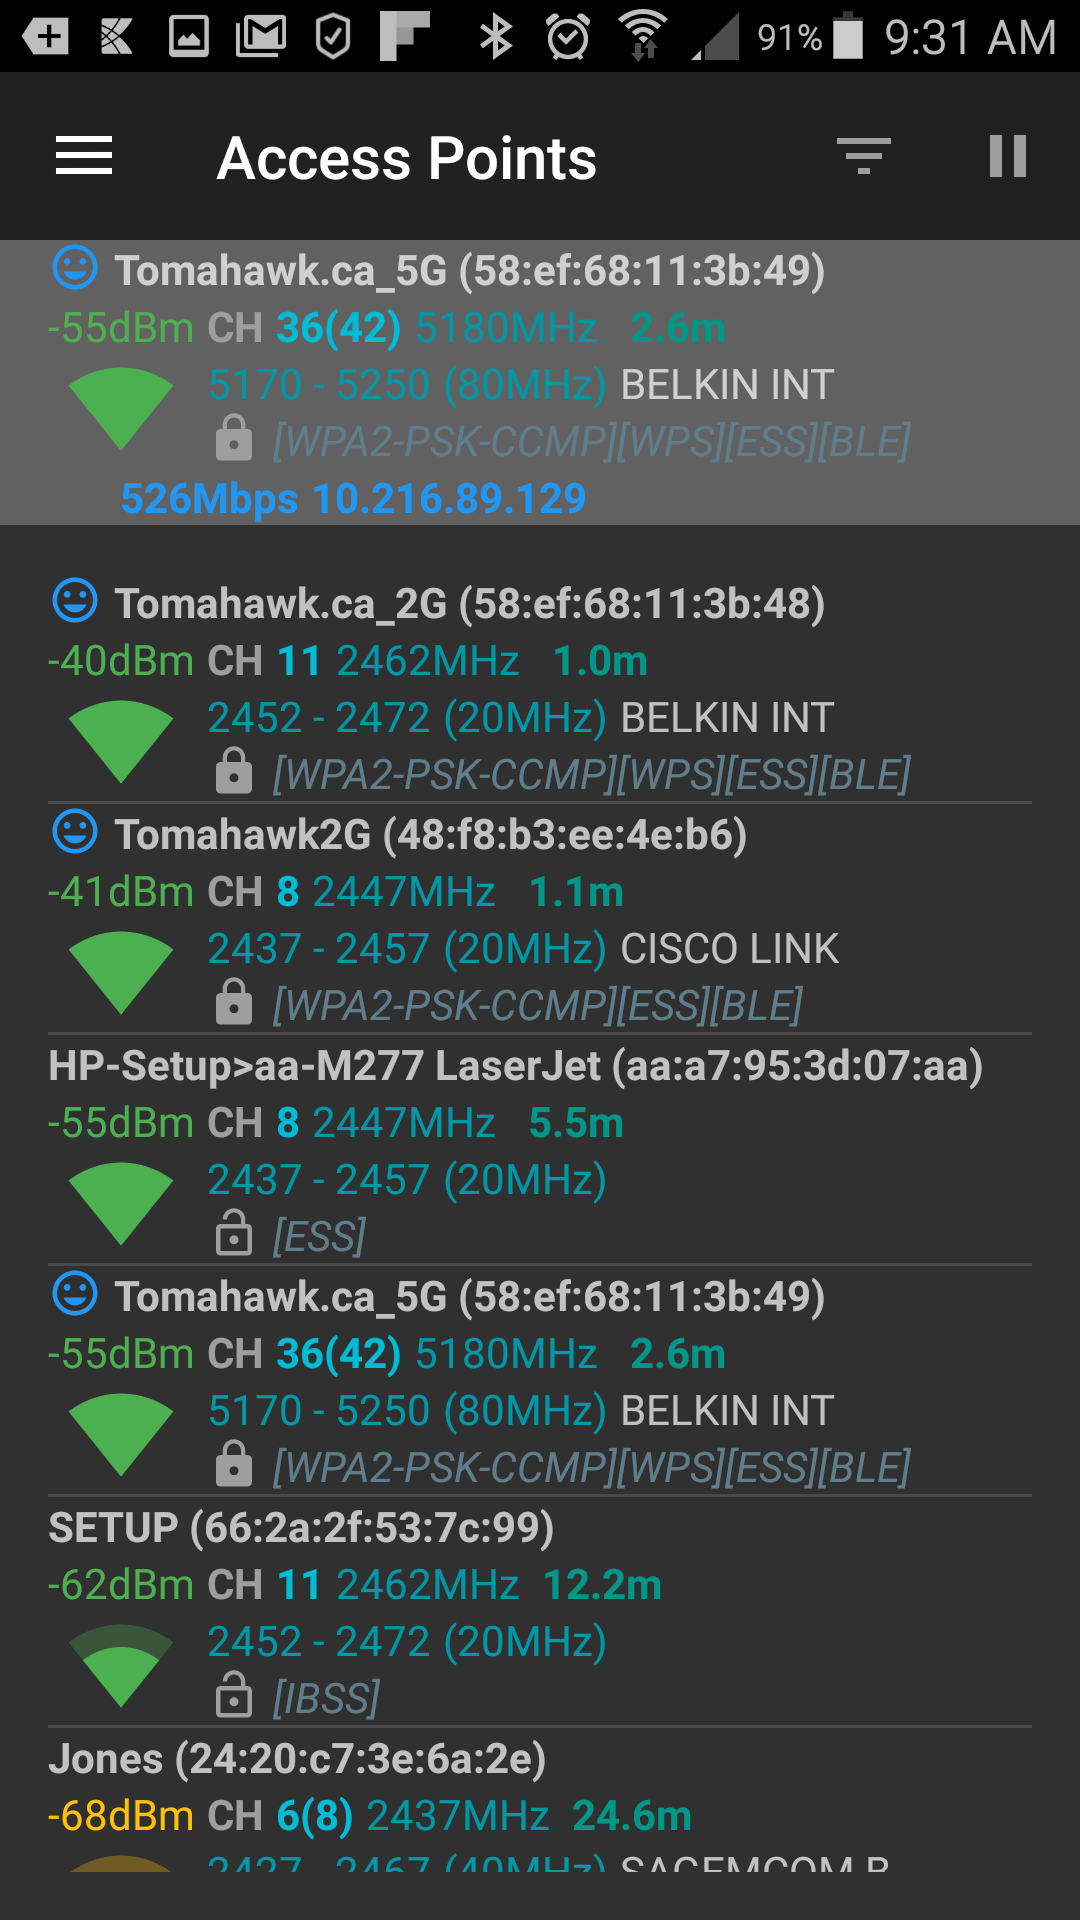
The Access Points Screen
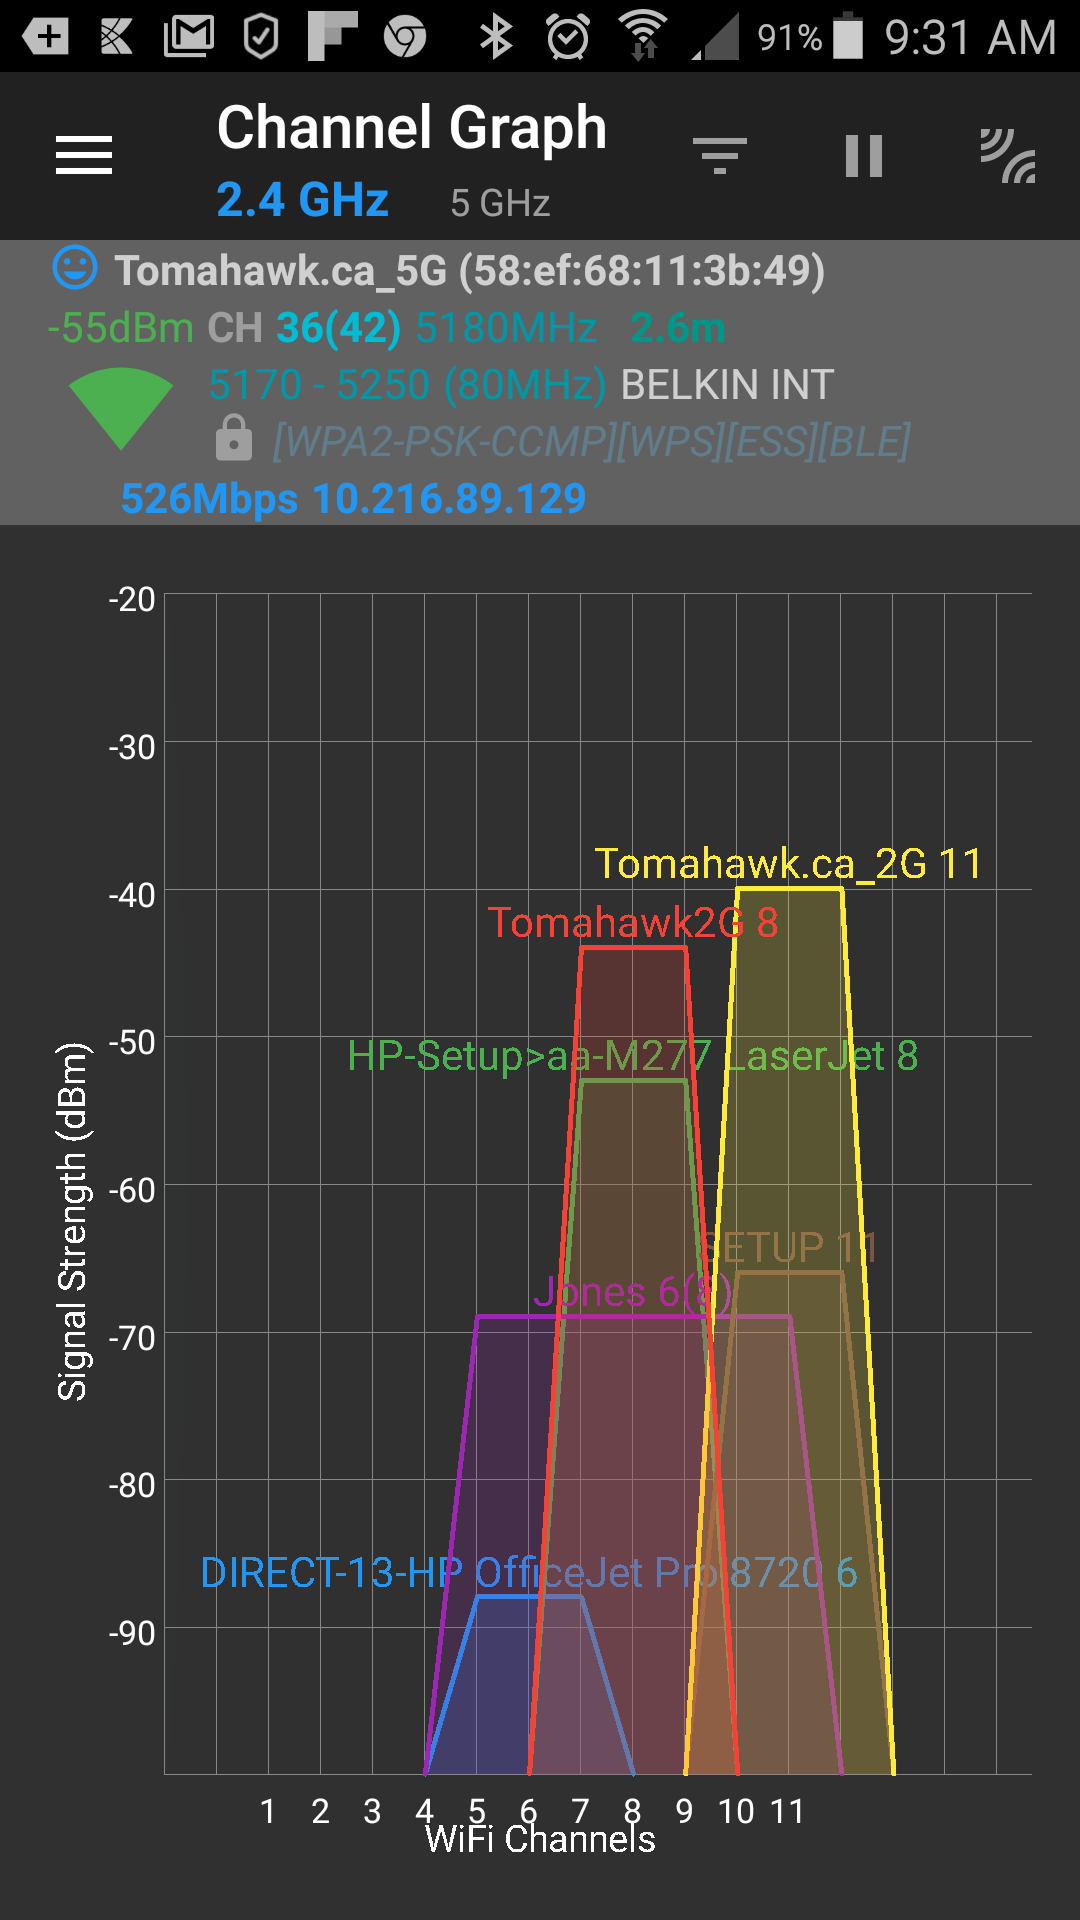
The Channel Graph Screen
Help with Troubleshooting WIFI
This is something that would be great to look at throughout the day and especially when you have these drops in signal. What we are looking for is how much it goes up and down through the day.
The signal strength is shown as a column of colour rising up from the bottom of the graph that ranges from minus 100db to minus 20db.
The smaller the number the higher the signal (keep in mind that these numbers are negative so -100 is much better than -20)
To best assist in troubleshooting, we are looking for the reading of how low the db number is for your WIFI source.
The second thing we are looking for is how many devices are on the same channel.
Too many devices trying to access on the same channel will have an adverse affect on connectivity strength.
Please provide screen captures of these items when contacting support.
Replication Status - OPSCOM Enforce App
System Status
The Replication Status screen displays all database table data on your unit and whether or not the tables/data are synchronized with the server.
- Tap on the Replication Status option.
- This will bring you to the Record Counts and Data Table Tools.
- Tap and hold an option to open a pop-up message with additional options.
Status Report
Status Icons
The following icons are used to indicate status:
- Green Checkmark: Table data is synchronized with the server.
- Red X: Table data is NOT synchronized with the server.
Note: During normal use (i.e., when issuing violations), it's expected that tables like VehicleTransfer and ViolationsTransfer may become temporarily out of sync. This indicates that new data (e.g., violations or vehicles) has been captured on your device and will need to be synced to the server.
- Blue Exclamation Point: This indicates there is no table data that needs to be synchronized between the handheld and the server.
Replication Actions
There are a number of actions that can be performed in the Replication Status area by holding down with your finger on an individual table:
PLEASE NOTE: None of these options should have to be used if your unit is working correctly. We suggest logging in and out of the application as needed for proper synchronization. Please contact OPSCOM Support if there are any issues before performing any replication status functions as detailed below.
- Push table data to the server
- This will attempt to upload the local devices table data to the server (i.e. synchronize) and is generally safe to do as nothing is overwritten or removed, though if you do push table data make sure all tables marked with a red X are synchronized.
- Rebuild and retrieve table data
Warning: This option will delete/drop the local table data and retrieve the newest available table data from the server. This could result in violations and/or vehicle data that hasn't yet been synchronized to the server and is still only on the local handheld from being lost. If a table is showing as out of sync never rebuild and retrieve table data unless instructed to by us.
- Delete local table data
Warning: This will delete the local table data but has no effect on the server. Similar to the above this could result in the loss of local table data if not synchronized to the server first. Never select this function unless told to by us.
- Email debug details to Tomahawk
- This will send an email log file to us containing helpful information for debugging/troubleshooting issues. Select if requested to by us, or notify us first before sending if possible.
Replication Options
There are additional options available in the Replication Status area accessible by selecting your devices options/menu button (![]() icon in the top right-hand corner):
icon in the top right-hand corner):
- Rebuild database:
WARNING: This will delete ALL local table data but has no effect on the server. This could result in the loss of local table data if not synchronized to the server first. Never select this function unless instructed by OPSCOM Support.
- Synchronize all:
- This function is safe to select and is similar, if not the same as logging in or out of the device. The device will attempt to synchronize ALL table data with the server. We still recommend logging in and out instead of using this function in case another option is selected by accident.
- Send config to Tomahawk:
- This will send an email log file to us containing helpful information for debugging/troubleshooting issues. Select if requested to by us, or notify us first before sending if possible.
- Download new config:
- When selected the device will re-download all relevant system settings on next startup (organization, device name, ticket footer, etc.).
Ionic - Handheld Training (Coming Soon)
Slides Presentation
(Slideshow Coming Soon)
Videos Linked in the Presentation
(New Videos Coming Soon)
Ionic - Search Vehicles
Search Vehicles - OPSCOM Enforce App
This article explains how to use the Search Vehicles function on the OPSCOM enforcement application. This feature is the primary tool for field personnel to look up vehicle information by license plate or VIN, verify parking permit status, and initiate enforcement actions. This guide is intended for operators of OPSCOM handheld units.
Using this Feature
The Vehicle Search function is a core component of the handheld application and does not require special configuration.
Connection Status Indicator A colored dot at the top of the search panel indicates the device's connection status:
-
Green Dot: The unit is connected to Wi-Fi or a cellular network (3G/LTE).
-
Yellow Dot: The unit is not connected. Searches can still be performed using cached data, but the information may not be real-time.
Performing a Vehicle Search
There are three methods for entering vehicle information: text input, voice command, and the device camera (LPR/OCR).
Text Search
-
On the Vehicle Search screen, tap the text field to activate the on-screen keypad.
-
Enter the full license plate number or Vehicle Identification Number (VIN).
-
Tap the Search button.
Voice Search
-
Tap the microphone icon to activate the voice recognition feature.
-
When the prompt appears, clearly speak the license plate number. The system will transcribe the speech into the search field.
-
Tap the Search button.
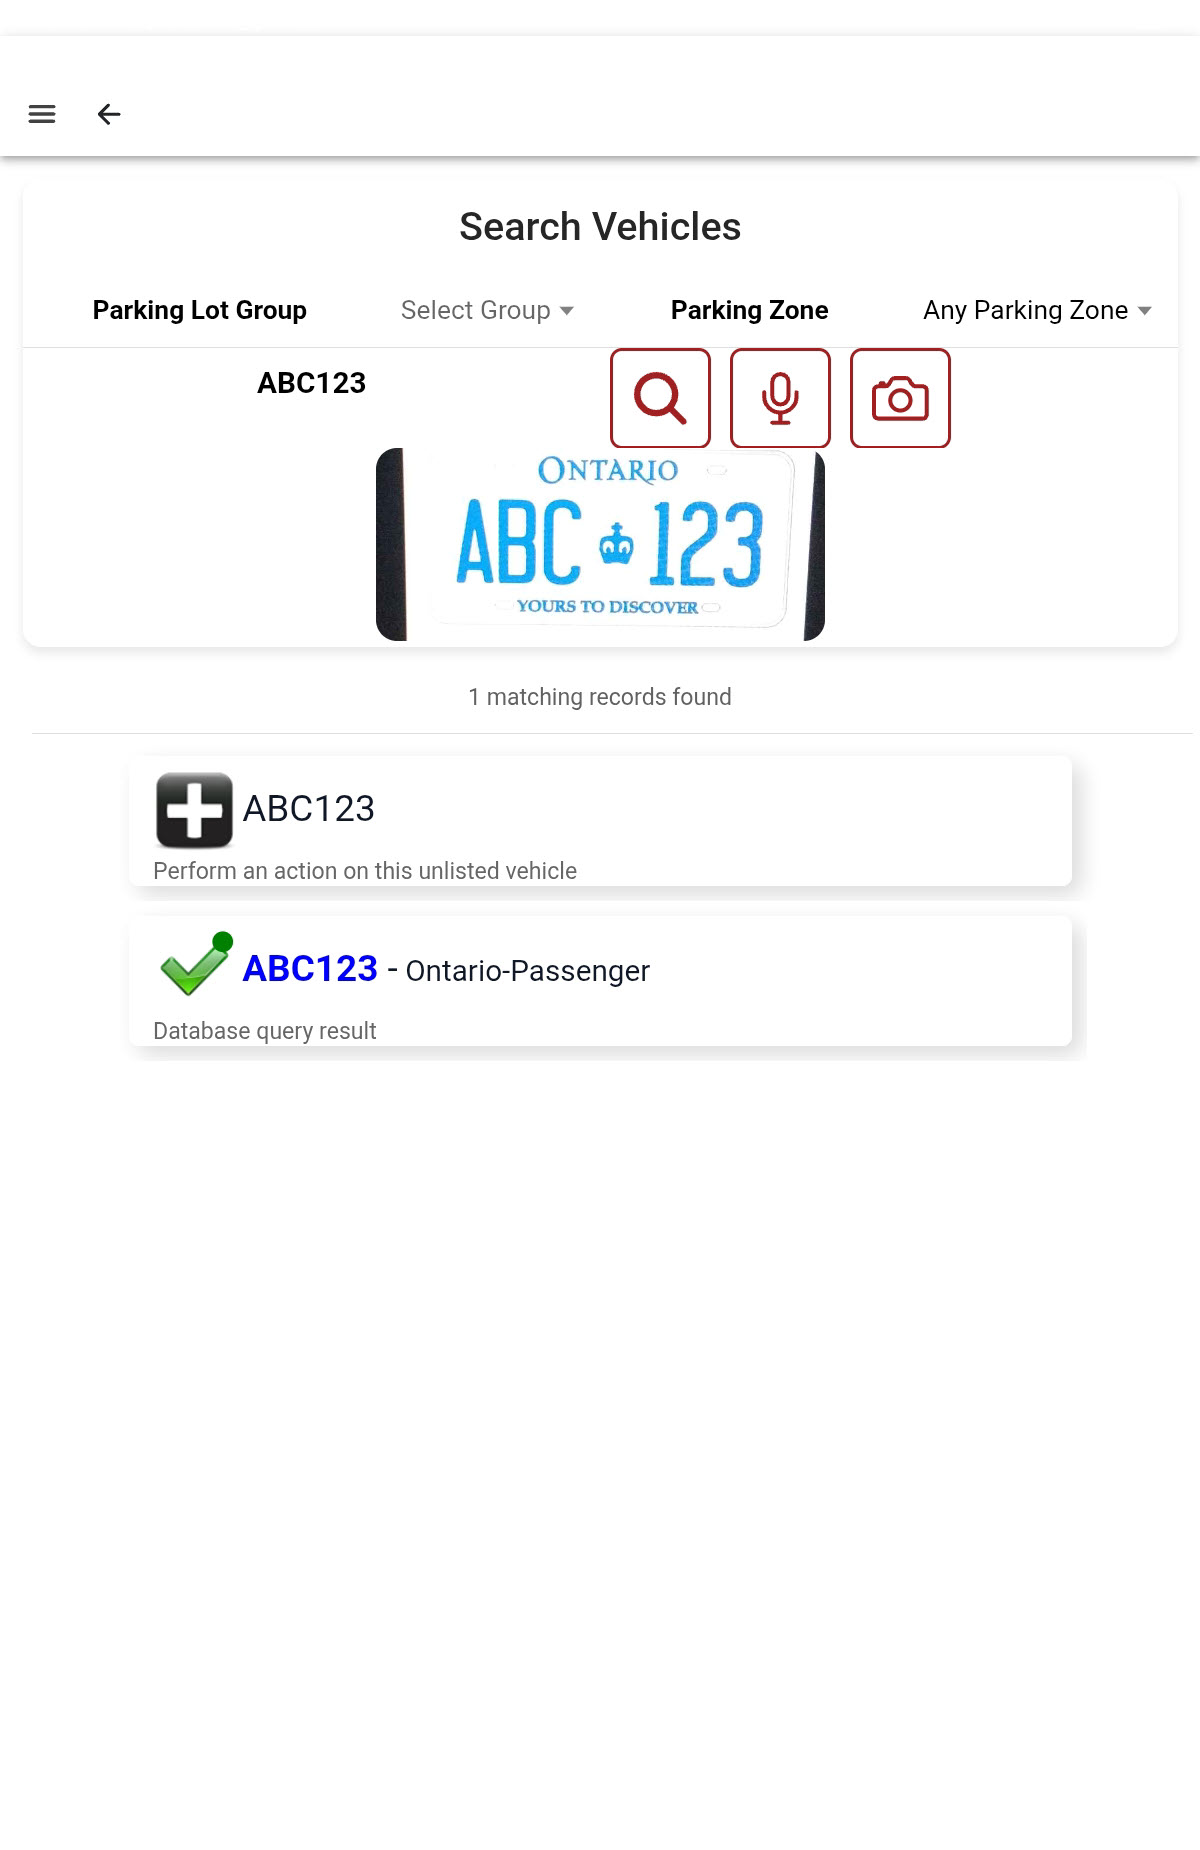
LPR/OCR Camera Search
-
Tap the camera icon to enter LPR (License Plate Recognition) search mode.
-
Position the device's camera so the vehicle's license plate is aligned within the on-screen rectangle.
-
Tap and hold the screen to capture an image of the plate.
-
The system will analyze the image and display a list of possible plate numbers.
-
Tap the correct plate number from the list to initiate the search.
Reviewing Search Results
After a successful search, the vehicle and permit details will appear below the search area. Tapping on the vehicle record expands a yellow ribbon, revealing available actions.
Available Actions & Buttons
-
Virtual Chalk: Tap this button to apply a virtual chalk to the vehicle, logging its current location and time for time-limit enforcement.
-
Issue Violation: Tap this button to proceed directly to the violation issuance screen for this vehicle.
-
Details: Tap this button to view a comprehensive screen with all permit and vehicle details.
You can also tap directly on the permit information displayed under the license plate for a quick view of its expiry details.
Best Practices & Considerations
-
Offline searches are possible thanks to the device's data cache, but always connect to a network when possible to ensure you are working with the most current data.
-
For best results with the LPR/OCR camera search, ensure the license plate is well-lit, clean, and fills as much of the alignment rectangle as possible.
-
For the most accurate voice search results, speak clearly in an environment with minimal background noise.
Search Vehicle Results - OPSCOM Enforce App
This article is a continuation of the Vehicle Search and explains how to interpret the results after looking up a vehicle. Understanding the information presented is crucial for verifying parking rights, reviewing a vehicle's history, and making informed enforcement decisions. This guide is intended for personnel using OPSCOM handheld units.
Understanding the Results Screen
After performing a search, the application presents detailed information in a multi-layered interface, starting with a summary and allowing you to access more specific details.
Results Summary
Immediately after a successful search, a list of potential plate matches is shown while a summary for the vehicles are displayed. This initial view typically shows the license plate, Province/State, and type of vehicle (passenger, commercial, etc.).
Quick Actions
Tapping on the vehicle record in the results list expands a More Details section, revealing more information on the make, model, color of car (if available), details on the violation history, and a set of quick action buttons.
[Image showing the More Details section with action buttons]
-
Chalk: Initiates the Virtual Chalking workflow for time-limit enforcement.
-
Violation: Proceeds directly to the Issuing a Violation screen for the selected vehicle.
-
Details: Opens a comprehensive screen with the vehicle's complete history.
Details
For a complete overview of a vehicle's record, tap the Details button. This screen provides an in-depth history organized into three distinct tabs, Current Permits, Violations, and Recent Chalk Records.
The Details screen is the central hub for all historical data related to a vehicle in the OPSCOM system. Reviewing the information on these tabs provides a complete picture before taking any enforcement action.
Current Permits
This tab displays a complete list of all current permits associated with the license plate. Each entry provides key information such as the permit type, its validity period (start and end dates), and the specific lots where it is valid.
Violations
This tab provides a historical log of all violations previously issued to the vehicle. For each entry, you can review the violation date, type of infraction, and its current status (e.g., paid, outstanding).
When reviewing a vehicle’s violation details, you will see two key summary numbers at the top. These two lines serve different—but critical—purposes for understanding enforcement policies.
1. All-Time Violations (Total Paid, Unpaid, and Warnings) - This count includes every non-spoiled violation the vehicle has ever received and will match the count in More Details on the main search results screen. This all-time total may be higher than the actual list of violations visible on the page. This is because the list is filtered by the Violation History on Handhelds setting (e.g., only the last 6 months), while this summary counts everything.
2. History Period Violations (Violations within the current window) - This count only includes violations that occurred within the date range set in System Settings > Violations > Violation History on Handhelds. Example: Your system may be set to boot a car after 5 violations. If your policy is to enforce this per year (last 12 months), this number tells you the relevant total (e.g., 3 violations in the last 12 months) even if the All-Time total is 10. This ensures officers apply policies correctly without counting ancient history.
Recent Chalk Records
This tab shows a history of all Virtual Chalking events for the vehicle. It serves as a log to track time-limit enforcement, displaying the date, time, and location of each chalking instance.
Best Practices & Considerations
-
Always review all three tabs in the Details screen to get a complete vehicle history before issuing a violation. A pattern of previous violations or chalks can provide important context for enforcement.
-
When checking the Permits tab, pay close attention to the valid dates and lot assignments for each permit to ensure the vehicle is compliant at the current time and location.
-
The accuracy of the data depends on the device's last synchronization. A green connection dot indicates you are viewing real-time information, while a yellow dot means the data is from the device's local cache.
Violations
Violations and Chalking
This article will discuss how to write violations, to either a person, or vehicle, and how chalking works in OPSCOM.
Violations
You can issue two (2) types of violations in OPSCOM: one is assigned to a person, the other is assigned to a vehicle, where the driver may not be known.
Chalking Violation
Chalking is a useful tool that can help quickly identify vehicles that are eligible for violations.
In order to issue virtual chalks to vehicles, which will let you know if a vehicle has moved since the last chalk, and how long ago it was chalked, making writing provable violations easy to do, without physically chalking cars.
- Go to Vehicle Search, search for the plate of the offending vehicle, and tap on Chalk.
- You will be asked to enter a plate province/state, and type (Passenger/Commercial/Government) and set a custom chalk grace period if desired, the default is controlled in system settings.
- After tapping Save, the vehicle's timer has been started, and you can come back later to get the violation.
If you would like to understand the purpose of virtual chalking more, see this article!
Person Violation
To issue a Person Violation, open the handheld app and log in to an account.
This must be done by a system administrator. If you need help with this step on the admin side, see this article.
You will need to know the person's name, and that they are registered as a user in our system to issue a person violation.
- From the main screen, tap on Person Search.
- Once you enter a name that is found in the system, tapping that entry will bring you to a violation entry screen. If there is no vehicle involved, select Private Property - Person. If a vehicle is involved, see the Vehicle Violation section below.
- You will need to enter ticket type, offence location, and the offence reason (or reasons, if multiple apply).
- You can now add files, such as photo or video evidence, and private (internal staff only) or public comments (user visible). When you are done, tap Save to issue this violation.
Vehicle Violation
To issue a vehicle violation, go back to the main screen, and tap on Vehicle Search.
In the search field, you can enter a known plate, or a plate that has never been entered before, and this plate will automatically be added to the vehicle data.
Searching a plate can bring a variety of result types:
This chart provides a reference for symbols and sounds you'll see returned from search:
|
Icon |
Audio Notification |
When/Why Is This Combo Used? |
| Black Cross | None |
Plate is not found in database. Tap to add new vehicle. |
|
Red X (with Red permit pill) |
None |
Plate found in database, but no valid/active permit or partially valid (prior to chalking) or plate was chalked (manually or by LPR), grace period is expired, but still no valid permit. Eligible for violation/ticket |
|
Green Check (with Green permit pill) |
Bing (LPR) |
Plate found in database, with at least one valid and active permit or plate was chalked, but a valid permit was added later. |
|
Green Check (with Red dot) |
None |
Plate found in database, has permit(s) but vehicle is NOT active. (Rare) |
|
Notification (Red !) |
None |
Plate has a specific warning for Do Not Ticket or Tow (DNTT) |
|
Notification (Blue !) (with Blue permit pill) |
None |
Plate found in database, has a permit that is valid but is parked in the wrong lot/zone. |
|
Chalk (Map) |
Swoosh (LPR) |
Plate has been chalked (manually or by LPR), grace period not expired |
|
Flag |
Buzz |
Indicates that there has been an alert triggered on either a person or a vehicle. |
In the below picture, we search for the plate TOMA92, and get a Map and Pencil icon, indicating a past chalk, and we can see the vehicle is 11 minutes over the 15 minute grace period, without a valid permit. This vehicle is eligible for a violation.
To issue a violation to the vehicle that over stayed the grace period, tap the Violation button after searching the vehicle plate. You will need to enter ticket type, offence location, and the offence reason, or reasons if multiple apply, just like with a person violation. After entering the ticket information, you will need to enter more vehicle information, such as province/state, and plate type (Passenger/Commercial/Government), and enter any other known information about the vehicle. This time, only a vehicle is required, if the driver identity is not known. Go to the people tab, and tap on the toggle for Failed To Identify. If the identity is known, enter it like normal.
You can now add files, such as photo or video evidence, and private (internal staff only) or public comments (user visible). When you are done, tap save to issue this violation.
Explanation of the Front of the Ticket/Warning
| Ticket Number | This is a system assigned number that identifies each individual violation/warning. |
| Date | This is the date that the violation/warning was issued on. |
| Ticket Type | This identifies the type of violation that occurred (broad range category). |
| License Plate | This is the license plate number for the vehicle that incurred the violation. |
| Province | This is the province that the license plate is issued in. |
| Offense Type | This identifies the specific violation that occurred. |
| Location | This identifies the location where the violation occurred. |
| Writer | This is a system assigned number that identifies the enforcement officer that issued the violation. Each enforcement officer has their own unique number and can be verified by administrators. The writer is identified by a unique identifier to provide security to the enforcement officer. If you require more information about the ticket writer you can search the violation on the admin side and get an actual name for the person who wrote the ticket. |
| Fine | This is the amount owed for the particular violation. Note, on the warning ticket the amount is followed by "*Warning". This indicates that the amount on the ticket is not owing, but this is the amount that would be due if a ticket for the same violation was issued. |
| Towing | This is the amount due if the vehicle that incurred the violation had to be towed. |
| Comments | This section includes any additional notes that the enforcement officer wants to include. |
Explanation of the Back of the Ticket/Warning
The back of the ticket provides details about the organization that issued the ticket and the policies and procedures regarding the ticket. The back clearly identifies how the violator can pay or appeal the ticket with a section for the violator to identify themselves and sign off on the ticket. The back also identifies where to find additional information on the organization and the office hours.
Reprint Violation
Reprinting Tickets
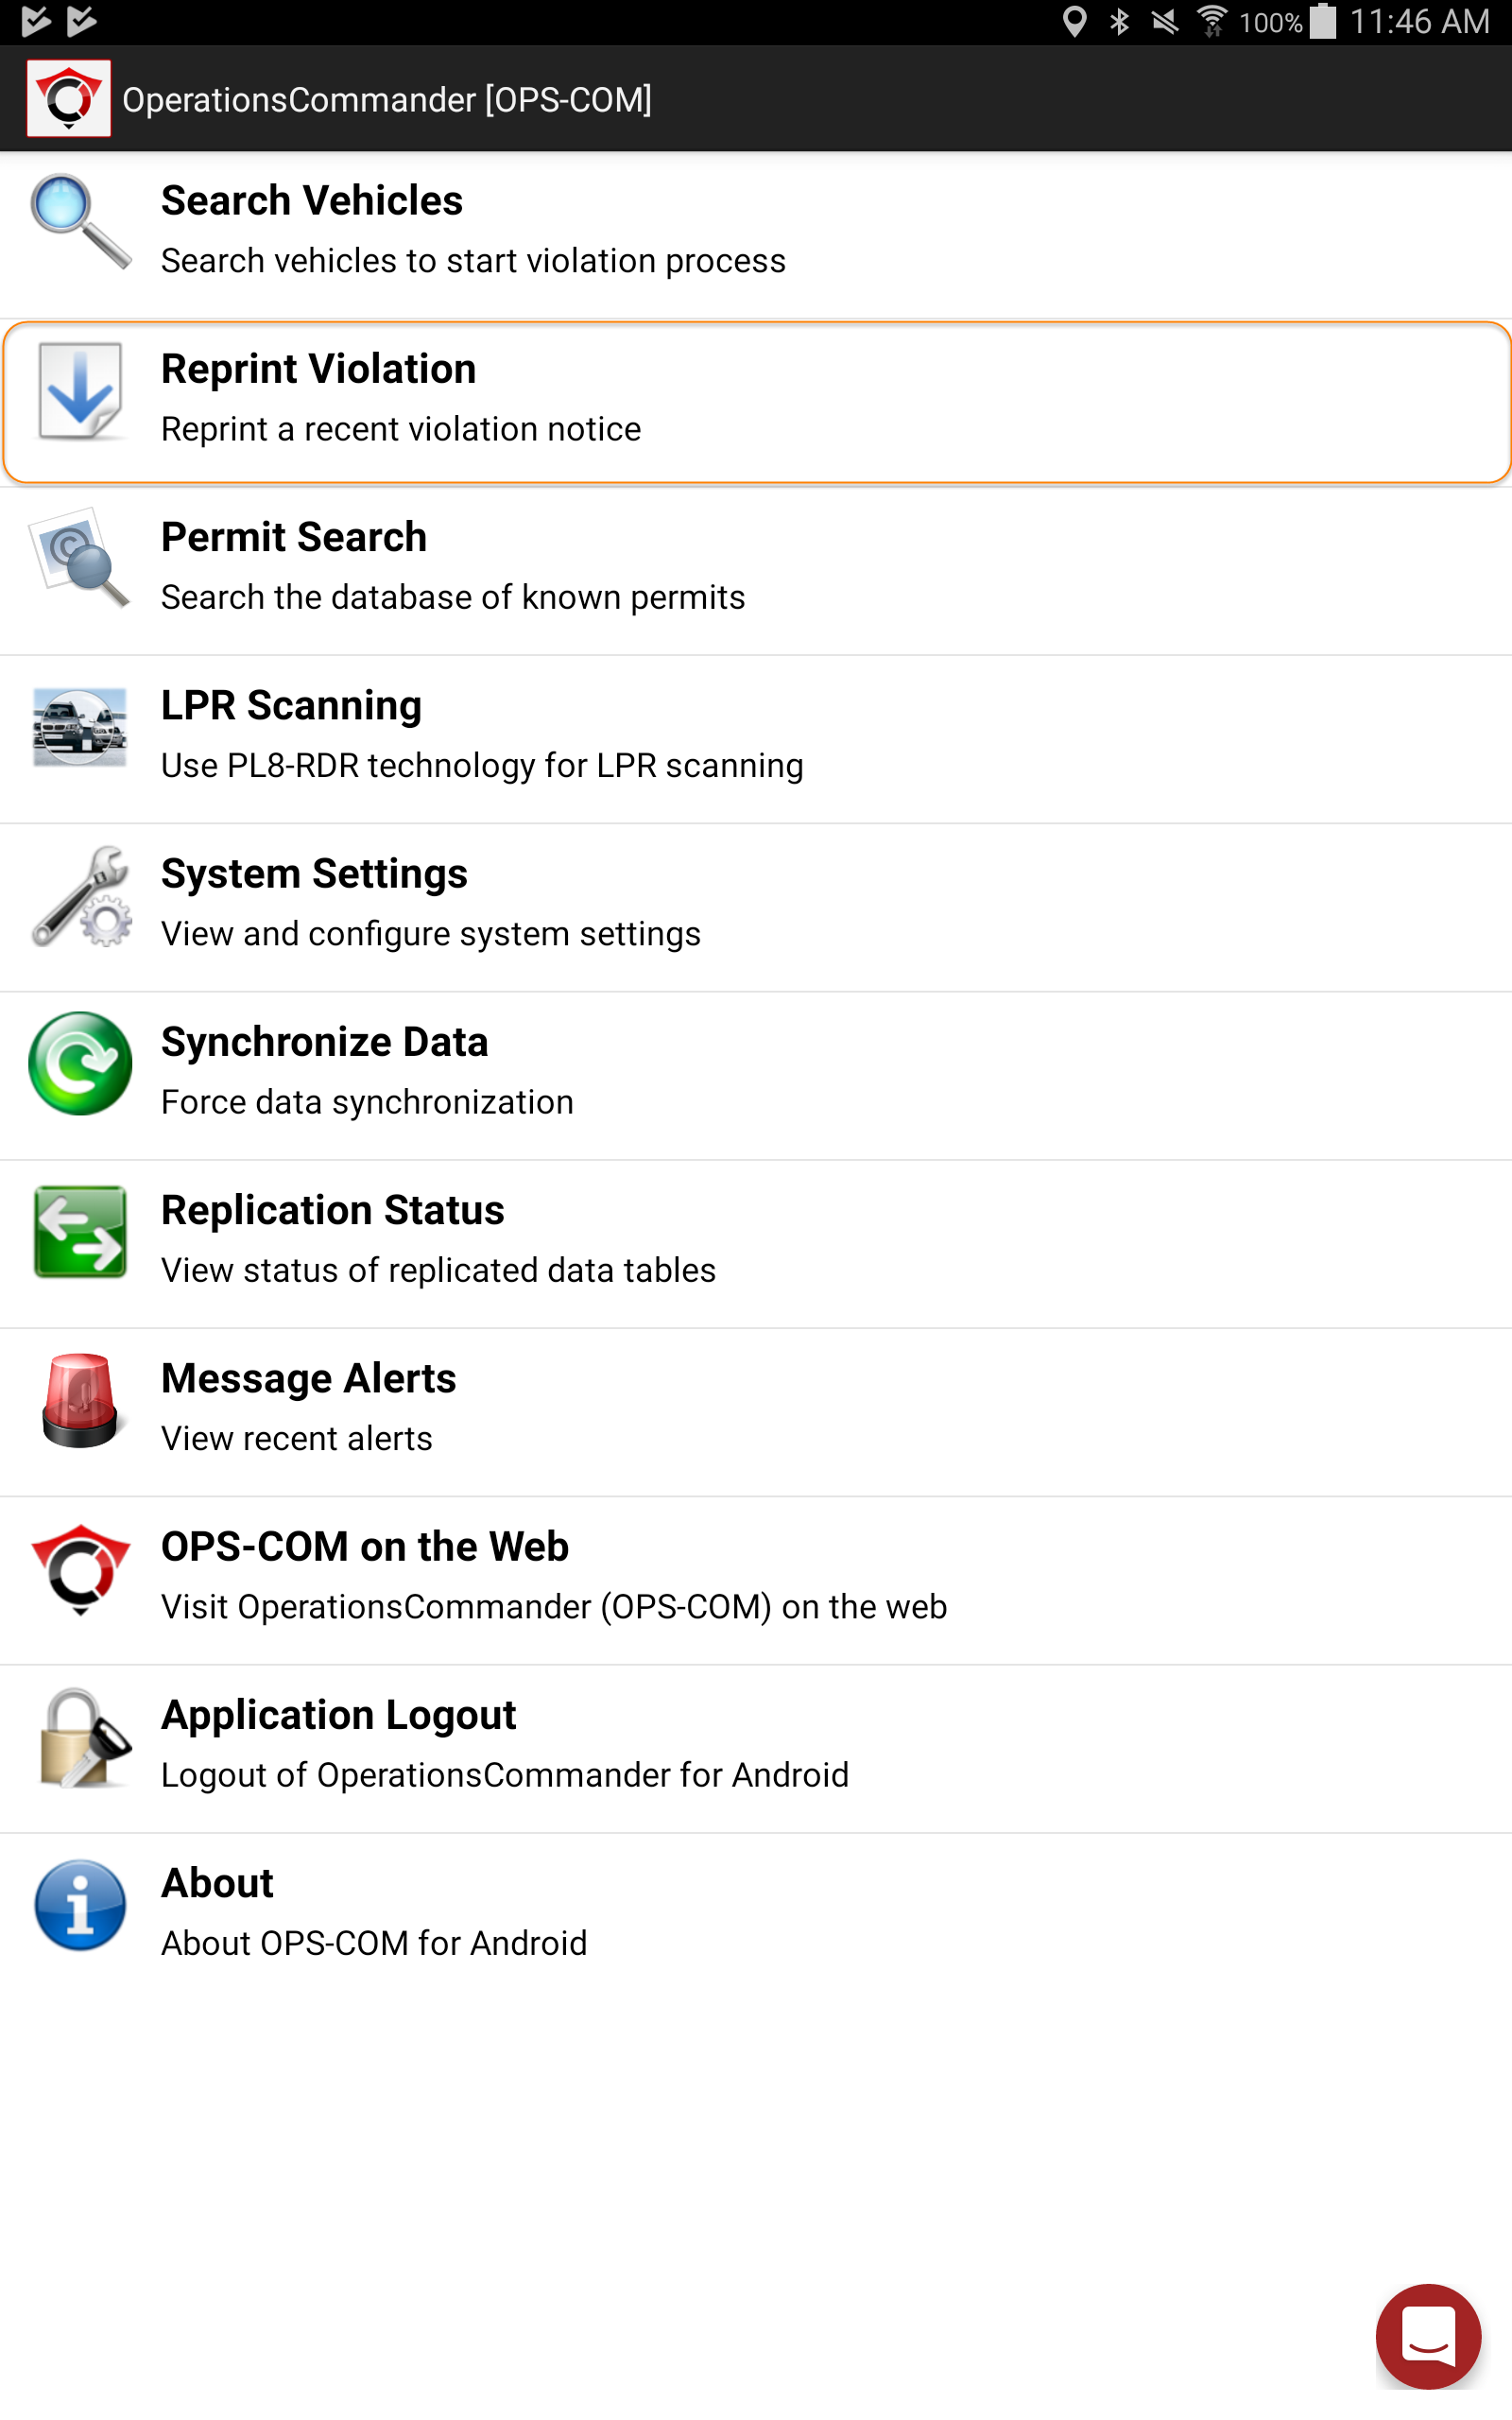
Tap on the second option in the main menu for Reprint Violation.
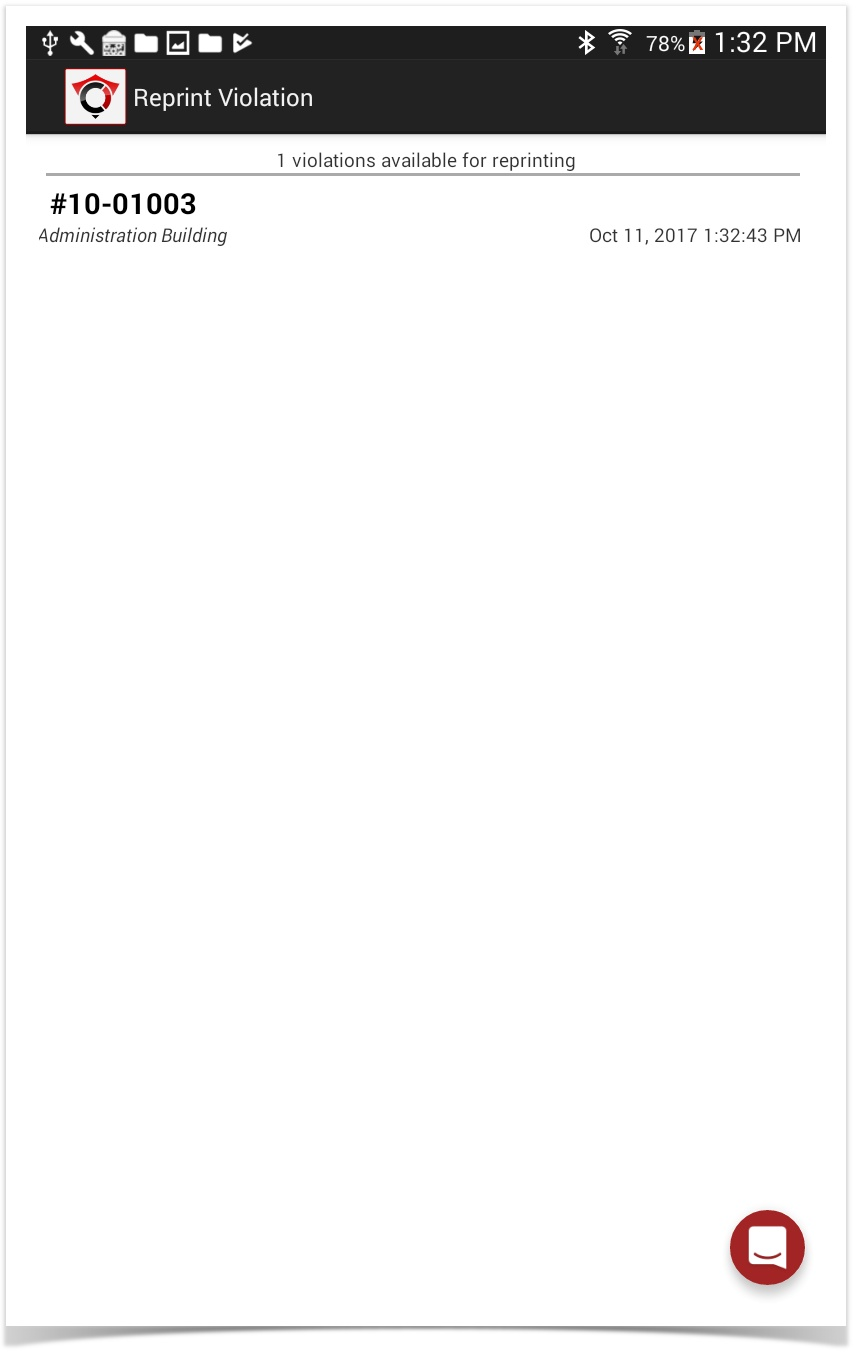
This will take you to the Reprint Violation Notice screen. Tap on the violation that you want to reprint and follow the printer instructions.
Signature Capture on Violation Entry
The Signature Capture on Violation Entry feature allows parking enforcement officers to capture a physical signature directly on their handheld device when issuing a ticket. Its primary purpose is to provide proof of receipt and interaction by saving an optimized image of the signature directly to the violation record. This article is intended for OPS-COM administrators to help them configure the application settings and train field officers on this functionality.
Setup and Configuration
This feature requires configuration directly within the handheld application settings to determine if the signature workflow is mandatory or optional for your field staff.
Handheld Configuration:
Using this Feature
Administrators can use the following instructions to guide parking enforcement officers through capturing a signature in the field using their handheld units.
Capturing a Signature
-
Perform a plate search and open a vehicle's violation entry screen.
-
Tap the pencil icon located on the fifth tab of the top segment bar to open the signature panel.
-
Tap the Open Signature Pad button to launch the full-screen modal.
-
Have the individual use a single finger to sign their name on the blank canvas.
-
Tap the Confirm button to lock in the signature.
-
Review the thumbnail preview of the signature on the tab to ensure it is legible.
-
Tap Save to complete the ticket issuance process.
Note for Android users: If the signature fails to register on the first attempt on an Android device, quickly Double Tap the button to force the save.
Visual Cues and Status Indicators
-
Thumbnail Preview: Once a signature is successfully confirmed, a small image preview will appear directly on the signature tab to verify the capture was successful.
If the Require Signature setting is active and an officer attempts to save the violation without capturing a signature, the application will block the save action. The pencil icon tab will immediately turn red, indicating to the officer that a required field is missing.
Best Practices and Considerations
-
Train staff on the confirmation workaround: Ensure enforcement officers are aware that they may need to Double Tap the Confirm button on certain Android devices if the signature fails to register immediately. Training officers on this quick workaround prevents frustration and delays during live field enforcement.
-
Establish clear enforcement policies: Organizations should develop a clear business rule for when a signature should be collected if the mandatory setting is toggled OFF. Since the signature tab remains available even when disabled as a strict requirement, officers should know which specific violation types or situational encounters still warrant attempting to get a signature.
-
Understand data syncing: Captured signatures are saved as highly optimized PNG files (averaging approximately 25KB). These files automatically sync back to the admin backend as image attachments on the violation record for future auditing, reporting, and appeals processing.
Virtual Chalking Explanation
What is E-Chalking (Virtual Chalking) in OPSCOM?
- Virtual chalking, or e-chalking is an electronic process that mirrors how an officer would manually chalk a vehicle's tire, in order to see how long they have been parked.
- Virtual chalking creates a Time-Stamped image, of both the license plate & the entire car, in order to track how long they've been parked
- Virtual chalking provides an image that can be attached to the violation and is acceptable in a court-of-law, provided the date/time stamp is visible & clear. The chalked image is part of the violation, unless the patrol officer deletes the image.
- When LPR software is capturing plates, officers can simply click "Virtual Chalk" to create/save the image
Why "Chalk" a Vehicle?
There are some situations where chalking is very useful, for example; If a vehicle is parked and the owner is going to purchase a permit, there can be a grace period to allow the client to obtain the permit and return to the vehicle to display the permit. Alternately, in areas where parking is provided on a timed basis where a vehicle can park free for 2 hours, the officer can virtually chalk the vehicle on a first pass earlier in the day and then be able to check the vehicle later in the day to determine if it has been parked longer than the permitted time frame.
Chalking vehicles manually is time consuming, so being able to virtually-chalk vehicles makes a time-efficient solution for a necessary aspect of parking management.
Chalk records stored with a violation help when dealing with Appeals as a time-stamped image is available as "proof" of the infraction.
For a guide on how to "Chalk" a vehicle on the handhelds, click here
NOTE:
Chalking can be done in a couple of ways. If you are photographing the plate to read it through character recognition the system automatically captures a close up image of the plate as well as a contextual image of the full back of the vehicle. Both are time stamped.
If you enter in a plate via text or voice when chalking you will want to take a contextual image so that you record the time stamp.
The same is true when you actually capture the plate a second time and then issue a violation. It's advisable to take a couple images at least, plus you have the time on the ticket that the violation was written so using both methods (timestamp and time on printed ticket) you can calculate the time the vehicle was parked. There is no limit as to how many images you can take.
Plate Capture using Hand Held
OPSCOM supports optical character recognition of plates, which allows you to search plates using the camera on your device.
Open the Vehicle Search page in the Ionic handheld app, and tap the camera icon instead of typing. Make sure to allow access to the devices camera, a notification will pop up asking about this. Once allowed, the camera opens with a green box in the middle of the screen, this box is where the license plate will go in the camera's field of view. Once the plate and box are lined up, tap and hold the screen for 3 seconds to save the read.
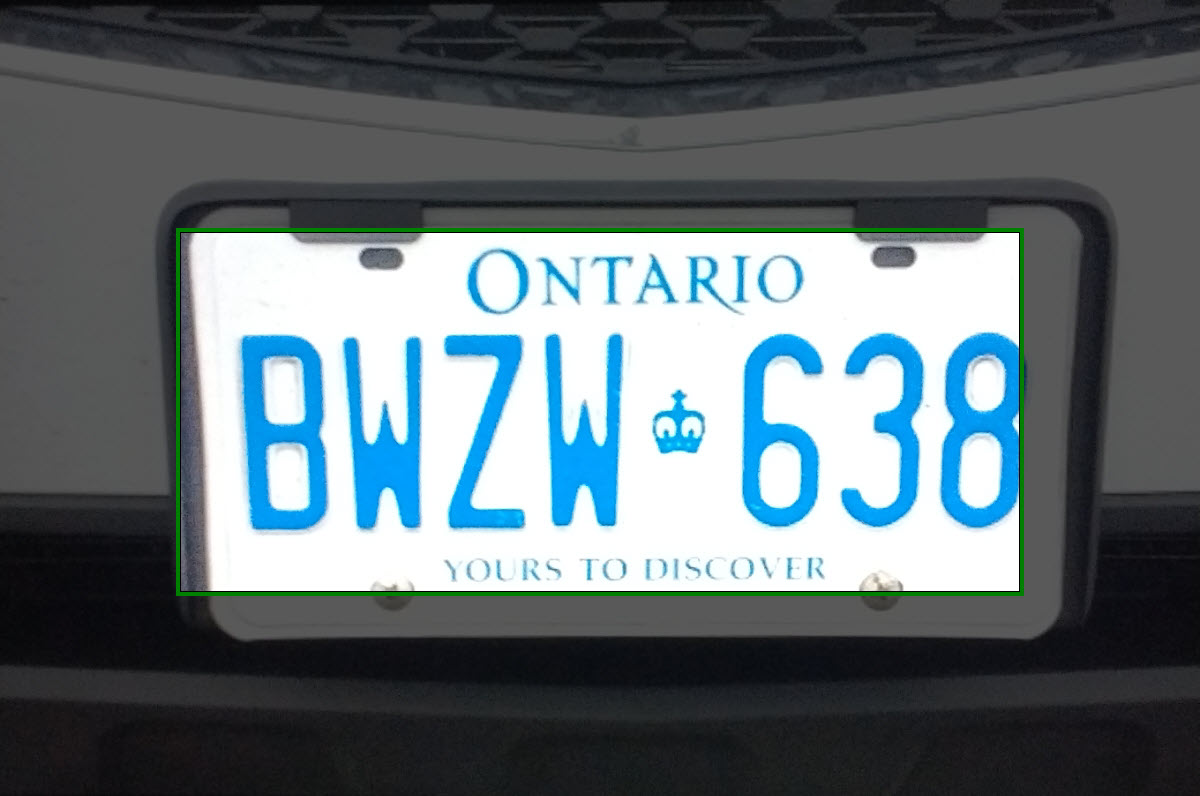
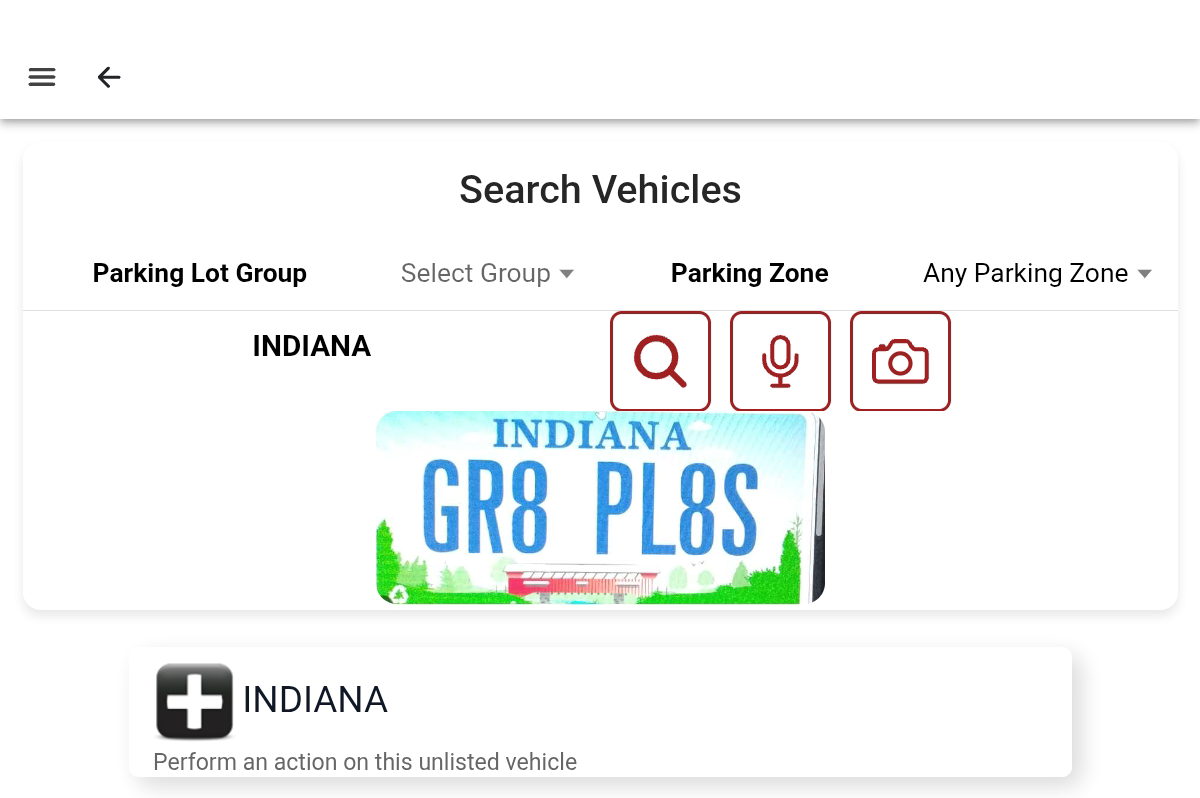
In the below picture, the camera captured the text at the top of the plate, in this case the state, Indiana.
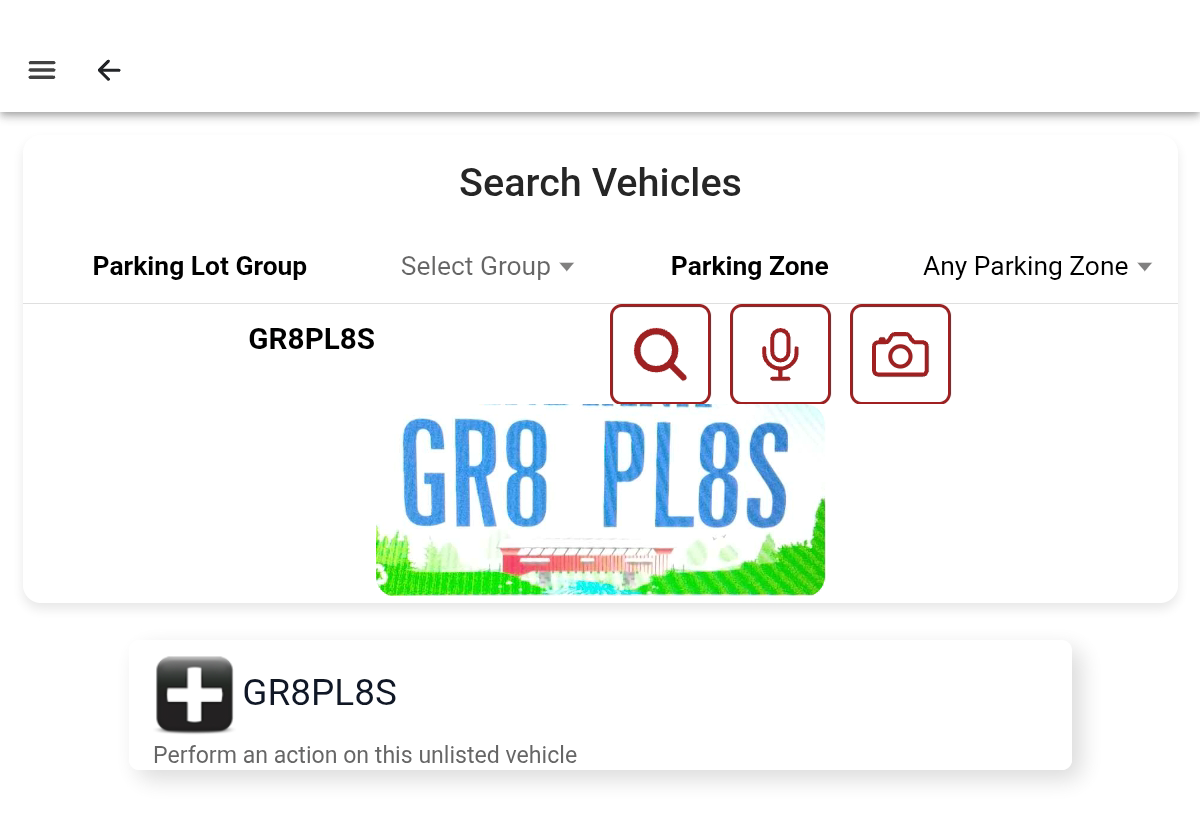
Try again, but get only the plate number in the picture. See the picture below, where the read is successful.
Printers & Printing
Star Micronics Printer Configuration
The Star Micronics Printer Configuration allows administrators to connect mobile printers to Android or iOS devices for use with the OPSCOM Enforce app. This setup enables enforcement officers to print tickets directly from their handheld devices, streamlining the violation issuance process.
Setup and Configuration
Before using the printer with the OPSCOM Enforce app, the hardware must be paired with the handheld device and set to the correct emulation mode.
The Star Micronics T300i or higher is recommended, as older models may not be fully supported.
Changing Printer Emulation
Emulation determines how the printer communicates with the operating system. The printer must be set to the specific mode required by your device type.
-
Open the paper cover of the printer.
-
Press and hold the POWER and FEED buttons simultaneously.
-
Release the buttons once the red error lamp flashes 5 times and the screen indicates Setup Mode.
-
Close the paper cover.
-
Review the status slip that automatically prints:
-
For Android: The slip must display Emulation = ESC/POS.
-
For iOS: The slip must display Emulation = StarPRNT.
-
-
Repeat these steps if the status slip does not show the correct emulation for your device.
Bluetooth Pairing
-
Power on the Star Micronics printer.
-
Navigate to Settings then Bluetooth on the handheld device.
-
Ensure the Bluetooth toggle is enabled.
-
Select the Star Micronics printer from the list of available devices.
-
Enter the PIN to pair the device.
Using this Feature
Once the hardware is paired and configured, it must be linked within the application settings to enable printing functionality.
Connecting in the Enforce App
-
Open the OPSCOM Enforce app and log in.
-
Tap the Menu icon at the top left of the screen.
-
Tap App Settings.
-
Scroll to the Printer Settings section.
-
Tap the Printer Driver drop-down menu and choose Star Micronics.
-
Tap Saved Bluetooth Printer to initiate a scan for nearby hardware.
-
Tap the printer name (typically SM-T300) or the specific serial number from the scanned list.
-
Tap the Emulation drop-down menu and select the mode matching your device:
-
Select StarPRNT for iOS devices.
-
Select EscPosMobile for Android devices.
-
-
Tap the Menu button and tap Home to return to the main screen.
The Enforce app interface may vary slightly between Android and iOS versions, but the printer configuration logic remains consistent across both platforms.
Best Practices and Considerations
-
Hardware Compatibility: Ensure you are using a Star Micronics T300i or higher, as older models may not be supported by the Enforce app.
-
Battery Management: Ensure the printer is fully charged before the start of a shift to prevent connection drops during ticket issuance.
-
Paper Checks: Always verify paper levels before leaving the office, as the printer will not alert the Enforce app when it is out of physical media.
-
Connectivity Issues: If the printer stops responding, toggle Bluetooth off and on in the device settings and verify that the printer has not entered sleep mode.
Zebra Printer Configuration
The Zebra Printer Configuration allows administrators to set up and connect Zebra mobile printers to Android or iOS devices for use with the OPSCOM Enforce app. This integration streamlines parking operations by enabling the direct printing of violation tickets from handheld units.
Setup and Configuration
Configuring a Zebra printer requires a one-time setup involving the official Zebra utility and the Enforce application to ensure consistent communication between the hardware and software.
Printer Discovery and Utility Setup
-
Power on the Zebra printer.
-
Uninstall and re-install the OPSCOM Enforce app on your handheld device to ensure a clean configuration environment.
-
Download and install the Zebra Printer Setup Utility from the app store.
-
Open the Zebra Printer Setup Utility.
-
Tap Discover Printers.
-
Tap and hold the Feed button on the physical printer until the Bluetooth symbol appears on the printer display, then release.
-
Tap the printer once it appears in the Discovered list.
-
Wait for the utility to retrieve settings; the printer is ready when the status displays Ready at the top of the screen.
Connectivity and Media Settings
-
Tap Connectivity Settings then tap Bluetooth.
-
Confirm that the Bluetooth and Discoverable switches are enabled.
-
Verify the Friendly Name (defaults to the serial number) and tap Next.
-
Tap Next on the second screen to keep default settings, then tap Apply.
-
Tap Media Settings and tap Media Settings again on the following page.
-
Follow the prompts to set the correct paper size for your rolls and tap Apply.
-
Tap Print a Test Label from the main Media Settings page to verify the hardware configuration.
Using this Feature
After the printer is configured in the Zebra utility, it must be linked to the Enforce app to be used for ticketing.
Connecting in the Enforce App
-
Open the OPSCOM Enforce app and log in.
-
Tap the Menu icon at the top left and tap App Settings.
-
Scroll to the Printer Settings section.
-
Tap the Printer Driver drop-down menu and choose Zebra.
-
Tap Saved Bluetooth Printer to scan for the device.
-
Tap your printer name or serial number when it appears in the list.
-
Tap Save when prompted with Save Printer?.
-
Tap the Menu icon and tap Home to begin using the application.
Best Practices and Considerations
-
Clean Installation: It is highly recommended to uninstall and re-install the Enforce app before setting up a new Zebra printer to prevent legacy configuration conflicts.
-
Bluetooth Visibility: If the printer does not appear during discovery, ensure you tap and hold the Feed button until the Bluetooth icon is visible on the printer's LCD.
-
Naming Conventions: Consider changing the Friendly Name in the Zebra utility to a unit number (e.g., "Enforcement Unit 01") to make it easier for officers to identify their specific printer in the app.
-
Media Calibration: If the printer skips labels or alignment is off, return to Media Settings in the Zebra utility to re-run the calibration process.
- Misprint Issue: If the printer outputs code (such as ^XA, ^FO, etc.) instead of the rendered label, it means the printer is receiving raw ZPL (Zebra Programming Language) data and treating it as text. Toggling the setting for "Line Mode" or setting another language (like EPL or XML) instead of ZPL should fix this issue.
Ensure the printer remains powered on and within close proximity to the handheld device during the "Applying Settings" phase to avoid corrupting the printer firmware.