Content & Design
- Email Headers and Footers
- Email Templates
- Translations
- User Portal Branding and Setup
- Pages and Content Blocks
- Templates and Design
- Form 11 Shortcodes
- User Information Shortcodes
- News Items (RSS Feed)
- Changing the Organization Name Displayed to Parkers
Email Headers and Footers
The Email Headers and Footers feature allows administrators to define and manage reusable layout components for system-generated emails. Its primary purpose is to ensure consistent organizational branding, provide essential contact information, and apply uniform styling across all automated email communications. This article is intended for OPSCOM administrators responsible for managing system configuration and visual design.
Setup and Configuration
This feature is a core administrative tool used to design the visual wrapper for outbound system emails.
Admin Side: Administrators must have the appropriate system role permissions enabled to access the contents and design configuration menus.
Using this Feature
Administrators can use the following instructions to navigate the layout list and edit individual email components.
Editing Email Layout Templates
-
Hover over System Configuration, then Contents & Design, and click Email Headers & Footers.
-
Click the Toggle Templates button to display the various sections of your email layouts.
-
Locate the specific section you wish to modify (e.g., Header, Footer, or Style) and click the Edit button next to it.
-
Add or modify text, insert images such as your organization's logo, or include inline styles directly within the HTML editor.
-
Click the Save Changes button to finalize your updates.
-
Click the Back button to return to the template list and edit other sections as needed.
Available Actions and Buttons
-
Toggle Templates: Click this button to reveal the underlying layout sections available for editing.
-
Edit: Click this button to open the HTML editor for a specific layout component.
-
Save Changes: Click this button to commit your modifications to the system database.
-
Archive Template: Click this button located in the top right corner of the editor to retire a layout template that is no longer needed.
-
Back: Click this button to exit the editor and return to the main layout list.
The Email Template Layout List page acts as a central repository for the individual components that wrap your messages. Remember that changes made to these foundational layout templates will globally and immediately affect all system email templates that are configured to use them.
Best Practices and Considerations
-
Maintain consistent branding: Use email headers and footers to consistently display your organization's logo, branding colors, and contact information. Uniform branding creates a professional and cohesive user experience across all automated communications.
-
Provide essential information: Ensure your footer contains crucial information such as your organization's name, website, and a general contact email or phone number. This gives users a clear path to reach out if they have questions about their parking portal activity.
-
Design for mobile responsiveness: Consider how your headers and footers will appear on mobile devices when adding content and styling. Use responsive design principles or simple layouts to ensure the emails are easily readable on smaller screens.
-
Test your changes: Always test the email templates that use these layouts after making any modifications. Send a test email to yourself to ensure everything renders correctly in various email clients before relying on the system to send them to active users.
-
Manage complex inline styling: Coordinate with OPSCOM Support for custom CSS in the Style template if you require complex or site-wide styling changes. While the provided editor allows for inline HTML styles, global CSS changes are often better managed directly at the template level by our team.
Email Templates
The Email Templates feature allows administrators to customize the content and appearance of automated emails sent by the system. Its primary purpose is to enable the creation of dynamic, informative messages using shortcodes and a smart editor, ensuring clear and consistent communication with portal users. This article is intended for OPS-COM administrators responsible for managing system communications and visual design.
Setup and Configuration
This feature is a core administrative tool used to manage outbound email content.
Admin Side: Administrators must have the appropriate system role permissions enabled to access the contents and design configuration menus. If your organization has multiple languages installed, you can click the Create button from the main template list to build localized versions of your messages.
User Side: This feature is strictly a backend administrative tool. End-users interact with the results of this configuration when they receive automated emails (e.g., password resets, appeal updates) in their personal inboxes.
Using this Feature
Administrators can use the following instructions to navigate the template list, edit default automated messages, and create custom templates for manual communications.
Editing Default Email Templates
-
Hover over System Configuration, then Contents & Design, and click Email Templates to view the active list.
-
Locate the specific template you wish to edit in the list.
-
Click the Edit button next to the template to open the dedicated editor interface.
-
Make the desired changes to the available fields and content areas.
-
Click the Save button to apply the changes.
Available Configuration Fields
When editing an email template, administrators must configure the following fields:
-
Label: Enter a descriptive name to easily identify the email template within the system's list.
-
Type: A non-adjustable value that indicates the specific purpose or system trigger for this email template (e.g., "Appeal Submitted," "Password Reset").
-
Language: Select the appropriate language for the template if your system supports options like French or English.
-
Layout: Select a pre-defined layout that surrounds your message. Layouts dictate your email header, footer, and overall styling.
-
Subject: Enter the exact text that will appear as the subject line of the email message.
-
HTML Content: Write the main body of the message here. This smart editor supports rich text formatting, the insertion of images, and the use of shortcodes to create visually appealing emails.
-
Text Content: Enter a plain text version of the message. This serves as a fallback for strict email clients that do not render HTML. It does not support shortcodes or any formatting.
Using Shortcodes
Each email template has a specific set of available shortcodes that allow you to dynamically insert user or event information into your message.
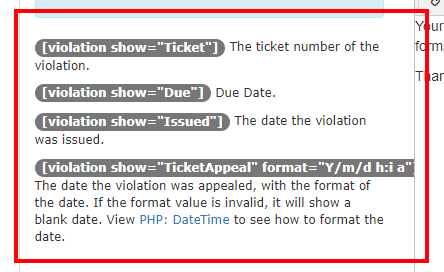
The shortcode tokens are typically displayed on the left side of the template editor. You can insert these directly into the HTML Content editor on the right side. For example, the template for an appeal might offer [ticket_appealed_date] or [ticket_number]. The system automatically replaces these shortcodes with the appropriate information when the email is generated and sent.
Creating and Using Custom Email Templates
Administrators can create and store frequently used emails that are not tied to specific system triggers. These templates automatically populate the email body when manually drafting a message to a user.
-
Click the Create button on the main templates page.
-
Enter a descriptive name into the Label field.
-
Compose the message using the HTML Content and Text Content fields.
-
Click the Save button.
-
Navigate to the compose email page to draft a manual email to a user.
-
Select your new template from the Load Template drop-down menu to automatically populate the email contents.
-
Complete any highlighted required fields in the interface before clicking the Send Email button.
Unlike system-defined default templates, custom templates include a Delete button on their configuration page, allowing you to quickly remove them from the system when they are no longer needed.
Best Practices and Considerations
-
Maximize the use of shortcodes: Utilize shortcodes fully to make your emails dynamic, personalized, and informative. Automating data entry reduces manual effort and prevents potential typographical errors in critical communications.
-
Maintain consistent branding: Use email layouts configured in the Email Headers and Footers section to maintain consistent branding across all system-generated emails. Consistent logos, colors, and contact info create a professional appearance.
-
Populate both content sections: Always ensure both the HTML Content and Text Content sections are populated and convey the message clearly. This guarantees compatibility for all email clients, even those that strip out HTML formatting.
-
Test all templates after editing: After making changes to an email template, send a test email to yourself or a test account. Verify that all shortcodes are rendering correctly, the formatting behaves as expected, and the message is clear.
-
Manage language-specific templates carefully: If your system supports multiple languages, ensure you create and maintain separate templates for each language. When using the Load Template feature for manual emails, remember that custom templates display for all users regardless of the selected language, so ensure the correct version is chosen before sending.
Translations
The Language Translations feature allows administrators to manage multi-language support and customize specific terminology displayed across the user portal. Its primary purpose is to ensure that all user-facing text, labels, and system messages are accessible and align perfectly with your organization's local terminology (e.g., changing the word "ticket" to "citation"). This article is intended for OPSCOM administrators responsible for managing portal content and localization.
Setup and Configuration
This feature is a core administrative tool used to dictate the text displayed on the user-side portal.
Admin Side: Administrators must have the appropriate system role permissions enabled to manage language settings and edit translations.
-
Hover over System Configuration, click Content & Designs, then Translations to access the Installed Languages page.
User Side: The translation configurations directly control the language options and specific wording available to end-users navigating the parking portal.
When reviewing the translation list in the backend, translations displayed in black text are active on the user side and can be freely changed. Translations displayed in red text are located on the admin side and are not currently supported for localization; they will remain in English until admin-side translations are fully supported.
Using this Feature
Administrators can use the following instructions to add new languages, create localized sub-languages, and manually edit specific terminology across the system.
Installing and Adding Languages
-
Install Default Languages: If base languages like English or French are available but not yet installed, you can install them directly to load a complete preset translation template with a defined Name and Locale.
-
Add Custom Languages: Click the Add Language button to bring up a modal. Enter a custom label and locale, then click Save Changes. The label identifies the translation throughout the site, while the locale is used for system identification.
-
Enable or Disable Languages: Toggle the switch under the Enabled column on the Installed Languages page. Disabling a language immediately removes it as a selectable option for end-users on the portal.
Adding Sub-Languages
Sub-languages allow you to support regional variations (e.g., American English vs. British English).
-
Ensure the primary "main" language is already created and installed.
-
Click the Add Language button.
-
Enter the existing main locale, followed by an underscore
_, and the sub-language identifier (e.g., enteringen_usfor American English). -
Click Save Changes. The sub-language will automatically inherit the translations set up on the main language.
Editing Translations and Terminology
The translator is not just for foreign languages; it is essentially a list of code terms and their corresponding display text, allowing you to easily replace local terminology (e.g., changing "ticket" to "citation" everywhere on the portal).
-
Click Edit Translations next to a language.
-
Enter a specific word or component (e.g., "permit" or "ticket") into the search bar at the top right to filter the list.
-
Click the specific text box for the term you wish to modify and type in your preferred localized text.
-
Click away from the input field. The translation will highlight in yellow to indicate an unsaved change, and the number of affected records will display at the bottom of the page.
-
Click the Save Changes button to apply the text updates across the system.
Creating Templates and Messaging for New Languages
When you create a brand new custom language, it will not automatically rely on the default templates and system messaging set up for previous languages. They will appear blank until configured.
-
Hover over System Configuration, click Content & Designs, then Templates & Design.
-
Click Toggle Templates for the templates currently being used.
-
Click the Create button to add the new template for your language, or click Edit on an existing language to copy its text over to the new one.
-
Hover over System Configuration, click Content & Designs, then System Messages.
-
Click the Edit button next to an individual message, select your new language, and type out the localized translation.
Best Practices and Considerations
-
Use the Token language for troubleshooting: Use the "Token" language on the user side to easily identify exactly where a translation exists so it can be changed. To do this securely, navigate to a user's profile on the admin side and click the Login as User button. Switching to the Token language reveals the backend code names for every text element on the screen. Regular users cannot access the Token language.
-
Establish the main language first: You must create the main language first before creating any related sub-languages. If the main locale is missing, the sub-language will fail to inherit the correct text and will default back to standard English.
-
Protect custom language data: Be aware that deleting a custom language permanently removes its data, requiring OPSCOM support to recover. While base languages like English and French can be easily re-installed, custom entries cannot. Note that deleting a main language will not delete its associated sub-languages.
-
Leverage bulk terminology updates: When editing terminology to fit local phrasing, update all instances of the word before saving. Searching for a term like "ticket" will pull up all translatable instances (e.g., Manage Ticket Categories, Pay Ticket). Editing them all at once ensures complete consistency across the user portal.
User Portal Branding and Setup
The User Portal Branding and Setup feature allows administrators to define the global default branding for the public-facing portal. Its primary purpose is to ensure a consistent visual presentation across the user environment by establishing a default site logo and header. This article is intended for OPS-COM administrators responsible for managing system configuration and visual design.
Setup and Configuration
This feature requires administrative access to the global system settings.
Admin Side: Administrators must have the appropriate system role permissions enabled to access the global system settings and the file management repository.
Using this Feature
Administrators can use the following instructions to configure the default logo and header images for their environment.
Configuring Default Images
-
Hover over System Configuration and click System Settings.
-
Click the Global tab to view the global settings section.
-
Click the Select Image button next to either the Default Site Logo or Default Site Header setting to open your file repository.
-
Browse or search for the specific image you wish to use within the Manage Files interface and click to select it.
-
Click Save Settings to apply your branding selections.
Once an image is selected, its file name or a preview will appear in the respective configuration settings field. For best practices on uploading and organizing your visual assets, please refer to the Uploading and Managing Files article.
Key Information Displayed
These default images serve as global fallbacks and will appear in various places throughout the system if no specific visual assets are set in other areas (such as the Contents and Designs section). Common locations where these default images are utilized include:
-
The User Portal (e.g., your public-facing permit purchasing site).
-
The phone interface utilized in features like Real-Time Parking.
-
Mobile applications, Text2ParkMe, and QR code interfaces.
Available Actions and Buttons
-
Select Image: Click this button to open the file manager to choose an existing image or upload a new one for your branding.
-
Save Settings: Click this button to commit your branding selections to the active system environment.
Best Practices and Considerations
-
Maintain branding consistency: Use high-quality, appropriately sized images that accurately reflect your organization's branding. Consistent logos and headers build trust and provide a professional appearance across all platforms.
-
Optimize image files: Ensure your image files are properly optimized for web use. Compress files and use appropriate resolutions to guarantee fast page loading times across both desktop and mobile interfaces.
-
Understand global impact: Remember that these are default fallback settings. If you have specific headers or logos configured in other sections of the system (like individual email templates or specific public pages), those specific configurations will always override these global defaults.
-
Ensure visual accessibility: Consider the visual accessibility of your chosen images. Ensure adequate color contrast for any text overlays, especially within your header design, to accommodate all users.
Pages and Content Blocks
The Pages and Content Blocks feature allows administrators to create and manage the visual content and system messages displayed throughout the user portal. Its primary purpose is to enable organizations to customize their public-facing pages, embed interactive features using shortcodes, and enforce user agreements via popup disclaimers. This article is intended for OPS-COM administrators responsible for managing portal content and user communications.
Setup and Configuration
This feature is a core administrative tool used to build and maintain the user-facing portal environment.
Admin Side: Administrators must have the appropriate system role permissions enabled to access the content and design menus.
User Side: The configurations applied here directly dictate the layouts, text, interactive forms, and popup agreements that end-users interact with while navigating the parking portal.
Shortcodes are not supported at this time on the user side.
Using this Feature
Administrators can use the following instructions to create custom pages, embed interactive shortcodes, and generate targeted system messages.
Accessing the Management Interface
-
Hover over the gears icon (System Configuration) and click Content & Designs then Pages and Content Blocks.
Creating Pages
-
Click the Create Page/Message button at the top right of the management screen.
-
Select Page from the Page Type drop-down menu.
-
Configure the following page attributes:
-
Title: Enter the name that will be displayed on the user navigation bar.
-
Path: Define the URL path after the domain (e.g., entering login/ establishes the page as the home page).
-
Visibility: Toggle the Visible button to make the page accessible or hidden to end-users.
-
Language: Select the appropriate language for the page (e.g., English or French).
-
Layout: Select the visual structure for the page. Typically, this is left as the Default Layout.
-
Content: Enter the main body text or embed shortcodes to display interactive features.
-
-
Click the Save Messaging button to finalize the page creation.
Toggling a page to invisible hides it from your end-users, but it will still remain fully editable to administrators on the backend under the Messages tab. This is highly useful for drafting content.
Content Placement and Shortcodes
The smart editor reads content from top to bottom, left to right. Where you place a shortcode heavily dictates the final visual layout.
For example, placing a lot information shortcode before your text content in the editor will render the interactive lot table visually above your text on the live page. Placing the shortcode after the text will render the table below it.
Editing Pages
-
Review the URL / System Location column in the page list to identify the specific area of the portal you are updating (e.g., updating /permits modifies the main permit screen).
-
Click the Edit button next to the specific page title.
-
Make the desired changes to the attributes or text formatting.
-
Click the Return to Page List button at the top of the screen to discard all recent changes, or click the Save Messaging button to apply them.
Creating System Messages
System messages are used to offer agreements and disclaimers before users make purchases. If a user does not agree to a required system message, they are automatically redirected away from the action.
-
Click the Create Page/Message button.
-
Select Message from the Page Type drop-down menu.
-
Enter a Title for the message.
-
Create a unique Identifier. This code is strictly used to link the message to a page via a shortcode.
-
Toggle the Visible setting, select the Language, and input your Content.
-
Click the Save Messaging button.
Do not click the Return to Template List button before saving. Doing so will immediately discard all changes, and your system message will not be created.
Editing System Messages
-
Click the Messages tab on the main management screen.
-
Click the Edit button next to the system message you wish to modify.
-
Adjust the title, identifier, visibility, language, or content as needed.
-
Click the Save Messaging button.
Linking Messages to Pages
System messages and pages work together using disclaimer shortcodes. To display a popup message on a specific page:
-
Copy the unique Identifier of the system message you created.
-
Open the target page in the editor.
-
Insert a disclaimer shortcode into the content area using the identifier (e.g.,
[disclaimer name=lockersDisclaimer dismiss=never]). -
Save the page. The system will now automatically trigger the message when users access that location.
Best Practices and Considerations
-
Do not orphan system messages: If you modify a system message's identifier, you must manually update all corresponding disclaimer shortcodes across your pages. Failing to update the shortcodes will break the link, and the message will fail to display to users.
-
Use visibility toggles for drafting: Keep the Visible toggle off while drafting new pages or complex system messages. This allows you to format text and test shortcodes in the backend without accidentally exposing unfinished pages to live users.
-
Leverage available documentation: Review the documentation for a detailed list of available shortcodes. Shortcodes limit the technicality of the system, offering a convenient way to add interactive forms, user data, and dynamic tables without requiring you to write code. Refer to the User Information Shortcodes article for complete details.
Related Videos
Templates and Design
The Templates and Design module allows administrators to heavily customize the visual functionality and branding of the User Portal. Its primary purpose is to structure the visual layout around your core page content, ensuring the portal accurately reflects your corporate branding and provides a seamless user experience. This article is intended for OPSCOM administrators.
Setup and Configuration
Configuring your portal's design involves creating a foundational layout and then building specific templates within that layout.
Admin Side:
Creating a Layout
-
Hover over System Configuration and click Templates and Design.
-
Click the Create Layout button located at the top right of the page.
-
Enter a descriptive name for your new layout in the provided field.
-
Click the Save Changes button. The layout will now appear in your Layouts list.
-
Click the Non-Default drop-down menu and select Default if you wish to make this the active layout for your system.
Creating Templates
-
Hover over System Configuration and click Templates and Design.
-
Click Toggle Templates next to your newly created layout to display its available templates.
-
Click the Create button to begin adding specific section templates to the layout, including bilingual support for English and French.
User Side: End-users do not interact with the setup of templates. They will simply view the customized layout when navigating the User Portal to register, add vehicles, purchase permits, or pay violations.
Using this Feature
The OPSCOM User Portal is split into specific visual sections using templates. All core text content is added through Pages and Content Blocks, while templates wrap around that content to provide styling and structure.
Template Sections
-
Header: The top of your page containing the header image, logos, and primary user navigation.
-
Content_Header: An upper section to place content, such as alerts or user information, before the main body.
-
Content: The core content of your pages. This cannot be added from the templates module and requires you to navigate to the system messaging tools.
-
Content_Footer: A lower section appearing after the core content. You can use this to display subsequent alerts, messages, or additional context.
-
Footer: The bottom of your page used to advertise important information, provide contact details, or display software versioning.
Available Actions & Buttons
-
Toggle Templates: Click this button to instantly display all of the section templates currently attached to a specific layout.
-
Edit: Click this button next to a layout or section name to modify its details and source code.
-
Archive: Click this button to safely retire a layout that you are no longer using without permanently deleting its history.
Default System Templates
If you adjust the scripts and styles to the point of breaking your site, or you are unsure what your changes have done, you can refer to the default templates below to quickly restore your page's functionality and style.
Default Script Template


Best Practices and Considerations
-
Avoid complex code changes if non-technical: If you are non-technical, it is highly advised not to change the raw code for Scripts, Styles, Header, and Footer Templates. Instead, rely on the provided default templates to ensure site stability.
-
Use verified script vendors: Only use verified script vendors like Bootstrap and jQuery to avoid breaking site functionality. Unverified JavaScript vendors can actively disrupt the user portal and cause elements to load incorrectly.
-
Leverage API integrations: Use the OPSCOM API to integrate with pay stations and other devices. This allows you to securely grab and display useful information from your users directly within your portal templates.
Form 11 Shortcodes
The Form 11 Shortcodes feature allows administrators to dynamically auto-fill specific violation details into system templates. Its primary purpose is to automatically pull nested data directly from a violation record—such as ticket numbers, user profiles, or vehicle details—and populate the issued Form 11 accurately without manual data entry. This article is intended for OPS-COM administrators responsible for configuring system templates and violation notices.
Setup and Configuration
This feature involves adding specific formatting strings directly to your system templates.
Admin Side: Administrators must have the appropriate system role permissions to access and edit system templates.
User Side: This is strictly a backend configuration tool. End-users will simply see the fully rendered Form 11 document with their specific violation details already auto-filled.
Using this Feature
Administrators can use the following syntax rules and data packets to construct dynamic shortcodes for their Form 11 templates.
Understanding the Base Shortcode
The base shortcode for pulling Form 11 violation data is formatted as follows:
[values show=violation._____]
The blank space must be filled with a specific variable name to pull from the violation information packet. The packet itself is always called violation, and this identifier must be placed at the very start of any value call.
Navigating Nested Values
For each nested value within the system's data packet, the parent packet name must be added as part of the variable string. Each part of the path is separated by a period (.), with the specific variable you want to output placed at the end.
Example Shortcodes
The following table provides common examples of Form 11 shortcodes. To return a specific value in the same section, simply replace the provided variable name with the sibling value you want to output.
| Example Shortcode | Description |
[values show=violation.Ticket] |
Returns the violation ticket number. |
[values show=violation.user_info.username] |
Returns the username of the user the violation belongs to. |
[values show=violation.writer.DisplayName] |
Returns the display name of the admin who assigned the violation to the user. |
[values show=violation.vehicle.Plate] |
Returns the plate of the vehicle the violation was assigned to, if applicable. |
[values show=violation.vehicle.province.ProvName] |
Returns the province or state of the vehicle plate. |
[values show=violation.vehicle.colour.ColourName] |
Returns the registered colour of the vehicle. |
[values show=violation.vehicle.plate_type.TypeName] |
Returns the plate type of the vehicle. |
[values show=violation.vehicle.vehicle_type.TypeName] |
Returns the type of the vehicle. |
[values show=violation.vehicle.make.MakeName] |
Returns the make of the vehicle. |
[values show=violation.location.LocationName] |
Returns the name of the location the infraction happened. |
[values show=violation.details.0.Ticket] |
Returns the violation ticket number (alternate value location). |
[values show=violation.details.0.type.ViolationDescr] |
Returns the violation type description. |
If a shortcode is entered incorrectly, or if the targeted data field is empty (null) for that specific user or vehicle, the system will simply leave that space blank on the generated Form 11.
Violation Packet Reference
The violation info packet is formatted like the JSON example below. The values on the left are the exact variable names you must use in your shortcode path, while the values on the right are example outputs returned by this packet.
{
    "ViolationID": 237,
    "SemPermitID": null,
    "Ticket": "TT-19026",
    "VehicleID": 5,
    "Spoiled": 0,
    "TicketType": 1,
    "Issued": "2024-07-17 16:11:00",
    "convNotice": null,
    "Due": "2024-07-27 16:11:00",
    "ViolationTypeID": -1,
    "Fine": "50.0000",
    "AdjustedFine": "20.0000",
    "Towing": "0.0000",
    "taxAmount": "0.0000",
    "Writer": 7,
    "LocationID": 10,
    "Comment": null,
    "TicketAppeal": null,
    "appealType": 0,
    "appealFormat": null,
    "AccessAdminID": 50,
    "ActionedPer": null,
    "Created": "2024-07-17 20:12:08",
    "AppealUserID": 0,
    "AppealProcessDate": null,
    "AppealAdminID": 0,
    "AppealComment": null,
    "AppealAdminComment": null,
    "AutoNotice": 0,
    "ProcessedByCollection": null,
    "SentToCollections": null,
    "PrivateComments": "",
    "DriveAway": 0,
    "UUID": null,
    "VioNotice": null,
    "latitude": null,
    "longitude": null,
    "Warning": null,
    "userid": null,
    "incidentID": null,
    "failToIdentify": null,
    "pin": "YL",
    "duplicate": null,
    "AdjustmentReason": null,
    "notices_count": 1,

    "user_info": {
            "UserID": 5,
            "studentNo": null,
            "employNo": "00800147",
            "username": "mashbury",
            "firstName": "Michael",
            "preferredname": null,
            "lastName": "Ashbury",
            "street": "688 Zaproxy Ridge",
            "city": "East Romaineburgh",
            "prov": 9,
            "postal": "K2G5B1",
            "email": "mash-bury@tomahawk.ca",
            "display_name": "Michael Ashbury",
            "account_no": "00800147",
            "prov_name": "Ontario",
    },

    "writer": {
            "AdminAccessID": 7,
            "Username": "admin",
            "DisplayName": "Administrator"
    },

    "vehicle": {
            "VehicleID": 5,
            "Active": 1,
            "Plate": "MASH",
            "Year": 1998,
            "TotalVio": 12,
            "TotalUnpaid": 2,
            "TotalWarning": 0,
            "vehicleAlert": true,
            "vin": "JNAMA43H9XGE50339",
            "electric_vehicle": false,

            "province": {
                    "ProvName": "West Virginia",
                    "ProvCode": "WV",
            },

            "make": {
                  "MakeName": "Toyota"
            },

            "colour": {
                  "ColourName": "Black"
            },

            "plate_type": {
                  "TypeName": " Passenger"
            }

            "vehicle_type": {
                  "TypeName": " Van"
            },

    },

    "location": {
            "LocationID": 10,
            "LocationName": "Hospital & Administration Building",
    },

    "details": {
            "ViolationsDetailID": 359,
            "ViolationID": 237,
            "Ticket": "TT-19026",
            "ViolationTypeID": 16,
            "LocationID": 10,
            "offenceFine": 50,
            "discountFlag": 1,
            "discountAmount": 20,
            "discountHours": 240,

            "type": {
                    "ViolationTypeID": 16,
                    "ViolationDescr": "No Parking Snow Route - Mandatory Towing",
                    "DefaultCost": 50,
                    "discountFlag": true,
                    "discountAmount": 20,
                    "discountHours": 240,
            }
    }
}
Best Practices and Considerations
-
Maintain exact syntax: Variable names are case-sensitive and must exactly match the data packet format. For example, using
provnameinstead ofProvNamewill cause the shortcode to fail. -
Understand nested logic: When targeting nested arrays (like user_info or vehicle), ensure you include all parent variables separated by periods in your shortcode path. You cannot skip levels in the hierarchy.
-
Test templates thoroughly: Always test new Form 11 templates by generating a sample notice for a dummy violation. This verifies that all shortcodes are rendering correctly and formatting as expected before they are sent to live users.
User Information Shortcodes
The User Information Shortcodes feature allows administrators to dynamically insert specific user details into email templates and system messages. Its primary purpose is to personalize automated communications—such as password reset emails or portal greetings—by automatically pulling data directly from the recipient's user profile. This article is intended for OPS-COM administrators responsible for configuring system communications and customizing templates.
Setup and Configuration
This feature involves adding specific formatting strings directly to your system templates or messages.
Admin Side: Administrators must have the appropriate system role permissions enabled to access and edit email templates or system messaging pages.
Using this Feature
Administrators can use the following specific shortcodes to construct dynamic and personalized communications. To use them, simply type or paste the exact shortcode string into the text editor of your chosen email template or system message.
| Shortcode | Description |
[user show="firstname"] |
Returns the first name of the user account receiving the email or messaging. |
[user show="lastname"] |
Returns the last name of the user account receiving the email or messaging. |
[user show="email"] |
Returns the email address of the user account receiving the email or messaging. |
[user show="username"] |
Returns the username of the user account receiving the email or messaging. |
[user show="salutation"] |
Returns the salutation of the user account receiving the email or messaging. |
Keep in mind that these shortcode descriptions are also conveniently located directly on the email template configuration page for lost passwords, allowing for quick reference while actively drafting recovery emails.
Best Practices and Considerations
-
Maintain exact syntax: Ensure shortcodes are typed exactly as shown, including the brackets and quotation marks. Any typographical errors will cause the shortcode to break, resulting in the raw, bracketed code displaying to the end-user instead of their information.
-
Use personalization to improve engagement: Incorporate the user's first name in greetings to make automated emails feel more personal and professional. For example, opening an email with "Hello
[user show="firstname"]," is much more engaging than a generic greeting. -
Test templates thoroughly: Always send a test email or preview a system message after inserting new shortcodes. This verifies that the tags are correctly pulling the intended user data and formatting properly within the layout before the messages are dispatched to active users.
News Items (RSS Feed)
The News Feed allows administrators to broadcast timely messages and updates directly to their users. Its primary purpose is to provide a simple content management dashboard for drafting, scheduling, and publishing announcements, paired with an open syndication channel (RSS) for power users. This article is intended for OPSCOM administrators responsible for managing site communications.
Setup and Configuration
This feature is a core communication tool used to push updates to the user portal and mobile application.
Admin Side: Administrators must have the appropriate system role permissions enabled to access the content and design configuration menus to manage news items.
User Side: End-users interact with the news feed directly from the main menu of the parking portal or mobile app. The system automatically checks for new messages once every 15 minutes, displaying an alert badge above the menu icon when unread messages are available. After new messages have been viewed, they will automatically be marked as read.
Using this Feature
Administrators can use the following instructions to navigate the management interface to create, schedule, and archive news broadcasts.
Accessing the Management Interface
-
Hover over System Configuration and click Content & Designs then News Items. Navigating this will bring you to the messages page.
Creating New Messages
-
Click the Create New Message button located at the top of the list.
-
Enter the title of the news post into the Title field.
-
Enter a short blurb describing what the post is about into the Description field.
-
Enter a link to a related webpage or the full article into the Article Link field.
-
Enter the exact text that will appear on the link button into the Link Text field.
-
Select the exact date on which the message will appear to users in the Published field.
-
Enable the Visible checkbox to ensure the message will be seen by users.
-
Click the Save Changes button.
A message will only appear to site users if the Visible checkbox is enabled and the configured publish date has already passed. This allows administrators to draft and schedule messages to appear on a set date in the future.
Archiving and Deleting Messages
-
Click the Archive button next to a specific record in the list.
-
Click the View Archived button to open the list of historically archived messages.
-
Click the Unarchive button to restore a message, or click the Delete button to permanently remove it from the system.
Once a message has been permanently deleted from the system via the archived list, it cannot be recovered.
Accessing the RSS Feed
Users can bypass the application entirely and pull updates directly into their favorite RSS feed readers (such as Feedly or Slack) using standard content syndication.
-
Access the RSS feed by appending
/newsfeed/rssto the end of your standard OPSCOM website URL.
Best Practices and Considerations
-
Schedule announcements in advance: Leverage the publish date feature to schedule messages in the future. This allows your team to prepare communications ahead of holidays, events, or planned maintenance without needing to manually publish them on the exact day.
-
Keep messaging concise: Keep your descriptions short and use the article link to provide detailed information. The news feed is designed for quick blurbs; long text can quickly clutter the user's mobile feed and portal interface.
-
Archive outdated content: Regularly archive old messages to keep your active list clean. Once a message is archived, it will no longer appear in the list of messages or be available to users, regardless of its previous visibility status.
-
Promote the RSS feed to power users: Encourage power users or internal staff to use the RSS feed URL. This provides an alternative, highly efficient way for them to stay up-to-date on news posts without actively logging into the portal or checking the app.
Changing the Organization Name Displayed to Parkers
This feature allows administrators to update the organization's display name across the entire platform. Its primary purpose is to control the branding that appears on the public-facing parking portal, connected handheld units, and printed violation notices. This article is intended for OPS-COM administrators responsible for managing global system configurations and organizational branding.
Setup and Configuration
This is a core system setting and does not require any special backend configuration to access or modify.
Admin Side: Administrators must have the appropriate system role permissions enabled to access the global system settings menus.
User Side: This feature is strictly a backend administrative configuration. End-users do not interact directly with this setting, but the configured name will automatically display on the parking portal when they log in or browse the site.
Using this Feature
Administrators can use the following instructions to seamlessly update the organization name displayed on the web portal and on enforcement handheld units.
-
Hover over System Configuration and click System Settings.
-
Click General System Settings from the provided list.
-
Locate the Organization Name: Website field at the top of the page and enter the desired display name.
-
Locate the Organization name: Handheld field and enter the desired display name.
-
Scroll to the bottom of the page and click the Save Changes button.
The text entered into the Organization Name: Website field will appear directly on your public-facing user portal. The text entered into the Organization name: Handheld field will appear on your enforcement officers' handheld screens and on all violation notices printed from a handheld device.
Best Practices and Considerations
-
Understand global handheld configurations: The Organization name: Handheld setting is a global configuration. The name you enter here will be displayed uniformly on all handheld units connected to your system. This setting cannot be changed manually on the individual handheld devices themselves.
-
Verify public-facing spelling: Ensure the name is spelled correctly and reflects your official branding before saving. Because the website name is a public-facing setting, any typographical errors will be immediately visible to all end-users on your portal.
-
Maintain brand consistency: For brand consistency, it is highly recommended to keep the website and handheld names the same. Do not configure different names unless your organization has a specific operational reason for displaying them differently to users versus field staff.