Payments Configuration
- Manage Deposit Types
- Managing Payment Types
- Managing Convenience Fees
- Taxes
- The Invoice Template
- Setup payments with Flex Dollars
- Stripe Payment Provider Setup
- Authorize.net Payment Provider Setup
Manage Deposit Types
The Manage Deposit Types feature allows administrators to define and manage various categories of deposits, such as those required for permits, equipment, or specific services. Its primary purpose is to accurately track refundable amounts, provide clear financial oversight, and ensure proper accounting for deposited funds within the system. This article is intended for OPS-COM administrators responsible for financial configurations and managing user deposits.
Setup and Configuration
This feature is a core administrative tool used to establish financial deposit requirements within the system.
Admin Side: Administrators must have the appropriate system role permissions enabled to access the payments configuration menus and manage the list of deposit types.
Using this Feature
Administrators can use the following instructions to navigate the management interface to seamlessly add, edit, or delete various deposit types.
Accessing the Management Interface
-
Hover over System Configuration, click Payments, then Manage Deposit Types.
Adding a Deposit Type
-
Click the Add Deposit Type button.
-
Enter a descriptive identifier in the Label field (e.g., Permit Deposit or Key Fob Deposit).
-
Enter prompt instructions in the Placeholder Text field if desired. This optional text appears in the deposit information text field to guide administrators when creating a deposit record.
-
Enable or disable the Flags toggle. This controls the ability to edit the Assignable Text field in the resulting active deposit record, which will appear in the user's profile associated with the deposit.
-
Enter the required monetary value in the Amount field.
-
Enable the Active checkbox to ensure the deposit is currently available to be assigned.
-
Click the Save Changes button.
Editing a Deposit Type
-
Locate the specific deposit type you wish to modify in the list.
-
Click the Edit button next to the entry.
-
Make any necessary changes to the configuration fields.
-
Click the Save Changes button to apply your updates.
Deleting a Deposit Type
-
Locate the specific deposit type you wish to remove from the list.
-
Click the Delete button next to the entry.
A deposit type can only be deleted if there are absolutely no records currently associated with it in the system. The Delete button will not be visible if the deposit type is actively in use or linked to past transactions. This restriction prevents financial data inconsistencies.
Best Practices and Considerations
-
Use clear labeling: Use descriptive labels for your deposit types. Utilizing clear names like Annual Permit Deposit or Visitor Pass Deposit ensures immediate clarity for both administrators reviewing accounts and users paying the fees.
-
Utilize placeholder text: Utilize the Placeholder Text field to provide clear instructions or examples for administrators. This helps guide staff members and standardizes data entry when they are manually creating deposit records.
-
Understand the flags setting: Use the Flags setting for Assignable Text to add specific, customizable notes to individual deposit records. This flexibility allows administrators to append unique details per transaction directly onto the user profile.
-
Ensure financial reconciliation: Accurately tracking deposit types is crucial for financial reconciliation. Proper configuration ensures all refundable amounts are reliably managed and easily audited by your accounting team.
Managing Payment Types
The Managing Payment Types feature allows administrators to control which payment methods are available throughout the system. Its primary purpose is to enable organizations to define new payment options, assign them to specific user types (e.g., Staff, Students, Public), and configure their usage for subscriptions or guest payments, ensuring strict alignment with internal financial policies. This article is intended for OPSCOM administrators responsible for configuring financial workflows and checkout experiences.
Setup and Configuration
This feature is a core administrative tool used to establish the payment gateways and offline payment methods accepted by your organization.
Admin Side: Administrators must have the appropriate system role permissions enabled to access the payments configuration menus and manage the list of payment types.
User Side: End-users interact directly with these configurations during the checkout process on the parking portal. The specific payment options they see are dynamically determined by the configurations applied to their assigned user type.
Using this Feature
Administrators can use the following instructions to navigate the management interface to seamlessly add, configure, and review payment types.
Accessing the Management Interface
-
Hover over System Configuration, click Payments, then $ Setup Payment Types.
Adding Payment Types
The following example outlines how to set up an offline payment type using the Always Successful provider. This configuration allows payments to be immediately flagged as fully processed with no admin intervention, which is ideal for scenarios like payroll deductions where the actual funds are handled outside of OPSCOM.
-
Click the Add Type button.
-
Select Always Successful from the Providers drop-down menu.
-
Click the Next Step button.
-
Enter a descriptive title into the Type Name field (e.g., Payroll Deduction).
-
Select the specific User Types this payment method will be available to.
-
Navigate to the Settings tab and enable the necessary checkboxes for your requirements.
-
Review the Allowed Payment Types section to see active payment types listed first, followed by inactive ones.
-
Click the Update Payment Type button to finalize the addition.
The list of Providers in the drop-down menu is hard-coded and securely controlled by Tomahawk. You cannot manually edit this picklist. Hover over the tooltip below the provider to view an explanation of what each provider entails.
Configuring Payment Types for Subscriptions and Guests
You can easily fine-tune how specific payment types are utilized for recurring subscriptions and guest checkout flows.
-
Locate the specific payment type you wish to configure in the list.
-
Click the Pencil icon next to the entry.
-
Click the Settings tab.
-
Enable the checkboxes for the items you wish to allow this payment type to be used for (e.g., enable the Text2ParkMe checkbox, the subscriptions to permit renewals checkbox, or the guest payments checkbox).
-
Adjust the Prompt Information settings to define what data is collected. You can enable only an email address or mandate full address information.
-
Click the Update Payment Type button to apply your changes.
Full address information is strictly required when the payment provider performs Address Verification using AVS, 3DS, or a similar security service. This configuration also controls what information fields appear on the QR Code reservations screen after the payment type is selected.
Hosted Payment Providers
Setting up a hosted payment provider requires specific credentials from your merchant account. Once you retrieve the required values from your provider of choice, save the credentials securely and contact OPSCOM Support for further configuration instructions.
-
OpenEdge: Requires an Auth Key (multi-digit string), Terminal ID (8-digit numeric key), and an X-Web ID (12-digit numeric key).
-
Moneris Checkout: Requires a store_id, an api_token, and a checkout_id.
-
Bambora Checkout: Requires a Payment Authorization Header and a Profile Authorization Header (both alphanumeric passcodes).
The information obtained from your hosted payment provider serves as the critical security credentials that encrypt the financial information exchanged between OPSCOM and the provider. It is vital that these keys are stored properly and securely to ensure complete operational security for your organization.
Extended Payment Information
For each active payment type, you can view extended information directly on the main management screen. This includes:
-
A general description of the payment type.
-
An indication of what the user will be prompted for when selecting that method (e.g., in a hosted payment scenario like EdgeExpress, the user might be prompted to enter an email address before being redirected to the credit card entry portal).
-
The total number of users currently associated with this payment type.
There are also three columns on the far right that use an X or a checkmark to indicate specific permitted uses:
-
Column 1: Indicates if this payment type can be used for guest payments.
-
Column 2: Indicates if this payment type can be used for permit and invoice renewal payments.
-
Column 3: Indicates if this payment type can be used for Text2ParkMe subscriptions.
Processing as an Admin
When administrators are manually processing payments on the backend, the available payment types presented in the interface will be split into two distinct categories:
-
The payment types the specific user is normally allowed to use based on their assigned User Type.
-
The administrative payment types an admin can choose to override with, which often includes additional options not visible to the end-user.
Best Practices and Considerations
-
Implement granular control: Leverage User Types to restrict payment methods. Ensuring users only see relevant options (e.g., only allowing "Payroll Deduction" for Staff users) prevents processing errors and unauthorized selections.
-
Maintain a clear user experience: Simplify the checkout process and reduce confusion for users. Limiting available payment types based on precise contexts or user designations makes the portal much easier to navigate.
-
Ensure refund alignment: Ensure that appropriate refund types are linked to their corresponding payment types. This configuration facilitates smooth and financially accurate refund processing when reversing transactions.
-
Verify subscription compatibility: Verify that the chosen payment gateway provider fully supports recurring transactions. This is a critical step before enabling any payment types for recurring billing subscriptions.
-
Conduct regular reviews: Periodically review your payment type configurations and their associated settings. This routine audit ensures your payment gateways remain perfectly aligned with your organization's evolving financial policies.
Managing Convenience Fees
The Managing Convenience Fees feature allows administrators to add an additional flat-rate charge directly to user payments, managed entirely within the system. Its primary purpose is to provide flexibility to offset processing costs, incentivize certain payment methods, or cover administrative burdens, distinct from any external transaction fees. This article is intended for OPSCOM administrators responsible for financial configurations and system pricing strategies.
Setup and Configuration
This feature is a core administrative tool used to establish additional charges applied to specific transactions or payment methods.
Admin Side: Administrators must have the appropriate system role permissions enabled to access the payments configuration menus and manage fee settings.
You can only use convenience fees if your system is currently configured to use Bambora or Worldline as your hosted payment provider.
User Side: End-users do not interact directly with the backend configuration of these fees. However, this fee amount is visible within the user portal and is added to their grand total before the final checkout screen.
Transaction Fees versus Convenience Fees
It is crucial to understand the distinction between these two types of fees before configuring your system:
-
Transaction Fees: These are charges applied directly by your payment provider (e.g., a credit card processor) for processing a payment. They are independent of OPSCOM internal settings and are managed solely by the payment provider.
-
Convenience Fees: These are additional charges that are managed and applied directly through OPSCOM. This fee amount is added to the grand total before being sent to the payment provider.
Using this Feature
Administrators can use the following instructions to navigate the management interface to seamlessly add and configure various convenience fees.
Accessing the Management Interface
-
Hover over System Configuration, click Payments, then Fees.
Setting Up Fees
-
Click the Add Fee button.
-
Configure the fee parameters based on your specific use case or scenario.
-
Click the Update button to save the new convenience fee.
Fee Limitations: Applied Once Per Order: Fees are applied once per fee type, per order. If a fee is set for permits, only a single fee is applied to the entire order, regardless of whether it contains one permit or five permits. Flat Rate Only: Fees are currently restricted to a flat rate. There is no percentage-based fee option available at this time. Grand Total Sent: Fees are not sent to the payment provider as a secondary item. Only the grand total (item base price plus the convenience fee) is sent for processing.
Configuration Scenarios
Administrators can configure fees to accommodate a variety of operational scenarios:
Admin Collected Fee for Collecting Cash and Cheques
The administrator wants to encourage online payments. A fee is set up as a deterrent when users pay with cash or cheque to cover the increased administrative burden of manual processing.
-
Setup: The fee would apply to all item types but only to payment types of Cash and Cheque.
Admin Collected Fee for Permits
Permits are sent to a third party for enforcement, and that third party charges $0.50 per permit they enforce. The client wishes to pass this exact cost onto the user.
-
Setup: The fee would apply to all payment types, but only to Permits and Temp Permits. The setup would specify $0.50 as the fee amount.
Admin Charges a Convenience Fee to Cover an OPSCOM Collected Transaction Fee
There is an agreement with the payment provider that all permits will incur a $2.95 transaction fee. The client still wants to receive the full $150 for a purchased permit, so they set up a convenience fee to offset this cost.
-
Setup: The convenience fee will be charged when selecting the specific payment type that incurs the $2.95 transaction fee. The setup would apply to the relevant payment provider and define the convenience fee as $2.95.
Admin Includes the Transaction Fee in the Price of the Item
An agreement exists where all permits incur a $2.95 transaction fee. However, the client chooses to absorb this fee by increasing the item's base price instead of adding a separate line item.
-
Setup: There is no specific setup for fees in this scenario within OPSCOM, as the fee is already embedded in the item's base price. If you want to inform users that a transaction fee is included in the final amount, you will need to update a relevant footer message (e.g., in email templates or on the user portal) stating this.
Best Practices and Considerations
-
Ensure clarity for users: Clearly communicate any convenience fees to your users before they complete a transaction. Full transparency regarding extra charges builds trust with your user base.
-
Apply fees strategically: Use convenience fees strategically to align with your overall pricing strategy. They can be highly effective tools to deter manual cash payments, offset third-party costs, or cover transaction fees.
-
Remember the flat rate limitation: Remember that fees are a flat rate, not percentage-based. Plan your fee amounts accordingly to ensure they adequately cover costs regardless of the total cart value.
-
Understand the impact on the grand total: Be aware that OPSCOM adds the convenience fee to the item's price to form the grand total. This combined total is what is ultimately sent to the payment provider for authorization.
-
Distinguish external transaction fees: Distinguish between internal convenience fees and any external transaction fees imposed by your payment gateway. Understand exactly where each fee is applied and how it impacts your final revenue.
-
Plan for reporting: Consider how convenience fees will be reported and accounted for in your financial reconciliation processes. Ensure your accounting team is aware of how these fees alter total transaction amounts.
Taxes
The Taxes feature allows administrators to define and manage the tax percentages applied to payments made within the system. Its primary purpose is to ensure accurate tax calculation during checkout, maintain compliance with local tax regulations, and provide transparency to users regarding applicable taxes. This article is intended for OPSCOM administrators responsible for financial configurations and system compliance.
Setup and Configuration
This feature is a core administrative tool used to establish the tax rates and rules applied to system transactions.
Admin Side: Administrators must possess the Primary Admin role with the Manage System Configuration permission enabled to edit system tax settings.
User Side: This feature is strictly a backend administrative configuration. End-users do not interact directly with tax configurations, but they will see the defined tax labels and calculated amounts displayed in their cart and on their receipts during the checkout process.
If you do not see the settings mentioned in this article, please contact support@ops-com.com to have them enabled for your environment. You will need to provide the written permission of your Primary Admin to request this access change.
Using this Feature
Administrators can use the following instructions to navigate the management interface to configure multiple settings for each tax type, ensuring accurate calculation and display.
Accessing the Management Interface
-
Hover over System Configuration and click Payments then Taxes.
Editing a Tax Type
When editing an existing tax type, administrators will interact with the following fields and actions to apply changes:
-
Locate the specific tax type you wish to modify on the configuration page.
-
Enable the Enable checkbox to make the tax type active and apply it to transactions, or disable it to deactivate the tax.
-
Enter the numerical percentage of tax to be calculated into the Percentage field (e.g., enter 13 for 13%).
-
Enter the desired display name into the Tax Label & Translation field. This defines exactly how this tax will be displayed to users during the cart and checkout process (e.g., HST, Sales Tax, or VAT). Multiple languages are supported for translation.
-
Enable the checkboxes under the Apply to the following items section to define the specific system modules or item types to which you want this tax to be applied (e.g., Permits, Violations, Lockers, or Access Cards).
Best Practices and Considerations
-
Ensure regulatory compliance: Ensure your tax configurations (percentages, labels, and applicability) are always compliant with current local, provincial/state, and national tax regulations.
-
Establish clarity for users: Use clear and understandable tax labels that resonate with your users. Utilizing familiar terms like "HST" or "State Tax" where applicable prevents confusion during checkout and reduces support inquiries.
-
Manage module applicability carefully: Carefully select the checkboxes under the Apply to the following items section to ensure taxes are only applied to the correct modules. This prevents incorrect charges from being applied to tax-exempt items or services.
-
Conduct thorough testing: After making any changes to tax settings, perform test transactions in a Preview Space. Verifying that taxes are calculated and displayed correctly in the cart and on receipts before rolling changes out to production ensures a seamless user experience.
-
Maintain communication with finance: Coordinate closely with your organization's finance or accounting department. Ensuring that the OPSCOM tax configuration perfectly aligns with your organization's internal financial reconciliation processes is critical for accurate reporting.
The Invoice Template
The Invoice Template feature allows administrators to fully customize the email and PDF invoices sent to companies for outstanding permits. Its primary purpose is to ensure that billing communications accurately reflect your organizational branding while dynamically generating all necessary financial details using shortcodes. This article is intended for OPS-COM administrators.
Setup and Configuration
Configuring the invoice template involves adjusting the meta data that dictates how the email is identified and formatted before it reaches the recipient.
Admin Side:
-
Hover over System Config and click Email Templates.
-
Click the Edit button next to Permit Invoice to access the template configuration form.
-
Enter a descriptive name for internal reference in the Label field.
-
Choose the appropriate language from the Language drop-down menu.
-
Select the default layout from the Layout drop-down menu.
-
Enter the text that will appear as the email subject line in the Subject field.
You can successfully use shortcodes in the Subject field to dynamically personalize the email. For example, inserting [invoice account="name"] will automatically call up and display the specific account name for the company being invoiced directly in the subject line.
User Side: End-users do not interact with the setup or configuration of administrative email templates.
Using this Feature
The template form interface contains four primary areas: Meta Data at the top, a list of available Short Codes on the left, the actual visual Template on the right, and a Text Content field at the bottom (used for configuring a plain text version of the invoice).
Administrators interact with the visual template editor to place static branding and dynamic shortcodes.
Available Shortcodes
The template allows the use of special tokens, or shortcodes, to accurately pull live information from the database and populate the invoice when sent. These function similarly to a standard mail merge.
-
[invoice account="number"]: The account number for the company.
-
[invoice account="name"]: The account name for the company.
-
[invoice account="fulladdress"]: The full address for the company.
-
[invoice account="invoice_comments"]: The invoice comment value that is editable for companies only. Any line breaks will be preserved.
-
[invoice show="invoiceno"]: The unique Invoice Number.
-
[invoice show="duedate"]: The invoice due date.
-
[invoice show="billdate"]: The invoice bill date.
-
[invoice show="subtotal"]: The subtotal of all items before Taxes.
-
[invoice show="taxtotal"]: The total calculated amount of tax.
-
[invoice show="amounttotal"]: The total sum amount for all outstanding permits for this invoice.
-
[invoice show="counttotal"]: The total number of permits for the selected sales window.
-
[invoice show="details"]: The comprehensive list of permits, costs, and who holds the permit.
Customizing the Template Sections
There are several key areas on the template that should be actively edited by the admin to ensure proper branding and data delivery:
-
Company Logo Field: Replace the placeholder by inserting your organization's logo.
-
Company Address: Enter your physical organizational address so it clearly appears on the generated document.
-
Invoice Identification: Insert shortcodes to pull in the [invoice show="invoiceno"], [invoice show="billdate"], and [invoice show="duedate"].
-
Invoice Details: Insert the [invoice show="details"] shortcode. When generated, this will automatically expand to list the Parker's Name, Item type being paid for (e.g., Permit, Access card), Item number (Permit Number), Sales Window, Lot Name, Quantity, and Cost.
-
Payment Information: Insert shortcodes to dynamically pull in the billing cost information, such as the [invoice show="subtotal"], [invoice show="taxtotal"], and [invoice show="amounttotal"].
Best Practices and Considerations
-
Optimize your logo format: Using a JPEG or PNG file format is highly recommended for your company logo. These formats ensure the highest quality rendering when the system generates the attached PDF version of the invoice.
-
Verify data placement: Always test your shortcodes by generating a sample invoice. This ensures the system retrieves and formats the intended data (such as the company's full address and account number) exactly where you placed the tokens.
-
Leverage company comments: Add specific billing instructions or notes in the company configuration. Using the [invoice account="invoice_comments"] shortcode allows you to pass these targeted messages directly onto the finalized invoice, maintaining clear communication with corporate clients.
Setup payments with Flex Dollars
The Flex Dollar and Payroll Deduction feature allows administrators to offer a specialized payment method for handling partial permit payments with internal credits. Its primary purpose is to enable users to apply a pre-defined amount of flex dollars towards a permit purchase, automatically notifying administrators of the remaining balance to be processed via internal payroll. This article is intended for OPSCOM administrators responsible for financial configurations and custom payment workflows.
Setup and Configuration
This feature requires both a system-level activation and specific internal configurations to function properly.
Admin Side: Administrators must have the appropriate system role permissions enabled to access the system settings, payments, and user configuration menus.
User Side: Eligible end-users interact with this feature directly on the checkout page of the user portal, provided their cart meets the specific criteria for flex dollar usage.
The Flex Dollar Payment feature is a custom development tailored specifically for limited use cases. It is enabled by a system-level setting that is typically configured by OPSCOM Support upon request. Please contact support to have this feature activated for your environment before proceeding with the configuration steps below.
Enabling the Feature
-
Hover over System Configuration and click System Settings.
-
Click Permits.
-
Enable the Enable Flex Dollars checkbox.
Configuring Email Notifications
An email address must be configured to receive internal notifications with the details of the transaction each time this payment method is used. This email address must be actively monitored for any changes or updates to student flex dollar balances.
-
Hover over System Configuration, click Payments, then Manage Flex Dollars.
-
Enter an actively monitored email address into the Flex Dollars Alert Email text box.
Defining Flex Dollar Amounts
You must create the specific flex dollar values that users are permitted to select during checkout.
-
Hover over System Configuration, click Payments, then Manage Flex Dollars.
-
Click the Add New button.
-
Enter the descriptive text the user will see in the drop-down menu into the Label field (e.g., Apply $100 of Flex Credit).
-
Enter the corresponding numeric amount into the Value field (e.g., 100.00).
-
Click the Save button.
-
Repeat this process for all the pre-determined flex dollar amounts your organization offers.
Archiving (Deleting) Options: To prevent users from selecting outdated credit amounts, click the Delete button next to any flex dollar entry. If the entry has linked transaction records, the system will automatically archive it rather than deleting it. The entry is then removed from the active list and hidden from end-users on the checkout page.
Assigning the Payment Method
This payment method must be explicitly enabled for the specific user types permitted to use it.
-
Hover over System Configuration, click Users, then User Types.
-
Select the specific user type you wish to grant access to (e.g., Staff).
-
Assign the Flex Dollars/Payroll Deduction payment option in the user type settings. Detailed instructions can be found on the User Types page.
Using this Feature
Once configured, this feature provides a streamlined purchasing workflow for users and a clear notification process for your administrative or payroll teams.
User Purchase Workflow
-
Add a standard term permit to the shopping cart on the user portal.
-
Select Flex Dollars/Payroll Deduction as the payment method on the checkout page.
-
Select the desired credit amount from the populated drop-down menu of configured flex dollar labels.
-
Complete the transaction. The permit is considered valid and is issued immediately upon checkout.
Administrator Workflow (Post-Purchase)
-
Receive the automated transaction email sent to the address configured in the Flex Dollars Alert Email field. This notification contains the user's name, contact information, permit details, flex dollar amount applied, and the remaining balance due.
-
Utilize this emailed information to independently confirm the user's flex dollar balances and process the remaining balance via your organization's internal payroll system.
For auditing purposes, a note detailing the applied flex dollar amount is automatically added to the user's transaction payment record. However, the payroll deduction component and the updating of actual flex dollar balances are not automated processes. The system's primary function is to simply calculate and report the remaining payroll deduction balance to administrators for manual processing.
Best Practices and Considerations
-
Understand cart restrictions: This payment option will only appear to eligible users when their cart contains only standard permits. It will not be available as a selectable payment method if other items, such as violation payments or locker rentals, are also present in the cart.
-
Use clear descriptive labels: Use clear and descriptive labels for the flex dollar amounts. Applying transparent nomenclature like "Use $75 Payroll Credit" directly reduces user confusion and support requests during the checkout process.
-
Train your payroll staff: Ensure the staff who manage payroll are fully aware of this workflow and understand how to act on the email notifications. Clear internal communication is critical to the success of this manual process.
-
Acknowledge external verification requirements: It is critical to understand that OPSCOM does not verify real-time flex dollar balances with any external system. Administrators are solely responsible for independently verifying the spent flex dollar amounts with their HR or payroll department and managing any discrepancies outside of the system.
-
Understand system payment logic: This type of payment is treated by the system as a full, successful payment. OPSCOM does not currently utilize strict split-payment logic or backend validation of flex balances beyond recording the user's chosen deduction amount.
- Archive retired dollar amounts: Use the Delete button to clear old flex dollar options from your active list. This keeps your administrative view manageable and prevents end-users from seeing or selecting expired credit amounts during checkout.
Stripe Payment Provider Setup
The Stripe Payment Provider Setup feature allows administrators to integrate with Stripe to process credit card payments directly within the system. Its primary purpose is to provide a secure and seamless checkout experience for users while simplifying financial reconciliation for your operations. This article is intended for OPSCOM administrators responsible for financial setup and payment gateways.
Setup and Configuration
This feature requires configuration within the OPSCOM administration portal as well as the external Stripe developer dashboard.
Admin Side: Administrators must have the appropriate system role permissions enabled to access the payments configuration menus and establish external integrations.
User Side: End-users interact with this feature seamlessly during the checkout process on the web portal or when interacting with field staff using handheld devices.
Admin Portal Configuration
-
Hover over System Configuration, click Payments, then Setup Payment Types.
-
Click the Add Type button.
-
Click the Payment Provider drop-down menu and choose Stripe.js.
-
Name the payment type, select the applicable user types, and click the Settings tab.
-
Enter your Stripe public key into the Publishable Key field.
-
Enter your Stripe secret key into the Secret Key field.
-
Verify that the Currency setting is correct for your region (the default is US dollars).
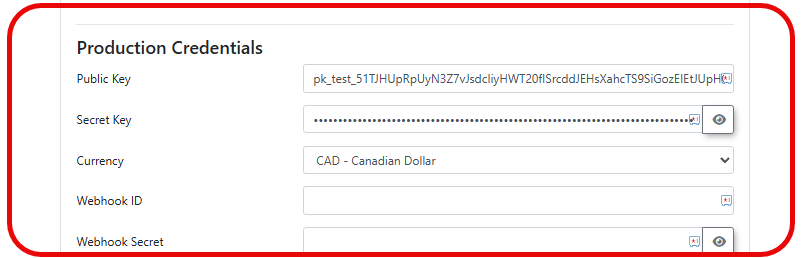
Only enter testing credentials into the configuration fields until you are completely ready for your users to have live access to this payment method.
Stripe Web hook Configuration
Webhooks are absolutely essential for Stripe to notify OPSCOM regarding payment successes or refund completions. Without these webhooks correctly configured, the system will not communicate any transaction information back to OPSCOM.
Register Your Endpoint
To begin receiving notifications, you must define exactly where Stripe should send the transaction data.
Retrieve Your Signing Secret
Once the endpoint is created, Stripe generates a unique security key to verify that the data sent to your server is authentic.
-
Locate the Signing secret section on the summary page for your newly created webhook.
-
Click the Reveal button to display the string (which typically begins with the prefix whsec_).
-
Copy this entire string and navigate back to your OPSCOM payment settings.
-
Paste the copied secret into the Webhook Secret field.
-
Copy the Destination ID provided by Stripe.
-
Paste the ID into the Webhook ID field to ensure all incoming data is securely verified.
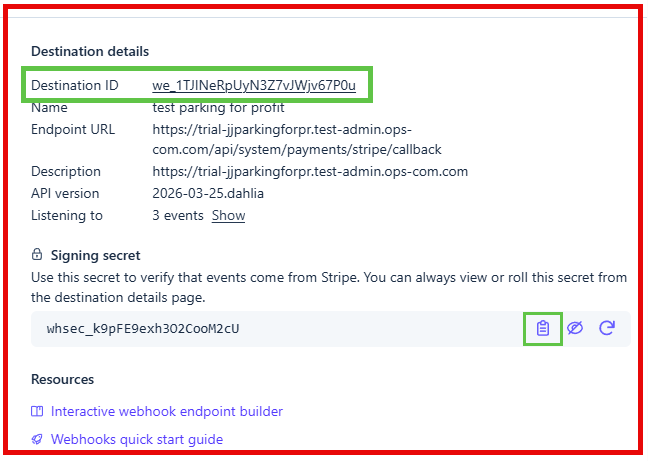
Ensure that your Webhook Secret is correctly matched between Stripe and OPSCOM to prevent pending status errors on completed payments.
Using this Feature
The checkout process is optimized for both web portal users and administrators using handheld devices in the field.
Web Portal Transactions
-
Click the Pay with Credit Card button when you reach the final stage of a transaction to open the secure payment form.
-
Enter the required credit card details into the form.
-
Click the Submit Payment button to complete the purchase.
Handheld App Transactions
-
Tap Checkout to open the payment summary within the OPSCOM for Android app.
-
Tap Select Payment Method and choose Stripe.
-
Tap and Hold the Process Payment button to finalize the transaction.
Managing Transactions and Reports
Administrators can seamlessly review all processed payments and manage financial returns through the standard reporting interfaces.
-
Hover over Financial Management, click Transaction Reports, then Recent Payments.
-
Review the Status column to determine the current state of each payment, and the Payment Date column to see exactly when the transaction occurred.
-
Click the View Details icon next to a specific transaction to see the full Stripe receipt.
-
Click the Refund Payment button to initiate a return of funds.
-
Click the Confirm Refund drop-down menu and choose Full Refund to finalize the reversal.
Best Practices and Considerations
-
Perform thorough deployment testing: Organizations should always keep Live Mode disabled during the initial deployment until all testing is verified with test credit card information. It is highly recommended to process a single, small test transaction in Live Mode using a real card before making the payment option available to the general public.
-
Maintain strict security requirements: Maintaining the security of your financial environment is critical. You should never share your Stripe secret key or webhook secret with anyone, nor should you store it in plain text outside of the secure administration configuration screens.
-
Rotate security keys regularly: Change the signing secret periodically. Additionally, ensure you only subscribe to the strictly required event types within Stripe to minimize unnecessary data transmission.
Authorize.net Payment Provider Setup
Setup and Configuration
OPSCOM Payment Type Creation
First, we need to create a new payment type for this integration.
-
Log in to the OPSCOM Admin Portal.
-
Hover over System Admin and click Payment Gateway Setup to create a new payment type.
-
Click the Script Type drop-down menu and choose JS: Authorize.JS.
-
Enter a descriptive name in the Payment Type Name field, such as Credit Card or Online Payment.
-
Disable access for all User Types to this payment method while setup is in progress.
Do not grant access to any user types until credential entry and webhook configuration are fully verified.
Authorize net API Credentials Generation
The next steps will detail how to link your OPSCOM installation to your payment provider account, with Authorize.net.
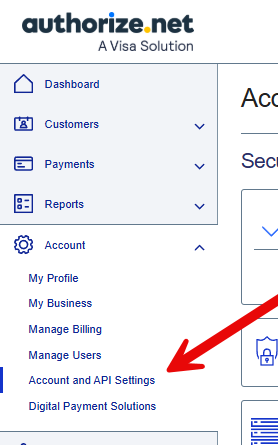
-
Click Account on the side bar and click Account and API Settings.
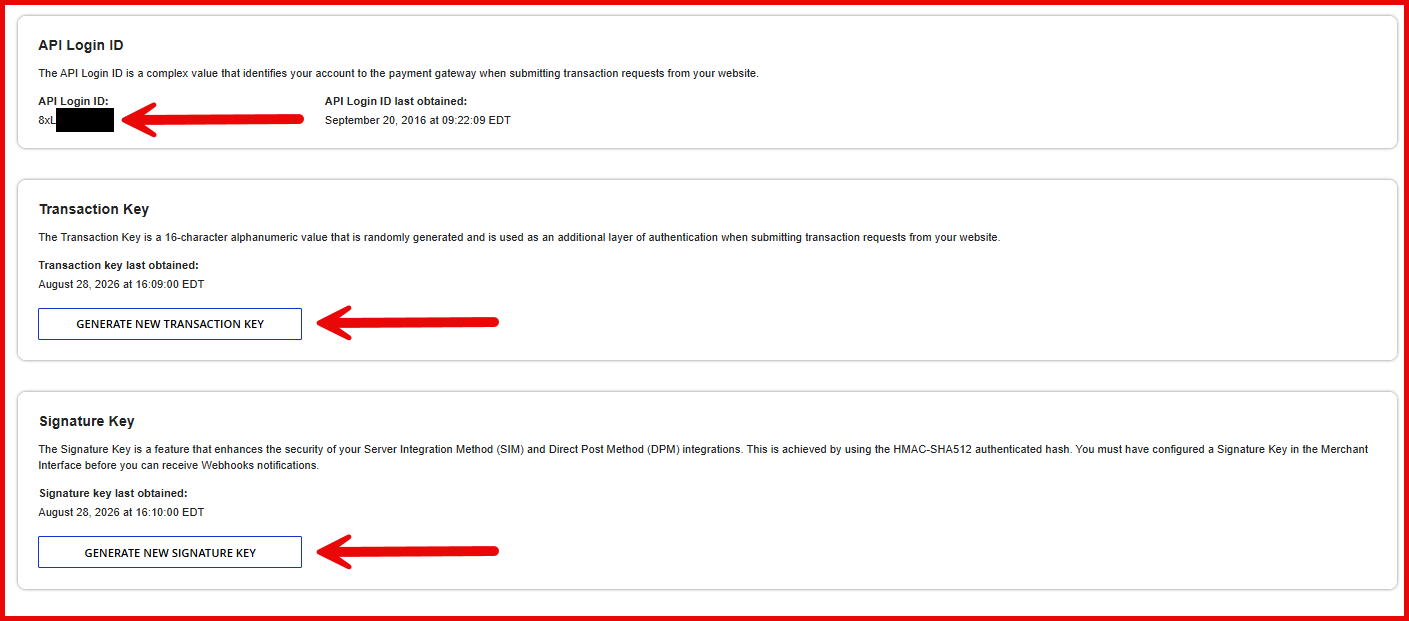
-
Click API Credentials and Keys.
-
Copy the API Login ID displayed near the top of the page.
-
Select the Generate New Transaction Key option, enter an identifier name, answer the security question (if applicable), and click the Submit button.
-
Copy the generated key immediately and store it in a secure password manager.
-
In the same way, select the Generate New Signature Key option, click the Submit button, and copy the generated key.
Finishing OPSCOM Payment Type Configuration
-
Return to the payment type settings page in OPSCOM.
-
Enter the API Login ID, Transaction Key, and Signature Key into the corresponding credential fields.
-
Enter these credentials into both the Production Credentials and Testing Credentials fields to enable testing on the preview environment.
-
Configure billing address requirement, or display preferences and enable or toggle the Bank Account payment option based on organizational requirements. (allows direct bank transfers)
-
Click the Update Payment Type button to save progress.
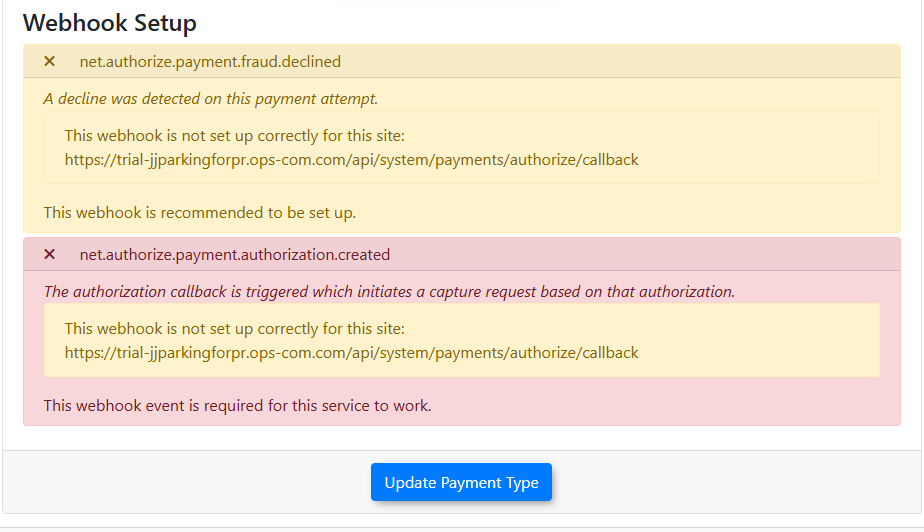
Now you should see this warning, and in the next step, we will fix it by setting up a webhook configuration on Authorize.net.
Webhook Notification Setup
-
Log into the Authorize.net Merchant Interface, click Account, and click Account and API Settings.
-
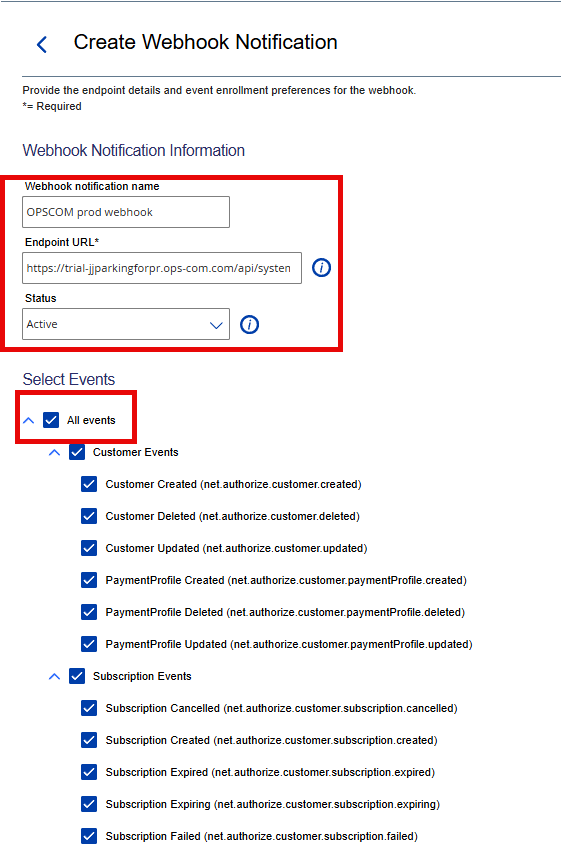
Scroll down to Webhooks and click the Create Webhook Notification button.

-
Enter OPSCOM in the Name field.
-
Enter
https://{your-domain}[.ops-com.com/api/system/payments/authorize/callback]in the Endpoint URL field, replacing{your-domain}with the active domain name.
For example: [https://citypark.ops-com.com/api/system/payments/authorize/callback] -
Click the Status drop-down menu and choose Active.

-
Select the All Events option under Event Selection.
-
Click the Save button.



Using this Feature
-
Return to the payment type configuration page in OPSCOM.
-
Refresh the browser page.
-
Confirm that a green success indicator appears for both the Production and Preview environments.
- Test on the preview environment, until you are satisfied.
( https://{CLIENT-ID}.preview-admin.ops-com.com/admin/ ) -
Re-enable access for the appropriate User Types on the payment type settings page to grant user access to the payment method.
Best Practices and Considerations
-
Disable user access during setup to prevent users from attempting payments while credentials or webhooks are being configured.
-
Verify Signature Key configuration to ensure OPSCOM can validate that incoming webhook notifications originate directly from Authorize.net.
-
Maintain separate test and production credentials by connecting an Authorize.net Sandbox account to the preview environment (
{client}.preview.ops-com.com) and a live account to the production environment. -
Ensure PCI DSS SAQ A compliance by using Authorize.JS to tokenize cardholder data directly in the customer browser, keeping raw card numbers off OPSCOM servers.
-
Establish a credential rotation schedule and update OPSCOM immediately whenever a Transaction Key or Signature Key is regenerated to avoid service disruptions or failed webhook signature checks.