System Settings in OPSCOM provide administrators with comprehensive control over the core functionalities and behaviors of their application, primarily impacting the administrative side. This centralized configuration area allows for fine-tuning various components, from general system parameters and security protocols to specific module functionalities like parking, violations, and payments, ensuring the system operates according to organizational needs.
1. Click **System Configuration**, then **System Settings** to access this area. 2. Explore the menus. Hovering over any menu item will explain with a tooltip what this setting controls. 3. Settings in **Blue** are read-only to Admins. Only a Tomahawk User can enable/disable this. For help with this contactOnly Admins that have the permission to **Manage System Configuration**, will see the System Settings. If they have that permission, they can edit any system setting available.
--- ### Best Practices & Considerations - **Review All Settings**: System settings are granular and cover many aspects of OPSCOM. Regularly review all components to ensure configurations align with your organization's current policies and operational needs. - **Security Settings First**: Prioritize the configuration of **Security** component settings (e.g., password expiry, strength requirements, admin lockouts) to maintain a robust security posture for your admin accounts. - **Email Configuration**: Ensure that all relevant email addresses (Default Notification Email, From Email, Appeal Notification Email, Automated Notification Email) are correctly set up to ensure timely system communications and alerts. - **Time Zone Accuracy**: Correctly setting your **Time zone** and **Time offset** is critical for accurate timestamping of all system events, permits, and violations. - **Impact of Toggles**: Be mindful that many settings are simple on/off toggles. Understand the full impact of enabling or disabling a module (e.g., "Enable Violations Module") or a specific feature before making changes. - **Team Collaboration**: For settings that require OPSCOM Team access to change, communicate your needs clearly to support staff. For other settings, collaborate with your internal teams (IT, finance, enforcement) to ensure changes meet everyone's requirements. - **Testing Changes**: For significant changes, especially those impacting user-side visibility or core workflows, consider testing in a [Preview Space](https://opscom.wiki/books/setup-configuration-for-admins/page/create-or-refresh-a-preview-space), before applying to your live production system. # New Page # Configuring SAML SSO with OPSCOM ### What is Single Sign-On (SSO) **Single Sign-On (SSO)** simplifies user access to OPSCOM by allowing them to authenticate using their existing, managed corporate accounts. This eliminates the need for separate OPSCOM usernames and passwords, enhancing convenience and security. This article details the setup and configuration of SAML-based SSO with OPSCOM, explaining the necessary fields, metadata exchange, and user synchronization. For more general information about SSO and OPSCOM [refer to this wiki article](https://opscom.wiki/books/customization-and-integration/page/single-sign-on-sso-and-operationscommander-what-do-you-need-to-consider). ### Prerequisites and Considerations Implementing SSO with OPSCOM, specifically using SAML (Security Assertion Markup Language), requires coordination between your organization's Identity Provider (IdP) and OPSCOM as the Service Provider (SP).The settings below must be filled out correctly and saved before you will see the Metadata tab to continue.
When OPSCOM generates your SP metadata, it is available as a **live URL** — not just a downloadable file. The metadata URL follows this pattern: ``` https://[your-domain]/auth/saml2/[ENTITY_ID]/metadata ``` **We strongly recommend providing your Identity Provider with this URL rather than a downloaded XML file.** When an IdP is configured to pull from a live URL, it will automatically fetch fresh metadata and the integration stays current. If you upload a static XML file to your IdP instead, be aware that the metadata contains a `validUntil` timestamp (calculated from the `cacheDuration` of 7 days from the time it was fetched). An IdP that strictly enforces this value may reject the metadata after that window. In practice, most enterprise IdPs — including Azure AD — do not enforce `validUntil` on uploaded SP metadata, but it is still better practice to use the live URL wherever possible.Azure AD note: When configuring the Enterprise Application in Azure, look for the option to enter a Federation Metadata URL rather than uploading a file. This is found in the Basic SAML Configuration section.
##### Service Provider Fields (Configured in OPSCOM) These fields define how OPSCOM will interact with your Identity Provider.| Setting | Default | What It Does |
|---|---|---|
| **Requested Auth Context** | `false` | When set to `false`, OPSCOM does not specify an authentication method in its request to the IdP — the IdP decides. Set to `true` to require password-based authentication (`PasswordProtectedTransport`). Leave as `false` for most Azure AD integrations. |
| **Require Name ID Policy** | Enabled | Includes a `NameIDPolicy` element in the SAML request, specifying the Name ID Format. **Disable this if your IdP is Microsoft ADFS** — ADFS frequently rejects the `NameIDPolicy` element and returns an `InvalidNameIDPolicy` error. Azure AD (Entra ID) handles it correctly and this should remain enabled. |
| **Require Encrypted Assertions** | Disabled | Requires the IdP to encrypt SAML assertions. Only enable if your IdP supports it and your SP certificate and private key are configured. Not required for standard Azure AD integrations. |
| **Sign Logout Requests / Responses** | Disabled | Requires the SP certificate and private key to be configured. Not required for standard Azure AD integrations. |
`` ` ``<``samlp:Response` `xmlns:samlp``=``"urn:oasis:names:tc:SAML:2.0:protocol"` `xmlns:saml``=``"urn:oasis:names:tc:SAML:2.0:assertion"` `ID``=``"_aa1963115aa6490e728c7376f4c8849813bbb..."``>` ` ``...` ` ``<``saml:Assertion` `xmlns:xsi``=``"http://www.w3.org/2001/XMLSchema-instance"` `xmlns:xs``=``"http://www.w3.org/2001/XMLSchema"` `ID``=``"_9efd79bf6425983ee9176f3d33a99d1a9176180..."``>` ` ``...` ` ``<``saml:Subject``>` ` ``<``saml:NameID` `SPNameQualifier``=``"MinionOpsComStaff"` `Format``=``"urn:oasis:names:tc:SAML:2.0:nameid-format:transient"``>_7a426e0be71f14c1f349db00d7d543b6f7dcb52baa` ` ``<``saml:SubjectConfirmation` `Method``=``"urn:oasis:names:tc:SAML:2.0:cm:bearer"``>` ` ``<``saml:SubjectConfirmationData` `NotOnOrAfter``=``"2021-08-24T16:00:41Z"` `Recipient``=``"https://minion-3.dev.parkadmin.com/auth/saml2/MinionOpsComStaff/acs"` `InResponseTo``=``"ONELOGIN_bb8a09203c888cf59af4c621a71cfa8f7559c016"``/>` ` ``` ` ``` ` ``<``saml:Conditions` `NotBefore``=``"2021-08-24T15:55:11Z"` `NotOnOrAfter``=``"2021-08-24T16:00:41Z"``>` ` ``<``saml:AudienceRestriction``>` ` ``<``saml:Audience``>MinionOpsComStaff` ` ``` ` ``` ` ``<``saml:AuthnStatement` `AuthnInstant``=``"2021-08-24T15:34:46Z"` `SessionNotOnOrAfter``=``"2021-08-24T23:34:46Z"` `SessionIndex``=``"_a7a68666092117d24aab8adecf1b0830622855b85..."``>` ` ``<``saml:AuthnContext``>` ` ``<``saml:AuthnContextClassRef``>urn:oasis:names:tc:SAML:2.0:ac:classes:PasswordProtectedTransport` ` ``` ` ``` ` ``<``saml:AttributeStatement``>` ` ``<``saml:Attribute` `Name``=``"uid"` `NameFormat``=``"urn:oasis:names:tc:SAML:2.0:attrname-format:basic"``>` ` ``<``saml:AttributeValue` `xsi:type``=``"xs:string"``>6ddf4027-3397-4e45-8628-0189f60fe91e` ` ``` ` ``<``saml:Attribute` `Name``=``"full name"` `NameFormat``=``"urn:oasis:names:tc:SAML:2.0:attrname-format:basic"``>` ` ``<``saml:AttributeValue` `xsi:type``=``"xs:string"``>Sarah Knowles` ` ``` ` ``<``saml:Attribute` `Name``=``"email"` `NameFormat``=``"urn:oasis:names:tc:SAML:2.0:attrname-format:basic"``>` ` ``<``saml:AttributeValue` `xsi:type``=``"xs:string"``>sknowles@tomahawk.ca` ` ``` ` ``` ` ``` ` ``` |
⚠️ Do not rename your Login Source after users have been associated to it. The Login Source value is stored against every user record created via SSO. If you change it, those users will no longer be matched to this login source on their next login attempt, effectively locking them out. If a rename is ever necessary, contact OPSCOM Support to arrange a coordinated update of all affected user records.
##### Synchronization Tab The **Synchronization** tab allows you to configure how user information is managed between your SSO system and OPSCOM.⚠️ Azure AD does not send a combined "full name" attribute by default. If you map the First Name field to a full name or displayName attribute, the user's entire display name (e.g., "Sarah Knowles") will be stuffed into the first name field. Map First Name and Last Name to separate attributes (givenname / surname, or first\_name / last\_name if configured as custom claims in Azure).
[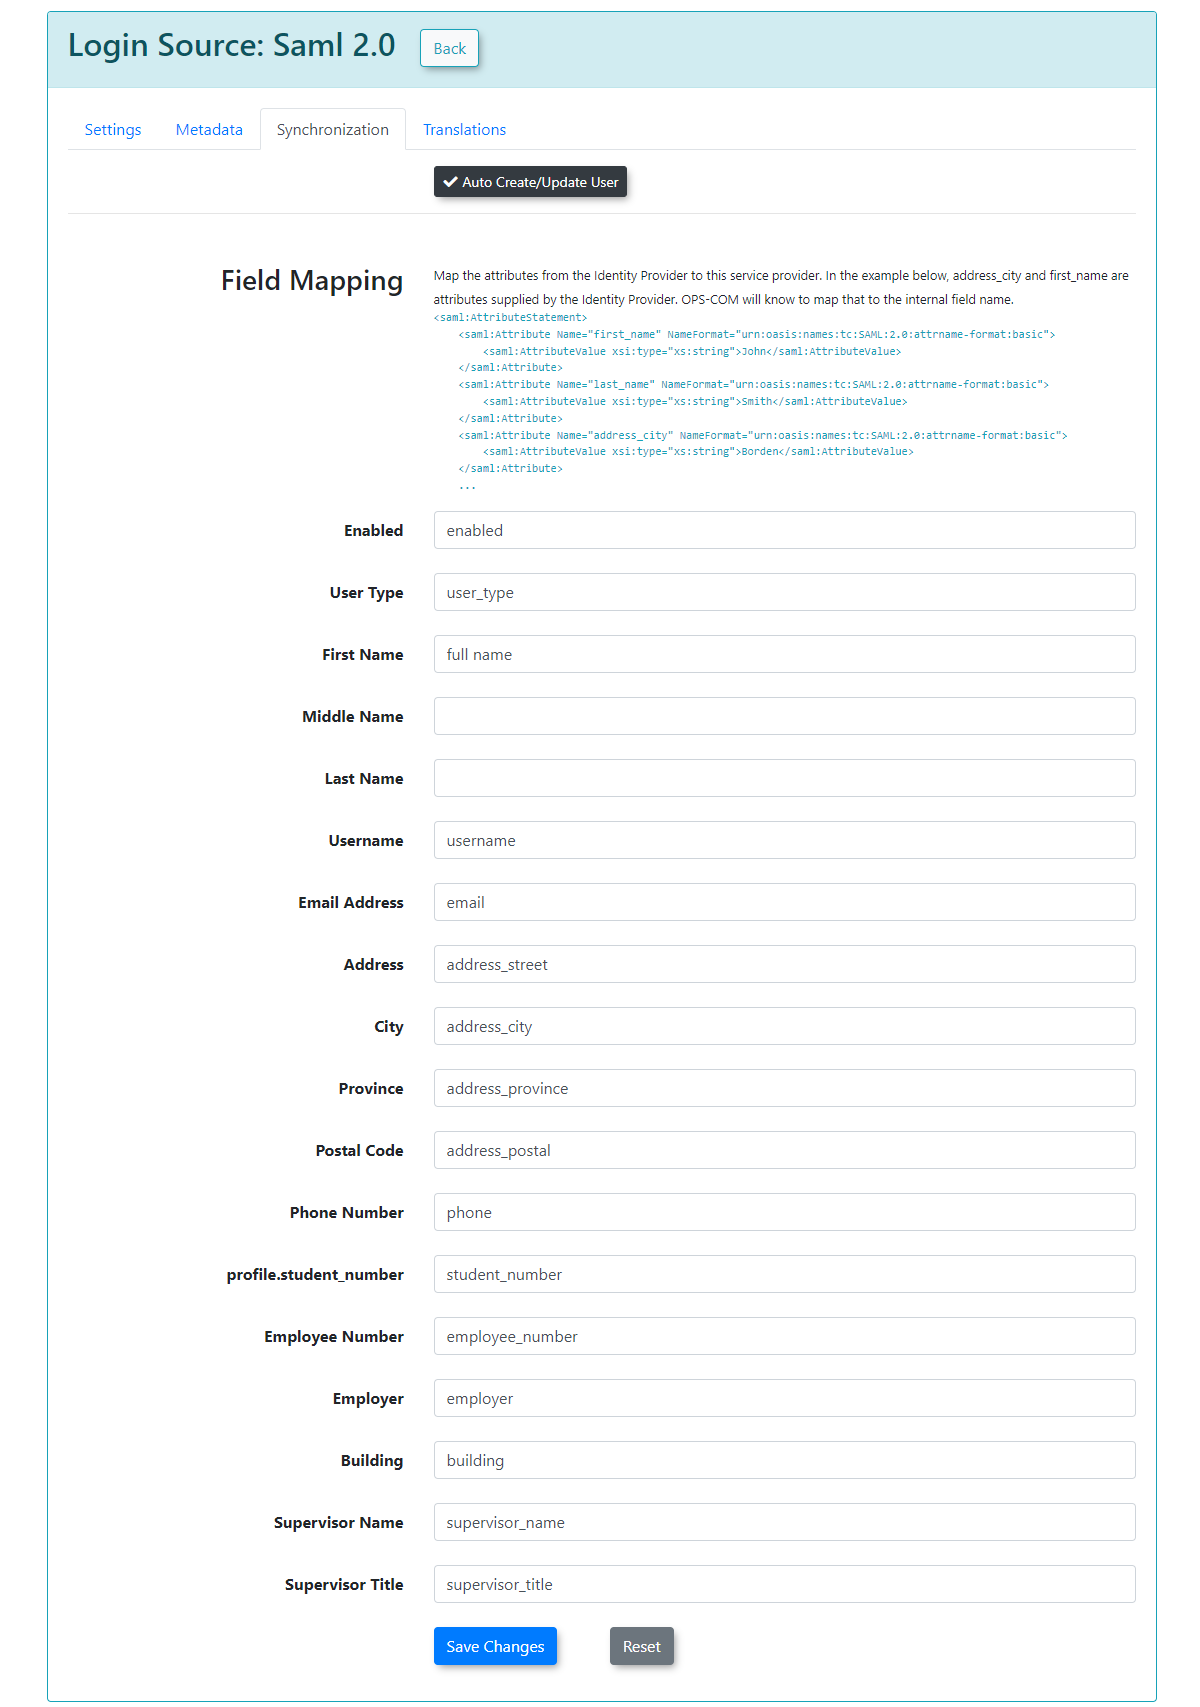](https://opscom.wiki/uploads/images/gallery/2024-06/W2qimage.png)The exact sample values from our test system may differ from your actual SAML system attributes.
##### Translations Tab The **Translations** tab allows you to customize the text displayed on your login button from the user side. You can create as many different translations as are available in your system (e.g., English and French). This ensures that the SSO login experience is localized for your users. [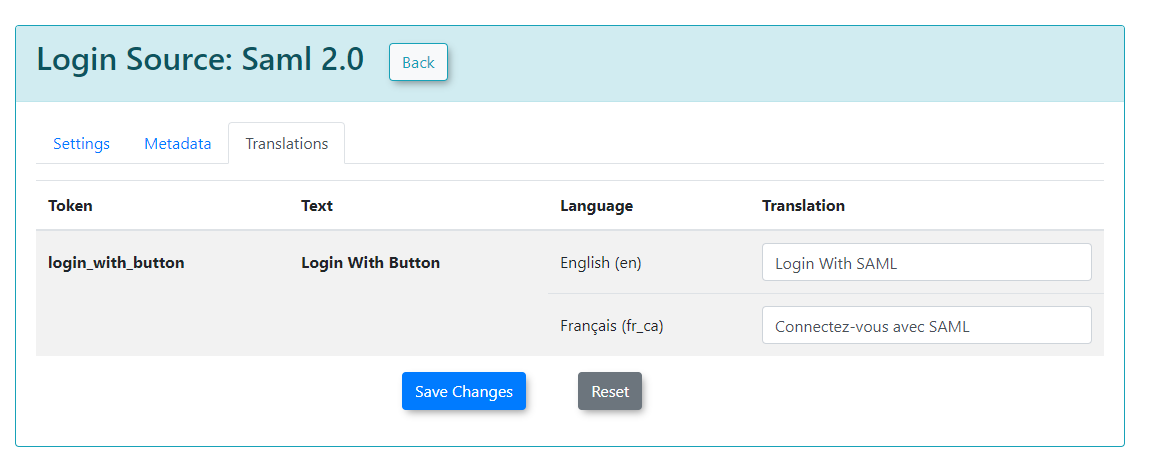](https://opscom.wiki/uploads/images/gallery/2024-06/0Bpimage.png) --- ### Error Handling: CommonPproblems and Their Causes - User cannot log in / "user not found" — The Unique ID Field in OPSCOM does not match the attribute name being sent by the IdP, or the user has not been assigned to the application in the IdP. - Assertion validation failure — The IdP x509 Certificate field contains the wrong certificate (often the SP cert copied in by mistake). InvalidNameIDPolicy error — Disable the "Require Name ID Policy" toggle (common with ADFS IdPs). - Incorrect user data on auto-created accounts — A field mapping value doesn't match the attribute name the IdP is actually sending. Use your IdP's test/debug tool to see the exact claim names in the assertion. - Login source mismatch — The Login Source value was changed after users were created. Contact OPSCOM Support. - OPSCOM's SSO debug log (when enabled) will display the full incoming user array, which makes attribute name mismatches straightforward to identify. --- ### Best Practices & ConsiderationsCommunication errors in OPSCOM, often manifested as "Communication Error" messages to users, typically occur when essential email "From" or "Reply-to" addresses are not correctly configured in the system settings. This article helps OPSCOM administrators identify and resolve such errors, ensuring that system-generated emails (like password reset confirmations) are sent successfully.
### Identifying a Communication Error Communication errors are usually a symptom of missing or incorrect email configurations within the system settings. A common example of a communication error occurs when a user attempts to submit the **Forgot Password** form on the user-side login page. An error message similar to the following may be displayed: ## [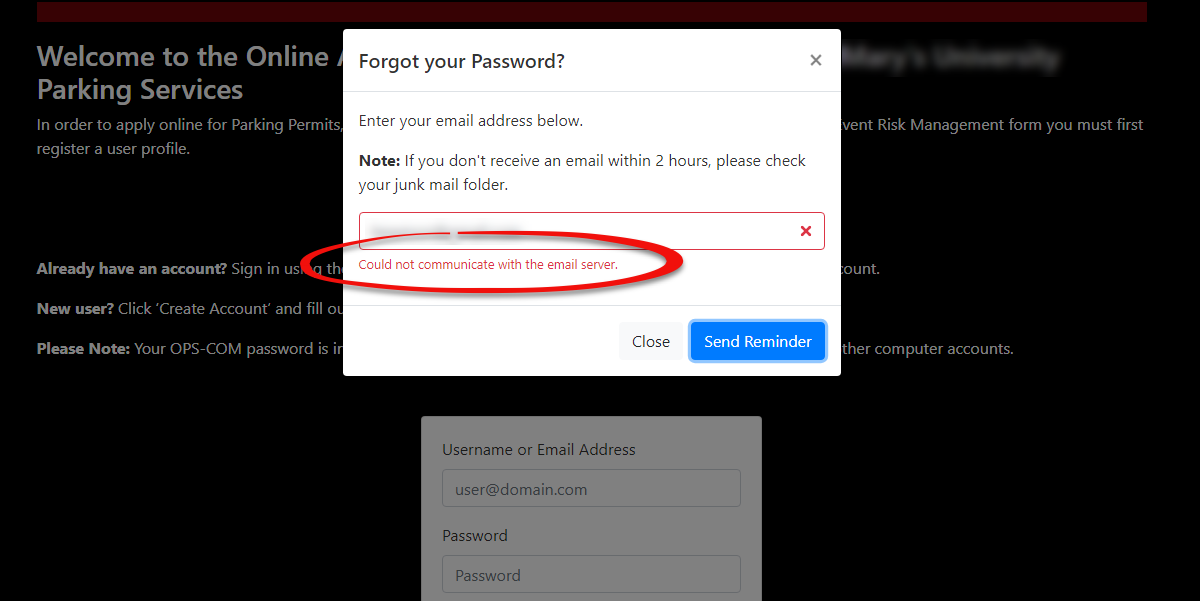](https://opscom.wiki/uploads/images/gallery/2024-06/preimage.png) This error indicates that the system is attempting to send an email but lacks a defined "From" or "Reply-to" address from which to send it. --- ### Fixing Communication Errors 1. Click **System Configuration,** then **System Settings.** 2. On the **General System Settings** tab, locate the **Reply-to Admin Email Address** field. 3. Enter a valid and active email address into this field. This address will serve as the system's "From" address for various automated communications. 4. **Save** your changes. Once you have updated the email address, this communication issue should be resolved. You can test by re-attempting the action that previously triggered the error (e.g., submitting the **Forgot Password** form). --- ### Best Practices & Considerations - **Crucial Email Fields**: The **Reply-to Admin Email Address** (and other "From Email" settings found in **System Settings**) are critical for all system-generated email communications. Ensure they are always populated with a valid, monitored email address. - **Troubleshooting**: If the issue persists after updating the **Reply-to Admin Email Address**, it may indicate a more complex underlying problem. - **Contact Support**: If the issue is still not resolved after completing these fields, please contact [support@ops-com.com](mailto:support@ops-com.comcom) for further assistance. Provide details of the error message and the steps you have already taken. - **Monitoring System Notifications**: Regularly check the email address configured as the "Default Notification Email" in **System Settings** to catch any internal system alerts about failed communications. # Alarms System Settings ## Setting up Alarms in OPSCOM There are 3 different alarms you can setup in OPSCOM. - [People ](https://opscom.wiki/books/the-opscom-admin-portal/page/people-alarms) - [Vehicle/Plate](https://opscom.wiki/books/the-opscom-admin-portal/page/plate-and-vehicle-alarms) - [Generic](https://opscom.wiki/books/the-opscom-admin-portal/page/generic-alarms/) # Defining User Profile SettingsUser Profile Settings in OPSCOM enable administrators to customize the information collected from users on their profile forms. By controlling the visibility and requirement status of various fields, you can tailor the user experience to your organizational needs, ensure necessary data is captured, and streamline the registration process.
User profile item settings are configured within the **System Settings** area of OPSCOM. 1. Click **System Configuration**, then **System Settings**. 2. On the **Manage System Settings** screen, click **User Profile.** ### Using this Feature On the **User Profile** settings page, items in the list can be set to one of three states, controlling their appearance and requirement on the user-side profile form: - **Hidden**: The field is **not visible** on the user-side profile form. - **Visible**: The field is seen on the user-side form, but entering information in it is **optional**. - **Required**: The field is seen on the user-side form and is **mandatory**. Required fields are indicated by a **red asterisk** (\*).**Note:** The system will not allow the user to save their profile if any required information is missing.
The state selected for each field is highlighted in black, with a checkmark indicating the active selection. [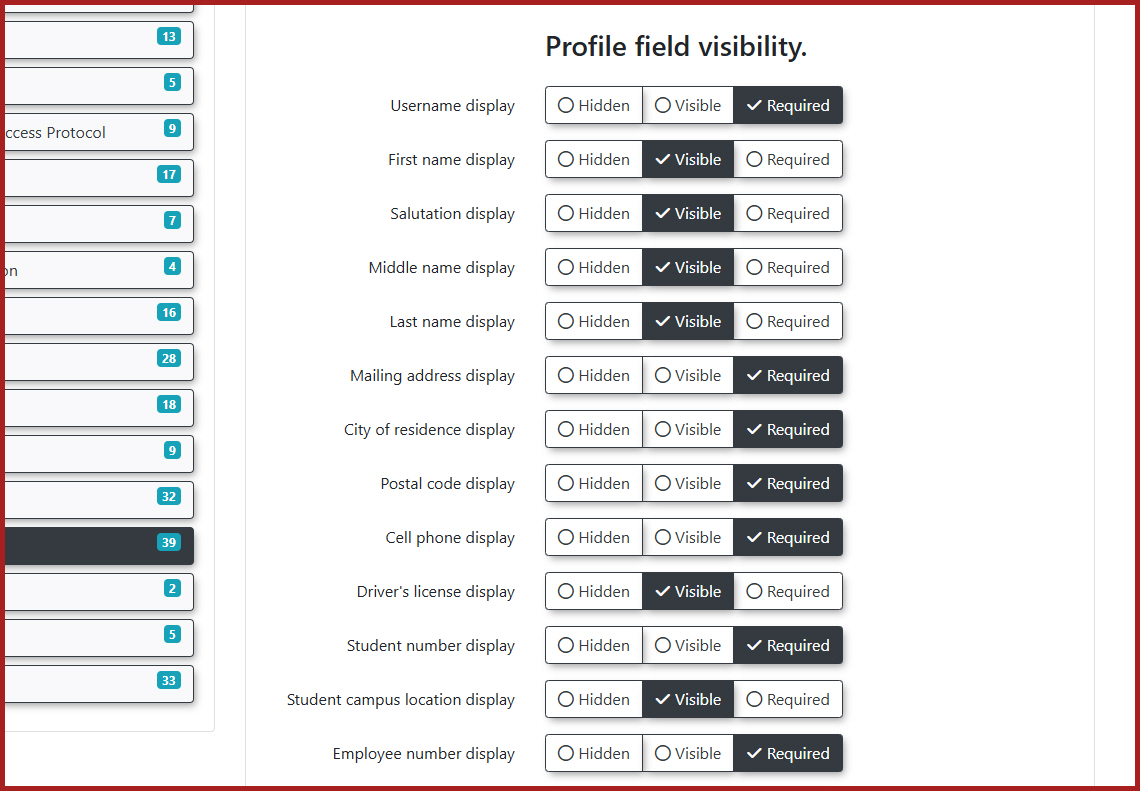](https://opscom.wiki/uploads/images/gallery/2025-06/F6L2025-06-17-12-55-28.jpg) [View the corresponding profile fields here.](https://opscom.wiki/books/the-opscom-admin-portal/page/user-profile-overview) ##### Customizing Profile Sections - **User Name**: A User Name is essential as it's one of the unique identifiers for system access. While a bare minimum typically includes Username, First Name, and Last Name, any of these items can be toggled on/off based on your needs. -**Note:** One scenario where you might hide Username is if an external source (such as LDAP) is supplying the username.
- **Enabling Username Edits**: By default, the username field is not editable by administrators. To enable this functionality, you must contactTo ensure students provide both their **Mailing Address** and **Active Local Address** enable the **Require Both Addresses for Students** setting in System Settings>User Profile. Once students fill these out, admins can view both locations under the **Active Addresses** section of the User Profile - complete with Map icons for quick Google Maps viewing. Note: To ensure these are visible on the Admin side, don't forget to also enable the **Using Student Second Address** setting.
- **Phone Information**: Allows for the collection of various phone numbers. - **License Information**: This field specifically refers to Driver's License number (not plate number). You may opt to record this information, especially if you are connected with local law enforcement. - **Student Information**: Fields relevant to student identification (e.g., Student Number, Max/Min Student Number Digits). - **Employee Information**: Fields relevant to employee identification (e.g., Employee Number, Max Employee Number Digits). ##### Considerations for Text2ParkMe Users If your organization is using **Text2ParkMe**, a second tab will be available on this page. This tab allows you to configure additional details, including credit card information, that end-users can enter.**Important:** If any credit card information is entered by the user, it automatically switches all other credit card information fields to "required" for that transaction.
--- ### Best Practices & Considerations - **Balance Data Collection and User Experience**: While it's important to collect necessary data, avoid making too many fields "Required" as this can create friction and deter users from completing their profiles. Prioritize truly essential information. - **Understand System Overrides**: Even if you hide everything possible, the system might still require certain fundamental pieces of information (e.g., core identifiers like Username or Email) and will override your settings to ensure basic functionality. - **Review Hidden Fields Periodically**: Ensure that fields marked "Hidden" truly remain irrelevant to your current processes. Organizational needs can change, making previously hidden data suddenly important. - **Tailor to User Types**: Consider which information is truly necessary for different user types (e.g., students versus employees) and configure accordingly. - **Impact on Mailing/Enforcement**: If you rely on mailing permits or recording specific ID numbers for enforcement, ensure the corresponding profile fields are set to "Required" or at least "Visible." - The **Allow Username Edits** setting can only be toggled by the OPSCOM Support team. If you require the ability to edit usernames, please contact OPSCOM support to request this change. # Account Creation PreferencesOPSCOM allows administrators to configure user account creation preferences, choosing between immediate auto-login or requiring email verification upon registration. Understanding and setting this preference is crucial for managing your user base effectively, balancing user convenience with security and data integrity needs.
Please refer to the [Registering as a User](https://opscom.wiki/books/OPSCOM-user-portal/page/registering-as-a-user) article for the user-side documentation. ### Setup & Configuration Account creation preferences are configured within the **User Profile** settings under **System Settings**. 1. Hover over **System Configuration,** then **System Settings,** and click the **User Profile** tab. 2. Toggle the **Auto Login After Register** setting, which controls the account creation flow. --- ### Using this Feature The **Auto Login After Register** setting has two states, each with distinct implications for user experience and system security: ##### Immediate Login (Auto Login After Register: ON) - **Configuration**: Toggle the **Auto Login After Register** setting to **ON**. - **Behavior**: This method allows users to instantly access their account immediately upon completing registration, without requiring them to verify their email address. - **Reasons to Use**: - **Limited Email Access**: Ideal for scenarios where users might not have immediate access to their email, such as in kiosk setups or for individuals without constant mobile email access. - **Reduced Friction**: Provides a smoother, quicker onboarding experience, especially if your target audience is less tech-savvy or if you aim to minimize any barriers to entry. ##### Email Verification (Auto Login After Register: OFF) - **Configuration**: Toggle the **Auto Login After Register** setting to **OFF**. - **Behavior**: This method requires users to click a unique verification link sent to their registered email address before they can fully access their account. - **Reasons to Use**: - **Verifying Legitimate Users**: This is generally the **preferred method** as it immediately confirms that the registration originates from a real user with a valid email address, significantly reducing bot registrations or fake accounts. - **Account Security and Recovery**: Email verification establishes a reliable communication channel crucial for secure password resets, account recovery procedures, and sending important notifications, thereby enhancing overall account security. - **Maintaining Data Integrity**: By ensuring valid email addresses from the outset, you improve the quality and accuracy of your user data in the system. --- ### Best Practices & Considerations - **Balance Security and Convenience**: Carefully weigh the trade-offs between user convenience (immediate login) and enhanced security/data integrity (email verification) based on your organization's risk tolerance and user base. - **Communication**: Clearly inform users about the account creation process, especially if email verification is required. Provide instructions on checking spam folders for verification emails. - **Email Deliverability**: If using email verification, ensure your system's email sending configurations are robust to guarantee that verification emails are delivered promptly and reliably. - **Target Audience Analysis**: Consider the technical literacy and typical access methods of your target audience when deciding on the preferred setting. - **Compliance**: Some data privacy regulations may implicitly favor email verification as it contributes to better data quality and user consent verification. # Configuring Multi-Factor Authentication on the User Portal**Multi-Factor Authentication (MFA)** adds a crucial second layer of security to user accounts in OPSCOM, significantly enhancing protection against unauthorized access. Currently, the primary method implemented is the use of **one-time passwords (OTPs)** sent via email. This article outlines how administrators can configure MFA at the system level and how users interact with this enhanced security feature on their portal.
### Setup & Configuration Implementing MFA involves administrator-side configuration within System Settings and customizing the associated email template. ##### Admin Side Configuration One-time passwords will not be available on the user portal until enabled within **System Settings**. 1. Hover over **System Configuration** and click **System Settings**. 2. On the **User Profile** tab, click **Enable Multi-Factor Authentication**.If this setting is not available for you to change, please have your primary Admin contact
One-time passwords always expire after **15 minutes**. This cannot be changed.
 --- ### Using this Feature ##### User-Side MFA Management Users can enable and manage their one-time password settings from their security page (formerly the passwords page). [Refer to this wiki article](https://opscom.wiki/books/OPSCOM-user-portal/page/multi-factor-authentication-user-portal) to see the steps involved.The state of the user's one-time password verification is stored in the local storage of their session data. If the local storage is cleared (e.g., clearing browser cache), they will have to enter another one-time password. The MFA verification does not persist across different web browsers or devices, meaning the user will have to enter a new one-time password if they try to log in using another browser or device.
--- ### Best Practices & Considerations - **Security Enhancement**: MFA significantly reduces the risk of unauthorized access, even if primary login credentials are compromised. It is highly recommended for all users. - **Gradual Rollout (Visible vs. Required)**: When introducing MFA, consider starting with the **Visible** setting to allow users to opt-in voluntarily. Once accustomed, transition to **Required** for all users if your security policy mandates it. - **Clear Communication**: Inform users about the MFA requirement, how to set it up, and how to log in using OTPs. Provide clear instructions and troubleshooting tips. - **Email Deliverability**: Ensure that your system's email settings are correctly configured and that OTP emails are not being blocked by spam filters. Users need to receive these emails promptly to log in. - **Template Customization**: Customize the OTP email template to include your organization's branding and any specific instructions for your users. - **User Training**: Consider providing brief training or a guide for users on how to manage their MFA settings and log in with OTPs. - **OTP Expiry**: Remind users that OTPs are time-sensitive (15 minutes) and that generating a new one invalidates previous ones. # Password and Security SettingsThe Security Settings in OPSCOM provide administrators with critical tools to enforce robust password policies and manage login security for all administrative accounts. Properly configuring these settings is essential for protecting sensitive system data, preventing unauthorized access, and complying with organizational security standards.
Security settings are managed within the **System Settings** area of OPSCOM. 1. Hover over **System Configuration,** and click **System Settings**. 2. Click **Security**. The **Manage System Settings** window will open, displaying all available security configurations. ### Using this Feature The **Security** component within **System Settings** allows administrators to configure various aspects of password management and account lockout policies. ##### Password Security Settings - **Salted Password Hashing**: - **Purpose**: This setting adds an essential layer of security to stored passwords. Hashing is a one-way, irreversible process that converts a user's password into a unique, short hash value. "Salting" introduces a random string into this process, ensuring that even if two users have the same password, their stored hash values will be different. This prevents "lookup" (reverse engineering) of the original password, meaning forgotten passwords must be reset, not retrieved. This significantly limits an administrator's ability to view employee passwords and closes a critical security vulnerability.**Note**: Once **Hash and Salt** is enabled, it **should not be turned off**.
- **Require Password Update**: - **Purpose**: When activated, this setting forces users to change their passwords upon their next login. - **Use Case**: Ideal for ensuring compliance with regular password changes or after a password reset by an administrator. - **Toggle Password Expiry**: - **Purpose**: By default, passwords in OPSCOM do not expire. For enhanced security, it is best practice to mandate regular password changes. This setting enables the use of password expiry. - **Configuration**: Toggle this setting **On**. - **Password Expiry in days**: Enter the number of days after which an administrator's password will expire, aligning with your organization's security policy (e.g., 90 days). - **Enable Password History**: - **Purpose**: When toggled **On**, OPSCOM will remember passwords previously used by an administrator. The system will then prevent the reuse of those passwords for a specified period. - **Configuration**: Set **How long to remember old passwords** (in days) to define the duration for which old passwords are not allowed to be reused. ##### Password Strength Requirements These settings allow you to enforce complexity rules for administrator passwords. - **Minimum Password Length**: Sets the minimum number of characters required for a password. - **Enable password strength requirements**: Toggles on or off the following specific complexity requirements: - **Numerical Characters**: Sets the minimum number of numbers required in the password. - **Lower Case Characters**: Sets the minimum number of lowercase characters required in the password. - **Upper Case Characters**: Sets the minimum number of uppercase characters required in the password. - **Non-Alpha Numeric**: Sets the minimum number of non-alphanumeric (special) characters required in the password (e.g., `!, &, #,` etc.). ##### Admin Account Lockout Settings These settings provide an additional layer of security by locking an administrator out of their account after repeated incorrect password attempts. - **Enable Admin Lockouts**: Toggles on or off the account lockout feature. - **Lockout after X Attempts**: Sets the number of failed login attempts with an incorrect password before the system will lock out the administrator. - **Login attempt timeframe**: Sets the timeframe (in minutes) during which incorrect login attempts are counted. For example, if an administrator fails 3 times within a 5-minute period, their account will be locked out. - **Lock the admin out for X minutes**: Sets the duration (in minutes) that the administrator's account will remain locked. For example, setting it to `120 minutes` would mean the administrator is locked out for 2 hours before another login attempt is permitted. --- ### Best Practices & Considerations - **Robust Security Policy**: Always implement a robust security policy that combines strong password requirements (length, complexity), password expiry, and lockout mechanisms. - **Enable Hashing**: Ensure **Salted Password Hashing** is always enabled for maximum password security. - **Regular Password Expiry**: Enforce regular password expiry (e.g., every 90 days) to mitigate the risk of compromised credentials. - **Meaningful Lockout Settings**: Configure lockout settings to balance security with user convenience. Too aggressive settings can lead to frequent lockouts, while too lenient settings can be a security risk. - **Communication**: Inform administrators about the security policies in place, including password strength requirements, expiry rules, and lockout procedures. This helps them comply and understand why they might be locked out. - **Admins can see, only OPSCOM Team can change**: Several security settings (e.g., **Hash and Salt**, **Require Password Update**, **Toggle Password Expiry**, **Enable Password History**, **Enable password strength requirements**, **Enable Admin Lockouts**) are visible to administrators but can only be changed by the OPSCOM Team. For modifications to these specific settings, contact [OPSCOM Support](mailto:support@ops-com.comcom). # Uploading and Managing FilesThe **Manage Files** section in your OPSCOM Admin site provides a centralized repository for all files used across your OPSCOM instance, primarily images for your user and admin dashboards. This feature allows administrators to easily upload, view, organize, and manipulate these files, ensuring consistent branding and visual content throughout your system.
### Using this Feature The **Manage Files** page offers different ways to view and interact with your uploaded files. 1. To access this, click **System Configuration,** then **Manage Files.** ##### Viewing Files Files can be viewed in two primary modes: - **Grid Mode**: Displays a visual preview (thumbnail) of each image, which is useful for quickly identifying content. - **Table Mode**: Provides a detailed list view, showing file names and other relevant information. ##### Managing Existing Files By right-clicking on an image or file, a contextual menu will appear, giving you several options: - **Download**: Save a copy of the file to your local device. - **Rename**: Change the name of the file. - **Delete**: Permanently remove the file from the system. To crop an image (i.e., resize or adjust its visible dimensions to focus on a specific area), first **View** the image. Then, click the **Cropping icon** to begin selecting the desired area of the image. ##### Adding Files to the Repository To add new files to this repository, click on the **Upload** tool. An **Upload files** interface will appear, prompting you to **Select files,** then **Submit**. The file will then be uploaded to your site's file storage.**Note:** Once an image is uploaded, it cannot be moved to a different folder. To maintain proper organization, ensure that you upload the image directly into the intended destination folder.
##### Adding Images to a Page (Referencing Uploaded Files) To display an image you've uploaded onto an OPSCOM page (e.g., a page header or a custom content area): 1. Click **Insert** in the text editor toolbar. 2. Select **Image** from the dropdown menu. 3. In the **Insert/edit image** window, click the **search folder icon** next to the source field to open the **Filemanager**. 4. In the Filemanager, locate and **double-click** the image you wish to insert. 5. The image will be added to the page at the location of your cursor. --- ### Best Practices & Considerations - **Organize Files**: If you have many files, consider creating sub-folders within the file manager to keep your assets organized and easy to find. Be sure to upload files directly into the appropriate folder, as uploaded files cannot be moved once added. - **Descriptive File Names**: Use clear and descriptive file names (e.g., `company-logo-header.png` instead of `image1.png`) to simplify identification and referencing. - **Optimize Image Sizes**: Before uploading, optimize large images for web use. Smaller file sizes will improve page load times for both admin and user interfaces. - **Backup Critical Assets**: While OPSCOM manages these files, consider maintaining local backups of critical branding assets (logos, banners) as a best practice. - **Path Accuracy**: When linking images to pages, ensure the URL path is exactly correct, including capitalization, as file paths are often case-sensitive. # Admin Dashboard Setup (Quick Start)The OPSCOM Dashboard is a fully customizable, widget-based analytics dashboard built into the admin portal. Each user can create multiple personal dashboards, arrange widgets freely on a drag-and-drop grid, and configure each widget individually to show exactly the data they need. Dashboards and widgets automatically refresh on a configurable schedule and are fully responsive down to mobile widths.
## Setup & Configuration Configuring dashboard layouts requires specific [administrative permissions](https://opscom.wiki/books/setup-configuration-for-admins/page/manage-roles-and-permissions). Dashboard layouts and widget configuration are now fully documented in our feature guide. For detailed instructions on available widgets, customization, and layout options, see the [**Using the OPSCOM Dashboard & Widgets**](https://opscom.wiki/books/the-opscom-admin-portal/page/using-the-opscom-arc-system-dashboard-widgets) article.