**Email Templates** in OPSCOM allow administrators to customize the content and appearance of automated emails sent by the system. By leveraging available shortcodes and a smart editor, you can create dynamic, informative, and engaging messages for various notifications, ensuring clear and consistent communication with users.
### Using this Feature #### **Default Email Templates** To access and manage your default email templates: 1. Hover over **System Configuration,** then **Contents & Design,** and click **Email Templates**. 2. All the default email templates available in the system will be displayed. The **Email Templates** interface allows you to edit existing templates, utilize dynamic shortcodes, and configure various fields to tailor your messages. ##### Editing Default Email Templates 1. Locate the template you wish to edit in the list. 2. Click the **Edit** button next to it. 3. You will be taken to a dedicated editor interface where you can make changes to the email template. [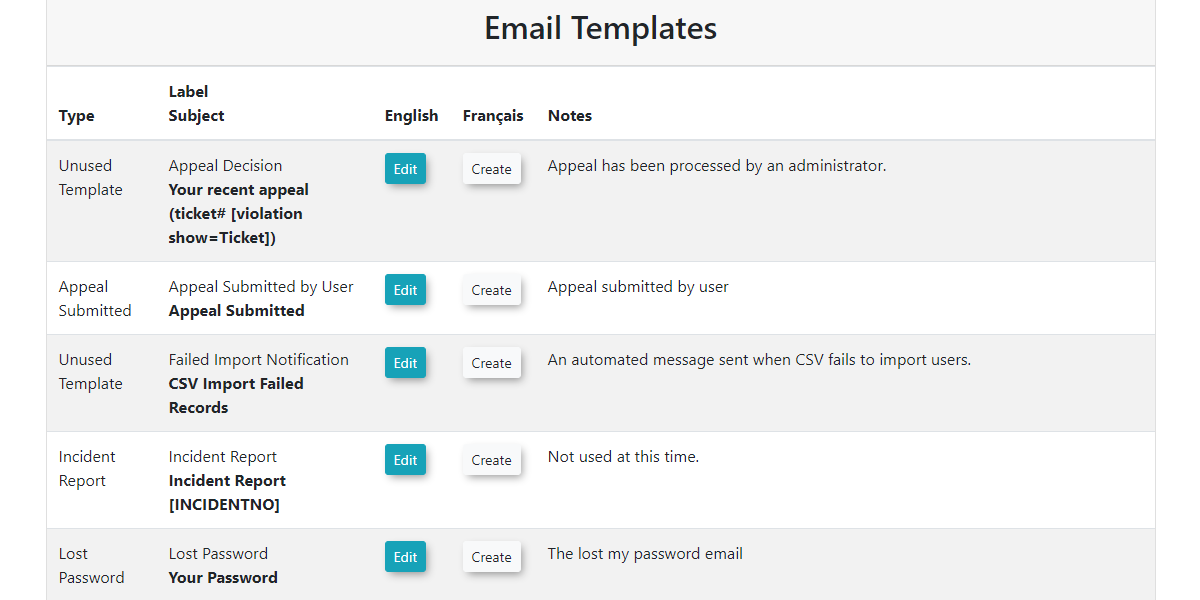](https://opscom.wiki/uploads/images/gallery/2024-06/79Nimage.png) ##### Creating Templates for Other Languages If you have other languages installed, you can click the **Create** button to create templates for these languages. ##### Email Template Fields - What do they do? When editing an email template, you will configure the following fields: - **Label**: This field is how you will identify your email template within the system's list. - **Type**: This is a non-adjustable value that indicates the specific purpose or trigger for this email template (e.g., "Appeal Submitted," "Password Reset"). - **Language**: This field contains options to select the language for the template, typically supporting options like **French** or **English**. - **Layout**: This allows you to select a pre-defined layout that surrounds your message. Layouts include your email header, footer, and overall styling. You can create or adjust email template layouts under **System Configuration,** then **Contents & Design,** and click **[Email Headers & Footers](https://opscom.wiki/books/setup-configuration-for-admins/page/email-headers-and-footers)**. - **Subject**: This is the text that will appear as the subject line of the email message. - **HTML Content**: Here you will write the main body of the message. This section supports rich text formatting, the insertion of images, and the use of shortcodes to create visually appealing and dynamic emails. - **Text Content**: This section is a simple text editor for the message itself. It does **not** support shortcodes or any formatting. This plain text version is often used as a fallback for email clients that do not render HTML. ##### Using Shortcodes Each email template has a set of **available shortcodes** that you can use to dynamically insert specific information into your message. [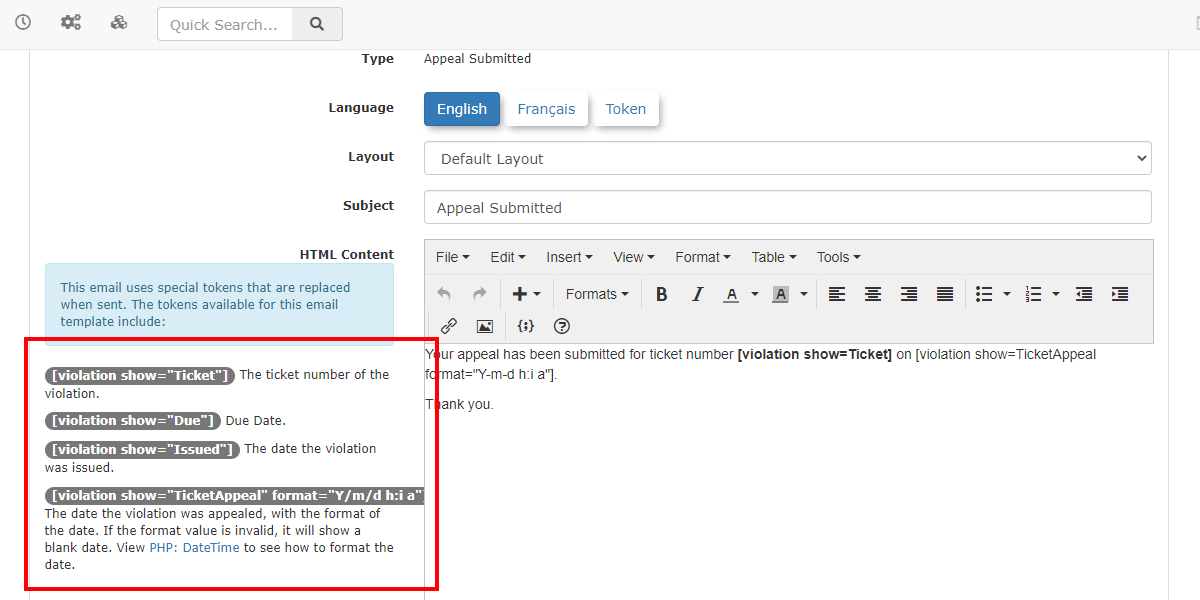](https://opscom.wiki/uploads/images/gallery/2024-06/Uo4image.png) - The shortcode tokens are typically displayed on the **left side** of the template editor. - For example, the email template for "Appeal Submitted by User" might offer shortcodes to automatically include details like `[ticket_appealed_date]` or `[ticket_number]`, allowing you to craft messages without manually knowing these specifics. - You can insert these shortcodes into the **smart editor** on the right side. The system will automatically replace the shortcode with the appropriate information when the email is sent to the desired user. - The smart editor also provides formatting capabilities, allowing you to add images, format text, and arrange your messages much like a word processor. #### **Custom Email Templates** Administrators can create and store frequently used emails that are not tied to specific system triggers. These templates can be used to automatically populate the email body when manually drafting a message to a user. ##### Creating a Custom Template 1. Click the **Create** button. 2. Enter a descriptive **Label**. Custom templates are assigned an internal type code beginning with `custom`. 3. Compose the message using the **HTML Content** and **Text Content** fields. 4. Click **Save**. ##### Using Custom Templates in Compose Email When drafting a manual email to a user via the **Compose Email** page: 1. Use the **Load Template** section to view all available custom templates. 2. Select a template to automatically populate the email contents. 3. The **Compose Email** interface will highlight any required fields that must be completed before you can click the **Send Email** button.**Tip:** Unlike system-defined templates, custom templates include a **Delete** button, allowing you to remove them when they are no longer needed.
--- ### Best Practices & Considerations - **Utilize Shortcodes Fully**: Maximize the use of available shortcodes to make your emails dynamic, personalized, and informative, reducing manual effort and potential errors. - **Consistent Branding**: Use email layouts (**Email Headers & Footers**) to maintain consistent branding (logos, colors, contact info) across all your system-generated emails. - **Clear Subject Lines**: Craft clear and concise subject lines so users can immediately understand the purpose of the email. - **Review Both HTML and Text Content**: Always ensure both the **HTML Content** and **Text Content** sections are populated and convey the message clearly. This provides compatibility for all email clients. - **Test Templates**: After making changes to an email template, send a test email to yourself or a test account to verify that all shortcodes are rendering correctly, formatting is as expected, and the message is clear. - **Language-Specific Templates**: If your system supports multiple languages, ensure you create and maintain separate templates for each language. - **Verify Custom Templates**: When using the **Load Template** feature, remember that custom templates show for all users regardless of the selected language; ensure the correct version is chosen.