Stripe Payment Provider Setup
The Stripe Payment Provider Setup feature allows administrators to integrate with Stripe to process credit card payments directly within the system. Its primary purpose is to provide a secure and seamless checkout experience for users while simplifying financial reconciliation for your operations. This article is intended for OPSCOM administrators responsible for financial setup and payment gateways.
Setup and Configuration
This feature requires configuration within the OPSCOM administration portal as well as the external Stripe developer dashboard.
Admin Side: Administrators must have the appropriate system role permissions enabled to access the payments configuration menus and establish external integrations.
User Side: End-users interact with this feature seamlessly during the checkout process on the web portal or when interacting with field staff using handheld devices.
Admin Portal Configuration
-
Hover over System Configuration, click Payments, then Setup Payment Types.
-
Click the Add Type button.
-
Click the Payment Provider drop-down menu and choose Stripe.js.
-
Name the payment type, select the applicable user types, and click the Settings tab.
-
Enter your Stripe public key into the Publishable Key field.
-
Enter your Stripe secret key into the Secret Key field.
-
Verify that the Currency setting is correct for your region (the default is US dollars).
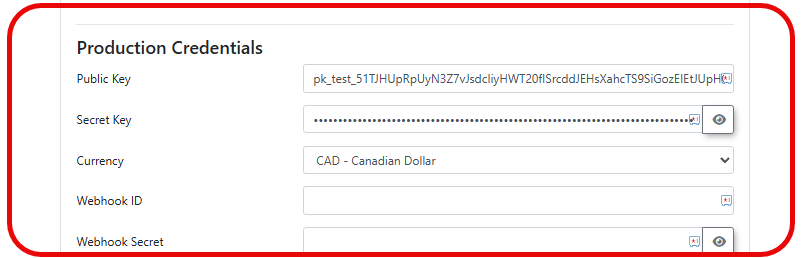
Only enter testing credentials into the configuration fields until you are completely ready for your users to have live access to this payment method.
Stripe Web hook Configuration
Webhooks are absolutely essential for Stripe to notify OPSCOM regarding payment successes or refund completions. Without these webhooks correctly configured, the system will not communicate any transaction information back to OPSCOM.
Register Your Endpoint
To begin receiving notifications, you must define exactly where Stripe should send the transaction data.
Retrieve Your Signing Secret
Once the endpoint is created, Stripe generates a unique security key to verify that the data sent to your server is authentic.
-
Locate the Signing secret section on the summary page for your newly created webhook.
-
Click the Reveal button to display the string (which typically begins with the prefix whsec_).
-
Copy this entire string and navigate back to your OPSCOM payment settings.
-
Paste the copied secret into the Webhook Secret field.
-
Copy the Destination ID provided by Stripe.
-
Paste the ID into the Webhook ID field to ensure all incoming data is securely verified.
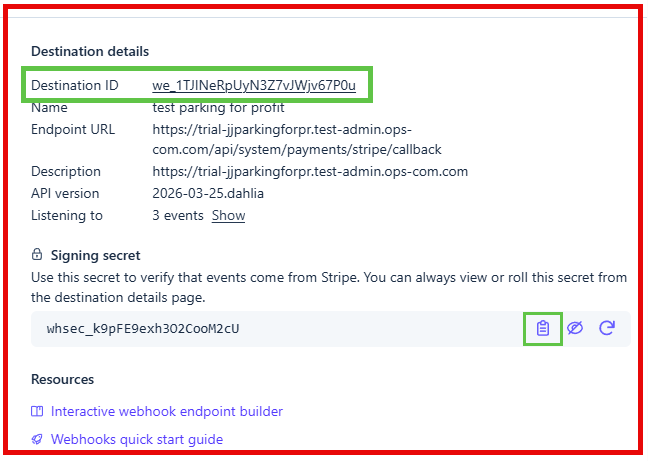
Ensure that your Webhook Secret is correctly matched between Stripe and OPSCOM to prevent pending status errors on completed payments.
Using this Feature
The checkout process is optimized for both web portal users and administrators using handheld devices in the field.
Web Portal Transactions
-
Click the Pay with Credit Card button when you reach the final stage of a transaction to open the secure payment form.
-
Enter the required credit card details into the form.
-
Click the Submit Payment button to complete the purchase.
Handheld App Transactions
-
Tap Checkout to open the payment summary within the OPSCOM for Android app.
-
Tap Select Payment Method and choose Stripe.
-
Tap and Hold the Process Payment button to finalize the transaction.
Managing Transactions and Reports
Administrators can seamlessly review all processed payments and manage financial returns through the standard reporting interfaces.
-
Hover over Financial Management, click Transaction Reports, then Recent Payments.
-
Review the Status column to determine the current state of each payment, and the Payment Date column to see exactly when the transaction occurred.
-
Click the View Details icon next to a specific transaction to see the full Stripe receipt.
-
Click the Refund Payment button to initiate a return of funds.
-
Click the Confirm Refund drop-down menu and choose Full Refund to finalize the reversal.
Best Practices and Considerations
-
Perform thorough deployment testing: Organizations should always keep Live Mode disabled during the initial deployment until all testing is verified with test credit card information. It is highly recommended to process a single, small test transaction in Live Mode using a real card before making the payment option available to the general public.
-
Maintain strict security requirements: Maintaining the security of your financial environment is critical. You should never share your Stripe secret key or webhook secret with anyone, nor should you store it in plain text outside of the secure administration configuration screens.
-
Rotate security keys regularly: Change the signing secret periodically. Additionally, ensure you only subscribe to the strictly required event types within Stripe to minimize unnecessary data transmission.