This feature shows how to integrate with Stripe to process credit card payments directly within the system. Its primary purpose is to provide a secure and seamless checkout experience for users while simplifying financial reconciliation for operations. This article is intended for **OPSCOM administrators** responsible for financial setup.
--- ## Setup and Configuration ### Admin Portal To begin the integration, an administrator must setup a payment type in OPSCOM, with will be linked to their Stripe account. This is handled through the central administration portal where you will input your unique credentials. - Hover over **System Configuration > Payments**, then click **Setup Payment Types**. - Click **Add Type**. - Click the **Payment Provider** drop-down menu and choose **Stripe.js** from the available options. Once the provider is selected, you can **name the payment type**, **select applicable user types**, and then **go to the settings tab*.*** Now, you have to get the API keys for your Stripe account, and setup webhooks, which can be found on the stripe dashboard, which you should be logged into, from a previous step. Your **Publishable Key**, and **Secret Key**, can be found and copied here. You can click on these values to copy them, and paste them into the payment type settings in OPSCOM. [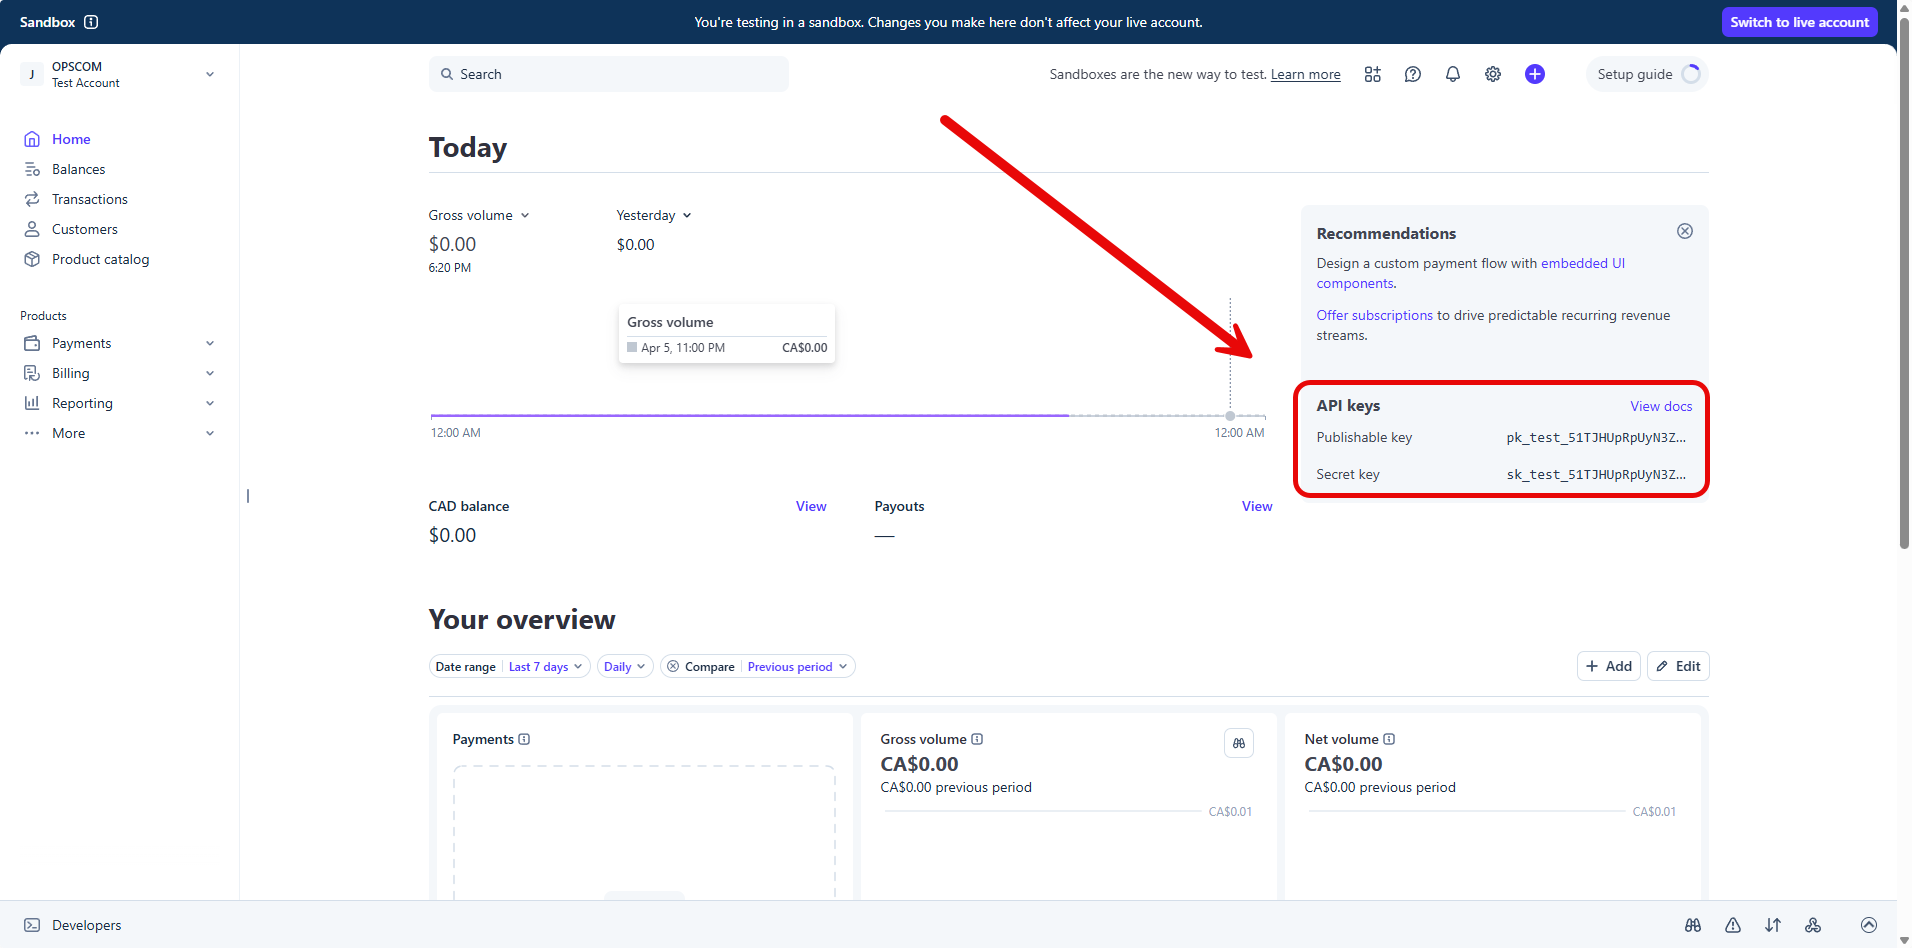](https://opscom.wiki/uploads/images/gallery/2026-04/VOiimage.png)You must provide your unique identification keys. Enter your Stripe public key into the **Publishable Key** field and your Stripe secret key into the **Secret Key** field. **Only enter the Testing Credentials until you are ready for your users to have access to this.**
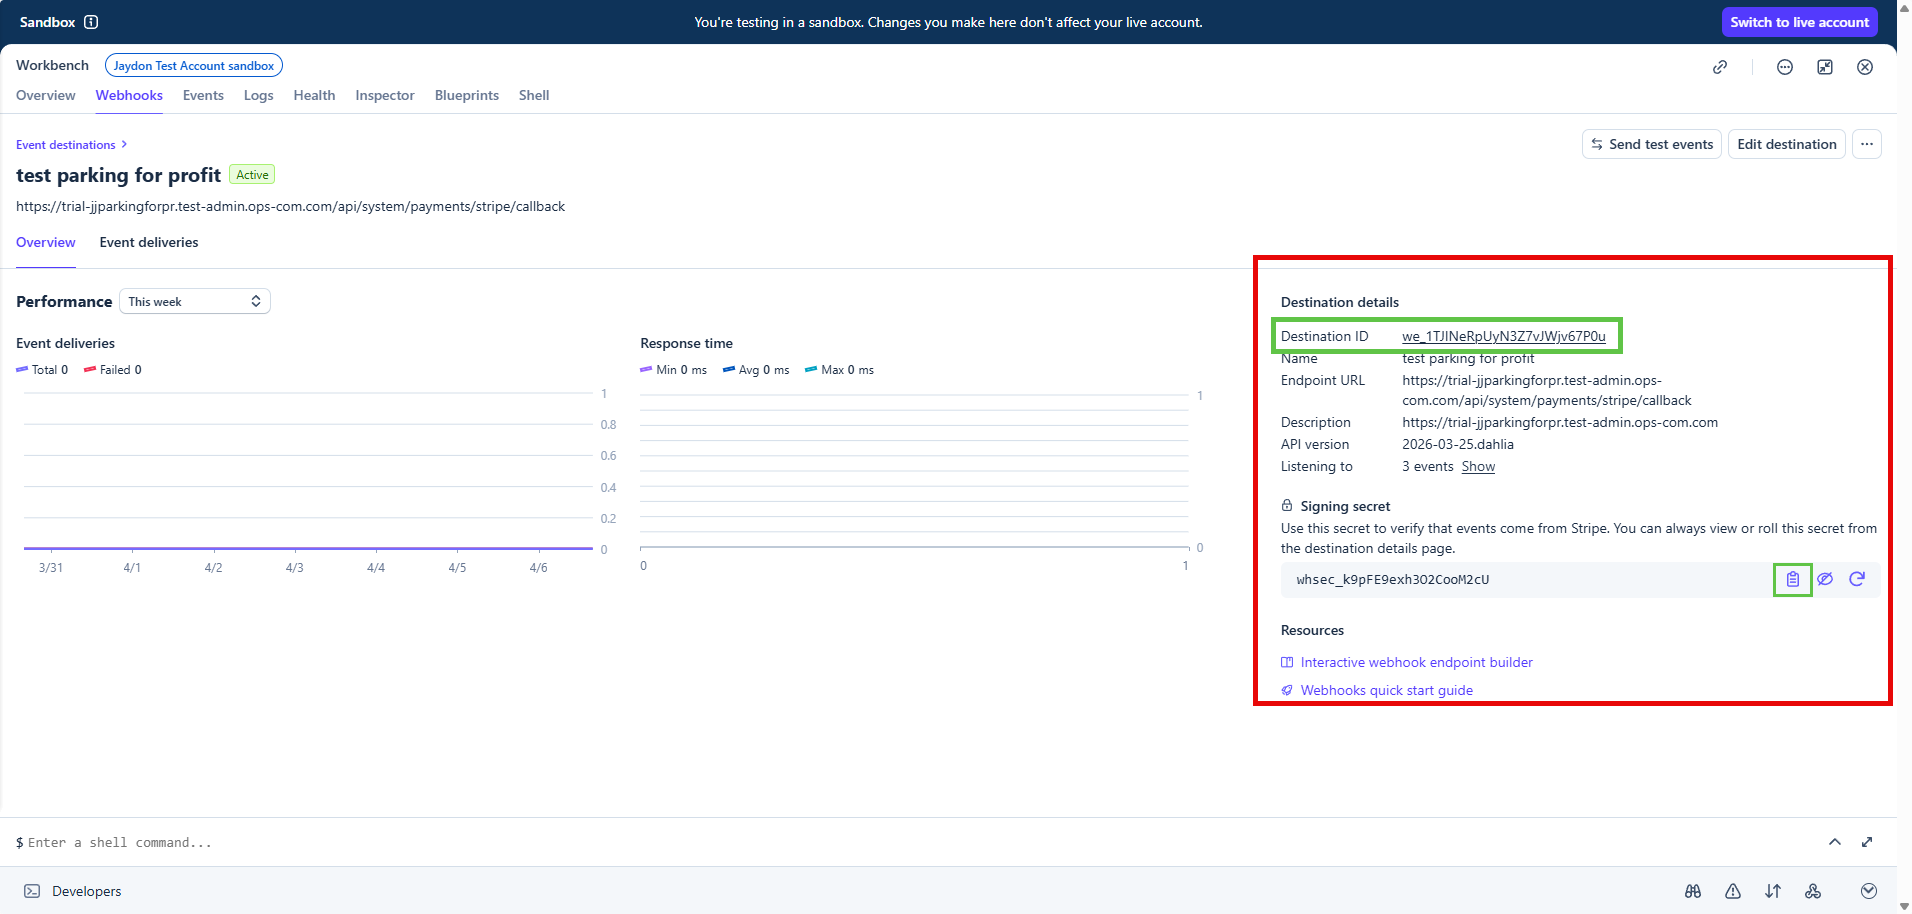
Take this time to ensure that the ***Currency*** setting is correct, in the payment type settings (the default is US dollars). The next steps will be about populating the **Webhook ID** and **Webhook Secret** fields, in OPSCOM, with the correct information from your Stripe dashboard. [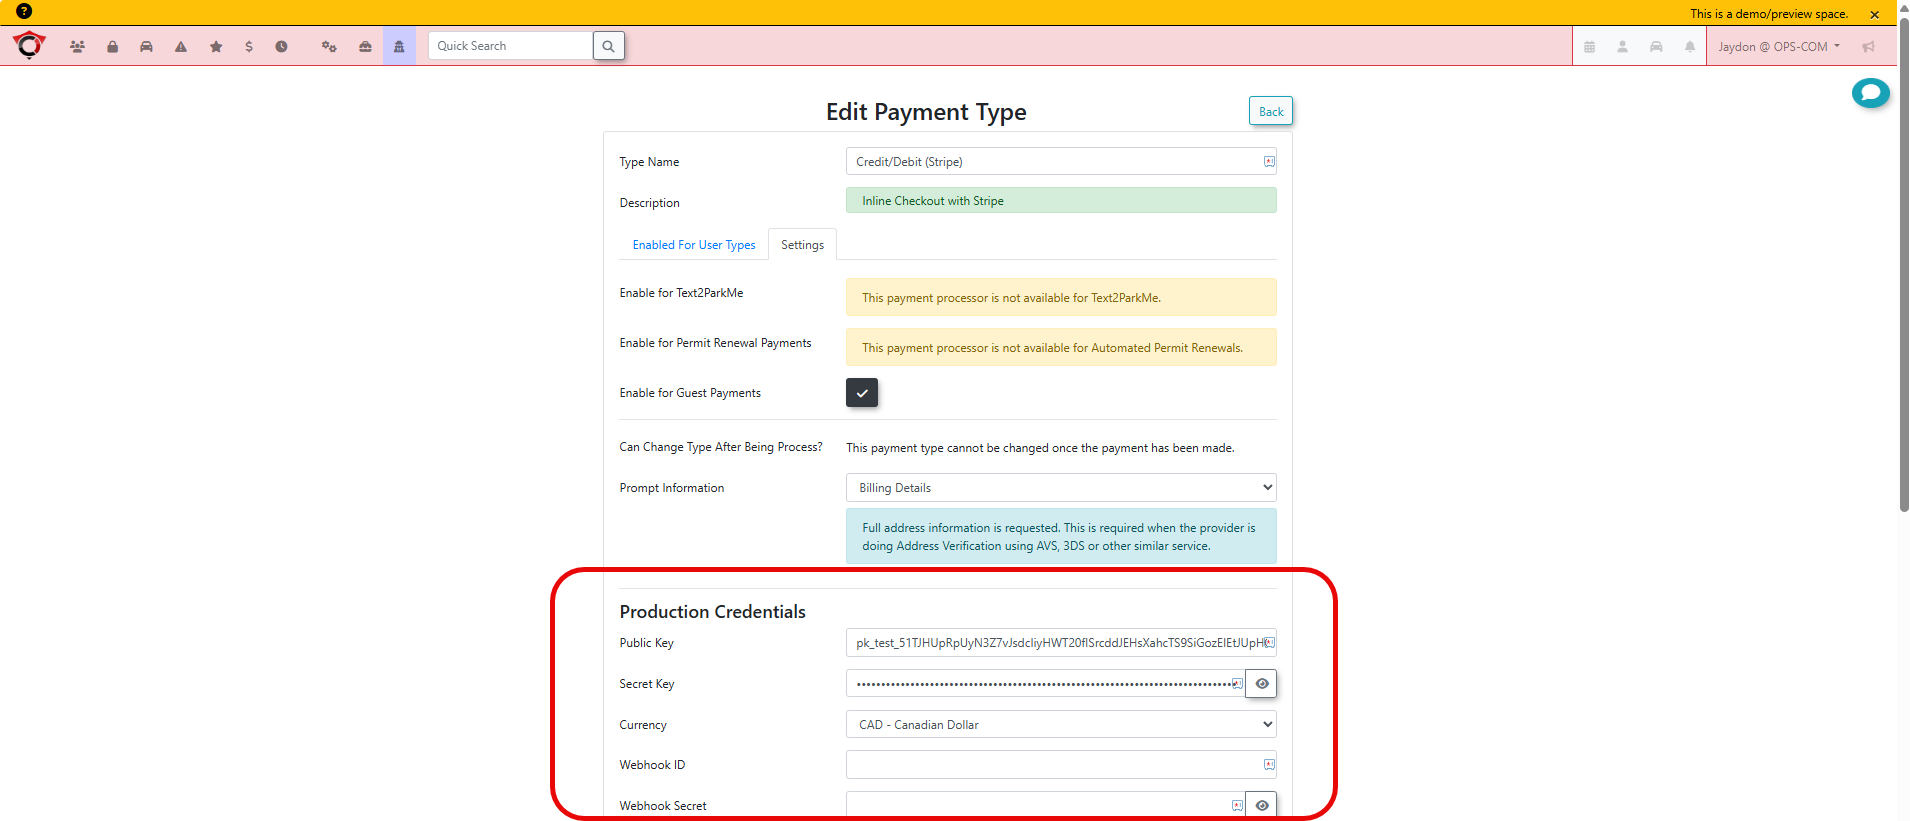](https://opscom.wiki/uploads/images/gallery/2026-04/gCTimage.png) --- ### Third-Party Webhook Configuration Webhooks are essential for Stripe to notify OPSCOM regarding payment successes or refund completions.Without these Webhooks, the system **WILL NOT** communicate any transaction information to OPSCOM.
| Sub-section | What it covers |
|---|---|
| **Register Your Endpoint** | Step-by-step Stripe Dashboard instructions to create an event destination, select event types, and enter the OPSCOM webhook URL |
| **Retrieve Your Signing Secret** | How to reveal and copy the `whsec_` secret, and destination ID into OPSCOM |
| **Test Your Endpoint** | Stripe CLI commands to forward live test events locally before going live |
| **Secure Your Endpoint** | Signature verification explanation and IP allowlisting recommendation |
| **Manage Event Delivery** | Delivered/Pending/Failed status descriptions and how to manually resend events |
Ensure that your **Webhook Secret** is correctly matched between Stripe and OPSCOM to prevent "Pending" status errors on completed payments.
[](https://opscom.wiki/uploads/images/gallery/2026-04/E3jimage.png) --- ## User Experience and Handheld Use ### Web Portal Transactions Users will interact with the Stripe interface during their standard checkout process. When they reach the final stage of a transaction, they simply click the **Pay with Credit Card** button to open the secure payment form. After they enter the credit card details into the form, they click the **Submit Payment** button to complete the purchase. ### Handheld App — *OPSCOM Parking Enforcement* For administrators or staff using handheld units in the field, the process is optimized for touch interaction. Tap **Checkout** to open the payment summary within the app. From there, tap **Select Payment Method** and choose **Stripe**. To prevent accidental charges, the final step requires you to tap and hold the **Process Payment** button to finalize the transaction. ## Managing Transactions and Reports Administrators can review all processed payments and manage financial returns through the standard reporting interfaces. Hover over **Financial Management** and click **Transaction Reports** then **Recent Payments** to view a live list of activity. Within this report, the **Status** column displays the current state of each payment, while the **Payment Date** indicates exactly when the transaction occurred. If you need more detail, click the **View Details** icon next to a specific transaction to see the full Stripe receipt. If a correction is needed, click the **Refund Payment** button to initiate a return of funds. You will then click the **Confirm Refund** drop-down menu and choose **Full Refund** to finalize the reversal.You can quickly find a specific transaction by using the search bar to enter a user's name or a specific receipt order ID/Confirm Code.
--- ## Best Practices and Considerations - **Deployment Testing** Organizations should always keep **Live Mode** disabled during the initial deployment until all testing is verified with test credit card information. It is highly recommended to process a single, small test transaction in **Live Mode** using a real card before making the payment option available to the general public. - **Security Requirements** Maintaining the security of your financial environment is critical. You should never share your **Stripe Secret Key** or **Webhook Secret** with anyone or store it in plain text outside of the secure administration configuration screens. - **Change the signing secret periodically**, and only subscribe to required event types.