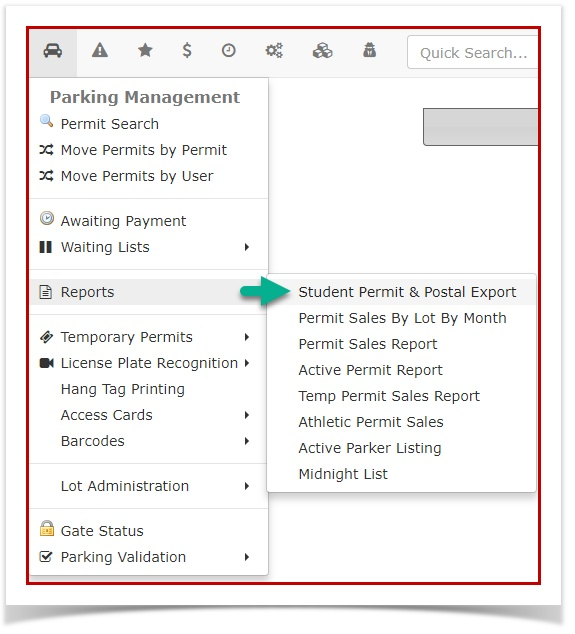
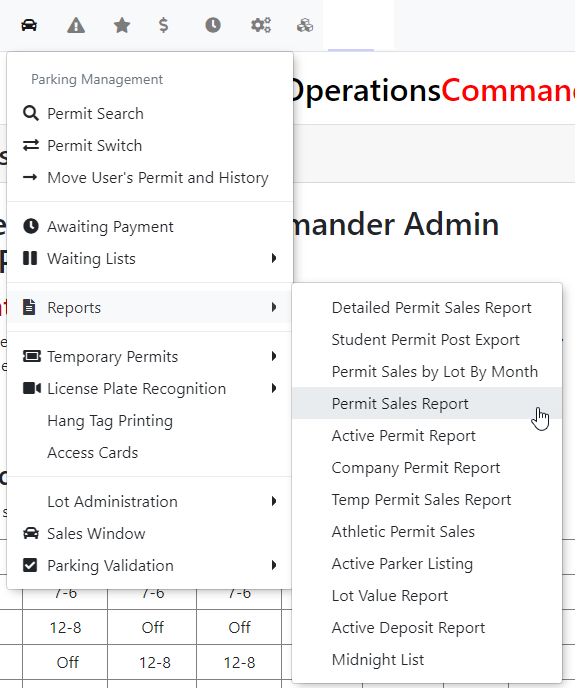
Parking Reports
- Permit Sales by Lot by Month
- Student Permit and Postal Export
- Active Deposit Report
- Lot Value Report
- Company Permit Report
- Detailed Permit Sales Report by Lot
- Invoiced Permits Report - Billing Summary by Date by Lot
- Temp Permit Sales Report
- Permit Sales Report
- Active Permit Report
- Subscription Verification Report
Permit Sales by Lot by Month
The Permit Sales by Lot by Month report provides OPS-COM administrators with a detailed breakdown of permit revenue and volume. It allows users to analyze sales performance for specific months, categorized by parking lot and payment method.
Setup & Configuration
This report is a standard feature of the Permit Management module. No additional configuration is required to enable the report, provided the administrator has the necessary permissions to access Reports.
Instructions for managing the lots that appear in this report can be found on the Lot Administration page.
Using this Feature
The Permit Sales by Lot by Month report is used to track financial trends and volume across different parking areas within a specific timeframe.
-
Hover over Permit Management and click Reports then Permit Sales by Lot by Month.
-
Select the desired month from the Month drop-down menu.
-
Select the desired year from the Year drop-down menu.
-
Click the Retrieve button to generate the report.
Key Information Displayed
-
Lot Name: The specific parking lot or zone associated with the sales.
-
Payment Type: The method used for the transaction (e.g., Credit Card, Payroll Deduction, etc.).
-
Amount: The total monetary value of permits sold, formatted as currency.
-
Sold: The total count of individual permits sold within the selected parameters.
Available Actions & Buttons
-
Copy: Copies the current table data to the clipboard.
-
CSV: Exports the report data into a Comma Separated Values file.
-
Excel: Downloads the report as an .xlsx spreadsheet.
-
PDF: Generates a portable document format version of the report.
-
Print: Opens the system print dialog to create a hard copy of the data.
Best Practices & Considerations
-
Reconcile regularly by comparing the Amount column against your financial processor reports to ensure all Payment Types are being recorded correctly.
-
Use the Export features to archive monthly data, as this provides a helpful historical snapshot for year-over-year growth analysis.
-
Verify Lot names periodically in Lot Administration to ensure that the data remains organized and easy for accounting teams to interpret.
Student Permit and Postal Export
1. In Parking Management, hover over the 'Permit Management' icon and click 'Student Permit and Postal Export'.
2. This will bring up the Student Permit and Postal Code Report page. Enter the start date and end date for the report you want to generate. Select the Create Report button to have the report exported to an Excel spreadsheet. The report will look similar to the sample below.

Office Excel: spreadsheet preview is finally here!
You can now display this file as a spreadsheet, instead of a PDF. Re-upload StudentPer...305D4644813.xls to display the new preview. https://OPSCOM.atlassian.net/wiki/download/attachments/755925/StudentPermit_11-02-2017_20305D4644813.xls?api=v2
Active Deposit Report
he Active Deposit Report provides OPS-COM administrators with a comprehensive overview of all security deposits currently held within the system. This report is designed to help staff track outstanding funds, identify orphaned deposits without active permits, and manage financial rollovers during sales cycles.
Setup and Configuration
While the Active Deposit Report is a standard feature, its accuracy depends on proper permit type configuration.
-
Ensure that permit types requiring a deposit have the Deposit Amount field populated within Permit Management and Lot Administration.
-
Verify that financial departments have established a General Ledger (GL) Code specifically for deposit accounts to ensure seamless reporting between OPS-COM and external accounting software.
-
Instructions for initial permit setup can be found on the Permit Configuration page.
Using this Feature
Administrators use this report to audit current liabilities and ensure that deposits are either refunded, consumed, or renewed when a user’s parking status changes.
Accessing the Report
-
Hover over Parking Management in the main navigation menu.
-
Click Reports.
-
Click Active Deposit Report.
-
The Deposit Report By Lot page will load, displaying a breakdown of deposits categorized by their assigned parking area.
Visual Cues and Status Indicators
To assist with quick auditing, the report uses specific color-coding to highlight records requiring attention:
-
Yellow Highlighting: Indicates deposits that have been rolled over to a new permit cycle but have not yet been fully processed or reconciled.
-
Red Highlighting: Indicates "orphaned" deposits where the user no longer has an active permit associated with the funds, or the sales window has closed without action.
Key Information Displayed
-
User Name: The account holder associated with the deposit.
-
Permit Number: The specific permit linked to the funds.
-
Lot Name: The physical location the deposit is secured against.
-
Deposit Amount: The total value held by the organization.
-
Date Added: When the deposit was originally paid.
Managing Active Deposits
When a user finishes parking or a permit expires, administrators must manage the deposit through the User Profile. There are three primary methods for handling these funds:
Refunding
Use the Refund action if the user is finished parking and the deposit item (e.g., a physical gate key or hangtag) is returned in good standing. This returns the original amount paid back to the user's initial payment method or via a manual check.
Consuming
The Consume action is used when the user is finished parking but the deposit funds are being retained by the organization. This is common when:
-
The user did not return the deposit item.
-
The item was returned damaged or not in good standing.
-
The user lost the item.
Note: Consuming a deposit does not trigger a refund or a new charge; it simply moves the funds from a "held" status to an "earned" status for the organization.
Renewing
The Renew action is used when a user intends to continue parking but their original deposit has been forfeited due to damage or loss. This allows the administrator to require a new deposit payment for the upcoming permit period while closing out the previous record.
Best Practices and Considerations
-
Perform regular monthly audits of the Active Deposit Report to identify orphaned deposits (highlighted in red) and ensure your liability accounts match your physical inventory.
-
Establish a clear business rule for the timeframe in which a deposit must be claimed. Organizations should decide if a deposit is automatically consumed if a permit has been expired for more than 30 or 60 days.
-
Always verify the condition of hardware (transponders, fobs, or keys) before selecting the Refund button to prevent financial loss.
-
Document the reason for consumption in the User Notes section of the User Profile whenever a deposit is not returned to provide a clear audit trail for the customer.
Lot Value Report
The Lot Value Report provides a real-time snapshot of permit utilization across all parking lots. This report helps OPSCOM administrators understand current lot occupancy and the total value of all active permits currently assigned to their facilities.
Using this Feature
The Lot Value Report displays data reflecting the exact moment the report is generated. Because it tracks currently active permits rather than historical sales transactions, the figures will fluctuate as permits expire or are issued.
To access and use this report:
-
Hover over Permit Management, then over Reports, and click Lot Value Report.
-
Review the Lot Usage screen which displays a breakdown of permit distribution.
-
Click the Export to Excel button if you require the data for further manipulation or external reporting.
Key Information Displayed
-
Rented: The number of permits currently assigned to users within that lot. This includes all active permits, such as administrative, internal, complimentary, or temporary permits, regardless of whether a financial transaction occurred.
-
Total Available: The maximum capacity or total number of permits allocated for that specific lot.
-
Utilization: The relationship between rented permits and total capacity, expressed as a percentage.
-
Total Value: The cumulative value of all active permits currently assigned to the lot.
Best Practices & Considerations
-
Understand that this is a snapshot-in-time report. Unlike sales reports that allow for selectable time periods, this report reflects current occupancy. It includes permits sold in prior months that are still active today.
-
Do not use this report for financial auditing of monthly sales. Because this report counts non-revenue permits (like internal or special access permits), the Rented count will often be higher than the totals found in revenue-specific reports.
-
Use this report to answer capacity questions. This is the primary tool for administrators to answer the question: How many permits are currently assigned to this lot?
-
Export data regularly if you need to track utilization trends over time, as the system does not store historical "snapshots" of this specific utilization screen.
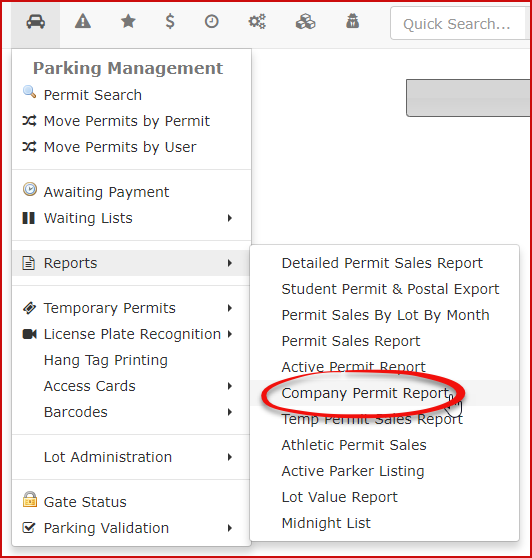
Company Permit Report
- In Parking Management, hover over Permit Management and click Reports then Company Permit Report.

- The Company Permit Report screen will display. You can filter by Processed On/Active on dates or by Company. Enable the check box if you want to show archived permits in your search results. In this case we are looking for 'Jones Windows'. Enter this in the company box and click Search. The active on field is the date that the sales window is active for.

- Click the Export button to create a .CSV file.

Detailed Permit Sales Report by Lot
The Detailed Permit Sales Report by Lot provides administrators with a granular view of permit transactions categorized by specific parking areas. This report is essential for understanding sales volume per lot and allows for the export of individual permit records for external data analysis.
Using this Feature
Administrators use this report to audit permit distributions and financial intake across different physical locations.
Generating the Report
-
Hover over Parking Management, select Reports, and click Detailed Permit Sales Report.
-
Enter the desired date range in the search fields to define the reporting period.
-
Click the List Payments button to generate the data.
Key Information Displayed
The report displays data in two primary sections to help balance granular detail with high-level overviews:
-
Lot Specific Payment Details: Groups transactions by lot. If an invoice contains multiple permits, each permit is displayed as an individual line item to ensure accurate lot-level tracking.
-
Summary by Lot: Located at the bottom of the report, this section aggregates the total sales amounts for each lot within the selected date range.
-
Data Columns: Includes specific payment details, permit types, and invoice associations for every transaction.
Available Actions
-
Excel Export: Click the Excel icon (or Export to Excel button) to download the raw data. This is useful for performing complex summations or creating custom pivot tables outside of the OPS-COM environment.
Best Practices & Considerations
-
Accurate Quantity Tracking: To determine the exact number of permits sold within a specific timeframe, export the report to Excel and use the Sum function on the permit line items.
-
Invoice Transparency: Keep in mind that one line item represents one permit. If a user purchased three permits on a single invoice, they will appear as three separate lines in this report to ensure the lot-specific data remains accurate.
-
Reconciliation: Use the Summary by Lot section as a quick reference to cross-check total revenue against your financial deposits for specific parking zones.
This report is the recommended tool for administrators who need to understand exactly what was sold and which lots those sales are attributed to.
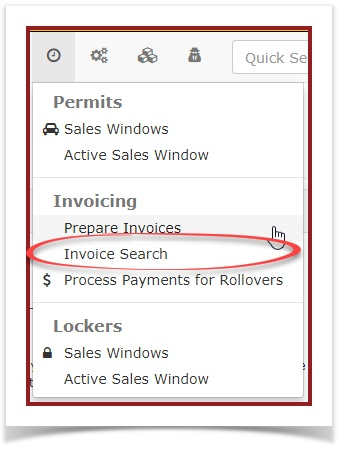
Invoiced Permits Report - Billing Summary by Date by Lot
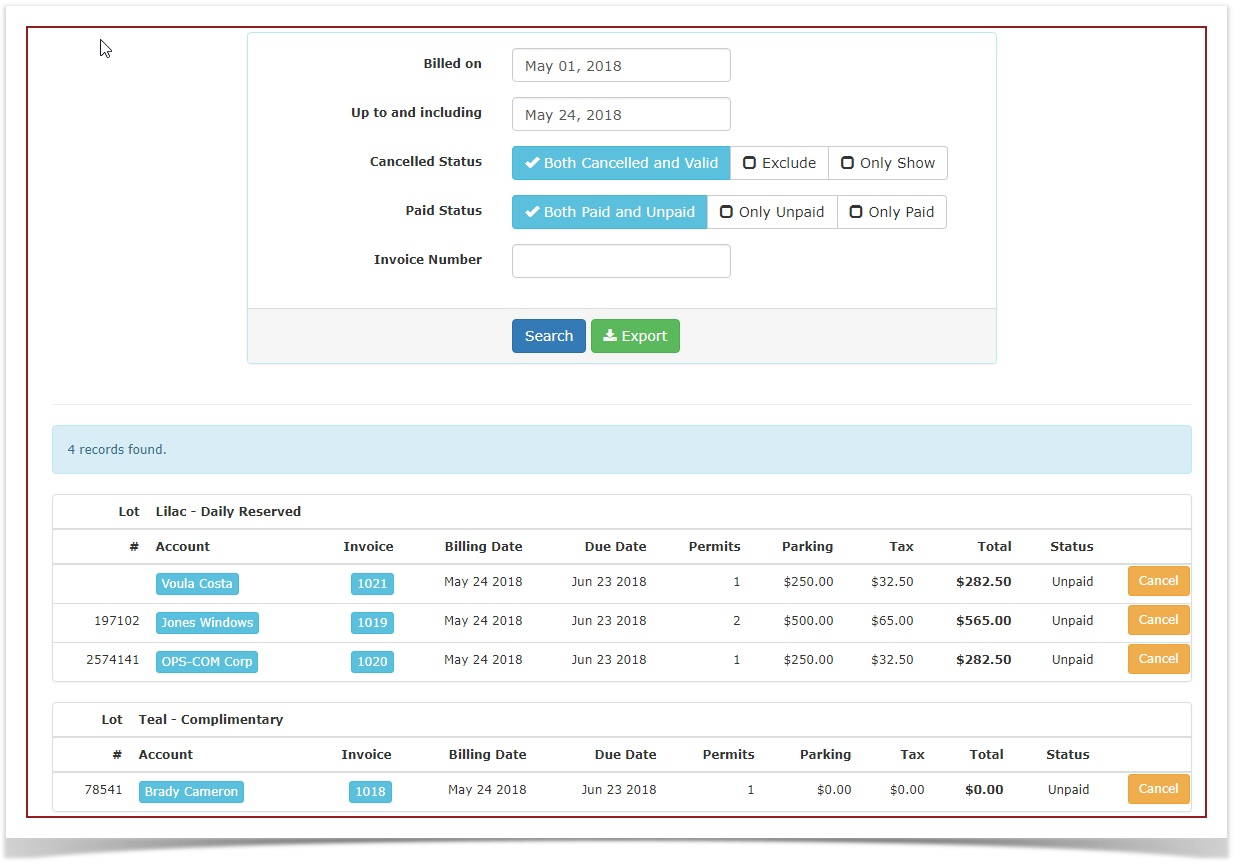
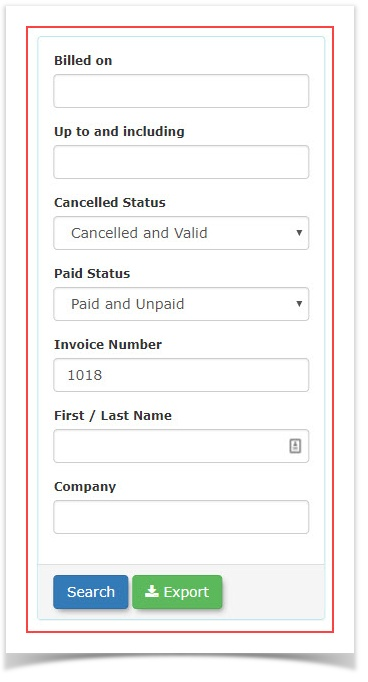
Searching for an Invoice
-
Click Allocations > Invoice Search.

-
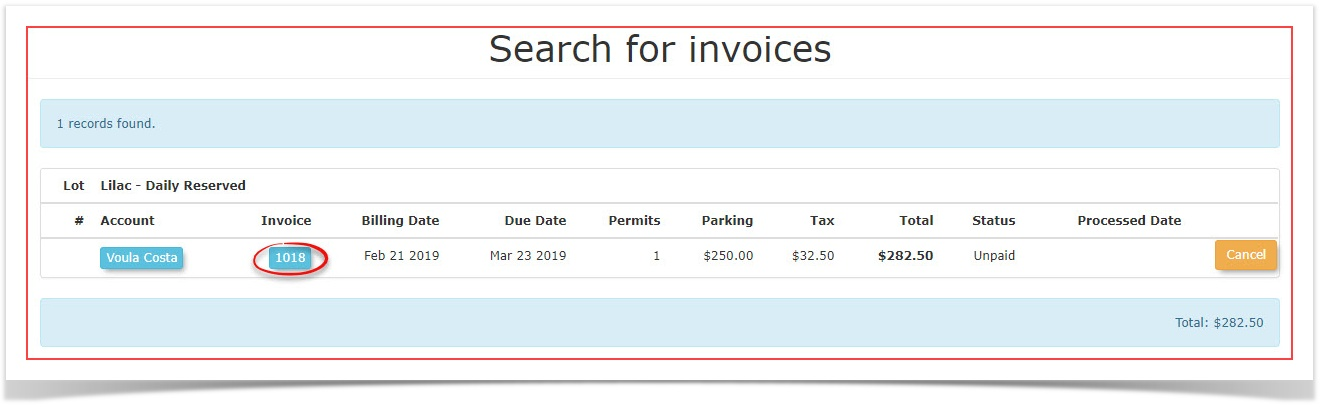
The 'Search for Invoices' screen displays. You can search for a specific invoice or for an invoice issued during a range of dates. You can also eliminate canceled or paid invoices from the search parameters.
In this case we are searching for a date range.

-
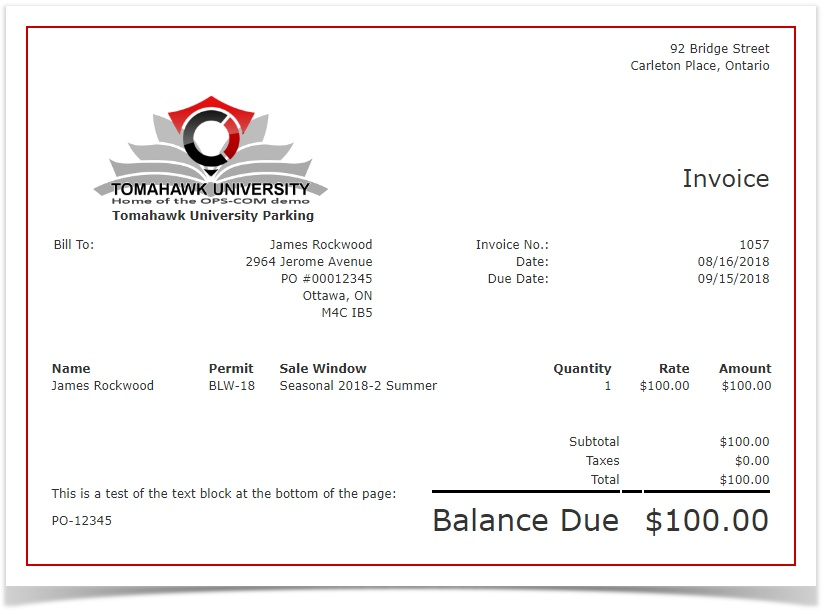
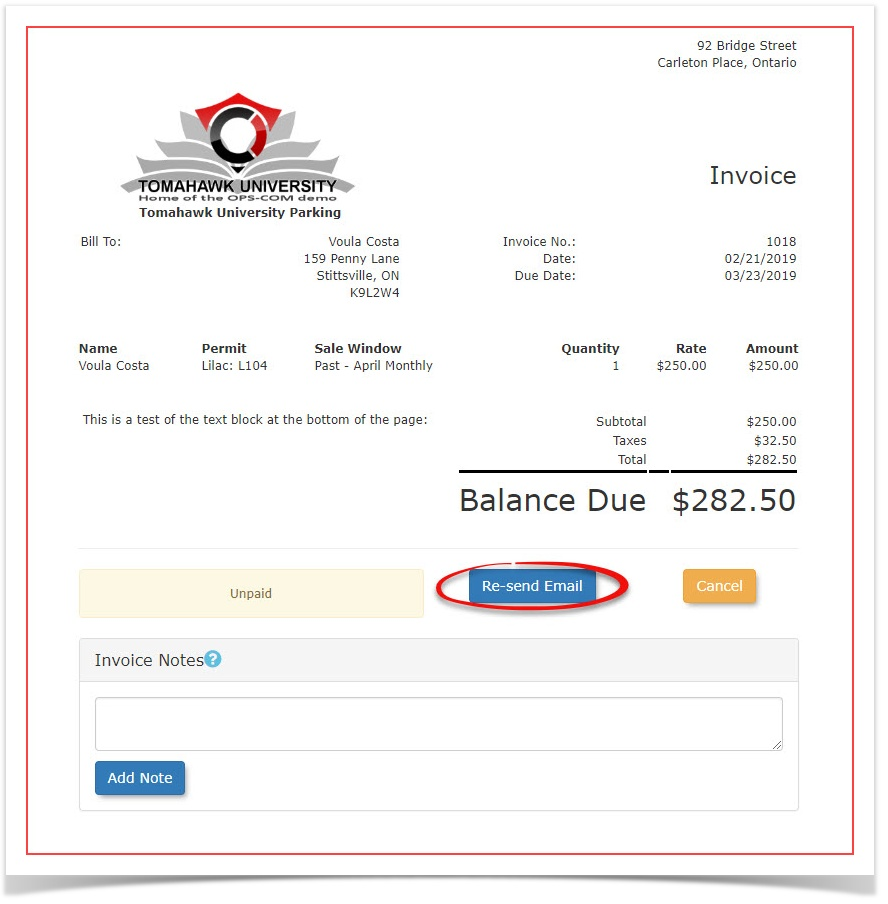
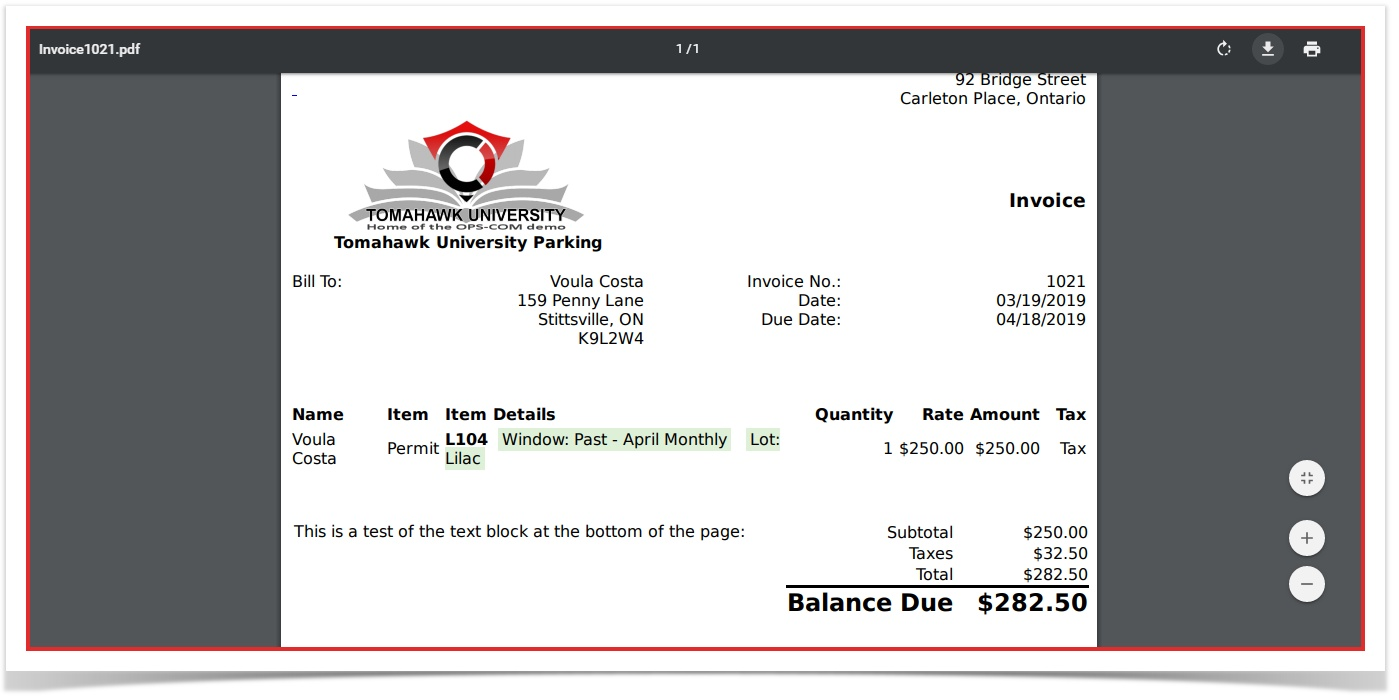
Click on an invoice number to see a copy of the invoice that will be sent to the client.
Note: If you wish to print this you can right click and print it out of your browser. You can also print to a PDF if required.

-
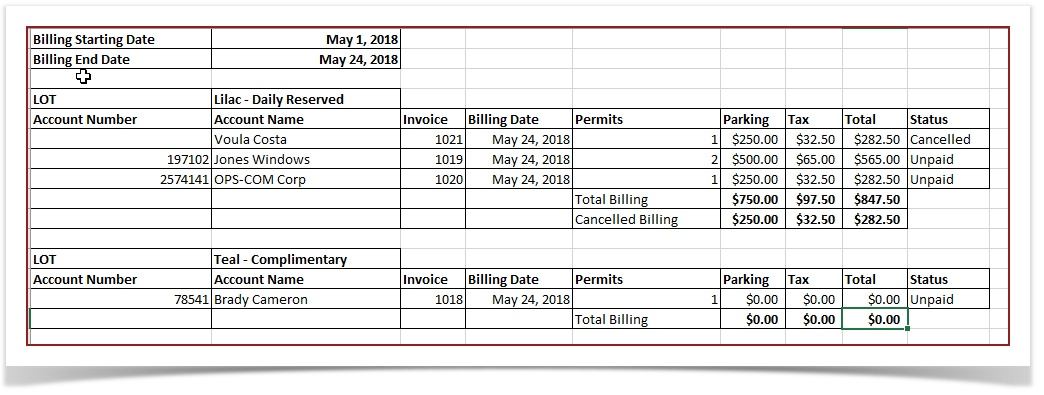
You can also export this report to Excel. This will show you the revenue for a selected date range by Lot.

Re-Sending an Invoice
When do we use this?
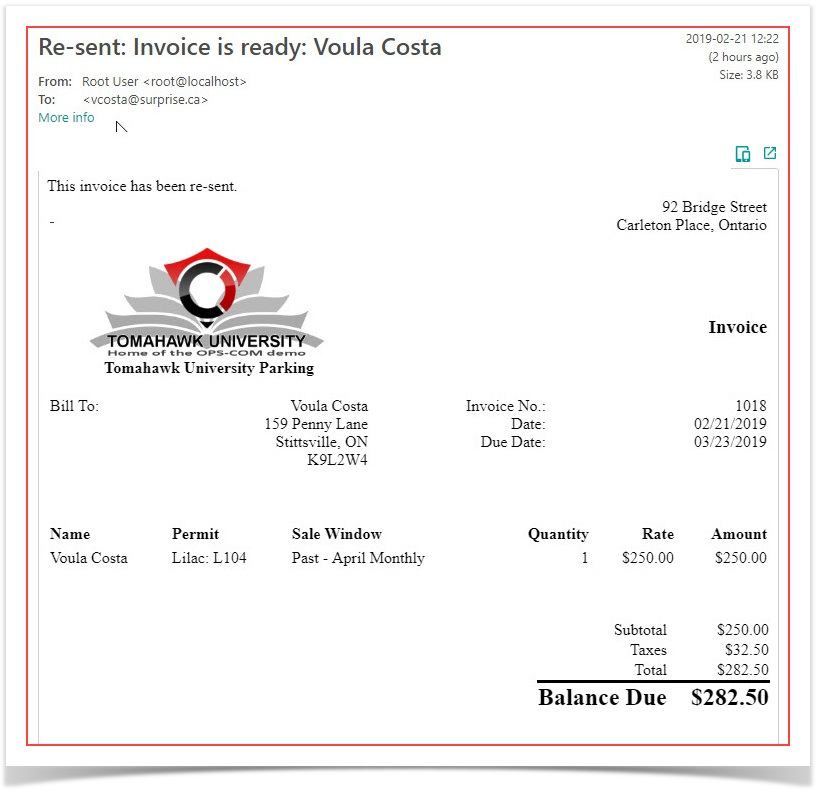
It is also possible to re-send an invoice if the client requests a second copy sent.
If for example the client mistakenly deleted the email, the admin has the ability to search up the original invoice and send it again.
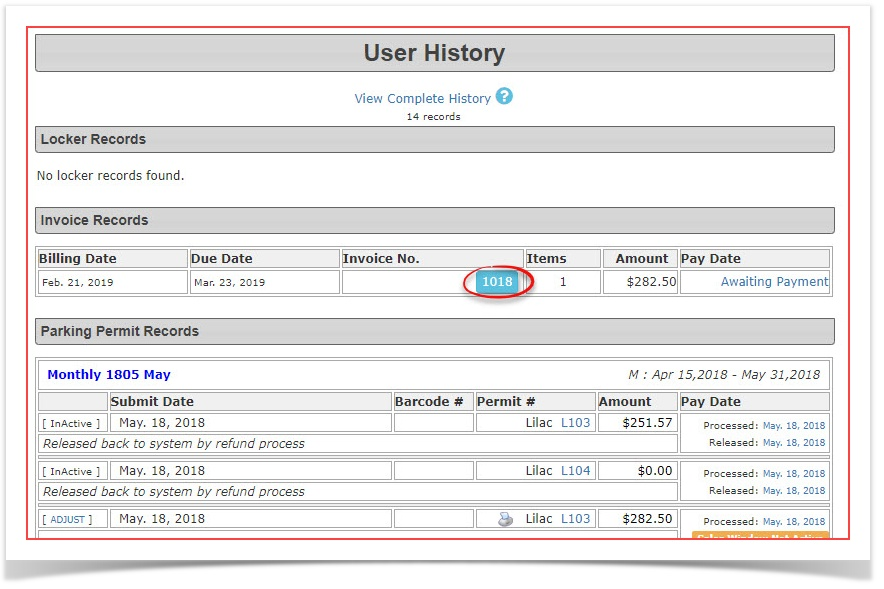
In our sample here we are looking for an invoice for Voula Costa.
-
To do so there are two different methods. You can find the invoice in the user's profile under History or you can search for the invoice through the Search Invoice utility.
-
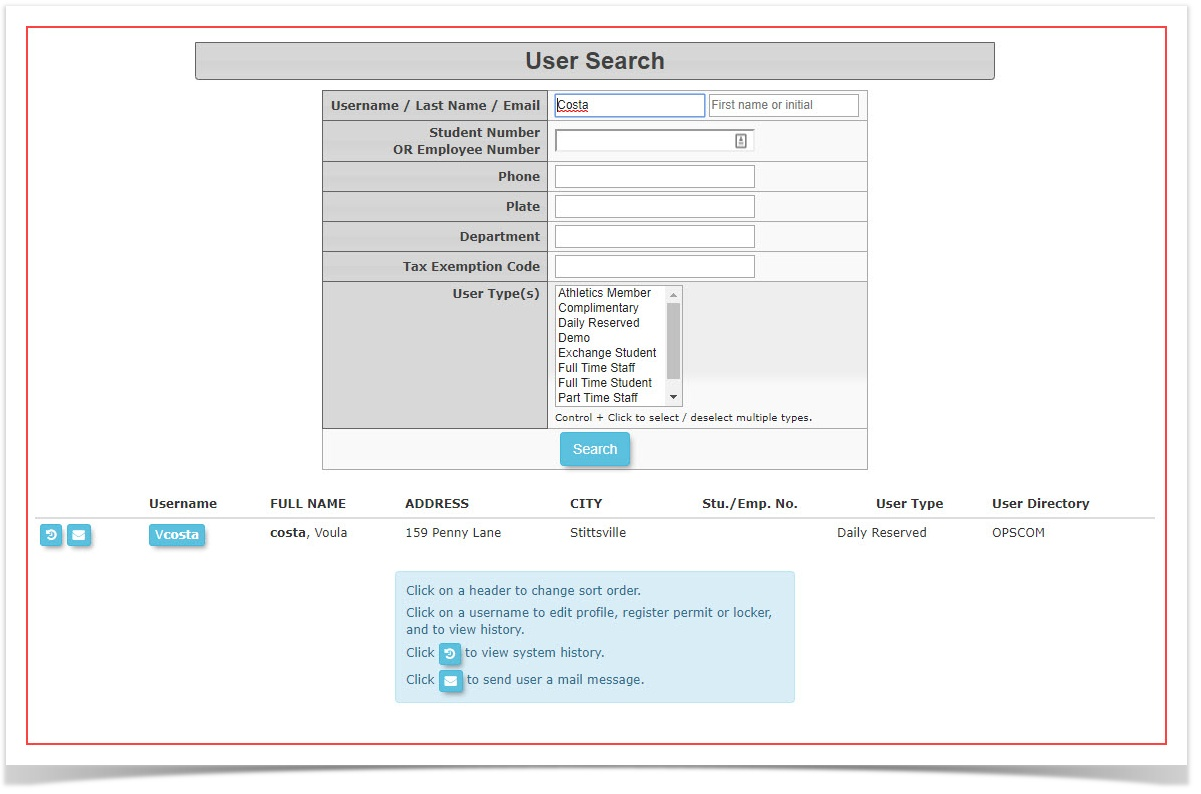
Firstly let's search the user in question: In this case using the last name Costa.

-
Click on the username to access the user's profile.

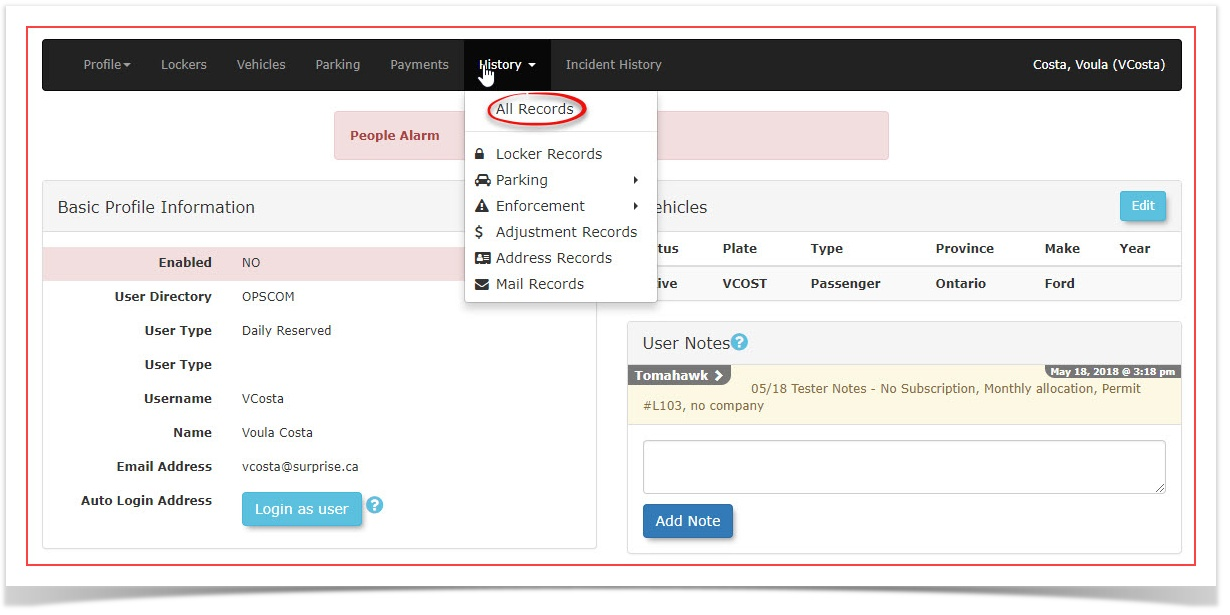
-
Once in the user's profile hover over History and click on All Records to access the list of this user's transactions.

-
Locate and click on the invoice number that you wish to resend.

-
Once in the invoice preview you will notice the Re-Send Email button. Click on this button to re-send the invoice.

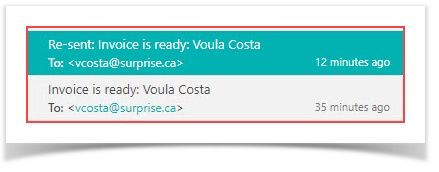
-
The invoice will be re-sent. In the sample below there is an original invoice send as well as a re-send. Notice the email title for the re-send has a prefix added indicating this is a Re-sent invoice.

-
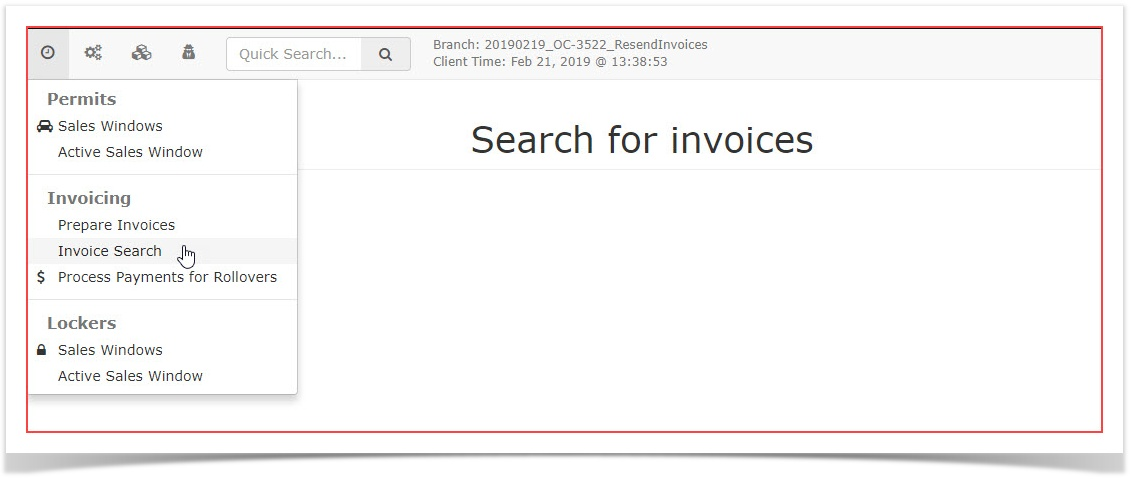
As mentioned above you can also find the invoice you wish to resend using the Invoice Search tool. To do so access the tool under the Permits menu.
Hover over Permits and click on Invoice Search in the drop down menu.

-
In the search criteria window enter the Invoice Number in question and click search. In this case Invoice Number 1018.

-
From the resulting search result click on the Invoice Number to access the Invoice Preview Window.

-
The process after this point is identical to step 6 and 7 above.
-
The Re-Sent Invoice will look identical the original invoice format:


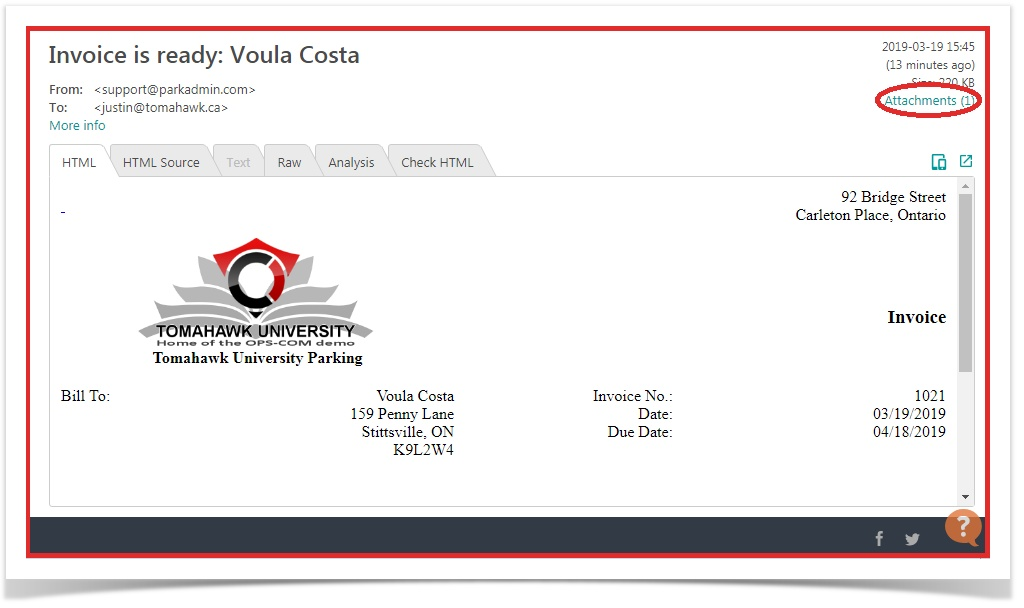
Printing From Emailed PDF
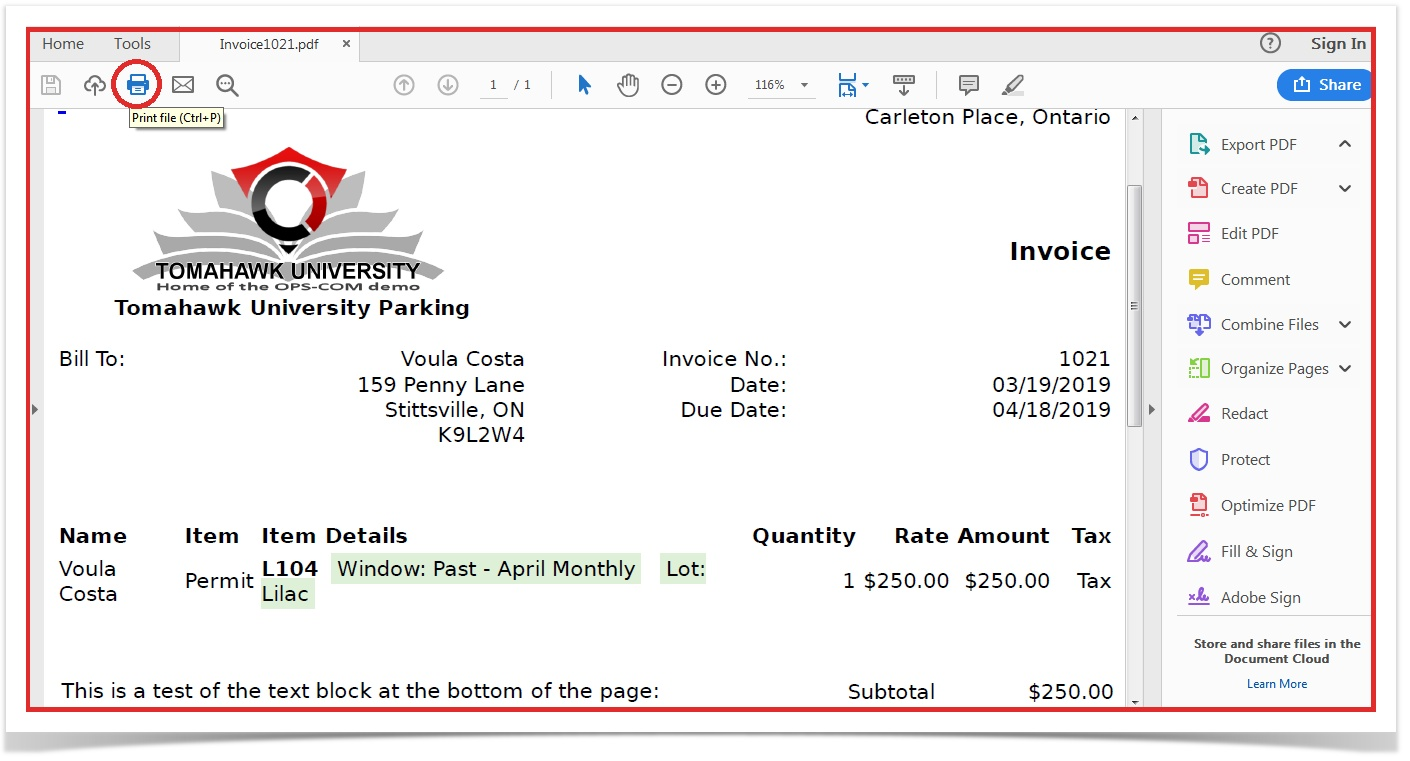
-
It is important to note that in order to print this PDF document you should follow these next steps
-
You must first navigate to the email of the invoice in the client email where you will find an attachments link circled below

-
After opening the attached PDF file you will be brought to the file opened in the web browser.

-
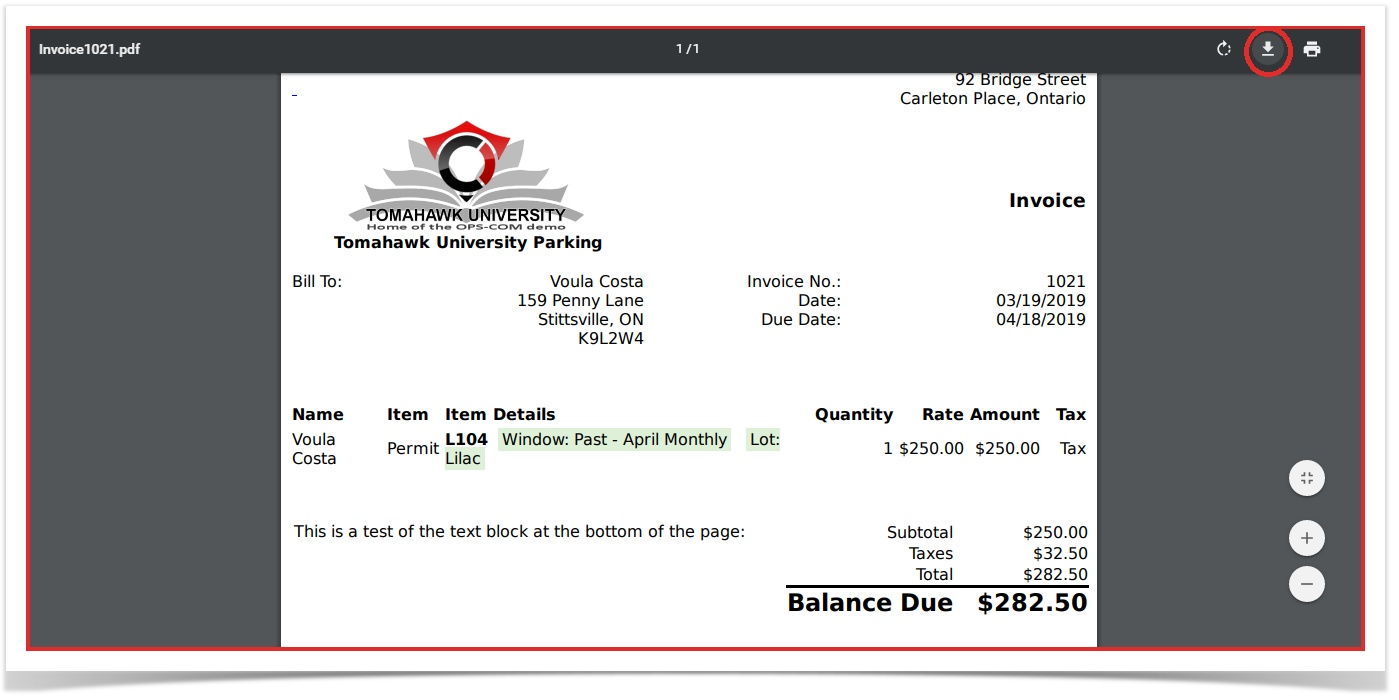
If you print form here you will receive a cut off version of this PDF. In order to prevent this you should download the file by pressing this button:

-
Save it to your preferred location and open it with the PDF reader of your choosing

-
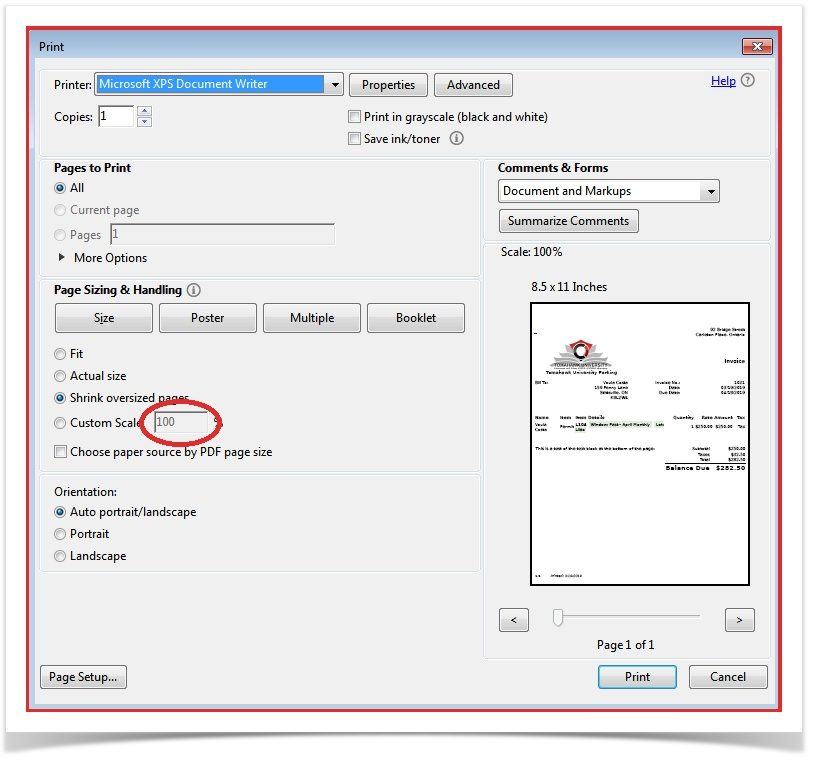
From here you just print the invoice like you would a normal document ensuring that the print scale is set to 100%

Temp Permit Sales Report
This article provides OPSCOM administrators with instructions on how to generate and interpret the Temp Permit Sales Report. This report is used to review temporary permit sales data within a specified date range, categorized by parking lot. It is essential for tracking revenue and permit usage across different locations.
Setup and Configuration
No special setup is required to use this report. It relies on the existing configuration of your organization's lots and temporary permits.
Using this Feature
Administrators can generate the report to view summary data and drill down into lot-specific details.
Generating the Report
-
Go to Parking Management, then Reports, and click Temp Permit Sales Report.
-
On the report page, set the desired date range using the Start Date and Up To and Including date pickers.
-
From the Payment As drop-down menu, select the payment status to filter by, such as Processed or Not Processed or Any.
-
Click the Search button to generate the report.
Interpreting the Results
Once generated, the report displays a summary of temporary permit sales for each lot that had activity within the selected timeframe. Clicking on the Magnifying Glass beside the lot's name will navigate to a detailed report showing every individual temporary permit transaction for that specific lot.
Key Information Displayed
Summary Report:
-
Lot Name: The name of the parking lot where temporary permits were sold.
-
Total Permits: The total number of temporary permits sold for that lot.
-
Total Amount: The total revenue ($) generated from temporary permit sales for that lot.
Detailed Report (by lot):
-
Permit No.: The permit number assigned.
-
Username: The username of the purchaser.
-
Amount: The $ amount of the permit.
- Date: The date of the permit sale.
- Type: The number of hours the permit is valid for, or 'daily' if it is a full daily permit.
- Pay Method: The method of payment.
- Processed Date: The date the payment was processed.
- Vehicles: The license plate number associated with the permit
Available Actions and Buttons
-
Export to CSV, Excel, PDF, Print: Click the appropriate button to export the summary report in the desired format, or click the magnifying glass next to a lot, and click the appropriate button to export the detailed report.
Best Practices and Considerations
- Financial Reconciliation: Use this report regularly to reconcile temporary permit sales with your financial records.
- Data Granularity: For a high-level overview, use the main report and the Export to Excel function. For detailed transactional data, click the individual Lot Name links to investigate further.
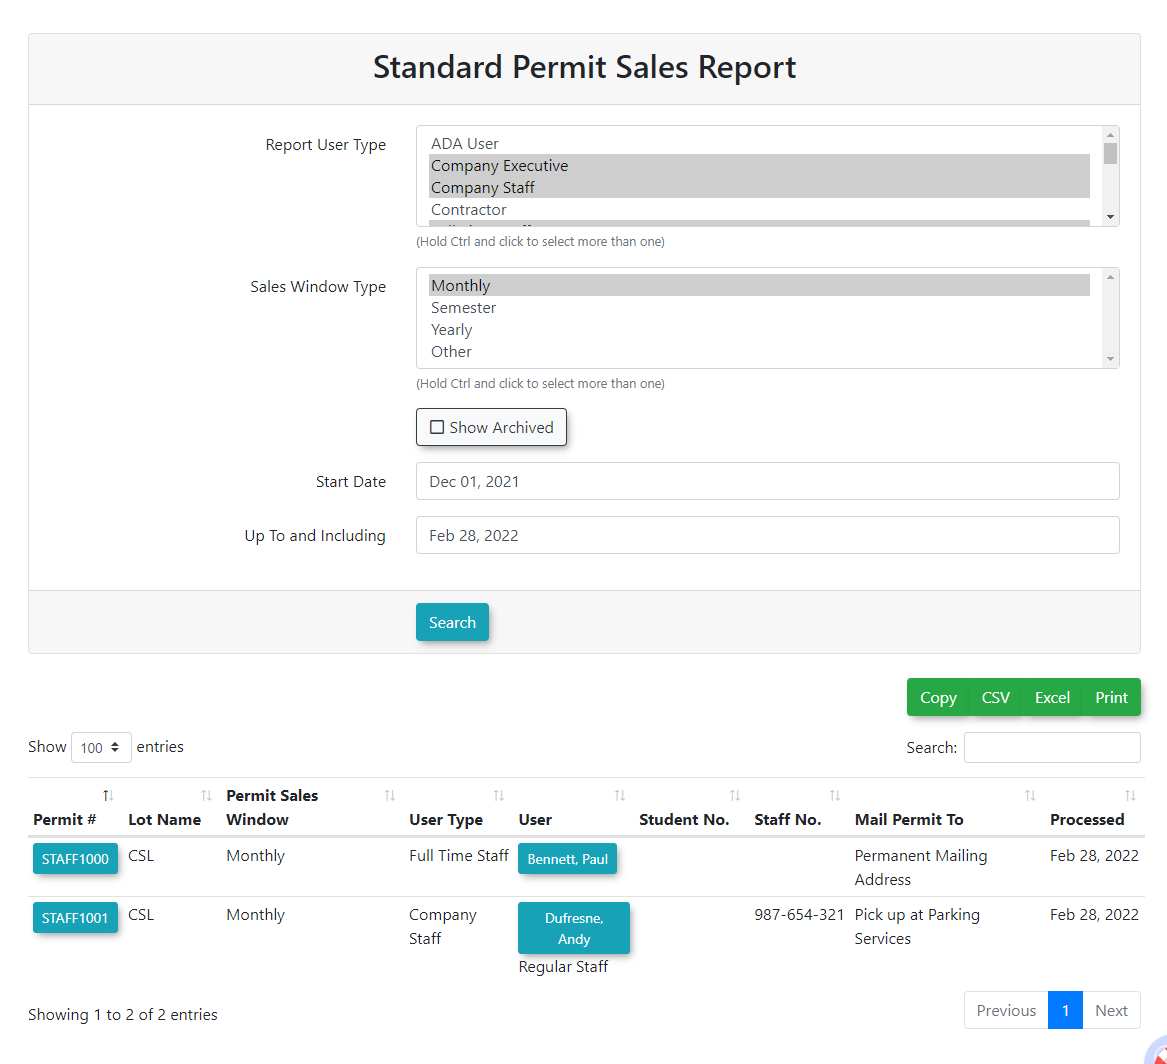
Permit Sales Report
In Parking Management, hover over the 'Permit Management' icon and click 'Reports' then 'Permit Sales Report'.
The 'Permit Sales Report' screen will display. Select the user type(s) and allocation type(s) you want to include in the report. Hold Ctrl and click to select more than one. Enable the check box if you want to show archived sales (this includes all released or switched permits). Choose the start date and end date and click the 'Create Report' button. The report will display under the search criteria. Click the 'View Details in Excel' button to export the table.
Active Permit Report
The Active Permit Report provides administrators with a comprehensive overview of all currently valid parking permits within the system. This report is essential for auditing permit distribution, verifying active revenue streams, and monitoring permit lifecycle statuses.
Setup & Configuration
There are no specific configuration steps required to enable this report, as it is a core system feature. However, administrators should ensure that User Types and Allocation Types (lots) are correctly defined in the Lot Administration and User Management sections to ensure the filtering options return accurate data.
Using this Feature
Accessing the Report
Hover over Parking Management, then Reports, and then click Active Permit Report.
Searching the Report
The Active Permit Report screen allows you to narrow down results based on specific criteria:
-
Select the user type(s) and allocation type(s) you want to include in the report. To select multiple items simultaneously, hold the Ctrl key while clicking the desired options.
-
Enable the Show Archived checkbox if you wish to include sales that are no longer active, such as permits that have been released or switched.
-
Choose a Start Date and End Date to define the timeframe for the permit records.
-
Click the Search button to generate the results.
Key Information Displayed
Once the search is executed, the report populates a table below the search criteria. Key data points include:
-
User Name and ID: Identification of the permit holder.
-
Permit Number: The unique identifier for the specific permit.
- Vehicles: The vehicle license plate(s) associated with the active permit.
-
Lot/Allocation: The specific area where the permit is valid.
-
Effective and Expiry Dates: The duration of the permit's validity.
-
Status: Indicates if the permit is currently active or archived.
Exporting Results
To perform further data analysis or share the report:
-
Click the Export button to download the displayed report details into an Excel (.xls) file.
Best Practices & Considerations
-
Audit Archived Data Regularly: When troubleshooting permit history, always enable the Show Archived checkbox to see the full "paper trail" of a user's previous permit switches or releases.
-
Date Range Precision: When running reports for specific billing cycles, ensure your Start Date and End Date align exactly with your organization's fiscal or academic terms to avoid counting overlapping permits.
-
Multi-Select Efficiency: Use the Ctrl + Click method to run reports across multiple lots at once, which is useful for comparing the density of active permits between different campus zones.
The Active Permit Report reflects real-time data. If a permit is cancelled or expires during the business day, it will immediately move from the active list to the archived list.
Subscription Verification Report
The Subscription Verification Report in OPSCOM automatically identifies users who have stored credit card information but are not enrolled in the automated permit rollover subscription. This report provides administrators with a centralized view to proactively engage with these customers, encourage subscription enrollment, and streamline future permit renewals.
Setup & Configuration
Accessing and running the Subscription Verification Report requires specific administrator permissions.
- Go to System Configuration, then Admin Management, and click Manage Roles.
- On the Manage Administrator Roles page, find the desired role (e.g., "Permit Manager," "Billing Admin") you want to update.
- Click the Permissions button next to that role and click Parking tab (represented by an the car icon).
- Enable the Access Subscription Report checkbox.
- Click Save Permissions.
Using this Feature
Go to Permits (Clock icon), and click Subscription Verification Report.
As soon as you click, the report will load automatically, displaying a list of customers who have stored credit card information but do not have an active permit rollover subscription.
Available Actions
- Explore Customer Details: The Username displayed in the report is a clickable button. Clicking on it will take you directly to that customer's profile page, allowing you to quickly view their details, contact information, and take any necessary action (e.g., to enroll them in the rollover subscription).
- Export Your Data: The report has built-in functionality to export the information for offline use or further analysis. Look for the export options on the report page to:
- Save as CSV format.
- Save as Excel format.
- Copy the report data to your clipboard.
- Print the report.
Best Practices & Considerations
- Proactive Engagement: Use this report to identify customers who are ideal candidates for automated permit rollovers. Proactively contacting them can improve renewal rates and customer satisfaction.
- Targeted Communication: Utilize the contact information gained from the customer profile link to send targeted communications about the benefits of automated rollovers.
- Data Accuracy: Regularly run this report to keep your data current and ensure you're addressing all relevant customers.
- Workflow Integration: Integrate this report into your permit renewal workflow. For instance, you might run it a month before permit expiration to identify users for outreach.
- Compliance: Ensure any outreach or data usage complies with your organization's privacy policies and relevant regulations.