IncidentAdmin
OperationsCommander works hard to maintain an up to date product wiki! If you have any questions or if you feel something is missing, post about it in the community.
- Active Dispatch Logs (BETA)
- Viewing an Incident
- Filling out the Incident Form (WIP)
- Incident Checklist
- My Incident Tasks
- View Cameras
- Related Occurrences
- Dispatch Logs
- Incident Distribution Feature
- View Open Incidents
- Incident Summary Report by Sub-Location
- Incidents Summary Report by Category
- Incidents Summary Report
- Recent Incidents Summary Report (Last 30 Days)
- Incident Reports
- Editing Incidents
- Incident Entry
- Search Incidents
- Configuring Incidents
- IncidentAdmin Workflow
- Hazing Transparency Report
- Fire Safety Report
- Setting Up for Clery Act Reporting
Active Dispatch Logs (BETA)
The Active Dispatch Logs feature allows administrators and dispatchers to record, track, and manage all incoming inquiries and automated system alerts. Its primary purpose is to provide a centralized dashboard of all open dispatch entries and seamlessly link them to actionable incident reports for further tracking. This article is intended for OPS-COM administrators and dispatch personnel.
Setup and Configuration
The Active Dispatch Logs feature is a core component of the Incident module. While it requires no special setup to operate, users must have the appropriate incident and dispatch management permissions enabled on their administrative role to view, edit, or assign incidents to logs.
Using this Feature
The Active Dispatch Logs page serves as the primary workspace for dispatchers to view all open logs that require follow-up, add new records, and assign tasks to other administrators.
Accessing and Creating Logs
-
Hover over the Incidents icon, click Dispatch, and select Active Dispatch Logs to view all open entries.
-
Click the Add Log button in the top right of your screen to create a new record.
-
Select the appropriate Source and Category from the drop-down menus.
-
Type the necessary details into the Note section.
-
Click Save Log to keep the record open and active, or click Save Log & Close if the dispatch is already resolved.
If a dispatcher clicks the incident number link within a log but receives an error, ensure their administrative role has the proper permissions configured to view and edit incidents.
Adding Additional Log Notes
-
Click the blue plus icon under the actions column of an existing log to add a separate, attached note.
-
Select the Source and Category, and enter the supplemental details.
-
Click Save Log to append the note, or click Save Log & Close to append the note and close the entire dispatch log.
Assigning a Log to an Incident Report
-
Click the Assign button under the actions column to attach the log to an incident or assign an admin user to act on it.
-
Select either A new incident or An existing incident.
-
Assign the log to an admin user. If you selected an existing incident, search for the incidents already assigned to an admin user or manually enter the incident number.
Closing Dispatch Logs
-
Click the red X icon under the actions column when a log has been fully dealt with.
-
Click the Confirm button in the pop-up window to remove it from the active list.
Searching Contacts
-
Click the Search Contacts button to open the Search Contact History window. Depending on the width of your monitor, this button will be located either on the right side of the screen or along the bottom of the page.
Visual Cues and Status Indicators
-
Blue Number Icon: Indicates how many additional notes or rolled-up alerts are linked to the dispatch log. Click the log to view all associated records.
-
Incident Number Link: Once an assignment is made, the incident number appears in the listing of Dispatch Log Records. Click this link to directly view or edit the incident report.
Available Actions and Buttons
-
Refresh: Displays a countdown indicating how long until the page automatically refreshes (the default is one minute). Actions such as adding notes or assigning an incident will temporarily pause the page refresh.
-
Limit To Recent: Toggle this setting to view older dispatch logs in addition to recent ones.
-
View Classic Logs: Click this button to redirect to the legacy dispatch logs view.
Best Practices and Considerations
-
Keep the dashboard clear: Always close dispatch logs once they are resolved using the red X icon or the Save Log & Close button. This ensures your active dispatch view remains uncluttered and focused on actionable items.
-
Leverage external integrations: Organizations should take advantage of API integrations where possible. Systems such as Cisco Prime or ITS-NetworkingAlerts can be configured to push an incident number alongside an alert, automatically creating a dispatch log with the associated incident already attached.
Viewing an Incident
The View Incident screen allows OPSCOM administrators to review, edit, and manage comprehensive details of a security event. Its primary purpose is to provide a centralized hub for tracking dispatch logs, linked individuals, related vehicles, and assigned tasks associated with a specific incident. This article is intended for OPSCOM administrators and dispatch personnel responsible for incident management.
Setup and Configuration
Accessing and interacting with the View Incident screen relies heavily on the administrative roles and permissions configured within the system.
To review and modify these settings, hover over System Configuration, click Admin Management, and click Manage Roles.
Viewing Permissions
To simply view an incident page, an administrator must have one of the following baseline permissions:
-
View All Incidents
-
View Incidents - Self (Must also be the reporter, Primary Investigator, Case Manager, part of an assigned task group, or assigned directly to a task).
If an incident is locked, administrators with the Incident Administrator permission can view the specific reason for the lock. Administrators with the View/Edit Confidential Information permission will see an additional Confidential Info section near the bottom of the page.
Editing Permissions
To access the edit options for an incident, the administrator must meet one of the following requirements:
-
Possess the Custom Permission - Open All permission.
-
Possess the Edit Incidents permission.
-
Possess the View Incidents - Self permission, be the reporting admin, AND the incident must be in an Open state.
Using this Feature
Administrators can navigate to the View Incident screen from multiple areas in the system, including search results, reports, and active dispatch logs. Once on the page, the interface is divided into functional tabs and side buttons.
Managing Tabs and Details
-
Dispatch Logs: Anyone who can view the incident can view its dispatch logs. Click the Log button to manually link a new dispatch entry, or navigate to the Dispatch Logs tab to drop a log. You must have the Add/Drop Dispatch Logs permission to perform these actions.
-
Linking People: Use this tab to associate individuals with the incident. Click show more to view extended details about a user that are not displayed on the primary screen.
-
Linking Other Items: Use the respective tabs to attach vehicles, missing property, and violations to the incident record.
-
Related Incidents: View this section to see and connect multiple occurrences that share common elements.
-
Checklists: Certain subcategories require a checklist to be completed before the incident can be closed. If required, a warning will appear while the issue is open. Fill out the details to proceed with closing the incident. You must have the View All Incidents or Incident Administrator permission to view these checklists.
-
Use of Force Forms: If the Use of Force setting is enabled (applicable for clients in Ontario), the government-mandated Use of Force forms will be displayed as read-only documents on this page.
Managing Tasks and Assignments
-
Case Manager Assignment: Assign the incident to a specific manager. You must have the Assign Incident To Case Manager permission. The individual being assigned must have either the Is Incident Case Manager or Is Incident Shift Manager permission.
-
Primary Investigator Assignment: Assign a lead investigator to the case. You must have the Edit Incident Tasks, Is Incident Shift Manager, or Assign Incident To A Different Investigator permissions (or already be the case manager). The assignee must have the Be Assigned Tasks Directly permission.
-
Editing Tasks and Comments: Add or edit tasks and their associated text. You must be the primary investigator/case manager or have the Edit Incident Tasks / Is Incident Shift Manager permissions. If you are only assigned to a task without these broader permissions, you will only see the option to reassign it.
Side Actions and Buttons
-
Close/Open Incident: Toggles the state of the incident. Requires the Open Incidents permission.
-
Edit / Edit Summary / View: Depending on your permissions (e.g., Edit Incident Summaries, Incident Admin) and the state of the incident (Locked, Open, Closed), this button allows you to modify the full incident or just the summary details.
-
Distribute and Email: Allows you to share the incident report. Requires the Incident Admin permission.
-
Download: Downloads a copy of the incident. Available to any admin who has permission to view the page.
-
Toggle Status: Switches the state of the record back and forth between read and unread.
-
Delete: Appears if the incident is eligible to be purged and the administrator possesses the Delete Incident permission.
Best Practices and Considerations
-
Audit Permissions Regularly: Organizations should strictly control editing and deletion permissions to maintain the integrity of incident reports and preserve accurate historical data for legal or security audits.
-
Complete Checklists Promptly: Ensure required checklists are filled out fully before attempting to close an incident to prevent administrative bottlenecks and ensure compliance with organizational reporting standards.
Filling out the Incident Form (WIP)
The Incident Form allows OPSCOM administrators to record, track, and manage comprehensive details regarding security or operational events. Its primary purpose is to centralize essential incident data, from basic descriptions to involved parties and follow-up tasks, ensuring accurate and organized record-keeping. This article is intended for OPSCOM administrators and security personnel responsible for incident management.
Setup and Configuration
Accessing and filling out the Incident Form is a core function of the IncidentAdmin module. It requires no specialized setup, but administrators must have the appropriate incident creation and editing permissions assigned to their user role to interact with these fields.
Using this Feature
When creating a new incident or modifying an existing record, administrators will interact with two primary sections: the basic overview and the detailed record tabs.
Basic Incident Information
The top section of the report captures the essential, high-level information about the event. Ensure the following core fields are completed accurately:
-
Description: A comprehensive narrative outlining what occurred.
-
Status: The current state of the incident (e.g., Open, Closed).
-
Time: The exact date and time the incident took place.
-
Place: The specific physical location where the event occurred.
-
Related information or events: Any immediate contextual details necessary for understanding the incident.
Detailed Incident Tabs
Below the basic information, the incident report allows administrators to record granular details using a series of specific tabs. Click each tab to link relevant data to the main incident report:
-
Dispatch Logs: Link or review communications and dispatch entries related to the event.
-
People: Record and link the profiles of any individuals involved in or witness to the incident.
-
Vehicles: Attach specific vehicle records and license plates involved in the event.
-
Missing Property: Document any items reported lost or stolen during the incident.
-
Tasks: Assign and track follow-up actions required to resolve the case.
-
Checklist: Complete any custom-generated forms or mandatory procedural checklists required by your organization.
-
Related: Link this incident to other existing issues or incident reports in the system.
-
External: Log follow-up items or external agency involvement.
-
Violations: Associate any parking or moving violations directly connected to the incident.
Best Practices and Considerations
-
Thorough Documentation: Always provide clear, objective, and detailed narratives in the Description field. This ensures the incident report can be accurately interpreted during future audits, investigations, or legal reviews.
-
Cross-Linking Data: Make full use of the detailed tabs to cross-link People, Vehicles, and Violations. Centralizing this data provides a complete picture of the event for investigating officers.
-
Mandatory Checklists: If your organization utilizes custom procedural forms, ensure the Checklist tab is fully completed before attempting to change the incident Status to closed.
Incident Checklist
The Incident Checklist provides a standardized form for administrators and investigators to ensure all critical investigative steps are completed before closing an incident. Its primary purpose is to help maintain comprehensive, consistent, and legally sound records for audits and internal reviews. This article is intended for OPSCOM administrators and security personnel responsible for managing and closing incident reports.
Setup and Configuration
The Incident Checklist is a core component of the IncidentAdmin module and requires no additional system setup. However, administrators must have the appropriate permissions to view and edit incidents to access and complete this form.
Using this Feature
Administrators must navigate to an active incident report to access and fill out the checklist. The form requires users to select standard responses (e.g., Yes, No, Not Required) and provide clarifying remarks for each step of the investigation.
Accessing the Checklist
Depending on your organization's specific subcategory configurations, filling out this checklist may be a mandatory system requirement before an administrator is permitted to close the incident report.
Checklist Fields Defined
When filling out the checklist, provide specific details in the remarks fields to justify your selections.
-
CCTV Reviewed: Indicate if closed-circuit cameras were reviewed. State what was found in the footage or explain why the footage was not reviewed.
-
Other Resources Reviewed: Indicate if external resources were utilized, such as social media, public directories, or OPSCOM records.
-
Witness(es) Interviewed: Note if witnesses were spoken to and summarize their specific contributions to the incident resolution.
-
Suspect(s) / Person(s) of Interest Interviewed: Document any suspect interviews, noting their involvement or statements.
-
Statements Obtained: Confirm if formal, written statements were collected from any involved parties.
-
Other Evidence Collected: Detail any physical or virtual evidence gathered (e.g., photos, physical items) and note its secure storage location.
-
Safe Plan and Community Resources Discussed with Complainant: Note if the complainant was provided with a safety plan or referred to external support resources.
-
Other Departments / Agencies Consulted or Notified: List any internal departments (e.g., Student Housing) or external agencies (e.g., local police) that were briefed on the incident.
-
Community Notified: State if and how the broader community was alerted to the incident (e.g., safety bulletins, campus emails).
-
Security / CPTED Audit Conducted: Indicate if a Crime Prevention Through Environmental Design (CPTED) or general security audit was performed. Note any vulnerabilities discovered and the steps taken to resolve them.
-
Recommendations Made to Prevent a Re-occurrence: Detail any operational or security changes suggested to prevent future similar incidents.
-
Complainant Notified of Outcome: Confirm that the reporting party was updated on the final resolution of the case.
-
Documentation Updated & Filed: Note exactly where related files, audits, or hard copies were saved.
-
Status at time of Closing: Select the final state of the case (Solved, Unsolved, or Unfounded).
-
Reason For Report Being Closed: Click the drop-down menu and choose the primary reason for closing the report.
-
Closing Comments: Provide a final narrative summarizing the resolution and confirming any implemented recommendations.
Best Practices and Considerations
-
Standardize Remarks: Organizations should develop a business rule outlining the minimum level of detail required in the remarks section. Simple "Yes" or "No" answers without context can lead to poorly documented investigations.
-
Complete Before Closing: Ensure all relevant checklist fields are thoroughly completed before attempting to change the overall incident status to closed.
My Incident Tasks
The My Incident Tasks feature provides a centralized dashboard for administrators to view and manage tasks assigned specifically to them. Its primary purpose is to streamline workflow and ensure timely follow-up on active security or operational events. This guide is intended for OPS-COM administrators who are part of an incident investigation or response team.
Setup and Configuration
Accessing the task dashboard requires no special system setup or configuration. It is a core component of the incident management module. However, for a task to appear on this list, an administrator must be actively assigned as a primary investigator, case manager, or individual task owner within an active incident report.
If you are a Case Manager or Shift Supervisor, you can use the blue drop-down menu to view the tasks assigned to other administrators on your team. This allows you to easily monitor the workload and progress of ongoing investigations.
Using this Feature
Administrators can use this page to filter, view, and directly access the incident reports containing their assigned tasks.
Accessing Your Tasks
-
Hover over Incidents and click My Tasks.
-
Click the blue drop-down menu and select your name to populate the list of tasks assigned to your account.
-
Click the specific Incident Number from the results table to open the detailed incident information page and review the task requirements.
Key Information Displayed
Once your name is selected, the task table will display:
-
Relation: Indicates whether the task is assigned directly to you (Mine) or to a group you are a part of (Team).
-
Incident No.: The unique identifier for the related incident.
-
Report Date: The date the initial incident was reported.
Best Practices and Considerations
-
Routine Monitoring: Administrators should make it a habit to check the My Tasks dashboard regularly to ensure critical investigative steps or follow-ups are not missed.
-
Update from the Source: Always update the task status and add relevant comments directly within the incident report after completing an assignment. This ensures the primary investigator and case manager have real-time visibility into the investigation's progress.
View Cameras
The View Cameras feature allows administrators to access integrated security camera feeds directly from the OPSCOM portal. Its primary purpose is to help security personnel and dispatchers monitor live activity and gather visual context for incident management. This article is intended for OPSCOM administrators.
Setup and Configuration
Accessing the camera feeds requires your organization to have an active, configured security camera integration within the OPSCOM system.
Additionally, administrators must have the appropriate incident and camera viewing permissions assigned to their user role to see the menu option. No additional user-side configuration is required once the system integration is complete.
Using this Feature
Administrators can launch the external camera viewer directly from the primary navigation menu.
-
Hover over the Incidents icon and click View Cameras.
-
Click the Launch Cameras button on the center of the page.
-
View and manage the camera feeds in the new browser window that opens.
Available Action and Button
-
Launch Cameras: Click this button to initiate the connection to your organization's camera integration. It forces the camera interface to open in a completely separate window, allowing you to keep your main OPSCOM dashboard active.
If you click the Launch Cameras button and the new window fails to load the video feeds, verify that your active session with your external camera provider has not timed out or require a separate login.
Best Practices and Considerations
-
Configure your browser settings: Ensure your web browser is configured to allow pop-ups from the OPSCOM portal. Because the camera viewer launches in a new window, strict pop-up blockers may prevent the feeds from opening when you click the button.
-
Optimize your dispatch workspace: If you are actively monitoring cameras while managing dispatch logs or filling out incident reports, consider using a dual-monitor setup. This allows you to keep the live camera feeds visible on one screen while interacting with the OPSCOM platform on the other.
Related Occurrences
Setup and Configuration
There is no special module configuration required to use the Related Occurrences feature, as it is a standard component of the incident management system. However, administrators must have the appropriate permissions to view and edit incidents to create and modify related lists.
Using this Feature
Administrators can link incidents by creating a named list and adding the relevant incident numbers to that group.
Creating a Related List and Linking Incidents
-
Hover over Incidents and click Search Incidents.
-
Enter the target incident number in the Occurrence# field and execute the search to open the Incident Information screen.
-
Click the Related tab along the top of the form.
-
Click the Track Related Occurrences button.
-
Click New Related List to begin creating a connection group.
-
Enter a descriptive name in the Name field (e.g., Suspicious Activity March 20) and provide context in the Notes field.
-
Click the Save button. A search box will now appear at the bottom of the screen.
-
Enter the current incident number you are viewing into the search box and click Search.
-
Click the Add button next to the result to add it to your new list.
-
Enter the second incident number you wish to relate into the search box and click Search.
-
Click the Add button to add this second incident to the same list.
You can return to the Track Related Occurrences screen at any time to add additional incidents to an existing list as an investigation develops.
Visual Cues and Status Indicators
Best Practices and Considerations
-
Standardize List Names: Organizations should establish a standardized naming convention for related occurrence lists (e.g., by date, location, or specific event type) to ensure they are easily searchable and understood by all investigators reviewing the case.
-
Provide Context: Always use the notes field when creating a new related list to briefly explain why the incidents are being linked, especially if the connection is not immediately obvious from the individual incident descriptions.
Dispatch Logs
The Dispatch Logs feature allows dispatchers and administrators to record, track, and manage incoming communications, system alerts, and operational tasks. Its primary purpose is to maintain a centralized and actionable record of all dispatch activities to ensure timely follow-up and resolution. This article is intended for OPSCOM administrators and dispatch personnel.
Setup & Configuration
The Dispatch Logs tool is a core component of the incident management system. It requires no specialized setup, but administrators must have the appropriate dispatch and incident management permissions enabled on their user role to view, create, or close log records.
Using this Feature
Administrators can use this page to create new manual logs, review automated system alerts, append notes, assign tasks, and print records.
Reviewing and Creating Logs
-
Hover over the Incidents icon, click Dispatch, and select Dispatch Logs to open the View/Edit Dispatch Log Records page.
-
Select an option from the Create New Log Record drop-down menu to define the source contact for a new log.
-
Select the appropriate Category from the drop-down menu on the Add New Log Record screen.
-
Type any required details into the Note section.
-
Click the Add New button at the bottom of the screen to save the information. The new log will now appear at the top of the Dispatch Log Records list.
Adding Notes and Assigning Logs
-
Click the Add link in the Add column next to a specific log to attach a supplementary note.
-
Enter the source, category, and additional details in the Add Log Note screen.
-
Click the Add button to save the note, or click the Add & Close button to save the note and simultaneously close the entire dispatch log.
-
Click the Assign link at the far right of the log to assign an admin user to act on the log or to attach it to an incident report.
When an assignment is made, the incident number will appear directly in the listing of Dispatch Log Records. You can click this link at any time to quickly access, view, or edit the associated incident report.
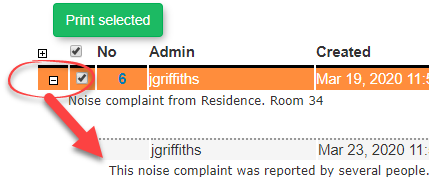
Viewing Rolled-Up Alerts
-
Click the + symbol to the left of a specific log to expand and view all available associated records or rolled-up alerts.
-
Click the specific link for the dispatch number if you need to add further information to the initial log.
Printing and Closing Logs
-
Select the appropriate source in the list of current dispatch logs and click the Print Selected button to generate a printed list of those specific logs.
-
Click the C in the Status column of a specific log to individually change its status to closed once it has been resolved.
-
Enable the checkboxes next to multiple log records to prepare them for bulk closure.
-
Click the Close Selected button to instantly close all checked logs.
Best Practices & Considerations
-
Maintain an organized dashboard: Dispatchers should establish a routine to close logs immediately once they are resolved or formally assigned to an incident. This keeps the open logs view uncluttered and focused on active issues.
-
Utilize Bulk Actions: When dealing with numerous informational system alerts (such as standard LPR reads or resolved warnings), use the Close Selected bulk action to save time and clear your queue efficiently.
-
Check for Rolled-Up Data: Always click the + symbol to review all related system triggers before closing a dispatch item, ensuring no critical secondary alerts are missed within a rolled-up log.
Incident Distribution Feature
The Incident Distribution feature allows dispatchers to email incident details directly to pre-configured user groups. Its primary purpose is to streamline communication and enable faster response times by eliminating the need to manually copy information to external email clients. This guide is intended for OPSCOM administrators and dispatch personnel.
Setup and Configuration
Before this feature can be utilized, an administrator must create distribution departments and assign users to them. These departments define the pre-configured recipients for incident emails.
Creating a Distribution Department
-
Hover over System Configuration, click Distribution, and select Departments and Users.
-
Click the List All button beside the Departments section.
-
Click the Plus button.
-
Enter a descriptive name in the Department Name field. This name will be visible to dispatchers.
-
Click Save Changes.
Adding a Contact to a Department
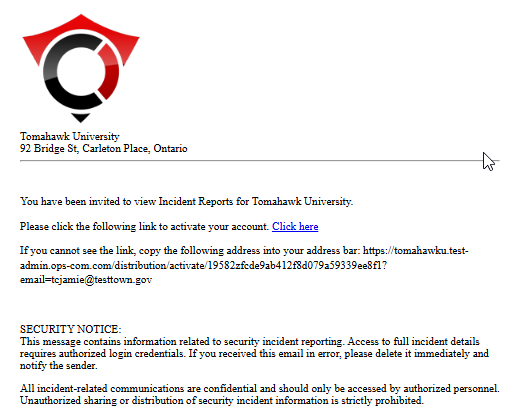
Contacts invited to view distributions are not the same as standard parkers or admin users. They exist strictly to access the incident distribution module, and they receive a specific invitation link to view internal incident reports when you click save and send.
Managing Existing Distribution Groups
Using this Feature
Once distribution groups are configured, dispatchers can quickly send vital incident details directly from an active incident's main information page.
Sending an Incident Email
Key Information Displayed
The automated email sent to the distribution group will extract and display the following key details from the incident report:
-
Incident Number
-
Location
-
Time of Incident
-
Description of Incident
-
Any optional comments added by the dispatcher
Best Practices and Considerations
-
Audit Distribution Groups: Regularly audit your distribution groups to ensure the email lists are completely up-to-date. Outdated contact information can lead to severely delayed or missed incident notifications.
-
Use Intuitive Naming: Create clear and intuitive group names. Titles like "Day Shift Patrol" or "Weekend Supervisors" are much more effective and recognizable for dispatchers than generic names like "Group 1".
-
Pre-Notify Contacts: Remember to send invited department contacts a separate message letting them know about the system. This ensures they expect the automated invitation and do not accidentally delete your message or lose it in their spam folder.
View Open Incidents
The View Open Incidents feature provides a centralized list of all currently unresolved security or operational events within the system. Its primary purpose is to help administrators and dispatchers easily track, access, and manage active cases that require further attention or investigation. This article is intended for OPSCOM administrators and security personnel.
Setup and Configuration
The Open Incidents report is a core component of the incident management system and requires no specific module setup. However, administrators must have the appropriate incident viewing or editing permissions assigned to their user role to access the page and interact with the records.
Using this Feature
Administrators can use this page to quickly pull up a list of all active cases and navigate directly to the detailed incident form for updates.
Accessing the Report
-
Hover over the Incidents icon and click View Open Incidents.
-
Review the populated list on the Open Incidents Report page.
-
Click a specific Incident No link to open, view, or edit the details of that particular incident.
Key Information Displayed
The Open Incidents Report provides a high-level summary of active cases, displaying the following information:
-
Admin Name: The administrator who reported or is associated with the active incident.
-
Incident No: The unique, clickable numerical identifier for the case.
-
Reported: The exact date and time the incident was initially logged into the system.
While any administrator with access to this report can view the list of open incidents, your ability to make changes or add notes after clicking an Incident No link depends entirely on your specific user role editing permissions.
Best Practices and Considerations
-
Maintain an accurate queue: Administrators should establish a routine to review this list and officially close incidents that have been resolved. Allowing the open incidents report to become cluttered with old or completed cases makes it difficult for the team to track current priorities and active investigations.
Incident Summary Report by Sub-Location
The Incident Summary Report by Sub-Location allows administrators to filter and view incident records based on specific physical areas within their organization. Its primary purpose is to help security and administrative teams quickly analyze incident trends in targeted zones over a specified timeframe. This article is intended for OPSCOM administrators handling security and incident management.
Setup and Configuration
There is no specific module setup required to run this report, as it is a core feature of the incident management system. However, administrators must have the appropriate reporting and incident viewing permissions assigned to their user role. Ensure that your organization's sub-locations are accurately defined within your system settings for the most effective reporting.
Using this Feature
Administrators can use this report to generate an overview table of incidents that occurred within a selected area and timeframe, with the ability to drill down into specific case details.
Running the Report
-
Hover over the Incidents icon, click Reports, and select Sub-Location Report.
-
Select the specific dates you want to search in the date range fields on the Search Incidents page.
-
Select the specific sub-location you wish to analyze from the provided drop-down menu.
-
Click the Search button once all criteria have been entered.
-
Click the Details link to the right of a specific incident in the results table to view or edit that individual report.
Key Information Displayed
-
Sub-Location Overview Table: Once the search is executed, a table appears at the top of the page providing an aggregated overview of all incidents that occurred in the selected sub-location during your specified time frame.
Available Actions and Buttons
-
Search: Click this button to execute the query based on your selected date range and sub-location parameters.
-
Details: Click this link to open the full incident profile, allowing you to review the narrative, dispatch logs, or make necessary edits to the record.
If you click the Details link and cannot edit the resulting incident record, verify that your administrative user role has the required permissions to edit incidents, or check if the incident has already been locked or closed.
Best Practices and Considerations
-
Standardize Location Data: Organizations should establish a clear business rule regarding how sub-locations are selected by staff during initial incident entry. If field officers are inconsistent with how they tag locations, this report will not provide an accurate reflection of localized security trends.
-
Targeted Audits: Use this report on a monthly or quarterly basis to identify specific sub-locations that experience high volumes of incidents, allowing you to strategically deploy additional resources or security personnel to those exact areas.
Incidents Summary Report by Category
The Incident Summary Report by Category allows administrators to filter and view incident records based on specific incident classifications. Its primary purpose is to help security and administrative teams track and analyze event trends across various categories within a specified timeframe and location. This article is intended for OPSCOM administrators responsible for security reporting and incident management.
Setup and Configuration
The Incident Summary Report by Category is a standard reporting feature within the incident management module and requires no specialized system setup to run. However, administrators must have the appropriate incident viewing and reporting permissions assigned to their user role to access this page.
Using this Feature
Administrators can use this report to generate a high-level overview of incidents grouped by category, with the ability to drill down into specific sub-category reports for more detailed information.
Running the Report
-
Hover over the Incidents icon, click Reports, and select Report By Category.
-
Enable the checkboxes next to the specific categories you want to include in your report.
-
Select the desired date range to narrow the reporting window.
-
Select a specific location and sub-location from the drop-down menus if you wish to filter the results geographically.
-
Click the Search Incidents button at the bottom of the screen once you have set your criteria.
You do not need to select an option in every single section or filter. Only apply filters to the specific criteria you want to investigate; leaving a filter blank will simply include all data for that parameter.
Key Information Displayed and Available Actions
Once the search is executed, a results table will appear at the bottom of the page providing an overview of the incidents that occurred in each selected category.
-
Sub-Category Reports: Click any of the linked sub-category names within the results table to generate a deeper Sub-Category Report containing the individual incident records.
-
Sort Data: Click the column headings within the Sub-Category Report to automatically sort the table data by that specific metric.
-
View Details: Click the Details link located beside a particular incident to open, view, or edit the full incident profile.
Best Practices and Considerations
-
Standardized Categorization: Organizations should ensure that field officers consistently apply the correct categories and sub-categories during initial incident entry. If incident types are logged inconsistently, this report will not provide an accurate reflection of security trends.
-
Targeted Audits: Use this report on a monthly or quarterly basis to identify which types of incidents are most prevalent on your property, allowing your organization to strategically adjust enforcement policies or deploy additional resources to mitigate those specific issues.
Incidents Summary Report
The Incident Summary Report allows administrators to generate a comprehensive list of all incident records within a specified time frame. Its primary purpose is to provide a broad overview of security events and facilitate data exports for external analysis or record-keeping. This article is intended for OPSCOM administrators responsible for incident management and reporting.
Setup and Configuration
The Incident Summary Report is a standard reporting feature within the incident management module and requires no specialized system setup to run. However, administrators must have the appropriate incident viewing and reporting permissions assigned to their user role to access this page.
Using this Feature
Administrators can use this report to generate a high-level overview of incident occurrences over a defined period and quickly export the resulting data.
Running the Report
-
Hover over the Incidents icon, click Reports, and select Summary Report.
-
Enter the desired date range in the Start Date and End Date fields.
-
Disable the Show only items with Summaries checkbox if you wish to include all incident records in the results, even those that currently lack a summary.
-
Click the Search Incidents button at the bottom of the criteria section to generate the report.
Key Information Displayed and Available Actions
Once the search is executed, the results will display in a table at the bottom of the Incident Summary Report page.
-
Details: Click this link located to the right of a specific incident to open its full profile, allowing you to review the complete narrative, view dispatch logs, or make necessary edits to the record.
-
Export to Excel: Click this button to download the displayed report data into a spreadsheet for external formatting and analysis.
By default, the system filters the report to only show incidents that contain a completed summary. Ensure you toggle the checkbox if you are auditing incomplete reports or need a raw count of all events.
Best Practices and Considerations
-
Require Incident Summaries: Organizations should establish a business rule requiring officers to write comprehensive summaries before officially closing an incident. This ensures the default view of the Incident Summary Report is consistently populated, highly informative, and actionable for administrators.
-
Leverage Data Exports: Use the Export to Excel feature when you need to combine OPSCOM incident data with other departmental statistics for comprehensive monthly, quarterly, or annual security reviews.
Recent Incidents Summary Report (Last 30 Days)
The Recent Incidents Summary Report provides a quick, pre-filtered overview of all security and operational events logged within the past 30 days. Its primary purpose is to allow administrators to monitor recent activity, track ongoing cases, and identify immediate trends without having to manually configure search dates. This article is intended for OPSCOM administrators responsible for day-to-day incident management.
Setup and Configuration
The Recent Incidents report is a standard feature within the incident management module and requires no specialized system setup to run. However, administrators must have the appropriate incident viewing permissions assigned to their user role to access the page.
Additionally, the ability to download this report requires explicit authorization. To grant this access, ensure the export permission is specifically enabled on the administrative role for any user who needs to extract this data.
Using this Feature
Administrators can use this page to quickly pull up a list of the last 30 days of activity and navigate directly to detailed incident forms.
Accessing the Report
-
Hover over the Incidents icon and click Recent Incidents.
-
Review the populated table containing all incidents recorded in the previous 30 days.
Available Actions and Buttons
-
View Incidents: Click this button located to the right of a specific incident to open the detailed profile, allowing you to review the narrative or make necessary updates.
-
Column Headings: Click any column heading within the table to dynamically sort the displayed data by that specific metric (e.g., date, status).
-
Export: Click the export icon or button to download the report data to an Excel spreadsheet for external analysis. Note that this option is only visible if your administrative role has the required export permission.
This specific report is hardcoded to only display data from the immediately preceding 30 days. If you need to view historical incidents beyond this timeframe, you must use the standard Incidents Summary Report where you can manually define a custom date range.
Best Practices and Considerations
-
Daily Review Routine: Administrators should establish a regular routine to review the recent incidents dashboard. This ensures the security team remains fully aware of recent events and can follow up on pending or newly opened cases promptly.
-
Restrict Export Permissions: Organizations should limit the Excel export permission to senior administrators or management. Incident reports frequently contain highly sensitive or confidential information; controlling who can download the raw data helps maintain privacy and organizational compliance.
Incident Reports
The Incident Reports section provides a centralized hub for tracking, analyzing, and exporting data related to security and operational events. Its primary purpose is to help administrators and security teams monitor incident trends across various timelines, locations, and categories. This article is intended for OPSCOM administrators responsible for incident management and statistical reporting.
Setup and Configuration
The incident reporting suite is a core component of the incident management module and requires no specialized system setup to operate. However, administrators must have the appropriate incident viewing and reporting permissions assigned to their user role to access these pages and generate data.
Using this Feature
Administrators can access a variety of specific reports to filter and analyze incident data based on their exact operational needs.
Accessing Incident Reports
-
Hover over the Incidents menu and click Reports.
-
Select the specific report you wish to run from the available drop-down options.
Available Reports
The following reporting tools are available to help you analyze your organization's incident data. Click on any of the report names below to navigate to their specific instruction articles:
-
Recent Incidents Summary Report (Last 30 Days): Provides a quick, pre-filtered overview of all security and operational events logged within the immediate past 30 days.
-
Incidents Summary Report: Generates a comprehensive list of all incident records within a manually specified date range, with the ability to export the raw data.
-
Incidents Summary Report by Category: Filters and displays incident records based on specific incident classifications and event types.
-
Incident Summary Report by Sub-Location: Filters and groups incident records based on specific physical areas or zones within your organization's property.
Best Practices and Considerations
-
Require accurate field entry: Organizations should establish clear business rules requiring officers to accurately categorize and geotag incidents during initial entry. If incident types and sub-locations are logged inconsistently by dispatchers or field officers, the resulting reports will not provide an accurate reflection of your security trends.
-
Utilize multiple reports for comprehensive analysis: Combine data insights from the Category and Sub-Location reports on a quarterly basis to identify exactly where specific types of incidents (e.g., vandalism, medical emergencies) are occurring most frequently, allowing for better resource deployment.
Editing Incidents
The Editing Incidents feature allows administrators to modify existing incident reports, add new information, and manage the case status. Its primary purpose is to ensure that records remain accurate, detailed, and up-to-date as investigations progress. This article is intended for OPSCOM administrators, dispatchers, and security personnel.
Setup and Configuration
There is no specific module configuration required to edit incidents. However, administrators must have the appropriate incident editing permissions assigned to their user role to view the edit options and make changes to the records.
Using this Feature
Administrators can quickly update incident details directly from the main incident information page.
Modifying an Incident
Available Actions and Buttons
-
Close Incident / Open Incident: Click this button to toggle the incident status between closed and open.
-
Edit Incident: Click this button to toggle between viewing the incident and actively editing its details.
-
Distribute Incident: Click this button to create a distribution report for authorized recipients.
-
Email Incident: Click this button to generate and send an email regarding the incident.
-
Download Incident: Click this button to download a PDF copy of the incident for offline filing or external use.
-
Toggle Read Status: Click this button to change the read status of the report from unread to read, or vice versa.
Clicking the Distribute Incident or Download Incident buttons will automatically lock the incident from being edited further. Ensure all details are final, accurate, and completely resolved before executing these actions.
Best Practices and Considerations
-
Verify before locking: Organizations should establish a business rule requiring investigators to thoroughly review the incident report before downloading or distributing it. Because these actions lock the record, premature distribution can result in incomplete or inaccurate permanent files.
-
Maintain accurate statuses: Always close an incident once the investigation is fully resolved and all checklist items are complete. This keeps your active open incident queues clean and ensures reports correctly reflect your team's current workload.
Incident Entry
The Incident Entry feature allows administrators and dispatchers to formally create and document new security or operational events within the system. Its primary purpose is to capture comprehensive event details, including involved individuals, vehicles, and missing property, to ensure accurate case management and reporting. This article is intended for OPSCOM administrators and security personnel.
Setup and Configuration
The Incident Entry feature is a core component of the incident management module and requires no specialized system setup. However, administrators must have the appropriate incident creation and editing permissions assigned to their user role to access this page and generate new reports.
Using this Feature
The incident entry process is broken down into two main phases: searching for and linking related entities (people, vehicles, property), followed by entering the specific narrative details of the event.
Accessing the Form
-
Hover over the Incidents icon and click Incident Entry.
-
Click the Create a New Incident button on the Opened Incidents page to begin a new report, or click a specific Incident Number link to view the details of an existing active incident.
Step 1 Linking People Vehicles and Property
-
Click the appropriate link on the Step 1 screen to search by Users, Vehicles, or Missing Property.
-
Click the Enter Specific Incident Details button to bypass this step entirely if the incident is not associated with any specific individuals, vehicles, or property.
-
Click the Add User to Incident button at the bottom right once you locate the correct individual via the search fields.
-
Click the Add a New Individual to the Database button if no user is found. This will open the Quick Registration Form where you can enter the new individual's details into the system.
-
Select the appropriate classification from the Relation drop-down menu to identify the person's exact relationship to the incident (e.g., victim, witness, prime suspect).
-
Click the Save User Details button.
-
Click the Search for Additional Individuals button to link more people, or use the appropriate links to attach vehicle and property details.
-
Click the Enter Specific Incident Details button at the bottom right to proceed to the next phase of the report.
Step 2 Entering Incident Information
-
Review the summary of the people, vehicles, and missing property you linked, which will now appear at the top of the Step 2 page.
-
Enter the comprehensive narrative and factual details of the event into the provided Incident Information fields.
-
Click the Choose File button beside the Attach Image line, select your local file, and click Open to upload and attach photographic evidence to the report.
-
Click the Save Incident button at the bottom of the page once all information has been submitted.
When filling out the specific details on the incident form, OPS Number is an abbreviation for the Other Police Services Number used for external tracking, and PON Summons is an abbreviation for Provincial Offences Notice Summons.
Post-Creation Actions
Once the incident has been saved, the system will automatically redirect you to the Recent Incidents Summary Report (Last 30 Days) screen.
-
View Incident: Click this link to the right of your newly created incident if you realize you need to reopen the file and edit any details.
Best Practices and Considerations
-
Link Entities First: Always attempt to link involved individuals and vehicles before moving to the specific incident details. Establishing these links early builds a stronger relational database, making future searches and related occurrence tracking much more effective.
-
Accurate Relations: Ensure the Relation field is accurately selected for every attached user. Misclassifying a witness as a suspect, or vice versa, can lead to severe data integrity and compliance issues down the line.
-
Upload Evidence Immediately: If you possess photographic evidence at the time of report creation, attach it immediately using the image upload tool rather than waiting until the case is updated later.
Search Incidents
The Search Incidents feature allows administrators to locate and review recorded security and parking incidents within the system. Its primary purpose is to help track ongoing investigations, update case statuses, and manage officer task assignments by querying data across incidents, people, and vehicles. This article is intended for OPSCOM administrators.
Setup and Configuration
While the search module is ready for use out of the box, administrators must configure underlying data models to maximize its effectiveness.
-
Ensure that operational locations and compliance classifications are pre-populated. Setup and management instructions can be found on the Viewing an Incident page.
-
Ensure administrative accounts possess the required security clear level toggled within their User Profile to view or modify search results.
Using this Feature
Administrators interact with three tailored search tabs on this screen. Each tab queries a distinct data subset within the incident management database.
Accessing the Search Screen
-
Hover over the Incidents icon and click Search Incidents.
-
Identify the appropriate search section on the screen: Incident Search, People Search, or Vehicle Search.
-
Enter the desired parameters within the chosen module.
-
Click the Search button at the bottom of that specific section to execute the query.
Incident Search Criteria
The Incident Search module filters files based on system metadata, investigative context, and operational timelines.
-
Occurrence #: A unique ID number designated to the incident automatically upon creation.
-
Police Occurrence #: A reference number assigned by partner police forces for cross-agency tracking.
-
Reported by (Officer): A drop-down menu used to narrow searches to incidents filed by specific personnel.
-
Reported Dates: Calendar fields to look up the exact date an incident was officially logged.
-
Status: A drop-down menu to filter records that are currently Open, Closed, or marked as Close Requested.
-
Summary: A text field to scan short descriptions written during intake.
-
Between Dates: A date range filter capturing when the physical event occurred.
-
Location and Sub-Location: Drop-down menus to isolate events by campus quadrants, properties, or specific parking lots.
-
Room Number: An alphanumeric field to pinpoint incidents inside specific building interiors.
-
Category: A drop-down menu classifying the general nature of the incident.
-
Sub Category: A contextual drop-down menu that changes dynamically based on the selection made in the general Category field.
-
PON/Summons Issued: A drop-down selection to filter based on whether a Provincial Offence Notice or legal summons was distributed.
-
Arrest/Apprehension Made: A drop-down selection isolating cases where security or police took individuals into custody.
-
Violence Involved: A selection filter to flag or exclude files involving physical altercations.
-
Weapons Involved: A selection filter to locate files involving hazardous instruments.
-
Text: A keyword index search that checks both the comprehensive narrative text and the custom location descriptions simultaneously.
-
Last Updated Between Dates: A date range filter tracking historical modifications or administrative edits.
-
Has Been Read: A filter with Yes, No, or Either parameters to separate newly submitted reports from audited ones.
-
Case Manager: A drop-down menu to filter files assigned to specific administrative supervisors.
-
Primary Investigator: A drop-down menu isolating files assigned to the lead field officer.
-
Task Assignments: A drop-down menu sorting records by specific backup or support personnel tasked with secondary actions.
-
Requires a Checklist: A selection filter checking if the incident layout demands a compliance checklist.
-
Include Checklist Details: A checkbox that, when enabled, appends the detailed line-item checklist outcomes directly into the visual search results table.
People Search Criteria
This module isolates incident records based on the profile data of involved subjects, including complainants, witnesses, or suspects. Administrators can search using standard identity fields, including first name, last name, phone number, employee or student ID number, or driver's license details.
A dynamic information banner automatically generates at the top of the search results to summarize user profile metrics if the search parameters include at least one complete identifier, the database returns exactly one distinct user profile, and the input data matches the profile field exactly. This banner will not display if the query results in multiple partial matches.
Vehicle Search Criteria
This module locates incident files linked to specific automotive property. Administrators can track down records by entering descriptive vehicle parameters, such as license plate states, makes, models, colors, or permit identifiers associated with the vehicle at the time of the event.
Best Practices and Considerations
-
Establish keyword naming conventions: Organizations should develop strict internal business rules for entering summaries and text narratives. Consistent terminology improves the accuracy of the Text search filter over multi-year lookups.
-
Combine parameters cautiously: Avoid combining highly specific criteria to prevent over-filtering results. Combining a precise Room Number alongside a narrow Between Dates window can easily hide a record. If a known incident is missing, strip away secondary filters and search using the Occurrence # alone.
-
Audit unread files regularly: Utilize the Has Been Read drop-down menu set to No as a weekly operational check to ensure all newly logged field incidents are triaged and assigned in a timely manner.
Configuring Incidents
The Incident Configuration feature provides the foundational settings required before your organization can effectively utilize the incident management module. Its primary purpose is to allow administrators to define standardized categories, identification flags, and descriptive drop-down lists, ensuring consistent data entry across all incident reports. This article is intended for OPSCOM administrators responsible for system setup and maintenance.
Setup and Configuration
Before dispatchers and officers can begin logging events, administrators must pre-configure several standardized data lists.
Configuration Categories
-
Categories: Define the primary types of incidents that occur on your property. Each main category (e.g., Break and Enter) can host multiple sub-categories to allow for precise classification during reporting.
-
Flags: Create custom tags to highlight critical information or flag the severity of an incident (e.g., violence involved, weapons involved). Detailed setup instructions can be found on the Incident Flags page.
-
Ethnicity: Populate a standardized drop-down list of ethnic descriptors to assist officers in identifying individuals related to an incident, whether they are a victim, suspect, or witness.
-
Relations: Define the exact terminology used to describe an individual's relationship or involvement with a specific incident (e.g., Complainant, Witness, Victim, Prime Suspect).
-
Ext. User Profile Options: Create extended value fields used for describing the physical characteristics of an individual involved in an incident (e.g., hair color, hair style, body build type, clothing style).
-
Missing Property Types: Build targeted pick lists that officers can use to describe property involved, damaged, or stolen during an incident (e.g., vehicles, jewelry, computers, electronics, money).
-
Cameras: Configure the required input settings for any integrated surveillance cameras that may capture footage of an incident on your property.
The descriptive data entered into the Ext. User Profile Options fields will only be visible within the incidents module to assist with investigations. These specific physical descriptions will not appear on a user's standard parking or general system profile.
Best Practices and Considerations
-
Standardize your categories: Organizations should establish a clear business rule for incident categorization prior to system launch. Creating too many overlapping sub-categories can confuse dispatchers, lead to inconsistent data entry, and skew your statistical summary reports.
-
Keep descriptors objective: Ensure that all options configured under Ext. User Profile Options and Ethnicity rely on professional and objective terminology. This ensures your organization maintains compliance and accuracy when standardizing suspect and witness descriptions for legal or investigative use.
IncidentAdmin Workflow
The IncidentAdmin workflow provides a comprehensive framework for reporting, tracking, and resolving security events on your property. Its primary purpose is to guide administrators through the complete lifecycle of an incident, from initial dispatch entry and task assignment to final resolution and statistical reporting. This article is intended for OPSCOM administrators and security personnel.
Setup and Configuration
Because this workflow encompasses the entire incident management module, there is no single setup step. Instead, administrators must ensure that all foundational elements—such as categories, flags, and physical locations—are properly established in the system prior to use.
Detailed setup instructions for these prerequisites can be found on the Configuring Incidents Configuring Incidents page. Additionally, administrators must have the appropriate roles and permissions enabled to create, view, edit, and report on incidents.
Using this Feature
The incident workflow generally follows three main phases: initiation, investigation and tracking, and reporting.
Initiating an Incident
Security events are typically brought to the administration's attention through direct observation by patrol staff, phone calls from individuals, administrative requests, or surveillance camera footage.
Entering these events into the system is handled through two primary modules, which can be utilized in any order depending on your organization's procedures:
-
Access the Dispatch Logs page to quickly record incoming calls, alerts, and initial reports.
-
Access the Incident Entry page to formally create and document a comprehensive case file.
While dispatch logs and incident entries can be generated independently, dispatch logs can be directly linked and assigned to an incident report. This preserves the initial call data and integrates it seamlessly into the final investigative file.
Tracking and Managing Investigations
Once an event is recorded in the system, security administrators can track the progress of the investigation and manage follow-up activities. The core workflow highlights during this phase include:
-
Searching, viewing, and editing active incident records as new details emerge.
-
Creating and assigning actionable tasks directly to field officers, primary investigators, case workers, and administrative staff.
-
Reviewing personal responsibilities by checking the My Tasks dashboard.
-
Recording specific procedural steps taken and documenting the final outcomes for all individuals involved.
-
Linking related occurrences and parking or moving violations to the main incident to build a complete case history.
Generating Reports
The final phase of the workflow involves analyzing the collected data. IncidentAdmin provides a suite of reporting tools to help administrators review records and operational efficiency:
-
Recent Incidents Summary Report: Lists all incident records logged within the last 30 days.
-
Search Repeat Offenders: Generates a report on specific individuals involved in multiple incidents over a period of time.
-
Weekly Stat Report: Calculates the total number of various incident types that occurred during a specified time span.
-
Calls for Service: Summarizes service call metrics and dispatch responses.
-
Summary Search: Retrieves a summary of all incidents recorded within a specified time frame.
-
Summary Report: Produces a downloadable, spreadsheet-formatted list of incident summaries based on a defined date range.
-
Report by Category: Filters and displays incidents under defined category classifications within a specific time frame.
-
Sub Location Report: Filters and displays incidents based on specific physical zones or sub-locations on your property.
Best Practices and Considerations
-
Standardize your reporting procedures: Organizations should develop a clear business rule outlining exactly when a situation warrants a simple dispatch log versus a full incident report. This ensures consistency in how daily activities are triaged and escalated.
-
Utilize task assignments: Always use the built-in task assignment features for follow-ups. Assigning specific tasks to investigators or case workers ensures that the investigation maintains momentum and creates an auditable trail of accountability.
Hazing Transparency Report
This article outlines the setup and use of compliance and reporting features designed to be fully congruent with "The Jeanne Clery Campus Safety Act, at 20 U.S.C. § 1092(f)" The primary purpose of these tools is to allow institutions to map existing local incident codes and campus buildings into broader federal reporting classifications without complicating standard data entry. This guide is intended for OPSCOM administrators.
Setup & Configuration
The configuration of these compliance features requires mapping your campus geography and incident categories using the administrative portal.
Location Types Configuration
Location types allow you to classify campus locations according to Clery Act, or other regulatory geography requirements (e.g., On-Campus, Public Property, Non-campus, etc.). This is also critical for the Hazing Transparency report, which groups data by location. Your installation may already have location data, all modules use the same list.
-
Hover over System Configuration, Manage Locations.
-
Review the default classifications provided by the system.
-
Click the Edit icon to rename a type, or click Add New to create a custom classification.
-
Click the Archive button to hide a classification you do not need. Archiving removes it from dropdowns without deleting historical data.
-
Hover over Locations and click Locations List.
-
Click the Edit icon next to a specific building or location.
-
Click the Location Type drop-down menu and choose the appropriate classification for that building.
If no location type exists for a particular location, it will not display on the Hazing Transparency report or the Annual Crime Statistics Report. Sub-locations will automatically have the same location type of the main location.
Category Types Configuration
Category types group your specific incident categories into broader regulatory buckets (usually defined by legal statutes). Your installation may already cover your needs, you can check the category types and edit them by doing the following;
- Hover over System Configuration, Incidents, and click Categories.
- Customize the default list by adding, editing, or archiving types to match your reporting framework.
- You can also configure sub categories by clicking the "Sub" icon, next to each category
You can make an incident category eligible for the Hazing Transparency report by checking that box when editing the incident category. Once you click save, any new incident created with the category you checked the box for, will include the Hazing Transparency form at the bottom.
Ensure the appropriate form checkboxes are enabled for each incident category you wish to use them with. Disabling a form for a specific incident type will make it unavailable when generating reports.
Using this Feature
Create a new incident and select the category you enabled the Hazing Transparency form for, as well as a subcategory.
-
Scroll down the incident edit page to view the supplemental form if the chosen category triggers the Hazing Transparency form.
-
Enter the required data, including the Student organization(s) involved in the hazing incident, relevant dates, and Description of the hazing incident.
-
Save the incident to log the compliance data.
Generating Compliance Reports
Once an incident exists with a Hazing Transparency form filled out, that information is submitted to the Hazing Transparency report. To view this report, do the following;
-
Hover over Incidents, Reports, and click on the Hazing Transparency Report to view university Hazing statistics grouped by building, based on a selected date range.
-
Click the Export to Excel button on either report screen to download the formatted data.
Best Practices & Considerations
-
Always ensure every active location is assigned a Location Type. If an incident occurs at a location missing this metadata, it will not properly map to your Clery geography or the Hazing Transparency Report.
-
Categories lacking a Category Type will still report. If you flag a category for reporting but forget to assign a Category Type, the system will group those incidents under an "Uncategorized" header to ensure data is never silently dropped.
-
Reports feature zero-count transparency. Every configured crime type or location will always show a row on your reports, even if the count is zero.
-
Color shading in reports indicates volume. When reviewing the Annual Crime Statistics Report, pay attention to the red shading in the cells; darker red visually highlights problem areas relative to the highest single count in your dataset.
-
Tip: If a specific crime type is missing from your Annual Crime Statistics report, immediately check that both the Include in Reports switch on the Category and the Reporting switch on the Sub-Category are enabled.
Fire Safety Report
This article outlines the setup and use of compliance and reporting features designed to be fully congruent with "The Jeanne Clery Campus Safety Act, at 20 U.S.C. § 1092(f)" The primary purpose of these tools is to allow institutions to map existing local incident codes and campus buildings into broader federal reporting classifications without complicating standard data entry. This guide is intended for OPSCOM administrators.
Setup & Configuration
The configuration of these compliance features requires mapping your campus geography and incident categories using the administrative portal.
Location Types Configuration
Location types allow you to classify campus locations according to Clery Act geography requirements (e.g., On-Campus, Public Property, Non-campus, etc.). This is also critical for Fire Safety Report, which groups data by building. Your installation may already have location data, all modules use the same list.
-
Hover over System Configuration, Manage Locations.
-
Review the default classifications provided by the system.
-
Click the Edit icon to rename a type, or click Add New to create a custom classification.
-
Click the Archive button to hide a classification you do not need. Archiving removes it from dropdowns without deleting historical data.
-
Hover over Locations and click Locations List.
-
Click the Edit icon next to a specific building or location.
-
Click the Location Type drop-down menu and choose the appropriate classification for that building.
If no location type exists for a particular location, it will not display on the Fire Safety Report or the Annual Crime Statistics Report. Sub-locations will automatically have the same location type of the main location.
Category Types Configuration
Category types group your specific incident categories into broader regulatory buckets (usually defined by legal statutes). Your installation may already cover your needs, you can check the category types and edit them by doing the following;
- Hover over System Configuration, Incidents, and click Categories.
- Customize the default list by adding, editing, or archiving types to match your reporting framework.
- You can also configure sub categories by clicking the "Sub" icon, next to each category
You can make an incident category eligible for the Fire Safety Report by checking that box when editing the category. Once you click save, any new incident created with the category you checked the box for, will include the Fire Safety form at the bottom.
Ensure the appropriate form checkboxes are enabled for each incident category you wish to use them with. Disabling a form for a specific incident type will make it unavailable when generating reports.
Using this Feature
Create a new incident and select the category you enabled the "Fire form" for, as well as a subcategory.
-
Scroll down the incident edit page to view the supplemental form if the chosen category triggers the Fire Safety form.
-
Enter the required data, including the cause of the fire, number of injuries, number of deaths, and value of property damage.
-
Save the incident to log the compliance data.
Generating Compliance Reports
Once an incident exists with a Fire Safety form filled out, that information is submitted to the Fire Safety Report.
-
Hover over Incidents, Reports, and click on the Fire Safety Report to view fire statistics grouped by building, based on a selected date range.
-
Click the Export to Excel button on either report screen to download the formatted data.
Best Practices & Considerations
-
Always ensure every active location is assigned a Location Type. If an incident occurs at a location missing this metadata, it will not properly map to your Clery geography or the Fire Safety Report.
-
Categories lacking a Category Type will still report. If you flag a category for reporting but forget to assign a Category Type, the system will group those incidents under an "Uncategorized" header to ensure data is never silently dropped.
-
Reports feature zero-count transparency. Every configured crime type or location will always show a row on your reports, even if the count is zero.
-
Color shading in reports indicates volume. When reviewing the Annual Crime Statistics Report, pay attention to the red shading in the cells; darker red visually highlights problem areas relative to the highest single count in your dataset.
-
Tip: If a specific crime type is missing from your Annual Crime Statistics report, immediately check that both the Include in Reports switch on the Category and the Reporting switch on the Sub-Category are enabled.
Setting Up for Clery Act Reporting
This is a step-by-step guide for setting up for Clery Act Reporting.
Step 1: Set up your Location Types
Location Types tell the system which of your campus locations count as "on-campus," "on-campus student housing," "public property," or "non-campus" — the categories the Clery Act requires.
Refer to this document for Location Setup details.
You'll see five ready-made types:
-
On-Campus (General)
-
On-Campus Student Housing
-
Public Property (Within Bounds)
-
Public Property (Adjacent)
-
Noncampus Buildings and Property
You can rename these, add new ones, or archive ones you don't need — nothing is fixed. Archiving hides a type everywhere (lists, dropdowns) without deleting its history.
Next, tag your actual buildings: go to your Locations list and, for each building, choose the appropriate Location Type from the dropdown on that location's edit screen. A building with no type assigned won't show up correctly on the Fire Safety Report or the Annual Crime Statistics Report, so this step matters.
Step 2: Set up Category Types & Turn on Reporting
Category Types group your incident Categories into broader buckets — "Criminal Offenses," "Hate Crimes," "Hazing," "VAWA Offenses," "Arrests & Referrals" by default.
Refer to this documentation for Category Setup details.
Same idea as Location Types — five ready-made defaults, fully editable, archivable.
The Annual Crime Statistics report only shows a crime category if two separate switches are both turned on. Missing either one means that category just won't show up at all — not with zeros, it simply won't be there.
In your Incident Categories do the following:
-
Turn on "Include in Reports" on the Category itself. Click the pencil icon next to a Category (e.g. "Homicide/Murder") to open its edit form. There's an "Include in Reports" switch — turn it on.
-
Turn on "Reporting" on each Sub-Category you want included. Click the "Sub" button next to that same Category to open its Sub-Category list. Each row (e.g. "Murder CCC 229") has its own "Reporting" toggle — turn it on for each one you want to appear on the report.
-
Flag which Categories should show the Hazing Form and Fire Form. When someone is entering an incident, the Hazing Transparency Form or Fire Safety Form should pop up automatically based on the incident's Category
-
"Trigger Hazing Form" — turn this on for any Category where a hazing incident
would be logged (e.g. a "Hazing" category). -
"Trigger Fire Form" — turn this on for any Category involving fires (e.g. a "Fire
Reports" category).
How you name and organize Sub-Categories controls what the report looks like. There is no fixed list of crime types built into the system — instead, set up your Categories and Sub-Categories to match what you need reported. For example:
-
-
Category "Homicide/Murder" → Sub-Categories "Murder," "Manslaughter"
-
Category "Sex Offenses" → Sub-Categories "Rape," "Fondling," "Incest," "Statutory Rape"
-
Category "Drug Violations" → Sub-Categories "Arrest," "Judicial Referrals"
-
Category "Liquor Violations" → Sub-Categories "Arrest," "Judicial Referrals"
-
Category "Weapons Violations" → Sub-Categories "Arrest," "Judicial Referrals"
Each Sub-Category becomes its own row on the report, indented under its Category, which
is in turn indented under its Category Type (or "Uncategorized").
Once set, whoever is entering an incident will see the matching form appear the moment
they pick that Category from the dropdown — no page reload needed.
Step 3: (For Hazing reporting) Set up Student Organizations
Where: Incidents → Student Organizations
Add the student organizations you'll need to tag on hazing incidents (fraternities, sororities, clubs, teams, etc.). You can archive an organization later if it's inactive — archived organizations disappear from the selection list but stay on any past hazing report they were already tagged on.