The Payroll Deduction Settings feature allows administrators to control whether users can select payroll deduction as a valid payment method for parking violations and temporary permits. Its primary purpose is to easily toggle these internal payment options on or off during the user checkout process to align with your organization's current financial policies. This article is intended for OPSCOM administrators.
## Setup and Configuration Controlling the availability of payroll deductions is managed through the global system settings. Because these settings use a "disable" logic, administrators must explicitly uncheck the boxes to make the payment options available to end-users. ### Admin Configuration 1. Hover over **System Configuration** and click **System Settings**. 2. Click the **Payments** component to open the payment control menu. 3. Locate the payroll deduction settings area within the menu. 4. Enable the **Disable Payroll Deduction for Violations** checkbox to stop users from paying for citations via payroll deduction, or disable the checkbox to allow the payment method. 5. Enable the **Disable Payroll Deduction for Temp Permits** checkbox to stop users from purchasing temporary permits via payroll deduction, or disable the checkbox to allow the payment method. 6. Save your system settings. ## Using this Feature Once configured, the system automatically handles how payment methods are presented to the end-user. ### User Checkout Experience - **Feature Enabled (Checkbox Unchecked):** When a user proceeds to the checkout screen to pay a violation or purchase a temporary permit, "Payroll Deduction" will appear as a selectable option alongside standard payment methods like credit card or account balance. - **Feature Disabled (Checkbox Checked):** The payroll deduction option is completely hidden from the user's checkout screen for that specific item type. --- ## Best Practices and Considerations**Reversing the Logic:** Remember that these settings are framed in the negative. To turn the payroll deduction feature **ON** for your users, you must make sure the respective checkboxes are **disabled** (unchecked).
- **Clear Financial Policies:** **Ensure your organization has a clear, documented policy** regarding employee eligibility for payroll deductions before allowing this payment method in the system. - **Permit Types:** Note that this specific configuration targets temporary permits. If your organization handles payroll deductions for long-term or permanent permits, those are typically managed within the individual permit pricing and eligibility settings, rather than this global toggle. # Setting up Quick Pay/Guest PaymentsThe Quick Pay and Guest Payments feature allows guest users to look up and pay for violations directly from the user portal without needing to create or log in to an account. Its primary purpose is to streamline the payment process for end-users, thereby reducing the volume of administrative inquiries and support tickets. This article is intended for OPSCOM administrators.
## Setup and Configuration For Guest Payments to function properly, you must first designate which payment types are available for guests and then activate the feature within the system's global settings.**Payment Provider Compatibility:** A compatible third-party payment provider that supports guest transactions must be configured in your OPSCOM system before enabling this feature. For detailed instructions, refer to the *[Setting up a third-party Payment Provider](https://opscom.wiki/books/setup-configuration-for-admins/page/managing-payment-types "Managing Payment Types")* page here.
### Enable Specific Payment Types 1. Hover over **System Configuration**, click **Payments**, then click **Setup Payment Types**. 2. Create a new payment type or click the **Edit** icon next to an existing payment type that you wish to enable for guests. 3. Click the **Settings** tab. 4. Enable the **Enable for Guest Payments** checkbox. 5. Click the **Save** button to confirm the change. 6. Repeat these steps for all payment types you want to make available for guest payments. ### Activate Global Setting 1. Hover over **System Configuration** and click **System Settings**. 2. Click the **Violations** tab. 3. Enable the **Enable Anonymous Violation Payments** checkbox. 4. Click the **Save Settings** button. ## Using this Feature Once Guest Payments are fully configured, a dedicated button will automatically appear on the public portal's main login page, allowing users to search for and pay their violation fines without logging in. For detailed instructions on how end-users interact with this interface, please refer to the *[OPSCOM-Go! - Quick & Easy Guest Payments](https://opscom.wiki/books/opscom-go-user-portal/page/opscom-go-quick-easy-guest-payments "OPSCOM-Go! - Quick & Easy Guest Payments")* page. --- ## Best Practices and Considerations - **Select appropriate payment types:** **Only enable electronic payment methods** (e.g., Credit Card) for Guest Payments. Manual payment types, such as cash or check, cannot be processed automatically through the public portal. - **Confirm provider compatibility:** Guest Payments will not function without a compatible payment gateway configured in OPSCOM. Consult your specific payment provider's documentation or support team if you are unsure about their guest transaction capabilities. - **Communicate availability:** **Consider adding a note on your organization's parking information page** to proactively direct users to this convenient payment option, ensuring they know they do not need to register for an account just to pay a one-time ticket. # Payment Reconciliation: Submitted / ProcessedThe Payment Reconciliation page allows administrators to effectively track and manage the status of payments within a defined time period. Its primary purpose is to reconcile the dollar value of received payments with your bank or credit card merchant by accurately comparing the amounts charged between the two systems. This article is intended for OPSCOM administrators responsible for financial reporting and auditing.
## Setup and Configuration To effectively filter reconciliation data, administrators can create designated groups and assign specific members to them.You must have the **View Payments** permission enabled on your profile to access this report. This permission can be added to your role by a Primary Admin.
### Creating a Payment Reconciliation Group 1. Hover over **System Configuration**, click **Admin Management** then **Manage Groups**. 2. Click the **Payment Reconciliation** module tab. 3. Click the **Add New** button in the top right corner. 4. Enter a name for the group into the **Group Name** field. 5. Set the purpose of the group using the **Module** drop-down menu. 6. Add the appropriate staff to the group using the **Admin Members** selection area. 7. Click the **Save Group** button. The new group will appear at the bottom of the Administrator Groups list. ### Adding Members to an Existing Group 1. Hover over **System Configuration**, click **Admin Management** then **Manage Groups**. 2. Click the **Edit** button next to the specific Administrator Group you wish to modify. 3. Click the **Admin Members** bar to select and add additional members to the group. 4. Click the **Save Group** button at the bottom of the window to apply your changes. ## Using this Feature Administrators can filter results to view either submitted or processed payments based on specific criteria. 1. Hover over **Payments** and click **Payment Reconciliation**. 2. Define the start and end dates for the payments you wish to view using the **Filter by Date Range** fields. 3. Select the specific payment methods you want to include in the results using the **Filter by Payment Type** drop-down menu. 4. Filter reconciliation data based on specific designated groups using the **Filter by Admin Group** drop-down menu. 5. Click the **Search** button. The results will display directly below the search criteria. 6. Click any column header within the results table to reorder and sort the data. ### Available Export Actions The report page offers various export options (displayed as green buttons) that allow administrators to generate files for external use: - **Copy:** Copies the row data to your clipboard, allowing you to easily paste it into external programs. - **CSV:** Creates and downloads a Comma-Separated Values (.csv) file for use in spreadsheet software. - **Excel:** Creates and downloads a Microsoft Excel (.xls) file. - **Print:** Prompts your web browser to print the current page view. --- ## Best Practices and Considerations\[!WARNING\] **Avoid using the Daily Payments Itemized report for reconciliation tasks.** While the *Daily Payments Itemized* report shows received payments, it is not recommended for financial reconciliation. It may display tax differently and can lead to rounding errors, making exact dollar-value comparisons inaccurate.
- **Reconciliation Focus:** **Always use the Payment Reconciliation report** as your primary tool when comparing internal OPSCOM system payments with external bank or merchant settlement statements. # Accepting a Student Account Payment from the Admin PortalThe Student Account Payment feature allows administrators to process transactions by billing a user's internal institutional account directly from the administrative portal. Its primary purpose is to seamlessly facilitate purchases, such as permits or lockers, for students who pay their parking fees through their central student tuition or university finance accounts. This article is intended for OPSCOM administrators.
## Setup and Configuration Before you can accept a student account payment, ensure this specific payment type has been created and enabled within your global payment settings. For detailed instructions on configuring new payment methods, please refer to the *[Managing Payment Types](https://opscom.wiki/books/setup-configuration-for-admins/page/managing-payment-types "Managing Payment Types")* page. ## Using this Feature Administrators can guide an unpaid item through the checkout process using a student's central account in just a few steps. The following example demonstrates this process using a permit purchase. 1. Navigate to the specific user's profile and initiate the purchase or assignment process (e.g., selecting a permit in the General Monthly Lot). 2. Choose the specific permit to assign to the user. 3. Click the **Purchase this Permit** button to continue. 4. Click the **Proceed to Payment** button on the subsequent payment due page. 5. Select **Student Account** from the payment method options on the payment selection screen. 6. Click the **Submit Payment** button. 7. Review the options presented on the Transaction Details screen: - **Process Manually:** This option will complete the transaction. - **Cancel and Keep:** This option will terminate the transaction but return the permit or locker to an awaiting payment status on the user's profile. - **Cancel and Release:** This option will terminate the transaction and release the permit or locker back into the pool of available inventory. 8. Click the **Process Manually** button to finalize the transaction. ### Visual Cues and Status Indicators - **Receipt Generation:** Once the payment is successfully processed, the final screen will display a detailed receipt. Because the payment method selected was **Student Account**, the item will be permanently marked and tracked in the system history as being paid via a student account. --- ## Best Practices and Considerations**Reconciling Funds:** To ensure your institution's finances remain balanced, **run a Daily Payments Itemized report filtered specifically by the Student Account payment type**. This report should be provided to your financial department on a regular schedule to allow them to manually retrieve the appropriate funds from the central student accounts.
- **Verify User Profiles:** **Always verify you are processing the transaction on the correct user profile** before clicking the final process button. Because student account funds are handled internally, charging the wrong student profile can create complex administrative errors for your finance department to reverse. # Payment for a locker from the Admin PortalThe Locker Payment feature allows administrators to assign a locker and process the associated payment on behalf of a user directly from the administrative portal. Its primary purpose is to seamlessly facilitate locker rentals and handle in-person transactions, ensuring accurate inventory and financial tracking. This article is intended for OPSCOM administrators.
## Setup and Configuration There is no specific system configuration required to use this feature, provided your locker inventory and payment methods are already established. Processing a locker payment is a standard administrative action available to users with the appropriate user management and payment processing permissions enabled on their account profile. ## Using this Feature Administrators can navigate the assignment and checkout process for a locker in just a few steps from a user's profile. [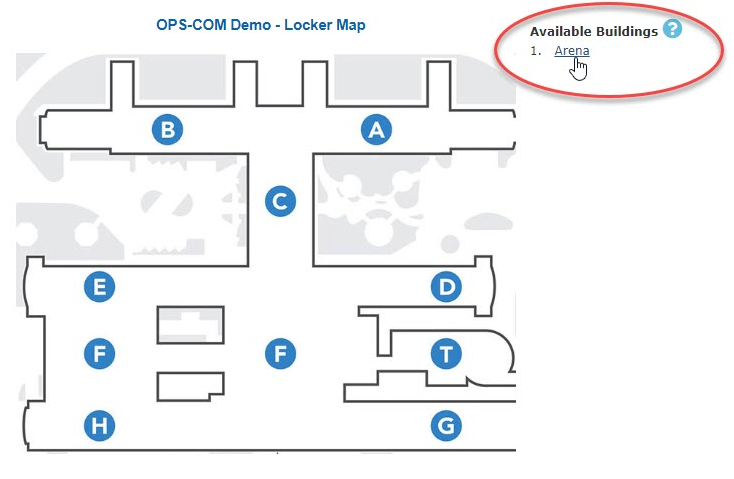](https://opscom.wiki/uploads/images/gallery/2026-07/xq8image.png) 1. Navigate to the specific user's profile on the admin portal. 2. Click the **Lockers** menu item to open the locker registration page. 3. Select the desired building from the list of locations with available lockers. 4. Choose the specific locker area within the building (e.g., Women's locker room). 5. Select the specific locker number you wish to assign to the user. 6. Click the **Reserve Locker** button to continue. 7. Verify the assignment information on the confirm locker registration page and click the **Confirm Info** button. 8. Click the **Proceed to Payment** button on the payment due page. 9. Select the desired payment method (e.g., Cash) from the payment selection section. 10. Click the **Submit Payment** button. 11. Review the options presented on the Transaction Details screen: - **Process Manually:** This option will complete the transaction and finalize the rental. - **Cancel and Keep:** This option will terminate the transaction but return the locker to an awaiting payment status on the user's profile. - **Cancel and Release:** This option will terminate the transaction and immediately release the locker back into the pool of available inventory. 12. Click the **Process Manually** button to finalize the transaction. ### Visual Cues and Status Indicators - **Receipt Generation:** Once the payment is successfully processed manually, the final Transaction Details screen will refresh to display a detailed receipt, confirming the locker assignment and the logged payment. --- ## Best Practices and Considerations**Managing Incomplete Transactions:** If a user forgets their wallet or needs to step away during an in-person transaction, use the **Cancel and Keep** button. This safely holds the specific locker under their profile for future payment without forcing you to restart the entire assignment process when they return.
- **Verify the User Profile:** **Always verify you are processing the transaction on the correct user profile** before clicking the final process button to prevent assigning inventory or logging manual payments to the wrong account. - **Releasing Inventory:** If a user changes their mind at the final checkout step and no longer wants the locker, ensure you click the **Cancel and Release** button so that the locker immediately becomes available for other users to rent. # Admin Portal Permit Purchase with Credit CardThe Admin Portal Permit Purchase with Credit Card process allows administrators to manually purchase and assign a parking permit on behalf of a user. Its primary purpose is to seamlessly facilitate over-the-phone or in-person permit sales while securely processing payments through your integrated payment provider. This article is intended for OPSCOM administrators.
## Setup and Configuration There is no specific system configuration required to use this feature, provided your third-party payment provider and permit inventory are already established. Processing a permit purchase is a standard administrative action available to users with the appropriate user management and payment processing permissions enabled on their account profile. ## Using this Feature Administrators can navigate the assignment and checkout process for a permit using a credit card in just a few steps. 1. Navigate to the specific user's dashboard on the admin portal. 2. Click the **Parking** tab to begin the assignment process. 3. Choose either the next permit available or select a specific permit number on the Confirm Parking Permit Registration page. 4. Click the **Purchase this Permit** button to continue. 5. Review the items listed on the Payments Due screen. 6. Choose the appropriate credit card payment provider from the available payment methods. 7. Click the **Submit Payment Information** button. 8. Click the **Submit Payment Information** button again on the confirmation screen to proceed to the external payment gateway. 9. Fill out the payment provider's input form with the credit card details. 10. Click the **Make Payment** button to complete the purchase. ### Key Information Displayed - **Transaction Record:** Once the payment is successfully processed, the screen will display a detailed transaction record. This includes the unique confirmation number, which is permanently stored in the user's payment history and can be easily retrieved using system search tools. --- ## Best Practices and Considerations\[!WARNING\] **Payment Security:** When taking a payment over the phone, **never write down or permanently store the user's credit card information**. Always enter the details directly into the payment provider's secure gateway in real-time to maintain strict PCI compliance.
- **Verify User Profiles:** **Always verify you are processing the transaction on the correct user profile** before proceeding to the payment gateway. Charging the wrong account can create administrative complications and require manual refunds. - **Searchable Transactions:** Encourage staff to provide the user with the generated confirmation number before ending the call, as this number can be used later to quickly locate the transaction if the user has any future inquiries. # Daily Payments - ItemizedThe Daily Payments Itemized report allows administrators to view a detailed breakdown of all submitted and processed payments within a specific date range. Its primary purpose is to help track individual transaction items, such as permits, deposits, and violations, for financial tracking and daily reporting. This article is intended for OPSCOM administrators.
## Setup and Configuration There is no specific system configuration required to access this report. Running the daily itemized report is a standard administrative function available to users with the appropriate financial and payment management permissions enabled on their account profile. ## Using this Feature Administrators can filter the daily payments by date range, payment status, and payment type to generate a highly specific financial report. 1. Hover over **Payments** and click **Daily Payments - Itemized**. 2. Select your desired date range using the provided date fields. 3. Filter the results by choosing specific payment types from the drop-down menu. 4. Choose to filter the report by either submitted or processed payments. 5. Click the **List Payments** button to generate the results. ### Key Information Displayed - **Daily Grouping:** Once generated, the results will be displayed directly below the search criteria, automatically organized and grouped by day. - **Processed Orders Breakdown:** A comprehensive table breakdown summarizing all daily processed orders is displayed at the bottom of the page for quick reference. ### Available Action & Button The report offers two distinct Excel export options depending on how you need the data organized for external use: - **Export to Excel (Group):** Click this button to generate a file where payment items (such as permits, deposits, violations, and lockers) that are part of the exact same transaction are grouped together into a single block. [](https://opscom.wiki/uploads/images/gallery/2024-08/lJIimage.png) - **Export to Excel (Line):** Click this button to generate a file where payment items that are part of the same transaction are separated out and listed on individual rows. [](https://opscom.wiki/uploads/images/gallery/2024-08/MPeimage.png) --- ## Best Practices and Considerations**Reconciliation Tasks:** While this report provides an excellent itemized view of daily transactions, **it is not recommended for strict bank reconciliation tasks** (comparing system payments directly to bank merchant payments). Itemized reports can occasionally display tax differently and lead to rounding errors. Always use the *Payment Reconciliation* page for direct bank statement comparisons.
- **Export Formats:** **Choose the correct export format based on your external accounting software.** If your financial department imports this data into a third-party accounting system, verify whether their software requires grouped transaction totals or individual line-item separation before running your export. # Admin Portal Cash, Cheque or Debit PaymentThe Admin Portal Manual Permit Payments feature allows administrators to process in-person, offline transactions—such as cash, cheque, money order, or debit card—when assigning a parking permit to a user. Its primary purpose is to facilitate front-desk permit sales while ensuring these off-gateway payments are securely and accurately logged within the system's financial records. This article is intended for OPSCOM administrators.
## Setup and Configuration There is no specific system configuration required to use this feature, provided your manual payment types and permit inventory are already established. Processing a manual payment is a standard administrative action available to users with the appropriate user management and payment processing permissions enabled on their account profile. If you need to add or edit the manual payment methods available at your front desk, instructions can be found on the *[Managing Payment Types](https://opscom.wiki/books/setup-configuration-for-admins/page/managing-payment-types "Managing Payment Types")* page. ## Using this Feature Administrators can navigate the assignment and checkout process for a manual permit purchase in just a few steps. 1. Navigate to the specific user's dashboard on the admin portal. 2. Click the **Parking** tab and click the **Standard Permit** button to access the permit purchase screen. 3. Choose either the next permit available or select a specific permit to assign to the user on the Confirm Parking Permit Registration page. 4. Click the **Purchase this Permit** button to proceed. 5. Select the desired manual payment type (e.g., Cash, Cheque, Money Order, or Debit Card) from the available options. 6. Click the **Submit Payment Information** button on the Payment Due screen. 7. Review the options presented on the Transaction Details screen: - **Process Manually:** This option will complete the transaction. You should select this option at the exact moment you physically collect the cash, cheque, money order, or process the external debit card. - **Cancel and Keep:** This option will terminate the transaction but keep the permit in an awaiting payment status on the user's profile. - **Cancel & Release:** This option will terminate the transaction and immediately release the permit back into the pool of available inventory. 8. Click the **Process Manually** button to complete the transaction. ### Visual Cues and Status Indicators - **Receipt Generation:** Once the manual payment is successfully processed, the screen will refresh to display a final confirmation screen and transaction record, confirming the purchase is complete and the permit is active. --- ## Best Practices and Considerations**Managing Incomplete Transactions:** If a user realizes they forgot their wallet or chequebook during an in-person transaction, use the **Cancel and Keep** button. This safely holds the specific permit under their profile for future payment without forcing you to restart the entire assignment process when they return.
- **Physical Collection:** **Always collect the physical funds or process the debit terminal transaction before clicking Process Manually.** Clicking this button tells the OPSCOM system that the money has been successfully secured. - **Releasing Inventory:** If a user changes their mind at the final checkout step and no longer wants the permit, ensure you click the **Cancel & Release** button so that the permit immediately becomes available for other users to purchase. # Paying for a Violation from the Admin PortalThe manual violation payment feature allows administrators to accept and process ticket payments on behalf of users directly from the administrative portal. Its primary purpose is to seamlessly facilitate in-person or over-the-phone ticket resolutions, ensuring all offline transactions (such as cash or cheque) are accurately recorded in the system's financial logs. This article is intended for OPSCOM administrators.
## Setup and Configuration There is no specific system configuration required to use this feature, provided your manual payment types are already established. Processing a manual payment is a standard administrative action available to users with the appropriate violation management and payment processing permissions enabled on their account profile. ## Using this Feature Administrators can locate an unpaid violation and guide it through the checkout process in just a few steps. ### Searching for the Violation 1. Type the specific violation number into the quick search bar and click the resulting drop-down link, or hover over **Violations** and click **Search**. 2. Enter the ticket number or license plate number into the **Search Text** field. 3. Click the **Search Using Only Text** button. 4. Click the specific ticket number link from the search results to open the **Violation Information** window. [](https://opscom.wiki/uploads/images/gallery/2026-07/jfoimage.png) ### Processing the Payment 1. Click the **Action** drop-down menu and choose **Make Payment**. 2. Review the awaiting items displayed on the payment screen. Disable the checkboxes for any items the user wishes to pay for at another time. 3. Click the **Proceed to Payment** button. 4. Select the specific payment type you wish to use (e.g., Cash) from the available options. 5. Click the **Submit Payment Information** button. 6. Click the **Submit Payment Information** button again on the confirmation screen to proceed. 7. Update the **Comment** field on the Transaction Detail screen if necessary. 8. Click the **Process Manually** button to finalize the payment and generate the transaction receipt. ### Visual Cues and Status Indicators - **Past Due Items:** The initial payment screen displays all items currently awaiting payment, including violations, permits, and deposits. If any items are past due, they will be locked; you will be required to process them and will not be able to toggle them off. - **Available Payment Types:** As an administrator, you will see every payment type available in your system during checkout. Remember that users paying from the public portal will typically only see electronic options, such as Credit Card. --- ## Best Practices and Considerations\[!WARNING\] **Physical Collection:** **Always collect the physical funds or process the debit terminal transaction before clicking Process Manually.** Clicking this button completes the transaction and logs the money as successfully secured in your system's financial records.
- **Managing Incomplete Transactions:** If you need to abort the payment on the final screen, you can choose to cancel the transaction instead of processing it. Canceling a payment for a violation simply places the violation back into an awaiting payment status on the user's profile. - **Search Methods:** Using the specific Ticket Number will load that exact ticket, whereas searching by Plate Number will generate a list of all tickets associated with that vehicle. # Payment Data Export via SFTPThe Payment Data Export via SFTP feature automatically exports payment and violation data into a CSV file specifically formatted for integration with the other financial systems like, Workday and Banner. Its primary purpose is to ensure seamless financial data synchronization by appending the necessary detail codes and term codes to user transactions. This article is intended for OPS-COM administrators responsible for system configuration and financial integrations.
## Setup and Configuration There are several items that must be carefully configured across different system modules in order for the right information to display in the exported CSV file. **Admin Side:** ### User Profile Configuration 1. Configure a unique user ID in the **[User Profile](https://opscom.wiki/books/the-opscom-admin-portal/page/user-profile-overview)**. This information will likely be populated automatically via a user data import. ### Lot Administration Configuration Each lot requires a unique banner detail code established during the preliminary planning phase of your project. 1. Head to **Parking Management**, hover over **[Lot Administration](https://opscom.wiki/books/the-opscom-admin-portal/page/pricing-and-lot-admin)** and click **Pricing & Lot Admin**. 2. Click the specific lot name to access the configuration screens. 3. Click the **Additional** tab. 4. Enter the required code into the **Banner Detail Code** field. 5. Save your lot configuration changes. ### Ticket Categories Configuration 1. Hover over **Violations** and select **[Ticket Categories](https://opscom.wiki/books/setup-configuration-for-admins/page/ticket-categories)** (or **Manage Ticket Categories**). 2. Click **Edit** on the category you wish to configure. 3. Enter the detail code for the ticket category (e.g., entering PRKB for the Boot Fee category). 4. Save your category changes. ### Sales Window Configuration You must enter a Term Code specifically used for permits on the sales window configuration page so it appears on the permit purchases export. 1. Hover over **Permits** and select **[Sales Window](https://opscom.wiki/books/the-opscom-admin-portal/page/permit-sales-window-management)**. 2. Click **Edit** to access the configuration screen for the desired window. 3. Enter the appropriate code in the **Banner Term Code** field. 4. Click the **Save Changes** button. ### Activate Script to Run on a Schedule 1. Click **View System Task Logs** from the main options menu. 2. Ensure the associated system task is set to active and has an active schedule set (e.g., verifying the task is set to run at 2:00 am nightly). **User Side:** End-users do not interact with the setup or configuration of the Banner export. They simply select the appropriate payment method during checkout. ## Using this Feature Once configured, the system automatically handles the data export based on your scheduled tasks. Administrators can verify the workflow by performing a test transaction on the user portal. ### Performing a Test Transaction 1. Navigate to the user portal and click the **Permits** menu item. 2. Select the lot you wish to purchase a permit in. 3. Click the **Reserve Permit** button. 4. Click **Continue to Checkout** to view your cart. 5. Select **Banner Payment** as your payment type. This can be configured so that Banner Payment is the only selection available to the user. 6. Click the **Submit Payment** button. 7. Click **Confirm Payment** on the refreshed screen to finalize the transaction and generate the online receipt. --- ## Best Practices and Considerations - **Understand the export trigger:** **The Export to Banner process will run automatically whenever the system task is scheduled to execute.** It actively gathers any violations or payments that can be sent to Banner that haven't been exported yet. Once an item has been exported by the system task, it is internally flagged to prevent duplicate exports. - **Anticipate unique file generation:** **The system does not create a cumulative file that gets more data added to it each day.** Rather, it creates a completely new CSV file every single time it runs. This interval isn't necessarily daily; it runs at whatever frequency your organization has decided. - **Handle missed schedules carefully:** **If the system task misses a scheduled day, there will be more than one new file in the output folder for your team to process.** Administrators must be prepared to process all pending files in Banner to ensure financial records are fully reconciled. # Search PaymentsThe Search Payments tool provides a dedicated interface to locate specific transactions and run pre-configured payment status reports. Its primary purpose is to help administrators quickly find individual payment records using unique identifiers, as well as audit unprocessed or daily payments for accurate financial tracking. This article is intended for OPSCOM administrators.
## Setup and Configuration There is no specific system configuration required to access this search tool. Running payment searches is a standard administrative function available to users with the appropriate financial and payment management permissions enabled on their account profile. ## Using this Feature Administrators can locate specific transactions using unique identifiers or utilize pre-configured reporting links to pull lists of payments based on their payment type and current processing status. ### Searching by Unique Identifier 1. Hover over **Payments** and click **Search**. 2. Enter the specific text string into the **Confirm Code**, **Transaction ID**, or **Order ID** field on the Payments Reporting form. 3. Click the associated search button. If the code exists in the system, the screen will automatically refresh to display the specific transaction details for that purchase. [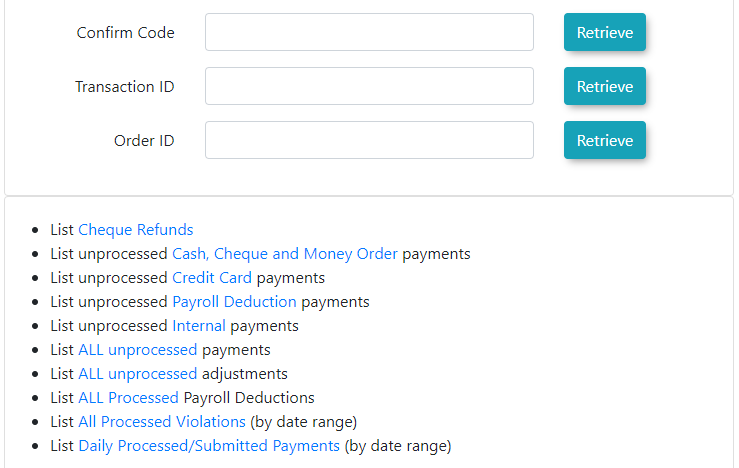](https://opscom.wiki/uploads/images/gallery/2026-07/2o2image.png) ### Using Pre-Configured Searches The search tool includes several pre-configured search links located below the main search fields. These links help you find grouped payment information quickly. Some reports require you to set a date range, while others will automatically pull all relevant data. Click any of the following links on the search page to generate the respective report: - **List Cheque Refunds** - **List unprocessed Cash, Cheque and Money Order payments** - **List unprocessed Credit Card payments** - **List unprocessed Payroll Deduction payments** - **List unprocessed Internal payments** - **List ALL unprocessed payments** - **List ALL unprocessed adjustments** - **List ALL Processed Payroll Deductions** - **List All Processed Violations** (requires a date range) - **List Daily Processed/Submitted Payments** (requires a date range) ### Reviewing the Daily Processed or Submitted Payments Report When you select the **List Daily Processed/Submitted Payments** option, you must specify your search parameters. 1. Select the desired date range using the provided fields. 2. Select whether you wish to search for submitted payments or processed payments. 3. Click the search button to generate the report. **Key Information Displayed:** The resulting report is divided into two distinct sections. The first section provides a highly detailed itemized list of all individual payments within the selected timeframe. The second section provides a concise daily summary table for quick financial reference. --- ## Best Practices and Considerations**Regular Audits:** Regularly use the pre-configured **List ALL unprocessed payments** search link to identify and resolve any pending transactions. Ensuring all manual cash, cheque, or internal payments are marked as processed keeps your financial reporting accurate and up to date.
- **Quick Access for User Support:** If a user contacts the administration office regarding a specific online purchase, ask them for the confirmation code provided on their digital receipt. Entering this into the **Confirm Code** search field is the fastest way to bypass broad user searches and instantly view the exact transaction details. # Banner ReportThe Banner Report feature allows administrators to generate a consolidated list of pending user payments intended to be processed through an external Banner ERP system. Its primary purpose is to export this batch payment data for institutional processing and simultaneously mark those associated items as paid within OPSCOM. This article is intended for OPSCOM administrators.
## Setup and Configuration There is no specialized system configuration required to access this report, provided your institution utilizes a Banner system for student or staff financials. Generating the report is a standard administrative function available to users with the appropriate financial reporting and payment management permissions enabled on their account profile. ## Using this Feature Administrators can use this tool to define the payment batch parameters, export the data for Banner, and mark the items as resolved in OPSCOM. ### Generating and Exporting the Report 1. Hover over **Payments** and click **Banner Report**. 2. Select the demographic you wish to report on from the **User Types** drop-down menu. 3. Select the specific item you are processing (e.g., yearly permits) from the **Choose Item Type** drop-down menu. 4. Select the end date of the billing period using the **Up To and Including** date picker. 5. Enter the appropriate payment identification code into the **Banner Code** field (e.g., 100). 6. Enter the exact item representation code into the **Detail Code** field (e.g., YP2020). 7. Enter your specific administrator ID into the **Admin Code** field to track who is making this payment report. 8. Click the **Export to Excel** button to download a spreadsheet of the selected names and payments. This file can then be imported directly into Banner to facilitate payment through central student or staff accounts. [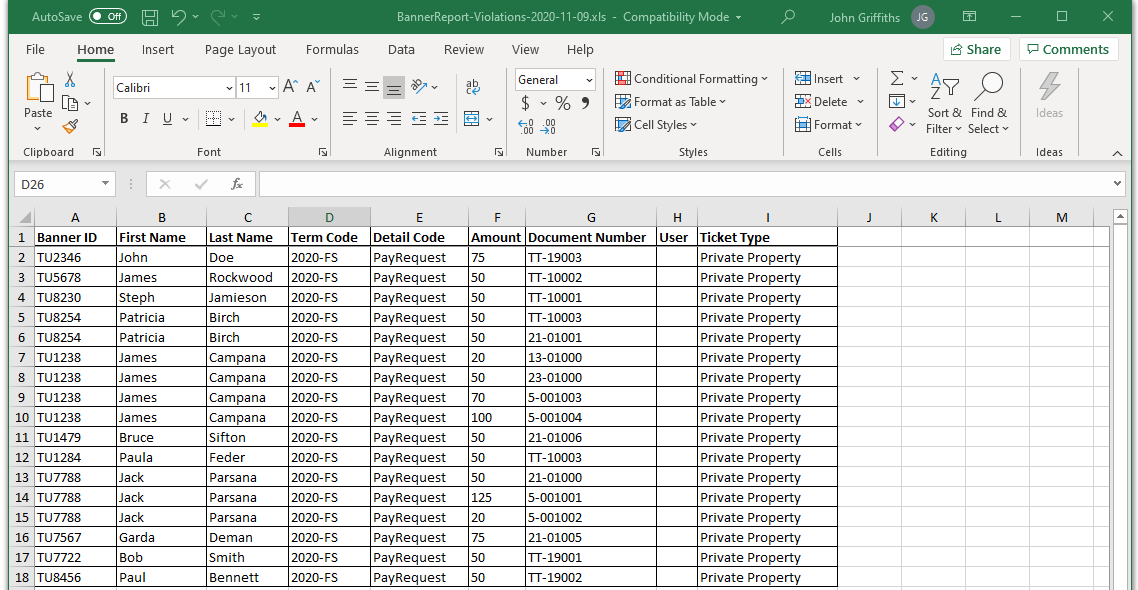](https://opscom.wiki/uploads/images/gallery/2026-07/gwaimage.png) ### Marking Items as Paid Once the report parameters are set and you are ready to resolve the balances in OPSCOM: 1. Click the **Mark as Paid** button to begin the internal payment process. 2. Click the **Confirm** button on the popup window to finalize the transaction.**Export Before Paying:** **Always click the Export to Excel button before clicking the Mark as Paid button.** Once you mark the items as paid in OPSCOM, they are cleared from the pending queue. If you do not have the exported spreadsheet saved, you will not be able to process the actual transfer of funds within your Banner system.
### Key Information Displayed and Status Indicators - **Transaction Code Generation:** Once the bulk payment is confirmed, a final screen will display a unique transaction code for the batch. - **Payment Status:** Searching for this specific transaction code using the standard OPSCOM payment search tools will return a list of all items included in the report, verifying that they are now successfully marked as paid in the system. --- ## Best Practices and Considerations - **Code Accuracy:** **Coordinate closely with your finance department** to ensure the values you enter into the **Banner Code** and **Detail Code** fields perfectly match your external system's current formatting requirements. Incorrect codes will cause the Excel import to fail in Banner. - **Record Keeping:** Keep a log of the generated OPSCOM transaction codes alongside your Banner import records to ensure easy auditing and cross-system reconciliation. # Flex PaymentsThe Flex Payments process allows administrators to create a prepaid credit balance on a user's account by issuing a zero-dollar placeholder permit and applying a manual negative adjustment. Its primary purpose is to provide flexible funding options for specific user groups, allowing them to apply this prepaid credit toward future parking purchases on the user portal. This article is intended for OPSCOM administrators.
## Setup and Configuration To utilize flex payments, administrators must first configure a dedicated zero-dollar lot and allocate placeholder permits to it. ### Configuring the Flex Payment Lot 1. Hover over **Lot Administration** and click **Pricing & Lot Admin**. 2. Create a new lot and enter a descriptive name (e.g., Flex Payment Lot). 3. Set the cost of the lot to $0.00. 4. Select the specific demographic utilizing flex payments from the **Usertype** drop-down menu (e.g., Full Time Staff). 5. Set the **Sales Window** to Yearly. 6. Save your lot configuration. 7. Hover over **Lot Administration** and click **Allocate**. 8. Add a block of dummy permits to this new lot (e.g., FLX001 through FLX010). [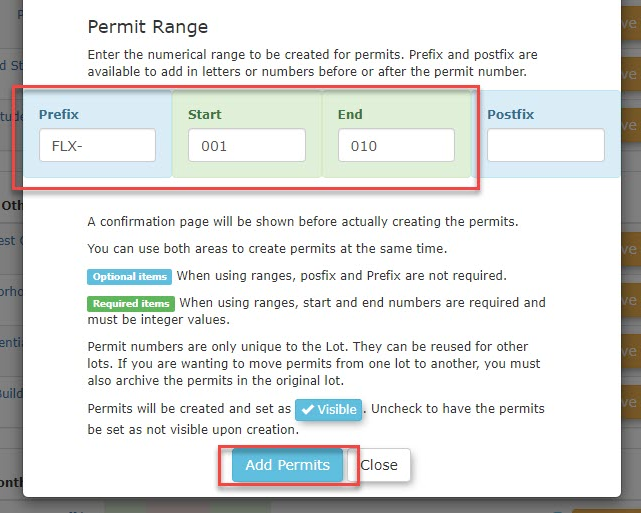](https://opscom.wiki/uploads/images/gallery/2026-07/oijimage.png)**Lot Visibility:** This placeholder lot does not need to be visible to standard users, as this functionality is executed exclusively from the administrative portal. You can safely hide this lot from public view in the lot settings.
## Using this Feature Once the placeholder lot is established, administrators can apply a flex credit to a user's account by "selling" them one of the zero-dollar permits and adjusting the transaction total. ### Applying the Flex Credit 1. Navigate to the specific user's profile and click the **Parking** tab. 2. Select a permit from the newly created Flex Payment Lot. 3. Click the **Purchase this Permit** button to proceed. 4. Click the **Proceed to Payment** button on the Payments Due screen. 5. Select a manual payment type, such as Cash, and process it as a zero-dollar purchase. 6. Click the **Adjust** button on the final confirmation screen to open the adjustment interface. 7. [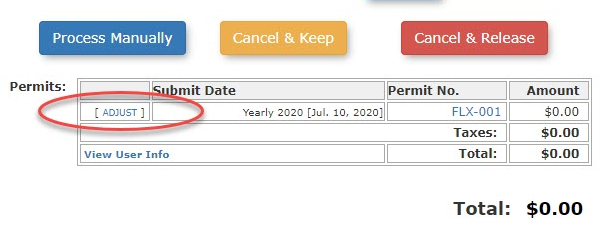](https://opscom.wiki/uploads/images/gallery/2026-07/YD62ydimage.png) 8. Enter a negative value to represent the credit amount (e.g., -200.00). 9. Enter a clear description in the **Comment** field (e.g., Flex Payment Adjustment). 10. Click the **Add Adjustment** button. ### Key Information Displayed - **User Portal Credit:** Once the negative adjustment is applied, the user will see a credit balance displayed directly on their dashboard when they log into the user portal. This balance can then be selected as a valid payment method when they check out to purchase their actual parking permit.**Do Not Process the Credit:** After adding the negative adjustment, **do not attempt to process a refund or payout for the credit balance**. Leave the negative balance on the user's account so the system recognizes it as available funds they can apply toward future permit purchases.
--- ## Best Practices and Considerations - **Audit Trails:** **Always use clear and standardized comments** when adding the negative adjustment (e.g., "Fall Semester Flex Funding"). This ensures your financial team can easily identify why a manual credit was applied to the user's profile during an audit. # Payroll Deduction WorkflowThe Payroll Deduction Workflow allows administrators to process permit payments by assigning the transaction cost directly to a user's internal payroll account. Its primary purpose is to seamlessly facilitate staff and employee parking purchases by logging the transaction for deferred collection through your organization's payroll system. This article is intended for OPSCOM administrators.
## Setup and Configuration Before you can process a purchase using this workflow, ensure that the Payroll Deduction payment method is active in your system. 1. Verify that the Payroll Deduction payment type is enabled for the specific user groups (e.g., Staff or Faculty) permitted to use this feature. 2. Check your global payment settings to ensure the deduction option is not disabled for standard permit purchases. For detailed instructions on configuring these payment toggles, please refer to the *[Payroll Deduction Settings](https://opscom.wiki/books/the-opscom-admin-portal/page/payroll-deduction-settings "Payroll Deduction Settings")* page. ## Using this Feature Administrators can process a permit purchase using the payroll deduction workflow directly from the administrative portal in just a few steps. 1. Navigate to the specific user's profile and initiate the permit purchase process until you reach the Payments Due screen. 2. Click the **Proceed to Payment** button. 3. Select **Payroll Deduction** from the available payment type selection tool. 4. Click the **Submit Payment Information** button to continue. 5. Review the details on the confirmation screen to ensure the purchase amount and permit assignment are correct. 6. Click the **Confirm Payment Information** button. 7. Click the **Process Manually** button on the Transaction Detail screen to complete the purchase.**Tracking Deductions:** Use the *Payroll Deduction Report* to accurately track these specific purchases. Generating this report allows you to export the necessary data for your finance or human resources department so they can physically collect the funds from the employees' paychecks.
### Visual Cues and Status Indicators - **Final Transaction Screen:** Once the payment is processed manually, the screen will refresh to display a final receipt. At this point, the system considers the permit successfully purchased and active. --- ## Best Practices and Considerations - **Eligibility Verification:** **Always verify that the user is eligible for payroll deduction** before completing the transaction. Processing a deduction for an ineligible user (such as a temporary contractor or student) can create reconciliation errors for your finance department. # Admin Portal Violation Payments with Credit CardThe Admin Portal Violation Payments with Credit Card process allows administrators to manually process parking ticket payments using a user's credit card directly through the administrative portal. Its primary purpose is to seamlessly facilitate over-the-phone or in-person electronic payments while securely processing the transaction through your integrated payment provider. This article is intended for OPSCOM administrators.
## Setup and Configuration There is no specific system configuration required to use this feature, provided your third-party payment provider is already established and credit card payment types are enabled in your environment. Processing a payment is a standard administrative action available to users with the appropriate violation management and payment processing permissions enabled on their account profile. ## Using this Feature Administrators can locate an unpaid violation and process a credit card payment in just a few steps. 1. Hover over **Violations** and click **Search**. 2. Type the specific ticket number into the **Search Text** box and perform the search. 3. Click the specific **Ticket #** link from the search results to open the Violation Information window. 4. Click the **Actions** drop-down menu and choose **Make Payment**. 5. Review the awaiting items displayed on the user's payment screen. Disable the checkboxes for any items the user does not wish to pay for at this time (such as unrelated permits or deposits). 6. [](https://opscom.wiki/uploads/images/gallery/2026-07/ulhimage.png) 7. Click the **Proceed to Payment** button. 8. Select the applicable credit card option (e.g., **Credit Card**, **MasterCard**, or **Visa**) from the payment type drop-down menu. 9. Enter the required credit card details into the secure payment form. 10. Click the **Submit Payment Information** button. 11. Click the **Confirm Payment Information** button on the confirmation screen to finalize the transaction. ### Visual Cues and Status Indicators - **Transaction Details:** Once the payment successfully processes, the system will redirect to a final transaction details page displaying a generated receipt for the purchase. ### Available Action for External Payments - **External Credit Card Transactions:** If a customer chooses to pay by credit card in person at the parking office using a physical pin pad or standalone cash register, you should select an external payment type (e.g., "Visa (External)"). This action bypasses the online payment gateway form and simply logs the transaction as paid in the OPSCOM financial records.**Payment Security:** When taking a credit card payment over the phone, **never write down or permanently store the user's credit card information**. Always enter the details directly into the payment provider's secure gateway in real-time to maintain strict PCI compliance.
--- ## Best Practices and Considerations - **Verify Selected Items:** **Always double-check the selected items on the checkout page** before clicking the proceed button. Because all of the user's pending items will appear, you must manually deselect any permits or other violations the user is not actively paying for to avoid overcharging their card. - **Confirming the User:** Verify that you are processing the violation on the correct user profile by matching the license plate and user details before submitting the final payment to prevent complex refund scenarios. # Failed Payments ReportThe Failed Payments Report allows administrators to search and review a list of unsuccessful payment transactions within a specific date range. Its primary purpose is to help identify exactly why a user's transaction did not process by providing access to detailed transaction records and specific payment provider error codes. This article is intended for OPSCOM administrators.
## Setup and Configuration There is no specific system configuration required to access this report. Running the failed payments report is a standard administrative function available to users with the appropriate financial reporting and payment management permissions enabled on their account profile. ## Using this Feature Administrators can generate a list of unsuccessful transactions and drill down into the specific error details in just a few steps. 1. Hover over **Payments** and click **Search Failed Payments**. 2. Enter the specific date range you wish to report on using the provided date fields. 3. Click the **Search** button. 4. Review the generated list of failed payments displayed for the selected time period. 5. Click the specific **Confirmation Code** link to open the full transaction record and view detailed failure information.**Understanding Provider Error Codes:** While some payment gateways return a detailed text explanation indicating exactly why a payment failed, other providers will simply supply a numerical error code (e.g., Response Code 481).
### Key Information Displayed - **Failed Payment List:** The initial search results display a high-level overview of the failed attempts, including the Pay ID, confirmation code, total amount of the payment, the date the payment failed, and the associated user's name. - **Transaction Record Details:** Drilling down into a specific confirmation code reveals the full transaction record. This includes any detailed information or response codes returned directly by your third-party payment provider. --- ## Best Practices and Considerations - **Investigating Codes:** **Perform a quick web search for the specific credit card response code** if your gateway only provides a number. For example, searching for "Credit card response code 481" will quickly reveal that there is an error in the information provided by the user, usually an incorrect expiration date or an incorrect billing address. - **User Support:** Use the information found in the transaction record to proactively assist users who call in regarding payment issues, guiding them to double-check specific fields (like their postal code or CVV) based on the gateway's response code. # Mark Items as PaidThe Mark Items as Paid feature allows administrators to efficiently update the payment status of outstanding items in bulk. Its primary purpose is to streamline administrative workflows when resolving unpaid balances for specific user demographics, item types, or lists of recovered violations returned by a collection agency. This article is intended for OPSCOM administrators.
## Setup and Configuration There is no specialized system configuration required to access this tool. Processing bulk payments is a standard administrative function available to users with the appropriate financial reporting and payment management permissions enabled on their account profile. ## Using this Feature Administrators can execute bulk payment updates either by defining broad system criteria or by entering a specific list of ticket numbers. ### Marking Items Paid by Criteria This method is useful for clearing out legacy balances or waiving fees for specific groups up to a certain date. 1. Hover over **Payments** and click **Mark Items Paid**. 2. Select the target demographic you wish to update from the **User Type** drop-down menu (e.g., Full Time Staff). 3. Select the specific item you are marking as paid from the **Choose Item Type** drop-down menu (e.g., Locker Rentals). 4. Select the end date for the adjustment period using the **Up To and Including** date picker. 5. Click the corresponding action button to process the bulk payment update for all items matching your selected criteria. ### Bulk Marking Violations Paid This method is primarily used when outstanding violations have been sent to collections, and the administrative office receives a return list of successfully retrieved payments from the collection agency. 1. Hover over **Payments** and click **Mark Items Paid**. 2. Click the **Bulk by Number** button located next to the Violations option. 3. Enter the specific violation numbers into the text tool, ensuring each ticket number is separated by a line return. 4. Select **Violations Paid Through Collection** (or the most appropriate payment type) from the drop-down list. 5. Click the **Mark Listed Paid** button to complete the process and apply the payments. [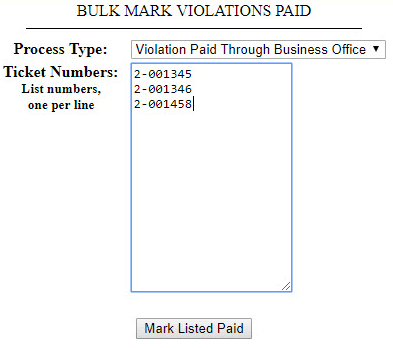](https://opscom.wiki/uploads/images/gallery/2026-07/u4uimage.png)**Exclude PINs from Violation Numbers:** When entering violation numbers into the bulk tool, you must not include the PIN associated with the ticket. For example, if a ticket is listed as 2-001345-92 (where 92 is the PIN), you should only enter **2-001345**.
--- ## Best Practices and Considerations - **Verify Collection Lists:** **Always double-check your compiled list of ticket numbers** before clicking the final submission button. Processing a bulk payment applies a permanent financial status change to all entered records, and manually reversing a large batch of incorrect tickets can be a time-consuming administrative task. # Payment AdjustmentsThe Payment Adjustments feature allows administrators to process financial refunds, release inventory, and reverse processed transactions for permits, lockers, and violations. Its primary purpose is to correct billing errors or process user cancellations while ensuring accurate financial tracking and inventory management within the system. This article is intended for OPSCOM administrators.
## Setup and Configuration There is no specific system configuration required to access the adjustment and refund tools. Processing payment adjustments is a standard administrative function available to users with the appropriate financial reporting, inventory management, and refund processing permissions enabled on their account profile. ## Using this Feature Administrators can process refunds and release associated inventory directly from a user's transaction history. The process varies slightly depending on the type of item being adjusted. ### Releasing a Permit Releasing a permit removes it from the user's account and makes it available in the system inventory, but it does not automatically issue a financial refund. 1. Navigate to the specific user's dashboard. 2. Click the specific permit number located under the parking section. 3. Click the permit number again from the permit details screen to open the permit search view. 4. Enter a descriptive reason in the **Comment** field to track why the permit is being released. 5. Click the **Release this permit** button. The permit will immediately appear as available in the system inventory. ### Refunding a Violation Refunding a violation payment reverses the financial transaction and reinstates the fine on the user's account. 1. Navigate to the user's history and locate the paid violation. 2. Click the **Processed** link next to the item to access the transaction details. 3. Click the **Refund** button. 4. Enter a descriptive reason in the **Comment** field on the Refund Payment Record window. 5. Click the **Refund Payment Record** button. 6. Click the **Process This Adjustment** button on the Adjustment Information screen.**Adjusting Violations to $0:** **Do not attempt to adjust a violation fine directly to $0 using the payment adjustment tool.** If a violation fine needs to be removed or zeroed out, administrators should use the designated warning or appeal workflows to waive the fee properly.
- **Key Information Displayed:** The transaction record will refresh and display the refund as a logged adjustment. If you return to the user's history, the violation will be placed back into an awaiting payment status. ### Refunding a Locker or Temporary Permit Refunding a locker or temporary permit reverses the financial transaction and automatically releases the inventory. [](https://opscom.wiki/uploads/images/gallery/2026-07/z7simage.png) 1. Navigate to the user's profile history and locate the locker or temporary permit transaction. 2. Click the process date link to access the transaction details. 3. Click the **Refund** button. 4. Enter a descriptive reason in the **Comment** field. 5. Click the **Refund Payment Record** button. 6. Click the **Process This Adjustment** button. - **Status Indicators:** In the user's history, the locker or temporary permit will now show as released. If you check the respective lot or building allocation pages, the item will appear as available inventory. ### Processing Multi-Item Refunds If a single transaction contains multiple item types (e.g., a permit and a violation purchased together), clicking the **Refund** button on that transaction will process both items according to their business rules. The payment will be refunded, the permit will be released back into available inventory, and the violation will return to an awaiting payment status. --- ## Best Practices and Considerations - **Provide Clear Comments:** **Always provide detailed comments when processing refunds or releasing inventory.** This ensures a clear, searchable audit trail for your finance department when they reconcile returned funds. - **Inventory Management:** Remember that refunding a physical item (like a locker or permit) automatically releases the inventory for anyone to purchase. If the user intends to keep the item but simply needs to change their payment method, you must be prepared to reassign the item to them immediately after the refund is processed. # Electronic Fund Transfer ConfigurationsThe Electronic Fund Transfer (EFT) feature allows administrators to export batch payment data into a flat file for external bank processing and subsequently reconcile the returned transaction statuses. Its primary purpose is to seamlessly manage recurring subscriptions or bulk payments directly through your banking institution. This article is intended for OPSCOM administrators.
## Setup and Configuration If your organization plans to use EFT as a payment method, you must configure your specific bank client number in the system. This identifier is provided by your banking institution (e.g., Royal Bank of Canada) and dictates where the funds will be deposited.**Tomahawk Assistance:** Depending on your initial onboarding process, the Tomahawk support team may have already entered this information for you.
[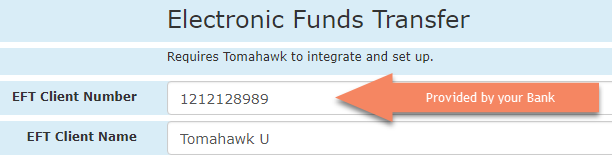](https://opscom.wiki/uploads/images/gallery/2026-07/cg3wv1image.png) To verify or update this configuration: 1. Hover over **System Configuration** and click **System Settings**. 2. Scroll down to locate the **Payments** section. 3. Enter your bank-provided client number into the appropriate EFT configuration field. 4. Save your system settings. ## Using this Feature The EFT workflow consists of two main administrative phases: generating the export file to send to your bank, and later updating the system based on the bank's transaction report. ### Creating EFT Files for the Bank Once user subscriptions are properly set up and you have performed a system rollover, you can generate the flat file containing the pending EFT information. 1. Hover over **Payments** and click **EFT Export**. 2. Download the generated flat file. 3. Submit this file to your banking representative for processing according to your institution's specific procedures. ### Marking EFT Items as Paid or Failed After your bank processes the flat file, they will provide you with a return report detailing which submitted payments were successful and which were declined (e.g., due to insufficient funds). You must manually update these statuses in OPSCOM. 1. Hover over **Payments** and click **EFT Process**. 2. Review the list of pending transactions on the Electronic Funds Transfer Process window. 3. Adjust the state for each payment using the available checkboxes. 4. Click the **Mark as Indicated** button to finalize the process and update the system records. **Available Actions and States:** - **Waiting:** This is the default status of all newly exported payments. If a specific payment has not yet been fully processed or confirmed by the bank, leave the record in this default waiting state. - **Paid:** Enable the **Paid** checkbox to mark the transaction as successfully processed and deposited. - **Failed:** Enable the **Failed** checkbox if the payment was returned, declined, or flagged as NSF by the bank. Selecting this action will automatically return the specific item to the user's profile as awaiting payment and archive the failed transaction record. --- ## Best Practices and Considerations - **Prompt Reconciliation:** **Always process your bank's return report in OPSCOM immediately after receiving it.** Delaying the EFT reconciliation process can result in users continuing to hold active permits despite having failed payments on their accounts. - **Bank Compatibility:** The standard flat file generated by the EFT Export tool is specifically formatted to align with the Royal Bank of Canada (RBC). If you are using a different banking institution, please contactThe Anonymous Violation Payment feature allows administrators to process parking ticket payments without tying the transaction to a registered user account. Its primary purpose is to quickly facilitate in-person or over-the-phone payments from guests or unregistered users who wish to resolve a citation. This article is intended for OPSCOM administrators.
## Setup and Configuration There is no specific system configuration required to access this feature, provided your manual and electronic payment types are already established. Processing an anonymous payment is a standard administrative action available to users with the appropriate violation management and payment processing permissions enabled on their account profile. If you need to configure new payment methods, instructions can be found on the *[Managing Payment Types](https://opscom.wiki/books/setup-configuration-for-admins/page/managing-payment-types "Managing Payment Types")* page. ## Using this Feature Administrators can search for an unpaid violation and process the transaction anonymously in just a few steps. 1. Hover over **Violations** and click **Search**. 2. Enter either the specific ticket number or the license plate number into the **Search Text** field. 3. Click the **Search using only text** button. 4. Click the specific **Ticket Number** link from the search results to open the Violation Information pop-up screen. 5. Click the **Make Anonymous Payment** button to proceed to the checkout process. 6. Enable the ticket checkbox to select the specific violation you wish to pay on the Payments Due window. 7. Click the **Proceed to Payment** button. 8. Select the appropriate method of payment from the available payment type drop-down menu. 9. Click the **Submit Payment** button. 10. Click the **Confirm Payment Information** button on the final confirmation screen to complete the transaction.**Confirm Ticket Details:** **Always verify the license plate and violation details with the user** before clicking the Make Anonymous Payment button. Because the payment is not tied to a searchable user profile, correcting a payment applied to the wrong ticket can be administratively difficult.
### Visual Cues and Status Indicators - **Processed Status:** Once the payment successfully processes, the screen will refresh to display the final Transaction Detail window. If you search for the violation again in the system, it will be marked as "PROCESSED" to indicate the balance has been cleared. --- ## Best Practices and Considerations - **Guest Payments:** If a guest user calls to pay a ticket but prefers to do it themselves, **remind them they can utilize the public portal's guest checkout feature** if your organization has anonymous online payments enabled. This reduces administrative overhead at the front desk. # Permit Purchase by an AdminThe Admin Portal Permit Purchase process allows administrators to assign a standard parking permit and process the associated transaction on behalf of a user. Its primary purpose is to seamlessly facilitate in-person or administrative permit assignments while accurately logging the financial transaction in the system. This article is intended for OPSCOM administrators.
## Setup and Configuration There is no specific system configuration required to use this feature, provided your parking lots, permit inventory, and payment methods are already established. Processing a permit purchase is a standard administrative action available to users with the appropriate user management and payment processing permissions enabled on their account profile. ## Using this Feature Administrators can assign a permit and guide it through the checkout process in just a few steps. 1. Navigate to the specific user's profile and click the **Parking** menu item. 2. Click the **Standard Permit** option. 3. Select the desired lot from the drop-down menu. 4. Review the purchase details on the confirmation screen. By default, the system will select the next available permit in the sequence. To assign a specific permit, expand the permit number drop-down menu and make your selection. 5. Click the **Purchase this Permit** button. 6. Review the items on the Payments Due screen and click the **Proceed to Payment** button. 7. Select the desired payment method (e.g., Cash) from the payment type drop-down list. 8. Click the **Submit Payment Type** button. 9. Click the **Confirm Payment Information** button to proceed to the transaction screen. 10. Review the options available on the Transaction Details screen: - **Process Manually:** This option will complete the purchase and finalize the transaction. - **Cancel & Keep:** This option will terminate the checkout process but keep the permit reserved in an awaiting payment status on the user's profile for future processing. 11. Click the **Process Manually** button to complete the purchase. ### Key Information Displayed - **Lot Availability:** When selecting a lot from the drop-down menu, the system will display the number of available spaces. It will only display lots that are available to the specific user's designated user type (e.g., Staff lots will only show for staff users). - **View Snapshot:** Located next to the Submit Date on the transaction screen, this link allows administrators to view a quick summary of the payment information and total values without drilling into the specific item details. - **Confirmation Number:** A unique alphanumeric identifier generated for the transaction, visible on the final receipt screen and accessible via the user's history for future reference. ### Available Action & Button - **Payment Notes:** A dedicated text area on the final transaction screen that allows administrators to annotate the purchase, refunds, or payment anomalies. These notes are completely private and are never visible to the end-user. - **Payment Method Adjustment:** Before finalizing the transaction, administrators have the ability to change the selected payment method directly from the Transaction Details screen if the user changes their mind. --- ## Best Practices and Considerations**Managing Incomplete Transactions:** If a user needs to finalize their payment at a later time, use the **Cancel & Keep** button. This safely holds the assigned permit under their profile without forcing you to restart the entire assignment process when they return to pay.
- **Detailed Auditing:** **Always add clear payment notes** if you alter the standard payment process, process an external offline payment, or apply a refund. This creates a reliable audit trail for your finance department. - **Verify Permit Selection:** **Always double-check the assigned permit number** before clicking the final process button, especially if your organization requires specific users to park in designated, numbered stalls. # Transact Campus/CashNet Hosted Payment SetupThe Transact Campus and CashNet Hosted Payment integration allows institutions to securely process parking and violation transactions through their existing CashNet merchant account. The primary purpose of this configuration is to ensure successful communication and data transfer between the OPSCOM environment and the external CashNet payment gateway. This article is intended for OPSCOM administrators and IT staff responsible for configuring financial integrations.
## Setup and Configuration Setting up this integration requires a coordinated exchange of information between your organization and the OPSCOM support team, followed by specific URL configurations within your CashNet portal. ### Information to Provide to OPSCOM Support To begin the setup process, you must supply specific configuration details from your CashNet system to the OPSCOM support team. - **Merchant Code:** Provide the specific merchant code your institution will be submitting items against from your client system. - **Item Code:** Create a specific item in CashNet for these transactions and provide the exact code to OPSCOM. This item must be configured to allow its value to change dynamically based on the transaction amount.**Exact Matches Required:** The item codes provided to OPSCOM must match exactly what is configured in your CashNet system. Any discrepancy between the systems will cause the transactions to fail.
### Configuring CashNet Store Settings Once OPSCOM support has your details, they will provide you with specific URLs containing your unique hosted ID. You must enter these into your CashNet Store Settings. 1. Navigate to your CashNet Store Settings page. 2. Enter the provided complete payment URL into the **Sign-out & Complete payment** field. 3. Enter the provided incomplete payment URL into the **Sign-out & Incomplete** field. 4. Select **Append Data using GET** from the **Pass information to calling system** drop-down menu.**URL Format Example:** The URLs provided by OPSCOM will look similar to `[https://hostedpayments.parkadmin.com/hook/cashnet/CLIENTS-UNIQUE-HOSTED-ID/?a=r](https://hostedpayments.parkadmin.com/hook/cashnet/CLIENTS-UNIQUE-HOSTED-ID/?a=r)`. You must ensure the placeholder text is replaced with your actual unique identifier.
### Configuring CashNet HTTP Notifications You must also configure CashNet to send transaction notification data back to OPSCOM so the system knows when a payment has cleared. 1. Navigate to the **HTTP Notifications** configuration section within CashNet. 2. Enter the provided callback URL into the **Successful & Failed Transactions** field. 3. Select **Name Value Format (POST)** from the **Select format for HTTP content** drop-down menu. ## Using this Feature Because this is a backend payment gateway configuration, administrators do not manually interact with this feature on a daily basis. Once fully configured and tested, the CashNet payment gateway will automatically handle electronic routing when users process transactions on the user portal or when administrators process credit card payments via the administrative portal. --- ## Best Practices and Considerations - **Firewall Allowlisting:** New outbound connections from CashNet will not work until they are explicitly allowed through their security firewall. **Contact CASHNet Client Support to enable the new connection** before attempting to process live transactions through OPSCOM. - **Verify Placeholder IDs:** **Always ensure you replace the sample CLIENTS-UNIQUE-HOSTED-ID** in the URLs provided by OPSCOM with the actual unique identifier assigned to you by CashNet before saving your settings. - **Variable Pricing Configuration:** Ensure the specific item code created in CashNet is properly set to accept variable values. Because parking permits and violation fines fluctuate in cost based on user selections, the gateway must be able to accept the dynamic total pushed from the OPSCOM shopping cart. # TouchNet (uPay) Hosted PaymentsThe TouchNet uPay Hosted Payment integration allows institutions to securely process parking and violation transactions through their existing TouchNet merchant account. Its primary purpose is to ensure successful communication and financial data transfer between the OPSCOM environment and the TouchNet payment gateway. This article is intended for OPSCOM administrators and IT staff responsible for configuring financial integrations.
## Setup and Configuration Setting up this integration requires a coordinated exchange of information between your organization, your TouchNet Account Manager, and your OPSCOM Account Manager. ### Gathering Required Credentials You must obtain the following configuration details from your TouchNet Account Manager for both your Sandbox (Test) and Production (Live) environments: - **uPay Site ID:** A unique identifier, usually a 3-digit number (e.g., 013). - **uPay URL:** A secure URL that uniquely identifies your account. - **T-Link Web Service URL:** Another secure URL that uniquely identifies your account for backend communication.**Providing Details to OPSCOM:** Once you have gathered these credentials, you must provide them to your OPSCOM Account Manager to complete the backend configuration. Please note that additional charges for setup may apply.
### Configuring the T-Link Web Service OperationsCommander's parent company, Tomahawk Technologies, is a certified [TouchNet Ready Partner](https://partners.touchnet.com/english/directory/partner/1512039/tomahawk-technologies). 1. When configuring the T-Link in your TouchNet account, look for a partner selection drop-down menu. 2. Select **Tomahawk Technologies** from the list.If you do not have the ability to configure a T-Link web service URL and your TouchNet Account Manager has not supplied one, you must request that TouchNet set up a uPay site for you that explicitly supports T-Link web services.
### General Ledger Codes OperationsCommander's TouchNet integration currently supports multiple General Ledger (GL) codes. This allows you to route funds to different accounts based on the item type. - You can specify one GL code for parking permits and a separate GL code for all other payments (such as violations or lockers). - Alternatively, you can use the exact same GL code for all purchases. - If you are using GL codes, you must provide the exact GL code names configured in your TouchNet account to your OPSCOM Account Manager. ## Using this Feature Because this is a backend payment gateway configuration, administrators do not manually interact with this feature on a daily basis. Once fully configured and tested by the OPSCOM support team, the TouchNet payment gateway will automatically handle electronic routing when users process transactions on the user portal or when administrators process credit card payments via the administrative portal. --- ## Best Practices and Considerations**Sandbox Testing:** **Always provide both your Sandbox and Production credentials** to your OPSCOM Account Manager. This ensures the integration can be thoroughly tested in a safe, simulated environment before live financial transactions are actively processed.
- **GL Code Accuracy:** **Verify that the GL codes you provide to OPSCOM match exactly** with what is configured in your TouchNet system. Incorrect routing codes can cause payments to fail or cause funds to be deposited into the wrong institutional accounts. # SchoolPayThe [SchoolPay](https://www.schoolpay.com/) Hosted Payment Setup process allows administrators to configure SchoolPay as an integrated payment gateway within the system. Its primary purpose is to enable users to securely pay for items—such as permits, lockers, and violations—directly through the SchoolPay platform during checkout. This article is intended for OPSCOM administrators.
## Setup and Configuration Before adding the payment type, ensure you have your specific SchoolPay account credentials (Username, Password, and Item ID) readily available. 1. Hover over **System Configuration** and click **Payments** then **Setup Payment Types**. 2. Click the **Add Type** button. 3. Select **SchoolPay - Hosted** from the provider drop-down menu. 4. Click the **Next Step** button. 5. Enter a clear, descriptive name in the **Type Name** field (e.g., Online Credit Card Payment). 6. Select the specific user groups who should have access to this payment method from the **Enabled for User Types** list. 7. Leave the **Enable for Text2ParkMe** and **Enable for Permit Renewal Payments** checkboxes disabled. 8. Enable the **Enable for Guest Payments** checkbox if you intend to allow anonymous checkout on your portal. 9. Select **Email Address** from the **Prompt Information** field. 10. Enter your **Username**, **Password**, and **Item ID** into the respective credential fields. 11. Select whether you are using your Production or Sandbox credentials from the environment drop-down menu. 12. Click the **Update Payment Type** button to save and activate the gateway. ## Using this Feature Because this is a backend payment gateway configuration, administrators do not manually interact with this feature on a daily basis. Once configured, the SchoolPay integration automatically handles electronic routing when users process transactions on the user portal. The standard user checkout flow proceeds as follows: 1. Select the SchoolPay payment type during the OPSCOM checkout process. 2. Enter a valid email address when prompted by the system. 3. Click the confirmation button to be securely redirected to the external SchoolPay system. 4. Enter the required credit card details on the SchoolPay interface. 5. Click **Finish** to process the funds and automatically redirect back to the OPSCOM portal. ### Visual Cues and Status Indicators - **Automated Receipts:** Upon a successful transaction and redirection back to OPSCOM, the system displays a final payment confirmation screen. Dual email receipts are automatically generated and sent to the user's supplied email address—one standard receipt from SchoolPay and one itemized receipt from OPSCOM. --- ## Best Practices and Considerations**Unsupported Features:** The OPSCOM SchoolPay integration does not currently support the Text2ParkMe or Permit Renewal payment features. **Do not enable these specific checkboxes** during configuration, as they will cause checkout errors.
- **Testing in Sandbox:** Always utilize your OPSCOM preview environment to test your Sandbox credentials before going live. This keeps your live production data—such as active permits, users, and financial records—completely separate and clean during the testing phase. - **User-Friendly Naming:** The text you enter into the **Type Name** field is exactly what your users will see when selecting a payment method during checkout. Choose a clear, recognizable name like "Online Credit Card" or "SchoolPay" to avoid confusion. - **Check Your Permissions:** If you attempt to follow the setup steps but do not see the **Setup Payment Types** option in your menu, verify your administrative roles. You must have the appropriate system configuration permissions enabled on your account profile to add or edit payment gateways. # PayPalThe PayPal Hosted Payment Setup process allows administrators to configure PayPal as an integrated payment gateway within the system. Its primary purpose is to enable users to securely pay for items—such as permits, lockers, and violations—using their PayPal accounts during checkout. This article is intended for OPSCOM administrators.
## Setup and Configuration Before adding the payment type in OPSCOM, ensure you have successfully created a merchant account with PayPal and have your designated PayPal email address readily available. 1. Hover over **System Configuration** and click **Payments** then **Setup Payment Types**. 2. Click the **Add Type** button. 3. Select the PayPal option from the provider drop-down menu. 4. Click the **Next Step** button. 5. Enter your designated PayPal email address into the credential configuration fields. 6. Select your required operational currency from the available options. 7. Select whether you are configuring the gateway for production use (live transactions) or a sandbox environment (testing). 8. Click the **Update Payment Type** button to save your credentials and activate the gateway. ## Using this Feature Because this is a backend payment gateway configuration, administrators do not manually interact with this feature on a daily basis. Once configured, the PayPal integration automatically handles electronic routing when users process transactions on the user portal. The standard user checkout flow proceeds as follows: 1. Select the PayPal payment type during the OPSCOM checkout process. 2. Click the confirmation button to be securely redirected to the external PayPal system. 3. Log in to the PayPal interface or enter the required credit card details as a guest. 4. Confirm the payment details to process the funds and automatically redirect back to the OPSCOM portal. ### Visual Cues and Status Indicators - **Automated Redirection:** Upon a successful transaction and redirection back to OPSCOM, the system will display a final payment confirmation screen and generate the associated receipt for the user's records. --- ## Best Practices and Considerations - **Testing in Sandbox:** **Always utilize a sandbox environment to test your credentials before going live.** This allows you to verify the checkout flow and ensure payments are routing correctly without affecting live financial records or requiring real funds. - **Currency Alignment:** **Ensure the currency selected in OPSCOM exactly matches your primary PayPal account settings.** Mismatched currencies can lead to unexpected conversion fees or cause transactions to fail entirely at checkout. - **Account Verification:** Ensure your PayPal business account is fully verified and unrestricted by PayPal before enabling it for public use on your OPSCOM portal to prevent funds from being held or delayed. # OpenEdge Hosted PaymentsThis article provides OPSCOM administrators with instructions for configuring OpenEdge Hosted Payments within the system. Setting up this integration allows you to securely process online credit card transactions for permits, violations, and other user fees.
## Account Registration and Credentials Before configuring OPSCOM, you must register for an OpenEdge account and obtain the necessary API credentials. 1. Navigate to the OpenEdge sign-up form. 2. Enter the following details in the Representative Information section: - **Rep First Name**: Phil - **Rep Last Name**: MacCallum - **Rep Email**:Your OpenEdge Account Manager will provide you with an **Auth Key** (multi-digit string), **Terminal ID** (8-digit numeric), and **X-Web ID** (12-digit numeric) for both Sandbox and Production environments.
## Setup and Configuration Once you have your credentials, you can create the payment type in the administration portal. 1. Hover over **System Configuration** and click **Payments** then **Setup Payment Types**. 2. Click the **Add Type** button. 3. Click the provider drop-down menu and choose **EdgeExpress - Hosted**. 4. Click the **Next Step** button. 5. Enter a name in the **Type Name** field. This name is displayed to users during checkout. 6. Select the user types you wish to grant access to this payment method under **Enabled for User Types**. 7. Enable the **Enable for Text2ParkMe** checkbox if your organization utilizes this module. 8. Enable the **Enable for Permit Renewal Payments** checkbox if you use this feature. 9. Enable the **Enable for Guest Payments** checkbox if you use this feature. 10. Click the **Prompt Information** drop-down menu and choose **Email Address**, as this is the only supported option for OpenEdge at this time. 11. Click the environment drop-down menu and choose **Production** or **Sandbox** to match your provided credentials. 12. Enter your **Auth Key**, **Terminal ID**, and **X-Web ID** in the respective credential fields. 13. Click the **Update Payment Type** button to save the configuration. ## Using this Feature Administrators should verify the integration before making it available to end-users. 1. Create a test user account and add a vehicle to the profile. 2. Navigate to the user portal and purchase a low-value item, such as a $1.00 permit or violation. 3. Select your newly created OpenEdge payment method during checkout. 4. Complete the transaction using a valid credit card. 5. Verify that the test user receives an email receipt confirming the successful payment. 6. Confirm with your finance department that the funds have been successfully deposited into your company bank account. --- ### Best Practices and Considerations - **Test in a preview space:** Organizations should utilize their OPSCOM preview environment when testing Sandbox credentials to ensure production data remains clean and untouched during the validation phase. - **Use descriptive naming conventions:** Ensure your **Type Name** is clear to end-users, as generic names like "Online Credit Card Payment" or specific ones like "OpenEdge Checkout" dictate the clarity of the user experience. # Moneris CheckoutThe Moneris Checkout Hosted Payment configuration allows administrators to process secure online transactions through a fully integrated Moneris merchant account. Its primary purpose is to enable reliable payment processing—including pre-authorizations and stored cards for recurring billing—directly within the OPSCOM checkout flow. This article is intended for OPSCOM administrators.
## Setup and Configuration Properly configuring Moneris Checkout involves two key stages: generating and configuring the settings within your Moneris merchant account, and then mirroring those exact settings within your OPSCOM environment. ### Gathering Required Credentials Before beginning the configuration in OPSCOM, you must create a profile in your Moneris account and obtain the following credentials: - **store\_id:** Your unique Moneris store number. - **api\_token:** Your unique API authentication token. - **checkout\_id:** Your specific checkout profile ID. - **hosted\_token\_id:** Generated from the Hosted Tokenization page (required if using Moneris Vault for stored payments). [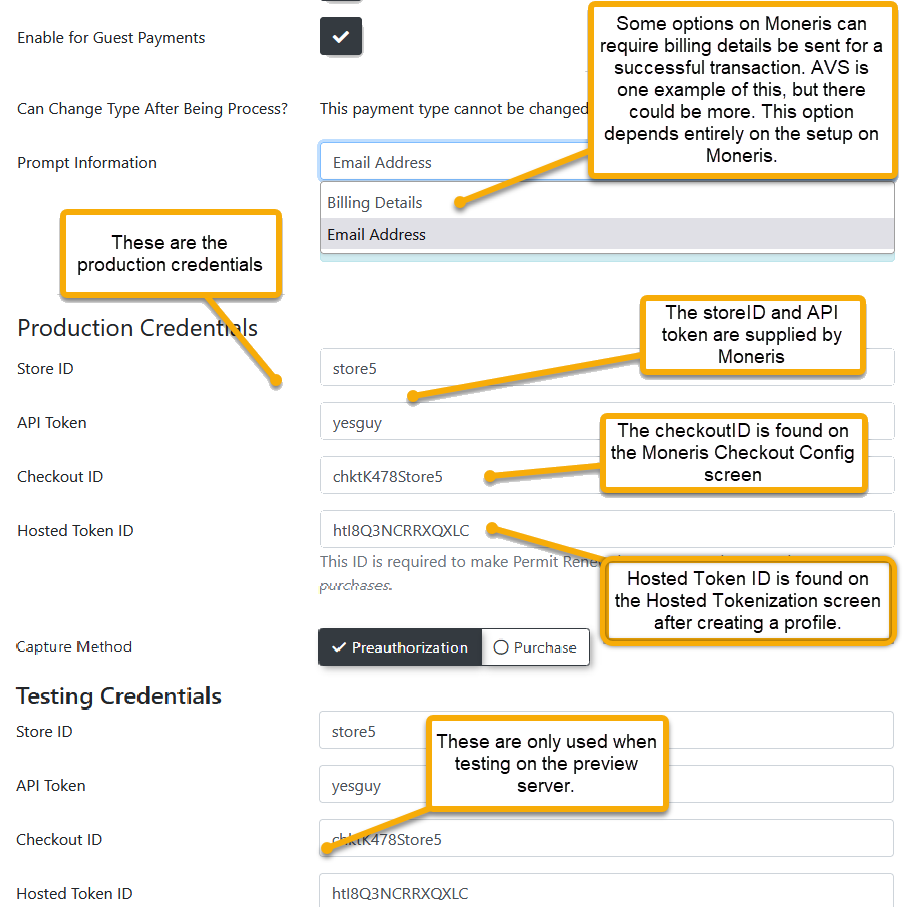](https://opscom.wiki/uploads/images/gallery/2026-07/embedded-image-8c6xeq2r.png) ### Moneris Portal Configuration 1. Log in to the Moneris Merchant Resource Center. 2. Click **Admin** in the main menu and select **Moneris Checkout Config**. 3. Locate your specific checkout profile and click to edit it. 4. Select **I have my custom order form and want to use Moneris simply for payment processing** under the Checkout Type settings. 5. Navigate to the Payment section and set the Transaction Type to your preferred method (preauthorize is highly recommended). 6. Disable the **Tokenize Card** option in the Payment section, as card tokenization for recurring payments is handled separately by the Moneris Vault. 7. Disable the **Enable Fullscreen** checkbox under the Branding and Design section to prevent the form from taking over the entire screen during checkout. 8. Select **Use Own Page** for the order confirmation setting so Moneris correctly redirects users back to the OPSCOM receipt page. ### OPSCOM System Configuration Once your Moneris portal is configured, you must add the payment type to OPSCOM. Detailed step-by-step instructions for adding the gateway can be found on the *[Payment Type Setup](https://opscom.wiki/books/setup-configuration-for-admins/page/managing-payment-types "Managing Payment Types")* page. **Important:** When configuring the gateway in OPSCOM, your Transaction Type setting (Pre-auth vs. Purchase) and your Security settings (AVS/CVV requirements) must exactly match what you configured in the Moneris portal. ## Using this Feature Because this is a backend payment gateway configuration, administrators do not manually interact with this feature on a daily basis. Once fully configured, Moneris automatically handles electronic routing when users process transactions on the user portal or when administrators process credit card payments via the administrative portal. ### Moneris Vault for Stored Payments Moneris Vault is a complementary service used for tokenizing and storing credit cards for future, automated use. This feature is heavily utilized for parking permit rollovers and the Text2ParkMe feature. To utilize this functionality, ensure your **hosted\_token\_id** is actively entered in your OPSCOM payment settings. --- ## Best Practices and Considerations - **Pre-Authorization vs. Purchase:** **We strongly recommend using the pre-authorization capture model** rather than the purchase model. The purchase model relies on a stable client connection; if a user's browser drops connection, the callback may fail to reach OPSCOM. The pre-authorization model processes funds server-to-server, preventing spotty internet connections from interfering with successful payment logging. - **AVS and Billing Information:** **Ensure your required checkout fields match your security settings.** If Moneris is configured to require Address Verification Service (AVS), you must configure OPSCOM to collect the user's full billing address during checkout. If OPSCOM is set to only collect an email address while Moneris expects a full billing address, all transactions will fail. - **Multi-Currency Limitations:** While Moneris supports multi-currency processing, enabling this feature will completely disable support for Recurring Billing, Gift Cards, 3D Secure 1.0, and Google Pay. Evaluate your institutional needs before enabling this feature. - **Invalid Credentials Error:** If you encounter an "Invalid credentials" error when attempting to tokenize a card, it is likely due to a missing **hosted\_token\_id** or because the token's "Source URL" authentication does not match the domain you are using. Verify your domain mappings in the Moneris portal to resolve this. # Moneris Hosted Paypage## Setup and Configuration Setting up this integration requires you to retrieve unique keys from your Moneris account, provide them to OPSCOM, and configure specific callback URLs within the Moneris portal. 1. Log in to your Moneris account using the Development portal (`[https://esqa.moneris.com/mpg/](https://esqa.moneris.com/mpg/)`) or the Production portal (`[https://www3.moneris.com/mpg](https://www3.moneris.com/mpg)`). 2. Hover over **Admin** and click **Hosted Paypage Config**. 3. Copy the specific **ps\_store\_id** and **hpp\_key** displayed at the top of the configuration page and provide them to your OPSCOM representative to connect the systems. 4. Enter the required OPSCOM callback URL into the **Approved URL** and **Declined URL** fields on the main configuration page. 5. Enter the required OPSCOM callback URL into the **Async Response URL** field within the Response/Receipt Data configuration section. 6. Enter the required OPSCOM callback URL into the **Response URL** field within the Security Features configuration section. 7. Modify the settings within the Paypage Appearance section to customize the visual design of the checkout page your customers will see. Use the preview button to verify your changes. 8. Enable the desired options within the Email Receipts configuration section.
**Environment URLs:** The callback URL you must enter into the Moneris configuration fields depends entirely on the environment you are configuring.
**Production/Live:** Use `[https://hostedpayments.parkadmin.com/hook/moneris/](https://hostedpayments.parkadmin.com/hook/moneris/)`
**Development/Testing:** Use `[https://hostedpayments.preview.parkadmin.com/hook/moneris/](https://hostedpayments.preview.parkadmin.com/hook/moneris/)`
You will use this exact same URL for the Approved URL, Declined URL, Async Response URL, and Security Response URL fields.
## Using this Feature Because this is a backend payment gateway configuration, administrators do not manually interact with this feature on a daily basis. Once fully configured, the Moneris Hosted Paypage automatically handles electronic routing when users process transactions on the user portal. During checkout, the user is securely redirected to the customized Moneris payment page to enter their card details. Once the payment succeeds or fails, Moneris automatically redirects the user back to the OPSCOM portal where an on-screen receipt is displayed and the transaction is logged in the user's account history. --- ## Best Practices and Considerations**Simulating Payment Declines:** When testing your integration in the development environment, Moneris provides a Penny Value Simulator chart in their developer documentation. **Use specific penny amounts to force certain callback responses** (such as an expired card or insufficient funds error) from the test gateway to ensure OPSCOM handles the declined payments properly.
- **Enable Email Receipts:** **It is highly recommended to enable email receipts within the Moneris portal.** While OPSCOM displays a secure on-screen receipt and logs the payment to the user's history, OPSCOM does not currently send automated email receipts for this specific gateway integration. - **Test Credit Cards:** **Always use the official Moneris test credit card numbers** provided in their developer documentation when performing your initial penny testing in the development environment. Do not use real credit card data until you are fully configured in the live production portal. # Chase E-xact Hosted PaymentsThe Chase E-xact Hosted Payment configuration allows administrators to process secure online transactions through the Chase E-xact payment gateway. Its primary purpose is to safely redirect users to a Hosted Payment Page (HPP) during checkout, ensuring sensitive payment data is securely handled outside of OPSCOM before posting the transaction results back to the system. This article is intended for OPSCOM administrators.
## Setup and Configuration To configure the Chase E-xact integration, you must gather specific credentials from your merchant account so they can be entered into the system. 1. Log in to your Chase E-xact merchant portal. 2. Retrieve your exact **Company Name**, your **E-xact ID** (Gateway ID), and the **Password** used to access your account. 3. Hover over **System Configuration** and click **Payments** then **Setup Payment Types**. 4. Click the **Add Type** button. 5. Select the Chase E-xact option from the provider drop-down menu. 6. Click the **Next Step** button. 7. Enter your **Company Name**, **E-xact ID**, and **Password** into the respective credential configuration fields. 8. Click the **Update Payment Type** button to save your credentials and activate the gateway. ## Using this Feature Because this integration utilizes a Hosted Payment Page (HPP) with a Relay Response, administrators do not manually interact with this feature on a daily basis. Once configured, the Chase E-xact integration automatically handles electronic routing when users process transactions on the user portal. The standard user checkout flow proceeds as follows: 1. Select the Chase E-xact payment type during the OPSCOM checkout process. 2. Click the confirmation button to be securely redirected to E-xact's external payment form. 3. Enter the required credit card details on the secure HPP. 4. Confirm the payment details to process the funds. ### Visual Cues and Status Indicators - **Automated Redirection:** Once the payment successfully processes, the transaction results are posted back to the OPSCOM webhook endpoint. The user is then automatically redirected back to the OPSCOM portal, where a final payment confirmation screen and receipt are generated for their records. --- ## Best Practices and Considerations - **Maintain Credential Security:** **Always ensure your merchant account password and E-xact ID are kept up to date in the system.** If your password expires or is changed within the external Chase portal, you must immediately update it within your OPSCOM payment settings to prevent checkout failures. - **Webhook Verification:** **Perform a small test transaction before going live** to verify that the Relay Response is correctly posting the results back to the OPSCOM webhook endpoint and properly triggering the final receipt generation. # Bambora CheckoutThe Bambora Checkout Hosted Payment configuration allows administrators to process secure online transactions through a fully integrated Bambora (Wordline) merchant account. Its primary purpose is to enable reliable payment processing and tokenized profiles directly within the OPSCOM checkout flow by utilizing secure authorization headers. This article is intended for OPSCOM administrators.
## Setup and Configuration To properly configure your Bambora payment type in OPSCOM, you require two separate encoded authorization headers: the Payment Authorization Header and the Profile Authorization Header. Both require your Bambora Merchant ID (MID) and a specific API access passcode to generate. ### Generating the Payment Authorization Header 1. Log in to your Bambora account. 2. Select **Administration**, click **Account Settings**, and then select **Order Settings** from the left navigation menu. 3. Scroll down to the API access passcode section. 4. Click the **Generate New Code** button if the field is empty. 5. Click the **Update** button at the bottom of the page to save your changes. 6. Locate and copy your Merchant ID from the top right of your Bambora account. 7. Navigate to the Bambora encoding tool URL provided by your implementation specialist. 8. Paste your Merchant ID and the new API access passcode into the appropriate fields. 9. Click the **Encode** button. 10. Copy the generated Payment Authorization Header. Ensure you only copy the string starting with the word Passcode (e.g., Passcode MzAw...). Do not copy the Authorization: prefix or the quotation marks. ### Generating the Profile Authorization Header 1. Select **Configuration** and click **Payment Profile Configuration** from the left navigation menu in Bambora. 2. Ensure the **API access passcode** option is selected under the Security Settings section. 3. Click the **Generate New Code** button if the field is empty. 4. Click the **Update** button at the bottom of the page to save your changes. 5. Navigate back to the Bambora encoding tool. 6. Paste your Merchant ID and this specific Profile API access passcode into the appropriate fields. 7. Click the **Encode** button. 8. Copy the generated Profile Authorization Header, again ensuring you only copy the string starting with the word Passcode.**Use a Text Editor:** **Temporarily paste your generated headers into a program like Notepad** while switching between Bambora and OPSCOM. This ensures you do not lose the copied strings during the multi-step configuration process.
### Adding the Payment Type in OPSCOM 1. Hover over **System Configuration** and click **Payments** then **Setup Payment Types**. 2. Click the **Add Type** button. 3. Select **Bambora - Checkout** from the Provider list. 4. Click the **Next Step** button. 5. Enter a clear, descriptive name into the **Type Name** field (e.g., Online Credit Card Payment). 6. Select the specific user groups who should have access to this method from the **Enabled for User Types** list. 7. Enable or disable the checkboxes for **Enable for Text2ParkMe**, **Enable for Permit Renewal Payments**, and **Enable for Guest Payments** based on your operational needs. 8. Select **Billing Details** from the **Prompt Information** drop-down menu if you are enforcing AVS in your Bambora account, or select **Email Address** if AVS is not required. 9. Paste your copied headers into the **Profile Authorization Header** and **Payment Authorization Header** fields under the Production Credentials section. 10. Enable the **Validate Card when adding subscriptions** checkbox if you want the card validated immediately by the payment provider when it is first added as a subscription method in a user's profile. 11. Leave the **Phone Number Field** set to hidden unless specifically required by your fraud detection settings. 12. Click the **Update Payment Type** button at the bottom of the page to save your configuration.**AVS and Prompt Settings Match:** **You must align your OPSCOM prompt information with your Bambora AVS settings.** If Address Verification Service (AVS) is enabled in Bambora, you must set OPSCOM to prompt for Billing Details. If you only prompt for Email Address while AVS is active, transactions will fail to process.
## Using this Feature Because this is a backend payment gateway configuration, administrators do not manually interact with this feature on a daily basis. Once fully configured, the Bambora Checkout integration automatically handles electronic routing and card tokenization when users process transactions on the user portal or when administrators process manual credit card payments via the administrative portal. --- ## Best Practices and Considerations - **AVS Configuration:** If using AVS, **Bambora recommends enabling only the AVS Postal/Zip Code Mismatch option**. The Street Mismatch option is extremely sensitive and may result in a high rate of declined payments due to minor formatting typos. - **User-Friendly Naming:** The text you enter into the **Type Name** field is exactly what your users will see when selecting a payment method during checkout. Choose a generic and recognizable name, such as "Credit Card", to avoid confusion during the checkout process. # Authorize.NetThe Authorize Net Hosted Payment Setup process allows administrators to configure Authorize.Net as an integrated payment gateway within the system. Its primary purpose is to enable users to securely pay for items using an external hosted payment form while automatically syncing the transaction data back to the user's OPSCOM profile. This article is intended for OPSCOM administrators.
## Setup and Configuration Before configuring the payment type in OPSCOM, ensure your Authorize.Net merchant account is fully established and properly configured for online transactions. ### Verifying Merchant Profile Settings Your account must be properly configured for e-commerce transactions to process payments from the portal. 1. Log in to your Authorize.Net portal. 2. Click **Account** and then select **Merchant Profile**. 3. Verify that the Product Type is set to **Card Not Present (CNP)** and the Market Type is set to **eCommerce** under the Business Information heading. ### Generating API Credentials To connect the systems, you must provide three unique pieces of identification to the Tomahawk Technologies (OPSCOM) support team. 1. Click **Account** and navigate to the API credentials area. 2. Locate your **API Login ID** (this was defined during your initial account creation). 3. Select the option to generate a new transaction key and click **Submit** to reveal your **Transaction Key**. 4. Select the option to generate a new signature key and click **Submit** to reveal your **Signature Key**. 5. Copy these three specific values and supply them to your OPSCOM representative to complete the backend system integration. ## Using this Feature Administrators manage the appearance and security behavior of the hosted checkout page directly from the Authorize.Net portal. Because OPSCOM handles the transaction handoff automatically, administrators do not manually process these specific web payments on a daily basis. ### Customizing the Payment Form 1. Click **Account** and select **Payment Form**. 2. Adjust the form styling to present a consistent look and feel for your end users. 3. Disable the shipping address fields to remove checkout confusion, as shipping is not required for parking transactions. ### Configuring Address Verification Service If you are utilizing Address Verification Service (AVS) for enhanced fraud protection, you must configure the hosted form to enforce these rules. 1. Navigate to the payment form settings. 2. Set the specific billing address fields to required. This ensures the gateway captures the data necessary to perform the AVS check against the provided credit card.**Keep Billing Details Visible:** Even though OPSCOM automatically connects the final payment to the logged-in user, **it is highly recommended to keep the billing details visible and editable** on the payment form. Users frequently use credit cards belonging to someone else (such as a spouse, parent, or corporate account), and the billing information must match the cardholder, not necessarily the OPSCOM user profile.
**Receipt and Response Pages:** You do not need to manually configure the receipt page or response details within Authorize.Net. As part of the secure payment protocol, OPSCOM automatically supplies this routing information and handles the final receipt generation on the user portal.
--- ## Best Practices and Considerations - **Environment Separation:** **Always use the Sandbox portal** (`[https://sandbox.authorize.net/](https://sandbox.authorize.net/)`) for initial integration and testing to ensure no transactions are accidentally pushed through a real payment processor. Only use the Production portal (`[https://account.authorize.net/](https://account.authorize.net/)`) for live, active transactions. - **Simulate Failure States:** When configuring your system in the Sandbox environment, review the official Authorize.Net developer testing guide. Use their designated test card numbers and specific penny amounts to generate failure states (like declined cards or AVS mismatches) to ensure OPSCOM handles the checkout errors gracefully before going live. # Hosted PaymentsThe Hosted Payments functionality allows organizations to integrate secure, third-party payment gateways with the OPSCOM platform. Its primary purpose is to facilitate online transactions for user purchases—such as permits, lockers, and violations—while maintaining strict PCI compliance by redirecting sensitive credit card data to the provider's secure servers. This article is intended for OPSCOM administrators.
## Setup and Configuration Because OPSCOM supports a wide variety of hosted payment providers, the specific configuration steps depend heavily on your chosen merchant gateway. However, all hosted payment integrations are managed from the same centralized administrative menu. 1. Hover over **System Configuration** and click **Payments** then **Setup Payment Types**. 2. Click the **Add Type** button. 3. Select your specific merchant gateway from the provider drop-down menu. For detailed, step-by-step instructions on generating the required API credentials and configuring the backend settings for your specific gateway, please refer to the appropriate integrated wiki article below:**Maintain Credential Security:** **Never share your payment gateway API keys, passwords, or token IDs openly.** If your gateway credentials expire or are reset within your merchant portal, you must immediately update them within your OPSCOM payment settings to prevent site-wide checkout failures.
### Supported Hosted Payment Providers - [OpenEdge Hosted Payments](https://opscom.wiki/books/the-opscom-admin-portal/page/openedge-hosted-payments) - [Bambora/Worldline Checkout ](https://opscom.wiki/books/the-opscom-admin-portal/page/bambora-checkout) - [Moneris Hosted Payments](https://opscom.wiki/books/the-opscom-admin-portal/page/moneris-hosted-paypage) - [Paypal Hosted Payments](https://opscom.wiki/books/the-opscom-admin-portal/page/paypal) - [SchoolPay ](https://opscom.wiki/books/the-opscom-admin-portal/page/schoolpay) - [TouchNet uPay](https://opscom.wiki/books/the-opscom-admin-portal/page/touchnet-upay-hosted-payments) - [Transact Campus/CashNet](https://opscom.wiki/books/the-opscom-admin-portal/page/transact-campuscashnet-hosted-payment-setup) ### Limited Support Providers - [Authorize.Net - Limited Support](https://opscom.wiki/books/the-opscom-admin-portal/page/authorizenet) - [Chase Exact - Limited Support](https://opscom.wiki/books/the-opscom-admin-portal/page/chase-e-xact-hosted-payments)**Testing Integrations:** **Always perform a small test transaction before going live** with a newly configured hosted payment provider. Most providers offer a sandbox or development environment that allows you to verify the checkout flow and ensure payments are routing correctly back to OPSCOM without affecting real financial records.
## Using this Feature Because hosted payments rely on backend API connections and secure redirects, administrators do not manually interact with the web payment feature on a daily basis once the initial configuration is complete. The standard user checkout flow for a hosted payment proceeds as follows: 1. Select the designated hosted payment type during the OPSCOM checkout process. 2. Click the confirmation button to be securely redirected to the external provider's hosted payment form. 3. Enter the required credit card details on the secure webpage. 4. Confirm the payment details to process the funds. ### Visual Cues and Status Indicators - **Automated Redirection:** Once the payment successfully processes on the provider's end, transaction results are posted back to the OPSCOM system. The user is then automatically redirected back to the OPSCOM portal, where a final payment confirmation screen and receipt are generated for their records. --- ## Best Practices and Considerations - **User-Friendly Naming:** The text you enter into the payment configuration name field is exactly what your users will see when selecting a payment method during checkout. Choose a clear, recognizable name like "Credit Card" or "Online Payment" to avoid confusion. # Technical Schematic - Step #1This article outlines the system logic and automated workflow for processing new violations and preparing them for collections. Its primary purpose is to help OPSCOM administrators understand how the platform evaluates user contact information to issue notices and automatically flags eligible violations for the collections pipeline.
## Setup and Configuration The initial phase of the collections process relies on automated system logic triggered by the age of the violation and the user's profile data. This workflow requires no daily manual setup, but administrators should understand the underlying conditions that drive the automation. When a violation reaches an age greater than the configured **AutoNoticeDays**, the system evaluates the primary driver's profile to determine the appropriate notification method and sets the corresponding flags: - **Primary Driver with Email Address**: The system automatically dispatches an email notification to the user. It then flags the record appropriately by updating the database value **Violation.AutoNotice** to **1**. - **Primary Driver without Email Address**: The system flags the violation to be manually printed and mailed by adding it to the **Letter Report**. It updates the database value **Violation.AutoNotice** to **2**.The initial ticket should generally be issued in the system on the same day the physical violation occurred to ensure the **AutoNoticeDays** calculation remains accurate.
## Using this Feature Administrators interact with this automated workflow primarily through the reporting modules when finalizing which items move to formal collections. Access the **Send to Collections** report to review flagged items. Review the populated list of violations. Items will only appear on this report if they have an associated **Violation Notice**, carry a **Violation.AutoNotice** flag of **1** or **2**, and have aged exactly 30 days past the date they were initially flagged. Select the specific items or users from the generated list that require escalation. Process the selected items to officially send them to collections.**Warning:** Items will not appear on the **Send to Collections** report until the full 30-day waiting period has elapsed following the initial **AutoNotice** flagging. Administrators must account for this buffer period in their collections schedule.
--- ## Best Practices and Considerations - **Establish clear business rules** regarding the timely entry of violations into the system to prevent delays in the automated notification and collections pipeline. - Encourage users to maintain an active email address on their profiles. This maximizes the use of automated email notices (AutoNotice 1) and minimizes administrative overhead associated with printing and mailing items from the **Letter Report** (AutoNotice 2). # Automatic Violation NoticeThe Automatic Violation Notice script automates the delivery of new and past-due violation emails to system users. This feature helps OPSCOM administrators streamline the collections process by ensuring timely communication regarding outstanding citations, whether via email or printed letters. This article is intended for OPSCOM administrators responsible for managing violation notices, appeals, and collections.
## Setup and Configuration Administrators must configure the system settings and notice literature before the automated scripts can accurately process and send emails. ### Configuring Notice Settings 1. Hover over **System Config** and click **Notice Literature** to configure the text templates for your emails. 2. Hover over **Tomahawk Options** and click **System Settings** to set the **Auto Notice Days**, which dictates the number of days until a violation is considered due. 3. Hover over **System Settings** and click **Collections**. 4. Enable the **Include All Unpaid Violations** checkbox to allow the system to group all violations associated with a user into a single report.Enabling the **Include All Unpaid Violations** checkbox means that selecting a single violation in the list will generate a report for *all* violations associated with that user. This action will subsequently remove all of their associated violations from the pick-list on the **Printable Violation Notice Report** page.
### Configuring the NIC Letter (Ontario MTO) For organizations processing a Notice of Impending Conviction (NIC) for Ontario courts, a specific letter format must be established. 1. Hover over **System Messaging** and click the **Messages** tab. 2. Edit the **Notice Letter** to match your required NIC formatting. ## Using This Feature Once configured, the Automatic Violation Notice script runs automatically. The primary administrative interaction involves reviewing system emails and managing physical letters for users who cannot be reached digitally. ### Notice Email Summary The system will automatically send four distinct types of emails: - **User overdue account notice:** Informs standard users that they have one or more past-due violations. - **User new violation notice:** Alerts a user that a new violation was issued to them that same day. - **Admin new violation report notice:** Emails the OPSCOM administrator with a summary of how many new violation emails were sent to users. - **Admin past due violation report notice:** Emails the OPSCOM administrator detailing how many past-due emails were sent, and lists users who could not be emailed due to missing email addresses. ### Managing the Letter Report Users without an email address on file are automatically added to the **Letter report** so administrators can print and physically mail their overdue notices. 1. Hover over **Violations** and click **Letter report**. 2. Review the list of users. The results will be divided into two categories: - **Printable Violation Notices:** Notices ready to be printed and mailed. - **Unprintable:** Notices that cannot be processed due to an incomplete or missing mailing address. ### Resending a NIC Letter Once a NIC letter has been generated and sent, a copy is stored within the associated violation record. 1. Search for the specific violation ticket or locate it on the user's profile. 2. Click the ticket number to open the detailed ticket view. 3. Click the **Overdue Letter** button to view and resend the notice. --- ## Best Practices and Considerations - **Organizations should regularly audit the Unprintable section of the Letter report** to identify users with incomplete mailing addresses and update their profiles accordingly. - **Be aware that the user new violation notice only triggers for violations issued on the current day.** It will not retroactively notify users of older "new" violations (e.g., a 3-day-old violation) once the feature is turned on. # Collections ModuleThe Collections Module provides OPSCOM administrators with a streamlined process for managing and recovering overdue violation funds. Its primary purpose is to identify unknown users through regional vehicle lookups and compile reports of accounts with outstanding balances to be sent to external collection agencies. This article is intended for OPSCOM administrators responsible for financial enforcement and collections.
## Setup and Configuration Before fully utilizing the Collections Module, administrators should verify that the automated system processes are active. 1. Verify that your system is configured to send overdue notices each night. 2. If these automated emails are not being generated, contact Tomahawk Support to have the feature enabled on your system. ## Using this Feature The Collections Module is currently located within the Violations management area. It allows administrators to retrieve owner information from license plates and generate specific reports for collection agencies. ### Accessing the Module Hover over **Violations** and click **Collections** to access the module's drop-down menu of reporting and export tools. ### Available Actions and Reports - **Vehicle Lookup Export**: Click this option to export vehicle data in an MTO-friendly format. This file can be imported into MTO terminals by staff or automated systems to perform an MTO Lookup Report. - **Import from Lookup MTO**: Click this option to import the registered owner details back into OPSCOM. This action automatically populates the address and contact fields for previously unknown users. - **Known Report**: Click this option to query and package specific user accounts into an Excel export intended for a collection service provider. Generating this report automatically sets an internal SentToCollections flag on the associated violations, ensuring future queries do not duplicate listings. - **Sent To Known Report**: Click this option to generate a report of known user accounts flagged as SentToCollections, filtered by date and user type. This report includes relevant payment details. - **Sent To Unknown Report**: Click this option to generate a report of unknown user accounts flagged as SentToCollections, filtered by date and user type. ### Managing Unknown Users For unknown vehicles, administrators can export license plate data to identify the registered owners. - Click **Vehicle Lookup Export** to download a formatted data file. This file is uploaded to your regional transportation authority (e.g., MTO terminals) to retrieve registered owner details. - Click **Import from Lookup (MTO)** to upload the results file back into OPSCOM. This# Collections Module The Collections Module allows OPSCOM administrators to manage overdue violation funds, identify unknown users, and process accounts for external collection agencies. This module streamlines the collection workflow by automating overdue notices and facilitating data exchange with provincial transport ministries, such as the Ministry of Transportation Ontario (MTO). ## System Logic and Workflows Understanding the background automation is critical for managing the collections process. ### Known Report Inclusion Logic The system uses specific parameters to determine which accounts are packaged into the **Known Report**. A user is included based on the user type and days overdue if they meet either of the following conditions: - The user has an email address AND an overdue notice was sent to them more than 30 days ago. - The user does not have an email address AND the violation is past its due date. ### Automated Overdue Notices Workflow Each night, the system searches for overdue violations and cross-references the associated vehicles and users. - If an email address is found, the system formulates a message and delivers the overdue notice to the user. - The violation's AutoNotice field is then flagged in the database. - If a user does not have an email address, or if the user is completely unknown to the system, a report is compiled with this information and emailed directly to the system administrator. --- ## Best Practices and Considerations - **Administrators must regularly review the nightly report of unknown users or users without email addresses.** This ensures that physical letters or manual lookup processes are initiated for individuals who cannot receive automated digital notices. - **Organizations should develop a business rule for managing student collections**, such as tying unpaid account balances to graduation holds or registration blocks, before sending these accounts to third-party collection agencies.For a visual representation of the preliminary steps and workflows leading up to a collection, please review the [Technical Schematic - Step #1](https://opscom.wiki/books/the-opscom-admin-portal/page/technical-schematic-step-1) documentation.
# What does a refund look like in the system?The refund process allows OPSCOM administrators to reverse completed transactions directly from a user's profile. This feature helps administrators return purchased items (like permits or lockers) back to active inventory or reverse payments for accounting purposes, such as handling Non-Sufficient Funds (NSF). This guide is intended for OPSCOM administrators responsible for financial processing and user account management.
## Setup and Configuration Processing refunds is a core administrative function that does not require any additional system setup or configuration. It is accessed entirely through the individual user's profile. ## Using this Feature Administrators interact with the refund feature by locating the original transaction in the user's history and initiating a reversal. ### Processing a Refund 1. Search for and open the target user's profile. 2. Click the **History** tab and select **All Records**. 3. Locate the specific transaction you wish to refund. - For standard permits, temporary permits, or lockers, click the **Processed** date link. - [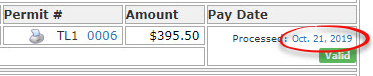](https://opscom.wiki/uploads/images/gallery/2026-07/hloimage.png) - For violations, click the **Processed** text link. - [](https://opscom.wiki/uploads/images/gallery/2026-07/0quimage-1.png) 4. Click the **Refund** button on the **Transaction Details** screen to open the refund window. 5. Enter an internal **Requisition Code** if required by your organization (this is optional). 6. Enter the total **Refund Amount**, ensuring you include applicable taxes. 7. Enter a required justification in the **comment** field. 8. Click the **Refund Payment Record** button to proceed, and accept any on-screen confirmations to continue. 9. Select the desired refund type from the **Adjustment Information** window. 10. Click the **Process This Adjustment** button to finalize the transaction. ### Visual Cues and Status Indicators Once the refund is processed, the system updates the user's profile to reflect the changes: - **Transaction Details:** The refunded amount will appear as a negative adjustment (e.g., $-395.50) on the transaction record. - **User History:** Under the **History** tab (**All Records**), the original purchase will display a **Released** date alongside a note indicating the item was "Released back to system by refund process." The financial transaction will also be logged under **Adjustment Records**. ### Handling NSF Payments Sometimes, a payment fails after it is recorded (e.g., a bounced cheque, known as Non-Sufficient Funds or NSF). Administrators must "refund" this payment in the system to create an outgoing record that neutralizes the failed incoming payment, keeping financial reporting accurate. - **Payment Type:** **Always select the identical payment type (e.g., Cheque) as the original failed payment** when processing an NSF refund. This ensures the Processed Payment Report accurately reflects the attempt and the subsequent removal of funds. - **Clear Notes:** **Always leave comprehensive and detailed notes documenting the failed payment.** This creates a transparent audit trail for anyone reviewing the accounting later.Ensure you are certain about releasing all items on a transaction before clicking the **Refund Payment Record** button. Once a permit is released back to inventory, it can be purchased immediately by another user.
--- ## Best Practices and Considerations - **Partial Refunds:** Refunding an entire transaction reimburses *all* items associated with that confirmation number and releases them back into inventory. **If you only need to reimburse a single item from a multi-item purchase, process an adjustment instead of a full refund.** - **Item Status After Refund:** Refunding a permit or locker releases the item back to the general inventory to be sold again. **Refunding a violation does not cancel the ticket; it simply returns the violation to an "awaiting payment" status.** # Cancel TransactionThe Cancel Transaction feature allows OPSCOM administrators to void an incomplete or erroneous payment directly from a user's profile. Its primary purpose is to provide flexibility in managing user accounts by either reserving a permit for future payment or releasing it back into the system's inventory. This guide is intended for OPSCOM administrators responsible for financial processing and user account management.
## Setup and Configuration Canceling a transaction is a core administrative function that requires no additional system setup or configuration. It is accessed entirely through the individual user's profile. ## Using this Feature Administrators interact with this feature by locating the transaction in the user's history and selecting the appropriate cancellation method. ### Step-by-Step Instructions 1. Search for and select the target user to open their profile. 2. Hover over the **History** tab and click **All Records**. 3. Locate the specific transaction and click the associated link to open the **Transaction Details** screen. 4. Click either the **Cancel & Keep** or **Cancel & Release** button based on the required outcome. 5. Click **OK** on the confirmation prompt to finalize the cancellation of the transaction. ### Available Actions and Buttons On the **Transaction Details** screen, you are presented with two distinct options for handling the cancellation: - **Cancel & Keep**: Click this button to cancel the transaction but keep the transaction details on the user's account. This action reserves the permit so that you can process the payment at another time. - **Cancel & Release**: Click this button to cancel the payment and immediately release the permit back into the system. --- ## Best Practices and Considerations - **Verify user intent before releasing items:** **Always ensure the user no longer needs the permit before selecting Cancel & Release.** Once an item is released, it returns to the active inventory and can be immediately purchased by another user. - **Manage reserved permits:** **Organizations should develop a business rule for how long a permit can remain reserved under a Cancel & Keep status** (e.g., 48 hours) before it must be either paid for or manually released to prevent inventory hoarding.The **Cancel & Release** action is final for that specific transaction. Once the permit is released back into the system, you will need to process a completely new transaction if the user decides they want the permit after all.
# AdjustmentsThe Transaction Adjustments feature allows OPSCOM administrators to modify the financial balance of an existing transaction by adding a charge or applying a partial reimbursement. Its primary purpose is to correct payment discrepancies or issue partial credits without canceling the entire transaction. This guide is intended for OPSCOM administrators responsible for financial processing and user account management.
## Setup and Configuration Making a transaction adjustment is a core administrative function that requires no additional system setup. It is accessed entirely through the individual user's profile within the administrative portal. ## Using this Feature Administrators can initiate an adjustment directly from the transaction record. Adjustments can be made before a transaction is completed or after the payment has been processed. ### Step-by-Step Instructions 1. Verify you are working in the correct user profile by checking the name displayed in the top right-hand corner of the screen. 2. Open the **Transaction Details** screen for the specific item you need to modify. 3. Click the **Adjust** link located on the transaction record to open the adjustment window. 4. Enter your internal organization's **Requisition Code** in the associated field, if applicable. 5. Set the amount sign to positive to charge the user an additional amount, or change the amount sign to a negative to apply a reimbursement. 6. Enter the specific dollar amount of the adjustment. 7. Enter a detailed explanation in the comments field to document the reason for the financial change. 8. Click the **Add Adjustment** button at the bottom of the screen. You will be returned to the **Payment Details** screen, and the new adjustment will be listed below the original transaction. 9. Click the **Not processed** link next to the new entry to open the adjustment verification window. 10. Verify that all adjustment details and amounts are correct. 11. Click the **Process this Adjustment** button at the bottom of the screen to finalize the change.**The adjustment process does not release items back into the system inventory.** If an item (such as a permit or locker) needs to be released and made available for another user to purchase, it must be done separately using the system's refund or release functionality.
### Visual Cues and Status Indicators - **Payment Status:** Once the adjustment is processed, the status line will automatically update from **Not processed** to **Submitted**, accompanied by a date stamp. This indicates the adjustment has successfully altered the dollar amount associated with the item. --- ## Best Practices and Considerations - **Always provide detailed comments when creating an adjustment record.** A clear justification is critical for maintaining an accurate and transparent financial audit trail for future reviews. - **Organizations should establish clear guidelines on when to use an adjustment versus a full refund.** Adjustments are ideal for partial credits, whereas full refunds are necessary when reversing an entire transaction. --- ### Related Video # Adjusting a violation to zero dollarsThis article outlines how OPSCOM administrators can adjust a violation fine to zero dollars, convert a ticket to a warning, or process a financial adjustment for a paid citation. These tools allow administrators to correct billing errors, grant leniency, or override existing citations directly from a user's profile.
## Setup and Configuration Adjusting a violation is a core administrative function that requires no special system setup or configuration. All adjustments and edits are performed directly from the user's profile within the administrative portal. ## Using this Feature There are multiple ways to adjust a fine to zero dollars. The method you choose depends on whether the ticket has already been paid and whether you want to maintain the ticket as an active offense or convert it to a warning. ### Editing the Ticket Fine Amount Use this method to reduce the fine to zero before the ticket is paid, while keeping it registered as an active violation. 1. Locate the specific violation you wish to reduce within the user's profile. 2. Click the specific ticket number to access the Violation Information detail screen. 3. Click the **Edit** button in the upper right corner to open the Edit Violation Information page. 4. Scroll down to the listed offense and change the dollar value of the fine to **$0.00**. 5. Click **Update this Violation** to save your changes. ### Changing the Ticket to a Warning Use this method to cancel the fine completely by changing the state of the ticket to a warning. 1. Locate the specific violation within the user's profile and click the ticket number. 2. Click the **Edit** button in the upper right corner. 3. Enable the **Warning** checkbox to change the state of the ticket. 4. Click **Update this Violation** to save your changes. ### Processing an Adjustment Adjustments to fines are performed *after* the initial fine has already been paid. 1. Navigate to the user's history and locate the paid violation you wish to zero out. 2. Click the **Adjust** link on the left side of the transaction record. 3. Enter the specific amount you wish to reduce the fine by in the Create Adjustment Record window. For example, if the user paid a discounted rate of $40.00 for a $50.00 ticket, enter 40.00. 4. Enter a detailed reason for the reduction in the comments field. 5. Save the adjustment to apply the credit to the user's account.Processing an adjustment creates a credit on the user's account in the Payments tab. This adjustment balance can be applied to a future payment or processed fully as a system refund.
### Adjusting Through Appeals A fine can also be adjusted or reduced to zero through the formal appeals process, which allows users to contest the citation before an administrator makes a final ruling. --- ## Best Practices and Considerations - **Document all changes:** **Always include a detailed comment when processing an adjustment or editing a ticket amount.** This ensures transparency and maintains an accurate financial audit trail for future review. - **Establish organizational policies:** **Organizations should establish clear business rules defining when it is appropriate to issue a warning versus when a user must go through the formal appeals process.** - **Understand post-payment workflows:** Remember that adjusting a paid ticket does not automatically return funds to the user's credit card or bank account. The adjustment sits as a credit on the user's account until an administrator actively processes a refund. # Types of ReimbursementThe OPSCOM system provides three primary methods for modifying or reversing financial transactions: cancellations, adjustments, and refunds. Understanding the differences between these options helps administrators accurately manage user accounts, correct billing errors, and maintain proper inventory levels. This article is intended for OPSCOM administrators responsible for financial processing and user account management.
## Setup and Configuration Managing reimbursements, adjustments, and cancellations are core administrative functions. They require no special system setup and are accessed directly through the individual user's profile within the administrative portal. ## Using this Feature Administrators must choose the correct financial action based on whether the transaction has been paid and what should happen to the associated items. ### [Cancel Transaction](https://opscom.wiki/books/the-opscom-admin-portal/page/cancel-transaction) Use this action to void a transaction **before** a payment is processed. - **When to use:** A user decides not to follow through on a promise to pay. - **System Impact:** The promise to pay is removed from the account, meaning the user no longer owes the money. The items associated with the transaction are immediately released back into the system inventory. ### [Adjustments](https://opscom.wiki/books/the-opscom-admin-portal/page/adjustments) Use this action to alter the cost of an item **before** it is paid for, or to alter the value of a transaction **after** it has been paid for. Adjustments can be positive (charging more) or negative (reimbursing a portion of the cost). - **When to use:** A user was charged too much or too little for an item, or they require a partial/pro-rated reimbursement because they are no longer using an item. - **System Impact:** The financial value of the transaction changes, but **items are not released back into the system**. ### Refunds For a detailed look at this process, see [What does a refund look like in the system?](https://opscom.wiki/books/the-opscom-admin-portal/page/what-does-a-refund-look-like-in-the-system). Use this action to return funds and cancel a transaction **after** it has been paid for. - **When to use:** A user has decided against a completed purchase, or the original transaction is completely incorrect and it is easier to reverse it and start over. - **System Impact:** The transaction is reversed, and **all transaction items are released back to the system**. --- ## Best Practices and Considerations - **Organizations should establish clear policies outlining when to use full refunds versus pro-rated adjustments** to ensure consistent financial reporting and customer service. - **Always verify the payment status of a transaction** before attempting to alter it, as this dictates whether a cancellation (pre-payment) or a refund (post-payment) is the appropriate action.**If there is more than one item in a transaction, processing a refund will reimburse and release ALL items associated with that purchase.** If you only need to reimburse a single item within a multi-item transaction, you must process an adjustment for the financial value and manually release the specific item separately.
# Payment Processing ModelsThis article outlines the architectural methods OPSCOM uses to handle financial transactions. Its primary purpose is to help administrators understand the differences between integrated gateways and hosted payment pages, ensuring secure and compliant transaction routing. This guide is intended for OPSCOM administrators.
## Setup and Configuration Selecting and configuring a payment processing model is a foundational step in your system setup. Because the configuration steps vary significantly by provider, you must configure your specific merchant account settings within the system. For detailed setup instructions regarding your specific provider, please refer to the dedicated wiki articles for your processor (e.g., *[TouchNet (uPay) Hosted Payments](https://opscom.wiki/books/the-opscom-admin-portal/page/touchnet-upay-hosted-payments "TouchNet (uPay) Hosted Payments")*, *[Moneris Hosted Paypage](https://opscom.wiki/books/the-opscom-admin-portal/page/moneris-hosted-paypage "Moneris Hosted Paypage")*, or *[Bambora Checkout](https://opscom.wiki/books/the-opscom-admin-portal/page/bambora-checkout "Bambora Checkout")*). ## Understanding the Processing Models OPSCOM supports different architectures for processing user payments, though the industry standard heavily favors hosted solutions for security reasons. [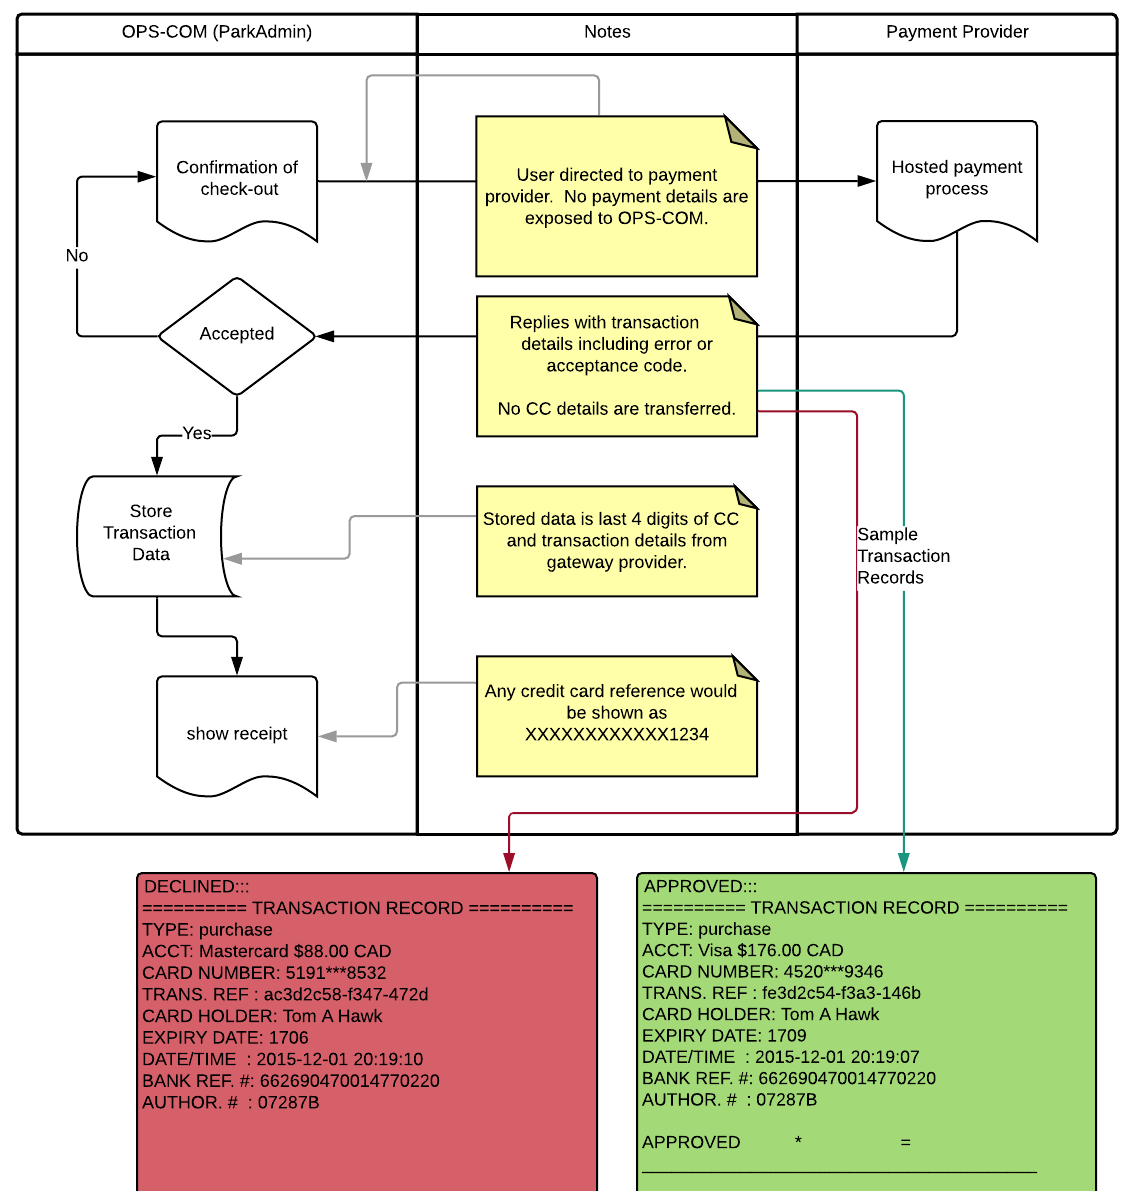](https://opscom.wiki/uploads/images/gallery/2026-07/6Mrg8yimage.png) ### Using Hosted Payments This is the preferred and industry-standard method for handling payments within the OPSCOM platform. **Key Information Displayed / Process Flow:** 1. The user confirms their cart items and initiates the checkout process in OPSCOM. 2. The system directs the user away from OPSCOM to the payment provider's secure hosted payment page. 3. The user supplies their sensitive payment details directly to the payment provider. **No payment details are exposed to or captured by OPSCOM.** 4. The payment provider processes the transaction and sends a secure notification back to OPSCOM. 5. OPSCOM receives the notification, marks the transaction as complete, and updates the user's profile accordingly. ### Using a Gateway This legacy method involves handling the payment data flow more directly through the application.**The Gateway model is actively being phased out as a method for handling payments.** Organizations still using a direct gateway should plan to migrate to a hosted payment solution to maintain security standards.
--- ## Best Practices and Considerations - **Prioritize Hosted Payments:** **Organizations should always utilize Hosted Payments for new setups.** This model drastically reduces your organization's PCI compliance scope because sensitive credit card data never touches your local network or the OPSCOM servers. - **Audit Legacy Systems:** If your organization has been using OPSCOM for many years, review your current payment configuration to ensure you are not relying on a deprecated gateway model.Need help migrating from a legacy gateway to a modern hosted payment provider? Contact the OPSCOM support team to discuss your transition plan and ensure uninterrupted payment processing.
# Payments and Transaction FlowThe OPSCOM system utilizes a standardized three-step transaction flow to manage the lifecycle of user purchases, such as parking permits. Understanding this workflow helps administrators accurately track financial commitments and manage inventory status from the initial reservation to final payment. This guide is intended for OPSCOM administrators responsible for financial processing and user account management.
## Setup and Configuration The payment transaction flow is an inherent system process within OPSCOM and does not require specific module configuration to function. However, administrators should ensure their payment methods and gateways are correctly configured before users attempt to make purchases. ## Using this Feature The lifecycle of an item purchase consists of three primary stages: linking the item, making a payment promise, and processing the payment. ### Step 1: Linking the Item to a User A user or an administrator links an item, such as a permit, to a user's account. - The item is placed in an **Awaiting Payment** status because a payment method has not yet been selected. - The specific item is temporarily reserved and is no longer accessible to other users in the system.The system utilizes an automated midnight clearing list. If a user reserves an item but does not proceed to the next step to establish a promise of payment, the system will automatically release the permit back into the available inventory at midnight.
### Step 2: Making a Promise of Payment The user or administrator selects a specific payment type (e.g., cash, cheque, or payroll deduction) to finalize the reservation. - This action constitutes a "promise to pay." - The user's transaction is automatically added to the **Unprocessed Payments** list. - This step provides users the flexibility to mail a cheque or visit the parking office in person to finalize their transaction at a later time. ### Step 3: Processing the Payment Once the physical payment (cash, cheque, etc.) is received by the office, the administrator must finalize the transaction in the system. - Access the **Unprocessed Payments** list. - Mark the specific transaction as **processed**. - The item is now fully linked to the user's account, and the financial transaction is complete. --- ## Best Practices and Considerations - **Monitor Unprocessed Payments:** **Regularly check the Unprocessed Payments list** to ensure pending transactions are finalized in a timely manner. - **Manage Inventory:** **Organizations should develop a business rule to drop payments and release permits after a set period, such as two weeks.** This ensures that valuable inventory is not tied up indefinitely by unfulfilled payment promises.