The Violations From Static Cameras feature allows administrators to generate parking infractions based on chalk records captured by static License Plate Recognition (LPR) cameras. Its primary purpose is to automate the identification of unauthorized or overtime vehicles, streamlining the workflow for issuing mail-out violations. This article is intended for OPSCOM administrators.
## Setup and Configuration Before you can actively generate violations from static camera logs, there are system prerequisites that must be met and initial mapping that must be configured.Ensure that the OPSCOM support team has configured your static cameras with the necessary settings to report on the correct lot group and GPS location. Additionally, if you need to change your default ticket prefix (e.g., TT-), you must contact support@ops-com.com to have this adjusted.
### Admin Configuration 1. Navigate to **System Configuration** and hover over **Parking**. 2. Open up **Manage Lot Groups** and edit the lots information through there. 3. Map your specific Lot Groups to the appropriate **Offence Location** to ensure incoming camera data is categorized correctly for enforcement. ## Using this Feature Once configured, static camera logs will populate in the system as they are captured, allowing administrators to filter the data and issue violations accordingly. 1. Hover over **Violations**, hover over **LPR and Chalking**, and click **Create Violations From Static Cameras**. 2. Click the **Report Type** drop-down menu to filter the logs (e.g., choose **No Permit & Over Lot Time** to only list vehicles that have no permits and have exceeded the lot group's free parking duration). 3. Click the **Vehicle Status** drop-down menu to further segment the search results based on system registration. 4. Click a specific log row from the generated list to display the violation entry form. 5. Review the entry and exit camera images provided to verify the chalk record. 6. Enter the required infraction details into the form and submit the violation. ### Key Information Displayed - **Vehicle Status Filters:** - **All:** Returns all captured plates, regardless of their registration status in the system (this is the default setting). - **In System:** Filters the results to only show vehicles or plates that currently exist in the database. - **Not in System:** Filters the results to only show unknown or unregistered vehicles and plates. - **Registered Users:** Filters the results to only show plates that are actively tied to a registered user or driver in the system. - **Weekdays Only:** When checked, this filter restricts the search results to only show chalk records where both the vehicle's entry and exit occurred between Monday and Friday. [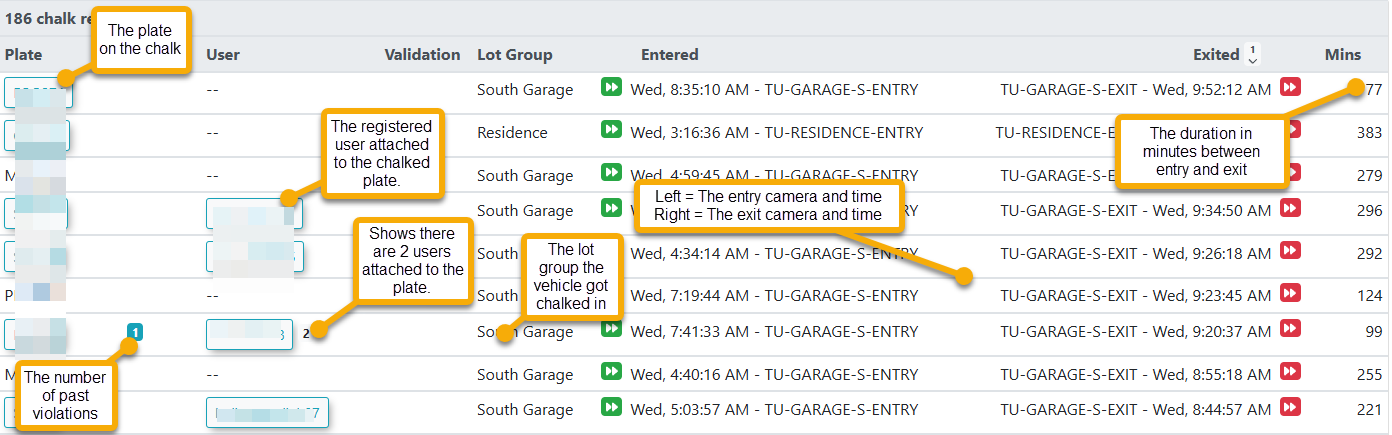](https://opscom.wiki/uploads/images/gallery/2026-07/ReQimage.png) - **Vehicle Record Formats:** Vehicles can appear on the creation screen in one of three formats: no existing vehicle record, a single vehicle record, or multiple vehicle records. The violation creation screen will dynamically adjust based on which format is detected. [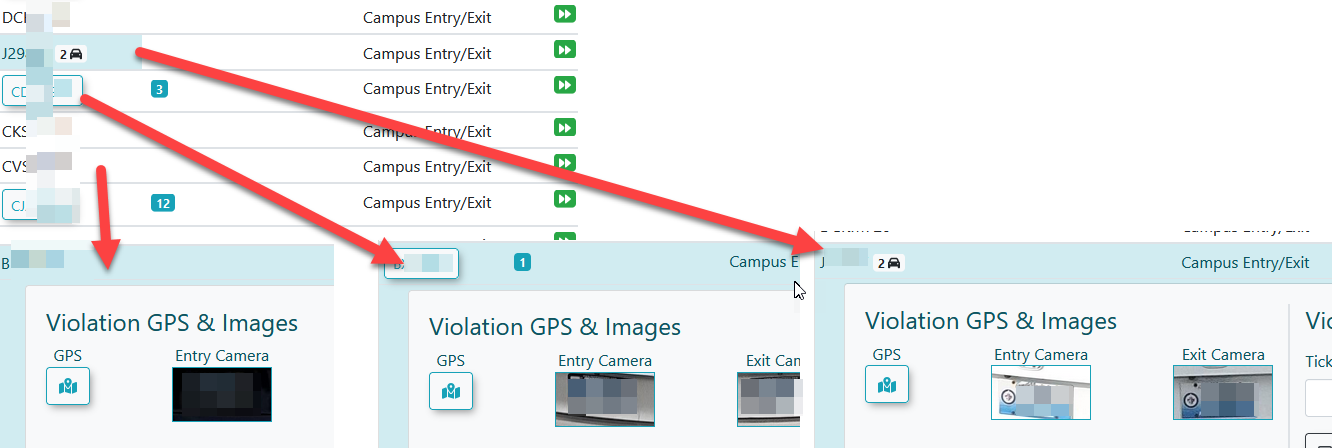](https://opscom.wiki/uploads/images/gallery/2026-07/m0V1xuimage.png) --- ## Best Practices and Considerations - **Verify Photographic Evidence:** **Always review the entry and exit camera images carefully** before finalizing a violation. Confirming that the LPR text accurately matches the physical license plate in the photo prevents easily appealed administrative errors. - **Automated Log Management:** Once the violation details are entered and successfully submitted, the chalk record will automatically disappear from the processing list. The newly created violation can then be found and managed using standard system search tools. # Spoiling a ViolationThe Spoiling a Violation feature allows administrators to void or invalidate an issued parking ticket within the system. Its primary purpose is to help correct enforcement errors or dismiss a ticket that was issued incorrectly, effectively removing its active penalty status. This article is intended for OPSCOM administrators.
## Using this Feature Administrators can manually change the status of an active ticket to spoiled by editing the specific violation record. 1\. Search for the specific violation using the **Quick Search** or **Violation Search** tool. 2\. Click the **Ticket #** link from the search results to open the violation details. [](https://opscom.wiki/uploads/images/gallery/2026-07/knd2025-05-26-13-24-46.png) 3\. Click the **Edit** button located at the top right of the violation screen. 4\. Click the **Spoiled** drop-down menu and choose **Spoiled** (changing it from the default *Valid - not spoiled*). 5\. Click the **Submit** button to save the updated violation details. Once submitted, the ticket will be successfully updated and will display as *Spoiled* the next time you query it in a search. --- ## Best Practices and Considerations - **Audit Trails:** **Always add a descriptive note or comment** to the violation record when changing its status. Documenting the specific reason for voiding a ticket (e.g., officer error, successful appeal, duplicate entry) creates a reliable audit trail that can be referenced if there are questions regarding the user's account history. - **Financial Impact:** Remember that once a violation is successfully spoiled, any associated fines or financial penalties are completely nullified. Verify your changes through the search tool to ensure the ticket status correctly displays as *Spoiled* so the user is no longer held financially responsible. # Cancelling a ViolationThe Cancelling a Violation feature allows administrators to formally dismiss an issued parking ticket within the system using the internal appeals workflow. Its primary purpose is to help correct enforcement errors or process an approved appeal, effectively voiding the ticket and removing any associated financial penalties from the user's account. This article is intended for OPSCOM administrators.
## Setup and Configuration There is no specific system setup or configuration required to use this feature. Cancelling a violation is a standard administrative action available to users with the appropriate violation management and appeals permissions enabled on their account. ## Using this Feature Administrators can manually cancel an active ticket by accessing the appeals section within the specific violation record. 1\. Hover over **Violations** and click **Search**. 2\. Enter the specific ticket number into the **Search Text** field. 3\. Click the **Search using only text** button. 4\. Click the **Ticket Number** link from the search results to open the violation details. [](https://opscom.wiki/uploads/images/gallery/2026-07/qhiimage.png) 5\. Click on the **Edit** button 6\. Click on the **Show Appeals Form** link to reveal the administrative action fields. 7\. Click the **Fine Action** drop-down menu and choose **Cancelled**. 8\. Enter the reason for the cancellation into the **Appeal Admin Comment** field. 8\. Click the **Update this Violation** button to finalize the status change. ### Visual Cues and Status Indicators - **Confirmation Message:** Upon successful completion of the steps above, a pop-up message will display in the top right corner of your screen stating that the "Violation has been updated." --- ## Best Practices and Considerations**Appeals Form Utilization:** Even if a user did not formally submit an online appeal through their user portal, administrators still utilize the **Show Appeals Form** section to process a backend cancellation. This ensures the administrative decision and reasoning are officially recorded in the system.
- **Audit Trails:** **Always provide a clear and detailed reason** in the **Appeal Admin Comment** field when cancelling a ticket. Documenting the specific reason for the dismissal (e.g., successful appeal, valid permit verified, officer error) creates a reliable audit trail for future reference. - **Financial Impact:** Remember that cancelling a violation immediately removes the financial liability from the user. Ensure you have the proper authorization or documentation before updating the fine action to prevent unauthorized dismissals. # Hiding Zero Dollar ViolationsThe Hiding Zero Dollar Violations setting allows administrators to automatically filter out violations that carry no financial penalty from standard views and searches. Its primary purpose is to declutter the system interface and streamline reporting by only displaying actionable, fine-bearing tickets. This article is intended for OPSCOM administrators responsible for system configuration.
## Setup and Configuration Administrators can enable this global filter directly within the core system settings. 1. Hover over '**System Config**' and click '**System Settings**' 2. Click '**Violations**' to open the specific Violations settings menu. 3. Enable the **Hide Zero Dollar Fines** checkbox to automatically hide zero-dollar violations across the system. 4. Save your changes to apply the new configuration. ## Using this Feature Once this setting is enabled, no further daily interaction is required. Zero-dollar violations will automatically be excluded from standard administrative searches, ticket lists, and general reports, allowing your team to focus exclusively on violations requiring payment or active follow-up. --- ## Best Practices and Considerations**Data Retention:** Keep in mind that while zero-dollar violations are hidden from general administrative views, they are not deleted. They remain permanently recorded in the system backend for auditing purposes and are still factored into automated repeat offender tracking logic.
- **Warning Workflows:** **Carefully consider your organization's warning workflows before enabling this setting.** If your enforcement team frequently issues zero-dollar tickets as formal warnings and requires administrative staff to actively review, process, or appeal these specific records, it is best practice to leave this setting disabled to ensure complete visibility. # Search Repeat Offenders ReportThe Search Repeat Offenders report allows administrators to identify vehicles and users that have accumulated multiple parking violations. Its primary purpose is to help enforcement teams track chronic offenders, manage warnings, and apply appropriate penalties or towing actions. This article is intended for OPSCOM administrators.
## Setup and Configuration There is no specific system setup or configuration required to use this report. Access to the Search Repeat Offenders page is a standard administrative feature available to users with the appropriate violation management and reporting permissions enabled on their profile. ## Using this Feature Administrators can use this reporting tool to filter violation data and output specific counts based on either the vehicle or the user profile. [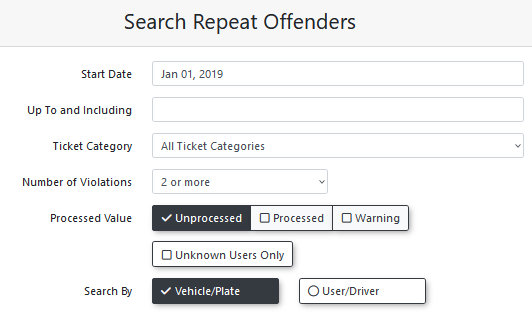](https://opscom.wiki/uploads/images/gallery/2026-07/mtmimage.png) 1. Hover over **Violations** and click **Search Repeat Offenders**. 2. Enter specific dates into the **Start Date** and **End Date** fields to specify the date range in which the violations were received. 3. Click the **Ticket Category** drop-down menu and choose a specific violation category to narrow the results. 4. Under **Search Criteria**, select either: - **Number of Violations:** Flags offenders based on ticket frequency. Choose a minimum threshold from the **Number of Violations** drop-down menu (e.g., 2 or more). - **Total Cost:** Flags offenders based on monetary value. Enter a minimum dollar threshold into the **Total Cost** field (e.g., $200). 5. Click the **Processed Value** check boxes and choose Unprocessed, Processed, or Warning to categorize violations based on their current status. 6. Enable the **Unknown Users Only** checkbox to exclusively show violations assigned to vehicles without a known user tied to them. 7. Click the **Search By** drop-down menu and choose **Vehicle/Plate** or **User/Driver** to determine how the output data will be grouped. 8. Click one of the green export buttons located at the top right of the search results to export the data in your chosen format. ### Key Information Displayed The data grouped in the output varies depending on whether you selected **Vehicle/Plate** or **User/Driver** in your search parameters. - **Vehicle/Plate Grouping:** Shows the number of violations on each specific license plate and lists any associated drivers of the vehicle. - **User/Driver Grouping:** Shows the total number of violations given to the user, including any violations assigned to vehicles where the user is the registered driver. - **Individual Violations:** In either grouping view, you can click on the hyperlinked violation count number to view the individual ticket details. ### Visual Cues and Status Indicators - **Warning Icon:** When searching by vehicle, a warning icon next to the username will show a targeted list of the violations associated specifically to that user. - **Breakdown Icon:** When searching by user, an icon next to the total violation count displays a breakdown of the total amount (showing the number of violations assigned directly to the user versus the number of violations assigned to that user's vehicles). --- ## Best Practices and Considerations - **Targeted Reporting:** **Utilize the Search By filter strategically based on your goals.** Searching by **Vehicle/Plate** is ideal for identifying unregistered cars or scofflaws that frequently violate lot rules, while searching by **User/Driver** is best for evaluating the overall compliance of a registered permit holder across all of their listed vehicles. - **Reviewing Warnings:** Use the **Warning Only** option under the **Processed Value** filter to evaluate if past warnings have been effective, or if a repeat offender has exhausted their leniency and now requires a fine-bearing ticket. - **Monetary vs. Count-Based Thresholds:** Use **Total Cost** when targeting high-balance accounts regardless of ticket count (ideal for identifying vehicles with large outstanding balances), and use **Number of Violations** to track repeat behavior patterns across multiple lower-cost infractions. # Restricting Payment of Violations in Court Requested Conviction (CRC) StatusThe Court Requested Conviction (CRC) payment restriction feature allows administrators to block users from paying for parking tickets that have been escalated to court or a collections agency. Its primary purpose is to ensure that escalated violations are handled through the proper legal or administrative channels, while still allowing authorized staff to override the block if necessary. This article is intended for OPSCOM administrators responsible for system configuration and collections management.
## Setup and Configuration Configuring this feature requires adjusting global system settings to restrict the users, followed by updating role permissions to grant specific administrators override capabilities. ### Configuring Global Restrictions 1. Hover over **System Configuration** and click **System Settings**. 2. Locate the settings pertaining to collections. 3. Enable the **Prevent Violation Payment** checkbox to stop users from paying escalated fines. 4. Enable the **Prevent Purchases** checkbox to stop users with escalated fines from buying new permits. 5. Save your settings. ### Configuring Administrative Overrides 1. Hover over **System Configuration** and click **Manage Roles**. 2. Select the role you wish to grant override abilities to (e.g., Primary Admin). 3. Click **Permissions** to access the role settings. 4. Click the **Violations** tab. 5. Enable the **Pay Violations In Collections** checkbox. This allows the administrator to manually process payments on violations that are in collections. (A) 6. Enable the **Purchase While Outstanding** checkbox. This allows the administrator to process purchases (like permits) for a user, even if they have a violation sent to collections. (B) 7. Save your role changes. [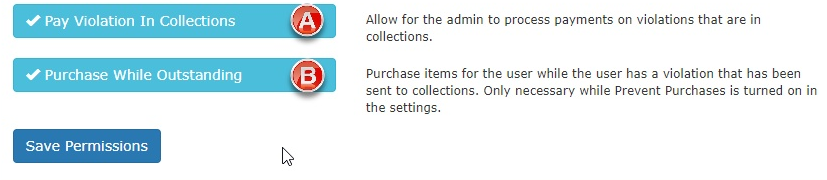](https://opscom.wiki/uploads/images/gallery/2026-07/ny4image.png)The **Purchase While Outstanding** administrative permission is only necessary if the **Prevent Purchases** setting has been enabled in the global system settings.
## Using this Feature Once configured, the system automatically handles how CRC and collections violations are presented to different user types. ### End User Experience When a user views a violation with the "Sent to CRC" status in their portal, they will see a notice indicating the violation has been sent to collections. The system will remove their ability to pay the fine online. If the user attempts to bypass this by using the OPSCOM Quick Pay or Guest Payments portal, they will receive the same message disallowing the transaction. [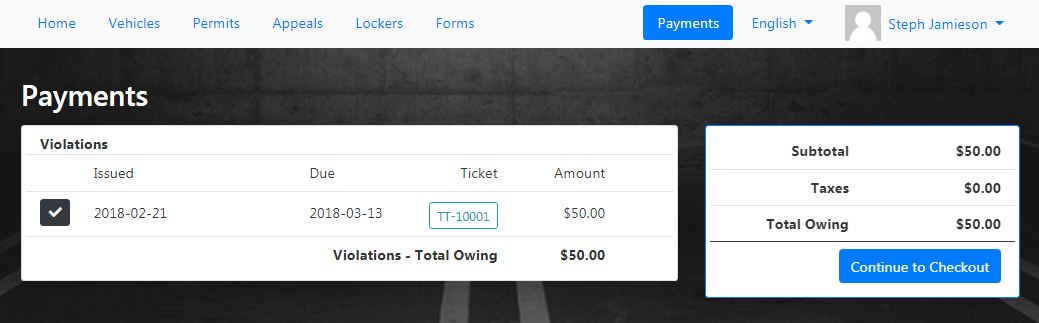](https://opscom.wiki/uploads/images/gallery/2026-07/izsimage.png) ### Administrator Experience Administrators viewing the same user profile will see the "Sent to Collections" status. However, if the administrator's role has the override permissions enabled, the payment fields and buttons will remain active, allowing them to manually collect and process the payment on behalf of the user. [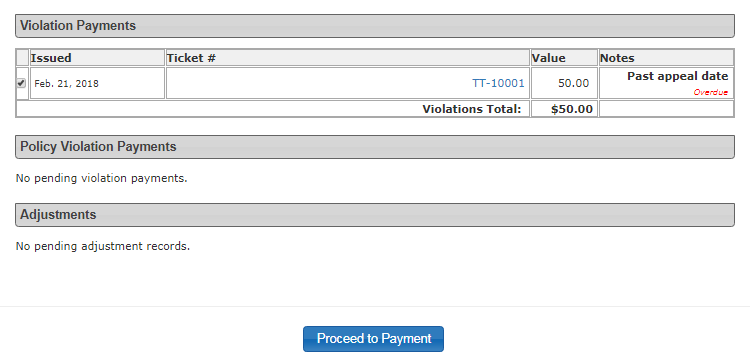](https://opscom.wiki/uploads/images/gallery/2026-07/8rximage.png) --- ## Best Practices and Considerations - **Business Rules for Overrides:** Organizations should develop a clear business rule detailing exactly when an administrator is allowed to use their override permission to accept a payment for a CRC violation, versus when they must direct the user to the court or collections agency. - **Clear Communication:** Consider updating your notice letters and email templates to clearly inform repeat offenders that once a ticket reaches CRC or collections status, their portal payment privileges will be suspended. # Printing the Certificate of Parking InfractionThe Certificate of Parking Infraction (commonly known as Form 11) feature allows administrators to generate and print official legal notices for specific parking violations. Its primary purpose is to produce a properly formatted PDF document that includes all required auto-filled information and officer signatures for legal processing. This article is intended for OPSCOM administrators responsible for violation management and system configuration.
## Setup and Configuration Before you can generate a certificate, you must ensure the Form 11 template is created within your system settings and determine if you require digital signatures from your enforcement officers. ### Create and Edit the Form 11 Template 1. Hover over **Content & Designs** and click **Pages and Content Blocks**. 2. Click the **Messages** tab and look for the item with the System Location value of **form11**. 3. If the template does not exist, click the **Create Page/Message** button. 4. Select **Message** from the Page Type drop-down menu. 5. Enter **form11** into the Identifier field. 6. Click the **Save Messaging** button. To edit an existing template, click the **Edit** button next to the **form11** entry in the **Messages** tab to access the text editor. ### Adding a Digital Signature Requirement You can configure the system to require enforcement officers to capture a digital signature when issuing a ticket on their handheld devices. 1. Hover over **System Configuration** and click **System Settings**. 2. Click **Violations** to open the violation settings menu. 3. Enable the specific setting to use signatures on tickets. 4. Save your configuration changes. [](https://opscom.wiki/uploads/images/gallery/2024-06/b24image.png) ## Using this Feature Once configured, administrators can generate the document from the web portal, and officers can apply their signatures in the field. ### Handheld Signature Capture (Android) - **Visual Cues & Status Indicators:** When the digital signature setting is enabled, a new signature tab will appear when writing a violation on an OPSCOM Android handheld unit. - **Available Action:** The patrol officer must tap the signature tab and physically sign the device screen to proceed. When the ticket is uploaded to the server, this timestamped signature is sent with the other violation images and will automatically display on the printed Form 11. ### Print Form 11 1. Hover over **Violations** and click **Search**. 2. Locate the specific violation and click the **Ticket Number** to open the details page. 3. Click the **Action** drop-down menu and choose **Generate (title of form)** (e.g., Generate Form 11). 4. Open the downloaded PDF file to view, save, or print the final Certificate of Parking Infraction. --- ## Best Practices and Considerations**Form 11 Content Configuration:** Although it is possible for administrators to edit the Form 11 template text manually, it is **strongly recommended to request the initial form content configuration directly from OPSCOM support**. The layout is highly specific and relies on complex shortcodes to accurately auto-fill dynamic legal information such as dates, license plate numbers, and fine amounts.
- **Signature Verification:** Always verify that the digital signature appears clearly on the final downloaded PDF. The timestamped signature serves as a crucial piece of evidence confirming the specific Provincial Offences Officer who issued the ticket. # MTO Annual ReportThe MTO Annual Report allows administrators to generate a summary of Ministry of Transportation (MTO) related violation data over a specified timeframe. Its primary purpose is to help compile the necessary yearly statistics and compliance metrics required for official external reporting. This article is intended for OPSCOM administrators.
## Setup and Configuration There is no specific system setup or configuration required to use this feature. The MTO Annual Report is a standard administrative tool available to users with the appropriate violation reporting permissions enabled on their account. ## Using this Feature Administrators can use this reporting tool to pull required MTO data for any given date range, such as a full calendar year. 1. Hover over **Violations** and click **Reports** then **MTO Report**. 2. Enter the desired starting date into the **Start Date** field. 3. Enter the desired end date into the **Up To and Including** field (e.g., January 1, 2020, to December 31, 2020, for a full year-end report). 4. Click the **Search** button to generate the report. ### Key Information Displayed - **MTO Requirements:** Once the search is executed, the screen will refresh to display a comprehensive list of items and statistical data explicitly required for the Annual MTO Report based on the date range selected. --- ## Best Practices and Considerations**Reporting Periods:** While typically used for year-end reporting, you can adjust the date range to pull data for specific quarters or months if you need to perform internal audits throughout the year.
- **Data Verification:** **Always verify your date range** before finalizing the report to ensure the data accurately reflects the specific fiscal or calendar year required for your organization's official MTO submission. # Collections - Flag as Sent to CollectionsThe Flag as Sent to Collections feature allows administrators to manually update a violation's status to bypass standard automated notification workflows, such as the Notice of Impending Charge (NIC) and Certificate of Request for Court (CRC) processes. Its primary purpose is to efficiently process violations that are being handled externally by a collections agency or to accommodate users requesting to go directly to trial. This article is intended for OPSCOM administrators handling violation management and collections.
## Setup and Configuration To use this feature, the specific administrative role must have the correct permissions enabled by a Primary Admin. 1. Hover over **System Configuration**, click **Admin Management** then **Manage Roles**. 2. Locate the specific role you want to edit and click the **Permissions** button. 3. Click the **Violations** tab. 4. Enable the **Manage Collections** checkbox. 5. Click the **Save Settings** button to apply the changes. ## Using this Feature Once the correct permissions are assigned, administrators can manually apply this flag to individual tickets from the search screen. 1. Hover over **Violations** and click **Search**. 2. Search for the specific violation you wish to flag. 3. Click the specific **ticket #** link in the results to open the Violation Information page. 4. Click the **Action** drop-down menu and choose **Flag as Sent to Collections**. 5. Click the **Ok** button to confirm the status change. --- ## Best Practices and Considerations**One-Time Process:** Once a violation has successfully gone through the collections workflow, the system permanently marks it as such. A ticket **cannot** re-enter the collections process a second time.
- **Audit Trails:** **Always use the Violations Notes feature** to add detailed comments to the violation record. Documenting the user's request or the specific reason the ticket was manually escalated to collections ensures a clear, reliable administrative history. - **Administrative Overrides:** Administrators with the appropriate permissions will still retain the ability to pay or cancel the violation within the system as necessary, even after it has been formally flagged for collections. # Municipal Violations and CollectionsThe Municipal Violations and Collections process allows Ontario-based municipal clients to manage violation offenses through the Provincial Offenses Act (POA) or the Administrative Monetary Penalty System (AMPS). Its primary purpose is to automate the retrieval of vehicle owner data from the Ministry of Transportation (MTO) for unregistered vehicles, facilitating the distribution of notice letters and processing for court collections. This article is intended for OPSCOM administrators managing municipal parking enforcement workflows.
## Setup and Configuration Before utilizing the MTO lookup and Court Requested Conviction (CRC) workflows, your municipality must be approved by the MTO as an Authorized Requester. Contact ARIS@ontario.ca to request a RAW data account. Once approved, administrators must configure four specific provincial codes within the system to ensure compatibility with the Ontario court system. 1. Hover over **System Configuration** and click **System Settings**. 2. Select the **Collections** component. 3. Enter the required values into the following designated fields based on your specific municipality: - **Case Court:** A 4-digit number (e.g., 3060). - **Case Jurisdiction:** A 3-digit number (e.g., 658). - **Agency Code:** 3 alphanumeric characters followed by 3 numbers (e.g., BYL390). - **Disbursement Code:** 1 alphanumeric character followed by 3 numbers (e.g., M525). 4. Click the **Save Settings** button.If your municipality uses an extra-detailed version of the notice letter where one notice is sent out for each individual violation rather than in bulk, you must disable the **Include All Unpaid Violations** setting within this same configuration menu.
## Using this Feature The lifecycle of a municipal violation involves several stages of exporting data, importing MTO responses, and escalating unpaid tickets. ### Exporting Data for the MTO When violations reach a specific age of non-payment (e.g., 15 days), administrators export the unknown vehicle data to request owner information from the MTO. 1. Hover over **Violations** and click **Collections** then **Vehicle Lookup Export**. 2. Configure your search criteria using the **Minimum number of violations**, **Vehicle province or state**, and **Date range** fields. 3. Click the export format button that matches your account type (e.g., **Aris Raw Data Account** or **Aris Abstract Account**). 4. The system will generate and download a text file formatted for the MTO. ### Importing the MTO Response File Once the MTO returns the file containing the registered owner information, it must be imported into the system to generate notice letters. 1. Hover over **Violations** and click **Collections** then **Vehicle Lookup Import**. 2. Click to choose the returned MTO file from your local computer. 3. Click the **Import** button. A confirmation message will appear in the top right of the page once complete. 4. You can now generate and print your mail-out notices using the *Notice Letter Report* page. ### Sending Violations to Court If a ticket remains unpaid after notice letters are sent (e.g., on day 65), it is eligible to be sent to the Ontario court system for collections. 1. Hover over **Violations** and click **Collections** then **Send to Court**. 2. Specify the number of days since the violation was issued to filter the list. 3. Apply any required administrative fees using the provided field. 4. Click the export button to generate the required text file for the Ontario court system. 5. To generate a printable summary of these cases for your court date, hover over **Violations** and click **Collections** then **Sent to Court Report**, and click **Export**. ### Flagging Paid Records from Court When the court provides a report indicating a violation was successfully paid, it must be manually updated in OPSCOM. 1. Hover over **Violations** and click **Collections** then **Flag as Paid by Court**. 2. Enter the applicable date range and click the **Search** button. 3. Select the specific violations that were resolved. 4. Click the **Flag as paid** button. These tickets will now appear on the Daily Processed Report with a payment type of *paid by court*. --- ## Best Practices and Considerations\[!WARNING\] **MTO Data Purging (ARIS Rules):** ARIS regulations dictate that information retrieved from the MTO is only temporarily stored within the OPSCOM system. Once a violation has been cancelled, paid, or sent to collections, all associated MTO personal data will be automatically and permanently purged from the system.
- **Establish a Schedule:** Organizations should develop a strict, recurring schedule for their violation lifecycle (e.g., exporting MTO lookups every Monday for tickets reaching 15 days old, and sending tickets to court every Friday for tickets reaching 65 days old) to maintain compliance and steady revenue recovery. - **Testing with Simulators:** If you need to test your import workflow before receiving live data back from the MTO, you can generate a mock response file using the Third Party Simulators tool. # Managing Violation/Citation AppealsThe Appeals Report provides administrators with a centralized view to review, manage, and action user appeals against parking violations. Its primary purpose is to allow for the detailed examination of appeal information and the recording of formal decisions (uphold, reduce, or cancel), ensuring a fair and transparent dispute process. This article is intended for OPSCOM administrators.
## Setup and Configuration Before you can process appeals, the module must be enabled and configured within your system settings, and your communication templates must be established. ### System Settings Configuration 1. Hover over **System Configuration** and click **System Settings**. 2. Click the **Violations** tab. 3. Ensure the **Enable Appeals Module** checkbox is enabled. (If it is not, please contact**Reset Appeal on Association:** Consider enabling the **Reset Appeal on Association** checkbox. This setting allows users who have a violation associated with their vehicle, but have not yet created an account, the same amount of time to appeal a violation as a registered user. Once they create and associate their account to the vehicle, the appeal timeframe will reset, giving them the full number of days specified in your settings to appeal.
### Email Templates 1. Hover over **System Configuration**, hover over **Templates & Design**, and click **Email Templates**. 2. Set up the **Appeal Decision** email template. Detailed instructions for this can be found on the *[Email Templates](https://opscom.wiki/books/setup-configuration-for-admins/page/email-templates "Email Templates")* page. This is the template the system will use to automatically communicate your final decision to the appellant. ## Using this Feature Administrators have two distinct methods for actioning an appeal: through the centralized Appeals Report, or directly from an individual violation's information page. ### Accessing and Actioning via the Appeals Report 1. Hover over **Violations**, hover over **Appeals**, and click **Appeals Report**. 2. Search for the specific appeal you wish to review. 3. Click the **View Info** button beside the person's name to access the full details on the **User Appeal History** screen. 4. Review the user history and vehicle details, then locate the **Appeal Management** section. 5. Click the **Action Taken** drop-down menu and choose one of the following options: - **Uphold:** The appeal is denied, and the original fine amount remains. - **Reduce Violation:** The appeal is partially granted. Enter the new, reduced fine amount into the field that appears. - **Cancel Violation:** The appeal is fully granted, and the violation is voided. 6. Enter your detailed explanation into the **Comments to Send to Appellant** box. 7. Click the **Submit** button to process the appeal and trigger the automated decision email. ### Actioning Appeals Directly from Violation Information 1. Access the **Violation Information** page for a specific ticket by using the *[Violation Search](https://opscom.wiki/books/the-opscom-admin-portal/page/search-for-a-violation "Search for a Violation")* tool. 2. Click the **Edit** button. 3. Click the **Ticket has not been appealed. Show appeals form** link to reveal the hidden appeals section. 4. Review the **Appeal Reason** provided by the user. 5. Click the **Fine Action** drop-down menu and choose **Upheld**, **Reduced**, or **Cancelled**. 6. Edit the **Offense Value** field if you are manually reducing the fine (this automatically sets to 0.00 if cancelled). 7. Enter any private, internal notes into the **Appeal Admin Comment** field. 8. Select your administrator account from the **Actioned per** drop-down menu. 9. Click the **Update this Violation** button to save the changes. --- ## Best Practices and Considerations**Payment Locks:** Once a user pays for a violation, the primary comments fields become permanently locked. If you need to add further comments to a paid ticket after the fact, you must use the separate **Violation Notes** section.
- **Internal vs External Comments:** **Always double-check which comment field you are using.** The **Comments to Send to Appellant** box is public and will be emailed directly to the user. The **Appeal Admin Comment** field on the individual violation screen is strictly for private, internal administrative notes. - **Timely Review:** Process appeals promptly to ensure fairness and maintain a positive relationship with your user base. - **Leverage Reporting:** Use the **Appeals Report** regularly to analyze appeal trends and common dispute reasons. This data is highly valuable for identifying confusing signage or updating enforcement policies. --- ### Related Video # Edit a ViolationThe Edit a Violation feature allows administrators to modify the details of an existing parking ticket, including processing appeals and updating fine amounts. Its primary purpose is to help correct enforcement errors, adjust penalties, or formally void a ticket while maintaining an accurate system record. This article is intended for OPSCOM administrators.
## Setup and Configuration There is no specific system configuration required to use this feature. Editing a violation is a standard administrative tool available to users with the appropriate violation management and appeals permissions enabled on their account profile. ## Using this Feature Administrators can update basic ticket information or process manual appeals directly from the violation record. ### Accessing the Edit Window 1. Search for the specific violation. Detailed instructions can be found on the *[Search for a Violation](https://opscom.wiki/books/the-opscom-admin-portal/page/search-for-a-violation "Search for a Violation")* page. 2. Click the specific **TICKET#** link from the returned records on the **Violation Search** screen to open the **Violation Information** window. 3. Click the **Edit** button located at the top right of the screen, or select it using the **Action** drop-down menu. ### Modifying Violation and Appeal Details 1. Make any necessary changes to the basic violation information on the **Edit Violation Information** window. 2. Click the **Ticket has not been appealed. Show appeals form** text link to reveal the appeals section. 3. Configure the specific fields within the Appeals Area as needed: - **Ticket Appealed:** Select the date in the first drop-down menu and how the appeal was filed in the second drop-down menu. - **Fine Action:** Choose **Upheld**, **Reduced**, or **Cancelled**. - **Offense Value:** Manually edit this amount if the ticket is reduced on appeal. If the ticket is cancelled, this value will automatically reduce to 0.00. You can also edit the offense value directly regardless of the appeal status. - **Appeal Reason:** Enter the reason for launching the appeal. This field is viewable by the user. - **Appeal Admin Comment:** Enter your private administrative notes. These notes are not viewable by the user. 4. Select the specific administrator account making the changes from the **Actioned per:** drop-down menu. 5. Click the **Update this Violation** button to save your changes. A message will appear on the screen confirming that the violation has been updated. --- ## Best Practices and Considerations ## - **Finalized Appeals:** **Appeals that are granted, reduced, or cancelled cannot be edited again** through the standard form and are no longer eligible for early payment discounts. Ensure your decisions are final before clicking the update button. - **Payment Locks:** Once a user pays for a violation, the primary comment fields become permanently locked. Administrators must use the separate **Violation Notes** section for any further comments or documentation regarding the ticket. - **Overturned Tickets:** If a ticket has already been appealed and the user goes to a higher authority to have the ticket overturned, you can edit the ticket and change its status to a warning. This zeros out the financial value and completes the processing while preserving the history of the ticket in the admin portal. **Always add a comment to the warning** to further explain why the ticket was overturned. --- ### Related Video # Paying a ViolationThe Paying a Violation feature allows administrators to manually process fine payments on behalf of users directly from the administrative portal. Its primary purpose is to help facilitate in-person or over-the-phone transactions, ensuring accurate reconciliation within the user's account and the system's financial records. This article is intended for OPSCOM administrators.
## Setup and Configuration There is no specific system setup or configuration required to use this feature. Processing a payment manually is a standard administrative action available to users with the appropriate payment processing and violation management permissions enabled on their account profile. ## Using this Feature Administrators can locate an unpaid violation and guide it through the manual checkout process in just a few steps. 1. Hover over **Violations** and click **Search**. 2. Enter the specific violation number into the **Search Text** field. 3. Click the specific **ticket number** link in the search results to view the Violation Information window. 4. Click the **Make Payment** button. 5. Select the items the user wishes to pay by enabling the corresponding checkboxes on the Payment Due screen. 6. Click the **Proceed to Payment** button. 7. Select the payment type you wish to process the item with (e.g., cash transaction). 8. Click the **Submit Payment Information** button. 9. Click the **Confirm Payment Information** button on the confirmation screen to continue. 10. Click the **Process Manually** button on the Transaction Details window to finalize the payment. ### Key Information Displayed Once the system processes the payment, it will return you to the final Transaction Details page. Several key pieces of information are recorded and displayed here: - The unique confirmation number of the transaction. - The core violation information (including the User's Name, the amount of the fine, the date submitted, transaction comments, and the payment type). - The specific Date Processed and the name of the administrative user who processed the payment. ### Visual Cues and Status Indicators - **User History Status:** Once the payment has been successfully completed, navigating to the user's history will visually show that the violation has been paid and its status is now marked as processed. --- ## Best Practices and Considerations**Multiple Item Selection:** The Payment Due screen will display all outstanding balances associated with the user's profile. **Always ask the user if they wish to clear multiple outstanding items at once.** You can select multiple violations or unpaid permits simultaneously by enabling their respective checkboxes, streamlining the checkout process into a single, efficient transaction.
- **Transaction Cancellation:** If you make an error or the user changes their mind before the final step is completed, you can click the **Cancel Transaction** button on the Transaction Details window to safely back out of the action without recording a payment or altering the violation's unpaid status. # Search for a ViolationThe Search for a Violation feature allows administrators to locate specific parking citations within the system using text, date, and time parameters. Its primary purpose is to help enforcement teams quickly access, review, and manage ticket records to process payments, handle appeals, or update information. This article is intended for OPSCOM administrators.
## Setup and Configuration There is no specific system setup or configuration required to use this feature. Accessing the search tool is a standard administrative function available to users with the appropriate violation management permissions enabled on their account profile. ## Using this Feature Administrators can perform broad text-based searches, narrow parameters down by specific date types, or utilize advanced search filters to locate records. ### Searching by Text 1. Hover over **Violations** and click **Search**. 2. Type the license plate number or specific violation number into the **Search Text** field. 3. Click the **Search using only text** button. ### Searching by Text and Date 1. Hover over **Violations** and click **Search**. 2. *(Optional)* Enter keywords or ticket details into the **Search Text** field. 3. Under **Search By**, select your preferred date parameter: **Due Date**, **Issued Date**, or **Infraction Date**. 4. Enter your timeframe in the **Start Date** and **up to and including** fields. 5. Refine results using the status toggles if needed (**Outstanding only / All** and **Warning / Only non-warning / All**). 6. Click **Search with text and date range**. ### Using Advanced Search Parameters Click the **Toggle More Options** button at the top right of the search card to reveal additional search filters: - **Status & Classification:** Filter by **Spoiled** status type, **Appeal State**, **User Type**, **Ticket Category**, **Offence Type**, or **Warning** status. - **Location & Region:** Narrow results by **Violation Location** or **Vehicle Province**. - **Flagged Criteria:** Check **Towing Charged** or **Notice Letter Issued** to filter for specific actions taken. - **User Details:** Search directly by **First Name**, **Last Name**, **Student / Employee #**, **Drivers License**, or **User State**.Click the **Pin** icon next to any advanced filter field to keep it pinned to your primary search view for future sessions.
### Managing Search Results Once a search is executed, the returned records will be displayed at the bottom of the screen. 1. Click the specific **Ticket Number** link from the results list to open the **Violation Information** window. 2. Click the **Edit/Update** button to display the modification screen and adjust the ticket details if required. **Available Actions** From the **Violation Information** window, administrators can take several actions, including processing a manual payment, adding internal notes to the violation, or linking the violation to a specific incident if your system utilizes the Incident module. --- ## Best Practices and Considerations**Ticket Number Formats:** Ticket numbers are composed of two parts: the core ticket number and the security PIN (e.g., 3-001005-11). While administrators can search using only the core ticket number (the first part), end-users must enter both parts to successfully look up their ticket on the public portal for security reasons.
# Configure Violations to a PersonThe Configure Violations to a Person feature allows administrators to issue citations directly against an individual's profile rather than attaching them to a specific vehicle license plate. Its primary purpose is to help enforcement teams track non-vehicular offenses, such as smoking, alcohol-related infractions, or personal conduct breaches on property. This article is intended for OPSCOM administrators.
## Setup and Configuration To issue personal violations, you must first enable the system-wide setting and then configure specific ticket categories to accept user-based assignments. ### Enabling the Global Setting 1. Hover over **System Configuration** and click **System Settings**. 2. Click the **Violations** tab. 3. Enable the **Link violations to users** checkbox to allow issuing violations by person. 4. Save your settings. [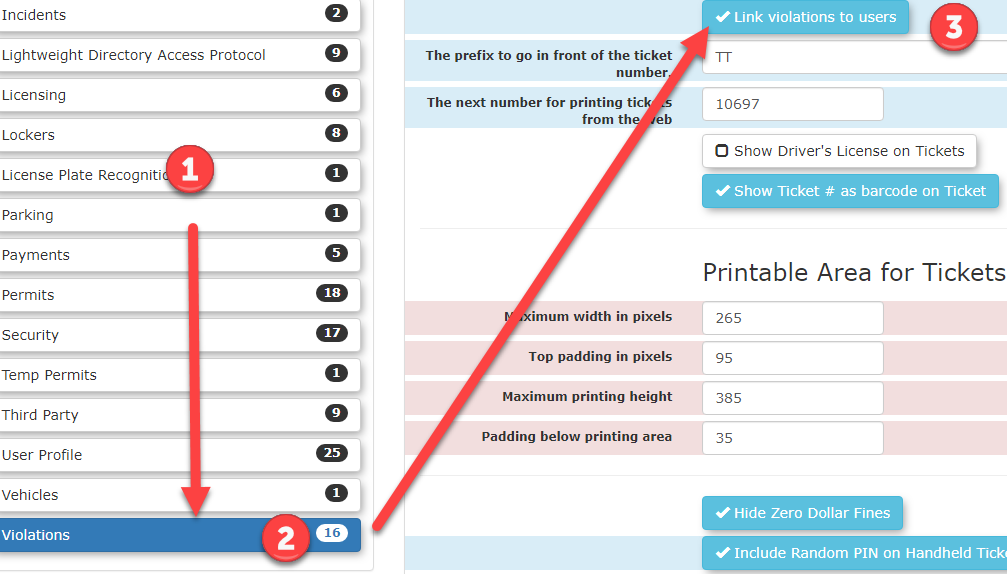](https://opscom.wiki/uploads/images/gallery/2026-07/kknimage.png) ### Configuring the Ticket Category 1. Hover over **Admin Options** and click **Violations** then **Manage Ticket Categories**. 2. Select the specific ticket category you wish to update (e.g., Municipal). 3. Locate the **Violation Applies To** setting. 4. Select **Users** to restrict this category strictly to individuals. 5. Save your changes. ## Using this Feature Once the category is properly configured, the violation entry form will dynamically adjust when this specific ticket type is selected by an administrator or patrol officer. 1. Begin the standard process for manually entering a violation. 2. Click the **Ticket Type** drop-down menu and choose the newly configured category. 3. Locate the **Apply violation to:** section that appears on the form. 4. Click the **A Person** option to attach the offense directly to the individual instead of a license plate. 5. Search for the specific user and finalize the violation entry. --- ## Best Practices and Considerations - **Category Management:** **Clearly define and separate your user-based ticket categories from your vehicle-based ones.** Configuring categories specifically for personal conduct ensures that patrol officers do not accidentally issue vehicular tickets (such as parking in a fire lane) to a person without capturing the required license plate data. - **Patrol Communication:** Ensure your field enforcement officers are trained on which ticket types apply to users. They will need to know to search for a user's profile (using a name or ID) rather than scanning a license plate when issuing these specific infractions from their handheld units. # Creating a Violation on the Admin PortalThe Manual Violation Entry feature allows administrators to record parking citations directly into the system via the web interface. Its primary purpose is to digitally log handwritten tickets or citations created from a patrol laptop, ensuring all violation data remains centralized for tracking, reporting, and court processing. This article is intended for OPSCOM administrators.
## Setup and Configuration Before utilizing the web entry portal, administrators can adjust specific global settings to manage how these tickets are generated and printed. 1. Hover over **System Configuration** and click **System Settings**. 2. Click the **Violations** tab. 3. Enter a specific prefix into the **Prefix to go in Front of Ticket Number** field to easily differentiate admin portal tickets from handheld device tickets (e.g., TT-). 4. Enter the starting sequence into the **Next Number for Printing** field if you wish to have the system automatically generate your ticket numbers. 5. Enable the **Drivers License on Tickets** checkbox to print this information on citations issued from a patrol laptop. 6. Enable the **Signature Required on Tickets** checkbox to include a signature line on the printed ticket. 7. Save your settings.The exact print dimensions for tickets issued via a laptop can be adjusted within the Printable Area for Tickets section on this same settings page.
## Setup and Configuration Before utilizing the web entry portal, administrators can adjust specific global settings to manage how these tickets are generated and printed. 1. Hover over **System Configuration** and click **System Settings**. 2. Click the **Violations** tab. 3. Enter a specific prefix into the **Prefix to go in Front of Ticket Number** field to easily differentiate admin portal tickets from handheld device tickets (e.g., TT-). 4. Enter the starting sequence into the **Next Number for Printing** field if you wish to have the system automatically generate your ticket numbers. 5. Enable the **Drivers License on Tickets** checkbox to print this information on citations issued from a patrol laptop. 6. Enable the **Signature Required on Tickets** checkbox to include a signature line on the printed ticket. 7. Save your settings.The exact print dimensions for tickets issued via a laptop can be adjusted within the Printable Area for Tickets section on this same settings page.
## Using this Feature Administrators can issue violations to a specific vehicle, a specific person, or both, depending on the offense type being cited. ### Entering a Violation for a Vehicle 1. Hover over **Violations** and click **Violation Entry**. 2. Select the **Ticket Writer** and choose the **Ticket Category** from their respective drop-down menus. (The **Ticket Number** will populate automatically if auto-generation is enabled in your settings). 3. Click the **Toggle More Options** button to reveal additional parameters, such as the **Spoiled** checkbox (to void the entry), the **Warning** checkbox (to issue without a fine), or the **Towing** fee field. 4. Click the **Search Vehicles** button to find vehicle information using the license plate or VIN. 5. Click the specific **Plate number** from the search results to associate it with the violation. If the vehicle is unregistered, follow the prompts to add a new vehicle record. 6. Select the **Location** and the specific **Offences** from their respective drop-down menus. 7. Click the **Attachments** button to upload any supporting photographic evidence from your computer. 8. Click the **Record this Violation** button to review the details. 9. Click the **Record this Violation** button again on the confirmation screen to finalize the entry. ### Entering a Violation for a Person 1. Hover over **Violations** and click **Violation Entry**. 2. Complete the initial ticket details and open the extra options if necessary. 3. Click the **Search Users** button to locate the individual by name, ID number, or driver's license. If the person refuses to provide ID, enable the **Failed to Identify** checkbox instead. 4. Click the **Select** button from the search results to associate that user with the violation. If the user does not exist, follow the prompts to add a new user profile. 5. Complete the remaining location, offense, and attachment fields. 6. Click the **Record this Violation** button, review the details, and click it again to submit. ### Available Actions and Status Indicators When searching for a vehicle or person during the entry process, several icons provide quick access to related profile data: - **Edit Button / Pencil Icon:** Allows you to quickly modify the existing vehicle or user details. - **Permit Icon:** Displays any active permit details associated with the vehicle or user. - **Red Flag Icon:** Indicates and displays active alarms related to the individual (requires the Alarms module). - **Red Alerts Button:** Indicates and displays incident alerts associated with the individual (requires the Incidents module). Once a violation is successfully submitted, the final completion screen offers quick action buttons allowing you to **Print** a copy of the ticket, **View** the newly entered details, **Search Violations**, view **Search Recent Violations**, or quickly **Enter Another violation**. --- ## Best Practices and Considerations - **Accuracy is Paramount:** **Ensure all information is precisely transcribed** when manually entering violations from a handwritten hard copy. Accurate plate, location, date, time, and offense details maintain critical data integrity for tracking and court purposes. - **Utilize the Spoiled Option:** If your organization uses pre-numbered physical paper tickets, consistently use the **Spoiled** checkbox during manual entry for any physical tickets that were ruined or otherwise unissued. This ensures a complete and accurate audit trail of your sequential ticket stock. - **Leverage the Warning Feature:** Use the **Warning** checkbox to easily issue non-fine warnings for first-time offenders without needing to select "Warning" as a completely separate ticket category. - **Anonymous Tickets:** When logging a hard-copy ticket for a vehicle that does not yet exist in the system, create an anonymous vehicle record during the search step. The driver can later use the *[OPSCOM-Go! - Quick & Easy Guest Payments](https://opscom.wiki/books/opscom-go-user-portal/page/opscom-go-quick-easy-guest-payments "OPSCOM-Go! - Quick & Easy Guest Payments")* portal to securely look up and pay the ticket without needing to create a full account. # Security PIN on Violations - How is it usedThe Security PIN on Violations feature appends a randomized, two-character code to the end of a printed parking ticket to act as a secure access password. Its primary purpose is to allow unregistered guest users to safely look up, pay, or appeal their citations online while preventing malicious users from searching sequential ticket numbers to view other people's data. This article is intended for OPSCOM administrators.
## Setup and Configuration By default, the system is configured to generate a random PIN on newly issued tickets. Administrators can disable or re-enable this feature directly within the core system settings. 1. Hover over **System Config** and click **System Settings**. 2. Click **Violations** to open the specific violation settings menu. 3. Disable the **Include Random PIN on Handheld Tickets** checkbox to stop generating PINs on newly printed tickets, or enable it to turn the feature on. 4. Save your configuration changes. ## Using this Feature The ticket PIN primarily impacts how unregistered users access their violations on the public-facing portal. It's the additional dash and two digits at the end of a violations ticket (e.g., the `-8T` in `TT-10016-8T`) and is only used as a password for the ticket when appealing it. [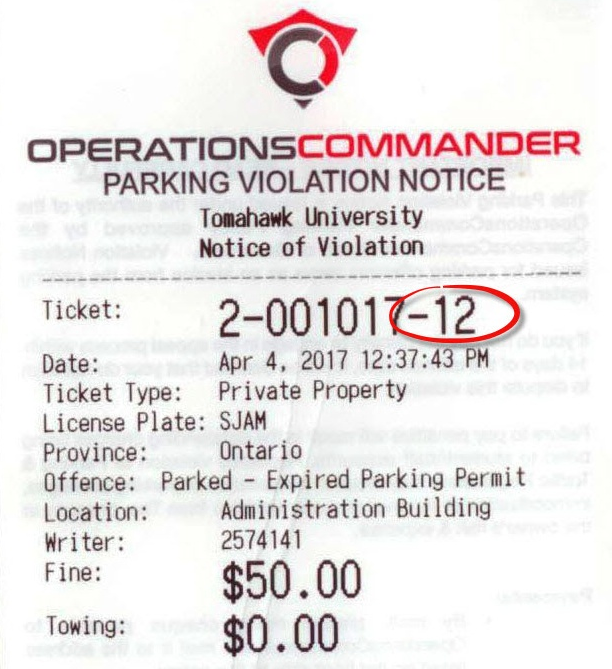](https://opscom.wiki/uploads/images/gallery/2026-07/eb0image.png) ### Guest User Access 1. Navigate to the main OPSCOM user login screen. 2. Click the **Lookup your Ticket** box. 3. Enter the complete ticket number, including the appended PIN, into the search field. 4. Click the check mark button to retrieve the ticket record. Once authenticated, the user will be presented with a secure screen allowing them to pay or appeal the ticket. The retrieved ticket record will automatically drop the PIN from the visual display once the user is inside the payment portal. ### Administrator Search Access When an administrator searches for a violation internally via the system search tools, the PIN is not strictly required. Searching for the core ticket number (e.g., `TT-10016`) will successfully return the violation. Searching for the full string including the PIN (e.g., `TT-10016-8T`) will also return the exact same ticket record. --- ## Best Practices and Considerations**Reporting and Mailouts:** The Security PIN is only utilized for initial online lookup validation. It is intentionally excluded from backend data exports. Automated FTP reports, internal data exports, and physical mailed notice letters will exclusively display the core ticket number (e.g., `TT-10016`) without the appended PIN.
- **Security Awareness:** **Keep the PIN feature enabled if you allow guest payments or guest appeals.** Disabling the PIN removes the password protection layer, potentially allowing individuals to type in sequential ticket numbers and view citation details that do not belong to them. # Ticket Warnings ExplainedThis article provides a breakdown of the layout and specific details displayed on both the front and back of OPSCOM violation and warning tickets. Its primary purpose is to help administrators understand the information presented to violators, as well as clarify the operational differences between issuing a warning and spoiling a ticket. This guide is intended for OPSCOM administrators.
## Setup and Configuration There is no specific system setup or configuration required for this overview. Ticket templates and layouts are generally configured in conjunction with OPSCOM support during your initial system onboarding. ## Key Information Displayed Whether an enforcement officer issues a standard violation or a warning, the printed ticket displays specific, standardized information for the user. [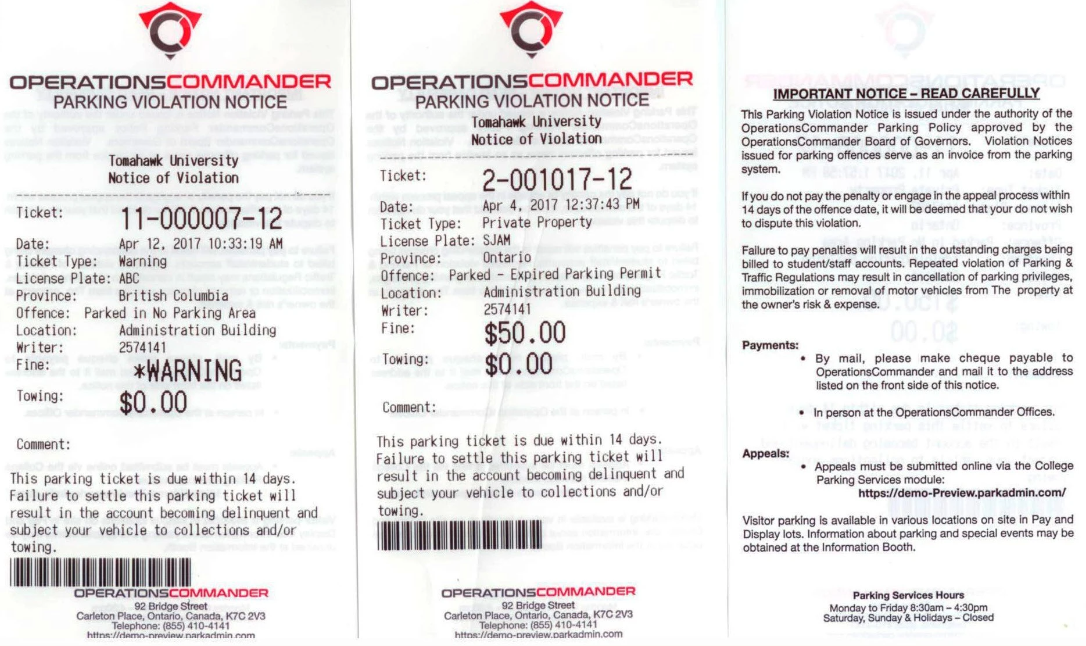](https://opscom.wiki/uploads/images/gallery/2026-07/bjximage.png) ### Front of the Ticket/Warning The front of the ticket contains the core details of the infraction: - **Ticket Number:** A system-assigned number that uniquely identifies the violation or warning. - **Date:** The exact date and time the ticket was issued. - **Ticket Type:** Identifies the broad category of the violation (e.g., Private Property). - **License Plate:** The license plate number of the offending vehicle. - **Province:** The province or state where the license plate is registered. - **Offense Type:** Identifies the specific rule or parking violation that occurred. - **Location:** The specific lot or property area where the violation took place. - **Writer:** A system-assigned unique number identifying the enforcement officer. This protects the officer's privacy in the field, while allowing administrators to easily look up the writer's actual name within the admin portal. - **Fine:** The financial penalty owed for the violation. - *Visual Cue:* On a warning ticket, the fine amount is followed by **\*Warning**. This indicates that no payment is currently due, but demonstrates what the penalty would have been if an actual ticket was issued. - **Towing:** The administrative amount due if the offending vehicle had to be towed. - **Comments:** Any additional notes or context provided by the enforcement officer. ### Back of the Ticket/Warning The back of the ticket provides the violator with the necessary administrative details and organizational policies: - **Payment and Appeal Instructions:** Clearly outlines the step-by-step process for how the violator can either pay their fine or submit a formal appeal through the online portal. - **Sign-off Section:** Provides a designated area for the violator to identify themselves and sign the ticket if required by your organization's policies. - **Organization Details:** Lists where to find additional information, your organization's contact details, and your standard office hours. --- ## Best Practices and Considerations**Understanding Warnings vs. Spoiled Tickets:** While neither a warning nor a spoiled ticket requires payment from the user, they serve two entirely different purposes within the OPSCOM system.
- **Issuing Warnings:** A warning is officially tracked in the system as a zero-dollar violation and is processed immediately upon syncing to the server. **Use warnings as an educational tool** for first-time offenders or minor infractions, effectively giving the user a "slap on the wrist" while still maintaining a permanent record of the offense on their profile. - **Spoiling Tickets:** The "Spoiled" status is used to void a ticket completely, making it as if the ticket never happened. **Officers should spoil a ticket if it was initiated in error**, such as accidentally entering the wrong license plate details, or if a driver arrives and moves their vehicle just as the patrol officer begins writing the citation. # Notice Letter TemplatesThe Notice Letter Templates page allows administrators to manage, create, and edit the content and appearance of system-generated notice letters. Also known as a Notice of Impending Conviction (NIC) letter, its primary purpose is to inform users of outstanding violations slated for the Ontario court system collection process. This article is intended for OPSCOM administrators responsible for system configuration and communication design.
## Setup and Configuration There is no specific system setup required to begin using templates, but you must navigate to the dedicated design menu to access the editor. 1. Hover over **System Configuration** and click **Content & Designs** then **Notice Letters**. 2. Review the overview list of all notice letter content currently in the system.**Multi-Language Support:** If your OPSCOM portal supports multiple languages, you must create and configure different content and templates for each language installed on the site.
## Using this Feature The templates page is divided into specific components that control either the text content or the visual styling of the physical letters. ### Managing Template Types Administrators can edit four distinct elements to build a complete notice letter: - **noticeLetter:** The core text template used when printing a notice letter containing a single violation. - **noticeLetterMultiple:** The core text template used when printing a notice letter that contains multiple violations. - **styles:** The CSS (Cascading Style Sheets) template used to apply element styling, such as assigning specific colors and text sizes to the letter. - **Header:** The content template that specifically dictates what appears in the header section of the notice letter. ### Editing the Layout Clicking into any of the templates above will open a WYSIWYG (What You See Is What You Get) content editor. While minor text adjustments can be made directly in the visual view, it is highly recommended to edit the raw HTML source code to prevent print alignment issues. 1. Click **Tools** in the editor menu. 2. Click **Source Code** to open the HTML view. 3. Apply your formatting changes directly to the HTML code, or paste in code designed from an external HTML editor. [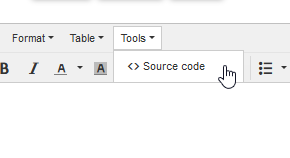](https://opscom.wiki/uploads/images/gallery/2026-07/image.png) ### Inserting Short Codes Notice letters use short codes as placeholders that automatically pull specific user or vehicle data from the database when the letter is generated (e.g., using `[values show=vehicle.plate]` to output "ABC123"). 1. Scroll to the bottom of the edit content page, below the content box, to view the list of usable short codes. 2. Highlight the specific short code you wish to use. 3. Right-click the highlighted text and click **Copy**. 4. Click the desired area within the content editor where you want the information to appear. 5. Press **Ctrl** and **V** on your keyboard simultaneously to paste the short code. --- ## Best Practices and Considerations\[!WARNING\] **Pasting Short Codes:** **Always use the keyboard shortcut (Ctrl + V) to paste short codes** into the editor. Right-clicking inside the content editor will open a proprietary formatting menu rather than your browser's standard paste option.
- **HTML Editing:** **Avoid relying entirely on the visual WYSIWYG editor for complex layouts.** The visual editor is not optimized for strict print templates. Making your changes through the HTML Source Code view ensures that the final printed PDF aligns correctly with your official municipal letterhead and windowed envelopes. - **Test Your Templates:** After making changes to a notice letter template or adding new short codes, generate a test letter for a sample violation to verify that all placeholders successfully pull the correct database information and the CSS styling renders properly.The Notice Letter Report allows administrators to identify and manage users who are eligible to receive a Notice of Impending Conviction (NIC) letter. Its primary purpose is to facilitate the Ministry of Transportation (MTO) workflow by generating physical notice documents for outstanding violations before they are escalated to the Ontario court system for collections. This article is intended for OPSCOM administrators.
## Setup and Configuration Before generating letters, administrators must enable the report and configure how the system consolidates these notices. 1. Hover over **System Configuration** and click **System Settings**. 2. Click the **Violations** tab. 3. Enable the **Enable Letter Report** checkbox to make the report page available in the main menu. 4. Click the **Collections** tab to configure additional notice settings: - Enable the **Send Letter To All** checkbox to include users in the report list who have already had a notice letter sent to them via email. - Enable the **Include All Unpaid Violations** checkbox to consolidate all of a user's unpaid violations onto a single notice letter. If this is disabled, the system will generate a separate letter for each individual violation. 5. Save your configuration changes. ## Using this Feature The Letter Report page is divided into printable and unprintable sections based on whether the system has the required user details to generate the document. ### Generating Notice Letters 1. Hover over **Violations** and click **Reports** then **Letter Report**. 2. Review the **Printable Violation Notice Report** section to see all violations currently eligible for a notice letter. 3. Click the **Print** button next to a single violation, or select multiple violations and print them simultaneously. The notice letters will be generated as a PDF file and downloaded by your web browser. 4. Click the **Upload** button to manually attach a document if a letter was already sent to the user outside of the standard system generation process. ### Managing the Unprintable Violation Notice Report - **Key Information Displayed:** This section lists violations that cannot currently generate a notice letter due to missing user details (e.g., an unregistered vehicle). - **MTO Data Import:** For these unknown vehicles, you must export the data to the MTO and import the return file. Once the MTO data is imported, the user details will temporarily populate, and the notice letters will immediately become printable. - **Status Reminders:** A reminder will display next to any vehicle that has had its data exported to the MTO but has not yet had the return data imported back into the system. ### Viewing and Regenerating Issued Letters 1. Hover over **Violations** and click **Search**. 2. Click the **Toggle additional options** button in the top right to expand the search parameters. 3. Enable the **Notice Letter Issued** checkbox and perform your search. 4. Click the specific **Ticket Number** to open the violation information window. 5. Scroll to the bottom of the window to view the attached notice letters. 6. Click the **Print** button to re-download the letter, or click the **Trash** icon to archive it. [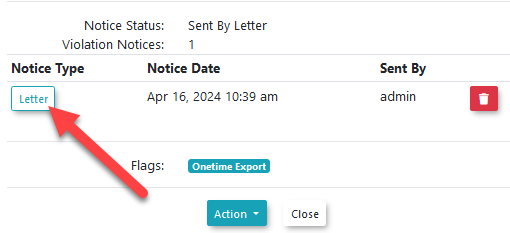](https://opscom.wiki/uploads/images/gallery/2026-07/m12image.png)Archiving a notice letter does not delete it from the system. It simply flags it as archived, allowing the violation to reappear on the main Letter Report page so a new notice can be generated (useful if your letter template was recently updated).
--- ## Best Practices and Considerations**Notice Letter Templates:** The visual appearance and layout of your notice letters are configured separately from this report. To design or edit the content of these templates, hover over **System Configuration** and click **Content & Designs** then **Notice Letter Templates**.
- **MTO Data Security:** **Be aware that imported MTO user data is temporary.** For security reasons and strict compliance with MTO regulations, this imported data will be automatically cleared from the system once all violations associated with that specific vehicle have been resolved (either paid by the driver or officially sent to collections). - **Reviewing Pending Letters:** Enable the **Not Ready to be Sent** checkbox on the main report page to view upcoming notice letters. These violations will appear in grey text, and the *notice-ready* column will display a countdown timer indicating the amount of time left before the letter can be officially generated (by default, notice letters are available 7 days after a violation payment becomes past due). # Auto Email Notifications for WarningsThe Auto Email Notifications for Warnings feature allows administrators to automatically dispatch email notices to users who have received a violation marked as a warning. Its primary purpose is to efficiently communicate zero-dollar infractions to users without requiring manual email processing by administrative staff. This article is intended for OPSCOM administrators.
## Setup and Configuration To use this feature, administrators must enable the global setting, configure the email template, and ensure the corresponding system task is active. ### Enabling the Global Setting 1. Hover over **System Configuration** and click **System Settings**. 2. Scroll down to locate the **Violations** sub-menu. 3. Enable the **Send Notices For Warnings** checkbox. 4. Click the **Save Settings** button. ### Configuring the Email Template 1. Hover over **System Configuration** and click **Content & Designs** then **Email Templates**. 2. Click the **Edit** button next to the **New Warning Notice** template. 3. Adjust the layout and content of the warning letter as needed and save your changes. [](https://opscom.wiki/uploads/images/gallery/2026-07/jyuimage.png) ### Enabling the System Task For the warning notices to be sent out automatically, the associated system task must be active. 1. Hover over **Tools** and click **View System Task Logs**. 2. Ensure the **New Violation Notices** task is enabled.**Task Frequency:** The frequency at which this system task runs can be adjusted, but it must be updated manually in the database by the OPSCOM team. Please contact support@ops-com.com for assistance with modifying this schedule.
## Using this Feature Once configured, the system handles the distribution of warning notices automatically based on the scheduled system task. No daily manual intervention is required. ### Available Actions and Functionality - **Running Tasks Manually:** Like other system tasks, the **New Violation Notices** task is set to run at a scheduled time. However, administrators can execute it immediately by clicking the **Run** button next to the task on the system task logs page. - **Output Filtering:** While the **Send Notices For Warnings** setting is enabled, the system task will include warning violations in its email output. If you choose to disable this setting later, the task will revert to only sending notices out for standard violations issued with a fine. --- ## Best Practices and Considerations - **Protecting Field Staff:** **We strongly recommend keeping a longer delay for the task frequency.** Delaying the automated warning emails is intentionally designed to prevent unsafe situations where field staff might be approached, pressured, or confronted by a user immediately after issuing a violation in the lot. # Appeal Evidence Uploads OverviewThe Appeal Evidence Uploads feature allows users to directly attach supporting files, such as images and text documents, to their violation appeals. Its primary purpose is to centralize all appeal-related information within the system, eliminating the need for administrators to request and track evidence through separate email channels and streamlining the overall review process. This article is intended for OPSCOM administrators.
## Setup and Configuration To use this feature, administrators must ensure both the core appeals module and the specific evidence upload setting are active within the system settings. 1. Hover over **System Configuration** and click **System Settings**. 2. Click the **Violations** tab. 3. Ensure the **Enable Appeals Module** checkbox is enabled. (If it is not available, please contact**Default Settings and Limits:** The evidence upload setting is enabled by default for organizations using the appeals module. Users can upload multiple files per appeal. Supported file types include JPG, PNG, and PDF, with a maximum file size limit of 12MB per file.
## Using this Feature This feature seamlessly integrates directly into the existing appeal submission and review workflows for both users and administrators. ### Administrator Experience When an administrator accesses a submitted appeal through the standard appeals report or violation information screen, any attached supporting files will be securely displayed directly on the review page. This provides immediate, centralized access to all relevant evidence without needing to search through external emails or documents before recording a decision. ### User Portal Experience When a user submits an appeal through the public portal, they will be prompted with an intuitive option to attach their supporting image and text files in one single submission. Detailed instructions on how users navigate this specific upload process can be found on the *[User Portal Experience](https://opscom.wiki/books/opscom-go-user-portal/page/appealing-your-parking-violation "Appealing Your Parking Violation")* page. --- ## Best Practices and Considerations - **Prompt Review:** **Always review the attached evidence before making a final appeal decision.** Because the documentation is now centralized, administrators can resolve disputes faster and with greater accuracy, improving the overall relationship with your user base. - **Data Security:** All uploaded files are securely stored within the OPSCOM system and are strictly accessible only by authorized administrative personnel handling the appeal. You can assure concerned users that their submitted evidence is handled with strict confidentiality.