This article provides OPSCOM administrators with the necessary instructions to configure the Permit Printing from Home feature. This functionality allows end-users to print a physical copy of their parking permit directly from the user portal. The setup involves creating a printable permit template using system messaging and then enabling a system-wide setting.
### Setup & Configuration Configuring this feature is a two-part process. First, the feature must be enabled in the system settings. Second, the templates for ***permitPdf*** and ***permitTempPdf*** must be customized, if desired. - Go the **System Configuration** and click **System Settings**. - Select the **Permits** tab. - Click the **Enable User Permit Printing** checkbox. - Click **Save Settings**. ##### Locate the Permit Print Template The printable permits are generated from a system message. - Go to **System Configuration**, then **Content and Design**, and click **Pages and Content Blocks**. - Select the **Messages** tab. - Edit the messages where the **System Location** column is labled ***permitPdf***, and ***permitTempPdf*** These two pages above, ***permitPdf*** and ***permitTempPdf*** are used to customize the content of either a regular printed permit, or a temporary printed permit, respectively. ### Define the Template Content Use the content editor to design the layout of your printable permit. You can use a combination of text, images (like your organization's logo), and specific shortcodes to dynamically pull in permit and user information. ##### Available Shortcodes The following shortcodes can be used within the message body to display dynamic permit information: - `[permitpdf user=fullname]` - Displays the full name of the user. - `[permitpdf vehicle=all]` - Displays a comma-separated list of up to three associated vehicles. - `[permitpdf vehicle=1]` - Displays the first vehicle on the permit. You can also use `vehicle=2` or `vehicle=3`. - `[permitpdf permit=expiry]` - Displays the permit's expiry date. - `[permitpdf permit=permitno]` - Displays the unique permit number. - `[permitpdf permit=lotshortname]` - Displays the short name of the associated lot. - `[permitpdf permit=lotname]` - Displays the full name of the associated lot. - `[permitpdf permit=location]` - Displays the location associated with the permit. ##### Default Template Content Below is a sample of what should be the default message content;[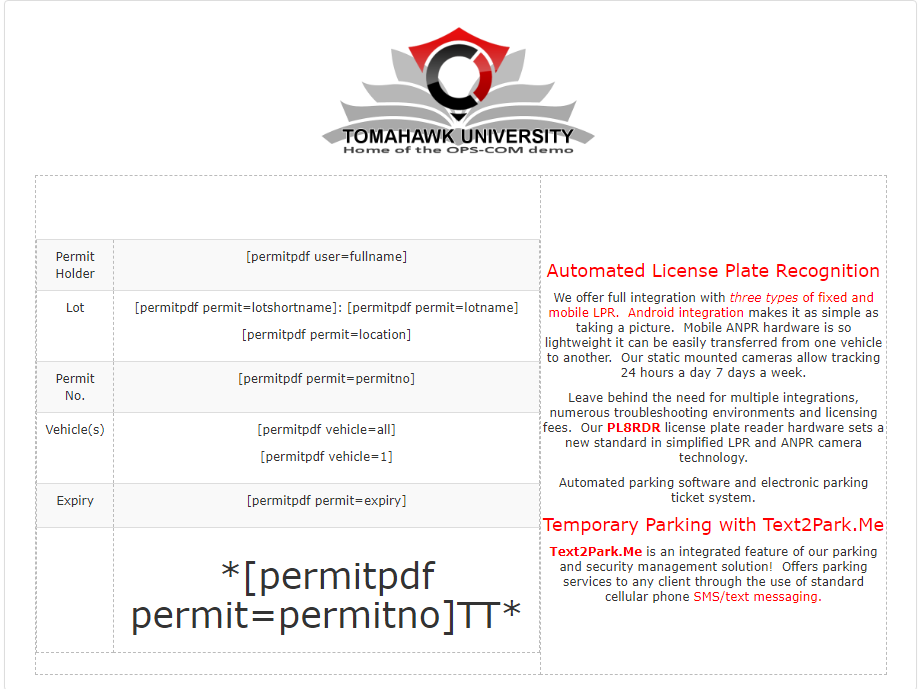](https://opscom.wiki/uploads/images/gallery/2025-08/gwrimage.png) To use our recommended template, you can leave the content as the default text, but be sure to change any logos or company names to your own. --- ### User Portal Guide Once enabled, users will see an option to print their permit from the user portal. For a detailed guide on the user-facing process, please refer to the *[Printing Your Parking Permits Made Easy!](https://opscom.wiki/books/OPSCOM-user-portal/page/printing-your-parking-permits-made-easy)* article. --- ### Best Practices & Considerations - **Always test your template before deploying.** After creating your message, print it out to ensure the layout, shortcodes, and any images appear correctly on a physical page. - **Include clear instructions for the user.** It is recommended to add text to the template that instructs the user on how to display the permit (e.g., "Please display this permit face-up on the driver's side of your dashboard").