
Configuring SAML SSO with OPS-COM
What is Single Sign-On (SSO)
Single Sign-On (SSO) simplifies user access to OPS-COM by allowing them to authenticate using their existing, managed corporate accounts. This eliminates the need for separate OPS-COM usernames and passwords, enhancing convenience and security. This article details the setup and configuration of SAML-based SSO with OPS-COM, explaining the necessary fields, metadata exchange, and user synchronization. For more general information about SSO and OPS-COM refer to this wiki article.
Configuring SAML Setup
ImportantImplementing -SSO with OPS-COM, specifically using SAML (Security Assertion Markup Language), requires coordination between your organization's Identity Provider (IdP) and OPS-COM as the Service Provider (SP).
Prerequisites and Considerations
Your OPS-COM Client Success team will be happy to discuss these options to ensure a smooth and successful setup.
Once the prerequisites are addressed, the SAML setup involves configuring fields for both OPS-COM (as the Service Provider) and your external SAML system (as the Identity Provider).
Service Provider Fields (Configured in OPS-COM):
These fields define how OPS-COM will interact with your Identity Provider.
Identity Provider Fields (Configured in OPS-COM, Values from Your SAML System):
These fields capture information from your external SAML system (Identity Provider). You will typically find these values within your SAML system's metadata (e.g., often displayed under Federation → Show Metadata on your SAML installation page).
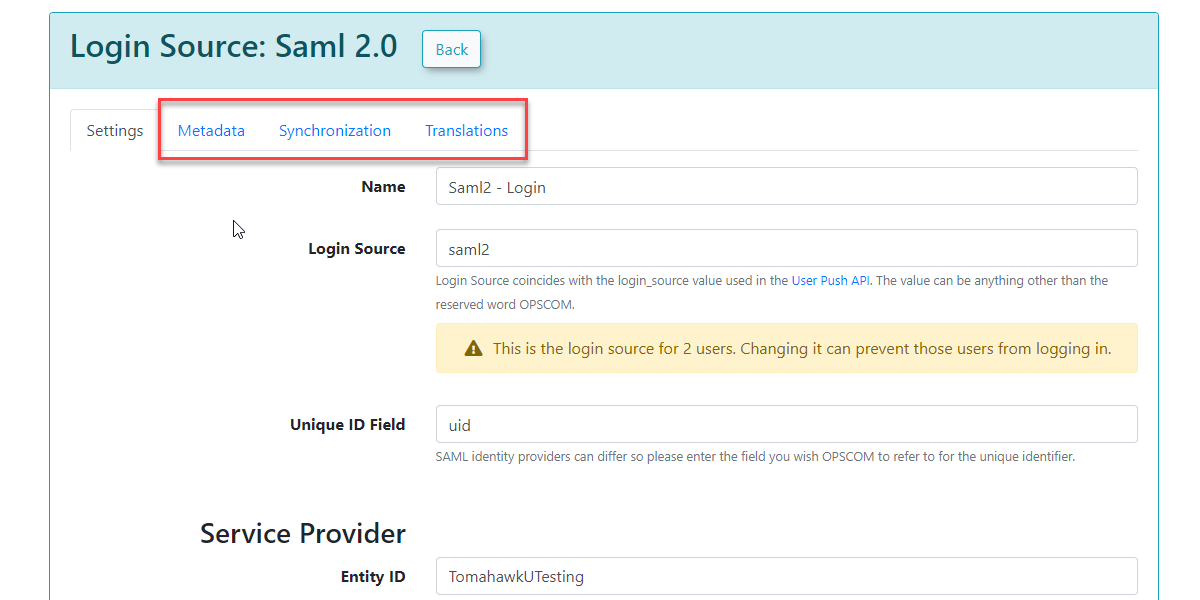
Once these settings have been completed and saved in OPS-COM, you will gain access to additional tabs: MetaData, Synchronization, and Translations.
Using this Feature
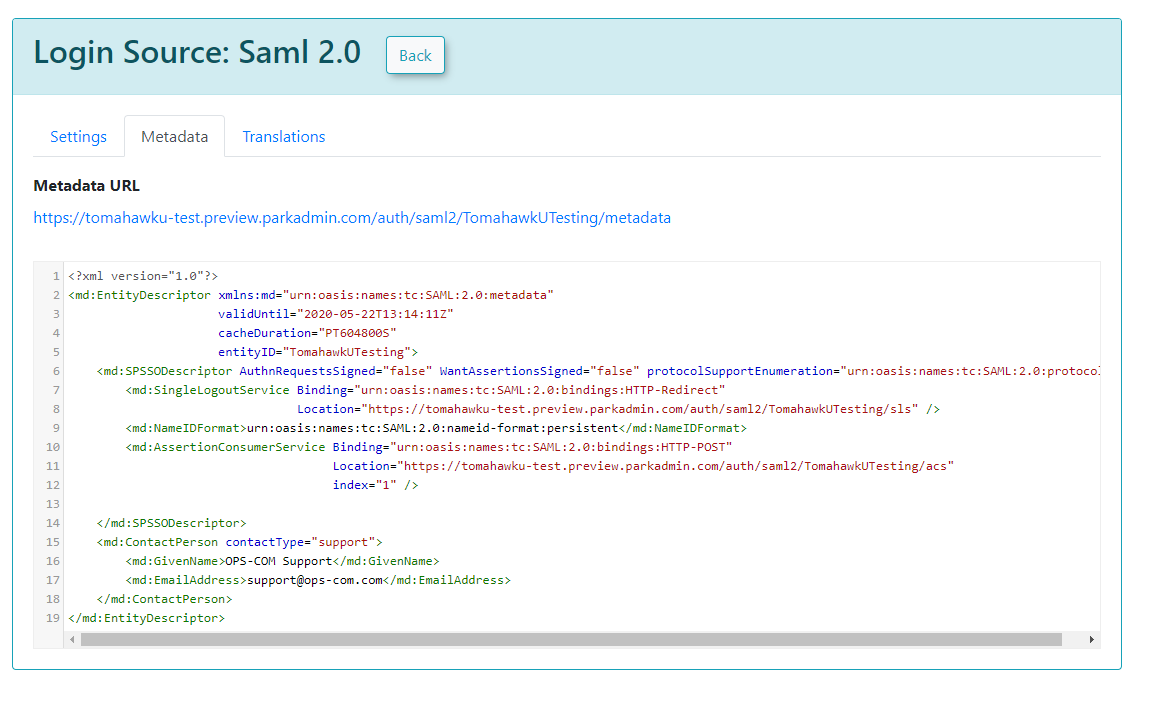
Metadata Tab
The Metadata tab in OPS-COM provides the XML code that you will need to provide to your Service Provider (OPS-COM, in the context of SAML communication from your IdP's perspective). This XML contains all the necessary information for your Identity Provider to communicate correctly with OPS-COM.
Sample XML File Explanation: When your external system (e.g., a SimpleSAMLPhp service set up as the identity provider) sends a response back to OPS-COM, it includes an saml:AttributeStatement tag containing several attributes. These attributes are required for OPS-COM to match to a user within its system. The most important field in this attribute section is the value used as the permanently unique identifier for a user. For example, if the XML response shows [uid] => Array ( [0] => 6ddf4027-3397-4e45-8628-0189f60fe91e ), then uid should be entered as the Unique ID Field in your Identity Provider Fields configuration within OPS-COM. If the unique ID is something else, such as SAMaccountName, then that should be used instead.
Synchronization Tab
The Synchronization tab allows you to configure how user information is managed between your SSO system and OPS-COM.
After you have provided the information in each field, click Save Changes. Your users will then begin to be created or updated automatically upon their SSO login attempts. If any of the supplied fields are incorrect or don't match, the corresponding information will be blank in OPS-COM when the user logs in, or it will remain unchanged if the user already existed.
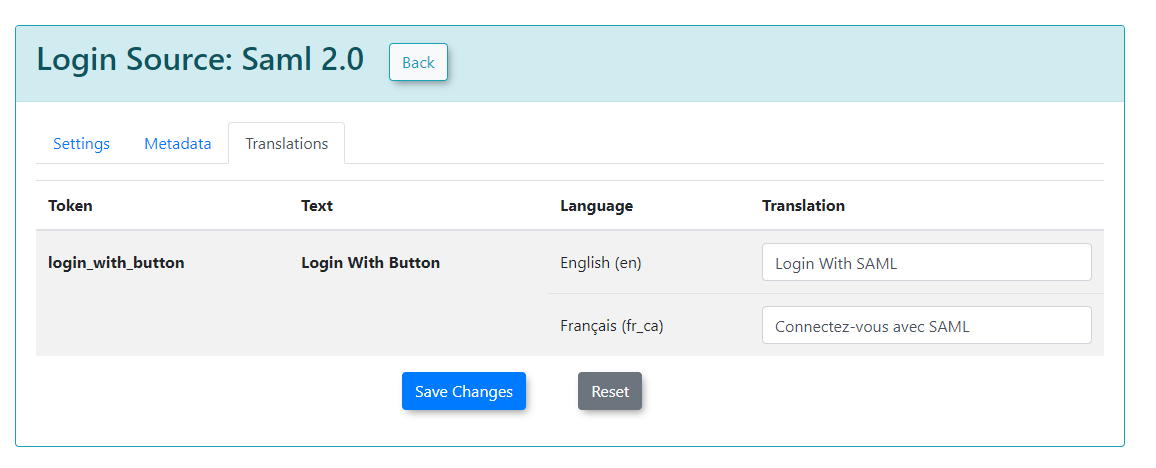
Translations Tab
The Translations tab allows you to customize the text displayed on your login button from the user side. You can create as many different translations as are available in your system (e.g., English and French). This ensures that the SSO login experience is localized for your users.
Best Practices & Considerations
Can you rewrite this article at a higher level. This is for users that may not really know the ins and outs of SSO but are interested in the functionality and how it general works with OPS-COM - What is Single Sign-On (SSO)?
Single Sign-On, or SSO, makes it easier to use different websites and apps without needing separate usernames and passwords for each one. With SSO, you log in once and get access to everything you need. Many companies use SSO to let employees access all their work tools with a single login. By adding OperationsCommander to your SSO system, your users can access our services without creating another account.
How does SSO work?
Here’s how SSO works in a simple way:
User Requests Access: You try to log in to a website or app, like your email or a school portal.
Redirect to SSO Service: Instead of asking for your username and password, the website sends you to an SSO service—a system that handles logins for multiple sites.
Enter Credentials: On the SSO service page, you enter your username and password. This is the only time you’ll need to do this to access multiple services.
Authentication: The SSO service checks your login information to make sure it’s correct. If everything checks out, it confirms who you are.
Return to the Original Site: Once verified, the SSO service sends a special token (like a digital pass) back to the website you wanted to access.
Access Granted: The website accepts the token and lets you in, so you can start using it without needing to log in again.
Why Use SSO?
Convenience: You only have to remember one set of login details.
Time-Saving: You can access multiple services quickly.
Improved Security: With fewer passwords to remember, you’re less likely to use weak passwords or write them down.
What do you need to consider before setting up SSO in OPS-COM?
SSO is a paid feature and you must have the setup fee and recurring fees negotiated before you can go further. Contact your Sales Representative or email support@ops-com.com to get this started.
Will you have different Login Sources? Will you have Students/Staff use SSO but Public Users will not?
Will login sources be different by usertype?
How do you want to get your users into OPS-COM in the first place?
Do you want Users created on the fly?
Do you want to keep the information synced up with your Authority or will it be a one-time import?
What user profile data/fields will you want to have synchronized between your SSO system and OPS-COM.
Can you take advantage of the UserPush APIs?
Our Client Success team will be happy to go over the options with you to get you setup for success and working smoothly.
Understanding Single Sign-On (SSO) with OPS-COM
Clear Intro Statement (Purpose & Overview)
Single Sign-On (SSO) offers a streamlined and secure way for your organization's users to access OPS-COM. Instead of managing separate usernames and passwords for OPS-COM, users can log in once using their existing company or institutional credentials, gaining seamless access to various services, including OPS-COM. This simplifies the login experience and enhances overall security.
What is Single Sign-On (SSO)?
At its core, SSO is about simplifying access. Imagine having one key that opens multiple doors. With SSO, that key is your single set of login credentials (username and password) that grants you access to various online applications and websites. Many organizations use SSO to provide their employees or members easy and consistent access to all their digital tools. When OPS-COM is integrated into your SSO system, your users can access our services without needing to create or remember another distinct account.
How SSO Works in a Simple Way:
SSO acts like a central gatekeeper for your online services:
Why Organizations Use SSO:
Key Considerations Before Setting Up SSO with OPS-COM
Implementing SSO requires planning and coordination to ensure it aligns with your organization's specific needs and security protocols.
Our Client Success team is ready to guide you through these important considerations and help tailor the SSO setup for your organization's success and seamless operation.

Service Provider Fields
The Unique Identifier is part of the XML communication between OPSCOM and your SAML system. It is supplied by your SAML system and it is what OPS-COM uses to match against our UniqueID field.
The Entity ID for Service Provider defines the SAML integration path of the URL in the metadata. If there is more than one SAML integration in the system, each ID needs to be unique. The value supplied ends up in the path like this: "https://client.ops-com.com/auth/saml2/ ENTITY_ID_FIELD /acs"
The x509 certificate can be generated and added to the service provider. You, the Identity Provider provide this.
Identity Provider Fields
These fields come from the system you are working with, such as SAML, when communicating with OPS-COM. For example, SAML should display its metadata under Federation → Show Metadata on the SAML installation page.
Once the settings have been completed and saved, you will have access to the MetaData, Synchronization, and Translations tabs.
Metadata
The Metadata tab provides the XML that would be provided to the Service Provider.
Sample XML File
The following is an example of a response from an external system to OPS-COM. In this case, it is a SimpleSAMLPhp service set up as the identity provider. At the bottom, are several attributes within an saml:AttributeStatement tag. These are required for our system to match to a user within our system. The one field that matters in this attribute section is the value being used as the permanently-unique identifier for a user. In this case it is "uid". Since "uid" is being sent back, then the setup for Identity Provider Fields should have "uid" as the Unique ID Field. If the unique ID is something else, such as SAMaccountName, then that should be used for the UniqueID.
<?xml version="1.0"?> <samlp:Response xmlns:samlp="urn:oasis:names:tc:SAML:2.0:protocol" xmlns:saml="urn:oasis:names:tc:SAML:2.0:assertion" ID="_aa1963115aa6490e728c7376f4c8849813bbb..."> ... <saml:Assertion xmlns:xsi="http://www.w3.org/2001/XMLSchema-instance" xmlns:xs="http://www.w3.org/2001/XMLSchema" ID="_9efd79bf6425983ee9176f3d33a99d1a9176180..."> ... <saml:Subject> <saml:NameID SPNameQualifier="MinionOpsComStaff" Format="urn:oasis:names:tc:SAML:2.0:nameid-format:transient">_7a426e0be71f14c1f349db00d7d543b6f7dcb52baa</saml:NameID> <saml:SubjectConfirmation Method="urn:oasis:names:tc:SAML:2.0:cm:bearer"> <saml:SubjectConfirmationData NotOnOrAfter="2021-08-24T16:00:41Z" Recipient="https://minion-3.dev.parkadmin.com/auth/saml2/MinionOpsComStaff/acs" InResponseTo="ONELOGIN_bb8a09203c888cf59af4c621a71cfa8f7559c016"/> </saml:SubjectConfirmation> </saml:Subject> <saml:Conditions NotBefore="2021-08-24T15:55:11Z" NotOnOrAfter="2021-08-24T16:00:41Z"> <saml:AudienceRestriction> <saml:Audience>MinionOpsComStaff</saml:Audience> </saml:AudienceRestriction> </saml:Conditions> <saml:AuthnStatement AuthnInstant="2021-08-24T15:34:46Z" SessionNotOnOrAfter="2021-08-24T23:34:46Z" SessionIndex="_a7a68666092117d24aab8adecf1b0830622855b85..."> <saml:AuthnContext> <saml:AuthnContextClassRef>urn:oasis:names:tc:SAML:2.0:ac:classes:PasswordProtectedTransport</saml:AuthnContextClassRef> </saml:AuthnContext> </saml:AuthnStatement> <saml:AttributeStatement> <saml:Attribute Name="uid" NameFormat="urn:oasis:names:tc:SAML:2.0:attrname-format:basic"> <saml:AttributeValue xsi:type="xs:string">6ddf4027-3397-4e45-8628-0189f60fe91e</saml:AttributeValue> </saml:Attribute> <saml:Attribute Name="full name" NameFormat="urn:oasis:names:tc:SAML:2.0:attrname-format:basic"> <saml:AttributeValue xsi:type="xs:string">Sarah Knowles</saml:AttributeValue> </saml:Attribute> <saml:Attribute Name="email" NameFormat="urn:oasis:names:tc:SAML:2.0:attrname-format:basic"> <saml:AttributeValue xsi:type="xs:string">sknowles@tomahawk.ca</saml:AttributeValue> </saml:Attribute> </saml:AttributeStatement> </saml:Assertion> </samlp:Response> |
Translations
Translations can be used to change the text displayed on your login button from the user side. We can create as many different translations as we have available on our system.
For this example, we have English and French.
Synchronization
The synchronization tab allows you to create users in OPS-COM when they login from SAML if they do not already exist by mapping your user attributes to our system. This also lets you update existing users information in the system.
In this example, any field that is mapped and has a value from your SSO side should get updated to the value from SAML.
To begin, ensure that you enable Auto Create/Update User. Keep in mind that these are sample values from our test system, and that your SAML system may differ.
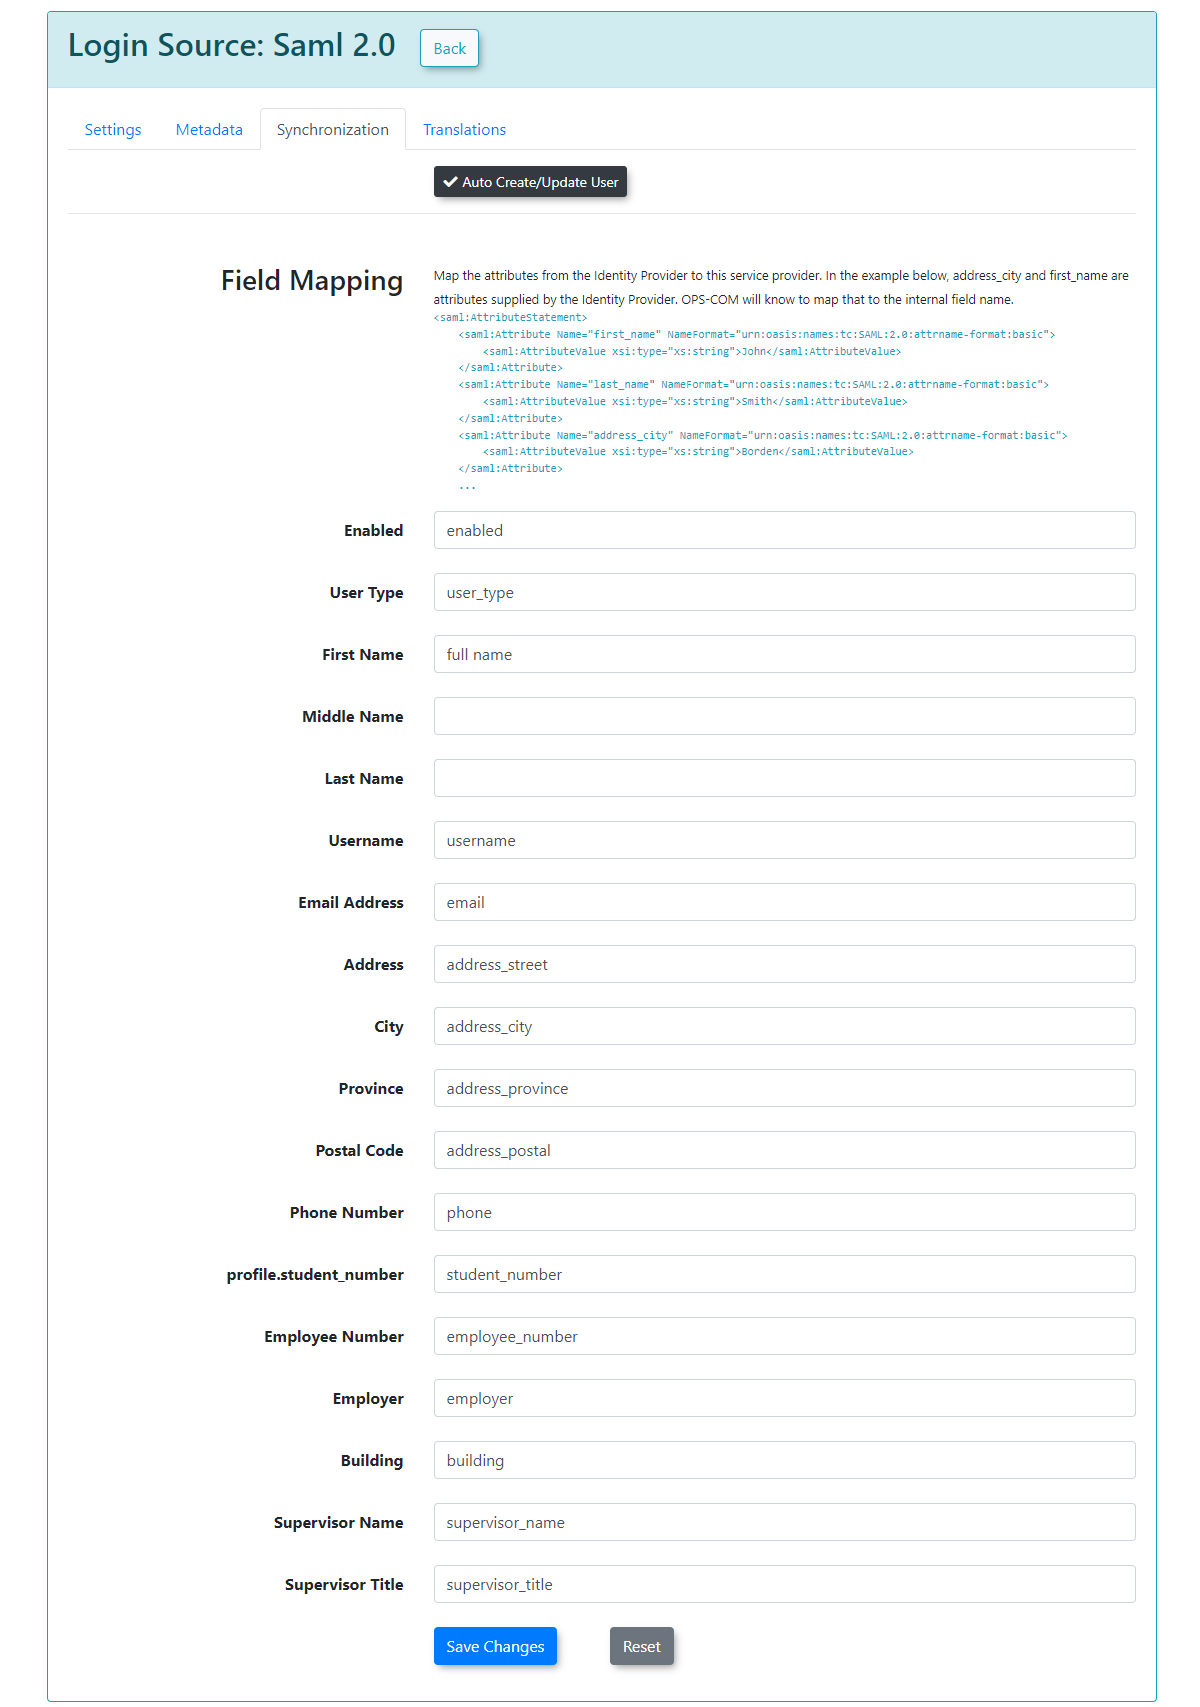
After you have supplied the information in each field, you can click Save Changes and your users will begin to be created/updated.
If any of the supplied fields are incorrect, then the information will be blank when the user logs in, or it will be unchanged if the user already existed.