
Connecting as USB Hard Drive
The Connecting as USB Hard Drive process allows users to physically link their Android handheld device to a desktop computer to access its internal file system. Its primary purpose is to enable the direct transfer, copying, or backup of application data and files (such as local OPSCOM folders) without relying on a network connection. This article is intended for OPS-COM administrators and IT support personnel managing the legacy Android application.
OnSetup and Configuration
This procedure relies on the native Android operating system and a physical connection to a desktop computer.
User Side (Enforcement Staff): The handheld device requires a physical USB data cable and must have Developer Options enabled within the Android Deviceoperating system to allow debugging and mass storage access.
Using this Feature
1.To Turnaccess the device's file system, you must first enable the correct connection mode on USBthe debugginghandheld, bythen clicknavigate Menuthe >file structure on your desktop computer.
Enabling Developer Options
If you do not already see a Development option in your settings menu, follow these steps to unhide it:
-
Tap Settings
>from the device's main menu. -
Scroll down and tap About phone.
-
Scroll down to locate Build number.
-
Tap Build number seven times in rapid succession. A notification will appear confirming that the Developer setting is now unlocked.
Connecting the Device
-
Tap Settings, select Applications,
>tap Development,>and enable the USB debugging checkbox.If youdo not have the Development option, please follow these steps:Go to the Settings menu, and scroll down to "About phone." Tap it.Scroll down to the bottom again, where you see "Build number."Tap it seven (7) times. After the third tap, you'll see a playful dialog that says you're four taps away from being a developer. Keep on tapping, and *poof*, you've got the Developer setting.
2.Plug the USB cable into yourPCdesktop computer and connectitthe other end to your Android device. A USB icon will
status bar when the device has been recognized.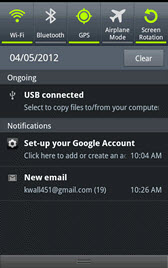
3. In the main screen of your Android device, use your finger to pull down thedevice's top status bar.Then -
Swipe down from the top edge of the Android device screen to reveal the notification shade.
-
Tap USB Connected and select the
buttonoption to mount theUSBdevice (e.g., Connect USB storage orMount)Mount).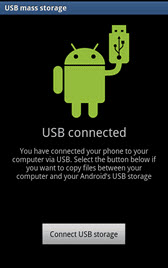
-
Tap
“Ok“.OkWhentotheconfirm.greenThe Android iconturnswillorange,change color (typically to orange), indicating the phone is now in USB Mass Storagemodemode.
Accessing Files on the Desktop Computer
-
Open the file explorer on your desktop computer and
shouldnavigatenowtoappeartheasconnectedUSBdevicesdiskordrivesremovableinstorage“Devicessection. -
Click the newly mounted hard drive letter associated with
RemovabletheStorage”Android device. -
Locate and
beclickassignedthedriveOPSCOMletters.folder (sometimes labeled ParkAdmin) to browse, copy, or transfer the required files.
NOTE:Disable Mass Storage Mode Turn off USB hard drive mode on the handheld device immediately when you are finished copying filesfiles. toLeaving avoidthis connection active can cause read/write conflicts and operational issues with the OPSCOM (ParkAdmin for Android) software.
OnBest Practices and Considerations
-
Use a data-capable cable: Ensure the
DesktopUSBComputercable
you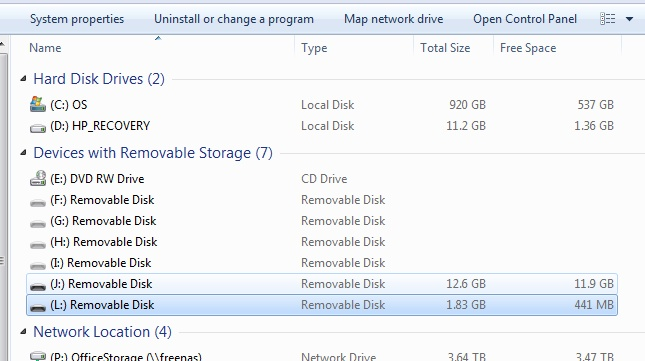
Some standard charging cables only provide power and will fail to trigger the USB connection prompt onTwoarehardusingdrivessupportsappeareddata transfer.thisyourdesktop.computerNavigatingoreachdevice.of -
andSafely
oneejecthastheandevice: Always safely eject the USB drive from your desktop computer's operating system before physically unplugging the cable. This prevents data corruption within the OPSCOM(ParkAdmin)foldersfolderduring(J:activeinfilethis case)transfers.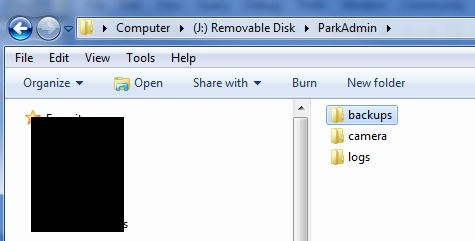
Related Video
Descend into the appropriate folder to copy or transfer files.