Vaxtor Setup - JSON Protocol for Static LPR Cameras
The following documentation will guide you to set your up your Vaxtor LPR reporting with OPSCOM.
These instructions are intended for VaxALPR On Camera Software which can be embedded in a multitude of different LPR cameras, including Axis, iPRO, Genetec, Hanwha, and more.
Use the Panasonic Easy IP Setup Tool to find cameras on the network.
Identify Cameras for OPSCOM
Each individual camera that will be connected to the OPSCOM platform must have an OPSCOM LPR Camera Deployment Form filled in and shared.
Before you begin filling in the deployment forms, be sure that you have been assigned your batch of “Camera ID” numbers by your Sales contact or OPSCOM Support. If you have not been assigned a batch of “Camera ID” numbers you should request them immediately.
Reports Menu Options
Now that you are ready to setup your Vaxtor requirements, follow the instructions beginning on page 5 of this document vaxtor-valpr-axis-user-manual.pdf, ending on page 8.
Once the VaxALPR software in installed you may now move on to Part 2 of the setup and input the relevant code, URL, and API requirements.
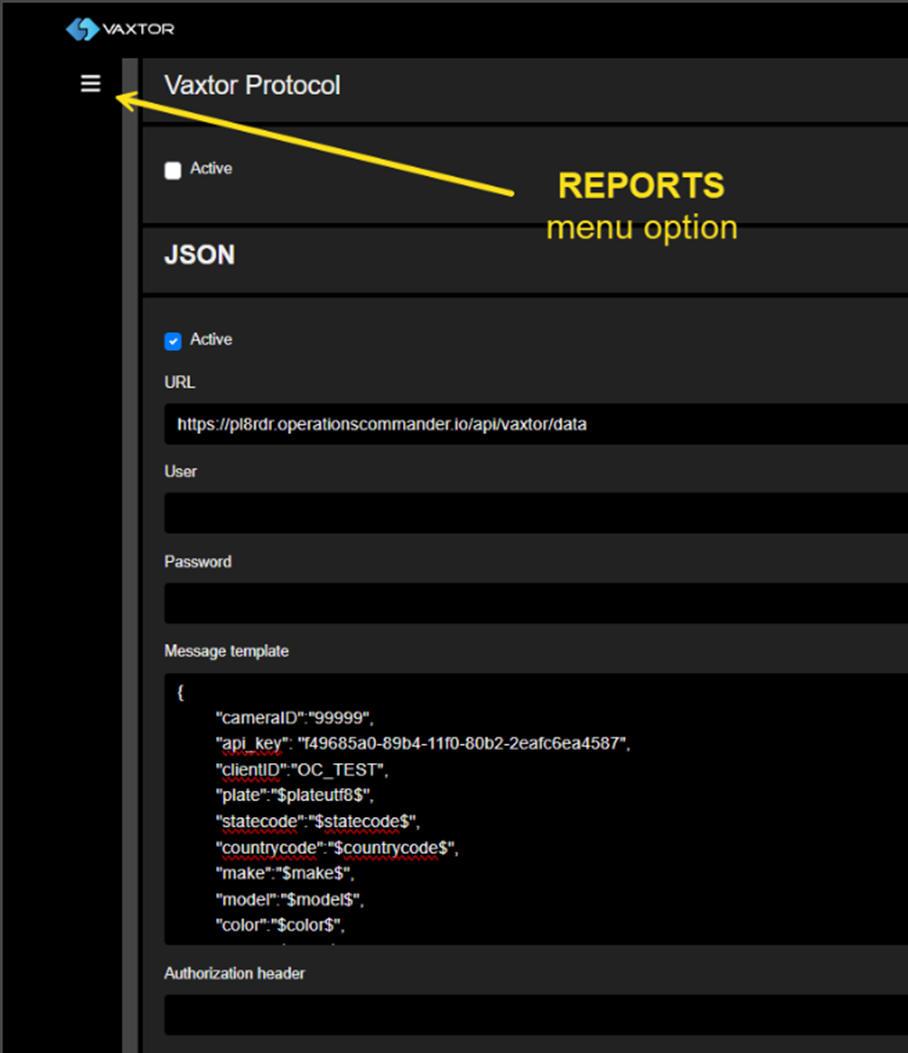
NB: URL(https://pl8rdr.operationscommander.io/api/vaxtor/data)
You must enable the “JSON” Protocol for each Vaxtor camera you wish to bring online. The JSON protocol requires that you copy the following code into the ‘Message template’ for each camera. The content is from the ‘{' to the end parentheses '}’ with zero changes to the line spacing.
There are 3 REQUIRED edits to this code for each camera.
-
Each camera requires that you input a unique “cameraID” number based on the numerical series you were provided with.
-
Under the “clientID” field you must input your exact client ID as provided by OPSCOM.
-
Under the “api_key” section you must copy in the exact api key you will have been provided with as part of your LPR deployment process.
{
   "cameraID" : "?????",
   "clientID" : "insert your clientID",
   "api_key"  : "insert your api key here",

   "plate":"$plateutf8$",
   "statecode":"$statecode$",
   "countrycode":"$countrycode$",
   "make":"$make$",
   "model":"$model$",
   "color":"$color$",
   "class":"$class$",
   "confidence":$confidence$,
   "direction":"$direction$",
   "left":$left$,
   "top":$top$,
   "right":$right$,
   "bottom":$bottom$,
   "width":$width$,
   "height":$height$,
   "image":"$image$",
   "utcdate":"$utcdate$",
   "latitude":"$latitude$",
   "longitude":"$longitude$"
}
Once the information has all been properly updated hit the “Save & Apply”
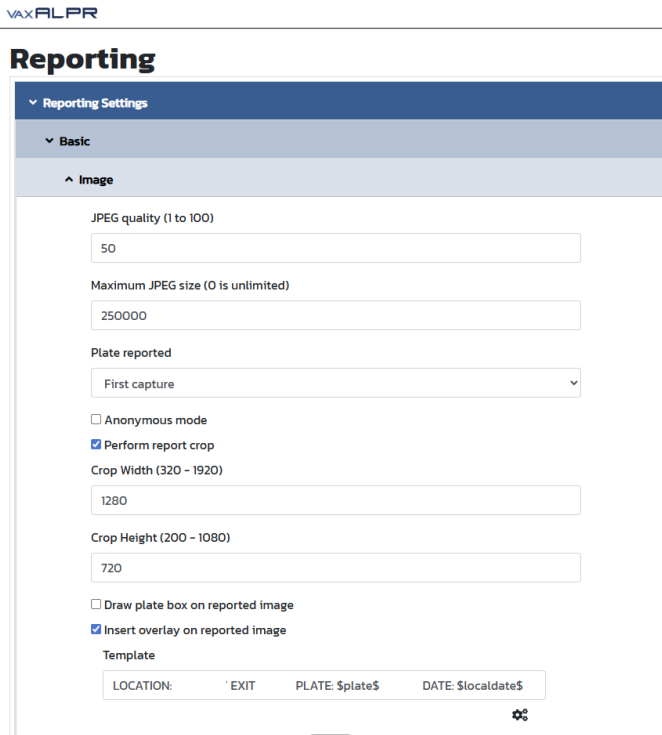
Recommended Optimization Settings for Vaxtor Reporting
Below are images of some of the optimized settings you may want to apply to the camera in the Vaxtor Reporting page