
Login Sources (SSO)
The Login Sources SSO feature allows administrators to define the various methods by which users canauthenticate and sign into the system. ThisIts featureprimary providespurpose administratorsis withto provide flexible control over user authentication,access, allowing for standard OPSCOMdirect logins or integration with external identity providers like SAML or LDAP,LDAP enhancingto enhance convenience and securitysecurity. This article is intended for diverseOPS-COM administrators responsible for managing system access and user populations.authentication.
Setup and Configuration
This feature is a core administrative tool used to manage how different user populations access the portal.
Admin Side: Administrators must have the appropriate system role permissions enabled to access the configuration menus and manage SSO integrations.
User Side: Users will interact with the configured login sources when accessing the portal. If a Single Sign-On (SSO) source is enforced, they will automatically be redirected to their institution's secure login page before accessing the system.
Using this Feature
Administrators can use the following instructions to manage the default login source, add new external identity providers, and modify existing authentication methods.
Setup & Configuration
Login sources are managed underManaging the System Configuration menu, within the Users section.
Hover overSystem Configuration,Users,and clickLogin Sources.
Default Login Source
OPSCOM is the default login
source.source for the system. This means that, by default, users will log in directly toOPSCOMthe portal using a standard username and password created within the systemitselfitself.on the standard login screen.If you disable the OPSCOM default login source, then only your other configured login sources, such as SAML or LDAP, will be
activeactive.forUsersuserwilllogins.be
to authenticate through those external providers.
Adding Login Sources
OPSCOMThe system supports multiple login sources,sources simultaneously, allowing some users to utilize SSO while others log in directly.
-
OnHovertheover System Configuration and click Users then Login Sources.page, -
Click the Add Login Source button.
-
FillEnterouta descriptive label into therequiredNameinformation:field. -
Enter the display identifier into the
RedLoginfieldsSourcearefield.requiredThis is what you will see on the user profile tobeindicatefilledifbeforetheyouusercanlogsclickinSavewith a special source (e.g., SSO or SAML). -
Enter the root domain into the
YellowDomainfieldsare technically requiredName forthe login sourceOPSCOM tofunctionusecorrectly,field.butThisthey will still allow empty or invalid values tomust besavedtheinitially.domainYellowwithoutfieldsanycan also indicate that a change has been madereferences to thefield.admin portal (for example, use CLIENTID.ops-com.com instead of CLIENTID.admin.ops-com.com/admin). -
TheDefine the Login Source - Codefieldfield. This is a crucialasidentifierit's whatthat the user profile will match against when associating users with this new login source.However,only one login source code can be activated at a timefor a particular type (e.g., you can have multiple SAML configurations, but only one primary 'SAML' code active for user matching at a time if the system differentiates by 'type' of code rather than unique code string across all). The source name (code) itself is typically determined by your Identity Provider, with the exception of 'OPSCOM' for direct logins. -
Namecan be anything that is identifiable to you. Login Sourceis what you will see onComplete theuser profile to indicate if this user will login with a special source. Often is is calledremaining SSOor SAMLDomain Name for OPSCOM to useshould be set to the OPSCOM domain without any references to admin etc. For example, if the domain name you login looks like CLIENTID.admin.OPSCOM.com/admin, this should be changed toCLIENTID.OPSCOM.com only.Do not fill out the rest of thefieldsuntilwhen you are ready tofollowapply theinstructionspecificforsetupsettinginstructionsupprovided by yourSSOIdentityinformation.Provider.-
ClickClick the Save ChangesChanges
When
Usingfilling thisout Feature
the Onceconfiguration loginform, sourcesfields highlighted in red are added,strictly required before you can managesave. theirFields statushighlighted in yellow are technically required for the login source to function correctly, but the system will temporarily allow empty or invalid values to be saved initially. Yellow fields can also indicate that an unsaved change has been made to that specific field.
Available Actions and properties.
Managing Login Sources
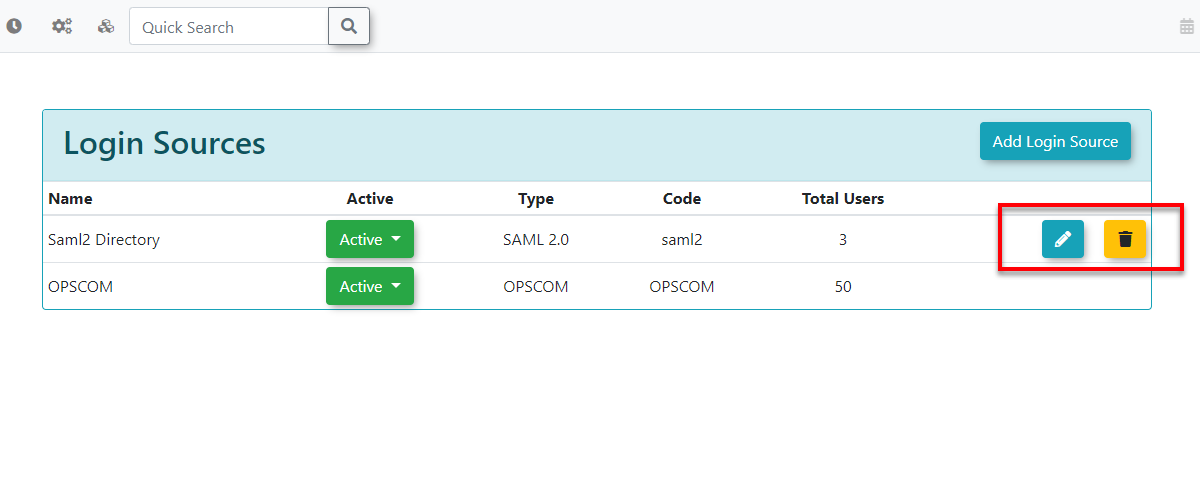
Buttons
From the Loginmain Sourcesmanagement page, you can manage your configured login sources using the buttonsfollowing next to each entry:actions:
-
Edit: Click
Editthis button to modify an existing login source's details. This will bring up thesameconfigurationform used for adding,form, allowing you to update itsconfiguration.connection properties. -
Delete: Click
Deletethis button to permanently remove a login source from thelist.system.A confirmation pop-up will usually appear before deletion.
Active/Inactive/Hidden Login Sources
YouStatus canDrop-down: makeSelect Logina Sourcesstatus of Active, InactiveInactive, or Hidden. for any login source. If a source is made Inactive,inactive, users who were previously connected to it will no longer be able to loginlog in and must be changedmanually migrated to a different login source.
Best Practices &and Considerations
-
StrategicStrategicallyPlanningplan forMultiplemultipleSourcessources::Carefully plan your login sourcestrategy.strategy before implementation. Determine exactly which user groups will use which login method (e.g., students via SAML, staff via LDAP, and public users viaOPSCOMdirect login). -
UserManageProvisioninguser provisioning::Consider how users will be created and linked to their login sources.WillDecidetheywhether profiles will be auto-createdonupon their firstlogin,successful SSO login or if they must be pre-imported?imported. This linkageusesstrictly relies on the exact string match of the Login Source - Code field. -
DisablingTestDefaultbeforeOPSCOMdisabling direct logins::If you intend for all users to access the system via an external SSO,ensurethoroughlyyou disabletest theOPSCOMintegration before disabling the default OPSCOM loginsource. Test thoroughly before making this changesource in a live environment. -
TestingDeactivateNewinsteadSourcesof deleting::Always thoroughly test any new login source after configuration to ensure users can successfully authenticate and access the system. Communication with Users: Clearly communicate to your users how they are expected to log in, especially if you introduce new SSO options or change existing methods. Provide clear instructions and links.Inactive vs. Deleting:Use theInactiveinactivefunctionstatus for temporary deactivation or if you foresee needing to reactivate a login source in the future.UseOnly use the Deleteonlyaction when a login source is permanentlyno longer neededretired and has absolutely no associated active users.-
Communicate changes to users: Clearly communicate to your users how they are expected to log in. If you introduce new SSO options or change existing methods, provide clear instructions and direct links on your portal homepage to prevent login confusion.