
Manage Roles and Permissions
The Roles and Permissions infeature OPSCOM provideprovides granular control over what administrative users can access and do within the system. ThisIts featureprimary allowspurpose is to allow administrators to define specific responsibilities, enhance security, and ensurestreamline thatoperations eachby userensuring hasusers only have appropriate access levels,levels. streamliningThis operationsarticle is intended for OPS-COM administrators responsible for managing backend system security and maintainingadministrative data integrity.access.
UsingSetup thisand Feature
Configuration
ClickfeatureSystemdictatesConfiguration,backendthenaccess and requires a high-level administrator to set it up initially.Admin
Management,Side:andAdministratorsclickmustManage Roles.
This
Creating and Managing Roles
Roles are central tohave the permissionspre-defined system, acting as templates for sets of permissions.
TheManage Administrator Rolespage will display. TheSystem Administrator (Primary)rolerole,isorpre-definedequivalentandhigh-levelallows youpermissions, to create new roles and assign them to otheradminstaffusers.members.Using this Feature
Administrators can use the following instructions to create new role templates, edit existing ones, assign granular permissions, and apply these roles to administrative staff.
Creating a New Role
-
Click System Configuration, then Admin Management, and click Manage Roles.
Tocreate a new role, clickClick the Add New Role button at the bottom of the page.
-
Enter a descriptive name in the Role Name field and provide a detailed summary in the Description
for that role.The description will appear as a rollover tooltip when you mouse over theEdit Rolebutton for that role.
-
Click the Save Role button to save
yourthe newrole.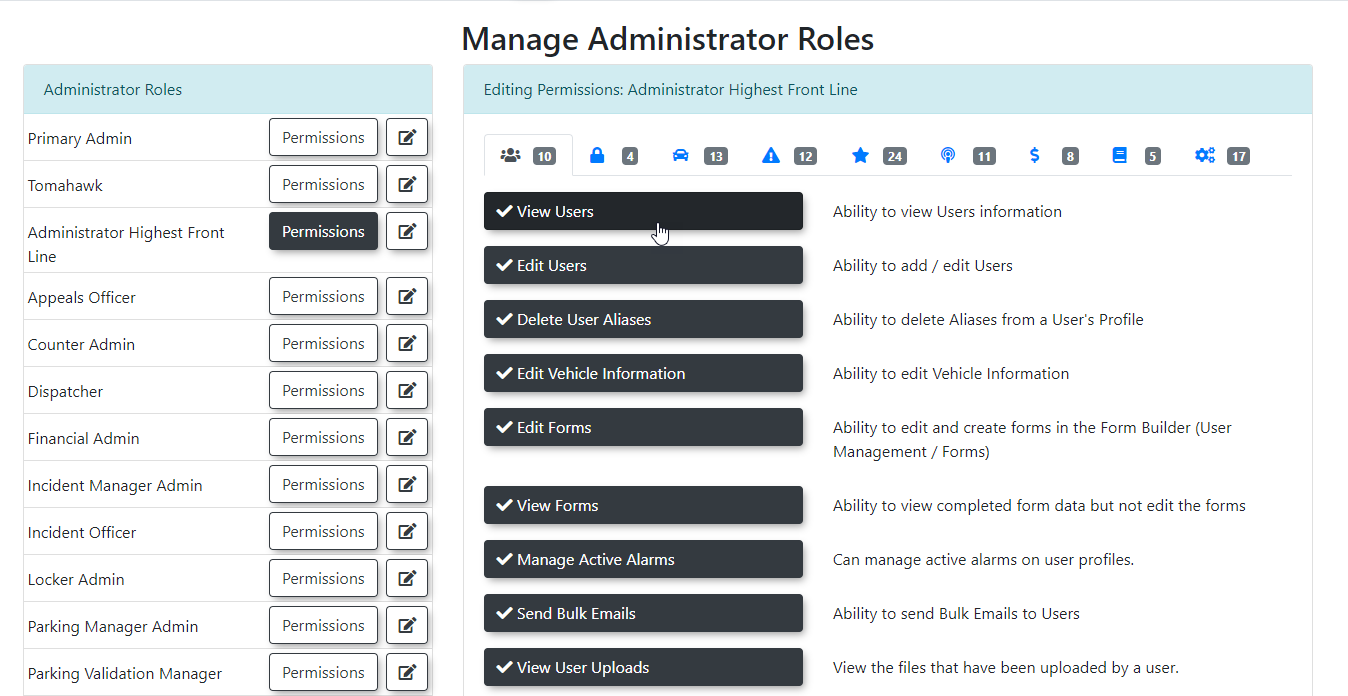
Editing an Existing
Roles
RoleYou can modify the name and description of any role (except theSystem Administratorrole).OntheManage Administrator Rolesscreen, clickClick the Edit Role button next to the specific role you wish to
update.update on the Manage Administrator Roles screen.-
Make
yourthe desired changes to the Role Nameand/orand Description.fields. -
Click the Save Role button to save your edits.
Assigning Permissions to a Role
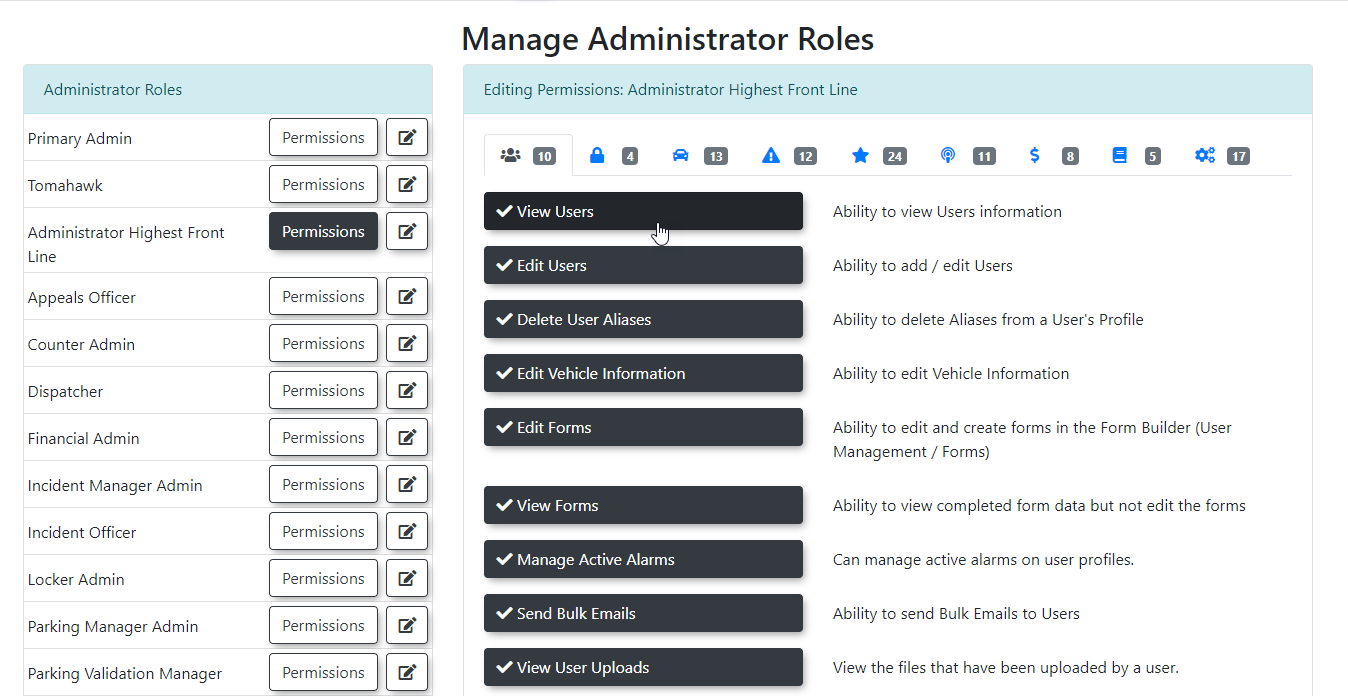
Once a role is created, you'll define what actions users assigned to that role can perform by setting its permissions.OntheManage Administrator Rolesscreen, clickClick the Permissions button next to the role you want to
configure.configureTheto open the Editing Permissionsscreenscreen.will display.Thetop bar displays various icons, mirroring the OPSCOM menu structure. The number next to each icon indicates how many permissions within that category have been selected for the current role.Click
ana specific module icon (e.g.,aPermit,"Permit"Violations)icon,fromathe"Violations"topicon)bar to display thespecificpermissions available within that category.Togrant a permission, enableEnable the checkbox next to
thata permission'sname.name to grant that specific access level to the role.OnceClick the Save Permissions button once you have navigated through each icon and selected all
thenecessarypermissionspermissions.for the role, clickSave Permissions. The role, with its defined permissions, is now created and ready for assignment.
Assigning Roles to Admin Users
After roles are defined, you can assign them to your administrative users.-
Click System
Configuration,Configuration, then AdminManagement,Management, and click Edit Admin Users.Theto open the Manage Active Administratorspagepage.will display. -
Select an existing user you wish to modify, or choose to create a new user.
OnAdd or confirm the details in the User Information section on the left side of the
screen,screen.add-
Select the specific role or
confirm theUser Information(e.g., name, email). On the right side, select the role(s)roles you wish to apply tothatthe user from the availableoptions.options on the right side.Youcan also add aCommentforEnter any relevant notes about the user's role or
status.status in the Comment field.-
Click the Update User button to finalize the changes.
On the Editing Permissions screen, the top bar displays various icons mirroring the system menu structure. The number next to each icon indicates exactly how many permissions within that category have been selected for the current role. Additionally, the role description will appear as a helpful rollover tooltip when you
havemousefinishedovermakingtheyourEditchanges.Role button.Available Actions and Buttons
-
Add New Role: Click this button at the bottom of the management page to create a new, blank role template.
-
Edit Role: Click this button next to an existing role to modify its name or description. Note that the primary System Administrator role cannot be edited.
Permissions: Click this button next to a role to open the granular matrix where individual system actions are enabled or disabled.
Save Permissions: Click this button to finalize the selected access levels for a given role.
Update User: Click this button to save any changes made to a specific administrator's profile, including their newly assigned roles.
Best Practices &and Considerations
-
Principle of Least Privilege: Always adhereAdhere to the principle of leastprivilege.privilege:GrantAlways grant users only the permissions absolutely necessary for them to perform their job functions. This minimizes security risks and reduces the potential for accidental system errors. -
Role-Based Access Control:Utilizerolesrole-basedtoaccessmanagecontrol:permissions efficiently.Instead of assigning individual permissions to eachuser,user manually, create template roles (e.g., "Enforcement Officer," "Permit Manager," "Finance Admin") and assign users to thoseroles.templates. This significantly simplifies onboarding, offboarding, and security auditing. -
ClearMaintainRoleclearDescriptionsrole descriptions::Use the role description field to clearly state the purpose of the role and the types of permissions it encompasses. This helps other administrators quickly understand what each role is intendedfor.for without having to open the complex permissions matrix. -
RegularConductReviewregular access reviews::Periodically review your defined roles and user assignments to ensure they remainappropriateappropriate. Adjust roles as job responsibilities change or as staffjoin/members join or leave your organization. -
Test
NewnewRolesroles before deployment::BeforeAlwaysdeployingtest a new roleto active users, test itwith atestdummy administrator account before deploying it toconfirmactive users. This confirms that the assigned permissions function exactly as expected and do not inadvertently grant too much or too little backend access.