Pages and Content Blocks
AccessingThe SystemPages Messagingand
ToContent accessBlocks feature allows administrators to create and manage yourthe Systemvisual Messagingcontent navigateand system messages displayed throughout the user portal. Its primary purpose is to enable organizations to customize their public-facing pages, embed interactive features using shortcodes, and enforce user agreements via popup disclaimers. This article is intended for OPS-COM administrators responsible for managing portal content and user communications.
Setup and Configuration
This feature is a core administrative tool used to build and maintain the user-facing portal environment.
Admin Side: Administrators must have the appropriate system role permissions enabled to access the content and design menus.
User Side: The configurations applied here directly dictate the layouts, text, interactive forms, and popup agreements that end-users interact with while navigating the parking portal.
Using this Feature
Administrators can use the following instructions to create custom pages, embed interactive shortcodes, and generate targeted system messages.
Accessing the Management Interface
-
Hover over the gears icon

onContent & Designs->then Pages and Content Blocks.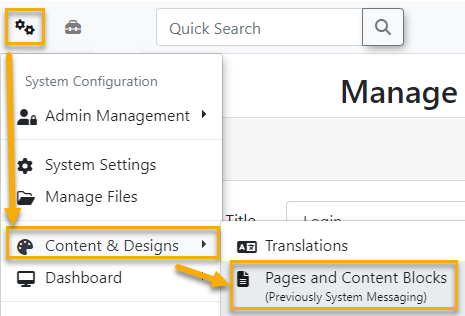
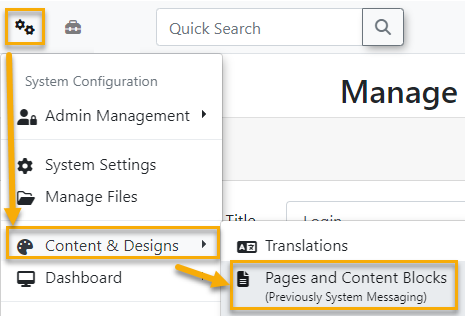
Creating Pages
-
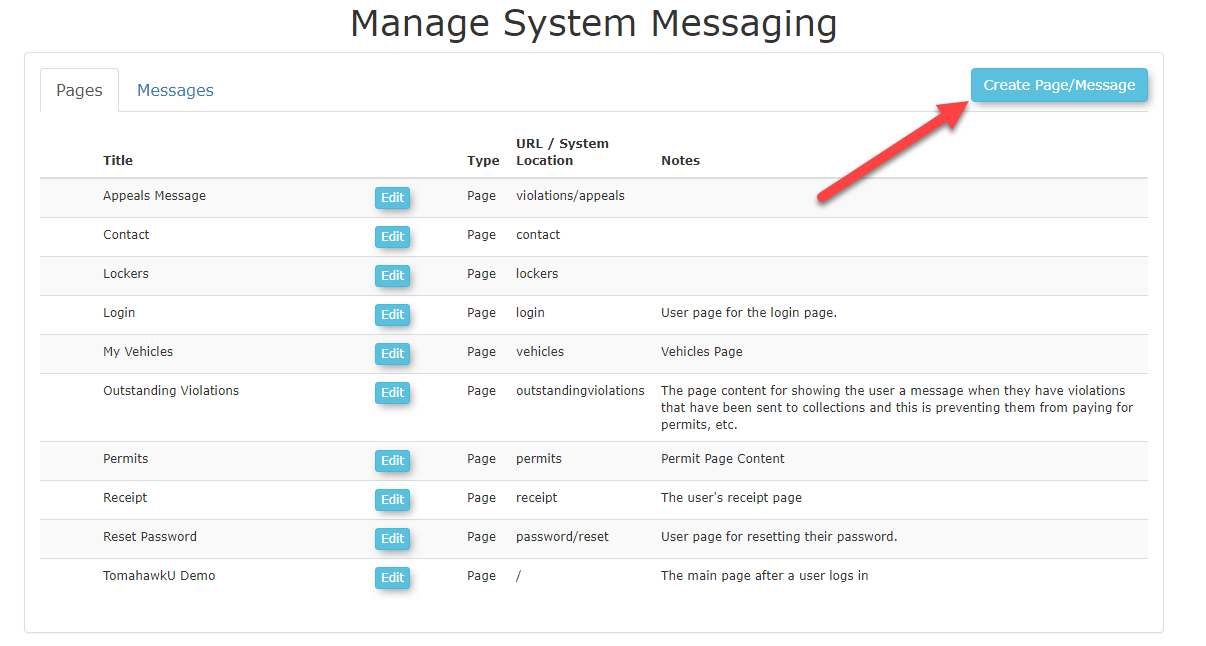
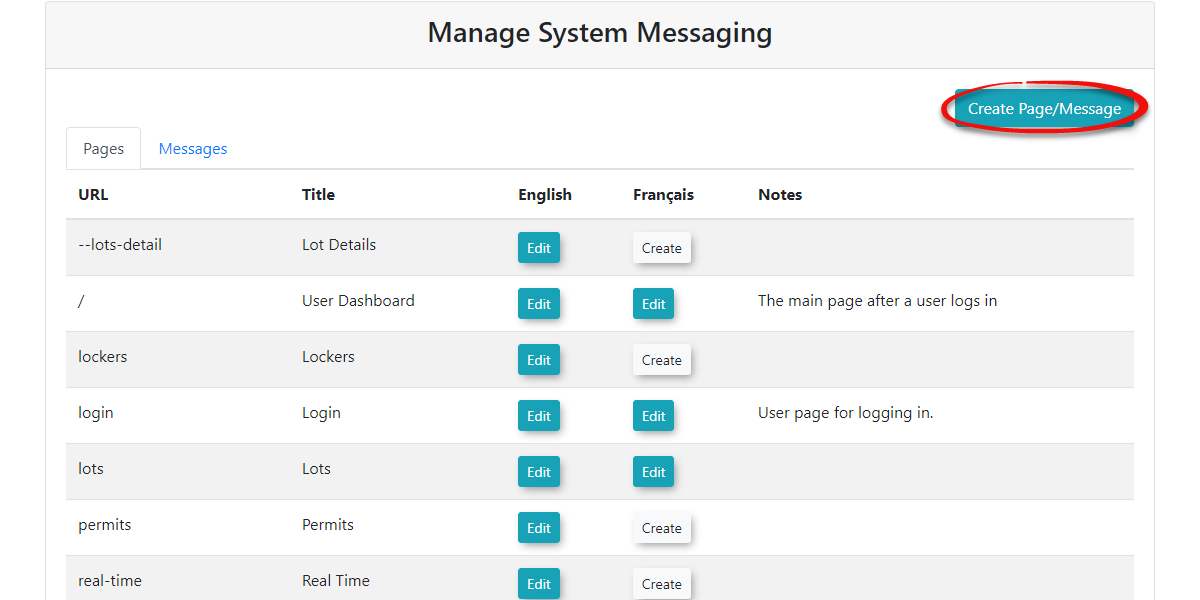
Pagesdisplay the visual content found throughout your application. You can edit the contents of your page or post aSystem Messageby using the Disclaimer Shortcode on thePageyou want it to show up on.Shortcodesalso make it convenient to add interactive content to your pages. For more information onShortcodesscroll to the bottom of this page.To create aPageclickClick the Create Page/Message button at the top right of the management screen.-
Select
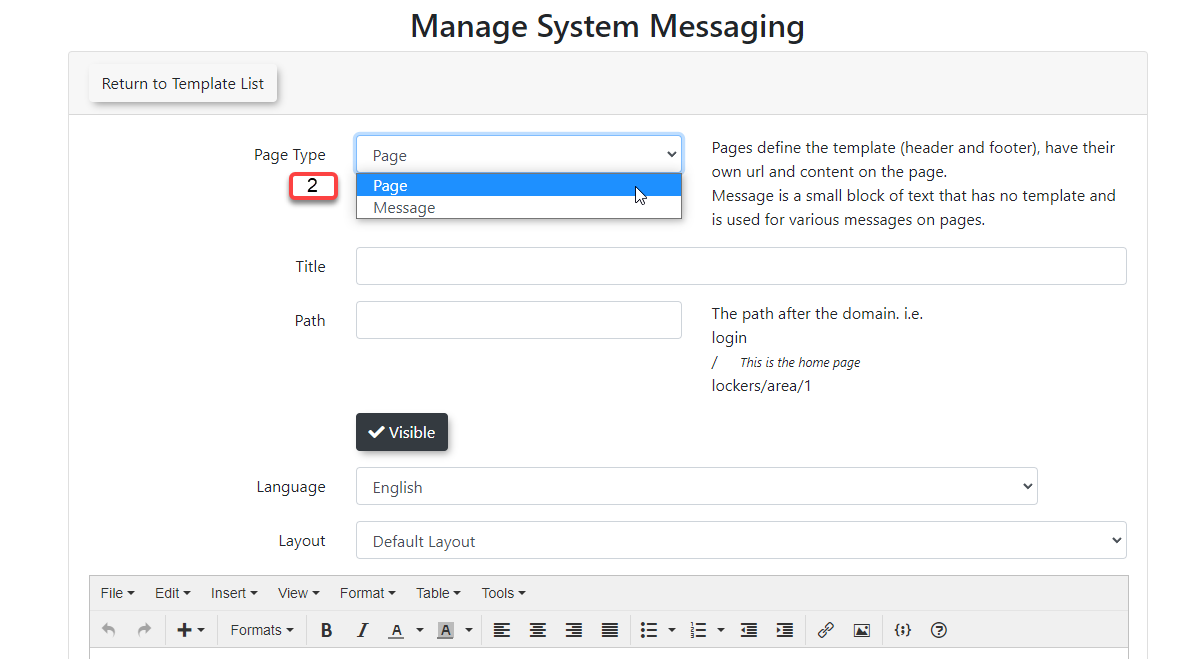
Manage System MessagingPagescreen. It doesn't matter what tab you're on when you do this as you will specifyfrom the Page Typewhendrop-downyoumenu.go -
createConfigure the
page.following page
to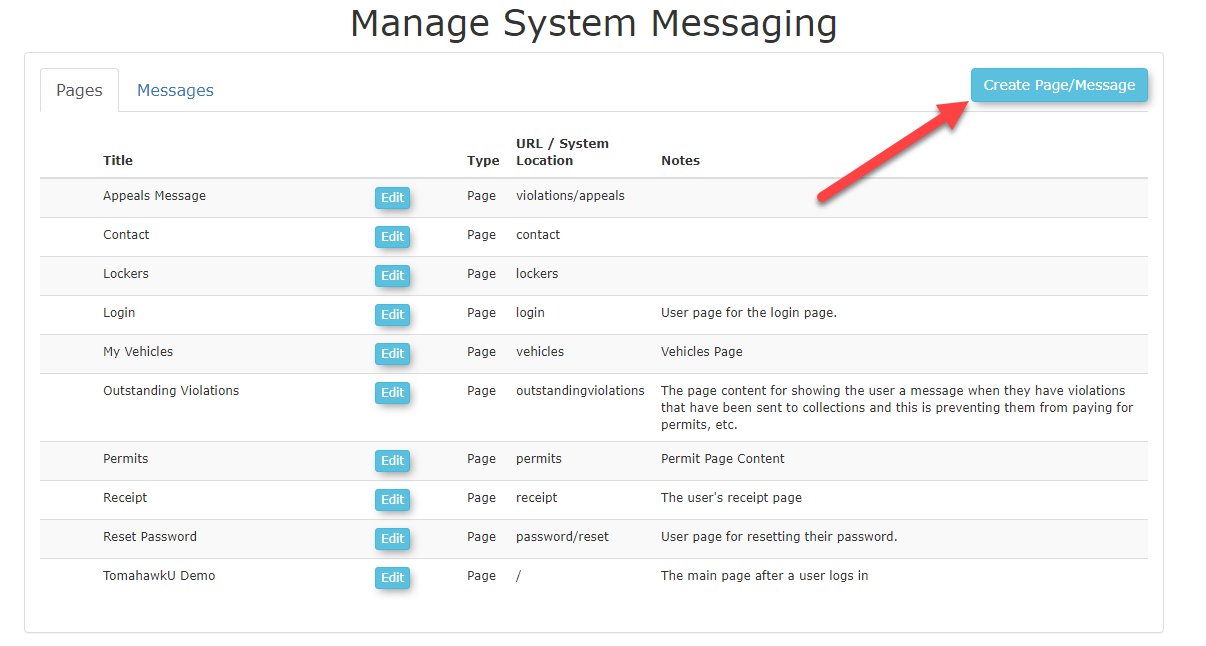
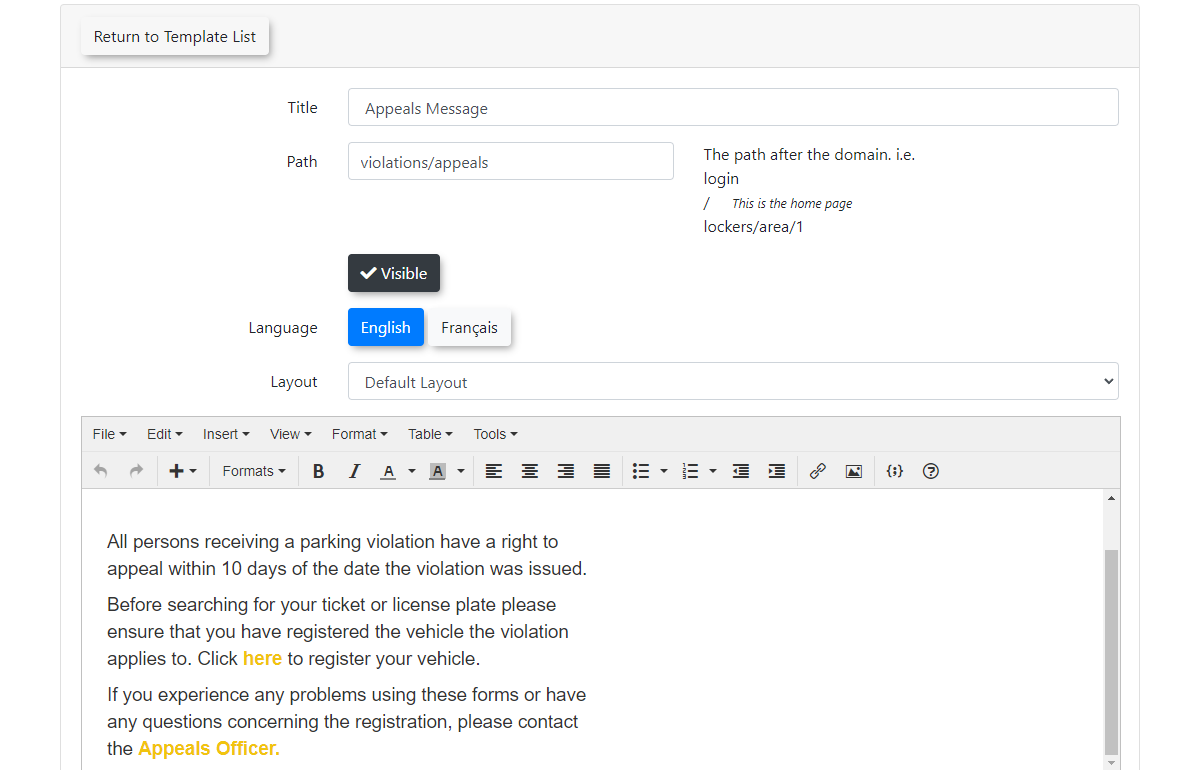
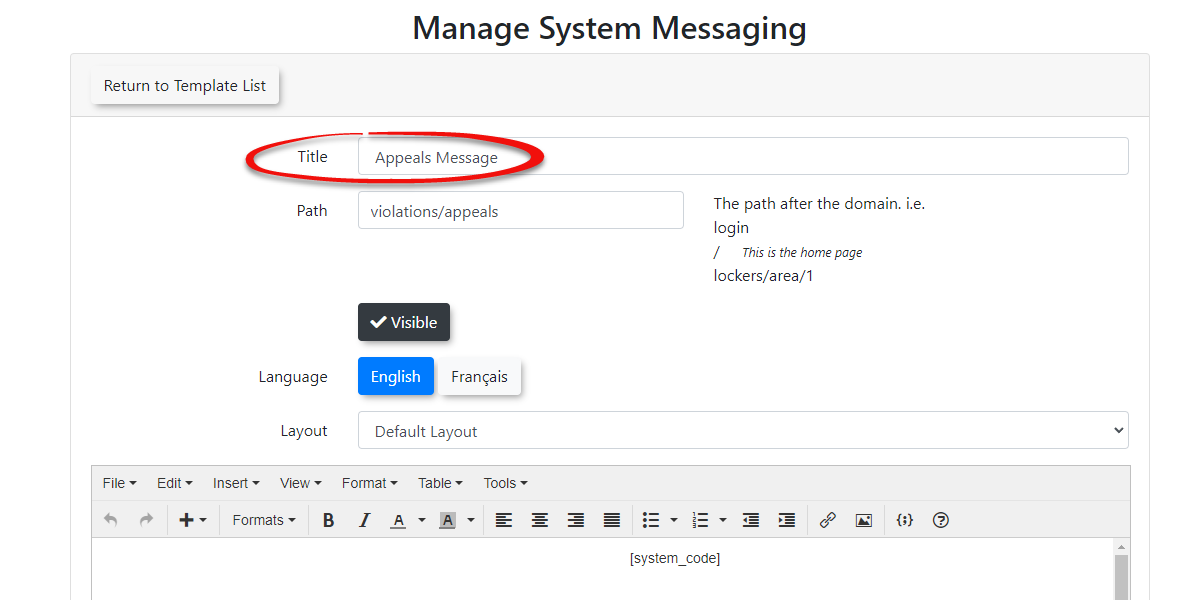
OnceyouTitle:
click this button OPSCOM will take you to a different section where you can setEnter thepropertiesnameand content of the page. Below is a detailed description of the options available to you when creating newPages.
Page AttributesShort DescriptionTitleTheTitleof the page you wish to create, whichthat will bethe namedisplayed on the user navigation bar.Path
g.,ThePath: Define the URL path after thedomain.domaini.(e.loginentering/login/ establishes→theThispageisas the homepageChangingVisibility:thisToggle the Visible button tolockers/area/1will displaylogin/lockers/area/1as the URL for that page.VisibilityYou can toggle the visibility of your pages which willmakeit so your users can't seethe pageanymore,accessiblebutoryouhiddencantostillend-users.editit.Language:
Select the appropriate language for the page (e.g., English or French). LanguageLayout:UseSelect the visual structure for the page. Typically, thistoisselectleftbetween two language options for a specific page. Tomahawk currently supportsEnglishandFrench.LayoutYou can select the layout of your page here. Usually, you will haveas the Default Layout.selected.Content:
ContentYour content will beEnter the main body textonor embed shortcodes to display interactive features.Click the Save Messaging button to finalize the page
youcreation.arecurrentlyediting. You can also useShortcodeshere to displayToggling a
body of material or feature. For example, a user login form could be displayed on your homepage.Important:Make sure you selectPageunder the drop-down menu next toPage Typeand notMessage. Below we will go into detail on how to create aPagefield by field. The images below give you a good visual example of what field is being explained, if there is a certain field you are unsure about you can easily find the picture and read from there.
itStart by giving your page aTitleand specify how you would like theURLat the top of yourpage tobeinvisibledisplayed.hides
Adjust the visibilityoffrom yourpage by toggling theVisiblebutton on/off. ThePagewill still be editable in theSystem Messagingsectionend-users, but it willnotstillberemainvisiblefully editable toyour users who areadministrators onyourPageorSystem Message.
Toggle On(Visible Page)Toggled Off(Invisible Page)
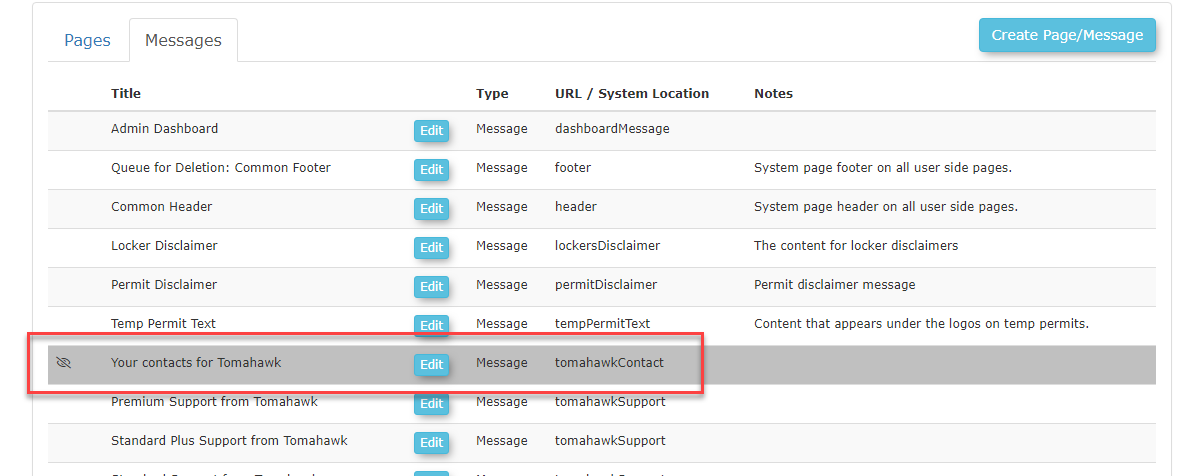
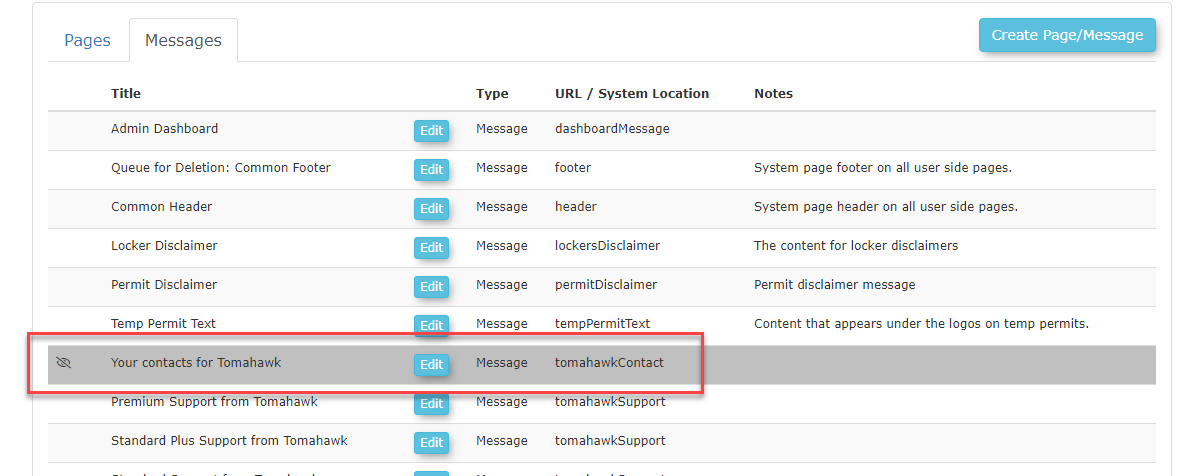
TogglingthePageas invisible will show itbackend under the Messagestabtab.likeThisseenisinhighlytheusefulimageforbelowdraftingto signify it cannot be seen by your users.
 Shortcodes
Content
Select the defaultLanguagePlacement andLayoutof your page. If you are not sure which template to use you can leave it as theDefault Layout.

Provide the content of your page in the editor found under the page settings. This content will be the main content of yourPages; you can useTemplates & Designto edit the other sections of your pages such as theHeader-ContentandFooter-Content.
OPSCOM usesShortcodesto display a section of interactive or static content like a user login, permits, etc.
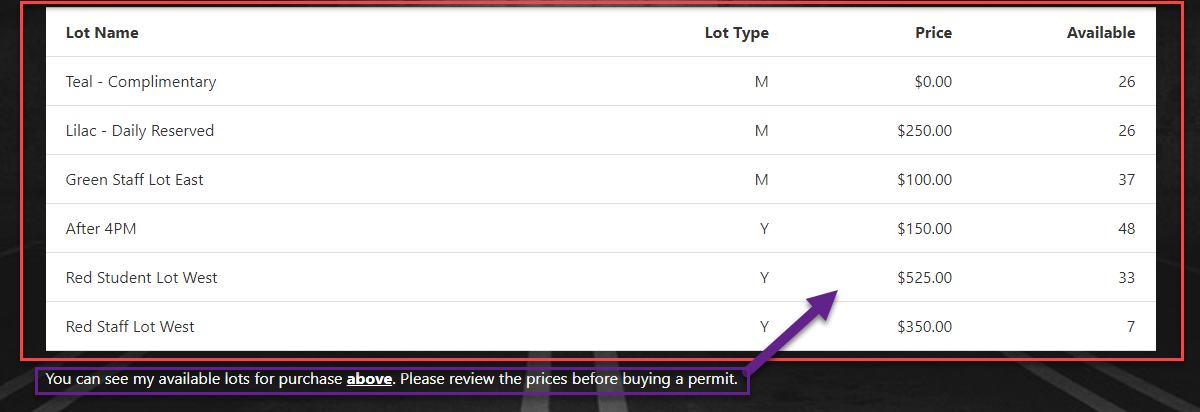
Content PlacementDepending on where you place your content it can appear differently. OPSCOM'sThe smart editor reads content from top to bottom, left to right.MeaningWherethatyou place a shortcode heavily dictates the final visual layout.For example, placing a
user loginShortcodebefore your content will look dramatically different than if you placed theShortcodelast. You can see a few visual examples of how this works below.For Example:ShortcodesBefore Content
contentAs you can see this displays ourlot information shortcode beforeouryourcontent.text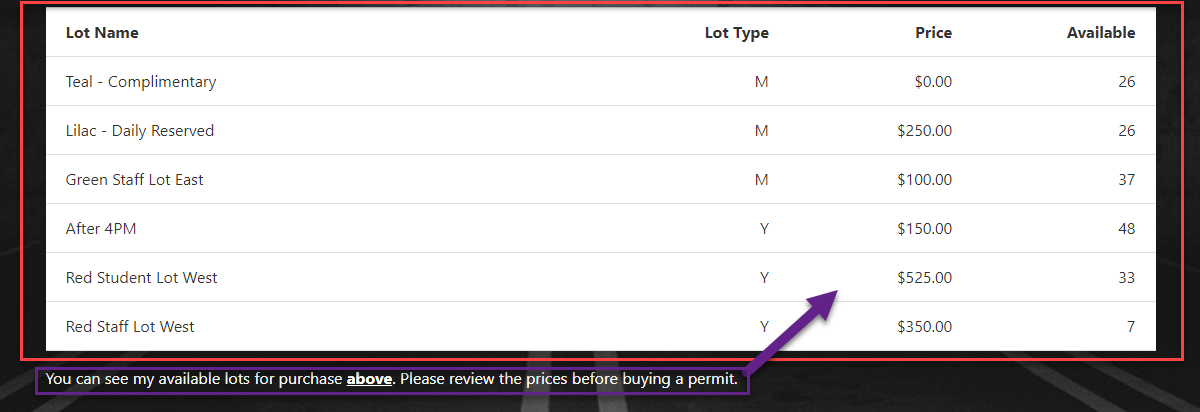
For Example:ShortcodesAfter Content
As you can see this placedrender theShortcodeinteractiveafterlot table visually above your text on thelotliveinformationpage. Placing the shortcode after the text will render the table below it.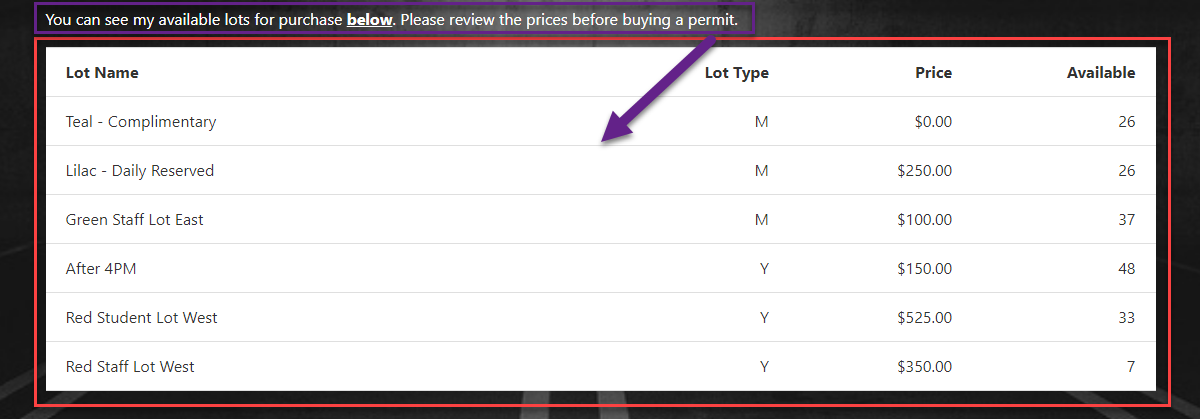
Editing Pages
-
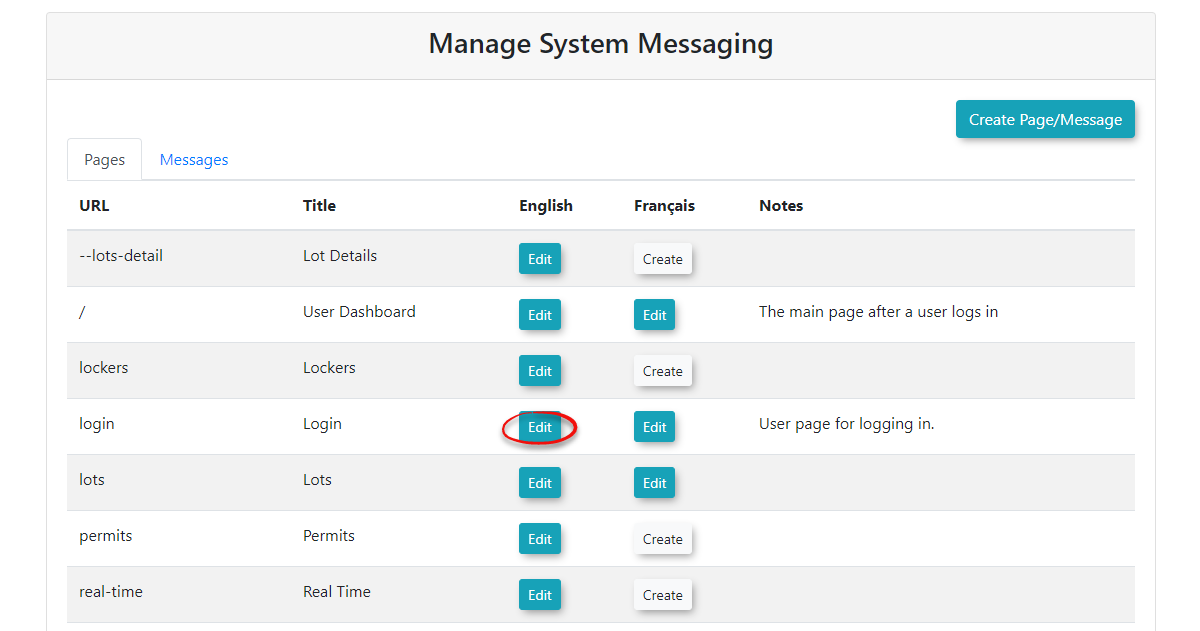
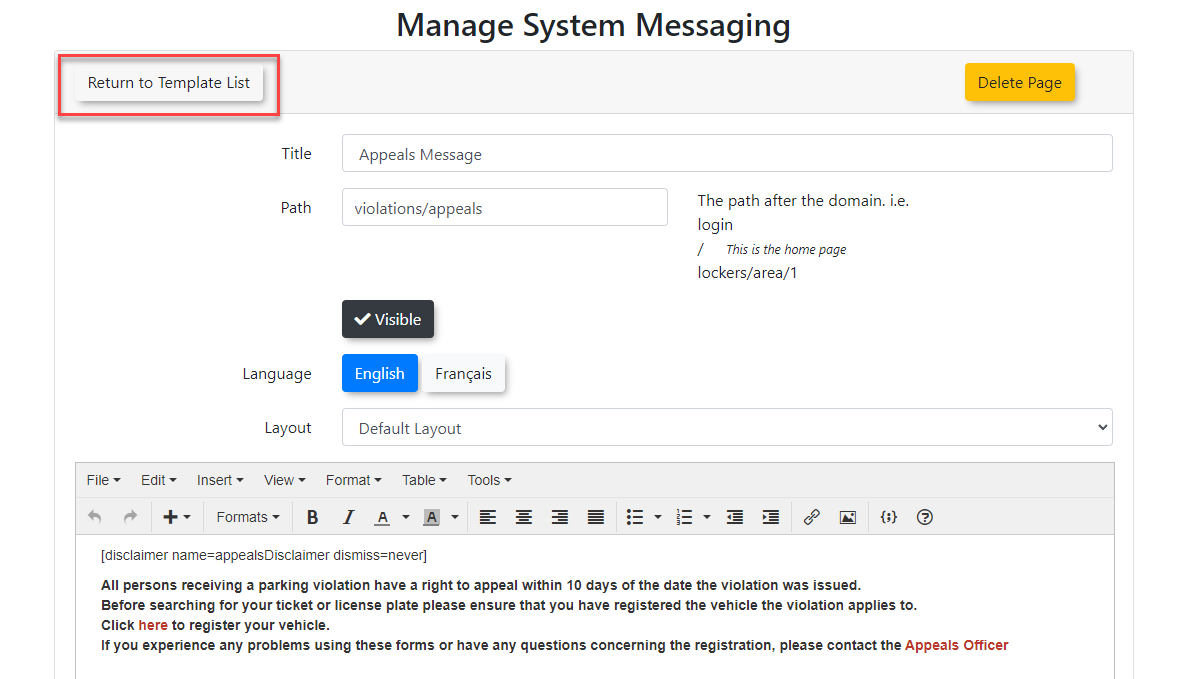
Keep in mind thatReview the URL / System Locationnextcolumntoin the pageislist to identify the specific areainofOPSCOMthethatportal you areupdating.updatingTherefore,(e.g.,ifupdatingyou/permitswished to updatemodifies the main permitscreen, you want to edit the page with aSystem Locationof /permits.screen).You can edit your pages attributes such as theTitle, Path, Visibility, Language, Layout,andContentafter it has already been created.ToEdita page, simply click onClick the Edit button next to the specific page
Titletitle.you-
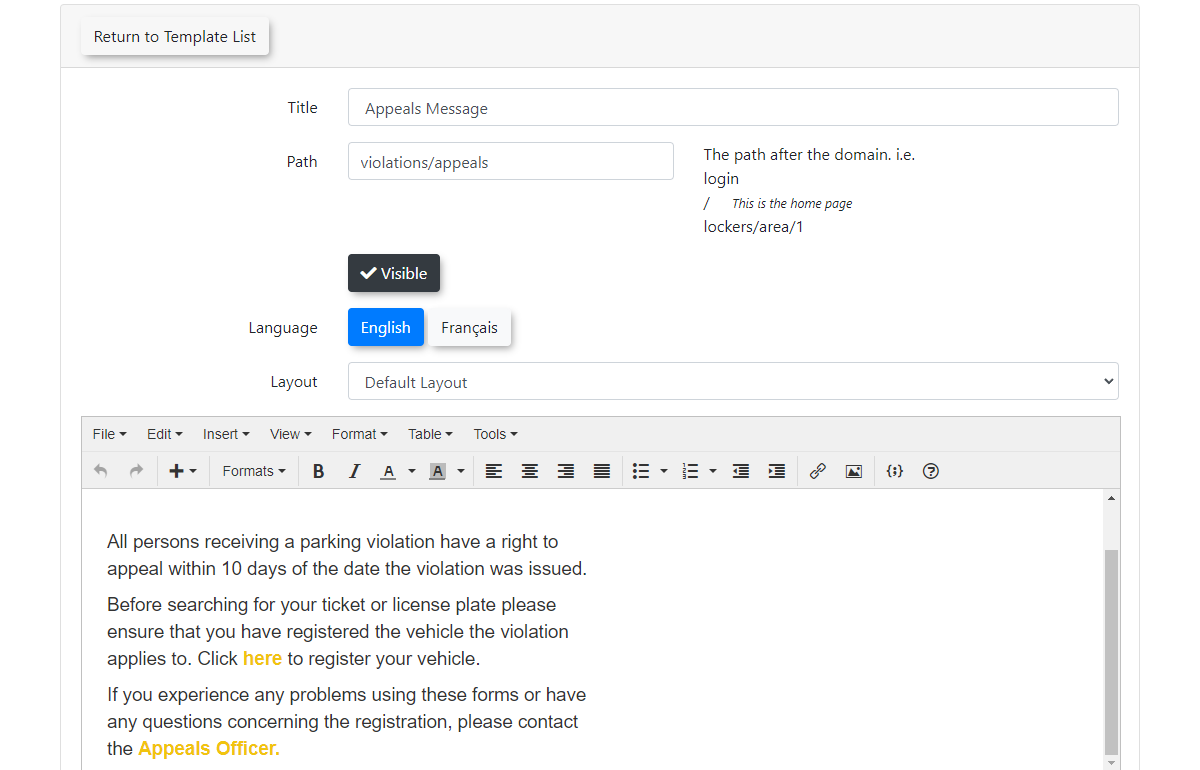
to edit. As seen inMake the
image below we are going to select and edit theAppeals Messagepage.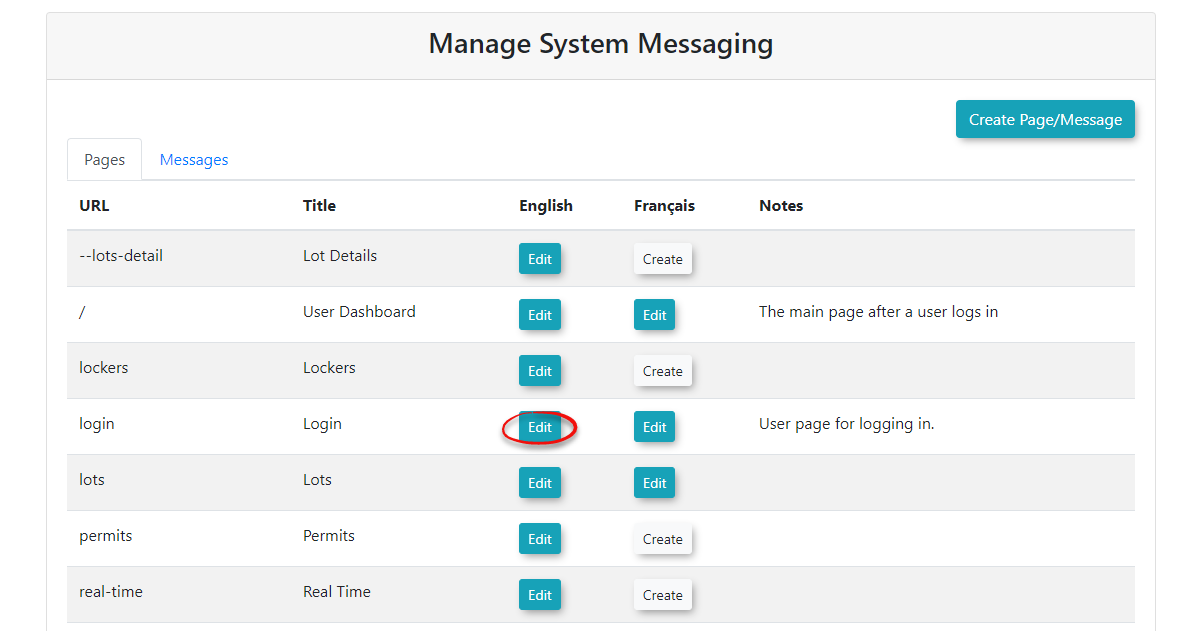
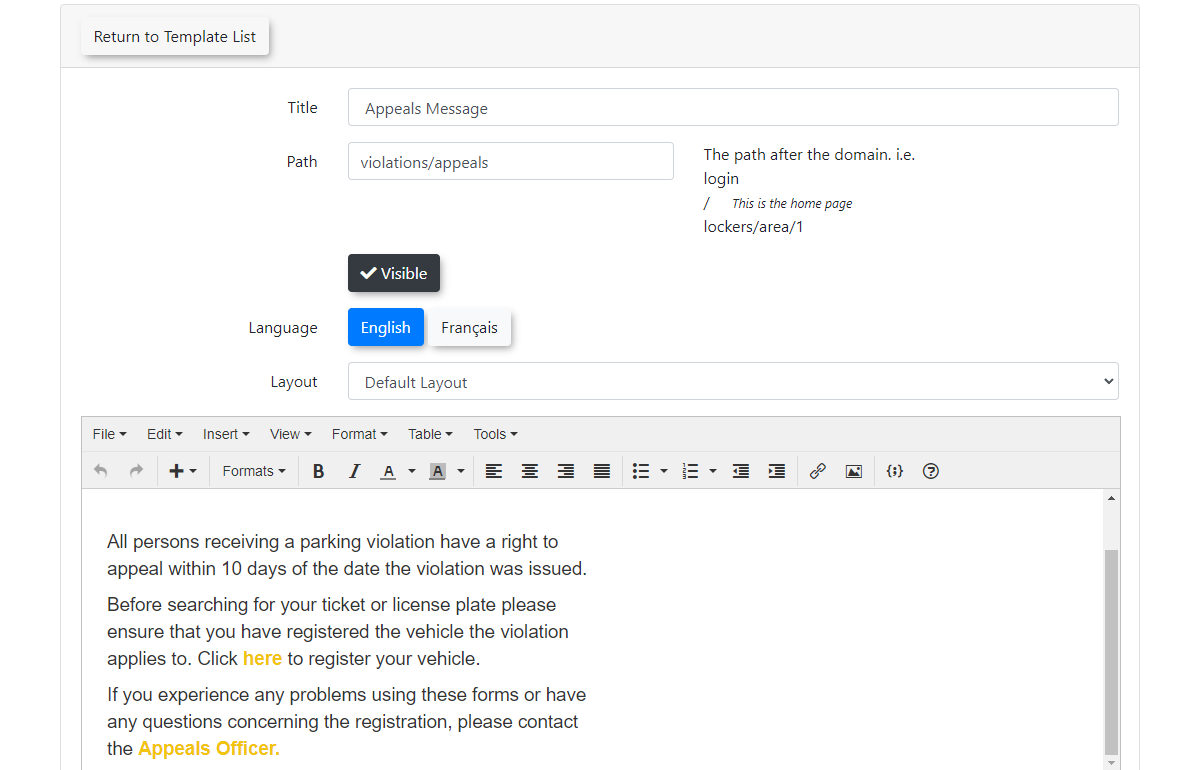
You can now make anydesired changes to thePagescontentattributes orattributes that you like.SeeCreating Pagesnear the top of the page if you are not sure what a specific field does. From here we can edit the format of thetextsuch as the colour, background color, etc..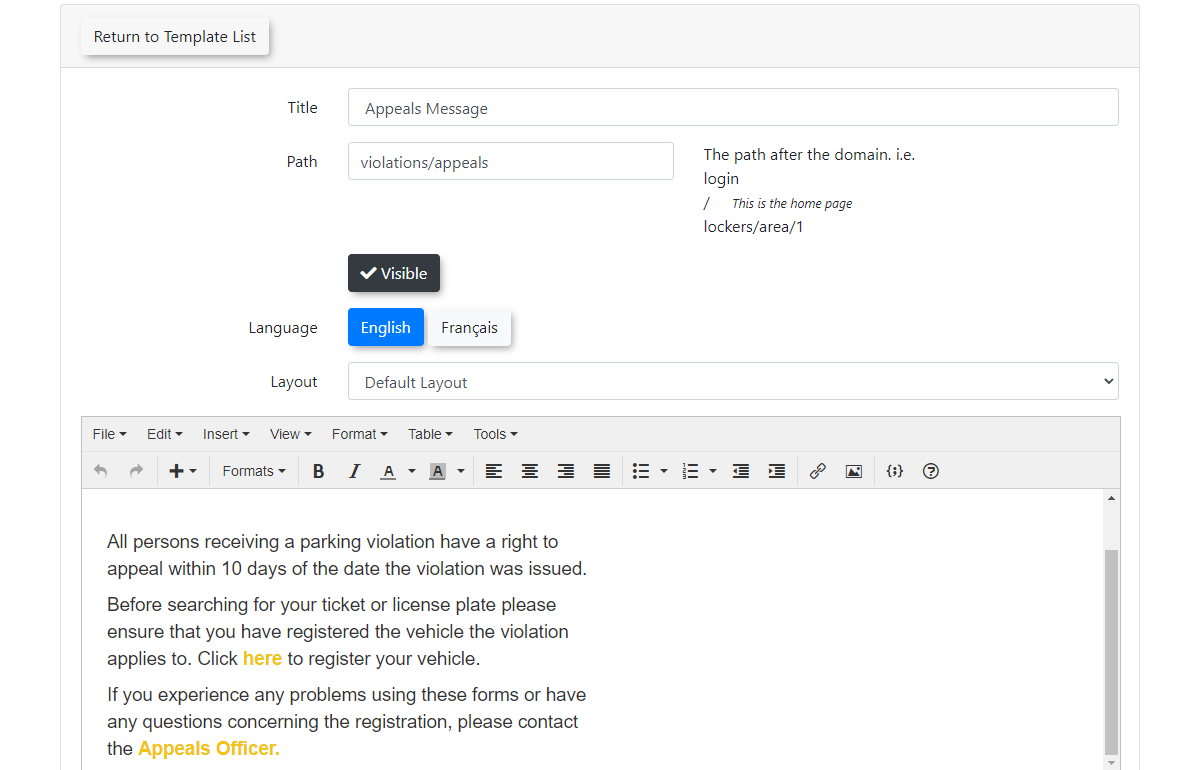
Ifyou have not made any changes toClick the
page you areEditing, you may go back to thePage Listby clickingReturn to Page List button at the top of thescreen.screenClicking this button willto discard allchangesrecentrecentlychanges,made.or
Once you have finished editingclick thepage, clickSave Messagingfor your changesbutton totakeapplyeffect.
wantCreating System Messages
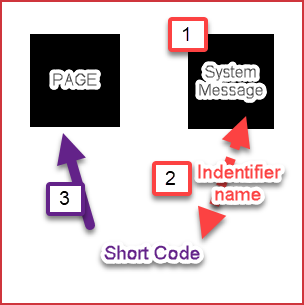
Important:Users will be brought back to theUserspage if users do not agree with aSystemMessage.messagesMeaning,arewe useSystem Messagingas a convenient wayused to offer agreements and disclaimers before users makepurchasespurchases.of permits or lockers.System Messages and How they work with PagesSystem MessagesandPageswork together using Disclaimer Shortcode's. When you create aSystem Message,you give that message a uniqueIdentifier.System message identifiers may be used in junction withDisclaimer Shortcodesto display yourSystem MessagesontoPages. The idea may be daunting at first, but once you get a better understanding of how these features work together, it will make more sense.Visual Example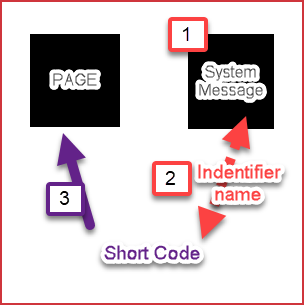
System Messagesprovide you with a convenient way to add alert messages to your pages that pop-up whenIf a userclicksdoes not agree to a required system message, they are automatically redirected away from thepage. You may createSystem Messagesto be displayed on specificPagesusing Disclaimer Shortcode's.
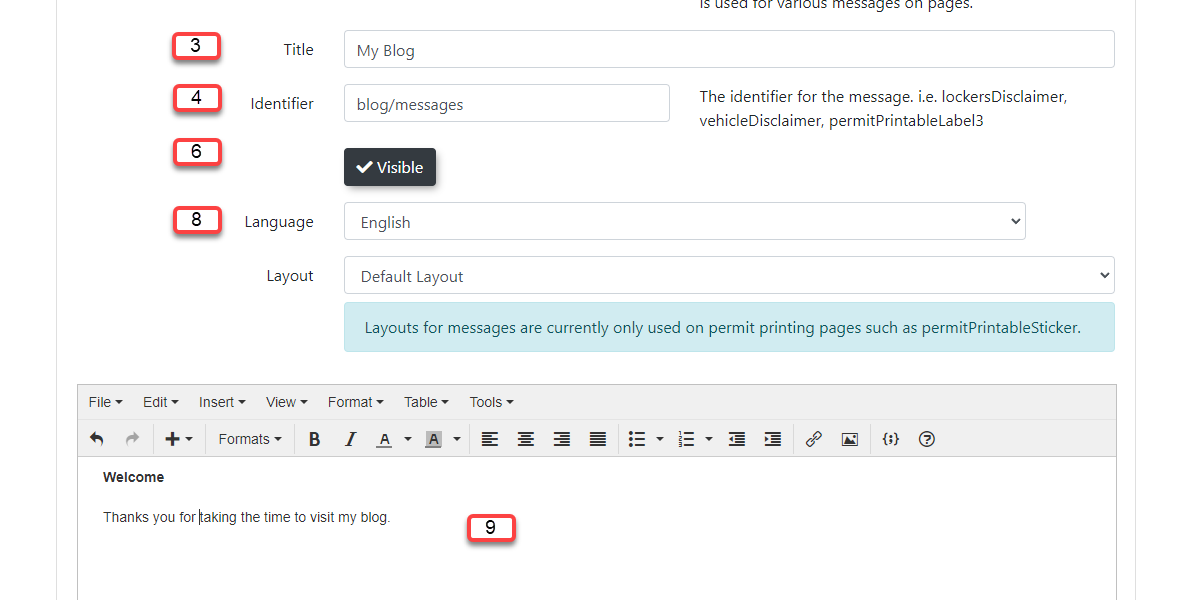
action.clicknotMessage AttributesDescriptionTitleThe title that will be displayed across the top of theSystem Messagewhen users navigate to that page.IdentifierThe identifier is used to know which page you want to display the message by usingShortcodes.VisibilityThis section toggles the visibility of your page which will make it so your users may not see the page, but you can still edit it.LanguageSelect between two language options for a specific page. Tomahawk current supportsEnglishandFrench.ContentContent is what will display on the actual page. You may useShortcodeshere to view predefined static or interactive content. For example, a user login form could be displayed on your homepage.Tocreate aSystem Messagemerely clickClick the Create
Page /Page/Messagebutton on the top right of theManage System Messagingscreen.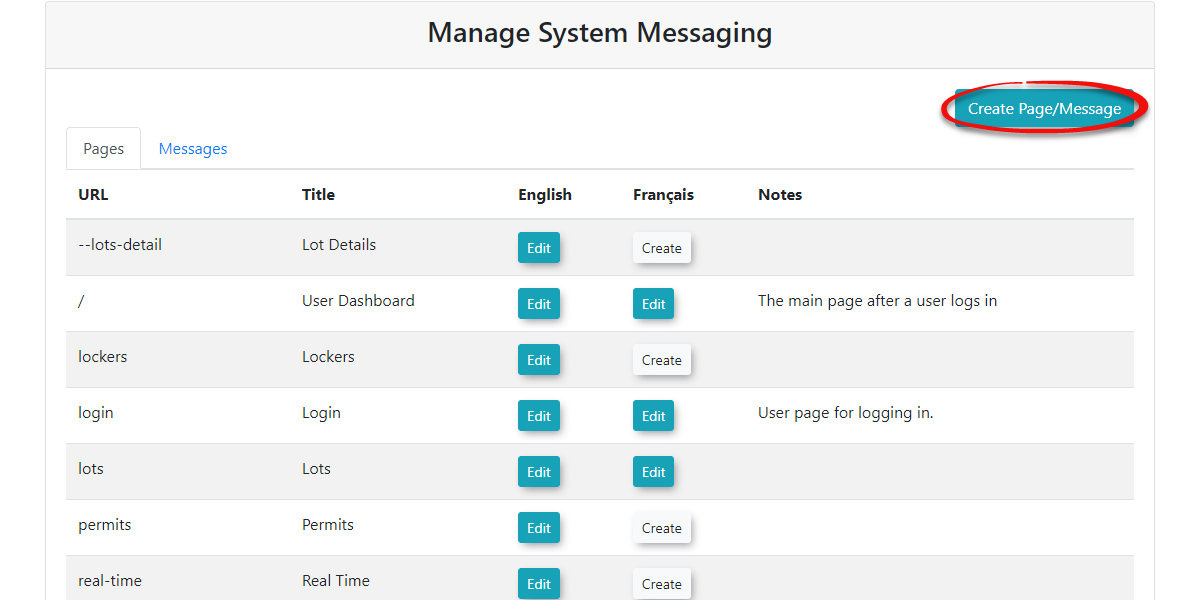
MakesureSelect
toMessageselectfrom the Page Typefrom thedrop-downmenu and change this toMessage. It is essential that you do not selectPagewhen creating aSystem Message.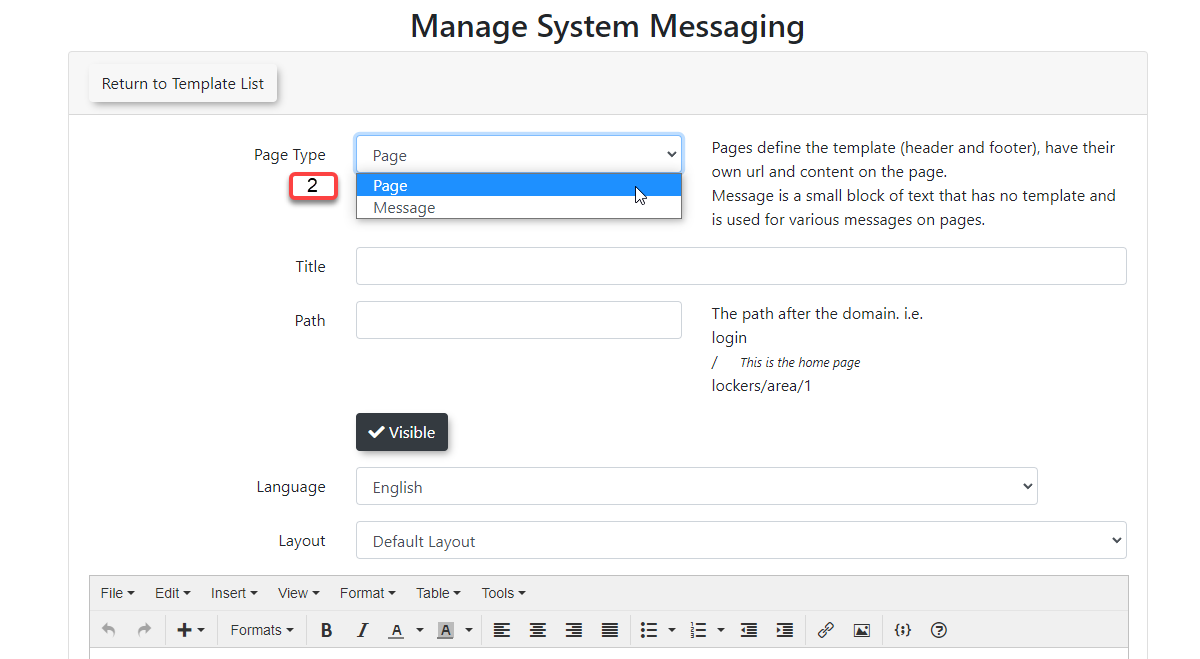
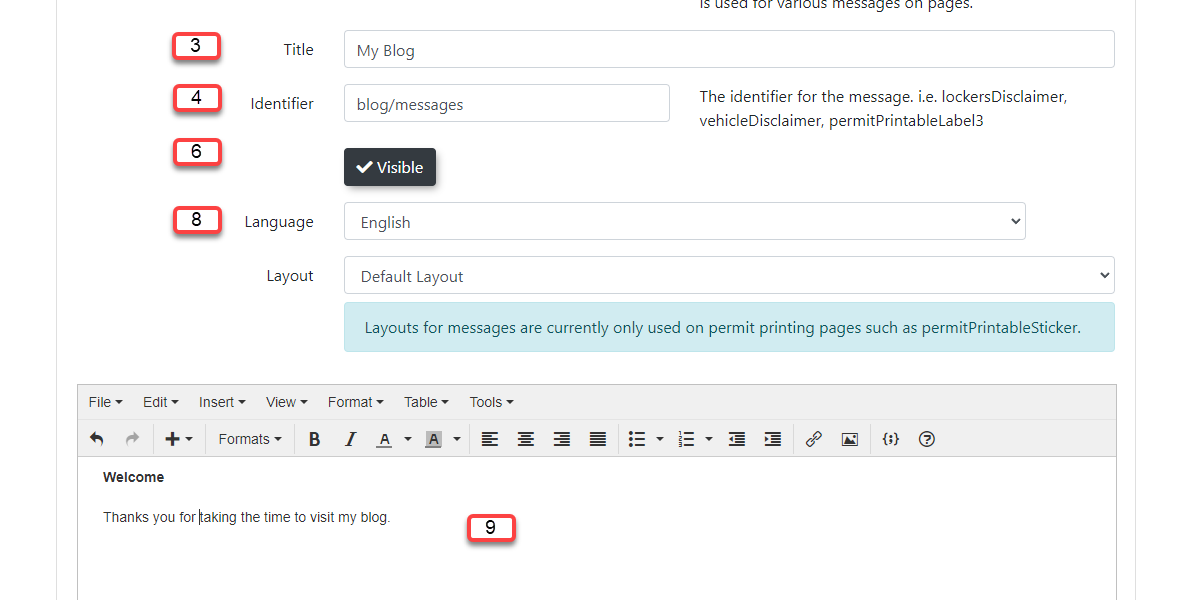
CreateEnter a Title for the message.
Givethe messageCreate a unique Identifier.
soThisitcodecanisbe accessed on yourPagesusing Disclaimer Shortcodes.Shortcodesare codesstrictly used to linkourthePagesandSystem Messagestogether.Once anIdentifieris created,It is essentialmessage tonoteathatpageyouviamayanotshortcode.use it anymore or you will get an error message.-
You may modify the visibility of yourSystem Messageby togglingToggle the Visible setting, select the Languagebutton,onandorinputoff.your
Content.Toggle On(Visible)Toggled Off(Invisible)
TogglingaSystem Messageas invisible ensures your users won't see it. Although, you can stilleditandviewClick the
SystemSaveMessageMessagingon the admin side, but it will be displayed as seen in the image below.
Select whichLanguageyou would like your content to be in. OPSCOM currently supports two languages which areEnglishandFrench.Edit the contents of yourSystem Messagein the editor found below the messages fields. This is the content that your users will see and will allow you to edit and format the way the text looks.Once finished, clickSave Messaging.
Do
Warning:Clickingthe Return to Template List button beforeSavesaving.MessagingDoing so will immediately discard allthechanges,changesandyouyourjustsystemmade, meaning that theSystem Messagemessage will notgetbecreated or your changes will not occur.created.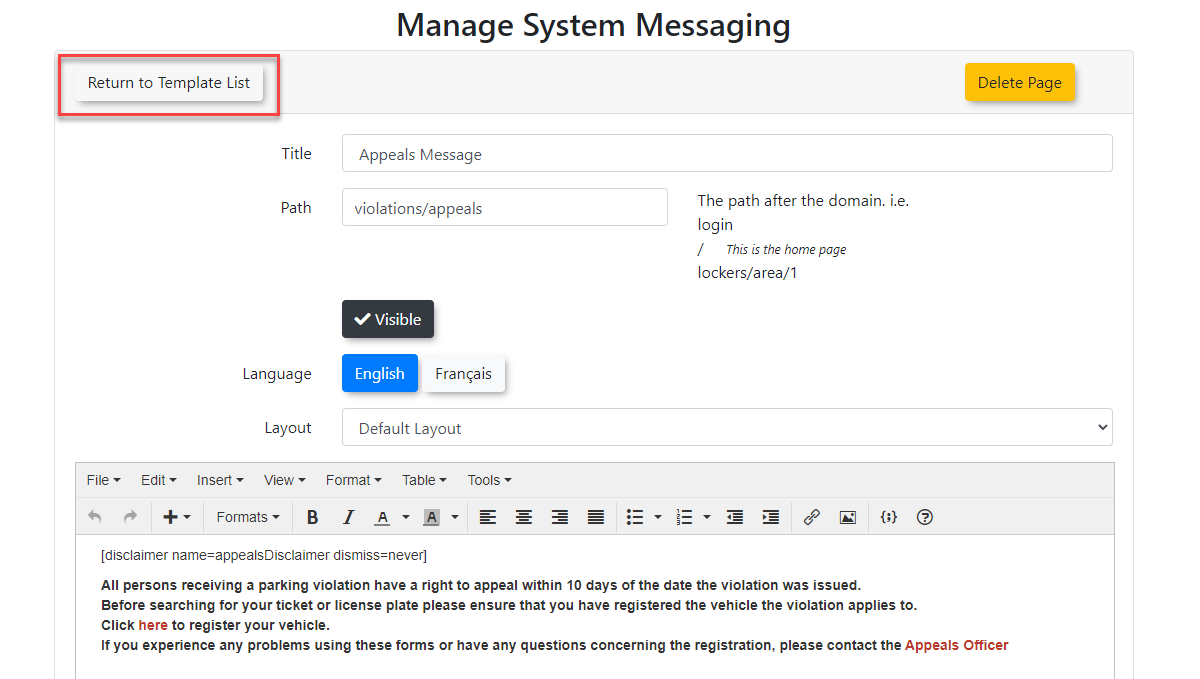
Editing System Messages
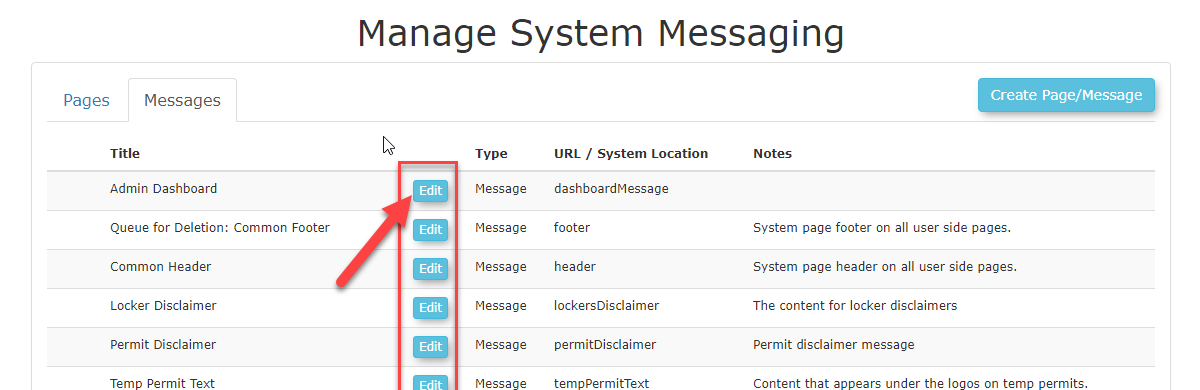
You can manage yourSystem MessagesTitle,Identifier, Visibility,Language, as well as modify the content to include text, images, orShortcodes.Practices and ConsiderationsToEdityourSystem MessagesclickClick the Messages
tabunderon theManagemainSystemmanagementMessagingscreen.page.-
SelectClick the Edit button next to the
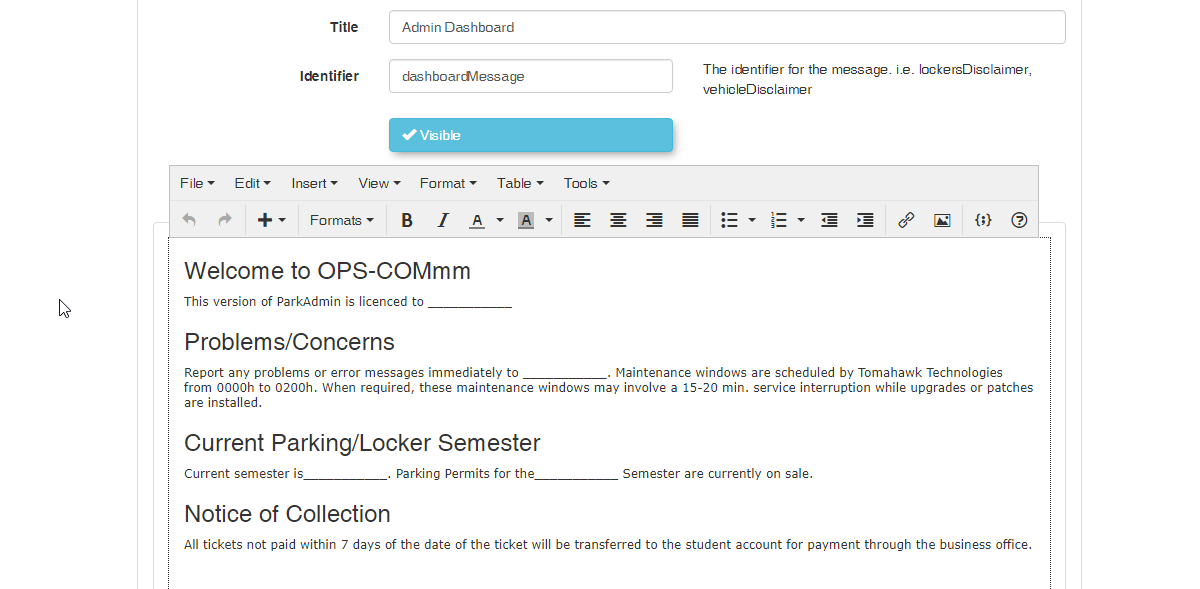
SystemsystemMessagemessage you wish toedit. For this example, we will be editing theAdmin Dashboard.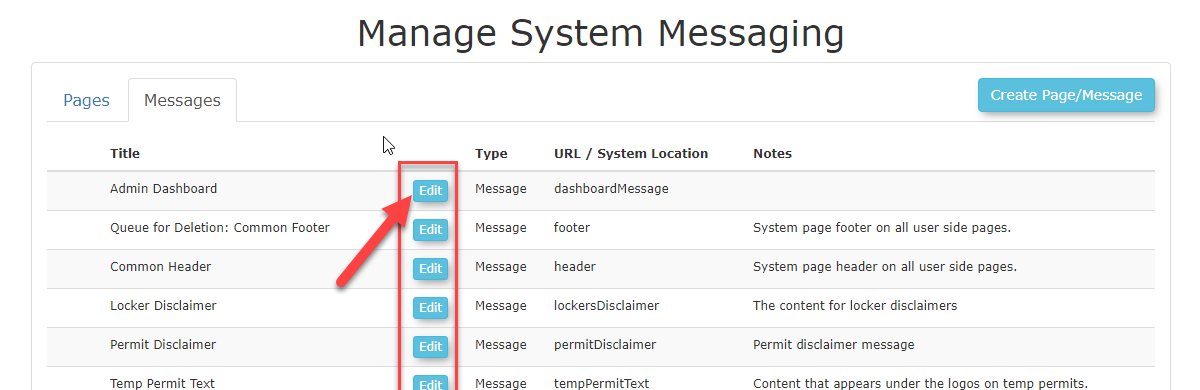
-
You will now be able to adjustAdjust themessagetitle,youridentifier,usersvisibility,willlanguage,seeorusingcontent as needed. -
Click the
SystemSave Messagingeditor.button.Below
aretheLinking
fields in which you can useMessages toeditPagestheSystem
Message.messages
andpagesusing MessagedisclaimerAttributesDescriptionTitleThe title that will be displayed across the top of theSystem Messagewhen users navigate to that page.IdentifierThe identifier is used to know which page you want toTo displaythea popup messageby usingShortcodes.VisibilityThis section toggles the visibility of your page which will make it so your users may not see the page, but you can still edit it.LanguageSelect between two language options foron a specificpage.page:OPSCOM-
supportsEnglishandFrench.
currentlyContentContent is what will display onCopy the
actual page. You may useShortcodeshere to view predefined static or interactive content. For example, a user login form could be displayed on your homepage.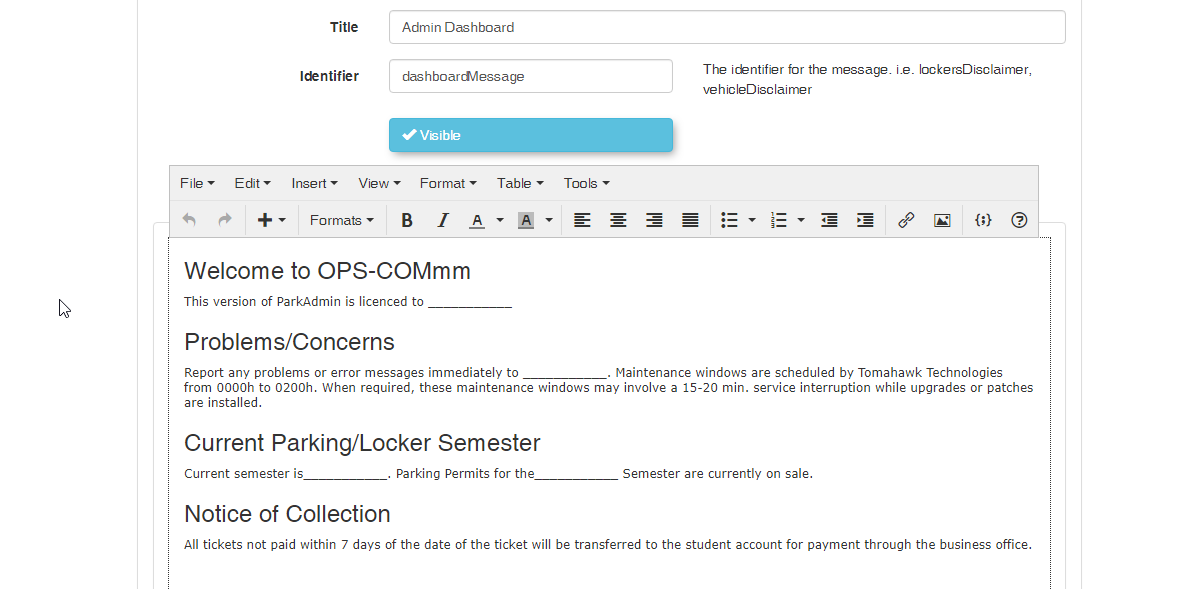
You may use theTitlefield to change theTitleof theSystem Message.You may use theIdentifierfield to change text used to display aSystem Messageto aPage,but this will require you to modify allDisclaimer Shortcodesusing the oldunique Identifierforof the system message you created.Open the target page in the editor.
Insert a disclaimer shortcode into the content area using the identifier (e.g.,
[disclaimer name=lockersDisclaimer dismiss=never]).Save the page. The system will now automatically trigger the message
you are replacing.You may clickSave Messagingwhenyouusersareaccessfinishedthatmaking your changes.
location.
Best
-
Do
If you modify a system message's identifier, you must manually update all corresponding disclaimer shortcodes across your pages. Failing toAddnotSystemorphanMessagessystem messages:PagesupdateusingtheShortcodesshortcodesNowwillthatbreakyoutheknow how to create yourPageslink, andSystemtheMessagesmessageyouwillcan bring them together using aDisclaimer Shortcode. AShortcodeis a small body of code surrounded by[ ]usedfail to displaycomplextotemplatesusers. -
Use visibility toggles for drafting: Keep the Visible toggle off while drafting new pages or
features.complex system messages. This allows you to format text and test shortcodes in the backend without accidentally exposing unfinished pages to live users. -
Leverage available documentation: Review the documentation for a detailed list of available shortcodes. Shortcodes limit the technicality of
ourthesystem bysystem, offering a convenient way to add interactivecontentforms, user data, and dynamic tables withouthavingrequiring you toknow how to script orwrite code.Please review the Shortcodes for Use on the User Portal for a detailed description of how shortcodes work. You can also find a list ofShortcodescurrently available to you by goingRefer to theOPSCOMUserShortcodeInformationDocumentation.Shortcodes article for complete details.
Related Videos