
Stripe Connect Setup
The Stripe Connect integration allows organizations to securely process credit card transactions and manage refunds directly within the system. Its primary purpose is to enable one-time payments, secure card saving for renewals, and straightforward dispute management. This guide is for OPSCOM administrators who need to set up and process payments using Stripe.
Setup and Configuration
Connecting a Stripe Account
First, we need to create a new payment type. Your old Stripe payment type will not work.
- Hover over Admin and click Config then Payments then Payment Types.
- Open your Stripe Connect payment type or create a new one.
- Click the Save button to display the Connect settings.
- Locate the Connected Account portion of the payment type's settings page.
Enter your legal Business Name and Country in the required fields.
This next step details enrolment of your existing Stripe account with OPSCOM as a Connected Account.
- Click the Connect Stripe Account button.
- Complete the Stripe hosted onboarding steps for your business details, bank account, and identity verification. This portion is entirely on Stripe's domain.
- Review the result in the payment type settings when Stripe returns you to OPSCOM. You may need to refresh the page.
- Click the Resume Onboarding button to finish or the Check Status button if the banner indicates charges are not yet enabled.
Setting up the Payment Webhook
To try it out yourself;
- Locate the Webhook setup (in OPSCOM) for the new payment type, on the settings page to see exactly what to enter.
- Navigate to your Stripe Dashboard, hover over Developers and click Webhooks then Add endpoint.
- Copy the Endpoint URL shown on the OPSCOM payment type settings page, and paste it into the Stripe field.
- Select every required event for the Events to select field, using the reference list provided in the section below.
- Click the Add endpoint button in Stripe.
- Copy the Webhook Endpoint ID and Signing Secret back into the matching fields in OPSCOM.
- Click the Save button at the bottom of the settings page.
You should always keep the webhook signing secret and any other payment related API keys stored securely as if they are passwords, for all payment providers.
This next step can be complex, and if needed, OPSCOM Support offers complimentary enrolement assistance, email support@ops-com.com
Required Webhook Events
-
payment_intent.succeeded: Listens for successful payment confirmations.
-
payment_intent.payment_failed: Listens for payment failures or declined cards.
-
payment_intent.canceled: Listens for cancelled payment attempts.
-
account.updated: Listens for updates to your connected account state.
-
capability.updated: Listens for changes to your account processing capabilities.
-
setup_intent.succeeded: Listens for when a user successfully saves a card on file.
-
payment_method.detached: Listens for when a saved card is removed.
-
charge.refunded: Listens for completed refund confirmations.
-
charge.refund.updated: Listens for changes to a refund status.
-
charge.dispute.created: Listens for newly opened chargebacks and disputes.
The Subscribed webhook events check is the fastest way to catch a webhook that is missing a newer event. If OPSCOM cannot read your endpoint, the row lists the full set of events to confirm by hand. It should list the specific event that is missing. Make sure all of them are properly included in in the webhook. If this is not done, the integration will not work. Once you paste and save the Webhook Endpoint ID and Signing Secret in OPSCOM, they intentionally disappear from the UI for security purposes. To get them again, you will have to regenerate a new key, and put this new key into the payment type in OPSCOM. SAVE THIS IN A PASSWORD KEEPER, FOR YOUR OWN CONVENIENCE AND SECURITY. If you need to update them, simply paste the new keys over the blank fields and click the Save button again.
Using this Feature
Taking a Payment
- Start a payment from a user account or relevant charge screen and choose the Stripe payment type.
- Enter the card details into the inline card form on the checkout step.
(for testing, use: 4111 1111 1111 1111) - Click the Submit button to process the payment and view the receipt.
If the browser is closed or the network drops after submitting, the payment still finalizes. A background checker reconciles it within about a minute. This is specific to Stripe Connect.
Managing Saved Cards
Processing Refunds
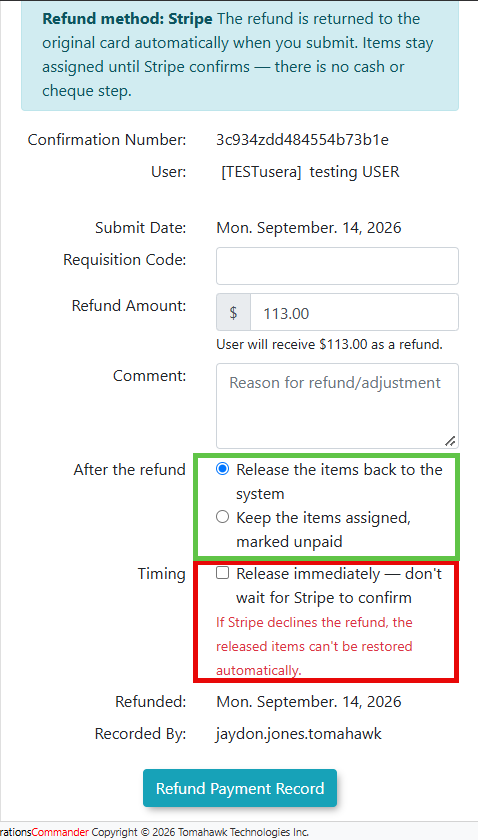
- Open the payment in OPSCOM and click the Refund button.
- Enter the amount in the field. Default is a full refund.
- You have the opiton to choose Release the items to unassign permits and return them to inventory, or choose Keep the items assigned to flag the user items as unpaid. (The second option will have the unpaid/refunded item returned to the user's cart, so they can pay another way)
- Clicking Release immediately to apply the release right away without waiting for Stripe confirmation can be a bad idea, if the user's card does not accept the refund. It is best to choose
- Click the Submit button.
In the image, I have put in a red box, the option that you should not use, and the two options to use are in the green box. Unless you have a reason to not notify Stripe about the refund, do not use the third opton.
Handling Chargebacks
Best Practices and Considerations
-
Organizations should treat the Stripe Dashboard as the source of truth for chargeback disputes and respond before Stripe deadlines. OPSCOM banners are convenience notices and cannot submit dispute evidence on your behalf.
-
Administrators should rely on the default pessimistic refund to ensure inventory only updates when the bank actually clears the return of funds. Do not force release items during a refund unless absolutely necessary.
-
Organizations must re-onboard their connected account if application fee rates change at the platform level. Existing accounts maintain their original fee structures until a new onboarding agreement is processed.