Templates and Design

The Templates and Design module allows administrators to heavily customize the visual functionality and branding of the User Portal. Its primary purpose is to structure the visual layout around your core page content, ensuring the portal accurately reflects your corporate branding and provides a seamless user experience. This article is intended for OPS-COM administrators.

OverviewSetup and Configuration

Configuring your portal's design involves creating a foundational layout and then building specific templates within that layout.

Admin Side:

Creating a Layout

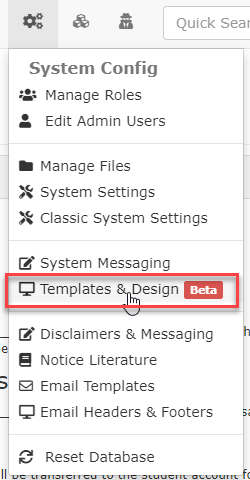
  1. Hover over System Configuration and click Templates and Design.

  2. Click the Create Layout button located at the top right of the page.

  3. Enter a descriptive name for your new layout in the provided field.

  4. Click the Save Changes button. The layout will now appear in your Layouts list.

  5. Click the Non-Default drop-down menu and select Default if you wish to make this the active layout for your system.

Creating Templates

  1. Hover over System Configuration and click Templates and Design.

  2. Click Toggle Templates next to your newly created layout to display its available templates.

  3. Click the Create button to begin adding specific section templates to the layout, including bilingual support for English and French.

User Side: End-users do not interact with the setup of templates. They will simply view the customized layout when navigating the User Portal system allows your clients to register, add vehicles, purchase permitspermits, andor pay violations.

It

Using this Feature

The OPS-COM User Portal is ansplit importantinto extensionspecific visual sections using templates. All core text content is added through Pages and Content Blocks, while templates wrap around that content to provide styling and structure.

Template Sections

  • Header: The top of your business,page containing the header image, logos, and it should reflect your corporate branding.

    Pages and Templates

    The OPSCOMprimary user Pagenavigation.

    will
  • store
  • Content_Header: An upper section to place content, such as alerts or user information, before the functionalitymain andbody.

  • Content: The core content of your mainpages. page,This whilecannot be added from the Templatestemplates willmodule beand requires you to navigate to the system messaging tools.

  • Content_Footer: A lower section appearing after the core content. You can use this to display subsequent alerts, messages, or additional context.

  • Footer: The bottom of your page used to changeadvertise important information, provide contact details, or display software versioning.

Available Actions & Buttons

  • Toggle Templates: Click this button to instantly display all of the functionalitysection oftemplates yourcurrently pages as well as the content around the Page. 

    Whereattached to Finda Templatesspecific layout.

  • Edit: Click this button next to a layout or section name to modify its details and Designsource code.

  • Archive: Click Systemthis Configuration, Templates & Designbutton to accesssafely theseretire features.a

    image.png

    All Default Templates 

    If at any point you feellayout that you haveare adjustedno longer using without permanently deleting its history.

Default System Templates

If you adjust the Default <scripts> and <styles> to the point of breaking your site, or you are simply unsure what your changes have done, you can refer to thesethe default templates below to quickly restore your pagespage's functionality and style.

Default Script Template

 
1
2
3
4
5
6
7
8
9
10
11
12
13
14
15
16
17
18
19
20
21
22
23
24
25
26
27
28
29
30
31
32
33
34
<script>
    $(function(){
        $.fn.shuffle = function() {
 
            var allElems = this.get(),
                getRandom = function(max) {
                    return Math.floor(Math.random() * max);
                },
                shuffled = $.map(allElems, function(){
                    var random = getRandom(allElems.length),
                        randEl = $(allElems[random]).clone(true)[0];
                    allElems.splice(random, 1);
                    return randEl;
                });
 
            this.each(function(i){
                $(this).replaceWith($(shuffled[i]));
            });
 
            return $(shuffled);
 
        };
        $('#slideshow-header div').shuffle();
        $("#slideshow-header > div:gt(0)").hide();
 
        setInterval(function() {
            $('#slideshow-header > div:first')
                .fadeOut(1000)
                .next()
                .fadeIn(1000)
                .end()
                .appendTo('#slideshow-header');
        },  10000);
    });
</script>
Default Style Template 
 
1
2
3
4
5
6
7
8
9
10
11
12
13
14
15
16
17
18
19
20
21
22
23
24
25
26
27
28
29
30
31
32
33
34
35
36
37
38
39
40
41
42
<style>
  body {
    backgroundblack url(/uploads/FILES/OC_TOMA/parking-deck.jpg) center center;
    background-size: cover;
    background-attachmentfixed;
    color#FFF;
  }
  .card, .modal, .list-group-item {
    color#333;
  }
  .slideshow-header {
    position:relative;
  }
  .slideshow-header .slides {
    z-index0;
    position:absolute;
    top:0px;
    left:0px;
    right:0px;
    bottom:0px;
    display:flex;
    align-items: center;
    justify-contentcenter;
  }
  .slideshow-header .overlay {
    z-index1;
    position:relative;
  }
  #slideshow-header {
    overflowhidden;
    opacity:0.8;
    box-shadow: 0 0 20px rgba(0000.4);
  }
 
  #slideshow-header > div {
    width:100%;
    positionabsolute;
  }
 
  #slideshow-header div img {
    width100%;
  }
</style>
Default Header Template 
 
1
2
3
4
5
6
7
8
9
10
<div class="text-center slideshow-header">
  <div class="slides" id="slideshow-header">
  </div>
  <div class="overlay">
    <img alt="" class="img-fluid" src="/MEDIA/demo_extras/TomahawkUniversity_logo.png" style="display:inline; width: 450px; margin-top: 80px; margin-bottom:80px;"/>
  </div>
</div>
[user_menu]


UnderstandingBest TemplatesPractices &and Design Considerations

Templates & Designs are the visual functionality of your web page structured around your Page content. OPSCOM provides you with default templates which allow you to get started easily without having to know any code. 

  • Once you

    Avoid arecomplex oncode thechanges landingif page fornon-technical: Templates & Design, you can view a list of your current templates, or create a new one. Templates contain all of the sections found on your User Portal except for the Page content found in the middle of the page. To adjust this you will have to leave Templates & Design and navigate to System Messaging

image.png

  • OPSCOM gives you a total of 12 section templates, 6 in English and 6 in French. (Of course, you will have to create the French content yourself as we do not provide a translator).
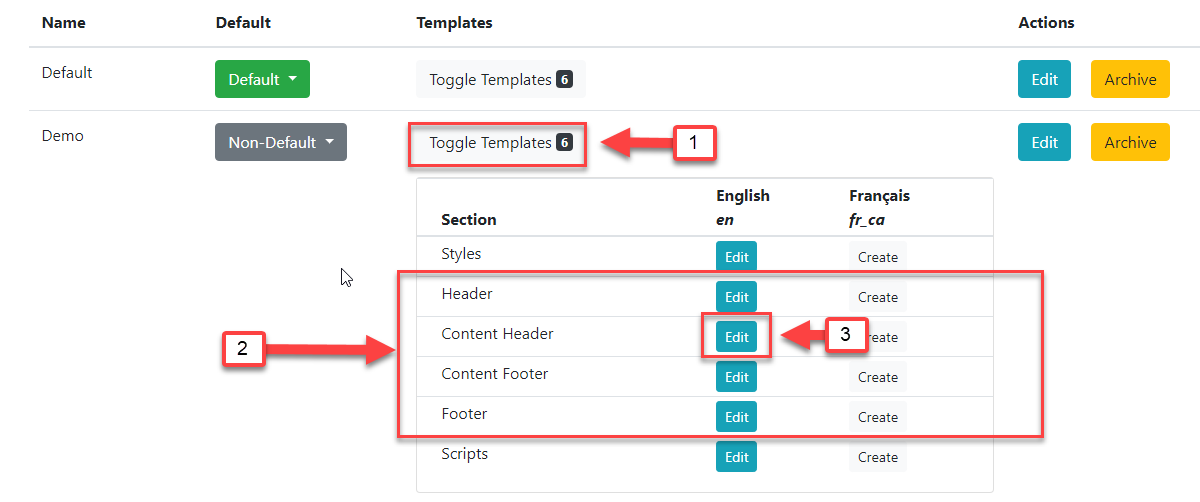
image.png

  1. Clicking on Toggle Templates will display all of the sections attached to that template. Templates can be created in English and French. 

  2. The contents of our pages are split into four separate sections. Header(1), Content Header(2), Content Footer(4), and Footer(5). See Template Layout right below this guide to get a better understanding of the OPSCOM layout. 

  3. To edit a template Section, simply click Edit next to the section name. 

Template Layout

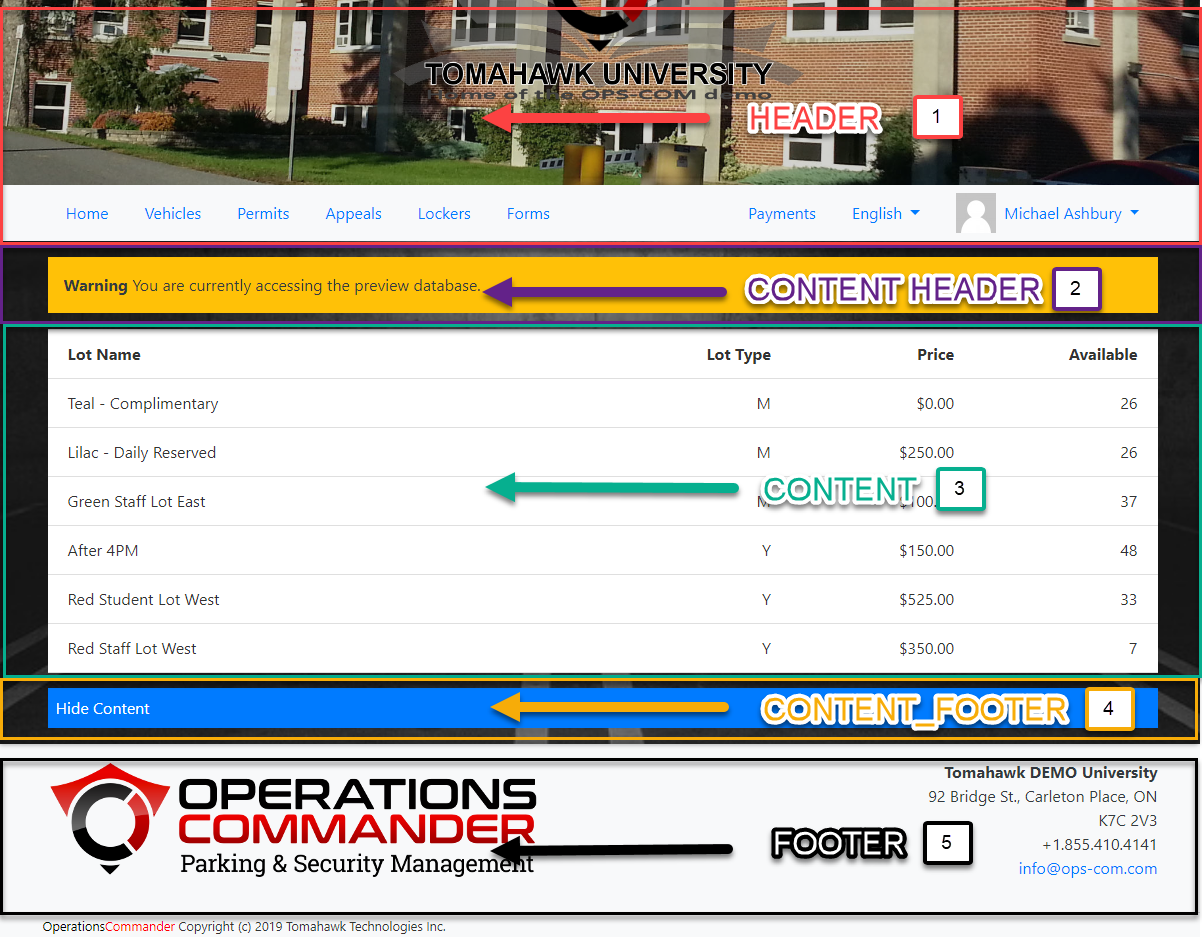
Below is a visual example of how your Pages are split into Sections using Templates. All of the Content (3) of our Pages are added through the System Messages under Pages

image.png

  1. Header - The header of your page, where you can find your header image and user navigation. 

  2. Content_Header - Another header section for you to place content into, such as alerts or user information. Everything placed here will appear before the Content and Content Footer.

  3. Content - The content of your pages. Content may not be added from Templates & Design and will require you to navigate to System Messaging

  4. Content_Footer - The footer of your Content. Everything placed here will appear after the Content Header and Content. Again, you can use this to display alerts, messages, or additional content to your Template. 

  5. Footer - The footer of your page is where you can find useful information. You can use this area to advertise important information your users might need while using your system. 

Page Layouts and Templates 

Creating Layouts

To create a layout simply click the Create Layout button found at the top right of the Layouts page. 

image.png

You will be presented with the Add Layout system message. 
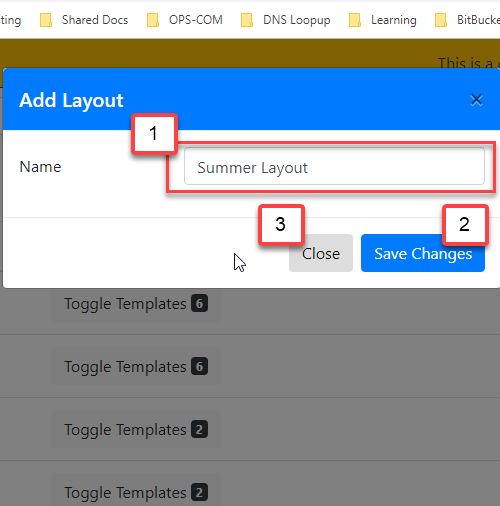
image.png

  1. Provide the name of your layout. In this example, we are going to create our own Summer Layout to be used, instead of the default layout.

  2. Click Save Changes when you are happy with the name of your layout. Once the Layout has been created, you can see it under the Layouts list. 

  3. If you wish to cancel the creation of your layout simply click Close

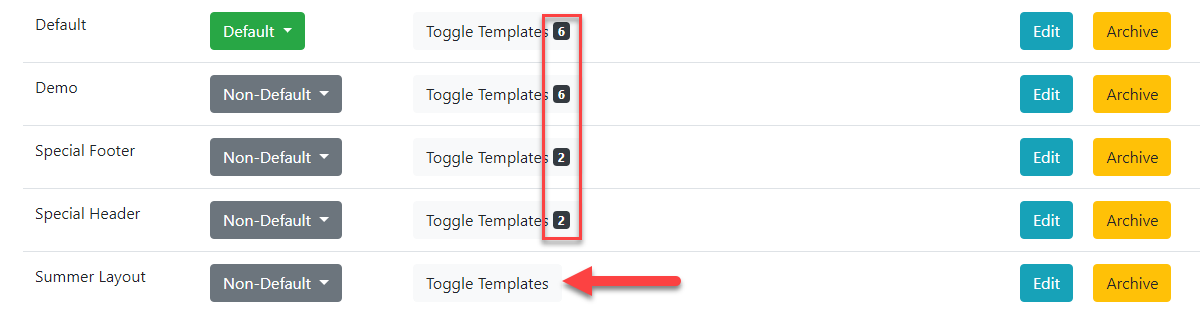
  4. You can see that our Summer Layout was added to the end of our Layouts List with no sections yet. 

  5. You can choose whether or not your template is the Default template at any time by clicking the Non-Default drop-down and selecting Default.
  6. Anytime you add sections to your Templates it will display how many are attached next to Toggle Templates. As you can see, we don't have any Sections created yet so there are no numbers to be displayed, otherwise, clicking on Toggle Templates would show you a list of all the templates currently attached to that Layout.


image.png

      7. You can edit the layout name by clicking on the Edit button next to archive.

      8. If you would like to archive a layout that you are no longer using, you can click the Archive button next to edit. 

Creating Templates

Now that you have a better understanding of how Templates work with Layouts we can start creating our own. 
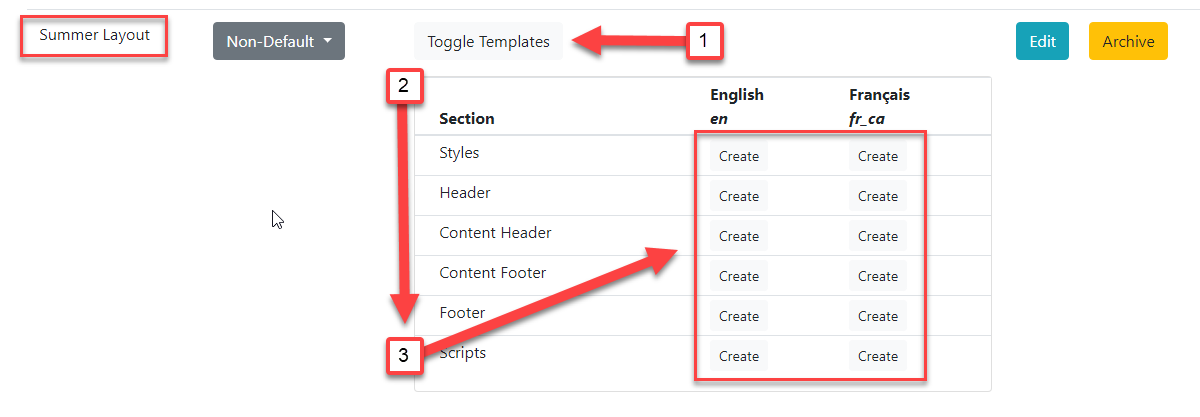
image.png

  1. Click on Toggle Templates. 

  2. Clicking this will display the available Templates attached to the Summer Layout

  3. You can now Create a variety of templates for your page, including bilingual support. 

  4. If you are non-technical, it is highly advised not to change the raw code for Scripts, Styles, Header, and Footer Templates. You can use the default Style, Script, Header, and Footer Templates from All Default Templates. These can still be edited according to your company and their style guides. See Edit the Page Style andInstead, Edit the Page Behaviour below for more information. 
     

Edit the Page Style (CSS) 

Important

This guide is used if you intend to adjust the Templates provided to you by OPSCOM. If you choose to rewrite your own Templates you can choose to ignore this.


Content
/* Style properties of our page body, this affects the entire page. */
body {
    backgroundblack url(/uploads/FILES/OC_TOMA/parking-deck.jpg) center center;
    background-size: cover;
    background-attachmentfixed;
    color#FFF;
}
 
/* This changes the color property of --Find where these classes are used 
.card, .modal, .list-group-item {
    color#333;
}
Slide Show
/* Below are all of the styles for our header slideshow at the top of each page. */
/*--------------WORD BANK---------------
 * ELEMENTS: Elements are the tags with '<>' around them such as <div> and <img> found in the default header and footer template.
 * We access them here by giving them a Class name or ID.                                          
 * PROPERTIES: Properties are used to define certain styles to a class or ID.
 * CLASS: Generally used to assign a style to a group of HTML elements but can be used on single elements as well.
 * They are assigned within HTML elements like this: <div class="MyClass"></div> where MyClass would be your class name.
 * ID's: Generally used to assign styles to a single element but can be used on multiple elements as well.
 *
 *--------------CLASSES-----------------
 *
 * To learn more about the CSS Position Property see: https://www.w3schools.com/cssref/pr_class_position.asp
 * For more information on CSS Syntax and Selectors see: https://www.w3schools.com/css/css_syntax.asp
 * It is not recommended to adjust with the position of elements unless you are sure about the changes being made. This can dramatically change how content is positioned. 
 */
 
/* Class Names and Elements
 * [.slideshow-header]: Container that contains our slides and overlay.
 *
 * Properties
 * @position: Adjust the position of the slideshow-header. For more information see: https://www.w3schools.com/css/css_positioning.asp
 */ 
.slideshow-header {
    position:relative;
}
 
/* Class Names and Elements 
 * [.slideshow-header]: Container that contains our slides and overlay.
 * [.slides]: Controls the style properties of the individual slides.
 
 * Properties  
 * @z-index: Adjust the stack placement of the [.slideshow-header] and [.slides] along the Z axis.
 * @position: Define the position of the page. 
 * @top:Change in the position from the top of an element.
 * @left: Change in the position from the left of an element.
 * @right: Change in the position from the right of an element.
 * @bottom: Change in the position from the bottom of an element.
 * @display: Adjusts how the content is displayedrely on the page.provided See:default https://developer.mozilla.org/en-US/docs/Web/CSS/display and https://www.w3schools.com/css/css_display_visibility.asp
 * @align-items: Aligns the child elements of this PARENT elementtemplates to beensure centered.site For a visual example see: https://developer.mozilla.org/en-US/docs/Web/CSS/align-items
 * @justify-content: Defines how the space disturbed around the child elements. For a visual example see: https://developer.mozilla.org/en-US/docs/Web/CSS/justify-content
 *
 * These are the style properties and values of the slideshow header and its individual slides.
 */
.slideshow-header .slides {
    z-index0;
    position:absolute;
    top:0px;
    left:0px;
    right:0px;
    bottom:0px;
    display:flex;
    align-items: center;
    justify-contentcenter;
}
 
/* Class Names and Elements
 * [.slideshow-header]: A container that contains our slides and overlay.
 * [.overlay]:
 *
 * Properties
 * @z-index: Used to layer elements. Elements with a higher z-index number will appear before elements that are lower.
 * @position: Set the position property for the element. We recommend you do not adjust this property unless you have knowledge on how the changes will affect your page.
 *
 * These are the styles for the overlay, as well as additional properties for the slideshow-header.
 */ 
.slideshow-header .overlay {
    z-index1;
    position:relative;
}
 
/*--------------ID'S---------------*/
/* ID Names and Elements
 * [#slideshow-header] is the container used to contain the images you have chosen for your header
 *
 * Properties
 * @overflow:
 * @opacity:
 * @box-shadow: Create a box shadow for this element.
 * EX: box-shadow: a, b, c, d(e, f, g, h); 
 */
#slideshow-header {
}
  
/* ID Names and Elements
 * [#slideshow-header] is the container used to contain the images you have chosen for your header
 *
 * Properties
 * @width: 100% width will take of 100% of that element.
 * @position:
 */
#slideshow-header > div {
    width:100%;
    positionabsolute;
}
  
/* ID Names and Elements
 * [#slideshow-header]: is the container used to contain the images you have chosen for your header.
 * [div]: Refers to our HTML elements.  
 * [img]: Refers to our images in the slideshow. 
 
 * Properties
 * @width: Defines the width of the images, divs and slideshow-header. A value of 100% will display the image across the entire page. 
 */
#slideshow-header div img {
    width100%;
}


stability.

Edit the Page Behavior (Scripts) 

Disclaimer

Please review the list of supported scripting languages below. If a Javascript vendor is unverified it may break the functionality of your site.

 Verified Script Vendors
  1. Bootstrap
  2. Use verified script vendors: Only use verified script vendors like Bootstrap and jQuery -to Toavoid fullybreaking customizesite functionality. Unverified JavaScript vendors can actively disrupt the slideshowuser scriptportal thatand displayscause elements to load incorrectly.

  3. Leverage API integrations: Use the slideshow found at the top of each page, you will need to know jQuery. You could choose to rewrite the slideshow script in whichever Javascript vendor that is verified. 

API Integration

Additionally, you can use ourOPS-COM API to integrate with pay stations and other devicesdevices. thatThis will allowallows you to securely grab and display useful information from your users.users directly within your portal templates.