User Types
The User Types infeature OPSCOMallows administrators to categorize your system users (e.g.,such as Student, Staff, or Public) and control various aspects of their interaction with the system,system. includingIts primary purpose is to tailor the user experience by defining access to specific lots, available payment options, and the visibility of specific fields visible on their profile.profile Configuringbased on their assigned group. This article is intended for OPS-COM administrators responsible for managing user types allows administrators to tailor the OPSCOM experience to different user groups, ensuring appropriate permissionsaccounts and functionalities.system permissions.
Setup & Configuration
User Type configurations are managed through the User Type Administration tool.
Hover over System Configuration, then Users, and click Types.
This willfeature openrequires administrative access to manage user groups and system master categories.
Admin Side: Administrators must have the appropriate system role permissions to access the user configuration tools and create new user types.
User Type AdministrationSide: page,Depending displaying a list ofon your existingconfiguration, Userend-users Types.can select their user type during the initial portal registration process.
Creating a New User Type
-
Hover over System Configuration, click Users, then Types to open the User Type Administration page.
-
Click the Create New User Type button.
-
Enter the desired name into the Type Name for your new user typefield (e.g., Public Parker)Parker).
Set
Select the appropriate internal master category from the Grouping fordrop-down menu. New user types must be assigned to one of four hardcoded categories: Staff, Student, Public, or Athletics.
-
Enable the Visible to Users toggle if you want to make this user type.type selectable by end-users during registration.
-
Enter a numerical value into the Extra Active Vehicles field. By default, users can have one active vehicle; this specifies how many additional active vehicles are allowed. Detailed instructions can be found on the Limiting Active Vehicles page.
-
Enable the checkbox next to each allowed payment method under the Allowed Payment Types section.
-
Click the Create User Type button to finalize the addition.
You can also create specific user types to categorize your archived users. This grouping is crucial as it links to OPSCOM's internal master user categories, which heavily govern access to other system items and the appearance of profile forms.
TheUsing fourthis main internal categories are:
Staff
Student
Public
Athletics
NewAdministrators usercan typesuse mustthe befollowing assignedinstructions to one of these categories. These are hardcoded and cannot be changed.
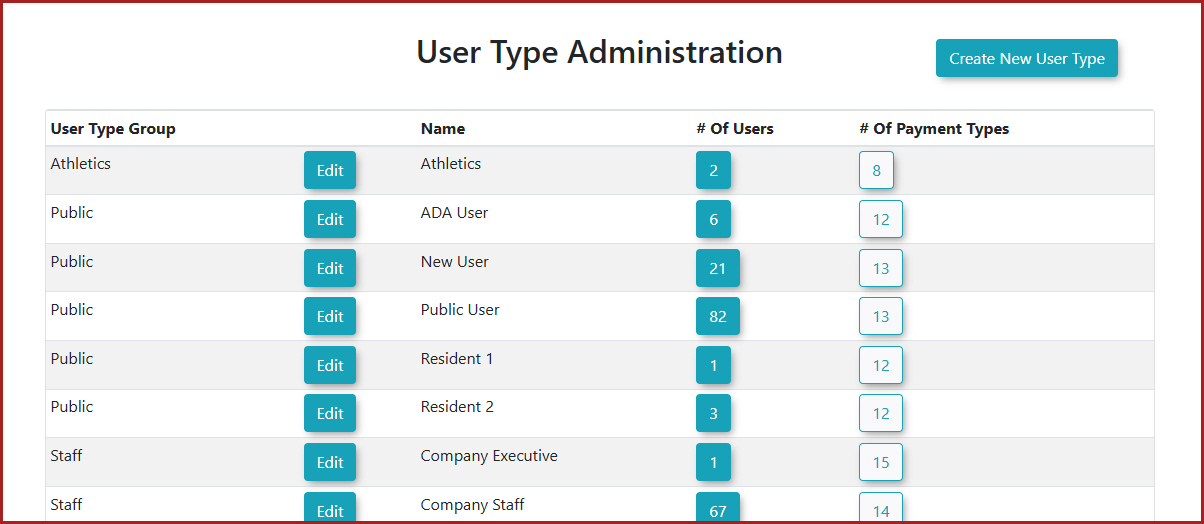
Once saved, your new user type (e.g., Public Parker) will appear in the list.
You can also createapply user types to allowprofiles, youmanage tolot categorizeaccess, yourand archivedexecute users.specific Refer to this wiki article to learn about managing archived users by user type.searches.
Using this Feature
Applying a User Type to a User
A Useruser Typetype can be assigned to a user when their account is first created or changed at any time later.
-
Hover over User Management and click User Search.
-
Search for the specific user you want to edit.
-
Edit the user profile
and click the User Type picklist.drop-down menu.
-
Choose the desired Useruser Typetype.
(e.g., Public Parker).
-
Click the Submit Profile Information, reviewbutton.
-
Review the submission,submission and click the Information Correct button.button to save the changes.
Searching by User Type
User Types can be used as criteria in various search tools within OPSCOM. You can use the User Search tool or you can click the # of Users button beside the lot to automatically perform a search for this user type.
Searching for Payment Types Assigned by User Type
You can click the # of Payment Types button to immediately see a list of all payment types associated to each user type.
Configuring Access to Lots with User Types
User Typestypes play a critical role in controlling backend and user-side access to parking lots.
-
Hover over Parking Management,Management, thenclick Lot Administration,Administration, andthen click Pricing & Lot Admin.
-
Click on the Lot Name of the lot you wish to configure.
On
Ensure User Type Lot is selected on the General Tab, under the Lot Access section,section.
ensure User Type Lot is selected.-
Select the specific user types you wish to allow access to this lot infrom the Lot Types picklist.drop-down menu. You can press Ctrl + Click to select multiple types.types
Scenario Example: For a particular lot, you might allow students and public parkers to purchase permits but restrict access for Staff/Faculty users.
simultaneously.
When viewing the list of lots in Lot Administration, you can click Show/Hide Lot User Types to quickly see which user types a lot is configured for.
User-Side Lot Visibility
When a user logs into the system (e.g., as "Joseph Callaghan" who is a student), and attempts to purchase a permit:
permit, the
The systemportal will only display lots that are explicitly configured for that user's specific Useruser Type.In thisFor example, thea user mightassigned onlya student user type will not see "Standard Permit Lot" and "Text2Park" if those are the staff-only lots accessibleduring the checkout process
Available Actions and Buttons
-
# of Users: Click this button located beside a user type in the main list to theirautomatically perform a system search for all users assigned to this group.
-
# of Payment Types: Click this button to immediately view a list of all payment types associated with each user type.
-
Show/Hide
when Deletingviewing orthe Archivinglist of lots in the Lot Administration module to quickly see exactly which user types a lot is configured to accept.
Delete User Type
Type: Click this button on an existing user type to - permanently remove it. A user type can only be deleted or archived if no active or inactive users are currently assigned to
it.it.
You must reassign all users from a user type before it can be removed. Once you have done so, edit the user and click the Delete User Type button.
Best Practices &and Considerations
-
Align with Organizationalyour Structureorganizational structure:: Create user types that directly reflect the categories of individuals interacting with your systemsystem. (e.g.,Using clear names like Faculty, Undergraduate, Graduate, Visitor).or Visitor makes management intuitive.
-
ControlEnforce Vehiclegranular Limitsaccess control:: Use the Extra Active Vehicles setting to manage the number of vehicles associated with users, which can impact parking availability and system load.
Granular Access Control: Leverage user types in Lot Administration to precisely control who can access and purchase permits for specific parking areas,areas. enhancingThis enhances security and ensures proper resource allocation.allocation (e.g., restricting student access to a faculty lot).
-
ImpactUnderstand the impact on Profileprofile Fieldsfields:: Remember that the internal Grouping (Staff, Student, Public, Athletics) you assign to a Useruser Typetype affectsdictates the visibility of fields in the user's profile registration form. For instance, student users might see specific student ID fields that staff users wouldwill not.
-
PaymentControl Typevehicle Restrictionslimits securely:: Use the Extra Active Vehicles setting to carefully manage the number of vehicles associated with specific user groups. This directly impacts parking availability and overall system load.
-
Apply payment type restrictions: Utilize the Allowed Payment Types setting to ensure only relevant payment methods are available to specific user typesgroups. (e.g.,For restrictingexample, you can safely restrict internal payroll deduction options to Staff users only).
Clear User Communication: Ensure users understand their assignedstaff user typetypes andonly.
how it affects their system experience, including visible lots and payment options.
