
Pricing and Lot Admin
The Pricing and Lot Admin page is a central management tool for OPSCOM administrators to create new parking lots, define their characteristics, and configure pricing and permit settings. ThisIts pageprimary allowspurpose foris to allow comprehensive control over lot visibility, access, permit types (standard, temporary, flex),types, and advanced features like waitlists and LPR settings,features, helping administrators efficiently manage theirparking inventory. This article is intended for OPS-COM administrators.
Setup and Configuration
Creating and configuring parking inventory.
Pricingis ÷d Lotinto Adminseveral Maindetailed Page
tabs To accesswithin the Pricinglot & Lot Admin page:editor.
Hover overParking Management,thenLot Administration,and clickPricing & Lot Admin.ThePermit Pricing & Lot Administrationscreen opens so you can manage all lot details.
Tip: Before setting up new lots, consider your organization's permit types, pricing structures, and any specific access restrictions (e.g., faculty-only lots, temporary parking areas).
KeyAccessing Informationthe Displayed
Lot - Editor
-
Hover over Parking Management, hover over Lot
NameAdministration:,TheandfullclicknamePricingof& Lot Admin. -
Click the
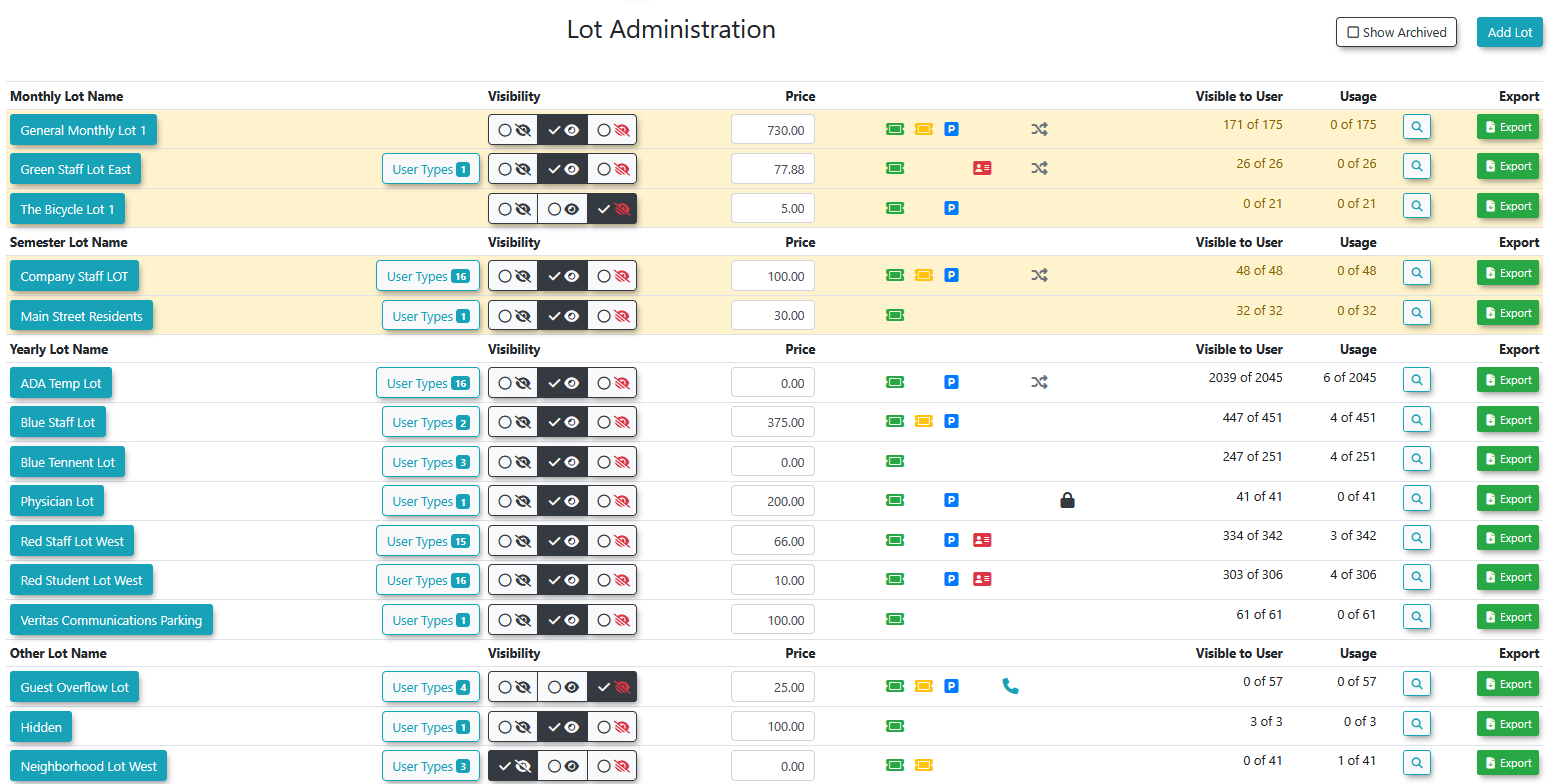
lot and its associated permit sales window (e.g., Monthly, Semester, Yearly, Other). User Types: The specific user types permitted to book permits for the lot.Visibility: Indicates the lot's visibility to users (e.g.,Not visible,Visible,Not visible but available).Price: The standard base price for permits in the lot.Permit types: Icons representing the types of permits enabled for the lot (e.g., standard, temporary, flex).Visible to User: The number of permits in the lot currently available for user purchase.Usage: The number of permits currently booked or in use within the lot.
Available Actions & Buttons
Show Archived: Click this button to view or edit lots that have been archived.- Add Lot
: Click thisbutton to create a newparkingconfiguration,lotorconfiguration.click LotanName (link): Click on theexisting Lot Nameof any listed lotlink toopen its detailed edit page, where you canmodifyvariousit.settings across different tabs.Export: Click theExportbutton at the far right of each lot line to export the lot's information to an Excel file.Search: Click theSearchbutton on each lot line to navigate to the permit search page and view all permits associated with that specific lot.
Lot Edit Page Tabs
When you click on a Lot Name, the Lot Edit Page opens, divided into several tabs for detailed configuration:
General Tab
Archivethe Lot:Enable the This lot is archived checkbox to safely archive the lot, making it unavailable for new sales
butwhile retaining historical data.-
Select an option from the Visibility to Users
:Selectdrop-downonemenuof the following options:Visible(e.g., Visible, NotVisible,Visible, or Hidden butAccessibleAccessible). LotName:Enter the full, descriptive name for the
lot.lot in the Lot Name field.LotShort Name:Enter an abbreviated name
forin thelot.Lot Short Name field.LotGroup
: Allows you to groupsimilar lots together using the Lot Group feature tobedisplayseenthem as a singleentityentity.in OPSCOM.LotAccess:Choose
between:- Common Lot
:Anyto allow any user typecantoparkpark,here.or - choose User Type Lot
:Restrictto restrict accessby(holdspecific user types. Holdthe Ctrl key to select multiple allowed usertypes from the dropdown.
- Common Lot
-
Enter a Lot Password
:Settingtoa password on a lot preventsprevent users from booking a permitin that lotunless theyenterhave thepassword.requiredThiscode.is useful for event parking. -
Fill out the Special Parking
Spaces:SpacesFill this outsection if your lot hasspecialdedicatedspacesspots like EV charging or ADA spaces.
Click the Update Lot afterbutton makingto changessave in this tab.changes.
Zone & Location Tab
LocationDescription:Enter a description of the lot's physical
location,locationwhich will appear onin theuserLocationinterface.Description field.Image:Upload an
imageImagethat willto be displayed next to the lotname;name.users can click it to enlarge.Zone:Configure a
zoneZone for this lot by selecting a zone and specifying days or a range within the saleswindow,window.along with a start and end time.MapDetail:Move or click Create a Map Marker in the Map Detail section to pinpoint the
lot'slocationonandaautomaticallymap. Once the marker is set, thepopulate GPScoordinatescoordinates.will automatically populate.
Click the Update Lot afterbutton makingto changessave in this tab.changes.
Standard Permits Section
DefaultCost:Enter the base cost
for standard permitsinthisthelot.Default Cost field.ProratedSales:Choose Enabled, Use Default Setting, or Disabled
as requiredforproratedProratedpermitSales.sales.MultiplePermits:Enable the This lot can be used for a second permit checkbox to allow users to purchase multiple permits for this lot.
WaitListOptions:Enable the Allow the use of Waitlist with this lot checkbox if you want the waitlist to be
available to be joined.active.-
Enable the Only Allow Waitlist after lot is full checkbox if you want a waitlist to
becomeactivateactiveonly when permitsforarethis lot arecompletely sold out.
WaitlistLot Category:Group multiple lots
togetheronto the same waitlist byselecting a category. This isentering a textfieldvalueonly,insotheuseWaitlistcareLotwhenCategorycreatingfield.this.-
Choose the applicable timeframe from the Lot Sales Window drop-down menu.
-
Enable the Hang Tag Settings if printing physical tags is required.
-
Click the Update Lot button to save changes.
Crucially, they will beand assigned thesameidenticalrankingacross all these grouped waitlists.ranking. This ensures that if a permit becomes available in any one ofthethoselotsgroupedwithin that category,lots, the user is eligible to purchasethat permit.
If a user joins a waitlist that is part of a Waitlist Lot Category, they will automatically be automatically added to ALLall individual lot waitlists that are associated with that specific group.
group
Click Update Lot after making changes in this tab.it.
Temporary Parking Tab
TemporaryParking Only:Enable the This lot is for temporary parking only checkbox if the lot is
exclusivelystrictlyforexclusive to temporary parking.MaxPermits per Day:Set the maximum number of daily temporary
parkingpermitsavailablein the Max Permits perdayDayforfield.this lot.PermitDuration:Enable Allow temp permits up to 30 days
to limit temporary permits to 30 days.Enableor Allow temp permits to be used over 30 days under the Permit Duration settings. Disable these settings entirely if you do not wish topermitchargetemporaryaparkingdailyfor periods exceeding 30 days.
PermitApplication to All Vehicles:Enable Allow all vehicles on profile to receive the permit to automatically apply the temporary permit to all vehicles on a user’s profile.
DailyCost:Enter the maximum fee for parking beyond 6 hours
(ifinapplicable).
theNote:Daily CostIfyoufield.do not wish to have a daily fee, disable any Permit Duration settings. You can still configure hourly cost as described below.HourlyCosts:Enter the hourly fee for
parking.parking in the Hourly Costs fields. If the lot has a flat rate, simply leave these fields blank.Over30 Days Monthly Cost:Enter the monthly cost for parking permits that extend beyond 30
days.days in the Over 30 Days Monthly Cost field.Real-TimeMap:Enable
Enablethe Allow this lot to appear on the Real-Time Parking Map checkbox to displaythisthe lot on theReal-TimepublicParkingmap.Mapfeature.QRCode:View,
- link
Viewto,thedownload,QR Codefor this lot.Access theLinkto the QR Code.Downloadprint, orPrintthe QR Code directly from this page.Addadd a Logo Image tobe displayed inthecenter of theQRCode.Code
Click the Update Lot after making changes in this tab.
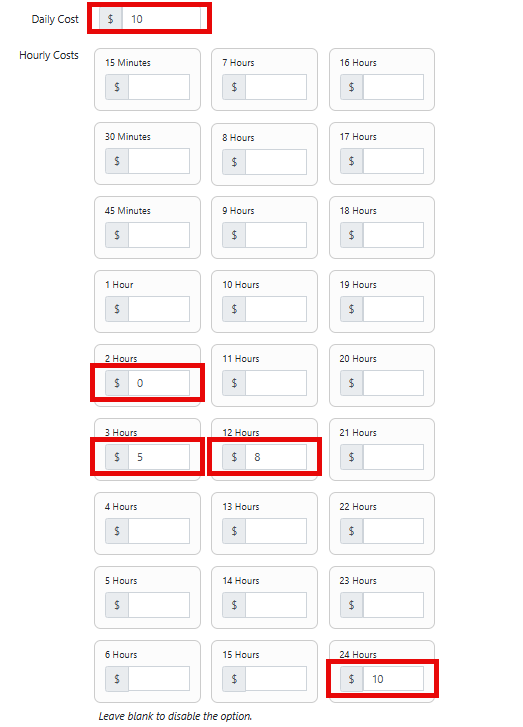
Here is an example of how you may wantbutton to configuresave your temporary pricing:changes.
In
the above example, permits will be available for free for 2 hours, $5 for 3 hours, $8 for 12 hours, and $10 for 24 hours/1 day.
Flex Permits Tab
-
This tab allows for flexible pricing based on specific times and days.Using Flex Permits: ClickEnable thecheckbox toEnable Flex Permits.checkbox.AddNew:Click
Clickthe Add New button to create a newTimetimeSlotslot with a specifiedPriceprice andacolorchoicecode.forColourcoding. ClickSave Changeswhen complete.View&Click
Edit: You canthe Edit button to modify existingTimetimeSlots,slots,Pricing,pricing, orColourscolorsindividually by clicking the appropriateEditbutton.individually. Alternatively, use the Time Slot Chart and the Select button to click and drag time slot information to apply to multiple times and dates simultaneously.Clear:Click the Clear button to quickly remove all pricing
configurationsconfigurations,from the chart.Fill: Click theclick Fillbuttonto populate the chart withalluniformthepricing,sameorpricing.Reload: Clickclick Reload to revertthe informationtoyourpreviously saved settings.
-
Click the Update Lot
afterbuttonmakingtochangessavein this tab.changes.
Lot LPR Settings Tab& Additional Settings Tabs
-
Set a grace period in the Free Parking Time
:Set a grace periodfield during which patrons can register their license plate with a pay-by-plate meter without incurring a charge. -
Enter the applicable integration data into the Banner Detail Code field (used strictly for the Banner system).
-
Click the Update Lot
afterbuttonmakingtochangessaveinchanges.
Using this tab.Feature
Administrators use the main dashboard of the Pricing and Lot Admin page to view a high-level summary of all lot data and access specific administrative functions.
AdditionalKey SettingsInformation Tab
Displayed
-
BannerLotDetailName:CodeThe full name of the lot and its associated permit sales window. -
User Types:
:ThisThefieldspecificisuser types permitted to book permits forusethestrictlylot.with -
Visibility: Indicates the lot's visibility to users (e.g., Not visible, Visible, Not visible but available).
-
BannerPrice:systemThe standard base price forspecificpermitsintegrations.in the lot. -
Permit types: Icons representing the types of permits enabled for the lot (e.g., standard, temporary, flex).
-
Visible to User: The number of permits in the lot currently available for user purchase.
-
Usage: The number of permits currently booked or in use within the lot.
Click Update Lot after making changes in this tab.
BestAvailable PracticesActions & ConsiderationsButtons
-
Show Archived: Click this button to reveal and manage lots that have been historically archived.
-
Add Lot: Click this button to launch the configuration screen for a completely new parking lot.
-
Lot Name (link): Click any listed lot name to open its detailed edit page, where you can modify various settings across different tabs.
-
Export: Click the export button at the far right of each lot row to output the lot's specific configuration information to an Excel file.
-
Search: Click the search button on each lot row to automatically navigate to the permit search page and view all active permits specifically associated with that lot.
Best Practices and Considerations
-
ConsistentEstablishNaminga consistent naming convention::Establish a consistent naming convention for your lots (e.g., "Lot A - Faculty," "Visitor Parking Garage") to significantly improve clarity for both internal administrators and public users. -
VisibilityManageControlvisibility carefully::Carefully consider the Visibility to Users setting for each lot. A lot markedNotasvisible"Hidden butavailableAccessible" is highly useful for administrative purposes orspecifichidden user groups,whileasstillitbeingremains accessible if the direct booking link is provided. -
WaitlistDefineManagementclear waitlist policies::If using waitlists, organizationsOrganizations should develop a clear business rule for when to remove a user from thewaitlist,waitlist, such as after a permit has been officially offered or after a user has been emailed. -
Optimize QR
CodecodeUsageplacement::If utilizing QR codes for temporary parking, ensure they are prominently displayed and easily scannable directly at the physical lot location. -
RegularConductReviewregular audits::Periodically review lotconfigurations,configurations, especially pricing structures and sales windows, to ensure they remain current and fully aligned with your organizational parking policies.