
Selling Permits Using Tablet Kiosks with OPSCOM
ThisThe articletablet provideskiosk instructionsfeature onallows howorganizations to configure a tablet to act as a dedicated self-service kiosk for selling temporary guest permits. ByIts lockingprimary thepurpose tabletis to a specific guest permit booking page, organizations can offerprovide a streamlined way for visitors to purchase parking without staff assistance or the need for a personal user account. This article is intended for OPS-COM administrators responsible for facility setup and temporary permit management.
Setup and Configuration
Setting up a kiosk involves three main parts: obtaining the unique booking link for the desired parking lot, enabling Kiosk Compatible Mode within OPSCOM,the system, and configuring the physical tablet device to lock it to the booking page.
Part One -One: Obtain the Guest Permit Link
Each lot configured for temporary permits has a unique URL for guest bookings. You will need this link to set up the kiosk.
-
GoHovertoover Parking Management,thenhover over Lot Administration, and click Pricing & Lot Admin. -
Click the name of the lot you want to feature on the kiosk.
-
SelectClick the Temporary Permits tab. -
Locate the QR code
section.sectionTheand copy the guest permit booking linkisdisplayed directly below thecode. Copy this URLcode to use in the tablet configuration step.
The lot must be properly configured to sell temporary permits. Detailed instructions can be foundfound on the the Pricing & Lot Admin page.page. You must set prices in the temporary permit section of the lot editor. If left blank, they will be disabled, and users will not be able to pick it as an option.
option 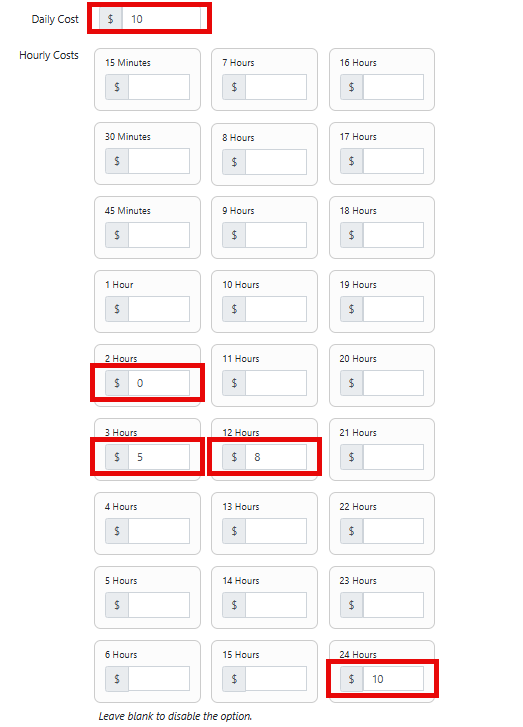
In the above example,setting permits will be available for for free for 2 hours, hours, $5 for 3 hours, hours, $8 for 12 hours,hours, and and $10 for 24 hours/1 dayday).
Part Two -Two: Enable Kiosk Compatible Mode in OPSCOM
This system-wide setting optimizes the guest permit workflow for a kiosk environment.
-
GoHovertoover System Configuration,and click System Settings. -
SelectClick the General System Settings tab. -
Enable the Enable Kiosk Compatible Mode toggle.
-
Click the Save Settings
.button.
Enabling this mode makes the following changes only to guest booking pages:
After a successful transaction, the user is returned to the initial booking page instead of a receipt page, making it ready for the next user.
The main navigation menu, header, and footer are hidden to prevent users from navigating away or attempting to log in on a public device.
Warning: Enabling Kiosk Compatible Mode affects affects all guest permit transactions, not just those from a kiosk. Users purchasing a guest permit via a QR code on their personal device will also be redirected to the start page after payment. We recommend enabling this setting only if you intend to use physical kiosks.
Part Three -Three: Configure the Tablet Device (Android)
To function as a kiosk, the tablet must be locked to the guest permit URL using third-party apps and built-in operating system features. The following steps provide one example of how to achieve this on an Android device.
Step A: Install and Configure a Kiosk Browser App
-
On your Android tablet, openOpen the Google Play Store on your Android tablet and install a kiosk browser application (e.g., Fully Kiosk Browser &Lockdown)Lockdown). -
OpenTap the app to open it and configure its initial settings. -
Paste the guest permit link from Part One into the Start URL field.
-
Enable Fullscreen Mode.
-
Disable the Show Action Bar and Show Address Bar
.options.
Explore the app's advanced settings, such as as navigating to Web Auto Reload ->and configuring Auto Reload on Idle. Setting this to 30 or 60 seconds will automatically reset the page for the nextnext user after a periodperiod of inactivity.
Step B: Pin the Kiosk App
Pinning the app prevents users from closing it and accessing other tablet functions. You can do this in the device settings, a separate app.settings.
-
Ensure the tablet has a security PIN or password
enabled. This can be setenabled in the device's Settings app, typically under the Lock screen.settings. -
Navigate to Settings,
->tap Security and privacy,->and tap More security settings. -
Enable the Pin app option.
-
Open the kiosk browser app you just configured.
-
Tap the recent apps button (on most devices, this is an icon with three vertical bars at the bottom of the screen).
-
Tap the icon appearing above the kiosk app's window and select Pin this app.
The device is now securely locked into the kiosk browser, and the device's PIN will be required to exit the app.
Using this Feature
Once fully configured, the tablet functions strictly as a locked-down, single-purpose device.device for guest purchases.
End-User Workflow
-
A user approachesApproach the tablet, whichalreadywilldisplaysalready display the permit booking page for the designated lot. -
Enter plate information and complete the payment process. The user cannot navigate to other apps, web pages, or system
settings.settings during this flow. -
AfterViewentering their plate information and completing payment, athe confirmation messageappears.upon successful payment. -
TheWait for the pagethento automaticallyresetsreset to the start of thebookingbooking process for the nextuser.user in line.
Best Practices and Considerations
-
Physically secure the
device.device: Use a commercial-grade tablet enclosure or stand to protect the device from theft and damage in a public environment. -
TheAdapttablettosetupdeviceprocess may vary.variations: The specific menu names and steps for configuring a tablet can differ based on the device manufacturer, OS version, or the specific kiosk app used. The instructions provided should be treated as a general guide. -
Test the entire user
flow.flow: Before deploying the kiosk publicly, perform several testtransactionstransactions.toThisensureensures the process is smooth, payment is successful, and the page resets correctly for the next user.