
Validator Admin Groups
ThisThe Validator Admin Groups article outlines how to configure, manage, and assign permissions for the Validator Tool. ThisIts featureprimary purpose is designedto for OPS-COMallow administrators to effectively organize validation groups, assign specific roles, and define management zones for permit validation operations. This guide is intended for OPS-COM administrators.
Setup and Configuration
Configuring validator groups involves creating the core group structures, adding members, and assigning management zones to individual administrators.
Admin Side: Administrators must completely configure these groups and permissions before staff can effectively use the validation tools.
User LevelSide: CapabilitiesEnd-users do not interact with validator groups or backend administrative permissions.
Creating a Validator Group
-
Hover over System Configuration and click Admin Management then Manage Groups.
-
Click the Parking Validator module.
-
Click the Add New button in the top right corner.
-
Complete the Group Name, Module, Validator Comment, Admin Members, and Default Validation Hours fields in the newly opened window.
-
Click the Save Group button.
The Default Validation Hours value serves only as an automatically populated preset. There is currently no way to enforce a strict limit, and administrators may manually override this duration.
Adding Members to a Group
-
Hover over System Configuration and click Admin Management then Manage Groups.
-
Click the Edit button next to the relevant Administrator Group.
-
Click on the Admin Members bar to select and add additional members.
-
Click the Save Group button at the bottom of the page.
Zones and How They are Assigned
-
Hover over System Configuration and click Admin Management then Edit Admin Users.
-
Select the specific Admin User you wish to edit.
-
Scroll to the bottom of the page to the Parking Validation Lot Zones window.
-
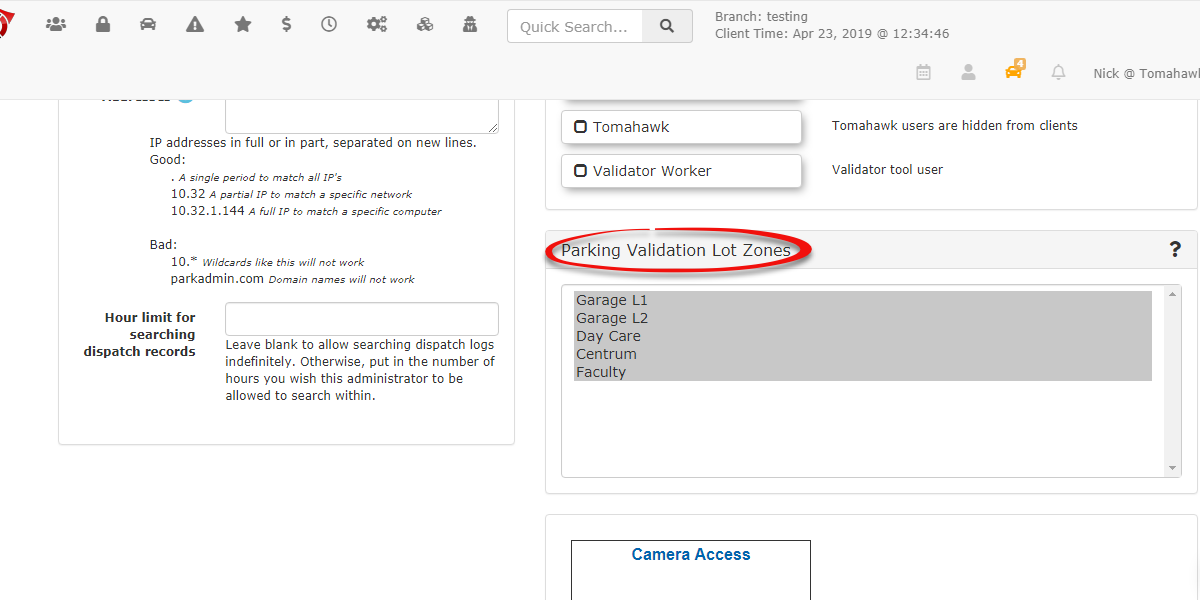
Select the specific zone or zones that this administrator will manage.
-
Click the Update User button to finalize the changes.
Using this Feature
The Validator Tool utilizes distinct rolesroles to accurately manage access to system data and dictate deletion capabilities. Understanding these roles is critical for secure system operation.
| Role | Access & Deletion Capabilities |
| Super Admin | Has full access to all groups. Can view all current, pending, past, and archived validations, and delete entries at any time. |
| Group Manager | Can view their own groups and associated current/pending validations. Can delete entries pre-validation and up to 15 minutes past the start date. |
| Validator Admin |
Can view and delete their own entries pre-validation or within the 15-minute grace period. |
| Validator Entry |
Can delete any future, current, or past validations. |
Enable a 15-minute grace period in system settings to allow administrators to correct input errors by deleting validations up to 15 minutes past the start time.
Archived information is not purged from the system. While archived entries are considered deleted, the data is retained to maintain system data integrity.
Creating a Validator Group
The Default Validation Hours value serves only as an automatically populated preset. There is currently no way to enforce a strict limit, and administrators may manually override this duration.
Adding Members to a Group
Zones and How They are Assigned
Navigate toSystem Configuration, selectAdmin Management, and click onEdit Admin Users.Select the specificAdmin Useryou wish to edit.Scroll to the bottom of the page to theParking Validation Lot Zoneswindow.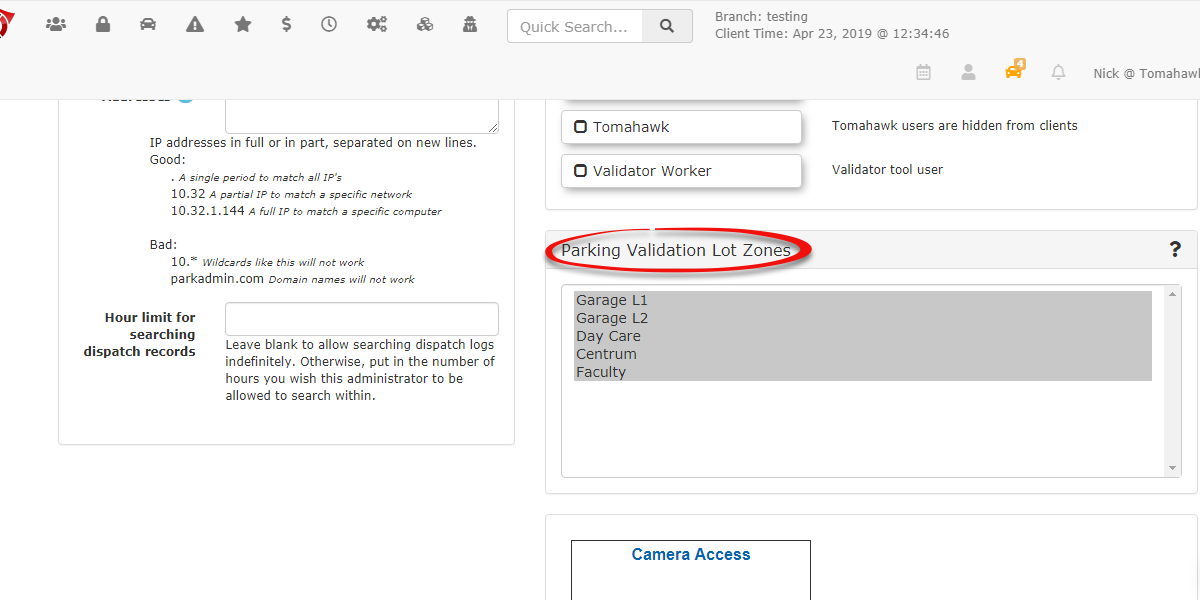
Select theZone(s)that this administrator will manage. Click theUpdate Userbutton to finalize the changes.
Best Practices and Considerations
-
Enable Grace Periods: Set up a 15-minute grace period on
deletions.deletions in your system settings. This highly recommended setting allows a current validation to be easily deleted up to 15 minutes past the start date in the event of an administrative input error. -
DataConfigureIntegrity:Visibility Rules:NoteIfthatanarchivedAdmin name is strictly required for searches, ensure All Admins or individual admins within their group are correctly configured. Proper configuration ensures consistently accurate search results across the system.
Archived information is not purged from the system. RecordsWhile archived entries are functionally considered deleted from active views, the historical data is permanently retained to maintain system data integrity.integrity and auditing capabilities.
Preset Durations: The Default Validation Hours value serves only as an automatically populated preset. There is currently no way to enforce a strict limit, as administrators may manually override this duration.
Visibility Rules: If an Admin name is required for searches, ensure All Admins or individual admins within their group are correctly configured to ensure accurate search results.