
Selling Permits Using Tablet Kiosks with OPS-COM
WithThis thearticle useprovides ofinstructions third-partyfor apps,OPS-COM manyadministrators tabletson canhow beto setconfigure upa tablet to act as kiosks.a Thisdedicated meansself-service thatkiosk anfor appselling ortemporary webpageguest canpermits. beBy “lockedlocking inthe place”, allowing userstablet to usea that page without being able to use the tablet’s other features. By combining this with OPS-COM’sspecific guest permit links,booking permitspage, organizations can be sold from tablet kiosks.
Background: guest permits in OPS-COM
Although this is covered in other documentation pages, understanding guest permits in OPS-COM is essential for setting up kiosks, so it’s discussed briefly here.
Guest permits areoffer a streamlined way for usersvisitors to reservepurchase temporaryparking permitswithout (i.e.staff dailyassistance or hourlythe permits) without having to create an account and log in. Users are given a URL (often a QR code) which sends them directly to a booking pageneed for a specificpersonal lot.user There,account.
enter
Setup licenseand plate,Configuration
Setting up a tempkiosk permit,involves andthree proceedmain throughparts: aobtaining checkout.
Each lot in OPS-COM has its own guestunique booking link for reservingthe tempdesired permits.parking Itlot, canenabling beKiosk accessedCompatible inMode within OPS-COM, and configuring the lotphysical settings;tablet godevice to Lotlock Administrationit → Pricing & Lot Admin, and click onto the relevantbooking page.
Part One - Obtain the Guest Permit Link
Each lot name.configured Then,for clicktemporary onpermits the Temporary Permits tab, and find the section withhas a QRunique code;URL thefor guest bookings. You will need this link is right below it:
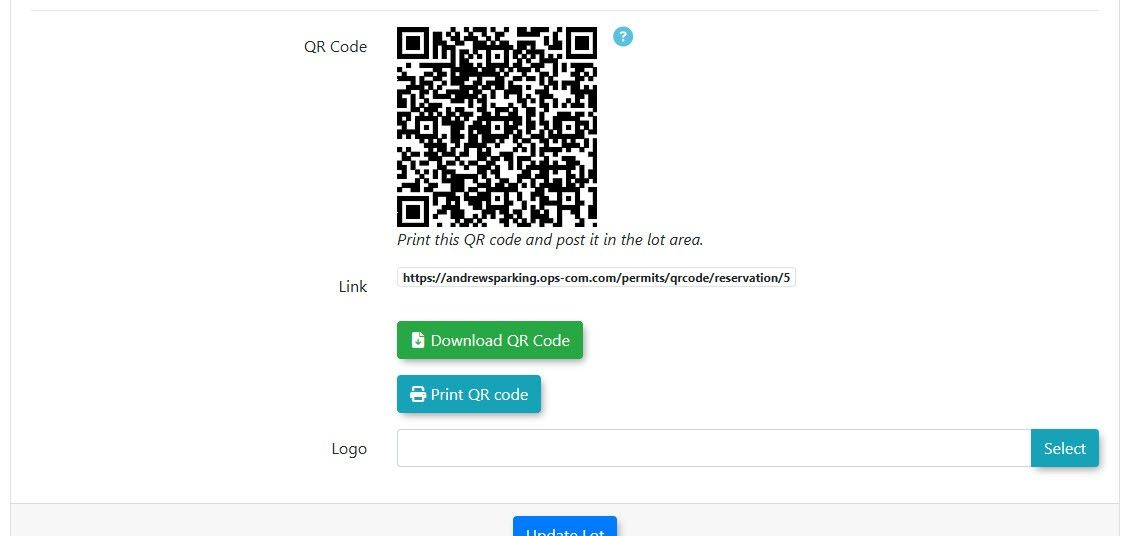
This link is the page you’ll want to display on a kiosk.
How to set up the kiosk.
-
Go to Parking Management, then Lot Administration, and click Pricing & Lot Admin
-
Click the name of the lot
foryou want to feature on the kiosk. -
Select the Temporary Permits tab.
-
Locate the QR code section. The guest permit booking link is displayed directly below the code.
-
Copy this URL to use in the tablet configuration step.
Note: The lot must be properly configured to sell temporary permitspermits. andDetailed guest booking is outside the scope of this document, but there are other articles which cover it. The rest of this article will cover how to set up a tablet to stay “locked into” this booking page, so itinstructions can be usedfound as a kiosk.
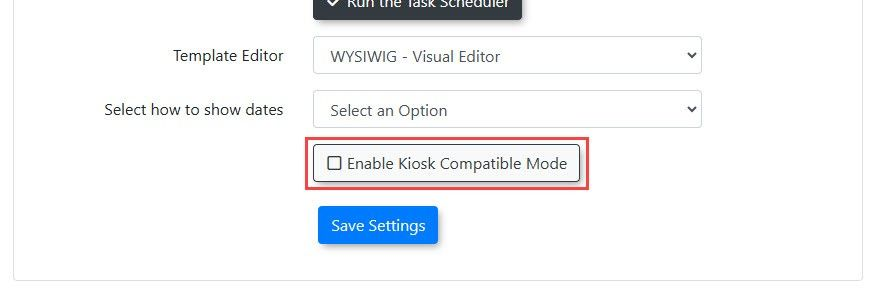
Enabling kiosk compatible mode in OPS-COM
The first step is to enable “kiosk compatible” mode fromon the OPS-COMPricing admin& site.Lot Go to System Settings → General System SettingsAdmin andpage.
the
Part forTwo - Enable Kiosk Compatible Mode. in OPS-COM
This system-wide setting altersoptimizes the guest checkoutpermit processworkflow infor a fewkiosk ways:
environment.
-
Normally,GoaftertoproceedingSystemthroughConfiguration, and click System Settings. -
Select the General System Settings tab.
-
Enable the Enable Kiosk Compatible Mode toggle.
-
Click Save Settings.
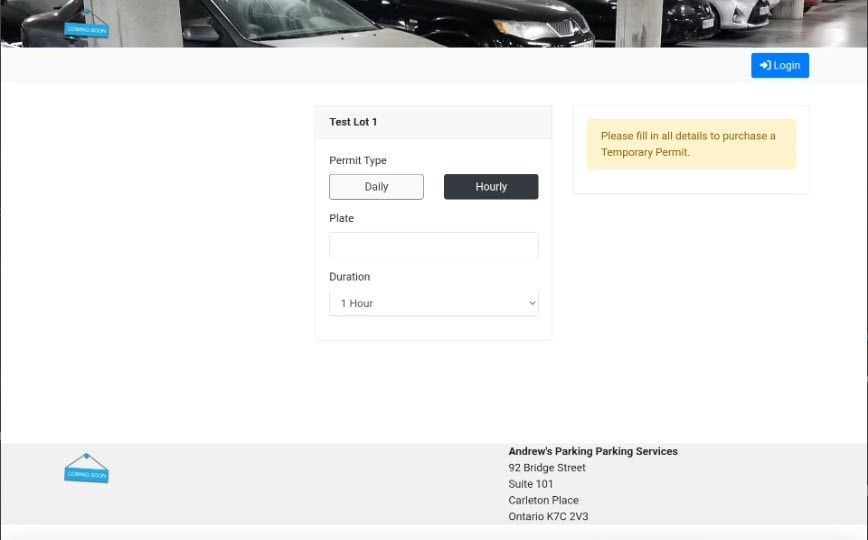
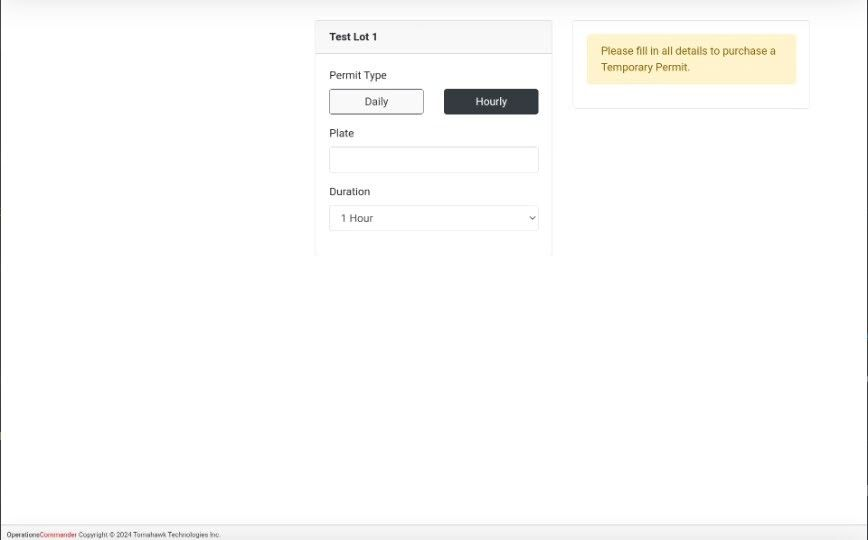
Enabling this mode makes the following changes only to guest booking pages:
-
After a
guestsuccessfulcheckout,transaction, the user isdirectedreturned to the initial booking page instead of a receiptpage.page,Withmakingthis setting enabled, they are instead sent back to the booking page (a pop-up message tells the user whether their payment was successful or not). This way, the page isit ready for the nextperson in line to reserve a permit.user. -
WhileTheon a guest booking page, themain navigationmenumenu,whichheader,containsandthefooterloginarebutton is hidden. This ishidden to prevent users fromloggingnavigatingintoawayanoraccountattempting to log in on a publickiosk. While on a guest booking page, the site header and footer are hidden. This is because they sometimes contain links to other pages on the site, which might display the login button.Note that these changesonly affect guest bookings; on any page that isn’t a guest booking link, the header and footer are still displayed, users can still log in, and when logged in they can reserve permits as they normally would.device.
HereWarning: isEnabling anKiosk exampleCompatible Mode affects all guest bookingpermit pagetransactions, (viewednot just those from a kiosk. Users purchasing a guest permit via a QR code on atheir tablet)personal with kiosk compatible mode disabled (top) and enabled (bottom):
Note: enabling kiosk compatible modedevice will also affectbe redirected to the experiencestart forpage usersafter makingpayment. a guest booking on personal devices (for example, via QR code). For this reason, weWe recommend enabling this setting only if you intend to use kiosks.physical kiosks.
Setting
up
Part tabletThree - Configure the Tablet Device (Android)
To function as a kioskkiosk,
Nowthe thattablet youmust havebe alocked to the guest bookingpermit link,URL using third-party apps and have enabled the necessary setting built-in OPS-COM,operating it’ssystem timefeatures. toThe addressfollowing thesteps mainprovide problem:one example of how to preventachieve usersthis fromon leavingan Android device.
Step A: Install and Configure a Kiosk Browser App
-
On your Android tablet, open the
bookingGooglepagePlaywhen they use the tablet kiosk.There are many third-party applications that allow you to do exactly this, with varying degrees of control. For the purposes of this document, we’ll show one way this can be set up using a combination of a (free) appStore andsome built-in features on Android. However, feel free to explore other options (“Android/iPad/Windows/etc. kiosk mode” is a good search starting point).
(e.g.,Setting upinstall a kiosk browseronapplicationAndroidOn an Android tablet, go to the Google Play Store, and search “Fully Kiosk”. Find and downloadFully Kiosk Browser & Lockdown: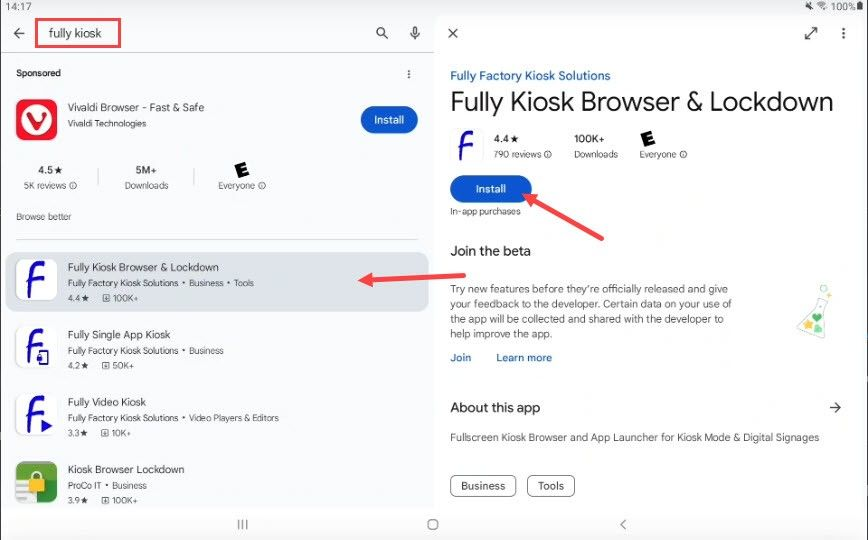
When you first open the app, it will display some basic settings. Enter your guest permit booking link as theStartURL).Fullscreen Modeshould be toggled on, whileShow Action BarandShow Address Barshould be off. Then click the “start” button.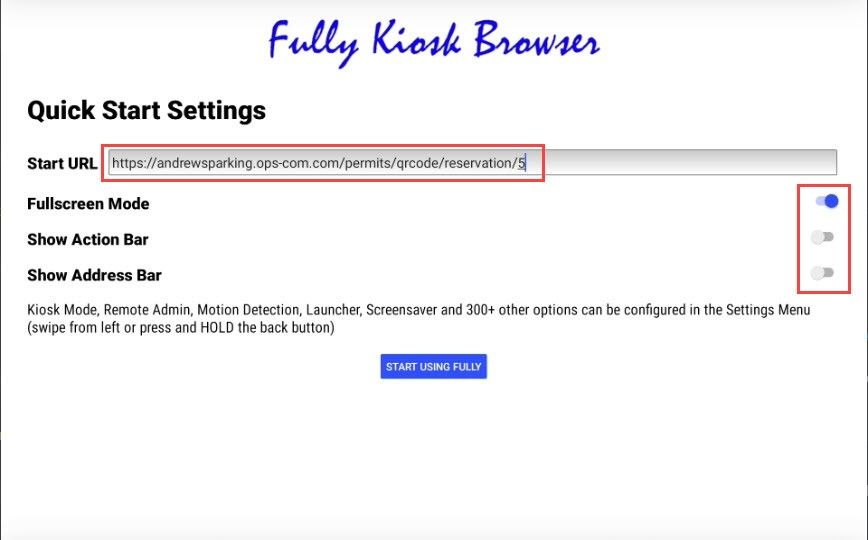
You can access more settings in the browser by swiping from the left edge of the screen towards the middle: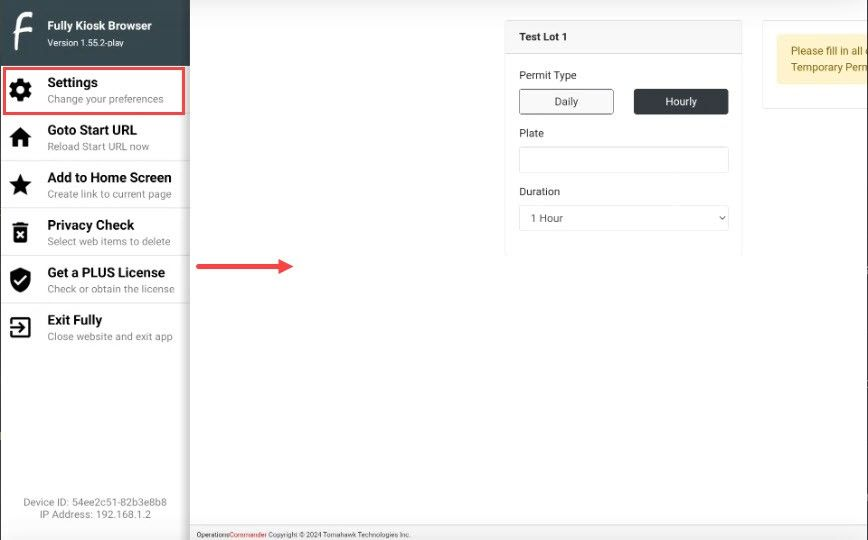
If you wish to change which lot to offer parking at, the startingURLcan be changed underWeb Content Settings → StartURL. Some other settings to consider changing are:Web Browsing Settings → Enable Pull to Refreshand/orLoad StartURLon Home Button: both these options allow easy ways for users to get back to the booking page if the previous user leaves mid-process. However, be aware that clumsy users may accidentally send themselves back to the starting page when they don’t intend to!-
Open the app to configure its initial settings.
-
Paste the guest permit link from Part One into the Start URL field.
-
Enable Fullscreen Mode.
-
Disable Show Action Bar and Show Address Bar.


Explore the app's advanced settings, such as Web Auto Reload →-> Auto Reload on Idle. (settingSetting this to 30 isor recommended):60 thisseconds will automatically reloadreset the start page after some seconds of inactivity, for example if the previous user leaves the kiosk mid-process. Be careful not to set this too short, or it may reload the starting page while the user fumbles for their card!
Web Auto Reload → Auto Reload on Screen On: reloads the starting page when the tablet screen is powered on.
This only scratches the surface of the browser settings. Feel free to look more into this app (or other kiosk browser options), to see what else is possible.
Configuring built-in Android options
With the webpage locked in using a kiosk browser, the next stepuser isafter toa makeperiod sureof inactivity.
Step B: Pin the Kiosk App
Pinning the app prevents users cannotfrom leaveclosing it and accessing other tablet functions. You can do this in device settings, a separate app.
-
Ensure the
kiosk browser app. This can be done using built-in features in Android. The settings layout may vary slightly for different devices, but should be similar enough to follow these instructions.First, make sure the devicetablet has a security PIN or password enabled. This can bedoneset in the device's Settings app, typically under Lock screen. -
Next, you’ll probably wantNavigate tosetSettingsthe->screen timeout to the maximum length possible. This can be done in theSettingsapp, underDisplay → Screen timeout.Finally, we want to “pin” the kiosk browser app. Again, go to theSettingsapp, then go toSecurity and privacy→-> More security settings.→ -
Enable the Pin app
(enableoption.this -
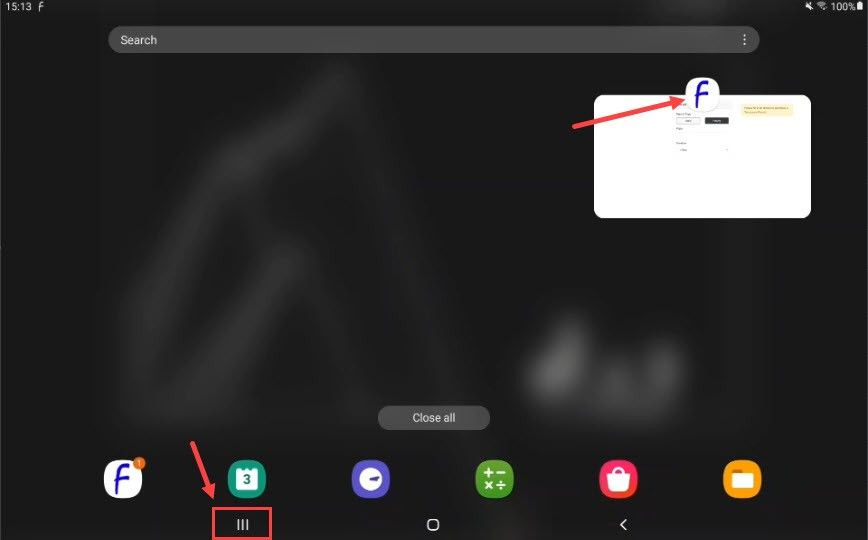
Now tap the “recent apps” button (the three bars at the bottom left of the screen). Swipe up to close each app except for the kiosk browser. Tap on the icon for the forOpen the kiosk browser app you just configured.
-
Tap the recent apps button (on
themostopendevices,app,thisnotis an icon with three vertical bars at the bottom of thescreen;screen).see -
Tap the
pictureiconbelow)appearing above the kiosk app's window andchooseselect Pin this app.
ThereThe shoulddevice is now belocked a notification sayinginto the appkiosk hasbrowser, beenand pinned:
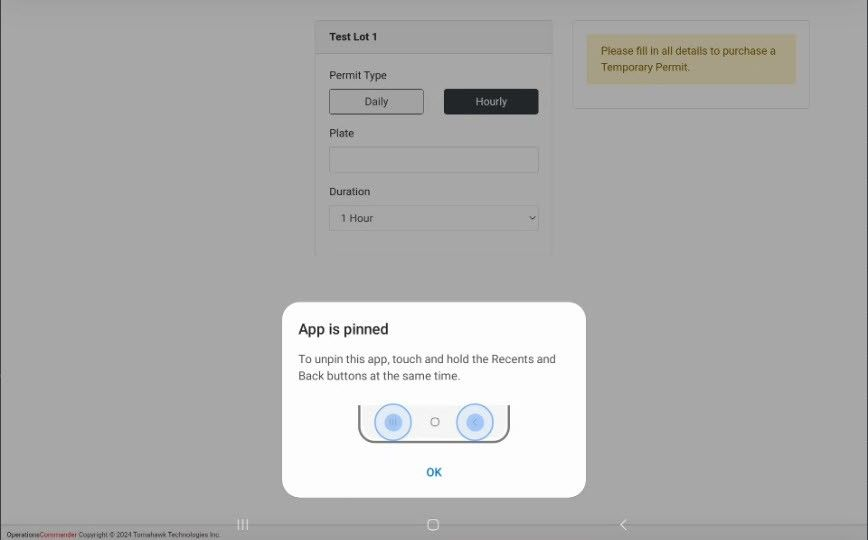
UsersPIN will now be unablerequired to exit the app;app.
Using orderthis Feature
Once fully configured, the tablet functions as a locked-down, single-purpose device.
End-User Workflow
-
A user approaches the tablet, which already displays the permit booking page for the designated lot.
-
The user cannot navigate to
dootherso,apps,theywebwouldpages,haveor system settings. -
After entering their plate information and completing payment, a confirmation message appears.
-
The page then automatically resets to
holdthe start of the“recentbookingapps”process for the next user.
Best Practices and “back”Considerations
-
Physically secure the
samedevice.time,Usethenaentercommercial-grade tablet enclosure or stand to protect the devicepassword.from theft and damage in a public environment. -
The tablet setup process may vary. The specific menu names and steps for configuring a tablet can differ based on the device manufacturer, OS version, or the specific kiosk app used. The instructions provided should be treated as a general guide.
-
Test the entire user flow. Before deploying the kiosk publicly, perform several test transactions to ensure the process is smooth, payment is successful, and the page resets correctly for the next user.